
EXPERIENCE ALTERYX:
ALTERYX.COM/TRIAL
SERVER
INSTALLATION
AND
CONFIGURATION
GUIDE
© 2020 Alteryx
Date: December 2020
Version: 1.9
Author: Brianne Hillmer

2
CONTENTS
CONTENTS ......................................................................................................................... 2
ABOUT THIS GUIDE........................................................................................................... 5
1. SYSTEM OVERVIEW ..................................................................................................... 6
1.1 System Requirements................................................................................................ 8
2. INSTALL ........................................................................................................................ 10
2.1 Download the Server Installation File ...................................................................... 10
2.2 Install Server ............................................................................................................ 10
3. LICENSE ....................................................................................................................... 11
3.1 Activate Online ......................................................................................................... 11
3.2 Activate Offline ......................................................................................................... 11
3.3 Activate using a License Server .............................................................................. 12
4. CONFIGURE ................................................................................................................. 13
4.1 System Settings ....................................................................................................... 13
4.1a Environment ........................................................................................................ 13
4.1b Controller ............................................................................................................ 14
4.1c Worker ................................................................................................................. 18
4.1d Gallery ................................................................................................................. 21
4.1e Engine ................................................................................................................. 24
4.2 Configure Controller and Workers ........................................................................... 26
4.2a Single-machine Configuration ............................................................................ 26
4.2b Multiple-Machine Configuration.......................................................................... 26
4.3 Configure Gallery Authentication ............................................................................. 27
4.3a Set Up Built-in Authentication ............................................................................ 28
4.3b Set Up Integrated Windows Authentication ....................................................... 28
4.3c Set Up SAML Authentication .............................................................................. 29
4.4 Configure SMTP....................................................................................................... 30
4.5 Configure Gallery SSL ............................................................................................. 31
4.6 Configure Run As User Permissions ....................................................................... 32
Required Run As User Permissions........................................................................... 33
4.7 Configure and Use Server Logs .............................................................................. 35
5. ADMINISTER GALLERY .............................................................................................. 38
5.1 Access the Gallery Admin Interface ........................................................................ 38
5.2 Gallery Configuration ............................................................................................... 38
User Settings .............................................................................................................. 38

3
Workflow Settings ....................................................................................................... 39
Gallery Settings........................................................................................................... 40
5.3 User and Group Management ................................................................................. 40
5.3a Add Gallery Users .............................................................................................. 40
5.3b User Roles and Permissions .............................................................................. 44
5.3c Manage Groups .................................................................................................. 45
5.4 Collections ................................................................................................................ 46
5.4a Allow Users to Create Collections ...................................................................... 46
5.4b Manage a Collection’s Users and Groups ......................................................... 46
5.4c Change a Collection’s Owner ............................................................................. 49
5.5 Subscriptions ............................................................................................................ 49
5.5a Create a New Subscription ................................................................................ 49
5.5b Add a User to a Subscription ............................................................................. 50
5.5c Remove a User from a Subscription .................................................................. 50
5.5d Edit a Subscription .............................................................................................. 50
5.5e Delete a Subscription ......................................................................................... 51
5.6 Workflows ................................................................................................................. 51
5.6a Add a Workflow................................................................................................... 51
5.6b Workflow Options ............................................................................................... 51
5.6c Create Workflow Tags ........................................................................................ 52
5.6d Enable Users to Run Workflows ........................................................................ 53
5.6e Enable Workflows for Migration ......................................................................... 53
5.7 Jobs (Schedules) ..................................................................................................... 53
5.7a Enable Users to Schedule Workflows ................................................................ 54
5.7b Enable Shared Schedules on Subscriptions ..................................................... 54
5.7c Edit or Delete a Schedule ................................................................................... 54
5.7d Cancel a Job ....................................................................................................... 55
5.7e Migrate Schedules to the Gallery ....................................................................... 55
5.8 Credentials ............................................................................................................... 56
5.8a Select the Workflow Credentials Setting for Your Gallery ................................. 56
5.8b Add a Credential ................................................................................................. 57
5.8c Share Credentials ............................................................................................... 57
5.9 Notifications .............................................................................................................. 58
5.10 Data Connections .................................................................................................. 60
5.10a Add a Data Connection .................................................................................... 60

4
5.10b Testing Data Connections ................................................................................ 62
5.10c Share a Data Connection ................................................................................. 63
5.10d Revoke Access to a Data Connection ............................................................. 63
5.10e Edit or Delete a Data Connection .................................................................... 63
5.11 Diagnostics ............................................................................................................. 64
5.12 Pages ..................................................................................................................... 65
5.13 Theme .................................................................................................................... 66
5.14 Links ....................................................................................................................... 66
5.15 Media ...................................................................................................................... 67
5.16 Districts ................................................................................................................... 68
6. GLOSSARY ................................................................................................................... 69

5
About This Guide
This guide includes the essential installation, configuration, and administration steps for Server
admins. For the most up-to-date and comprehensive help content, including help for Gallery
users, visit the online help documentation for Server at http://help.alteryx.com/current/server.

6
1. System Overview
Alteryx Server includes these primary components.
Designer
Designer is a Windows software application that provides an intuitive drag-and-drop user
interface for you to create repeatable workflow processes. You can drag tools from a toolbox
onto a canvas, connect them, and edit their properties to create workflows, apps, and macros.
You can use these workflows to blend and enrich data from a range of sources, perform
advanced analytics, and quickly produce results to share with others.
In a Server deployment, Designer users can publish their workflows, apps, and macros to the
Gallery where other Gallery users can access, run, and download them.
A scheduler interface, which allows users to schedule workflows to be executed at a specific
time or on a recurring interval, is also added to Designer as part of the Server deployment.
Gallery
Gallery is a cloud-hosted or self-hosted application for publishing, sharing, and executing
workflows. In a Server deployment, users can publish Designer workflows, macros, and apps to
a private Gallery hosted on your server infrastructure. Once published, other Gallery users can
run workflows and view the results. Alteryx also offers the Alteryx Analytics Gallery, where
you can sign up and share workflows, apps, and macros publicly or with selected users.

7
Controller
The controller manages the Server settings and delegates workflows to be executed to the
workers.
The controller consists of the Alteryx service as its primary piece of code. The service allows
you to deploy the engine, which processes workflows, across multiple servers, providing a
scalable architecture for the scheduling, management, and execution of analytic workflows. The
service uses a controller-worker architecture where 1 server acts as the controller and manages
the job queue, and others act as workers that run the jobs. If you deploy Server across multiple
servers, you can only enable 1 machine as a Controller. The service relies on the persistence
layer to store information critical to the functioning of the service. The service also sends content
to the Gallery when requested.
Worker
Workers are responsible for executing workflows. Once the controller delegates a job to a
worker, the worker runs it and produces the output. There has to be at least 1 worker machine in
a Server deployment.
Workers contain an instance of the Alteryx engine. The engine supports direct connections to
various data sources. The engine accesses the input data and then processes it in memory during
workflow execution. When processing exceeds memory limitations, the engine leverages
temporary files on disk and deletes them once the processing is complete.
The engine can be self-contained in a Designer deployment, scaled across an organization via
Server, or deployed in the cloud in the Gallery.
The engine integrates with R. Both the suite of R-based tools and the macros used for predictive
analysis leverage the R program.
Developers can write applications that call the engine directly using the application programming
interface (API). The software development kit (SDK) allows developers to add programs to their
Alteryx toolbox.
Persistence Layer
The persistence layer stores application data and ties all the components together. It is the
management record for your Server. The service relies upon the persistence layer to store
information critical to the functioning of the Service, such as application files, the job queue, and
result data.
There are 2 supported mechanisms for persistence: SQLite and MongoDB. For lightweight and
local deployments, SQLite is adequate for most scheduling needs. For heavier usage, or if you
are deploying the Gallery, you have to use MongoDB. If you use MongoDB, you can use the
embedded MongoDB or connect to your implementation of MongoDB.
8
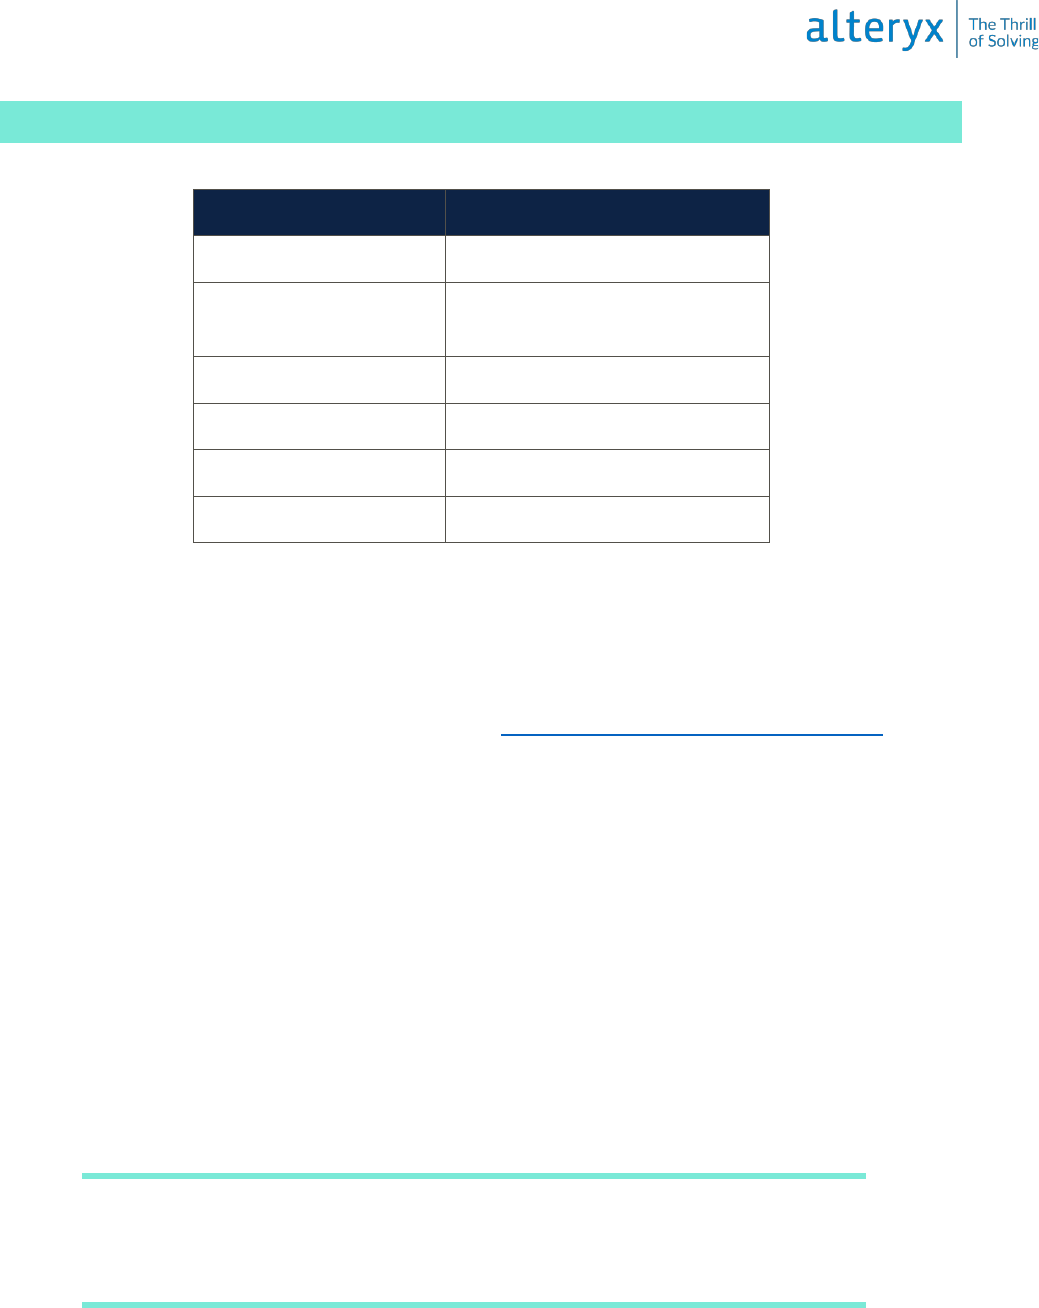
1.1 System Requirements
To install and run Alteryx, your system must meet these minimum system requirements.
REQUIRED MINIMUMS
Machine
64-bit
OS
Microsoft Windows Server
2008 R2 or later
Chip
Quad-core (single chip)
Processor
2.5GHz or faster
RAM
16GB
Disk Size
1TB
Other Requirements
• Administrator Rights: Admin access to the host server's operating system or physical
access to the server hardware is required to install Server.
• Active Directory Read Access: Read access to Active Directory, if you plan to use
Integrated Windows Authentication. Go to 4.3 Configure Gallery Authentication for
more info on authentication options.
• Access to the Alteryx Licensing System: Ensure the computer can contact the
whitelist.alteryx.com web domain used by the Alteryx licensing system.
• File Share Access: Read and write permissions to the file share.
• Predictive Tools Install: Install Predictive Tools to run workflows that use the Predictive
Tools on Server.
• Base Address: The base address is the URL that users use to access the Gallery. The
URL defaults to http://localhost/gallery/ which you can use to run the Gallery
locally.
• SMTP Server: SMTP host information is required for Gallery email notifications.
• Alteryx Admin User: The Gallery administrator can manage users and workflows. You
specify a Default Gallery Admin when configuring the Gallery authentication.
• Database Type: To configure a machine to run a Gallery instance you have to use
MongoDB.
Important
If you were previously using SQLite for Alteryx Scheduler, jobs have to be
manually re-scheduled when switching to MongoDB.
• Ports: These are the default ports used by Server. You can customize ports if necessary.

9
Public
• 80: AlteryxService, Non-SSL/TLS AlteryxServerHost (webserver),
and AlteryxAuthHost (Authentication Service)
• 443: AlteryxServerHost (webserver) and AlteryxAuthHost (Authentication
Service) with SSL/TLS
• 27018: Embedded MongoDB
Loopback Only
• 5562: AlteryxMetrics
• 8700-8799: Python for Insights

10
2. Install
2.1 Download the Server Installation File
Download the Server product from the Alteryx Downloads and Licenses portal.
1. Sign in to the Alteryx Downloads and Licenses portal at licenses.alteryx.com.
2. Under Product Downloads, select Alteryx Server.
3. On the Download Products page, select the version of the product you want to download.
The latest version is available on the New Versions tab. Access previous versions on the
Previous Versions tab.
4. On the Downloads page, select the plus icon next to Alteryx Server to display a
description of the product.
5. Select the link for the Alteryx Server product in the File Name column to download the
file.
2.2 Install Server
1. Run the Alteryx Server Installer with admin rights. (Right-click and select Run as
administrator.)
2. Confirm the destination folder and select Next.
3. Check the I accept the license agreement checkbox and select Next.
4. Select 1 of these options and select Finish.
• Configure Server now: Opens the Alteryx System Settings window so you can
configure the Server.
• Close and run Alteryx Designer later: Closes the installation window. Access
the system settings at any time via the Alteryx System Settings desktop icon.
• Install Predictive Tools: Installs the predictive tools in Designer. The predictive
tools use R, an open-source programming language used for statistical and
predictive analysis. Select this option to launch the R installer. You have to install
the predictive tools to use the predictive macros in Designer. To install at a later
time, go to Options > Download Predictive Tools in Designer.
Best Practice
We recommend you install all Server components on a separate, physical drive
(for example, D:) from the OS install. To avoid latency, use a local, solid-state
drive not a network drive. Assign all workspaces and directories to use the
same drive as the installation.
Benefit: This minimizes input/output contention with OS operations.

11
3. License
3.1 Activate Online
If you haven’t licensed your Server, you are prompted to do so. Use the license key from your
license administrator to activate a product license. If the license prompt doesn’t immediately
load, you can access it in Designer under Options > Manage Licenses > Activate New License.
To activate a license online…
1. In the Alteryx Server Activation window, enter your email address.
2. Enter your License keys one per line.
3. Select Activate.
4. In the Activation Success window, select Experience Alteryx.
3.2 Activate Offline
As an alternative to online activation, you can submit a request for an activation (BIN) file. If
you want to activate with a file, select Activate with File to open the Alteryx Offline
Activation window.
Step 1. Create a Request (REQ) File from the Offline Computer
1. Open Designer. If the Alteryx Designer Activation window doesn’t open automatically,
select Options > Manage Licenses > Activate New License.
2. Select Activate Offline.
3. In the Offline Activation window, select Create in the Request step to create a request
(REQ) file.
4. Enter your First name, Last name, Email address, and your License keys.
5. Select Create request.
Alteryx creates a request file with your email address and REQ extension as shown in
this example: [email protected].req
6. Select Save to save the request (REQ) file where it can be accessed from the Alteryx
Downloads and Licenses portal or send the file to your license administrator.
Step 2. Upload the Request File to the Alteryx Downloads and Licenses Portal
Important
This step requires internet access.
1. Sign in to the Alteryx Downloads and Licenses portal at licenses.alteryx.com.
2. On the Home page, select Upload Activation Request.
3. Select Browse and select the request (REQ) file you saved in the previous step.

12
4. The Alteryx Downloads and Licenses portal generates an activation file with your
email address and BIN extension as shown in this example: email@company.com.bin.
5. Save the activation (BIN) file so that you can access it from the offline computer.
Step 3. Open the activation (BIN) File on the Offline Computer
1. In the Alteryx Designer Activation window on the offline computer, select Back. Or
select Options > Manage Licenses > Activate New License to open the Alteryx Offline
Activation window.
2. Select Browse and select the activation (BIN) file.
3. In the Activation Success window, select Experience Alteryx.
3.3 Activate Using a License Server
The Alteryx License Server allows for the hosting and managing of purchased product licenses
within your organization’s internal network. The license server allows for smoother and more-
secure deployment of Alteryx products, especially behind proxies and firewalls. Download the
license server from the Alteryx Downloads and Licenses portal at licenses.alteryx.com.
To activate using a License Server:
1. Open Designer. If the Alteryx Designer Activation window doesn’t open automatically,
select Options > Manage Licenses > Activate New License.
Note: If don’t have valid licenses, the license server displays Install License.
Select OK to continue.
2. Select the here link within To access your License Server, click here text. The license
server displays Manage Licenses.
3. In License Server Connectivity, select Connect. The license server displays available
licenses. If this is the first time you have activated a license, enter your email address.
4. Select Activate for each product you want to activate.
5. Select Close.

13
4. Configure
4.1 System Settings
After you install and license Server components, if you select Configure Server now on the last
page of the installation, the System Settings window automatically opens. If the window doesn’t
open automatically, select the Alteryx System Settings shortcut icon on your desktop. You can
also access System Settings in Designer under Options > Advanced Options > System
Settings.
From System Settings, you can configure your Server instances to be a single or multiple-
machine configuration. Go to 4.2 Configure Controller and Workers for more info on single
or multiple-machine configuration.
4.1a Environment
On the Environment screens in System Settings, select the Server Setup Type and the Global
Workspace to use as a root location for file storage.
Setup Type
On the Setup Type screen, select the components of the Server architecture to enable on the
machine. You can enable the complete Server architecture on a single machine. If you want to
have a multi-machine, scaled Server deployment, you can enable specific components per
machine.
• Designer Only: Enables only Designer on the machine. Scheduler and Gallery
functionality aren’t enabled or configurable.
• Designer and Scheduler Only: Enables Designer and Scheduler on the machine. Gallery
functionality isn’t enabled. Select this option if you want users on the machine to build
and run workflows and schedule workflows to run in the future.
• Complete Alteryx Server: Enables the entire Server architecture to run on the machine.
This includes Designer, Scheduler, and Gallery. Select this option if you want to run a
single-machine environment and want the complete Server functionality.
• Custom: Allows you to enable specific components for the machine. Select this option
for multi-machine deployments of Server.
o Enable Controller: Enables a controller on the machine. The controller manages
and distributes scheduled workflow jobs to workers.
o Enable Worker: Enables a worker on the machine. Workers execute scheduled
workflow jobs assigned by the controller.
o Enable Gallery: Enables Gallery on the machine. If you enable Gallery, you have
to specify a Default Gallery Administrator on the Gallery > General screen.
• Send Server usage data: When enabled, Alteryx collects usage data for each job run,
including manual and scheduled runs. Alteryx uses this information to plan future
enhancements and prioritize fixes and features. To opt out of sending your usage data to
Alteryx uncheck this option. Unchecking this option doesn’t prevent your IT department
from collecting usage data. The usage data collected includes the following:

14
o Version of Server running the job.
o Serial number of the Server installation.
o Job schedule.
o Job ID.
o Date and time the job was run.
o Errors, warnings, conversion errors, messages.
Global Workspace
On the Global Workspace screen, select a root location where Server files are stored. The root
path is used as the base location for storage of temporary files, log files, and database files. This
path should point to a location that is safe to store large amounts of files. Go to 4.7 Configure
and Use Server Logs for more info.
4.1b Controller
The controller manages the service settings and delegates work to the workers. You can only
enable 1 machine as the controller in a deployment.
Configure the controller component on the Controller screens in System Settings. The
Controller screens are available in System Settings if you've selected 1 of these options on the
Environment > Setup Type screen:
• Designer and Scheduler Only
• Complete Alteryx Server
• Custom > Enable Controller
General Configuration
The General Configuration screen includes configuration options such as where you want to
store temporary files and log files and what information you want to log.
Controller Token
The Controller Token is an auto-generated secret key that the controller uses to communicate
with workers and machines using Designer.
If a machine using Designer isn’t a controller machine and you want to schedule a workflow for
a future date on this machine, you have to add the controller token on the Schedule Workflow
screen to schedule a workflow.
You also need the controller token if you want to have one machine act as a controller and
another machine act as a worker. Set up the controller machine to get your controller token.
Then, add the controller token in System Settings > Controller > Remote when setting up
the worker machine.
You can regenerate the token if necessary, for example, if the token is compromised. If you
regenerate the token, you have to update Gallery and worker nodes in the deployment. If you
want to regenerate your token, select Regenerate.

15
Workspace
The Controller Workspace is the location where the controller stores temporary or cache files.
By default, the folder is located within the global workspace folder as defined in the
Environment screens in System Settings. Use a location that is safe to store large amounts of
files.
Logging
The controller produces logs for events, such as services started and shut down, execution
requests, etc. These logs can be helpful for troubleshooting. Go to 4.7 Configure and Use
Server Logs for more info.
Scheduler
Select Enable Scheduler auto-connect to allow users on the machine to auto-connect to the
Scheduler. Enable this if you have difficulties connecting to the Scheduler.
Insights
Select Enable Insights to allow the machine to handle requests for rendering insights in the
gallery. Insights are interactive dashboards created in Designer.
Engine
Check Enable AMP Engine to enable running workflows that use the Alteryx Multithreaded
Processing (AMP) engine in this environment. This is the on-off setting for the Server
environment. If you enable the AMP engine for the controller, you also need to set at least 1
worker to run the AMP engine on the System Settings > Engine screen. Go to 4.1e Engine for
more info.
Understand AMP Engine Settings
The Enable AMP Engine setting on the System Settings > Controller screen is the on-
off setting for the Server environment. This setting enables AMP at the environment
level. The setting in System Settings > Engine tells the worker which engines it can
use and thus, which workflows it can run. Go to 4.1e Engine for more info.
For example, let's take a 3-node environment. Node 1 is set up for the controller and
Gallery and has AMP enabled. Node 2 is a worker only node with the engine set to
Original Only. Node 3 is a worker only node with its engine set to Both. In this
scenario, running AMP workflows on Server is enabled and these workflows would
only run on node 3. Original engine workflows would run on either node 2 or node 3. If
node 3 is offline Original-engine workflows would still run on node 2, but AMP
workflows would get stuck in the queue until node 3 came back online.

16
We recommend testing the AMP engine in a development environment before deploying it to
production.
Persistence
As the orchestrator of workflow executions and various other operations, the controller needs a
location where it can maintain the available workflows, a queue of execution requests, and other
information. Define where information critical to the functioning of the service is stored on the
Persistence screen.
Database Type
The controller maintains data in either SQLite or MongoDB databases. Server offers embedded
SQLite or MongoDB options, as well as a User-managed MongoDB option. If you are
configuring the machine for a gallery, you must use MongoDB or User-managed Mongo DB.
• SQLite: Creates an instance of the SQLite database. Recommended for lightweight and
local deployments that use the scheduler.
• MongoDB: Creates an instance of the MongoDB database. Recommended for heavier
usage.
• User-managed MongoDB: Allows you to connect to your implementation of MongoDB.
Important
• For User-managed MongoDB, we only support MongoDB with
SCRAM authentication. MongoDB with Kerberos authentication isn't
supported.
• We highly recommended that you have an automated backup system for
your persistence database.
• If you switch between SQLite and MongoDB database types, scheduled jobs
aren't migrated. These jobs have to be manually rescheduled.
Data Folder
The Data Folder is the storage location for either the SQLite or embedded-MongoDB database
files. If you select User-managed MongoDB, the Data Folder is disabled as it is configured in
your MongoDB instance.
Advanced Database Connection
Select Advanced User-Managed Mongo DB if you require support for these.
• TLS/SSL
• Replica Sets
• Sharding
• MongoDB Atlas

17
Note: If you were using replica sets before the availability of the connection string
option (2019.4 release or previous), you have to change to a connection string.
When you have selected this option, the Database section displays a MongoDB Connection
field for you to specify your MongoDB connection string.
Database
If you selected User-managed MongoDB and you aren’t using the Advanced Database
Connection, you will specify the Host location of the MongoDB instance, as well as the
Database Name in the Database section. If the MongoDB instance requires authentication,
enter these in the Username and Admin Password fields.
For embedded MongoDB, the Host, Username, Admin Password, and Password fields are
automatically populated. The Admin Password is for MongoDB Admins to set up backups and
replica sets. The Password is used by all components to communicate with MongoDB. You can
also use the Password for creating usage reports that connect to the database.
Persistence Options
The controller maintains a queue of jobs and caches uploaded files for use in executing those
jobs. Workflow queues and results can quickly take up space if left unattended. You can
flag various items and files for deletion after a specified number of days. These settings may help
to reduce the amount of drive space used.
Best Practice
We recommend that you enable the deletion of queue and results, completed schedules,
and uploaded files after 180 days (or a non-zero value of your choice). A value of 0
persists items indefinitely.
Benefits: This reduces the hard-drive space usage and decreases the size of Server
Usage Report output.
Mapping Configuration
On the Mapping Configuration screen, configure the machine to act as a Map Controller and
define the thresholds for the tile and layer caching. Caching map tiles and the reference maps
needed to render them increases performance. Larger cache size and increased time-to-live result
in faster responses for previously requested tiles but take up more memory and disk space.
A smaller cache has the opposite effect.
• Enable map tile controller: Select Enable map tile controller to allow the machine to
serve map tiles rendered by workers. The Map Question and Map Input tools use
these tiles for rendering maps.

18
o Memory cache: This is the maximum number of map tiles stored in memory.
1,000 tiles require roughly 450 MB of memory. A higher memory cache results in
more stored tiles to increase performance but requires more system resources.
o Disk cache: This is the maximum amount of space allocated for caching map tile
images on the hard drive. A higher disk cache results in greater consumption of
drive space but may increase the performance of map tile requests.
o Reference layer time to live: Map Questions and Map Input tools create
reference layers and are driven by a YXDB file. The controller can maintain a
reference to this YXDB file to help speed up rendering. This setting defines the
amount of time to persist reference-layer information. Increasing this number may
optimize the performance of frequently requested layers. Expired reference layers
are regenerated the next time they are requested.
Remote Controller
If you have configured the machine to act as a worker, the Remote Controller screen is the only
screen present under Controller. This is where you connect the machine to the controller
machine. Enter the host location and the controller Token to connect to the controller machine.
• Host: Enter the host location of the controller machine.
• Token: Enter the controller machine token. You can find the Controller Token in the
System Settings of the controller machine on the Controller > General screen.
4.1c Worker
The worker handles the execution of analytic workflows. There has to be at least 1 machine
enabled as a worker to execute workflows. You can configure the same machine to be both the
controller and a worker. The number of workers needed depends on the desired system
performance.
Configure the worker on the Worker screens in System Settings. The worker screens are
available for configuration if you've selected 1 of these options on the Environment > Setup
Type screen:
• Designer and Scheduler Only
• Complete Alteryx Server
• Custom > Enable Worker
Worker Configuration
The Worker Configuration screen includes configuration options, such as, where you want to
store temporary files and whether you want the machine to run scheduled workflows.

19
Workspace
The Workspace is where the worker stores temporary or cache files, and unpackaged workflows
for use when executing workflows. By default, it is the same as the controller folder. This path
should point to a location that is safe to store large amounts of files.
Allow Machine to Run Scheduled Alteryx Workflows
When checked, the worker accepts requests to run workflows from the scheduler and the Gallery.
In multi-node deployments, you might want to uncheck this option if you have another machine
that runs workflows. When unchecked, the machine will only render map tiles or insights.
Workflows Allowed to Run Simultaneously
This is the maximum number of jobs that you want to allow to run simultaneously on this
machine. You might want to increase this to improve the responsiveness of scheduled jobs.
Depending on the available resources and other configuration parameters, if set too high, this
might cause poor job throughput, stability issues, or general performance issues. For help with
this setting, reach out to your Sales or Support representative.
Best Practice
• For Original Engine, we recommend setting Workflows allowed to run
simultaneously to {# of Physical CPU Cores}/2.
• For AMP Engine, we recommend setting Workflows allowed to run
simultaneously to 1.
Go to 4.1b Controller and 4.1e Engine to learn more about engine settings.
To find the number of cores, enter this command in a command prompt:
wmic cpu get NumberOfCores/Format:List
Cancel Jobs Running Longer Than (Seconds)
Use this setting to force cancel jobs after a certain amount of time. This frees up system
resources from being taken up by long-running jobs. This setting only applies to scheduled jobs
and doesn’t affect manual runs from the Gallery.
Quality of Service
In an environment where you have deployed multiple workers, Quality of Service determines
which jobs each worker runs. When a worker handles a job request, it compares the priority level

20
of the job to its Quality-of-Service value. Jobs that have a value greater than or equal to the
worker's Quality of Service value are handled by that worker.
For example, if an available worker has a Quality of Service of 0, the worker handles any
request. But a worker with a Quality of Service of 3 only handles jobs that have a priority of 3 or
higher. This allows you to reserve resources for higher-priority requests. For normal operation
with 1 machine configured as a worker, set quality of service to 0.
• 0: Low (normal workflow execution)
• 1: Medium
• 2: High
• 3: Critical
• 4: Chained application execution (all apps in the chain aside from the last)
• 6: Workflow validation requests
• Job Assignment
You can assign a specific worker to run a job. To do so, first, add a job tag for the worker, then
select that job tag when creating a schedule or running a workflow.
• Run unassigned jobs: Select this option to use the worker to run untagged jobs.
• Job tags: To assign the worker to run tagged jobs, add job tags. Comma separate multiple
job tags. You can add the same job tag to multiple workers.
Run the Worker as a Different User
You can configure the machine to run the workflows as a specified user or account. This allows
the worker to use specific credentials to access files or data locations. To set the machine to run
as a different user, enter the Domain, Username, and Password.
Best Practice
We recommend engaging your IT team to create a service account that has access to the
necessary databases, shared network drives, and files.
For information on run as user permissions, go to 4.6 Configure Required Run As
User Permissions.
Mapping Configuration
You can enable the worker to act as a map worker. Map workers render map tiles for map
questions and the Map Input tool. You can specify the number of processes to use for tile
rendering. The more processes allowed, the more simultaneous rendered tiles. Increasing this
setting increases the system resources used.

21
Insights Configuration
Enable Insight Worker
You can configure the worker to act as an insight worker. Insights are interactive dashboards
created in Designer and published in a Gallery. When enabled, the worker renders insights.
Insights Allowed to Run Simultaneously
The maximum number of insights to run simultaneously on the machine. Increasing this setting
increases the system resources used.
Max Cache Size (# of Cache Directories)
The maximum number of insights cached on a worker machine. Each insight consists of a
description and data file, so each insight cache is a directory that contains those files.
Max Port, Min Port
The range of port numbers designated for use when rendering insights.
4.1d Gallery
The Gallery is a cloud-based application for publishing, sharing, and executing workflows. It
communicates with the service to manage and execute workflows. Gallery uses a MongoDB
persistence layer for state maintenance. This allows you to deploy the Gallery across multiple
servers behind a load balancer (not provided as part of the architecture) to support horizontal
scalability.
The Gallery is a private website, hosted on your server infrastructure that allows internal users to
share workflows, apps, and macros. Alteryx also offers a Public Gallery
(https://gallery.alteryx.com/) where users can sign up and share workflows, apps, and macros.
Configure the Gallery component on the Gallery screens in System Settings. The Gallery
screens are available for configuration if you've selected 1 of these options on
the Environment > Setup Type screen:
• Complete Alteryx Server
• Custom > Enable Gallery
Gallery General
The Gallery General screen has configuration options, such as where you want to store
temporary files and log files.
Gallery Workspace

22
The Gallery Workspace is the location where the Gallery stores temporary files. By default, it is
a folder within the global workspace folder. This path should point to a location that is safe to
store large amounts of files.
• Logging Directory: This is the location where you want to store Gallery log messages.
• Base Address: This is the URL that users use to go to the Gallery.
• Enable SSL: Enabling SSL changes the URL in the Base Address field to HTTPS. If
your certificate is set to a port other than the default 443, include the port in the URL (for
example, https://localhost:445/gallery/).
• Default Run Mode: Run Mode determines the workflows that Gallery users can run.
Use Default Run Mode to block workflows with specific tools or directory access from
running in the Gallery.
Semi-safe and Safe are only available if you have enabled the Run As setting in System
Settings on the Worker > Run As screen or if you have specified Run As.
If your Default Run Mode is Safe or Semi-safe, Gallery admins can change the run mode in
each workflow on the Workflows page in the Gallery Admin interface.
o Unrestricted: Gallery users can run any workflow.
o Semi-safe: Block Gallery users from running workflows that read data from or
write data to a location that isn’t within the workflow staging directory
(workspace).
o Safe: Block Gallery users from running workflows that read data from or write
data to a location that isn’t within the workflow staging directory (workspace).
Gallery users are also blocked from running workflows that use specific tools,
events, and data connectors. See Safe and Semi-safe Run Modes: Blocked Tools,
Events, and Data Connectors in the online help documentation at for a complete
list of blocked tools, events and data connectors.
Gallery Authentication
The Gallery Authentication screen has configuration options for the type of authentication you
want to use to access the Gallery. Server supports built-in authentication, integrated Windows
authentication with or without Kerberos support, and SAML authentication. Go to 4.3 Configure
Gallery Authentication for detailed steps for setting up your Gallery's authentication.
Gallery SMTP Configuration
The SMTP screen has configuration options for enabling SMTP. The information on the SMTP
page is required for Server to send email notifications for various events, such as registering your
Gallery account, changing your password, or sharing a workflow. Go to 4.4 Configure SMTP
for steps to set up SMTP.

23
Gallery Persistence
On the Gallery Persistence screen, specify where you want to store Gallery information, like
users, collections, etc.
By default, both Web Persistence and Search Persistence are set to use the same settings as
those specified for the controller on the Controller > Persistence screen.
Use Advanced Connections
Select Use Advanced Connections if you don’t want to use the same location as specified for
the controller or if you require support for these.
• TLS/SSL
• Replica Sets
• Sharding
• MongoDB Atlas
If you were using replica sets before the availability of the connection string option (2019.4
release), you have to change to a connection string.
When you select. Use Advanced Connections, the Web Persistence and Search
Persistence sections display a Connection field for you to specify your MongoDB connection
string.
Web Persistence
Select Use Controller Persistence Settings to use the same location as specified for the
controller on the Controller > Persistence screen. This is the default option for Gallery web
persistence.
If you want the Gallery to use a different MongoDB connection than the controller, chose 1 of
these:
• Select Use Advanced Connections and specify a Connection.
OR
• Uncheck Use Controller Persistence Settings and specify the Host, Database
name, Username, and Password.
Search Persistence
Indices for search functionality within the Gallery are also stored in the MongoDB.
Select Same settings as Web Persistence to use the same location as specified for web
persistence. This is the default option for Gallery search persistence.
If you want the search indices to use a different MongoDB connection than web persistence,
chose 1 of these:
• Select Use Advanced Connections and specify a Connection.
OR
• Uncheck Same settings as Web Persistence and specify the Host, Database
Name, Username, and Password.

24
4.1e Engine
The engine executes workflows using high-speed data processing and analytics. This process can
be self-contained in Designer, scaled across an organization by the Alteryx service, or deployed
in the cloud in Gallery.
Configure the engine component on the Engine screens in System Settings.
Engine Configuration
The Engine Configuration screen has configuration options, such as where you want to store
temporary files and log files and options for specifying system resource usage to optimize
performance.
Temporary Directory
The location where Server stores temporary files used in workflow processing.
Logging Directory
The location where Server stores output logs produced during workflow processing. Go to 4.7
Configure and Use Server Logs for more info.
Package Staging Directory
The location where Server temporarily saves files associated with the workflow when you edit
workflows stored in a Gallery. By default, Server saves these files inside of the Engine
Temporary Directory.
Memory Limit per Anchor
The maximum memory to use to consume data for each output anchor for tools in a workflow.
The default memory doesn't typically need to be changed.
Engine
The Engine setting tells the worker which engines it can use and thus, which workflows it
can run. If you select AMP Engine Only or Both, you also have to select Enable AMP
Engine to enable AMP at the environment level.
• Select Original Engine Only to run only Original Engine workflows on this node.
• Select AMP Engine Only to run only AMP Engine workflows on this node.
• Select Both to run Original Engine and AMP Engine workflows on this node.

25
Understand AMP Engine Settings
The Enable AMP Engine setting on the System Settings > Controller screen is the
on-off setting for the Server environment. This setting enables AMP at the environment
level. Go to 4.1b Controller for more info. The setting in System Settings > Engine
tells the worker which engines it can use and thus, which workflows it can run.
For example, let's take a 3-node environment. Node 1 is set up for the controller and
Gallery and has AMP enabled. Node 2 is a worker only node with the engine set
to Original Only. Node 3 is a worker only node with its engine set to Both. In this
scenario, running AMP workflows on Server is enabled and these workflows would
only run on node 3. Original engine workflows would run on either node 2 or node 3. If
node 3 is offline Original-engine workflows would still run on node 2, but AMP
workflows would get stuck in the queue until node 3 came back online.
Default Sort/Join Memory Usage
Default Sort/Join Memory Usage is the minimum memory the engine will use to perform sort
and join operations in a workflow. The default memory doesn't typically need to be changed.
Default Number of Processing Threads
Default Number of Processing Threads defines the number of processing threads tools or
operations can use. The default value is the number of available processor cores plus 1.
Generally, this value shouldn't be changed.
Allow Users to Override
Select Allow Users to Override to allow users to override the above settings to define their
memory usage, processing, threads, etc. If unchecked, the users assume the settings provided.
Run Engine at a Lower Priority
Select Run Engine at a Lower Priority if you are running other memory-intensive applications
simultaneously. We recommend you select this Run Engine at a Lower Priority for machines
configured to run the Gallery.
Allow User Alias to Override
Select Allow User Alias to Override to allow any user alias that is in the Alias Repository
to take priority over a system alias.

26
Proxy
Server can use a proxy to access the internet, rather than connecting directly to an internet host.
Server pulls the proxy settings displayed in Engine > Proxy from the Windows internet settings
for the user logged into the machine. If there are no proxy settings for the user logged into the
machine, Engine > Proxy isn't available within the System Settings menu.
The proxy settings displayed in Engine > Proxy might not reflect the proxy settings that are
used when the service runs during workflow execution. If your organization uses proxies for
internet access, we recommend using the Worker > Run As setting to ensure access to the
internet is allowed when Gallery users run and schedule workflows. Go to 4.1c Worker for more
info.
If a proxy server is set up for the machine and a username and password are
required, select Proxy requires password to enter the Username and Password for
proxy authentication.
4.2 Configure Controller and Workers
You can configure Server in a basic setup, with all components running on the same machine, or
as a multi-node instance with multiple machines.
After you install and license Server components, the System Settings window opens. Configure
Server components in System Settings.
4.2a Single-Machine Configuration
1. If the System Settings window doesn’t open automatically, double-click the System
Settings desktop icon. The System Settings Status screen displays the system
components that are enabled by default.
2. Select Next to configure settings for each component (See 4.1 System Settings).
• Environment (Go to 4.1a Environment)
• Controller (Go to 4.1b Controller)
• Worker (Go to 4.1c Worker)
• Gallery (Go to 4.1d Gallery)
• Engine (Go to 4.1e Engine)
3. On the Finalize Your Configuration screen, select Finish. The Status screen displays
the system components you enabled.
4. Select Done to close the System Settings window.
4.2b Multiple-Machine Configuration
After you install Server on a machine, you can scale it to accommodate for higher levels of usage
by enabling certain components on additional machines. Increase engine processing capabilities
by configuring an additional machine to act as a worker.

27
Configure a Controller Machine
1. Install Server on the controller machine.
2. Double-click the System Settings icon on the desktop of the worker machine.
3. On the Environment > Setup Screen select Custom > Enable Controller.
4. Select Next on the System Settings screens until you reach the Controller > General
Configuration screen.
5. Select View to display the Controller Token. Copy the token and save it.
6. Find and save the controller machine name.
Configure a Worker Machine
1. Install Server on the worker machine.
2. Double-click the System Settings icon on the desktop of the worker machine.
3. On the Environment > Setup Screen select Custom > Enable Worker.
4. On the Controller > Remote screen, enter the controller machine name in the Host
field and the Controller Token in the Token field.
5. Select Test to verify the connection to the controller machine.
6. Select Next to configure settings for the remaining components.
o Worker (Go to 4.1c Worker)
o Gallery (If enabled, go to 4.1d Gallery)
o Engine (Go to 4.1e Engine)
7. On the Finalize Your Configuration screen, select Finish. The Status screen displays
the system components you enabled.
8. Select Done to close the System Settings window.
The worker machine is now configured to execute workflow job requests from the controller
machine.
4.3 Configure Gallery Authentication
Configure the authentication method you want to use to manage Gallery access on the System
Settings > Gallery Authentication page.
Start by selecting the authentication method you want to use for your Server. Then, see the setup
steps for your selected method.
Server supports built-in authentication, integrated Windows authentication with or without
Kerberos support, and SAML authentication.
• Built-in: Allows users to access the Gallery using an email address and password.
• Integrated Windows authentication: Allows users to access the Gallery with internal
network credentials.
• Integrated Windows authentication with Kerberos: Allows users to access the Gallery
with internal network credentials using Kerberos authentication protocols.
• SAML authentication: Allows users to access the Gallery with Identity Provider (IDP)
credentials.

28
Warning
Server doesn't support changing the authentication type after configuration. Doing
so might compromise Gallery functionality.
4.3a Set Up Built-In Authentication
The set up for each authentication type varies. Select your selected authentication type for steps
to complete the setup.
Step 1. Set a Default Gallery Administrator for Built-In Authentication
After selecting Built-in authentication, create a Default Gallery Administrator at the bottom of
the Gallery Authentication page. The Gallery administrator manages users, workflows, and
more. For Built-in authentication, enter the administrator's email address.
Complete the remaining screens in System Settings (go to 4.1d Gallery and 4.1e Engine for
more info on these screens) and select Finish.
Step 2. Finish the Gallery Administrator Account Creation
1. To complete the creation of the Gallery administrator account, go to the sign-in page of
the Gallery. To do so, select the link to the Gallery shown on the System
Settings > Status page or enter the URL to the Gallery in your internet browser.
2. Select Sign In.
3. On the sign-in page, select Don't have an account? Create one now.
4. Enter a First Name, Last Name, and select a time zone from the drop-down menu.
5. In Email, enter the email address that you provided for the Default Gallery
Administrator on the System Settings > Gallery Authentication page.
6. In Password, create an account password.
7. Select Sign Up.
You are now logged in as the Gallery administrator. The credentials you entered in the sign-up
form are saved as your credentials going forward. You are now ready to add Gallery users. Go to
5.3a Add Gallery Users.
4.3b Set Up Integrated Windows Authentication
Step 1. Set a Default Gallery Administrator for Built-In Authentication
After selecting Integrated Windows authentication, create a Default Gallery
Administrator at the bottom of the Gallery Authentication page. The Gallery administrator
manages users, workflows, and more. For Integrated Windows authentication, enter the user
account in this format: domain\username.

29
Complete the remaining screens in System Settings (go to 4.1d Gallery and 4.1e Engine for
more info on these screens) and select Finish.
Step 2. Access the Gallery
The default Gallery administrator can now access the Gallery. To do so, select the link to the
Gallery shown on the System Settings > Status page or enter the URL to the Gallery in your
internet browser. You are now logged in as the Gallery administrator and ready to add Gallery
users. Go to 5.3a Add Gallery Users.
Multi-Domain Support
• Server supports multiple domains for Windows authentication. You don't need to
configure anything in Server to enable this, but these capabilities and permissions
have to be present across the domains.
• The domain the Gallery runs on needs to have the same trust policy as other
domain users so Active Directory can resolve and determine user permissions.
• Both domains need to be part of the same forest.
• The Alteryx service needs to be able to read all attributes from CN=Users and
CN=Computers containers for both domains. The Alteryx service runs under the
local system account on the server it is installed on. If you define a dedicated service
account instead of using the local system. The account needs permission to read all
attributes from both containers to enable authentication for both domains.
4.3c Set Up SAML Authentication
To configure SAML authentication for Single Sign On (SSO), your Identity Provider (IDP) has
to support SAML.
Before configuring SAML authentication for the Gallery, you have to add Server as a Service
Provider in the IDP. The IDP might need...
• the ACS Base URL (for example, http://localhost/aas/Saml2/Acs).
• the SP Entity ID (for example, http://localhost/aas/Saml2).
• The IDP might also require that you map email, firstName, and lastName attribute
statements to corresponding fields in the IDP to authenticate users.
1. Select an option for obtaining metadata required by the IDP. You can configure SAML
using an IDP Metadata URL or an X509 certificate and IDP SSO URL.
2. Complete the SAML IDP Configuration.

30
o ACS Base URL: The URL for the Assertion Consumer Service that accepts
SAML messages to establish a session.
o IDP URL: The URL for the Alteryx application configured in the IDP, also
known as, the IDP Entity ID.
o IDP Metadata URL: The URL provided by the IDP that includes the IDP SSO
URL and the X509 certificate for configuring the Alteryx Authentication Service.
o IDP SSO URL: The SSO URL, provided by the IDP, that the Alteryx
Authentication Service uses to log into the IDP.
o X509 certificate: The public certificate provided by the IDP for secure
communication with the Alteryx Authentication Service.
o Verify IDP: Select to open a browser window, log in, test the IDP configuration,
and set the default Gallery administrator.
Set a Default Gallery Administrator for SAML
A Gallery administrator account has to be created to administer the site (manage users,
workflows, and more). For SAML authentication, select Verify IDP to test the IDP
configuration and populate the field with IDP credentials.
You are now logged in as the Gallery administrator. You are now ready to add Gallery users. Go
to 5.3a Add Gallery Users.
4.4 Configure SMTP
The SMTP screen has configuration options for enabling SMTP. SMTP is required for Server to
send email notifications for various events, such as registering your Gallery account, changing
your password, or sharing a workflow. Go to 5.9 Notifications for more info.
1. Enter the email address from which you want emails to be sent in From Email.
2. Enter the email service hostname in Host.
3. Enter a username and password in Username and Password, if the SMTP server
configuration requires it.
4. Select Test to send a test email to the email address in From Email.
5. The port default is 25 as this is standard for SMTP. You can customize this port if
necessary.
6. If the SMTP server is set up to use SSL, select the Use SSL checkbox.
Deselect Enable SMTP to complete the Server setup without enabling SMTP. Email
notifications from the Gallery are disabled until SMTP settings are configured.

31
4.5 Configure Gallery SSL
Server supports SSL (Secure Socket Layer) encryption via HTTPS to ensure safe and secure
communication between Designer and Server, as well as any communication between a user’s
web browser and your company's Private Gallery.
Best Practices
• We recommend involving IT network administrators to configure SSL. SSL
configuration requires expertise in creating, distributing, and certifying SSL files via
a Certificate Authority (CA).
• Use a recognized CA to sign your SSL certificates.
• Self-signed certificates are discouraged.
Before enabling SSL on your machine, obtain a valid SSL certificate for your company's Private
Gallery from a trusted Certificate Authority (CA). The service address that you specify for the
certificate has to match the address that you want to use for your Gallery website domain
(the Base Address in System Settings on the Gallery General screen). Go to 4.1d Gallery for
more info about your Base Address.
After you have obtained an SSL certificate, you need to configure your webserver to use that
certificate when users visit your site. To do this, the certificate thumbprint has to be associated
with a specific port on the machine.
Step 1. Obtain Your SSL Cert's Thumbprint
Obtain the thumbprint of the certificate:
1. Locate and open the certificate (.cer) file.
2. Select the Details tab.
3. Scroll through the list and highlight Thumbprint.
4. The value displayed in the box at the bottom is the thumbprint of the certificate. Copy the
value and paste it into a text editor to remove all spaces. Use this value when configuring
the port.
Step 2. Configure a Port to Use the SSL Cert
To associate the certificate thumbprint to a specific port:
1. Select the Windows Start button.
2. Enter netsh in Search and select Enter.
3. Edit the example command. Example Command.
http add sslcert ipport=0.0.0.0:443

32
certhash=0000000000003ed9cd0c315bbb6dc1c08da5e6
appid={eea9431a-a3d4-4c9b-9f9a-b83916c11c67}
a. Replace the certhash value with the certificate thumbprint value without the
spaces.
b. Modify the ipport value if you want to use a port other than the default port
(443).
c. Leave the appid as it is since it is the application ID for the Gallery.
4. Paste the resulting command into the netsh console and select Enter to associate the
certificate with the given port.
5. Verify the association and successful install of the certificate by running this command in
the netsh console.
http show sslcert
6. All SSL certificate associations and their respective ports are listed.
Step 3. Configure the Gallery URL
After the certificate is associated with a port, the Server configuration has to be changed to
expect web requests over HTTPS instead of HTTP. If you associated the certificate with a port
other than the default (443), Server has to be configured to utilize that port.
1. Double-click the System Settings icon on your desktop.
2. Select Next on each screen in System Settings to navigate to the Gallery screens.
3. On the Gallery General screen, select Enable SSL. Enabling this option changes the
URL in the Base Address field to HTTPS.
4. If you enable SSL and your certificate is set to a port other than the default 443, specify
the port in the Base Address. For example, https://localhost:445/gallery/.
5. Select Next to continue navigating through the settings.
6. Select Done to close the System Settings and restart Alteryx Services.
After you have enabled SSL in the Server System Settings, users who go to the Gallery will see
HTTPS and a padlock symbol displayed before the URL address in their browser. This means
that a secure connection is established with a unique session key and communications are secure.
4.6 Configure Run As User Permissions
Server supports the ability to run workflows using specific user accounts. These accounts are
referred to as Run As user accounts. You can set a Run As user account to execute workflows as
a specific user. This allows workflows to read and write data to the program files the user
has access to.
You can configure your Server's worker and subscriptions (studios) to use specific Run As user
accounts. Go to 4.1c Worker and 5.5 Subscriptions for more info. You can also require Gallery
users to enter their credentials to run a workflow making each user's account a Run As user
account. Go to 5.8 Credentials for more info.

33
To use a Run As user account to execute workflows, enable all required permissions on each
Server worker machine. Verify the Secondary Logon service is running to enable alternative
users to run other services.
First, edit the local group policy on the machine to give the Run As user account permission to
log on as a batch job.
1. Select Start on the Windows taskbar.
2. In Search, enter gpedit.msc or local group policy.
3. In the Local Group Policy Editor window, select Computer
Configuration > Windows Settings > Security Settings > Local Policies > User
Rights Assignment.
4. Select Log on as a batch job.
5. In Log on as a batch job Properties, select Add User or Group.
6. Complete the required information to add the user or group.
7. Select OK and Apply.
Then, set permissions on each of the folders requiring Run As user permissions.
1. Right-click the folder for which you want to set permissions and select Properties.
2. Select the Security tab and select Edit.
3. In Group or user names, select the name of the user you want to grant permissions to or
select Add to add a user that doesn't appear in the list.
4. In Permissions for Run As User, select the required Run As permissions for the user.
5. Select Add after selecting all required permissions.
6. Select Apply.
Complete these steps on each worker machine for each of the user accounts you want to add as a
Run As user.
Required Run As User Permissions
Each Run As user has to have all these permissions set on each worker machine. You might need
to enable additional permissions on the machine depending on the workflow and the data and
program files the workflow accesses.
The Run As user also needs permissions to access the data sources included in the workflows run
in the Gallery. Necessary permissions and data sources vary based on the workflow.
Required Run As User Permissions
The folder where Alteryx is installed contains Alteryx program files.
• Location: [Install Directory] (The default location is C:\Program
Files\Alteryx. This might be hidden by Windows.)
• Permissions: Read & Execute, List, Read

34
The Windows Program Data folder contains content related to encryption keys used by
Windows APIs.
• Location: %ProgramData%\Microsoft\Crypto\RSA\MachineKeys
• Permissions: Read, Write
The folder that contains Server license files.
• Location: %ProgramData%\SRC
• Permissions: Read & Execute
The Server program files folder contains installed spatial data. Spatial data can also be
installed in other locations. Access is only necessary if spatial data is included in workflows.
• Location: %ProgramFiles(x86)%\Alteryx
• Permissions: Read & Execute
In staging folder specified in System Settings > Worker > General > Workspace. This
folder contains temporary files, such as unpackaged workflows, or other files used to execute
workflows. Ensure that these subfolders inherit permissions: MapTileCache, Results, Cache,
TileSetInfoCache, and XProcessCache.
• Location: %ProgramData%\Alteryx\Service\Staging
• Permissions: Modify, Read & Execute, List Folder Contents, Read, Write
The engine folder in System Settings > Engine > General > Temporary Directory. This
folder contains temporary files used in processed workflows and apps.
• Location: %ProgramData%\Alteryx\Engine
• Permissions: Modify, Read & Execute, List Folder Contents, Read, Write
The logging directory specified in System Settings > Engine > General > Logging
Directory. This folder contains output files created when workflows or apps are processed. By
default, logging isn't enabled so the directory might be empty.
• Permissions: Modify, List Folder Contents, Read, Write (Write permission is only
needed if logging is enabled.)
The Run As and workflow credentials user account has to have a profile on the local machine
where the workflow is executed and needs to have full control of that profile. This profile
should be created automatically with the correct permissions the first time a job runs with the
specified credential.
• Location: C:\Users: %HOMEDRIVE%%HOMEPATH%
• Permissions: Full Control

35
This is the minimum permission required on the windows profile storage folder so profiles can
be created successfully.
• Location: C:\Users\<UserName>: %HOMEDRIVE%\Users
• Permissions: Read & Execute, List Folder Contents, Read
4.7 Configure and Use Server Logs
Server creates log files and saves them to a location set in your Server's system settings. Logs
capture warnings and errors and can be used to investigate and diagnose issues.
4.7a Configure Logging for Your Server
Configure Service Logs
Configure the service log file location, logging level, file size, and file rotation on the System
Settings > Controller > General screen.
1. The storage location for service log files is set
to C:\ProgramData\Alteryx\Service by default. Customize the location if
necessary.
2. Choose the Level of messages to log.
Best Practice
We recommend setting the log level to Low or None. This minimizes disk write
operations and input/output contention. You can increase the log level when
debugging aberrant Server behavior.
o None: No logging.
o Low: Only log emergency, alert, critical, and error messages.
o Normal: Log low, warning, and notice messages.
o High: Log all message types.
3. Specify the maximum File size in MB for log files.
4. Select Enable log file rotation to place log files that exceed the max size in an archive
file. New events write to a new file. This prevents the creation of large log files that are
difficult to consume in standard log readers.
Configure Gallery Logging
The storage location for Gallery log files is set
to C:\ProgramData\Alteryx\Gallery\Logs by default. Customize the location if
necessary, on the System Settings > Gallery > General page.

36
Configure Engine Logging
Engine logs are not stored by default. You can specify a location to store engine log files on the
System Settings > Engine > General page in the Logging Directory.
4.7b Use Log Files for Troubleshooting
Service and Gallery logs are most-commonly used for investigating issues. There are several
steps you can take to investigate logs and diagnose issues in Server.
1. Locate and open the log in a text editor or Microsoft Excel.
2. Search log entries for words such as Error, Alert, and Critical.
3. Read the error description.
4. Starting from the error, locate the point in the log where Server started ("AlteryxService
starting").
5. Scan for events before the error occurred to identify potential causes.
6. Scan for events after the error occurred to identify potential consequences.
4.7c Types of Log Files
Service Logs
File Name: AlteryxServiceLog.log
Default Location: C:\ProgramData\Alteryx\Service
Service logs contain communication between components and startup and shutdown of processes on
the controller and worker machines. Go to 4.1c Controller for more info.
Gallery Logs
File Name: alteryx-[year]-[month]-[date].csv
Default Location: C:\ProgramData\Alteryx\Gallery\Logs
Gallery logs contain Gallery processes and functions, including errors found when running an
Analytic App that uses interface tools, and schedule migration records. Go to 4.1d Gallery for more
info.
Engine Logs
File Name: Alteryx_Log_[number].log
Default Location: Manually set.
Engine logs contain the output of messages created when a workflow runs, as well as the timestamps
when tools run in a workflow. Go to 4.1e Engine for more info.

37
UI Error Logs
File Name: [name].log
Default Location: C:\ProgramData\Alteryx\ErrorLogs (might be saved in a sub-folder)
The UI error logs contain stack traces for errors.

38
5. Administer Gallery
5.1 Access the Gallery Admin Interface
Users with the curator user role are considered Gallery admins. Curators can access the Gallery
Admin interface directly via this URL: [BaseAddress]/gallery/admin. Go to 4.1d
Gallery for more info about your base address.
You can also access the Gallery Admin interface via Gallery. To do so, select your username in
the upper-right corner and select Admin.
5.2 Gallery Configuration
There are 3 categories of Gallery-level settings available to Gallery admins to configure on the
Gallery Configuration page of the Gallery Admin interface. These are user settings, workflow
settings, and Gallery settings.
To manage Gallery-level settings, select Configuration on the Admin toolbar.
User Settings
There are 3 user settings on the Configuration page.
Default Role
The default user role is set to Viewer by default. You can change the default role using
the Default Role dropdown on the Gallery Configuration page. Go to 5.3b User Roles and
Permissions to learn more about how roles are evaluated.
Users Can Register
By default, users are not allowed to sign up for access to your company's private Gallery. To
allow users to sign up, enable the Users Can Register setting.
When enabled, users can sign up for a new account on the Gallery sign-in page. When disabled,
the Don't have an account? Create one now. is removed from the sign-in page. When the sign-
up form is disabled, new users must be added by an Admin.
Integrated Windows Authentication
Users Can Register is enabled by default for Galleries configured to use Integrated
Windows Authentication and can't be disabled.
SAML Authentication
We recommend enabling Users Can Register for Galleries configured to use SAML
Authentication.

39
This setting was previously Enable user registration on the Users page of the Gallery Admin
interface.
Unregistered Users Can Run Public Workflows on the Homepage
By default, only users signed in to the Gallery can run workflows. When enabled,
the Unregistered Users Can Run Public Workflows on the Homepage setting allows
workflows placed in the company Gallery can be run without signing in.
This setting was previously Enable unregistered users to run Public Gallery workflows on
the Workflows page of the Gallery Admin interface.
Workflow Settings
There are 2 workflow settings on the Configuration page.
Curators Can Flag Workflows for Promotion
When enabled, Curators (Gallery admins) can indicate a workflow is ready to be promoted by
selecting Yes for This workflow is ready to be migrated within a workflow. Go to 5.6e Enable
Workflows for Migration to learn about workflow migration.
This setting was previously Enable workflows to be marked as ready for migration to a
separate environment on the Workflows page of the Gallery Admin interface.
Workflow Credentials Setting
The Workflow Credentials Setting determines the credentials required for running workflows
at a Gallery-level.
• Use Default Credentials: Runs all workflows using the default Run As account, which
defaults to the LocalSystem account. The Run As account may be defined on any of the
following process levels, listed in order of precedence:
o Per studio subscription via Default Credentials.
o Per Server worker node by adding a Run As account via Server System Settings.
o Per Server via modification to Alteryx Service with the Windows Services
Console.
• Require User Credentials: Prompts users to enter their credentials when they run the
workflow.
• Allow Users to Select: Allows users to select credentials requirements when saving a
workflow in Designer to a private Gallery. Options include:
o User is not required to specify credentials
o User must specify their own credentials
o Always run this workflow with these credentials

40
Important
The credentials setting you select may require additional user permissions. Go to
4.6 Configure Required Run As User Permissions for more information on setting
Run As User permissions.
Changing the credentials setting in these ways disables schedules in the Gallery:
• Use Default Credentials to Require User Credentials.
• Require User Credentials to Use Default Credentials.
• Allow Users to Select to Require User Credentials if users did not create schedules
with credentials.
• Allow Users to Select to Use Default Credentials if users created schedules using their
credentials.
This setting was previously Credentials setting for workflows on the Credentials page of the
Gallery Admin interface.
Gallery Settings
Users Can Schedule Workflows
When enabled, the Users Can Schedule Workflows Gallery-level permission enables users with
the user-level Schedule Jobs permission to create and edit workflows. Both permissions must be
enabled for a user to schedule workflows.
This setting was previously Enable users to schedule workflows on the Jobs page of the
Admin interface.
Disable Direct Download
When enabled, Disable Direct Download removes the ability for Gallery users to download
assets from the Gallery. Users can still download these assets from Designer.
5.3 User and Group Management
On the User Management page of the Gallery Admin interface, add and manage Gallery users
and groups.
5.3a Add Gallery Users
Once you have set up the authentication method for your Gallery you can add Gallery users in
the Gallery Admin interface.

41
The necessary steps for adding Gallery users depend on the Gallery authentication type. Go to
4.3 Configure Gallery Authentication.
Steps for Adding Users for Built-In and SAML Galleries
Once Built-in or SAML authentication is set up, you can choose to add users yourself or allow
users to register themselves. Follow the steps under either the Add Users section or Allow Users
to Register section for further instructions.
Add Users
Creating the users yourself allows you to better control the new users' access and permissions
upon their first login. When you manually create users, you can assign each user a role or assign
them to user groups with a specific role.
Set a Default User Role
New Gallery users assume the default user role unless you assign them a group. The default user
role is set to Viewer by default. Go to 5.3b User Roles and Permissions to learn about the
permissions each user role includes. You can change the default role using the Default
Role drop-down menu on the Gallery Configuration page. Go to 5.2 Gallery Configuration.
Create a New User
1. On the Users tab of the User Management page, select the plus icon to add a new user.
2. Enter the user's first name in the First Name field.
3. Enter the user's last name in the Last Name field.
4. Enter a valid email address in the Email field.
5. Select a Role.
6. Select Yes for Can Schedule to allow the user to schedule workflows to run at a
scheduled time. Note, you have to also enable workflow scheduling on the Jobs page for
a user to be able to schedule jobs.
7. Select Yes for Can Prioritize to allow the user to prioritize a job. When there are
multiple jobs in the queue, the job with the highest priority runs first.
8. Select Yes for Can Tag Jobs to allow the user to assign a specific worker to run a
workflow.
9. Select Yes for Can Create Collections to allow the user to create collections.
10. Select Yes for API Access to allow the user to access the Gallery API.
11. (Optional) In Subscription Id, enter a Studio Subscription Key. If left blank, the user
is assigned their private studio. If you want to have the user share a studio with another
user, paste the corresponding subscription key.

42
12. If you disabled the Users Can Register option (go to 5.2 Gallery Configuration), enter
a password for the user in the Password and the Re-enter Password fields.
13. Select Save.
If you set up an SMTP server to send email notifications, the user receives an email with the link
to the Gallery and instructions for activating their account. Go to 4.4 Configure SMTP and
5.9 Notifications.
Set Up Groups and Assign Group Roles
If you want to have users assume a role other than the default user role you can assign them to a
group and assign that group a role. Or you can assign a specific role for each user.
Create a New Group
1. On the Groups tab of the User Management page, select the plus icon to add a new
group.
2. Enter a name for your group in Group Name.
3. Select a Group Role to assign to all users in the group.
Add Users to a Group
Custom Groups allow you to choose the users that are part of the user group. Follow these steps
to add a user to a group:
1. Select a group.
2. Select Add User.
3. Search for the user by username or email.
4. Select the user.
5. Select Save.
Allow Users to Register
If you choose to register users, you can control users' initial access using the default user role.
Once a user has registered, you can log in to create user groups or assign individual user roles.
First, ensure that you enabled the Users Can Register setting on the Gallery
Configuration page (go to 5.2 Gallery Configuration). Next, customize the default user role to
control users' access and permissions when users sign in.
Set a Default User Role
New Gallery users assume the default user role unless you add them to a group or assign a user
role other than Default. The default user role is set to Viewer by default. Go to 5.3b User Roles
and Permissions to learn about the permissions each user role includes. You can change the

43
default role using the Default Role dropdown on the Gallery Configuration page. Go to 5.2
Gallery Configuration.
Now you are ready to invite users to register for a Gallery account. Once a user has registered,
you can log in to create user groups or assign individual user roles.
5.3 Steps for Adding Users in Integrated Windows Authentication Galleries
Once integrated Windows authentication is set up, all users on the domain can go to your Gallery
URL and log in with their Active Directory credentials. Before inviting users to log in to
Gallery, customize the default user role to control users' access and permissions when users sign
in.
Set a Default User Role
New Gallery users assume the default user role unless you add them to a group or assign a user
role other than Default. The default user role is set to Viewer by default. Go to 5.3b User Roles
and Permissions learn about the permissions each user role includes. You can change the
default role using the Default Role dropdown on the Gallery Configuration page. Go to 5.2
Gallery Configuration for more info.
Set Up Groups and Assign Group Roles
If you want to have users assume a role other than the default user role, you can add them to a
group and assign that group a role. Or, after they have registered, you can change their user role.
Create a New Group
1. On the Groups tab of the User Management page, select the plus icon to add a new
group.
2. Select a Group Type.
a. Select Active Directory to add a group from your Active Directory as a user
group.
b. Select Create Custom Group to create a user group you can manually add users
to.
3. If you are adding a Custom Group, enter a name for your group in Group Name.
4. If you are adding an Active Directory group, search for the Active Directory group
in Search Groups.
5. For both Custom Groups and Active Directory groups, select a Group Role to assign to
all users in the group.
Add Users to a Group
If you added an Active Directory group, the users in that group are assigned to that same group
in Gallery and assume the role assigned to that group. Custom Groups allow you to choose the
users that are part of the user group. Follow these steps to add a user to a group.
1. Select a group.

44
2. Select Add User.
3. Search for the user by username or email. This searches Active Directory for Active
Directory users and groups.
4. Select the user.
5. Select Save.
Once you have configured your default role and created any custom and Active Directory groups
you need, you can invite Gallery users to sign in using the Gallery URL. When users access the
Gallery URL, they are prompted to log in using the Active Directory credentials.
5.3b User Roles and Permissions
User roles are set by Curators (Gallery admins) in the Gallery Admin interface. User
roles determine the user's level of access to Gallery users and assets.
User Roles
Gallery users can have one of the following roles.
• Curator: Curators (Gallery Admins) can access the Gallery Admin interface to perform
administrative tasks. Curators also have all the privileges of an Artisan.
• Artisan: Artisans can publish, run, and share workflows in their private studio and shared
collections.
• Member: Members can run workflows that are shared with them via collections.
• Viewer: Viewers can run public workflows on the homepage and in districts.
• No Access: Blocks access to all Gallery assets. The No Access role is typically used in
Galleries using either Integrated Windows Authentication or SAML Authentication to
control initial access to the Gallery when new users sign up.
• Default: Assumes the default user role. Go to 5.2 Gallery Configuration for more info.
User Permissions
In addition to user roles, there are several user permissions that you can set to control what users
can do.
• Schedule Jobs: Allows the user to schedule workflows to run at a scheduled time. Note,
you have to also enable workflow scheduling on the Jobs page for a user to be able to
schedule jobs.
• Prioritize Jobs: Allow the user to prioritize a job. When there are multiple jobs in the
queue, the job with the highest priority runs first.
• Assign Jobs: Allows the user to assign a specific worker to run a workflow.
• Create Collections: Allows the user to create collections.
• API Access: Allows the user to access the Gallery API.

45
• Active: Set to No to prevent the user from accessing the Gallery.
Set a Default User Role
New Gallery users assume the default user role unless you add them to a group or assign a user
role other than Default. The default user role is set to Viewer by default. You can change the
default role using the Default Role dropdown on the Gallery Configuration page. Go to
5.2 Gallery Configuration for more info.
Note, the default role is displayed as Evaluated in some places like the in the group Details.
Understand Role Hierarchy
A user's role, and their resulting Gallery access, can come from 3 places, the
user role, the group role, or the default role. Gallery evaluates roles in this order:
user role, group role, default role. Users' access resolves to the most specific role
assignment. So, if a user's role assignment is any role other than Default, that is
their role and corresponding access. If a user's role is Default, then the
Gallery looks to see if they are in a group. If the user is in a group, they assume
the group role. If they are not in a group, they assume the default role.
5.3c Manage Groups
On the Groups tab of the User Management page in the Gallery Admin interface, Curators
(Gallery admins) can create user groups. User groups allow admins to more efficiently
assign user roles. They also support asset sharing via collections.
Create a New Group
1. On the Groups tab of the User Management page, select the plus icon to add a new
group.
2. If you are using Integrated Windows Authentication, you have a Group Type option.
a. Select Active Directory to add a group from your Active Directory as a user
group.
b. Select Create Custom Group to create a user group you can manually add users
to.
3. If you are adding a Custom Group, enter a name for your group in Group Name.
4. If you are adding an Active Directory group, search for the Active Directory group
in Search Groups.
5. For both Custom Groups and Active Directory groups, select a Group Role to assign to
all users in the group.
46
Add Users to a Group
Custom Groups allow you to choose the users that are part of the user group. Follow these steps
to add a user to a group.
1. Select a group.
2. Select Add User.
3. Search for the user by username or email. This searches Active Directory for Active
Directory users and groups if you are using Integrated Windows Authentication. If you
are using Built-in Authentication this searches Server for Gallery users.
4. Select the user.
5. Select Save.
Delete a Group
To delete a group, select the trash icon in the Actions column of the group grid. When you
delete a group, you also remove collections access for the group's members.
5.4 Collections
A collection allows users to share assets (workflows, apps, macros, and insights) with other
Gallery users. This guide covers the options available to Curators (Gallery admins) on
the Collections page in the Gallery Admin interface.
To learn more about options for collection users within the Gallery, visit the online help
documentation for Server at https://help.alteryx.com/current/server/collections-gallery-interface.
5.4a Allow Users to Create Collections
Curators (Gallery Admins) have to give users permission to create collections. In Galleries that
use built-in authentication, you can enable the Can Create Collections permission when
creating a new user.
If you allow users to register in a built-in authentication Gallery or are using windows or SAML
authentication, follow these steps to enable this permission once users have registered their
Gallery account.
1. Go to the User Management page in the Gallery Admin interface.
2. Select the user.
3. In the Actions panel, select Yes for Create Collections permission.
5.4b Manage a Collection’s Users and Groups
Manage a collection's users and groups on Collections pages of both the Admin interface
and Gallery user interface.

47
Add a User or Group to a Collection
Important
The collection owner has to give you permission to add a user. Go to the Users tab of
the collection to confirm you have permission to add users. Curators (Gallery admins)
who have been added to the collection always have access to add and remove users and
groups from collections.
1. Select Collections.
2. Select the collection.
3. Select Users > Add Users. Or, to add a group, select Groups > Add Group.
4. In the search field, enter the username, group name, or email address, and select the user
or group when it appears in the list.
5. Select Expiration Date to assign a date for when the user's or group's access expires.
Enter a date or use the date picker to select an expiration date.
6. Select permissions:
o Admin: Select Yes to set all the permissions to Yes.
o Add Assets: Select Yes to allow the user or group to add assets to the collection.
o Remove Assets: Select Yes to allow the user or group to remove assets from the
collection.
o Update Assets: Select Yes to allow the user or group to open the asset in
Designer, make changes, and save it back to the collection.
o Add Users: Select Yes to allow the user or group to add users to the collection.
o Remove Users: Select Yes to allow the user or group to remove users from the
collection.
Important
You can't edit a Curator's collection permissions.
7. Select Add.
Edit User or Group Permissions
Curators (Gallery admins) can follow these steps to adjust user or group collection permissions.
All other users can remove the user and re-add them to adjust their permissions.
1. Select Collections.

48
2. Select the collection.
3. Select Users. Or, to edit a group, select Groups.
4. Select one or more users or groups and select Edit.
5. Select Expiration Date to assign a date for when the user's or group's access expires.
Enter a date or use the date picker to select an expiration date.
6. Select permissions:
o Admin: Select Yes to set all the permissions to Yes.
o Add Assets: Select Yes to allow the user or group to add assets to the collection.
o Remove Assets: Select Yes to allow the user or group to remove assets from the
collection.
o Update Assets: Select Yes to allow the user or group to open the asset in
Designer, make changes, and save it back to the collection.
o Add Users: Select Yes to allow the user or group to add users to the collection.
o Remove Users: Select Yes to allow the user or group to remove users from the
collection.
Important
You can't edit a Curator's collection permissions.
7. Select Save.
Remove a User or Group from a Collection
1. Select Collections.
2. Select the collection.
3. Select Users. Or, to remove a group, select Groups.
4. Find the user or group you want to remove.
5. Select the trash icon in the Actions column to remove a user or group from
the Collection.
Set an Expiration Date for a User's or Group's Access
1. Select Collections.
2. Select the collection.
3. Select Users. Or edit a group expiration date, select Groups.
4. Select the users or groups and then select Edit.
5. In Expiration Date enter a date or use the date picker to select a date.

49
5.4c Change a Collection’s Owner
Curators (Gallery admins) can change a collection's owner in the Gallery Admin interface.
1. Select the collection.
2. Select Change Owner.
3. In the Users search bar, enter the username or email address, and select the user when
they appear in the list.
5.5 Subscriptions
Important
In a coming release, to streamline your asset management, subscriptions (studios) are
going away. Assets will be associated with users rather than a given subscription
(studio). If you have assets in your Private Studio these will be associated with your
user instead.
If you are using subscriptions (studios) to share assets, we recommend that you migrate
shared assets to collections to prepare for this improvement.
A subscription allows Designer users to publish and share workflows privately within your
organization. Gallery Admins can create subscriptions and manage the users and workflows
assigned to them. Subscriptions are also known as studios.
A Private Studio (in other words, subscription) is automatically created for each Gallery user.
When a user creates a workflow in Designer and publishes it to the Gallery, the workflow is
added to the user's Private Studio (subscription). Workflows published to the Private Studio are
private. Only other users assigned to the Private Studio (subscription) can see the workflows.
To manage subscriptions, go to the Subscriptions page of the Gallery Admin interface.
5.5a Create a New Subscription
1. On the Subscriptions page, select Add New Subscription.
2. Select Yes or No for API Enabled. Access to the Private Server Gallery API is disabled
by default. The Gallery API supports the ability to authenticate, list apps, run apps, and
retrieve app results using an API Key and Secret from Gallery Settings.
3. Select Yes or No for Shared Schedules Enabled. Yes allows users to view and edit the
schedules and job results for workflows published by all users in the subscription.
4. (Optional) To add Default Workflow Credentials select Set Account. Go to 5.8
Credentials for more info.
a. Select a saved credential in the Workflow Credentials dropdown.

50
b. Select OK.
5. Select Save.
The new subscription is added to the Subscriptions page.
5.5b Add a User to a Subscription
1. On the Subscriptions page, select a subscription.
2. Select Add User. Enter the username and select the user when it appears. Note, this will
change the user's Private Studio (subscription) and remove their access to the workflows
in their existing subscription.
5.5c Remove a User from a Subscription
Users can only have one subscription. So, you must add a user to a new subscription to remove
them from their existing subscription. There are 2 methods for moving a user from one
subscription to another.
• Copy the Subscription Id of the new subscription and paste it in the Subscription
Id field in the user's profile.
OR
• Go to the new subscription you want to add the user to. Select Add User. Enter the
username and select the user when it appears. Note, this will change the user's Private
Studio (subscription) and remove their access to the workflows in their existing
subscription.
5.5d Edit a Subscription
1. On the Subscriptions page, select a subscription.
2. Enter a new Private Studio Name.
3. Select a new worker in the Assigned Worker dropdown.
4. Select Yes or No for API Enabled. Access to the Private Server Gallery API is disabled
by default. The Gallery API supports the ability to authenticate, list apps, run apps, and
retrieve app results using an API Key and Secret from Gallery Settings.
5. Select Yes or No for Shared Schedules Enabled. Yes allows users to view and edit the
schedules and job results for workflows published by all users in the subscription.
6. To change Default Workflow Credentials, select Change Account. Go to 5.8
Credentials for more info.
a. Select a saved credential in the Workflow Credentials dropdown.
b. Select OK.
7. To add a user to the subscription, select Add User. Enter the username and select the user
when it appears. Note, this will change the user's Private Studio (subscription) and
remove their access to the workflows in their existing subscription.

51
8. Select Save.
5.5e Delete a Subscription
Before you delete a subscription (studio), you have to remove all users from it. To do so, add the
users to another subscription.
To delete a subscription, find the subscription and select the trash icon next to the
subscription name. Note, deleting a subscription also deletes the workflows in that subscription.
5.6 Workflows
On the Workflows page, curators (Gallery admins) can add workflows to the Gallery and
manage their settings. You can also add apps and macros to the Gallery via the Workflows page.
Curators can also create and apply tags to workflows to improve search results and group similar
workflows into districts. Go to 5.16 Districts.
5.6a Add a Workflow
Curators (Gallery admins) can upload workflows directly via the Gallery Admin interface.
1. Begin by saving your workflows as an Alteryx workflow package (YXZP) file to upload
to the Gallery.
2. On the Workflows page, select Add New Workflow.
3. Select the workflow on your computer or a shared location.
The workflow displays in your list on the Workflow page. Apps and macros can also be upload
using these steps.
5.6b Workflow Options
These options are available on the workflow details page of the Gallery Admin interface.
• Uploaded: Date workflow was uploaded and Gallery user who uploaded the workflow.
• Private Studio: The private studio where the workflow is located.
• Run: The number of times all users who have access have run the workflow.
• Tags: To add a new tag, select Add Tags, and select the tags you want to apply. To
remove a tag, select the X icon on the tag you want to remove.
• Change Icon: To change the workflow icon, select Change Icon, and browse for a new
icon.
• Name: The name of the workflow. Not editable in Gallery.
• Author: The workflow author as specified in the Meta Info tab in Designer. Not editable
in Gallery.
• Description: Enter a description for the workflow in the Description field.

52
• Copyright: Copyright info specified in the Meta Info tab in Designer. Not editable in
Gallery.
• Run Mode: Use Run Mode to block specific tools or access. The Server admin selects
the Default Run Mode during server configuration. Go to 4.1e Gallery. To change
the Run Mode for the workflow, select a setting from the drop-down.
o Unrestricted: Gallery users can run the workflow regardless of tools or access.
o Semi-safe: Blocks Gallery users from running the workflow if it reads data from
or writes data to a location that is not within the directory or sub-directory of the
workflow staging directory (workspace).
o Safe: Blocks Gallery users from running the workflow if it reads data from or
writes data to a location that is not within the workflow staging directory
(workspace). Gallery users are also blocked from running the workflow if it uses
specific tools, events, and data connectors.
Semi-safe and Safe are only available if the Server admin has enabled
the Run As setting in System Settings on the Worker > Run As screen
or if a Run As user is specified. Go to 4.1c Worker and 5.8
Credentials for more information.
• Worker Assignment: To change the worker that runs the workflow, select a worker from
the drop-down. If a worker is not assigned, the worker assigned to the studio runs the
workflow.
• Requires Private Data Setting: Indicates the workflow needs licensed data to run.
Select Yes, if the workflow needs licensed data, or No if the workflow does not need
licensed data.
• Private Data Exemption Setting: Give an exemption to allow a workflow with private
data to run. Select Yes, to allow an exemption or No to deny an exemption.
• Place in My Company's Gallery: Select Yes, to share the workflow in your company's
Gallery, or No, to remove the workflow from your company's Gallery. Removing the
workflow from your company's Gallery does not remove the workflow from the user's
studio.
• This workflow is ready to be migrated: This option is only available when
the Curators Can Flag Workflows for Promotion setting is enabled on
the Configuration page. Go to 5.2 Gallery Configuration for more info. Select Yes to
mark workflows and apps for migration. Go to 5.6e Enable Workflows for
Migration for more info.
5.6c Create Workflow Tags
1. Only Curators (Gallery Admins) can create workflow tags. Workflow tags can be
assigned to districts to assist with workflow organization within the Gallery. Go to 5.16
Districts for more info. Gallery users can then assign tags to workflows.
2. To create a new tag, go to the Workflows page, scroll to the Tags section.

53
3. Enter a tag in the Tag field and select Add New.
4. Select Admin Only to make the tag only available to Curators (Gallery Admins) to
assign to workflows.
5.6d Enable Users to Run Workflows
By default, only users signed in to the Gallery can run workflows. Curators (Gallery admins) can
change this setting to enable users to run workflows on the homepage without logging in. To do
so, enable the Unregistered Users Can Run Public Workflows on the Homepage setting on
the Configuration page in the Admin interface.
5.6e Enable Workflows for Migration
Curators (Gallery admins) can manage workflow deployments during development and testing
phases by migrating workflows from one Server environment to another using a series of
endpoints.
Mark workflows for migration in 2 places.
1. Enable Curators to flag workflows for migration:
o On the Configuration page of the Gallery Admin interface, enable the Curators
Can Flag Workflows for Promotion setting.
2. Mark a specific workflow for migration:
o On the Workflows page of the Gallery Admin interface, select a workflow, and
select Yes for This workflow is ready to be migrated.
Once you mark workflows for migration, you can then use a series of API endpoints to publish
them from the source environment into the appropriate subscription (studio) of the target
environment.
5.7 Jobs (Schedules)
On the Jobs page, you can enable workflow scheduling in Gallery; this allows users with
scheduling permission to schedule workflows to the Gallery while working in Designer or
Gallery. You can also view the status of all jobs running in Gallery and manage schedules.
The Jobs page does not display jobs running in Designer.
To manage jobs (schedules), go to the Jobs page of the Gallery Admin interface.
The Jobs page contains 3 tabs:
• Status: Displays all jobs that are currently running or queued in your Gallery. Jobs
include workflow runs that were scheduled or manually run. Jobs can be run one at a time
or simultaneously based on the configuration of your Server. Go to 4.1c Worker to learn
more about these configuration options.
• Scheduled Workflows: Displays all schedules set up for Gallery workflows. Edit,
disable, or delete schedules on this tab.

54
• Migrate: Displays schedules saved to a controller. From here, you can select schedules to
migrate from the controller to the Gallery and assign a Gallery user to own each schedule.
5.7a Enable Users to Schedule Workflows
By default, Gallery users aren't allowed to schedule workflows. Curators (Gallery admins) can
allow users to schedule workflows. First, enable the Users Can Schedule Workflows Gallery-
level setting on the Configuration page in the Gallery Admin interface.
Next, each user has to have permission to schedule workflows.
1. Select Users on the Gallery Admin interface toolbar.
2. Select the User.
3. In the Actions panel, select Yes for the Schedule Jobs permission.
4. Select Save.
5.7b Enable Shared Schedules on Subscriptions
Curators (Gallery admins) can follow these steps to enable shared schedules on the same
subscription.
1. Select Subscriptions on the Gallery Admin interface toolbar.
2. Select the Subscription.
3. Select Yes for Shared Schedules Enabled.
4. Select Save.
5.7c Edit or Delete a Schedule
Curators (Gallery admins) can edit and delete schedules on the Jobs page of the Gallery Admin
interface.
Edit a Schedule
1. On the Scheduled Workflows tab, find the job you want to edit.
2. Select the pencil icon next to the Schedule you want to edit.
3. In the Edit Schedule window, edit schedule details. All schedule details, except
workflow credentials, are editable.
4. Select Done.
Delete a Schedule
On the Scheduled Workflows tab, select the trash icon next to the schedule you want to delete.

55
5.7d Cancel a Job
Curators (Gallery admins) can cancel jobs on the Jobs page of the Gallery Admin interface.
1. On the Status tab, find the job you want to cancel.
2. Select the cancel job icon on the job you want to cancel.
Canceling a scheduled job cancels that occurrence. The job will run again at the next scheduled
time. Go to 5.7c Edit or Delete a Schedule for steps to cancel all future job runs.
5.7e Migrate Schedules to the Gallery
The Migrate tab of the Jobs page of the Gallery Admin interface displays workflow schedules
that were scheduled to a controller via Designer. You can migrate these scheduled jobs to your
private Gallery. Each schedule has to be assigned a Gallery user as the schedule owner.
Schedules that were created to run in the scheduled workflow's original location on disk aren't
available for migration. Only schedules that were created to use a copy of a workflow saved to
the Scheduler DB are available for migration.
Before migrating schedules to the Gallery, consider these recommendations:
• Deleting a schedule on the Migrate tab removes the schedule from the page and deletes it
from the controller. Create a back-up of your MongoDB database.
• If the current Gallery credentials setting is Require users to enter credentials,
scheduled runs will fail after migration. To remedy, migrate the schedules and ask the
schedule owners to add credentials. Go to 5.8 Credentials for more info.
• Migrate schedules from a single Curator (Gallery Admin) account at a time.
• Migrate all schedules for a single workflow at the same time to prevent multiple copies of
the workflow from being added to the Gallery.
• Migrate schedules at a time when scheduled and ad hoc jobs aren't running because
schedule migration is queued after those jobs.
• Workflows saved as a macro (YXMC) can't be run in the Gallery, so schedules of those
workflows can't be migrated to the Gallery. However, schedules of workflows containing
macros can be migrated to the Gallery.
To migrate schedules:
1. Select the Migrate tab.
2. Select the check box next to 1 or more schedules or select the check box next
to Schedules to select all schedules displayed on the current page.
3. In Search, select or type the name of a Gallery user to own the selected schedules.
4. Select Migrate.
Once migrated, a copy of the schedule and a copy of the workflow are saved to the Server. The
schedule owner can view a copy of the schedule on the Schedules page of the Gallery interface
and a copy of the workflow in their private studio. If a schedule fails to migrate, check the

56
Gallery logs to investigate why the failure occurred. Go to 4.7 Configure and Use Server Logs
for more info.
5.8 Credentials
Within the Gallery Admin interface, curators (Gallery admins) can save credentials to share with
Gallery users to use when running workflows to support access to directories and data.
5.8a Select the Workflow Credentials Setting for Your Gallery
A Note About Changing Your Credentials Setting
Changes to your credentials setting can affect your schedules.
- A change from Use Default Credentials to Require User Credentials disables
schedules in the Gallery.
- A change from Require User Credentials to Use Default Credentials disables
schedules in the Gallery.
- If users created schedules without credentials, a change from Allow Users to
Select to Require User Credentials disables schedules in the Gallery.
- If users created schedules with their credentials, a change from Allow Users to
Select to Use Default Credentials disables schedules in the Gallery.
The Workflow Credentials Setting determines whether users are required to enter when they
run workflows. Select the Workflow Credentials Setting on the Configuration page of
the Gallery Admin interface.
• Use Default Credentials: Runs all workflows using the default Run As account, which
defaults to the LocalSystem account. You can define a Run As account on any of the
following process levels, listed in order of precedence:
o Per studio subscription via Default Credentials.
o Per worker node by adding a Run As account on the System
Settings > Worker > Run As screen. Go to 4.1c Worker for more info.
o Per Server via a modification to Alteryx Service with the Windows Services
Console.
• Require User Credentials: Prompts users to enter their credentials when they run the
workflow.
• Allow Users to Select: Allows users to select credentials requirements when saving a
workflow to the Gallery. Options include:
o User is not required to specify credentials

57
o User must specify their own credentials
o Always run this workflow with these credentials
The credentials setting you select might require additional user permissions. For information on
setting Run As User permissions, go to 4.6 Configure Required Run As User Permissions.
5.8b Add a Credential
To add a new credential for users to use when running workflows, go to the Credentials page of
the Gallery Admin interface.
1. On the Credentials page, select Add Credentials.
2. Enter a Username. The username is the Active Directory username. You can reference
an AD account in one of 3 ways:
o userName, for example, flast. This assumes the domain the server is attached
to.
o netbiosDomainName\userName, for example domain\flast.
o userName@domain.tld, for example, flast@domain.tld.
3. Enter a Password. The password has to be 62 or fewer characters.
4. Select Add.
The Gallery validates credentials against Windows Active Directory. Valid credentials return a
confirmation message. If the credentials are invalid or don't exist, an error message displays.
5.8c Share Credentials
To share credentials, go to the Credentials page of the Gallery Admin interface, and select a
credential.
Share with a User
1. Select the User tab.
2. Select Add User.
3. Search for and select a user to share the credentials with.
4. Select Add.
Share with a Group
You can only share Credentials with custom groups. If you want to share credentials with an
Active Directory (AD) group, you can add an AD group to a custom group and then share the
credentials with the custom group.
1. Select the Custom Groups tab.
2. Select Add Group.

58
3. Search for and select a group to share the credentials with.
4. Select Add.
Share with a Studio
1. Select the Private Studios tab.
2. Select Add Private Studio.
3. Search for and select a studio to share the credentials with.
4. Select Add.
5.9 Notifications
Server admins can set up email notifications for various events, for example, Gallery account
registration, password changes, or workflow sharing. Manage enabled email notifications,
message text, and email groups on the Notifications page.
Only users who have logged into the Gallery at least once receive email notifications.
To enable email notifications, enter the SMTP server information in System Settings on
the Gallery > SMTP screen. Go to 4.1d Gallery.
To manage notifications, go to the Notifications page of the Gallery Admin interface.
Add a System Message
You can add a system message to display to Gallery users when they log into the Gallery. The
system message displays as a banner alert at the top of the page when Gallery users log in. Users
can close the system message by selecting OK. You might use this message to notify users of
changes or system downtime.
To add a system message, enter your message text in the System Message field and select Save.
To remove a system message, delete the text in the System Message field and select Save.
Enable or Disable Emails
To enable or disable emails, select an email in the list. Change Email
status to Enabled or Disabled.
Change Emails to HTML or Plain Text
Emails send as HTML by default. HTML emails support images and text formatting. Plain text
emails do not support image or text formatting. If users are having trouble viewing the content of
email notifications, you may want to switch to plain text. To change how emails are sent, select
an email in the list. Change Send email as to HTML or Plain Text.

59
Edit Email Text
1. To edit the default email text, select an email in the list.
2. In the Subject field, edit the default subject of the email.
3. In the Body field, edit the message text.
4. Select Group to change the email group to whom the email is sent. You can also manage
email groups on the Notifications page.
5. Select Save.
Edit Placeholder Variables
The email subject line and body contain placeholder variables that populate based on
the user's profile. You can edit which placeholder variable is used, but the populated
text for a given placeholder variable can't be changed.
To change the placeholder variable, double-click the highlighted placeholder, for
example, [[Collection Owner Name]], and enter a new Placeholder Name. Select OK.
Email Notifications Actions List
Email notifications send for each of these actions once SMTP is set up for your Server. You can
disable individual email notifications.
• Workflow Added to Collection: Sent when a user adds a workflow to a collection.
• Workflow Updated in Collection: Sent when a user updates a workflow in a collection.
• Collection Shared with User: Sent to the user when another user shares a collection with
them.
• Membership Granted: Sent when a curator assigns the user a member role.
• Artisanship Granted: Sent when a curator assigns the user an artisan role.
• Workflow Shared in Public Gallery: Sent when a user shares a workflow to the public
gallery (homepage).
• Curator Created a New License Owner Account: Sent to the user when their account is
created.
• Curator Created a New User Account: Sent to the user when their account is created.
• License Created: Sent to the curator when they buy a license.
• Membership Expired: Sent to the user when their membership has expired.
• Membership Revoked: Sent to the user when their membership is revoked.
• Validation Email: Email with validation code that is sent to the user when they create an
account.
• Password Changed: Sent to the user when their password is changed.
• Password Reset: Sent to the user when they request a password reset.

60
• Pending User Workflow Added to Collection: Sent to a pending collection user when a
workflow is added to a collection that they are invited to view.
• Pending User Collection Updated: Sent to pending user when a collection they are invited
view is updated.
• Pending User Invited to a Collection: Sent to a pending user when they are invited to a
collection.
• Pending User Granted Membership: Sent to a pending user when they are granted
membership.
• Pending User Granted Artisanship: Sent to a pending user when they are granted
artisanship.
• Referral: Sent when a user wants to refer someone to the Gallery.
• Workflow Shared Link: Sent to a user when a workflow has been shared with them.
• License Created Notification: Message sent to Alteryx when a new license is created.
• Curator Created a New Active User Account: Sent when a curator adds an active account.
• Collection Sharing Granted: Sent when sharing rights are granted to a user in a collection.
• Collection Sharing Revoked: Sent when sharing rights are revoked to a user in a
collection.
• Collection Cleanup Error: Sent to Gallery admins when the collection cleanup
background process has an error.
5.10 Data Connections
On the Data Connections page of the Gallery Admin interface, Curators (Gallery admins) can
create Gallery data connections to allow Gallery users to connect to databases. Once configured,
these data sources are available for users who have added the Gallery to select from a list and
use.
• Data connections in Gallery are different than those in Designer.
• Gallery data connections aren't available for in-DB connections
5.10a Add a Data Connection
1. On the Data Connections page, select Add New Data Connection.
2. Select the connection type in the Connection drop-down.
Microsoft SQL Server Setup Steps
1. In Name, enter a connection name.
2. In Host, enter the SQL database hostname

61
3. Select an authentication option.
o Use Windows authentication: Use the default credentials or enter specific
credentials for the data connection.
o Use SQL Server authentication: Enter server credentials. Pipe characters aren't
supported in passwords.
4. (Optional) Select Test Connection. A connection verification or failure message
displays. You can save a connection if the test fails.
5. If you selected Use Windows authentication, select an option, then select Test.
o Default: Use the default credentials for data connection testing.
o Use specific test credentials: Enter specific credentials for the data connection.
6. (Optional) Select Database to view a list of databases on the server. A list displays only
if the connection test was successful.
o Select a database to set it as the default database for this connection.
o Select Type a database name and enter the name of the database on the server.
Ensure the name contains a forward slash (\) in the server name, such as RM-LT-
013\SQLEXPRESS2.
7. Select Save.
Oracle Setup Steps
All fields are required. After you complete the required information, test the connection.
1. In Name, enter a connection name.
2. In Host, enter the Oracle server hostname or IP address.
3. In Service Name, enter the name of the TNS-based application on the network. This
information is optional if only 1 service exists.
4. In Port, enter the network listening port for the Oracle database. The default is 1521.
5. In Username and Password, enter the username and password for the data connection.
Pipe characters aren't supported in passwords.
6. (Optional) Select Test Connection. A connection verification or failure message
displays. You can save a connection if the test fails.
7. Select Save.
Other Data Connection Setup Steps
1. In Name, enter a name for the connection.
2. Enter a connection string in Connection String.
o Connection strings have to be 212 characters or less.
o Connections that don't use a data source name (DSN) are recommended. This is
also known as a DSN-less connection.

62
Copy Connection Strings from Designer
You can copy and paste connection strings from data connections you
created in Designer. To do so, log into Designer as an Admin. Go
to Options > Advanced Options > Manage Data Connections.
3. Select Save.
5.10b Testing Data Connections
Connection Tests on a Multi-Node Server
A multi-node configuration of Server has a controller and 2 or more worker machines. In this
configuration, the test functionality tests the connection on the controller machine, not the
individual worker machines. To ensure that the connection will work on any of the machines,
confirm that the same database drivers and driver versions are installed on each machine.
Failed Connection Tests
Connection tests can fail for many reasons. These are the most common reasons for connection
tests to fail.
• You don't have access to the server or database. For example, in some cases, only the
connection end-user has the authority to access the server or database.
• Network security can also prevent you from connecting to the server or database.
• Server isn't able to reach the database server host. To troubleshoot, ping the database
server host to ensure that there is network connectivity while logged in to the
server where Server is installed,
• The credentials for the database are invalid or don't have the appropriate access
permissions. Contact the database administrator.
• The database is offline. Contact the database administrator to confirm that the database is
online and working as expected.
• You are running a multi-node configuration of Server.
You can still save data connections that fail the connection test.
Default Credentials Used in Connections Tests
You can use Windows Authentication or SQL Server authentication to create a
Microsoft SQL Server connection. For Windows Authentication, you can use default
credentials or specific credentials for the data connection. You can set default
credentials in multiple locations. The Gallery looks for available credentials in these
locations. and selects the default credential in this order:

63
- System Settings > Worker > Run As. Go to 4.1c Worker for more information on
run-as users.
- Windows Server Manager > Tools > Services. Locate the AlteryxService, and
right-click and select Properties. The credentials on the Log On tab, under This
account.
- Local machine.
The connection test fails if credentials are invalid.
5.10c Share a Data Connection
After you create a data connection, return to the Data Connections page to share the connection
with users to use in Designer.
1. On the Data Connections page, select the pencil icon for the data connection you want
to share.
2. On the Edit Data Connections screen, select Users and Studios.
3. Enter the name of a user or subscription.
4. Select the user or subscription.
The user or studio you share the connection with is listed under Edit Data Connections > Users
and Studios.
Important
For Microsoft SQL Server connections, confirm that the user has the same or more
recent version of Microsoft SQL Server Native Client installed on their computer.
5.10d Revoke Access to a Data Connection
To revoke a user's access to a connection, select the "x" icon next to the user's name.
5.10e Edit or Delete a Data Connection
1. On the Data Connections page, select the pencil icon for the data connection.
2. On the Edit Data Connections screen, edit information in Name or Connection String.
3. Select Save.
Delete a Data Connection
To delete a connection, select the trash icon next to the connection name.

64
5.11 Diagnostics
The Diagnostics page of the Gallery Admin interface provides visibility into user and asset
information on the Gallery and worker machines in a Server environment.
Use the Diagnostics page to monitor the number of users, assets, collections, studios, credentials,
schedules, and jobs on the Server. You can also view the number of worker machines that are
connected and identify constraints in resources impacting performance.
Apps
• Total Apps: The total number of all versions of workflows, apps, and macros saved on
the server, including those that users have deleted.
• Published Apps: The number of workflows, apps, and macros made public in My
Company's Gallery.
• Deleted Apps: The number of workflows, apps, and macros that users have deleted.
Users
• Total Users: The total number of active and inactive users in the MongoDB.
• Active Users: The number of users marked as active.
• Disabled Users: The number of users marked as inactive.
Collections
• Total Collections: The total number of collections created.
• Apps in Collections: The total number of workflows, apps, and macros shared in all
collections. If a workflow is in 2 collections, it is counted twice.
• Users in Collections: The total number of users in all collections. If a user is in 2
collections, it is counted twice.
Server
• Studios: The total number of studios (subscriptions) created.
• Credentials: The total number of credentials created for running workflows.
• Schedules: The total number of schedules created for running workflows that have a
valid next run date. Schedules that will no longer run are not included.
• Active Jobs: The total number of jobs that are queued, initialized, or running.
• Data Connections: The total number of data connections.
• AMP: An AMP icon displays if the Server admin has enabled the Alteryx Multithreaded
Processing (AMP) engine for the environment. Go to 4.1b Controller.
Workers
• Available Workers: The total number of workers communicating with the controller.
• Worker: The hostname of the worker machine.
• CPU: The percentage of the current CPU usage for a specific worker.
• Memory: The percentage of the current memory usage for a specific worker.

65
• AMP: The AMP icon displays if the Server admin has set up the worker to run AMP
workflows. Go to 4.1e Engine.
Worker [Host name of the machine]
• Run Unassigned Jobs?: If Yes, the worker has been configured to run jobs that have not
been assigned a job tag.
• Job Tags: The tag added when configuring the worker that can be used to assign a
specific worker to run a job. Job tags are selected when users create a schedule or run a
workflow.
• CPU: The percentage of the current CPU usage for all connected workers.
• Memory: The percentage of the current memory usage for all connected workers.
CPU and Memory data isn’t persisted in the database. If the service is restarted, the data
is lost.
5.12 Pages
On the Pages page of the Gallery Admin interface, create new pages to add to your private
Gallery. Pages are HTML friendly and include an editor toolbar to format text and include other
common elements like hyperlinks, images, and tables.
Using links (go to 5.14 Links) you can link to the page in the header of your Gallery to provide
your Gallery users with useful content. For example, on the Alteryx Public Gallery
(https://gallery.alteryx.com/), several of the links in the link menu are Gallery.
To manage pages, select Pages on the Admin toolbar.
Create a Page
1. On the Pages page, select Add New Page.
2. Enter a title for the page in the Title field.
3. Permalink displays the auto-assigned page URL based on the page title. Double-click to
edit.
4. (Optional) Type a description of the page in Excerpt.
5. Select a Status Draft or Published.
6. In Body, enter text and use the editor toolbar to add other common elements like
hyperlinks, images, and tables.
7. Select Save.

66
Edit a Page
To edit a page:
1. On the Pages page, use filters to locate the page.
a. Select the page title.
2. Edit the page details and body.
3. Select Save.
Delete a Page
On the Pages page, use filters to locate the page and select the trash icon next to the page.
5.13 Theme
On the Theme page of the Gallery Admin interface, brand the Gallery with your organization's
name, logo, and colors. If you choose not to customize the Gallery, the default theme is used.
To update your Gallery theme, select Theme on the Admin toolbar.
1. On the Theme page, enter the server name in Server Name. This is displayed to Gallery
users as the Gallery name in the Sharing menus.
2. To change the logo from the Alteryx logo, select Upload a logo, then Choose File and
select an image file. Supported file formats are JPEG and PNG. Your image must be
20KB or less. For best results, use images that are about 200x46 pixels. Images wider
than 200 pixels will be resized.
3. In Site Colors select new colors for various elements. Select the existing color to select a
new color.
4. Select Save.
Refresh the Gallery to see your changes.
5.14 Links
On the Links page of the Gallery Admin interface, you can add a link to Gallery pages (go to
5.12 Pages) or an external webpage. After you a create page, add a link to the page in the
Gallery header. Links are visible to all users.
For example, on the Alteryx Public Gallery (https://gallery.alteryx.com/), several of the links in
the link menu are Gallery pages.
To manage links, select Links on the Admin toolbar.
Add a Link
Add new links on the Links page, in the Header section. As of version 2019.4, you can only add
links to the header.

67
1. In the Page dropdown, select a Gallery page to link to. Select None (external link) to
link to an external webpage.URL:
2. If you selected None (external link) in the Page dropdown, enter a webpage URL in
the URL field.
3. In the Title field, enter the link text you want to display to Gallery users.
4. Select Add New Link.
Users can select the link icon in the top-right of the header to access links.
Delete a Link
To delete a link, select the trash icon next to the link on the Links page.
5.15 Media
On the Media page of the Gallery Admin interface, upload banner ads and other images and
files to the Gallery.
To manage media, select Media on the Admin toolbar.
Add a Banner Ad
1. On the Media page, select Banner Ads > Add New.
2. Select Browse and select an image file.
3. (Optional) Select the pencil icon to add a link and hover text.
o In Link, enter a URL. This will send users to the URL specified when they select
the image.
o In Hover text enter text that will appear on hover.
o Select OK.
Add an Image
1. On the Media page, select Uploads > Upload a File.
2. Select Browse and select an image file.
3. (Optional) In Title, enter a title for the image and select Save.
Delete a Banner Ad or Image
To delete a banner ad or image, select the trash icon next to the image you want to delete.

68
5.16 Districts
Use districts to group shared, public workflows on the homepage so that users can easily find
them. You can see how districts are used in the Alteryx Public Gallery
(https://gallery.alteryx.com/).
Curators (Gallery admins) can create new districts and modify existing districts on
the Districts page of the Gallery Admin interface.
1. On the Districts page, select Add New District.
2. On the Create District page, enter a Title to display on the district page.
3. In Nav Link, enter the slug portion of the link URL.
4. Select a workflow tag in the Tag drop-down. Workflows with this workflow tag will
display on the district page. Go to 5.6c Create Workflow Tags for steps on creating
workflow tags.
5. Enter a Description to display on the district page.
6. Select Save.

69
6. Glossary
A
Admin
Go to Curator.
App
An app or analytic app is a workflow with a user interface. Using the app interface app
users can execute a workflow with their specific data and parameters. You can publish
apps to your Gallery for others to access and run.
Artisan
A user role that grants the user permission to publish, run, and share workflows in the
Gallery. Go to 5.3b User Roles and Permissions for more info.
Authentication Type
The method users use to authenticate to your Gallery. Server supports built-in
authentication, integrated Windows authentication with or without Kerberos support, and
SAML authentication. Go to 4.3 Configure Gallery Authentication for more info.
B
Base Address
The URL that users use to go to the Gallery. In email notifications, the base address is
used in links to workflows. The Windows Communication Framework (WCF)
technology also uses the base address to see if it needs to handle requests coming in. Go
to 4.1d Gallery for more info.
Built-In Authentication
Gallery authentication method where users specify an email address and password of
their choosing to access the Gallery. Go to 4.3 Configure Gallery Authentication for
more info.
C
Collection
A collection allows users to share assets (workflows, apps, macros, and insights) with
other Gallery users. Go to 5.4 Collections for more info.

70
Controller
The controller handles the management of the service settings and the delegation of work
to the workers. In a typical deployment, there is 1 machine enabled as the controller and
it is set up to act as a worker as well. Go to 4.1b Controller and 4.2 Configure
Controller and Workers for more info.
Controller Token
An auto-generated key used to configure a worker machine to communicate with the
controller machine. Go to 4.1b Controller and 4.2 Configure Controller and Workers
for more info.
Credentials
Within the Gallery Admin interface, curators (Gallery admins) can save credentials to
share with Gallery users to use when running workflows to allow access to directories
and data. Go to 5.8 Credentials for more info.
Curator
A user role that grants Gallery users access to the Gallery Admin interface. Go to 5.3b
User Roles and Permissions and 5. Administer Gallery for more info.
D
Data Connection
Curators (Gallery admins) can create data connections to allow Gallery users to connect
to databases. Once configured, these data connections are available for users to select
from a list and use. Go to 5.10 Data Connections for more info.
Default Gallery Administrator
The initial Gallery administrator who sets up and manages Gallery users. Go to
4.1d Gallery and 4.3 Configure Gallery Authentication for more info.
Designer
Alteryx desktop application that provides an intuitive drag-and-drop user interface for
authoring and executing analytic applications.
District
A category used to group shared, public workflows on the homepage. For example, the
Alteryx Public Gallery (https://gallery.alteryx.com/#!districts) uses districts to organize
public workflows. Go to 5.16 Districts for more info.

71
E
Engine
Consumes workflows and provides high-speed data processing and analytics
functionality. Go to 4.1e Engine for more info.
Environment
A system settings component that includes machine configuration type (worker,
controller, Gallery), as well as the global workspace for other components to use as a root
location for file storage. Go to 4.1a Environment for more info.
F
G
Gallery
A cloud-hosted or self-hosted application for publishing, sharing, and executing
workflows. Go to 4.1d Gallery for info on configuring the Gallery. Go to 5. Administer
Gallery for info on Gallery administration.
Group
User groups allow admins to more efficiently assign user roles. They also support asset
sharing via collections. Go to 5.3c Manage Groups for more info.
H
I
Insight
An insight is an interactive dashboard built using the Insight tool. You can publish an
insight to your Gallery for others to view.

72
J
Job
All scheduled and manually-run workflows that are actively processing or queued. Go to
5.7 Jobs (Schedules) for more info.
K
L
Links
Links are navigation links to Gallery pages or an external webpage. For example, you
can see links in the link menu on the Alteryx Public Gallery
(https://gallery.alteryx.com/). Go to 5.14 Links for more info.
Logs
Information about system events, such as services started or shutdown, execution
requests, warnings, errors, etc. Use logs to investigate and diagnose issues. Go to
4.7 Configure and Use Server Logs for more info.
M
Macro
A macro is a workflow or group of tools built into a single tool that you can insert into
another workflow. Create a macro to save an analytic process you perform
repeatedly. You can publish macros to your Gallery for others to access and run.
Media
Banner images and other images and files uploaded for use on Gallery pages. Go to
5.15 Media for more info.
Member
A user role that grants the user permission to run workflows that are shared with them via
collections. Go to 5.3b User Roles and Permissions for more info.

73
N
Notification
Curators (Gallery admins) can set up email notifications for various events, for example,
Gallery account registration, password changes, or workflow sharing. Go to 5.9
Notifications for more info.
O
P
Pages
Pages are HTML friendly and include an editor toolbar to format text and include other
common elements like hyperlinks, images, and tables. Using links (go to 5.14 Links) you
can link to the page in the header of your Gallery to provide your Gallery users with
useful content. For example, on the Alteryx Public Gallery
(https://gallery.alteryx.com/), several of the links in the link menu are Gallery pages.
Go to 5.12 Pages for more info.
Persistence
A part of the Alteryx service that stores information critical to the functioning of the
service, such as application files, the job queue, and result data. Go to
4.1b Controller and 4.1d Gallery for more info.
Q
Quality of Service
The Quality of Service (QoS) setting is used to manage resource allocation in an
environment where multiple workers are deployed. You can set the QoS per worker to
reserve worker resources for higher-priority requests. Go to 4.1c Worker for more info.
R
Run As User
A run as user is a user account that is configured to run workflows. Go to 4.6 Configure
Required Run As User Permissions for more info about configuring run as user
accounts. Using a run as user allows workflows to read and write data to the program
files the user has access to. In Server, you can specify a run as user on the worker screen
within system settings. Go to 4.1c Worker for more info. Curators (Gallery admins) can

74
also add the credentials for user accounts configured to be run as users. Go to 5.8
Credentials for more info.
Role
User roles are set by Curators (Gallery admins) in the Gallery Admin interface. User
roles determine the user's level of access to Gallery users and assets. Go to 5.3b User
Roles and Permissions for more info.
S
SAML Authentication
Gallery authentication method where users access the Gallery with Identity Provider
(IDP) credentials. Go to 4.3 Configure Gallery Authentication for more info.
Scheduler
Allows users to schedule workflows to run on a specified date and time or a recurring
basis. The scheduler connects to either a local or remote instance of the service where the
job is queued for execution at the appropriate time. Go to 5.7 Jobs (Schedules) for more
info.
Service
A scalable service supporting workflow execution and scheduling. It uses a controller-
worker architecture which allows it to be deployed across multiple servers.
SMTP Server
Sends out email notifications for various events, such as Gallery account registration,
password resets, or shared workflow notifications. Go to 4.4 Configure SMTP for more
info.
SSL
SSL (Secure Socket Layer) encryption ensures safe and secure communication between
Designer and Server, as well as any communication between a user’s web browser and
your company's Private Gallery. Go to 4.5 Configure Gallery SSL for more info.
Studio
A studio (in other words, subscription) is automatically created for each Gallery user.
When a user creates a workflow in Designer and publishes it to the Gallery, the workflow
is added to the user's private studio (subscription).
Subscription
A subscription allows Designer users to publish and share workflows privately to your
organization's Gallery. Curators (Gallery admins) can create subscriptions and manage
the users and workflows assigned to them. Subscriptions are also known as studios.
System Settings
The various settings, including the Environment, Controller, Worker, Gallery, and Engine
components, that you configure after Server installation.

75
T
Theme
Allows you to brand the Gallery with your organization's name, logo, and colors. If you
choose not to customize the Gallery, the default theme is used. Go to 5.13 Theme for
more info.
U
V
Viewer
A user role that grants the user permission to run public workflows on the homepage and
in districts. Go to 5.3b User Roles and Permissions for more info.
W
Windows Authentication
Gallery authentication method where users access the Gallery with internal network
credentials. Go to 4.3 Configure Gallery Authentication for more info.
Windows Authentication with Kerberos
Gallery authentication method where users access the Gallery with internal network
credentials using Kerberos authentication protocols. Go to 4.3 Configure Gallery
Authentication for more info.
Worker
Workers are responsible for executing analytic workflows. There has to be at least 1
worker machine to execute applications through the service. You can configure the same
machine to be both the controller and a worker. Go to 4.1c Worker and 4.2 Configure
Controller and Workers for more info.
X
Y

76
X
Z
