
1 Migration Guide: Amazon Aurora MySQL to HeatWave MySQL on Amazon Web Services (AWS)
Copyright © 2024, Oracle and/or its affiliates. Public
Business / Technical Brief
Migration Guide: Amazon
Aurora MySQL to HeatWave
MySQL on Amazon Web
Services (AWS)
Copyright © 2024, Oracle and/or its affiliates.
Public

2 Migration Guide: Amazon Aurora MySQL to HeatWave MySQL on Amazon Web Services (AWS)
Copyright © 2024, Oracle and/or its affiliates. Public
Before you start:
• You must have an account on Oracle Cloud Infrastructure (OCI) and Amazon Web Services (AWS).
• You must have enabled HeatWave MySQL on AWS from the OCI Console. For instructions on how to enable
HeatWave MySQL on AWS from OCI, refer to the documentation:
https://dev.mysql.com/doc/heatwave-aws/en/heatwave-aws-getting-started.html
• Some OCI and AWS knowledge is preferred.
• This migration guide only covers how to migrate your database from Amazon Aurora MySQL to HeatWave
MySQL on AWS. Before performing the migration, you should have considered downtime (the length of the
downtime will mostly depend on the size of your database and checks you may want to perform before
bringing your database back online), application compatibility, current database metrics (CPU, storage size,
RAM, max number of concurrent users, backups, binary logs expiration, number of replicas if any, etc.),
desired database metrics, networking, security, user testing, etc.
• The migration method shown in this guide works for Amazon Aurora MySQL v5.7 and above.
• When following the guide, you should always execute the commands/steps shown as an admin/root user
wherever applicable.
o On OCI and AWS you must have the ability to create and manage resources.
o For your Amazon Aurora MySQL instance, use an admin/root user.
• You do not need to make any configuration changes to your Amazon Aurora MySQL for this migration.
• If you have MySQL replication configured in your current Amazon Aurora MySQL environment, you can
perform the migration steps shown in this guide from either your source or replica instance.
• The Overview section of this migration guide contains all the steps that are needed to finish the database
migration from Amazon Aurora MySQL to HeatWave MySQL on AWS.
• In the Walkthrough section, we will apply the information provided in the Overview section and give you a
simple step-by-step guide. In this guide, we will use an Amazon Aurora MySQL instance with some sample
data pre-loaded and will migrate it over to HeatWave MySQL on AWS. This will help you follow and better
visualize the process and information provided in the Overview section.
• You can use the Walkthrough section's step-by-step guide as a reference for your migration from Amazon
Aurora MySQL to HeatWave MySQL. When following the guide, make changes along the way to your AWS
and OCI environment accordingly or as required. Since each user following the step-by-step guide will have
their environments configured differently, we will not be able to provide an ideal example that works for
everyone.

3 Migration Guide: Amazon Aurora MySQL to HeatWave MySQL on Amazon Web Services (AWS)
Copyright © 2024, Oracle and/or its affiliates. Public
Overview:
Following are the required steps to migrate data from Amazon Aurora MySQL to HeatWave MySQL on AWS:
I) Have an Oracle Cloud Infrastructure (OCI) and Amazon Web Services (AWS) account.
OCI Sign in/Sign up page: https://cloud.oracle.com
AWS Sign in/Sign up page: https://aws.amazon.com
II) Ensure you can access the HeatWave MySQL on AWS Console after enabling the HeatWave MySQL on AWS
service on OCI.
Enabling HeatWave MySQL on AWS service: https://dev.mysql.com/doc/heatwave-aws/en/heatwave-aws-getting-
started.html
MySQL HeatWabe on AWS Console: https://cloud.mysql.com/
III) On AWS, create an access key and an S3 bucket.
[The Amazon Aurora MySQL data will be exported to an S3 bucket, which will then be later imported into HeatWave
MySQL on AWS. You must create the AWS S3 bucket in the same region where your HeatWave MySQL on AWS DB
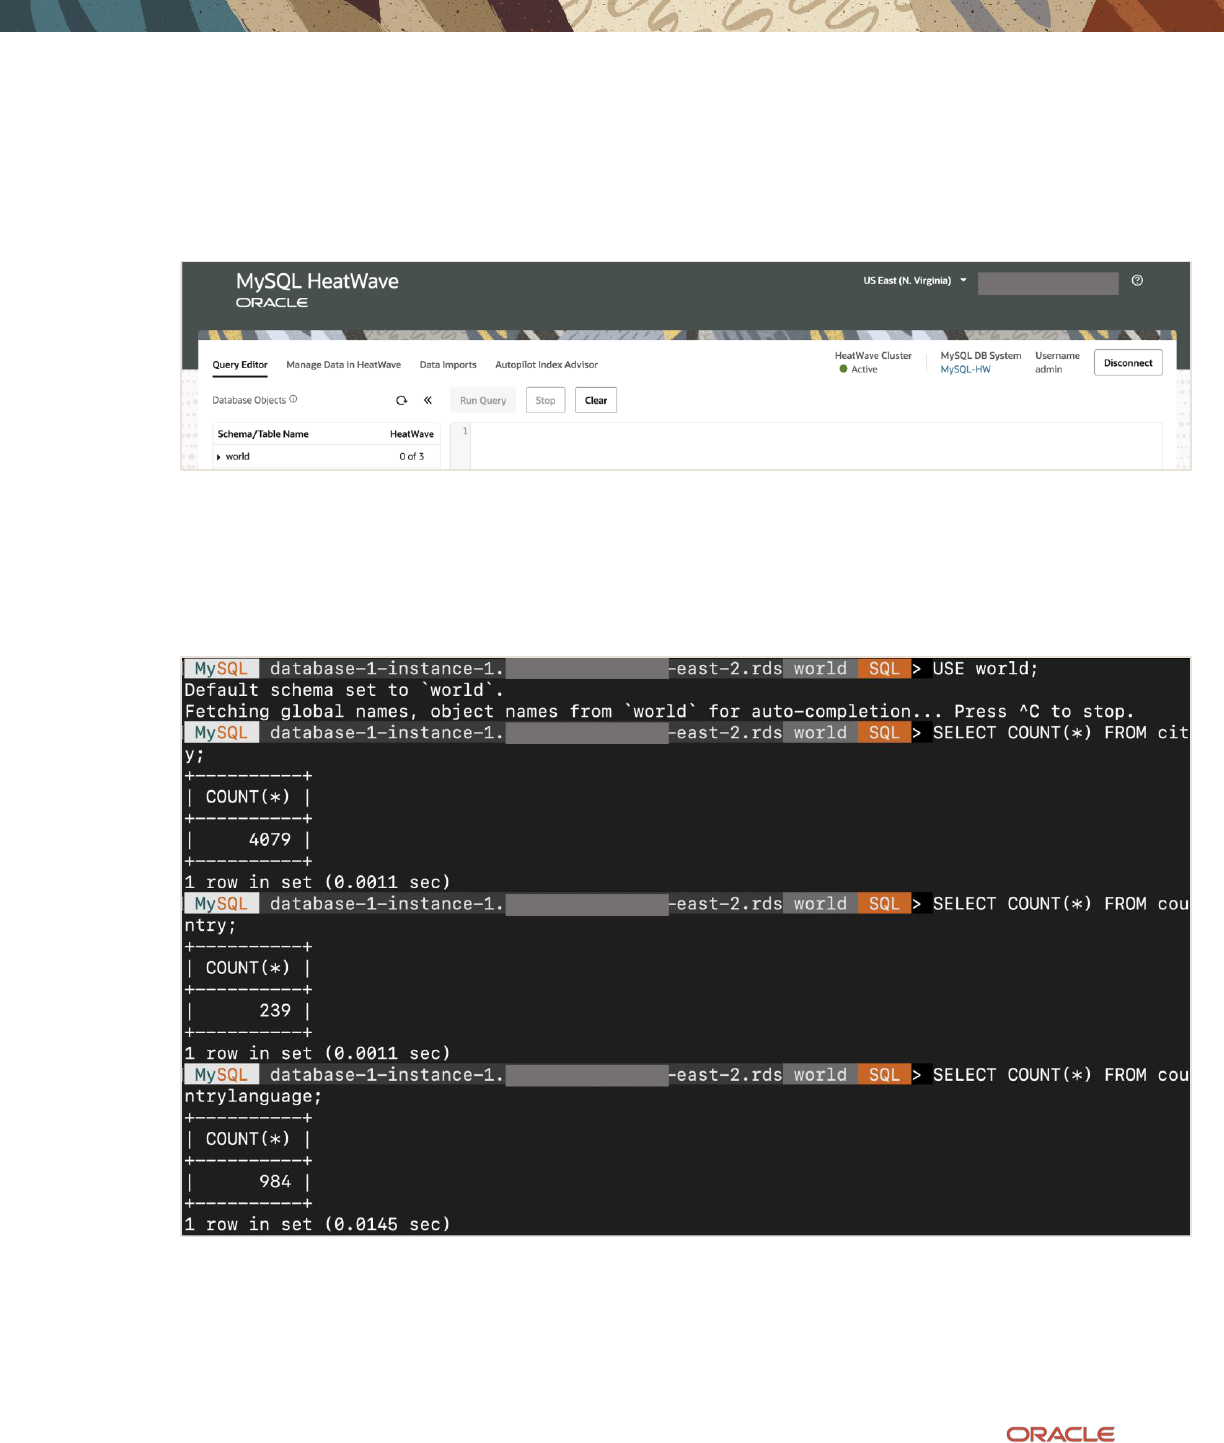
System will reside. An AWS access key is required to grant secure access to the AWS S3 bucket. The user creating the
access key must have the AmazonS3FullAccess permissions policy.]
Creating access keys for the root user: https://docs.aws.amazon.com/IAM/latest/UserGuide/id_root-
user_manage_add-key.html
AmazonS3FullAccess Policy: https://docs.aws.amazon.com/aws-managed-
policy/latest/reference/AmazonS3FullAccess.html
Creating a bucket: https://docs.aws.amazon.com/AmazonS3/latest/userguide/create-bucket-overview.html
IV) Install MySQL Shell 8.3 (or above) on an EC2 instance that can connect to Amazon Aurora MySQL and
create a credentials file.
[MySQL Shell on EC2 will be used to copy DDL and data from Amazon Aurora MySQL to the AWS S3 bucket. You
must download MySQL Shell 8.3 or above. A credentials file needs to be created on the EC2 instance to store access
keys. The credentials file will be used by MySQL Shell for authentication to export data from Amazon Aurora MySQL
to the AWS S3 bucket.]
Download MySQL Shell: https://dev.mysql.com/downloads/shell/
Install MySQL Shell: https://dev.mysql.com/doc/mysql-shell/8.0/en/mysql-shell-install.html
AWS
AWS Credentials File: https://docs.aws.amazon.com/cli/latest/userguide/cli-authentication-user.html#cli-
authentication-user-configure-csv.titlecli-authentication-user-configure-file
V) Connect to Amazon Aurora MySQL using MySQL Shell on EC2. Afterwards, execute the MySQL Shell
util.dumpInstance() utility to export all schemas (including users, indexes, routines, triggers) from Amazon
Aurora MySQL to the AWS S3 bucket.
[The dump created by MySQL Shell's instance dump utility comprises DDL files specifying the schema structure, and
tab-separated .tsv files containing the data.]
MySQL Shell Dump Utilities: https://dev.mysql.com/doc/mysql-shell/8.3/en/mysql-shell-utilities-dump-instance-
schema.html

4 Migration Guide: Amazon Aurora MySQL to HeatWave MySQL on Amazon Web Services (AWS)
Copyright © 2024, Oracle and/or its affiliates. Public
VI) Create a HeatWave MySQL on AWS DB System and a HeatWave Cluster.
[HeatWave MySQL on AWS is a fully-managed MySQL service, developed and supported by the MySQL team at
Oracle.]
Provision HeatWave MySQL on AWS: https://dev.mysql.com/doc/heatwave-aws/en/heatwave-aws-dbsystem-
create.html
VII) Import data from AWS S3 bucket to HeatWave MySQL on AWS.
[The data will be imported using the Data Import Feature. This feature allows you to import data in a variety of
formats such as MySQL dump files and text files from an AWS S3 bucket to HeatWave MySQL on AWS in the same
region.]
Importing Data Using the Data Import Feature: https://dev.mysql.com/doc/heatwave-aws/en/heatwave-aws-
importing-data-data-import.html
VIII) (Optional) Use the Query Editor tab to verify whether the data was migrated successfully from Amazon
Aurora MySQL to HeatWave MySQL on AWS.
[The Query Editor under the Workspaces page allows you to connect to the HeatWave MySQL on AWS DB System
and run queries against it.]
HeatWave MySQL on AWS Console Overview: https://dev.mysql.com/doc/heatwave-aws/en/console-overview.html
IX) If the HeatWave option was enabled during HeatWave MySQL on AWS DB System creation, load data from
MySQL InnoDB storage into the HeatWave Cluster using automation.
[Loading data into the HeatWave in-memory Cluster combines transactions, analytics, and machine learning services
into one MySQL Database.]
Loading Data into HeatWave: https://dev.mysql.com/doc/heatwave-aws/en/heatwave-aws-loading-unloading-
heatwave.html

5 Migration Guide: Amazon Aurora MySQL to HeatWave MySQL on Amazon Web Services (AWS)
Copyright © 2024, Oracle and/or its affiliates. Public
Walkthrough:
I) Have an Oracle Cloud Infrastructure (OCI) and Amazon Web Services (AWS) account.
OCI Sign in/Sign up page: https://cloud.oracle.com
AWS Sign in/Sign up page: https://aws.amazon.com
II) Ensure you can access the HeatWave MySQL on AWS Console after enabling the HeatWave MySQL on AWS
service on OCI.
Enabling HeatWave MySQL on AWS service: https://dev.mysql.com/doc/heatwave-aws/en/heatwave-aws-getting-
started.html
HeatWave MySQL on AWS Console: https://cloud.mysql.com/
III) On AWS, create an access key and an S3 bucket.
1. Below is the Amazon Aurora MySQL instance version and the sample database (“world”) that will be migrated
for this guide. The sample world database consists of 3 tables. The Amazon Aurora MySQL instance used for
this does not have public access and is deployed in the US East (Ohio) region.

6 Migration Guide: Amazon Aurora MySQL to HeatWave MySQL on Amazon Web Services (AWS)
Copyright © 2024, Oracle and/or its affiliates. Public
2. The AWS VPC associated with the above Amazon Aurora MySQL instance uses an IPv4 CIDR: 10.1.0.0/16.
You can view the VPC resource map below:
3. Log in to AWS as a root user or another user that has the AmazonS3FullAccess permissions policy and create
an access key. Click on your account name or number in the upper right corner of the Console and choose
Security Credentials.
4. Scroll down on the Security Credentials page until you see the Access Keys section. Click Create access key.

7 Migration Guide: Amazon Aurora MySQL to HeatWave MySQL on Amazon Web Services (AWS)
Copyright © 2024, Oracle and/or its affiliates. Public
5. Check the Continue to create access key box and click Create access key.
6. On the Retrieve access key page, save the access key and secret access key values for later use by
downloading the .csv file. Choose Done.

8 Migration Guide: Amazon Aurora MySQL to HeatWave MySQL on Amazon Web Services (AWS)
Copyright © 2024, Oracle and/or its affiliates. Public
7. Expand the Services menu at the top left of the screen, click Storage, and choose S3.
8. Click Create bucket.
9. Select the AWS Region where you want to create the bucket. The bucket must be in the same region as
HeatWave MySQL on AWS. For this guide, we are going to deploy the bucket in US East (N. Virginia) as that is
where we will deploy HeatWave MySQL on AWS DB System later in this section. Choose the Bucket type as
General purpose and give your Bucket a name.

9 Migration Guide: Amazon Aurora MySQL to HeatWave MySQL on Amazon Web Services (AWS)
Copyright © 2024, Oracle and/or its affiliates. Public
10. Leave everything else as-is and click Create bucket.

10 Migration Guide: Amazon Aurora MySQL to HeatWave MySQL on Amazon Web Services (AWS)
Copyright © 2024, Oracle and/or its affiliates. Public
IV) Install MySQL Shell 8.3 (or above) on an EC2 instance that can connect to Amazon Aurora MySQL and
create a credentials file.
11. From the AWS Services menu, go to Compute and select EC2.
12. Click Launch instance. We are creating this instance in the same region as our Amazon Aurora MySQL
instance.
13. Enter an EC2 name. For Application and OS Images, select Red Hat Enterprise Linux 9.

11 Migration Guide: Amazon Aurora MySQL to HeatWave MySQL on Amazon Web Services (AWS)
Copyright © 2024, Oracle and/or its affiliates. Public
14. For Instance type, choose an instance type you think is appropriate. If you have large amounts of data -
provisioning an EC2 with more vCPUs and Memory will speed up the migration process. For the Key pair
section, you can use your existing keys or create a new pair. For this guide, we will use an existing key pair.
15. Under Network settings, ensure that the correct VPC (the VPC that is associated with your Aurora instance)
and Subnet are selected. For this guide - we have decided to deploy the EC2 instance inside a public subnet.
For Auto-assign public IP select Enable. Under the Firewall (security groups), choose Create security
group and have an Inbound security group rules like the below one, which only allows SSH from your IP.

12 Migration Guide: Amazon Aurora MySQL to HeatWave MySQL on Amazon Web Services (AWS)
Copyright © 2024, Oracle and/or its affiliates. Public
16. Leave everything as-is and click Launch instance.
17. You will be brought to a Next Steps page. Here, click Connect to instance.
18. If you are using the SSH client to connect to EC2, copy the Example SSH command and log in to your EC2
instance.

13 Migration Guide: Amazon Aurora MySQL to HeatWave MySQL on Amazon Web Services (AWS)
Copyright © 2024, Oracle and/or its affiliates. Public
19. You can SSH into EC2 using the below command:
$ ssh -i </path/to/private-ssh-key> ec2-user@<ec2-Public-DNS>
Note: after running the above SSH command, if prompted Are you sure you want to continue connecting
(yes/no/[fingerprint])?, type yes.
20. We are now successfully connected to the EC2 instance.
21. After making a connection to the EC2 instance, go to the below website and download MySQL Shell 8.3 on
your EC2 instance. From the MySQL Shell download page, under Select Version, ensure 8.3.x Innovation or
higher is selected. MySQL Shell 8.3 is fully compatible with MySQL 8.3, 8.2, 8.1, 8.0, and 5.7. For Operating
System and OS Version - pick the appropriate option depending on the OS and the OS Version that you are
running. Click Download. Do not download the Debug Information Package.
https://dev.mysql.com/downloads/shell/
Note: for this guide, we will show you how to install MySQL Shell on a Linux environment. For other
environments, see Installing MySQL Shell on Windows, Installing MySQL Shell on Linux, and Installing MySQL
Shell on macOS.

14 Migration Guide: Amazon Aurora MySQL to HeatWave MySQL on Amazon Web Services (AWS)
Copyright © 2024, Oracle and/or its affiliates. Public
22. Right-click on No thanks, just start my download and click Copy link address.
23. Go back to the EC2 instance that can connect to your Amazon Aurora MySQL and execute the below
command to download MySQL Shell:
$ wget <MySQL-Shell-Download-Link>
Replace the link with what you have.
$ wget https://dev.mysql.com/get/Downloads/MySQL-Shell/mysql-shell-8.3.0-
1.el9.x86_64.rpm
Note: to install wget on the EC2, execute:
$ sudo yum install wget

15 Migration Guide: Amazon Aurora MySQL to HeatWave MySQL on Amazon Web Services (AWS)
Copyright © 2024, Oracle and/or its affiliates. Public
24. After downloading the MySQL Shell rpm, install MySQL Shell:
$ sudo yum localinstall mysql-shell*
25. You can now verify if MySQL Shell has successfully installed on your EC2 instance by executing the below
command:
$ mysqlsh --version
26. Go back to the AWS EC2 Instances page and select your EC2 instance. Choose Actions, then Networking,
and click Connect RDS database.

16 Migration Guide: Amazon Aurora MySQL to HeatWave MySQL on Amazon Web Services (AWS)
Copyright © 2024, Oracle and/or its affiliates. Public
27. On the Connect RDS database page, pick your Aurora Cluster and select Connect.
28. Next, log in to your Amazon Aurora MySQL using MySQL Shell by executing the below command:
$ mysqlsh <user>@<hostname>:<port-number>
-OR-
$ mysqlsh -u <user> -p -h <hostname> -P <port-number>
Note: you can interact with MySQL Shell using JavaScript, Python, or SQL mode. The default is JavaScript. To
switch between the different modes, execute /js for JavaScript, /py for Python, and /sql for SQL mode
inside MySQL Shell. To exit out of MySQL Shell, execute /q.

17 Migration Guide: Amazon Aurora MySQL to HeatWave MySQL on Amazon Web Services (AWS)
Copyright © 2024, Oracle and/or its affiliates. Public
29. Exit out of MySQL Shell and create a.aws directory inside the home directory of your EC2 instance. Go
inside the newly created directory and create a file called credentials using the text editor of your choice.
MySQL JS> \q
$ mkdir ~/.aws
$ cd .aws
$ nano credentials
30. Inside the credentials file, paste the below contents and fill in the aws_access_key_id and
aws_secret_access_key values using the .csv file you downloaded in step 6.
[default]
aws_access_key_id =
aws_secret_access_key =
31. Save and close the file.

18 Migration Guide: Amazon Aurora MySQL to HeatWave MySQL on Amazon Web Services (AWS)
Copyright © 2024, Oracle and/or its affiliates. Public
V) Connect to Amazon Aurora MySQL using MySQL Shell on EC2. Afterwards, execute the MySQL Shell
util.dumpInstance() utility to export all schemas (including users, indexes, routines, triggers) from Amazon
Aurora MySQL to the AWS S3 bucket.
32. Before connecting to Amazon Aurora MySQL using MySQL Shell and proceeding with the below steps, it is
highly recommended that you use a command like screen or tmux. These commands will allow you to
reconnect to a dropped session in case your connection drops in the middle of performing the MySQL Shell
export using util.dumpInstance(). For small databases, the screen or tmux may not be necessary. For
this guide, we will use tmux. To learn more about tmux, see A beginner’s guide to tmux. Below are the basics
of using the tmux command:
• Install tmux on Linux: $ sudo yum install tmux
• Start a new tmux session, from your terminal execute: $ tmux
• List all the active tmux sessions: $ tmux ls
• Detach from a tmux session and leave it running in the background: $ Ctrl+B d
• Attach a tmux session running in the background: $ tmux attach
• End a tmux session: $ Ctrl+B &
33. Start a tmux session and connect to your Amazon Aurora MySQL using MySQL Shell on EC2.
$ tmux
$ mysqlsh <user>@<hostname>:<port-number>
-OR-
$ mysqlsh -u <user> -p -h <hostname> -P <port-number>

19 Migration Guide: Amazon Aurora MySQL to HeatWave MySQL on Amazon Web Services (AWS)
Copyright © 2024, Oracle and/or its affiliates. Public
34. Change to the JavaScript mode (if you are not in JS mode) of MySQL Shell and run the
util.dumpInstance() utility to export all Amazon Aurora MySQL data into the S3 bucket. The data will be
copied over from Amazon Aurora MySQL to S3 using HTTPS.
MySQL JS> \js
MySQL JS> util.dumpInstance("mysql-hw-dump",{s3bucketName: "mysql-hw-bucket",
"compatibility": ["force_innodb", "skip_invalid_accounts", "strip_definers",
"strip_restricted_grants", "strip_tablespaces", "ignore_wildcard_grants",
"strip_invalid_grants", "create_invisible_pks"], users: "true", threads: 4,
targetVersion: "8.3.0", ocimds: "true", dryRun:"true"})
Note: replace the bucket name (mysql-hw-bucket) with your S3 bucket name and the target version
(8.3.0) to the HeatWave MySQL on AWS version that you are planning to migrate to.
Note:
• util.dumpInstance(outputUrl[, options]): MySQL instance dump utility exports all
schemas or a selected schema from a MySQL instance into a set of local files or an OCI or AWS
bucket. By default, this utility includes all schemas, users, indexes, routines, and triggers. You can use
the excludeSchemas or includeSchemas and excludeTables or includeTables option to
specify individual schemas or tables to be excluded or included in the dump files. For example:
excludeSchemas: ["test", "world"]and excludeTables: ["test.table",
["world.city"]. See Dump Utilities.
• s3BucketName: The name of the S3 bucket to which the dump is to be written.
• compatibility: Apply the specified requirements for compatibility with HeatWave MySQL for all
tables in the dump output, altering the dump files as necessary.
o force_innodb: Change CREATE TABLE statements to use the InnoDB storage engine for
any tables that do not already use it.

20 Migration Guide: Amazon Aurora MySQL to HeatWave MySQL on Amazon Web Services (AWS)
Copyright © 2024, Oracle and/or its affiliates. Public
o skip_invalid_accounts: You cannot export a user that has no password defined. This
option skips any such users.
o strip_definers: Remove the DEFINER clause from views, routines, events, and triggers,
so these objects are created with the default definer (the user invoking the schema), and
change the SQL SECURITY clause for views and routines to specify INVOKER instead of
DEFINER. HeatWave MySQL requires special privileges to create these objects with a definer
other than the user loading the schema. If your security model requires that views and
routines have more privileges than the account querying or calling them, you must manually
modify the schema before loading it. If you plan to use HeatWave MySQL on AWS v8.3 or
above, this option is not required.
o strip_restricted_grants: Certain privileges are restricted in HeatWave MySQL.
Privileges such as RELOAD, FILE, SUPER, BINLOG_ADMIN, and SET_USER_ID. You cannot
create users granting these privileges. This option strips these privileges from dumped
GRANT statements.
o strip_tablespaces: Tablespaces have some restrictions in HeatWave MySQL. If you
need tables created in their default tablespaces, this option strips the TABLESPACE= option
from CREATE TABLE statements.
o ignore_wildcard_grants: If enabled, ignores errors from grants on schemas with
wildcards, which are interpreted differently in systems where the partial_revokes system
variable is enabled.
o strip_invalid_grants: If enabled, strips grant statements which would fail when users
are copied. Such as grants referring to a specific routine which does not exist.
o create_invisible_pks: Primary keys are required by High Availability and HeatWave. If
you intend to export data for use in a highly available DB system or a HeatWave DB system,
add primary keys as they are not defined on the tables. This compatibility flag adds invisible
primary keys to each table that requires them.
• users: Include (true) or exclude (false) users and their roles and grants in the dump. You can use
the excludeUsers or includeUsers option to specify individual user accounts to be excluded or
included in the dump files. For example: excludeUsers: ["'test'@'%'",
"'root'@'localhost'"].
• threads: (Optional) The number of parallel threads to use to dump chunks of data from the MySQL
instance. Each thread has its own connection to the MySQL instance. The default is 4.
• targetVersion: Define the version of the target MySQL instance, in n.n.n format. Such as 8.3.0 or
8.0.36, for example. If the value is not set, the MySQL Shell version is used.
• ocimds: Setting this option to true enables checks and modifications for compatibility with the
HeatWave MySQL Service.
• dryRun: Displays information about the copy with the specified set of options, and about the results
of HeatWave MySQL Service compatibility checks, but does not proceed with the copy. Setting this
option enables you to list out all the compatibility issues before starting the copy.
• consistent: Enable (true) or disable (false) consistent data copies by locking the instance for
backup during the copy.

21 Migration Guide: Amazon Aurora MySQL to HeatWave MySQL on Amazon Web Services (AWS)
Copyright © 2024, Oracle and/or its affiliates. Public
35. Running the above step 34 command may generate Errors regarding table locks (see image below). If you
do encounter such a problem (if and only if) run the same command as in step 34 but this time add an
additional option: consistent: "false" and re-run the command.
MySQL JS> util.dumpInstance("mysql-hw-dump",{s3bucketName: "mysql-hw-bucket",
"compatibility": ["force_innodb", "skip_invalid_accounts", "strip_definers",
"strip_restricted_grants", "strip_tablespaces", "ignore_wildcard_grants",
"strip_invalid_grants", "create_invisible_pks"], users: "true", threads: 4,
targetVersion: "8.3.0", ocimds: "true", dryRun:"true", consistent: "false"})
Note: replace the bucket name (mysql-hw-bucket) with your S3 bucket name and the target version
(8.3.0) to the HeatWave MySQL on AWS version that you are planning to migrate to.
[… output truncated]

22 Migration Guide: Amazon Aurora MySQL to HeatWave MySQL on Amazon Web Services (AWS)
Copyright © 2024, Oracle and/or its affiliates. Public
36. Once you have run the command in step 34/35 and do not see any errors in the output (warnings are okay),
run the same step 34 (or step 35 if required) command but this time change the dryRun option to false.
MySQL JS> util.dumpInstance("mysql-hw-dump",{s3bucketName: "mysql-hw-bucket",
"compatibility": ["force_innodb", "skip_invalid_accounts", "strip_definers",
"strip_restricted_grants", "strip_tablespaces", "ignore_wildcard_grants",
"strip_invalid_grants", "create_invisible_pks"], users: "true", threads: 4,
targetVersion: "8.3.0", ocimds: "true", dryRun:"false"})
Note: replace the bucket name (mysql-hw-bucket) with your S3 bucket name and the target version
(8.3.0) to the HeatWave MySQL on AWS version that you are planning to migrate to. Add the consistent:
"false" option if you have encountered the table lock error.
[… output truncated]
Note: once the MySQL Shell dump utility finishes, all your data will be exported over from Amazon Aurora
MySQL to the AWS S3 bucket. You can end your tmux session by executing Ctrl+B &.
37. Open the AWS S3 Console and verify whether the dump was successful.

23 Migration Guide: Amazon Aurora MySQL to HeatWave MySQL on Amazon Web Services (AWS)
Copyright © 2024, Oracle and/or its affiliates. Public
VI) Create a HeatWave MySQL on AWS DB System and a HeatWave Cluster.
38. Log in to the HeatWave MySQL on AWS Console.
39. After logging in, click on the MySQL tab.
40. On the DB Systems tab, choose Create MySQL DB System.

24 Migration Guide: Amazon Aurora MySQL to HeatWave MySQL on Amazon Web Services (AWS)
Copyright © 2024, Oracle and/or its affiliates. Public
41. The Create MySQL DB System and HeatWave Cluster dialog will open. Enter a MySQL Display Name and a
Description (optional). Configure your Administrator credentials that will be used to manage HeatWave
MySQL.
42. Next, select your Hardware configuration by choosing the appropriate amount of vCPUs and Memory and
configure your Data storage size. Leave the Availability zone and MySQL Configuration as-is. If you have a
custom MySQL configuration that you would like to apply, you can do so by clicking Change. For more
information regarding custom configurations, see Configuration.

25 Migration Guide: Amazon Aurora MySQL to HeatWave MySQL on Amazon Web Services (AWS)
Copyright © 2024, Oracle and/or its affiliates. Public
43. For MySQL version, choose the MySQL server version to deploy. You have two options, Innovation or Bug
fix. With the new MySQL versioning model, you have the flexibility to select an innovation or a bug fix
release. Both releases are production-grade quality. MySQL innovation releases allow you to access the latest
features and improvements. Innovation releases are ideal for fast-paced development environments with
high levels of automated tests and modern continuous integration techniques for faster upgrade cycles.
MySQL bug fix releases (aka long-term support releases) allow you to reduce the risks associated with
changes in the database software behavior, as these releases only contain necessary fixes (bugfix and
security patches). For more information regarding MySQL innovation and bug fix releases, see Introducing
MySQL Innovation and Bug fix versions. For this guide, we have chosen 8.3.0. Select the start time for the
Maintenance Window.
44. For Networking, check the Enable inbound connectivity from allowed public IP address ranges if you
would like your MySQL DB System to be accessible via the public internet and specify the Allowed public IP
address ranges. For this guide, we have chosen not to do that. Configure your Port, X Plugin Port, and the
Backup policy.

26 Migration Guide: Amazon Aurora MySQL to HeatWave MySQL on Amazon Web Services (AWS)
Copyright © 2024, Oracle and/or its affiliates. Public
45. For IAM roles, leave it as-is. Select Next.
46. Select whether to provision a HeatWave Cluster, which will allow you to run OLAP (analytics queries) and
ML (machine learning) workloads alongside OLTP. Give your Cluster a Display name and Description
(optional). Lastly, configure the shape and Cluster size. The HeatWave.16GB shape can process up to 25 GB
of data and the HeatWave.256GB shape can process up to 400 GB of data. If you intend to use HeatWave
AutoML and Lakehouse functionality, the HeatWave.256GB shape is required. Choose Create.

27 Migration Guide: Amazon Aurora MySQL to HeatWave MySQL on Amazon Web Services (AWS)
Copyright © 2024, Oracle and/or its affiliates. Public
47. Your HeatWave MySQL DB system will start Creating.
48. After approximately 15-20 minutes, the HeatWave MySQL DB system will change its state from Creating to
Active.
49. Click on the name of your MySQL DB System to open the MySQL DB System Details page. Here you can see
information like Hostname, Shape, Storage, MySQL version, etc.

28 Migration Guide: Amazon Aurora MySQL to HeatWave MySQL on Amazon Web Services (AWS)
Copyright © 2024, Oracle and/or its affiliates. Public
VII) Import data from AWS S3 bucket to HeatWave MySQL on AWS.
50. It is now time to import the Amazon Aurora MySQL data sitting in the S3 bucket to HeatWave MySQL on AWS
using the Data Import feature.
51. In the HeatWave MySQL Console, click the Workspaces tab, and then click the Data Imports tab. Click
Connect to MySQL DB System.
52.
In the Connect to MySQL DB System dialog, select the DB System to which you want to import data and
enter the administrator credentials that you provided while creating the DB System. Click Connect.
53.
Click Import Data.

29 Migration Guide: Amazon Aurora MySQL to HeatWave MySQL on Amazon Web Services (AWS)
Copyright © 2024, Oracle and/or its affiliates. Public
54.
In the Import data into DB System dialog, enter a Display name and Description (optional) for the data
import operation. Under Source, specify the S3 URI for the Object where your Amazon Aurora MySQL dump
is located. See below:

30 Migration Guide: Amazon Aurora MySQL to HeatWave MySQL on Amazon Web Services (AWS)
Copyright © 2024, Oracle and/or its affiliates. Public
55. After specifying the S3 URI, choose User access key for the Authentication method. The recommended
authentication method approach here is to use the IAM role, but for this guide, we will use the user access
key that we created in step 6. For more information on how to use the IAM role, see Data Import Feature. The
user using the access key must have the AmazonS3FullAccess permissions policy. Under File Type, specify
MySQL dump files, for Character set, enter the character set of your dumped data, and for Update GTID
set, select APPEND. Choose Import.
56. Your data will now start importing from the S3 bucket to HeatWave MySQL on AWS and the status of the
Data Import changes to In Progress. Once the operation is complete, the status will change to Succeeded.
Click or select a Data Import operation to view more information like the import progress of the tables,
potential warnings, and errors.
31 Migration Guide: Amazon Aurora MySQL to HeatWave MySQL on Amazon Web Services (AWS)
Copyright © 2024, Oracle and/or its affiliates. Public
VIII) (Optional) Use the Query Editor tab to verify whether the data was migrated successfully from Amazon
Aurora MySQL to HeatWave MySQL on AWS.
57. On the Workspaces page, click Query Editor and ensure you are connected to your HeatWave MySQL on
AWS DB System. Once you are connected, you can see all your schemas and tables on the left panel, like
below:
58. You can run the below query on every table that you have for your Amazon Aurora MySQL and HeatWave
MySQL on AWS to ensure that the row count matches on both sides:
MySQL SQL> SELECT COUNT(*) FROM <schema-name>.<table-name>;
59. Here is our row count comparison for Amazon Aurora MySQL and HeatWave MySQL on AWS:
Amazon Aurora MySQL row count:

32 Migration Guide: Amazon Aurora MySQL to HeatWave MySQL on Amazon Web Services (AWS)
Copyright © 2024, Oracle and/or its affiliates. Public
HeatWave MySQL on AWS row count:
60. After validating, you can have your application(s) point to the new HeatWave MySQL on AWS DB System.

33 Migration Guide: Amazon Aurora MySQL to HeatWave MySQL on Amazon Web Services (AWS)
Copyright © 2024, Oracle and/or its affiliates. Public
IX) If the HeatWave option was enabled during HeatWave MySQL on AWS DB System creation, load data from
MySQL InnoDB storage into the HeatWave Cluster using automation.
61. On the Workspaces page, click Manage Data in HeatWave and ensure you are connected to your HeatWave
MySQL on AWS DB System.
62. Click the check box present in front of the schema or table name to select the schemas and tables you
want to load into HeatWave for query acceleration and to run OLAP and ML workloads - alongside OLTP.
After selecting, click Load into HeatWave.

34 Migration Guide: Amazon Aurora MySQL to HeatWave MySQL on Amazon Web Services (AWS)
Copyright © 2024, Oracle and/or its affiliates. Public
63. A dialog will appear, which will provide a summary of the load operation. It shows information like DB System
name, number of tables to load, estimated load size, and estimated load time. Click Load Tables.
64. Your data will begin loading into HeatWave from the MySQL InnoDB storage. You can verify the status of the
load operation by looking at the Loaded column on the Manage Data in HeatWave tab.
65. You now have a complete HeatWave MySQL cluster.
To learn more about using HeatWave MySQL on AWS, please visit our documentation.

35 Migration Guide: Amazon Aurora MySQL to HeatWave MySQL on Amazon Web Services (AWS)
Copyright © 2024, Oracle and/or its affiliates. Public
Connect with us
Call +1.800.ORACLE1 or visit oracle.com. Outside North America, find your local office at: oracle.com/contact.
blogs.oracle.com facebook.com/oracle twitter.com/oracle
Copyright © 2024, Oracle and/or its affiliates. All rights reserved. This document is
provided for information purposes only, and the contents hereof are subject to change
without notice. This document is not warranted to be error-free, nor subject to any other
warranties or conditions, whether expressed orally or implied in law, including implied
warranties and conditions of merchantability or fitness for a particular purpose. We
specifically disclaim any liability with respect to this document, and no contractual
obligations are formed either directly or indirectly by this document. This document
may not be reproduced or transmitted in any form or by any means, electronic or
mechanical, for any purpose, without our prior written permission.
Oracle, Java, and MySQL are registered trademarks of Oracle and/or its affiliates. Other names
may be trademarks of their respective owners.
