
Getting Started
with
GERBER OMEGA™ 7.0
Software and Device Installation

OMEGA 7.0 Getting started Page 2
Copyright Notice
COPYRIGHT © 2020 Gerber Technology, LLC. All Rights Reserved.
Portions Copyright © 2001 artofcode LLC. This software is based in part on the work of the Independent JPEG
Group. Portions Copyright © 2018 Soft Horizons. All Rights Reserved.
Ghostscript Included.
This document may not be reproduced by any means, in whole or in part, without written permission of the
copyright owner.
This document is furnished to support OMEGA 7.0. In consideration of the furnishing of the information contained
in this document, the party to whom it is given assumes its custody and control and agrees to the following:
1 The information herein contained is given in confidence, and any part thereof shall not be copied or
reproduced without written consent of Gerber Technology, LLC.
2 This document or the contents herein under no circumstances shall be used in the manufacture or
reproduction of the article shown and the delivery of this document shall not constitute any right or license to do
so.
Printed in USA
OMEGA, GERBER MAXX, GA, Gerber ColorID, Gerber P2C, GERBER SOLARA UV, ART Path, enVision, ImageRIP,
GERBER EDGE FX, Sabre, GerberColor, and Support First are trademarks and GRAPHIX ADVANTAGE, GERBER
EDGE, EDGE, Gerber Scientific Products, and GSP are registered trademarks of Gerber Scientific Products. Allen
Datagraph is a trademark of Allen Datagraph, Inc. Aristo AG50 and AG130 are registered trademarks of the Aristo
Graphic Systeme GMBH & CO KG. ENCAD and NovaCut are registered trademarks of Eastman Kodak Company.
Graphtec and SignJet PRO are trademarks of Graphtec America, Inc. HPGL is a trademark and HP is a registered
trademark of Hewlett-Packard Company. Ioline is a trademark of Ioline Corporation. Mimaki is a trademark of
Mimaki Engineering Co., LTD. Roland PNC is a trademark and Roland is a registered trademark of Roland Digital
Group.
Summa is a registered trademark of Summa Inc. Vytek is a trademark of Vinyl Technologies, Inc. Wild is a registered
trademark of Leica. Windows, Microsoft, and Vista are registered trademarks of Microsoft Corporation in the U.S.
and other countries. Zund is a registered trademark of Zund System Technik AG. Intel is a registered trademark of
Intel Corporation. Macintosh is a registered trademark of Apple, Inc. Radio Shack is a registered trademark of Radio
Shack Corporation. Sentinel is a trademark of SafeNet, Inc. Onyx is a registered trademark of Onyx Graphics.
PANTONE® Colors displayed may not match PANTONE-identified standards. Consult current PANTONE Color
Publications for accurate color. PANTONE® and other Pantone, Inc. trademarks are the property of Pantone, Inc. ©
Pantone, Inc., 2018.
Pantone, Inc. is the copyright owner of color data and/or software which are licensed to Gerber Technology, LLC. to
distribute for use only in combination with Gerber OMEGA. PANTONE Color Data and/or Software shall not be
copied onto another disk or into memory unless as part of the execution of Gerber OMEGA 7.0.
P85030A Rev A

OMEGA 7.0 Getting started Page 3
Variables
There are many variables in process reproduction of colors generated by the GERBER printers, any one of which may
affect the quality of the Gerber simulations of PANTONE Colors, including:
● Type of media/paper used
● Type of ink film used
● Effective final resolution
● Dot structures/halftones
For optimal results we recommend that the following materials be used:
1. 3M Scotchcal 220-10 or 225-10 Gloss White Vinyl
2. GerberColor™ ProcessPro ™ Foils
THE PANTONE-IDENTIFIED COLOR DISPLAYED ON THE PRINT AND/OR COPY GENERATED BY THIS
SOFTWARE HAVE NOT BEEN EVALUATED NOR ARE THEY APPROVED BY PANTONE, INC. TO BE IN
COMPLIANCE WITH PANTONE, INC.'S COLOR VALUES OR STANDARDS. Consult current PANTONE Color
publications for accurate colors.
P85030A Rev A

OMEGA 7.0 Getting started Page 4
SOFTWARE LICENSE AGREEMENT
This is an agreement between you, the end user, and Gerber Technology, LLC. and its suppliers ("GT"). By opening the sealed software package or
using the GT Software, you are agreeing to be bound by the terms of this agreement.
If you do not agree to the terms of this Agreement, promptly return all copies of the software, the media (USB drive, DVD, CD-ROM, jump drive,
floppy diskettes, etc.) package, and all accompanying materials (including any GT security device), to the GT-authorized distributor where you
obtained them for a full refund of the price of the GT software.
Otherwise, YOU AGREE TO THE FOLLOWING:
Grant of License to you by GT You May:
1. Use the GT Software on a single computer (with a single terminal) at a single location together with the applicable GT security device(s).
2. Make a single additional copy of the GT Software for archival or backup purposes to be stored in a secure environment.
3. Transfer the GT Software to another party, provided that: (a) this Agreement, all copies of any and all versions of the GT Software,
accompanying materials, and any applicable security device(s) are transferred together to the same recipient; and, (b) the recipient agrees
to the terms of this Agreement. (If you are leasing any GT equipment utilizing the GT Software, please refer to your lease agreement for
any prohibitions on transfer).
License Restrictions. You may NOT:
1. Use the backup copy for any purpose except for reinstalling the GT Software on your computer in the event of a computer failure.
2. Make any copies of the GT Software (in whole or in part) except for the archival or backup copies specifically authorized in the Grant
of License, above.
3. Decompile, reverse assemble, reverse engineer, or make any other attempt to decipher the GT Software or any applicable GT
security device(s) or otherwise determine the source code of the GT Software, or assist or permit others to do any of the foregoing.
4. Develop, make, or use a functional equivalent of, or modify, the applicable security device(s), or assist or permit others to do any of the
foregoing.
5. Revise, reproduce, or distribute the GT Software documentation.
6. Retain any copies of the GT Software, including its documentation, if you transfer the GT Software to another party; or make any transfer
except as specifically authorized in the Grant of License, above.
If you violate any of the foregoing license use restrictions, your license automatically terminates and you no longer have the right to use or transfer the
GT Software. Such termination is in addition to any other civil or criminal remedies available to GT or any other companies that have an ownership in
or relating to the GT Software.
LIMITED WARRANTY - MEDIA AND SECURITY DEVICE
GT's only warranty with respect to the materials provided to you is that the media (USB drive, DVD, CD-ROM, floppy diskettes, etc.) on which the GT
Software may be contained, and any applicable GT security device, will be free of defects in material and workmanship for a period of 90 days from
the date of original purchase. GT's only obligation will be to repair or replace, at GT 's election, such media or GT security device found to be
defective. To avail yourself of the foregoing limited warranty, you must first inform GT of the defect and return the media/security device to a
GT-authorized distributor during the warranty period. The foregoing Limited Warranty is made to the end user only and does not apply to
media/security devices damaged by accident, abuse, misuse, or modification. GT DISCLAIMS ANY AND ALL OTHER WARRANTIES, EXPRESS OR
IMPLIED, INCLUDING, WITHOUT LIMITATION, ANY WARRANTY OF MERCHANTABILITY OR FITNESS FOR A PARTICULAR PURPOSE.
NO WARRANTY - GT SOFTWARE
The GT Software and accompanying written materials are provided to you "AS IS." GT does not warranty that the GT Software will meet your
requirements, that the operation of the GT Software will be error free or will match the appearance and description in the written documentation, or that
the GT Software will function on your computer or will not interfere with any other program you may have on your computer. GT DISCLAIMS ANY AND
ALL WARRANTIES, EXPRESS OR IMPLIED, INCLUDING, WITHOUT LIMITATION, ANY WARRANTY OF MERCHANTABILITY OR FITNESS FOR A
PARTICULAR PURPOSE, WITH RESPECT TO THE GT SOFTWARE AND THE ACCOMPANYING WRITTEN MATERIALS.
NEITHER GT NOR ANYONE ELSE WHO HAS BEEN INVOLVED IN THE CREATION, PRODUCTION, OR DISTRIBUTION OF THE GT SOFTWARE,
ACCOMPANYING WRITTEN MATERIAL, USB Drive, DVD, CD-ROM OR DISKETTE MEDIA, AND/OR SECURITY DEVICE WILL HAVE ANY
OBLIGATION OR LIABILITY TO ANY BUYER OR END USER OR ANY OTHER PERSON FOR LOSS OF PROFITS, LOSS OF USE, OR ANY
INCIDENTAL, SPECIAL OR CONSEQUENTIAL DAMAGE (EVEN IF GT HAS BEEN ADVISED OF THE POSSIBILITY OF SUCH DAMAGE) THAT
ARISE OUT OF OR ARE IN CONNECTION WITH YOUR OBTAINING OR ATTEMPTING TO USE THE SOFTWARE, WRITTEN MATERIALS, USB
Drive, DVD, CD-ROM OR DISKETTE MEDIA, AND/OR SECURITY DEVICE (including, without limitation, lost profits, downtime, goodwill, loss of use,
damage to or replacement of equipment or property, and costs of recovering, reprogramming, replacing or reproducing any program or data stored in
or used with the GT Software).
COPYRIGHT OWNERSHIP
The GT Software, accompanying written materials and applicable security device(s) are owned by GT or its suppliers, and the GT Software and
accompanying written materials are protected by United States copyright laws and international treaty provisions. In addition to the above license use
restrictions, copyright protection limits the making and use of copies of the GT Software. There may be civil and criminal penalties for copyright
violations.
U.S. GOVERNMENT RESTRICTED RIGHTS
The GT Software and accompanying written materials are provided with RESTRICTED RIGHTS. Use, duplication, or disclosure by the Government is
subject to restrictions as set forth in subparagraph (c)(1)(ii) of the Rights in Technical Data and Computer Software clause at 52.227-7013 or
subparagraphs (c)(1) and (2) of the Commercial Computer Software - Restricted Rights at 48 CFR 52.227-19, as applicable. Contractor/manufacturer
is Gerber Technology, LLC./24 Industrial Park Road/Tolland/CT 06084.
If any provision of this Agreement is found to be unlawful, void or unenforceable, then that provision shall be severed from this Agreement and will not
affect the enforceability of the remaining provisions. This Agreement is the entire agreement between you and GT concerning the subject matter
hereof. No GT distributor, agent or employee is authorized to modify this Agreement, and no representation shall be binding upon GT, unless it is in
writing and signed by a GT officer. This Agreement is governed by the laws of the State of Connecticut, U.S.A., without regard to principles or
applications of choice of law rules or international treaties.
P85030A Rev A

OMEGA 7.0 Getting started Page 5
Contents
Copyright Notice 2
Contents 5
QuickStart OMEGA 7.0 Installation 7
Summary of OMEGA 7.0 Installations 7
Additional installation items: 10
Install Find My Font – Gerber Omega Edition 10
OMEGA 7.0 Installation Changes and Enhancements 17
Other important OMEGA 7.0 Installation Notes 19
Important information about converting TrueType fonts 20
OMEGA 7.0 Folder Locations 21
Chapter One: Welcome 22
About Getting Started 22
Notes and tips 22
OMEGA 7.0 Kits 23
New Features in OMEGA 7.0 24
Reference Overview 25
OMEGA 7.0 Computer Hardware and Software Requirements 27
Chapter Two: Installing OMEGA 7.0 Software 29
Be sure to follow these steps BEFORE installation for a successful installation: 29
Installation Steps 30
Activating Arabic language support 39
Activating Chinese language support 40
Chapter 3: Adding output devices 42
Installing vinyl printers 42
Local vinyl printers 42
Remote vinyl printers 43
Networked vinyl printers 46
Adding or deleting a plotter 49
Installing fonts from the OMEGA 7.0 System Software USB install thumb drive 56
Uninstalling fonts 59
Installing the Gerber Library Pack (Now Included with OMEGA) 59
Using the Gerber Device Profile Manager 59
Installing ICC profiles using the OMEGA 7.0 System Software USB install 60
thumb drive 60
Filtering ICC profiles using the Gerber Device Profile Manager 62

OMEGA 7.0 Getting started Page 6
Removing ICC profiles using the Gerber Device Profile Manager 63
Making the required update to Sabre firmware 65
Troubleshooting the Sabre firmware update 67
Selecting a language for a 4 MB Sabre 67
Chapter Four: Beyond Getting Started 68
Registration card 68
Locating the System ID and Serial Number 68
Getting Help right in OMEGA 7.0 69
Finding a topic 70
Finding additional topics in the Topic pane 70
Finding previously-viewed topics 71
Printing topics 71
Customer support 72
Gerber hardware 72
FastFacts 72
Chapter Five: Troubleshooting 73
Questions and answers 73
Technical support messages 74
Chapter Six: HPGL Plotter Installation 76
Working with HPGL plotters 76
Verifying communication settings 77
Custom HPGL plotter setup 77
If the plotter is a USB device, DO NOT PLUG IN THE PLOTTER into the USB port. 77
Read the plotter instructions for USB driver plotter installation instructions. 77
Chapter Seven: Using Networked Computers for Remote Output and Rendering Using Omega Plot and
Gerber Queue Manager 80
Connecting and sharing output devices 80
Short form instructions to set up remote devices and output remotely: 80
To output from Computer A to the devices on Computer B 81
Remote Device Setup and Output Instructions with Pictures 82
Share the QUEUE folder on Computer B to allow Computer A to send files 82
Set up and choose the remote device on Computer A 85
To output from Computer A to the devices on Computer B 87
To map a network drive to the gspqueue folder 87

OMEGA 7.0 Getting started Page 7
QuickStart OMEGA 7.0 Installation
Summary of OMEGA 7.0 Installations
OS, Hardware and Installation Requirements:
● Windows 8.1 32 or 64, Windows 10 32 or
64
● Enough hardware to run the OS and
install OMEGA.
● At least 2 GB RAM, At Least 100 GB free
space, 2 USB ports or more, serial port or GSP
USB to serial port adapter, mouse, 1024x768
16 million color monitor
● EDGE 1 and 2 require a Gerber USB to Parallel
cable P83301A.
● EDGE FX requires an Ethernet port.
● You must be in ADMIN mode to install, and it is
highly recommended that all virus checkers are
disabled during the installation.
● Autocarve and Gerber Braille Interpreter require a 32
bit OS
● The USB to Parallel cable can run 32 or 64 bit
Windows 7
Installation Summary
1. Back up data files, PLT files,
Fonts, clipart, and any other
files used on the PC where the
software is being installed
2. DO NOT
PUT THE
SECURITY
KEY ON
THE PC FIRST!
3. Insert the OMEGA USB
install thumb drive
4. Browse to and run
SETUP.EXE
5. The OMEGA Setup Wizard
will appear. Click Install
Products
6. Click on the INSTALL OMEGA 7.0
Button
IF the Choose Setup Language dialog
box appears, choose the correct
language to install.
7. Click YES to Agree to the
license agreement.

OMEGA 7.0 Getting started Page 8
8. The Installshield screen will
appear. Click Next
9. Click YES to the BACKUP
warning if files are backed up.
10. The Sentinel driver may
automatically update. If the
Sentinel Driver updates, you
will be prompted to reboot the
PC after this driver loads. DO
NOT INSTALL THE SECURITY
KEY YET and Reboot the PC.
11. If the Sentinel Driver installed
and the PC rebooted, start the
installation process again by
removing and inserting the
OMEGA USB install thumb
drive and running
SETUP.EXE.
12. When the Main Setup menu
appears again, Follow steps 2
through 9 above again.
13. A Run OMEGA Demo
Mode screen will appear.
14. INSTALL the Security Key onto a
functioning USB drive. Click
NO, Attempt to Read the Security
Key Again.
15. If the upgrade requires a
password, carefully enter the
password from the card inside
the password envelope and
Click OK.
16. Enter User Name and
Company Name information if
prompted. Click Next.
17. Click OK to accept the default
location for OMEGA files. Click
Next.
18. Enter User Name and Company
Name information if prompted.
Click Next.
19. Choose the installation type
of Typical or Compact. Click
Next.
20. Choose the name of the default
Program Group Name. Click
Next.
21. Click Next to create a desktop
icon

OMEGA 7.0 Getting started Page 9
22. If upgrading, a message may appear
about copying existing fonts and
libraries. OMEGA 7.0 automatically
copies fonts and libraries into its
own folder so they can be used in
OMEGA 7.0.
23. The files will begin installing
and OMEGA features will flash
by.
24. If upgrading from an older
version of OMEGA, you may be
prompted to uninstall the
previous versions. Click YES or
NO as desired.
25. A screen will appear asking to View
the README and INSTALL
Plotters/Printers. Choose the items
that need to be done and click
FINISH.
26. The README will appear
if chosen to be read.
27. The INSTALL DEVICES
screens will appear if the
checkbox is left on. DO NOT
PHYSICALLY CONNECT
THE GERBER EDGE YET.
28. You will be prompted to check
for updates. It is recommended
that you perform this step.
Follow the on-screen prompts.
29. Once devices are installed
and the README is read,
a screen will prompt you
to install Fonts and
Libraries.
30. Click OK.
31. If needed, install Fonts and
Libraries from the OMEGA
7.0 USB install thumb drive
or from Omega Tray.
32. The Installation Screen will disappear and the
Install Products menu will appear again. Click
Install Find My Font and follow the prompts. See
below for more information on this installation.
33. REGISTER the
software to be kept
informed of updates
and products and for
warranty coverage.
34. Go to the OMEGA 7.0
program group and
check for updates (if on
an Internet connected
system).
35. Run OMEGA 7.0
Successfully!
36. Start Find My Font, go
to HELP>License
Information and enter
the Password for Find
My Font included in
the OMEGA 7.0 box.
An internet connection
is required when
entering this password.

OMEGA 7.0 Getting started Page 10
Additional installation items:
Install Find My Font – Gerber Omega Edition
Gerber Omega 7.0 includes a special Edition of Find My Font. Find My Font matches unknown
fonts to a database of fonts stored on a local PC, and/or to an online database of more than
130,000 fonts. Find My Font – Gerber Omega Edition will match to a special section of Gerber
fonts in the online database.
To install Find My Font – Gerber Omega Edition:
Insert the OMEGA 7.0 USB install thumb drive
When the install menu appears, click on Install Products
Click on Install Find My Font.
A separate installation program will start.
Click Yes to update or re-install version if
Find My Font is already loaded.
Click Next to proceed
Click to accept the License Agreement.
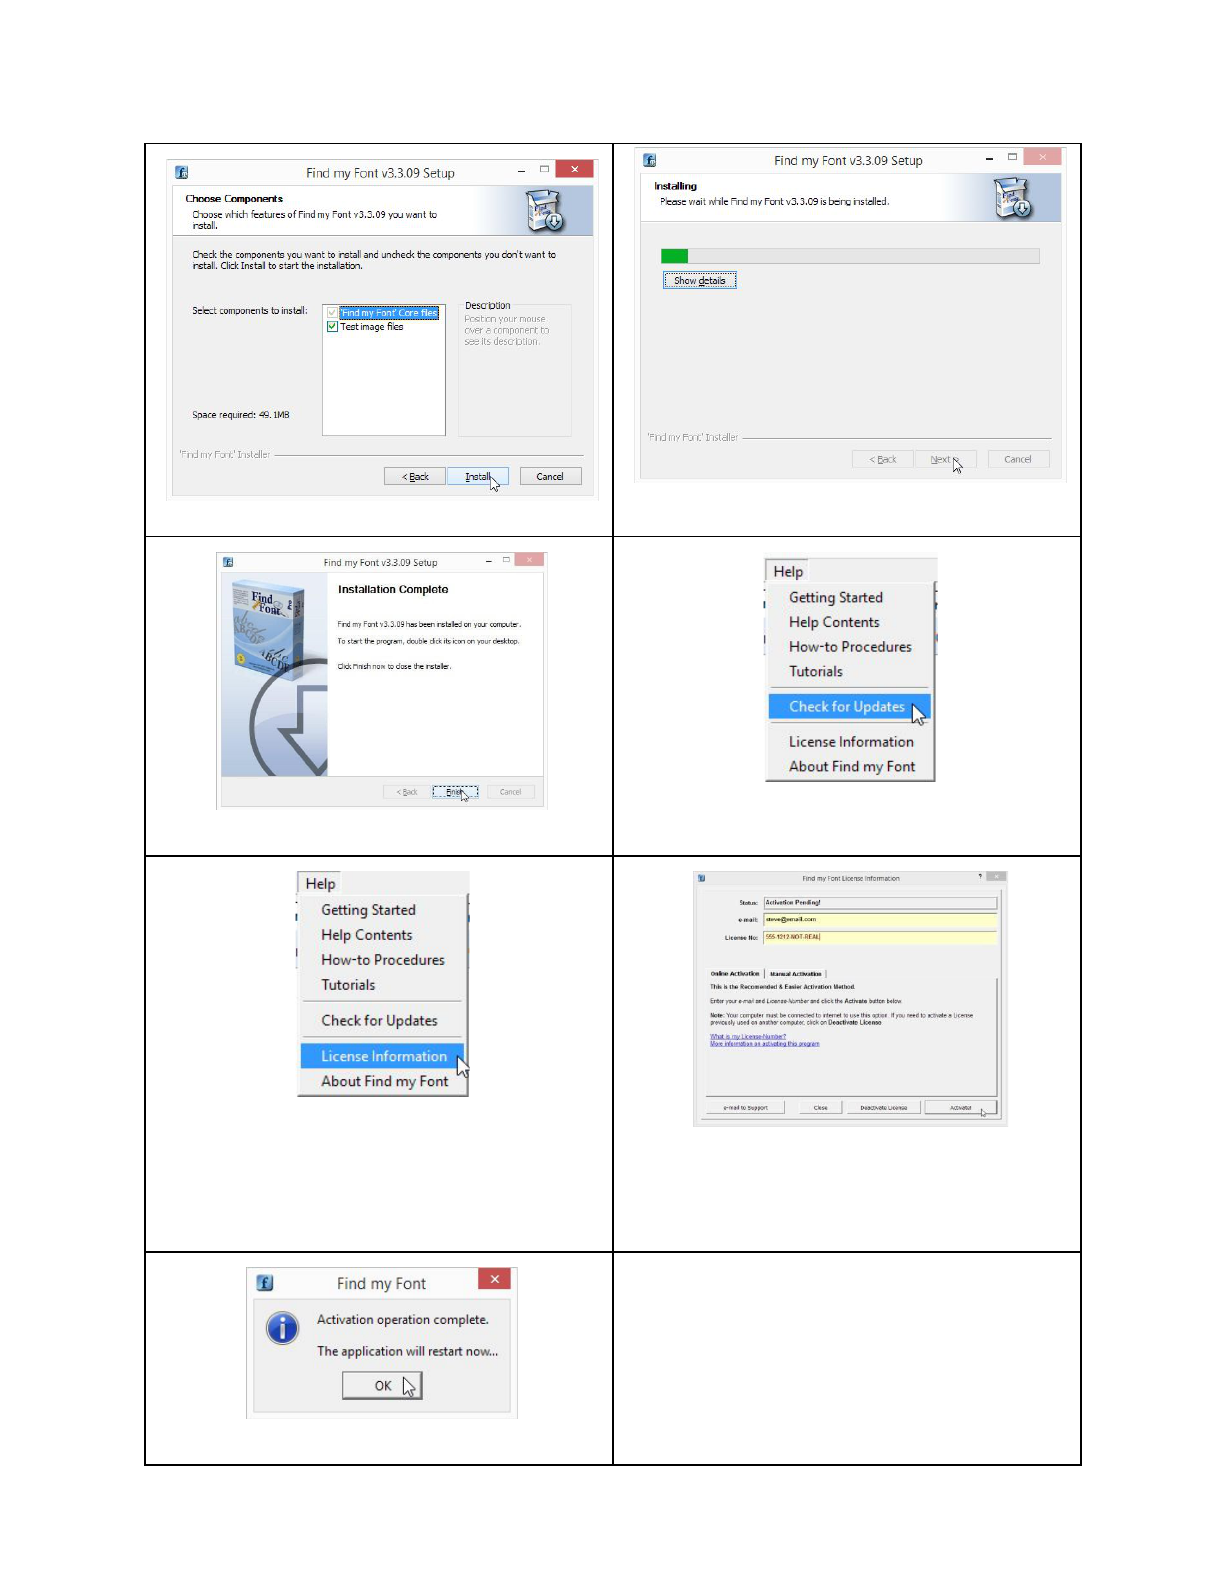
OMEGA 7.0 Getting started Page 11
Click Install to continue.
A progress screen will appear.
Click Finish to complete the installation
Start Find My Font, click Help and Click
Check for updates for the latest version.
Click Help>License Information and
Enter the Find My Font – Gerber Omega
Edition password included in the OMEGA
7.0 box. NOTE that an internet connection
and valid email address are required.
Click OK to restart the program.
See Find My Font – Gerber Omega Edition
information below about FontSets and
indexes.

OMEGA 7.0 Getting started Page 12
1. Any Opentype or Truetype fonts can also be used with Find My Font as part of a font
matching database located on your PC. The fonts do NOT have to be installed to be part of
a font matching database.
● Start Find My Font
● Go to Fonts>FontSets Setup or press CTRL+F
● Click on Add FontSet
● Browse to the folder where the fonts are located>Click OK
● Be sure the Active checkbox on the left side is turned on.
● For faster font matching, highlight each Fontset in the list and click on Create/Update
Index.
● Click OK to exit the FontSets setup dialog box.

OMEGA 7.0 Getting started Page 13
Find my Font: New Version and "Mobile" Version
We are pleased to introduce an updated version of Find my Font GERBER OMEGA Pro
(version 3.3.15), and Find My Font MOBILE Gerber OMEGA Pro version for Android and iOS
devices.
Please CAREFULLY
follow these instructions to access these new capabilities:
Start Find my Font Gerber Omega Pro on your OMEGA system.
Go to the Help menu, then go to License Information
Status should show as ACTIVE: Gerber Omega Pro edition. An email address and License
Number should also be displayed
Copy the email address and license number and store in a safe place. Ideally, store these in a
TXT or other electronic file. These will be needed to update to the latest version and to use
Find my Font Mobile Gerber Omega Pro.
Click Close to close the License Information dialog box.
Close Find my Font.
Go to the following link to download the latest version:
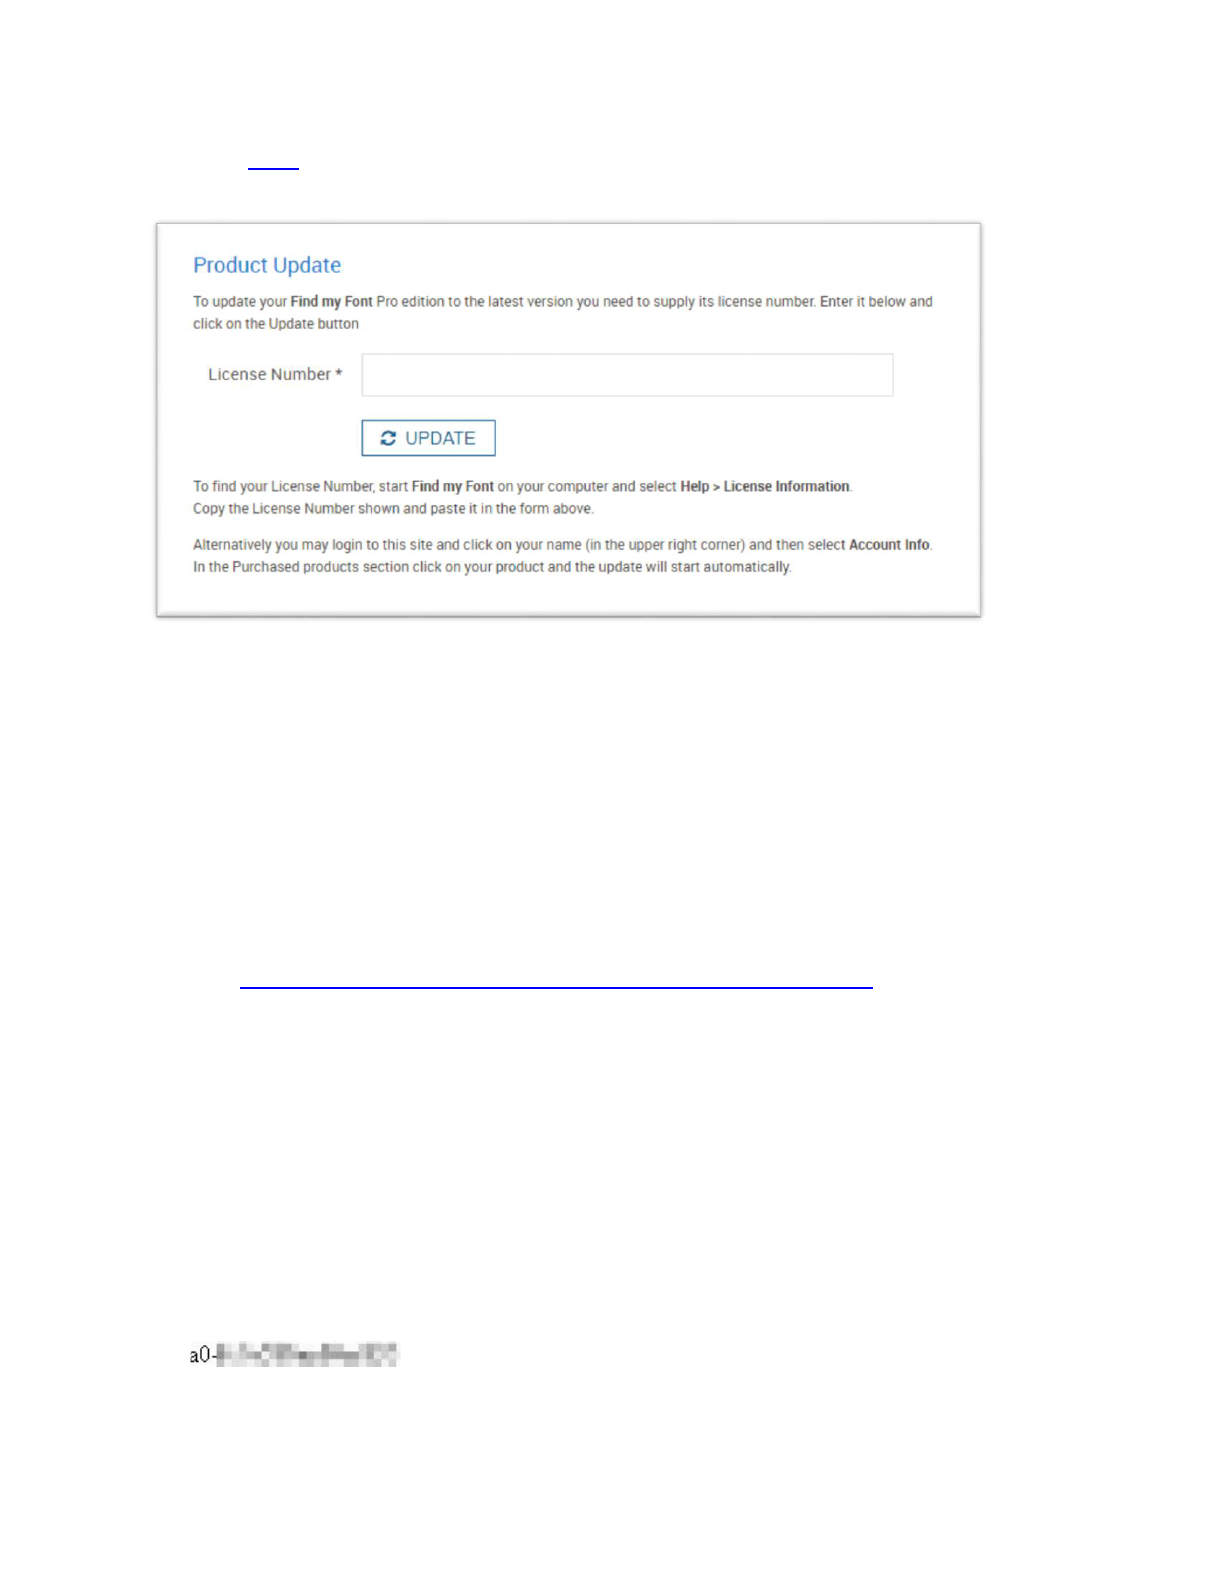
OMEGA 7.0 Getting started Page 14
https://www.findmyfont.com/download/product-update
Enter the copied license number EXACTLY as it appears in the license dialog box.
Download and save the installation file to a known location on your computer.
Once downloaded, start the installation program and follow the installation prompts.
Any previous FontSets or Font Indexes will be used in the updated program.
Find my Font Mobile Gerber Omega Pro
Find my Font Mobile Gerber Omega Pro allows you to take images of fonts or upload image
files of fonts on you Apple or Android mobile device and identify fonts from the complete Find
my Font Mobile Gerber Omega Pro database. This database includes all the standard FMF font
matching font images, as well as the Gerber database of font matching images.
To install Find my Font Mobile Gerber Omega Pro edition:
Go to https://www.findmyfont.com/download/download-mobile-edition
Click on the Apple or Google Play Link
Follow the instructions to install on your device.
You must now link your Find my Font Mobile Gerber Omega Pro license to your OMEGA
license.
Start Find my Font Mobile on your device.
Touch the Menu icon in the upper left corner of the screen
Touch "About Find my Font."
Carefully write the App Id: on a piece of paper and or type it into a notepad file with your
other FMF license information. It will be 18 characters long with a dash after the first two
characters (2 characters-16 characters). It will look something like this:
.
Start Find my Font, latest version, in OMEGA.
Be sure the OMEGA PC is connected to the Internet.
Go to the Help menu, then go to Find my Font mobile.

OMEGA 7.0 Getting started Page 15
A dialog box will appear. Type in or paste the FMF Mobile App Id exactly as it appeared on
the mobile screen.
Click on Connect. A message will appear: Device successfully Connected!

OMEGA 7.0 Getting started Page 16
Close and restart the mobile app on your device. You should see a yellow star at the
bottom of the screen. This means that you have an unlimited number of font matches
available.
Go to the Find my Font Mobile Gerber Omega Pro Menu on the mobile device and
touch About Find my Font. It should show Find my Font Gerber Omega with an Omega
logo.
Go here for more information about Find my Font Mobile Gerber Omega Pro installation
and usage:
https://www.findmyfont.com/support/blog/112-find-my-font-goes-mobile
https://www.findmyfont.com/support/blog/113-connect-your-desktop-with-your-mobile
- app
https://www.findmyfont.com/download/product-update
Refer to the Find my Font HELP menu and online information for more instructions.

OMEGA 7.0 Getting started Page 17
OMEGA 7.0 Installation Changes and Enhancements
The OMEGA Upgrades have been consolidated as follows:
GA to OMEGA upgrades remain a single product
OMEGA 1.5X and 2.0/2.1 upgrades to OMEGA 7.0 have been consolidated into one
product.
● 1.5 and 2.0/2.1 Upgrades are ONLY available with security keys, and are no longer
available as password upgrades or GerberNet upgrades.
OMEGA 2.5x/2.6x and 3.0 upgrades to OMEGA 7.0 have been consolidated into one
product.
OMEGA 4.0/5.0/6.0 upgrades to OMEGA 7.0 have been consolidated into one product.
OMEGA 6.5 to 7.0 upgrades remain a single product
The security key is smaller and purple.
Find My Font – Gerber Omega Edition is included with all versions except for Plot Station.
Neither ImageRIP nor ImageRIP profiles are included as part of the installation at all.

OMEGA 7.0 Getting started Page 18
Gerber EDGE Fonts and Gerber Highway Fonts are available to be installed as part of
OMEGA 7.0.
Insert the OMEGA 7.0 USB install thumb drive and run setup.exe and then click on Install
Products>Click on Install Fonts.
This starts Font Manager and displays these fonts as available for installation by
displaying the installable fonts as black in the right pane of Uninstalled fonts.
Click on the desired fonts and click on Install/Purchase.

OMEGA 7.0 Getting started Page 19
All Gerber Clipart Files are now included as part of OMEGA 7.0. This is a $495 (USD) value.
Insert the OMEGA 7.0 USB install thumb drive and run setup.exe and then click on
Install Libraries. This screen below will appear. Click OK to install. Click OK once the
libraries are installed. The libraries will be installed in
C:\ProgramData\Gerber\Omega 7.0\Library
Other important OMEGA 7.0 Installation Notes
OMEGA 7.0 security keys more reliably upgrade with a password.
When installing an OMEGA 7.0 Upgrade on the same system that had a previous version of
OMEGA already installed, the GSP Fonts and Libraries will be copied from the previous
version folder location to the new OMEGA 7.0 folder.
Omega 7.0 UPGRADES can reside side-by-side with Omega 3.0*, 4.0*, 5.0*, 6.0* or 6.5*.
*Subject to compatibility with your windows OS version.
New OMEGA 7.0 seats and other upgrades not mentioned above CANNOT run side by
side with OMEGA or GA versions previous to 3.0.
At the end of the install, users are prompted to CHECK FOR UPDATES. Check for updates
can also be run manually from The OMEGA 7.0 program group, Omega Tray,
Composer>Help Menu or Omega Plot>Help Menu.
OMEGA 7.0 automatically loads the latest EDGE firefiles. If you have an EDGE FX, be sure
to load the latest EDGE FX SRE file onto the FX itself.
Certain OMEGA 7.0 Folder locations have been moved to be in compliance with Microsoft
security settings and to allow for successful OMEGA 7.0 uninstallation. Go to START>All
Programs>Gerber OMEGA 7.0>Gerber Folder Locations to go directly to all OMEGA
folders. Click here for a complete list of OMEGA 7.0 Folder Locations.

OMEGA 7.0 Getting started Page 20
Important information about converting TrueType
fonts
If you convert TrueType fonts into Gerber fonts on multiple systems, you must be careful about
how you exchange files and the resulting converted fonts. When Composer stores font
information in a PLT file, it references the part number of the fonts that are in the PLT file. If
you convert TrueType font into a Gerber font on “system 1,” it might be named “FONT1.” If
you convert the same TrueType font into a Gerber font on a different system, the resulting
Gerber font file name will probably be different, even though the original TrueType font name
is the same. This occurs because the TrueType font converter looks for the next available font
name on that particular system and uses that available font name. Different systems most likely
will have different font names available as the next available font name.
Therefore when you transfer a job from system “A” to system “B”, and then edit and regenerate
text that uses a converted TrueType font, the resulting text will be in a different font from what
was originally generated on system “A.”
It is strongly recommended that all converted TrueType fonts be maintained in a common
network location, or are copied from “system A” to “system B” to be sure all of the font names
and underlying fonts are the same.
OMEGA 7.0 Getting started Page 21
OMEGA 7.0 Folder Locations
See below for the computer locations for OMEGA files.
OMEGA 7.0 Data
Type
Folder locations for Windows 8 / 8.1 and Windows 10
OMEGA 7.0
Program Files
32 bit: C:\Program Files\Gerber Scientific Products\OMEGA 7.00\Software
64 bit: C:\Program Files (x86)\Gerber Scientific Products\OMEGA 7.00\Software
Omega 7.0 Fonts
C:\ProgramData\Gerber\Omega 7.0\Fonts
Omega 7.0
Libraries (GAD
Files)
C:\ProgramData\Gerber\Omega 7.0\Library
Omega 7.0 Queue
Folder
C:\ProgramData\Gerber\Omega 7.0\Queue
NOTE: If upgrading to OMEGA 7.0 on the same computer as a previous OMEGA
version such as OMEGA 2.5 or 3.0, this folder will remain in the same location as
the previous OMEGA version.
Omega 7.0 Spell
Check
Dictionaries
C:\ProgramData\Gerber\Omega 7.0\Dicts
Omega 7.0 Design
Time Log file
C:\ProgramData\Gerber\Omega 7.0\LogFiles
OMEGA 7.0 User-
Created Custom
Palettes
C:\ProgramData\Gerber\Omega 7.0\Palettes
Image Rendering
Color Separation
Path
C:\ProgramData\Gerber\Omega 7.0\Seppath
.INI files
C:\Users\username\AppData\Local\GSP\Omega
Job files
C:\Users\Public\Gerber\Jobs
NOTE: If upgrading to OMEGA 7.0 on the same computer as a previous OMEGA
version this folder will remain in the same location as the previous OMEGA
version.
Samples
C:\Users\Public\Gerber\Jobs\Samples
NOTE: If upgrading to OMEGA 7.0 on the same computer as a previous OMEGA
version this folder will remain in the same location as the previous OMEGA
version.
Gerber OpenType
font versions of
base set OMEGA
GSF fonts
C:\Users\Public\Gerber\Jobs\Gerber OpenType\
NOTE: If upgrading to OMEGA 7.0 on the same computer as a previous OMEGA
version this folder will remain in the same location as the previous OMEGA
version.

OMEGA 7.0 Getting started Page 22
Chapter One: Welcome
Welcome to OMEGA™ 7.0, the state-of-the-art design and production system for the sign,
graphics, and screen-print industries. OMEGA 7.0 teams powerful design and production
features in a friendly, easy-to-use package.
About Getting Started
To help you put your OMEGA 7.0 software to work as quickly as possible, refer to the chapters
that apply to your system and software.
Chapter Two: Installing OMEGA 7.0 Software tells you how to connect the security key
needed to run OMEGA 7.0 and provides installation instructions for OMEGA 7.0 software.
Chapter Three: Adding Output Devices gives detailed instructions on installing hardware
devices for your system. Please refer to the individual device manuals for specific installation
instructions.
Chapter Four: Beyond Getting Started presents helpful information on registration, system
information, the help system, and customer support, and suggests where you will find other
useful OMEGA 7.0-related information.
Chapter Five: Troubleshooting contains questions and answers to common problems and error
messages.
Chapter Six: HPGL™ Plotter Installation discusses custom installation for HPGL plotters.
Chapter Seven: Networking Devices describes how to setup a GSP® network.
Notes and tips
The following conventions are used in this manual:
Note: A note contains important information that could affect the successful completion of a
task.

OMEGA 7.0 Getting started Page 23
Tip: A tip contains a suggestion or to remind you of something that may appear
elsewhere in the manual.
CAUTION: A caution statement contains information which, if not observed, could
result in damage to the equipment.
OMEGA 7.0 Kits
The OMEGA 7.0 full and upgrade kits include:
OMEGA 7.0 USB install thumb drive
Printed What’s New document
Printed Getting Started document
Registration card
Find My Font – Gerber Omega Edition Password Card (All versions except OMEGA 6.0
or 6.5 to 7.0 Upgrades and PlotStation)
Either a password or a security key (see chart below)
Note: OMEGA 7.0 is delivered on a USB install thumb drive and as a download from
gerbertechnolgy.com/eservice
. It is not available on a CD or DVD.
NEW Seat Kits
UPGRADE Kits
OMEGA 7.0 Security Key
Included
OMEGA 7.0 Security Key
Included
Password Included
CP, CS, LS, MIP, NFR, PS
GA to OMEGA 7.0
OMEGA 1.5X and 2.0/2.1 to
OMEGA 7.0
OMEGA 2.5 to OMEGA 7.0
OMEGA 3.0 and 4.0 to
OMEGA 7.0
OMEGA 5.0 to OMEGA 7.0

OMEGA 7.0 Getting started Page 24
New Features in OMEGA 7.0
For the most detailed information about the newest features in OMEGA 7.0 see “What's New in
OMEGA 7.0”, as well as previous “What's New in OMEGA” presentations located on the
OMEGA 7.0 System Software USB install thumb drive.
For detailed tutorials of many OMEGA tools, see the OMEGA Learning Guide
that is included on
the OMEGA 7.0 USB install thumb drive.
These new features were added to OMEGA 7.0
● User Palette - customized by the user
● Feature Templates - savable function sets
● Select by job palette - allows selection from the job palette
● Persistent foil adjust - easier to use foil adjust for color to color correction
● Keyboard customize - allows user assignable hotkeys
● Back-cut improvements - layer name monitoring and device selection
● CS software functions added - including clipping paths and process colors
● And much more!
These new features were added to OMEGA 6.5
● Groups of Groups or nested groups
● PLT file costing of Gerber vinyls and GerberColor Foils, and automatic text character
counting using the PLT Extractor tool
● New PDF export filter with support for clipping paths and named colors
● New AI/EPS/PDF import capability to maintain original colors from imported CMYK files
● Ability to constrain detail editing and line digitizing movement with the ALT key
● Ability to toggle show filled/wireframe and scroll through Composer with the mouse while
in Composer dialog boxes
● Merge data from PLT Extractor results into PLT files for customer presentations or job
tracking.
● Easier to use back-cut decals
● Much more!
These new features were added to OMEGA 6.0
● Font Identification with matching to locally installed fonts as well as an online database
● Contextual visualization and designing with Composer effects such as Outline, Warp,
Shadow, Distortion and others
● Easier to use Raster to Vector and generate Decal Cut with improved preset settings
● Bitmap image fills
● Integrate logos and images on QR codes generated in Composer
● Enhanced design tools such as ALT key constraints, vertical point alignment
● Export image files up to 32,000 pixels for inkjet workflows
● ART Path and Composer import DXF files with colors and map colors to layers
● Bonus Gerber Soft Fonts and Clipart Libraries
● Much more!
These new features were added to OMEGA 5.0
● Improved Raster to Vector and Decal Cut
● Omega Plot Weedlines
● On Screen Fills

OMEGA 7.0 Getting started Page 25
● New FHWA Highway Fonts
● Nesting in Composer
● Distort Gradient Fills
● Automatic print-to-cut alignment between EDGE’s and enVision 375 plotters
● “ReActionable” Surround Border
● Turn ReAction regeneration off for graphic edits
● Omega Plot Perforation Cut
● New Composer Guidelines
● SplView Enhancements
● Preview Jobs from GQManager
● Perform Foil adjust from SPLView
● Improved Export to Hot Folder
● Auto Process Art Path
● Omega Plot automatic Alignment
● English / Metric switching units
● Single Barcode Generation
● DWG and PDF import improvements
● And Much More!
These Features were added to OMEGA 4.0:
● GERBER EDGE FX HiRez printing mode
● Faster rendering of autotext, autonumber, or any repeats generated in Composer.
● Auto halftone settings for EDGE printing
● Easier and faster backcut or liner-cut decal production
● Better integration of Foil Adjust program (formerly called RegFixer)
● Grid cut or butt-cut weedborder
● ART Path automatic nesting
● Plotter output “Smart Start” Technology
● Support for more friction-fed plotters
● Easier, improved barcode layout features
● More undos, and ability to undo after saving
● Auto “Strokes for Chokes” button
● Choke spread top color designation
● Ability to add a PDF wrapper to JPG exports
● Automatic mapping of imported EPS/PDF and AI colors to EDGE spot colors
● New and easy to locate Gerber software and user file folder locations, accessible from
Gerber Folder Locations function under the Gerber OMEGA 7.0 program group
● Many more enhancements and features
Reference Overview
The OMEGA 7.0 Reference Manual is included as a PDF file, (along with other OMEGA 7.0
documentation), on the OMEGA 7.0 System Software USB install thumb drive. You can
either read the desired chapters on-screen or print them as you need them.
The Reference Manual is divided into books and chapters, presenting information about the
hundreds of tools, commands and features incorporated in OMEGA 7.0. Each book is

OMEGA 7.0 Getting started Page 26
summarized below. All the information in the OMEGA 7.0 Reference Manual is also in the
OMEGA 7.0 Help system. See Help for the most up-to-date information.
Be sure to check What’s New in OMEGA 7.0 for information and links to videos describing
the new features of OMEGA 7.0.
Go to www.gerbertechnology.com/signs-graphics/design/omega/ for even more information about
OMEGA.

OMEGA 7.0 Getting started Page 27
OMEGA 7.0 Computer Hardware and Software
Requirements
OMEGA 7.0 is compatible with:
Windows 8/8.1 Professional 32 or 64 bit and Windows 10 Professional 32 or 64 bit.
Windows 8 and 10 no longer support ECP parallel ports. Therefore Gerber Edge and
Gerber Edge 2 printers must use a Gerber USB to Parallel Port option (P83301A) that can
interface EDGE and EDGE 2 printers to computers with these operating systems.
The EDGE FX uses an Ethernet port and does not require any additional adapters.
3D Autocarve and Gerber Braille Interpreter will not run on 64 bit systems, even
if upgrading from a previous version of OMEGA.
Minimum requirements are dictated by the operating system used
CPU
Intel Pentium IV™ (a higher-performance processor is recommended)
RAM
2 GB (more recommended)
Free Disk Space
40+ GB (more recommended)
Video Display
As dictated by the operating system. 1024 X 728 minimum resolution and
support of 16 million colors. Higher resolution and more colors are
recommended.
USB Ports
1 required. At least two recommended. Works with USB 1.1, 2.0 and 3.0
Ethernet Port
1 required for use with the Gerber EDGE FX.
Serial (9-pin)
1 required for use with Gerber sprocket plotters and /or routers.
● GSP offers a USB to Serial Adapter (P83305A) if a serial port is not
available.
Parallel (25-pin)
NOT SUPPORTED. Please use the Gerber USB to Parallel Cable
(P83301A)
ECP Parallel (25-pin)
NOT SUPPORTED. Please use the Gerber USB to Parallel Cable
(P83301A)
Mouse or Pointing
Device
Required
Additional hard disk space, memory and faster processors will improve performance, especially
when working in data intensive operations or with large files.
Windows operating systems compatibility
EDGE 1 and or EDGE 2 printers require the GSP USB to Parallel cable (P83301A).

OMEGA 7.0 Getting started Page 28
Windows 8/8.1 and 10 do not support the needed EDGE 1 and EDGE 2 parallel port
usage. Therefore you cannot communicate with a GERBER EDGE or EDGE 2 printer VIA
PARALLEL PORT
when using these operating systems. You will need the above GSP USB
to Parallel Cable.
Or you can upgrade your thermal printer to a GERBER EDGE FX which communicates via
Ethernet cable.
Windows 7, 8 or 10
32 bit
Windows 7, 8 or 10
64 bit
Design
Composer and other design functions. Create and save
PLT files.
YES
YES
Rendering
Omega Plot rendering of SPL files.
YES
YES
Output
EDGE via parallel cable
NO
NO
EDGE 2 via ECP parallel cable
NO
NO
EDGE via off-the-shelf USB-to-Parallel cable
NO
NO
EDGE 1 or 2 via GSP custom USB-to-Parallel cable
(P83301A)
YES
YES
EDGE FX (Ethernet only)
YES
YES
Plotters via serial port
Limited
Gerber USB to Serial
Recommended
Limited
Gerber USB to Serial
Recommended
Plotters via Gerber USB to Serial Cable (P83305A)
YES
YES
Plotters via Off the shelf USB to Serial Cable
GSP Cable strongly
recommended
GSP Cable strongly
recommended

OMEGA 7.0 Getting started Page 29
Chapter Two: Installing OMEGA 7.0 Software
This section describes the step-by-step instructions to successfully install OMEGA 7.0.
OMEGA can be installed in one of two ways:
1. Upgrading an existing security key with a Gerber-supplied password
● This process applies to OMEGA Upgrades (2.5 to 7.0; 3.0 to 7.0; 4.0 to 7.0, 5.0 to 7.0, 6.0 to 7.0 and 6.5 to
7.0)
2. Installing a new security key from Gerber that includes OMEGA 7.0 security
● This process applies to new OMEGA kits (OMEGA CP, CS, LS, PS), and
● Upgrades from older systems (GA to 7.0; Omega 1.5 to 7.0; OMEGA 2.0 to 7.0)
The majority of the steps for these two installation procedures are identical. Therefore, the
installation will be covered with one set of instructions.
Be sure to follow these steps BEFORE installation for a successful
installation:
● DO NOT INSTALL the SECURITY KEY at the BEGINNING of
the OMEGA 7.0 installation.
● Be sure to have all the required OS software and hardware.
● Be sure to locate your new security key or password for the upgrade.
● Be sure to have the proper Gerber USB to serial and USB to parallel cable adapters.
● Do not plug in any Gerber USB to Serial or USB to Parallel cables into the PC until
instructed to do so in the instructions.
● You must have Administrative privileges.
● Temporarily disable any Antivirus software (Internet access is not required during the
software install, so you can also disable your internet connection).
● If you are prompted by UAC permission screens, click Yes to allow installation.
● Remove all other security keys until after OMEGA installation.
● Only use the Sentinel Protection Installer that is installed from the OMEGA 7.0 System
Software USB install thumb drive. Do not install the Sentinel System Driver from the
SafeNet® website or other software installations.
● Back up your critical design files, image files, PLT files, fonts, libraries and any other
important files before installing the new software. 1 TB external drives are very
inexpensive and well worth saving days of frustration due to lost data.

OMEGA 7.0 Getting started Page 30
Installation Steps
1. DO NOT PLUG THE SECURITY KEY IN AT THIS TIME!
2. Insert the OMEGA 7.0 System Software USB install thumb drive. Run
setup.exe from the USB install thumb drive.
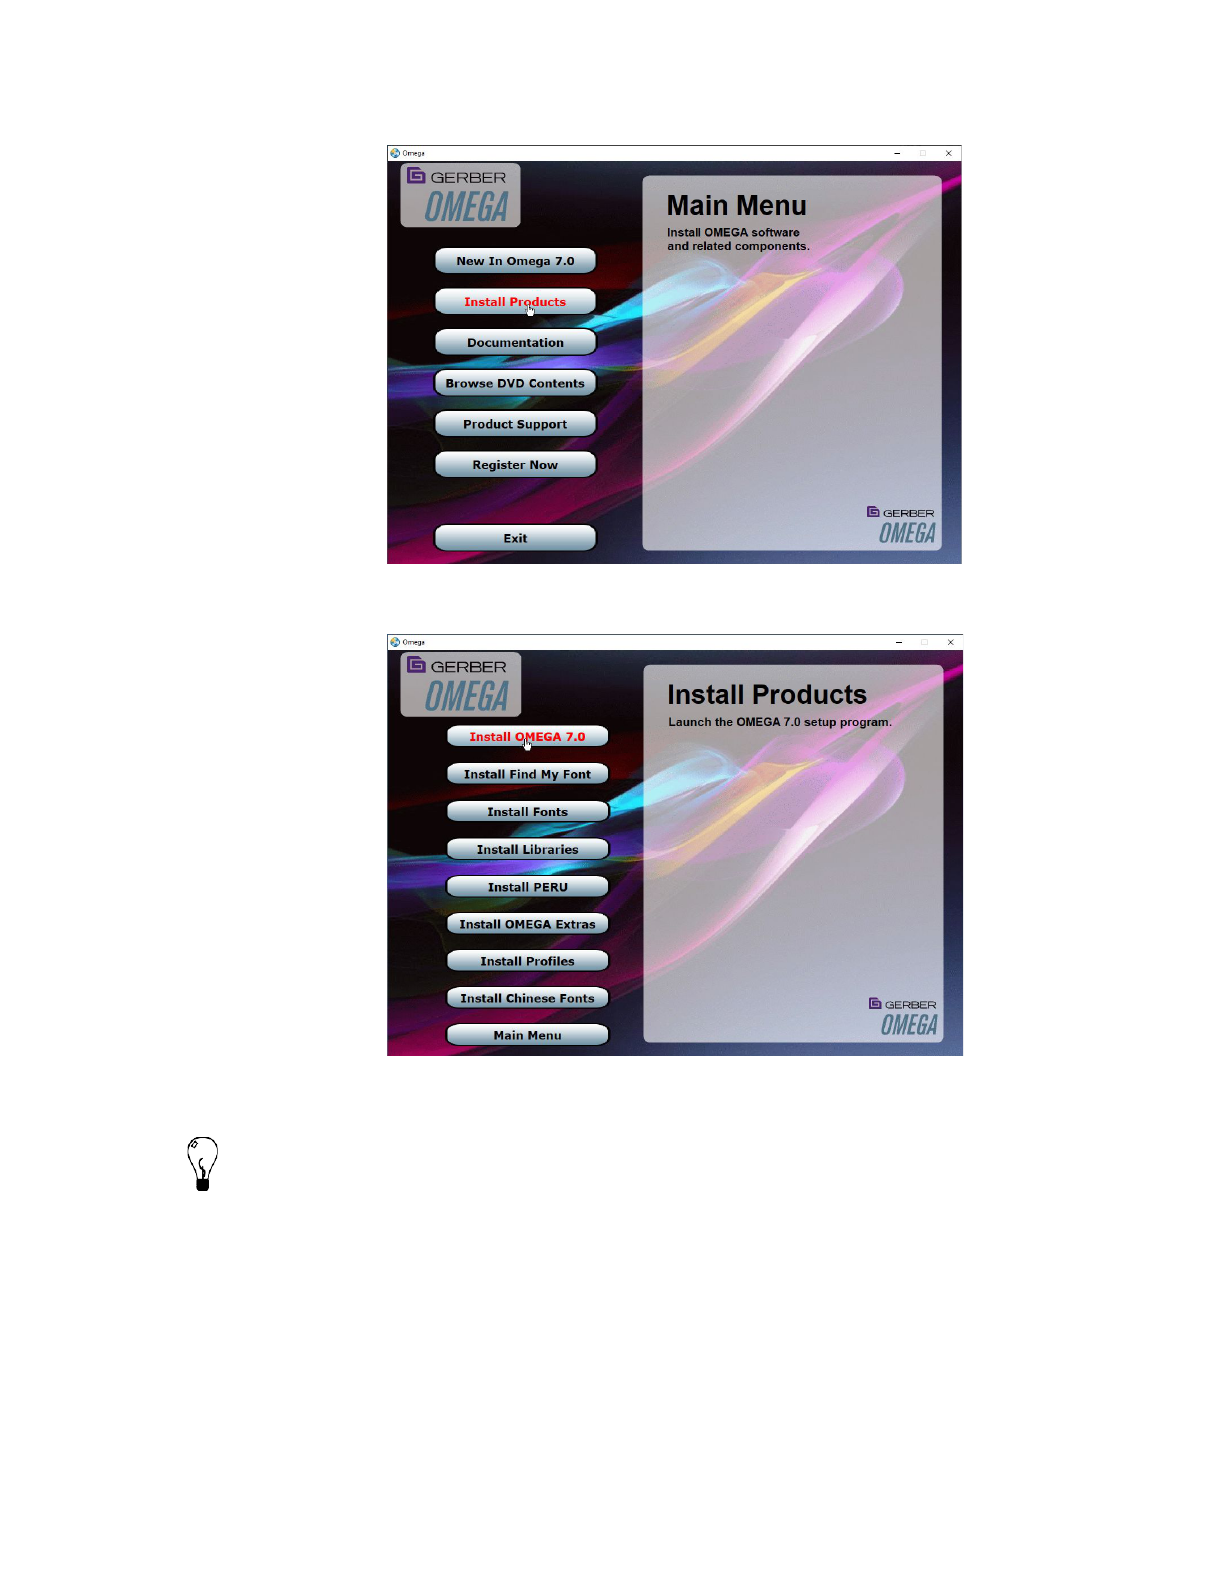
3. The OMEGA 7.0 Main Menu screen will open. In the OMEGA 7.0 Setup Wizard click the
Install Products button. An Install Products screen opens.
4. Choose Install OMEGA 7.0.
5. If the Choose Setup Language dialog box opens, verify the correct language is selected.
Click Next.

OMEGA 7.0 Getting started Page 31
6. The License Agreement dialog box opens. If you agree to the License Agreement terms,
Click Yes. If not, click No and return the complete
OMEGA 7.0 kit to your distributor.
7. Click Next at the InstallShield screen.
8. A message will appear about backing up files. Click Yes to proceed, or click No to exit
installation.

OMEGA 7.0 Getting started Page 32
9. After clicking Yes, the Sentinel Driver may or may not install.
● If the Sentinel driver does NOT install, skip to the next section.
10. If the Sentinel driver DOES install, a prompt will appear for a system restart. If a system
restart required message appears, click OK and follow instructions in the System Restart
dialog box that opens. Note: You must restart the PC after installing the Sentinel driver
in order to continue the software installation.
11. Click Finish and the computer will shutdown and restart. If you accidentally choose NO,
you will be returned to the Install Products Screen. Reboot your computer.
12. Once the system reboots and returns to the desktop screen, you must re-initiate the
install. Browse to the OMEGA 7.0 USB install thumb drive and run setup.exe.

OMEGA 7.0 Getting started Page 33
13. The OMEGA 7.0 Main Menu screen opens. Click on the Install Products button, then
click the Install OMEGA 7.0 button, and follow the instructions in the dialog boxes
that appear. Proceed to the next step.
When a DEMO MODE Message appears, install the security key and click on NO to
look for the security key again. The installation will proceed.
At this point, either the installation will proceed, or you will be prompted for a password.
If the password screen appears, enter the password provided on the password card in
the OMEGA kit.

OMEGA 7.0 Getting started Page 34
14. Enter your name and your company name. The serial number from your security key
will automatically display. Click Next.
15. The Choose Destination Location dialog box opens. Choose the default location and
click Next.
16. To install to a custom location, Use the browse button to navigate the folders to find the
location where you want OMEGA 7.0 to be installed. Click Next.
Note: By default, Setup will install OMEGA 7.0 in the folders listed at the end of this
document. GSP Fonts, Libraries, and Palettes have their own folders elsewhere on the
computer. See the list of locations Use the “Gerber Folder Locations” shortcut to locate
them quickly and easily.

OMEGA 7.0 Getting started Page 35
17. The Setup Type dialog box opens. Choose from the three setup types described below.
Most users select Typical.
18. Choose the setup type you desire: Typical, Compact, or Custom. Click Next
19. If custom is chosen, a screen will appear to choose the install items. Choose the items to
be installed.
20. Click the Change button in the Select Features dialog box to open the Select Subfeatures
dialog box. If a feature does not have subfeatures, the Change button is disabled.

OMEGA 7.0 Getting started Page 36
21. Choose the subfeatures to load and click Continue to continue with the installation. The
Select Features dialog box reopens.
22. Follow the on-screen instructions in the Select Features dialog box. Click Next.
23. Choose the default program folder name, or enter a new program folder name.
24. Choose to create a desktop icon and / or Quick Launch icon.
a. A desktop icon provides a shortcut to all the OMEGA 7.0 program icons, as well
as a link to OMEGA 7.0 folder locations
b. A quick Launch icon adds a small, easily-accessed icon at the bottom of the
Windows screen.

OMEGA 7.0 Getting started Page 37
25. If upgrading and on the same PC as a previous OMEGA version, existing font files and
GCA libraries will get copied for OMEGA 7.0 use.
26. A progress box displays showing the files being copied, and an informational OMEGA
7.0 slide presentation will play.
27. If upgrading from OMEGA 5, 4, or 3 on the same PC as OMEGA 7.0 a prompt will
appear asking if the previous versions should be un-installed. Click Yes or No for
uninstalling any previous versions.
a. OMEGA 7.0 can run side by side with OMEGA 6.5, 6.0*, 5.0*, 4.0*, and 3.0*. This
can help the transition from a previous version to OMEGA 7.0.
28. If a reboot prompt appears, BE SURE TO REBOOT THE COMPUTER.

OMEGA 7.0 Getting started Page 38
29. If a reboot prompt does not appear, additional screens will appear to install output
devices. If upgrading from a previous version on the same PC, the previously installed
output devices will be shown. If needed, change any output devices and click close to
move to the next screen.
30. A screen will ask to check for updates. It is highly recommended to click Yes.

OMEGA 7.0 Getting started Page 39
31. If an update is available, follow the prompts to download and install the update.
32. A screen will prompt to install fonts and profiles from the “Install Products” menu.
Click OK to return to the Install Products screen where Fonts, Libraries and other
items can be installed.
33. Click Finish to complete the installation. If the "View Readme" box is checked, the
OMEGA 7.0 Readme file will open. Close it when done reading. If the Install
plotters/printers box is checked, several dialog boxes will open in sequence.
34. Please reboot your computer even if not prompted to do so.
35. Click OK and the Install Products screen will open. Install Find My Font, Fonts,
Libraries, Profiles and follow the instructions that follow.
Note: Fonts and profiles can be loaded using the OMEGA 7.0 System Software USB
install thumb drive. Install Products button or GSP Tray. For more font information
refer to the section “Installing fonts from the OMEGA 7.0 System Software USB
install thumb drive.” For more Profile information refer to “Using the Gerber
Profile Manager.”
Activating Arabic language support
Enabling Arabic for OMEGA 7.0 requires the following steps:
Enable Arabic support in Windows Control Panel
Enable Arabic fonts in Composer on the Tools > Options > Text tab.
Install the Arabic Font Pack using Font Manager or transfer existing Arabic fonts from a
previous OMEGA software package.
After enabling Arabic support for OMEGA 7.0, Arabic text may be entered using the Enter/Edit
Text dialog box. Arabic text cannot be entered using Text on the Work Surface (TOWS).
For complete instructions on how to enable Arabic and load the Arabic fonts, see “Installing
Arabic for OMEGA 7.0.pdf” located in the Documentation\How Tos folder on the OMEGA 7.0
System Software USB install thumb drive.

OMEGA 7.0 Getting started Page 40
Activating Chinese language support
Enabling Chinese for OMEGA 7.0 requires the following steps:
Enable Chinese support in Windows Control Panel
Enable Chinese fonts in Composer on the Tools > Options > Text tab
Install the Chinese Font Pack using Font Manager or transfer existing Chinese fonts from a
previous OMEGA software package.
After enabling Chinese support for OMEGA 7.0, Chinese text may be entered using the
Enter/Edit Text dialog box or the Enter/Edit Small Text dialog box. Chinese text cannot be
entered using Text on the Work Surface (TOWS).
For complete instructions on how to enable Chinese and load the Chinese fonts, see “Installing
Chinese for OMEGA 7.0.pdf” located in the Documentation\How Tos folder on the OMEGA 7.0
System Software USB install thumb drive.

OMEGA 7.0 Getting started Page 41
Chapter Three:
Adding Output Devices
Whether installing OMEGA 7.0 for the first time or upgrading your software, you may need to
add output devices. The Add or Delete Plotters/Routers, or Add or Delete Vinyl Printers dialog
boxes enable you to install the output devices. You can access these dialog boxes four different
ways:
1 During installation of OMEGA 7.0 by turning on the Install Printers/Plotters checkbox
located on the final installation screen.
2 By right clicking on the GSP Tray icon that is found at the bottom right of your
Windows status bar and choosing Install Vinyl Printer, Install Plotter/Router. If
the GSP Tray icon is not available, click Start > Programs > Gerber OMEGA 7.0 >
GSP Tray.
3 By clicking Start > Programs > Gerber OMEGA 7.0 > GQMgr > Install menu > Plotter,
Vinyl Printer, or Inkjet Printer.
4 By clicking one of the “Install…” buttons in the Omega Plot “Plotter/Printer
Select” dialog box.
These procedures are described in the following pages:
To add output devices after installing OMEGA 7.0 software
To add or delete a local vinyl printer (USB-to-Parallel)
To add or delete a remote vinyl printer
To add or delete a network vinyl printer
To add a local plotter via a COM port
To install a plotter via a USB port
To delete a local plotter
To add or delete a remote plotter
Note: You must have Administrative privileges to install the Windows USB-to-
Parallel driver or any peripheral drivers and software updates on your system.
Y
ou
must also turn OFF User Account Control (UAC). To do so, use the Windows search
tool and type in UAC and press Enter. Click on
Turn User Account Control on or off
and follow instructions in the dialog box.

OMEGA 7.0 Getting started Page 42
Chapter 3: Adding output devices
at the end of OMEGA 7.0 installation
To add output devices after installing OMEGA 7.0 software
1 Turn on Install Plotters/Printers checkbox in the OMEGA 7.0 Setup Complete dialog
box to open the Add or Delete Gerber Vinyl Printer(s) dialog box.
2 If you are installing a vinyl printer use one of the procedures in “Installing vinyl
printers.” If you are not adding a vinyl printer, click Close to display the next
device installation dialog box - the Add or Delete Plotter/Router(s) dialog box.
Follow the installation procedures later in this chapter.
Installing vinyl printers
OMEGA 7.0 allows you to install three types of vinyl printers:
Local (Gerber USB-to-Parallel)
Remote
Network (Gerber MAXX™ 2 or GERBER EDGE FX)
Note: There may be some screen shot variation depending on which operating system is being
used.
Local vinyl printers
GERBER EDGE and EDGE 2 vinyl printers can be connected to the OMEGA 7.0 computer via a
Gerber USB-to-Parallel cable.
Windows 8.0/8.1 and 10 computers do not support the needed EDGE 1 and EDGE 2
parallel port usage. Therefore you cannot communicate with a GERBER EDGE or EDGE
2 printer VIA PARALLEL PORT
. You must use a Gerber USB-to-Parallel cable.
Or you can upgrade your thermal printer to a GERBER EDGE FX which communicates via
Ethernet cable.
Installing a GERBER EDGE using the Gerber USB-to-Parallel cable
You can install a GERBER EDGE as a USB device using the Gerber USB-to-Parallel available
from GSP.
See the "USB Interface Cable Installation Instructions.pdf" document on the OMEGA 7.0 USB
install thumb drive in the documentation folder for EDGE USB Installation Instructions.
Do not plug in the Gerber USB to Serial or Parallel cables until instructed to do so in the instructions.
Note: This procedure assumes you have installed OMEGA 4.0 SP1 or higher.
To delete a local vinyl printer

OMEGA 7.0 Getting started Page 43
1 Open the Add or Delete Gerber Vinyl Printer(s) dialog box. The Local tab displays.
Note: There may be some screen shot variation depending on which operating system is being
used.
2 Choose the printer from the Installed Vinyl Printer to be deleted.
3 Click Delete.
4 Click Close. The next time that you access the Add or Delete Gerber Vinyl Printer(s)
dialog box, the vinyl printer will be removed from the Installed Vinyl Printers field.
Remote vinyl printers
To add a remote vinyl printer
Note: Instructions for networking Gerber equipment can be found in “Chapter Seven:
Networking Devices.” Follow these instructions before proceeding.
Note: There may be some screen shot variation depending on which operating system is being
used.
1 Open the Add or Delete Gerber Vinyl Printer(s) dialog box. The Local tab displays.
Click the Remote tab.

OMEGA 7.0 Getting started Page 44
2 Click the Browse button to open the Browse for Folder dialog box.
3 Select the correct drive (Gspqueue folder) for the networked printer.
4 Click OK to return to the Add or Delete Gerber Vinyl Printers dialog box with the
Remote Path filled in.
5 Choose a printer from the Available Vinyl Printers on the remote system list.

OMEGA 7.0 Getting started Page 45
6 Click Add to open the Add-Name Device dialog box.
7 Use the name provided, or enter your own description and click OK. The name of the
new plotter will appear in the Installed Vinyl Printers field of the Add or Delete
Gerber Vinyl Printer(s) dialog box.
8 If you wish to modify which profiles display in OMEGA 7.0, click the Profile Manager
button to open the Gerber Device Profile Manager dialog box. Turn on which profiles
that you want to appear (EDGE, EDGE 2, EDGE FX, or MAXX 2) and uninstall any
profiles that are unnecessary and click OK.
9 Click Close to close the Add or Delete Gerber Vinyl Printer(s) dialog box.
To delete a remote vinyl printer
1 Open the Add or Delete Gerber Vinyl Printer(s) dialog box. The Local tab displays.
2 Click the Remote tab.
Note: There may be some screen shot variation depending on which operating system is being
used.

OMEGA 7.0 Getting started Page 46
3 Choose the installed vinyl printer to be deleted.
4 Click Delete.
5 Click Close. The next time that you access the Add or Delete Gerber Vinyl Printer(s)
dialog box, the remote vinyl printer will be removed from the Installed Vinyl
Printers list.
Networked vinyl printers
To add a network vinyl printer
1 Networked vinyl printers include the GERBER EDGE FX and the GERBER MAXX 2.
Open the Add or Delete Gerber Vinyl Printer(s) dialog box. The Local tab displays.
2 Click the Network tab.
Note: If a Security Alert dialog box displays when installing a GERBER EDGE FX, click
Unblock to allow the network connection to the GERBER EDGE FX.

OMEGA 7.0 Getting started Page 47
Note: For HiRez printing mode to work for the EDGE FX, the firmware must be updated. See
the instructions included with EDGE FX Firmware version on the OMEGA 7.0
USB install
thumb drive, or on
www.gerbertechnology.com
.
3 Choose an available thermal printer from the list.
4 If you are installing the GERBER EDGE FX and it is visible on the network, it appears
in the Available Vinyl Printers for networking box. Choose which GERBER EDGE FX
to install from the Available Vinyl Printers list.
OR
If you are installing a GERBER EDGE FX you can click the Browse button to navigate
to the GERBER EDGE FX printer location.
OR
If you are installing either a GERBER MAXX 2 or a GERBER EDGE FX you can type
the IP number of your thermal printer in the IP Address box. Refer to your network
administrator for information on obtaining this address.
5 Click Add and the Add – Name Device dialog box displays. Accept the default name
or enter a unique name for the thermal printer.
6 Click OK to return to the Network tab. The name of the newly installed Gerber
thermal printer appears in the Installed Vinyl Printer(s) section of the Add or Delete
Vinyl printer(s) dialog box.
Note: Profiles are loaded from the OMEGA 7.0 System Software USB install thumb drive.
The USB install thumb drive must be installed to access the profiles.
7 To install or modify which profiles display in OMEGA 7.0, click the Profile Manager
button to open the Gerber Device Profile Manager dialog box. Select the devices from
the list to display the associated profiles (EDGE, EDGE 2, EDGE FX, or MAXX, Solara,
or Solara ion). Deselect the devices to hide the profiles that are unnecessary. You can
also use the Device Profile Manager to uninstall and reinstall profiles. You will need to
insert the OMEGA 7.0 Software USB install thumb drive to install profiles. For
complete help on this topic, press F1 while in the Device Profile Manager dialog box.

OMEGA 7.0 Getting started Page 48
8 Click OK to return to the Add or Delete Gerber Vinyl Printer(s) dialog box.
9 If you have installed a GERBER EDGE FX the Device Home page button is available
to open the web interface of the GERBER EDGE FX. Once open, you may wish
to make a shortcut on your desktop for easy access.
10 Click Close.
To delete a network vinyl printer
1 Open the Add or Delete Gerber Vinyl Printer(s) dialog box. The Local tab displays.
2 Click the Network tab.
3 Select the vinyl network printer to be deleted from the Installed Vinyl Printers list.
4 Click Delete.
5 Click Close.
6 The next time that you access the Add or Delete Gerber Vinyl Printer(s) dialog box,
the selected printer will be removed from the Installed Vinyl Printers field.

OMEGA 7.0 Getting started Page 49
Adding or deleting a plotter
Two types of plotters can be installed with your OMEGA 7.0 system, local and remote. Many
Gerber plotters are installed via a COM port, but some plotters can be installed using a USB
port. In addition to installing the USB plotter in OMEGA 7.0, you will need to install the plotter
driver that came with the equipment.
Tip: Occasionally a plotter will use a standard Windows driver instead of a custom
driver and the driver will already be loaded on your computer.
To add a local plotter via a COM port
1 Open the Add or Delete Gerber Plotter/Router(s) dialog box 42. The Local tab
displays.
2 Select a plotter from the Available Plotter/Router(s) on local system list.
3 Choose a Local Port.
Note: If you are installing a USB plotter such as a Gerber P2C, see the procedure entitled
“Installing a plotter via a USB port.
4 Click Add to open the Add - Name Device dialog box.
5 Accept the default name or enter your own description for the device. The description
appears in the output dialog boxes. Click OK. The name of the new plotter will appear
in the Installed Plotter(s) field of the Add or Delete Plotter(s) dialog box.
6 Close the Add or Delete Plotter(s) dialog box.

OMEGA 7.0 Getting started Page 50
To install a plotter via a USB port
This procedure assumes you have a Gerber P2C™ plotter. A 64 bit P2C driver is on the
OMEGA 7.0 USB install thumb drive.
If you are installing the Gerber Tempo, see the Gerber Tempo Setup Manual.
If you have a Gerber USB to Serial Cable, see the USB Interface Cable Installation
Instructions.pdf document in the OMEGA 7.0 Documentation Folder.
If you are installing another USB plotter see the documentation that came with the plotter.
1 Plug in and turn on the Gerber P2C plotter (or other compatible USB plotter).
2 Plug the USB cable into the plotter and then into the USB port of your
computer. Windows should detect the new device and display the “New
hardware found” message.
3 When Windows displays the New Hardware Wizard, install the plotter driver using
the Gerber P2C driver disk that came with the equipment. If you need specific
instructions, see the PDF document located on the driver disk entitled “Installing the
Gerber P2C Plotter USB Driver.”
4 After installing the driver, right-click Omega Tray and choose Install Plotter/Router to
open the Add or Delete Plotter/Router(s) dialog box. The Local tab displays. (If the
Omega Tray icon is not available, click Start > Programs > Gerber OMEGA 7.00 >
Omega Tray.)
5 Choose the Gerber P2C (or other compatible USB plotter) and click USB for the Local
Port.
6 Click Add to open the Add - Name Device dialog box.

OMEGA 7.0 Getting started Page 51
7 Accept the default name or enter your own description for the device. The description
appears in the output dialog boxes. Click OK. The name of the new plotter will appear
in the Installed Plotter(s) field of the Add or Delete Plotter(s) dialog box.
8 Close the Add or Delete Plotter(s) dialog box.
9 The first time you send a job to this plotter GQ Manager will flash prompting you to
open it. The Select USB Vendor and Product Numbers dialog box displays.
10 Choose the connected USB plotter from the Connected Devices list (or the Common
Devices list if it is a plotter in that list) and click OK. This will load the USB
information (Vendor ID and Product ID) for the plotter into OMEGA 7.0. Click OK.
Tip: If the plotter you are installing is a common device it may be listed in the Common
Devices list. Turn on Common Devices to activate that list.
11 To view the USB plotter Vendor and Product IDs, open GQMgr. Right-click the
installed USB plotter and choose Properties to open the Properties for Gerber P2C (or
other plotter) dialog box.

OMEGA 7.0 Getting started Page 52
12 Turn on USB and the Vendor ID and the Product ID should display in the USB
information box.
Tip: The List button in the Properties dialog box returns to the Select USB Vendor and
Product ID dialog box.
To install a plotter via TCP/IP connection
1 Open the Add or Delete Gerber Plotter/Router(s) dialog box 42. The Local tab
displays.
2 Click on the Network tab. Choose the appropriate plotter from the Available Plotter(s)
for networking list. Click the Add button to add it to the Installed Plotter/Router(s) list
at the bottom of the dialog box.
3 Enter the default IP address in the IP Address field. The default IP address should be
found in the original documentation provided with your plotter. If not, contact the
manufacturer.
4 Click on the Close button to complete the process.
To delete a local plotter
1 Open the Add or Delete Gerber Plotter/Router(s) dialog box 42. The Local tab
displays.
Note: There may be some screen shot variation depending on which operating system is being
used.

OMEGA 7.0 Getting started Page 53
2 In the Available Plotter/Router(s) list box select the plotter to be deleted.
3 Click Delete.
4 Click Close.
To add a remote plotter
Note: You must map a network drive to the remote plotter. You will get errors if you browse
through Network Neighborhood to select the drive.
1 Open the Add or Delete Gerber Plotter/Router(s) dialog box42.
2 Click the Remote tab.
3 Click the Browse button to open the Browse for Folder dialog box.
4 Select the appropriate drive (Gspqueue folder) for the remote plotter.

OMEGA 7.0 Getting started Page 54
5 Click OK to return to Add or Delete Plotter/Router(s) with the Remote Path
completed.
6 Choose a plotter from the Available Plotter/Router(s) on remote system list.
7 Click Add to open the Add - Name Device dialog box.
8 Either accept the default name or enter your own description in the Device Name text
box. The description will display in the output dialog boxes.
9 Click OK. The name of the newly installed plotter appears in the Installed
Plotter/Router(s) section of the Add or Delete Plotter/Router(s) dialog box.
10 Click Close to return to the Plotter/Printer Select dialog box.

OMEGA 7.0 Getting started Page 55
To delete a remote plotter
1 Open the Add or Delete Gerber Plotter/Router(s) dialog box 42.
2 Click the Remote tab.
3 Select the installed plotter to be deleted.
4 Click Delete.
5 Click Close.

OMEGA 7.0 Getting started Page 56
Installing fonts from the OMEGA 7.0 System Software
USB install thumb drive
Gerber Font Manager is accessible from the OMEGA 7.0 System Software USB install thumb
drive, the OMEGA 7.0 program list, or from OMEGA Tray 7.0. When open, Gerber Font
Manager displays fonts that are currently loaded on your system in the left pane and
uninstalled fonts that are on the OMEGA 7.0 System Software USB install thumb drive in the
right pane. Fonts that can be installed from the drive for free display in black. At the bottom of
the dialog box, underneath the left pane are three color-coded notations:
Not on drive or needs to be Purchased: Purple fonts in the installed list are installed on
the computer but not on the disk. These fonts may have been separately purchased,
purchased from another source, or fonts you created yourself.
Not Secured for System: Red fonts in the list will not be used by OMEGA 7.0.
Purchasable Fonts: Blue fonts in the list indicate that they can be loaded from the disk
if you choose to purchase that font pack. Fonts are loaded from the disk using a
password obtained at purchase.
Fonts are installed from the disk to your computer by highlighting one or more fonts in the
Uninstalled Fonts list (right pane) and clicking Install/Purchase. Free fonts (which install
immediately) are removed from the Uninstalled Fonts list and appear in the Installed Fonts list.
If the font is part of a purchasable font pack, the Gerber Font Pack Purchase password dialog
box displays so that you can enter a password.
To install fonts from the OMEGA 7.0 System Software USB install thumb drive
1 Insert the OMEGA 7.0 System Software USB install thumb drive. The OMEGA
7.0 Setup Wizard should automatically display. Click Start > Run, then Browse the
drive for Setup.exe;
Note: There may be some screen shot variation depending on which operating system is being
used.
OMEGA 7.0 Getting started Page 57
2 Click Install Products to open the Install Products screen.
3 Click the Install Fonts button to open Font Manager.
Tip: You can also open the Font Manager from the Gerber OMEGA program group, or
right-click the Omega Tray icon and choose Font Manager.
The USB install thumb drive must be in the drive to access the fonts.

OMEGA 7.0 Getting started Page 58
4 In the Uninstalled Font list click on the fonts to install so that they are highlighted. Use
the Windows convention of Shift+click or Ctrl+click to select multiple fonts.
5 Click Install/Purchase. Free (black) fonts automatically install into a designated
folder. The font folder location is shown when clicking the Install To menu item. You
can access the folder anytime by going to the Gerber OMEGA 7.0 program group and
selecting Gerber Folder Locations and then Gerber Fonts.
Purchasable (blue) fonts require a password for installation. The Gerber Font Pack
Purchase Password dialog box automatically displays when you attempt to install a
purchasable font.
6 Enter the Password from the Password Envelope provided when you purchased the
font pack. If your password is missing contact your Gerber distributor or Gerber
Service. Please have your OMEGA 7.0 serial number, GSP System identification
number, and your sales order number available when you call.
7 Click OK and the fonts you have selected install in the C:\Program Files\Gerber
Scientific Products\OMEGA 7.0\GSPFonts folder. Fonts in the font pack that were not
selected are made available for installation and now display in black rather than blue

OMEGA 7.0 Getting started Page 59
in the Uninstalled Fonts list. You may select one or more of these fonts from the list
and install them.
Tip: You can also right-click on the font and select Install.
Uninstalling fonts
The Font Manager dialog box displays installed and uninstalled fonts. Installed fonts are
available for use in Composer. If you uninstall a font it is not permanently deleted. Uninstalled
fonts that are not located on the OMEGA 7.0 System Software USB install thumb drive are
moved to the ni (not installed) folder where they can later be reinstalled. You can access the
folder anytime by going to the Gerber OMEGA 7.0 program group and selecting Gerber Folder
Locations and then Gerber Fonts.
Installing the Gerber Library Pack (Now Included with
OMEGA)
A number of free Gerber Library folders containing Gerber Clip Art (GCA) install automatically
with OMEGA 7.0. Additional Library files formerly available for purchase can now be installed
from the OMEGA 7.0 System Software USB install thumb drive at no charge.
To install a purchasable Gerber Library using the OMEGA 7.0 USB install thumb drive
1 Insert the OMEGA 7.0 System Software USB install thumb drive. Browse to and execute the
setup.exe file
2 Click Install Products to open the Install Products screen.
3 Click Install Libraries to open the Copy Libraries dialog box.
4 With OMEGA 7.0, a message will appear stating that Libraries will be copied to your
hard drive.
5 Click OK and the GCA files are copied to the disk into the Libraries folder. All GCA
files in that Library pack folder are now available for use.
Using the Gerber Device Profile Manager
The Gerber Device Profile Manager allows you to install or remove ICC profiles for Gerber
printers. The Gerber Device Profile Manager can filter device profiles so that only the profiles
for the printers in your workflow are available.

OMEGA 7.0 Getting started Page 60
Profiles are no longer automatically installed during OMEGA 7.0 installation. You must install
profiles from the OMEGA 7.0 System Software USB install thumb drive. If you delete device
profiles using the Gerber Profile Manager, they are removed permanently from your system.
If you want these profiles in the future, you must reinstall them from the original OMEGA 7.0
System Software USB install thumb drive.
Installing ICC profiles using the OMEGA 7.0 System Software USB install
thumb drive
You can install new ICC device profiles from the OMEGA 7.0 System Software USB install
thumb drive or reinstall previously removed profiles using the Gerber Device Profile Manager.
To install ICC profiles
1 Insert the OMEGA 7.0 System Software USB install thumb drive. Browse to and execute the
setup.exe file.
2 Click Install Products to open the Install Products screen.
3 Click the Install Profiles button to open the Gerber Device Profile Manager.
Tip: You can also open the Device Profile Manager by right-clicking the Omega Tray
icon and selecting Device Profile Manager. If the Omega Tray icon is not available,
start it from the Gerber OMEGA 7.0 program group. Alternatively you can open the
Profile Manager from any Add or Delete Printer dialog box, click the Profile Manager
button.
4 Choose a device from the Device(s) list.
5 Click Install From… to open the Browse for Folder dialog box. Browse to the GSP
Profiles folder on the OMEGA 7.0 System Software USB install thumb drive.

OMEGA 7.0 Getting started Page 61
6 Click OK to return to the Gerber Device Profile Manager dialog box. The profiles that
are available to install display in the Not Installed Information box.
7 Select the ICC profiles to load from the Not Installed Information list. Use the
Windows convention of Shift+click or Ctrl+click to select multiple profiles.
8 Click Install. The newly installed profiles appear in the Install Information portion
of the dialog box.

OMEGA 7.0 Getting started Page 62
Tip: To see detailed information on an individual profile select that profile in the
Installed or Not Installed list and the File Name, Tag Information, and location display.
9 Click OK.
Filtering ICC profiles using the Gerber Device Profile Manager
Only the profiles for the printers highlighted in the Device(s) list of the Gerber Device Profile
Manager dialog box are available in OMEGA 7.0. You may select one or more devices from the
list using the Windows standard Ctrl+click or Shift+click conventions.
To filter ICC profiles using the Gerber Device Profile Manager
1 To open the Gerber Device Profile Manager right-click the Omega Tray
icon and select the Device Profile Manager, or from any Add or Delete
Printer dialog box, click the Profile Manager button.
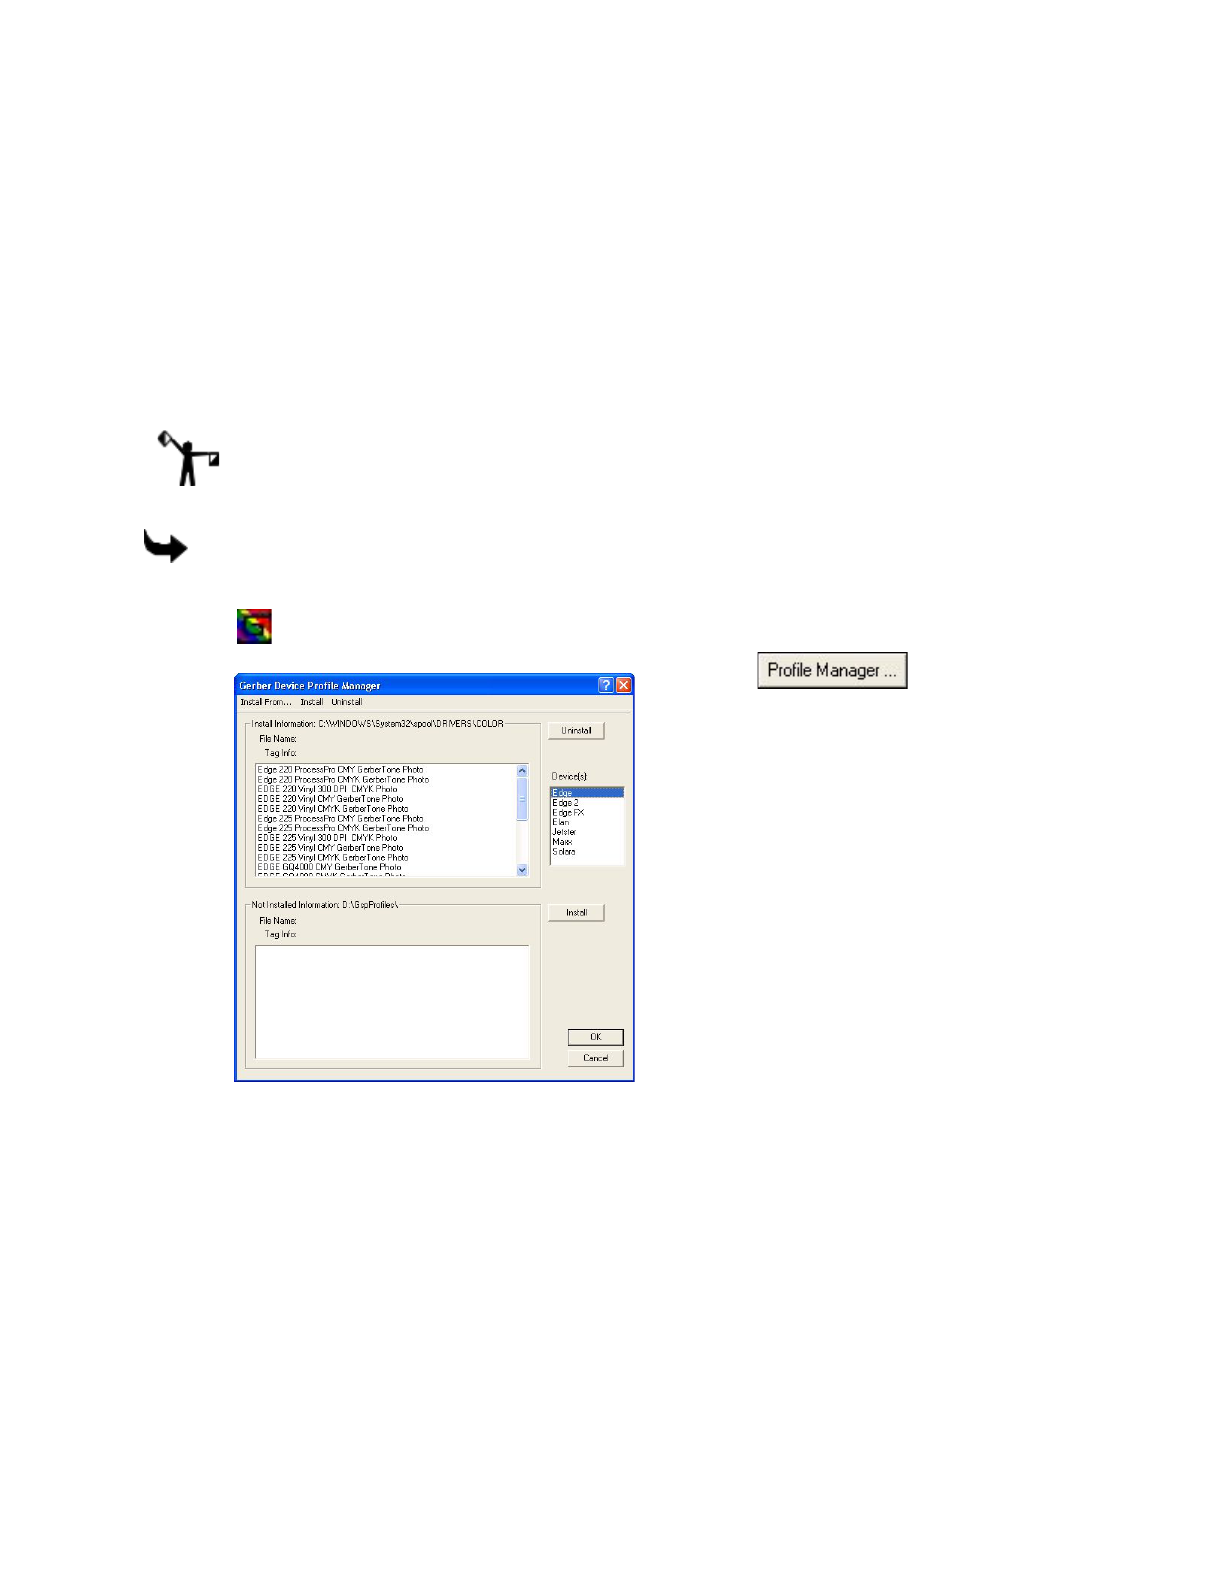
OMEGA 7.0 Getting started Page 63
2 Select the devices in your workflow. Only profiles that are installed for those devices
will display in OMEGA. Use the Windows convention of Shift+click or Ctrl+click to
select multiple devices.
3 Click OK.
Removing ICC profiles using the Gerber Device Profile Manager
You can permanently remove unnecessary ICC device profiles from your system using the
Gerber Device Profile Manager. Removing profiles for equipment that is not in your workflow
makes it easier to select the correct profile.
Note: If you delete device profiles using the Gerber Device Profile Manager, they are removed
permanently from your system. If you want these profiles in the future, you must reinstall
them from the OMEGA 7.0 System Software USB install thumb drive.
To remove ICC profiles using the Gerber Device Profile Manager
1 To open the Gerber Device Profile Manager right-click the GSP Tray
icon and select the Device Profile Manager, or from any Add or
Delete Printer dialog box, click the Profile Manager
button.
2 Choose one or more devices from the Device(s) list.
3 Select the ICC profiles that you wish to remove from the Install Information list. Use
the Windows convention of Shift+click or Ctrl+click to select multiple profiles.

OMEGA 7.0 Getting started Page 64
4 Click Uninstall. The selected profiles are permanently removed from your system and
no longer display in the Install Information list.
5 Click OK.

OMEGA 7.0 Getting started Page 65
Making the required update to Sabre firmware
The firmware on Sabre routers must be at revision level L.0 or later in order for the router to
work with the version of ART Path included with OMEGA 7.0. It is easy to upgrade your router
to the latest revision of firmware using the GSP Flash Downloader program located in the
Firmware folder on the OMEGA 7.0 System Software USB install thumb drive. GSP Flash
Downloader is the program used to upgrade the operating system in your Gerber Sabre to a
new revision level. It accomplishes the same thing as installing new integrated circuit chips into
the Sabre. Do not use any other Flash Downloader program that you may have on your system
or on any other media. The G32Flash V3.1.2.exe included on this disk guards against loading an
incompatible version of the operating system on your Sabre.
CAUTION: Attempting to install the wrong version of the operating system on
your Sabre router WILL damage it. Be sure to follow these instructions carefully
and use only the G32Flash V3.1.2.exe to upgrade your Sabre.
First, determine the current Rev level of your Sabre firmware.
To determine the Rev level of Sabre firmware
1 From the Sabre MAIN MENU 2, choose C: Configuration. The CONFIGURATION 1
menu displays.
2 Choose C: Revision level. The REVISION menu displays.
3 On the Control line carefully note all the letters and numbers that follow.
To decide if the firmware can be updated
1 If the Control is any version of A, B, C, or D, STOP. You must contact Gerber Service at
860-871-8082 or 800-828-5406 for assistance. If you are outside the United States, you
must contact your authorized Gerber distributor.
2 If the Control is E.6A, F.5, H.0, I.4, or L.2E, or N.3E, you can upgrade the operating
system using one of the SAB_Q00x.sre files. Sabre routers at any of these revision
levels have a 1MB control board and can only have one language version of the
operating system at a time. The folders for individual language versions of the Q.0x
operating system are as follows:
FOLDER
FIRMWARE FILE
LANGUAGE
Q0 - DUTCH
SAB_Q00D.sre
Dutch
Q0 - ENGLISH
SAB_Q00E.sre
English
Q0 - FRENCH
SAB_Q00F.sre
French
Q0 - GERMAN
SAB_Q00G.sre
German
Q0 - GERMAN
SAB_Q00I.sre
Italian
Q0 - ITALIAN
SAB_Q00P.sre
Portuguese
Q0 - SPANISH
SAB_Q00S.sre
Spanish
3 If the Control is L.0, L.2, or N.3 you can upgrade the operating system using the T1
operating system file SAB_T01_.sre. Sabre routers at these Control levels have a 4MB
control board, which can accept the operating system upgrade that contains all
language versions. After upgrading the operating system to T1 you can select one of
the languages at the Sabre keyboard.

OMEGA 7.0 Getting started Page 66
If the operating system is at Rev level L.0, L.2, L.2E, or N.3 it will work with the OMEGA 7.0
version of ART Path. However, Gerber recommends that you upgrade to the latest operating
system.
To update your Sabre router’s firmware
1 Determine to which COM port the Sabre is connected. Verify the connection by
opening GQMgr.
CAUTION: Attempting to install the wrong version of the firmware on your Sabre
router WILL damage it. Before you go any further, make certain that the version of
the firmware you select conforms to the previous instructions.
Note: There may be some screen shot variation
depending on which operating system is being used.
2 In Windows Explorer select the desired operating
system. If the Control is E.6A, F.5, H.0, I.4, L.2E, or
N.3E, navigate to Firmware\Sabre\Q0x - 1MB
folder located on the OMEGA 7.0 System Software
USB install thumb drive. Browse to and execute the
setup.exe and then click the Browse Drive Contents
button. Within the Sabre folder, double click the
desired Q0 - language folder. For example, Q0 -
Italian.
3 If the Control is L.0, L.2, or N.3 navigate to
Firmware\Sabre\T1 - 4 MB folder located on the OMEGA 7.0 System Software USB
install thumb drive. Insert the USB install thumb drive. Browse to and execute the
setup.exe and then click the Browse Drive Contents button to locate the
Firmware\Sabre\T1 – 4 MB folder.
4 Double-check your operating system selection. If you are not certain which
operating system version to install, call Gerber Service at 860-871-8082 or
800-828-5406 before continuing.
5 Double-click G32Flash V3.1.2.exe to open the Downloader program. The G32Flash
3.1.2 GSP Flash Downloader window displays.
6 Confirm that the desired SAB_Q00X.sre (where X is the language indicator) or the
SAB_T01_.sre file displays in the File box.
7 Confirm that Router is selected in the Device box.
8 In the Port box click the COM port to which the Sabre is connected.
9 Click Download. As the selected operating system file downloads, a slider bar tracks
progress. Status messages will appear in the Status/Download History box.
10 When the word Done appears in the Status/Download History box, the Sabre will
reboot. The Sabre is now upgraded to the new operating system. Press Exit to close the
G32Flash window.
11 The Sabre keyboard should ask you to confirm the table size (404 or 408). Toggle to the
correct option and press ENTER.

OMEGA 7.0 Getting started Page 67
12 The Sabre keyboard should then ask you to confirm the router motor type. Toggle the
A key to display the type of routing motor currently installed on your router and press
ENTER.
13 The Sabre displays the message to orient. Press A.
Troubleshooting the Sabre firmware update
If you choose the wrong device or you choose the wrong COM port, the following message
appears in the Status/Download History box:
Error: No response from device. Abnormal Termination - Download NOT
successful.
After selecting the correct COM port or device, run the upgrade again by pressing Download.
Selecting a language for a 4 MB Sabre
After updating the Sabre firmware to revision T1 you can select the language you wish to use.
To select a language with a T1 - 4 MB Sabre operating system
1 From Main Menu 2 of the Sabre keyboard, choose C: Configuration. The
CONFIGURATION 1 menu displays.
2 Press the UP arrow key to display the CONFIGURATION 2 menu.
3 Press B: Setup to display SETUP MENU 1.
4 Press the UP arrow key to display SETUP MENU 2.
5 Press A: Select Language to display the SELECT LANGUAGE menu.
6 Press A until the correct language displays.
7 Press Enter to accept the language and return to the SETUP MENU1.

OMEGA 7.0 Getting started Page 68
Chapter Four: Beyond Getting Started
Where do you go from here? This chapter provides information about your registration card,
locating your OMEGA 7.0 System ID and Serial Number, customer support, recovery
information, and computer viruses.
Registration card
The fastest way to register OMEGA 7.0 is ONLINE at:
https://www.gerbertechnology.com/sign-graphics/forms/software-registration/
If you do not have Internet access, please complete and return the registration form to Gerber.
You may also fax this form to 860-871-3862 Attention: Gerber Service. As a registered
OMEGA user, you will periodically receive information on OMEGA 7.0 updates and new
product information as it becomes available. Be sure to send any other hardware registration
cards to their respective manufacturers.
Note: By completing and returning the OMEGA 7.0 end-user registration card, you
acknowledge and accept the terms and conditions of the GSP Software License Agreement and
limited warranty for disk media and any applicable security device.
Locating the System ID and Serial Number
You will need your OMEGA 7.0 System ID number and OMEGA 7.0 Serial Number when you
order any OMEGA 7.0 option or talk to Gerber Service.
To locate the System ID and Serial Number
1 If Omega Tray is not running open it by clicking Start > Programs > Gerber OMEGA
7.0 > Omega Tray. The colorful Omega Tray icon displays in the Windows Status Bar.
2 Right-click on the Omega Tray icon from the Status Bar to open the Omega Tray
menu.
NOTE: You can also use the WINBLOCK Utility on the OMEGA USB install thumb drive to
create a report of your serial number and system ID number. Browse to and execute the
setup.exe file. Install the security key, then from the main install menu, click Product Support,
then click Security Key Report.

OMEGA 7.0 Getting started Page 69
3 Click System Identification String from the list. The Gerber System ID message
box opens. The Gerber System ID dialog box provides the System ID and System
Serial Number. (The System ID number is also printed on a label on the security
key.)
Getting Help right in OMEGA 7.0
The on-screen Help system of OMEGA 7.0 software is designed to quickly and easily provide
up-to-date procedures and information for you while you are working.
There are several ways to open Help topics:
In a dialog box, press F1 to get general information about that dialog box.

OMEGA 7.0 Getting started Page 70
Press Shift+F1 or click the arrow/question mark in the standard toolbar to turn the
cursor into a question mark, then click a tool, command, or menu item to get
information.
Click Help > Help Topics to open the Help window.
Note: There may be some screen shot variation depending on which operating system is being
used.
Finding a topic
The Navigation pane on the left side of the window contains three tabs – the Contents tab
(shown in the illustration), the Index tab, and the Search tab. The Contents tab is arranged in the
same order as the Table of Contents of the reference manual and is synchronized with the topic
displayed in the Topic pane in the right side of the window. The Index tab displays an
alphabetical listing of the keywords associated with topics. The Search tab provides access to
full-text search.
Note: To open or close the Navigation pane, toggle the Show or Hide button on the Help
toolbar.
Tip: If you open the Index tab, a quick way to find a topic is to type a word related to
what you want to do. For example, if you want to move an object, type “Move.” The list
automatically scrolls to display the word “Move” highlighted and the subtopics under it.
Finding additional topics in the Topic pane
The Topic pane contains two additional navigation tools. Clicking on words or phrases that are
in underlined green type displays additional information directly related to the open topic. For
example, in the “Decorative borders” topic, there are subtopics such as “Set the radius” and
“Absolutely size the border.”

OMEGA 7.0 Getting started Page 71
If you click the Prey or Next arrows, you sequentially step forward and backward through the
main help topics in the order in which they appear in the Table of Contents. You can also click
on one of the topics which are also shown to the right.
The down arrow list (shown below as Book 1) provides Browse Sequences of related topics.
Choose the Browse Sequence from the list to display those topics.
Another navigator tool is the “See Also” button directly below the topic title. Clicking on this
button displays a Topics Found list box with topics, both directly and indirectly related to the
open topic. For Example, in the Decorative borders topic, there are topics such as “Setting the
radius” and “Absolutely sizing the border” as well as topics related to drawing in general, such
as “Circles and ellipses” and “Rectangles and squares.”
Finding previously-viewed topics
Click Back in the Help toolbar, you sequentially step back through each of the topics you have
viewed since you opened Help in this working session. Alternatively you can choose the Back
command from the Options menu.
Printing topics
If you need a paper copy of a topic, you can print it right from the Help window.
To print a help topic
1 Click Options > Print or click on the Print button on the Help toolbar to open the
Print dialog box.
2 Choose the print options and then click OK.

OMEGA 7.0 Getting started Page 72
Customer support
If you have questions about OMEGA 7.0, you can contact Gerber Service by any of the methods
listed below. If you are a Support First™ member, use your toll-free assistance number.
phone: 860-871-8082 or 800-828-5406
fax: 860-871-3862
e-mail: gspservice@gerbertchnology.com
http://www.gerbertechnology.com/signage or
www.gspinc.com
Before calling with a software question, have the applicable information available:
Microsoft® Windows release numbers
GSP system ID and serial numbers
The OMEGA 7.0 System Software USB install thumb drive, Windows DVD, and the
computer hardware utilities disks
Gerber hardware
If you need assistance with any Gerber hardware, contact Gerber Service at 860-871-8082 or 800-
828-5406. Have the following information available:
OMEGA 7.0 system serial number
Gerber hardware serial number and model
Complete description of the problem
FastFacts
Gerber FastFacts™ provides answers to technical and service questions. FastFacts are available
in the Support section of the GSP website: www.gerbertechnology.com/eservice

OMEGA 7.0 Getting started Page 73
Chapter Five: Troubleshooting
This chapter of the manual is divided into two parts:
Questions and answers regarding setting up OMEGA 7.0
Error messages
Questions and answers
I’m a previous GRAPHIX ADVANTAGE customer who is upgrading my system. The label
on my upgrade kit is missing, so when the system asks for the password I don’t have one.
What should I do?
All GRAPHIX ADVANTAGE to OMEGA 7.0 upgrades have new security keys which are pre-
made to the current version. You will not need a password to install OMEGA 7.0. You should
remove your existing security key from the computer and follow the instructions as outlined in
the Getting Started Manual.
Where do I find the OMEGA 7.0 serial number and system ID?
Right-click the Omega Tray icon from the Windows Tray in the bottom right corner of your
screen. Choose System Identification String from the menu list. The serial number is also located
on the security key. (If the Omega Tray icon is not available, start it from the OMEGA program
group.)
When I try to install the software, I get an error message telling me to close all Gerber
applications?
It probably means that you minimized a Gerber program to an icon, rather than closing it
(Omega Plot or Omega Tray, for example). Check the task bar at the bottom of your desktop
and close the application.
My system cannot communicate with the plotter?
● Check the cables to ensure that they are correctly and securely installed, or try another
COM or USB port.
● Ensure you are connected directly to the computer with no adapters between the
computer and plotter. Depending on the plotter, some USB adapters are acceptable.
See “Adding or deleting a plotter” for more information.
● Verify you have selected the appropriate plotter driver in Omega Tray.
● Verify the queue folder is shared as gspqueue on both systems, if this is
a networked/remote device.
● See Chapter Seven: Networking Devices.

OMEGA 7.0 Getting started Page 74
● Ensure you are not installing an output device on a Layout Station.
● If Windows Vista or 7, turn off/configure User Account Control (UAC).
● If device uses a USB cable, verify Vendor ID and Product ID
● Ensure local user has permission to output.
● Ensure local user has permissions to read/write/modify the queue folder
● If you are still unsuccessful, call Gerber Service at 860-871-8082 or 800-828-5406 to verify
the installation.
I sent a job to the GERBER EDGE through the Omega Plot program. Nothing prints or a data
error occurs. What should I do?
● Be sure that the GERBER EDGE cable is attached directly to Gerber USB to Parallel
Cable and not to a switch box or USB hub or extender.
● Verify that the cable is fully connected to the GERBER EDGE and the computer. All
cable screws and clips must be fully installed to provide adequate grounding.
● It is strongly recommended that both the computer and the GERBER EDGE are plugged
into the same power strip. This provides a common ground. Different ground potentials
between different outlets may cause communication problems between the PC and
peripheral devices.
● Be sure that the GERBER EDGE is turned on before starting Composer or Omega Plot.
● Static can cause a data error – put static mats under the equipment and the operator;
have a material catcher for the vinyl to drop into.
● You may be using a USB cable (generic or Gerber). Be sure to use a Gerber USB to
Parallel Cable (P83301A) and set the EDGE interface setting to USB.
● Gerber EDGE FX – ensure cable is connected to a network card.
● Verify IP address [see FX Manual].
● Use static IP address [see FX Manual].
I am upgrading my system and have previously purchased the Braille option, but now I can’t
find the Braille icon.
The system looks for the Braille option and then creates the icon during installation. The
application installs when you install the USA Braille and/or USA Braille Relief fonts via Font
Manager.
Technical support messages
If you receive a message similar to one below, you need assistance from a Gerber Service
Representative (call Gerber Service at 860-871-8082 or 800-828-5406). See Customer Support on
page 72 for further necessary information.
Cannot find location…
Cannot find or create…

OMEGA 7.0 Getting started Page 75
Decompress failed on file…
Decompression failed on……-installation aborted
Error attempting…
Error creating…
Error returned…
Illegal key configuration…
Reboot failed…
Still cannot read…
Still cannot update…
Unable to define…
Unable to determine available disk space…
Unable to display…
Use DLL function failed…
Other messages
Key Read Error
Refer to the “Understanding security issues” section, if necessary, to make sure that the key is
securely connected, as well as installed in the correct port, and then reboot your computer. If
this fails, call Gerber Service at 860-871-8082 or 800-828-5406.
Cannot install OMEGA 7.0 on a remote drive
You can only install OMEGA 7.0 on a local drive of the computer where the USB security key is
located.
Gerber recommends at least ### MB of memory...Do you want to continue?
If you continue without adding the recommended amount of memory, your system will operate
more slowly and you may not be able to output large jobs.
Not enough space on…
Select another drive. Another solution is to note how much space is needed, exit installation,
make room on the hard disk by removing files, and then start the installation again. Also,
consider a Compact or Custom installation. Refer to “Choosing the setup type” for more
information on Compact installations. See “Computer Hardware and Software Requirements”
for more information on page 27.

OMEGA 7.0 Getting started Page 76
Chapter Six: HPGL Plotter Installation
Working with HPGL plotters
OMEGA 7.0 allows you to connect an HPGL plotter. HPGL is an acronym for Hewlett-
Packard® Graphics Language, a standard command set used to communicate with plotters.
OMEGA includes a generic HPGL driver capability that drives most vinyl-cutting
plotters. Additionally, specific drivers are included for basic cutting for a variety of
manufacturers including:
● Allen Datagraph™
● Aristo®
● Gerber Scientific Products
● Graphtec
● Ioline™
● Roland®
● Mimaki™
● Mutoh
● Summa®
● Vytek™
● Wild®
● Zund®
● Generic HPGL

OMEGA 7.0 Getting started Page 77
Verifying communication settings
Many plotters have communications settings that are set using DIP switches or a control panel
on the plotter. Verify that communications settings for your plotter match the communications
settings for OMEGA 7.0. This is important for users of non-Gerber plotters so that you can set
up your plotter appropriately since OMEGA 7.0 communication settings cannot be changed.
OMEGA 7.0 sends data as follows:
♦ Baud Rate = 9600
♦ Parity = No
♦ Data Bits = 8
♦ Stop Bits = 1
Note: Contact Gerber Service at 860-871-8082 or 800-828-5406 for other ways to verify
communication settings.
Custom HPGL plotter setup
If your HPGL plotter does not appear in the plotter list in the Add or Delete Plotter/Router(s)
dialog box, you can use the following procedure to set up OMEGA 7.0 to communicate with the
plotter.
Before beginning, you need to gather the following information about your plotter:
Plotter name
Units of measurement used by the plotter – US or metric
Effective plotting area (length and height)
These specifications are usually found in your plotter owner’s guide. If you cannot locate them,
contact your plotter manufacturer.
You must enter these specifications in the Add – Name HPGL Device dialog box that opens
after you highlight the appropriate plotter in the Add or Delete Plotter/Router(s) dialog box
and click the Add button. This provides the Omega Plot program with information about the
plotter so that Omega Plot knows how to control the plotter and how much plotting area is
available.
To add a plotter
1 Open the Add or Delete Gerber Plotter/Router(s) dialog box 42. The Local tab
displays.
2 Scroll through the list until you find the appropriate HPGL plotter.
3 Click the Add button to add it to the Installed Plotter/Router(s) list at the bottom
of the dialog box. The Add – Name HPGL Device dialog box opens.
If the plotter is a USB device, DO NOT PLUG IN THE PLOTTER into the USB port.
Read the plotter instructions for USB driver plotter installation instructions.
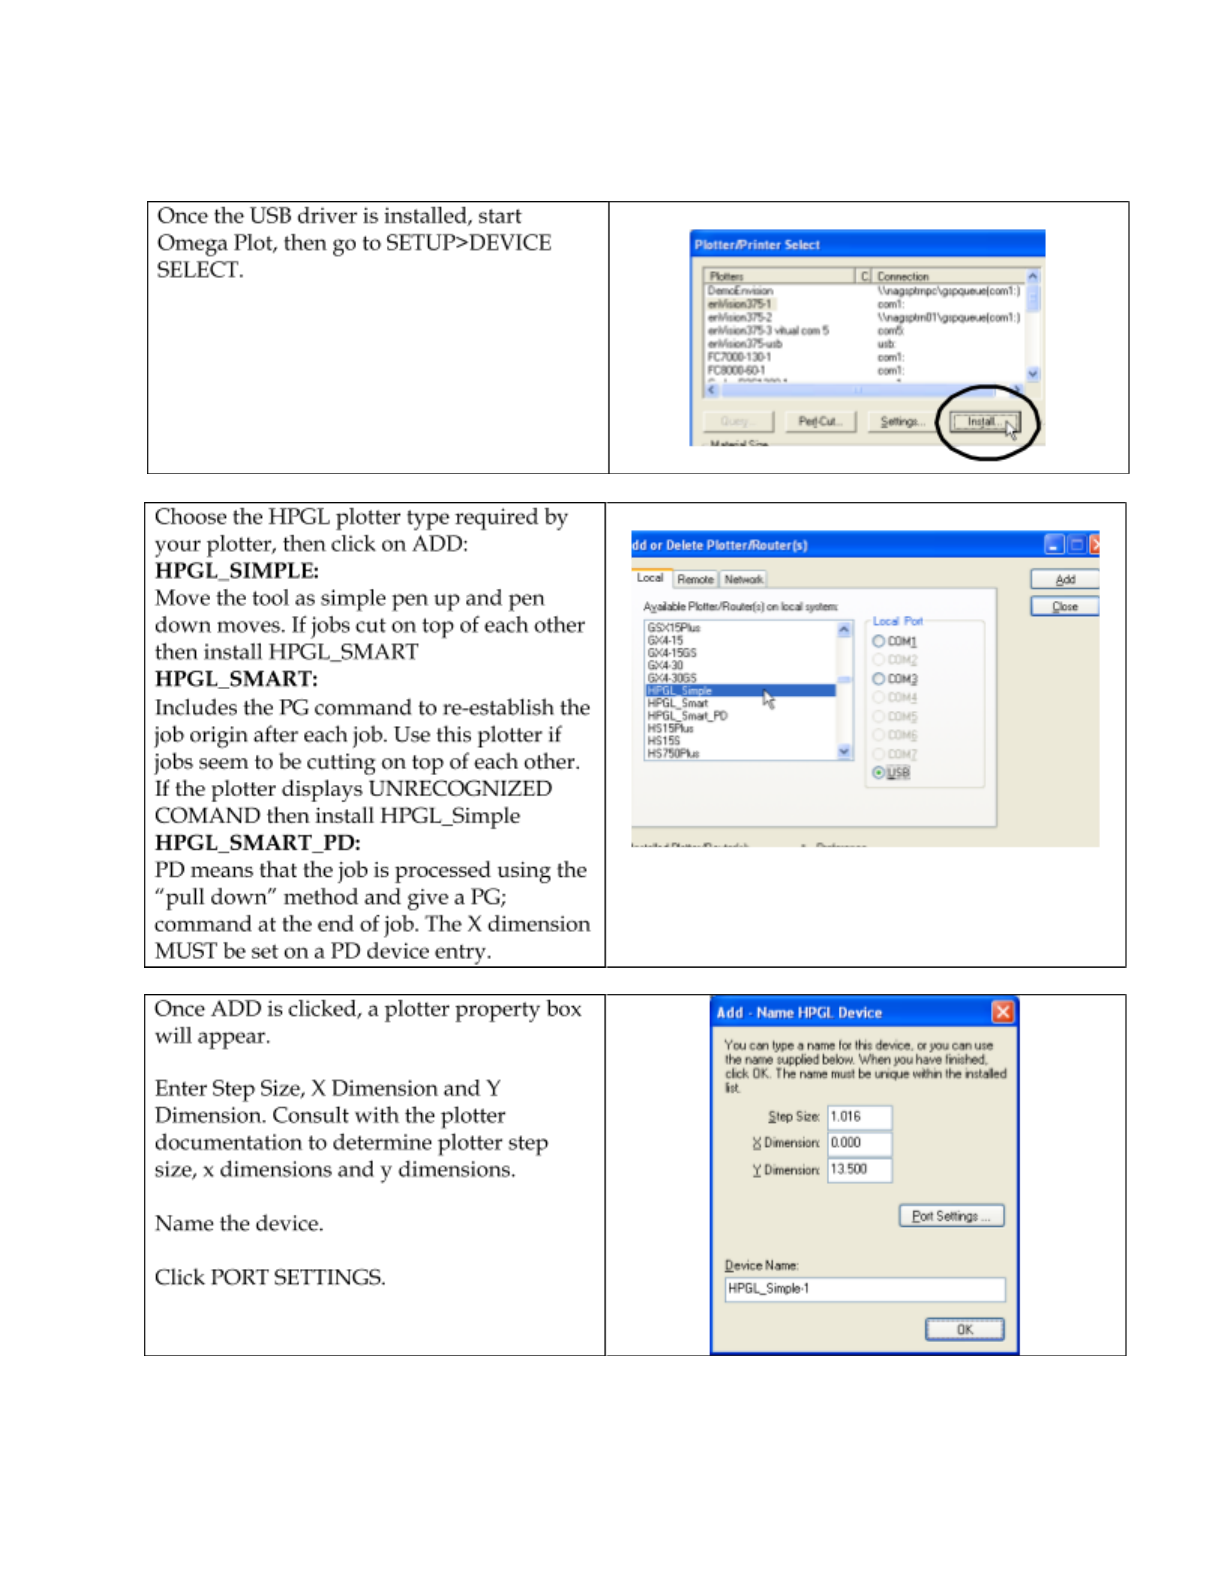
OMEGA 7.0 Getting started Page 78
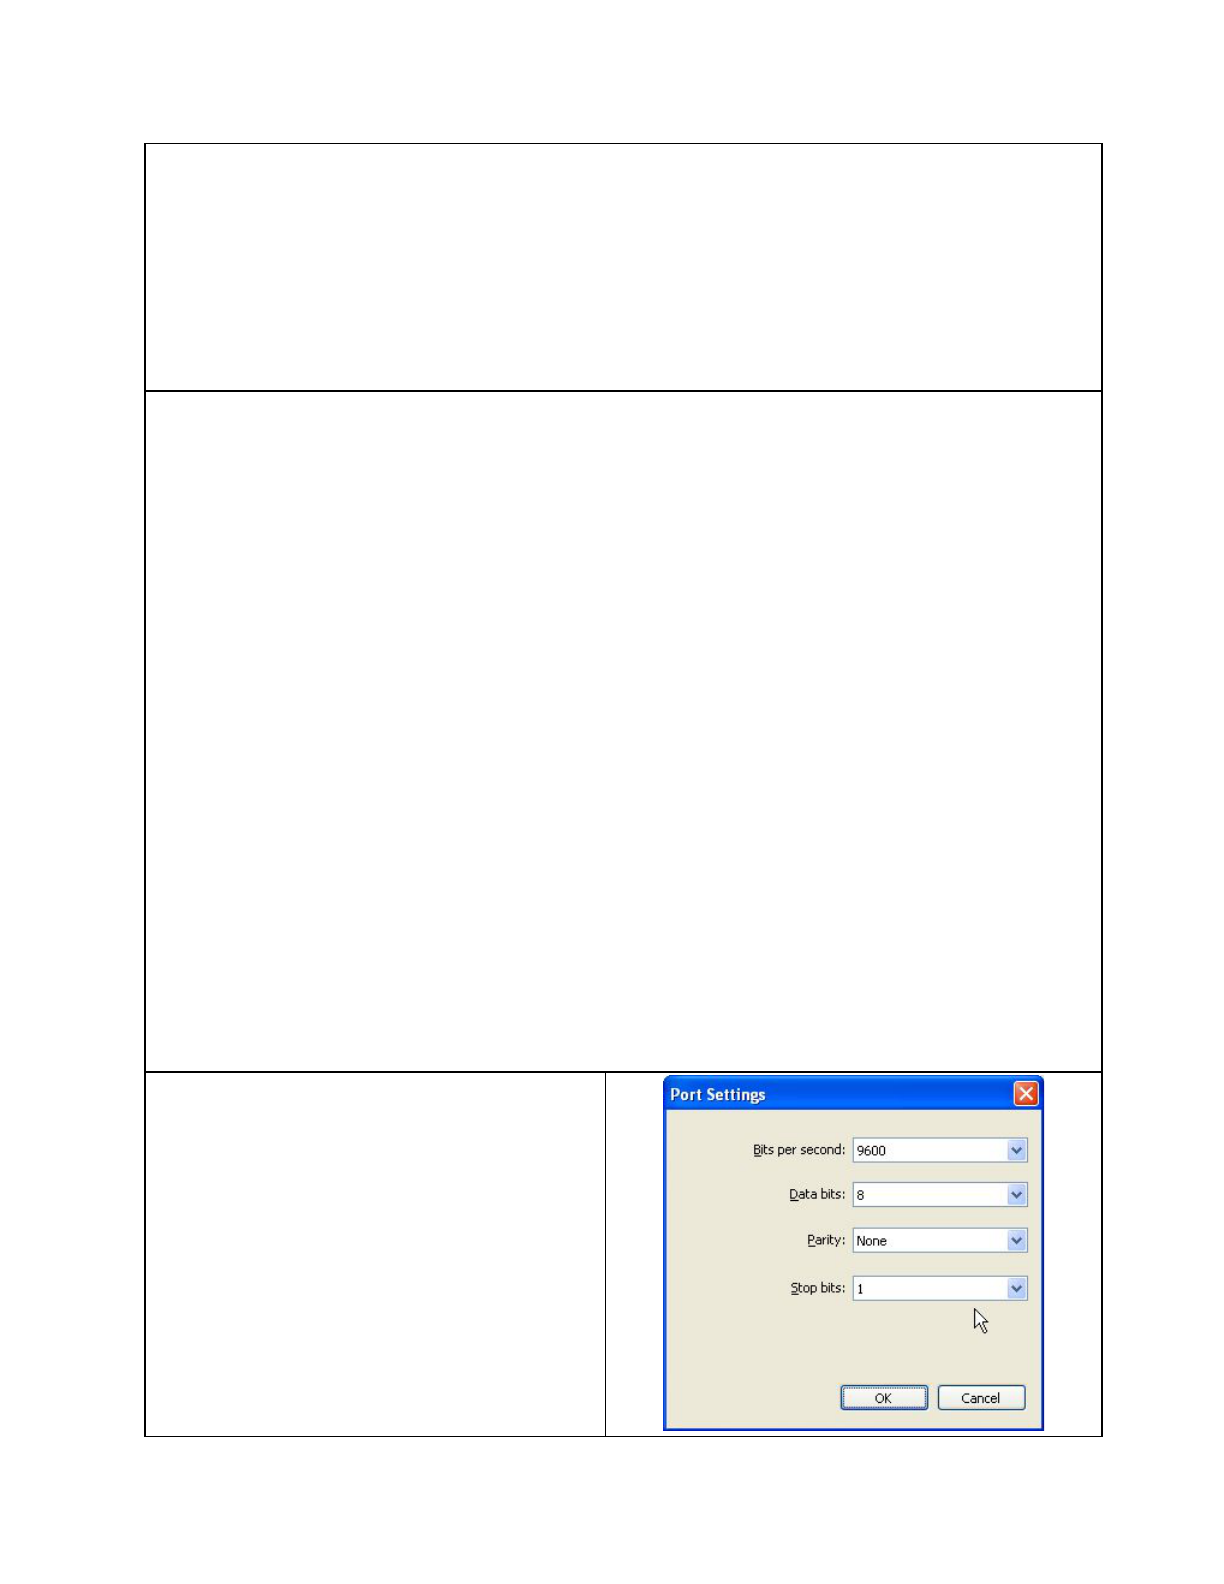
OMEGA 7.0 Getting started Page 79
Plotter step size:
Note: Be sure this value is entered correctly for your plotter or shapes may plot larger or smaller than
they should. The values shown in this example are common plotter settings, the proper settings for your
plotter may be different.
Note: The plotter step sizes translate as follows: the 1.016 value = 1016 steps per inch which is a step size
of
0.025mm,
and the 2.54 value = 2540 steps per inch which is a step size of
0.01mm
To change the cutting area of the plotter
1 Change the X Dimension field to the actual cutting length (X axis) of the plotter in
the form of nnn.nnn. Metric values must be converted to inches.
Note: A value of 0 means there is no limit to length. Usually this means the plotter is capable
of cutting an entire roll of material (50 yards). If the plotter has a specific length limit, enter
that limit instead of 0.
2 Enter the correct value in the Y Dimension field (this information should be
provided in your original plotter documentation).
Note: If the cutting height is in millimeters, convert it to inches and enter it in the form of
nnn.nnn. For example, a plotter has a plotting height of 580 mm. To convert this value to
inches, use the following formula:
580/25.4 = 22.8346456
3 Round the result to three decimal places.
Tip: We recommend that a lesser value than the absolute plotting height be entered to
avoid reaching the plotter limits.
Note: If the Y axis cutting height is set incorrectly for your plotter, large jobs will not panel
correctly.
Note: For specific instructions on installing a plotter, refer to “Chapter Three: Adding Output
Devices.”
Consult with the plotter documentation for
PORT SETTINGS.
Enter the Port Settings
Click OK.
Click OK again.

OMEGA 7.0 Getting started Page 80
Chapter Seven: Using Networked Computers for
Remote Output and Rendering Using Omega Plot
and Gerber Queue Manager
Connecting and sharing output devices
OMEGA allows one computer on a network (Computer A) to output to devices attached to
another computer (Computer B) on a network. Additionally, Omega Plot on Computer A can
send jobs to be rendered by Omega Plot on Computer B, then output the job to the devices
attached to Computer B.
Please note that for these instructions, Computer A is a computer with OMEGA 7.0 installed.
Computer B is a computer with Omega 7.0 installed and with output devices set up and
attached that are controlled by GQManager.
Short form instructions to set up remote devices and output remotely:
Be sure to have Administrative Privileges on both computers.
Computer B: Install the EDGE and plotters and be sure they are operational.
Computer B: Share the Queue folder on Computer B and name the shared folder
gspqueue.
Computer A: Map a network drive to the gspqueue folder located on Computer B.
Computer A: Go to Plot, then go to Device Setup (F7). If setting up the plotter, Click on
Install at the top of the screen next to the plotter list at the top of the screen. If setting up
and EDGE, click on install next to the Printers list at the bottom of the screen.

OMEGA 7.0 Getting started Page 81
Click on the Remote tab then click on the … button. Browse to the shared folder just
created on Computer B.
A list of plotters or EDGE printers installed on Computer B will appear in the list below.
Click on the desired device, then click on the Add button.
A Name dialog box will appear. Give the device a name that denotes that it is a
networked device, or the Computer name to which the device is connected. Click OK.
That device will appear in the list of available plotters or printers in the device
select dialog box on Computer A.
To output from Computer A to the devices on Computer B
Start Plot and GQManager on Computer B. Minimize GQManager.
On Computer A, open the job to be output in Plot. Select the desired remote device from
the Computer A Plot Device Select dialog box (F7). Set up the Plot parameters as needed
and output.
The job will render on Computer A, then send an output file and PRM file to the
QUEUE folder on Computer B. The job from Computer A will appear in GQManager
on Computer B and the job will appear at the device for output.
To send a job from Computer A to render AND output on Computer B:
● Be sure Plot and GQManager are running on Computer B.
● On Computer A in Plot Device Select, choose the Computer B remote device as the
output device AND click on the Render Remote checkbox.
● When the job is sent from Computer A, all the files needed to render the job will be
copied over the network to Computer B where the job will be both rendered and
output.

OMEGA 7.0 Getting started Page 82
Remote Device Setup and Output Instructions with
Pictures
Share the QUEUE folder on Computer B to allow Computer A to send
files
Browse to Omega Queue folder at
c:\programdata\Gerber\Omega 7.0\queue. If
the queue folder is not located here, find the
queue folder by going to the Omega 7.0
program group>Gerber Folder
Locations>Gerber PrintCut Queue
Right click on the Queue
folder>Properties>Sharing tab>Advanced
Sharing

OMEGA 7.0 Getting started Page 83
Click Share this folder, and type in GSPqueue
for the Share Name. Click on Permissions.
Click on Everyone at the top of the dialog box,
then click Full Control at the bottom. Click OK,
then click OK to get back to the main sharing
dialog box.
Click on the Security tab>Edit button.
Click the Add button.

OMEGA 7.0 Getting started Page 84
Type "everyone" in the Enter Object Names
to Select field. Click OK
Click on Full Control in the Permissions for
Everyone field
Review this video for sharing procedures for Windows 8 and 10:
https://www.youtube.com/watch?v=aaEdZBuspec
Windows 7 sharing instructions are listed below.

OMEGA 7.0 Getting started Page 85
Set up and choose the remote device on Computer A
Computer A: Go to Plot, then go to Device
Setup (F7). If setting up the plotter, Click on
Install at the top of the screen next to the
plotter list. If setting up and EDGE, click on
install nest to the Printers list.
Click on the Remote tab.

OMEGA 7.0 Getting started Page 86
Click on the … button.
Browse to the shared folder just created on
Computer B.
Depending on whether a remote plotter or
printer is being installed, a list of plotters or
EDGE printers installed on Computer B will
appear in the list below. Click on the desired
device, then click on the Add button.
A Name Box will appear. Give the device a
name that denotes that is it a networked
device, or the Computer name to which the
device is connected. Click OK.
That device will appear in the list of
available plotters or printers in the device
select dialog box on Computer A.
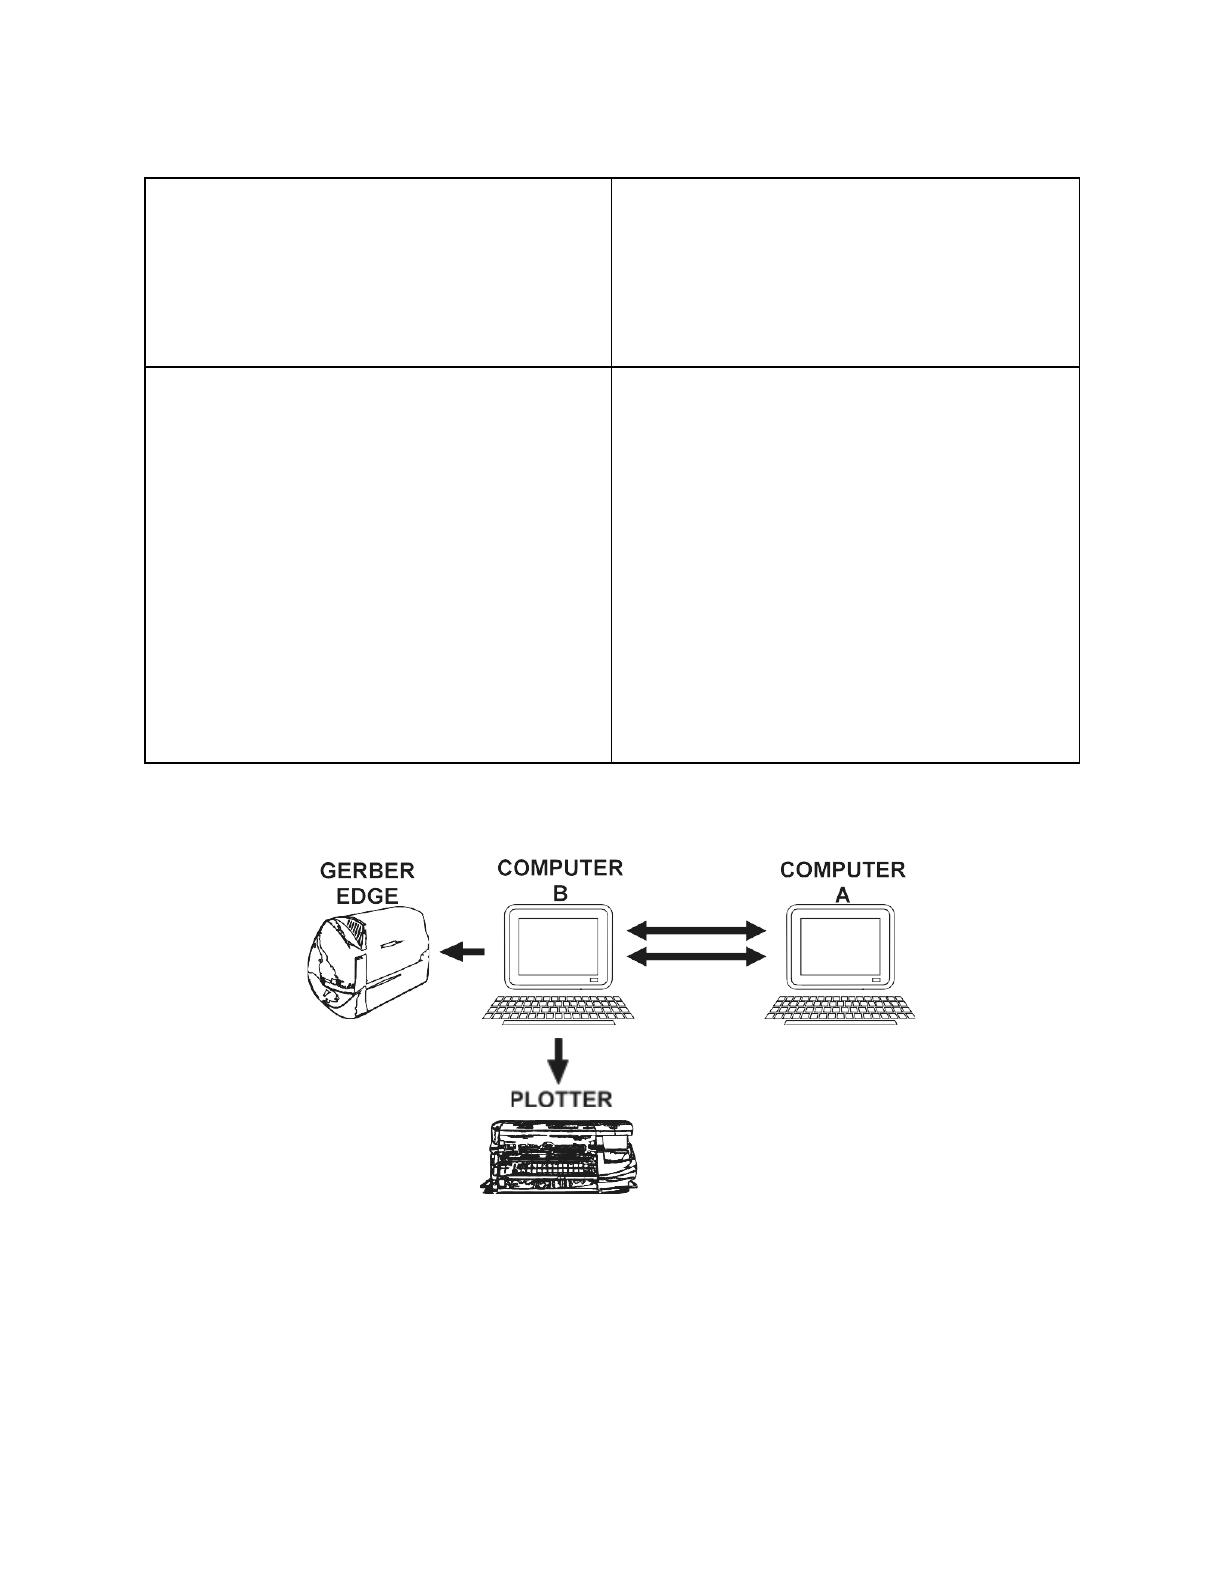
OMEGA 7.0 Getting started Page 87
To output from Computer A to the devices on Computer B
Start Plot and GQManager on Computer B.
Minimize GQManager.
On Computer A, open the job to be output in
Plot.
Select the desired remote device from the
Computer A Plot Device Select dialog box
(F7). Set up the Plot parameters as needed
and output.
The job will render on Computer A, then
send a rendered output file and PRM file to
the QUEUE folder on Computer B. The job
from Computer A will appear in
GQManager on Computer B and the job will
appear at the device for output.
To send a job from Computer A to render
AND output on Computer B,
Be sure Plot and GQManager are running on
Computer B,
On Computer A in Plot Device Select, choose
the Computer B remote device as the
output device AND click on the Render
Remote checkbox.
When the job is sent from Computer A, all
the files needed to render the job will be
copied over the network to Computer B
where the job will be both rendered and
output.
To map a network drive to the gspqueue folder
1 Using the illustration below as a guide, double-click the Network Neighborhood icon
located on the Computer B desktop. You can also “Open Windows Explorer”.
2 Double-click the icon that represents your Computer A.

OMEGA 7.0 Getting started Page 88
3 Right-click the gspqueue folder and select Map Network Drive.
4 Choose a drive designation and click OK.
