
USER MANUAL
_ACID V

Special Thanks
DIRECTION
Frédéric Brun Kevin Molcard
PROJECT MANAGEMENT
Raynald Dantigny
PRODUCT MANAGEMENT
Edouard Madeuf (lead) Christophe Luong Sebastien Rochard
DEVELOPMENT
Simon Conan
Stefano D'Angelo
Pierre-Lin Laneyrie
Baptiste Aubry
Mathieu Nocenti
Raynald Dantigny
Corentin Comte
Marie Pauli
Alexandre Adam
Yann Burrer
Loris De Marco
Cyril Lepinette
Patrick Perea
Stéphane Albanese
Pascal Douillard
Christophe Luong
Pierre Mazurier
Fabien Meyrat
Samuel Lemaire
Pauline Alexandre
Samuel Limier
Fanny Roche
Rasmus Kürstein
Kevin Arcas
Alessandro De Cecco
Hugo Caracalla
Mauro De Bari
Geoffrey Gormond
Marius Lasfargue
Marc Antigny
DESIGN
Maxence Berthiot (lead) Edouard Madeuf Shaun Ellwood
SOUND DESIGN
Lily Jordy
Jean-Michel Blanchet
Quentin Feuillard
Maxime Audfray
Florian Marin
QUALITY ASSURANCE
Germain Marzin
Arnaud Barbier
Matthieu Bosshardt
Aurélien Mortha
Julien Viannenc
Roger Schumann
Thomas Barbier
Adrien Soyer
Bastien Hervieux
Adam Chrustowski
Enrique Vela
Benjamin Renard
Nicolas Stermann
Nicolas Naudin
Rémi Pelet
Jonathan Gabrièle
USER MANUAL
Stephen Fortner (author) Jimmy Michon
BETA TESTING
Marco Koshdukai Correia
Chuck Zwicky
Terry Marsden
Fernando Manuel
Rodrigues
Gustavo Bravetti
Chuck Capsis
Jay Janssen
Jeff Cecil
Richard Courtel
Ken Flux Pierce
Apollo Negri
Olivier Malhomme
Davide Puxeddu
Andrew Macaulay
Kirke Godfrey
Jam El Mar
George Ware
Adrian Dybowski (Navi
Retlav)
Bastiaan Barth (Solidtrax)
David Birdwell

Gary Morgan
Andrew Capon
Andrew Enderson
Mat Herbert
Stephen Wey
© ARTURIA SA – 2023 – All rights reserved.
26 avenue Jean Kuntzmann
38330 Montbonnot-Saint-Martin
FRANCE
www.arturia.com
Information contained in this manual is subject to changewithout notice and does not
represent a commitment on the part of Arturia. The software described in this manual is
provided under the terms of a license agreement or non-disclosure agreement. The software
license agreement specifies the terms and conditions for its lawful use.Nopartofthis
manual may be reproduced or transmitted in any form or by any purpose other than
purchaser’s personal use, without the express written permission of ARTURIA S.A.
All other products, logos or company names quoted in this manual are trademarks or
registered trademarks of their respective owners.
Product version: 1.0.0
Revision date: 21 August 2023

Thank you for purchasing Acid V!
This manual covers the features and operation of Arturia’s Acid V,oneofourmanypowerful
virtual instruments.
Be sure to register your software as soon as possible! When you purchased Acid V,you
were sent a serial number and an unlock code by e-mail. These are required during the
online registration process.
Special Messages
Specifications Subject to Change:
The information contained in this manual is believed to be correct at the time of printing.
However,Arturia reserves the right to changeormodifyanyofthespecificationswithout
notice or obligation to update the hardware that has been purchased.
IMPORTANT:
The software,whenusedincombinationwith an amplifier,headphonesorspeakers, may
be able to produce sound levels that could cause permanent hearing loss. DO NOToperate
for long periods of time at a high level or at a level that is uncomfortable.
If you encounter any hearing loss or ringing in the ears, you should consult an audiologist.
EPILEPSY WARNING – Please Read Before Using Acid V
Some people are susceptible to epileptic seizures or loss of consciousness when exposed
to certain flashing lights or light patterns in everyday life.This may happen even if the
person has no medical history of epilepsy or has never had any epileptic seizures. Ifyou
or anyone in your family has ever had symptoms related to epilepsy (seizures or loss
of consciousness) when exposed to flashing lights, consult your doctor prior to using this
software.
Discontinue use and consult your doctor
immediately
if you experience any of the following
symptoms while using this software: dizziness, blurred vision, eye or muscle twitches, loss
of consciousness, disorientation, or any involuntary movement or convulsion.
Precautions to Take During Use
• Do not stand too close to the screen.
• Sit a good distance away from the screen.
• Avoid using if you are tired or have not had much sleep.
• Make sure that the room is well lit.
• Rest for at least 10 to 15 minutes per hour of use.

Introduction
Congratulations on your purchase of Arturia Acid V!
Aswith all of our products, webelieveinofferingthebestofbothworlds in a single package
and letting you choose howyouwant to use it. You can choose to focus on the Hardware
Panel and get an improved vintagehardware-likeexperience,orexploretheAdvanced Panel
and discover sonic and performance possibilities that go well beyond the original synth’s
capabilities.
Here's to a beautiful blend of the old and the new–andthebeautifulmusic you'll makewith
it!
Peace, love, and music,
The Arturia team
Be sure to visit the www.arturia.com website for information about all of our other great
hardware and software instruments. They havebecomeindispensable,inspiringtoolsfor
musicians around the world.

Table Of Contents
1. WELCOME TO Acid V! ................................................................................................................................................ 4
1.1. The Fall and Rise of the TB-303.................................................................................................................................... 5
1.2. Why a virtual 303?.............................................................................................................................................................. 6
1.3. Acid V Feature Summary................................................................................................................................................. 7
1.4. Ten TB-303 tracks to check out ................................................................................................................................... 8
2. ACTIVATION AND FIRST START.......................................................................................................................... 9
2.1. Register, Activate, and Install Acid V ........................................................................................................................ 9
2.2. Initial setup for stand-alone use ............................................................................................................................. 10
2.2.1. Audio and MIDI settings: Windows .............................................................................................................................................................. 10
2.2.2. Audio and MIDI settings: macOS................................................................................................................................................................... 12
2.2.3. Using Acid V as a plug-in..................................................................................................................................................................................... 13
2.3. Playing Acid V for the first time ............................................................................................................................... 14
3. MAIN CONTROLS........................................................................................................................................................ 15
3.1. Common behaviors ........................................................................................................................................................... 15
3.1.1. Value pop-ups................................................................................................................................................................................................................ 15
3.1.2. Parameter descriptions.......................................................................................................................................................................................... 16
3.1.3. Fine adjustment........................................................................................................................................................................................................... 16
3.1.4. Double-click for default .......................................................................................................................................................................................... 16
3.2. Core Sound Controls ......................................................................................................................................................... 17
3.2.1. Waveform ........................................................................................................................................................................................................................ 17
3.2.2. Pitch .................................................................................................................................................................................................................................... 17
3.2.3. Cutoff ................................................................................................................................................................................................................................. 17
3.2.4. Resonance ...................................................................................................................................................................................................................... 17
3.2.5. Env Mod ........................................................................................................................................................................................................................... 18
3.2.6. Decay ................................................................................................................................................................................................................................ 18
3.2.7. Accent................................................................................................................................................................................................................................ 18
3.2.8. About the 303 envelope ....................................................................................................................................................................................... 18
3.3. Sub Oscillator........................................................................................................................................................................ 19
3.3.1. Octave................................................................................................................................................................................................................................ 19
3.3.2. Waveform ...................................................................................................................................................................................................................... 19
3.3.3. Volume ............................................................................................................................................................................................................................. 19
3.4. Vibrato ....................................................................................................................................................................................... 19
3.5. Distortion Section ............................................................................................................................................................. 20
3.5.1. Drive Knob .................................................................................................................................................................................................................... 20
3.5.2. Dry/Wet ......................................................................................................................................................................................................................... 20
3.5.3. Distortion types .......................................................................................................................................................................................................... 21
3.6. The Pattern Panel.............................................................................................................................................................. 22
3.6.1. Mode buttons and the keyboard..................................................................................................................................................................... 22
3.6.2. Hold button ................................................................................................................................................................................................................... 23
3.6.3. Legato playing and note order ....................................................................................................................................................................... 23
3.6.4. Slide, Accent, and Vibrato................................................................................................................................................................................... 24
3.6.5. Pattern info display ................................................................................................................................................................................................ 24
3.7. Advanced voice parameters ...................................................................................................................................... 25
3.7.1. Bass Boost...................................................................................................................................................................................................................... 25
3.7.2. PW...................................................................................................................................................................................................................................... 25
3.7.3. Accent Attack............................................................................................................................................................................................................... 25
3.7.4. Cutoff Range................................................................................................................................................................................................................ 25
3.7.5. Pitch Tracking ............................................................................................................................................................................................................. 25
3.7.6. Noise Gain ..................................................................................................................................................................................................................... 25
3.7.7. Clipper .............................................................................................................................................................................................................................. 25
4. ADVANCED VIEW PART 1 - SEQUENCER..................................................................................................... 26
4.1. Sequencer mode................................................................................................................................................................. 26
4.1.1. Sequencer lock............................................................................................................................................................................................................. 26
4.2. Creating or editing a sequence................................................................................................................................ 27
4.2.1. Setting the pattern length ..................................................................................................................................................................................... 27
4.2.2. Adding and removing steps.............................................................................................................................................................................. 28
4.2.3. Adjusting the octave............................................................................................................................................................................................... 28
4.2.4. Randomizers ............................................................................................................................................................................................................... 28
4.2.5. Accents, Slides, and Vibrato.............................................................................................................................................................................. 29
4.2.6. Sequence management ..................................................................................................................................................................................... 30

4.2.7. Sequence Browser.................................................................................................................................................................................................... 31
4.2.8. Sequence Scales....................................................................................................................................................................................................... 32
4.2.9. Rate and gate time.................................................................................................................................................................................................. 33
4.2.10. Swing............................................................................................................................................................................................................................. 33
4.2.11. Note playback order .............................................................................................................................................................................................. 34
4.2.12. Steps and Shift ......................................................................................................................................................................................................... 34
4.2.13. Polymetric mode .................................................................................................................................................................................................... 35
4.2.14. Transmutation........................................................................................................................................................................................................... 36
4.3. Arpeggiator mode............................................................................................................................................................. 37
4.3.1. Controls in common with sequencer mode............................................................................................................................................. 37
4.3.2. Mode Arp setting....................................................................................................................................................................................................... 38
4.3.3. What about octave range? ............................................................................................................................................................................... 39
5. ADVANCED VIEW PART 2 - MODULATORS.............................................................................................. 40
5.1. Assigning a Modulator ................................................................................................................................................... 40
5.1.1. Modulation amounts ................................................................................................................................................................................................. 41
5.2. How Modulators work .................................................................................................................................................... 43
5.2.1. Breakpoints and grab handles......................................................................................................................................................................... 43
5.2.2. Modulation presets.................................................................................................................................................................................................. 44
5.2.3. Modulation copy ....................................................................................................................................................................................................... 45
5.2.4. Polarity, Mode, and Retrigger .......................................................................................................................................................................... 45
5.2.5. Rate and tempo sync ............................................................................................................................................................................................. 47
5.2.6. Scale .................................................................................................................................................................................................................................. 47
6. ADVANCED VIEW PART 3 - EFFECTS............................................................................................................ 48
6.1. Effects routing....................................................................................................................................................................... 48
6.2. Selecting an effect ............................................................................................................................................................ 49
6.3. Effect presets....................................................................................................................................................................... 50
6.4. Effect copy ............................................................................................................................................................................ 50
6.5. Effect types............................................................................................................................................................................. 51
6.5.1. Dry/Wet slider .............................................................................................................................................................................................................. 51
6.5.2. Effects tempo sync .................................................................................................................................................................................................. 51
6.5.3. Reverb.............................................................................................................................................................................................................................. 52
6.5.4. Delay................................................................................................................................................................................................................................. 53
6.5.5. Tape Echo ...................................................................................................................................................................................................................... 54
6.5.6. PS Delay......................................................................................................................................................................................................................... 55
6.5.7. Compressor.................................................................................................................................................................................................................. 56
6.5.8. Multiband ........................................................................................................................................................................................................................ 57
6.5.9. Multi Filter ...................................................................................................................................................................................................................... 59
6.5.10. Param EQ .................................................................................................................................................................................................................. 60
6.5.11. Distortion ........................................................................................................................................................................................................................ 61
6.5.12. Bitcrusher..................................................................................................................................................................................................................... 63
6.5.13. Super Unison ............................................................................................................................................................................................................. 64
6.5.14. Chorus............................................................................................................................................................................................................................ 65
6.5.15. Chorus JUN-6............................................................................................................................................................................................................ 66
6.5.16. Flanger............................................................................................................................................................................................................................ 67
6.5.17. BL-20 Flanger ........................................................................................................................................................................................................... 68
6.5.18. Phaser............................................................................................................................................................................................................................ 69
6.5.19. Stereo Pan................................................................................................................................................................................................................... 70
7. USER INTERFACE......................................................................................................................................................... 71
7.1. Upper Toolbar......................................................................................................................................................................... 72
7.1.1. Main Menu ........................................................................................................................................................................................................................ 72
7.1.2. Preset Browser access and Name Pane..................................................................................................................................................... 76
7.1.3. Output volume .............................................................................................................................................................................................................. 77
7.1.4. Advanced Button......................................................................................................................................................................................................... 77
7.1.5. Gear icon.......................................................................................................................................................................................................................... 77
7.2. Lower Toolbar ....................................................................................................................................................................... 78
7.2.1. Parameter descriptions.......................................................................................................................................................................................... 78
7.2.2. Hold duplicate .............................................................................................................................................................................................................. 79
7.2.3. Undo, Redo, and History ....................................................................................................................................................................................... 79
7.2.4. CPU Meter..................................................................................................................................................................................................................... 80
7.2.5. Macro controls........................................................................................................................................................................................................... 80
7.2.6. Resize handle............................................................................................................................................................................................................... 81
7.2.7. Max View button......................................................................................................................................................................................................... 81

7.3. The Side Panel...................................................................................................................................................................... 81
7.3.1. Settings Tab ................................................................................................................................................................................................................... 82
7.3.2. MIDI Tab......................................................................................................................................................................................................................... 82
7.3.3. Macro Tab....................................................................................................................................................................................................................... 87
7.3.4. Tutorials........................................................................................................................................................................................................................... 89
8. THE PRESET BROWSER......................................................................................................................................... 90
8.1. Search and Results............................................................................................................................................................. 91
8.2. Using Tags as a Filter...................................................................................................................................................... 92
8.2.1. Types.................................................................................................................................................................................................................................. 92
8.2.2. Styles ................................................................................................................................................................................................................................ 93
8.2.3. Banks................................................................................................................................................................................................................................ 93
8.3. Search Results window................................................................................................................................................. 94
8.3.1. Sorting the Preset Order....................................................................................................................................................................................... 94
8.3.2. Clearing Tags .............................................................................................................................................................................................................. 95
8.3.3. Liking Presets.............................................................................................................................................................................................................. 95
8.4. Sidebar ..................................................................................................................................................................................... 96
8.4.1. My Sound Banks ........................................................................................................................................................................................................ 96
8.4.2. My Favorites.................................................................................................................................................................................................................. 97
8.4.3. My Playlists ................................................................................................................................................................................................................... 97
8.5. Preset Info Section ........................................................................................................................................................... 98
8.5.1. Editing Info for Multiple Presets ...................................................................................................................................................................... 99
8.6. Preset Selection: Other Methods.......................................................................................................................... 100
8.7. Macro Knobs ........................................................................................................................................................................ 101
8.8. Playlists ................................................................................................................................................................................... 101
8.8.1. Create your first Playlist ...................................................................................................................................................................................... 101
8.8.2. Add a Playlist ............................................................................................................................................................................................................ 102
8.8.3. Add a Preset .............................................................................................................................................................................................................. 102
8.8.4. Re-order the Presets............................................................................................................................................................................................. 103
8.8.5. Remove a Preset..................................................................................................................................................................................................... 104
8.8.6. New Song and Playlist Management........................................................................................................................................................ 104
9. Software License Agreement......................................................................................................................... 105

1. WELCOME TO ACID V!
Arturia would liketothankyoufor purchasing our Acid V.It’s a faithful recreation of the now
legendary TB-303 Bass Line,anunassuming little bass synth and sequencer module that
started out as a commercial flop,thenrosetometeoricpopularity in the hands of sound
explorers in genres including acid, techno, and house.
Aswith all Arturia V Collection instruments, westartwith meticulous attention to detail about
the behavior of the hardware original all the way down to the circuit level. Then, weadd
features that maketheinstrumentwork and makesenseintoday’scomputer-basedmusic
production environments.
Arturia - User Manual Acid V - WELCOME TO Acid V! 4

1.1. The Fall and Rise of the TB-303
In1981,Japanesekeyboard giant Roland wanted to produce a self-sequencing bass
synthesizer that could replace a bass guitar player in a band. Given that the design lead was
Tadao Kikumoto, who also designed the TR-909 drum machine, hopes were high.
However,itsoriginaltarget customers — singer-songwriters and bands — scratched their
heads. Its monophonic analog oscillator produced either a sawtooth or square wave,fed
into a 24dB-per-octavelowpass filter with very pronounced resonance.Inotherwords, it
sounded nothing likeabassguitarnomatterhowyousetthecontrols.Instead, it produced
a“squelchy,”rubbery,almostnasaltonesomewhere between a jaw harp (one can be heard
in the beginning of “Join Together” by The Who) and a thinned-out Mini.
Also,themusicians at whom it was aimed found its pattern-based interface less than
intuitive,with its constant need to toggle between play and write modes. Itwas also a
non-starter for synth players of the era, who wanted polyphony and ever-growing sound
libraries. So,theTB-303lived its first commercial lifetime mainly in the bargain bins until it
was discontinued in 1984.
Over the next ten years or so,amiracle happened. Electronic music producers
liked
its
quirkytoneandfound that beginning in the late 1980s, they could purchase units for next
to nothing. Sync input and CV/gate output meant they could sync it rhythmically with
their drum machines. The emergence of acid, techno,andhousestyles(especiallyinthe
underground music scenes of Detroit and Chicago,amongotherplaces)sawtheTB-303
used in ever more tracks. Ifyouwere on a dance floor anytime between, say, 1987 and
2000, hearing that squelchy squawk meant things were about to get
lit
.
Today, original TB-303 units in mint condition sometimes fetch upwards of US$3,000 on
the used gear marketplace.Thus the TB-303 is nowinthegoodcompanyofmanyelectric
instruments that sounded nothing likewhattheywere supposed to sound like(for example,
the B-3 was meant to emulate a pipe organ; the tine electric piano,anacousticpiano)but
found their own true voices because their true audiences found them.
The original TB-303. Image via Wikimedia Commons
5 Arturia - User Manual Acid V - WELCOME TO Acid V!

1.2. Why a virtual 303?
One of the most practical benefits of going virtual is to avoid the increasing cost and scarcity
of original hardware units. Plus, if you do find one,there’stheinconvenience and complexity
of getting it synced and working in a DAW-based production or performance setup.(You
DAWless and Eurorack jocks for whom this is easy are a different story. Just go buy a
RackBrute m’kay?)
Acid V displays the familiar chiclet-keyboard layout of the 303, but beneath is the Advanced
View,which includes a highly intuitivesequencer/arpeggiator with upto64steps. From this
panel you can place the accents, slides, and vibrato (separately for each step,ofcourse)
that were a hallmark of the 303 sound. You can browse,save,andloadfactory and user
sequences, or import your own. A single click exports your sequence as MIDIdatafor
further manipulation in your DAW.There’snoneofthejockeying between tracks and pattern
on the original because the Slide,Accent, and Vibrato buttons on the main panel act as
overrides, each adding its effect to the sequence.
Or,youcansimplyturnofftheinternalsequencerandrecordAcid V in External mode,as
you would any other virtual instrument — the choice is yours.
Acid V gives you more fine-grained control of the 303 sound via expanded and “under the
hood” controls such as bass boost, variable pulse width, and distortion using algorithms
curated from our extensiveFXCollection. Oh, and did wementionithasasub-oscillatorfor
bottom-end boom not possible on the original?
AcollectionofPresets from many of our best sound designers fully covers of every style of
electronic music that made the sound of the 303 what it is today.
Of course,alltheshiny newfeaturesintheworld are second to the sound being absolutely
authentic. As it turns out, we have a thing for that ...
Arturia - User Manual Acid V - WELCOME TO Acid V! 6

1.3. Acid V Feature Summary
Among Acid V’s sonic weaponry are such diverse elements as:
• Authentic 303 oscillator with sawtooth and pulse waveforms
• Faithful model of 303 diode ladder filter with cutoff and resonance
• Advanced voicing features such as bass boost, variable pulse width, accent
attack, filter cutoff knob range, circuit noise, pitch tracking, and clipping level
• Sub-oscillator with pulse, saw, and sine wave options; three-octave range
• Built-in distortion module with 14 curated algorithms
• Vibrato with adjustable speed and depth
• Advanced sequencer/arpeggiator with:
◦ Classic 303 slides, accents, and octaves, plus vibrato
◦ Sequence generation and alteration in the Advanced View
◦ Polymetric mode so your notes, accents, swings, vibrato,andeven
octaves can have independent sequence lengths
◦ 64 steps maximum
◦ External mode sequencing of Acid V in your DAW
◦ Sequence import and export
◦ Loads and loads of factory sequences and patterns
• Extensive Preset library
• Optional independent steplengthpertrack(polymetry)insequencer/arpeggiator
• Sequencer on and off modes for 303-style pattern sequencing or conventional
linear use within a DAW
• Dozens of sequencer presets with the ability to lock the sequencer to one preset
as you change patches
• Four effects slots featuring a choice of 17 effects from our latest V Collection
• Effect categories include Spatial, Distortion, Dynamics, Modulation, and Filter/EQ
• Three advanced Modulators with intuitiveworkflowtocreatecomplex
movements
7 Arturia - User Manual Acid V - WELCOME TO Acid V!

1.4. Ten TB-303 tracks to check out
Need some inspiration? “Topten”listsarealways subjective,butherearetentracksthat
cemented the TB-303 sound into history. Each should be easily searchable on streaming
services such as Apple Music, Spotify, or YouTube Music.
Song Artist Notes
Rip It Up Orange Juice First track using the 303 to hit top ten in UK Singles chart
Acid Tracks Phuture
From 1987; one of the seminal tracks of the emerging Chicago acid-
house scene
Raga Bhairav
Charanjit
Singh
Combined Indian Raga melodies with acid beats back in 1982!
Voodoo Ray
AGuy Called
Gerald
The 303 is used more as a melody or top loop than a bass
What Time Is
Love?
The KLF Big 1990s rave sound from the masters of the genre
Breathe Deeper Tame Impala
Synthpopfromthemid-2000s, perfect example of the 303
renaissance
Try Again Aaliyah Great example of acid bass in hip-hop; produced by Timbaland
Da Funk Daft Punk Listen to the bridge starting at 2:38 for maximum acid-tude
IntheHeat of the
Night
Imagination
Smooth ’80s funk makes the 303 sound almost likeafretlessbass—
its original purpose!
Everybody Needs
a 303
Fatboy Slim Thanks to Acid V, everybody can have one!
Weknow—we’veprobably left someone important out, so we’re glad user manuals don’t
have comments sections! Now, let’s get onto the business of having fun with Acid V.
Arturia - User Manual Acid V - WELCOME TO Acid V! 8

2. ACTIVATION AND FIRST START
2.1. Register, Activate, and Install Acid V
Acid V works on computers equipped with Windows 8.1 or later and macOS 10.13 or later.
You can use it as a standalone version or as a plug-in for your favorite DAW(DigitalAudio
Workstation), in Audio Units, AAX, VST2, or VST3 format.
Before you install or register the software,you’llneedtocreateaMyArturia account
here,usinganemailaddressandpassword of your choice: https://www.arturia.com/
createanaccount/
While it’s possible to handle registration, activation, and other tasks manually online,it’sfar
simpler to download and use the Arturia Software Center app,which can be found here:
https://www.arturia.com/support/downloads&manuals
You’ll enter your email address and password to set upArturia Software Center,which acts
as a central location for all of your Arturia software registrations and activations. Italso
helps you install and update your software by keeping tabs on current versions.
You can register,activate,andinstallyourproductinsideArturia Software Center by
pressing the Register a newproductbutton, and clicking the boxes to Activate and then
Install your software.Theregistrationprocesswill require you to enter the serial number
and the unlock code you received when you bought your software.
You can also do this online by logging into your account and then following the instructions
here: http://www.arturia.com/register
Once you’veregistered,activated, and installed Acid V,it’stimetoget it to talk to your
computer.
Arturia Software Center
9 Arturia - User Manual Acid V - ACTIVATION AND FIRST START

2.2. Initial setup for stand-alone use
Ifyouwould liketouseAcid V in standalone mode,youwill need to ensure that its MIDI
input/output and audio outputs are being routed properly to and from the software.You’ll
generally only need to do this once,unlessyouchangeyourMIDIcontrolleroraudio/MIDI
interface. The setup process is the same on both Windows and macOS.
!This section only applies to those of you who plan to use Acid V in stand-alone mode.Ifyouare
only going to use Acid V as a plug-in inside a host DAWorothermusic software,youcansafelyignore
this section – your host music software handles these settings.
2.2.1. Audio and MIDI settings: Windows
At the topleftoftheAcid V application is a pull-down menu. Itcontainsvarious setup
options.
Click on Audio Midi Settings to open the following window.This works in the same way on
both Windows and macOS, although the names of the devices available to you will depend
on the hardware you are using. Remember,this option is only available (and needed) in the
standalone version of Acid V.
Acid V Main Menu
Arturia - User Manual Acid V - ACTIVATION AND FIRST START 10

Starting from the top, you have the following options:
• Device selects which audio driver and device will handle playback of Acid V.
This can be your computer’s internal driver,ageneric ASIOdriver,oranexternal
soundcard or interface driver. The name of your hardware interface may appear
in the field below, depending on your selection.
• Output Channels lets you select which of the available outputs will be used to
route audio out. Ifyouonlyhavetwooutputs,this selection boxwill not be
shown. If you have more than two, you can select a specific pair of outputs.
• Input Channels normally let you select inputs of a virtual instrument for routing
and processing external audio.This is irrelevant in Acid V because it does not
feature audio input.
• The Buffer Size menu lets you select the size of the audio buffer your computer
uses to calculate sound. The latency in milliseconds is displayed after the buffer
size setting.
!Asmallerbuffermeanslower latency, i.e.ashorterdelaybetween pressing a key and hearing the
note,butloadsyourCPUmoreheavilyandcancausepops or clicks. A larger buffer means a lower
CPUload,asthecomputerhasmoretimetothink, but can result in a noticeable delay between playing
anoteandhearingit.Afast, modern computer should easily be able to operate at a buffer size of 256
or even 128 samples without clicks If you still get clicks, enlarge the buffer size until they stop.
• The Sample Rate menu lets you set the sample rate at which audio is sent out of
the instrument.
!Theoptions here will depend on what your audio device can support; nearly every device can
operate at 44.1 kHzor48kHz, which will be perfectly fine for most applications. Ifyouhaveaspecific
need to use a higher sample rate, up to 96 kHz, Acid V will happily support that.
11 Arturia - User Manual Acid V - ACTIVATION AND FIRST START

• The ShowControl Panel button will jump to the system control panel for
whatever audio device is selected.
! Note that this button is only available in the Windows version.
• Test Tone sends a short test tone when you click the Play button, to help you
troubleshoot audio issues. You can use this feature to confirm that the instrument
is routed correctly through your audio interface and that audio is playing back
where you expect to hear it (your speakers or headphones, for example).
• The MIDIDevices area will display any MIDIdevices you haveconnectedto
your computer (if any). Click the check boxtoaccept MIDIfromthedevice(s)
you want to use to control the instrument. You can select multiple MIDIdevices
at once with the checkboxes.
!Instandalonemode,Acid V listens for all MIDIchannels,sothere’snoneedtospecify
a channel.
• Tempo sets a base tempo for features inside Acid V such as LFO and effects
sync. When using Acid V as a plug-in, the instrument gets tempo information
from your host software.
2.2.2. Audio and MIDI settings: macOS
The menu for setting upaudioandMIDIdevices for macOS is accessed in the same way
as for Windows, and the setupprocessisnearlyidentical.All options work the same way
as described aboveintheWindows section. The only difference is that all macOS devices,
including external audio interfaces, use the CoreAudio driver built into macOS to handle
routing. Intheseconddropdown menu under Device,choosetheaudiodevice you wish to
use.
Audio MIDI Settings for macOS
Arturia - User Manual Acid V - ACTIVATION AND FIRST START 12

2.2.3. Using Acid V as a plug-in
Acid V comes in VST2, VST3, Audio Unit (AU), and AAX plug-in formats, for use in all major
DAW software such as Ableton Live, Cubase, Logic, Pro Tools, Studio One, and more.
When using Acid V as a plug-in, all audio and MIDIdevice settings are handled by your host
music software.Please refer to your host music software’s documentation if you haveany
questions about loading or using plug-ins.
Note that when you load Acid V as a plug-in instrument inside your host software,its
interface and settings work the same way as in standalone mode (see below), with a few
small differences:
• Acid V will synchronize to your DAW’s host tempo/BPM when sync is required
• You can automate numerous parameters using your DAW’s automation system
• You can use more than one instance of Acid V in a DAW project
• You can run the outputs of Acid V through any additional audio effects available
to your DAW, such as delay, chorus, filters, etc.
• You can route Acid V’s audio outputs creatively inside your DAW,usingtheDAW’s
own audio routing system.
Acid V's interface looks the same in plug-in mode as in standalone mode.
13 Arturia - User Manual Acid V - ACTIVATION AND FIRST START

2.3. Playing Acid V for the first time
Now that you have Acid V up and running, let’s take it for a quick test drive!
Ifyouhaven’t done so already, launch Acid V as a plug-in or as a stand-alone instrument.
IfyouhaveaMIDIcontrollersetup,useittoplaysomenotesonAcid V.You might first
need to activate your MIDIcontrollersintheMIDISettings(seeabove). You can also use
your mouse to play the on-screen keyboard or use the keys of your computer keyboard.
The large Hold button onscreen lets you removeyourmousefromthescreenorfromakey
and still keeps the sequence going.
The upanddown arrows at the topoftheinstrumentletyoustepthroughallofAcid V’s
available presets. Try playing a few,andwhenyoufindonethatyoulike,tryadjustingsome
of the other on-screen controls to see how they affect the sound.
Play with the controls, and don't worry — nothing is saved unless you specifically savea
preset (described later in this User Guide), so there is no riskyou'llmessupanyofAcid V’s
factory presets.
Wehope this chapter has gotten you off to a smooth start. Nowthatyou’reupandrunning,
the rest of this guide will help you work your way through all of Acid V’s features on a
section-by-section basis. By the time you reach the end, wehope you’ll understand all of
Acid V’s capabilities – and will be using this fantastic instrument to create equally fantastic
music!
Arturia - User Manual Acid V - ACTIVATION AND FIRST START 14

3. MAIN CONTROLS
From here you can control all key aspects of Acid V:itssoundandselectionofitspattern
sequencing, arpeggiator,andexternalmodes.You can also select sequences from the
pattern browser and transpose them using the onscreen keyboard. Since the heart of the
303 is really its pattern capabilities, weshouldmentionrightherethatyoudon'tactually
program
patterns here.Thattaskisperformed in the Sequencer/Arpeggiator controls of the
Advanced View [p.26]. Here, the main interface is for
playing
and tweaking your sounds.
3.1. Common behaviors
All Arturia virtual instruments share some common control behaviors to makeediting
sounds easier.
3.1.1. Value pop-ups
Move or hover on any control and a pop-up banner or “tool tip” will display its value.
15 Arturia - User Manual Acid V - MAIN CONTROLS

3.1.2. Parameter descriptions
Operating or hovering on any control also displays its name and a brief description of its
function in the left corner of the lower toolbar [p.78].
3.1.3. Fine adjustment
Hold the right mouse button or Control key while dragging on any knob to adjust it more
slowly. This helps when you want to dial in precise values. Ifyourmouseisequipped with
awheel,youcanholdtheControl key (Windows) or Command key (macOS) and use the
wheel to fine-tune as well.
3.1.4. Double-click for default
Double-click on any knob to return it to its factory default setting.
Arturia - User Manual Acid V - MAIN CONTROLS 16

3.2. Core Sound Controls
This is the main synth section of Acid V,replicating the monophonic sound engine of the
TB-303.
3.2.1. Waveform
Simply a toggle switch, this selects a buzzy sawtooth waveormorehollowsquarewave.
On the original hardware, this switch was found on the rear panel.
3.2.2. Pitch
This knob sets the base pitch of the oscillator. It’s bipolar,andranges from -12 to +12
semitones. At its default position of 12 o’clock, middle
A
= 440Hz.
3.2.3. Cutoff
This knob controls the cutoff frequency of the 24dB-per-octave resonant filter.
3.2.4. Resonance
We’vemodeledtheoriginal303’sresonanceprecisely,andAcid V can get very squelchy
indeed! Turn this knob up to see what we mean.
17 Arturia - User Manual Acid V - MAIN CONTROLS
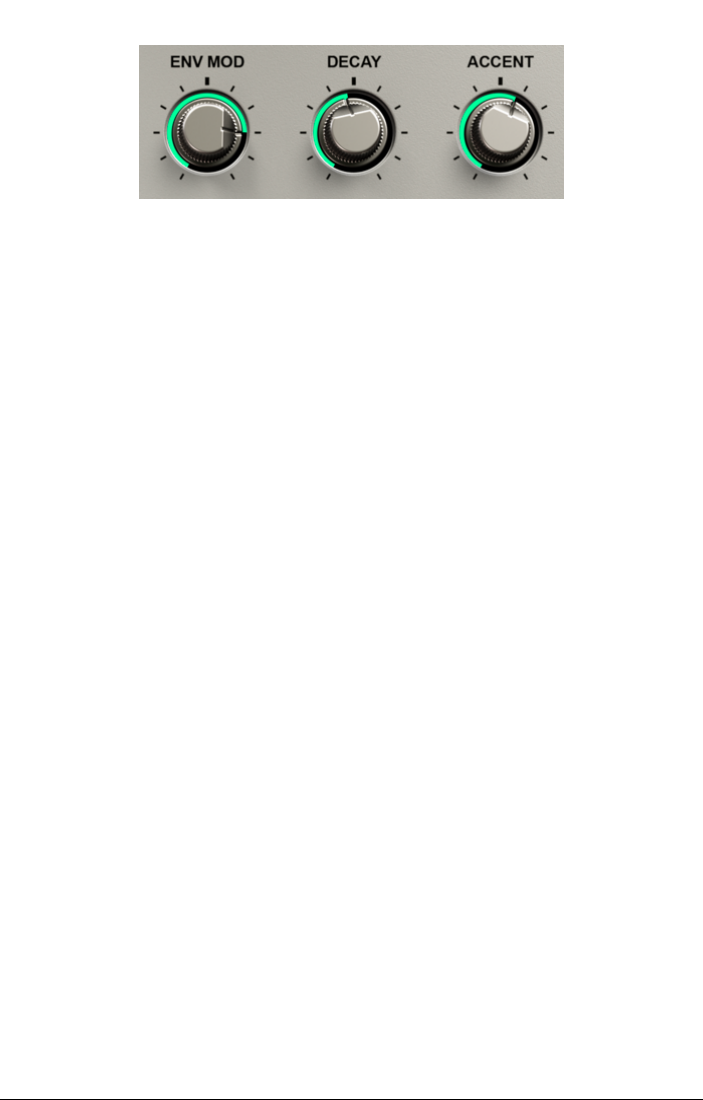
3.2.5. Env Mod
The EnvMod knob adjusts the amount of envelope modulation applied to the filter cutoff by
the Decay knob and Accents.
3.2.6. Decay
This adjusts the Decay of only the filter envelope.
3.2.7. Accent
You actually accent a note either by checking a boxfor its stepinthesequencer [p.26] or
via external MIDIvelocity [p.82].Whenanoteisaccented,twothings happen: Itgets louder,
and the decay of the filter envelope becomes shorter,resultingamorepronouncedfall-off.
The Accent knob determines the degree to which both of these things happen.
3.2.8. About the 303 envelope
The envelope generators in the original TB-303 are actually so simple that they can confuse
traditional synth players. There are twoofthem:onefor volume and one for the filter,but
the Decay and EnvMod knobs as described aboveonlyaffectedthefilterenvelope.The
volume and filter envelope shapes were more or less simple gates, with no adjustable attack
or release phases. With most synth bass sounds, the character and emotion comes from
howfast the tone goes from being brighter to duller — more harmonics to fewer — or if
that motion occurs at all. So,given that the original 303 was meant to be an inexpensive
instrument, its manufacturer chose to focus envelope control on this “money shot” aspect of
the sound. Thus, what the accent knob is adjusting is really twothings at once: the level of
the volume (VCA) envelope, and the decay time of the filter envelope.
Arturia - User Manual Acid V - MAIN CONTROLS 18

3.3. Sub Oscillator
Users of the original TB-303, or any recent hardware or software emulation focused
exclusively on originality, may havewished they could thicken upitslowend.Afterall,the
original said “Bass Line” right on the panel. Acid V’s sub-oscillator grants this wish with three
simple settings:
3.3.1. Octave
This knob adjusts whether the sub-oscillator pitch is the same as the main pitch, or one
octave lower, or two.
3.3.2. Waveform
Acid V offers a choice of square, sawtooth, and sine waveforms for the sub-oscillator.
3.3.3. Volume
Turn it up! (Or down if you want a more original 303 character. We’re not here to judge,just
to give you what you want.)
3.4. Vibrato
Vibrato on a bass machine? Certainly — bass players use it, but usually in small doses on
certain notes. Acid V’s vibrato works similarly, applying only to notes in the Sequencer [p.26]
whose steps havetheVibrato boxchecked. The Speed and Amount knobs control those
aspects of the vibrato only for notes where it applies.
19 Arturia - User Manual Acid V - MAIN CONTROLS

3.5. Distortion Section
Going far beyond the inherent dirtiness of the 303 sound, Acid V’s distortion circuit employs
asetofalgorithmsfromourdistinctiveFXCollection, curated specifically to enhance the
303 sound.
3.5.1. Drive Knob
This sets the input or “pre-gain.” Inotherwords, how“hot”theincoming signal will drivethe
distortion effect.
3.5.2. Dry/Wet
Balances the undistorted and distorted sounds.
Arturia - User Manual Acid V - MAIN CONTROLS 20

3.5.3. Distortion types
Select a distortion algorithm by browsing with the left and right arrows, or clicking on the
algorithm name bar to bring up the following menu:
There is also an algorithm-based distortion effect in the Effects Section [p.48].Thetwohave
slightly differing algorithm sets and may be used together — and it’s worth noting that
the effects-based distortion can get even more aggressive.Weinvite you to explore these
distortion types for yourself and pick the ones that suit your music best — each is either a
little or a lot different from the other!
21 Arturia - User Manual Acid V - MAIN CONTROLS

3.6. The Pattern Panel
Here is where the real fun begins! This area resembles the chiclet keyboard on the original
303, but works somewhat differently. It’s essentially a simplified version of a sequencer.
Also easier,wehope,asyouwill not be creating patterns or arpeggiations here — again, that
happens in the sequencer [p.26] — just deciding how they will be played.
3.6.1. Mode buttons and the keyboard
Weshouldstartwith these because they determine howAcid V’s pattern-pumping power
behaves.
3.6.1.1. Seq mode
When this is selected, the underlying sequencer is active,andplayingnotesonthechiclet
keys onscreen, or on a connected MIDIcontroller,transposesthemusical key of the
sequence.
3.6.1.2. Arp mode
InArpeggiator mode,theup-to-64-stepsequencerbecomesanarpeggiator(with the same
maximum number of steps) with multiple note-order modes [p.37].Now,playingoneormore
notes on your MIDI controller will determine the notes in the arpeggio.
3.6.1.3. Ext mode
External mode disables Acid V’s own pattern capabilities if you want to sequence it in a
DAW,trigger it from an external MIDIsequencer,orjustpluginyourMIDIcontrollerand
play it like a super-cool bass monosynth.
Arturia - User Manual Acid V - MAIN CONTROLS 22

3.6.2. Hold button
This button essentially functions likeasustainpedalandfreesyourhands.InSeqandArp
modes, the pattern will continue to play after you press a key (onscreen or on a controller),
and striking a new key will transpose it.
InExtmode,theHold button does not function, as weassumeyou’lluseahardware hold
button or sustain pedal. However,ifyouhaveanyofAdvanced Views open, the pattern
panel and hold button become obscured, so weputaduplicate hold button [p.79] in the lower
toolbar so you can still keep your patters running.
♪ Remember that Acid V is a monophonic-only synth with last-note priority.
3.6.3. Legato playing and note order
Acid V has particular behaviors when it comes to note play order when you’re triggering it
from an external keyboard (or pad device). Here’s how to make them work for you.
3.6.3.1. Legato in Seq mode
In Seq mode,ifyouplayasecondkey
legato
(before releasing the first key), the pattern
keeps playing. The key will transpose but the pattern will
not
reset to its first step.(Ifyoudo
not play legato, it will.)
Likewise,ifyouplayasecondnotewhile holding the first, then release the second note,the
pattern will momentarily shift to the second note’s key without resetting to its first step.
IftheHold [p.23] is engaged, playing newkeys (onscreen or on a controller) will keepthe
sequence going, transpose it, and not reset it to its first step, as above.
3.6.3.2. Legato in Arp mode
In Arp mode,playinglegatowill simply add newnotestothearpeggio,which will be heard
according to the selected play order [p.37] mode.
Again, you can engage the Hold function to do this without needing to play legato.
3.6.3.3. Legato in Ext mode
Play legato in Ext mode,andthefilterandvolume envelopes will not retrigger. Also,aslight
amount of portamento (glide) will be heard between notes. IfyouhaveaMIDIcontroller
hooked up,keepathumb on one key and then alternately play the key an octaveupwith
your pinky finger to hear this in action.
23 Arturia - User Manual Acid V - MAIN CONTROLS

3.6.4. Slide, Accent, and Vibrato
When a pattern is running in Seq or Arp modes, the red LEDs abovethesebuttonswill
light when a stepoccursthathasslide,accent,and/orvibratoapplied. Pressing any of the
buttons acts as an
override
,thatis,itapplies slide,accent,orvibratotoallsteps played as
long as the button is held. Onscreen, these buttons havemomentary(non-latched)behavior.
In Ext mode,pressinganyofthemsimplyapplies that attribute to any notes you’re playing.
3.6.5. Pattern info display
This little area shows a fewusefultidbitsofinformation, and can call upabrowser where
you can select sequencer patterns from factory and user banks — including ones you’ve
imported.
In the lower row:
• The left number shows the step the pattern is at in real time
• The middle number displays the total number of steps in the pattern
• The icon on the right is either six dots (representing steps) in Seq mode or a tiny
keyboard in Arp mode
3.6.5.1. Opening the sequence browser
Intheupper rowofthepatterndisplay,youcanchangesequencerpatternsusingtheleft
and right arrows. Clicking on the pattern name will open uptheSequence Browser [p.31],
where you can do this in a more comprehensive,searchable way. Note that this will flip
Acid V into the Sequencer/Arpeggiator pageoftheAdvanced View,soyou’llneedtoclickthe
Advanced button [p.77] to return to the main view.
Arturia - User Manual Acid V - MAIN CONTROLS 24

3.7. Advanced voice parameters
Clicking the “carat” button abovetheAcid V logo on the upper right side opens upaslide-out
drawer of “under the hood” parameters that giveyoucontrolover the sound that no original
303 owner could dream of — unless perhaps they were a circuit-bender and handy with a
soldering iron. Left to right, these are:
3.7.1. Bass Boost
Asitsnameimplies, this boosts the bass rangeoftheoscillator.You can combine this with
the Sub-Oscillator [p.19] for fatness some listeners might confuse with a Mini!
3.7.2. PW
This stands for pulse width, and when the square waveform [p.17] is used, it varies the
width of the waveform as on many popular analog synths. This creates a definite changein
harmonic content and tone, but one that’s subtler than sweeping a lowpass filter.
3.7.3. Accent Attack
On an original 303, you could not adjust the attack time of,well, much of anything. Here,
Acid V allows you to vary the attack time of the filter envelope of notes that have accents.
3.7.4. Cutoff Range
This knob adjusts the rangeofthemainCutoff [p.17].You can thus use it to “scale” the
primary Cutoff knob’s minimum and maximum frequencies, for subtler or more dramatic
filter sweeps when you modulate the knob.
3.7.5. Pitch Tracking
Analog oscillators didn’t turn input voltageintomusical pitch with perfect accuracy. This
setting introduces subtle variations in what pitch the oscillator plays in response to a given
MIDInote.It’s bipolar,andeven at its extreme ends, this is not enough to create an “out of
tune” sound — it just adds a touch more analog realism.
3.7.6. Noise Gain
Part of the 303’s character was that it was not a perfectly clean sounding bass machine,so
Acid V offers a setting to emulate noisy analog ICchips. Again, this is nothing as obvious as
the white noise sources found on many analog synthesizers.
3.7.7. Clipper
All 303s clipwith the accent and master output knobs set at maximum. This allows you to
more easily cliptheoutputstageofAcid V if a dirty sound is desired. It’s a separate feature
from the other distortion [p.20] features and effects in Acid V.
25 Arturia - User Manual Acid V - MAIN CONTROLS

4. ADVANCED VIEW PART 1 - SEQUENCER
At the heart of Acid V is a powerful 64-stepsequencerandarpeggiatorthatdwarfs the
capabilities of the original hardware,nottomentionanymodernemulation focused solely
on vintageauthenticity.ClicktheAdvanced button [p.77] at the toprightoftheUpper Toolbar,
then the green Sequencer tab, to get here.
4.1. Sequencer mode
The Seq and Arp buttons at the topleftofthis area mirror those on the main panel, selecting
the mode for the pattern generator. Also note the overall on/off button to the upper left,
which disables the sequencer without deleting any information.
4.1.1. Sequencer lock
When the padlock icon appears locked, changing an overall Acid V Preset in the Preset
Browser [p.90] does
not
changethesequencerpatternorotherinformation. This applies
to both Sequencer and Arpeggiator modes. So,ifyouhaveapatternyoulikebutwant to
browse sonic personalities for it, you can do so easily.
Arturia - User Manual Acid V - ADVANCED VIEW PART 1 - SEQUENCER 26

4.2. Creating or editing a sequence
Wehavecarefullymodeledthegatingbehavior,accents,slides,andotheraspectsofthe
original’s sequencer,allofwhich are an indispensable part of its unique sound. However,
wehavemadeiteasier to create patterns using an intuitive“pianoroll”interface,whereyou
can tweak almost everything graphically.
4.2.1. Setting the pattern length
Grab the vertical blue handle,which will usually be found at the right side of the window,
and slide it back and forth to adjust the overall length of the pattern.
You can also set the maximum length directly in the Steps [p.34] field.
Also,don’tmiss the horizontal scroll bar along the bottom. Itgives you access to the full 64
steps.
27 Arturia - User Manual Acid V - ADVANCED VIEW PART 1 - SEQUENCER

4.2.2. Adding and removing steps
The fact that Acid V is monophonic makes things somewhat simple here.Rows are steps,
and notes ascend in a column.
• Click on any step’s rectangle to add that note at that step.Therectanglewill
illuminate in green.
• Right-click to remove the note.
• “Draw” quick sequences by sweeping the mouse cursor across the grid.
4.2.3. Adjusting the octave
Acid V has a four-octaverangefor each step.Changetheoctavefor a given stepwith the
vertical slider at the top of the column.
♪ This can takealittlegetting used to compared to a conventional MIDIpianorolleditor,because
the same note in different octaves can appear in the same row.Suppose you wanted to create a simple
pattern where the same note jumped upanddown an octavein
C
.Simply click in as many Cs as
you want — which will all appear in the same row—thenusetheoctavesliders.Noticethattheslider
positions change color to indicate the selected octave.
4.2.4. Randomizers
There are two randomizers in Acid V: one for notes and one for octaves.
4.2.4.1. Note randomizer
Hover over the note name column and it will turn into an icon that looks likegaming dice.
Dragging upordown on this will increase or decrease the probability that a different note
than the one set will be played as the sequence runs.
4.2.4.2. Octave randomizer
Likewise,hover over the word “Octave” abovethenotecolumntobringupitsdiceicon.This
changes the probability that any note will sound at a different octave than the one set.
♪ Since you can randomize notes and octaves at the same time,invarying degrees, you can come
up with some pretty crazy results and inspiring song starters.
Arturia - User Manual Acid V - ADVANCED VIEW PART 1 - SEQUENCER 28

4.2.5. Accents, Slides, and Vibrato
Here is howyouaddtheaccentsandslidesthatmadethe303famous, as well as the
vibrato unique to Acid V.Across the bottom of the piano roll are three checkboxes: Slide,
Accent, and Vibrato. Simply check one or more for the attributes you want on that step.
4.2.5.1. How accents work
Again, an accent [p.18] both increases the volume and shortens the filter envelope decay of
the note played at a given step.Bothofthesearegoverned by knobs wecovered in the
chapter on the main panel [p.15].
4.2.5.2. How slides work
A slide introduces a small amount of portamento,(pitchglideupordown), between the step
it is applied to and the
previous
step.(Ifyouplaceaslideonstep1thepitchwill glide from
the final step in the pattern.)
4.2.5.3. How vibrato works
Vibrato in Acid V is intentionally subtle,without the extreme depth you might hear on a synth
meant for leads. The speed and amount are controlled by the largeknobsintheVibrato
[p.19] section of the main panel.
29 Arturia - User Manual Acid V - ADVANCED VIEW PART 1 - SEQUENCER

4.2.6. Sequence management
Ifyoulikethepatternyou’vecreated,youcansaveitbyclickingthediskiconshown above,
which will prompt you to saveitasausersequencewith a dialogue boxwhereyoucan
type in a name:
4.2.6.1. Share sequence
The “share” icon to the diskicon’srightexportsyoursequenceasaMIDIfileyoucanthen
drag-and-drop directly into your DAW by grabbing the little icon that is generated.
4.2.6.2. Clear sequence
Be careful with the eraser icon! Itclearstheentiresequence.Actually, if you accidentally
clear a sequence,Acid V has extensiveundoandhistory functions in the lower toolbar [p.78],
so you can always go back in time.
4.2.6.3. Duplicate pattern
Click the x2 icon if you want to “roll out” a series of notes quickly. This will duplicate the
full length of the existing pattern and append it to the end. The overall sequence length will
automatically double.
Arturia - User Manual Acid V - ADVANCED VIEW PART 1 - SEQUENCER 30

4.2.7. Sequence Browser
Belowthesequencemanagement icons is a field with the current pattern name and two
arrows. You can browse patterns using the arrows, or click the name to open the Sequence
Browser. Neither action will change the overall Acid V Preset.
Once inside the browser,youcanchoosefactory or imported sequences directly by name.
Click OK to load the sequence and exit the browser.
!You must haveimportedsomesequencesfor the Imported button to be visible.Ithasatrash-can
icon that will delete the entire bank.
Click the X at upper right to exit the browser without loading a new sequence.
4.2.7.1. Importing Sequences
You can import sequences by moving files in our proprietary format in the folder /Library/
Arturia/Samples/Acid V/User/Sequencer/User. Our Sequence Scales [p.32],especiallythe
”Acid” ones, can really makethemostofimportedsequencesand,sotospeak,303-ify
them.
31 Arturia - User Manual Acid V - ADVANCED VIEW PART 1 - SEQUENCER

4.2.8. Sequence Scales
Click the Scales field towards the left of the Sequencer windowtoaccessoptions for scales.
We’vedividedthemintotwocategories:
Acid
,which are chromatic scales customized to
invoketheclassic303andthemusical styles in which it was heard; and
Classic
,which are
arangeofthe“usualsuspects”ofalternativescalesaccordingtomusic theory. These can
restrict the notes the sequencer will play to only those that are part of the selected scale.
The graphic at the bottom of the Scales menu shows which notes are activefor a given
scale.
4.2.8.1. Custom scales
Click
Custom
and the graphic at the bottom of the Scales menu becomes adjustable.You
may then click each note’s icon to make it available or unavailable to the custom scale.
The sliders belowthenoteiconsaddarandomfactor. Each one changes the probability that
its note will be played at a given step when the note randomizer [p.28] is in use.
Arturia - User Manual Acid V - ADVANCED VIEW PART 1 - SEQUENCER 32

♪ Here’s howtothink of the relationshipbetween these sliders and the dice icon seen when hovering
over the note name column, which controls the overall note randomizer. That dice icon increases the
odds that at any step,adifferentnoteisgoingtobeplayedthantheoneyou’vechosenfor the step.
Then, in terms of what that alternate note is going to be,theslidersheregiveeachnoteinthescalean
advantageordisadvantage.It’s likeaprizedrawing: The winning ticket is chosen blindly out of a hat,
but you could guarantee a win by purchasing every available ticket, which is likeraisinganote’sslider
all the way. On the other hand, you can’t win if you don’t play, which is likelowering a note’s slider all
the way.
4.2.9. Rate and gate time
The Rate parameter sets the sequencer tempo.Clickthegreenword belowtheknobto
access tempo sync options:
• BPM: Absolute beats per minute, independently of your host/project tempo
• Bars: Either a division or a multiple of musical bars relativetoyourDAWtempo,
with a “straight” feel
• Triplet: LikeBars,butthreeeighth-notesareplayedinthespaceofonequarter-
note
• Dotted: LikeBars,with a pair of eighth-notes played as a dotted eighth then a
sixteenth
Gate time adjusts the windowoftimeinwhich each stepisallowed to “speak.” Inpractice,
this can sound like the step has more or less sustain.
4.2.10. Swing
Swing is often described as a “behind the beat” rhythmic feel, and Acid V has a rangeof50
to 75percent,which you changebydraggingupordown on the number. Fifty percent is
closest to a “straight” feel.
33 Arturia - User Manual Acid V - ADVANCED VIEW PART 1 - SEQUENCER

4.2.11. Note playback order
Acid V offers four options for note play order in Seq mode.Access them using the green
arrow to the right of the “Playback” name field.
• Forward: Sequence plays from step 1 to its final step.
• Backward: Sequence plays from its final step back to step 1.
• Forward Backward: Sequence plays from step1toitsfinalstep,thenreverses
direction and plays back to step1.This is an “exclusive” order,meaningthatthe
first and final steps are not repeated.
• Random: Steps of the sequence play in random order.
4.2.12. Steps and Shift
The Steps parameter simply mirrors the action of the vertical blue handle [p.27] for setting
the pattern length.
The upanddown arrows in the Shift section transpose the entire pattern upordown by one
semitone for each click.
The left and right arrows do something more interesting wecall
rotation.
They shift steps
horizontally, by one stepfor each click. For example,clickingrightina16-stepsequence
would turn step1intostep2,andsoon,alltheway until the final stepbecomesthenew
step 1.
Arturia - User Manual Acid V - ADVANCED VIEW PART 1 - SEQUENCER 34

4.2.13. Polymetric mode
Click the Polymetric name field on the left side to enter Polymetric mode,andyouwill see
something liketheimageabove.Instead of one grab handle [p.27] to set the pattern length,
there are now five separate ones for Octave, Notes, Slide, Accent, and Vibrato.
The positions of each of these handles means that the pattern will reset to step1atdifferent
times with respect to that handle’s attribute (notes, accents, etc.). Effectively, this lets you
mix things upsothatagiven stepmaysometimesplayatadifferentoctave,haveornot
haveanaccent,andsoforth. This can be a powerful tool for making sequences more varied
and less robotic.
4.2.13.1. Polymetric reset
Drag upordown in the Reset field to set the number of steps at which the pattern will
“realign.” This does not mean it starts over at step1.Itmeansthatwhenthespecified stepis
reached, the settings you originally made between a step’s note,itsoctave,andwhetherit
has an accent, slide, or vibrato will return to normal, i.e. what the onscreen controls show.
35 Arturia - User Manual Acid V - ADVANCED VIEW PART 1 - SEQUENCER

4.2.14. Transmutation
This final section in Seq mode makes two very interesting alterations.
♪ Try the Transmuter in conjunction with the Acid scales to get the best result.
4.2.14.1. Generate
Clicking the “beaker” icon doesn’t turn lead into gold, but performs some sonic alchemy.
Itsimplychanges everything up: notes at each step,octaves, and which steps get a slide,
accent, and/or vibrato.You can click it to transform the existing sequence,thenmovethe
amount up or down to adjust the degree of generativity.
4.2.14.2. Density
Density works in the main sequencer interface and by selecting patterns from the Sequence
Browser. The default value of this parameter is 1.00, at which all the steps in the pattern
play. Reducing it thins out the sequence by muting steps. They’re not deleted — turning it
back upwill restore them. With Density at minimum, the entire sequence is silent. Adjust
density by first selecting a pattern from the sequence browser,thenbyraisingorlowering
the knob.
♪ One good use of the Density setting is for musical bridges or breaks where you want the bass line
to be more sparse.
Arturia - User Manual Acid V - ADVANCED VIEW PART 1 - SEQUENCER 36

4.3. Arpeggiator mode
InArpeggiator mode,thesequencerinAcid V turns into an advanced arpeggiator. What’s
the difference? Where the sequencer plays notes you specify for each step,thearpeggiator
turns real-time note input from a connected MIDIcontrollerintopatternsthatascend,
descend, or play in other orders you can set.
Said more simply, if you hold a chord on a keyboard, the Arpeggiator mode plays the notes
of the chord as a pattern.
InArpeggiator mode,thepiano-rollnotegridisgreyed-out,butyoucanstillsettheoctave,
slide, accent, and vibrato for each step.
4.3.1. Controls in common with sequencer mode
Many functions and settings are shared with Seq mode,solet’sdoaquicksummaryof
those before proceeding to what’s unique about Arp mode.Thebulletsbelowlinkbackto
the relevant sections about the sequencer. (There’s no need to repeat all this information, as
this chapter is getting long!)
37 Arturia - User Manual Acid V - ADVANCED VIEW PART 1 - SEQUENCER

• Scales [p.32] including the custom scale
• Rate, tempo sync, and gate time [p.33]
• Swing [p.33]
• Playback order [p.34]
• Step length and Shift [p.34]
• Polymetric mode [p.35]
Note that the Transmutation [p.36] feature is unavailable in Arpeggiator mode.
4.3.2. Mode Arp setting
This corresponds to the “arpeggiator mode” setting found on many synthesizers. Itcontrols
note playback order in a different way from the playback setting mentioned above [p.34].
Namely, it relates the note order as heard to whatever you play on a keyboard controller.
Clicking in the name field brings up the following menu:
•
Order:
Note order follows the order in which you pressed keys
•
Reverse:
Like Order, but the note order heard is the opposite of what you played
•
Up:
Note order ascends in pitch
•
Down:
Note order descends in pitch
•
Up&Down Inclusive:
Note order ascends and descends, with the highest and
lowest notes repeated
•
Up&Down Exclusive:
Note order ascends and descends, with the highest and
lowest notes
not
repeated
•
Random:
A random note order is generated based on played keys
♪ The Playback [p.34] setting applies on topofwhatever note order is chosen here,allowing for
creative possibilities. Setting both to
Random
is particularly interesting!
Arturia - User Manual Acid V - ADVANCED VIEW PART 1 - SEQUENCER 38

4.3.3. What about octave range?
Most arpeggiators haveanoverall setting for octaverange,soyoumight havenoticedthe
absence of one here.Remember that Acid V has a four-octaverangefor
each
step,andthat
this applies in Arp mode as well as Seq mode.
That’s about all there is to Arpeggiator mode.Next,let’smoveontoexploringthehighly
flexible Modulators in Acid V!
39 Arturia - User Manual Acid V - ADVANCED VIEW PART 1 - SEQUENCER

5. ADVANCED VIEW PART 2 - MODULATORS
Modulators in Acid V are a very powerful means for applying variation to virtually any
parameter in the instrument. Ifyouarefamiliar with synths, you might be asking “What
kinds of modulation sources are wetalkingabouthere?Envelopes or LFOs?” The answer is:
both! You can program the Modulators to act in either way, and they go beyond what either
aconventional LFO or an ADSR envelope can do,althoughtheycancertainlyplaythose
roles with ease. Acid V has three Modulators, which function identically.
Access the Modulators by first going into Advanced View [p.77] then clicking any of the
Modulation tabs.
♪ Users of other Arturia instruments will knowmodulatorsbyadifferentname:Functions. But this
time around we wanted to make it sound less like you’re in math class.
5.1. Assigning a Modulator
Before weget into howModulators work, let’s cover howtoassignonetoadestinationin
Acid V.OneachoneoftheModulation tabs, there is an animated thumbnail that displays
the waveform or action of that Modulator. Click on this thumbnail and drag it to whatever
you want to modulate, such as the filter cutoff, like so:
Arturia - User Manual Acid V - ADVANCED VIEW PART 2 - MODULATORS 40

You can assign the same Modulator to multiple destinations or multiple Modulators to the
same destination.
♪ Don’t limit yourself to the main panel when it comes to modulation destinations. Many settings
inside the Sequencer/Arpeggiator,Effects,andeven the Modulators themselves (such as rate) are
eligible targets.
5.1.1. Modulation amounts
Once a Modulator is assigned, hovering over the destination knob shows a pop-upmini-
knob, like this:
This controls the modulation amount for the destination, and it’s bipolar,meaningthatyou
can turn it to either side of 12 o’clock to set positiveornegativevalues. Anamountcontrolfor
each Modulator assigned to the destination will appear,color-codedtomatchtheModulator
tab. Here is what Modulators 1 and 2 assigned to filter cutoff would look like:
41 Arturia - User Manual Acid V - ADVANCED VIEW PART 2 - MODULATORS

Operating or hovering on a mini-knob also shows a collar around the destination knob to
indicate the modulation amount, matching its color:
You can also hover over the animated thumbnail on any Modulator tab to viewits
destinations, and control their amounts with horizontal sliders that mirror the action of the
mini-knobs.
This is useful for when you haveaModulator assigned to several destinations and don’t
want to hunt around the interface to control them all. Notice also that each destination has its
own on/off button. This lets you shut off modulation only to that destination, while retaining
the modulation amount you’ve set in case you turn it back on later.
Arturia - User Manual Acid V - ADVANCED VIEW PART 2 - MODULATORS 42

5.2. How Modulators work
Aswesaid,Modulators in Acid V can work likeenvelopes, LFOs, or likeamadscientist
combined both into a hybrid and gaveitsuperpowers. Basically, they makeiteasier than
ever to turn what you see on the graph into what you hear.
5.2.1. Breakpoints and grab handles
Modulators let you create any curveorshapeofmodulationyouwant beginning with two
simple tools:
breakpoints
and
grab handles
.A
breakpoint
is a point in time at which the
modulation changes direction. (Actually, it doesn’t haveto—youcoulduseabreakpointas
aspotwhere,for example,thecurveincreasesordecreasesinsteepness — but changing
direction is usually what a breakpoint is for.)
Left-click on the graph to add a breakpoint. Right-click on the point to delete it.
Between any twobreakpointsisa
grab handle
that you can drag to changetheshapeor
intensity of the curvebetween those twopoints.Leavingahandleinmid-position would
create a more or less straight line between points. Dragging it as far as it will go in a
direction generally creates a steep “knee” shape.
Between grab handles and breakpoints, any shape can be created, from a simple sine wave
for an LFO to a conventional synth-style ADSR to extremely complex shapes.
A breakpoint is circled in red; a grab handle in yellow
43 Arturia - User Manual Acid V - ADVANCED VIEW PART 2 - MODULATORS

5.2.2. Modulation presets
You can create and saveyourown Modulator shapes in Acid V,butyouneednotever worry
about it if you’d rather just get on to making music. Modulators offer 18 shape presets, six of
which can be accessed by clicking the six buttons shown above.Or,browse the full menu
with the left-right arrows, or by clicking on the name field, which will display this menu:
At the bottom of this menu is a “Saveas”option. Click this to saveashapeyou’vecreated(a
dialogue pop-upwill prompt you to name it), which can then be called upfromwithin any
overall Acid V Preset.
Access six basic Modulator waves with the buttons on the right, or browse all 18 options by
clicking on the name field on the left
The full menu of
Modulator presets
Arturia - User Manual Acid V - ADVANCED VIEW PART 2 - MODULATORS 44

5.2.3. Modulation copy
Clicking the icon that looks liketwooverlapping squares lets you copy all of the settings of
the current Modulator to either of the other two.
5.2.4. Polarity, Mode, and Retrigger
Click any of these three fields to bring up its menu.
5.2.4.1. Polarity
Click on the Unipolar/Bipolar field to select the current Modulator’s polarity.
•
Unipolar:
The Modulator sends only positivevalues and the graph has no center
line
•
Bipolar:
The Modulator sends positiveandnegativevalues and the graph does
have a center line
5.2.4.2. Mode
The Mode setting is an important one,becauseitselectswhethertheModulator behaves
more like an envelope or more like an LFO.
•
One:
The modulation shape plays through once, i.e. more like an envelope
•
Loop:
The modulation plays repeatedly and can retrigger from the start point
based on a selectable event
45 Arturia - User Manual Acid V - ADVANCED VIEW PART 2 - MODULATORS
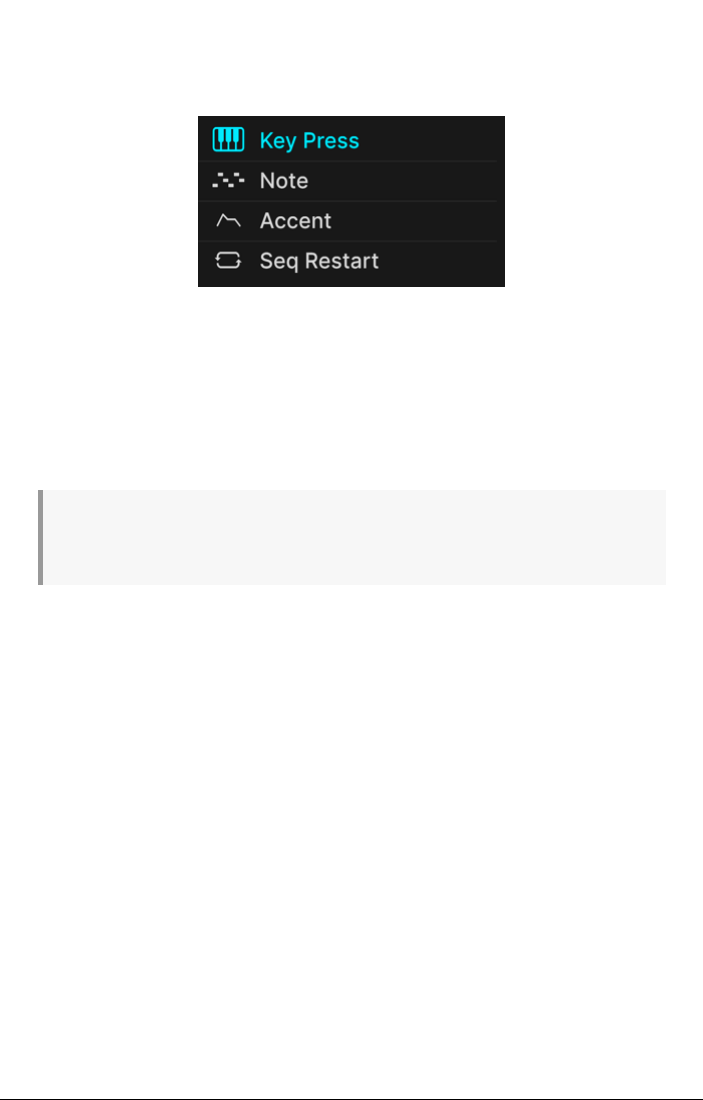
•
Run:
The modulation plays repeatedly and only returns to the start point when it
reaches the end
5.2.4.3. Retrigger
One-shot and Loopmodesallowfor the modulation to retrigger,thatis,startover from its
initial point, based on one of four events, which are selected from the above menu.
•
Key Press:
When an incoming MIDI note is received from a controller or a DAW
•
Note:
When the Sequencer/Arpeggiator plays a new note
•
Accent:
Like Note, but only on notes that have accents
•
Seq Restart:
When the Sequencer/Arpeggiator restarts from the beginning for
any reason
♪
Seq Restart
is a particularly cool option, since other things — such as whether you play legato — can
restart the Sequencer from the beginning. This lets you lock a modulation’s character to the musical
statement you’re making with the series of notes in the Sequencer.
Arturia - User Manual Acid V - ADVANCED VIEW PART 2 - MODULATORS 46

5.2.5. Rate and tempo sync
Of course,Modulators in Acid V sync to your project tempo — or not. The knob adjusts the
rate. Click on the name field to bring up the options menu:
•
Hz:
Unsynced, the Modulator free-runs and the rate is expressed in Hertz
•
Bars:
Either a division or a multiple of musical bars relativetoyourDAWtempo,
with a “straight” feel
•
Triplet:
LikeBars,butthreeeighth-notesareplayedinthespaceofonequarter-
note
•
Dotted:
LikeBars,with a pair of eighth-notes played as a dotted eighth then a
sixteenth
5.2.6. Scale
The final setting in the Modulator is Scale,which adjusts the output of the Modulator
independently of any other amount settings, such as those involved with routing [p.41].This
is useful for setting an absolute “ceiling” on howintensethemodulationcanget, then using
depths at individual destinations for further fine-tuning.
47 Arturia - User Manual Acid V - ADVANCED VIEW PART 2 - MODULATORS

6. ADVANCED VIEW PART 3 - EFFECTS
Acid V includes a suite of powerful stereo effects curated from our latest V Collection of
virtual instruments. You can use uptofour effects at once,andeachofthefour effects slots
offers a choice of 17 effect types. Enter Advanced View [p.77] then click the Effects tab to
navigate here.
6.1. Effects routing
Effects routing in Acid V is “hard wired” as serial. The signal is first processed by the effect
in the slot at far left, then simply moves from left to right. This makes sense,sinceAcid
Vamonophonic instrument and there’s no possibility of different voices or simultaneous
sounds needing to go through different effects. Plus, it keeps things simple.Justsetupthe
effects chain you want, not unlike a guitar pedalboard.
There is a global on/off button on the Effects tab,plusindividualon/offbuttonsfor each of
the slots. Inallcases,thesewill disable the effect(s) without losing any of their settings. This
is a great tool for comparing dry and wet sounds as you craft your tracks.
Acid V effects are routed serially
Arturia - User Manual Acid V - ADVANCED VIEW PART 3 - EFFECTS 48

6.2. Selecting an effect
Click the name field at the topofanyoftheeffectsslots(youcanalsoclickanyempty
square that says “none” aboveit)tobringuptheeffectsselectionmenu.Theeffectsare
divided into five categories to make choosing a little easier.
•
Spatial:
Reverb and delays
•
Dynamics:
Compressor and multi-band compressor
•
Filter/EQ:
Synth-style multi-filter and parametric EQ
•
Distortions:
Algorithmic distortion as well as bitcrusher
•
Modulations:
“Super Unison,” choruses, flangers, phaser, and stereo panner
The full list of effect types [p.51] with descriptions of all their parameters is just below.
Acid V offers 17 effects in five categories
49 Arturia - User Manual Acid V - ADVANCED VIEW PART 3 - EFFECTS

6.3. Effect presets
Each of the 17 effect types in Acid 3V comes with a handful of presets, though of course
weencourageyoutotwist those knobs and create your own. That said, the presets can be
great starting places, not to mention convenient for when you want to grab a quick sound,
so please do explore them all. Notice the “Saveas”option, which will bring upadialogue
boxthatpromptsyoutonameandsaveanysettingsyoulikeasyourown FX preset. This
may be then called up from within any overall Acid V Preset.
6.4. Effect copy
Click the “overlapping squares” icon at the toprightofanyoftheslots’namefields to copy
the effect you’re working on to any of the other three slots. This brings over both the choice
of effect and all the settings at the time you perform the copy operation.
The factory presets for
the Delay effect in Acid V
Arturia - User Manual Acid V - ADVANCED VIEW PART 3 - EFFECTS 50

6.5. Effect types
Nowit’stimetomeeteacheffecttype individually. Ingeneral, you can adjust at least some
of the parameters that are also adjustable with knobs or sliders by clicking and dragging
inside the effect’s graphic visualizer. Wewill flag such settings with
(H)
for those you can
drag horizontally and
(V)
for those you can drag vertically.
6.5.1. Dry/Wet slider
Every effect except for the Parametric EQ and Stereo Pan has a horizontal slider for Dry/
Wet mix, i.e. how much pre-effect vs. post-effect signal you hear.
♪ Remember that due to the serial routing, a sound that’s relatively dry with respect to one effect
may still be carrying a lot of the previous one in the chain.
6.5.2. Effects tempo sync
The Spatial effects as well as every Modulation effect except Super Unison and Chorus have
tempo-sync options for their time or rate parameter,accessedbyclickingonthegreen
word next to the parameter name belowtheknob.Theseshouldnowbefamiliar from the
sequencer and modulators, and are:
• Unsynced
• Sync
• Sync triplets
• Sync dotted
Now let’s visit the effects in the order in which they appear on the effects menu.
51 Arturia - User Manual Acid V - ADVANCED VIEW PART 3 - EFFECTS

6.5.3. Reverb
Reverb is the sound of a space – a recording studio,concerthall,stairwell, tiled bathroom,
you name it. Reverb is often used as the final effect in a chain to put everything else that’s
going on into the same acoustic space, lending cohesiveness to the sound.
Control Description
HPF Reduces the high-frequency content before processing
LPF Scoops out the low-frequency content before processing
Pre-delay Sets the amount of time before the input signal is affected by the reverb
Decay (V) Determines the length of time the reverb effect will last
Size (H) Adjusts the size of the room: counter-clockwise is smaller, clockwise is larger
Damping Controls the rate at which the high frequencies decay
MS Mix Adjusts the reverb from mono to an increasingly wide stereo space
Arturia - User Manual Acid V - ADVANCED VIEW PART 3 - EFFECTS 52

6.5.4. Delay
Delay is a generic term for any effect that makes a copy of an input sound and repeats it
ashorttimelater.TherearethreedelayeffectsinAcid V,andthis first one sounds good all
around.
Control Description
HPF Higher values cause increased reduction of low-frequency content with each echo
LPF Higher values cause increased reduction of high-frequency content with each echo
Rate (H)
Changes the length of the delay, with unsynced and tempo-sync options (sync, triplets,
dotted)
Fine Lets you fine-tune the delay time set by the Rate knob with +/- 30ms of delay time.
Feedback
(V)
Adjusts how many times the delay will repeat
Stereo
Width
Higher values increase the distance between the left and right iterations of the echoes
Ping Pong Toggles alternating left/right echoes with exact rhythmic spacing
53 Arturia - User Manual Acid V - ADVANCED VIEW PART 3 - EFFECTS

6.5.5. Tape Echo
Tape Echo is a type of delay characteristic of early tape-based delay machines such as
the Maestro Echoplex and Roland Space Echo.Input sounds are recorded to a loopoftape
with one or more playback heads to create the echoes. Because tape loops can be unstable
and shift in pitch and timbre,theyproduceaneffectthatiswarmer and less precise than a
digital delay.
Control Description
Input Adjusts the incoming signal to achieve varying amounts of analog saturation.
Time (H) Changes the length of the delay, with unsynced and tempo-sync options
Fine Lets you fine-tune the delay time (set by the Time knob) with +/- 30ms of delay time.
Intensity (V) Sets the feedback amount of the delayed signal.
Stereo Width Higher values increase the distance between the left and right iterations of the echoes
Ping Pong Toggles alternating left/right echoes with exact rhythmic spacing
Arturia - User Manual Acid V - ADVANCED VIEW PART 3 - EFFECTS 54

6.5.6. PS Delay
PS stands for pitch-shifting delay, and is a classic effect popularized by the Eventide
Harmonizer. Itworks likeaconventional delay, but in addition to being fed back to create
echoes, the delayed audio signals are subjected to a pitch shift, either up or down.
Control Description
HPF Controls the cutoff of a highpass filter that affects the delayed signal only
LPF Controls the cutoff of a lowpass filter that affects the delayed signal only
Time (H) Sets delay time, with unsynced and tempo-sync options
Feedback Controls how much of the delayed signal feeds back into the effect to be delayed again.
Stereo
Detune
Detunes the delayed signal relative to the incoming signal
Spray
Adds a scattering effect across the sound for each successiveechowith slightly randomized
echo times
Pitch Shift
(V)
Adjusts the amount that the delayed signal is pitch-shifted relative to the incoming signal
Stereo
Offset
Offsets the delayed signal in the stereo picture
55 Arturia - User Manual Acid V - ADVANCED VIEW PART 3 - EFFECTS

6.5.7. Compressor
A Compressor is used to control the dynamic rangeofasound:itreducesthedifference
between the softest and loudest levels a sound can have.Itdoesthis based on reducing a
gain by a certain amount (the ratio) once the audio releases a certain level (the threshold).
Control Description
Makeup Enables control of the output level to compensate for the gain reduction of the input
Threshold (H) Sets the level where compression will begin
Ratio (V) Determines the amount of compression to be applied once the threshold is reached
Output Gain
Attack
Release Sets the release curve of the compressor
♪ There’s an old audio jokethat’sgreatfor understanding compressors. Threshold is howloudyour
music has to be before your parents tell you turn it down. Ratio is howmuch you turn it down. Attack
is howfast your parents react once it’s too loud. Release is howsoonyouturnitbackuponcethey’re
gone.
Arturia - User Manual Acid V - ADVANCED VIEW PART 3 - EFFECTS 56

6.5.8. Multiband
Amultiband compressor works likeaseries of regular compressors, but each one works
on a separate rangeoffrequencies (
band
). First used by mastering engineers to squeeze
the maximum level out of recordings, these compressors are nowusedfor subtle sculpting,
sound design, special effects, and much more.
The multiband compressor is probably the most complex effect type in Acid V,firstofall
because there are things you can
only
adjust by dragging in the graphical visualizer. It
can work on uptothreefrequencybands,andyoucanusethetwoon/offbuttonsbelow
the visualizer to turn the lower and/or upper bands off.You can also drag upordown on
the numbers belowthevisualizertosetthefrequencycrossover between the lowandmid
bands (left number) and mid and high bands (right number).
On topofallthat,it’salsoan
expander
,which means it can raise the level of soft signals.
The green bars with horizontal lines inside on the toparefor compression; those beloware
for expansion.
With all this in mind, here is the parameter rundown:
57 Arturia - User Manual Acid V - ADVANCED VIEW PART 3 - EFFECTS

Control Description
Threshold
(V)
Drag the border of a green bar to adjust the point at which the compression (or expansion) starts
working
Ratio (V)
Drag
inside
of a bar to adjust the amount of compression or expansion for that band. Increasing
ratios are depicted by denser horizontal lines, until the inside bar turns green at maximum
Band On/
Off Icons
The high and/or lowbandsmaybeswitched off,resultingina2-or1-bandcompressor/
expander
Low-Mid
Crossover
Drag on this field, located at lower left of the visualizer,tochangethecrossover point between
the low and mid bands
Mid-High
Crossover
Drag on this field, located at lower right of the visualizer,tochangethecrossover point between
the mid and high bands
Out Low Independent output level control for low band
Out Mid Independent output level control for mid band
Out High Independent output level control for high band
Input Sets the overall input gain
Attack
Sets the time it takes for the compressor/expander to “grab” the signal once a threshold is
reached
Release
Sets the time it takes for the compressor/expander to “let go” of the signal once the signal falls
beneath the threshold
Output
Located at right, the main Output knob governs the overall makeupgainwhile preserving the
difference in output between the bands
Arturia - User Manual Acid V - ADVANCED VIEW PART 3 - EFFECTS 58

6.5.9. Multi Filter
Sometimes it's nice to haveanextrafilterhandyfor tweaking your tone before it gets to
the output. The Multi Filter FX gives you fivetochoosefrom!Types include: lowpass (
LP
),
highpass (
HP
), bandpass (
BP
), feedback comb filter (
CombFB
), and feed-forward comb
filter (
CombFF
). The comb filters simulate the behavior of a flanger with twodifferent
tonal qualities – CombFB produces a series of evenly spaced peaks, and CombFF produces
evenly-spaced notches.
Control Description
Filter type Drag up or down on the letters to the lower left of the visualizer to choose the filter type
Slope
Click a selection at the lower right of the visualizer to choose the filter steepness; these do not
apply to the comb filters
Cutoff (H) Adjusts the cutoff frequency of the filter
Resonance
(V)
Sets the resonance of the filter, which is a peak of frequencies clustering near the cutoff
59 Arturia - User Manual Acid V - ADVANCED VIEW PART 3 - EFFECTS
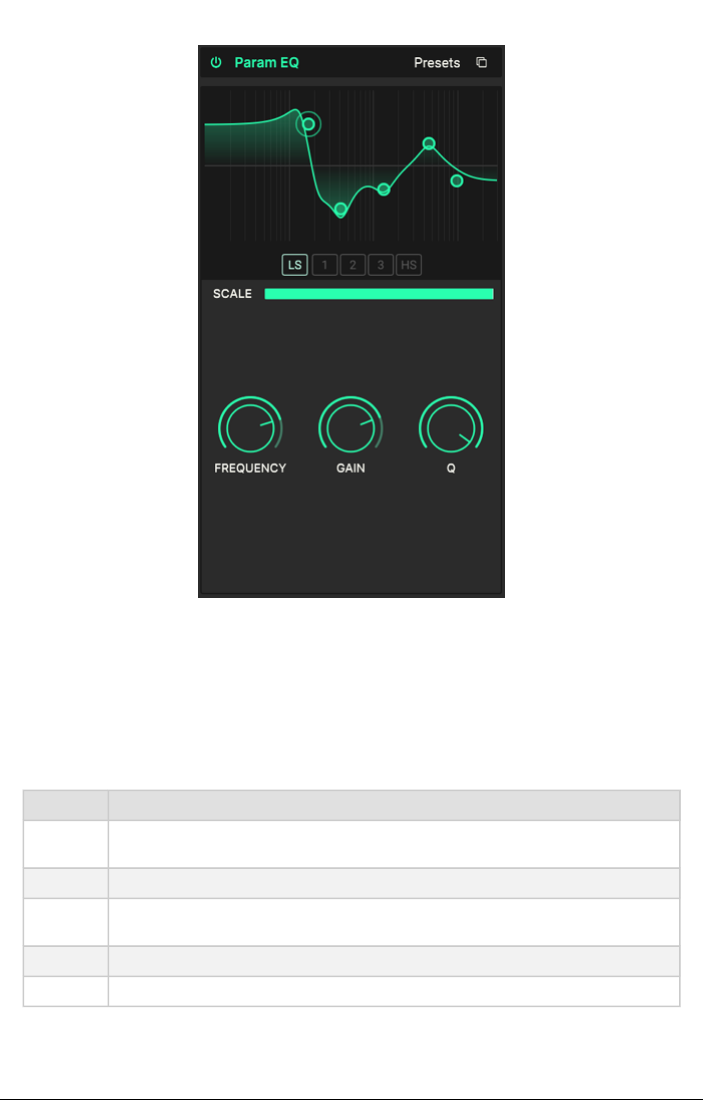
6.5.10. Param EQ
A Parametric Equalizer lets you sculpt tone very precisely, as opposed to the very broad
tonal strokes you get from a synth filter or tone controls. Itcanbeusedtogently or
surgically boost or cut certain frequencies to alter the overall sound or removeproblem
frequencies.
The EQ in Acid V has fivebands,andyoucanadjustthefrequency,gain(boostorcut),and
Q(howwide the band is around the selected frequency) for each one.Infact, that ability to
tweak the frequency and bandwidth is just what “parametric” means!
Control Description
Band
select
Click one of the points in the visualizer or one of the fivebuttonsbelowtoselectthebandthe
next controls listed will affect
Scale Adjusts the overall impact of the EQ curve on your sound
Frequency
(H)
Selects the center frequency of the current band
Gain (V) Adjusts the boost or cut to the level of the current band
Q Adjusts the width of the spectrum around the Frequency that is affected by the boost or cut
Arturia - User Manual Acid V - ADVANCED VIEW PART 3 - EFFECTS 60

6.5.11. Distortion
Distortion offers the most algorithms of any Acid V effect. They’re derived algorithms from
our flagshipdistortioneffectcalledDist COLDFIRE.Therearemanydifferentkindsofsignal
distortion, each with its unique sonic signature – and they can transform sounds in ways
ranging from subtle warmth to an all-out audio thunderstorm! There’s also a multi-mode
filter that can be applied either before or after the distortion.
Click in the upper left of the visualizer to bring upthedistortiontypes menu, which expands
upon those from the distortion on the main panel.
61 Arturia - User Manual Acid V - ADVANCED VIEW PART 3 - EFFECTS

Rather than offering lengthy technical descriptions of what each algorithm does, we
encourage you to explore the character of each for yourself.
Control Description
Type select As above
Drive (V) Sets the distortion amount
Auto Engages automatic gain compensation to avoid undesired loud peaks
Out Gain Use this to compensate for increased output gain caused by the other settings
Filter on/off Toggles integrated filter in or out
Filter menu Pop-up selects lowpass, highpass, bandpass, or notch modes
Cutoff (H) Adjusts cutoff/center frequency of integrated filter
Resonance (V) Adjusts resonance of integrated filter
Pre/Post Drag on field to place filter pre- or post-distortion
Dark Click to adds a fixed low-pass filter post-distortion
Arturia - User Manual Acid V - ADVANCED VIEW PART 3 - EFFECTS 62

6.5.12. Bitcrusher
A bitcrusher does exactly what it sounds like: it crushes bits! Technically, it can reduce
both the bit depth and the sample rate of the signal. Bit depth (e.g. 16-bit vs. 8-bit) deals
with differences in volume; sample rate (e.g. 44,100 kHz, likeaCD)dealswith frequency
response.Whenmusicians talk about the “lo-fi” sound of vintagesamplers,gameconsoles,
or computers, they’re talking about bitcrushing.
Control Description
Bit Depth (V) Reduces the number of bits used to render gradations in amplitude.
Downsample (H) Divides the sample rate used to represent the signal.
63 Arturia - User Manual Acid V - ADVANCED VIEW PART 3 - EFFECTS
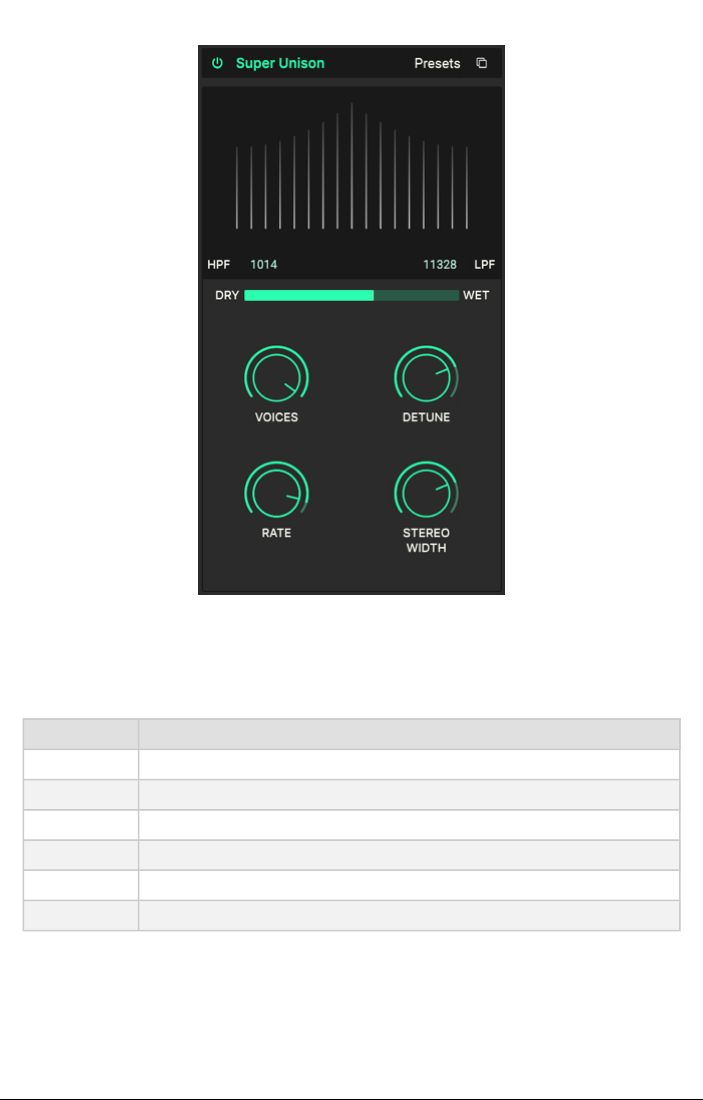
6.5.13. Super Unison
Not unlikeasynth’sUnison mode,this effect adds duplicates of the input signal to itself,with
the option to detune them. The graphic indicates amount of detuning between the voices
horizontally and volume of detuned voices vertically. The original signal is the tallest line in
the center.
Control Description
HPF Controls the cutoff of a highpass filter that affects the processed signal only
LPF Controls the cutoff of a lowpass filter that affects the processed signal only
Voices (H) Sets the number of unison voices
Detune (V) Determines the detuning amount
Rate Adjusts the speed of modulation of all voices
Stereo Width Adjusts the spread of the voices across the stereo picture
Arturia - User Manual Acid V - ADVANCED VIEW PART 3 - EFFECTS 64

6.5.14. Chorus
Chorus is an effect first developed in the mid-1970s by Roland for the Jazz Chorus amplifier
and CE-1 pedal. Inachorus,thedrysignalismixed with one or more slightly delayed copies
of itself (called
voices
), whose amount of delay is gently varied by an LFO to create a sense
of thickness.
Control Description
Waveform Toggles modulation LFO between sine and sawtooth waveforms
Mono/
Stereo
Drag to toggle mono or stereo operation
Voices
Selects the number of delay lines the chorus will use,with a different starting phase for each
voice
Rate Adjusts the speed of the chorus
Feedback
(V)
Adjusts the amount of chorused signal that is fed back into the effect
Delay (H) Sets the amount of delay applied to the input signal
Depth Controls the intensity of the chorus
65 Arturia - User Manual Acid V - ADVANCED VIEW PART 3 - EFFECTS

6.5.15. Chorus JUN-6
One of the most famous chorus effects is the one built into the Juno-6 synthesizer and its
successors. This chorus is an accurate model of the original.
Control Description
Rate (H) The chorus rate, with unsynced and tempo-synced options
Depth (V) The depth of the chorus effect in milliseconds
Phase The phase of the chorused signal relative to the dry signal
Arturia - User Manual Acid V - ADVANCED VIEW PART 3 - EFFECTS 66

6.5.16. Flanger
The Flanger is the most intense of the time/modulation effects. Itoriginallycamefrom
audio engineers gently pressing on the flange(rim)ofamoving tape reel to slowdown
the playback a tiny bit. Combined with the original signal, this produces the signature “jet
engine” effect.
Control Description
Waveform Toggles the modulation LFO between sine and triangle waveforms
Mono/Stereo Click to select mono or stereo operation
+/- Click to toggle flanger between additive and subtractive operation
Rate Adjusts the rate of the flanger, with unsynced and tempo-synced options
Delay (H) Adjusts the length of the delay, which changes the harmonic content
Feedback
(V)
Adds feedback for a harsher or “ringing” sound. Maximum is 99% to avoid runaway feedback
LP Freq Use this to define the amount of high-frequency content that will enter the flanger effect
HP Freq This determines the amount of low-frequency content that the flanger effect will receive
Depth Sets the modulation depth
67 Arturia - User Manual Acid V - ADVANCED VIEW PART 3 - EFFECTS

6.5.17. BL-20 Flanger
The BL-20 Flanger is based on the sound of Arturia's Flanger BL-20 plug-in, which is in turn
based on the sound of the rare but beautiful-sounding Bel BF-20 hardware flanger from the
1970s.
Control Description
Wide Provides a wider stereo imagebyinverting the phase of the LFO modulating the right channel
Mono Input When engaged, optimizes the flanger for processing a monaural signal
Rate Adjusts the rate of the flanger, with unsynced and tempo-synced options
Delay (H) Adjusts the audible depth of the flange effect
Feedback
(V)
Adjusts the amount of effected signal feeding back into the flanger
Depth Adjusts the depth of the LFO that modulates the delayed signal
Arturia - User Manual Acid V - ADVANCED VIEW PART 3 - EFFECTS 68

6.5.18. Phaser
Fire phasers, Mr. Worf! Phase shifting splits the incoming signal, changes the phase of one
side,andrecombinesitwith the unaffected signal. Modulation of this signal via an LFO
results in a notch-comb filter that sweeps through the frequency spectrum, causing that
familiar “whooshing” sound. Some phaser pedals havejusttwoorthreeknobs;theonein
Acid V offers a lot of fine-grained control.
♪ TwoiconicusesofthephaserareonanalogstringsbyGary Wright and Jean Michel Jarre,andon
electric piano by Steely Dan.
Control Description
Waveform Sets the waveform for the internal LFO
Rate Adjusts the rate of the phaser, with unsynced and tempo-synced options
Feedback (V) Controls the amount of phased signal feeding back into the effect for a more resonant sound
Amount Determines the depth of modulation by the LFO
Frequency
(H)
Sets the harmonic center for the modulation effect
N Poles Determines the steepness of the phaser’s filter frequency response
Stereo Gradually changes the phaser from mono to stereo output
69 Arturia - User Manual Acid V - ADVANCED VIEW PART 3 - EFFECTS

6.5.19. Stereo Pan
Stereo Pan lets you automatically control and movethestereopositionoftheAcid V
monophonic voice, to provide motion and breadth.
Control Description
Amount (V) Instead of a dry-wet slider, this sets the overall width of the panning
Mono Bass When engaged, low frequencies will not be panned
Invert Button Inverts the LFO output, thus changing the “direction” of panning
Rate Adjusts the rate of the panning, with unsynced and tempo-synced options
Cutoff Sets the frequency below which panning stops when Mono Bass is engaged
Arturia - User Manual Acid V - ADVANCED VIEW PART 3 - EFFECTS 70
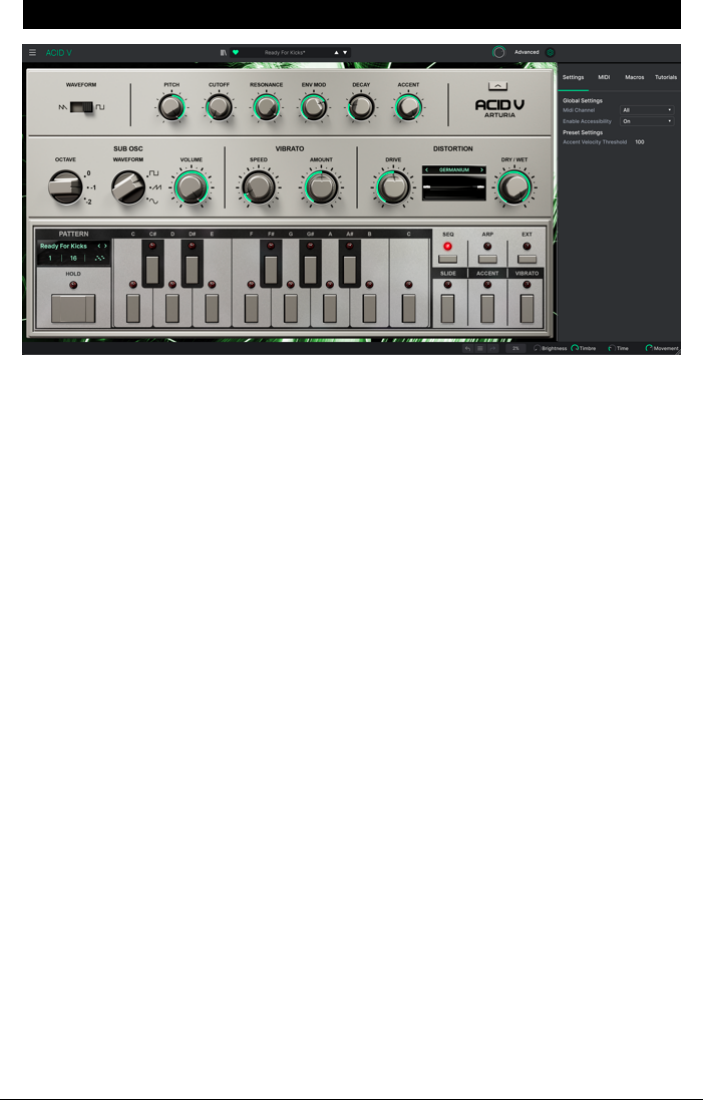
7. USER INTERFACE
This chapter covers everything that is not in the main panel and advanced views — all
the utilitarian functions that makeAcid V a joy to use in a modern music production
environment.
The toolbars aboveandbelowthemain panel [p.15] of Acid V contain a number of important
functions for Preset selection, housekeeping, and other utility settings.
Then there’s the side panel, where you makeimportantglobalandMIDIsettings,canuse
and create Macros [p.87] to control several settings with a single control movement, and
explore Acid V via interactive tutorials.
The Upper Toolbar includes:
• The Main Menu [p.72]
• The Preset Name Pane and Preset Browser [p.90] access button
• An overall output volume [p.19] knob
• The button to open the Advanced Views [p.77]
• A gear-shaped icon that opens the side panel [p.81]
The Lower Toolbar includes:
• The parameter description area [p.16] that shows infowhenyouhover over any
control
• A Bypass button
• Aduplicate Hold button [p.23] for when you’re in one of the Advanced Views and
the main hold button is obscured
• Undo, Redo, and History [p.79]
• The CPU Meter [p.80] and Panic [p.80] functions
71 Arturia - User Manual Acid V - USER INTERFACE
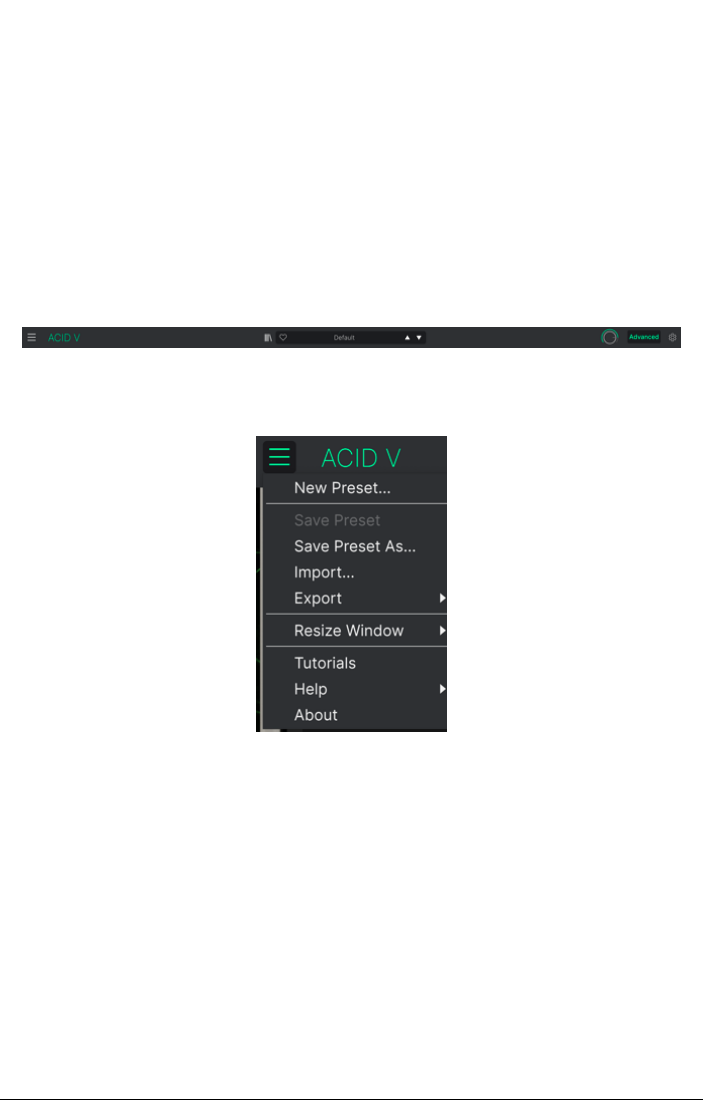
• Duplicate knobs for the Macros [p.80] in the side panel
• A corner grab handle [p.81] for resizing the Acid V window
The side panel includes:
• Settings [p.82]
• MIDI [p.82]
• Macros [p.87]
• Tutorials [p.75]
7.1. Upper Toolbar
Let’s start with the Upper Toolbar, covering its functions from left to right.
7.1.1. Main Menu
Clicking the “hamburger” icon (three horizontal lines) in the topleftcorneroftheupper
toolbar opens the Main Menu, a drop-down menu that lets you access a number of useful
functions related to Preset management and more.
7.1.1.1. New Preset
Creates a new Default Preset with initialized settings for all parameters.
Arturia - User Manual Acid V - USER INTERFACE 72

7.1.1.2. Save Preset
Overwrites the current Preset with any changes you havemade.This applies only to user
presets, so this option is greyed-out for factory presets.
7.1.1.3. Save Preset As...
This option saves the current settings of Acid V under a newPreset name.Clickingthis option
reveals a windowwhereyoucannameyourPreset and enter more detailed information
about it:
♪ The Bank, Author,andType fields are all useful when searching for Presets in the Preset Browser
[p.90].All of the words in boxes you see belowthataretags [p.92],which can further help refine
searches in the Preset Browser.
7.1.1.4. Import...
This command lets you import a Preset file or entire Bank stored on your computer. Itopens
a navigation window in your computer’s OS to find the proper files.
7.1.1.5. Export...
You can export Presets to your computer in twoways: as a single Preset, or as a Bank. In
either case,anOS-level navigation windowletsyouspecifywheretosavethefile(s).Both
individual Presets and Banks have the filename extension .303x.
• Export Preset: Exporting a single Preset is handy for sharing a preset with
someone else. The saved preset can be reloaded using the Import menu option.
73 Arturia - User Manual Acid V - USER INTERFACE

• Export Bank: This option exports an entire Bank of Presets, which is useful for
backing uporsharingmanyPresets at once.Saved Banks can be reloaded using
the Import menu option.
7.1.1.6. Resize Window
Acid V can be resized from 50% to 200% of its default size (100%) without any visual
artifacts. On a smaller screen, such as a laptop,youmaywant to reduce the interface size
so it doesn’t dominate the display. On a larger screen or a second monitor,youcanincrease
the size to get a better view of the controls and graphics.
You can also do this using keyboard shortcuts: every time you press CTRL- (Windows) or
CMD- (macOS), the windowwill shrink by one size increment, and every time you press
CTRL+ (Windows) or CMD+ (macOS), the window will grow by one size increment.
Inaddition,youcanclick-dragtheresize handle [p.81] at the right of the lower toolbar to
make the Acid V window any size.
7.1.1.7. Audio MIDI Settings
These appear only if Acid V is working in stand-alone mode.Used as a plug-in, these are
handled in the context of your DAWorhostsoftware.Refer to the chapter on Activation [p.9]
for details on the settings for both Windows and macOS. They work in much the same way
in stand-alone mode.
Arturia - User Manual Acid V - USER INTERFACE 74

7.1.1.8. Tutorials
Acid V comes with interactivetutorialsthatwalk you through different features of the plug-
in. Clicking this option opens a pane on the right side of the windowwherethetutorials
appear. Select one to access step-by-stepdescriptions that highlight the relevant controls
and walk you through the process.
7.1.1.9. Help
Get more help by visiting links to this user manual and Frequently Asked Questions pages
on Arturia’s website. You will need an internet connection to access these pages.
7.1.1.10. About
Here you can viewthesoftware version and developer credits. Click again anywhere on
the screen (outside the About windowbutinsidetheplug-in)tomakethis pop-upwindow
disappear.
75 Arturia - User Manual Acid V - USER INTERFACE

7.1.2. Preset Browser access and Name Pane
Clicking the “books on a shelf“ button opens the Preset Browser [p.90],which offers a myriad
of ways to browse, sort, and organize Presets in Acid V.
Clicking on the Preset name also opens upquickdrop-down menus for selecting Presets
outside of the Browser,asshown above.You can select to lookatlistsofPresets organized
by Type, as shown above, or look at All Presets at once.
Everything you need to knowaboutmanagingPresets is covered in detail in the next chapter
[p.90]. This includes working with Favorites, which are tagged by clicking the heart icon.
The Preset Name Pane
Arturia - User Manual Acid V - USER INTERFACE 76

Note: AnasteriskjustafterthenameinthePreset Name Pane (*) indicates that you’veeditedthat
Preset.
7.1.3. Output volume
This knob simply controls the main output level of Acid V.
7.1.4. Advanced Button
Near the upper right corner of the toptoolbaristheAdvanced Button.This changes the lower
area of the main panel (where the onscreen keyboard normally is seen) into the views for
the Sequencer, Modulators, and Effects.
7.1.5. Gear icon
This opens the side panel [p.81] where settings, Macros, and tutorials reside.
77 Arturia - User Manual Acid V - USER INTERFACE
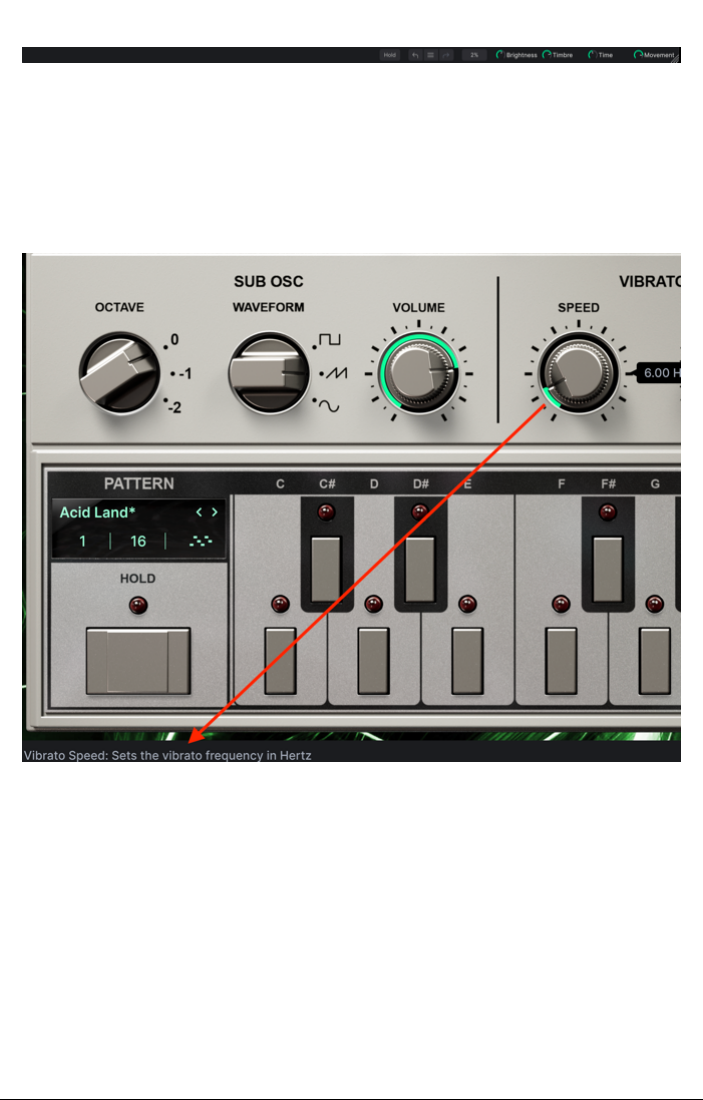
7.2. Lower Toolbar
The Lower Toolbar of the Acid V interface can be thought of in terms of left and right halves.
On the left is the Control Description display, and on the right are buttons for several useful
utility functions.
7.2.1. Parameter descriptions
Operate or hover on any knob,button,icon,orothercontrol,andabrief description of what
it does appear in the lower left-hand corner. That’s pretty much the only thing on the left
side.
Lower toolbar in Acid V
This Control Description pops up when you mouse over the Speed knob in the Main Panel
Arturia - User Manual Acid V - USER INTERFACE 78

7.2.2. Hold duplicate
This only appears in advanced view,andconveniently duplicates the Hold [p.23] found on
the main panel. You may wish to hold and unhold a running sequence while working on it
or tweaking the Modulators and Effects. That’s what this is for.
7.2.3. Undo, Redo, and History
When editing a virtual instrument, it’s all too easy to overshoot the sweet spot for one or
more controls, and then wonder howtoget back to where you were.LikeallArturia plug-ins,
Acid V offers comprehensiveUndo,Redo,andHistory functions so that you always havea
safe way back.
7.2.3.1. Undo
Click the left arrowtorevert to the state before the most recent edit you made.You may
click repeatedly to undo several edits in reverse time order.
7.2.3.2. Redo
Click the right arrowtoredothemostrecentedityouundid.Ifyouhaveundoneseveral,
you may click repeatedly to redo them in forward time order.
79 Arturia - User Manual Acid V - USER INTERFACE

7.2.3.3. History
Click the center “hamburger” (three lines) button to open the History window,asshown
above.This provides a step-by-stepaccountofevery moveyouhavemadeinAcid V.
Clicking on an item in the list not only re-executes that move—itreturnstheplug-intothe
overall state it was in when you first made that move.
7.2.4. CPU Meter
At far right is the CPUMeter,which displays the overall load Acid V is placing on your
computer CPU.Since it deals only with this plug-in, it is not a substitute for the resource
metering tools in your DAW.
7.2.4.1. Panic
Mouse over the CPUMeter,anditwill display the word PANIC. Click to send an all-sounds-
off command that silences any sound processed through Acid V.This is a momentary
command, so sound will resume if your DAW is still playing.
Intheevent of serious runaway audio (say, from an unrelated delay effect that has gone
into a feedback loop), stopyourDAWplaybackanddisable the plug-in causing the problem.
7.2.5. Macro controls
These controls can affect multiple parameters by turning just one of them, and mirror the
actions of those found in the Macros [p.80] tab of the side panel. Factory Presets are pre-
programmed with useful Macros.
Mousing over the
CPU Meter
accesses the
PANIC function
Arturia - User Manual Acid V - USER INTERFACE 80

7.2.6. Resize handle
Grab and drag the diagonal lines to the right of the Macro controls to resize the Acid V
window.This lets you get achievesizesinbetween increments in the Resize Window [p.74]
menu if that better suits your screen layout.
7.2.7. Max View button
Sometimes, you may see the abovebuttonwith twodiagonalarrows appear over the resize
handle.This happens when, for some reason, the windowsizeisnotdisplayingallofthe
controls of Acid V. Click it to restore a full view of the open controls.
7.3. The Side Panel
The gear-shaped icon at the toprightoftheUpper Toolbar opens the Side Panel,which
in turn contains four tabs covering important subsystems that you won't havetoaccess
quickly when you're playing or editing sounds in Acid V:
• Settings:Global settings such as MIDIreceivechannels,splits,octaveshift, and Poly mode
• MIDI:MIDILearnfunctionsfor use with MIDICCmessages sent from a controller or DAW
• Macro:Assignments for four Macros that control multiple parameters with a single knob
twist
• Tutorials: In-app interactive tutorials, also accessible from the main menu
Let’s look at them from left to right.
81 Arturia - User Manual Acid V - USER INTERFACE

7.3.1. Settings Tab
This tab covers settings to control how a Preset responds to incoming MIDI.
7.3.1.1. MIDI Channel
Selects the MIDIchannel(s)onwhich Acid V will receiveMIDIinput. You can select a
particular channel, or choose “All” for Omni Mode.
7.3.1.2. Enable Accessibility
This gives your computer’s system-level accessibility tools for differently abled persons
access to Acid V.
7.3.1.3. Accent Velocity Threshold
Inthechapteronthemainpanel,wetalked about howanaccent [p.18] can be triggered by
checking a step’s boxinthesequencer
or
by MIDIvelocity when Acid V is in Ext mode.This
parameter sets that velocity. Drag on the number field to change it.
7.3.2. MIDI Tab
This is where Acid V may be placed in MIDILearnmode.Inthis mode,allMIDI-assignable
parameters on the Hardware Panel are highlighted and you can map physical controls on
your MIDIcontrollertothem.Atypical example might be to map a real expression pedal to
the Master Volume control, or a physical knob on the MIDIcontrollertotheFrequency knob
of the Filter section.
The Side Panel’s Settings tab
Arturia - User Manual Acid V - USER INTERFACE 82

7.3.2.1. MIDI Controller menu
The Side Panel's MIDI tab
The MIDI Controller menu
83 Arturia - User Manual Acid V - USER INTERFACE

At the toprightoftheMIDItabistheMIDIController drop-down menu, where you can
select templates for many Arturia MIDIcontrollers.Thesemapphysicalcontrolstomany
“most wanted” parameters in Acid V for a plug-and-play experience.AGeneric template is
also provided for third-party MIDI controllers.
7.3.2.2. MIDI Config menu
The MIDIConfig drop-down lets you managedifferentsetsofMIDImapsfor controlling
Acid V from MIDIhardware.You can Save/SaveAsthecurrentMIDIassignmentsetup,
Delete it, Import a configuration file, or Export the currently active one.
This is a quick way to set updifferenthardware MIDIkeyboards or controllers with Acid V,
without having to build all the assignments from scratch each time you swap hardware.
For example,ifyouhavemultiple hardware controllers (small livekeyboard, largestudio
keyboard, pad controller,etc.),youcancreateaprofilefor each of them, savethem,
and then quickly load them here.This saves you from having to redo the MIDImapping
assignments from scratch each time you swap hardware.
Two options in this menu are especially powerful:
• Default: Gives you a starting point with predetermined controller assignments.
• Empty: Removes the assignments of all controls.
The MIDI Config menu
Arturia - User Manual Acid V - USER INTERFACE 84

7.3.2.3. Assigning and unassigning controls
Click the Learn button in the MIDItabtoputAcid V into Learn mode.Controls available for
assignment are purple.Controls that are already assigned are red, but can be reassigned
if desired. The screenshot aboveshows the assigned and unassigned controls for Acid V's
Default configuration.
Click any purple control and its name will appear in the list. Now,moveacontroloroperate
aswitch on your MIDIcontroller.Thecorrespondingcontrolonscreenwill turn red and the
assigned MIDI CC number will appear in the list to the left of the parameter name.
Tounassignacontrolonscreen,control-clickorright-clickit.Alternativemethodsof
assignment are available in the MIDI Parameter Menu [p.86] described below.
7.3.2.4. MIDI channel, CC, and min and max values
The first twocolumnsinevery MIDIassignmentlisttheMIDIChannel(Ch)andMIDI
Continuous Control Changenumber(CC)for the assignment. Upto16Channelsareavailable
on any MIDIstream,andthe127possible MIDIControl Changenumbers,while freely
assignable,followcertainconventions on most instruments. For example,Modulation Wheel
is almost always MIDI CC 1, Master Volume is CC 7, and Sustain Pedal is CC 64.
The Min and Max value columns for each parameter in the list let you scale the amount
by which a parameter in Acid V changes in response to a physical control movement. For
example,youmaywish to limit the rangeofafiltersweep,even though you’re probably
going to turn the knob all the way during a live performance.
Drag upordown on a value to changeit.Settingthemaximum lower than the minimum
reverses the polarity of the physical controller,i.e.turningit
up
will turn the assigned
parameter
down
.
Switches that only havetwopositions(On/Off,etc.)would normally be assigned to buttons
on your controller, but it's possible to toggle those with a fader or another control if you like.
♪ Don’t forget that many items in the Advanced views (Sequencer,Modulators, and Effects), not just
settings on the main panel, may be MIDI Learned.
When MIDI Learn is active, available parameters are purple and already-assigned
parameters are red.
85 Arturia - User Manual Acid V - USER INTERFACE

7.3.2.5. MIDI Parameter Menu
Control-clicking or right-clicking on any item in the list - only the list, not the main interface -
of assigned parameters brings upaconvenient menu with the following options, which can
be different for each parameter.
• Absolute: The assigned parameter in Acid V tracks the literal value your physical
controller is sending out.
• Relative: The assigned parameter in Acid V will go upordown from its current
value in response to physical controller movements. This is often useful when
using endless 360-degree encoders that don’t have physical motion limits.
• Delete: Removes the assignment and turns the corresponding onscreen control
purple again.
• ChangeParameter: Brings upalargesub-menuofevery assignable parameter
in Acid V.This lets you changetheassignmentofthecurrentCC/physicalcontrol
manually, and is useful when you knowexactly the destination you’re looking
for.
7.3.2.6. Reserved MIDI CC numbers
Certain MIDIContinuous Controller (CC) numbers are reserved and cannot be reassigned to
other controls. These are:
• Pitch Bend
• Aftertouch (Channel Pressure)
• All Notes Off (CC #123)
All other MIDI CC numbers may be freely assigned to control any parameter in Acid V.
Right-clicking a parameter gives you
these options
Arturia - User Manual Acid V - USER INTERFACE 86

7.3.3. Macro Tab
This tab handles assignments for the four Macro knobs on the right side of the Lower
Toolbar. You can assign multiple parameters to each one,thenuseMIDILearn[p.82] to
assign the Macro itself to a physical control if you want.
Macros are saved at the Preset level.
7.3.3.1. Macro slots
Click one of the Macro knobs to select which Macros you want to work with. The default
names are
Brightness
,
Timbre
,
Time
,and
Movement
,butyoucanrenamethembydouble-
clicking the name field. The knob abovethenamecorrespondstotheknobofthesame
name in the Lower Toolbar [p.80].
The Side Panel's Macro Tab
87 Arturia - User Manual Acid V - USER INTERFACE
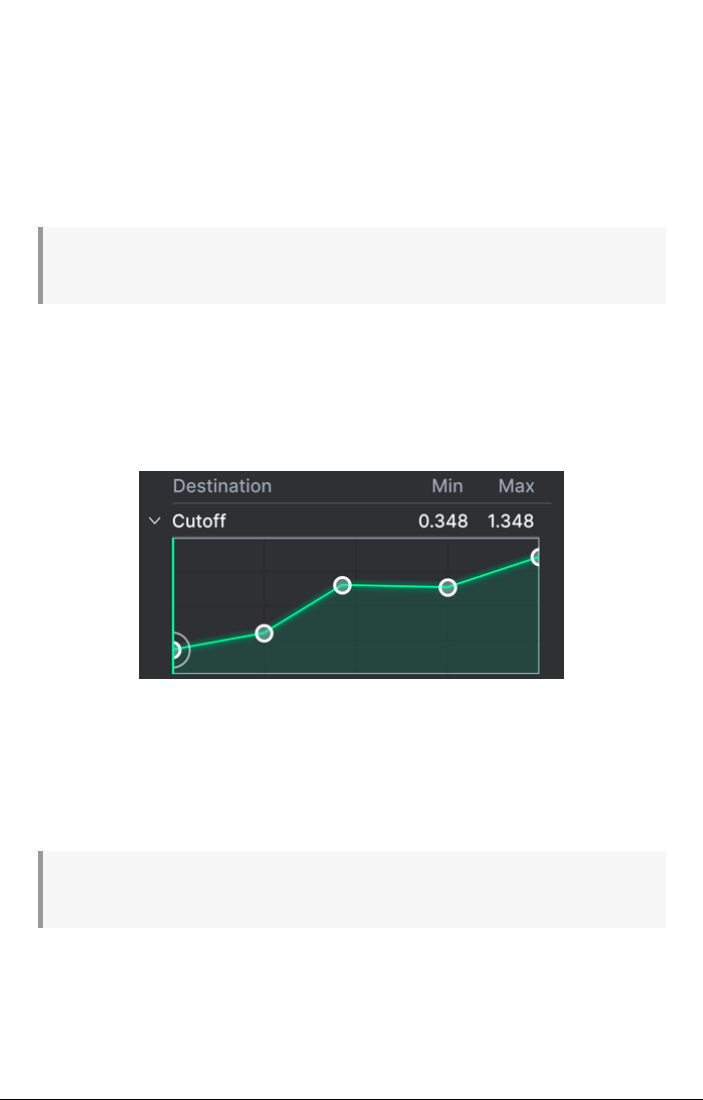
7.3.3.2. Making Macros
Click the Learn button in the Macro tab and you will see that the process works much like
MIDIassignments—available destinations turn purple and ones already assigned turn red.
Click on a purple control onscreen and its name will appear on the list.
ToremoveaparameterfromtheMacro,right-clickitsnameinthelistandselectDelete.
Parameters under Macro control have Min and Max values and may be scaled by dragging
upordown directly on the number,justasisdonewith MIDIassignments.Toreverse the
polarity of a parameter (i.e.haveitgodown when you turn the Macro knob upandvice-
versa), set the minimum value higher than the maximum.
♪ You can name and assign parameters as you liketoMacros.Keepinmind, though, that clarity is
usually better than cleverness when you’re working on a track.
7.3.3.3. Macro curves
Beyond simple scaling, you can customize a curvethatdetermines howeachparameter
under the Macro’s control proceeds from its minimum to maximum value and back when
you turn the Macro knob.Clickthe> icon next to the parameter name to open the curve
window.
Making Macro curves is a lot likeworking with shapes in the Modulators. Click on the curve
to add a breakpoint, represented by a small circle.You can then drag the point and the curve
segments between it and its nearest neighbors will changeaccordingly.Right- or control-
click on a point to removeit.Thefirstandlastbreakpointscannotberemoved. (Note that
unlike the Modulators, there are no grab handles between the breakpoints.)
♪ Asimplediagonallinewould produce a linear curve,butthepotentialfunhereistomakethings
non-linear.
An example Macro curve for the filter cutoff
Arturia - User Manual Acid V - USER INTERFACE 88

7.3.4. Tutorials
Inthis tab,which can also be opened by selecting Tutorials from the Acid V main menu
[p.72],youcanclickontitlesfor the individual chapters, which in turn will takeyouthrough
different areas of Acid V in steps. The parts of the panel to focus on are highlighted as you
go.
!Ifyou’reeditingaPreset, makesuretosaveitbefore opening the Tutorials, because doing so will
load a newPreset and overwrite your changes. The Tutorials also takeover the Side Panel space when
in use.
Warning pop-up when launching a tutorial
89 Arturia - User Manual Acid V - USER INTERFACE

8. THE PRESET BROWSER
The Preset Browser is howyousearch,load,andmanagesoundsinAcid V.Ithasdifferent
views but they all access the same banks of Presets.
Toaccessthesearchview,clickthebrowser button (the icon looks a bit likebooks on a
library shelf). To close the browser, click the Clear All that appears in its place.
The browser has four main areas:
Number Area Description
1.
Search and Results
[p.91]
Search Presets with text strings, and by tags for Type and Style.
2. Sidebar [p.96] Manage Banks, Favorites, and Playlists.
3. Preset Info [p.98]
Summary of Bank and Tags, Designer name,anddescription infofor
current Preset.
4. Macro Knobs [p.101]
Largesizeduplicates of Macro knobs in Lower Toolbar and the Macros
tab.
Arturia - User Manual Acid V - THE PRESET BROWSER 90

8.1. Search and Results
Click on the Search field at the topandenteranysearchterm.Thebrowser will filter your
search in twoways: First, by matching letters in the Preset name.Then,ifyoursearchterm
is close to that of a Type or Style [p.92] it will include results fitting those tags as well.
The Results list beneath shows all Presets that fit your search. Click the X icon at right to
clear your search terms.
91 Arturia - User Manual Acid V - THE PRESET BROWSER

8.2. Using Tags as a Filter
You can narrow(andsometimesexpand)yoursearchusingdifferenttags.Therearetwo
kinds of tags:
Types
and
Styles
.You can filter by one,theother,orboth.Our extensiverange
of MIDIcontrollerkeyboards also allows you to browse sounds directly from the MIDI
keyboard.
8.2.1. Types
Types are categories of instruments and musical roles: bass, leads, strings, pads, organs,
and more.With a clear search bar,clicktheTypes button to bring upalistoftypes. Notice
that each type also has several sub-types:
Click any one of them, and the results will showonlyPresets that match that tag. You can
also select multiple Types using Cmd-click (macOS) or Ctrl-click (Windows). For example,if
you aren't sure whether the Preset you're looking for was tagged with “Electro” or “Techno”,
select both to broaden the search.
Results columns can be inverted by clicking the arrowbuttonstotherightoftheirtitles
(Name, Type, Designer).
Arturia - User Manual Acid V - THE PRESET BROWSER 92

8.2.2. Styles
Styles refine your search according to further musical attributes. Accessed by the Styles
button, this area has three further subdivisions:
•
Genres
:Identifiable musical genres such as decades, Trance,Techno,
Synthwave, Disco, etc.
•
Styles
: General “vibe” such as Atmospheric, Dirty, Clean, Complex, Mellow, etc.
•
Characteristics
:SonicattributessuchasAnalog, Evolving, Distorted, Dry, Rise,etc.
Click on any tag to select it. Click again (or right-click) on any selected tag to de-select it.
Notice that when you select a tag, several other tags usually disappear. This is because the
browser is narrowing your search by a process of elimination. De-select any tag to remove
that criterion and widen the search without having to start all over again.
8.2.3. Banks
Next to the Types and Styles buttons is the Banks button, which lets you do your search
(using all the methods above) within the factory bank or user banks.
93 Arturia - User Manual Acid V - THE PRESET BROWSER

8.3. Search Results window
Click the ShowResults button if you cannot already see your list of results. Click the sort
arrow to reverse the alphabetical order of any column.
8.3.1. Sorting the Preset Order
Click the NAME header in first column of the Results list to sort Presets in ascending or
descending alphabetical order.
Click the TYPE header in the second column to do the same thing by Type.
Click the Arturia logo to the left of TYPE to bring factory-featured Presets to the topofthe
list. These will appear just under any Presets you have liked [p.95].
Click the User toggle switch to restrict your search to Presets in user banks.
The third column has twoheaderoptions: DESIGNER and BANK.Clicktheiconwith three
lines to choose between the two.Thenclickeitherheadernameaswith the other two
columns to switch the alphabetical order.
Arturia - User Manual Acid V - THE PRESET BROWSER 94

8.3.2. Clearing Tags
Just abovetheTypes, Styles, and Banks buttons, you will see labels for all the activetagsin
asearch.ClicktheXnexttoanyonetoremoveit(andthus broaden the results). Click CLEAR
ALL to remove all tags.
8.3.3. Liking Presets
AsyouexploreandcreatePresets you can mark them as Liked by clicking the heart next to
their names. Later,clickonthehearticontoputallofyourfavorites at the topoftheResults
list.
8.3.3.1. Shuffle Presets
Clicking the “crossed arrows” button randomly reorders the Presets. This can be useful for
finding something you likewhenyoursearchresultsarealonglistthattakes time to scroll
through — it might bring a killer Preset to the top.
Use as many of the sorting and filtering features as you need and you will find the exact
sound you want every time.
95 Arturia - User Manual Acid V - THE PRESET BROWSER

8.4. Sidebar
The leftmost section of the Preset Browser determines what is displayed in the Search and
Results [p.91] section.
The topmost option is Explore:
The Explore section is the default, letting you search the current bank of Presets loaded into
Acid V as we did in the previous section.
8.4.1. My Sound Banks
Clicking MySoundBanksbrings upawindowwith all of the currently available Sound
Banks, starting with the Factory bank. User banks appear next to it, and can be deleted,
renamed, or exported by right-clicking them.
Arturia - User Manual Acid V - THE PRESET BROWSER 96

8.4.2. My Favorites
The middle part of the Sidebar has a menu called MyFavorites,which allows you to color-
code certain groups of Presets for easy access. ItalsoincludestheLiked group,soyoucan
quickly find Presets you've marked with the heart icon.
Todecidewhich colors you'd liketodisplay,hover over MyFavorites and click Edit.Thenuse
the toggle switches to select which colors you'd like to see or hide, and then click Done.
Please note that you can also rename these favorites into Bass, Leads, et cetera. Just right-
click on the favorite and enter a new name.
ToaddPresets to a particular set of Favorites, simply drag-and-dropthemover the
appropriate color,orright-clickthePreset name and select the color. Then click on the color
itself to display your grouping.
8.4.3. My Playlists
The bottom part of the sidebar displays any Playlists you havecreatedorimported.Playlists
are a very powerful management tool for set lists for gigs. Learn more about them in the
Playlists section [p.101] below.
!Ifyoudon’tseeanything here,itisbecauseyouhaven’t created any Playlists yet. Head to the
Playlists [p.101] section at the end of this chapter to find out how.
97 Arturia - User Manual Acid V - THE PRESET BROWSER

8.5. Preset Info Section
The right side of the browser windowshows specific information about each Preset. The
information for User Presets (but not Factory ones) may be changed here: Name,Type,
Favorite, etc.
Tomakethedesiredchanges, you can type in the text fields, use one of the pull-down
menus to change the Bank or Type, and click the + sign to add or delete Styles.
Types and Styles changes you makeherearereflectedinsearches.For example,ifyou
removethe“Distorted”StyletagandthensavethatPreset, it will not showupinfuture
searches for Distorted sounds.
Clicking on the three-dots icon at the toprightpops upamenuwith organizational options
for the Preset.
Arturia - User Manual Acid V - THE PRESET BROWSER 98

Options include
Save
,
SaveAs
,
Delete Preset
,and
Add to Playlist
,completewith an option
to create a newPlaylist. (You cannot overwrite or delete factory Presets, so the Saveand
Delete options may not appear.)
The dots with color icons allowyoutoaddthePreset to a particular groupofFavorites,
which is described above.
8.5.1. Editing Info for Multiple Presets
Ifyou'dliketomoveseveral Presets to a different bank while preparing for a performance,
or enter a single comment for several Presets at the same time,it'seasytodo.Simply
hold command (macOS) or ctrl (Windows) and click the names of the Presets you want to
changeintheResults list. Then enter the comments, changetheBankorType,etc.,andsave
the Preset.
♪ Ifyouwant to alter the information for a Factory Preset you must first use the
SaveAs
command
to re-saveitasaUser Preset. After this the Infosectionwill gain Edit and Delete buttons at the bottom
of the window.
99 Arturia - User Manual Acid V - THE PRESET BROWSER

8.6. Preset Selection: Other Methods
Click on the Preset name in the center of the Upper Toolbar to bring upadrop-down menu.
The first option in this menu is
All Presets
,anditbringsupasubmenuofliterallyevery
Preset in the current bank.
Belowthis are options that correspond to the Type tags. Each of these brings upasubmenu
of all Presets of its Type.
IfyouhaveanactivesearchbyType and/or Style,theup/down arrows to the right of the
Preset name will step through only the results that conform to your search.
However,
All Presets
in the drop-down menu always ignores those criteria. Likewise for the
Type choices below the line — they always include all Presets within that Type.
Arturia - User Manual Acid V - THE PRESET BROWSER 100
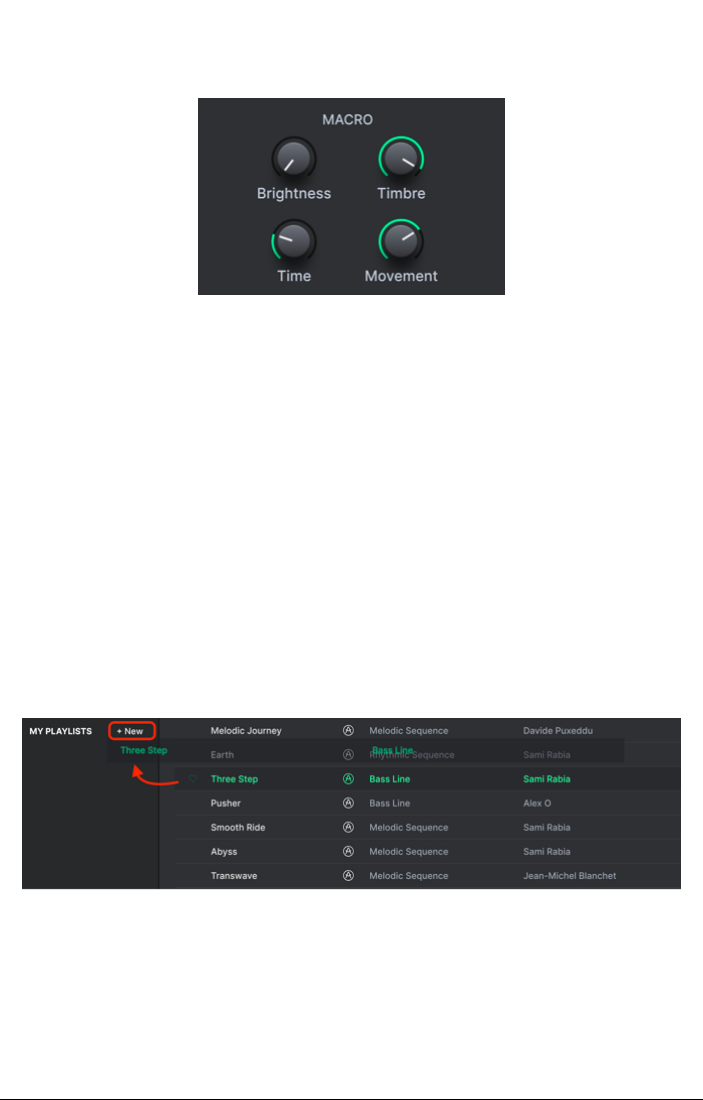
8.7. Macro Knobs
These are simply larger duplicates of the Macro knobs in the Lower Toolbar and on the
Macros tab. Move one and its partner moves with it.
Assigning parameters to Macros is covered in the Macro Tab [p.87] section of Chapter 7.
8.8. Playlists
Playlists are a way to collect Presets into different groups for different purposes, such
as a set list for a particular performance or a batch of Presets related to a particular
studio project. Within a Playlist, Presets can be reordered and grouped into Songs, a handy
addition to a set list.
The subheading
MyPlaylists
appears under MyFavorites in the Sidebar. However,whenyou
first start using Acid V,you’llhavenoPlaylists yet, and
MyPlaylists
won't be there yet. To
make it appear, you’ll have to create your first Playlist.
8.8.1. Create your first Playlist
Toget started, drag any Preset to the Sidebar. The
MyPlaylists
heading will appear,along
with a +New icon. DropthePreset onto the +New icon, and you will then be given a pop-up
to name your first Playlist. Once you'vecreatedonePlaylist, the
MyPlaylists
heading will
become a permanent part of the Sidebar.
101 Arturia - User Manual Acid V - THE PRESET BROWSER

8.8.2. Add a Playlist
ToaddaPlaylist, hover your mouse over the
MyPlaylists
heading and click the +New icon
when it appears.
Give the Playlist a name and it will appear in the Playlists menu in the Sidebar.
Once you'vecreatedsomePlaylists, right-clicking on a Playlist name will popupasetof
options – you can
Rename
,
Delete
,or
Export
the Playlist to your computer,asafilewith the
“.aplst” extension.
8.8.3. Add a Preset
You can use all of the options in the Explore windowtolocatePresets for your Playlist. When
you find a desired Preset, click-drag it onto the Playlist name.
Dragging a preset to a Playlist
Arturia - User Manual Acid V - THE PRESET BROWSER 102

To view the contents of a Playlist, click on the Playlist name.
8.8.4. Re-order the Presets
Presets may be reorganized within a Playlist. For example,tomoveaPreset from slot 3 to
slot 4, drag and drop the Preset to the desired location.
This will moveotherPresets upinthelisttoaccommodatethenewlocationofthePreset
you just moved. A bright green line will briefly appear at the “insert point.”
103 Arturia - User Manual Acid V - THE PRESET BROWSER

8.8.5. Remove a Preset
TodeleteaPreset from a playlist, select the Playlist, then right-click on the Presets name in
the Results Pane to bring upapop-upmenu.This will only delete the Preset
from the Playlist
,
not delete the Preset from the Acid V browser!
This menu also includes Rename, Copy, Paste,andDuplicate options. More management
options are described below.
8.8.6. New Song and Playlist Management
The NewSongbutton creates a newSongatthebottomofthePlaylist. You can name it,
then click and drag it to position it in the Playlist and add Presets to it in the desired order.
You can havemultiple songs in each Playlist, and if drag a song by its title,itbringsallits
Playlists with it — in order!
ToaccessotherPlaylist management options, click on the three-dots icon next to the New
Song button. This brings up a pull-down menu:
• Rename Playlist: Renames the current Playlist without making a copy.
• SavePlaylist As:Createsaduplicate of the playlist with “Copy” appended to the
name. You can change the name before saving.
• Export Playlist:ExportsyourPlaylist to a location on your computer,with the
filename extension “aplst.”
• Delete Playlist:DeletesthecurrentPlaylist but does
not
delete any of the Presets
in it.
Arturia - User Manual Acid V - THE PRESET BROWSER 104

9. SOFTWARE LICENSE AGREEMENT
InconsiderationofpaymentoftheLicenseefee,which is a portion of the price you paid,
Arturia, as Licensor,grantstoyou(hereinaftertermed“Licensee”)anonexclusiverightto
use this copy of the Acid V (hereinafter termed “SOFTWARE”).
All intellectual property rights in the software belong to Arturia SA(hereinafter:“Arturia”).
Arturia permits you only to copy, download, install and use the software in accordance with
the terms and conditions of this Agreement.
The product contains product activation for protection against unlawful copying. The OEM
software can be used only following registration.
Internet access is required for the activation process. The terms and conditions for use of the
software by you, the end-user,appearbelow.Byinstallingthesoftware on your computer
you agree to these terms and conditions. Please read the following text carefully in its
entirety. Ifyoudonotapprovethesetermsandconditions,youmust not install this software.
Inthis event givetheproductbacktowhereyouhavepurchasedit(includingallwritten
material, the complete undamaged packing as well as the enclosed hardware) immediately
but at the latest within 30 days in return for a refund of the purchase price.
1. Software Ownership Arturia shall retain full and complete title to the SOFTWARE recorded
on the enclosed disks and all subsequent copies of the SOFTWARE, regardless of the media
or form on or in which the original disks or copies may exist. The License is not a sale of the
original SOFTWARE.
2. Grant of License Arturia grants you a non-exclusivelicensefor the use of the software
according to the terms and conditions of this Agreement. You may not lease,loanorsub-
license the software.Theuseofthesoftware within a network is illegal where there is the
possibility of a contemporaneous multiple use of the program.
You are entitled to prepare a backupcopy of the software which will not be used for
purposes other than storage purposes.
You shall havenofurtherrightorinteresttousethesoftware other than the limited rights as
specified in this Agreement. Arturia reserves all rights not expressly granted.
3. Activation of the Software Arturia may use a compulsory activation of the software and
acompulsoryregistrationoftheOEMsoftware for license control to protect the software
against unlawful copying. Ifyoudonotaccept the terms and conditions of this Agreement,
the software will not work.
Insuchacasetheproductincludingthesoftware may only be returned within 30 days
following acquisition of the product. Upon return a claim according to § 11 shall not apply.
4. Support, Upgrades and Updates after Product Registration You can only receivesupport,
upgrades and updates following the personal product registration. Support is provided only
for the current version and for the previous version during one year after publication of the
newversion. Arturia can modify and partly or completely adjust the nature of the support
(hotline, forum on the website etc.), upgrades and updates at any time.
The product registration is possible during the activation process or at any time later through
the Internet. Insuchaprocessyouareasked to agree to the storageanduseofyour
personal data (name,address,contact,email-address,andlicensedata)for the purposes
specified above.Arturia may also forward these data to engaged third parties, in particular
distributors, for support purposes and for the verification of the upgrade or update right.
5. No Unbundling The software usually contains a variety of different files which in its
configuration ensure the complete functionality of the software.Thesoftware may be used
as one product only. Itisnotrequiredthatyouuseorinstallallcomponentsofthesoftware.
You must not arrangecomponentsofthesoftware in a newway and developamodified
version of the software or a newproductasaresult.Theconfigurationofthesoftware may
not be modified for the purpose of distribution, assignment or resale.
105 Arturia - User Manual Acid V - Software License Agreement

6. Assignment of Rights You may assign all your rights to use the software to another
person subject to the conditions that (a) you assign to this other person (i) this Agreement
and (ii) the software or hardware provided with the software,packed or preinstalled
thereon, including all copies, upgrades, updates, backupcopies and previous versions,
which granted a right to an update or upgrade on this software,(b)youdonotretain
upgrades, updates, backupcopies and previous versions of this software and (c) the
recipient accepts the terms and conditions of this Agreement as well as other regulations
pursuant to which you acquired a valid software license.
Areturnoftheproductduetoafailure to accept the terms and conditions of this Agreement,
e.g. the product activation, shall not be possible following the assignment of rights.
7. Upgrades and Updates You must haveavalid license for the previous or more inferior
version of the software in order to be allowed to use an upgrade or update for the software.
Upon transferring this previous or more inferior version of the software to third parties the
right to use the upgrade or update of the software shall expire.
The acquisition of an upgrade or update does not in itself confer any right to use the
software.
The right of support for the previous or inferior version of the software expires upon the
installation of an upgrade or update.
8. Limited Warranty Arturia warrants that the disks on which the software is furnished is
free from defects in materials and workmanshipundernormalusefor a period of thirty (30)
days from the date of purchase.Your receipt shall be evidence of the date of purchase.Any
implied warranties on the software are limited to thirty (30) days from the date of purchase.
Some states do not allowlimitations on duration of an implied warranty, so the above
limitation may not apply to you. All programs and accompanying materials are provided “as
is” without warranty of any kind. The complete riskastothequalityandperformance of the
programs is with you. Should the program provedefective,youassumetheentirecostofall
necessary servicing, repair or correction.
9. Remedies Arturia's entire liability and your exclusiveremedyshallbeatArturia's option
either (a) return of the purchase price or (b) replacement of the diskthatdoesnotmeetthe
Limited Warranty and which is returned to Arturia with a copy of your receipt. This limited
Warranty is void if failure of the software has resulted from accident, abuse,modification,
or misapplication. Any replacement software will be warranted for the remainder of the
original warranty period or thirty (30) days, whichever is longer.
10. No other Warranties The abovewarranties are in lieu of all other warranties, expressed
or implied, including but not limited to,theimplied warranties of merchantability and fitness
for a particular purpose.Nooralorwritteninformation or advice given by Arturia, its dealers,
distributors, agents or employees shall create a warranty or in any way increase the scope
of this limited warranty.
11. No Liability for Consequential Damages Neither Arturia nor anyone else involved in
the creation, production, or delivery of this product shall be liable for any direct, indirect,
consequential, or incidental damages arising out of the use of,orinabilitytousethis product
(including without limitation, damages for loss of business profits, business interruption, loss
of business information and the like) even if Arturia was previously advised of the possibility
of such damages. Some states do not allowlimitations on the length of an implied warranty
or the exclusion or limitation of incidental or consequential damages, so the abovelimitation
or exclusions may not apply to you. This warranty gives you specific legal rights, and you
may also have other rights which vary from state to state.
Arturia - User Manual Acid V - Software License Agreement 106
