
ILLINOIS SUPREME COURT COMMISSION ON ACCESS TO JUSTICE
E-Filing Guide for
Self-Represented Litigants
How to E-File in Odyssey
E-filing Steps
1
• Prepare Documents
2
• Register
3
• Sign In
4
• Create new Password
5
• Add Payment Account
6
• Case Information
7
• Party Information
8
• Upload Filings
9
• Pay Fees
10
• Review Summary / Submit

Need Help? Call Odyssey's Filer Support Number: 1-800-297-5377
EF-D 3705.2
Page 1 of 4
(07/18)
ILLINOIS SUPREME COURT COMMISSION ON ACCESS TO JUSTICE
E-Filing Guide for
Self-Represented Litigants
How to E-File in Odyssey
Step 1: Prepare your Documents
E-filing Steps
1
• Prepare Documents
2
• Register
3
• Sign In
4
• Create New Password
5
• Add Payment Account
6
• Case Information
7
• Party Information
8
• Upload Filings
9
• Pay Fees
10
• Review Summary / Submit

Need Help? Call Odyssey's Filer Support Number: 1-800-297-5377
EF-D 3705.2
Page 2 of 4
(07/18)
Prepare court documents to be e-filed
To e-file your court documents, they must be saved as a text-searchable PDF file, whether you start from a
fillable PDF, handwritten form, or Word document.
Fillable PDF forms
1. A Fillable PDF form is an electronic document that allows you to type in your information in the shaded
boxes. To e-file this document, you want to make sure the document is no longer fillable (so no one
can type anything else).
2. You can save your document while you are working on it
by clicking File then Save As. This keeps the fields fillable
meaning you can keep typing in the document.
3. Once you have finished working on your document, click
File then Print. This does not mean you are going to print
the document. This is just the way to save the document in
the right format and so that no one can type anything else
in the document.
If your form is a Court Form found at http://www.illinoiscourts.gov/Forms/approved/default.asp
the fillable PDF form has the "Print Form" and "Save Form" boxes at the bottom of your document
and you can click Save Form to save your work while you are finishing your document or Print
Form when you are ready to save it to file it.
4. When the "Print" box pops up click on the printer/destination labeled Adobe PDF or Save as PDF.
Click on Print or Save or OK.
5. A "Save As" box will pop up. When it does, name your file. You
can choose to name it anything, but it should be something that
helps you and the court identify the document.
6. Make sure the "Save as type" box (under your file name) says
PDF or Adobe PDF. Click Save.
7. Your document is now saved as a PDF on your computer.
You may now e-file your court documents.

Need Help? Call Odyssey's Filer Support Number: 1-800-297-5377
EF-D 3705.2
Page 3 of 4
(07/18)
Handwritten forms
If you filled in your forms by hand, you will need to scan and save them as a PDF
to a computer.
1. Take your handwritten document to a scanner. Click Scan.
If you do not have a scanner at home, you may be able to scan your documents at the court,
your public library, or other office supply store.
2. When it is scanned, the document will either:
a. Appear on the computer screen and you have to save it, or
b. It will be sent to a folder on the computer and you will want to open it and save it with a file
name that you choose.
3. With the document up on the computer, click File and Save As. A
"Save As" box will pop up. When it does, name your file. You can
choose to name it anything, but it should be something that helps
you and the court identify the document. Make sure the "Save as
type" box (under your file name) says PDF. Click Save.
4. If your document scans in a different format like JPG or PNG, you
will need to save it as a PDF.
5. To do that, select Print. This does not mean you are going to
print the document. This is just the way that you can save the
document in the right format.
6. When the "Print" box pops up click on the printer/destination
labeled Adobe PDF or Save as PDF. Click on Print or Save or
OK.
7. A "Save As" box will pop up. When it does, name your file. You
can choose to name it anything, but it should be something
that helps you and the court identify the document. Make sure
the "Save as type" box (under your file name) says PDF. Click
Save.
You may now e-file your court documents.
Need Help? Call Odyssey's Filer Support Number: 1-800-297-5377
EF-D 3705.2
Page 4 of 4
(07/18)
Microsoft Word Documents
If you created your own document in Word, you will need to save it as a
PDF document. There are two ways to do this.
Option 1
1. Click File then Save As.
2. A "Save As" box will pop up. When it does,
name your file. You can choose to name it
anything, but it should be something that
helps you and the court identify the
document.
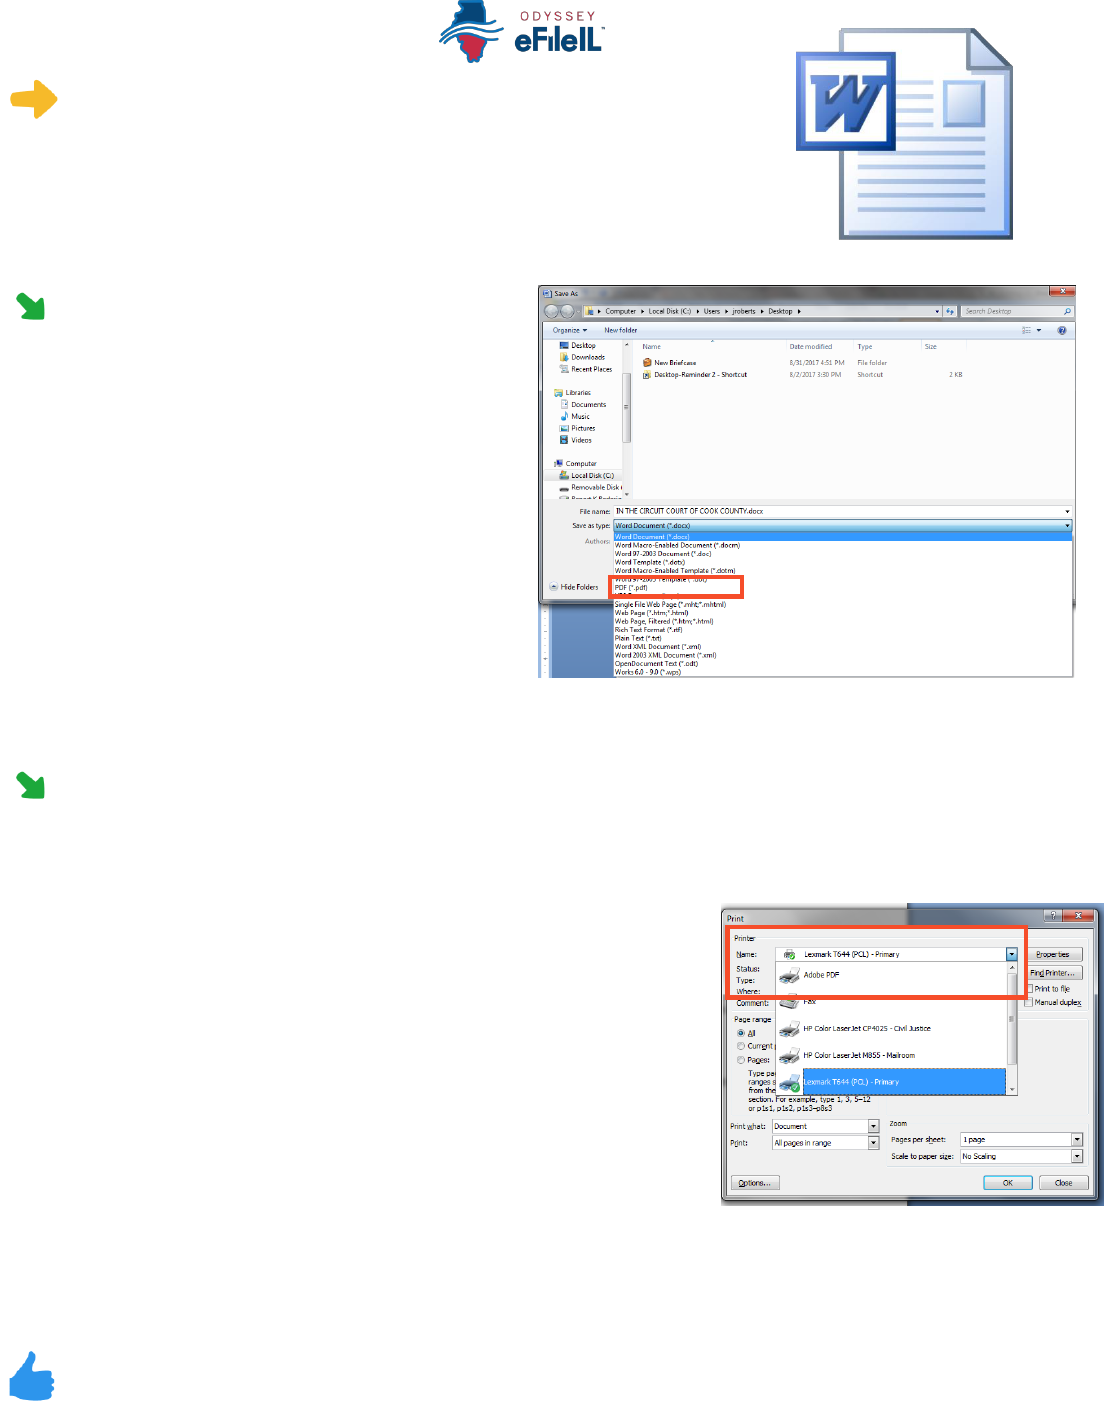
3. Select the dropdown arrow for Save as type.
Click on PDF or Adobe PDF. Click Save.
Option 2
1. Click File then Print. This does not mean you are going to print the
document. This is just the way that you can save the document
in the right format.
2. When the "Print" box pops up click on the printer/destination
labeled Adobe PDF or Save as PDF. Click on Print or Save or OK.
3. A "Save As" box will pop up. When it does, enter your file
name. You can choose to name it anything, but it should be
something that helps you and the court identify the document.
4. Make sure the "Save as type" box (under your file name) says PDF. Click Save.
You may now e-file your court documents.

Need Help? Call Odyssey's Filer Support Number: 1-800-297-5377
EF-R 3701.3
Page 1 of 6
(07/18)
ILLINOIS SUPREME COURT COMMISSION ON ACCESS TO JUSTICE
E-Filing Guide for
Self-Represented Litigants
How to E-File in Odyssey
Step 2: Register to E-File
E-filing Steps
1
• Prepare Documents
2
• Register
3
• Sign In
4
• Create New Password
5
• Add Payment Account
6
• Case Information
7
• Party Information
8
• Upload Filings
9
• Pay Fees
10
• Review Summary / Submit

EF-R 3701.3
Page 2 of 6
(07/18)
Register to e-file
Before you can electronically file (e-file) your court documents, you need to create an account.
NOTE: if you have created an account in any Illinois Electronic Filing Service Provider (EFSP) you do NOT need to
create another new account, but you can go directly to sign in. This instruction guide only contains information
for efiling in the Odyssey EFSP.
Go to the Odyssey website
1. Go to efile.illinoiscourts.gov.
2. Click on Providers or EFSPs.
3. This page will show you all of the currently
approved EFSPs.
4. Click on the OdysseyeFileIL icon.
EF-R 3701.3
Page 3 of 6
(07/18)
Choose to register a new account
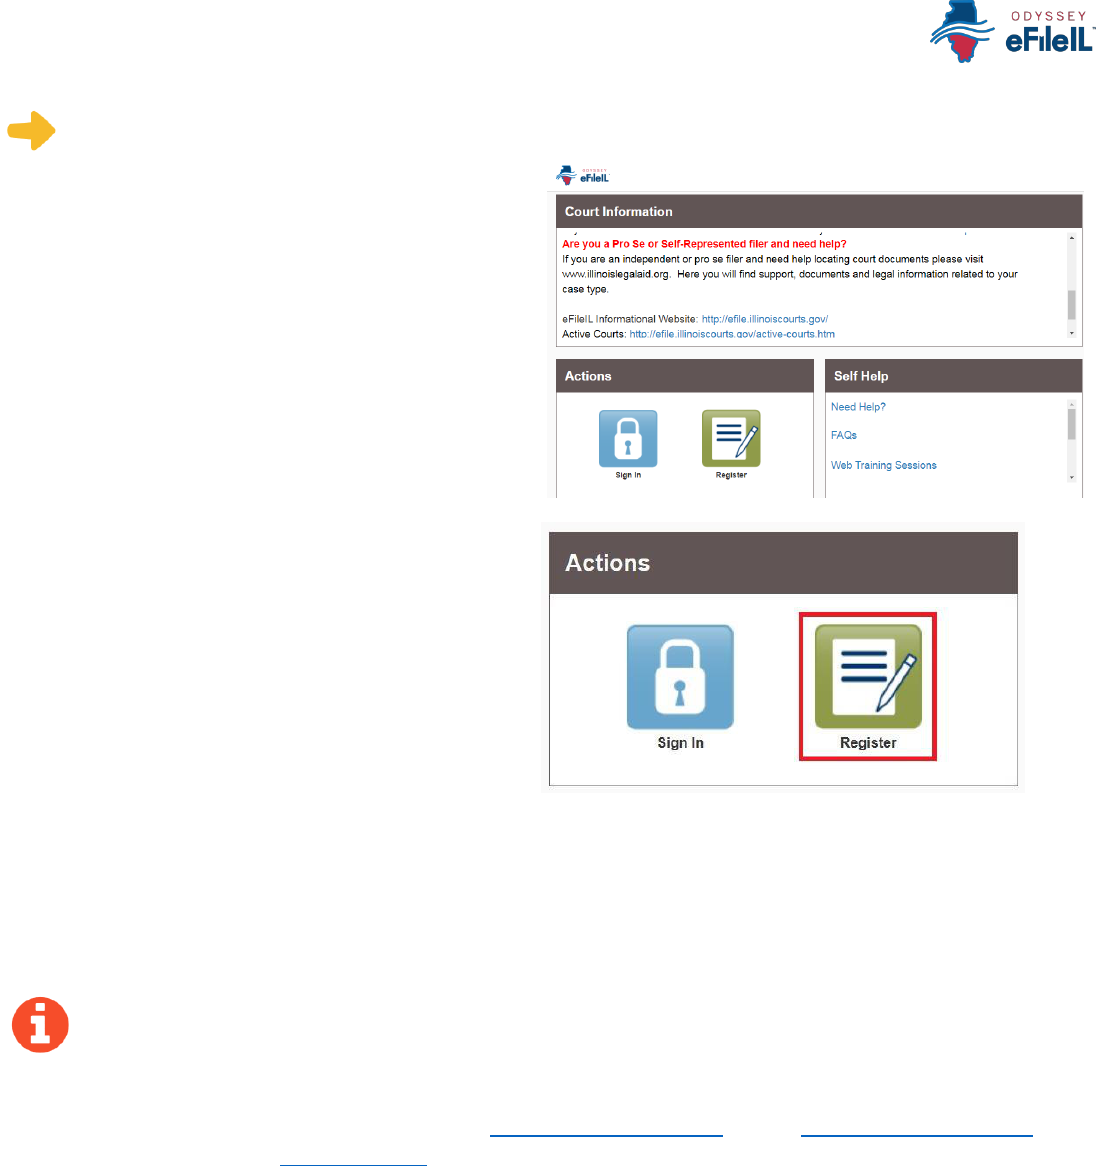
1. The Actions panel is where you sign into
Odyssey or register as a user.
2. Click Register.
The Register button takes you to the page where you can register in the system by using your name and
contact information. If you have already registered as a user for any Illinois EFSP, click Sign In. For detailed
instructions on how to Sign In to your account see How to E-File in Odyssey Step 3: Sign In.
You will need:
Email address. If you do not have an email address, you will need to create one. Commonly
used email accounts include: Gmail www.google.com/gmail, Yahoo https://mail.yahoo.com,
and Mail.com www.mail.com (Note: Mail.com does not require cell phone verification).
Mailing address that is not a P.O. Box.
Telephone number

Need Help? Call Odyssey's Filer Support Number: 1-800-297-5377
EF-R 3701.3
Page 4 of 6
(07/18)
Enter email, password, and create a security question
1. Enter your name, an existing email address (that you can check regularly), and create a password.
The password can be new or a one you have used for other purposes. This password is what
you will use to sign into Odyssey.
2. Make up a security question and answer that you can easily remember. For example:
Security Question: What is my dog's name? or What is my wedding anniversary?
Answer: Fido 1/1/2011
If you forget your password, you may have to correctly answer your security question to be able
to access your account again. It is a good idea to write down and save your password as well as
your security question and answer.
3. Then click Next.
Register as a self-represented litigant
1. If you do not have an attorney, you need to register for a self-represented litigant account and not a
firm account.
2. Click on the Circle to register
as a self-represented litigant.

EF-R 3701.3
Page 5 of 6
(07/18)
When you click on the button above, this alert will pop up.
3. Click on Continue as Pro Se.
Enter your contact information
1. Select the country where you live. The United States
of America is the default country.
2. Enter your address and telephone number.
3. Click Next.
Enter an address where you can receive mail during your legal case. This cannot be a P.O. Box.
Read the Terms and Conditions
1. Read the Terms and Conditions.
2. If you agree, click I Agree – Create My Account

Need Help? Call Odyssey's Filer Support Number: 1-800-297-5377
EF-R 3701.3
Page 6 of 6
(07/18)
Confirm your account through email
After you agree to the Terms and
Conditions, you will see this screen:
You must verify your email address to complete the registration process.
1. Login to the email account you listed during registration to see the verification email.
2. Open the email and click the link to confirm your email address. The email will look like this:
The email will be from no-re[email protected]. If you do not see the email in your inbox, check
your junk mail or spam folder in your email account.
3. Click on Click to Activate Account.
A page will open with confirmation that your
account has been created. It will look like this:
You have successfully registered with Odyssey.

Need Help? Call Odyssey's Filer Support Number: 1-800-297-5377
EF-S 3702.3
Page 1 of 2
(07/18)
ILLINOIS SUPREME COURT COMMISSION ON ACCESS TO JUSTICE
E-Filing Guide for
Self-Represented Litigants
How to E-File in Odyssey
Step 3: Sign In
E-filing Steps
1
• Prepare Documents
2
• Register
3
• Sign In
4
• Create New Password
5
• Add Payment Account
6
• Case Information
7
• Party Information
8
• Upload Filings
9
• Pay Fees
10
• Review Summary / Submit

Need Help? Call Odyssey's Filer Support Number: 1-800-297-5377
EF-S 3702.3
Page 2 of 2
(07/18)
Sign in to e-file
After you have created an account with Odyssey, you need to sign in to e-file your documents. If you have not
registered as a user, click Register. For detailed instructions on how to register for an account see How to E-
File in Odyssey Step 2: Register to E-File.
Click Sign In
1. To sign in to your account visit: https://illinois.tylerhost.net/ofsweb
2. The Actions panel is where you sign into Odyssey or register as a user.
3. Click Sign In.
Enter your email and password
1. Enter the email address and password you used when
you registered for your e-filing account.
2. Click Sign In.
If you forgot your password, see How to E-file in
Odyssey Step 4: Create a New Password for
instructions on creating a new password.
You have successfully signed in to your Odyssey account.

Need Help? Call Odyssey's Filer Support Number: 1-800-297-5377
EF-P 3703.3
Page 1 of 3
(07/18)
ILLINOIS SUPREME COURT COMMISSION ON ACCESS TO JUSTICE
E-Filing Guide for
Self-Represented Litigants
How to E-File in Odyssey
Step 4: Create a New Password if You Forgot It
E-filing Steps
1
• Prepare Documents
2
• Register
3
• Sign In
4
• Create New Password
5
• Add Payment Account
6
• Case Information
7
• Party Information
8
• Upload Filings
9
• Pay Fees
10
• Review Summary / Submit

Need Help? Call Odyssey's Filer Support Number: 1-800-297-5377
EF-P 3703.3
Page 2 of 3
(07/18)
Create a new password
If you forget your password, you need to create a new one. After several failed attempts to sign in to the
system, your account will be locked. You will need to create a new password.
Tell Odyssey you forgot you password
1. At the login screen, click Forgot Password?
2. Enter the email address you used when you
registered for your Odyssey account.
3. Click Next.
4. Check the box next to I'm not a robot.
5. Click Reset Password.

Need Help? Call Odyssey's Filer Support Number: 1-800-297-5377
EF-P 3703.3
Page 3 of 3
(07/18)
6. The following message will pop up. Check your email to find the link to reset your password.
7. This is what the email will look like.
Click click here.
The email will be from
no[email protected]. Check your
junk or spam folders if you don't see
the email in your inbox.
8. Enter your new password in the first box and
then enter the same new password again.
9. Click Change Password.
10. This message will pop up and confirm you
successfully changed your password.
You have successfully created a new password. You can now login to your
Odyssey account.

Need Help? Call Odyssey's Filer Support Number: 1-800-297-5377
EF-PA 3704.3
Page 1 of 7
(07/18)
ILLINOIS SUPREME COURT COMMISSION ON ACCESS TO JUSTICE
E-Filing Guide for
Self-Represented Litigants
How to E-file in Odyssey
Step 5: Add a Payment Account
E-filing Steps
1
• Prepare Documents
2
• Register
3
• Sign In
4
• Create New Password
5
• Add Payment Account
6
• Case Information
7
• Party Information
8
• Upload Filings
9
• Pay Fees
10
• Review Summary / Submit

Need Help? Call Odyssey's Filer Support Number: 1-800-297-5377
EF-PA 3704.3
Page 2 of 7
(07/18)
Add a payment account
Before you can e-file your court documents, you must add a payment account. If there is a filing fee due, it
must be paid at the time of e-filing. If you cannot afford the filing fee, you still have to follow the steps to
create a payment account, but can select "Waiver." This does not mean your waiver will be approved, and you
may have to create another payment account and pay filing fees if the waiver is denied.
If you can afford to pay your filing fee, you must have a credit card or a checking account to pay online.
If you do not have a credit card or checking account, one option is to buy a pre-paid debit card from
most major stores such as Walgreens, Walmart, or Target. If you want to pay in cash, you need to ask
your local court to find out if they accept cash payments and what their process is for paying the filing
fee in person.
Click Payment Accounts under Actions
1. From the Home Page above Filer Dashboard,
click the orange button for Actions.
2. Under Actions click Payment Account.

Need Help? Call Odyssey's Filer Support Number: 1-800-297-5377
EF-PA 3704.3
Page 3 of 7
(07/18)
3. Click Add Payment Account.
4. This pop up box will appear. Read the information and click
I Understand and Agree.
5. Enter a name for the account payment. You may name it
anything. This name is just so you can identify the payment
account. This name will appear in Step 9: Pay Fees.
6. Select how you want to pay. The options are: Credit Card,
eCheck, Gov. Agency Filing, Pay at Counter, or Waiver.
a. Credit Card also includes prepay debit cards.
b. eCheck means direct payment from a checking or
savings bank account.
c. Gov. Agency Filing option will not apply to a self-
represented litigant.
d. Pay at Counter means that you want to pay in cash.
e. Waiver means that you are requesting the court to
waive your filing fees because you cannot afford
the fees.
See the following pages for detailed information about each
payment account type.

Need Help? Call Odyssey's Filer Support Number: 1-800-297-5377
EF-PA 3704.3
Page 4 of 7
(07/18)
Credit card or prepay debit card
There is a convenience fee for paying by credit card. You will pay an extra 2.89% of the total filing fee.
If using a prepaid card, make sure to purchase it for the total filing fee plus 2.89%.
1. To use a credit card or prepay debit card, choose
Credit Card in the drop down menu and create a
Payment Account Name. This name is just for you
to know which card you entered.
2. Click Enter Account Information.
3. Click the Credit Card bubble at the top. Enter your credit
card or prepay debit card information and click Continue.
The card must be Discover, Master Card, or Visa. If you
want to use American Express, please check
http://efile.illinoiscourts.gov/active-courts.htm#legend
to see if your Location accepts it.
4. Review your card information, read the Terms and
Conditions, and click Save Information.
5. If approved, the payment account will be listed in the
box and the word "Yes" will be listed under active.
You may now e-file your court documents and pay with a credit card.

Need Help? Call Odyssey's Filer Support Number: 1-800-297-5377
EF-PA 3704.3
Page 5 of 7
(07/18)
eCheck (bank account)
There is a convenience fee for paying by eCheck. You will
pay an extra flat fee of 25 cents.
1. To pay using your bank routing and account number, choose
eCheck in the drop down menu and create a Payment
Account Name. This name is just for you to know which
account you entered.
2. Click Enter Account Information.
3. Click the eCheck bubble at the top. Under Account Type,
select whether you want to pay from your checking or
savings account.
4. Enter that account information including account number
and routing number. Click Continue.
If you need help finding your account or routing
numbers on your check, click Routing Number
Help under the Routing Number box.
5. Review your checking or savings information, read the
Terms and Conditions, and click Save Information.
6. If approved, the type of payment will be listed in the
box and the word "Yes" will be listed under active.
You may now e-file your court documents and pay with an eCheck.

Need Help? Call Odyssey's Filer Support Number: 1-800-297-5377
EF-PA 3704.3
Page 6 of 7
(07/18)
Pay at Counter (cash)
1. If you want to pay in cash (and you've confirmed your local
court accepts cash payments) choose Pay at Counter in the
drop down menu and create a Payment Account Name. This
name is just so you can identify the payment account.
2. Click Save Changes.
3. If you successfully chose Pay at Counter, "Pay at
Counter" will be listed in the box and the word
"Yes" will be listed under active.
Important note about the Pay at Counter payment account
Selecting the Pay at Counter Payment Account does NOT mean you are allowed to pay in cash. You
must contact your local court BEFORE e-filing to find out if they accept cash payments. If they do not,
you CANNOT use the Pay at Counter Payment Account for the purpose of cash payments and your
filing may be rejected. Some courts may also require that you e-file in person at the courthouse to be
able to use the Pay at Counter payment account.
You may now e-file your court documents and Pay at Counter in cash.

Need Help? Call Odyssey's Filer Support Number: 1-800-297-5377
EF-PA 3704.3
Page 7 of 7
(07/18)
Fee waiver
1. If you are going to file a fee waiver choose Waiver in the drop
down menu and create a Payment Account Name. This name
is just so you can identify the payment account.
2. Click Save Changes.
3. If you successfully chose Waiver, "Waiver"
will be listed in the box and the word "Yes"
will be listed under active.
Important note about the Waiver payment account
Selecting the Waiver Payment Account does NOT mean you will get your fees waived.
If you are asking the court to waive your fees for the first time in this
case, you must upload an Application for Waiver of Court Fees as a
Lead Document. A judge will review your application and may
require you to appear in court. You will receive an order either
granting or denying your application. If your application is denied,
you will need to create another payment account and pay your filing
fees. If you do not upload the Application, your filing may be
rejected.
An Application for Waiver of Court Fees can be found under Fee Waiver for trial/circuit courts or under
Appellate for appellate courts: http://illinoiscourts.gov/Forms/approved/default.asp. For more
information about how to upload the Application as a Lead Document, see How to E-File in Odyssey
Step 8: Upload Your Documents in the Filings Section.
If the court already approved your Application in this case, you do NOT need to submit another
application, but you MUST upload a copy of the signed Fee Waiver Order when you submit your court
filing. You still select "Waiver" as your payment account.
You may now e-file your court documents with an application for fee waiver.

Need Help? Call Odyssey's Filer Support Number: 1-800-297-5377
EF-C 3706.2
Page 1 of 7
(07/18)
ILLINOIS SUPREME COURT COMMISSION ON ACCESS TO JUSTICE
E-Filing Guide for
Self-Represented Litigants
How to E-File in Odyssey
Step 6: Enter your Case Information
E-filing Steps
1
• Prepare Documents
2
• Register
3
• Sign In
4
• Create New Password
5
• Add Payment Account
6
• Case Information
7
• Party Information
8
• Upload Filings
9
• Pay Fees
10
• Review Summary / Submit

Need Help? Call Odyssey's Filer Support Number: 1-800-297-5377
EF-C 3706.2
Page 2 of 7
(07/18)
Enter Your Case Information
This manual will go over starting a new case and filing into an existing case.
To start a new case, you will need to know three pieces of information: (1) Location; (2) Category;
and (3) Case Type.
To file into an existing case, you will need to know two pieces of information: (1) Location; and
(2) Case Number OR Party Name. (NOTE: Party Name is not searchable in some counties)
New Case – Click Start a New Case
Choose the Location
1. The Location means the where the case will be heard.
a. New cases will be filed in the trial court in the County
where your case will be heard.
i. Family law cases can be filed in the county that
you or your spouse/the other parent live in.
ii. Cases for money or property can be filed where
the defendant lives or where the events
happened that you believe give you the right to
sue. For example, where the accident occurred,
contract was signed, or leased premises is
located.
iii. Name change cases can be filed in the county where you live.

Need Help? Call Odyssey's Filer Support Number: 1-800-297-5377
EF-C 3706.2
Page 3 of 7
(07/18)
iv. If the County you are looking for does not show up, it means that County isn't using
Odyssey yet. Contact your local court to find out how you should be e-filing your
documents.
FOR COOK COUNTY: in the Location box you will need to know three pieces of information to make
your selection
1. County (Cook)
2. Division (in Cook County the Division is what is described below as Category).
The options are Chancery, Civil, County, Criminal, Domestic Relations, Domestic
Violence, Juvenile, Law, Probate)
3. District (in Cook County there are 6 different districts, divided up by location.
Chicago is District 1). To figure out what District your city is in, go to:
http://www.cookcountyclerkofcourt.org/NewWebsite/Departments.aspx?deptT
ype=Districts
b. If you are filing to appeal a trial court's decision, select the
Appellate District that your County is in.
c. If you are filing to appeal an appellate court's decision, select
Supreme Court of Illinois.
If you are filing in an Appellate or Supreme Court, please see the E-filing Guides specific to Civil Appeals
for more information about how to e-file in those courts.
2. Click in the Location box and a drop down menu will appear. Scroll down through the list until you find
the correct location and click on it.
Choose the Category and Case Type
1. The Category for e-filing is the way the court has divided up and labeled groups of Case Types.
a. Categories are official legal terms used by the court and may not be easy to understand or
guess which types of cases would be in which Category.
b. The Case Type is the topic you want to address with the court.
5

Need Help? Call Odyssey's Filer Support Number: 1-800-297-5377
EF-C 3706.2
Page 4 of 7
(07/18)
2. The common Categories (called Divisions in Cook County) are:
Adoption
Arbitration
Chancery
Civil
Dissolution (Divorce)
Eminent Domain
Family
Law
Law Magistrate
Miscellaneous Remedy
Mental Health
Municipal Corporation
Order of Protection
Probate
Small Claims
Tax
3. To figure out what Category to select, you need to know what kind of Case Type you have. Here are
commonly used Case Types and which Category they are in:
Category (called Division in
Cook County)
Common Case Types
Chancery
Foreclosure
Law Magistrate
(Civil in Cook)
Eviction (rent under $50,000) NOTE: Forcible Entry and Detainer
means Eviction
Order of Protection
(Domestic Violence in Cook)
Order of Protection; Stalking No Contact Order; Civil No Contact
Order
Small Claims
(Civil in Cook)
Contract; Tort; Small Claims $10,000 or less
Dissolution (Domestic
Relations in Cook)
Dissolution of Marriage/Civil Union or Legal Separation
Family (Domestic Relations
in Cook)
Parentage/Paternity; Custody/Visitation/Child Support
Probate
Guardianship of a Minor
Miscellaneous Remedy
(Chancery in Cook)
Certiorari (to review administrative decisions), Administrative
Review
Miscellaneous Remedy
(County in Chicago, Civil in
suburban Cook)
Change of Name
Law
Contract or Tort-Money Damages
Criminal
Expungement
4. Once you have figured out your Case Type and Category, you must first click the Category. Then the
Case Types will show up, click on your Case Type.
All Categories and Case Types can be found in the appellate or trial court Configuration Standards
on www.efile.illinoiscourts.gov. Note, these standards do not apply to Cook County. Ask court staff
if you need help with Location, Category, or Case Type.
Dissolution
means
Divorce
Need Help? Call Odyssey's Filer Support Number: 1-800-297-5377
EF-C 3706.2
Page 5 of 7
(07/18)
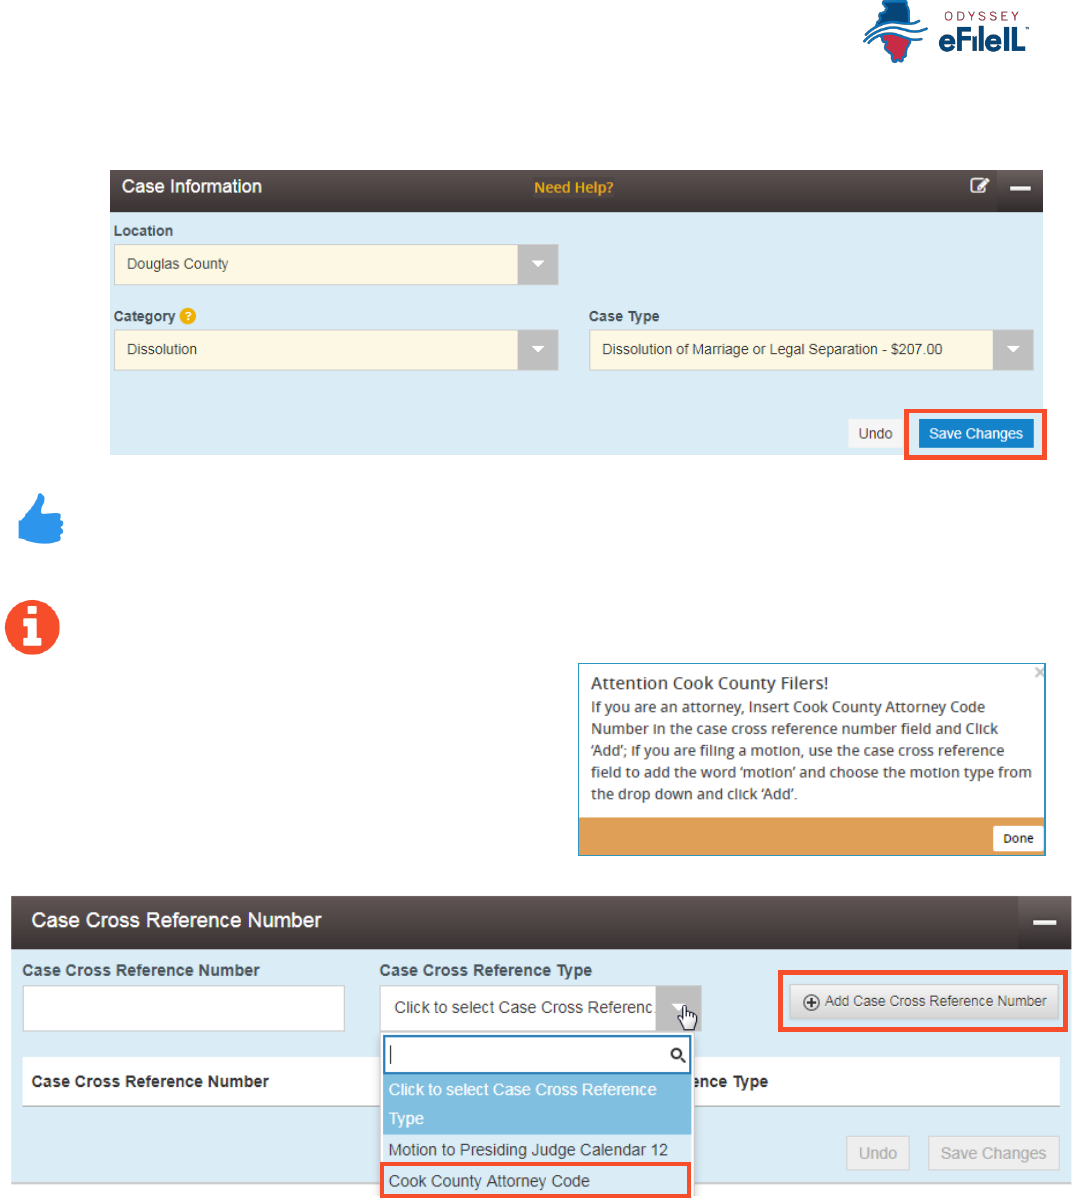
5. Click Save Changes.
You have successfully entered the Case Information for a New Case.
Important note for Cook County ONLY - Case Cross Reference Number
There is one additional part of case information
that applies only in Cook County. Once you hit
Save Changes, a pop up box will appear. Read the
message. Click Done and the new field will
appear.
Even though you are representing yourself, you MUST fill out this section.
a. Type in 99500 in the Case Cross Reference Number box.
b. Click on Case Cross Reference Type drop down menu and select Cook County Attorney Code.
c. Click Add Case Cross Reference Number.
d. Click Save Changes.
If you are trying to file a motion, type the word Motion in the Case Cross Reference Number box and
select Motion in the drop down menu.
a. Click Add Case Cross Reference Number, then click Save Changes.
99500
Need Help? Call Odyssey's Filer Support Number: 1-800-297-5377
EF-C 3706.2
Page 6 of 7
(07/18)
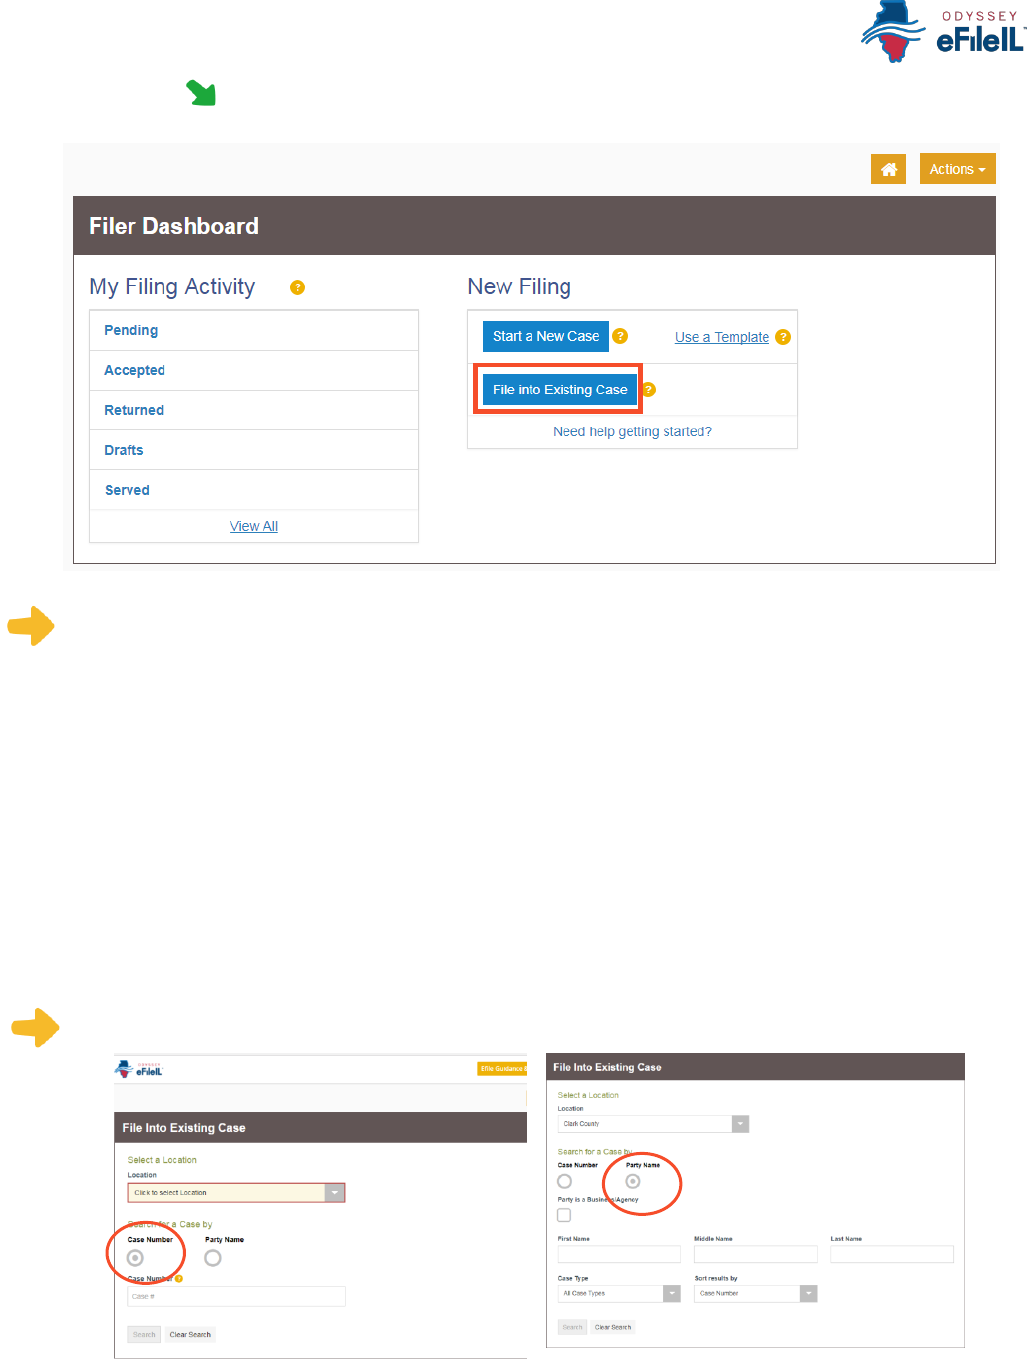
Existing Case – Click File Into Existing Case
Choose the Location
1. The Location means where the case was filed.
a. If you are filing as part of a case at the trial court, select the County where the case was filed.
i. For Cook County, the Location will contain the County, Division, and District. More
information can be found above.
b. If you are filing as part of a case on appeal, select the Appellate District or Supreme Court
where the case was filed. Please see the E-filing Guides specific to Civil Appeals for more
information about how to e-file in those courts.
2. Click in the Location box and a drop down menu will appear. Scroll through until you find the correct
location and click on it.
Choose to search by Case Number or Party Name
Decide if you want to search by Case Number or by Party Name and click that button. NOTE: Party Name
searches are not available in Cook County.
Need Help? Call Odyssey's Filer Support Number: 1-800-297-5377
EF-C 3706.2
Page 7 of 7
(07/18)
1. Case Number
a. The Case Number can be found on the upper right corner of any court documents you've
received about the case.
b. The Case Number should be entered in a specific format, with no extra spaces or dashes.
i. Use the full 4 digits of the year, capital letters, remaining numbers
1. For example: document says 15-d-1234, you would search 2015D1234
2. If the case does not appear, ask court staff about specific format for your court
ii. Exception: Cook County cases in Civil Division that have the letter "M" in the case
number, do NOT use the letter M when searching.
1. For example: document says 18-M4-123456, you should search 20184123456
c. Type in the number and click Search.
2. Party Name
a. If you cannot find the Case Number, you can search by Party Name instead.
b. You must enter a first and last name and then click Search.
c. You can search by your name if you are a party in the case.
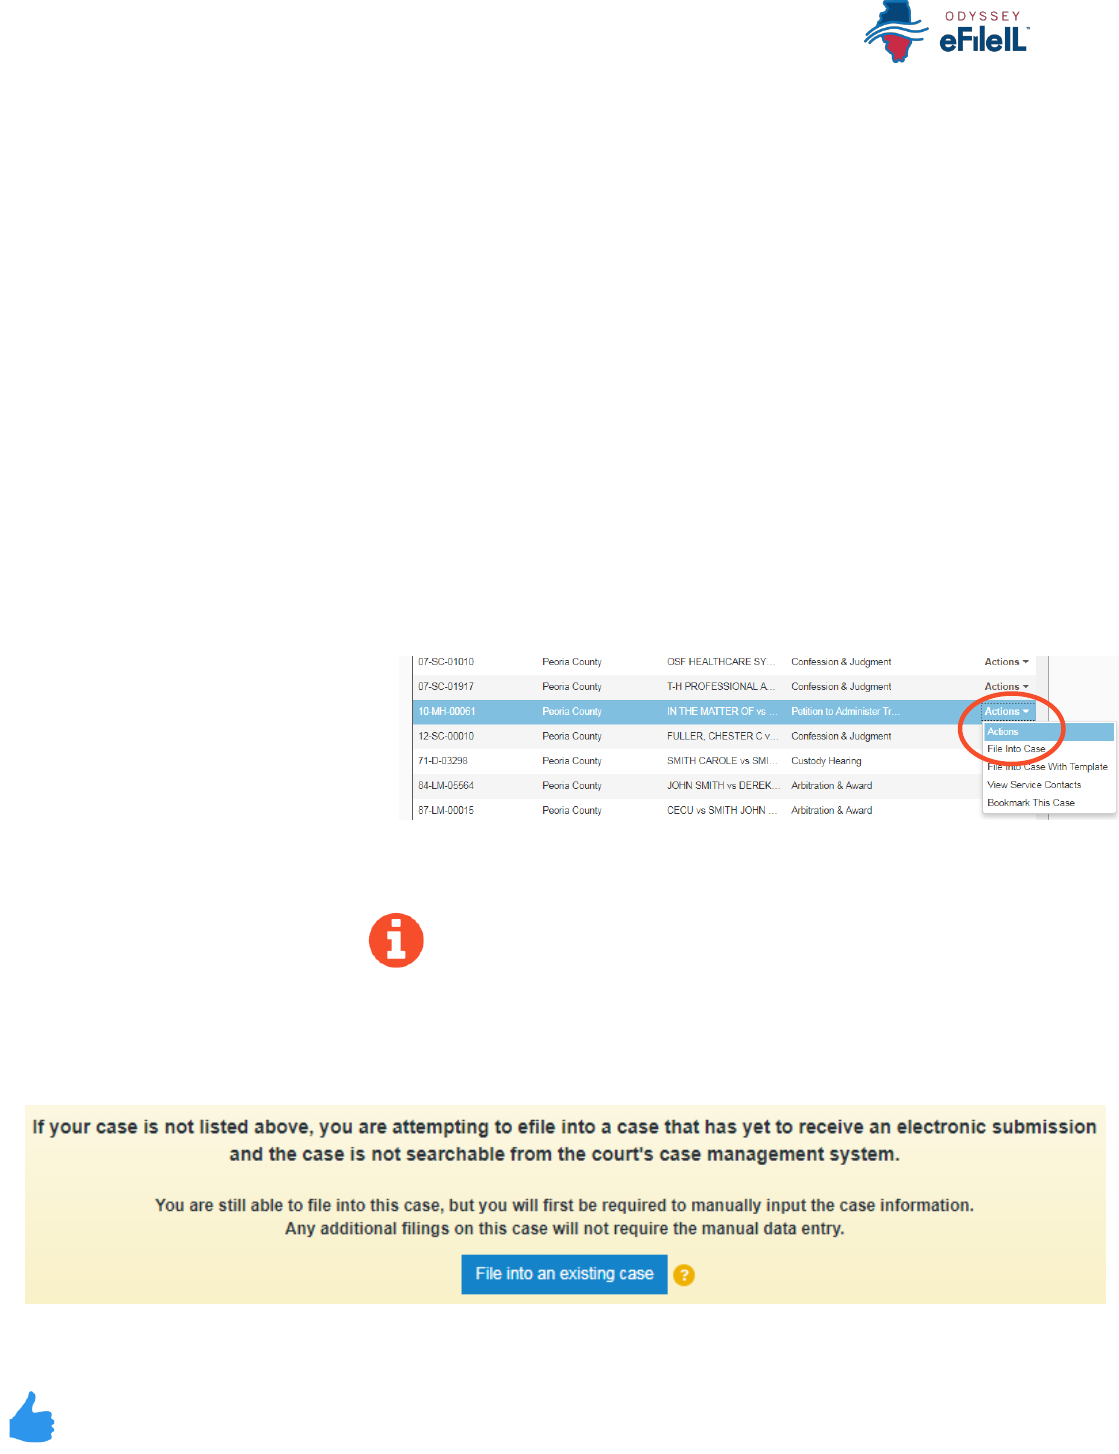
3. After you select Search, a list of cases will appear.
a. If no cases appear,
double check the case
number and contact
your local court to
confirm the case
number format.
4. Click on the Actions arrow to the right of the case information.
a. Click on File Into Case.
Important Note
Not all existing cases have been put into the efiling system yet. If your existing case does not show up
after both a Case Number and Party Name search, you can still file into the case if you get the message
below. Click on File into an existing case, then you will need to enter the information manually as if it
were a new case. See the instructions above.
If your case is not found and this message does not display, ask court staff to verify the case number
and your next steps.
You have successfully selected the Case Information for an Existing Case.

Need Help? Call Odyssey's Filer Support Number: 1-800-297-5377
EF-PI 3707.2
Page 1 of 4
(07/18)
ILLINOIS SUPREME COURT COMMISSION ON ACCESS TO JUSTICE
E-Filing Guide for
Self-Represented Litigants
How to E-File in Odyssey
Step 7: Enter the Party Information
E-filing Steps
1
• Prepare Documents
2
• Register
3
• Sign In
4
• Create New Password
5
• Add Payment Account
6
• Case Information
7
• Party Information
8
• Upload Filings
9
• Pay Fees
10
• Review Summary / Submit

Need Help? Call Odyssey's Filer Support Number: 1-800-297-5377
EF-PI 3707.2
Page 2 of 4
(07/18)
Enter Party Information
You need to enter information about yourself and the other party before e-filing.
Enter Your Information
1. The Party Type that you are entering information for will be highlighted. It will always start with the
Plaintiff or Petitioner.
If you are filing or
starting the case, you
are the Plaintiff or
Petitioner. If someone
else filed or started the
case and you are
responding to it, you are
the Defendant or
Respondent.
2. If you are the
highlighted party,
click the box that
says "I am this party."
3. The name, address, and phone number you used when you registered for e-filing will pop up in the
boxes.
4. Click Save Changes.

Need Help? Call Odyssey's Filer Support Number: 1-800-297-5377
EF-PI 3707.2
Page 3 of 4
(07/18)
Enter the Details of the Other Party or Parties
Once you have saved your information, the other Party Type will be
highlighted.
Other Party is a Person
1. You must fill in their First Name and Last
Name.
2. You may also fill in the other Party's street
address, city, state, postal code, and phone
number. None of those are required fields.
3. If the other Party has an attorney that has
already filed something in the case, they will
appear on the drop down menu under Lead
Attorney. You can select them. If you know
the other Party is representing themselves,
you can select Pro Se. This is not a required field.
Other Party is a Business or Agency
1. Click the box that says "Party is a
Business/Agency."
2. You must fill in the Business Name.
3. You may also fill in the Business's street address, city,
state, postal code, and phone number. None of those
are required fields.
4. If the Business's attorney has already filed something
in the case, they will appear on the drop down menu
under Lead Attorney. You can select them. This is not
a required field.

Need Help? Call Odyssey's Filer Support Number: 1-800-297-5377
EF-PI 3707.2
Page 4 of 4
(07/18)
5. Once you have entered the Other
Party's information, click Save
Changes.
Enter Additional Party's Information
If there are more than two parties in your case, you can add another party to your e-filing by clicking on Add
Another Party.
1. Select the Party Type from a
drop down menu.
The Party Type drop down menu
will have every type of Party there
is from Adoptive Child to Ward or
additional Plaintiffs or Defendants.
If you don't know the party type,
ask court staff.
2. If it is a person, you must fill in their First Name and Last Name. If it is a Business, you need to select
that box and enter the Business Name.
3. You may fill in the remaining information, but it is not required.
4. Click Save Changes.
5. Repeat as needed until you have entered the Party Information for all Parties in the case.
You have successfully entered the Party Information.

Need Help? Call Odyssey's Filer Support Number: 1-800-297-5377
EF-U 3708.2
Page 1 of 7
(07/18)
ILLINOIS SUPREME COURT COMMISSION ON ACCESS TO JUSTICE
E-Filing Guide for
Self-Represented Litigants
How to E-File in Odyssey
Step 8: Upload Your Documents in the Filings Section
E-filing Steps
1
• Prepare Documents
2
• Register
3
• Sign In
4
• Create New Password
5
• Add Payment Account
6
• Case Information
7
• Party Information
8
• Upload Filings
9
• Pay Fees
10
• Review Summary / Submit

Need Help? Call Odyssey's Filer Support Number: 1-800-297-5377
EF-U 3708.2
Page 2 of 7
(07/18)
Upload documents and complete the Filings section
The documents you want to file with the court have to be uploaded into the system. This all happens in the
Filings section after you have completed the Case Information and Party Information. The whole packet of
what you upload to file is called an "envelope" in the e-filing system.
Choose the Filing Type
1. Click on Efile.
This box should be defaulted to Efile, but some Locations may also have Serve or EfileAndServe as
Filing Type options. Make sure you select Efile or talk to your court staff about the other options.
Note: selecting Serve or EfileAndServe does NOT qualify for service of process.
Choose the Filing Code
1. Click on the Filing Code box for
the drop down menu. Filing
Code means the type of
document that you are filing
with the court (for example:
Complaint, Motion, Waiver).
2. Click on the type of document
you are filing.
If you don’t know your Filing Code ask the court staff so there is no problem with your filing.

Need Help? Call Odyssey's Filer Support Number: 1-800-297-5377
EF-U 3708.2
Page 3 of 7
(07/18)
3. Once you select the Filing Code, you have the
option of filling out four boxes, but they are not
required.
a. Filing Description (optional)
i. This is just for you to remember
what you are filing.
b. Client Reference Number (optional)
i. This is a tracking number for
lawyers to use to know which
client's case they are filing in.
Since you are representing
yourself, you won't use this box.
c. Comments to Court (optional)
i. These comments are for the court reviewer to read when assessing your document.
d. Courtesy Copies (optional)
i. You may enter a list of email addresses (separated by a comma) for where you want the
document sent.
Note: this is a courtesy and does NOT qualify for service of process or proper notice.
Explanation of Lead Documents, Attachments, and Document Size
What is a Lead Document?
Any document that you need the court to look at to be able to give you what you want.
o For example, if you want the court to grant your request to move your court date, upload your
Motion for a Continuance as a Lead Document.
All notice documents (such as a Notice for Court Date, Notice of Motion) are Lead Documents.
You can file more than one Lead Document at a time.
o For example, you could have Lead Document 1: Notice of Motion; Lead Document 2: Motion for
a Continuance; and Lead Document 3: Application for Waiver of Court Fees.
o An Application for Waiver of Court Fees is always a Lead Document and should be filed at the
same time as your other documents. If the court already approved your Application for Waiver
of Court Fees, you should file a copy of the approved Order as an attachment to anything you
file after that.
What are Attachments?
A category of filing that is only an option in some counties and for some types of Filing Codes. If you
don't see Attachments as an option, file everything in the Lead Document section. You can do that by
making the Lead Document and any attachments/exhibits one PDF, and upload as a Lead Document.
Any document that you reference in your Lead Document, but is not technically part of the Lead
Document. They are usually called exhibits or attachments.
o For example, if you write an Answer in an eviction case saying why you shouldn't be evicted,
that written explanation is the Lead Document. In the Answer, you reference a receipt for
paying rent. The copy of the receipt could be labeled Exhibit or Attachment 1 and would be an
Attachment, not a Lead Document.
What are the Document Size Limits?
For Trial Courts, each document cannot be larger than 25MB and a combined total of 50MB per filing.
For the Supreme Court and the Appellate Courts the file size limit is to 150MB.

Need Help? Call Odyssey's Filer Support Number: 1-800-297-5377
EF-U 3708.2
Page 4 of 7
(07/18)
Upload First Lead Document (Required)
All Lead Documents MUST be uploaded as separate Lead Documents or your filing may be rejected.
This means that you have to scan or save each Lead Document separately so you can upload it
separately. Generally speaking, most filings will have at least 2 Lead Documents: (1) the main
document you are filing and (2) a notice or proof of delivery document.
If any Lead Document is more than one page long, all the pages of the same document should be
scanned/saved as one document and uploaded as one document. For example, if your Motion is 3
pages long, all 3 pages should be uploaded as one Lead Document.
1. Click on the Upload Icon under the
Lead Document heading.
2. A Window will pop up where you will select your document.
3. Find where the document is saved on the computer (desktop, documents folder, flash drive).
4. Select the document you would like to file and click Open. The document title will appear in the
Description Box.
5. If you selected the wrong
document, you can delete it by
clicking on the X in the right
corner.
6. Once you have the correct document, select
the drop down menu for the Security box.
Click whether the document is public (non-
confidential) or confidential.
Most court documents are public (non-confidential) even though they contain personal information
that you may like to keep private. You may need a court order to be able to select confidential. Please
speak to court staff before selecting confidential because your filing may be rejected.

Need Help? Call Odyssey's Filer Support Number: 1-800-297-5377
EF-U 3708.2
Page 5 of 7
(07/18)
7. If your Lead Document doesn't have
attachments or optional services, Click Save
Changes. If your Lead Document has
attachments or you want optional services,
see below.
Upload Attachments (Optional)
1. Click on the Upload Icon under the
Attachments heading.
2. A Window will pop up where you will
select your document.
3. Find where the document is saved on
the computer (desktop, documents
folder, flash drive).
4. Select the document you would like to file and click Open. The document title will appear in the
Description Box.
5. If you selected the wrong document, you can delete it by clicking on the X in the right corner.
6. Once you have the correct document,
select the drop down menu for the
Security box. Select whether the
document is public (non-confidential)
or confidential.
7. Click Save Changes (unless you want
Optional Services, see next page).
Most court documents are public (non-confidential) even though they contain personal information
that you may like to keep private. You may need a court order to be able to select confidential. Please
speak to court staff before selecting confidential because your filing may be rejected.

Need Help? Call Odyssey's Filer Support Number: 1-800-297-5377
EF-U 3708.2
Page 6 of 7
(07/18)
Optional Services and Fees (Optional)
Unless you need something like certified
copies of judgments, a jury demand, or an
alias summons, you do not have to do
anything in this section.
1. Click Add Optional Services and Fees
and look through the drop down menu
to see what is offered.
2. Click on the Service you want. Be sure
not to click anything you already
selected in the Filing Code, or you may
be charged twice.
3. If applicable, type the number of that service
you want in the Enter a Quantity box.
4. Click Save Changes.
Upload Additional Lead Document
1. Add additional Lead Documents by clicking the Add Another Filing.
2. Follow the instructions above for Uploading another Lead Document.
3. Repeat for all Lead Documents in your case.
Service
Contacts
After uploading your
documents, if you see the
Service Contacts box it
means you selected Serve
or EfileAndServe for the
Filing Type.
1. Click Actions next to the party you want to send email notice to. Note: this gives notice to the other
side, but NOT qualify for service of process.

Need Help? Call Odyssey's Filer Support Number: 1-800-297-5377
EF-U 3708.2
Page 7 of 7
(07/18)
2. Click on Add from Service Contacts or Add From Public List to find the email you want to send to.
3. If you find the email, Click on it.
a. Click Save Changes.
4. If you get a message saying there are no
contacts or no items to display, click
Close.
5. If you don't want to send anyone notice of the filing by email or if no contacts are listed, you can get rid
of this section by going back to the Filings Section. You will see all of the Lead Documents you have
uploaded.
a. Click on the first
document. It will
now be shaded
blue and the
information about
the document will
open delow.
b. Click on the
dropdown menu
for Filing Type.
c. Change the Filing
Type to Efile.
d. Scroll down and click Save Changes.
e. Click on the next document and change the Filing Type to Efile. Make sure all Lead Documents
have just Efile as the Filing Type.
You have successfully uploaded your documents/completed the Filings
section.

Need Help? Call Odyssey's Filer Support Number: 1-800-297-5377
EF-PF 3709.2
Page 1 of 4
(07/18)
ILLINOIS SUPREME COURT COMMISSION ON ACCESS TO JUSTICE
E-Filing Guide for
Self-Represented Litigants
How to E-File in Odyssey
Step 9: Pay Fees
E-filing Steps
1
• Prepare Documents
2
• Register
3
• Sign In
4
• Create New Password
5
• Add Payment Account
6
• Case Information
7
• Party Information
8
• Upload Filings
9
• Pay Fees
10
• Review Summary / Submit

Need Help? Call Odyssey's Filer Support Number: 1-800-297-5377
EF-PF 3709.2
Page 2 of 4
(07/18)
Finalize Fees
If you did not create a Payment Account when you
registered for e-filing, please see How to E-file in
Odyssey Step 5: Add a Payment Account for
instructions on how to do so.
Review the Documents to be Filed
1. Make sure that
the Fees section
lists all the
documents you
want to file.
2. If not, return to
the Filings section
to add or delete
documents.
Party Responsible
for Fees actually
means who is
submitting the
filing. Always
select yourself for
this field.
Important note for Cook County ONLY – Ad Damnum
This field called Ad Damnum may appear
in the fees section. It means the amount
of money you are asking for. You must
type in the total amount of money you ask
for in your document. If you don't type in the amount, your document could be rejected.
a. For example, if you are file a small claims case asking for $4000 in your complaint, type $4000
into the Ad Damnum box.

Need Help? Call Odyssey's Filer Support Number: 1-800-297-5377
EF-PF 3709.2
Page 3 of 4
(07/18)
Select a Payment Account
1. Click on the drop down menu.
2. Select the Payment Account (that you created during registration) you want to use for this filing
(Credit, eCheck, Pay at Counter, or Waiver).
a. Select Pay at Counter if:
i. You want to pay in cash and you have confirmed that your court accepts cash.
b. Select Waiver if:
i. You are filing an Application
for Waiver of Court Fees and
one of your Lead Documents
is the Application; or
ii. You have been approved for
a Fee Waiver and one of your
Attachments is the signed
order from the judge.
3. Click Save Changes.
4. If you used Credit or eCheck, you have paid
your court fees.
5. If you selected Pay at Counter you will need to pay in cash before your filing will be processed.
6. If you have submitted an Application for Waiver of Court Fees, you will need to check with the court
about what you need to do next, if anything. Some courts require you to go to an in-person hearing
before a judge will decide if you get the waiver. Make sure you follow your court's process. Your
application could be denied if you don't follow the court's process. If your application is denied, you
will need to pay your filing fees.
If something has changed about your Credit or eCheck accounts since they were approved during
registration, this could cause your filing to be rejected when you e-file. Make sure your payment
account information is up to date and accurate before e-filing.
You have now successfully completed the Fees section for e-filing. Please
see next page if filing in Cook County.

Need Help? Call Odyssey's Filer Support Number: 1-800-297-5377
EF-PF 3709.2
Page 4 of 4
(07/18)
Important note for Cook County ONLY
There are two additional fields under the Fees section only in the Cook County efiling system.
Return Date
The Return Date is the first court date for certain Divisions.
1. Click Verify.
a. If your type of case does not require a return date,
the system will place a check in the "Return Date
Note Applicable" box. Click Save Changes.
b. If your type of case requires a return date, the
system will list the first available date.
i. If you are available that day, click Save Changes.
ii. If you are unavailable that day, click on the Calendar button.
iii. Select a later date you want.
iv. Click Verify.
v. If your date is available, the system will say "Return Date has been verified." If your date
is not available, they system will give you the next available date and say "Return Date
has changed!"
vi. Click Save Changes.
Submission Agreement
1. Read the message.
2. Click the box to check off that you have read the message.
If you have questions about the Return Date or the Submission Agreement, ask your court staff.

Need Help? Call Odyssey's Filer Support Number: 1-800-297-5377
EF-SU 3710.2
Page 1 of 3
(07/18)
ILLINOIS SUPREME COURT COMMISSION ON ACCESS TO JUSTICE
E-Filing Guide for
Self-Represented Litigants
How to E-File in Odyssey
Step 10: Review the Summary & Submit Your E-filing
E-filing Steps
1
• Prepare Documents
2
• Register
3
• Sign In
4
• Create New Password
5
• Add Payment Account
6
• Case Information
7
• Party Information
8
• Upload Filings
9
• Pay Fees
10
• Review Summary / Submit

Need Help? Call Odyssey's Filer Support Number: 1-800-297-5377
EF-SU 3710.2
Page 2 of 3
(07/18)
Review E-file Summary & Submit E-file
Once you have completed all the e-filing steps (Case Information, Party Information, Filings, and Fees), you can
review a Summary of your filing before submitting it. After you review your Summary, you must Submit your
filing to the court to complete e-filing. The whole packet of what you submit to the court is called an
"envelope" in the e-filing system.
Click Summary
1. Scroll to the bottom of the webpage
after you've completed the Case
Information, Party Information, Filings,
and Fees sections.
2. Click Summary.
If you have not entered all the
required information for your e-file,
you will not be able to review a
Summary of your e-filing envelope.

Need Help? Call Odyssey's Filer Support Number: 1-800-297-5377
EF-SU 3710.2
Page 3 of 3
(07/18)
Review your e-file Summary
1. After you click Summary, review the Case
Information, Party Information, Filings,
and Fees.
2. If anything is incorrect, click Back. Once
on the previous page, you can click into
any section that is incorrect and make the
changes you want.
Submit your e-filing
1. Once you review your e-file summary and make sure the information is
correct, click Submit.
You have successfully reviewed and submitted your e-filing envelope to the court.
Submitting your e-filing envelope in the system is the first step in giving your
documents to the courts. Once you submit the e-filing envelope, the Circuit Clerk's
office will review the filing. The Clerk will either accept or reject your filing. Check
your email for notification from the court about whether your filing is accepted or
rejected.
