

Import/Export Guide 2
Table of Contents
1 Import/Export overview 5
1.1 Getting started with Import/Export checklist 5
1.2 Available import and export workflows 6
1.3 Import/Export transfer modes 6
1.4 Considerations when to use and not use Express Transfer with Import/Export 7
1.5 Supported file types 7
1.6 Data upload size limitation 8
1.7 Concurrent and consecutive jobs 8
2 Installing Import/Export 9
2.1 Requirements 9
2.1.1 Workspace requirements 9
2.1.2 Port Access 9
2.2 Installing Import/Export 9
3 Permissions 11
4 Import/Export load file specifications 13
4.1 Supported file types 13
4.2 Metadata, extracted text, and native files 14
4.2.1 Encoding 14
4.2.2 Header row 15
4.2.3 Fields 15
4.2.4 Accepted date formats 17
4.2.5 Delimiters 19
4.2.6 Default delimiters 20
4.2.7 ZIP archive with extracted text and natives 20
4.3 Image and extracted text files 21
4.3.1 Supported image file formats 21
4.3.2 Load file format 21
4.3.3 ZIP archive with images 22
4.3.4 Importing extracted text during an image load 22
4.4 Processed data 22

Import/Export Guide 3
4.5 Transcript file types supported 23
5 General recommendations for structured data import and export jobs 24
5.1 Load file import recommendations 24
5.2 Load file export recommendations 24
6 Express Transfer overview 26
6.1 Prerequisites 26
6.2 Considerations when to use and not use Express Transfer with Import/Export 26
6.3 Express Transfer overview 27
6.3.1 Prerequisites 27
6.3.2 Considerations when to use and not use Express Transfer with Import/Export 28
6.4 Installing and updating Express Transfer desktop application 28
6.4.1 Requirements 28
6.4.2 Prerequisites 29
6.4.3 Installing Express Transfer 29
6.4.4 Silent installation of Express Transfer 32
6.4.5 Locating the Express Transfer version number 32
6.4.6 Automatically checking for software updates 35
6.4.7 Manually checking for software updates 38
6.5 Activating and deactivating Express Transfer 39
6.5.1 Prerequisites 39
6.5.2 Considerations when to use and not use Express Transfer with Import/Export 39
6.5.3 Activating Express Transfer 39
6.5.4 Deactivating Express Transfer 41
6.5.5 Data transfer performance considerations 41
6.6 Express Transfer system tray menu 43
6.7 Express Transfer Preferences 44
6.7.1 Automatically checking for software updates 44
6.7.2 Limit bandwidth 47
6.7.3 Exclude temporary Microsoft Office files from data import 49
6.7.4 Configuring proxy settings 52
6.8 Express Transfer Connectivity check 55
6.8.1 Network Throughput Check 58

Import/Export Guide 4
6.9 Express Transfer Job tracking and history 58
6.10 Express Transfer reporting jobs failed or completed with errors 63
7 Importing data using Import/Export 66
7.1 Importing data using Import/Export 66
7.2 Importing a document load file 67
7.3 Importing an image load file 77
7.4 Importing a production load file 84
7.5 Importing an RDO load file 92
7.6 Importing raw unprocessed data for Processing via Import/Export 101
8 Exporting data using Import/Export 109
8.1 Exporting data using Import/Export 109
8.2 Exporting a folder load file 109
8.3 Exporting a production set load file 124
8.4 Exporting an RDO load file 136
8.5 Exporting a saved search load file 148
9 Import/Export Job tracking and history 162
9.1 Reviewing the Import/Export Job page 162
9.2 Support for Mass Operations 163
10 Import/Export queue 165

Import/Export Guide 5
1 Import/Export overview
Note: Starting September 1, 2024, we’re streamlining our Staging boundaries to more effectively
separate staging data from workspace and system data. With this change, you will no longer be able to
write to or access data outside of the defined staging area. Folders that will remain within the
Staging area: ARM, ProcessingSource, StructuredData, and TenantVM. Folders that will be removed:
FTA, Temp, Export, and dtSearch, in addition to any other folders that you manually created. Refer to the
Staging Area FAQ in Community for more details.
Import/Export provides an efficient and streamlined ability to import raw data files, document load files,
image load files, production files, RDO files, as well as to export folders and subfolders, production sets,
saved searches, and RDO files. It is the recommended method for importing and exporting data for
RelativityOne.
You can use Import/Export with or without activating Express Transfer, however, we recommend activating
Express Transfer. For more information on Express Transfer, see Express Transfer overview on page27
and review the section below on considerations when to use and not use Express Transfer.
Notes:
n
As of July 1, 2024 the Relativity Desktop Client (RDC) is no longer operational for any RelativityOne
customers. Import/Export should be used for all RelativityOne importing and exporting workflows.
See the Community article RDCDeprecation FAQ for additional information.
n
For customers whose file shares haven’t been fully migrated to ADLS yet, Import/Export offers a solu-
tion where the import process utilizes the primary file share to store the uploaded data. See
theCommunity article Import/Export uses ADLS if one is present on the tenant for details.
n
After documents are imported using Import/Export, you can automate creating a dtSearch index or
run a search terms report with those documents using Automated Workflows
1.1 Getting started with Import/Export checklist
Ready to get up-to-speed with Import/Export? Learn more about the functionality, how to get it installed in
your instance of RelativityOne, and workflow specifics with the resources listed below.
Overview Sessions:
Take a deeper dive by watching our recorded Import/Export Foundations: Comprehensive Overview
webinar, in addition to other Import/Export self-paced webinars on the Relativity Learning site under Data
Ingestion &Management.
Before you can start working with Import/Export, you will have to set things up in your RelativityOne
instance:
1. Reach out to your IT Department and ensure TCP port 443 is open to transfer data in RelativityOne
with Express Transfer.
2. Install Import/Export from the Relativity Application Library.
3. Open Import/Export and install Express Transfer for larger data transfers and to streamline structured
data loads. Only complete this step if your organization intends to use Express Transfer with
Import/Export.
4. Ensure that users have the proper permissions.

Import/Export Guide 6
Now that Import/Export is set up, you are ready to perform these workflows and benchmark your speeds:
n
Import data, both structured and unstructured
n
Export folders, RDO data, productions and saved searches
n
Import and export data using Express Transfer with Import/Export
n
View the Job History
Have questions?
n
n
Visit our What’s New page, Relativity Documentation or our Community Site.
n
Contact Relativity Customer Support.
1.2 Available import and export workflows
The following workflows can be performed using Import/Export .
n
Import workflows:
o
Raw (Unprocessed/Unstructured) Data
o
Unstructured data workflow with Processing
n
Structured (Processed)Data —Structured data includes natives, text, and image files, and
load files containing metadata.
n
Document load file import
n
Image load file import
n
Production load file import
n
Relativity Dynamic Object load file import
n
Export workflows:
o
Folder export
o
Production set export
o
SavedSearch export
o
RDOexport
1.3 Import/Export transfer modes
There are two methods available to transfer data using Import/Export. Refer to the next section for
considerations when to use each one.
n
Import/Export with Express Transfer
This refers to activating Express Transfer within Import/Export to transfer data into and out of
RelativityOne. This mode is the recommended method for data transfer. Express Transfer is a

Import/Export Guide 7
separately installed desktop application that sits outside of the RelativityOne browser software
and handles the data transfer process. See Express Transfer overview and Installing Express
Transfer for more information
n
Import/Export only
This refers to only using the Import/Export browser application within the RelativityOne
software to import and export data without Express Transfer activated. This mode is
sometimes referred to as web mode or web only mode. See Installing Import/Export. Even if
the Express Transfer application is installed on the desktop, it must not be activated when
using web mode.
1.4 Considerations when to use and not use Express Transfer
with Import/Export
We recommend using Import/Export with Express Transfer activated whenever possible for all importing
and exporting workflows, and particularly when:
n
data file size is greater than 20 GB (although Express Transfer can be used for any size data trans-
fer).
n
processing multiple import jobs. The jobs will be queued and executed when the previous job is com-
plete.
n
slow or unstable network connection. Express Transfers enables you to retry the upload.
Use Import/Export without activating Express Transfer when:
n
your company policy prohibits installing desktop applications.
n
your network configuration does not allow third party applications to send or receive data, such as
proxy settings.
n
data file size is less than 20 GB.
n
data is in ZIP files.
Note: You need to use Express Transfer to upload and process encrypted materials, such as password-
protected zip files or Case files (L01/N01) that require Password Bank functionality. If you cannot use
Express Transfer for such imports, zip your encrypted materials in a single unencrypted ZIP container
(the 20 GB limit for the zip file size applies). Import/Export will transfer and extract the top-level zip file,
preparing your encrypted materials for Processing. Then, Processing will utilize Password Bank to
decrypt materials.
1.5 Supported file types
Import/Export supports the following file types. Refer to Import/Export load file specifications for more
information regarding load files. Also see General recommendations for structured data import and export
jobs on page24.

Import/Export Guide 8
n
ZIP and PST files—for transferring data to the server-side.
n
Native files for processing—see the list of supported file types for processing within the Processing
guide.
n
Document Load File import—.dat, .csv and .txt load files.
n
Image Load File import—Opticon-formatted page-level files. Formats supported: single page TIFF
(Group IV) files, single page JPG files, and single and multiple PDF files.
Note: RelativityOne allows users to restrict given file types from being imported into their instances with
the RestrictedFileTypes instance setting. Import/Export reads and applies this instance setting when
importing materials into RelativityOne, therefore, all file types listed as restricted file types will be skipped.
1.6 Data upload size limitation
When Express Transfer is activated for use with Import/Export, there is no data upload limit. See Express
Transfer overview and Activating Express Transfer for more information.
When Express Transfer is not activated for use with Import/Export, the application accepts single .zip or .pst
containers or a single structured import data set load file up to 20 GB for a single import.
1.7 Concurrent and consecutive jobs
The concurrent or consecutive nature of a job depends on what stage the job is at, which data transfer mode
you're using (web only or Express Transfer), and what type of job you're running (Processing, Import, or
Export). For more information, see the Community article Import/Export Concurrent and Consecutive Jobs.

Import/Export Guide 9
2 Installing Import/Export
The Import/Export application will not be installed automatically in all your workspaces so you must do so
manually in each one from the Relativity Application Library.
2.1 Requirements
Refer to the sections below for the necessary requirements for Import/Export.
2.1.1 Workspace requirements
When using Import/Export, you need the following RelativityOne applications installed in your workspace
from the Relativity Application Library:
Note: Import/Export requires the Relativity.Transfer.Service to be installed in your RelativityOne
instance. This is a global RelativityOne application that is installed and updated automatically.
n
Import/Export (see installation steps below)
n
Export
n
Import
n
Processing (only required if you intend to process unstructured raw data for processing with
Import/Export)
n
Relativity Lists (version 1.2.305 or newer)
Note: Import/Export requires Relativity Lists version 1.2.305 or newer to be installed and
enabled in the workspace for running import and export jobs. If the Relativity Lists
application is not available, all Import/Export workflows will be disabled.
2.1.2 Port Access
Import/Export requires TCP port 443 to be open to transfer data. For further assistance, please contact your
ITDepartment. Also refer to the ImportExport Application - Required Ports article in Community for
additional information.
2.2 Installing Import/Export
To manually install Import/Export in the workspace:
1. Log into RelativityOne as an Admin user.
2. Navigate to the Application Library.
3. Type Import/Export in the Name field's filter and press Enter.
4. Click the Import/Export application name to go to the Application Information tab.
5. Click Select in the Workspaces Installed pane.

Import/Export Guide 10
6. Find and select your workspace(s) and click the right arrow button to move it to the right-hand pane.
7. Click Apply.
If you want to use Import/Export with Express Transfer, which is recommended in most cases, you must
activate Express Transfer within the Import/Export application. Refer to Express Transfer overview on
page27 and Activating Express Transfer on page39 for more information.

Import/Export Guide 11
3 Permissions
Import/Export validates the user's permissions and checks if all required applications are installed in their
workspace. If the user does not have permission to run a given workflow or if any application needed for that
workflow is not installed, Import/Export grays out the workflow button and displays a warning message
below it explaining why it's inactive. This validation process works separately for each workflow.For
example, if a user does not have permission to run a Processing job, they may still be able to import load file
data but will not be able to process it.
All permissions are set in Workspace security.
The following permissions are required for all import and export workflows:
Object security Tab visibility Other Settings
n
Document - Add, Edit, View
n
Folder - Add, Edit
n
Import/Export Extraction Job -
Add, Edit
n
Import/Export Job - Add, Edit
n
Relativity Time Zone - View
n
Documents
n
Import/Export
Job
Additional permissions required for Raw (Unprocessed) Data import workflow only:
Object security Tab visibility Other Settings
n
Entity - Add, Edit
n
OCRLanguage - View
n
Processing Data Source - Add,
Edit, View
n
Processing Error - Add, Edit
n
Processing Set - Add, Edit, View
n
Quick Create Set - Add, Edit
Mass operations
n
Allow
Import
Additional permissions required for Structured Data import workflows only:
Object security Tab visibility Other Settings
n
Production - View
n
Relativity Import Data Source - Add,
Edit, View
n
Relativity Import Job - Add, Edit, View
Admin operations
n
Allow
Import
Additional permissions required for Export workflows only:

Import/Export Guide 12
Object security Tab visibility Other Settings
n
Import/Export Job - Add, Edit
n
Production - View
n
Relativity Export Service Job - Add,
Edit, View
Admin operations
n
Allow
Export

Import/Export Guide 13
4 Import/Export load file specifications
Note: Starting September 1, 2024, we’re streamlining our Staging boundaries to more effectively
separate staging data from workspace and system data. With this change, you will no longer be able to
write to or access data outside of the defined staging area. Folders that will remain within the
Staging area: ARM, ProcessingSource, StructuredData, and TenantVM. Folders that will be removed:
FTA, Temp, Export, and dtSearch, in addition to any other folders that you manually created. Refer to the
Staging Area FAQ in Community for more details.
A load file is used to transfer data and its associated metadata into a database. During import, the
application reads the load file to determine what metadata should be written into each field and to copy it to
the workspace. If your organization uses a processing vendor, you’ll need to upload case data with a load
file. You'll also use load files when you receive a subset of data from another party, such as a production
from opposing counsel.
Below are the load file specifications for Import/Export.
4.1 Supported file types
Import/Export supports the following file types.
n
ZIP and PST files—for transferring data to the server-side.
n
Native files for processing—see the list of supported file types for processing within the Processing
guide.
n
Document Load File import—.dat, .csv and .txt load files.
n
Image Load File import—Opticon-formatted page-level files. Formats supported: single page TIFF
(Group IV) files, single page JPG files, and single and multiple PDF files.
Note: RelativityOne allows users to restrict given file types from being imported into their instances with
the RestrictedFileTypes instance setting. Import/Export reads and applies this instance setting when
importing materials into RelativityOne, therefore, all file types listed as restricted file types will be skipped.
Import/Export web only accepted file types:
For Unstructured Processing Jobs
n
PST—Individual Entity and Custodian files
n
ZIP containers:
o
All loose files must be in a ZIPcontainer
o
Entity and Custodian identifier at the folder level
For Load Files and Structured Data Sets
n
Load file—Keep the Load File (.dat, .opt, etc.) separate from zipped documents
n
Files—Native or Image/Production files must be in a ZIP container

Import/Export Guide 14
4.2 Metadata, extracted text, and native files
Import/Export uses a flat, document-level load file to load metadata, document level extracted text, and
natives files. Each line should represent one document.
4.2.1 Encoding
You must choose the proper encoding of a file when a load file is first selected. Import/Export supports the
following encodings:
n
Arabic (ASMO 708)
n
Arabic (ISO)
n
Arabic (Windows)
n
Baltic (ISO)
n
Baltic (Windows)
n
Central European (ISO)
n
Central European (Windows)
n
Chinese Simplified (GB18030)
n
Chinese Simplified (GB2312)
n
Chinese Traditional (Big5)
n
Cyrillic (DOS)
n
Cyrillic (ISO)
n
Cyrillic (KOI8-R)
n
Cyrillic (KOI8-U)
n
Cyrillic (Mac)
n
Cyrillic (Windows)
n
Estonian (ISO)
n
Greek (ISO)
n
Greek (Windows)
n
Hebrew (ISO-Logical)
n
Hebrew (ISO-Visual)
n
Hebrew (Windows)
n
Japanese (EUC)
n
Japanese (JIS 0208-1990 and 0212-1990)
n
Japanese (JIS)
n
Japanese (JIS-Allow 1 byte Kana - SO/SI)

Import/Export Guide 15
n
Japanese (JIS-Allow 1 byte Kana)
n
Japanese (Shift-JIS)
n
Korean
n
Korean (EUC)
n
Latin 3 (ISO)
n
Latin 9 (ISO)
n
Thai (Windows)
n
Turkish (ISO)
n
Turkish (Windows)
n
Ukrainian (Mac)
n
Unicode (UTF-16)
n
Unicode (Big-Endian)
n
Unicode (UTF-8)
n
US-ASCII
n
Vietnamese (Windows)
n
Western European (ISO)
n
Western European (Mac)
n
Western European (Windows)
4.2.2 Header row
Import/Export does not require load file header rows. However, they are strongly recommended to ensure
accuracy.
The field names in your header do not need to match the field names in your workspace.
4.2.3 Fields
RelativityOne doesn’t require any specific load file field order. You can create any number of workspace
fields to store metadata or coding.
During the load process, you can match your load file fields to the fields in your workspace. The identifier
field is required for each load. When loading new records, this is your workspace identifier.
When performing an overlay, you can use the workspace identifier or select another field as the identifier.
This is useful when overlaying production data. For example, you could use the Bates number field rather
than the document identifier in the workspace.
All fields except Identifier are optional; however, you may find some of the following system fields beneficial.

Import/Export Guide 16
1. Identifier—the unique identifier of the record.
2. Group Identifier—the identifier of a document’s family group.
n
The group identifier repeats for all records in the group.
n
Usually, this is the document identifier of the group’s parent document. For example:
o
If an email with the document identifier of AS00001 has several attachments, the email
and its attachments have a group identifier of AS00001.
n
If a group identifier for a record is not set, the document identifier populates the group identifier
field in the case. This effectively creates a “group” of one document.
3. MD5 Hash—the duplicate hash value of the record.
n
You can enter any type of hash value (and rename the field in your case).
n
If documents share the same hash value, the software identifies the documents as a duplicate
group.
n
If a hash field for a record is not set, the document identifier populates the hash field in the
case. This effectively creates a “group” of one document.
4. Extracted Text—the text of the document. Either the OCR or Full Text. The extracted text appears in
the viewer and is added to search indexes. This field can contain either:
n
The actual OCR or Full Text.
n
The path to a document level text file containing the OCR or Full Text. Both relative and abso-
lute (full) paths are supported; however, to import load file data that contains absolute paths,
Express Transfer must be activated. Relative paths can start with Blank or .\, as in: MainFolder-
\SubFolder\File.extension or .\MainFolder\SubFolder\File.extension. Absolute paths can start
with a backslash (\), as in: \MainFolder\SubFolder\File.extension.
5. Native File Path—the path to any native files you would like to load. Both relative and absolute (full)
paths are supported; however, to import load file data that contains absolute paths, Express Transfer
must be activated. Relative paths can start with Blank or .\, as in: MainFolder-
\SubFolder\File.extension or .\MainFolder\SubFolder\File.extension. Absolute paths can start with a
backslash (\), as in: \MainFolder\SubFolder\File.extension.
Notes:
n
To avoid import errors, run a load file precheck via the Precheck Load File button to validate
whether the native file paths are correct and that linked native files exist and are accessible.
n
Currently, the application does not check if duplicate native file paths are in the load file. There-
fore, you may want to manually review your load file data to ensure there are no duplicated file
paths before starting an import job. Duplicated native file paths do not cause import errors, but
they may lead to billing consequences.
6. Folder Info—builds the folder browser structure for the documents.
n
This field is backslash “\” delimited.
n
If not set, the documents load to the root of the case.
n
Each entry between backslashes is a folder in the system's folder browser.
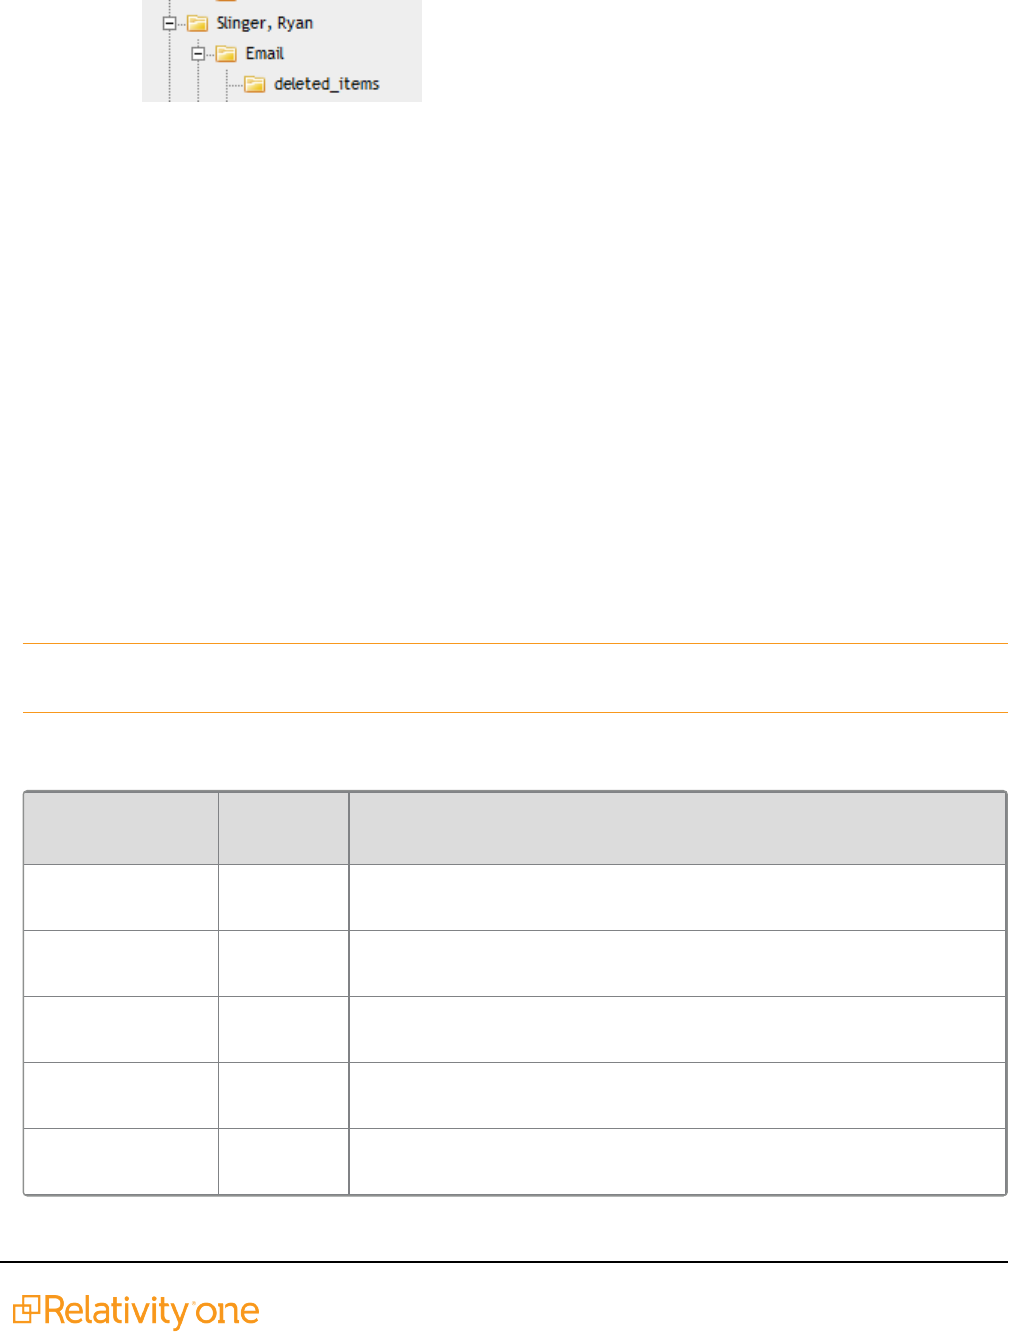
Import/Export Guide 17
n
Each backslash indicates a new subfolder in the browser. For example, if the load file con-
tained the following entry in the folder information field, “Slinger, Ryan\Email\deleted_items”,
then the software would build the following folder structure:
Each document with the above entry would be stored in the “deleted_items” folder.
7. Relativity Native Time Zone Offset—RelativityOne's native viewer technology displays all email
header dates and times in GMT. This numeric field offsets how email header dates and times appear
in the viewer.
n
If the value in this field is blank, or 0, for a document, then the email header date and time
appears in GMT.
n
You can enter a whole number in this field (positive or negative) to offset the time from GMT to
the local time zone of the document. For example, if the document was collected from US CDT
time, enter “-5” in the field, because the CDT offset from GMT is -5.
n
This ONLY applies when viewing email header dates and times in the RelativityOne Native File
Viewer. Your metadata fields display as imported.
4.2.4 Accepted date formats
RelativityOne accepts date and time as one field. For example, Date Sent and Time Sent should be one
field. If date sent and time sent ship separately, you must create a new field for time. You can format date
fields to accept the date without the time, but not the time without the date. Dates cannot have a zero value.
Format dates in a standard date format such as “6/30/2023 1:23 PM” or “6/30/2023 13:23”.
Note: To import or export data with a date/time format that differs from the US format, be sure to select
the correct Regional Settings option when creating a new Import/Export job.
The table below lists the date formats recognized by Import/Export and Import Service (IAPI). It contains
both valid and invalid date formats:
Entry in Load File
Object
Type
Definition
Monday January 4
2023
1/4/2318
0:00
05/28/2023 7:11
AM
05/28/2023
7:11 AM
5.08:40 PM 6/30/2023
17:08
The current date will be entered if the date is missing. For this
example, assume the import was done on 6/30/2023.
17:08:33 6/30/2023
17:08
The current date will be entered if the date is missing. For this
example, assume the import was done on 6/30/2023.
17:08 6/30/2023
17:08
The current date will be entered if the date is missing. For this
example, assume the import was done on 6/30/2023.

Import/Export Guide 18
Entry in Load File
Object
Type
Definition
5:08 PM 6/30/2023
17:08
The current date will be entered if the date is missing. For this
example, assume the import was done on 6/30/2023.
14-Apr 4/14/2023
0:00
The current year will be entered if the year is missing.
9-Apr 4/9/2023
0:00
The current year will be entered if the year is missing.
14-Mar 3/14/2023
0:00
The current year will be entered if the year is missing.
1-Mar 3/1/2023
0:00
The current year will be entered if the year is missing.
22-Feb 2/22/2023
0:00
The current year will be entered if the year is missing.
20230420 4/20/2023
0:00
20230420 2:22:00
AM
4/20/2023
0:00
4/9/2023 16:13 4/9/2023
16:13
4/9/2023 8:49 4/9/2023
8:49
9-Apr-23 4/9/2023
0:00
Apr. 9, 23 4/9/2023
0:00
4.9.2023 4/9/2023
0:00
4.9.23 4/9/2023
0:00
4/9/2023 4/9/2023
0:00
4;9;2023 4/9/2023
0:00
Wednesday, 09
April 2023
4/9/2023
0:00
12-31-2023 12/31/2023
12:00 AM
2023-11- 11/28/2023

Import/Export Guide 19
Entry in Load File
Object
Type
Definition
28T17:45:39.744-
08:00
0:00
4/9/23 13:30 PM Results in an error
2023-044-09 Results in an error
4/9/2023 10:22:00
a.m.
Results in an error
00/00/0000 Results in an error unless the CreateErrorForInvalidDate value is set
to false.
4.2.5 Delimiters
During import, you can designate which delimiters are used in your load file. You can select each delimiter
from the ASCII characters, 001 – 255.
The delimiter characters have the following functions:
n
Column—separates load file columns.
n
Quote—marks the beginning and end of each load file field (also known as a text qualifier).
n
Newline—marks the end of a line in any extracted or long text field.
n
Multi-value—separates distinct values in a column. This delimiter is only used when importing into a
RelativityOne multi-choice field.
n
Nested-values—denotes the hierarchy of a choice. This delimiter is only used when importing into a
RelativityOne multi-choice field.
For example, say a load file contained the following entry, and was being imported into a multi-choice
field: “Hot\Really Hot\Super Hot; Look at Later”
With the multi-value delimiter set as “;” and the nested value delimiter set as “\"”, the choices would
appear in RelativityOne as:
All checkboxes are automatically selected under each nested value. The full path to each
multi-choice element is required. For example:

Import/Export Guide 20
DocID
New Privilege
NZ997.001.00000048
04. Redact;01. Yes\b.
Solicitor/Client;
appears as:
To select "01. Yes/a. Litigation," add it to the record after ";".
4.2.6 Default delimiters
If you generate your own load files, you may choose to use the system defaults:
n
Column—Unicode 020 (ASCII 020 in the application)
n
Quote—Unicode 254 (ASCII 254 in the application)
n
Newline—Unicode 174 (ASCII 174 in the application)
n
Multi-Value—Unicode 059 (ASCII 059 in the application)
n
Nested Values—Unicode 092 (ASCII 092 in the application)
4.2.7 ZIP archive with extracted text and natives
To import any text or native file when not using Express Transfer, you need to zip the files and upload the zip
file in the Choose Load File And Location dialog in Import/Export.
The zip file structure can be either flat or hierarchical with multiple levels of sub-folders. You must ensure
that file paths in the related load file match the zip file's structure.
See below for a sample of a hierarchical zip file structure and a matching load file:
^Control Number^|^Extracted Text^|^Native File^
^DOCUMENT_
12345^|^MainFolder\SubFolderTextA\SubFolderTextB\TextFile12345.txt^|^MainFolder\SubF
olderNatives\NativeFile12345.xls^

Import/Export Guide 21
4.3 Image and extracted text files
For image imports, Import/Export requires Opticon load files with ANSI/Western European encoding. This
.opt text file references the Control ID on a page level. The first page should match up to any data you intend
to load. You can use this same process for importing page-level extracted text.
Import/Export does not support Unicode .opt files for image imports. When you have a Unicode .opt file, you
must save it in ANSI/Western European encoding.
You must convert images in unsupported formats using a third-party conversion tool before Import/Export
can successfully upload them.
4.3.1 Supported image file formats
Import/Export accepts only the following file types for image loads:
n
Single page, Group IV TIF (1 bit, B&W)
n
Single page JPG
n
Single page PDF
n
Multi page PDF
n
Multi page TIF can be imported into the system, but you must load them as native files
n
Only one PDF per document is supported
4.3.2 Load file format
The Opticon load file is a page-level load file, with each line representing one image.
Below is a sample:
REL00001,REL01,D:\IMAGES\001\REL00001.TIF,Y,,,3
REL00002,REL01,D:\IMAGES\001\REL00002.TIF,,,,
REL00003,REL01,D:\IMAGES\001\REL00003.TIF,,,,
REL00004,REL01,D:\IMAGES\001\REL00004.TIF,Y,,,2
REL00005,REL01,D:\IMAGES\001\REL00005.TIF,,,,
The fields are, from left to right:
n
Field One – (REL00001) – the page identifier
n
Field Two – (REL01) – the volume identifier is not required.
n
Field Three – (D:\IMAGES\001\REL00001.TIF) – a path to the image to be loaded
n
Field Four – (Y) – Document marker – a “Y” indicates the start of a unique document.
n
Field Five – (blank) – can be used to indicate folder
n
Field Six – (blank) – can be used to indicate box
n
Field Seven – (3) – often used to store page count, but unused in Import/Export

Import/Export Guide 22
4.3.3 ZIP archive with images
To import images when not using Express Transfer, you need to zip the image files and upload the zip file in
the Choose Load File And Location dialog in Import/Export.
The zip file structure can be either flat or hierarchical with multiple levels of sub-folders. You must ensure
that image file paths in the related load file match the zip file's structure.
4.3.4 Importing extracted text during an image load
You can also import extracted text during the image import process by setting an option in Import/Export.
For more information about importing extracted text during an image load, see Importing an image file via
Import/Export.
No changes are needed in the Opticon load file. If the aforementioned setting is active, Import/Export looks
for page level .txt files that are named identically to their corresponding TIF files. For example:
4.4 Processed data
Some data originates from client files and needs processing to extract the metadata. The following table
shows the delimiters that your internal processing software must use to present data as fields.
Value Character ASCII Number
Column ¶ 020
Quote þ 254
Newline ® 174
Multi-Value ; 059
Nested Value \ 092
You can provide this list to your vendor to help communicate the required delivery format for load files. The
fielded data should be delivered as delimited files with column or field names located in the first line.

Import/Export Guide 23
4.5 Transcript file types supported
Import/Export only supports these transcript file types: .ptf, .xmptf, .rtf, .txt, .trn, and .lef. See Uploading
transcripts in the User Guide for more information on transcripts.

Import/Export Guide 24
5 General recommendations for structured data import
and export jobs
Note: Starting September 1, 2024, we’re streamlining our Staging boundaries to more effectively
separate staging data from workspace and system data. With this change, you will no longer be able to
write to or access data outside of the defined staging area. Folders that will remain within the
Staging area: ARM, ProcessingSource, StructuredData, and TenantVM. Folders that will be removed:
FTA, Temp, Export, and dtSearch, in addition to any other folders that you manually created. Refer to the
Staging Area FAQ in Community for more details.
5.1 Load file import recommendations
n
When using Import/Export in web only mode, ensure that the full path listed in the load file is captured
in the ZIP file.
n
Try to limit the number of fields in a single import job to 100 to minimize risk of job failure due to SQL
exception related issues.
n
When importing new choice fields, you may experience the unexpected behaviors, such as errors
occurring when importing choice fields or slow import jobs for choice fields. To help prevent these
issues, try to limit the number of choice values in a single import job to 100. This number indicates the
maximum of new values in all choice type fields across the entire set of records.
n
Extracted Text import:
o
There is no limitation or performance impact related to size of extracted text when the import is
performed to Data Grid.
o
Performance and stability will be affected for extracted texts import to SQL. If there is no other
option and you must use SQL, please import extracted text separately from other data fields.
o
Depending on the job configuration, the extracted text import to Data Grid is 60-80% faster
than similar import to SQL.
o
Performance is improved when extracted text files use UTF-16 encoding.
5.2 Load file export recommendations
n
Depending on the exported data structure, a Workspace folder structure can degrade performance
significantly, up to 30 times slower in edge cases, so we recommend using the File Type folder struc-
ture.
n
Setting too high value of the volume and sub-directory size can also cause significant performance
degradation. We recommend using default settings. Default Volume Max size (MB)=650. Sub-dir-
ectory Max files=500.
n
Exporting images as PDFs or multi-page TIFFs is slower than exporting them as single page images.
n
Exporting to a ZIP archive using Import/Export in web only mode is significantly slower than exporting

Import/Export Guide 25
data with Express Transfer or exporting data to the Staging only.
n
Exporting text files in Unicode (UTF-16) encoding is faster than in other encodings.

Import/Export Guide 26
6 Express Transfer overview
Express Transfer is an integral part of Import/Export workflows when activated for use with Import/Export.
Using Express Transfer with Import/Export is the recommended method of transferring data in Relativity.
The Express Transfer application is designed especially for transferring large structured and unstructured
data files greater than 20 GB; however, it can be used for any data size.
Using the application with Import/Export helps reduce the time and effort it takes to transfer data in
Relativity. For additional information on performance considerations when transferring data using desktop
applications, see Data transfer performance considerations on page41
Express Transfer is a separately installed desktop application that operates outside of RelativityOne.
Although you are accessing and using Import/Export within RelativityOne to process transfer jobs, it is the
activated Express Transfer application that is handling the actual data transfer process in the background to
and from RelativityOne and the staging area or local disk. You can monitor import and export job transfers
through the Express Transfer application as well as from the Import/Export Jobs page.
To ensure that you always have the most recent version and features of Express Transfer, the default
update setting is configured to automatically prompt you when a new version is available. We recommend
keeping this setting enabled. See Installing and updating Express Transfer desktop application on page28
for more information. You can manually check for updates anytime by right-clicking the Express Transfer
icon in your system tray. See Express Transfer system tray menu on page43 for more information.
6.1 Prerequisites
To use Import/Export with Express Transfer, the following must be completed in this order:
1. Import/Export application must be installed in the workspace from the Application Library. Refer to
Installing Import/Export for more information.
2. Express Transfer desktop application must be installed on your computer. Refer to Installing Express
Transfer for more information.
3. Express Transfer must be activated within Import/Export. Refer to Activating Express Transfer for
more information.
6.2 Considerations when to use and not use Express Transfer
with Import/Export
We recommend using Import/Export with Express Transfer activated whenever possible for all importing
and exporting workflows, and particularly when:
n
data file size is greater than 20 GB (although Express Transfer can be used for any size data trans-
fer).
n
processing multiple import jobs. The jobs will be queued and executed when the previous job is com-
plete.
n
slow or unstable network connection. Express Transfers enables you to retry the upload.
Use Import/Export without activating Express Transfer when:

Import/Export Guide 27
n
your company policy prohibits installing desktop applications.
n
your network configuration does not allow third party applications to send or receive data, such as
proxy settings.
n
data file size is less than 20 GB.
n
data is in ZIP files.
Note: You need to use Express Transfer to upload and process encrypted materials, such as password-
protected zip files or Case files (L01/N01) that require Password Bank functionality. If you cannot use
Express Transfer for such imports, zip your encrypted materials in a single unencrypted ZIP container
(the 20 GB limit for the zip file size applies). Import/Export will transfer and extract the top-level zip file,
preparing your encrypted materials for Processing. Then, Processing will utilize Password Bank to
decrypt materials.
6.3 Express Transfer overview
Express Transfer is an integral part of Import/Export workflows when activated for use with Import/Export.
Using Express Transfer with Import/Export is the recommended method of transferring data in Relativity.
The Express Transfer application is designed especially for transferring large structured and unstructured
data files greater than 20 GB; however, it can be used for any data size.
Using the application with Import/Export helps reduce the time and effort it takes to transfer data in
Relativity. For additional information on performance considerations when transferring data using desktop
applications, see Data transfer performance considerations on page41
Express Transfer is a separately installed desktop application that operates outside of RelativityOne.
Although you are accessing and using Import/Export within RelativityOne to process transfer jobs, it is the
activated Express Transfer application that is handling the actual data transfer process in the background to
and from RelativityOne and the staging area or local disk. You can monitor import and export job transfers
through the Express Transfer application as well as from the Import/Export Jobs page.
To ensure that you always have the most recent version and features of Express Transfer, the default
update setting is configured to automatically prompt you when a new version is available. We recommend
keeping this setting enabled. See Installing and updating Express Transfer desktop application on the next
page for more information. You can manually check for updates anytime by right-clicking the Express
Transfer icon in your system tray. See Express Transfer system tray menu on page43 for more information.
6.3.1 Prerequisites
To use Import/Export with Express Transfer, the following must be completed in this order:
1. Import/Export application must be installed in the workspace from the Application Library. Refer to
Installing Import/Export for more information.
2. Express Transfer desktop application must be installed on your computer. Refer to Installing Express
Transfer for more information.
3. Express Transfer must be activated within Import/Export. Refer to Activating Express Transfer for
more information.

Import/Export Guide 28
6.3.2 Considerations when to use and not use Express Transfer with Import/Ex-
port
We recommend using Import/Export with Express Transfer activated whenever possible for all importing
and exporting workflows, and particularly when:
n
data file size is greater than 20 GB (although Express Transfer can be used for any size data trans-
fer).
n
processing multiple import jobs. The jobs will be queued and executed when the previous job is com-
plete.
n
slow or unstable network connection. Express Transfers enables you to retry the upload.
Use Import/Export without activating Express Transfer when:
n
your company policy prohibits installing desktop applications.
n
your network configuration does not allow third party applications to send or receive data, such as
proxy settings.
n
data file size is less than 20 GB.
n
data is in ZIP files.
Note: You need to use Express Transfer to upload and process encrypted materials, such as password-
protected zip files or Case files (L01/N01) that require Password Bank functionality. If you cannot use
Express Transfer for such imports, zip your encrypted materials in a single unencrypted ZIP container
(the 20 GB limit for the zip file size applies). Import/Export will transfer and extract the top-level zip file,
preparing your encrypted materials for Processing. Then, Processing will utilize Password Bank to
decrypt materials.
6.4 Installing and updating Express Transfer desktop application
The Express Transfer application must be installed on your computer in order to use it with Import/Export
workflows. The instructions below can be used for both MicrosoftWindows and Apple macOS installations.
You can configure preferences to automatically check for new software versions or you can check for them
manually. We recommend keeping the default setting to enable the system to automatically check for new
software versions to ensure you're using the latest software features available.
For additional information on performance considerations when transferring data using desktop
applications, see Data transfer performance considerations on page41
6.4.1 Requirements
Refer to the sections below for the necessary requirements for Express Transfer.
6.4.1.1 System requirements
To use Express Transfer, your computer must meet the following minimum system requirements:
System Configuration Requirement
Operating system MS Windows 10, MS Windows 11, or Apple macOS

Import/Export Guide 29
System Configuration Requirement
Windows Server operating system Windows Server 2019 or Windows Server 2022
System memory 4 GB RAM, recommended 8 GB RAM
6.4.1.2 Port access
Express Transfer requires TCP port 443 to be open to the public internet to transfer data. For further
assistance, please contact your ITDepartment. Also refer to the Express Transfer Application - Required
Ports article in Community for additional DNS address information.
6.4.2 Prerequisites
To use Express Transfer, the following must be completed in this order:
1. Import/Export application must be installed in the workspace from the Application Library. Refer to
Installing Import/Export for more information.
2. Express Transfer desktop application must be installed on your computer. Refer to Installing Express
Transfer for more information.
3. Express Transfer must be activated within Import/Export. Refer to Activating Express Transfer for
more information.
6.4.3 Installing Express Transfer
To install theExpress Transfer application on your computer for use withImport/Export:
1.
Navigate to the Import/Export Job page.
2.
Click the New Import/Export Job button.
3.
Depending on the operating system used, click the Windows or MacOS button to download the
installer file.

Import/Export Guide 30
Note: For macOS systems, you need to have administrative privileges to use and install the
software, as well as to receive automatic software updates. On the Installer dialog, enter your user
name and password, then click Install Software.
4.
Navigate to the folder on your computer where the installer file was downloaded. Depending on the
operation system, double-click one of the following files to begin the installation process:
n
For Windows OS: Express Transfer Setup.exe
n
For macOS: Express Transfer Setup.pkg
5.
Click one of the options on the Select Setup Install Mode dialog:
n
Install for me only (recommended)—enables Express Transfer to be used by your account
only.
n
Install for all users—enables Express Transfer to be used by anyone who logs on to this
computer. You will need Admin credentials to select this option.
6.
Click Next.
7.
Use the default destination folder already displayed or click Browse to select a different location for
the Express Transfer application.
8.
Click Next.
9.
(Optional) On the Select Additional Tasks dialog, do any of the following:
n
Autostart Express Transfer on system startup—select this check box to automatically
launch the Express Transfer application each time your computer starts. Leave it blank if you
want to manually launch Express Transfer when you want to use it.
n
Create a desktop shortcut—select this checkbox to create a shortcut icon on your desktop
for Express Transfer. Otherwise, leave it blank.
10.
Click Next.
11.
Click Install on the Ready to Install dialog to begin the installation process.
12.
When the installation is complete, click Finish to close the installation wizard. Express Transfer is
now installed.
Note: To use Express Transfer for import and export workflows, you must activate it within
Import/Export. See Activating Express Transfer for more information.

Import/Export Guide 31
If you selected the Run Express Transfer checkbox on the finish setup dialog of the wizard, the Express
Transfer application will open and its icon will be available in the system tray. Right-click on the icon to
display an application menu with these options:
n
Connectivity check—choose this option to check if Express Transfer is successfully accessing the
Internet and the Import/Export application. See Express Transfer Connectivity check for more inform-
ation.
n
Show logs—choose this option if instructed to do so by Relativity Support to investigate or
troubleshoot an issue with Express Transfer transaction logs and text files. File explorer will open the
logs folder on your local drive (for example, C:\Users\<username>\AppData\Local\Express Trans-
fer\logs). With Express Transfer open, you can also press F8 to display the logs folder.
n
Check for Updates—choose this option if you want to manually check to see if your version is up-to-
date or if a new version of Express Transfer is available. See Manually checking for software updates
on page38 for more information.
n
Preferences—choose this option to modify the application settings. You can also view the software
version number from this dialog.

Import/Export Guide 32
n
Quit—choose this option to completely exit the Express Transfer application. The Express Transfer
icon will no longer display in the system tray. To reopen Express Transfer, double-click on its desktop
shortcut, if you saved one for it, or select it from your computer's list of programs.
6.4.4 Silent installation of Express Transfer
In some organizations, the IT department or System Administrator may be the one to install the Express
Transfer desktop application installer file behind the scenes over a network instead of having each end user
do it themselves on their individual desktop. This method is often referred to as a silent, or unattended,
installation because it requires no end user interaction with the installation wizard. The Express Transfer
end user is not aware that the installation process is occurring. Typically, this type of installation is used in
large enterprise organizations to help control the software installation process to ensure that it’s done
consistently so that all users have the same installation configuration.
When installing Express Transfer from command line tools, we support silent and verysilent mode:
n
/silent—this option displays the installation wizard as it goes through the installation process. All the
default options are automatically selected.
n
/verysilent—this option does not display the installation wizard as it goes through the installation pro-
cess. All default options are selected automatically.
Prerequisites
n
Administrator rights to run the command prompt.
n
Knowledge of how to use command line interface (CLI) tools.
n
Obtain the downloaded Express Transfer installer file for Windows OS, which is Express Transfer
Setup.exe. See Installing Express Transfer for more information on how to download the file using
the Import/Export application.
6.4.5 Locating the Express Transfer version number
The Express Transfer version number is displayed at the bottom of the In Progress and History tabs within
the application.

Import/Export Guide 33
You can also find it in the bottom left corner of the Preferences dialog by right-clicking on the Express
Transfer icon in the system tray and selecting Preferences.

Import/Export Guide 34

Import/Export Guide 35
The Express Transfer software version number is contained in the first few numbers after the "v", for
example "v2.49.0." The numbers after the hyphen are session identifiers that change each time you launch
Express Transfer after quitting the application. These numbers may be used by Customer Support if you
encounter a problem with the software. You can disregard them otherwise.
6.4.6 Automatically checking for software updates
You can configure whether or not you want the system to automatically check for new software versions of
Express Transfer each time it opens and notify you with a message box. By default, this feature is enabled
in Express Transfer Preferences. We recommend that you keep it enabled to ensure your system is running
the latest software version containing the most recent software features available. If you choose to change
this default setting, you will need to use the Check for Updates option in the Express Transfer system tray.
See Manually checking for software updates on page38 for more information.
To automatically check for software updates:
1.
Right-click on the Express Transfer icon in your system tray.
2. Click Preferences.

Import/Export Guide 36
3. By default, theCheck for Updates is toggled on. If you do not want the system to automatically
check for updates and notify you, toggle it off.
Note: We do not recommend turning this option off. If it is off, your Express Transfer version
may not contain the latest features. If it is off, you will need to regularly use the Check for
Updates option in the Express Transfer system tray to determine if your software version is
current. See Manually checking for software updates on page38 for more information.

Import/Export Guide 37
4. Click Save after updating the setting.
5. To apply any changes made to Preferences, quit the Express Transfer application by right-clicking on
the Express Transfer icon in your system tray and clicking Quit.
6. Reopen the application by double-clicking on its desktop shortcut, if you saved one for it, or select it
from your computer's list of programs.
Whenever a new version is available, you'll be notified with an Application update dialog displaying the new
version number available and release notes for it. Click Update now to download the new version's
executable file, and then follow the Installing Express Transfer on page29 steps to finish installing the
update on your system.

Import/Export Guide 38
6.4.7 Manually checking for software updates
You can check for software updates anytime by right-clicking on the Express Transfer icon in your
system tray and clicking Check for Updates. If your software version is current, a message displays letting
you know it's up-to-date.
If a new version is available, the Application update window displays the new version number available and
release notes for it. Click Update now to download the new version's executable file, and then follow the
Installing Express Transfer on page29 steps to finish installing the update.

Import/Export Guide 39
6.5 Activating and deactivating Express Transfer
You have the ability to activate and deactivate Express Transfer for use with Import/Export; however, the
recommended method for transferring data is with Express Transfer activated.
6.5.1 Prerequisites
To use Express Transfer, the following must be installed in this order:
1. Import/Export application must be installed first in the workspace from the Application Library. Refer
to Installing Import/Export for more information.
2. Express Transfer desktop application must be installed on your computer. Refer to Installing Express
Transfer for more information.
6.5.2 Considerations when to use and not use Express Transfer with Import/Ex-
port
We recommend using Import/Export with Express Transfer activated whenever possible for all importing
and exporting workflows, and particularly when:
n
data file size is greater than 20 GB (although Express Transfer can be used for any size data trans-
fer).
n
processing multiple import jobs. The jobs will be queued and executed when the previous job is com-
plete.
n
slow or unstable network connection. Express Transfers enables you to retry the upload.
Use Import/Export without activating Express Transfer when:
n
your company policy prohibits installing desktop applications.
n
your network configuration does not allow third party applications to send or receive data, such as
proxy settings.
n
data file size is less than 20 GB.
n
data is in ZIP files.
Note: You need to use Express Transfer to upload and process encrypted materials, such as password-
protected zip files or Case files (L01/N01) that require Password Bank functionality. If you cannot use
Express Transfer for such imports, zip your encrypted materials in a single unencrypted ZIP container
(the 20 GB limit for the zip file size applies). Import/Export will transfer and extract the top-level zip file,
preparing your encrypted materials for Processing. Then, Processing will utilize Password Bank to
decrypt materials.
6.5.3 Activating Express Transfer
To use Import/Export withExpress Transfer, you need to activate Express Transfer. Once activated, it will
remain active until your Relativity session ends or until you deactivate it.
To activate Express Transfer for use with Import/Export:

Import/Export Guide 40
1.
Navigate to the Import/Export Job page.
2.
Click the New Import/Export Job button to start a new job.
3.
Click Activate on the Choose workflow dialog to activate Express Transfer.
4. If a browser message box appears asking to allow the site to open Express Transfer, click Open Link
to proceed with activating Express Transfer. If you do not, then Express Transfer will not be activated.
Note: To always allow your system to open the link to Express Transfer, select the "Always
allow" checkbox, and the message box will not display anymore.
Note: If the activation process fails, click the Complete activation button on the message
that displays to initiate the activation process. Refer to Express Transfer Connectivity check
on page55 for more information on connection status information.
5. When the activation process successfully completes, the Express Transfer application displays.
6. Return to the Import/Export application. The Express Transfer status will change to Active on the
Choose Workflow dialog.

Import/Export Guide 41
Note: The Express Transfer application will remain active until you click the Deactivate
button or log out of RelativityOne. You do not need to keep reactivating it to use it. However,
if you deactivate it or log out of RelativityOne, you will need to reactivate Express Transfer to
use it again with Import/Export.
6.5.4 Deactivating Express Transfer
If you do not want to use an active session of Express Transfer with Import/Export, you can click the
Deactivate button on the Choose Workflow dialog.
In order to use Express Transfer again with Import/Export, you will need to reactivate it.
6.5.5 Data transfer performance considerations
There are many variables that can degrade or improve the performance of data transfers for desktop
applications, such as Express Transfer. Transfer rates when using desktop applications are influenced by
several variables and results may vary based on factors such as RAM, CPU, local drive specifications,
network drive specifications, and available bandwidth at the time of the transfer.
Review the list of performance considerations below before beginning to use Express Transfer.
If you experience issues despite following the information below, please contact Support for assistance. For
additional information, refer to the Community article Performance considerations for data transfers.
n
Run on local machine: Express Transfer has been designed and tested as a desktop application
being run on a user’s local machine.
n
Read access: Ensure that Express Transfer has read access to all files/folders (remove system / hid-
den attributes).
n
Port 443: Ensure that port 443 is open to the public internet and is not blocked or traffic is restricted to
it. See the Community article Performance considerations for data transfers for more information.
n
Internet connection: Use a strong and stable internet connection for data transmission. Wi-Fi is not
recommended.

Import/Export Guide 42
n
Internet speed: Transfer speeds are dependent on your internet speeds. Check your internet con-
nection using Speedtest or any other bandwidth testing website. Make note of the upload speed in
megabits per second. Also refer to Express Transfer Limit bandwidth setting if needed.
n
Local storage speed: Transfers from network drives or external disks (such as thumb drives/USB
drives) will degrade performance and/or cause issues maintaining a connection. It is most effective to
copy data to and from a fast local storage.
n
Local machine specs: Ensure your local machine and browser adheres to the Express Transfer min-
imum system requirements and is operating the latest version of the software.
n
Level of data fragmentation: Due to bandwidth sharing, avoid performing large and fragmented
transfers in parallel. The more fragmented the dataset, the lower the transfer performance.
n
Concurrent transfers: Number of concurrent transfers that are happening at the same time within
the network by various tools, services, and users.
n
Concurrent utilization: Level of concurrent utilization of the user's computer resources (CPU, RAM,
I/Os) by other processes on that computer.
n
Compressed datasets: Avoid compressing datasets (with ZIP, 7z, etc.). The faster transfer time due
to fewer multi-part files is negated by the time and effort to compress and decompress data.
However, compressing datasets without decompressing in the destination folder (staging directory)
can be considered when all the following are true:
o
Dataset consist of fragmented data
o
Destination folder is a Processing source location
o
The dataset uploaded is going to be processed by Relativity Processing
n
VPN usage: Using a VPN can potentially slow down internet traffic. When workstations use a VPN
session, it can interfere with transfers from that workstation. RelativityOne is hosted in a public cloud
and does not require VPN to use. See the Community article Performance considerations for data
transfers for more information.
n
Traffic monitoring and data protection software: These types of software tools influence data
transfer. See the Community article Performance considerations for data transfers for more inform-
ation on each of these:
n
Firewall: Firewall configuration may require special tuning to use the Express Transfer.
n
Antivirus software: Antivirus software may disrupt the transfer protocol in Express
Transfer.
n
Anti-malware software: An exception should be created for Express Transfer in Win-
dows Defender or in other anti-malware software installed on the user's machine.

Import/Export Guide 43
6.6 Express Transfer system tray menu
Once the Express Transfer application is installed, its icon will be available in the system tray. Right-
click on the icon to display an application menu with these options:
n
Connectivity check—click this option to check if Express Transfer is successfully accessing the
Internet and the Import/Export application. See Express Transfer Connectivity check for more inform-
ation.
n
Show logs—click this option if instructed to do so by Relativity Support to investigate or troubleshoot
an issue with Express Transfer transaction logs and text files. File explorer will open the logs folder on
your local drive (for example, C:\Users\<username>\AppData\Local\Express Transfer\logs). With
Express Transfer open, you can also press the F8 key on your keyboard to display the logs folder.
n
Check for Updates—click this option if you want to manually check to see if your version is up-to-
date or if a new version of Express Transfer is available. See Manually checking for software updates
on page38 for more information. If you do not have Express Transfer Preferences set to auto-
matically check for updates, you will need to use this option frequently to ensure your version of
Express Transfer is the most current one available. We recommend keeping the Check for updates
option in Express Transfer Preferences toggled on. See Installing and updating Express Transfer
desktop application on page28 for more information.
n
Preferences—click this option to modify the application settings. You can also view the software ver-
sion number from this dialog. See Express Transfer Preferences on the next page for more inform-
ation.
n
Quit—choose this option to completely exit the Express Transfer application. The Express Transfer
icon will no longer display in the system tray. To reopen Express Transfer, double-click on its desktop
shortcut, if you saved one for it, or select it from your computer's list of programs.

Import/Export Guide 44
6.7 Express Transfer Preferences
Use Express Transfer Preferences to modify the Check for Updates setting, to limit bandwidth, to exclude
temporary Microsoft Office files from data import, and to configure proxy settings.
6.7.1 Automatically checking for software updates
You can configure whether or not you want the system to automatically check for new software versions of
Express Transfer each time it opens and notify you with a message box. By default, this feature is enabled
in Express Transfer Preferences. We recommend that you keep it enabled to ensure your system is running
the latest software version containing the most recent software features available. If you choose to change
this default setting, you will need to use the Check for Updates option in the Express Transfer system tray.
See Manually checking for software updates on page38 for more information.
To automatically check for software updates:
1.
Right-click on the Express Transfer icon in your system tray.
2. Click Preferences.

Import/Export Guide 45
3. By default, theCheck for Updates is toggled on. If you do not want the system to automatically
check for updates and notify you, toggle it off.
Note: We do not recommend turning this option off. If it is off, your Express Transfer version
may not contain the latest features. If it is off, you will need to regularly use the Check for
Updates option in the Express Transfer system tray to determine if your software version is
current. See Manually checking for software updates on page38 for more information.

Import/Export Guide 46
4. Click Save after updating the setting.
5. To apply any changes made to Preferences, quit the Express Transfer application by right-clicking on
the Express Transfer icon in your system tray and clicking Quit.
6. Reopen the application by double-clicking on its desktop shortcut, if you saved one for it, or select it
from your computer's list of programs.
Whenever a new version is available, you'll be notified with an Application update dialog displaying the new
version number available and release notes for it. Click Update now to download the new version's
executable file, and then follow the Express Transfer Preferences on page44 steps to finish installing the
update on your system.

Import/Export Guide 47
6.7.2 Limit bandwidth
Some organizations may have slow internet speeds and experience issues with transfer job stability
causing jobs to fail due to connection timeouts. In this situation, the organization may want to limit
bandwidth so that it's shared with Import/Export transfers and other business activities. This may help
improve the efficiency and stability of job transfers. Limiting bandwidth can be configured in Express
Transfer by turning on the Limit bandwidth option in Preferences. When this option is on, Express Transfer
job transfers will be slower, but more stable.
To configure Limit bandwidth:
1.
Right-click on the Express Transfer icon in your system tray.
2. Click Preferences.

Import/Export Guide 48
3. The Limit bandwidth option is off by default. If you wish to turn the option on, click the toggle.
4. Click Save after updating the setting.
5. To apply any changes made to Preferences, quit the Express Transfer application by right-clicking on
the Express Transfer icon in your system tray and clicking Quit.

Import/Export Guide 49
6. Reopen the application by double-clicking on its desktop shortcut, if you saved one for it, or select it
from your computer's list of programs.
6.7.3 Exclude temporary Microsoft Office files from data import
Whenever you open a Microsoft Office file, a temporary file is created which contains a ~ (tilde) sign at the
beginning of the file name. When you’re importing unprocessed data for Processing and selecting the data
source on the Create Processing Job dialog, these temporary files will display in the file list and will also be
included in the data import process. To prevent these temporary files from being included in the import
process, the Exclude temporary file(s) option defaults to the On position in Express Transfer Preferences.
If you wish to change that setting and include those temporary files, refer to the steps below.
To include temporary Microsoft Office files in import jobs:

Import/Export Guide 50
1.
Right-click on the Express Transfer icon in your system tray.
2. Click Preferences.

Import/Export Guide 51
3. The Exclude temporary file(s) option is on by default. If you wish to turn the option off, click the
toggle.
4. Click Save after updating the setting.
5. To apply any changes made to Preferences, quit the Express Transfer application by right-clicking on
the Express Transfer icon in your system tray and clicking Quit.

Import/Export Guide 52
6. Reopen the application by double-clicking on its desktop shortcut, if you saved one for it, or select it
from your computer's list of programs.
6.7.4 Configuring proxy settings
If your organization or IT department requires using Express Transfer with a proxy server, follow the steps
below to set up the necessary credentials. Contact your IT Department for the required information
Note: The port number used in the steps below will be different from Port 443, which is still required to be
open to the public Internet regardless of this proxy configuration. See Port access on page29 for more
information.
To configure proxy settings:
1.
Right-click on the Express Transfer icon in your system tray.

Import/Export Guide 53
2. Click Preferences.

Import/Export Guide 54
3. The Proxy settings option is off by default. If you wish to turn the option on, click the toggle, and then
enter the necessary information for the following fields. Contact your IT Department for the correct
information:
n
Proxy address (required)
n
Port (required)
n
Username
n
Password

Import/Export Guide 55
4. Click Save after updating the setting.
5. To apply any changes made to Preferences, quit the Express Transfer application by right-clicking on
the Express Transfer icon in your system tray and clicking Quit.
6. Reopen the application by double-clicking on its desktop shortcut, if you saved one for it, or select it
from your computer's list of programs.
7. Perform a Connectivity Check to make sure Express Transfer is connected to the Internet. If not, then
the proxy settings are incorrect and will need changed.
6.8 Express Transfer Connectivity check
Connectivity check ensures that the Express Transfer desktop application authenticates and successfully
accesses the Internet, the necessary ports, and the Import/Export application to transfer data. This check
executes automatically when you activate Express Transfer from the Import/Export application within
RelativityOne. You can also manually perform a connectivity check anytime, even when there are active
transfers.
The following checks occur during the connectivity check process:
Connectivity
Check
Description
Internet con-
nection
This step confirms your system is connected to the internet. If this step fails, there is
either no internet connection available or the proxy or firewall is blocking the connection
for Express Transfer. Please contact your IT department for help.
Access to
Express Trans-
fer gateway
This step confirms Express Transfer successfully set up all ports needed to connect to
your specific region. If this step fails, please contact your IT department for help.
Connection with
Express Trans-
This step confirms Express Transfer successfully connected to the infrastructure
specific to your RelativityOne region. If this step fails, please contact your IT department

Import/Export Guide 56
Connectivity
Check
Description
fer infra-
structure
so they can verify the correct port configuration. For more information, refer to the
Express Transfer Application - Required Ports article in Community.
Activation
status
This step confirms Express Transfer is active. If it fails, see Activating and deactivating
Express Transfer for more information on reactivating it.
Connection with
Import/Export
This step confirms Express Transfer is communicating with Import/Export in Relativ-
ityOne.
Note: If you perform a connectivity check before activating Express Transfer in Import/Export, only the
Internet connection is checked and the others display the no connectivity icon. Express Transfer must
be active to perform the full connectivity check.
To manually run a connectivity check, use any of these methods:
n
From the System tray: Right-click on the icon in the desktop system tray and choose Connectivity
check from the pop-up menu.
n
From within Express Transfer: Click the circled check mark icon at the bottom of the Express
Transfer application.

Import/Export Guide 57
The test results display after each process completes. The word "Successful" displays when all connections
are working properly. If any of the system checks fail, Express Transfer will not work.
Click the Check again button to refresh the connection in the event you lose connectivity.
Note: If the "Activation status" test fails, the Activate button will display next to an inactive Check again
button. Click the Activate button to try to activate Express Transfer again.
Icon legend:

Import/Export Guide 58
icon indicates the connectivity test was successful.
icon indicates the connectivity test failed.
icon indicates the connectivity test is in progress.
icon indicates the connectivity test was not performed on this item. (Tip: If this displays,
double check to be sure Express Transfer is active in Import/Export.)
6.8.1 Network Throughput Check
If there are issues with your network speeds and connectivity, a notice displays next to the Connectivity
check icon to notify you that the network connection is poor and this may cause slow transfer speeds. Check
your internet connection or consult your ITdepartment for further assistance.
6.9 Express Transfer Job tracking and history
You can track the progress and history of jobs that were started with Express Transfer without logging into
RelativityOne.
To do so, open Express Transfer by double-clicking the shortcut on your desktop.
Note: Once the job is running using Express Transfer, you can close the Import/Export application, if
desired, and the transfer job will continue and not be affected. You can monitor the job using the steps
below. You do not have to be logged into RelativityOne to view information within the Express Transfer
application.
6.9.0.1 Prerequisites
To use Express Transfer, the following must be completed in this order:
1. Import/Export application must be installed in the workspace from the Application Library. Refer to
Installing Import/Export for more information.
2. Express Transfer desktop application must be installed on your computer. Refer to Installing Express
Transfer for more information.
3. Express Transfer must be activated within Import/Export. Refer to Activating Express Transfer for
more information.
6.9.0.2 In Progress Tab
The In Progress tab displays ongoing transfer information. With Express Transfer, on a single client
machine you can have one import (upload) job at a time and up to five concurrent export (download) jobs at
a time. For uploads, the jobs will be queued on the client machine.

Import/Export Guide 59
n
Job Name—displays the name of the job. Click the job name to view more information about the job
on the Job Details window. Or, click the Actions button next to the transfer line, then click View
details. See Viewing and copying details of Express Transfer jobs.
n
Transfer progress bar—displays the percentage of transfer completion.
n
Starting—this status indicates the job is beginning to transfer data.
n
In Queue—this status indicates the job is waiting until the first job is complete.
n
Cancel a job—to cancel a job that's in progress, click the Actions button next to the transfer line and
then click Cancel.
n
If no transfers were triggered, the tab displays a message that there are no jobs at the moment and
directs you to RelativityOne to start a new job.
To check more details about the job, visit the Import/Export Job page in RelativityOne. Refer
to"Import/Export Job tracking and history" for more information.
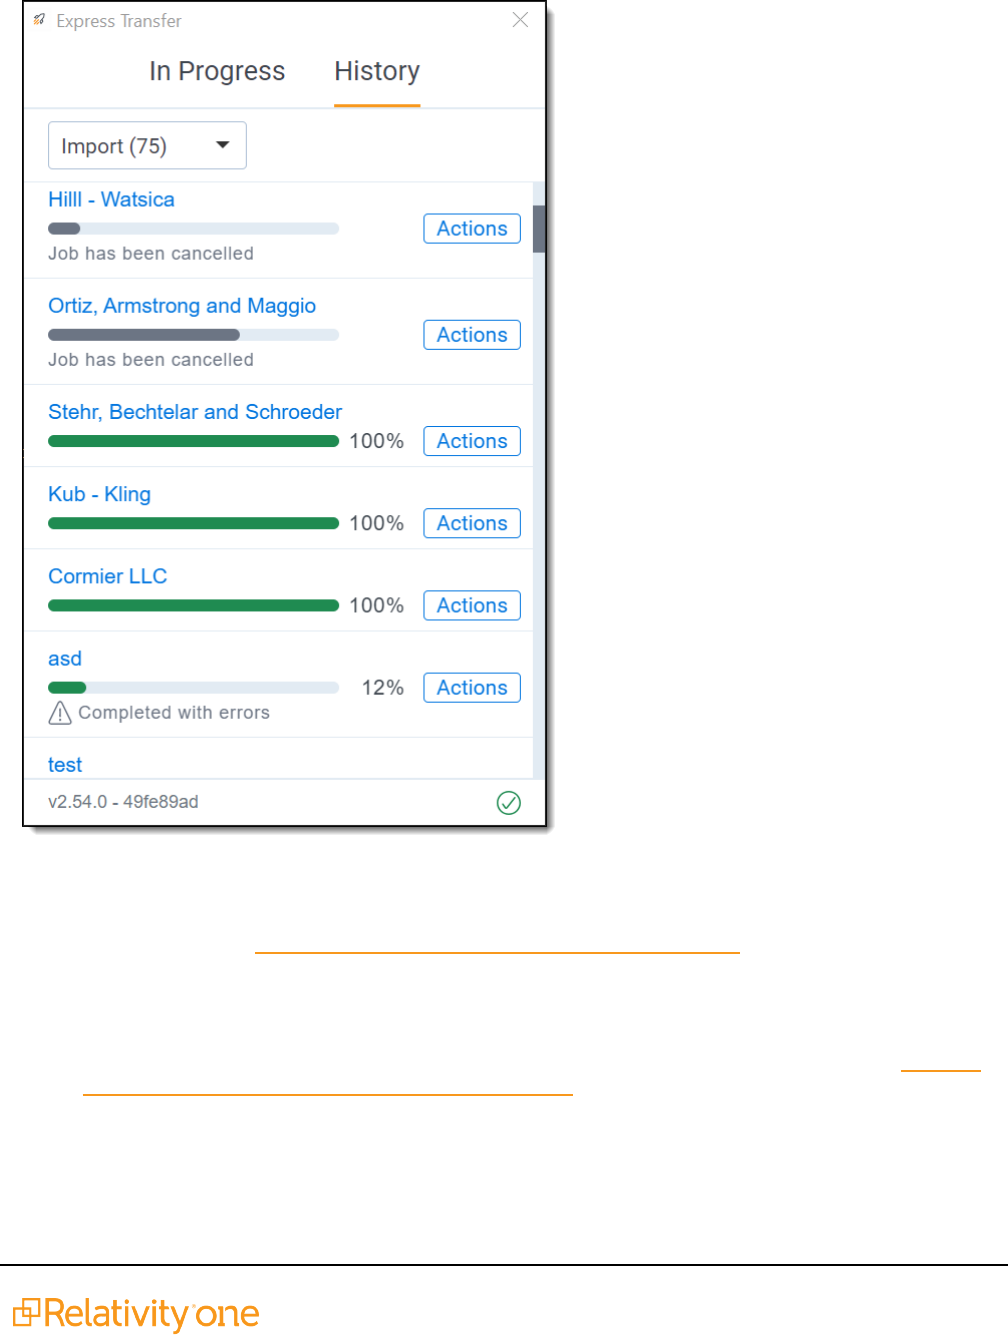
Import/Export Guide 60
6.9.0.3 History tab
The History tab displays information about the status of previous transfer jobs that were executed.
n
Finished—a full green bar and 100% indicates that the transfer successfully finished. To view details
about the job, click the job name link or click the Actions button next to the transfer line and then click
View details. See Viewing and copying details of Express Transfer jobs.
n
Job Failed (with red exclamation mark icon)—displays in red and indicates that the transfer has
failed and the number of items that failed. The reason for the failure is displayed next to the icon. You
can perform a manual retry for a failed transfer by clicking the Actions button next to the transfer line
and then clicking Retry failed files. Jobs older than seven days cannot be restarted. See Express
Transfer reporting jobs failed or completed with errors for more information. To view job details, click
the Actions button next to the transfer line and then click View details.
n
Completed with Errors (with warning symbol icon)—indicates that the transfer has completed
but encountered errors. The number of skipped files is displayed. You can skip failed files by clicking

Import/Export Guide 61
the Actions button next to the transfer line and then clicking Skip failed files. See Express Transfer
reporting jobs failed or completed with errors for more information. To view job details, click the
Actions button next to the transfer line and then click View details.
n
Cancelled—indicates that the transfer has been cancelled from within RelativityOne Import/Export or
from within the Express Transfer desktop application. To view more information about the job, click
the Actions button next to the transfer line and then click View details.
To check the full history, visit the Import/Export Job page in RelativityOne. Refer to"Import/Export Job
tracking and history" for more information.
6.9.0.4 Filtering Express Transfer jobs
To filter your jobs based on the type of transfer (Import or Export) on the In Progress or History tabs, click the
drop-down arrow and select Import or Export. By default, all transfer types are displayed.
6.9.0.5 Viewing and copying details of Express Transfer jobs
To obtain information about a particular Express Transfer job, click the Actions button next to the transfer
line and then click View details.

Import/Export Guide 62
The Job details window displays the transfer information. Click the copy button if you need to copy
and paste the information to the clipboard to use it elsewhere.

Import/Export Guide 63
6.10 Express Transfer reporting jobs failed or completed with
errors
When using ExpressTransfer with Import/Export, if a job fails to finish or completes with errors, you can
generate a report from Express Transfer Job Details that includes information such as the time stamp, file
status, file name, error message, and file path. You also have a few options on how to handle the failed or
errored jobs, such as retrying or skipping failed files. For more information about job tracking and history,
see Express Transfer Job tracking and history on page58.
Note: Available for Express Transfer version 2.21.1 and above. See Locating the Express Transfer
version number on page32 if needed.
1. From the Express Transfer application, click the History tab.
2. Click the Actions button corresponding with the job that failed or completed with warnings and do
any of the following:

Import/Export Guide 64
n
View details—click to view job information in another window.
n
Show report—click to view the saved Excel file (.csv) with the failed jobs or those com-
pleted with errors. This link will open File Explorer on your local drive to the Reports
folder (such as C:\Users\<username>\AppData\Local\Express Transfer\Reports). You
cannot generate a report for jobs that were run prior to upgrading to version 2.21.1.
n
Retry failed files—click to rerun the failed files. Jobs older than seven days cannot be
rerun.
n
Skip failed files—click to continue running the job excluding the failed files. The job
status will be “Completed with errors.” The successful documents will be uploaded and
available. You can view information about the failed files by clicking Show report to
decide how you want to proceed with them. This option is recommended if you attemp-
ted to retry the failed files and the job still fails. Once Skip failed files is executed, the
Retry failed files option is no longer available.

Import/Export Guide 65

Import/Export Guide 66
7 Importing data using Import/Export
Note: Starting September 1, 2024, we’re streamlining our Staging boundaries to more effectively
separate staging data from workspace and system data. With this change, you will no longer be able to
write to or access data outside of the defined staging area. Folders that will remain within the
Staging area: ARM, ProcessingSource, StructuredData, and TenantVM. Folders that will be removed:
FTA, Temp, Export, and dtSearch, in addition to any other folders that you manually created. Refer to the
Staging Area FAQ in Community for more details.
You can use Import/Export to import unprocessed raw native files, document load files, image load files,
production load files, and Relativity Dynamic Objects. Refer to Import/Export load file specifications and
Data upload size limitation on page8 for more information regarding load files. Also see General
recommendations for structured data import and export jobs on page24.
Note: After documents are imported using Import/Export, you can automate creating a dtSearch index or
run a search terms report with those documents using Automated Workflows. To learn more, visit
Automated Workflows.
n
Document load file import—use this workflow to import load files containing document metadata, nat-
ive files, or extracted text into Relativity.
n
Image load file import—use this workflow to import load files containing images into Relativity.
n
Production load file import—use this workflow to import load files containing productions into Relativ-
ity.
n
Relativity Dynamic Object load file import—use this workflow to import dynamic object (RDO) data
into Relativity.
n
Unstructured data workflow with Processing—use this workflow to import raw (unprocessed) native
files that require processing in Relativity.
7.1 Importing data using Import/Export
Note: Starting September 1, 2024, we’re streamlining our Staging boundaries to more effectively
separate staging data from workspace and system data. With this change, you will no longer be able to
write to or access data outside of the defined staging area. Folders that will remain within the
Staging area: ARM, ProcessingSource, StructuredData, and TenantVM. Folders that will be removed:
FTA, Temp, Export, and dtSearch, in addition to any other folders that you manually created. Refer to the
Staging Area FAQ in Community for more details.
You can use Import/Export to import unprocessed raw native files, document load files, image load files,
production load files, and Relativity Dynamic Objects. Refer to Import/Export load file specifications and
Data upload size limitation on page8 for more information regarding load files. Also see General
recommendations for structured data import and export jobs on page24.
Note: After documents are imported using Import/Export, you can automate creating a dtSearch index or
run a search terms report with those documents using Automated Workflows. To learn more, visit
Automated Workflows.

Import/Export Guide 67
n
Document load file import—use this workflow to import load files containing document metadata, nat-
ive files, or extracted text into Relativity.
n
Image load file import—use this workflow to import load files containing images into Relativity.
n
Production load file import—use this workflow to import load files containing productions into Relativ-
ity.
n
Relativity Dynamic Object load file import—use this workflow to import dynamic object (RDO) data
into Relativity.
n
Unstructured data workflow with Processing—use this workflow to import raw (unprocessed) native
files that require processing in Relativity.
7.2 Importing a document load file
Note: Starting September 1, 2024, we’re streamlining our Staging boundaries to more effectively
separate staging data from workspace and system data. With this change, you will no longer be able to
write to or access data outside of the defined staging area. Folders that will remain within the
Staging area: ARM, ProcessingSource, StructuredData, and TenantVM. Folders that will be removed:
FTA, Temp, Export, and dtSearch, in addition to any other folders that you manually created. Refer to the
Staging Area FAQ in Community for more details.
You can use Import/Export to import document load files (.dat, .csv, and .txt) into RelativityOne that contain
document metadata, native files, or extracted text. You're also able to use saved job profiles to expedite the
configuration process.
If you want to use Import/Export with Express Transfer active, which is the recommended workflow for data
transfer, refer to Express Transfer overview on page27 for more information.
Refer to Import/Export load file specifications and Data upload size limitation on page8 for more information
regarding load files. Also see General recommendations for structured data import and export jobs on
page24.
To import a document load file:
1. Use tabs, search, or the quick nav bar to navigate to the Import/Export Job page.
2. On the Import/Export Job page, click the New Import/Export Job button to start a new job.
3. On the Choose Workflow dialog, the Import button is selected by default. Next, click the Structured
(Processed) Data workflow box to import a document load file to your workspace.

Import/Export Guide 68
Note: If Express Transfer has been activated, the Express Transfer section will display a
status of Active. See Activating and deactivating Express Transfer on page39 for more
information.
4. On the Choose the Load File type dialog, click the Document box to import a document load file to
your workspace.
5. If Express Transfer is not Active, skip this step. If it is Active, click Select on the Select data to Import
dialog to browse to your local drive and select the folder with the files that you want to upload. In the
case of universal naming convention (UNC) paths (for example, \\Server-
Name\SharedResourceName\FilePath), you can copy and paste the path into the Select Folder
address bar in the dialog box to access the desired folder.
Notes:
n
You can choose only one folder with a load file to transfer.
n
File names must be 200 characters or less, including the extension.
n
We recommend using a local drive instead of a mapped or external drive to avoid potential
slowness and connection issues with the file import process. Also see Data transfer per-
formance considerations on page41.
n
When Express Transfer is active, you should not zip data for importing.
n
When Express Transfer is active, it uploads only files linked in the selected load file, regard-
less of their location.
n
When Express Transfer is active, it ignores mismatches in upper and lower case between file
paths in the load file and the actual file names.
n
When Express Transfer is active, it supports load files with relative paths, absolute paths, and
UNC paths. It is possible to mix different path types in a single load file.

Import/Export Guide 69
6. On the Choose Load File and Location dialog, complete the following fields, then click Continue.
Refer to Import/Export load file specifications for more information regarding load files.
n
Job Name—provide a descriptive job name so that you can quickly identify and track
that job on the Import/Export Job Page. The Job name field accepts up to 50 characters.
n
Destination folder—click the Select button, and do one of the following:
o
Choose an existing folder.
o
Create a new workspace folder by right-clicking on an existing folder, click
Create, enter a new folder name, click out of the new folder to save it, then click
Select.
n
Profile—are job configuration settings that were previously saved to a profile file (.ie or
.kw*) so they can be reused when creating future jobs with the same or similar settings
in RelativityOne, which saves time and effort as well as helps prevent data entry errors
when you're mapping fields, for example. Profiles with the ".ie" extension can only be
used in Import/Export.
o
None—select this option if you do not desire to use a profile for this import or if
you intend to create a new profile based on the settings entered in the upcoming
steps.You will be able to save the profile settings later to an .ie file via the Down-
load Profile (.ie) button.
o
From Local Disk Profiles—use this option to select a previously saved
Import/Export profile (.ie file) or an existing .kw* profile (created via the former
Relativity Desktop Client application) to reuse the job settings for this workflow.
Use the drag and drop feature or browse for a file to choose it. All job settings
provided within the selected profile file will be automatically entered where applic-
able in the succeeding workflow dialogs.

Import/Export Guide 70
n
Regional Settings (Date and Time)—select the desired format for imported date and
time data. A preview of the chosen format will appear below the selection. The setting
selected will remain for all future jobs until you choose another one from the list or until
you clear your browser cache. When browser cache is cleared, the setting will revert to
the US date and time by default.
n
Load File—use the drag and drop feature or click browse for a file to select the doc-
ument load file from your local drive.
n
Include Native & Text—select this option to include native and text files.
Note: The Include Native & Text option is not available for image or production
import workflows as there are no native files included in OPT files.
n
Native & Text—if Include Native &Text was selected, use the drag and drop feature or
click browse for a file to select the zipped native and text file from your local drive. See
ZIP archive with extracted text and natives on page20
n
(Optional) Notification Addresses—enable email notifications by providing the email
addresses of those who should get notified once the job completed, failed, or canceled.
7. On the Load File Settings dialog, select the delimiters and encoding values of the document load file
for the import, then click Continue. The File Column Headers Preview pane will help you to choose
the proper settings.
n
File Encoding—select an encoding format for the document load file. Consult your pro-
cessing vendor or department to determine the correct encoding option, if necessary.
The File Column Headers Preview pane automatically updates when you select the File
Encoding type. Since the load file is parsed based on the delimiter set, you may need to
check delimiters used in the load file if the column headers are not lined up correctly.
Determine the delimiters used in the file, and then select them in the delimiters section
of this dialog.
n
First Line Contains Column Names toggle—select this option if the first line contains
column names. Select the delimiters and encoding values used by your load file as
needed:
o
Column—select the character used to separate columns.
o
Quote—select the character used as the text qualifier.
o
Newline (Long Text Fields)—select the character used to indicate the end of a
line in any extracted text or long text field.

Import/Export Guide 71
o
Multi-Value—select the character used to separate choices within a field.
o
Nested Value—select the character used to separate the different levels of a
multi-choice hierarchy.
8. On the Fields Mapping dialog, select the load file fields to import and map them to the workspace
fields, then click Continue.
To automatically map fields, click Auto Map Fields, and the fields from the load file will be
mapped to any existing fields of the exact same name in the workspace. Any fields without a
match will display "Choose..." in the Workspace Fields column and you will need to select one
from the drop-down list. To search for a field in the list, begin typing the desired field name and
matching search results display for selection.
Consider the following when auto-mapping fields:
n
Case is not taken into account for the mapping. For example, a field named "email" in
the load file would map to a field named "Email" in the workspace.
n
Spacing is taken into account. For example, in a two-word field name, if there is one
space between words in the workspace field, and two spaces between words in the load
file field, the fields will not be mapped.
n
Characters are mapped only to themselves. For example, an underscore is only
mapped to another underscore, not to a space.
Only fields matched or those with additional settings selected are loaded into the workspace.
Other fields in the Load File Fields and Workspace Fields are ignored. You must always match
the identifier field for the load file.
Other options and fields on this dialog:

Import/Export Guide 72
n
Auto Map Fields button—click this button to automatically map fields. The fields from
the load file are mapped to any existing fields of the same name in the workspace.
n
Mapped to the top toggle—when toggled on, this option groups all mapped fields on
the top of the listing.
n
Create Field button—click this button if you want to create a new workspace field.
n
Export to CSV—click this button to save the field mapping configuration to a .csv file on
your local drive. Be aware that this option can cannot be accessed after the job has run
and can only be selected prior to executing the job.
n
Load File Sample column—presents read-only example data from the load file fields.
n
Load File Fields column—displays the field names from the load file. Use the Filter box
to search for field names.
n
Workspace Fields column—allows you to manually map the load file fields to the exist-
ing workspace fields. Use the Filter box to search for field names.
n
Additional Field Settings column—to enable additional field settings, click the
Choose down arrow in this column to select the additional field as follows:
n
Text File—select this option if the mapped Long Text field contains a rel-
ative path, absolute path, or UNC path to a text file, and then select the File
Encoding type for the file. If using absolute or UNC paths, Express Trans-
fer must be activated prior to starting the import job.
Note: This field was renamed from Extracted Text since it now
applies to any Long Text field.
n
Folder Information Column—select this option if you want to use a
metadata field to build the folder structure for the workspace.
n
Native File—select this option if the field from your load file contains a rel-
ative path, absolute path, or UNC path to the native files. If using absolute
or UNC paths, Express Transfer must be activated prior to starting the
import job.
9. On the Import Settings dialog, configure your import job by selecting from which line number you want
the load file to begin importing and how you want the records to be imported.
n
Start Line—select the line number in the load file where you want the import process to begin.
The default value is set to 0, which results in loading the entire load file.

Import/Export Guide 73
n
Import mode—Choose an import mode.
o
Append Only—loads only new records.
o
Overlay Only—updates existing records only. If selected, then you must include an
Overlay Identifier in an overlay load. This field acts as a link indicating to RelativityOne
where to import the data.
o
Append/Overlay—adds new records and overlays data on existing records.
Note: For Append/Overlay and Overlay Only, if a blank metadata field exists in the
load file (.dat, .csv), the blank value will overlay (remove) any existing value that may
reside in the corresponding mapped field.
n
Multi-Select Field Overly Behavior—this field displays if you selected Overlay Only or
Append/Overlay as the Import Mode and have mapped at least one Multiple Choice or Multiple
Object field. Choose one of the following options:
o
Use Field Settings—merges or replaces all values for multi-choice and multi-object
fields in the load file with corresponding multi-choice and multi-option fields in the work-
space. The fields are merged according to the overlay behavior settings in the envir-
onment.
o
Merge Values—merges all values for multi-choice and multi-object fields in the load file
with corresponding multi-choice and multi-option fields in the workspace. The fields are
merged regardless of the overlay behavior settings in the environment.
o
Replace Values—replaces all values for multi-choice and multi-object fields in the load
file with corresponding multi-choice and multi-option fields in the works pace. The fields
are merged regardless of the overlay behavior settings in the environment.
10.
(Optional) Click Download Profile (.ie) on the Import Settings dialog to download the job
configuration settings entered thus far to an .ie file on your computer so that they can be reused for
other jobs.
11.
(Optional) Click Precheck Load File on the Import Settings dialog to run a validation process on the
load file to check for errors prior to importing it. All detected errors are displayed in the Precheck
window. Click the down arrow next to any error message to view its details. If you want to correct the
errors in the source file(s) and repeat the importing steps, click Cancel to discontinue importing the
file at this time. Otherwise, go to the next step to import the load file with errors and correct them later.
The following validations are performed during precheck:
n
Date format
n
Field type
n
Field length
n
Number of load file cells
n
Number of folders and choice fields
n
File paths for natives and extracted text (checks 1,000 random lines across the whole load file)

Import/Export Guide 74
Note: The Precheck Load File summary dialog displays a maximum of 1,000 errors for each error
category. For example, if an error category has 2,000 errors, only the first 1,000 will display in the
drop-down list.
12. Click the Import button to start the importing process.
13. Review the importing progress on the Overview tab on the Importing dialog. Real-time details regard-
ing the number of transferred files and data size being processed displays during the Uploading and
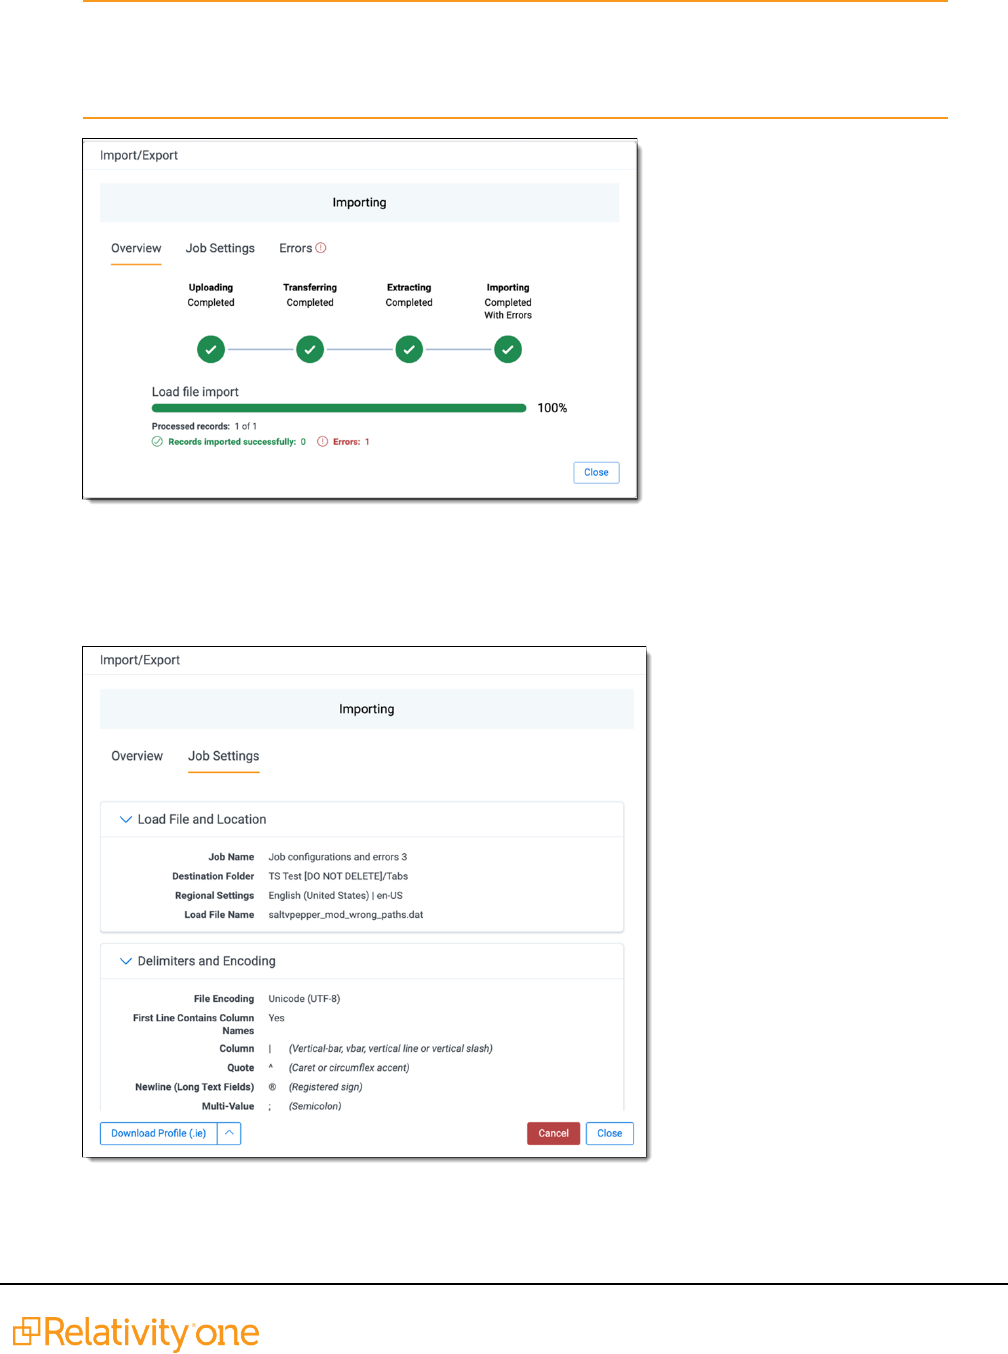
Import/Export Guide 75
Extracting steps. If needed, click Cancel to stop the import job before it completes. Otherwise, click
Close when the importing process is complete.
Caution: If you used Import/Export in web only mode (meaning Express Transfer was not
active), do not close the Importing dialog until after the Uploading step has successfully
completed. Closing the dialog prior to the Uploading step completing will terminate the data
transfer (upload) process.
14. Go to the Job Settings tab on the Importing dialog to review the job configuration settings. If desired,
click Download Profile (.ie) to download the job configuration settings entered thus far to an .ie file
on your computer so that they can be reused for other jobs.

Import/Export Guide 76
15. If no errors were found in the load file, go to the next step. If errors were found, click the Errors tab on
the Importing dialog to view them, then do either of the following:
Note: Only records that imported without errors will appear in the workspace.
n
To proceed without correcting the errors, click Close.
n
To manually correct them now, click the Download Error Load File button. Review the
errors and correct them as needed. When done, upload the file with the corrected data
by clicking the Select button on the Importing screen next to New Load File and nav-
igating to the load file on your local drive to select it. Once selected, click Import to
import the job with corrected data.
16. Click Finish to close the dialog.
You can review the Import/Export Job page to see more information about the job. Refer to Import/Export
Job tracking and history for details.
For more information on where Import/Export saves files, see the Community article, Import/Export: Where
Files Are Saved By The Import/Export Application.
Note: If you ran the job with Express Transfer active, you are able to close the Import/Export application
while the job is running, if desired, and the transfer job will continue and not be affected. You can monitor
the progress and history of jobs within Express Transfer (see "Express Transfer Job tracking and
history"). You do not have to be logged into RelativityOne to view information within the Express Transfer
application.

Import/Export Guide 77
7.3 Importing an image load file
Note: Starting September 1, 2024, we’re streamlining our Staging boundaries to more effectively
separate staging data from workspace and system data. With this change, you will no longer be able to
write to or access data outside of the defined staging area. Folders that will remain within the
Staging area: ARM, ProcessingSource, StructuredData, and TenantVM. Folders that will be removed:
FTA, Temp, Export, and dtSearch, in addition to any other folders that you manually created. Refer to the
Staging Area FAQ in Community for more details.
You can use Import/Export to import image and PDFload files that are Opticon-formatted (.opt) page-level
files. When you import images, they are added to a workspace as documents. When you import PDFs, they
are visible in the PDFViewer and Extracted Text view, if you included text files. If you wish to import PDFs
as images, they need to be converted to an image file type (.tiff or .jpg) before you run the import job.
See Community articles How to import multipage PDF files with Express Transfer Active and How to import
multipage PDF files using Import/Export for more information.
RelativityOne only accepts the following types of files:
n
Single page TIFF (Group IV)
n
Single page JPG
n
Single and multiple PDF (files must have a .pdf extension)
Note: Import/Export expects all the files in the OPT load files to be of the same type. This means you
cannot mix image and PDF files in the same load file.
If you want to use Import/Export with Express Transfer active, which is the recommended workflow for data
transfer, refer to Express Transfer overview on page27 for more information.
Refer to Import/Export load file specifications and Data upload size limitation on page8 for more information
regarding load files. Also see General recommendations for structured data import and export jobs on
page24.
To import an image load file:
1.
Use tabs, search, or the quick nav bar to navigate to the Import/Export Job page.
2.
On the Import/Export Job page, click the New Import/Export Job button to start a new job.
3.
On the Choose Workflow dialog, the Import button is selected by default. Next, click the Structured

Import/Export Guide 78
(Processed) Data workflow box to import an image load file to your workspace.
Note: If Express Transfer has been activated, the Express Transfer section will display a
status of Active. See Activating and deactivating Express Transfer on page39 for more
information.
4.
On the Choose the Load File type dialog, click the Image box to import an image load file to your
workspace.
5. If Express Transfer is not Active, skip this step. If it is Active, click Select on the Select data to Import
dialog to browse to your local drive and select the folder with the files that you want to upload. In the
case of universal naming convention (UNC) paths (for example, \\Server-
Name\SharedResourceName\FilePath),you can copy and paste the path into the Select Folder
address bar in the dialog box to access the desired folder.
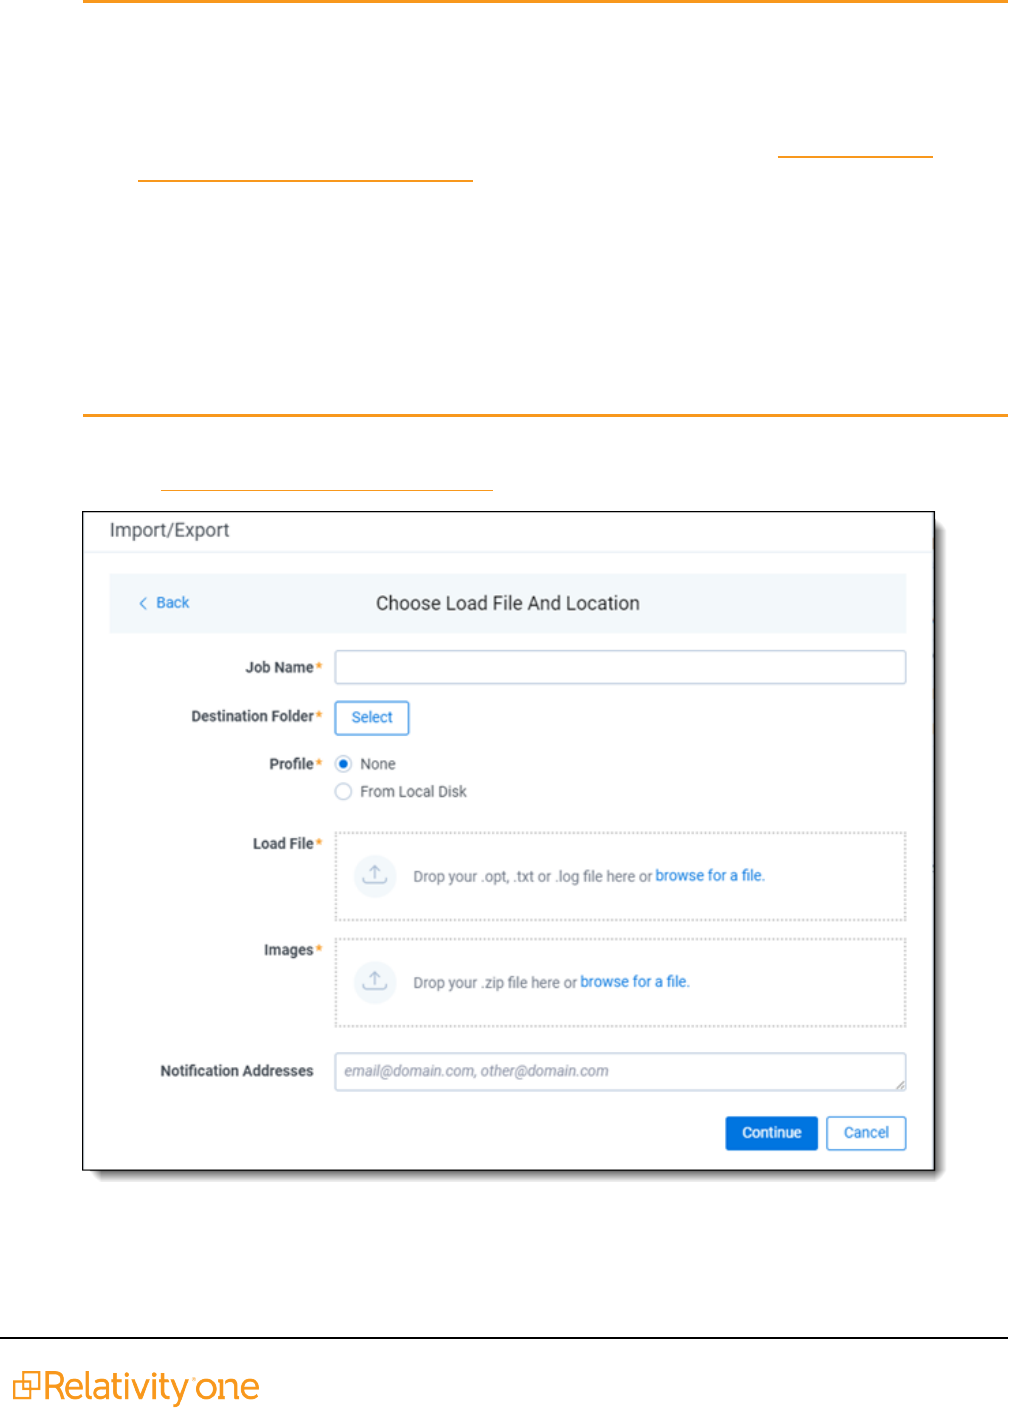
Import/Export Guide 79
Notes:
n
You can choose only one folder with a load file to transfer.
n
File names must be 200 characters or less, including the extension.
n
We recommend using a local drive instead of a mapped or external drive to avoid potential
slowness and connection issues with the file import process. Also see Data transfer per-
formance considerations on page41.
n
When Express Transfer is active, you should not zip data for importing.
n
When Express Transfer is active, it uploads only files linked in the selected load file,
regardless of their location.
n
When Express Transfer is active, it ignores mismatches in upper and lower case between file
paths in the load file and the actual file names.
n
When Express Transfer is active, it supports load files with relative paths, absolute paths, and
UNC paths. It is possible to mix different path types in a single load file.
6. On the Choose Load File and Location dialog, complete the following fields, then click Continue.
Refer to Import/Export load file specifications for more information regarding load files.
n
Job name—provide a descriptive job name so that you can quickly identify and track
that job on the Import/Export Job page. The Job name field accepts up to 50 characters.

Import/Export Guide 80
n
Destination folder—click the Select button, and do one of the following:
o
Choose an existing folder.
o
Create a new workspace folder by right-clicking on an existing folder, click
Create, enter a new folder name, click out of the new folder to save it, then click
Select.
n
Profile—are job configuration settings that were previously saved to a profile file (.ie or
.kw*) so they can be reused when creating future jobs with the same or similar settings
in RelativityOne, which saves time and effort as well as helps prevent data entry errors
when you're mapping fields, for example. Profiles with the ".ie" extension can only be
used in Import/Export.
o
None—select this option if you do not desire to use a profile for this import or if
you intend to create a new profile based on the settings entered in the upcoming
steps. You will be able to save the profile settings later to an .ie file via the
Download Profile (.ie) button.
o
From Local Disk Profiles—use this option to select a previously saved
Import/Export profile (.ie file) or an existing .kw* profile (created via the former
Relativity Desktop Client application) to reuse the job settings for this workflow.
Use the drag and drop feature or browse for a file to choose it. All job settings
provided within the selected profile file will be automatically entered where
applicable in the succeeding workflow dialogs.
n
Load file—drag and drop or use browse for a file to select the load file from your local
drive.
n
Images—drag and drop or use browse for a file to select a zipped image file from your
local drive. See Image and extracted text files on page21.
n
(Optional) Notification Addresses—enable email notifications by providing the email
addresses of those who should get notified once the job completed, failed, or canceled.
7.
On the Import Settings dialog, configure your import job by selecting the numbering and choosing the
import mode.
n
Start Line—select the line number in the load file where you want the import process to
begin. The default value is set to 0, which results in loading the entire load file.

Import/Export Guide 81
n
Numbering—select one of the following options:
o
Use load file page IDs—default setting.
o
Auto-number pages—select this option if page IDs in the production are not
unique. For example, you might import a set of .tiff files that share a page
identifier for each record. The page identifiers are shared per document and are
not unique. The Auto-number pages option appends the 01, 02, and so on to the
page-level identifier, creating a unique number per page.
n
Import Mode—choose how you want the records to be imported:
o
Append Only—load only new records.
o
Overlay Only—update existing records only. If selected, then you must assign a
unique identifier in the Overlay Identifier field that will be used to overlay data in
the workspace. This field acts as a link indicating to RelativityOne where to import
the data.
o
Append/Overlay—adds new records and overlays data on existing records.
n
(Optional) Load Extracted Text toggle—select this option to load new text for
Production documents that may be revised based on redactions. The Files encoding
field will display once this toggle is selected. The text files must be meet these
requirements:
o
Have .txt extensions
o
Stored in the same directory as image files
o
Named in the same way as the image files
n
Files encoding—this field displays if the Load Extracted Text option is selected.
Choose the encoding format for the text file:
o
Western European (Windows)—indicates the Windows standard encoding for
English.
o
Unicode—utilizes more than 107,000 characters covering 90 scripts.
o
Unicode (Big-Endian)—is the same as Unicode, except that the byte order is
reversed.
o
Unicode (UTF-7)—represents Unicode text using a stream of ASCII characters
to guarantee that the high bit will always be zero.
o
Unicode (UTF-8)—represents all characters in the Unicode character set using
8-bit bytes.
8.
(Optional) Click Download Profile (.ie) on the Import Settings dialog to download the job
configuration settings entered thus far to an .ie file on your computer so that they can be reused for
other jobs.
9.
(Optional) Click Precheck Load File on the Import Settings dialog to run a validation process on the
load file to check for errors prior to importing it. The following validation is performed during precheck:
Image file paths (checks 1,000 random lines across the whole load file). All detected errors are
displayed in the Precheck window. Click the down arrow next to any error message to view its details.

Import/Export Guide 82
If you want to correct the errors in the source file(s) and repeat the importing steps, click Cancel to
discontinue importing the file at this time. Otherwise, go to the next step to import the load file with
errors and correct them later.
Note: The Precheck Load File summary dialog displays a maximum of 1,000 errors for each error
category. For example, if an error category has 2,000 errors, only the first 1,000 will display in the
drop-down list.
10. Click the Import button to start the importing process.
11.
Review the importing progress on the Overview tab on the Importing dialog. Real-time details
regarding the number of transferred files and data size being processed displays during the
Uploading and Extracting steps. If needed, click Cancel to stop the import job before it completes.
Otherwise, click Close when the importing process is complete.
Caution: If you used Import/Export in web only mode (meaning Express Transfer was not active),
do not close the Importing dialog until after the Uploading step has successfully completed.
Closing the dialog prior to the Uploading step completing will terminate the data transfer (upload)
process.

Import/Export Guide 83
12. Click the Job Settings tab on the Importing dialog to review the job configuration settings. If desired,
click Download Profile (.ie) to download the job configuration settings entered thus far to an .ie file
on your computer so that they can be reused for other jobs.
13. If no errors were found in the load file, go to the next step. If errors were found, click the Errors tab on
the Importing dialog to view them, then do either of the following:
Note: Only records that imported without errors will appear in the workspace.
n
To proceed without correcting the errors, click Close.
n
To manually correct them now, click the Download Error Load File button. Review the errors
and correct them as needed. When done, upload the file with the corrected data by clicking the

Import/Export Guide 84
Select button on the Importing screen next to New Load File and navigating to the load file on
your local drive to select it. Once selected, click Import to import the job with corrected data.
14. Click Finish to close the dialog.
You can review the Import/Export Job page to see more information about the job. Refer to Import/Export
Job tracking and history for details.
For more information on where Import/Export saves files, see the Community article, Import/Export: Where
Files Are Saved By The Import/Export Application.
Note: If you ran the job with Express Transfer active, you are able to close the Import/Export application
while the job is running, if desired, and the transfer job will continue and not be affected. You can monitor
the progress and history of jobs within Express Transfer (see "Express Transfer Job tracking and
history"). You do not have to be logged into RelativityOne to view information within the Express Transfer
application.
7.4 Importing a production load file
Note: Starting September 1, 2024, we’re streamlining our Staging boundaries to more effectively
separate staging data from workspace and system data. With this change, you will no longer be able to
write to or access data outside of the defined staging area. Folders that will remain within the
Staging area: ARM, ProcessingSource, StructuredData, and TenantVM. Folders that will be removed:
FTA, Temp, Export, and dtSearch, in addition to any other folders that you manually created. Refer to the
Staging Area FAQ in Community for more details.
You can use Import/Export to import external productions, including single and multiple PDF files, into
RelativityOne with Import/Export. This is useful after a production goes out the door in the event a case
team needs access to documents as they were in the production and needs them available for searching.
If you want to use Import/Export with Express Transfer active, which is the recommended workflow for data
transfer, refer to Express Transfer overview on page27 for more information.

Import/Export Guide 85
Refer to Import/Export load file specifications and Data upload size limitation on page8 for more information
regarding load files. Also see General recommendations for structured data import and export jobs on
page24.
To import a production load file:
1.
Use tabs, search, or the quick nav bar to navigate to the Import/Export Job page.
2.
On the Import/Export Job page, click the New Import/Export Job button to start a new job.
3.
On the Choose Workflow dialog, the Import button is selected by default. Next, click the Structured
(Processed) Data workflow box to import a production load file into your workspace.
Note: If Express Transfer has been activated, the Express Transfer section will display a
status of Active. See Activating and deactivating Express Transfer on page39 for more
information.
4.
On the Choose the Load File type dialog, click the Production box to import a production load file to
your workstation.
5.
If Express Transfer is not Active, skip this step. If it is Active, click Select on the Select data to Import
dialog to browse to your local drive and select the folder with the files that you want to upload. In the
case of universal naming convention (UNC) paths (for example,
\\ServerName\SharedResourceName\FilePath), you can copy and paste the path into the Select
Folder address bar in the dialog box to access the desired folder.

Import/Export Guide 86
Notes:
n
You can choose only one folder with a load file to transfer.
n
File names must be 200 characters or less, including the extension.
n
We recommend using a local drive instead of a mapped or external drive to avoid potential
slowness and connection issues with the file import process. Also see Data transfer per-
formance considerations on page41.
n
When Express Transfer is active, you should not zip data for importing.
n
When Express Transfer is active, it uploads only files linked in the selected load file,
regardless of their location.
n
When Express Transfer is active, it ignores mismatches in upper and lower case between file
paths in the load file and the actual file names.
n
When Express Transfer is active, it supports load files with relative paths, absolute paths, and
UNC paths. It is possible to mix different path types in a single load file.
6.
On the Choose Load File and Location dialog, complete the following fields, then click Continue.
Refer to Import/Export load file specifications for more information regarding load files.

Import/Export Guide 87
n
Job name—provide a descriptive job name so that you can quickly identify and track
that job on the Import/Export Job page. The Job name field accepts up to 50 characters.
n
Destination folder—click the Select button, and do one of the following:
o
Choose an existing folder.
o
Create a new workspace folder by right-clicking on an existing folder, click
Create, enter a new folder name, click out of the new folder to save it, then click
Select.
n
Profile—are job configuration settings that were previously saved to a profile file (.ie or
.kw*) so they can be reused when creating future jobs with the same or similar settings
in RelativityOne, which saves time and effort as well as helps prevent data entry errors
when you're mapping fields, for example. Profiles with the ".ie" extension can only be
used in Import/Export.
o
None—select this option if you do not desire to use a profile for this import or if
you intend to create a new profile based on the settings entered in the upcoming
steps. You will be able to save the profile settings later to an .ie file via the
Download Profile (.ie) button.
o
From Local Disk Profiles—use this option to select a previously saved
Import/Export profile (.ie file) or an existing .kw* profile (created via the former
Relativity Desktop Client application) to reuse the job settings for this workflow.

Import/Export Guide 88
Use the drag and drop feature or browse for a file to choose it. All job settings
provided within the selected profile file will be automatically entered where
applicable in the succeeding workflow dialogs.
n
Load file—drag and drop or use browse for a file to select the load file from your local
drive.
n
Images—drag and drop or use browse for a file to select a zipped image file from your
local drive. See Image and extracted text files on page21.
n
(Optional) Notification Addresses—enable email notifications by providing the email
addresses of those who should get notified once the job completed, failed, or canceled.
7.
On the Import Settings dialog, you can select the production to import and choose the numbering and
import mode settings.
n
Production—select the Production set to import.
n
Start Line—select the line number in the load file where you want the import process to
begin. The default value is set to 0, which results in loading the entire load file.
n
Numbering—choose the numbering option:
o
Use load file page IDs—default setting.
o
Auto-number pages—select this option if page IDs in the production are not
unique.
n
Import mode—choose how you want the records to be imported:
o
Append Only—loads only new records.
o
Overlay Only—updates existing records only. If selected, then you must assign a
unique identifier in the Overlay Identifier field that will be used to overlay data in
the workspace. This field acts as a link indicating to RelativityOne where to import
the data.
o
Append/Overlay—adds new records and overlays data on existing records. If
selected, then you must assign a unique identifier in the Overlay Identifier that
will be used to overlay data in the workspace. This field acts as a link indicating to
RelativityOne where to import the data.
8.
If you selected Overlay Only or Append/Overlay in the previous step, select an Overlay Identifier to
specify the field that links your overlay load file to the workspace.

Import/Export Guide 89
n
Merge Values—merges all values for multi-choice and multi-object fields in the load file with
corresponding multi-choice and multi-option fields in the workspace. The fields are merged
regardless of the overlay behavior settings in the environment.
n
Replace Values—replaces all values for multi-choice and multi-object fields in the load file
with corresponding multi-choice and multi-option fields in the workspace. The fields are
merged regardless of the overlay behavior settings in the environment.
n
Use Field Settings—merges or replaces all values for multi-choice and multi-object fields in
the load file with corresponding multi-choice and multi-option fields in the workspace. The
fields are merged according to the overlay behavior settings in the environment.
9.
(Optional) Click Download Profile (.ie) on the Import Settings dialog to download the job
configuration settings entered thus far to an .ie file on your computer so that they can be reused for
other jobs.
10. (Optional) Click Precheck Load File on the Import Settings dialog to run a validation process on the
load file to check for errors prior to importing it. The following validation is performed during precheck:
Image file paths (checks 1,000 random lines across the whole load file). All detected errors are dis-
played in the Precheck window. Click the down arrow next to any error message to view its details. If
you want to correct the errors in the source file(s) and repeat the importing steps, click Cancel to dis-
continue importing the file at this time. Otherwise, go to the next step to import the load file with errors
and correct them later.
Note: The Precheck Load File summary dialog displays a maximum of 1,000 errors for each
error category. For example, if an error category has 2,000 errors, only the first 1,000 will
display in the drop-down list.

Import/Export Guide 90
11. Click the Import button to start the importing process.
12.
Review the importing progress on the Overview tab on the Importing dialog. Real-time details
regarding the number of transferred files and data size being processed displays during the
Uploading and Extracting steps. If needed, click Cancel to stop the import job before it completes.
Otherwise, click Close when the importing process is complete.
Caution: If you used Import/Export in web only mode (meaning Express Transfer was not active),
do not close the Importing dialog until after the Uploading step has successfully completed.
Closing the dialog prior to the Uploading step completing will terminate the data transfer (upload)
process.

Import/Export Guide 91
13. Go to the Job Settings tab on the Importing dialog to review the job configuration settings. If desired,
click Download Profile (.ie) to download the job configuration settings entered thus far to an .ie file
on your computer so that they can be reused for other jobs.
14. If no errors were found in the load file, go to the next step. If errors were found, click the Errors tab on
the Importing dialog to view them, then do either of the following:
Note: Only records that imported without errors will appear in the workspace.
n
To proceed without correcting the errors, click Close.
n
To manually correct them now, click the Download Error Load File button. Review the errors
and correct them as needed. When done, upload the file with the corrected data by clicking the

Import/Export Guide 92
Select button on the Importing screen next to New Load File and navigating to the load file on
your local drive to select it. Once selected, click Import to import the job with corrected data.
15. Click Finish to close the dialog.
You can review the Import/Export Job page to see more information about the job. Refer to Import/Export
Job tracking and history for details.
For more information on where Import/Export saves files, see the Community article, Import/Export: Where
Files Are Saved By The Import/Export Application.
Note: If you ran the job with Express Transfer active, you are able to close the Import/Export application
while the job is running, if desired, and the transfer job will continue and not be affected. You can monitor
the progress and history of jobs within Express Transfer (see "Express Transfer Job tracking and
history"). You do not have to be logged into RelativityOne to view information within the Express Transfer
application.
7.5 Importing an RDO load file
Note: Starting September 1, 2024, we’re streamlining our Staging boundaries to more effectively
separate staging data from workspace and system data. With this change, you will no longer be able to
write to or access data outside of the defined staging area. Folders that will remain within the
Staging area: ARM, ProcessingSource, StructuredData, and TenantVM. Folders that will be removed:
FTA, Temp, Export, and dtSearch, in addition to any other folders that you manually created. Refer to the
Staging Area FAQ in Community for more details.
You can import Relativity's dynamic objects (RDO) for use in Relativity applications. The workflow for RDO
data import follows the same general guidelines as those for document load file imports.
If you want to use Import/Export with Express Transfer active, which is the recommended workflow for data
transfer, refer to Express Transfer overview on page27 for more information.
Refer to Import/Export load file specifications and Data upload size limitation on page8 for more information
regarding load files. Also see General recommendations for structured data import and export jobs on
page24.
To import RDO data:

Import/Export Guide 93
1.
Use tabs, search, or the quick nav bar to navigate to the Import/Export Job page.
2.
On the Import/Export Job page, click the New Import/Export Job button to start a new job.
3.
On the Choose Workflow dialog, the Import button is selected by default. Next, click the Structured
(Processed) Data workflow box to import a document load file to your workspace.
Note: If Express Transfer has been activated, the Express Transfer section will display a status of
Active. See Activating and deactivating Express Transfer on page39 for more information.
4.
On the Choose the Load File type dialog, click the RDO box to import a load file to your workspace.
5.
If Express Transfer is not Active, skip this step. If it is Active, click Select on the Select data to Import
dialog to browse to your local drive and select the folder with the files that you want to upload. In the
case of universal naming convention (UNC) paths (for example,
\\ServerName\SharedResourceName\FilePath), you can copy and paste the path into the Select
Folder address bar in the dialog box to access the desired folder.
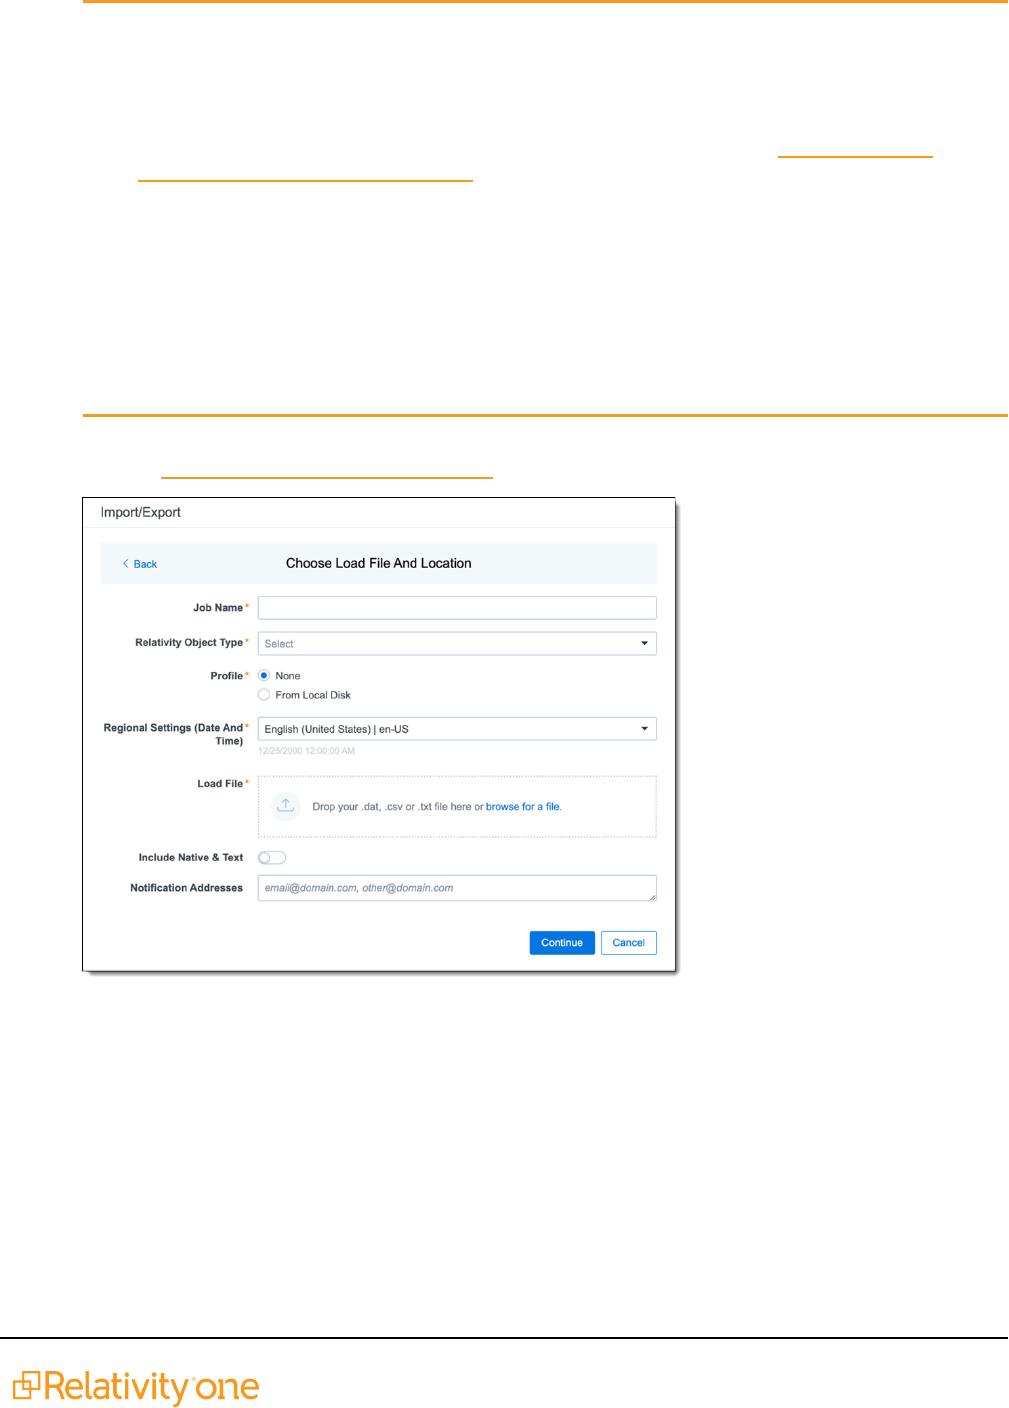
Import/Export Guide 94
Notes:
n
You can choose only one folder with a load file to transfer.
n
File names must be 200 characters or less, including the extension.
n
We recommend using a local drive instead of a mapped or external drive to avoid potential
slowness and connection issues with the file import process. Also see Data transfer per-
formance considerations on page41.
n
When Express Transfer is active, you should not zip data for importing.
n
When Express Transfer is active, it uploads only files linked in the selected load file,
regardless of their location.
n
When Express Transfer is active, it ignores mismatches in upper and lower case between file
paths in the load file and the actual file names.
n
When Express Transfer is active, it supports load files with relative paths, absolute paths, and
UNC paths. It is possible to mix different path types in a single load file.
6.
On the Choose Load File and Location dialog, complete the following fields, then click Continue.
Refer to Import/Export load file specifications for more information regarding load files.
n
Job Name—provide a descriptive job name so that you can quickly identify and track that job
on the Import/Export Job Page. The Job name field accepts up to 50 characters.
n
Relativity Object Type—select the Relativity object type from the drop-down list that you want
to import data.
n
Profile—are job configuration settings that were previously saved to a profile file (.ie or .kw*)
so they can be reused when creating future jobs with the same or similar settings in
RelativityOne, which saves time and effort as well as helps prevent data entry errors when
you're mapping fields, for example. Profiles with the ".ie" extension can only be used in

Import/Export Guide 95
Import/Export.
o
None—select this option if you do not desire to use a profile for this import or if you
intend to create a new profile based on the settings entered in the upcoming steps. You
will be able to save the profile settings later to an .ie file via the Download Profile (.ie)
button.
o
From Local Disk Profiles—use this option to select a previously saved Import/Export
profile (.ie file) or an existing .kw* profile (created via the former Relativity Desktop Client
application) to reuse the job settings for this workflow. Use the drag and drop feature or
browse for a file to choose it. All job settings provided within the selected profile file will
be automatically entered where applicable in the succeeding workflow dialogs.
n
Regional Settings (Date and Time)—select the desired format for imported date and time
data. A preview of the chosen format will appear below the selection. The setting selected will
remain for all future jobs until you choose another one from the list or until you clear your
browser cache. When browser cache is cleared, the setting will revert to the US date and time
by default.
n
Load File—use the drag and drop feature or click browse for a file to select load file with
RDO data from your local drive.
n
Include Native & Text—select this option to include native and text files.
Note: The Include Native & Text option is not available for image or production import
workflows as there are no native files included in OPT files.
n
Native & Text—if Include Native &Text was selected, use the drag and drop feature or click
browse for a file to select the zipped native and text file from your local drive. See ZIP archive
with extracted text and natives on page20
n
(Optional) Notification Addresses—enable email notifications by providing the email
addresses of those who should get notified once the job completed, failed, or canceled.
7.
On the Load File Settings dialog, select the delimiters and encoding values of the load file for the
import, then click Continue. The File Column Headers Preview pane will help you to choose the
proper settings.
n
File Encoding—select an encoding format for the load file. Consult your processing
vendor or department to determine the correct encoding option, if necessary.
The File Column Headers Preview pane automatically updates when you select the File
Encoding type. Since the load file is parsed based on the delimiter set, you may need to
check delimiters used in the load file if the column headers are not lined up correctly.
Determine the delimiters used in the file, and then select them in the delimiters section
of this tab.

Import/Export Guide 96
n
First Line Contains Column Names toggle—select this option if the first line contains
column names.
n
Select the delimiters and encoding values used by your load file:
o
Column—select the character used to separate columns.
o
Quote—select the character used as the text qualifier.
o
Newline (Long Text Fields)—select the character used to indicate the end of a
line in any extracted text or long text field.
o
Multi-Value—select the character used to separate choices within a field.
o
Nested Value—select the character used to separate the different levels of a
multi-choice hierarchy.
8.
On the Fields Mapping dialog, select the load file fields to import and map them to the workspace
fields, then click Continue.
To automatically map fields, click Auto Map Fields, and the fields from the load file will be mapped to
any existing fields of the exact same name in the workspace. Any fields without a match will display
"Choose..." in the Workspace Fields column and you will need to select one from the drop-down list.
To search for a field in the list, begin typing the desired field name and matching search results
display for selection.
Consider the following when auto-mapping fields:
n
Case is not taken into account for the mapping. For example, a field named "email" in the load
file would map to a field named "Email" in the workspace.
n
Spacing is taken into account. For example, in a two-word field name, if there is one space
between words in the workspace field, and two spaces between words in the load file field, the
fields will not be mapped.

Import/Export Guide 97
n
Characters are mapped only to themselves. For example, an underscore is only mapped to
another underscore, not to a space.
Only fields matched or those with additional settings selected are loaded into the workspace. Other
fields in the Load File Fields and Workspace Fields are ignored. You must always match the identifier
field for the load file.
Note: To import RDO data into a workspace, you must map the document identifier, whether it be
Name, Control Number, or another field. If you do not, the import mode options will be limited and
you will be unable to proceed with the import.
n
Create Field button—click this button if you want to create a new workspace field.
n
Export to CSV—click this button to save the field mapping configuration to a .csv file on your
local drive.
n
Mapped to the top toggle—when turned on, this option groups all mapped fields on the top.
n
Load File Sample column—presents exemplary data from the load file fields.
n
Load File Fields column—provides the load file field names. Use the Filter box to search for
field names.
n
Workspace Fields column—allows you to manually map the load file fields to the existing
workspace fields. Use the Filter box to search for field names.
n
Additional Field Settings column—currently not supported.
9. On the Import Settings dialog, configure your import job by selecting from which line number you want
the load file to begin importing and how you want the records to be imported.
n
Start Line—select the line number in the load file where you want the import process to
begin. The default value is set to 0, which results in loading the entire load file.
n
Import mode—Choose how you want the records to be imported.
o
Append Only—loads only new records.
o
Append/Overlay—adds new records and overlays data on existing records. If
selected, then you must assign a unique identifier in the Overlay Identifier field
that will be used to overlay data in the workspace. This field acts as a link
indicating to RelativityOne where to import the data.
Note: For Append/Overlay and Overlay Only, if a blank metadata field exists in
the load file (.dat, .csv), the blank value will overlay (remove) any existing value
that may reside in the corresponding mapped field.

Import/Export Guide 98
o
Overlay Only—updates existing records only. If selected, then you must include
an Overlay Identifier next.
o
Overlay Identifier—if either “Overlay Only” or “Append/Overlay” mode is selec-
ted, then assign the unique identifier that will be used to overlay data in the work-
space. This field acts as a link indicating to RelativityOne where to import the
data.
10.
(Optional) Click Download Profile (.ie) on the Import Settings dialog to download the job
configuration settings entered thus far to an .ie file on your computer so that they can be reused for
other jobs.
11.
(Optional) Click Precheck Load File on the Import Settings dialog to run a validation process on the
load file to check for errors prior to importing it. All detected errors display in the Precheck window.
Click the down arrow next to any error message to view its details. If you want to correct the errors in
the source file(s) and repeat the importing steps, click Cancel to discontinue importing the file at this
time. Otherwise, go to the next step to import the load file with errors and correct them later.
The following validations occur during Precheck:
n
Date format
n
Field type
n
Field length
n
Number of load file cells
n
Number of folders and choice fields
n
File paths for natives and extracted text (checks 1,000 random lines across the whole load file)
Note: The Precheck Load File summary dialog displays a maximum of 1,000 errors for each error
category and will display a message indicating the total number of errors found. For example, if an
error category has 2,000 errors, only the first 1,000 will display in the drop-down list.

Import/Export Guide 99
12. Click the Import button to start the importing process.
13.
Review the importing progress on the Overview tab on the Importing dialog. Real-time details
regarding the number of transferred files and data size being processed displays during the
Uploading and Extracting steps. If needed, click Cancel to stop the import job before it completes.
Otherwise, click Close when the importing process is complete.
Caution: If you used Import/Export in web only mode (meaning Express Transfer was not active),
do not close the Importing dialog until after the Uploading step has successfully completed.
Closing the dialog prior to the Uploading step completing will terminate the data transfer (upload)
process.

Import/Export Guide 100
14. Go to the Job Settings tab on the Importing dialog to review the job configuration settings. If desired,
click Download Profile (.ie) to download the job configuration settings entered thus far to an .ie file
on your computer so that they can be reused for other jobs.
15. If no errors were found in the load file, go to the next step. If errors were found, click the Errors tab on
the Importing dialog to view them, then do either of the following:
Note: Only records that imported without errors will appear in the workspace.
n
To proceed without correcting the errors, click Close.
n
To manually correct them now, click the Download Error Load File button. Review the errors
and correct them as needed. When done, upload the file with the corrected data by clicking the

Import/Export Guide 101
Select button on the Importing screen next to New Load File and navigating to the load file on
your local drive to select it. Once selected, click Import to import the job with corrected data.
16. Click Finish to close the dialog.
You can review the Import/Export Job page to see more information about the job. Refer to Import/Export
Job tracking and history for details.
For more information on where Import/Export saves files, see the Community article, Import/Export: Where
Files Are Saved By The Import/Export Application.
Note: If you ran the job with Express Transfer active, you are able to close the Import/Export application
while the job is running, if desired, and the transfer job will continue and not be affected. You can monitor
the progress and history of jobs within Express Transfer (see "Express Transfer Job tracking and
history"). You do not have to be logged into RelativityOne to view information within the Express Transfer
application.
7.6 Importing raw unprocessed data for Processing via Import/Ex-
port
Note: Starting September 1, 2024, we’re streamlining our Staging boundaries to more effectively
separate staging data from workspace and system data. With this change, you will no longer be able to
write to or access data outside of the defined staging area. Folders that will remain within the
Staging area: ARM, ProcessingSource, StructuredData, and TenantVM. Folders that will be removed:
FTA, Temp, Export, and dtSearch, in addition to any other folders that you manually created. Refer to the
Staging Area FAQ in Community for more details.
Note: Effective August 20, 2024, Import/Export uploads raw (unprocessed) data to the ProcessingSource
folder and triggers the Processing application. The ProcessingSource folder is included in your Staging
threshold. To avoid additional storage costs, you may want to delete the uploaded raw (unprocessed)
data from this folder once it is no longer needed.

Import/Export Guide 102
You can use Import/Export to import native, unprocessed/unstructured files, including Slack data, into
RelativityOne that require processing and it will automatically trigger a Processing job in one operation.
Notes:
n
Import/Export is not a replacement for the Processing application; however it is a simplified workflow
when setting up a processing set. Using the Processing application is recommended when setting up
large, complex processing jobs. Also, within the Processing application, you can use Quick Create
Sets, Inventory, check and update Processing Profiles, and customize data source options.
n
Processing profiles must already exist in RelativityOne before using them in the steps below.
If you want to use Import/Export with Express Transfer active, which is the recommended workflow for data
transfer, refer to Express Transfer overview on page27 for more information.
To import raw unprocessed/unstructured files for Processing:
1.
Use tabs, search, or the quick nav bar to navigate to the Import/Export Job page.
2.
On the Import/Export Job page, click the New Import/Export Job button to start a new job.
3.
On the Choose workflow dialog, the Import button is selected by default. Next, click the Raw
(Unprocessed) Data workflow box to import native (raw) files into your workspace.
Note: If Express Transfer has been activated, the Express Transfer section will display a status of
Active. See Activating and deactivating Express Transfer on page39 for more information.
4.
Select the data files to import as follows depending on the activation status of Express Transfer:
n
With Express Transfer Active: Click Select on the Select data to Import dialog to browse to
your local drive and select the folder with the files that you want to upload. In the case of uni-
versal naming convention (UNC) paths (for example, \\Server-
Name\SharedResourceName\FilePath), you can copy and paste the path into the Select
Folder address bar at the top of the dialog box in order to access the desired folder. You also
have the option on the dialog to choose from file share by clicking Choose from File Share,

Import/Export Guide 103
selecting the import source folder, and clicking Select Folder. Once the folder has been selec-
ted, click Continue.
Note: When you select a folder to upload, Express Transfer will transfer all the
data from the selected folder, including sub-folders, to the staging area,
regardless of the specific job configuration, like the custodian mapping settings.
This also applies to the load file import workflows.
n
With Express Transfer not Active: On the Select file dialog, do one of the following
below to upload a file. Data files must be zipped when using the first two options men-
tioned below. Single PSTfiles do not require zipping.
n
Drag and drop the zipped data file or single PST file into the upload area.
n
Click browse for a file to select a zipped data or single PST file from your
local drive.
n
Click Choose from File Share to upload files directly from the file share.
Then, select the import source folder and click Select. You do not need to
zip files when importing them with this option.

Import/Export Guide 104
5.
On the Create Processing Job dialog, complete the following fields:
n
Job name—provide a descriptive job name so that you can quickly identify and track that job
on the Import/Export Job page. The Job name field accepts up to 50 characters.
n
Profile—select the desired Processing profile. The Processing profile must already exist in
Relativity.
Note: If you are importing Slack data, please refer to Importing Slack short message data for
Processing via Import/Export on page108 below.
n
Destination folder—click the Select button, and do one of the following:
o
Choose an existing folder.
o
Create a new workspace folder by right-clicking on an existing folder, click Create, enter
a new folder name, click out of the new folder to save it, and then click Select.
n
(Optional) Notification Addresses—enable email notifications by providing the email
addresses of those who should get notified once the job completed, failed, or canceled.
6.
Next, use the Select Data Sources section to select the Data Sources and assign Custodians. A
maximum of 70 data sources (folders with data, loose files) can be selected and assigned custodians.
See recommendations below for preparing data sources.

Import/Export Guide 105
Notes: Recommendations for preparing data sources.
n
Each selected file is treated as a separate data source. Consider organizing loose files into
folders per custodian.
n
If you import data for a single custodian, you may want to create a top-level folder and place all
the data into that folder to speed up the configuration and execution of the Processing job.
n
To exclude Microsoft Office temporary files, which are those file names starting with a ~ (tilde)
sign, see Exclude temporary Microsoft Office files from data import on page49 for more
information.
n
Be sure your data sources have unique names. Data sources are not case sensitive. If you
have data sources with duplicate names, you may see processing errors. For example, \\
[file.share]\Processing Source[SOURCE.NAME] and \\[file.share]\Processing Source
[Source.Name] would be considered duplicate names since the system does not differentiate
between capital and lower case letters. To make them unique, you could rename the folders
[SOURCE.NAME1] and [Source.Name2].
Choose the Data Source by selecting the checkbox next to the folder name. Then, assign the
Custodian using any method below:
n
Manually assign custodians: Select the proper custodian from the Custodian drop-down list
and click the Assign button.
n
Automatically assign custodians: Click the Auto Map Custodians button to automatically
assign custodians to data source folders and files based on the naming pattern. Only the Last
name, First name naming pattern is supported at this time. If you want to modify the automatic
assignment, click Clear next to the custodian’s name.
The application reads data source names and checks if matching custodians have already
been added to the Entity object. Depending on the result, one of the following occurs:
o
Custodian(s) already exists in the Entity: If the custodian(s) already exists in the
Entity, the application automatically assigns corresponding custodians to folders and
files.
o
New custodian automatically created:If the application cannot find the
corresponding custodian in the Entity object, it creates a new one based on the data
source name. Newly created custodians are marked with a blue dot in the Select Data
Sources pane. New custodians will be added to the Entity object after you click Run Job
in the next step. However, if you click Cancel instead of running the job, the new
custodians will not be created.
n
Add a new custodian now: If you want to add a new custodian to the drop-down list from
here instead of through the Entity object, click the Add Custodian link, and do the following on
the Add Custodian dialog:

Import/Export Guide 106
a. Select the custodian Type:
n
Person—select this option to enter a First Name and Last Name of the indi-
vidual acting as custodian of the data to be processed.
n
Other—select this option if the custodian of the data to be processed is not
an individual but is, for example, an entity or company name, and then
enter the name in theFull Name field. You can also select this option if you
wish to enter an individual's full name without having that name include a
comma once you export the data associated with it.
b. Click the Add Custodian button. The newly created custodian will be added to
the Custodian drop-down list for you to select and assign to the data source.
7.
Click Run Job to start importing data.
Note: Import/Export will upload all the zipped data to the Staging area, extract it, and create a new
Processing job based on the data source selection. Only data sources assigned to custodians will
be processed and imported to your workspace.
Note: Effective August 20, 2024, Import/Export uploads raw (unprocessed) data to the
ProcessingSource folder and triggers the Processing application. The ProcessingSource
folder is included in your Staging threshold. To avoid additional storage costs, you may want
to delete the uploaded raw (unprocessed) data from this folder once it is no longer needed.
8. Review the importing progress on the Importing &Processing dialog. Real-time details regarding the
number of transferred files and data size being processed displays during the Uploading and Extract-
ing steps. Do any of the following:
Note: Only records that imported without errors will appear in the workspace.

Import/Export Guide 107
n
Click Cancel to stop the importing process before it completes.
n
Click Close when the importing process is complete.
Caution: If you imported data without activating Express Transfer, you can close the
dialog before the import process finishes without causing an interruption in data flow
as long as it's closed after the Uploading step is completed. Closing the dialog earlier
will terminate the data transfer (upload) process.
n
Click Go to Processing when the Discovery step begins to go to the Processing Sets page of
the Processing application.
Import/Export utilizes the Processing application to process native files, extract metadata, and create
documents. Depending on the processing profile configuration, the following processing phases will be
triggered:
n
Discovery
n
Discovery and publish (if the auto-publish option is enabled in your processing profile)
Notes:
n
We recommend using the Processing application directly to determine global dedupe order creating
processing sets.
n
The Inventory phase of processing is always skipped when you import unstructured data. If Inventory
is needed, use Staging Explorer to import data into RelativityOne, and then run Processing directly.
Please refer to Processing in Relativity documentation for more information about using the Processing
application to ingest raw data directly into your workspace.
For more information on where Import/Export saves files, see the Community article, Import/Export: Where
Files Are Saved By The Import/Export Application.

Import/Export Guide 108
Note: If you ran the job with Express Transfer active, you are able to close the Import/Export application
while the job is running, if desired, and the transfer job will continue and not be affected. You can monitor
the progress and history of jobs within Express Transfer (see "Express Transfer Job tracking and
history"). You do not have to be logged into RelativityOne to view information within the Express Transfer
application.
7.6.0.1 Importing Slack short message data for Processing via Import/Export
All commercial customers can now leverage Import/Export to upload Slack data for Processing.
To import Slack short messages for Processing via Import/Export:
1. Copy the zip file containing the Slack data into a folder on your drive.
2.
Use tabs, search, or the quick nav bar to navigate to the Import/Export Job page.
3.
On the Import/Export Job page, click the New Import/Export Job button to start a new job.
4.
Activate Express Transfer. See Activating and deactivating Express Transfer on page39 for more
information.
Note: If your organization is not permitted to use Express Transfer and you need to leverage
the web mode of Import/Export to import Slack data, you must zip the folder in which the zip
file is located from Step 1. Be aware that this will create an additional zip level (the zip file
from Step 1 within a zipped folder file) for transport purposes only. For this reason, we
recommend using Express Transfer for all your imports and exports.
5.
On the Choose workflow dialog, the Import button is selected by default.
6.
Click the Raw (Unprocessed) Data workflow box.
7. Provide the Job Name, select a Destination Folder, and select the Processing Profile.
Note: The following settings must already be enabled in the Processing Profile: Convert
Slack to RSMF and Download Attachments. See Processing profiles documentation for
more information.
8. For Data Source, select the folder that contains the zipped Slack data, then assign a Custodian.
9. Click Run Job. Import/Export uploads the data and passes the job configuration to the Processing
application. Please refer to Processing in Relativity documentation for more information about using
Processing to ingest raw data directly into your workspace.
Note: All the RSMF conversion is done in Processing automatically. See Processing documentation on
RSMF files for more information.

Import/Export Guide 109
8 Exporting data using Import/Export
Note: Starting September 1, 2024, we’re streamlining our Staging boundaries to more effectively
separate staging data from workspace and system data. With this change, you will no longer be able to
write to or access data outside of the defined staging area. Folders that will remain within the
Staging area: ARM, ProcessingSource, StructuredData, and TenantVM. Folders that will be removed:
FTA, Temp, Export, and dtSearch, in addition to any other folders that you manually created. Refer to the
Staging Area FAQ in Community for more details.
You can use Import/Export to export the following:
n
Exporting a folder—use this workflow to export a folder.
n
Exporting a production set—use this workflow to export a production set.
n
Exporting a saved search—use this workflow to export a saved search load file.
n
Exporting RDO data—use this workflow to export Relativity's dynamic objects (RDO) load file.
Also see General recommendations for structured data import and export jobs on page24.
8.1 Exporting data using Import/Export
Note: Starting September 1, 2024, we’re streamlining our Staging boundaries to more effectively
separate staging data from workspace and system data. With this change, you will no longer be able to
write to or access data outside of the defined staging area. Folders that will remain within the
Staging area: ARM, ProcessingSource, StructuredData, and TenantVM. Folders that will be removed:
FTA, Temp, Export, and dtSearch, in addition to any other folders that you manually created. Refer to the
Staging Area FAQ in Community for more details.
You can use Import/Export to export the following:
n
Exporting a folder—use this workflow to export a folder.
n
Exporting a production set—use this workflow to export a production set.
n
Exporting a saved search—use this workflow to export a saved search load file.
n
Exporting RDO data—use this workflow to export Relativity's dynamic objects (RDO) load file.
Also see General recommendations for structured data import and export jobs on page24.
8.2 Exporting a folder load file
Note: Starting September 1, 2024, we’re streamlining our Staging boundaries to more effectively
separate staging data from workspace and system data. With this change, you will no longer be able to
write to or access data outside of the defined staging area. Folders that will remain within the
Staging area: ARM, ProcessingSource, StructuredData, and TenantVM. Folders that will be removed:
FTA, Temp, Export, and dtSearch, in addition to any other folders that you manually created. Refer to the
Staging Area FAQ in Community for more details.
You can use Import/Export to export folders and sub-folders out of RelativityOne.

Import/Export Guide 110
If you want to use Import/Export with Express Transfer, which is the recommended method for data transfer,
refer to Express Transfer overview on page27 for more information. With Express Transfer activated, you
can run up to five concurrent export jobs on a single client machine. For more information, see Concurrent
and consecutive jobs on page8.
Refer to Import/Export load file specifications for more information regarding load files. Also see General
recommendations for structured data import and export jobs on page24.
To export folders:
1.
Use tabs, search, or the quick nav bar to navigate to the Import/Export Job page.
2.
On the Import/Export Job page, click the New Import/Export Job button to start a new job.
Note: If Express Transfer has been activated, the Express Transfer section will display a
status of Active. See Activating and deactivating Express Transfer on page39 for more
information.
3.
On the Choose workflow dialog, click the Export button, then click Folder.
4.
On the Export Settings, complete the following fields and click Continue:

Import/Export Guide 111
Data Source:
n
Job Name—provide a descriptive job name so that you can quickly identify and track
that job on the Import/Export Job page. The Job name field accepts up to 50 characters.
n
Folders—choose which workspace folder to export.
n
Export Sub-folders toggle—select this option to export sub-folders of the previously
selected folder.
n
Views—select the workspace view that you would like to use to export metadata.
n
Profile—are job configuration settings that were previously saved to a profile file (.ie or
.kw*) so they can be reused when creating future jobs with the same or similar settings

Import/Export Guide 112
in RelativityOne, which saves time and effort as well as helps prevent data entry errors
when you're mapping fields, for example.
o
None—select this option if you do not desire to use a profile for this export or if
you intend to create a new profile based on the settings entered in the upcoming
steps. You will be able to save the profile settings later on the “Export Job
Configuration Summary” dialog. The file extension for the new profile created will
be “.ie”.
o
From Local Disk Profiles—use this option to select a previously saved
Import/Export profile (.ie file) or an existing .kw* profile to reuse the job settings for
this workflow. Use the drag and drop feature or browse for a file to choose it. All
job settings provided within the selected profile file will be automatically entered
where applicable in the succeeding workflow dialogs.
Location and Files:
n
Export Location Type—select one or both of these options:
o
Local Disk—select this option to export the selected production set data to the
Staging area and compress it to a single zip file. Once complete, you can down-
load the zip file with your web browser directly to a local disk by clicking the Down-
load button. This is the recommended option when Express Transfer is activated.
Note: This temporary non-Staging Area location is automatically
deleted once the download is completed when using Express
Transfer or is deleted after 5 days when using web mode for
downloads. This data is not included in your Staging Area
threshold.
n
Staging Area—select this option to create a copy of the data in the Struc-
turedData folder in the Staging Area.You will need to use Staging Explorer later
to download data. The exported data will not be compressed.
n
Local Disk and Staging Area—select both options to create a copy of the selec-
ted data in the StructuredData folder in the Staging Area, as well as download it to
your local disk with Express Transfer or web browser
Note: The StructuredData folder is included in your Staging Area
threshold. To avoid additional storage costs, you may want to
delete the exported data from that folder once it is no longer
needed.
Notifications:
n
(Optional) Notification Addresses—enable email notifications by providing the email
addresses of those who should get notified once the job completed, failed, or canceled.
5.
On the Load File Settings dialog, select the data file format and data file encoding, then click
Continue.

Import/Export Guide 113
n
Data File Format—select one of the formats below for the load file you are exporting:
o
.dat (Concordance)—load file exports with the standard Concordance delimiters.
o
.csv (Comma separated)—load file exports with comma separated delimiters
o
.html (HTML)—load file is in HTML format and contains hyperlinks to launch any
exported files.
o
.txt (Custom)—load file exports with the custom delimiters that you select in the Load
File Characters section that displays when this option is selected.
n
Start Line—select a line (record number) that identifies the initial document for export. The
application begins by exporting the document with this number and continues by exporting
documents with subsequent record numbers.

Import/Export Guide 114
n
Data File Encoding—select the encoding type for the document-level load file from the drop-
down.
n
Regional Settings (Date and Time)—select the desired format for the exported date and
time data. A preview of the chosen format will appear below the next field. Your selection for
this field will remain for future export jobs until you change it or clear the browser cache.
Clearing the browser cache will default the format to "English (United States)."
n
Long Time (with seconds)—by default, this option is toggled off. Toggle it on if you want to
include seconds with the exported date and time information. For example, the time will export
as 12:10 AM (HH:MM AM/PM) when the toggle is off, and it will export as 12:10:25 AM
(HH:MM:SS AM/PM) when the toggle is on.
n
Export Multiple Choice Fields as Nested—select this option to maintain the hierarchy of
RelativityOne multiple-choice lists, when applicable. The Nested Value delimiter, a backslash,
separates child choices.
6.
On the Select Fields dialog, choose the Workspace Fields that you want to export by moving them to
the Selected Fields box, then click Continue. The Workspace Fields box displays all available fields,
but only the fields in the Selected Fields box will be exported.
Note: The Production::Begin Bates and Production::End Bates fields automatically populate
in the Selected Fields column.
You can do the following to move fields:
n
Highlight a field and click one of the directional arrow buttons in the center to move it
between boxes
n
Double-click on a field to move it left and right between boxes
n
Use CTRL+ left mouse click to select multiple fields, then choose the desired directional
arrow to move between boxes

Import/Export Guide 115
n
In Selected Fields column, set the load file column order by dragging the fields to their
proper ordering position.
7. On the Production Image Type dialog, select the images you want to export.

Import/Export Guide 116
n
Original Images—select to export only the original, non-produced images or select.
n
Produced Images—select to export a produced version of the images.
n
Include original images toggle—select to export original images for the documents
that are not in a specified production.
8. Move the productions that you want to export from the Available Productions box to the Selected Pro-
ductions box.
Note: Any produced native files will be exported as a native instead of an image. Only one
produced image is exported based on precedence in the list. If the document is in the
topmost production, that version is exported. If not, Relativity checks for the document in the
second production and so on. If the document is not a part of any of the selected
productions, and "Include original images" toggle is enabled, then the original document is
produced.
9. To include native files and/or images in the exported data, select the corresponding options on the
File Settings dialog, then click Continue.

Import/Export Guide 117
n
Export Native Files toggle—select this option to export native files.
n
Export Images toggle—select this option to include images in the export. If this option
is toggled on, then you must set the Data File Format for image-level load file (Opticon,
IPRO, or IPRO (FullText)) and the File Type for export images (Single-page TIFF/JPG,
Multi-page TIFF/JPG, or Rendered PDF).
n
Export PDF toggle—select this option to include existing stored PDFs in the export. No
document-to-PDFconversion functionality is performed in this step. The PDFs must
already exist as PDF files. If this option is toggled on, then you must set the Data File
Format for PDF-level load file (Opticon, IPRO, or IPRO (FullText)).
10. On the File And Folders dialog, choose the desired naming convention and folder structure for the
exported files, then click Continue.

Import/Export Guide 118
Text and Native File Names:
n
Named after—select one of the following naming conventions for exported files:
o
Control Number—select this option to name the files using the document iden-
tifier/control number.
o
Custom name—select this option to customize the file names. If this option is
selected, enter data in the following fields that display:
l
Prefix—choose whether to have the prefix be the Control Number or Pro-
duction Begin Bates.
l
Select spacing—select the desired spacing option from the drop-down
list.
l
Select field—choose a field from your workspace or choose Custom Text
and provide your text.
l
Preview—you will be able to view a Preview of the custom file name to see
if it's what you want and make changes in the fields as needed.
n
Append original filename toggle—select this option to append the original file name,
which is defined as the file name as it was on disk, to the end of the exported file name.
Folder Structure:
n
Group files by—select one of the options below for how to group the exported files:

Import/Export Guide 119
Note: Depending on the structure of your exported data, export job
performance degradation may result and be several times longer when using
Workspace Structure compared with using File Type. Unless it is necessary
to use Workspace Structure, we recommend using the File Type option for the
export job.
n
File Type—select this option to group files by their type and place them in
separate folders based on type (such as in Natives, Images, Text, and
PDFs folders).
n
Workspace Structure—select this option to preserve the workspace
folder structure. This option may reduce the time of preparing production
data since the files will not need to be manually realigned later to replicate
the folder structure in the workspace.
11.
On the Text File Settings dialog, you can select to export text field as files and then choose the text
file encoding as follows.
n
Export Text Field as Files toggle—determines the export method of the extracted text or
OCR. Select this option if you want to export files as individual document-level text files, with
one file per document. Deselect it to include text as part of the load file.
n
Text File Encoding—if Export Text Field as Files is toggled on, then select the encoding
format for the document-level text files.
n
Text Fields Precedence—select and assign an order to long text fields that Relativity checks
for text when performing an export. Relativity adds the Text Fields Precedence column as the
last column in the load file. You must select at least one long text field to use this functionality.
Choose the fields from the Add Fields drop-down, then click Add. To delete a selected field,
click its trashcan icon.

Import/Export Guide 120
To order the precedence of the fields, click the six-dot handle left of the field name
and drag it to the proper ordering position. During an export, the system checks
the topmost (first) field in the list for text, and if the field is null, it checks the next
field in order of precedence for text, and so on. When it finds a field that contains
text, Relativity adds the contents of that field to the Text Fields Precedence
column in the document load file, and then continues checking the fields for the
next document and so on. For example, if you listed the Extracted Text field first
and the Production OCR field second, the system would first check the Extracted
Text field for content, and if it was null, it would move on to the Production
OCRfield, and so on.
The Text Fields Precedence column displays the file path to the exported files if
you select the Export Text Field as Files checkbox above.
12. Click Continue.
13. (Optional) In the Advanced Settings dialog, toggle on Set Custom Information if you want to cus-
tomize the volume and folder information. Otherwise, leave the toggle off.

Import/Export Guide 121
Volume Information—this section controls the naming and size of the volume identifier. Set the
following options in this section:
n
Prefix—enter the alpha prefix for the volume identifier.
n
Start—enter the first number used for the numeric section of the volume identifier. Multiple
volumes increment numbers during export creating unique volume identifiers.
n
# of digits—enter the number of digits attached to the prefix. For example, if you enter 3, the
output is VOL001, VOL002, and so on.
n
Max Size (MB)—enter the maximum size allowed for each volume.
Subdirectory Information—this section controls the naming and size of volume sub-folders. Set the
following options in this section:
n
Image Prefix—enter the alpha prefix for the sub-directory that stores exported images.
n
Native Prefix—enter the alpha prefix for the sub-directory that stores exported native files.
n
Text Prefix—enter the alpha prefix for the sub-directory that stores exported extracted text
files.

Import/Export Guide 122
n
PDF Prefix—enter the alpha prefix for the sub-directory that stores exported extracted PDF
files.
n
Start—enter the starting number for the sub-directories.
n
# of digits—select the number of digits of the sub-directory prefix. For example, if you enter 3,
the output is IMG001, IMG002, and so on.
n
Max Files—select the number of files to store in each sub-directory.
14. Click Continue.
15. On the Export Job Configuration Summary, review the export job settings and go back to make any
corrections as needed.
16. (Optional) Click Save Settings on the Export Job Configuration Summary dialog to export the job
configuration settings entered thus far to its own profile file (.ie file extension) and save it on your com-
puter so you can reuse these settings when creating a new export job with Import/Export.
Note: Import/Export saves job configuration settings to its own profile file format (.ie file
extension). Comparing to the legacy .kw* standard, it brings more flexibility as you now can
apply saved job settings across various workspaces. The .ie profile file format is not
supported in other RelativityOne data transfer tools.
17. Click the Export button to start the exporting process.
18. When it's complete, the job summary lists the records exported successfully (including Load files con-
taining .dat, opt, etc.), errors found, and path to your exported files.
n
If using Import/Export with Express Transfer active, the exported files automatically start to
download. You can track the download's progress in the Exporting dialog or in Express

Import/Export Guide 123
Transfer (see Express Transfer Job tracking and history).
Note: If you ran the job with Express Transfer active, you can close the
Import/Export application while the job is running, if desired, and the transfer
job will continue uninterrupted. You can monitor the progress and history of the
job within Express Transfer. You do not have to be logged into RelativityOne to
view information within the Express Transfer application.
n
If using Import/Export in web only mode, the application generates a zip file containing
the exported data that can be download. Click the Download button to save the expor-
ted data zip file to your computer, or click the Close button to close the dialog without
downloading the file.
Note: When downloading zip files to your computer, you can configure your
browser to allow you save the zip file to a custom file name of your choosing as
well as to a specific folder destination instead of using the default file name and
destination. In the Settings menu of your browser, select Downloads. Toggle on
the option to ask where to save or what to do with each file before downloading.
Now, when you click the Download button in the Exporting dialog, your browser
will display a dialog that allows you to change the default zip file name and
select a destination other than the default one. If needed, you can also create a
new folder in the chosen destination for the exported data.
n
If you chose to Export to Staging Area when setting up your export job on the Export
Settings dialog, the application automatically exports data to your RelativityOne file
share and skips the downloading process. Go the path listed on the dialog to access the
exported data files.
For more information on where Import/Export saves files, see the Community article, Import/Export: Where
Files Are Saved By The Import/Export Application.
You can always view the job's Exporting dialog information after it's closed by going to the Import/ExportJob
page and clicking the job name link. The Job page also contains more details about all jobs.

Import/Export Guide 124
8.3 Exporting a production set load file
Note: Starting September 1, 2024, we’re streamlining our Staging boundaries to more effectively
separate staging data from workspace and system data. With this change, you will no longer be able to
write to or access data outside of the defined staging area. Folders that will remain within the
Staging area: ARM, ProcessingSource, StructuredData, and TenantVM. Folders that will be removed:
FTA, Temp, Export, and dtSearch, in addition to any other folders that you manually created. Refer to the
Staging Area FAQ in Community for more details.
You can use Import/Export to export a production set load file out of RelativityOne.
If you want to use Import/Export with Express Transfer, which is the recommended method for data transfer,
refer to Express Transfer overview on page27 for more information. With Express Transfer activated, you
can run up to five concurrent export jobs on a single client machine. For more information, see Concurrent
and consecutive jobs on page8.
Refer to Import/Export load file specifications for more information regarding load files. Also see General
recommendations for structured data import and export jobs on page24.
To export a production load file:
1.
Use tabs, search, or the quick nav bar to navigate to the Import/Export Job page.
2.
On the Import/Export Job page, click the New Import/Export Job button to start a new job.
3.
On the Choose workflow dialog, click the Export button, then click Production Set.
Note: If Express Transfer has been activated, the Express Transfer section will display a
status of Active. See Activating and deactivating Express Transfer on page39 for more
information.
4.
On the Export Settings, complete the following fields and click Continue.

Import/Export Guide 125
Data Source:
n
Job Name—provide a descriptive job name so that you can quickly identify and track
that job on the Import/Export Job page. The Job name field accepts up to 50 characters.
n
Profile—are job configuration settings that were previously saved to a profile file (.ie or
.kw*) so they can be reused when creating future jobs with the same or similar settings
in RelativityOne, which saves time and effort as well as helps prevent data entry errors
when you're mapping fields, for example.
o
None—select this option if you do not desire to use a profile for this export or if
you intend to create a new profile based on the settings entered in the upcoming
steps. You will be able to save the profile settings later on the “Export Job
Configuration Summary” dialog. The file extension for the new profile created will
be “.ie”.
o
From Local Disk Profiles—use this option to select a previously saved
Import/Export profile (.ie file) or an existing .kw* profile to reuse the job settings for

Import/Export Guide 126
this workflow. Use the drag and drop feature or browse for a file to choose it. All
job settings provided within the selected profile file will be automatically entered
where applicable in the succeeding workflow dialogs.
n
Production—choose the desired production set to export.
Location and Files:
n
Export Location Type—select one or both of these options:
o
Local Disk—select this option to export the selected production set data to the
Staging area and compress it to a single zip file. Once complete, you can down-
load the zip file with your web browser directly to a local disk by clicking the Down-
load button. This is the recommended option when Express Transfer is activated.
Note: This temporary non-Staging Area location is automatically
deleted once the download is completed when using Express
Transfer or is deleted after 5 days when using web mode for
downloads. This data is not included in your Staging Area
threshold.
n
Staging Area—select this option to create a copy of the data in the Struc-
turedData folder in the Staging Area.You will need to use Staging Explorer later
to download data. The exported data will not be compressed.
n
Local Disk and Staging Area—select both options to create a copy of the selec-
ted data in the StructuredData folder in the Staging Area, as well as download it to
your local disk with Express Transfer or web browser
Note: The StructuredData folder is included in your Staging Area
threshold. To avoid additional storage costs, you may want to
delete the exported data from that folder once it is no longer
needed.
Notifications:
n
(Optional) Notification Addresses—enable email notifications by providing the email
addresses of those who should get notified once the job completed, failed, or canceled.
5.
On the Load File Settings dialog, select the data file format and data file encoding, then click
Continue.

Import/Export Guide 127
n
Data File Format—select one of the formats below for the load file you are exporting:
o
.dat (Concordance)—load file exports with the standard Concordance
delimiters.
o
.csv (Comma separated)—load file exports with comma separated delimiters
o
.html (HTML)—load file is in HTML format and contains hyperlinks to launch any
exported files.
o
.txt (Custom)—load file exports with the custom delimiters that you select in the
Load File Characters section that displays.
n
Start Line—select a line (record number) that identifies the initial document for export.
The application begins by exporting the document with this number and continues by
exporting documents with subsequent record numbers.

Import/Export Guide 128
n
Data File Encoding—select the encoding type for the document-level load file from the
drop-down.
n
Regional Settings (Date and Time)—select the desired format for the exported date
and time data. A preview of the chosen format will appear below the next field. Your
selection for this field will remain for future export jobs until you change it or clear the
browser cache. Clearing the browser cache will default the format to "English (United
States)."
n
Long Time (with seconds)—by default, this option is toggled off. Toggle it on if you
want to include seconds with the exported date and time information. For example, the
time will export as 12:10 AM (HH:MM AM/PM) when the toggle is off, and it will export as
12:10:25 AM (HH:MM:SS AM/PM) when the toggle is on.
n
Export Multiple Choice Fields as Nested—select this option to maintain the hierarchy
of RelativityOne multiple-choice lists, when applicable. The nested value delimiter, a
backslash, separates child choices.
6.
On the Select Fields dialog, choose the Workspace Fields that you want to export by moving them to
the Selected Fields box, then click Continue. The Workspace Fields box displays all available fields,
but only the fields in the Selected Fields box will be exported.
Note: The Production::Begin Bates and Production::End Bates fields automatically populate
in the Selected Fields column.
You can do the following to move fields:
n
Highlight a field and click one of the directional arrow buttons in the center to move it
between boxes
n
Double-click on a field to move it between boxes
n
Use CTRL+ left mouse click to select multiple fields, then choose the desired directional
arrow to move between boxes
n
In Selected Fields column, set the load file column order by dragging the fields to their
proper ordering position.

Import/Export Guide 129
7.
In order to include native files and/or images in the exported data, select the corresponding options
on the File Settings dialog, then click Continue.
Natives:
n
Export Native Files toggle—select this option to export native files.
Images:
n
Export Images toggle—select this option to include images in the export. If this option
is toggled on, then you must set the Data File Format and the File Type for export
images.
n
DataFile Format—select one of the formats for image-level load file: Opticon, IPRO, or
IPRO (FullText).

Import/Export Guide 130
n
File Type—select one of the file types: Single-page TIFF/JPG, Multi-page TIFF/JPG, or
Rendered PDF.
8.
On the File And Folders dialog, choose the desired naming convention and folder structure for the
exported files, then click Continue.
Text and Native File Names:
n
Named after—select one of the following naming conventions for exported files:
o
Control Number—select this option to name the files after the control number.
o
Production Begin Bates—select this option to name the files after the
production number.
o
Custom name—select this option to customize native and text file names. If this
option is selected, enter data in the following fields that display:
l
Prefix—choose whether to have the prefix be the Control Number or
Production Begin Bates.
l
Select spacing—select the desired spacing option from the drop-down
list.
l
Select field—choose a field from your workspace or choose Custom Text
and provide your text.

Import/Export Guide 131
l
Preview—you will be able to view a Preview of the custom file name to see
if it's what you want and make changes in the fields as needed.
n
Append original filename toggle—select this option to append the original file name,
which is defined as the file name as it was on disk, to the end of the exported file name.
Folder Structure:
n
Group files by—select one of the options below for how to group the exported file:
Note: Depending on the structure of your exported data, export job
performance degradation may result and be several times longer when using
Workspace Structure compared with using File Type. Unless it is necessary
to use Workspace Structure, we recommend using the File Type option for the
export job.
n
File Type—select this option to group files by their type and place them in
separate folders based on type (such as in Natives, Images, Text, and
PDFs folders).
n
Workspace Structure—select this option to preserve the workspace
folder structure. This option may reduce the time of preparing production
data since the files will not need to be manually realigned later to replicate
the folder structure in the workspace.
9.
On the Text File Settings dialog, you can select to export text field as files and then choose the text
file encoding as follows.
n
Export Text Field as Files toggle—determines the export method of the extracted text
or OCR. Select this option if you want to export files as individual document-level text
files, with one file per document. Deselect it to include text as part of your load file.
n
Text File Encoding—if Export Text Field as Files is toggled on, then select the
encoding format for the document-level text files.
n
Text Fields Precedence—select and assign an order to long text fields that Relativity
checks for text when performing an export. Relativity adds the Text Fields Precedence
column as the last column in the load file. You must select at least one long text field to
use this functionality. Choose the fields from the Add Fields drop-down, then click Add.

Import/Export Guide 132
To delete a selected field, click its trashcan icon.
To order the precedence of the fields, click the six-dot handle next to the field
name and drag it to the proper ordering position. During an export, the system
checks the topmost (first) field in the list for text, and if the field is null, it checks
the next field in order of precedence for text, and so on. When it finds a field that
contains text, Relativity adds the contents of that field to the Text Fields
Precedence column in the document load file, and then continues checking the
fields for the next document and so on. For example, if you listed the Extracted
Text field first and the Production OCR field second, the system would first check
the Extracted Text field for content, and if it was null, it would move on to the
Production OCRfield, and so on.
The Text Fields Precedence column displays the file path to the exported files if
you select the Export Text Field as Files checkbox above.
10. Click Continue.
11. (Optional) In the Advanced Settings dialog, toggle on Set Custom Information if you
want to customize the volume and folder information using the fields below. Otherwise,
leave the toggle off.

Import/Export Guide 133
Volume Information—this section controls the naming and size of the volume identifier. Set
the following options in this section:
n
Prefix—enter the alpha prefix for the volume identifier.
n
Start—enter the first number used for the numeric section of the volume identifier.
Multiple volumes increment numbers during export creating unique volume identifiers.
n
# of digits—enter the number of digits attached to the prefix. For example, if you enter
3, the output is VOL001, VOL002, and so on.
n
Max Size (MB)—enter the maximum size allowed for each volume.
Subdirectory Information—this section controls the naming and size of volume sub-folders.
Set the following options in this section:
n
Image Prefix—enter the alpha prefix for the sub-directory that stores exported images.
n
Native Prefix—enter the alpha prefix for the sub-directory that stores exported native
files.

Import/Export Guide 134
n
Text Prefix—enter the alpha prefix for the sub-directory that stores exported extracted
text files.
n
PDF Prefix—enter the alpha prefix for the sub-directory that stores exported extracted
PDF files.
n
Start—enter the starting number for the sub-directories.
n
# of digits—select the number of digits of the sub-directory prefix. For example, if you
enter 3, the output is IMG001, IMG002, and so on.
n
Max Files—select the number of files to store in each subdirectory.
12. Click Continue.
13. On the Export Job Configuration Summary, review the export job settings and go back
to make any corrections as needed.
14. (Optional) Click Save Settings on the Export Job Configuration Summary dialog to
export the job configuration settings entered thus far to its own profile file (.ie file
extension) and save it on your computer so you can reuse these settings when creating
a new export job with Import/Export.
Note: Import/Export saves job configuration settings to its own profile file format (.ie
file extension). Comparing to the legacy .kw* standard, it brings more flexibility as you
now can apply saved job settings across various workspaces. The .ie profile file
format is not supported in other RelativityOne data transfer tools.
15. Click the Export button to start the exporting process.
16. When it's complete, the job summary lists the records exported successfully (including
Load files containing .dat, opt, etc.), errors found, and path to your exported files.

Import/Export Guide 135
n
If using Import/Export with Express Transfer active, the exported files
automatically start to download. You can track the download's progress in the
Exporting dialog or in Express Transfer (see Express Transfer Job tracking and
history).
Note: If you ran the job with Express Transfer active, you can close the
Import/Export application while the job is running, if desired, and the
transfer job will continue uninterrupted. You can monitor the progress
and history of the job within Express Transfer. You do not have to be
logged into RelativityOne to view information within the Express Transfer
application.
n
If using Import/Export in web only mode, the application generates a zip file
containing the exported data that can be download. Click the Download button to
save the exported data zip file to your computer, or click the Close button to close
the dialog without downloading the file.
Note: When downloading zip files to your computer, you can configure
your browser to allow you save the zip file to a custom file name of your
choosing as well as to a specific folder destination instead of using the
default file name and destination. In the Settings menu of your browser,
select Downloads. Toggle on the option to ask where to save or what to
do with each file before downloading. Now, when you click the Download
button in the Exporting dialog, your browser will display a dialog that
allows you to change the default zip file name and select a destination
other than the default one. If needed, you can also create a new folder in
the chosen destination for the exported data.
n
If you chose to Export to Staging Area when setting up your export job on the
Export Settings dialog, the application automatically exports data to your
RelativityOne file share and skips the downloading process. Go the path listed on
the dialog to access the exported data files.
For more information on where Import/Export saves files, see the Community article,
Import/Export: Where Files Are Saved By The Import/Export Application.

Import/Export Guide 136
You can always view the job's Exporting dialog information after it's closed by going to the
Import/ExportJob page and clicking the job name link. The Job page also contains more
details about all jobs.
8.4 Exporting an RDO load file
Note: Starting September 1, 2024, we’re streamlining our Staging boundaries to more effectively
separate staging data from workspace and system data. With this change, you will no longer be able to
write to or access data outside of the defined staging area. Folders that will remain within the
Staging area: ARM, ProcessingSource, StructuredData, and TenantVM. Folders that will be removed:
FTA, Temp, Export, and dtSearch, in addition to any other folders that you manually created. Refer to the
Staging Area FAQ in Community for more details.
You can use Import/Export to export Relativity's dynamic objects (RDO) load file out of RelativityOne.
If you want to use Import/Export with Express Transfer, which is the recommended method for data transfer,
refer to Express Transfer overview on page27 for more information. With Express Transfer activated, you
can run up to five concurrent export jobs on a single client machine. For more information, see Concurrent
and consecutive jobs on page8.
Refer to Import/Export load file specifications for more information regarding load files. Also see General
recommendations for structured data import and export jobs on page24.
To export an RDOload file:
1. Use tabs, search, or the quick nav bar to navigate to the Import/Export Job page.
2. On the Import/Export Job page, click the New Import/Export Job button to start a new job.
3. On the Choose workflow dialog, click the Export button, then click RDO.

Import/Export Guide 137
Note: If Express Transfer has been activated, the Express Transfer section will display a
status of Active. See Activating and deactivating Express Transfer on page39 for more
information.
4. On the Export Settings, complete the following fields, then click Continue:
Data Source:
n
Job Name—provide a descriptive job name so that you can quickly identify and track
that job on the Import/Export Job page. The Job name field accepts up to 50 characters.

Import/Export Guide 138
n
Relativity Object Type—select the Object Type you want to export.
Note: If you need to perform a mass export of native translated files, see Mass
exporting translated documents and the Community article Mass Export Native
Translated files via Import/Export.
n
View—select the Object View for the selected Object Type.
n
Profile—are job configuration settings that were previously saved to a profile file (.ie or
.kw*) so they can be reused when creating future jobs with the same or similar settings
in RelativityOne, which saves time and effort as well as helps prevent data entry errors
when you're mapping fields, for example.
o
None—select this option if you do not desire to use a profile for this export or if
you intend to create a new profile based on the settings entered in the upcoming
steps. You will be able to save the profile settings later on the “Export Job Con-
figuration Summary” dialog. The file extension for the new profile created will be
“.ie”.
o
From Local Disk Profiles—use this option to select a previously saved
Import/Export profile (.ie file) or an existing .kw* profile to reuse the job settings for
this workflow. Use the drag and drop feature or browse for a file to choose it. All
job settings provided within the selected profile file will be automatically entered
where applicable in the succeeding workflow dialogs.
Location and Files:
n
Export Location Type—select one or both of these options:
o
Local Disk—select this option to export the selected production set data to the
Staging area and compress it to a single zip file. Once complete, you can down-
load the zip file with your web browser directly to a local disk by clicking the Down-
load button. This is the recommended option when Express Transfer is activated.
Note: This temporary non-Staging Area location is automatically
deleted once the download is completed when using Express
Transfer or is deleted after 5 days when using web mode for
downloads. This data is not included in your Staging Area
threshold.
n
Staging Area—select this option to create a copy of the data in the Struc-
turedData folder in the Staging Area.You will need to use Staging Explorer later
to download data. The exported data will not be compressed.
n
Local Disk and Staging Area—select both options to create a copy of the selec-
ted data in the StructuredData folder in the Staging Area, as well as download it to
your local disk with Express Transfer or web browser

Import/Export Guide 139
Note: The StructuredData folder is included in your Staging Area
threshold. To avoid additional storage costs, you may want to
delete the exported data from that folder once it is no longer
needed.
Notifications:
n
(Optional) Notification Addresses—enable email notifications by providing the email
addresses of those who should get notified once the job completed, failed, or canceled.
5. On the Load File Settings dialog, select the data file format and data file encoding, then click
Continue.
n
Data File Format—select one of the formats below for the load file you are exporting:
n
.dat (Concordance)—load file exports with the standard Concordance
delimiters.
n
.csv (Comma separated)—load file exports with comma separated delim-
iters
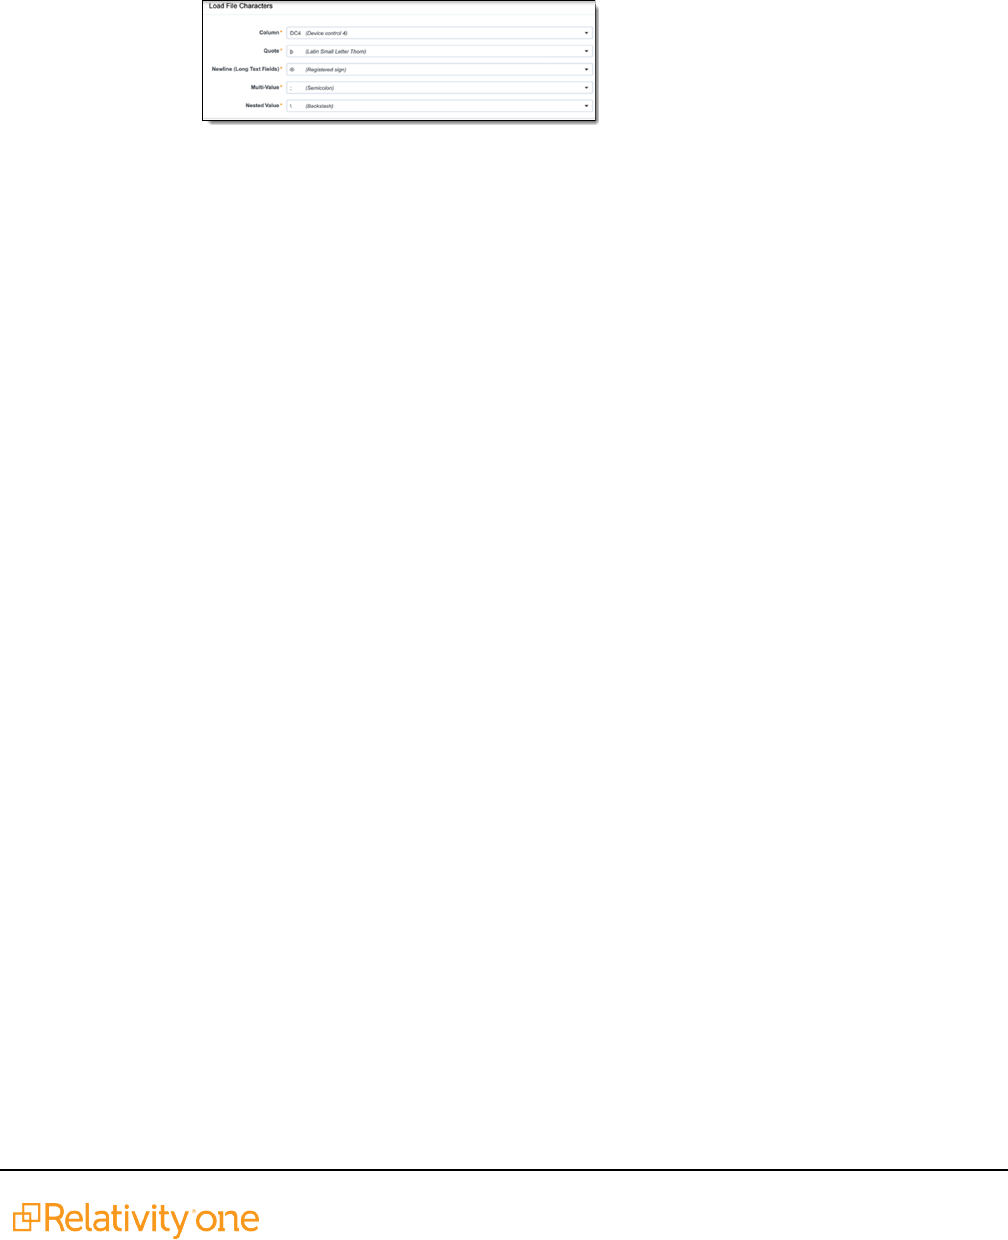
Import/Export Guide 140
n
.html (HTML)—load file is in HTML format and contains hyperlinks to
launch any exported files.
n
.txt (Custom)—load file exports with the custom delimiters that you select
in the Load File Characters section that displays when this option is selec-
ted.
n
Start Line—select a line (record number) that identifies the initial document for export.
The application begins by exporting the document with this number and continues by
exporting documents with subsequent record numbers.
n
Data File Encoding—select the encoding type for the document-level load file from the
drop-down.
n
Regional Settings (Date and Time)—select the desired format for the exported date
and time data. A preview of the chosen format will appear below the next field. Your
selection for this field will remain for future export jobs until you change it or clear the
browser cache. Clearing the browser cache will default the format to "English (United
States)."
n
Long Time (with seconds)—by default, this option is toggled off. Toggle it on if you
want to include seconds with the exported date and time information. For example, the
time will export as 12:10 AM (HH:MM AM/PM) when the toggle is off, and it will export as
12:10:25 AM (HH:MM:SS AM/PM) when the toggle is on.
n
Export Multiple Choice Fields as Nested—select this option to maintain the hierarchy
of RelativityOne multiple-choice lists, when applicable. The Nested Value delimiter, a
backslash, separates child choices.
6. On the Select Fields dialog, choose the Workspace Fields that you want to export by moving them to
the Selected Fields box, then click Continue.
The Selected Fields column is automatically populated with fields that are included in the
selected view. The Workspace Fields box displays all available fields. Only the fields listed in
the Selected Fields box will be exported.
You can do the following to move fields:
n
Highlight a field and click one of the directional arrow buttons in the center to move it
between boxes
n
Double-click on a field to move it between boxes
n
Use CTRL+ left mouse click to select multiple fields, then choose the desired directional
arrow to move between boxes
n
In Selected Fields column, drag fields up and down to set the load file column order

Import/Export Guide 141
7. To include native files in the exported data, toggle on Export Native Files on the File Settings dialog,
and click Continue.
8. On the File And Folders dialog, choose the desired naming convention and folder structure for the
exported files, then click Continue.

Import/Export Guide 142
Text and Native File Names:
n
Named after—select one of the following naming conventions for exported files:
o
Identifier—select this option to name the files using the document iden-
tifier/control number.
o
Custom name—select this option to customize the file names. If this option is
selected, enter data in the following fields that display:
l
Prefix—choose whether to have the prefix be the Control Number or Pro-
duction Begin Bates.
l
Select spacing—select the desired spacing option from the drop-down
list.
l
Select field—choose a field from your workspace or choose Custom Text
and provide your text.
l
Preview—you will be able to view a Preview of the custom file name to see
if it's what you want and make changes in the fields as needed.
n
Append original filename toggle—select this option to append the original file name,
which is defined as the file name as it was on disk, to the end of the exported file name.
9. On the Text File Settings dialog, you can select to export text field as files and then choose the text
file encoding as follows.

Import/Export Guide 143
n
Export Text Field as Files toggle—determines the export method of the extracted text or
OCR. Select this option if you want to export files as individual document-level text files, with
one file per document. Deselect it to include text as part of the load file.
n
Text File Encoding—if Export Text Field as Files is toggled on, then select the encoding
format for the document-level text files.
n
Text Fields Precedence—select and assign an order to long text fields that Relativity checks
for text when performing an export. Relativity adds the Text Fields Precedence column as the
last column in the load file. You must select at least one long text field to use this functionality.
Choose the fields from the Add Fields drop-down, then click Add. To delete a selected field,
click its trashcan icon.

Import/Export Guide 144
To order the precedence of the fields, click the six-dot handle next to the field
name and drag it up or down to the proper ordering position. During an export, the
system checks the topmost (first) field in the list for text, and if the field is null, it
checks the next field in order of precedence for text, and so on. When it finds a
field that contains text, Relativity adds the contents of that field to the Text Fields
Precedence column in the document load file, and then continues checking the
fields for the next document and so on. For example, if you listed the Extracted
Text field first and the Production OCR field second, the system would first check
the Extracted Text field for content, and if it was null, it would move on to the
Production OCRfield, and so on.
The Text Fields Precedence column displays the file path to the exported files if
you select the Export Text Field as Files checkbox above.
10. Click Continue.
11. (Optional) In the Advanced Settings dialog, toggle on Set Custom Information if you want to cus-
tomize the volume and folder information. Otherwise, leave the toggle off.

Import/Export Guide 145
Volume Information—this section controls the naming and size of the volume identifier. Set
the following options in this section:
n
Prefix—enter the alpha prefix for the volume identifier.
n
Start—enter the first number used for the numeric section of the volume identifier. Mul-
tiple volumes increment numbers during export creating unique volume identifiers.
n
# of digits—enter the number of digits attached to the prefix. For example, if you enter
3, the output is VOL001, VOL002, and so on.
n
Max Size (MB)—enter the maximum size allowed for each volume.

Import/Export Guide 146
Subdirectory Information—this section controls the naming and size of volume sub-folders.
Set the following options in this section:
n
Native Prefix—enter the alpha prefix for the sub-directory that stores exported native
files.
n
Start—enter the starting number for the sub-directories.
n
# of digits—select the number of digits of the sub-directory prefix. For example, if you
enter 3, the output is IMG001, IMG002, and so on.
n
Max Files—select the number of files to store in each sub-directory.
12. Click Continue.
13. On the Export Job Configuration Summary, review the export job settings and go back to make any
corrections as needed.
14. (Optional) Click Save Settings on the Export Job Configuration Summary dialog to export the job
configuration settings entered thus far to its own profile file (.ie file extension) and save it on your com-
puter so you can reuse these settings when creating a new export job with Import/Export.
Note: Import/Export saves job configuration settings to its own profile file format (.ie file
extension). Comparing to the legacy .kw* standard, it brings more flexibility as you now can
apply saved job settings across various workspaces. The .ie profile file format is not
supported in other data transfer tools.
15. Click the Export button to start the exporting process.
16. When it's complete, the job summary lists the records exported successfully (including Load files con-
taining .dat, opt, etc.), errors found, and path to your exported files.

Import/Export Guide 147
n
If using Import/Export with Express Transfer active, the exported files automatically start to
download. You can monitor the download's progress in the Exporting dialog or in Express
Transfer (see Express Transfer Job tracking and history).
Note: If you ran the job with Express Transfer active, you can close the
Import/Export application while the job is running, if desired, and the transfer
job will continue uninterrupted. You can monitor the progress and history of the
job within Express Transfer. You do not have to be logged into RelativityOne to
view information within the Express Transfer application.
n
If using Import/Export in web only mode, the application generates a zip file containing
the exported data that can be download. Click the Download button to save the expor-
ted data zip file to your computer, or click the Close button to close the dialog without
downloading the file.
Note: When downloading zip files to your computer, you can configure your
browser to allow you save the zip file to a custom file name of your choosing as
well as to a specific folder destination instead of using the default file name and
destination. In the Settings menu of your browser, select Downloads. Toggle on
the option to ask where to save or what to do with each file before downloading.
Now, when you click the Download button in the Exporting dialog, your browser
will display a dialog that allows you to change the default zip file name and
select a destination other than the default one. If needed, you can also create a
new folder in the chosen destination for the exported data.
n
If you chose to Export to Staging Area when setting up your export job on the Export
Settings dialog, the application automatically exports data to your RelativityOne file
share and skips the downloading process. Go the path listed on the dialog to access the
exported data files.
For more information on where Import/Export saves files, see the Community article, Import/Export: Where
Files Are Saved By The Import/Export Application.
You can always view the job's Exporting dialog information after it's closed by going to the Import/ExportJob
page and clicking the job name link. The Job page also contains more details about all jobs.

Import/Export Guide 148
8.5 Exporting a saved search load file
Note: Starting September 1, 2024, we’re streamlining our Staging boundaries to more effectively
separate staging data from workspace and system data. With this change, you will no longer be able to
write to or access data outside of the defined staging area. Folders that will remain within the
Staging area: ARM, ProcessingSource, StructuredData, and TenantVM. Folders that will be removed:
FTA, Temp, Export, and dtSearch, in addition to any other folders that you manually created. Refer to the
Staging Area FAQ in Community for more details.
You can use Import/Export to export a saved search load file out of RelativityOne.
If you want to use Import/Export with Express Transfer, which is the recommended method for data transfer,
refer to Express Transfer overview on page27 for more information. With Express Transfer activated, you
can run up to five concurrent export jobs on a single client machine. For more information, see Concurrent
and consecutive jobs on page8.
Refer to Import/Export load file specifications for more information regarding load files. Also see General
recommendations for structured data import and export jobs on page24.
To export a saved search load file:
1.
Use tabs, search, or the quick nav bar to navigate to the Import/Export Job page.
2.
On the Import/Export Job page, click the New Import/Export Job button to start a new job.
3.
On the Choose workflow dialog, click the Export button, then click Saved Search.
Note: If Express Transfer has been activated, the Express Transfer section will display a
status of Active. See Activating and deactivating Express Transfer on page39 for more
information.
4.
On the Export Settings, complete the following fields, then click Continue:

Import/Export Guide 149
Data Source:
n
Job Name—provide a descriptive job name so that you can quickly identify and track
that job on the Import/Export Job page. The Job name field accepts up to 50 characters.
n
Profile—are job configuration settings that were previously saved to a profile file (.ie or
.kw*) so they can be reused when creating future jobs with the same or similar settings
in RelativityOne, which saves time and effort as well as helps prevent data entry errors
when you're mapping fields, for example.
o
None—select this option if you do not desire to use a profile for this export or if
you intend to create a new profile based on the settings entered in the upcoming
steps. You will be able to save the profile settings later on the “Export Job
Configuration Summary” dialog. The file extension for the new profile created will
be “.ie”.
o
From Local Disk Profiles—use this option to select a previously saved
Import/Export profile (.ie file) or an existing .kw* profile to reuse the job settings for
this workflow. Use the drag and drop feature or browse for a file to choose it. All

Import/Export Guide 150
job settings provided within the selected profile file will be automatically entered
where applicable in the succeeding workflow dialogs.
n
Saved Search—choose the desired saved search to export.
Location and Files:
n
Export Location Type—select one or both of these options:
o
Local Disk—select this option to export the selected production set data to the
Staging area and compress it to a single zip file. Once complete, you can down-
load the zip file with your web browser directly to a local disk by clicking the Down-
load button. This is the recommended option when Express Transfer is activated.
Note: This temporary non-Staging Area location is automatically
deleted once the download is completed when using Express
Transfer or is deleted after 5 days when using web mode for
downloads. This data is not included in your Staging Area
threshold.
n
Staging Area—select this option to create a copy of the data in the Struc-
turedData folder in the Staging Area.You will need to use Staging Explorer later
to download data. The exported data will not be compressed.
n
Local Disk and Staging Area—select both options to create a copy of the selec-
ted data in the StructuredData folder in the Staging Area, as well as download it to
your local disk with Express Transfer or web browser
Note: The StructuredData folder is included in your Staging Area
threshold. To avoid additional storage costs, you may want to
delete the exported data from that folder once it is no longer
needed.
Notifications:
n
(Optional) Notification Addresses—enable email notifications by providing the email
addresses of those who should get notified once the job completed, failed, or canceled.
5.
On the Load File Settings dialog, select the data file format and data file encoding, then click
Continue.

Import/Export Guide 151
n
Data File Format—select one of the formats below for the load file you are exporting:
o
.dat (Concordance)—load file exports with the standard Concordance
delimiters.
o
.csv (Comma separated)—load file exports with comma separated delimiters
o
.html (HTML)—load file is in HTML format and contains hyperlinks to launch any
exported files.
o
.txt (Custom)—load file exports with the custom delimiters that you select in the
Load File Characters section that displays when this option is selected.
n
Start Line—select a line (record number) that identifies the initial document for export.
The application begins by exporting the document with this number and continues by
exporting documents with subsequent record numbers.

Import/Export Guide 152
n
Data File Encoding—select the encoding type for the document-level load file from the
drop-down.
n
Regional Settings (Date and Time)—select the desired format for the exported date
and time data. A preview of the chosen format will appear below the next field. Your
selection for this field will remain for future export jobs until you change it or clear the
browser cache. Clearing the browser cache will default the format to "English (United
States)."
n
Long Time (with seconds)—by default, this option is toggled off. Toggle it on if you
want to include seconds with the exported date and time information. For example, the
time will export as 12:10 AM (HH:MM AM/PM) when the toggle is off, and it will export as
12:10:25 AM (HH:MM:SS AM/PM) when the toggle is on.
n
Export Multiple Choice Fields as Nested—select this option to maintain the hierarchy
of RelativityOne multiple-choice lists, when applicable. The Nested Value delimiter, a
backslash, separates child choices.
6.
On the Select Fields dialog, choose the Workspace Fields that you want to export by moving them to
the Selected Fields box, then click Continue. The Workspace Fields box displays all available fields,
but only the fields in the Selected Fields box will be exported.
Note: The Production::Begin Bates and Production::End Bates fields automatically populate
in the Selected Fields column.
You can do the following to move fields:
n
Highlight a field and click one of the directional arrow buttons in the center to move it
between boxes
n
Double-click on a field to move it between boxes
n
Use CTRL+ left mouse click to select multiple fields, then choose the desired directional
arrow to move between boxes
n
In Selected Fields column, set the load file column order by dragging the fields to their
proper ordering position.

Import/Export Guide 153

Import/Export Guide 154
7.
On the Production Image Type dialog, select the images you want to export.
Production Image Type:
n
Original Images—select to export only the original, non-produced images.
n
Produced Images—select to export a produced version of the images.
Select Productions:
n
Include original images toggle—select to export original images for the documents
that are not in a specified production.
n
Move the productions that you want to export from theAvailable Productions box to the
Selected Productions box.
Note: Any produced native files will be exported as a native instead of an image. Only one
produced image is exported based on precedence in the list. If the document is in the
topmost production, that version is exported. If not, Relativity checks for the document in the
second production and so on. If the document is not a part of any of the selected
productions, and "Include original images" toggle is enabled, then the original document is
produced.

Import/Export Guide 155
8.
On the File Settings dialog, select the options to include native files, images, and/or PDFs in the
exported data, then click Continue.
n
Export Native Files toggle—select this option to export native files.
n
Export Images toggle—select this option to include images in the export. If toggled on,
then you must set the Data File Format for image-level load file (Opticon, IPRO, or
IPRO (FullText)) and the File Type for export images (Single-page TIFF/JPG, Multi-
page TIFF/JPG, or Rendered PDF).
n
Export PDF toggle—select this option to include existing stored PDFs in the export. No
document-to-PDFconversion functionality is performed in this step. The PDFs must
already exist as PDF files. If this option is toggled on, then you must set the Data File
Format for PDF-level load file (Opticon, IPRO, or IPRO (FullText)).
9.
On the File And Folders dialog, choose the desired naming convention and folder structure for the
exported files, then click Continue.

Import/Export Guide 156
Text and Native File Names:
n
Named after—select one of the following naming conventions for exported files:
o
Control Number—select this option to name the files using the document iden-
tifier/control number.
o
Custom name—select this option to customize the file names. If selected, enter
data in the following fields that display:
l
Prefix—choose whether to have the prefix be the Control Number or
Production Begin Bates.
l
Select spacing—select the desired spacing option from the drop-down
list.
l
Select field—choose a field from your workspace or choose Custom Text
and enter your text.
l
Preview—you will be able to view a Preview of the custom file name to see
if it's what you want and make changes in the fields as needed.
n
Append original filename toggle—select this option to append the original file name,
which is defined as the file name as it was on disk, to the end of the exported file name.
Folder Structure:
n
Group files by—select one of the options below for how to group the exported files:

Import/Export Guide 157
Note: Depending on the structure of your exported data, export job
performance degradation may result and be several times longer when using
Workspace Structure compared with using File Type. Unless it is necessary
to use Workspace Structure, we recommend using the File Type option for the
export job.
n
File Type—select this option to group files by their type and place them in
separate folders based on type (such as in Natives, Images, Text, and
PDFs folders).
n
Workspace Structure—select this option to preserve the workspace
folder structure. This option may reduce the time of preparing production
data since the files will not need to be manually realigned later to replicate
the folder structure in the workspace.
10.
On the Text File Settings dialog, you can select to export text field as files and then choose the text
file encoding as follows.
n
Export Text Field as Files toggle—determines the export method of the extracted text or
OCR. Select this option if you want to export files as individual document-level text files, with
one file per document. Deselect it to include text as part of the load file.
n
Text File Encoding—if Export Text Field as Files is toggled on, then select the encoding
format for the document-level text files.
n
Text Fields Precedence—select and assign an order to long text fields that Relativity checks
for text when performing an export. Relativity adds the Text Fields Precedence column as the
last column in the load file. You must select at least one long text field to use this functionality.
Choose the fields from the Add Fields drop-down, then click Add. To delete a selected field,
click its trashcan icon.

Import/Export Guide 158
To order the precedence of the fields, click the six-dot handle next to the field
name and drag it to the proper ordering position. During an export, the system
checks the topmost (first) field in the list for text, and if the field is null, it checks
the next field in order of precedence for text, and so on. When it finds a field that
contains text, Relativity adds the contents of that field to the Text Fields
Precedence column in the document load file, and then continues checking the
fields for the next document and so on. For example, if you listed the Extracted
Text field first and the Production OCR field second, the system would first check
the Extracted Text field for content, and if it was null, it would move on to the
Production OCRfield, and so on.
The Text Fields Precedence column displays the file path to the exported files if
you select the Export Text Field as Files checkbox above.
11. Click Continue.
12.
(Optional) In the Advanced Settings dialog, toggle on Set Custom Information if you want to
customize the volume and folder information. Otherwise, leave the toggle off.

Import/Export Guide 159
Volume Information—this section controls the naming and size of the volume identifier. Set the
following options in this section:
n
Prefix—enter the alpha prefix for the volume identifier.
n
Start—enter the first number used for the numeric section of the volume identifier. Multiple
volumes increment numbers during export creating unique volume identifiers.
n
# of digits—enter the number of digits attached to the prefix. For example, if you enter 3, the
output is VOL001, VOL002, and so on.
n
Max Size (MB)—enter the maximum size allowed for each volume.
Subdirectory Information—this section controls the naming and size of volume sub-folders. Set the
following options in this section:
n
Image Prefix—enter the alpha prefix for the sub-directory that stores exported images.
n
Native Prefix—enter the alpha prefix for the sub-directory that stores exported native files.
n
Text Prefix—enter the alpha prefix for the sub-directory that stores exported extracted text
files.

Import/Export Guide 160
n
PDF Prefix—enter the alpha prefix for the sub-directory that stores exported extracted PDF
files.
n
Start—enter the starting number for the sub-directories.
n
# of digits—select the number of digits of the sub-directory prefix. For example, if you enter 3,
the output is IMG001, IMG002, and so on.
n
Max Files—select the number of files to store in each sub-directory.
13.
Click Continue.
14.
On the Export Job Configuration Summary, review the export job settings and go back to make any
corrections as needed.
15.
(Optional) Click Save Settings on the Export Job Configuration Summary dialog to export the job
configuration settings entered thus far to its own profile file (.ie file extension) and save it on your
computer so you can reuse these settings when creating a new import job with Import/Export.
Note: Import/Export saves job configuration settings to its own profile file format (.ie file extension).
Comparing to the legacy .kw* standard, it brings more flexibility as you now can apply saved job
settings across various workspaces. The .ie profile file format is not supported in other
RelativityOne data transfer tools.
16. Click Export to begin the exporting process.
17. When it's complete, the job summary lists the records exported successfully (including Load files con-
taining .dat, opt, etc.), errors found, and path to your exported files.
n
If using Import/Export with Express Transfer active, the exported files automatically start to
download. You can track the download's progress in the Exporting dialog or in Express Trans-
fer (see Express Transfer Job tracking and history).

Import/Export Guide 161
Note: If you ran the job with Express Transfer active, you can close the
Import/Export application while the job is running, if desired, and the transfer
job will continue uninterrupted. You can monitor the progress and history of the
job within Express Transfer. You do not have to be logged into RelativityOne to
view information within the Express Transfer application.
n
If using Import/Export in web only mode, the application generates a zip file containing
the exported data that can be download. Click the Download button to save the expor-
ted data zip file to your computer, or click the Close button to close the dialog without
downloading the file.
Note: When downloading zip files to your computer, you can configure your
browser to allow you save the zip file to a custom file name of your choosing as
well as to a specific folder destination instead of using the default file name and
destination. In the Settings menu of your browser, select Downloads. Toggle on
the option to ask where to save or what to do with each file before downloading.
Now, when you click the Download button in the Exporting dialog, your browser
will display a dialog that allows you to change the default zip file name and
select a destination other than the default one. If needed, you can also create a
new folder in the chosen destination for the exported data.
n
If you chose to Export to Staging Area when setting up your export job on the Export
Settings dialog, the application automatically exports data to your RelativityOne file
share and skips the downloading process. Go to the path listed on the dialog to access
the exported data files.
For more information on where Import/Export saves files, see the Community article, Import/Export: Where
Files Are Saved By The Import/Export Application.
You can always view the job's Exporting dialog information after it's closed by going to the Import/ExportJob
page and clicking the job name link. The Job page also contains more details about all jobs.

Import/Export Guide 162
9 Import/Export Job tracking and history
The Import/Export Job page enables you to monitor the progress of jobs currently running, review previous
jobs that were executed, and view other pertinent job details at the workspace level.
Note: To monitor jobs at the instance level, see Import/Export queue on page165.
9.1 Reviewing the Import/Export Job page
To access the page, use tabs, search, or the quick nav bar to navigate to the Import/Export Job page.
The following columns display on the Import/Export Job page:
n
Name—the name of the job. You can click this link to:
o
Return to the data transfer progress dialog if the job is still in progress.
o
View the data transfer summary if the job has completed.
Note: You may need to refresh the Import/Export Job page to see the job's current progress.
n
Job Workflow
o
Unprocessed—for imports of raw native files that require file processing.
o
Document Import—for imports of document load files.
o
Image Import—for imports of image load files.
o
Production Import—for imports of production load files.
o
Production Export—for exports of production load files.
n
Job Status—the current job status.
General job statuses:
n
New—a new job has been configured but has not been started.
n
Uploading phase—data is being uploaded to RelativityOne. Statuses
include: Uploading, Upload Completed, Upload Failed, and Upload
Canceled.
n
Extracting phase—uploaded data is being extracted. Statuses include:
Extraction Requested, Extraction Request Failed, Extracting, Extraction
Failed, and Extraction Canceled.

Import/Export Guide 163
n
Transferring phase—Statuses include: Transfer Requested, Transfer
Request Failed, Transferring, Transfer Failed, and Transfer Canceled
n
Processing phase (only for unprocessed data import)—Statuses
include: Processing Request Failed and Processing Requested.
Detailed job statuses:
n
Import job statuses (for structured data import)—Import Job
Canceled, Import Job Completed, Import Job Completed with Errors,
Import Job Failed, Import Job Inserting, Import Job Scheduled, Import Job
Started, and Import Request Failed
n
Processing job statuses (for unprocessed data import)—Discovery
Not Started, Discovery in Progress, Discovery Completed, Discovery Com-
pleted with Errors, Discovery Failed, Discovery Canceled, Publish Not Star-
ted, Publish in Progress, Publish Completed, Publish Completed with
Errors, Publish Failed, and Publish Canceled.
n
Export job statuses—Export Job Started, Export Job Request Failed,
Export Job Scheduled, Export Job in Progress, Export Job Completed,
Export Job Completed with Errors, Export Job Failed, Export Job
Canceled, Download Read, Download Requested, Download in Progress,
Download Completed, Download Completed with Errors, Download Failed,
and Download Canceled.
n
System Created by—the name of the user who started the job.
n
Date Started Local—the local date and time when the job started.
n
Date End Local—the local date and time when the job was completed.
n
Identifier—displays the ID of the job.
You can extend the Import/Export Job view by creating your own view. Please refer to Creating a view for
more information.
9.2 Support for Mass Operations
The Import/Export Job page only supports the following Mass Operations:
n
Delete—select the check box next to the desired Import/Export jobs that you want to delete from the
Job list. Then, choose Delete from the Mass Operations drop-down list at the bottom of the list. This
action only removes the job line item from the Job list and does not remove the job data that was
already uploaded to or exported from your system. You will need to manually delete those files from
your system.
n
Export to a file—select the check box next to the desired Import/Export jobs in list to export the data
in the current view to a text file. Then, choose Export to File from the Mass Operations drop-down
list at the bottom of the list. The data currently displayed in the rows and columns of the Job list for the
selected jobs will be exported. As you change the columns displayed, so will the data that is exported.

Import/Export Guide 164
If no individual records are selected, Relativity will export all records in the current view, regardless of
how many records are displayed per page.

Import/Export Guide 165
10 Import/Export queue
Import/Export Queue lists the current Import/Export jobs in progress and their status throughout the
RelativityOne instance. You can find the Import/Export Queue under the Queue Management tab.
Notes:
n
Users who have been granted permissions to the Queue Management tab in the Tab Visibility sec-
tion of the Admin Security console automatically have access to the Import/Export Queue tab.
n
To monitor jobs at the workspace level, see Import/Export Job tracking and history on page162.
The Import/Export Queue provides job information for the following fields:
n
Job Name—the name of the job, as entered during creation. Click on the link to navigate to the
Import/Export job details.
n
Job Status—the current state of the job, as represented by the following status values:
o
Extraction Requested
o
Extraction In Progress
o
Extraction Completed
o
Upload Requested
o
Upload In Progress
o
Upload Retried
o
Upload Completed
o
Import Job Requested
o
Import Job Idle
o
Import Job Scheduled
o
Import Job Inserting
o
Processing Requested
o
Discovery Not Started

Import/Export Guide 166
o
Discovery In Progress
o
Discovery Completed
o
Publish Not Started
o
Publish In Progress
o
Transfer Requested
o
Transfer In Progress
o
Transfer Completed
o
Export Job Requested
o
Export Job Scheduled
o
Export Job In Progress
n
Workspace—the workspace in which the job was created and run.
n
Workflow Type—the type of import/export job, as represented by the following values:
o
Unprocessed—job was initiated using the Raw (Unprocessed)Data workflow option within the
Import tab.
o
Document Import—job was initiated using the Structured (Processed) Data work-
flow>Document option within the Import tab.
o
Image Import—job was initiated using the Structured (Processed) Data workflow>Image
option within the Import tab.
o
Production Import—job was initiated using the Structured (Processed) Data work-
flow>Production option within the Import tab.
o
RDO Import—job was initiated using the Structured (Processed) Data workflow>RDO option
within the Import tab.
o
Production Export—job was initiated using the Structured (Processed) Data work-
flow>Production Set option within the Export tab.
o
Saved Search Export—job was initiated using the Structured (Processed) Data work-
flow>Saved Search option within the Export tab.
o
Folder Export—job was initiated using the Structured (Processed) Data workflow>Folder
option within the Export tab.
o
RDO Export—job was initiated using the Structured (Processed) Data workflow>RDO option
within the Export tab.
n
Start Date—the date on which the job was started.
n
Created By—the user who started the job.

Import/Export Guide 167
Proprietary Rights
This documentation (“Documentation”) and the software to which it relates (“Software”) belongs to
Relativity ODA LLC and/or Relativity’s third party software vendors. Relativity grants written license
agreements which contain restrictions. All parties accessing the Documentation or Software must: respect
proprietary rights of Relativity and third parties; comply with your organization’s license agreement,
including but not limited to license restrictions on use, copying, modifications, reverse engineering, and
derivative products; and refrain from any misuse or misappropriation of this Documentation or Software in
whole or in part. The Software and Documentation is protected by the Copyright Act of 1976, as amended,
and the Software code is protected by the Illinois Trade Secrets Act. Violations can involve substantial
civil liabilities, exemplary damages, and criminal penalties, including fines and possible imprisonment.
©2024. Relativity ODALLC. All rights reserved. Relativity® is a registered trademark of Relativity
ODA LLC.
