
Foxclone V50 Return to contents
31 March 2023 Page 1 of 64
Foxclone User Guide
To navigate round the guide:
• Any item in the contents can be clicked to go to that item.
• At the top of every page is a link that will go to the contents list.
• Any items highlighted will go to the item, e.g. this will go to the
contents list.

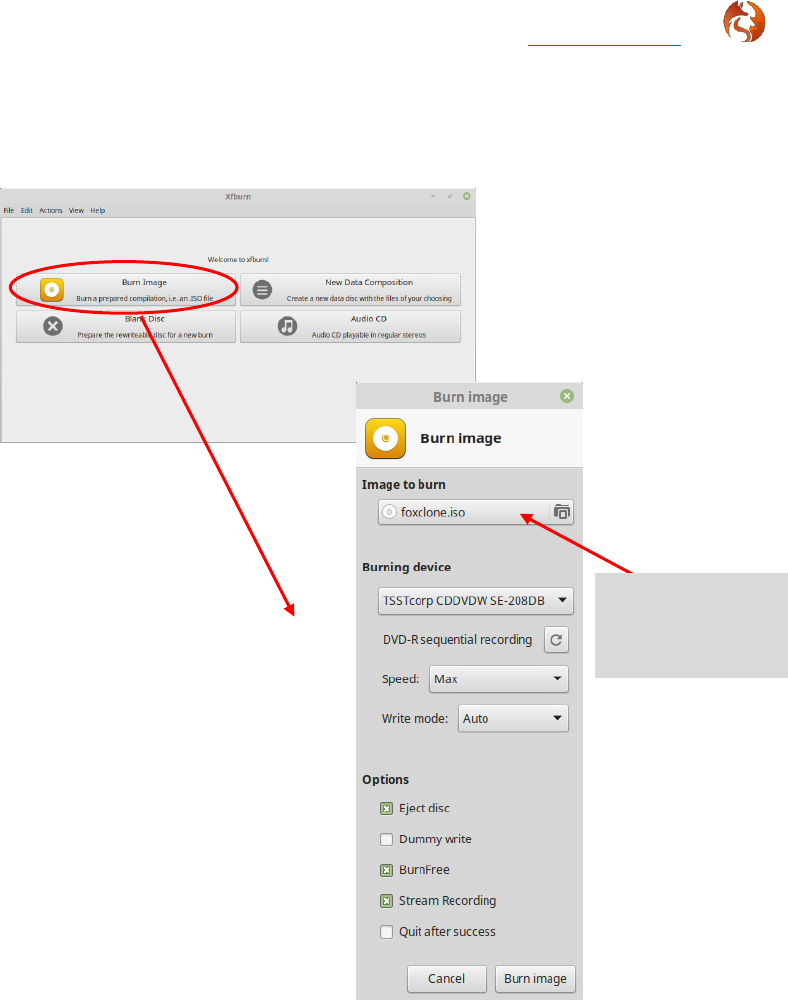
Foxclone V50 Return to contents
31 March 2023 Page 2 of 64
Contents
Contents ................................................................................................................................ 2
What is it? ............................................................................................................................. 4
How should it be used? ......................................................................................................... 5
Installation ............................................................................................................................ 6
Linux ........................................................................................................................ 6
Multi-boot USB .......................................................................................................... 7
Windows .................................................................................................................... 8
Boot ................................................................................................................................... 9
The desktop ......................................................................................................................... 11
Foxclone .............................................................................................................................. 12
Backup ................................................................................................................................. 13
What’s in a backup? ............................................................................................................ 18
Deleting backup files ............................................................................................... 19
Restore ................................................................................................................................ 20
Clone ................................................................................................................................. 23
Clone drive to drive ................................................................................................. 24
Clone File to Drive ................................................................................................... 26
Verify ................................................................................................................................. 28
Settings ............................................................................................................................... 30
What else is in the iso? ........................................................................................................ 32
Accessories .............................................................................................................. 32
Fox guide ........................................................................................................................ 32
File manager ................................................................................................................... 32
Image viewer .................................................................................................................. 33
PDF reader ...................................................................................................................... 33
Screenshot ...................................................................................................................... 33
Text editor ...................................................................................................................... 34
Timezone ................................................................................................................. 34
Internet.................................................................................................................... 35
Pale Moon ...................................................................................................................... 35
System tools ............................................................................................................ 36
Disks ............................................................................................................................ 36
Disk Usage Analyser........................................................................................................ 37
File recovery ................................................................................................................... 38
Gparted .......................................................................................................................... 38
GSmartControl ................................................................................................................ 38
Hardware Info................................................................................................................. 39
Terminal ......................................................................................................................... 40
TestDisk .......................................................................................................................... 40
Preferences ............................................................................................................. 41
Display ............................................................................................................................ 41
Connecting to a network ..................................................................................................... 42

Foxclone V50 Return to contents
31 March 2023 Page 3 of 64
Preparing and formatting drives .......................................................................................... 43
Formatting a drive with Disks .................................................................................. 43
Formatting a drive with gparted ............................................................................. 46
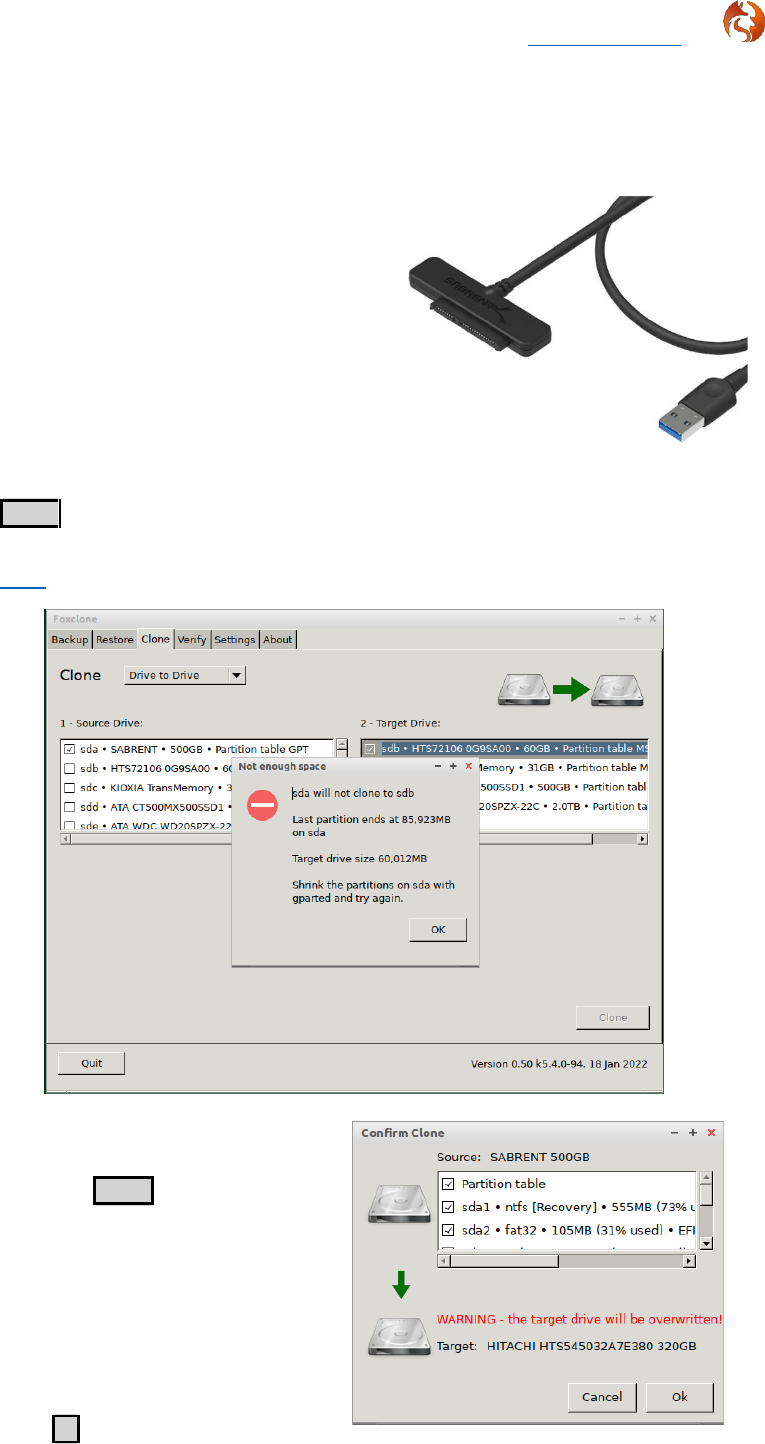
Re-sizing/adding partitions with gparted ................................................................ 48
Partition tables .................................................................................................................... 50
MBR partition tables ............................................................................................... 50
GPT partition tables................................................................................................. 52
Bootloaders and boot modes .................................................................................. 53
Known issues ....................................................................................................................... 55
Troubleshooting .................................................................................................................. 56
Take a screenshot .................................................................................................... 56
Enable logging ......................................................................................................... 56
To contact us ........................................................................................................... 57
How does it work? ............................................................................................................... 58
Version History .................................................................................................................... 59
Issues ................................................................................................................................. 62
March 2023 FoxcloneV50 – cloning a legacy boot drive ........................................ 62
Changes ............................................................................................................................... 63
The legal stuff ...................................................................................................................... 64

Foxclone V50 Return to contents
31 March 2023 Page 4 of 64
What is it?
1.
Foxclone is a Linux based image backup, restore and clone tool using a simple
point and click interface. It takes images of the partitions on your hard drive
(HDD) or solid-state drive (SSD) and stores them for later restoration. Image
files can optionally be compressed to save space. Foxclone is a front end for
the Linux terminal utility partclone.
Backup and restore:
• GPT and MBR/legacy/MSDOS
partition tables.
• FAT32, NTFS and ext4
partitions.
• Unknown partition types*.
• Encrypted partitions*.
Clone:
• Direct drive to drive.
• To drive from a full backup.
• From a larger drive to a
smaller drive**.
Limitations:
• 64 bit systems only.
• Local drives only
• RAID – no.
• LVM – no.
• Mac filesystems – no.
• English only.
* e.g. the MS reserved partition in a windows 10 installation or a LUKS encrypted partition.
foxclone does a byte-by-byte copy of the whole partition as it is unable to determine the
used blocks. So, dependent on the size of the partition, it can take a long time
** as long as the total size of partitions on the source drive is less than the size of the new drive
and all the unallocated space is at the end of the drive.

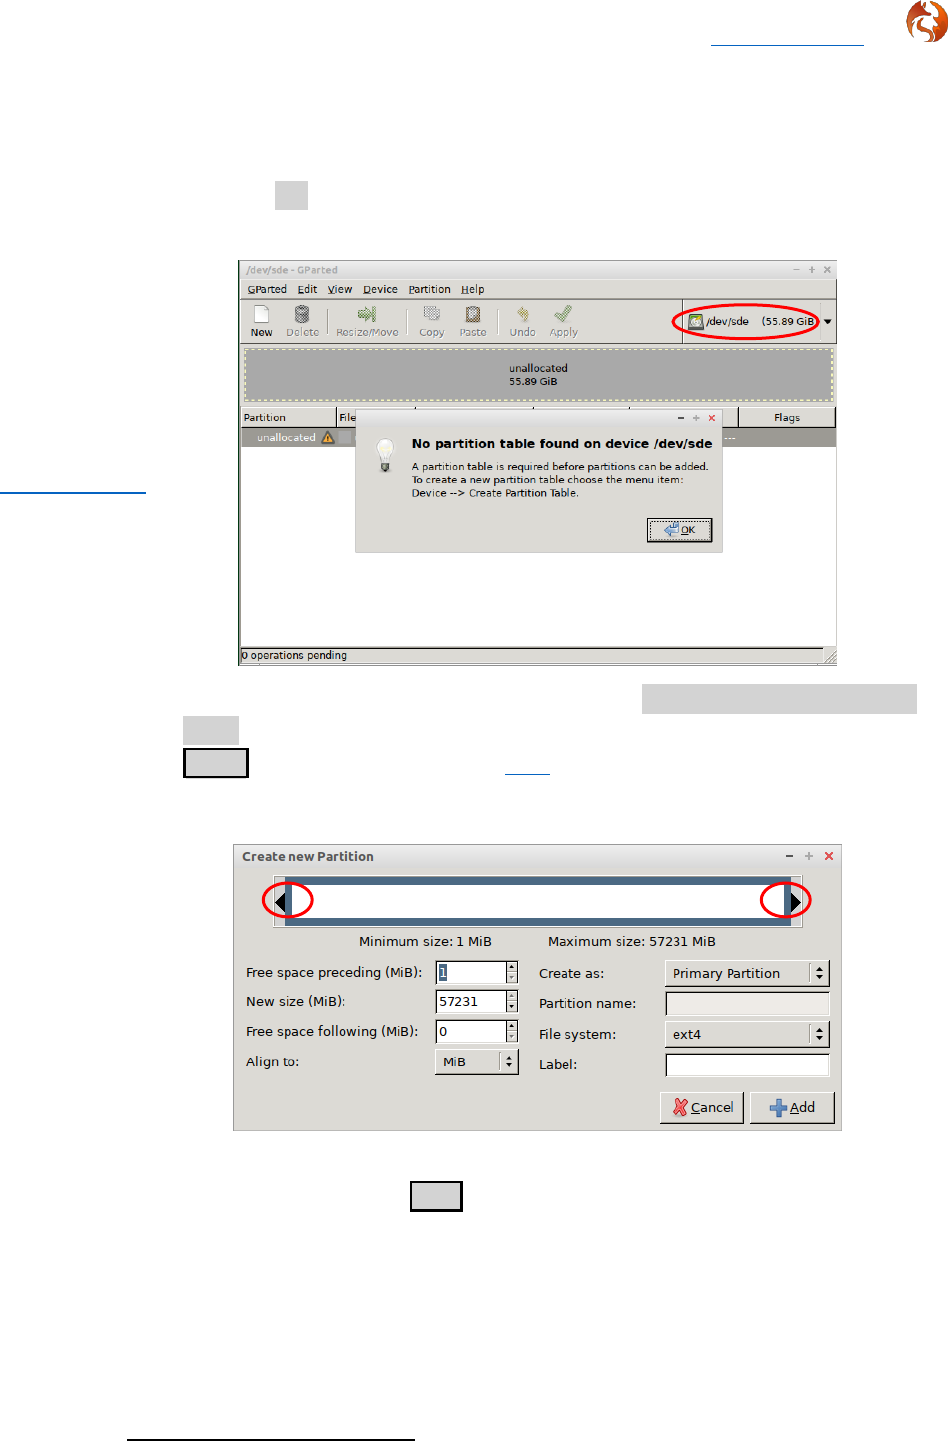
Foxclone V50 Return to contents
31 March 2023 Page 5 of 64
How should it be used?
2.
It cannot be stressed strongly enough – a partition backup utility such as
foxclone or clonezilla or any other image backup tool should not be used as
your only backup tool.
3.
A partition backup utility is there for disaster recovery:
• A failed or failing drive.
• An operating system borked (usually by the user) to the extent that it
will no longer boot.
4.
It should not be used as a daily backup tool, why?
• It is a manual process, you cannot automate it, at some point you will
forget to do it.
• It is slow, you have to backup up complete partitions. There is no
incremental or differential backup to speed things up.
• It doesn’t understand files and folders, just partitions. Mess up a few
files, you have to restore the entire partition probably overwriting
newer files that were perfectly okay, potentially leaving you worse off.
Problem dependent, it can be a sledgehammer to crack a nut.
5.
An image backup tool, such as foxclone, should be used in conjunction with a
file level backup tool(s). There are plenty of excellent Linux file backup
utilities, timeshift, backintime, luckybackup to name just three. These:
• Are installed in your running system. You do not have to boot a
separate operating system, e.g. from a USB stick. More convenient.
• Can be automated to run daily or at whatever frequency you want.
• Are incremental – they only backup files that are new or changed – so
quick.
• Allow you to restore individual files – just the ones you broke!
Use file level backup as your first line of defence.
Use image backup as your last line of defence.

Foxclone V50 Return to contents
31 March 2023 Page 6 of 64
Installation
6.
Download the iso and burn to either a USB stick or CD.
Linux
7.
If burning to a USB stick use the USB Image Writer that comes with your
distribution. The example is based on Linux Mint.
Click to navigate to the
download location
Click to select the device – if it
doesn’t appear, unplug and
plug it in again
Foxclone V50 Return to contents
31 March 2023 Page 7 of 64
8.
If burning to a CD, there are many Linux utilities, xfburn is one of the simplest.
Install from your software manager/centre if not installed.
Multi-boot USB
9.
Examples include Ventoy, Pendrive and UNnetbootin – follow the vendor’s
instructions. Note, when using one of these solutions, foxclone may give
warning/error messages as it reads your system. These should not interfere
with normal use of foxclone.
Click to navigate
to the download
location
Foxclone V50 Return to contents
31 March 2023 Page 8 of 64
Windows
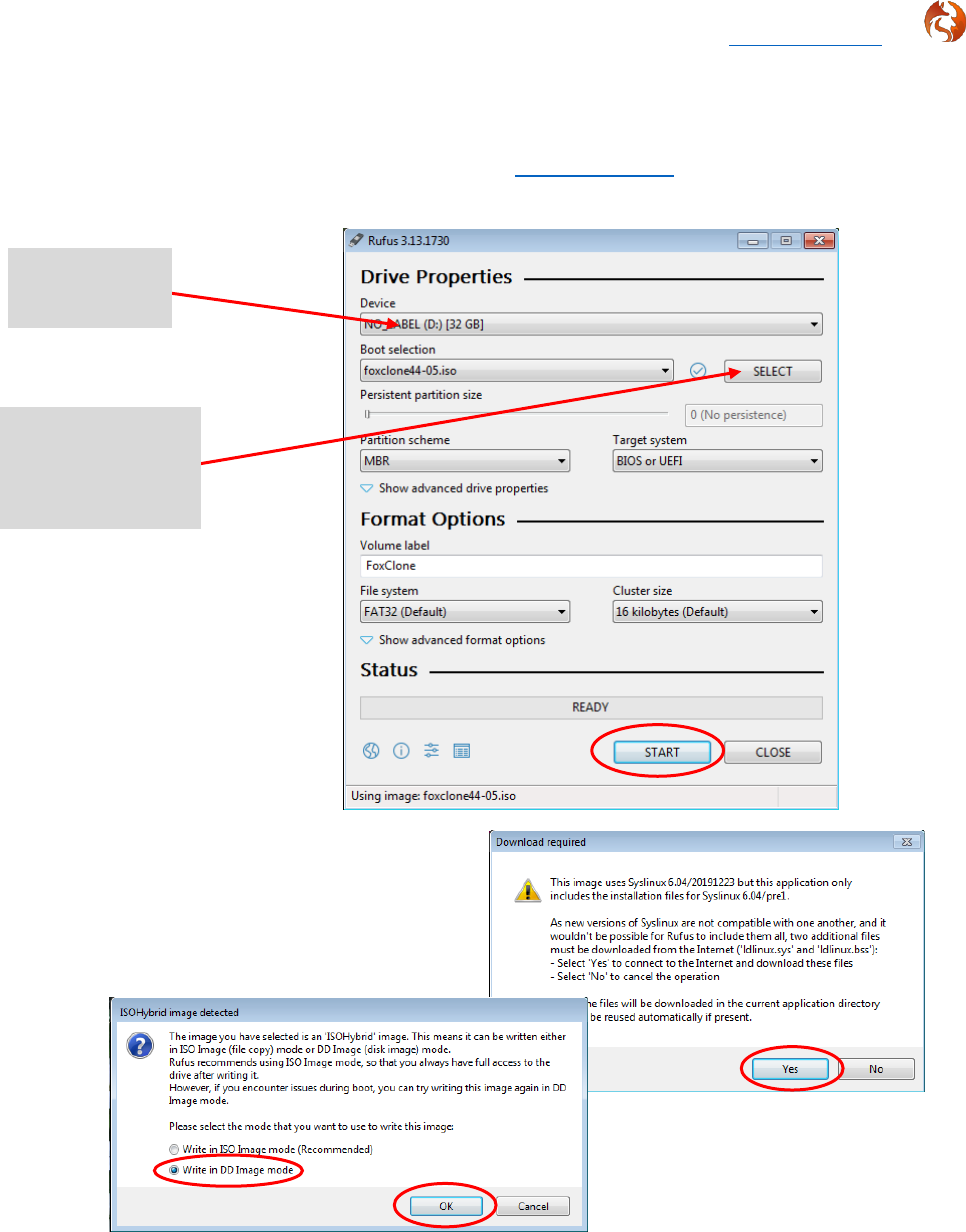
10.
There are a number of windows tools available. The example uses rufus,
which can be downloaded from https://rufus.ie/. The download is a single
executable.
Select Write in DD Image mode. If
ISO image mode is selected it is likely
that when you boot the usb stick you
will end up at the Grub> prompt!
11.
The iso can be burnt to CD using windows built in CD writing utilities.
Click to select
USB stick
Click to browse
to the foxclone
iso file

Foxclone V50 Return to contents
31 March 2023 Page 9 of 64
Boot
12.
At the manufacturer’s splash screen, press the key to get into the boot menu
1
.
This key varies across PCs, as an example for a Lenovo Thinkpad it is F12, on
my desktop it is F11. Consult your user manual to find out what the key is or
google. Do not confuse the boot menu with the boot priority order settings in
BIOS. The boot menu is a one time selection for the device to use to boot the
PC. It overrides the normal boot priority order. The next time you boot, the PC
will revert to the normal boot order. Virtually all BIOSes support this feature,
they just do it differently.
13.
The example shows the boot menu for a Thinkpad T430.
14.
If the USB stick (or CD) does not appear in the menu and/or it won’t boot:
• UEFI and legacy boot. If foxclone will not boot in UEFI mode, make
sure that secure boot is disabled in BIOS. Still no joy – try enabling CSM
(compatibility support mode) if that is an option. There may also be
other settings for USB boot. No further guidance can be offered – all
BIOSes are different.
• The iso is a minimal 64 bit ubuntu installation running a 5.4 kernel.
This may not boot on some older hardware.
15.
If the USB stick boots, then fails to load – have you got multiple USB drives
plugged in? If so, remove all USB drives except for the foxclone USB stick and
reboot. When the foxclone USB has booted, then plug in the other USB drives
before running foxclone.
1
Trouble with BIOS recognising the Fn key on boot? If using a wireless keyboard, try with a
wired keyboard.

Foxclone V50 Return to contents
31 March 2023 Page 10 of 64
16.
Still not booting, if failing to boot from a USB stick, try:
• Plugging the USB stick into a USB2.0 port not USB3.x. If that fails…
• Burn the foxclone iso to CD and boot from that.
17.
If booting in legacy mode you will be presented with the isolinux start screen.
It will automatically boot into foxclone.
18.
If booting in UEFI mode you will get grub. You need to press ENTER to boot
foxclone.
Foxclone V50 Return to contents
31 March 2023 Page 11 of 64
The desktop
19.
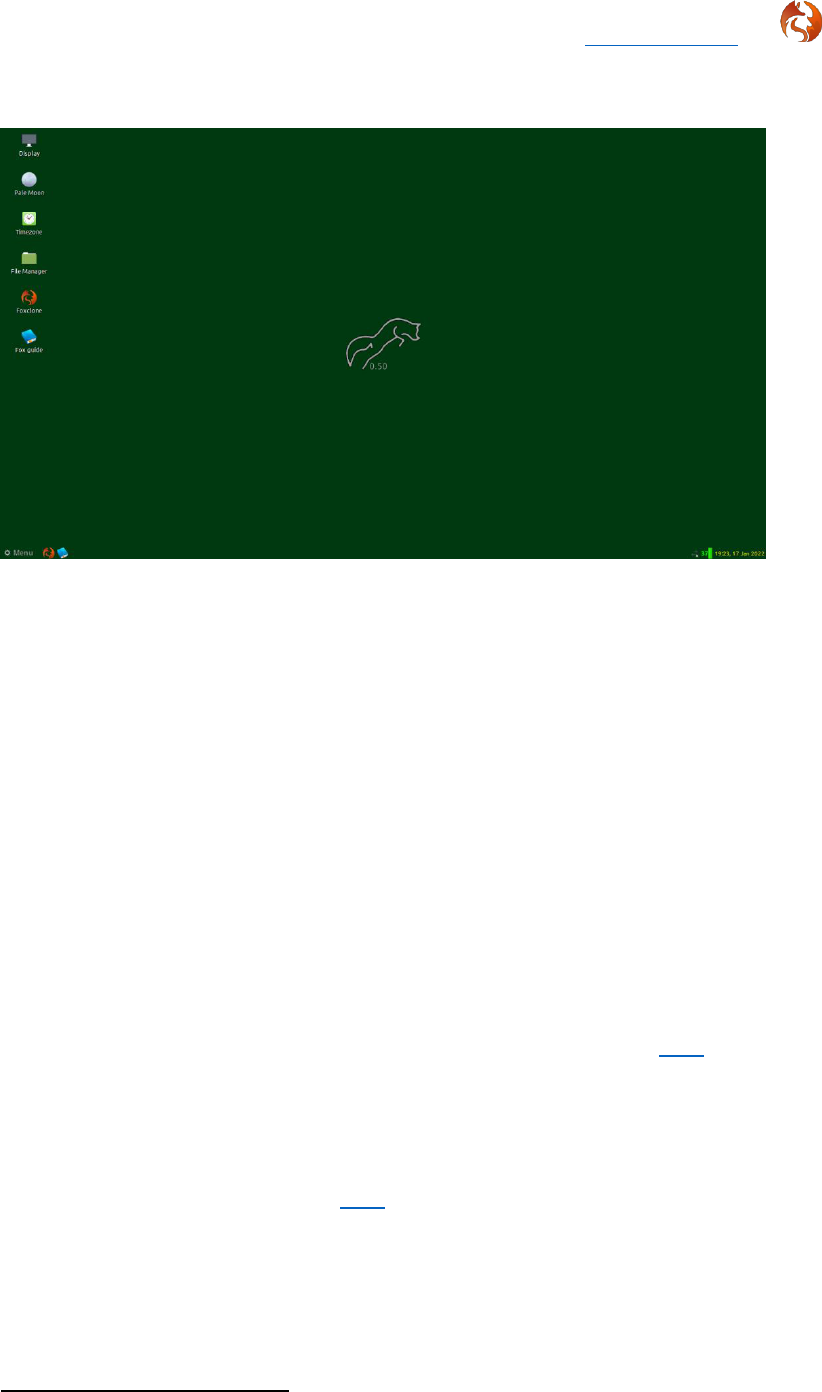
Double click on any of the launchers on the desktop to start:
• Display – foxclone should boot into the native resolution for your PC, if
not use this to change display resolution.
• Pale Moon – the web browser for access to the foxclone website.
• Timezone – if the time displayed in the panel is incorrect, use this to
set your timezone (foxclone date/timestamps its backups). Note, it can
take a couple of minutes after changing the time zone for it to register
in the panel.
• The File Manager – for access to the files on your system or the
network.
• Foxclone.
• The User Guide – this document.
20.
Bottom left on the panel is the main menu, described further here, with
launchers for foxclone & the user guide. These can be activated with a single
click.
21.
Bottom right are icons displaying:
• Network status – see here for connecting to a network.
• CPU temperature
2
in °C.
• Battery status – if present.
• Time/date (see Timezone above).
2
Foxclone places a heavy load on the CPU, using all cores when backing up or restoring. Check
the temperature periodically. With a laptop make sure the inlet/outlet vents are clear. The
CPU should not overheat – it will be automatically throttled when the temperature typically
exceeds 100°C.

Foxclone V50 Return to contents
31 March 2023 Page 12 of 64
Foxclone
22.
Before starting foxclone, plug in any external drives you want to use.
23.
To start foxclone, double click on the launcher on the desktop or single click
on the launcher in the panel, or foxclone can be found in the menu under
system tools.
24.
When it starts, foxclone will search the system for information on the
attached drives.
25.
It will then display the main window.
Use the tabs to select the
function you want

Foxclone V50 Return to contents
31 March 2023 Page 13 of 64
Backup
26.
Basic information is shown for each drive – its name, size and partition table
type. Hover over a drive and a hint will give more information. Hover in the
blank space (the window is resizable) and a hint giving information on what
drives have been excluded will be displayed. Note when booting with Ventoy
the boot drive will be shown (you cannot backup the boot drive).
Where do you want to save it?
What do you want to backup?

Foxclone V50 Return to contents
31 March 2023 Page 14 of 64
27.
Click on the drive that you want to backup (you can only select one). Box 2
will immediately show the partitions on that drive.
28.
All partitions are selected by default. If you want to select/deselect individual
partition, check the ‘enable partition selection’ checkbox on the settings tab.
Any partition with an operating system is shown in bold.
You cannot select
A swap partition – there is no data to backup. foxclone automatically
saves the details
3
on a swap partition and on a restore will recreate it.
An extended partition on a drive with a legacy partition table – an
extended partition is just a special entry in the partition table that
points to another partition table that contains details on the logical
partitions.
An EFI partition – this contains the bootloader and is automatically
backed up.
29.
Not happy – wrong drive, not the partitions you expected, just click on a
different drive in box 1 and start again.
30.
Box 3 is now asking for the drive where you want to save the backup.
31.
Click on the destination drive and box 4 will show the partitions on that drive.
3
Primarily the UUID – when the swap partition is recreated it uses the same UUID so that Linux
does not hang on boot for 90 seconds looking for a swap partition it can’t find.

Foxclone V50 Return to contents
31 March 2023 Page 15 of 64
32.
Click on the partition where you want to save the backup.
33.
If there is not enough space on the selected partition, foxclone will display a
warning message.
Or
It helps to add labels to all
partitions. Where there is a
label, foxclone will display it in
brackets [ ]. This makes it
easier to identify which
partition is which.
If there is not enough space an error message will
be displayed. Choose another partition or another
partition on another drive as the backup destination.
Or…
If compression is enabled (the default), foxclone will
estimate the space required. Where the compressed
image size is less than the space available, the user
will be given the option of proceeding or cancelling.
Foxclone assumes compression will achieve a 30%
reduction in image size. This is conservative.

Foxclone V50 Return to contents
31 March 2023 Page 16 of 64
34.
When a partition has been selected with enough free space, the
Save to File button is enabled.
Click to choose the
folder & filename for the
backup.
35.
This then opens up the partition you selected as the destination with the file
save dialog where:
Click Save when finished, or cancel to go back.
Change or accept the backup
filename. The default is the
current date as YYYYMMDD.
Foxclone will append .backup to
the filename you specify.
You can create a new folder or
double click on an existing folder to
open it up as the destination

Foxclone V50 Return to contents
31 March 2023 Page 17 of 64
36.
Foxclone will now display a confirmation
window showing the partitions to be
backed up and the destination
folder/filename.
This is the point of no return; you are
being asked to confirm the backup
before starting. Click on OK and the
backup will start.
37.
As the backup progresses it will display a
progress window.
It provides some information on the current
partition being backed up, showing progress
and overall progress.
This is the only progress window that has a
cancel button on it. Click it once only, it may
take a few seconds to respond. You will
have to manually delete any backup files
that have already been created.
When the backup is complete, the Add
Note and Finish buttons will be enabled.
38.
To add a note, click on the note button.
39.
Click Finish to finish – backup done! Then Quit on the main window and
shutdown from the main menu.

Foxclone V50 Return to contents
31 March 2023 Page 18 of 64
What’s in a backup?
40.
The screenshot shows the contents of a backup folder. All the filenames start
with 20191126 full. This was the name specified in the backup.
41.
The *.backup file is a text file
created by foxclone describing the
backup. It is read by foxclone when a
restore is done.
42.
The *.grub is a copy of the first
MB of the drive. On a drive with a
legacy partition table this is needed
to copy grub – the bootloader
4
. This
will not be present in the backup of a
UEFI system.
43.
The *.note.txt file is a text file
containing the notes made during a
backup. If no notes were made there
will be no file.
44.
This is then followed by pairs of files for each partition backed up. The *-
log.txt files are log files created by foxclone when doing the backup. They
are for information and serve no other purpose.
45.
The *.img files are the backup image files for each partition that was backed
up. The end of the filename varies depending on the settings. If the filename
ends:
• *.img – then this is an uncompressed image file.
• *.img.gz – this is a compressed image file.
• *.img.000 or *.img.gz.000 – this file is part of an image set for the
specified partition where the image has been split across several files.
The next file in the set will be 001 and so on.
46.
Finally, the *.sfdisk file is a text file created by sfdisk describing the
partition table. It is used by sfdisk to recreate the partition table when doing
a restore.
4
The first stage bootloader lives in the first 512 bytes on the drive. On a legacy install the
second stage bootloader ‘hides’ in the space between the end of the partition table and the
start of the first partition (usually at 1MB). This is not required on a GPT format drive booting
in UEFI mode.

Foxclone V50 Return to contents
31 March 2023 Page 19 of 64
Deleting backup files
47.
At some point you will fill up the backup drive and want to delete old backups.
The backup files are owned by root, so you can’t delete them as an ordinary
user.
48.
In your file manager, navigate to the folder containing the backup and right
click on it, in the example MBRfull7bodhi, and ‘open as root’. You will then be
able to delete the backup files.

Foxclone V50 Return to contents
31 March 2023 Page 20 of 64
Restore
Restore will only restore to the drive the backup was taken from. If you want
to restore a full backup to a different drive use Clone file to drive. Note –
backups taken using earlier versions may incorrectly identify the drive to
restore if there are two identical drives in the system, see version history.
49.
Box 1 lists all the drives found on the system, select the drive containing the
backup. Box 2 will be immediately populated with the partitions on the drive.
50.
As soon as you click on a partition in box 2, the file open window will appear
showing the contents of that partition.
Navigate to the backup file and
double click on it or click the
Open button.
This will open the backup file,
read the content and populate
boxes 3 and 4 on the main
window.
Where is the backup?

Foxclone V50 Return to contents
31 March 2023 Page 21 of 64
Box 3 shows the partitions in the backup and box 4
shows the current partitions on the destination
drive.
You can only restore to the drive that you took the backup from. If you want
to restore to a different drive use clone.
51.
All the partitions are automatically selected, if you want to change this, first
check ‘Enable partition selection’ on the Settings tab. Then individual
partitions can be selected/de-selected for restore.
If you try to de-select ‘restore partition
table’ and get this warning, you should
restore all partitions (and hope that the
backup is a full backup).
52.
Foxclone gives the user the choice on
what partitions to backup and what to
restore. With this flexibility comes the
responsibility to ensure the backups held
are sufficient. The first backup should
always be a full backup. Thereafter if no changes are made to the partition
sizes or positions, a backup of an individual partition may be sufficient. For
example, a later backup of a /home partition because that is likely to see more
change than the / partition – hence keep a more up-to-date copy. But, shrink,
grow or move any partition – do a full backup beforehand.
53.
Click the Restore button to continue. You get a confirm window – showing
what will be restored, last chance to change your mind.
Only if there is one
Current content on the
destination drive
Contents of
the backup

Foxclone V50 Return to contents
31 March 2023 Page 22 of 64
OK to continue and the restore will
start.
A progress window is
displayed. Finish and
View Log are enabled on
completion.
Clicking on View Log will
display a log showing the
partition table details and
then the output from
partclone for each partition
restored.
54.
View Log displays the log files in
/tmp/foxclone. If you want a
permanent copy then copy these files
to a location on your existing drives
using the file manager.
55.
Click Finish to close the window,
foxclone will reread the drives before
enabling the main window. Then Quit
on the main window to exit foxclone
There is no cancel button
on restore. To cancel a
restore part way through
would leave the drive in an
unknown state – there
would be a complete
mismatch between the
partition table and the
partitions on the drive. It
would not boot. Hence,
once started, a restore
must run to completion.

Foxclone V50 Return to contents
31 March 2023 Page 23 of 64
Clone
56.
Use clone to:
• Change the main system drive from a smaller to larger drive.
• Replace an HDD with an SSD. You can clone from a larger drive (or
backup) to a smaller drive as long as the total space used by the
partitions is less than the size of the smaller drive and all the
unallocated space on the larger drive is at the end.
This Will not work
Part 1 Part 2 Part 3 Unallocated
Unallocated
Old drive
New drive
This Will work
✓
Part 1 Part 2 Part 3 Unallocated
Unallocated
Old drive
New drive
• Replace a failed or failing system drive.
57.
Clone provides two options, selectable through the drop-down on the clone
window:
• Drive to drive – direct copy from one drive to another.
• From backup file to drive – using a previously created full
5
backup of
the source drive.
5
It is up to the user to make sure that the backup selected is a full backup.
Foxclone V50 Return to contents
31 March 2023 Page 24 of 64
Clone drive to drive
58.
With a desktop this is straightforward – find a spare SATA slot on the
motherboard and plug the new drive in with SATA cable. With a laptop it
helps to have one of these – a SATA to
USB cable, not expensive at around
$10. Connect the new drive to it and
plug into a USB port.
59.
Click on the source drive in box 1 and the destination drive in box 2, then click
Clone to proceed. If there is not enough space on the target drive a warning
message will pop up. Shrink the partitions with gparted and try again, see
here for help on re-sizing partitions.
60.
When the partitions on the
source drive will fit on the target
drive the Clone button will be
enabled, click to proceed. A
confirm window will open. This
shows the source and target
drives together with the
partitions on the source drive.
This is the point of no return.
Click OK to start the clone.

Foxclone V50 Return to contents
31 March 2023 Page 25 of 64
61.
A progress window will
appear, the Finish and
View Log buttons are
enabled on completion.
62.
Clicking the View Log button will display
the log, showing details on the partition table
and each partition cloned to the new drive.
63.
Clicking Finish will close the progress
window. Foxclone will then re-read the drive
information before enabling the main window.
64.
In the main window, then click Quit to
exit foxclone.
65.
There are now two issues to resolve:
• Un-allocated space – there will be unallocated space on the cloned
drive. Foxclone does not adjust the sizes of any partitions to fit the
new drive. This can be done with gparted
6
, see here for help.
• Booting – there are now two identical drives connected to the
system
7
. If the cloned drive contains an operating system, BIOS is likely
to get confused about which drive to boot from and start throwing
errors or boot from the source drive. The simplest solution is to
disconnect the source drive, replace it with the clone drive and reboot.
6
If the clone is a boot drive with an operating system, you may want to check that it boots first
before adjusting the size of any partitions.
7
Specifically, the partitions on the clone drive have identical UUIDs to the partitions on the
source drive. When booting Linux with grub it looks for the boot partition based on the UUID
of the partition. A UUID is a unique reference for every partition, e.g. ddc976e3-bc24-4b8d-
9151-a72c9013d3e8.
There is no cancel button on clone.
To cancel a clone part way through
would leave the clone drive in an
unknown state – there would be a
complete mismatch between the
partition table and the partitions on
the drive. It would not boot. Hence,
once started, a clone must run to
completion.

Foxclone V50 Return to contents
31 March 2023 Page 26 of 64
Clone File to Drive
66.
Starting point – you must have
a full backup of the drive you are
cloning from.
67.
Select Backup file to Drive from
the drop down. Boxes 1 and 2 are
just like a restore – which drive and
which partition is the backup on?
As soon as you click on a partition in
box 2 it will open up the file dialog
to get the backup file.
In the example shown, the backup is in a
folder UEFI win10 LM19-2 and it contains
a UEF boot installation with windows 10
and Linux mint 19.2.
68.
When the backup file is
opened, box 3 is populated with
the contents of the backup and
box 4 is inviting you to select the
target drive. Once the target is
selected, the Clone button is
enabled, click to continue.
As with clone ‘drive to drive’, if
you click on a drive and it isn’t big
enough you will get a warning
and invitation to select a
different drive.
Return to restore

Foxclone V50 Return to contents
31 March 2023 Page 27 of 64
69.
A confirm window will pop up identifying the backup & its contents and the
target drive. Last chance to change your mind.
Click OK to start the clone.
70.
A progress window will appear. The Finish and View Log buttons are
enabled on completion.
Clicking on View Log will display a log showing what foxclone has done.
Click Finish to close and return to the main window. As the system has
changed, foxclone will re-read the drives and partitions. Click Quit to exit
foxclone.

Foxclone V50 Return to contents
31 March 2023 Page 28 of 64
Verify
71.
Verify can be used to check the integrity of backup files.
Select the drive containing the backup files and box2 will show the partitions
on the drive. Select the partition containing the backup and a file open dialog
will appear.
Navigate to the backup file and double
click on it or click the Open button.
This will open the backup file, read the content and populate box 3 on the
main window.

Foxclone V50 Return to contents
31 March 2023 Page 29 of 64
72.
Click on the partition backup to verify
8
and then click on the Verify button.
A progress window will appear.
When finished the Finish and
View Log buttons will be enabled.
73.
The log shows the status of the verify. As each image is checked it creates a
text file with the outcome and saves this file in the same folder as the backup.
The format of the filename is:
<backup filename>.<partition>.img.chk, e.g.
20191107.sda2.img.chk
The log window shows the
outcome of all image
checks carried out. Not
just the one that has just
been done, but also any
that have previously been
verified.
8
Extended, swap or partitions with unknown filesystems cannot be selected.

Foxclone V50 Return to contents
31 March 2023 Page 30 of 64
Settings
74.
Compression – when selected, backup image files will be compressed and will
take the form *.img.gz. If de-selected the image files are not compressed and
take the form *.img. Compression will typically reduce the backup file size by
30% or more.
75.
In previous versions of foxclone the level of compression was selectable. This
has been removed in foxclone50. There is little to be gained by using higher
compression levels. Compression is pre-set at level 1.
i7-3632QM (quad core) backing up a Linux
Mint root partition from SSD to HDD
(5400rpm), both ends SATA3.
Compression achieves a
2
/
3
reduction in the
image file size.
Very similar results were obtained with an
external USB3 HDD (Samsung M3 portable).
76.
Split files – unlikely to provide much benefit with modern filesystems, but
included for completeness. It provides the ability to split the backup image
files over several files. FAT32 has a file size limit of 4GB
9
. The file size limits on
NTFS and ext4 partitions are such as to be irrelevant. If the backup
destination is formatted FAT32, foxclone will automatically split the backup
files.
9
To be precise, 4GB less one byte, i.e. (2
32
– 1) bytes.

Foxclone V50 Return to contents
31 March 2023 Page 31 of 64
77.
Enable partition selection – by default foxclone will select all partitions for a
backup or restore. If you want to select individual partitions, enable this
checkbox. Be aware that not doing a full backup or restore will cause
problems if you subsequently change the partition table (by resizing, moving
or deleting partitions). A restore may not boot. Foxclone insists on restoring
the partition table if it detects that the partition table has changed since the
backup.
78.
Font size – if the default font size is too small, use this setting to increase the
size to make it more readable.
You will need to increase the size of foxclone’s windows to make more
information visible.

Foxclone V50 Return to contents
31 March 2023 Page 32 of 64
What else is in the iso?
Accessories
Fox guide
79.
This document.
File manager
80.
The file manager is pcmanfm.
81.
If any files are saved in foxclone, they will be lost when the system is
rebooted. The file manager can be used to copy any files, e.g. screenshots or
error logs to your system so they are available after reboot. The panel on the
left shows all the devices (partitions) in the system. Click on any one to open.
Note that any partition with a label will display the label name, much more
useful than 61GB volume – where you have to open it to look at the contents
to figure out what it is.
If a volume showing
in the Devices pane
is mounted by
clicking on it, it will
also appear on the
desktop. The
contents can also
be accessed by
double clicking on
the desktop icon.
Return to desktop

Foxclone V50 Return to contents
31 March 2023 Page 33 of 64
Image viewer
82.
Use to view any pictures, e.g. screenshots. It is easier to double click on an
image file in the file manager to view it.
PDF reader
83.
The pdf reader is qpdfview and is used to display this document, the user
guide.
Screenshot
84.
Screenshots can be taken with the keyboard shortcuts:
• PrtScn – will take a screenshot of the whole screen.
• Alt + PrtScn – will take a screenshot of the active window. The
screenshot is automatically saved into /home/ubuntu.
PrtScn will bring up a dialogue,
click Take Screenshot and then
Save to save a copy to
/home/ubuntu.
Return to troubleshooting

Foxclone V50 Return to contents
31 March 2023 Page 34 of 64
Text editor
85.
The text editor is mousepad.
Timezone
86.
Foxclone date/timestamps its backups. Use this if the date/time showing
(panel bottom right) is incorrect. Timezone sets the timezone.
It is a terminal application, use cursor keys to navigate, the tab key to move
from item to item, Enter to select.
Note – after changing the timezone it can
take a couple of minutes for the time to be
updated in the panel.


Foxclone V50 Return to contents
31 March 2023 Page 37 of 64
Disk Usage Analyser
11
89.
This provides a
graphical display of
file/space usage within
a partition. From the
initial screen select the
volume (partition) to be
analysed.
Be warned – depending on the number of files and used space on a partition it
can take a long time to display. The screenshot is a windows 10 C: partition.
11
Installed by default in most Linux distributions.
If a volume is not mounted, use
the file manager to mount it
(click on it in the devices pane)

Foxclone V50 Return to contents
31 March 2023 Page 38 of 64
File recovery
90.
A terminal program, photorec, for ‘disaster recovery’ to recover deleted files
or lost data from a reformatted partition or corrupted file system.
More information and a step-by-step guide can be found here:
https://www.cgsecurity.org/wiki/PhotoRec_Step_By_Step.
Gparted
91.
The standard Linux partition utility. More information here.
GSmartControl
92.
A tool for querying and controlling SMART (self-monitoring, analysis and
reporting technology) data on hard disks and solid state drives. It allows you
to inspect the drive’s SMART data to determine health as well as run various
tests on it.


Foxclone V50 Return to contents
31 March 2023 Page 40 of 64
Terminal
94.
gnome-terminal, for running terminal commands.
TestDisk
95.
A terminal program for data recovery. To quote “is powerful free data
recovery software! It was primarily designed to help recover lost partitions
and/or make non-booting disks bootable again when these symptoms are
caused by faulty software”.
More information and a step-by-step guide can be found here:
https://www.cgsecurity.org/wiki/TestDisk_Step_By_Step

Foxclone V50 Return to contents
31 March 2023 Page 41 of 64
Preferences
Display
96.
Use to change display resolution. As an alternative to running Display, right
click on the desktop.
Right click on the screen shown (LVDS-1), select Resolution and change as
appropriate.
Useful if foxclone does not set the screen to the native resolution or if you
want to reduce the resolution to magnify the screen to make it easier to read.
The display resolution can also be changed by right clicking on the desktop.
97.
When finished Layout > Apply.

Foxclone V50 Return to contents
31 March 2023 Page 42 of 64
Connecting to a network
98.
Network status is shown by the icon bottom right of the screen:
Not connected
Default
Connecting
Wireless connected
Wired connected
99.
To connect to a wired network simply plug in an ethernet cable. To connect to a
wireless network, click on the network icon:
You will be prompted for the wifi password.
Click on the network
to connect
Return to desktop
Return to web browser
Return to contact us

Foxclone V50 Return to contents
31 March 2023 Page 43 of 64
Preparing and formatting drives
100.
When you buy an external drive, e.g. an external USB HDD, it will come
formatted, normally fat32. There is no need to do anything unless you want to
reformat it to ntfs or ext4, just plug it in and use it.
101.
If you buy an internal bare drive it will come unformatted. If you want to use
the new drive for an operating system, you don’t need to do anything, the
installer will format the drive for you. If you want to use it as a data drive you
will need to format it.
102.
There are two Linux programs for formatting drives:
• gnome-disks. This is installed by default in most Linux systems and
normally appears as ‘Disks’ on the menu);
• gparted. The gnome partition editor, this is not normally installed, but
can be installed via the software manager or whatever software
installation tool is provided with your Linux distribution.
Formatting a drive with Disks
103.
When you start Disks you are presented with this screen.
On the left, the drives in your system are shown, on the right, the contents of
the selected drive. The gear icon provides options on what to do with the
contents. The screenshot shows a ‘new’ unformatted drive.
Return to Disks

Foxclone V50 Return to contents
31 March 2023 Page 44 of 64
104.
A common mistake for newbies using Disks with a new drive is to click on the
gear icon and select format.
The outcome is a partition on a drive with no partition table. If you try and
backup this partition with foxclone it will give you a warning. While not
necessarily bad, you will not be able to:
• Use the partition as a destination for Timeshift snapshots.
• Add more partitions.
105.
The correct way to format the drive is to add a partition table and then add
partitions. Instead of clicking on the gear icon, click on the hamburger icon at
the top of the screen and select Format Disk.
The Volume Name is the
partition label. It is
always a good idea to
add labels.

Foxclone V50 Return to contents
31 March 2023 Page 45 of 64
Two choices are provided:
• Compatible with all system (MBR), and
• Modern systems (GPT).
If in doubt, choose GPT and click Format. An overview of partition table types
is given here.
106.
When finished, not much has changed, but you now have a + button and the
screen shows you now have a partition table.
Click + to add partitions – you can now have more than one partition and set
the size of each partition. Here I have created two partitions, one ntfs and the
other ext4 with the labels TestPart1 and TestPart2. The display is also now
showing information about the selected partition.
Foxclone V50 Return to contents
31 March 2023 Page 46 of 64
Formatting a drive with gparted
107.
This is the same un-formatted drive used in the Disks example. Now when I
try to create a partition on it (by right clicking in the unallocated area and
selecting new), gparted gives me an error message. The drive is selected from
the ‘drop down’ top right.
108.
To create a partition table, on the menu select Device > Create Partition
Table. Select the partition table type (msdos = legacy = mbr, or gpt) and click
Apply . More on partition tables here.
109.
To add a new partition, right click in the unallocated area and select new.
110.
The size can set by either entering the numbers or dragging the handles
at the top, then click +Add. Do not change the value shown for Free space
preceding for the first partition on an MBR drive
12
. Don’t forget to add a label.
12
IF an operating system is going to be installed, the second stage bootloader (grub for Linux)
hides in the space between the end of the partition table and start of the first partition.
Return to gparted

Foxclone V50 Return to contents
31 March 2023 Page 47 of 64
111.
Add as many partitions as required. At the bottom of the screen gparted will
show a list of tasks to perform.
gparted will not make any changes to the drive until you select Edit > Apply
All Operations from the menu.
112.
The outcome is shown below, the panel on the left can be displayed from
View > Device Information on the menu.
113.
Once you have created the partition, add a label. Always add a label! Linux will
automount your partitions at /media/you/labelname if you have a label. If you
don’t have a label, it will use the UUID, e.g. /media/you/d29bacfb-3d33-48ea-
b1d4-caa0906e9694, not user friendly.
Create a label by right-clicking on the partition. From the menu select Label
file system.

Foxclone V50 Return to contents
31 March 2023 Page 48 of 64
114.
One ‘issue’ with gparted is that if you create an ext4 partition with it, the
partition will be owned by root, so you won’t have write access. To fix this,
boot your system as normal, mount the partition (in your file manager click on
it – it should be showing in the panel on the left under devices) and in a
terminal:
sudo chown $USER:$USER /media/you/mylabel
replacing you with your username and mylabel with the label you gave it when
you created the partition
13
. This changes ownership from root to you.
Re-sizing/adding partitions with gparted
115.
gparted can be found on the menu under system tools. It is the standard
Linux partition editor. The screenshot shows the results of cloning a 240GB
drive to a 320GB drive
14
. The drive is selected from the ‘drop-down’ top right.
116.
The drive is a dual boot Windows and Linux mint install on a drive with a gpt
partition table. There are three partitions for linux, two ext4 (/ and /home) and
a swap partition. To use the unallocated space, either:
• The swap partition (sda7) must be moved to the right.
• The /home partition (sda6) needs to be re-sized.
Or a new partition needs to be created in the unallocated space.
117.
To resize or move an existing partition, right click on it and select
Resize/Move. Click & drag on the partition to move it or click & drag on the
right arrow to grow it, or enter the numbers. Click on Resize/Move to finish.
13
If you didn’t give the partition a label it will mount using the UUID, something like
/media/you/ddc976e3-bc24-4b8d-9151-a72c9013d3e8 = not user friendly.
14
Note gparted shows sizes and usage in GiB, not GB, where 1GiB = 1.074 GB,
https://www.gbmb.org/gib-to-gb
To see this pane,
view > device
information
Return to clone
Un-allocated space


Foxclone V50 Return to contents
31 March 2023 Page 50 of 64
Partition tables
119.
A partition table sits at the beginning of a drive and tells the operating system:
• How many partitions.
• Where they are (start and finish, hence size as well).
• The filesystems on the partitions, e.g. ntfs or ext4.
There are a number of different partition table types, but for practical
purposes only two need to be considered – MBR and GPT. The choice of
partition table type is driven by a number of factors, but mainly how the
computer will boot – in legacy mode or UEFI mode.
MBR partition tables
120.
Also known as legacy or msdos. As the name implies, the original standard for
partition tables
15
. The partition table lives in the first sector (512 bytes) on the
drive, so not a lot of space considering that some boot code has to fit in there
as well.
121.
The original characteristics of a legacy partition table were:
• A maximum of four partitions.
• A maximum partition size of 2TiB
16
.
• A maximum file size of 2TiB.
The limit on the number of partitions was a constraint and in 1986 a kludge
was introduced – the extended partition. The extended partition is just a
pointer in the partition table that points at another partition table that
contains ‘logical’ partitions. So today a legacy partition table has:
• A maximum of four primary partitions or three primary partitions and
one extended partition.
• An extended partition contains logical partitions.
• A maximum partition size of 2TiB.
• A maximum file size of 2TiB.
A takeaway from this is that if you have a drive larger than 2TiB (quite
common now), you must format it with a GPT partition table.
15
Defined in 1983, so it is a miracle that it is still in use today. At the time a typical hard drive
was 5MB or 10MB, enormous, that is, if you could afford one.
16
With a 512 byte sector size, by changing the sector size, e.g. to 4096 bytes, larger partitions
could be used.
Return to format drive

Foxclone V50 Return to contents
31 March 2023 Page 51 of 64
122.
The screenshot (gparted) shows a Linux on a drive with a legacy partition
table.
There is one primary partition, sdb1 (the / partition), and an extended
partition sdb2. Inside the extended partition are two logical partitions, sdb6
for swap and sdb5 for the /home partition.
123.
Not particularly tidy, all three partitions could have been primary partitions
leaving room for either one further primary partitions or an extended
partition (if more than one additional partition is needed – these would be
created as logical partitions).
Note logical partitions will always start at sdX5 irrespective of the number of
primary partitions you have.
124.
A further thing to note with the latest ubiquity installer (used in Linux Mint 20
and a number of other ‘buntus). An automatic ‘erase and install’ option in
legacy mode will create a primary fat32 partition (of no use to anyone) and
then put everything else in an extended partition. This is a good reason for
pre-partitioning your drive with gparted and using the ‘something else’ option
during install.
125.
This is a useful Wikipedia article on legacy partition tables.

Foxclone V50 Return to contents
31 March 2023 Page 52 of 64
GPT partition tables
126.
Also known as a GUID
17
partition table, a GPT partition table fixes the
shortcomings of the legacy partition table. To do this, it is bigger, a legacy
partition table is 1 sector at the start of the drive, a GPT partition table
occupies the first 34 sectors. The characteristics of a GPT partition table are:
• A maximum of 128 primary partitions, plenty enough for everyone and
no need to mess around with extended partitions.
• A maximum drive size of 8ZiB. That is 8,388,608TiB (I had to look it up).
It will be a while before we hit this limit.
For practical purposes, maximum file sizes are so large as to no longer be a
concern. There is one exception, fat32, with a maximum file size of 4GB
18
.
127.
A further advantage of a GPT partition table is that there is a backup copy
stored at the end of the drive. If the primary partition table at the start of the
drive gets corrupted, it can be fixed. With a legacy partition table, if it gets
corrupted, that’s it, you’ve lost the contents of the drive.
128.
Another feature of a GPT partition table is that it will allow you to assign a
name to a partition in addition to a label. I’ve yet to find a use for the partition
name.
129.
Another Wikipedia article, this time on GPT partition tables.
17
Globally Unique IDentifiers.
18
Which is why foxclone automatically switches on file splitting when backing up to a fat32
partition.

Foxclone V50 Return to contents
31 March 2023 Page 53 of 64
Bootloaders and boot modes
130.
The two types of partition table are associated with two different boot
modes:
• MBR/msdos/legacy drives boot, unsurprisingly, in legacy mode.
• GPT drives boot in UEFI
19
mode.
It is possible to boot in UEFI mode from a legacy drive or boot legacy on a GPT
drive, but that’s outside the scope of this guide.
131.
With legacy mode, the boot list in BIOS points at the boot drive, typically
defined as HDD0, HDD1 and so on. BIOS then looks on that drive for the initial
boot code which shares the first sector with the partition table. Not much
space there, so this points at the second stage bootloader (for Linux this is
normally grub). This ‘hides’ in the space between the end of the partition
table and start of the first partition. This in turn, in Linux, points at /boot in
your boot partition (normally / unless you have a separate /boot partition).
132.
UEFI is the modern standard and just about every computer since about 2008
will support UEFI boot. If your computer came with Windows 10 installed it
will almost certainly be UEFI boot. If Windows 7, then probably legacy boot.
133.
In UEFI, BIOS is more intelligent and looks for a special EFI partition on the
drive and executes the programs in it. Instead of the boot entries in BIOS
being specified by drive, e.g. HDD0, they are specified by the operating system,
so you will see entries like ubuntu or windows boot loader. In the EFI partition
is an EFI folder and inside that folders for each operating system. This is the
contents of the EFI folder on a dual boot system, Windows with Linux Mint.
19
Unified Extensible Firmware Interface.

Foxclone V50 Return to contents
31 March 2023 Page 54 of 64
134.
This is what the drive looks like in gparted. It is dual boot, Windows 10 and
Linux Mint.
• Compared to the gparted screenshot of a legacy drive you can see an
additional column for the partition name.
• There is no extended partition – no need.
• The EFI partition is sda2, it’s not very big (doesn’t need to be) but it
must be formatted fat32 and must have the flags boot & esp set (this
is what tells BIOS that it is the EFI partition).
135.
What type of partition table should I use?
• If in doubt use GPT.
• If your drive is larger than 2TiB you must use GPT.
• If you want to dual boot Linux with windows and you are putting Linux
on a separate drive, format the second drive the same as the first. So if
windows is booting in legacy mode, format the second drive legacy
and install Linux in legacy mode. If windows is booting in UEFI mode,
format the second drive GPT and install Linux in UEFI mode.


Foxclone V50 Return to contents
31 March 2023 Page 56 of 64
Troubleshooting
137.
Run into problems? Provide as much information as possible to assist fault
finding.
Take a screenshot
138.
If it will help troubleshooting take a screenshot. Press PrtScn or it can be
found on the Menu > Accessories. Save the file and then use the file manager
to copy the screenshot file to one of your drives so it will still be there after
you reboot.
Enable logging
139.
If the problem with foxclone is repeatable, then enable logging on the settings
tab.
When logging is enabled, foxclone will tell you where the log
file is saved, it should appear on the desktop. It saves
information on your system and the output of foxclone
actions.
Use the file manager to copy the file to one of your drives and
email it to [email protected].

Foxclone V50 Return to contents
31 March 2023 Page 57 of 64
To contact us
140.
Email [email protected] with any screenshots and/or text files with foxclone
output. The more information describing the problem, the easier it is for us –
help us to help you.

Foxclone V50 Return to contents
31 March 2023 Page 58 of 64
How does it work?
141.
Foxclone is a front end for partclone, a terminal utility that backs up and
restores a variety of partition types to/from image files
(https://www.partclone.org). In addition to partclone, foxclone also uses:
• blkid – to get partition labels. Also to determine the UUID of swap
partitions so that when cloned, a swap partition has the same UUID
and Linux will not hang for 90 seconds trying to find the wrong swap
partition.
• blockdev – to get the size of a drive in blocks.
• cmp – on restore to compare partition tables to determine if changed.
• dd – to copy and restore grub on a legacy drive.
• df – to determine the number on used 1k blocks in a partition
• grep – to filter output from other terminal commands.
• hdparm – to get the serial number of a sata drive.
• killall – to kill partclone when a backup is cancelled.
• mkdir – make a folder.
• mkswap – restore or clone a swap partition.
• mount – mount a partition.
• nvme – to get the serial number of a NVME drive.
• os-prober – search for installed operating systems.
• partclone – backup and restore partitions.
• parted – get information on the drives and partitions in the system.
• partprobe – to force the kernel to re-read the partition table after a
change.
• pigz – a multi-threaded alternative to gzip. Used to compress and
decompress image files.
• pkexec – together with a set of defined policies allows foxclone to run
with root privileges.
• rmdir – remove a folder.
• sfdisk – backup and restore partition tables.
• swapon & swapoff – to turn swap on and off.
• umount – unmount a partition.
• uname – get the kernel version running in the ISO.

Foxclone V50 Return to contents
31 March 2023 Page 59 of 64
Version History
V50
A complete rewrite of foxclone, primarily to improve
maintainability. Basic functionality is unchanged.
• Cosmetic changes to the user interface.
• Most windows are resizable.
• Logging is simpler.
• More error checks when backing up/restoring.
• No grub file on a backup from a drive with a gpt partition
table (not needed).
• Now supports exFAT.
In the iso:
• Setting timezone added.
• LightDM replaces slim as the display manager.
V46
Fixes two bugs saving grub (the bootloader) in a backup:
• With spaces in either the folder or filename a grub file
would not be saved.
• On a large drive with the last partition starting at about
1TB or greater, a grub file would not be saved.
These bugs are only relevant to a backup of a drive booting in
legacy mode. When booting in UEFI mode, grub (the
bootloader) is stored in the EFI partition.
V45
Fixes a self-inflicted error restoring from a backup of a pcie
NVME drive.
V44
In foxclone:
• Verify tab added with the ability to check image files.
• Log button added on most progress windows providing
the ability to view logs generated in a restore or clone.
• Bug fix – previously an attempt to clone from an NVME
pcie drive (or backup of an NVME pcie drive) to a sata
drive would fail, now fixed.
• Bug fix – a backup or restore started shortly before
midnight and continuing past will now display the correct
time to completion.
In the ISO:
• The build scripts have been completely re-written. The
outcome is largely unchanged from the previous version.
V42
In foxclone:
• The warning message that foxclone can’t find a serial
number has been removed (usually applies to USB
sticks – adding no value).
Return to restore

Foxclone V50 Return to contents
31 March 2023 Page 60 of 64
• Treatment of drive with no partition table, but a valid
filesystem has been changed. Previously foxclone
ignored the drive. Now it will allow it as a backup
destination but will not allow it as a source.
• Partition information displayed in list/checkboxes has
been changed.
• Default compression level changed to 1. Slightly faster
with slightly larger backup files.
• Minor bug fixes.
• Significant update to the user guide.
In the ISO:
• Thunar replaces pcmanfm as the file manager.
• qpdfview replaces evince as the PDF viewer (user
guide).
• Networking enabled.
• Pale Moon added as a web browser for access to the
foxclone website.
V40
In previous versions, a restore identifies the drive to restore
using the model name (as returned by parted). This may cause
a problem in systems with two identical drives. A backup taken
with V40 now records the drive model name and serial
number.
V39
Foxclone was hanging on a restore from a backup where the
backup files were split. Bug fixed.
V38
In V37 cloning to a 2TB drive was reporting not enough space
due to use of 32 bit integer functions. Changed to 64 bit
functions and problem fixed.
V37
Where the backup destination is on a fat32 partition,
automatically switches on ‘split files’ with a file size of 2048MB
to avoid breaching the 4GB file size limit on a fat32 partition.
V36
Checks for any MS reserved partitions and sets the filesystem
to unknown. V35 was incorrectly identifying an MS reserved
partition as ext4 on a GPT format PCIE NVME drive.
V35
On a restore checks to see if the mount point for a drive has
changed since the backup, e.g. from sdc to sdd. If changed asks
the user if they want to continue the restore using the new
mount point.
V34
Stops the user trying to backup or clone to/from the foxclone
boot drive. Allows for more than 9 partitions on a drive (why
would you want to do this?).

Foxclone V50 Return to contents
31 March 2023 Page 61 of 64
V33
Runs foxclone as root – users were having problems saving
backups to partitions they had created on external drives and
were owned by root. Bug fixes for NVME drives. Default mount
point in foxclone changed from /media/foxclone to
/mnt/foxclone. In LM19.3 was causing problems with the file
manager trying to auto open partitions mounted in /media.
V32
Checks for ownership of the backup destination and rereads
the system after a restore or clone. Minor internal changes.
V31
Bug fix to handle bios_grub partitions, found after testing with
hybrid UEFI/legacy installs.
V30
Identifies drives with a valid filesystem but no partition table
(gnome-disks allows you to do this) – not good practice. A
warning is flagged up and the drive is ignored.
V25
Initial beta issue for testing.

Foxclone V50 Return to contents
31 March 2023 Page 62 of 64
Issues
March 2023
FoxcloneV50 – cloning a legacy boot drive
142.
With the release of Ubuntu 22.04 (also Linux Mint 21) an “erase and install”
with legacy boot:
• Formats the drive with a GPT partition table.
• Creates a bios_grub partition for the bootloader and installs grub to it.
• Creates an EFI partition and also installs grub in it.
• Creates a single ex4 partition for /.
143.
Foxclone will successfully clone a drive setup this way, but it may not boot.
The solution is to re-install grub to the bios_grub partition. To fix, boot your
installation stick:
• Confirm you are booting legacy, open a terminal and efibootmgr. If the
output is EFI variables are not supported you are booting legacy, so
• sudo mount /dev/sdXY /mnt
where sdXY is your / partition, e.g. sda3 or nvme0n1p2.
• sudo grub-install --boot-directory=/mnt/boot /dev/sdX
where sdX is your system drive, e.g. sda or nvme0n1.
144.
Foxclone will be updated when this bug is fixed.

Foxclone V50 Return to contents
31 March 2023 Page 63 of 64
Changes
145.
Through to January 2023, the main site for foxclone was foxclone.com with
the archive site at foxclone.org. The domain registration for foxclone.com
expired
20
and the domain has been re-registered by a third party. Foxclone
has no association with the current registrant.
146.
The main site for foxclone is now https://foxclone.org/ and the email address
for support has changed.
20
The site was registered and hosted by my collaborator, Larry Hale. During 2022 I believe Larry
passed on. RIP Larry Hale (1945-2022), we miss you.

Foxclone V50 Return to contents
31 March 2023 Page 64 of 64
The legal stuff
Copyright © 2019 - 2022 Andy Hardwick.
The program, foxclone, is free software; you can redistribute it and/or modify
it under the terms of the GNU General Public License as published by the Free
Software Foundation; either version 2 of the License, or (at your option) any
later version.
This code is distributed in the hope that it will be useful, but WITHOUT ANY
WARRANTY; without even the implied warranty of MERCHANTABILITY or
FITNESS FOR A PARTICULAR PURPOSE. See the GNU General Public License
for more details.
A copy of the GNU General Public License is available on the World Wide Web
at
http://www.gnu.org/copyleft/gpl.html.
You can also obtain it by writing to the Free Software Foundation, Inc., 51
Franklin Street - Fifth Floor, Boston, MA 02110-1335, USA.
If you are running foxclone from the ISO, other software in the ISO is subject
to its own licensing terms, specifically Pale Moon (the web browser) is
licenced for use under the Mozilla Public License 2.0 (MPL 2). Licencing for
individual software packages in the ISO can be found in
/usr/share/doc/packagename/copyright.
