
Oracle® Product Hub
Implementation Guide
Release 12.2
Part No. E48841-09
November 2023
Oracle Product Hub Implementation Guide, Release 12.2
Part No. E48841-09
Copyright © 1995, 2023, Oracle and/or its affiliates.
Primary Author: Laurel Dale
Contributing Author: Sangeetha Mani, Kashif Suleman
This software and related documentation are provided under a license agreement containing restrictions on
use and disclosure and are protected by intellectual property laws. Except as expressly permitted in your
license agreement or allowed by law, you may not use, copy, reproduce, translate, broadcast, modify, license,
transmit, distribute, exhibit, perform, publish, or display any part, in any form, or by any means. Reverse
engineering, disassembly, or decompilation of this software, unless required by law for interoperability, is
prohibited.
The information contained herein is subject to change without notice and is not warranted to be error-free. If
you find any errors, please report them to us in writing.
If this is software or related documentation that is delivered to the U.S. Government or anyone licensing it on
behalf of the U.S. Government, then the following notice is applicable:
U.S. GOVERNMENT END USERS: Oracle programs, including any operating system, integrated software,
any programs installed on the hardware, and/or documentation, delivered to U.S. Government end users are
"commercial computer software" pursuant to the applicable Federal Acquisition Regulation and agency-
specific supplemental regulations. As such, use, duplication, disclosure, modification, and adaptation of the
programs, including any operating system, integrated software, any programs installed on the hardware,
and/or documentation, shall be subject to license terms and license restrictions applicable to the programs. No
other rights are granted to the U.S. Government.
This software or hardware is developed for general use in a variety of information management applications.
It is not developed or intended for use in any inherently dangerous applications, including applications that
may create a risk of personal injury. If you use this software or hardware in dangerous applications, then you
shall be responsible to take all appropriate fail-safe, backup, redundancy, and other measures to ensure its
safe use. Oracle Corporation and its affiliates disclaim any liability for any damages caused by use of this
software or hardware in dangerous applications.
Oracle and Java are registered trademarks of Oracle and/or its affiliates. Other names may be trademarks of
their respective owners.
Intel and Intel Xeon are trademarks or registered trademarks of Intel Corporation. All SPARC trademarks are
used under license and are trademarks or registered trademarks of SPARC International, Inc. AMD, Opteron,
the AMD logo, and the AMD Opteron logo are trademarks or registered trademarks of Advanced Micro
Devices. UNIX is a registered trademark of The Open Group.
This software or hardware and documentation may provide access to or information about content, products,
and services from third parties. Oracle Corporation and its affiliates are not responsible for and expressly
disclaim all warranties of any kind with respect to third-party content, products, and services unless
otherwise set forth in an applicable agreement between you and Oracle. Oracle Corporation and its affiliates
will not be responsible for any loss, costs, or damages incurred due to your access to or use of third-party
content, products, or services, except as set forth in an applicable agreement between you and Oracle.
For information about Oracle's commitment to accessibility, visit the Oracle Accessibility Program website at
http://www.oracle.com/pls/topic/lookup?ctx=acc&id=docacc.
Oracle customers that have purchased support have access to electronic support through My Oracle Support.
For information, visit http://www.oracle.com/pls/topic/lookup?ctx=acc&id=info or visit http://www.oracle.
com/pls/topic/lookup?ctx=acc&id=trs if you are hearing impaired.

iii
Contents
Send Us Your Comments
Preface
1 Setup Overview
Setting Up Oracle Applications Technology
............................................................................ 1-1
Setup Prerequisites.................................................................................................................... 1-2
Using Oracle iSetup.................................................................................................................. 1-2
Setup Steps................................................................................................................................ 1-3
Profile Options.......................................................................................................................... 1-3
Other Default Options............................................................................................................ 1-15
2 Defining Responsibilities and Users
Defining Responsibilities and Users........................................................................................ 2-1
Creating Responsibilities
.......................................................................................................... 2-1
Creating Internal Users............................................................................................................. 2-4
Setting Up Supplier Users.........................................................................................................2-5
Setting Up Customer Users....................................................................................................... 2-5
3 Setting Up the Item Catalog
Overview of Item Catalogs........................................................................................................3-2
Building the Item Catalog Text Index.......................................................................................3-2
Defining Item Catalog Categories
............................................................................................ 3-2
Defining Item Attachment Categories...................................................................................... 3-9
Adding Attachment Categories to an Item Catalog Category
................................................ 3-10
Defining Item Templates........................................................................................................ 3-12
iv
Managing Item Statuses.......................................................................................................... 3-15
Defining Change Policies....................................................................................................... 3-16
Defining New Item Request Types........................................................................................ 3-18
Defining New Item Request Workflows................................................................................ 3-21
Associating New Item Requests with an Item Catalog Category.......................................... 3-22
Defining Item Numbers and Descriptions............................................................................. 3-26
Creating Pages for an Item Catalog Category......................................................................... 3-28
Managing Search Criteria
....................................................................................................... 3-29
Managing Display Formats..................................................................................................... 3-35
Defining Item Catalog Import Formats.................................................................................. 3-40
Assigning Systems to an Item Catalog Category....................................................................3-44
Publishing Item Catalog Categories....................................................................................... 3-45
Defining Report Templates Using Business Intelligence Publisher .................................... 3-55
Defining Cross Reference Types
............................................................................................ 3-57
Importing Item Catalog Metadata
...........................................................................................3-58
4 Setting Up Attributes and Functions
Defining Value Sets for User-Defined Attributes
....................................................................4-1
Defining Value Set Versions for Transaction Attributes
.........................................................4-7
Defining Table Value Sets...................................................................................................... 4-12
Creating Independent Values................................................................................................. 4-14
Publishing Value Sets............................................................................................................. 4-16
Defining Item Attributes and Attribute Groups.................................................................... 4-21
Defining Transaction Attributes............................................................................................. 4-33
Using Seeded Attributes......................................................................................................... 4-36
Using Additional Attributes................................................................................................... 4-38
Creating User-Defined Functions for Item Attributes .......................................................... 4-38
Defining Attribute Usages ..................................................................................................... 4-44
Displaying Attachments on Item Attribute Pages..................................................................4-45
Associating Attribute Groups with an Item Catalog Category.............................................. 4-48
Adding Actions to an Attribute Group
................................................................................... 4-52
Publishing Attribute Groups.................................................................................................. 4-54
5 Setting Up Catalogs
Overview of Catalogs................................................................................................................ 5-1
Defining Catalog Categories
..................................................................................................... 5-4
Defining Catalogs......................................................................................................................5-6
Assigning a Category to a Catalog
............................................................................................ 5-9
Mapping Catalog Categories................................................................................................... 5-10
Administering a Category Hierarchy within a Catalog..........................................................5-10
v
6 Administering Item Business Rules
Overview of Item Business Rules............................................................................................. 6-1
Administering Rule Sets........................................................................................................... 6-4
Building Rule Expressions...................................................................................................... 6-16
Viewing Attributes Used in Rule Sets.................................................................................... 6-37
Including other Rule Sets........................................................................................................ 6-38
Viewing Rule Set Dependencies............................................................................................ 6-39
Assigning Rule Sets to Entities
............................................................................................... 6-40
Using On-Demand Rule Set Execution...................................................................................6-42
Copying Item Rules Data to Other Instances......................................................................... 6-43
7 Setting Up Change Categories and Types
Overview of Change Categories and Types............................................................................. 7-1
Defining Change Categories..................................................................................................... 7-2
Enabling Change Category Function Security......................................................................... 7-5
Creating Priority, Reason, and Classification Codes..............................................................7-13
Creating Statuses..................................................................................................................... 7-15
Defining Workflow Templates............................................................................................... 7-17
Creating Task Templates........................................................................................................ 7-23
Defining Header/Line Type Attributes and Attribute Groups.............................................. 7-25
Defining Header Types
.......................................................................................................... 7-28
Defining Line Types............................................................................................................... 7-35
Optimizing the Change Management Text Index.................................................................. 7-39
Defining Change Category Search Criteria and Display Formats......................................... 7-41
Defining Change Category Reports........................................................................................ 7-42
Subscribing to a Change Management Business Event......................................................... 7-44
Customizing Change Management Workflows..................................................................... 7-47
Implementing User Defined Functions for Change Type Attributes.................................... 7-48
8 Setting Up Item Structures
Overview of Item Structures..................................................................................................... 8-1
Defining Structure Types.......................................................................................................... 8-2
Associating a Structure Name with a Structure Type.............................................................. 8-4
Defining Structure Attributes
................................................................................................... 8-6
Defining Component Attributes............................................................................................... 8-8
Defining Display Formats and Search Criteria for Structures
................................................. 8-9
Creating an Item Catalog Category Structure......................................................................... 8-11
vi
9 Setting Up Content Management Repositories
Integrating Oracle E-Business Suite Applications with Content Management Repositories
.................................................................................................................................................... 9-1
Setting Up a Content Management Repository........................................................................ 9-3
10 Setting Up E-Business Suite Attachments
Overview of E-Business Suite Attachments........................................................................... 10-1
Structuring Folders.................................................................................................................. 10-1
Attachment Review and Approval..........................................................................................10-3
Change Management for Attachments................................................................................... 10-5
11 Implementing Roles and Role Based Security
Overview of Roles and Role Based Security.......................................................................... 11-1
Administering Roles............................................................................................................... 11-3
Administering People, Groups, and Companies....................................................................11-6
Implementing Role Based Security...................................................................................... 11-11
Implementing Change Management Role Based Security.................................................. 11-24
Creating Custom Privileges.................................................................................................. 11-27
12 Setting Up Inbound Product Data Synchronization and Data Quality
Management
Setup Overview of Inbound Product Data Synchronization................................................. 12-1
Creating Match Rules.............................................................................................................. 12-2
Defining Source Systems........................................................................................................ 12-5
A Workflows for Change Management
Workflows for Change Management....................................................................................... A-1
B Item and Catalog Business Events
Business Events......................................................................................................................... B-1
C Reading Data for User-Defined Attributes
Overview................................................................................................................................... C-1
D Synchronizing Item User-Defined Attributes with Item Descriptive Elements
Overview................................................................................................................................... D-1
vii
E Change Management Business Events
Description of Change Management Business Events............................................................ E-1
F Seeded Item Metadata Libraries
Sellable Product Information Library - Horizontal..................................................................F-1
Product Management Library - Horizontal............................................................................ F-23
Communications Services Billing Library - Vertical............................................................. F-25
Communications Product Details Library - Vertical.............................................................. F-44
G Web Services for Publishing
Oracle Product Hub Web Services Overview.......................................................................... G-1
Value Set Web Service..............................................................................................................G-2
Attribute Group Web Service
.................................................................................................G-12
Item Catalog Category Web Service....................................................................................... G-18
Item Web Service.................................................................................................................... G-30
Controlling the Output Payload.............................................................................................G-79
Error Reporting....................................................................................................................... G-80
Index

ix
Send Us Your Comments
Oracle Product Hub Implementation Guide, Release 12.2
Part No. E48841-09
Oracle welcomes customers' comments and suggestions on the quality and usefulness of this document.
Your feedback is important, and helps us to best meet your needs as a user of our products. For example:
• Are the implementation steps correct and complete?
• Did you understand the context of the procedures?
• Did you find any errors in the information?
• Does the structure of the information help you with your tasks?
• Do you need different information or graphics? If so, where, and in what format?
• Are the examples correct? Do you need more examples?
If you find any errors or have any other suggestions for improvement, then please tell us your name, the
name of the company who has licensed our products, the title and part number of the documentation and
the chapter, section, and page number (if available).
Note: Before sending us your comments, you might like to check that you have the latest version of the
document and if any concerns are already addressed. To do this, access the new Oracle E-Business Suite
Release Online Documentation CD available on My Oracle Support and www.oracle.com. It contains the
most current Documentation Library plus all documents revised or released recently.
Send your comments to us using the electronic mail address: [email protected]
Please give your name, address, electronic mail address, and telephone number (optional).
If you need assistance with Oracle software, then please contact your support representative or Oracle
Support Services.
If you require training or instruction in using Oracle software, then please contact your Oracle local office
and inquire about our Oracle University offerings. A list of Oracle offices is available on our Web site at
www.oracle.com.

xi
Preface
Intended Audience
Welcome to Release 12.2 of the Oracle Product Hub Implementation Guide.
See Related Information Sources on page xii for more Oracle E-Business Suite product
information.
Documentation Accessibility
For information about Oracle's commitment to accessibility, visit the Oracle
Accessibility Program website at http://www.oracle.com/pls/topic/lookup?
ctx=acc&id=docacc.
Access to Oracle Support
Oracle customers that have purchased support have access to electronic support
through My Oracle Support. For information, visit http://www.oracle.
com/pls/topic/lookup?ctx=acc&id=info or visit http://www.oracle.com/pls/topic/lookup?
ctx=acc&id=trs if you are hearing impaired.
Structure
1 Setup Overview
2 Defining Responsibilities and Users
3 Setting Up the Item Catalog
4 Setting Up Attributes and Functions
5 Setting Up Catalogs
6 Administering Item Business Rules
7 Setting Up Change Categories and Types
8 Setting Up Item Structures
9 Setting Up Content Management Repositories
10 Setting Up E-Business Suite Attachments
xii
11 Implementing Roles and Role Based Security
12 Setting Up Inbound Product Data Synchronization and Data Quality Management
A Workflows for Change Management
B Item and Catalog Business Events
C Reading Data for User-Defined Attributes
D Synchronizing Item User-Defined Attributes with Item Descriptive Elements
E Change Management Business Events
F Seeded Item Metadata Libraries
G Web Services for Publishing
Related Information Sources
Oracle E-Business Suite User's Guide
This guide explains how to navigate, enter and query data, and run concurrent requests
using the user interface (UI) of Oracle E-Business Suite. It includes information on
setting preferences and customizing the UI. In addition, this guide describes
accessibility features and keyboard shortcuts for Oracle E-Business Suite.
Oracle Application Framework Personalization Guide
This guide covers the design-time and run-time aspects of personalizing applications
built with Oracle Application Framework.
Oracle Bills of Material User's Guide
This guide describes how to create various bills of materials to maximize efficiency,
improve quality and lower cost for the most sophisticated manufacturing
environments. By detailing integrated product structures and processes, flexible
product and process definition, and configuration management, this guide enables you
to manage product details within and across multiple manufacturing sites.
Oracle Trading Community Architecture User Guide
Oracle Trading Community Architecture (TCA) maintains information including
relationships about parties, customers, organizations, and locations that belong to your
commercial community in the TCA Registry. This guide enables you to use the features
and user interfaces provided by TCA and by other Oracle E-Business Suite applications
to view, create, and update Registry information. For example, you can import batches
of party data in bulk from external source systems into the TCA Registry, merge
duplicate parties, sites, and customer accounts, generate time zones for phones and
locations, and run various customer reports.
Oracle Inventory User's Guide
This guide describes how to define items and item information, perform receiving and
inventory transactions, maintain cost control, plan items, perform cycle counting and
physical inventories, and set up Oracle Inventory.
Oracle E-Business Suite Integrated SOA Gateway User's Guide
This guide describes the high level service enablement process, explaining how users
can browse and view the integration interface definitions and services residing in
xiii
Oracle Integration Repository.
Oracle E-Business Suite Projects Fundamentals - Guide
Oracle Project Fundamentals provides the common foundation shared across the Oracle
Projects products (Project Costing, Project Billing, Project Resource Management,
Project Planning and Control, and Project Portfolio Analysis). Use this guide to learn
fundamental information about the Oracle Projects solution.
Oracle Workflow User's Guide
This guide describes how users can view and respond to workflow notifications and
monitor the progress of their workflow processes.
Oracle XML Publisher Administration and Developer's Guide
This guide describes how to set up and administer Oracle XML Publisher as well as
how to use the Application Programming Interface to build custom solutions.
Integration Repository
The Oracle Integration Repository is a compilation of information about the service
endpoints exposed by the Oracle E-Business Suite of applications. It provides a
complete catalog of Oracle E-Business Suite's business service interfaces. The tool lets
users easily discover and deploy the appropriate business service interface for
integration with any system, application, or business partner.
The Oracle Integration Repository is shipped as part of the Oracle E-Business Suite. As
your instance is patched, the repository is automatically updated with content
appropriate for the precise revisions of interfaces in your environment.
Do Not Use Database Tools to Modify Oracle E-Business Suite Data
Oracle STRONGLY RECOMMENDS that you never use SQL*Plus, Oracle Data
Browser, database triggers, or any other tool to modify Oracle E-Business Suite data
unless otherwise instructed.
Oracle provides powerful tools you can use to create, store, change, retrieve, and
maintain information in an Oracle database. But if you use Oracle tools such as
SQL*Plus to modify Oracle E-Business Suite data, you risk destroying the integrity of
your data and you lose the ability to audit changes to your data.
Because Oracle E-Business Suite tables are interrelated, any change you make using an
Oracle E-Business Suite form can update many tables at once. But when you modify
Oracle E-Business Suite data using anything other than Oracle E-Business Suite, you
may change a row in one table without making corresponding changes in related tables.
If your tables get out of synchronization with each other, you risk retrieving erroneous
information and you risk unpredictable results throughout Oracle E-Business Suite.
When you use Oracle E-Business Suite to modify your data, Oracle E-Business Suite
automatically checks that your changes are valid. Oracle E-Business Suite also keeps
xiv
track of who changes information. If you enter information into database tables using
database tools, you may store invalid information. You also lose the ability to track who
has changed your information because SQL*Plus and other database tools do not keep a
record of changes.

Setup Overview 1-1
1
Setup Overview
This chapter covers the following topics:
• Setting Up Oracle Applications Technology
• Setup Prerequisites
• Using Oracle iSetup
• Setup Steps
• Profile Options
• Other Default Options
Setting Up Oracle Applications Technology
This overview explains how to implement the parts of Oracle Applications. You need to
complete several setup steps including:
• Perform system wide setup tasks such as configuring concurrent managers and
printers
• Manage function and data security, which includes setting up responsibilities to
allow access to a specific set of business data and complete a specific set of
transactions, and assigning individual users to one or more of these responsibilities.
Also, if your product uses Oracle Workflow to manage the approval of change requests
(for example) or to send change notifications, you need to set up Oracle Workflow.
Related Topics
Oracle Workflow Guide
1-2 Oracle Product Hub Implementation Guide
Setup Prerequisites
Before setting up this application, you must complete the required setup steps for the
following:
• In Oracle Inventory, see "Setting Up" in the Oracle Inventory User's Guide
• In Oracle Bills of Material, see "Setting Up" in the Oracle Bills of Material User's Guide
• In Oracle Engineering, see "Setting Up" in the Oracle Engineering User's Guide
• In Oracle Sourcing, if you intend to collaborate with suppliers complete the setup
steps for defining suppliers see the Oracle Sourcing Implementation and Administration
Guide
• In Oracle Receivables, if you intend to collaborate with customers complete the
setup steps for defining customers see "Setting Up Receivables" in the Oracle
Receivables User's Guide
Using Oracle iSetup
If you are implementing a new instance of the Oracle e-Business Suite and have
relatively standard implementation requirements, you can use Oracle iSetup to rapidly
configure the following applications:
• Oracle Purchasing
• Oracle Inventory
• Oracle Bills of Material
• Oracle Order Management
• Oracle Shipping
• Oracle Costing
• Oracle Planning
• Oracle Engineering
• Oracle Work in Process
• Oracle General Ledger
• Oracle Payables
Setup Overview 1-3
• Oracle Receivables
• Oracle Cash Management
• Oracle Assets
Oracle iSetup simplifies the setup process by providing templates and predefined setup
steps that may or may not apply to your enterprise. You can use Oracle iSetup to
migrate the following data:
• Item catalog category headers.
• Alternate catalog headers.
• Items and associated data.
• Roles and privileges.
• Structure names, structures, structure components, reference designators, and
substitute components.
For more information and examples of using Oracle iSetup to migrate data from one
instance of the Oracle E-Business Suite to another, refer to My Oracle Support ID
1504980.1.
Setup Steps
Following is a summary of the setup steps:
• Defining Responsibilities and Users
• Defining the Item Catalog
• Defining Catalogs
• Defining Change Categories and Types
• Defining Item Structures
• Setting Up Content Management Repositories
• Defining Roles
• Implementing Role-Based Security
Profile Options
Profile options enable or change the behavior of certain features in the application.

1-4 Oracle Product Hub Implementation Guide
Following is a description of each of the system profiles used in this application, and
their default values.
Profile Description Default Value
EGO: Attribute Group Sync
WSDL URL
Profile for Installation Specific
Attribute Group Sync WSDL
URL. This is used only when
publishing Attribute Groups
to other Oracle Product Hub
systems.
Null
Additional Information:
Modify this profile value
when publishing to other
Oracle Product Hub
systems as explained in
Step 12 of My Oracle
Support ID 1336146.1.
EGO: Enable exporting to
Excel
Governs the action of
exporting search results.
Changing the value to Yes
enables users to export certain
search results data.
No

Setup Overview 1-5
Profile Description Default Value
EGO: Enable GTIN Validation Governs whether GTIN
validations are performed.
Changing the value to No
disables all GTIN validations.
Additional Information:
GTIN validations include:
•
Length is 14.
•
Contains a valid check
digit.
•
The GTIN is unique
and only assigned to
one item.
•
Does not contain more
than 6 leading zeros.
•
The third digit from
the left in a GTIN
must be 0, 1, 3, 6, 7, 8,
or 9 when the second
digit from the left is 0.
•
If a GTIN in a RCI
message has six
leading zeros, digits 7-
9 must be between
301-968.
•
GTINs submitted in
RCI messages cannot
contain values 0980-
0989 or 099 in the first
4 digits.
•
GTINs submitted in
RCI messages cannot
contain values 02, 04,
05, and 10-29 in the
second and third
Yes

1-6 Oracle Product Hub Implementation Guide
Profile Description Default Value
digits from the left.
EGO: Enable GTIN Validation Validates whether an item has
a unique GTIN.
Changing the value to No
enables users to specify the
same GTIN for multiple
items.
Yes
EGO: Enable Oracle
Collaborative Development
Enables edit options for
structures in HTML.
Oracle recommends leaving
the value as No.
No
EGO: Enable Product
Information Management
Data Librarian
Enables the use of Product
Hub-specific features such as
Import Workbench if the
value is Yes. See: Setup
Overview of Inbound Product
Data Synchronization, page
12-1.
No
EGO: Enable Product
Lifecycle Management
Enables the use of Product
Lifecycle Management-
specific features if the value is
Yes.
No
EGO GDSN Enabled Obsolete profile option. No

Setup Overview 1-7
Profile Description Default Value
EGO: Internal User Default
Role for Items
Governs the default role that
is set up for internal users
who access items. This role is
assigned to internal users for
all items in the organizations
to which the users have
access.
Design Reviewer is seeded for
Forms interoperability.
Additional Information:
Forms does not have data
security, so users must be
given additional privileges
on specific items (either
directly or via inheritance)
to perform actions on
itemsC.
Users with the Design
Reviewer role can view/access
all item information. If you
want to restrict access further,
define a custom role and then
reset the default role for all
enterprise internal users.
It is recommended that you
always specify a role that
minimally has the View Item
privilege.
Design Reviewer
EGO: Item Catalog Category
required for Create Item
using Spreadsheet.
Select Yes to require the
selection of an ICC when
importing new items using a
spreadsheet. Since attribute
groups and other
specifications are associated
with an ICC, this ensures all
item specifications are
associated with the ICC upon
creation.
Null

1-8 Oracle Product Hub Implementation Guide
Profile Description Default Value
EGO: Item Catalog Category
Sync WSDL URL
Profile for Installation Specific
Item Catalog Category Sync
WSDL URL. This is used only
when publishing Item
Catalog Categories to other
Oracle Product Hub systems.
Null
Additional Information:
Modify this profile value
when publishing to other
Oracle Product Hub
systems as explained in
Step 12 of My Oracle
Support ID 1336146.1.
EGO: ITEM RULE PROCESS
SIZE
During item import, all item
business rules are applied at
one time to a certain number
of items, specified in this
profile option, during one
iteration. If the profile option
value is left blank (null), the
number of items defaults to
100 internally.
Adjust the number to achieve
the best item import
performance for your system
configuration. This profile
option applies to the
following item import
methods:
•
Importing Items Using a
Spreadsheet
•
Import Workbench
•
Import Catalog Items
See: Managing Item Imports,
Oracle Product Information
Manaagement User's Guide.
Null

Setup Overview 1-9
Profile Description Default Value
EGO: Maximum Match
Results
In Import Workbench while
importing items from external
source systems, users can run
Match Rules to discover
existing items in PIM Data
Hub that match based on the
criteria defined in the Match
Rule. This option restricts the
number of matches the
matching process finds for
every item. The matches
display in the Matching Items
section within the
Unconfirmed tab.
50
EGO: Maximum number of
attribute groups in Search.
This site level profile option
specifies the maximum
number of attribute groups
you can use as search criteria
and in display formats.
Caution:
Increasing the
value could result in slow
item search performance.
5

1-10 Oracle Product Hub Implementation Guide
Profile Description Default Value
EGO: Maximum number of
attribute groups in UDA
extension framework cache.
This site level profile option
defines the maximum number
of cached attribute groups.
This ensures that there will be
no performance issues while
creating new display formats
at the parent ICC level even
when there are more than 100
attribute groups and
valuesets involved.
Changes made to this profile
value are visible to all
applications using the User
Defined Attributes
Framework. Entering a large
value improves performance
in Display Format, Criteria
Template, and Search pages,
but it also leads to larger
memory utilization. Verify
that your hardware has
sufficient memory before
increasing the value of this
profile option.
100
EGO: Maximum number of
rows for sorting
Specifies the maximum
number of rows to sort during
an item search. If a search
retrieves more than the
maximum number of rows,
the search results are
displayed without sorting (a
warning is displayed).
Additional Information:
Specifying a value greater
than 2000 may have a
negative impact on search
performance.
2000
EGO: Number of recent links
to display
Specifies the number of links
to display in the Recently
Visited list
20

Setup Overview 1-11
Profile Description Default Value
EGO: Restrict actions in Item
form
Governs the Forms actions for
items.
Set to Yes to ensure that data
level role-based security is
honored in Forms. When set
to Yes users will be unable to
access the following
functionality in Forms:
•
Categories
•
Catalog
•
Revisions
•
Organization
Assignments
•
Attachments (disables
attachments)
Keep the default value No if
you wish to make all actions
available in Forms.
No
EGO: Stats Collection
Threshold
This option sets the threshold
for the number of records at
which the statistics collection
program will be executed on
the interface table.
100
EGO: Thesaurus for Matching Enables the use of a synonym
search when matching
incoming external items to
Oracle Product Information
Management Data Hub
(PIMDH) items if the value is
Yes. See: Creating Match
Rules, page 12-2.
A thesaurus is not included
by default in the database. If
you load a thesaurus into the
database, then set this option
to Yes.
No

1-12 Oracle Product Hub Implementation Guide
Profile Description Default Value
EGO: User Organization
Context
This option stores the
organization selected by a
user. When the user logs in to
the system, the system
retrieves the organization
from this option and uses it
for the session.
Change the organization
stored in this profile option
by using the Change
Organization function within
the Development Manager
responsibility.
-1
EGO: Value Set Sync WSDL
URL
Profile for Installation Specific
Value Set Sync WSDL URL.
This is used only when
publishing Value Sets to other
Oracle Product Hub systems.
Null
Additional Information:
Modify this profile value
when publishing to other
Oracle Product Hub
systems as explained in
Step 12 of My Oracle
Support ID 1336146.1.
Enable PIM for Telco Features This site (organization) profile
option enables the use of
telecommunications industry
features such as item catalog
category/value set versions
and transaction attributes if
the value is set to Yes.
No

Setup Overview 1-13
Profile Description Default Value
ENG: Internal User Default
Role for Changes
Governs the default role that
is set up for internal users
who access change objects.
This role is assigned to
internal users for all change
objects in the organizations to
which the users have access.
Reviewer is seeded for Forms
interoperability.
Additional Information:
Forms does not have data
security, so users must be
given additional privileges
on specific change objects
(either directly or via
inheritance) to perform
actions on change objects.
Users with the Reviewer role
can view/access all
information for a change
object. If you want to restrict
access further, define a
custom role and then set reset
the default role for all
enterprise internal users.
It is recommended that you
always specify a role that
minimally has the View Item
privilege.
Reviewer

1-14 Oracle Product Hub Implementation Guide
Profile Description Default Value
ENG: ALLOW AUTO-
SUBMIT WORKFLOW
This option enables the
change order creation PL/SQL
API to automatically explode
the new change order
workflow routings and
submit the change orders for
approval.
Setting this option to No
requires users to manually
explode new change order
workflow routings and
submit the change orders for
approval after using the
change order creation PL/SQL
API.
No
INV:Sync iProcurement Item
Index
Setting this option to Yes
causes the Item Catalog Text
Index to run each time an
item is created or updated.
Setting this option to No
prevents the index from
automatically running. The
concurrent program 'Item
Catalog Text Index Build'
must be manually scheduled
to run.
Yes
Item Simple Search Delimter Enables the use of item
delimiters when performing a
simple search. For example,
an item's name is Item A. The
description for Item A is
X\Y\Z. if you enter "\" as a
delimiter, then you can enter
the search criteria X\ and the
search result is X\Y\Z.
Null
PWB: Copy BOM Default Org
Selection
This option automatically
selects the common structure
for any selected organization
when copying a structure in
the Product Workbench.
Select All

Setup Overview 1-15
Other Default Options
The EGO_DEFAULT_OPTIONS table enables you to specify default behavior during
the item creation process. Your database administrator can use SQL to access this table
and set the default value for each option. The following table lists all of the options
available in EGO_DEFAULT_OPTIONS:
Option Description Default Value
EGO_ASSIGN_PACK_SUPPL
IER
Controls whether or not all
lower levels of a packaging
hierarchy are assigned the
same suppliers as those
assigned to the parent pack
level. See: Assigning
Suppliers to Items, Oracle
Product Hub User's Guide.
Y
EGO_ASSIGN_PACK_SUP_S
ITE
Controls whether or not all
lower levels of a packaging
hierarchy are assigned the
same supplier sites as those
assigned to the parent pack
level. See: Assigning
Suppliers to Items, Oracle
Product Hub User's Guide.
Y
EGO_ASSIGN_PACK_SS_OR
G
Controls whether or not all
lower levels of a packaging
hierarchy are assigned the
same supplier site
organizations as those
assigned to the parent pack
level. See: Assigning
Suppliers to Items, Oracle
Product Hub User's Guide.
Y
EGO_ASSIGN_PACK_CATE
GORY
Controls whether or not all
lower levels of a packaging
hierarchy are assigned the
same item catalog category as
the parent pack level. See:
Assigning an Item to a
Category, Oracle Product Hub
User's Guide.
Y

1-16 Oracle Product Hub Implementation Guide
Option Description Default Value
EGO_UNASSIGN_PACK_CA
TEGORY
Controls whether or not you
must individually assign an
item catalog category to each
level of a packaging
hierarchy. See: Assigning an
Item to a Category, Oracle
Product Hub User's Guide.
Y
EGO_ASSIGN_PACK_ORG Controls whether or not any
packs associated with an item
are assigned to the same
organizations as the item. See:
"To assign a pack to an
organization:" in Enabling
Organization Assignments,
Oracle Product Hub User's
Guide.
Y
EGO_DEFAULT_STYLE_SUP
_AND_SUP_SITE
Controls whether or not any
suppliers and supplier sites
associated with a style item
are assigned during item
creation to the style's SKU
items. See: Assigning
Suppliers to Items, Oracle
Product Hub User's Guide.
Y
EGO_DEFAULT_STYLE_ITE
M_ORG
Controls whether or not the
SKU items associated with a
style item are assigned to the
same organizations as the
style item during item
creation. See: Enabling
Organization Assignments,
Oracle Product Hub User's
Guide.
Y
EGO_DEFAULT_STYLE_SUP
_SITE_ORG
Controls whether or not any
supplier site organizations
associated with a style item
are assigned during item
creation to the style's SKU
items. See: Assigning
Suppliers to Items, Oracle
Product Hub User's Guide.
Y

Setup Overview 1-17
Option Description Default Value
EGO_DEFAULT_STYLE_ALT
ERNATE_CATALOG
Controls whether or not any
alternate catalogs associated
with a style item are assigned
during item creation to the
style's SKU items. See:
Assigning an Item to a
Category, Oracle Product Hub
User's Guide.
Y
EGO_DEFAULT_STYLE_LC_
PHASES
Controls whether or not a
lifecycle and phases
associated with a style item
are assigned during item
creation to the style's SKU
items. See: Managing Item
Phases, Oracle Product Hub
User's Guide.
Y
EGO_DEFAULT_STYLE_LC_
PROJS
Controls whether or not a
lifecycle tracking project
associated with a style item is
assigned during item creation
to the style's SKU items.
Y
EGO_DEFAULT_STYLE_PEO
PLE
Controls whether or not roles
assigned to a style item are
assigned during item creation
to the style's SKU items. See:
Implementing Role Based
Security, page 11-11.
Y
EGO_SKU_CONCAT_VA_D
ELIM
This delimiter value is used
when creating function
generated SKU item numbers
and descriptions by
concatenating the variant
attribute values. For example,
if the delimiter value is 3, then
a shirt SKU item number with
the variant attribute values of
Color = Blue and Size =
Medium might be
shirtBluMed. See: Creating
Style and SKU Items, Oracle
Product Hub User's Guide.
(blank)

Defining Responsibilities and Users 2-1
2
Defining Responsibilities and Users
This chapter covers the following topics:
• Defining Responsibilities and Users
• Creating Responsibilities
• Creating Internal Users
• Setting Up Supplier Users
• Setting Up Customer Users
Defining Responsibilities and Users
You can securely collaborate with internal users, suppliers, and customers. You can set
up users and grant them responsibilities to enable specific business functions. You can
further restrict access to specific items, catalogs, or change management objects with
role-based security.
Task Required?
Creating Responsibilities
Creating Internal Users Yes
Setting Up Supplier Users
Setting Up Customer Users
Creating Responsibilities
The top-level menu for the seeded responsibilities (Development Manager,

2-2 Oracle Product Hub Implementation Guide
Development Engineer, and Supplier Engineer) is the EGO Manager Menu
(EGO_MANAGER_MENU); you should view the seeded menus and functions before
creating ones of your own. To view the seeded menus and functions, open the EGO
Manager Menu in the Application Developer's Menu form and click the View Tree
button. In the Menu Viewer you can expand each menu as you decide which menus to
include in your custom responsibilities. If a node appears with no prompt under a
menu, then you should include that function to ensure that all the menu items work
correctly. You can use menu exclusion rules when defining your responsibilities if you
need to exclude any specific menus or functions for a user.
Top level menu with seeded responsibilities

Defining Responsibilities and Users 2-3
Menu Viewer

2-4 Oracle Product Hub Implementation Guide
Defining responsibilities with menu exclusions
Creating Internal Users
You can define E-Business Suite users and assign them responsibilities that grant them
access to specific E-Business Suite applications. After creating an employee, customer or
supplier, create a user account to which you then link the employee, customer, or
supplier. Each internal user should have an employee ID with an e-mail address
specified so he or she can receive notifications. You can assign internal users a custom
responsibility or one of the following seeded responsibilities:
• Development Engineer
• Development Manager
• Manufacturing Engineer
• Product Manager
• Program Manager
• Supplier Engineer
Defining Responsibilities and Users 2-5
Setting Up Supplier Users
You can securely collaborate with suppliers. You can set up E-Business Suite users for
each of the suppliers with whom you collaborate on product and component designs.
Assuming the supplier company has already been defined in Oracle Purchasing or
Oracle Sourcing, you can register a supplier user in Oracle Sourcing using the Sourcing
Super User responsibility. You need to specify the supplier's e-mail address as the user
ID so that the system can e-mail the supplier his or her password. After the supplier
user is registered via Oracle Sourcing, you can assign him or her a responsibility such as
Supplier Engineer, which specifies the functions available to that supplier user. For
example, the seeded responsibility Supplier Engineer provides a restricted set of
functions that enable the supplier to view specific items (secured with item roles), create
issues and change requests for an item, but not create or view change orders.
For more details about registering and setting up supplier users, see the Oracle Sourcing
Implementation and Administration Guide and Oracle E-Business Suite Security Guide.
Setting Up Customer Users
You can securely collaborate with your customers. You can set up E-Business Suite
users for each of the customers with whom you collaborate on product and component
information.
Assuming that you have already defined the customer company in the Oracle E-
Business Suite, create customer users by selecting the Trading Community Manager
responsibility. In the Customers – Standard form create a new Customer Type of
Person. You must specify a valid Address.
Then navigate to the Party Relations window and assign the person to the customer
company as follows:
Relationship Type
EMPLOYMENT
Relation
Employee Of
Object
Company name
Start Date
Specify a start date. After assigning a person to the customer company, select the
System Administrator responsibility to define the customer user. Then, in the Users
form, enter the required information and specify the customer person name in the
Customer field.
For more details about setting up customer users, see the Oracle Receivables Users Guide

2-6 Oracle Product Hub Implementation Guide
and Oracle E-Business Suite Security Guide.
Creating a new customer person

Defining Responsibilities and Users 2-7
Setting up party relations for a new customer person

2-8 Oracle Product Hub Implementation Guide
Defining a customer user

Setting Up the Item Catalog 3-1
3
Setting Up the Item Catalog
This chapter covers the following topics:
• Overview of Item Catalogs
• Building the Item Catalog Text Index
• Defining Item Catalog Categories
• Defining Item Attachment Categories
• Adding Attachment Categories to an Item Catalog Category
• Defining Item Templates
• Managing Item Statuses
• Defining Change Policies
• Defining New Item Request Types
• Defining New Item Request Workflows
• Associating New Item Requests with an Item Catalog Category
• Defining Item Numbers and Descriptions
• Creating Pages for an Item Catalog Category
• Managing Search Criteria
• Managing Display Formats
• Defining Item Catalog Import Formats
• Assigning Systems to an Item Catalog Category
• Publishing Item Catalog Categories
• Defining Report Templates Using Business Intelligence Publisher
• Defining Cross Reference Types
• Importing Item Catalog Metadata
3-2 Oracle Product Hub Implementation Guide
Overview of Item Catalogs
Oracle enables you to define hierarchies of items using catalogs and catalog categories.
The Item Catalog contains all of the items in the system; all other catalogs are subsets of
the Item Catalog. For example, the Product Catalog contains all of the items in the Item
Catalog that are sold. Oracle provides several predefined catalogs, such as the Product
Catalog, Asset Catalog, and the Service Catalog. Customers can also define additional
catalogs for browsing and reporting purposes. Each catalog includes a hierarchy of
categories, with each catalog item assigned to a catalog category.
This chapter describes many tasks that enable you to use item catalog features. You
only need to complete the following two tasks to use the item catalog; perform the other
tasks only if you want the ability to use additional item catalog features.
• Building the Item Catalog Text Index
• Defining Item Catalog Categories
Related Topics
Using the Item Catalog chapter, Oracle Product Hub User's Guide
Building the Item Catalog Text Index
To take advantage of the Oracle Text search features available such as keyword search,
stemming search, and fuzzy search— run the concurrent program Item Catalog Text
Index Build. Any user with the Development Manager responsibility can submit this
concurrent program from the Submit Request window. Select the concurrent request
parameter Action=CREATE when submitting the request.
Defining Item Catalog Categories
The item catalog contains all items defined for your company or organization. Within the
item catalog, item catalog categories provide a way to logically classify items that have
similar characteristics. For example, you can classify a computer monitor in an item
catalog category named Computer Parts and Components. Item catalogs are
hierarchical, and relationships between the various item catalog categories (such as an
item's catalog category attributes) are inherited. You can define a rich hierarchical
taxonomy of item catalog categories that enable you to set up item attribution,
lifecycles, and their change policies, security, attachment categories, results formats,
criteria templates, and import formats.
When defining item catalog categories, do the following:
• Create a list of all your items.
Setting Up the Item Catalog 3-3
• Classify the items in unique item catalog categories and sub-categories that suit
your business needs.
• Consider which category is a sub-classification within a category (for example,
SRAM, DRAM could be subcategories of the item catalog category Memory).
• List the required and optional item attributes for each item catalog category.
Additional Information: Catalog Groups defined in Oracle Inventory
appear as Item Catalog Categories.
Item catalog categories provide metadata common to all items that share the category.
For example, the item catalog category "Engine" describes attributes, functions and
other characteristics common to several item numbers, such as Engine M10000 and
Engine M20000. Item catalog categories are hierarchically structured, with
characteristics (such as attribute groups, functions, pages, lifecycles, criteria templates,
and result formats) inherited throughout the hierarchy.
Following are some of the basic item catalog category terms:
• Item Catalog Categories
Item catalog categories inherit attributes from the parent category; so consider
which attributes to associate at higher levels in the item catalog category.
Inheritance helps to simplify maintenance.
• Item Lifecycles
Item lifecycles enable you to track and control the lifecycle phases of items. You can
specify an item lifecycle for each item catalog category. Item lifecycles are inherited
from the parent item catalog category.
• Change Policy
Item behavior is described by defining a change policy for each lifecycle phase in a
given lifecycle.
• Security
You can control item creation, viewing and update access by assigning a role on the
item catalog category to a user or group of users.
• Attachment Categories
You can classify a file that is attached to an item using an attachment category.
Attachment categories are inherited from the parent catalog category, and those
most commonly used can be defined at a higher node. You can then add more
specific attachment categories for the child item catalog categories.
3-4 Oracle Product Hub Implementation Guide
Creating Versions of Item Catalog Categories
You can choose to create a different version of an item catalog category (ICC) when you
change a transaction attribute or structure component in the ICC if you set the profile
option "Enable PIM for Telco Features" to Yes. Enabling the use of ICC versions enables
the use of transaction attributes and ICC structures. Transaction attributes differ from
other types of attributes such as operational or user-defined attributes because the
choices of transaction attribute values for an item can change depending on the date.
For more information about transaction attributes, see Defining Transaction Attributes,
page 4-33.
ICC structures enable you to create a default structure for use by all items created
within a certain item catalog category. For more information about ICC structures, see
Creating an Item Catalog Category Structure, page 8-11.
Caution: When you enable the use of ICC versions, the system
automatically creates a draft version for every new ICC created. You
cannot choose to create versions for some ICCs, but not others.
Once you set the profile option "Enable PIM for Telco Features" to Yes, you must create
a released version for each existing ICC. Oracle provides an upgrade API that
automatically performs this task. Your database administrator can invoke the upgrade
API from the back end once you enable the Telco features.
Warning: You must turn on the "Enable PIM for Telco Features" profile
option before invoking the upgrade API. Do not disable the "Enable
PIM for Telco Features" profile option by changing the value from 'Y' to
'N' after it has been enabled. If it is disabled and enabled again, you
must invoke the upgrade API again to maintain data integrity and
consistent functionality.
Setting Up the Item Catalog 3-5
Upgrade API Sample Call
DECLARE
uid NUMBER;
rid NUMBER;
rad NUMBER;
sgid NUMBER;
BEGIN
SELECT
USER_ID,RESPONSIBILITY_ID,RESPONSIBILITY_APPLICATION_ID,
SECURITY_GROUP_ID
INTO
uid, rid, rad, sgid
FROM
FND_USER_RESP_GROUPS
WHERE
USER_ID = (SELECT USER_ID FROM FND_USER WHERE USER_NAME =
'SYSADMIN')
AND RESPONSIBILITY_ID =
(SELECT RESPONSIBILITY_ID FROM FND_RESPONSIBILITY_VL WHERE
RESPONSIBILITY_KEY = 'SYSTEM_ADMINISTRATOR');
FND_GLOBAL.apps_initialize (uid, rid, rad, sgid);
ego_p4t_upgrade_pvt.upgrade_to_pim4telco(null);
END;
When creating a child ICC version, the Draft version inherits the transaction attributes
and structure components defined in the latest released versions of any of its parent
categories. You can then define additional attributes or structure components for the
child ICC, in addition to the attributes and structure components of the parent ICC.
Any new transaction attributes and structure components added to a parent ICC draft
version and released in a new version appear in all child ICC draft versions unless the
new parent ICC version is released with a start date in the future.
When an item is assigned to an ICC that contains transaction attributes or an ICC
structure, links to the Transaction Attributes and Structure pages appear in the item's
Overview page in the same way as links to other ICC pages containing operational and
user-defined attributes appear. The Transaction Attributes page shows the attribute
details in read-only mode, but you cannot assign an attribute value since transaction
attribute values are assigned when a transaction takes place. Any items created at any
given time within an ICC with versions inherits the ICC version effective during item
creation.
To create an item catalog category:
The following steps apply to creating an item catalog category with the profile option
"Enable PIM for Telco Features" set to either Yes or No.
1.
On the item Search: Item Catalog Categories page, click the Create Item Catalog
Category link.
2.
On the Create Item Catalog Category page, enter the following:
Catalog
Defines the category name. The number of segments (and respective labels) for item
3-6 Oracle Product Hub Implementation Guide
catalog category depends on how the item catalog group flexfield is defined in
Oracle Inventory setup.
Note: Any leading or ending white spaces in the key flexfield
segments are trimmed automatically.
Description
Optionally enter a brief description of the item catalog category.
Parent Item Catalog Category
Specify the immediate parent of the item catalog category you are creating, thereby
determining the item catalog category hierarchy.
Default Template
Optionally specify an item template to use to populate the Create Item page for any
item of the item catalog category you are creating. On the Create Item page, you
can modify the template applied upon item creation or choose not to apply a
template.
Item Creation Allowed
Select to specify that items of the item catalog category can be created (if you do not
select, the category only serves as a placeholder in the catalog hierarchy). If item
creation is not allowed, the category typically specifies characteristics (attribute
groups, etc.) that are inherited by its descendants.
Inactivate
Optionally specify a date on which to inactivate the item catalog category. You
cannot specify an inactive date that is later than the inactive date of an item catalog
category's parent, nor can you specify an inactive date that has already passed.
Also, all children of a parent catalog category with an inactive date should be made
inactive at the same time or earlier. Making a category inactive has the following
implications:
• You cannot create items in that item catalog category or any of its descendants.
• You cannot use that item catalog category or any of its descendants as the
parent catalog category upon creation of an item catalog category.
3.
Click Apply.
The system returns you to the Basic Information page. From here, you can perform
all remaining item catalog category setup steps described in this chapter.
This is the last step when creating an item catalog category with the profile option
"Enable PIM for Telco Features" set to No. If this profile option is set to Yes,
continue with the following steps.
Setting Up the Item Catalog 3-7
To release an item catalog category draft version
Important: You can only perform the following steps if the profile
option "Enable PIM for Telco Features" is set to Yes and from within the
Setup Workbench (HTML interface). You cannot access item catalog
category versions from the Forms interface.
Clicking Apply in the previous step creates a locked item catalog category draft version.
Only the user listed in the Locked By field can release a draft version. Add all
transaction attributes and associate a structure before releasing the draft version to
create a numbered version. Once you release an item catalog category, you cannot
update the released version. The following information associated with the item catalog
category is not included in a version. If you make any changes to the following
information, the changes apply to all versions.
• Basic information
• People
• Attribute groups, both operational and user-defined
• Item pages
• Lifecycles
• Attachment categories
• Search criteria
• Display formats
• Import formats
• Templates
• Report templates
• Item creation details
Additional Information: The system chooses which numbered version
of the item catalog category to use for an item based on the versions'
start and end dates. Only an item catalog category with a numbered
version that has a date range which encompasses the item's effective
date can be assigned to an item.
4.
In the Basic Information page, click Release.
3-8 Oracle Product Hub Implementation Guide
To lock and unlock a draft item catalog category version
A version enabled item catalog category is automatically locked upon creation of the
draft. Only the user listed in the Locked By field can update the item catalog category
transaction attributes or structure or release the item catalog category to create a new
version. To enable another user to update the item catalog category, unlock it. The other
user can then lock it and make updates or release the item catalog category. Locking the
item catalog category only locks the draft version's transaction attributes, structure,
version description, and start date. You can update the item catalog category primary
information, such as description and the inactivate date, regardless of the lock status.
This primary information applies to all versions.
5. On the Basic Information page, if the draft is locked and you are the user who
locked it, the Unlock button is visible. Click Unlock.
The Locked By field displays the name of the person who locked it. Only the person
displayed in the Locked By field can unlock the draft.
6. If the draft is unlocked, the Locked By field is blank and the Lock button is visible.
Click Lock.
To update an item catalog category
Before updating an item catalog category draft version, you must lock it.
To update an item catalog category with no versions, refer to Updating Item Catalog
Categories, Oracle Product Hub User's Guide.
7.
To change the item catalog category primary (header) information for all item
catalog category versions, in the Basic Information page, click the Update button.
8.
To change the draft version's description or start date, in the Basic Information
page, click the draft version's Update icon.
9. To change the draft version's transaction attributes or structure, in the Basic
Information page, click the Draft link.
On the Transaction Attributes page, you can update, delete, or add transaction
attributes to the item catalog category. See: Defining Transaction Attributes, page 4-
33.
On the Structure page, you can update, add, or delete components and validate the
structure. See: Creating an Item Catalog Category Structure, page 8-11.
To revert the draft item catalog category to an earlier version
The Revert Draft to button enables you to refresh the draft version's characteristics with
a released version's characteristics.
10.
Select a released version that contains the characteristics that you want the draft
version to contain.

Setting Up the Item Catalog 3-9
11. Click Revert Draft to.
The draft version now contains the same characteristics as the released version
selected.
Related Topics
Updating Item Catalog Categories, Oracle Product Hub User's Guide
Defining Transaction Attributes, page 4-33
Defining Item Attributes and Attribute Groups, page 4-21
Creating an Item Catalog Category Structure, page 8-11
Defining Item Attachment Categories
Whenever users add attachments to an item, they specify an attachment category. Item
attachment categories provide a way to classify attachments—this classification
identifies the purpose of the attachment to the business object, and can also be used as
one of the search criteria within an attachment list. If users do not specify an attachment
category for an item catalog category, and none are inherited from its parent catalog
category, they always have the option of using the attachment category Miscellaneous.
Additional Information:
Attachment categories inherited from a parent
catalog category cannot be deleted at the child catalog category level.
Attachment categories are defined by the system administrator and are available across
the various applications of the E-Business Suite. Attachment categories that you define
can be made available to any E-Business Suite application. Thus, attachment categories
are shared across the E-Business Suite applications and this should be kept in mind
when defining any new attachment categories. Rules defining the usage of attachment
categories are defined independently by each application.
You can define attachment categories in the Document Categories window. Before
defining a new attachment category, verify that it does not already exist. If it already
exists, then you can enable it for item catalog categories.
Defining an attachment category

3-10 Oracle Product Hub Implementation Guide
Related Topics
Adding Attachment Categories to an Item Catalog Category, page 3-10
Adding Attachment Categories to an Item Catalog Category
Once you define an attachment category (also known as a document category), you can
enable it for an item by associating it with an item catalog category.
All item catalog categories inherit attachment categories (in the same way they inherit
item attributes) from their parent catalog category. So, before associating attachment
categories with item catalog categories, create a list of all attachment categories
available for use in your item catalog. Consider which attachment categories are
common among item catalog categories within each branch of the item catalog
hierarchy. If an attachment category is applicable to all the child catalog categories, then
the attachment category should be associated with the parent catalog category.
When associating attachment categories with item catalog categories, you can specify
the effectivity of this association by providing a Start Date and an End Date. If an
attachment category association has an end date, an attachment in that category cannot
be used for the items belonging to the category beyond the specified date.
Associating an attachment category with an item catalog category
To add attachments to an item, users need to specify an attachment category.
Attachment categories sort and organize attachments that users might attach to an item
or items. They provide a way to classify attachments—this classification identifies the
purpose of the attachment to the business object, and can also be used as one of the
search criteria within an attachment list. If users do not specify an attachment category
for an item catalog category, and none are inherited from its parent catalog category,
Setting Up the Item Catalog 3-11
they always have the option of using the attachment category "Miscellaneous".
When moving attachment categories, only those attachments whose categories are
common between the source and target catalog categories will be retained.
By adding attachment categories, you can classify all attachments that you add to
specific item catalog categories.
Note: Attachment categories inherited from a parent catalog category
cannot be deleted at the child catalog category level. Attachment
categories can be inherited from a parent catalog category and explicitly
added to the catalog category itself. Administrators should not
associate the same attachment category with an item catalog category in
this manner.
The following attachment categories are available for all item catalog categories:
• Description
• Image
• Item Internal
• Miscellaneous
• To Buyer
• To Supplier
• To Receiver
• To Mobile Picker
• To Mobile Putaway
• To Mobile Receiver
To add an attachment category to an item catalog category:
1.
On the Search: Item Catalog Categories page, select the item catalog category to
which you wish to attach an attachment category.
2.
On the Basic Information page of the item catalog category, click the Attachment
Categories link.
3.
On the Attachment Categories page, click Add.
4.
On the Search and Select: Attachment Categories page, select an attachment
3-12 Oracle Product Hub Implementation Guide
category from the list. You can also search within the list for a specific attachment
category and then select it.
5. Click Apply.
Related Topics
Defining Item Attachment Categories, page 3-9
Defining Item Templates
You can specify one or more item templates during the item creation process. The
system applies the templates in the order listed, so later templates overwrite attribute
values applied with earlier templates. An item template is a defined set of attribute
values used during item creation. When you apply a template to an item, you overlay
or default in the set of attribute values to the item definition. For example, every time
users in a particular organization create new items, the attributes as defined and
approved by the organization appear in the appropriate fields--no user guesswork is
required, and much time is saved during the creation of items with a similar form, fit
and function.
You can create item templates that contain either the operational attributes for an item,
which are visible to all organizations, or user-defined attributes, which are specific to an
item catalog category. When you explicitly associate a template with an item catalog
category, it is made available for all create and update item actions in that item catalog
category. Also, the values for the user-defined attributes that are specified in the
template are inherited from parent to child within the particular item catalog category.
After creating the item template for use with user-defined attributes, you must associate
it with an item catalog category.
Benefits:
• Default operational and user-defined attributes to speed up the process of
specifying item attribute values
• Enforce consistency of item attribute values for items belonging to certain item
catalog categories or item types. For example, you may have an item template for
all purchased computer hard-drive assemblies.
For more details about creating item templates that use operational attributes, as well as
a listing of the Oracle provided templates, see Item Templates, Oracle Inventory User's
Guide.
To define an item template and specify user-defined attributes:
1.
Navigate to the Setup Workbench. In the Items tab, select the Templates subtab.
Setting Up the Item Catalog 3-13
2. On the Search: Templates page, click Create.
3. In the Oracle Forms Find Item Templates window, click New.
4. In the Item Template window, provide the item template name and description,
and then specify the operational attributes and the default values. When finished,
save the template.
5. Navigate to the item catalog category to which you wish to associate the new item
template and click the Templates link.
6.
On the Templates page, click Add Template.
Associate item templates with any item catalog category. Item templates are
inherited down through the item catalog hierarchy
7.
On the Add Templates to Item Catalog Category page, locate the new template,
select it and click Apply.
8.
On the Templates page for the item catalog category, click the template name to
which you wish to add user-defined attributes.
9.
On the Update Template page, select the user-defined attributes you wish to add to
the template:
• Select an attribute group, then click Go.
• Select the user-defined attributes to add to the template. You can also choose to
set the default attribute values.
• Click Enable.

3-14 Oracle Product Hub Implementation Guide
Updating item template for user-defined item category attributes
You can also make this the default item template for all new items created in this
item catalog category by selecting Set as Default.
Click Apply.
How to Use Item Templates:
1. During the new item creation process you can specify one or more item templates
or use the default if one was set up at the item catalog category level. See: Creating
New Items, Oracle Product Hub User's Guide
Caution: If applying more than one template, specify the order to
apply them. The last template's attribute values override any
previously applied template attribute values.
2.
The operational attribute values specified in an item template are not set for
'unapproved' items (items that require a new item request). Apply the item
template manually once the item is approved.
Related Topics
Item Templates, Oracle Inventory User's Guide
Defining Item Templates, Oracle Inventory User's Guide
Copying Item Templates, Oracle Inventory User's Guide
Setting Up the Item Catalog 3-15
Managing Item Statuses
An item status is assigned to a lifecycle phase; in fact, each lifecycle phase can have
multiple item statuses associated with it. Create or edit item statuses before associating
them with lifecycle phases.
To create an item status:
1. On the Search: Item Catalog Categories page, click the Lifecycle Phases tab.
2. On the Search: Lifecycle Phases page, click the Item Statuses link.
3. On the Search: Item Statuses page, click the Create Item Status link.
4. On the Create Item Status page, provide the following information:
Status
The name of the item status.
Description
The description of the item status.
Inactive Date
The date on which the item status is no longer valid and available for use.
5. Select the Value checkboxes that correspond to the attributes that you wish to
associate with the item status.
6. Click Apply.
To edit an item status:
1. In the Applications tree menu, click the Setup Workbench link.
2.
On the Search: Item Catalog Categories page, click the Lifecycle Phases tab.
3. On the Search: Lifecycle Phases page, click the Item Statuses link.
4.
On the Search: Item Statuses page, select the item status that you wish to edit.
5. On the Item Status Details page, click Update.
6.
On the Edit Item Status page, update the Description, Inactive Date, or, select an
attribute you wish to apply.
7.
Click Apply.
3-16 Oracle Product Hub Implementation Guide
Defining Change Policies
Administrators can define and update item change policies for item catalog categories.
These item change policies determine the rules for how and when an item's attributes,
attachments, and associations are changed. For example, a company manufacturing an
engine that has hundreds of specifications may wish to define item change policies for
the different phases of development. So when the engine is in the concept or design
phase, many of the attributes are allowed to change without formal approval, and the
lifecycle policy is not very restrictive. When the engine progresses to the prototype
phase, the company might wish to place all attributes, attachments, and associations
under stricter change control, perhaps requiring a change order for all modifications.
Later, when the engine is in the production phase, the company will likely want every
facet of the engine's production under tight control.
Defining item change policies enables a company to:
• Specify whether or not item changes are allowed in a particular lifecycle phase of an
item lifecycle.
• Specify what types of changes (attributes, attachments, associations, structures) are
allowed for an item in each lifecycle phase.
• Specify whether or not a change order is required to make particular changes to an
item in a specific lifecycle phase.
Note: Change policies inherited from a parent catalog category cannot
be edited at the child catalog category level.
If you do not define a change policy for an item, then by default changes are allowed in
all lifecycle phases.
Item change policies only take effect after the item has been approved.
On the Update Change Policy for Attributes (or Associations or Attachments) page,
select the appropriate attribute group (or association or attachment category) and the
change policy you wish to apply for the particular phase. The valid change policies are:
• Allowed
• Not Allowed
• Change Order Required

Setting Up the Item Catalog 3-17
Setting lifecycle change policy
Additional Information: Before establishing a change policy for
attributes or attachments, you must first associate the attribute group or
attachment category with the item catalog category.
To update an item change policy:
1. On the Search: Item Catalog Categories page, search for the item catalog category
(see: Browsing Item and Alternate Catalogs , Oracle Product Hub User's Guide) for
which you would like to define an item change policy, and click its name link.
2. On the Basic Information page for the item catalog category, click the Lifecycles
link.
3.
On the Lifecycles page, locate the lifecycle for which you wish to define a change
policy. If no lifecycles are listed, add the lifecycle for which you wish to define item
change policies.
4.
From the View pulldown list (for attributes, associations, attachments, structures, or
promotion/demotion), select the item change policy defined for the selected
lifecycle, and then select the lifecycle phase you want to update. Click Go.
5.
From the Update pulldown list, select the lifecycle phase you want to update. Click
Go.
6.
On the Update Change Policy for: Attributes (or Associations, Attachments,
Structures, or Promote and Demote) page, select the appropriate attribute group (or
association, attachment category, structure, or promotion, demotion, or revision)
and the change policy you wish to apply to the particular phase. The valid change
3-18 Oracle Product Hub Implementation Guide
policies are:
• Allowed
• Not Allowed
• Change Order Required
Important: Before establishing a change policy for attributes or
attachments, you must first associate the attribute group or
attachment category with the item catalog category.
You can switch back and forth among the various lifecycle phases via the tabs on
the Update Change Policy for: Attributes (or Associations, Attachments,
Structures, or Promote and Demote) page.
Defining New Item Request Types
New item request is a workflow process, which enables you to route the definition and
approval of a new item. When creating a new item, various people in the organization
can define various aspects of an item, such as operational attributes, user-defined
attributes, AML, and so on. using a workflow process. You can also combine the
definition routing and approval routing in a new item request workflow.
New Item Request is a seeded Change Management category for which you must define a
type before you can set up new item requests for an item catalog category. new item
request (NIR) types are defined like any other change type. The topic Defining Header
Types, page 7-28 provides additional type definition details.
Once a specific NIR type is created, the administrator can assign additional information,
such as the associating NIR-related attributes. Examples of such attributes are Cost
Impact and Implementation Cost. You can then organize these attribute groups in
different pages, similar to Associating Attribute Groups with an Item Catalog Category,
page 4-48.
When users create items in item catalog categories that require an item request, the new
item request type specified for the item catalog category determines how the request is
routed for distribution and approval, and identifies the approvers for the new item. For
example, the new item request type determines what item request attributes and
sections are available on pages; it determines the valid priorities and reasons available
to users; it also determines the valid statuses for the request (for example, Open,
Approval, and Closed). In essence, the new item request change type defines the
process for routing the collection of item attributes and approval requests from various
people who are internal (such as Engineering and Manufacturing) or external to your
organization (such as Suppliers).

Setting Up the Item Catalog 3-19
Prerequisites
❒ Define one or more workflow templates. See:
• Defining Workflow Templates, page 7-17
• Defining New Item Request Workflows, page 3-21
To define a new item request type:
1. On the Change Management Categories page in the Setup Workbench, select the
New Item Request category, then select the Types tab in the lower half of the page.
When the page refreshes click Create.
Create New Item Request Type
2.
On the Create New Item Request Type page, enter information in the required
fields.
The Number Generation field provides multiple methods for item number request
generation, but you can only select either the Sequence Generated or Function
Generated method for the new item request type. When using the sequence
generated item request numbering method, all item number requests automatically
generate based on the sequence generation rules specified here. Specify a prefix,
starting number, and increment. For the function generated method, specify a
function and select whether or not to enable key attributes.

3-20 Oracle Product Hub Implementation Guide
Note: The Number Generation field on the Create New Item
Request Type page applies to the number generation for new item
requests, not for new items. Item number generation is defined at
the item catalog category level.
You must have already defined a custom function before using the
function generation method. For details, see Creating User Defined
Functions, page 4-38.
You can set up the default Assignee for all new item requests of this type in the
Default Assigned To section.
3. After creating the new item request type you can continue the setup tasks via the
side navigation links on the Basic Information page.
Click the Attribute Groups link to associate attribute groups with the new item
request type.
Click the Pages link to organize the associated attribute groups on one or more New
Item Request pages.
Defining User Defined Attributes for a New Item Request Type
Click the Codes link to associate valid priorities and reasons for new items that are
created with this request type.
Click the Configuration link to select the display sections and primary attributes
that you wish to make available for this request type.
Click the Workflow link to define the statuses of the workflow. Click the Update
Properties icon for a particular status to set up valid phases for promotion,
demotion and the associated workflows. In the Workflows region, you can add
many workflow templates, if desired. When creating a new item request using this
new item request type, the user can select which workflow template to use. Select
which workflow template to appear as the default during the new item request
creation process.
You can then select each workflow template one at a time and specify the following:
• Auto Promote
Indicates that when the workflow completes successfully and all required
Setting Up the Item Catalog 3-21
approvers have approved, the item request will automatically be promoted to
the specified valid phase.
• Auto Demote
Indicates that when the workflow completes successfully and all required
approvers have approved, the item request will automatically be demoted to
the specified valid phase.
• Enable Digital Signature
Indicates that users who are expected to approve or reject the item request must
enter their username and password to reauthenticate themselves.
Related Topics
Defining Header Types, page 7-28
Associating New Item Requests with an Item Catalog Category, page 3-22
Defining New Item Request Workflows, page 3-21
Creating New Item Requests, Oracle Product Hub User's Guide
Defining New Item Request Workflows
One of the most important features of new item requests is the ability to associate one or
more workflows to each status of a new item request. The administrator can add
workflow steps and specify the status of the NIR in which to execute a workflow. The
administrator can add multiple workflows for each status, then the user can choose
from this list of workflows which one to use for the status in a particular new item
request. The administrator specifies the step number, status of the NIR process in which
one of the workflows will be initiated, and finally associates the workflows by choosing
them from the workflow templates.
To define a workflow template to assign to a new item request, see Defining Workflow
Templates, page 7-17. NIR workflows are typically Definition and Approval
workflows. An example of a NIR workflow is outlined in the following figure.

3-22 Oracle Product Hub Implementation Guide
NIR Workflow example
Once you finish associating workflow templates with the NIR type, you need to specify
the category association for the NIR.
Related Topics
Associating New Item Requests with an Item Catalog Category, page 3-22
Defining Workflow Templates, page 7-17
Associating New Item Requests with an Item Catalog Category
Important:
Before associating new item requests with an item catalog
category, you must set up both a workflow template and a new item
request type. For details, see Defining Workflow Templates, page 7-17
and Defining New Item Request Types, page 3-18.
You can define a new item approval request for all items created in a particular item
catalog category. Defining a new item approval request enables an enterprise to enforce
standard business processes during item creation, thereby avoiding costly mishaps,
such as duplicate parts. New item approval requests enable your enterprise to have
different people from various lines of business help define the many item attributes
required during item creation.
You can set up a new item request for an item catalog category to request approval

Setting Up the Item Catalog 3-23
from several people in sequence or parallel. Each person may also be required to enter
certain item attributes during the approval process.
To associate a specific new item request type with a category, you need to navigate to
the item catalog category and specify the new item request type in the New Item
Request page.
In the Workflow/Approval section, you can specify which attributes the people
associated with a workflow step are required to enter. For example, when the new item
request has a workflow status of Open, one person in the workflow may be responsible
for some technical specifications associated with the new item being created; another
might need to provide details about the new item's safety standards. In this case,
associate the attribute groups related to technical specifications and safety standards so
that the appropriate people can add the information necessary to define all aspects of
the new item.
Since a NIR is a change, it has a status type. Only certain workflow types are allowed
for a given NIR status type as tabulated below.
NIR Status Type Valid Workflow Type
Open Definition
Approval/Review Definition and Approval, or Approval
Others Generic
Prerequisites
❒ Defining Workflow Templates, page 7-17
❒ Defining New Item Request Workflows, page 3-21
❒
Setting Up New Item Request Types, page 3-18
To associate new item requests with an item catalog category:
1.
Navigate to the Setup Workbench Item Catalog Categories tab. Find and select the
item catalog category to which to associate a new item request type.
2.
Click the New Item Request link. In the New Item Request page, click Update.
The Update New Item Request page opens.

3-24 Oracle Product Hub Implementation Guide
Associating a New Item Request with an Item Catalog Category
3.
In the New Item Request Required field, specify one of the following:
• None - no new item request is required for items created within this item
catalog category.
• Specify for Category - if you select this option, you can select a value in the Item
Request Type field.
• Inherit from Parent - use the same new item request type as the parent item
catalog category.
You can change the value of the New Item Request Required field at any time. For
example, if you no longer want to inherit the NIR type from the parent ICC, you
can specify a new NIR type or no longer require new item requests.
Click Apply. The New Item Request page appears.
4.
If the item catalog category is associated with an item request type, either through
inheritance or directly, then the Workflow/Approval section appears in the New
Item Request page.
If there is more than one workflow associated with an item request type, select each
workflow for each status using the pull down lists in the Workflow and Workflow
Status fields. For each workflow, you can choose to associate attribute groups to
each workflow step only if the ICC is associated with an item request type directly.
Otherwise, the attribute group definitions are inherited from the parent ICC or

Setting Up the Item Catalog 3-25
nonexistent.
To update the attribute groups for a workflow step, click the Associate Attribute
Groups icon for the workflow step.
Example of When to Associate Attribute Groups
When the new item request is in the Open workflow phase, one person in the
workflow may be responsible for some technical specifications associated with the
new item being created; another might need to provide details about the new item's
safety standards. In this case, associate the attribute groups related to technical
specifications and safety standards so that the appropriate people can add the
information necessary to define all aspects of the new item.
You can set up the collection of user-defined attributes during the new item request
process for any attribute group associated with the item catalog category.
Note:
People associated with the workflow must also have
sufficient privileges on the item for which you are creating a
request. To ensure the appropriate people have sufficient privileges
to view and update the attributes on the item for which they are
responsible, you should confirm that they have the appropriate role
at the organization or item catalog category level.
5. In the Associate Attribute Groups page, search for and select the user-defined
attribute groups associated with the ICC for which you want the workflow
assignees to add attribute values.
Click Apply.
Associating Item Attribute groups with Definition Steps
Related Topics
Defining New Item Request Workflows, page 3-21
3-26 Oracle Product Hub Implementation Guide
Defining Item Numbers and Descriptions
You can define new item numbers and descriptions so that they are automatically
generated when users create new items. Setting up autonumber generation ensures that
new items created in item catalog categories have a consistent numbering scheme. You
can set up item number and description generation so that numbers/descriptions are
either:
• Sequence generated
If the item request numbering method is sequence generated, then all item number
requests automatically generate based on the sequence generation rules specified
here. You can specify a prefix, starting number, increment, and suffix.
Note: Sequence generation does not apply to Item Description
generation--it is for item number generation only.
• Function generated
If the item request numbering/description method is function generated, then all
number/descriptions for new items in the item catalog category automatically
generate based on a custom function. When specifying that an item
number/description is function generated, select the function that you want to use,
and then map the function parameters to the user-defined attributes that you want
included in the item number/description. When creating a new item, users receive
prompts to enter the user-defined attributes used in generating the item
number/description.
Note: You must have already defined a custom function before
using this item number/description generation method. For details,
see Creating User-Defined Functions, page 4-38.
• Inherited from parent
If the item request numbering/description generation method is inherited from a
parent, then the item number/descriptions for the items generate using the same
method as the parent item catalog category.
Note:
All item catalog category subcategories have, by default, a
number/description scheme that is inherited from their parent.
• User entered
If the item request numbering/description method is user entered, then the user is
required to manually enter a number or a description for new items.

Setting Up the Item Catalog 3-27
To set up automatic change number generation using user-defined functions, follow
these steps:
1. Update the header type.
2. Select Function Generated from the Number Creation drop-down list.
3. Associate the function.
4. Associate the function parameters to the attributes.
To define automatic item number/description generation:
1. On the Basic Information page of an item catalog category, click either the Number
Generation or Description Generation link. On the Auto Generation page for the
generation method you selected, click Update.
Item Number Generation
Setting up Item Number Generation
2.
On either the Item Description Generation or Item Number Generation page,
select the generation method you wish to use and fill in the required fields.

3-28 Oracle Product Hub Implementation Guide
Description Generation Sample
Creating Pages for an Item Catalog Category
Item pages provide a mechanism to customize the user interface. The administrator can
combine and sequence attribute groups into pages. There is no limit on the number of
attribute groups associated with a page. However, attribute groups contained in a page
must have the same association level, for example, they must all be at one of the
following attribute group levels:
• Item
• Item Revision
• Item Supplier
• Item Supplier Site
• Item Organization
• Item Supplier Site Organization
Note: Pages inherited from a parent catalog category cannot be deleted
at the child catalog category level. Pages can be inherited from a parent
catalog category and explicitly added to the catalog category itself.
Administrators should not associate the same pages with an item
catalog category in this manner.
Setting Up the Item Catalog 3-29
To create a page for an item catalog category:
1. On the Search: Item Catalog Categories page, search for the item catalog category
(see:Browsing Item and Alternate Catalogs , Oracle Product Hub User's Guide) and
click its corresponding name link.
2. On the Basic Information page for the item catalog category, click the Item Pages
link.
3. On the Item Pages page, click Add.
4. On the Create Item Catalog Category Page page, enter the following:
Display Name
Enter the name to be displayed in the user interface.
Internal Name
Enter the internal name. The internal name cannot be updated once a page has been
created.
Description
Enter a description of the catalog category page.
Sequence
Enter the sequence number. For each page associated with a catalog category, a
corresponding link is displayed to the user on the Item Detail page. The sequence
number determines the order for the page links on the Item Detail page.
Data Level
Select Data Level and click Go. The data level constrains applicable attribute
groups. You cannot update the data level after a page has been created.
Note: If you change the data level after you have already associated
attribute groups with a page, those attribute groups will no longer
be associated with the page.
5.
Click Add Another Row if you wish to add an attribute group to the page being
created.
6.
Click Apply.
Managing Search Criteria
Search criteria templates offer a convenient way to save frequently used search criteria.
Search criteria can be created either by administrators or end users. Administrator-
3-30 Oracle Product Hub Implementation Guide
created search criteria templates are available for all users. User-created search criteria
are available only to the particular user who creates it. When a default search criteria
template for a particular object is defined by a user and administrator, the user-defined
search criteria template takes precedence.
You can create item search criteria and import formats for the following business
entities:
• Item
• Item Organization
• Item Revision
• Item Supplier
• Item Supplier Site
• Item Supplier Site Organization
Because search criteria templates contain primary, operational, and user-defined
attributes, they are always defined in the context of an item catalog category, structure
type, or change category (depending on the object for which a criteria template is
created).
The following figure shows the Update Search Criteria page, with the criteria template
for the item catalog category Capacitors. Begin by listing the common attributes a
typical user might search for when using the item catalog category Capacitors. Here,
attributes such as Capacitor Tolerance and Capacitor Voltage, among others, are
specified. After adding attributes, you can specify operators and values to further
restrict the scope of your search.

Setting Up the Item Catalog 3-31
Defining Item Catalog Search Criteria
To create administrator level search criteria:
Administrators can create search criteria from the respective item catalog category
definition page for an item, the structure type definition page for a structure, or the
change category list page for a change object. You can access these pages via the Setup
Workbench link on the Applications page.
1. From the object's definition page (either the Basic Information page for an item
catalog category or structure type or the Categories page for a change object), click
the Search Criteria link.
Note: On the change management Categories page, click the Search
Criteria icon in the row of the category for which you wish to create
search criteria.
Note:
The Packaging BOM structure type Basic Information page
has no link to Search Criteria. You can check Display Formats and
Import Formats from the Setup Workbench Structures tab.

3-32 Oracle Product Hub Implementation Guide
2. On the Search Criteria Template page, click Create.
3. On the Create Search Criteria page, provide a name and description for the search
criteria. You can set this search criteria as the default search criteria for the object by
clicking Set as Default. Note that the name of the respective item catalog category,
structure type, or change category already appears. You have the option of copying
an existing item catalog category, structure type, or change category search criteria
and combining the respective attributes with those you wish to add to this search
criteria.
4. Click Add Criteria to add search criteria.
If you simply wish to locate a single attribute, enter its name and click Find. To
search for attributes by business entity (for item catalog categories only) and
attribute group, select the business entity, click Go, then select the attribute group
and click Go again.
For change categories, search for attributes by change category.
For structures, search for attributes either by structure type (you do not need to
specify a structure type because you are always in the context of a structure and
structure type) or by catalog category. To search for attributes by structure type,
select Component. To search for attributes by catalog category, select Item.
5.
On the Add Criteria page, you can move search criteria back and forth from the
Available Criteria list to the Selected Criteria list via the Move, Move All, Remove,
and Remove All shuttles. When finished, click Continue.
6. Back on the Create Search Criteria page after adding criteria, you can specify
operators and values to further refine the search criteria. For example, when
searching for Capacitors, you may always want to include Capacitors with a
Capacitance value that is between 5 and 30 uF (microfarads)--in this case you would
Setting Up the Item Catalog 3-33
add the attribute "Capacitance Value" to your search criteria, then select the
operator "between," and specify a minimum value of "5" uF and a maximum value
of "30" uF.
Note: For multi-row attributes with a value set, the distinction
between the operators "is not" and "none of which is" is as follows:
• is not
Returns any record containing at least one attribute value that
is not the value specified. For example, suppose you have a
multi-row attribute for "Color." If you specify an operator and
value "is not" as "Red," then the search results will include
records where there is at least one attribute value for "Color"
that is not "Red."
• none of which is
Returns any record where none of the attribute values is the
value specified. For example, suppose you have a multi-row
attribute for "Color." If you specify an operator and the value
"none of which is" as "Red," then the search results will include
records where none of the attribute values for "Color" are equal
to "Red."
To clear the criteria values, select the criteria and click Clear. To
delete criteria attributes, select the criteria and click Delete. To copy
a criteria attribute and it's value, select the criteria and click
Duplicate.
Tip:
All of the operators except for "contains" are case sensitive.
7. Click Apply to save your search criteria definition.
To create user level search criteria:
1. Navigate to the Advanced Search page for items, change objects, or structures.
For items, click on the Item Advanced Search link in the Applications tree menu.
For change objects, click on the Issue, Idea, or Change Advanced Search link in the
Applications tree menu. See Searching for Items in a Structure, Oracle Product Hub
User's Guide for instructions on how to navigate to the Advanced Search page for
structures.
2.
On the Advanced Search page, select an Item Catalog Category or Change
Category (whichever is appropriate for your context) and click Go.
3-34 Oracle Product Hub Implementation Guide
Skip this step for structures.
3. Click Personalize in the Search Criteria section.
4. Once in the Personalize Search Criteria page, follow the steps for "To create
administrator level search criteria:" listed above. Begin at the step where you are in
the Search Criteria Template page.
To update user level search criteria:
1. Navigate to the Advanced Search page for items, change objects, or structures.
For items, click on the Item Advanced Search link in the Applications tree menu.
For change objects, click on the Issue, Idea, or Change Advanced Search link in the
Applications tree menu. See Searching for Items in a Structure, Oracle Product Hub
User's Guide for instructions on how to navigate to the Advanced Search page for
structures.
2. On the Advanced Search page, select an Item Catalog Category or Change
Category (whichever is appropriate for your context) and click Go.
Note: For structures, you do not have to specify a Structure Type
because you are always in the context of a structure and structure
type.
3.
Click Personalize in the Search Criteria section.
4.
On the Personalize Search Criteria page you are provided with a list of search
criterion that are available for the item catalog category/structure type/change
category you originally selected. You can only edit search criteria that you created.
Click the update icon for the search criteria you wish to update.
5. On the Update Search Criteria page, you can update the name, description, set as
default, and other attributes of the search criteria. You can also
add/delete/copy/clear/modify criteria, corresponding search operators, and values.
6.
Click Apply to save your search criteria definition.
Related Topics
Managing Display Formats, page 3-35
Searching for Items, Oracle Product Hub User's Guide
Searching for Ideas, Issues, and Changes, Oracle Product Hub User's Guide
Defining Change Category Search Criteria and Display Formats, page 7-41
Setting Up the Item Catalog 3-35
Searching for Items in a Structure, Oracle Product Hub User's Guide
Defining Display Formats and Search Criteria for Structures, page 8-4
Managing Display Formats
Display Formats enable you to predefine search display views. You can use these views
to look at different sets of attributes of the items, change objects, or structure
components that are returned by the search. Item display formats, by default, always
include the item number, item description, item catalog category, and revision level.
Change display formats always include, by default, the change number. Structure
display formats always include, by default, name, description, and component revision.
You can create item display formats using primary, operational, and user-defined
attributes. Select user-defined attributes from attribute groups associated with any of
the following business entities:
• Item
• Item Organization
• Item Revision
• Item Supplier
• Item Supplier Site
• Item Supplier Site Organization

3-36 Oracle Product Hub Implementation Guide
Creating a Display Format
Both administrators and users can create display formats. Administrator-created
display formats are available to all users. User-created display formats are available
only to the users who created them.
To create an administrator level display format:
1.
Administrators can create display formats from the respective item catalog category
definition page for an item, the structure type definition page for a structure, or the
change category list page for a change object. You can access these pages via the
Setup Workbench link in the Applications tree menu.
2.
From the object's definition page (either the Basic Information page for an item
catalog category or structure type, or the Categories page for a change object), click
the Display Formats link.
Note: On the change management Categories page, click the
Display Format icon in the row of the category for which you wish
to create a display format.
3.
On the Display Formats page, click Create.
Setting Up the Item Catalog 3-37
Note: When viewing display formats for structures, the name of
this page is Search Results Format.
Alternatively, you can click Copy to select an existing display format and copy its
columns into a new display format. You can add additional, new columns into this
copied display format, too.
4. On the Create Display Format page, provide the name and a description for the
display format. Also, select the number of rows you want to display per page.
You can set this display format as the default display format for the object by
clicking Set as Default. Note that the name of the respective item catalog category,
structure type, or change category already appears.
In the View Columns region, specify the columns you want to display in the search
results display. If you simply wish to locate a single attribute, enter its name and
click Find. To search for attributes by business entity (for item catalog categories
only) and attribute group, select the business entity, click Go, then select the
attribute group and click Go again.
Additional Information: If you want to include the attribute Default
Material Status in your display format, you must also include the
attributes Lot:Control and Generation. You can find these attributes
within the Item Organization business entity and the Inventory
attribute group. For more information about these attributes, refer
to the Oracle Inventory User's Guide.
For structures, search for attributes either by structure type (you do not need to
specify a structure type because you are always in the context of a structure and
structure type) or by catalog category. To search for attributes by structure type,
select Component. To search for attributes by catalog category, select Item. If you
select Item, you must specify a catalog category.
You can move display attributes back and forth from the Available Columns list to
the Selected Columns list via the Move, Move All, Remove, and Remove All
shuttles.
Note that you can rename the columns that will appear in your display format by
clicking Rename Columns. On the Rename Columns page, the original column
names that you have already selected are listed. Enter the new column names in the
New Column Name field and click Continue.
In the Sort Order section, you can select up to three columns upon which to sort the
display results. You can also specify whether or not the search results in these
columns be displayed in ascending or descending order. Only indexed and non-
secured attributes (attributes that are not secured by a view or edit privilege) are
available for sorting. Thus, you cannot sort secured attributes.
3-38 Oracle Product Hub Implementation Guide
Under "Display Sections," (available only for items and change objects) you can
select which sections will be displayed in your search results. Sections are displayed
as a column containing an icon with a direct link to the section. For example, to
include an Attachments link on your search results page, select Attachments from
the Available Sections list and move it to the Selected Sections list.
5. Click Apply to save your display format definition.
Note: Set up a display format to include item multi-row attributes
the same way you set it up to include single attributes. After the list
of items that met your search criteria appears, click the Show link
for a particular item. The Show region displays the multi-row
attributes.
To update an administrator level display format:
1. Administrators can update display formats from the respective item catalog
category definition page, the structure type definition page, or change category list
page--all of which are accessible via the Setup Workbench link in the Applications
tree menu.
2.
From the object's definition page (either the Basic Information page for an item
catalog category or structure type, or the Categories page for a change object), click
the Display Format link.
Note:
On the change management Categories page, click the
Display Format icon in the row of the category for which you wish
to update a display format.
3. On the Display Format page, click the Update icon in the row of the display format
you wish to update. You can only edit the display formats that are explicitly
associated with the item catalog category, structure type, or change category
originally selected.
4. On the Update Display Format page, you can update the name, description and
other columns of the display format. You can also add/remove/rename columns
and modify sort criteria.
5.
Click Apply to save your display format definition.
To create a user level display format:
1. Navigate to the Advanced Search page for items, change objects, or structures.
For items, click on the Advanced Search link in the Applications tree menu. For
Setting Up the Item Catalog 3-39
change objects, click on the Issue, Idea, or Change Advanced Search link in the
Applications tree menu. See Searching for Items in a Structure, Oracle Product Hub
User's Guide for instructions on how to navigate to the Advanced Search page for
structures.
2. On the Advanced Search page, select an Item Catalog Category or Change
Category (whichever is appropriate for your context) or, alternatively, an Alternate
Catalog, and click Go.
Optionally, you can limit your search further to a certain organization, revision,
and, if you selected an Alternate Catalog, alternate category.
3. Click Personalize in the Display Format section.
4. On the Personalize Display Formats page, click Create or click the Copy icon for
one of the existing display formats.
5.
Once in the Personalize Display Formats page, follow the steps for "To create an
administrator level display format:" listed above. Begin at the step where you are in
the Create Display Format page.
6. Click Apply to save your display format definition.
To update a user level display format:
1.
Navigate to the Advanced Search page for items, change objects, or structures.
For items, click on the Advanced Search link in the Applications tree menu. For
change objects, click on the Issue, Idea, or Change Advanced Search link in the
Applications tree menu. See Searching for Items in a Structure, Oracle Product Hub
User's Guide for instructions on how to navigate to the Advanced Search page for
structures.
2. On the Advanced Search page, select an Item Catalog Category or Change
Category (whichever is appropriate for your context) or, alternatively, an Alternate
Catalog, and click Go.
Optionally, you can limit your search further to a certain organization, revision,
and, if you selected an Alternate Catalog, alternate category.
For structures, you do not need to specify a structure type because you are always
in the context of a structure and structure type.
3.
Click Personalize in the Display Format section.
4.
On the Personalize Display Formats page, click the Update icon of the display
format you wish to update. You can only update your user display formats that are
explicitly associated with the item catalog category, alternate catalog, structure
type, or change category originally selected.
3-40 Oracle Product Hub Implementation Guide
5. On the Update Display Format page, you can update all of the display format
fields.
6. Click Apply to save your display format definition.
Related Topics
Searching for Items, Oracle Product Hub User's Guide
Searching for Ideas, Issues, and Changes, Oracle Product Hub User's Guide
Defining Change Category Search Criteria and Display Formats, page 7-41
Searching for Items in a Structure, Oracle Product Hub User's Guide
Defining Display Formats and Search Criteria for Structures, page 8-4
Defining Item Catalog Import Formats
An import format identifies the primary and user-defined attributes (but not the
operational attributes) in an item catalog category that is imported into the application
using a spreadsheet. You can import operational attributes; however, to do this, you
must specify an item template and item status in your import format. Both item
templates and item statuses can be used to set operational attributes when importing
items.
Seeded Business Entities for Importing
You can define import formats for the following business entities:
• Item
• Item Revision
• Item Supplier
• Item Supplier Site
• Item Organization
• Item Supplier Site Organization
An import format can also import values for a multi-row attribute group.
To import any of the above business entities from the system into an Excel spreadsheet,
you must use an import format. An import format identifies the operational and user
defined attributes in an item catalog category that will be imported into the
spreadsheet. Consequently, when you import item business entities from an Excel
spreadsheet, the items are all imported to a particular item catalog category defined in
the import format. These imported item business entities inherit all the attribute groups
Setting Up the Item Catalog 3-41
defined for the specific item catalog category. You can also copy, update and delete
import formats.
If users do not select an item catalog category when importing business entities, the
default System business entity import format is available for use. If an import format
has not yet been defined for an item catalog category that a user selects, then the default
System business entity import format is available for use. The System business entity
import format does not appear if a user selects an item catalog category that already has
import formats defined. You cannot modify the System business entity import formats.
Items uploaded to the system from a spreadsheet become, by default, Engineering
items. If you wish to upload a non-Engineering item, then include an available primary
attribute column called "Engineering Item Flag" in your import format. When
uploading the spreadsheet identify such items in this column by specifying the value
"Yes" or "No" in this column. If you leave the column blank, the item once again
defaults to an Engineering item.
To create an item import format:
1.
In the Applications tree menu, click the Setup Workbench link.
2.
On the Search: Catalog Categories page, locate the item catalog category for which
you wish to create the import format, and click its name link.
3.
On the Basic Information page for the item catalog category, click the Import
Formats link.
4. On the Import Formats page, click Create.
5. On the Create Import Format page, provide the following information:
Name
Provide the name of the import format you are creating for the item catalog
category.
Description
Provide a description of the import format.
Set as Default
Select the checkbox if you wish for this import format to be the default import
format for the item catalog category in which it is created.
Note:
There can be only one default import format for each item
catalog category.
6.
In the View Columns region of the Create Import Format page, find the attribute
columns to appear on the import format using the following fields:
3-42 Oracle Product Hub Implementation Guide
• Attribute Name
If you know the partial name of an attribute and the business entity it belongs
to, you can use this field to find it.
For example, if you are looking for a status attribute assigned to the Item
Supplier business entity, select Item Supplier in the Business Entity field and
click Go. Enter %stat% in the Attribute Name field and click Find. The Item
Supplier attributes containing "stat" in their names are listed below and are
available for selection.
• Business Entity
To view all attributes assigned to a business entity, select one of the following
entities and click Go.
• Item
• Item Organization
• Item Revision
• Item Supplier
• Item Supplier Site
• Item Supplier Site Organization
• Attribute Group
Select an attribute group assigned to the selected business entity, then click Go.
All attributes within the attribute group are now available for selection.
7. Use the Move and Remove buttons to select and remove attributes from the import
format.
You can select either single or multi-row attributes to include in the import format.
Tip:
You can rename the columns that will appear in your import
format by clicking Rename Columns. On the Rename Columns
page, the original column names that you have already selected are
listed. Enter the new column names in the New Column Name
field and click Apply.
8. Once you have moved all of the attribute columns you want in the import format
into the Selected Columns box, click Apply.
Your new import format now appears in the list of available import formats for the
selected Item Catalog Category.
Setting Up the Item Catalog 3-43
Note: When importing data using Excel, you can use a combination
of 220 character fields, 200 numeric fields, and 50 date fields,
subject to an overall 255 field limit. For example, an import format
can include 220 character columns and 35 numeric columns for a
total of 255 columns. If you use a display format to export and
import data, the same restriction applies.
To copy an import format:
1. Navigate to the Import Format page. See: To create an item import format, page 3-
41.
2. On the Import Formats page, locate the import format you wish to copy and click
its Copy icon in the Copy column.
3. On the Copy Import Format page, note that a new name is defaulted, as well as the
description. You can change either, and also add or remove attributes in the
Selected Columns box.
Note that you can rename the columns that will appear in your import format by
clicking Rename Columns. On the Rename Columns page, the original column
names that you have already selected are listed. Enter the new column names in the
New Column Name field and click Continue.
If there are more columns/attributes than can be easily scrolled in the list, you can
filter the list by providing the attribute group and clicking Go, or providing the
attribute name and clicking Find.
Note: You can select either single or multi-row attributes to include
in the import format.
4.
Click Apply.
To update an import format:
1.
Navigate to the Import Format page. See: To create an item import format, page 3-
41.
2. On the Import Formats page, locate the import format you wish to update and click
the Update icon in the Update column.
3. On the Edit Import Format page, you can change the name, description, default
setting and add or remove attributes/columns as needed.
Note that you can rename the columns that will appear in your import format by
clicking Rename Columns. On the Rename Columns page, the original column
3-44 Oracle Product Hub Implementation Guide
names that you have already selected are listed. Enter the new column names in the
New Column Name field and click Continue.
If there are more columns/attributes than can be easily scrolled in the list, you can
filter the list by providing the attribute group and clicking Go, or providing the
attribute name and clicking Find.
Note: You can select either single or multi-row attributes to include
in the import format. Also, you cannot modify the System Item
import format.
4. Click Apply.
To delete an import format:
1. Navigate to the Import Format page. See: To create an item import format, page 3-
41.
2. On the Import Formats page, locate the import format you wish to delete, select it
and click Delete.
Related Topics
Importing Items and Related Objects Using a Spreadsheet, Oracle Product Hub User's
Guide.
Assigning Systems to an Item Catalog Category
You can publish value sets, item catalog categories, items, and structures to other
systems that use this information. The following steps describe how to define default
systems for an item catalog category. Systems defined for a parent item catalog category
are inherited by the entire ICC hierarchy below the parent. If you choose to define
default systems for an item catalog category, these systems are automatically selected
during the publishing process when publishing item catalog categories, items, and
structures.
1.
From the Oracle Applications Home Page, select an appropriate responsibility,
then Setup Workbench. Select the Items tab.
2.
In the Item Catalog Categories page, search for and select an item catalog category.
3. In the Basic Information page, click Systems.
4.
In the Systems page, select an organization in which to associate systems.
5.
Click Update, then Add Another Row to add systems.
Setting Up the Item Catalog 3-45
6. In the Systems field, select a system from the list.
If the system you want to select is not listed, then see Defining Source Systems,
page 12-5.
If you want to remove a system from the item catalog category and organization,
select the system, then click Remove.
7. Once you have added all of the systems for the item catalog category and
organization, then click Apply.
Repeat this task for as many item catalog category, organization, and system
combinations as needed.
Related Topics
Publishing Item Catalog Categories, page 3-45
Publishing Item Catalog Categories
You can search for and select an item catalog category (ICC) and its hierarchy, then
publish it to one or more systems, such as Siebel Customer Relationship Management,
Oracle Billing and Revenue Management, or another Oracle Product Hub instance. You
have the option to publish:
• only the selected ICC.
• the selected ICC and its parent ICC.
• the selected ICC and its children ICCs.
• the selected ICC, its parent, and its children (recommended).
You must publish the ICC with its parent unless the parent ICC has been previously
published. Republish the ICC when you release a new version of the ICC. Publishing an
ICC also publishes all attribute groups and transaction attributes associated with the
ICC. When releasing a new version of an ICC, create a new revision for any item
associated with the ICC to make the ICC changes available at the item level.
Additional Information:
Alternatively, you can use a PL/SQL Public API
to publish ICCs. See: Using PL/SQL Public APIs to Publish Objects,
Oracle Product Hub User's Guide.
Attributes Published with an Item Catalog Category
The following types of attributes are published along with an ICC:
• Seeded attributes.
3-46 Oracle Product Hub Implementation Guide
• User-defined attributes.
• Transaction attributes.
The sections below provide more information about publishing each type of attribute.
Seeded Attributes
You can assign seeded attribute groups (see: Using Seeded Attributes, page 4-36 and
Seeded Item Metadata Libraries, Oracle Product Hub Implementation Guide) to an ICC.
These are published with the ICC and any assigned attribute values are published with
the items. Do not change the seeded attribute group and attribute metadata. Changes
prevent correct synchronization with the target system.
User-Defined Attributes
You can add new user-defined attribute groups and attributes to a new version of an
ICC at any time. In order to publish user-defined attributes, use the following naming
conventions:
• Use the format "attribute group.attribute" as the internal name for the attribute.
For example, a new attribute SupplierName added to the attribute group
"Suppliers" has the internal name Suppliers.SupplierName. This prevents duplicate
attributes across the attribute groups.
• When publishing to Siebel, the internal name for all user-defined attributes must
begin with "XX_".
For example, a new attribute SupplierName added to the attribute group
"Suppliers" has the internal name XX_Suppliers.SupplierName.
Additional Information:
In Siebel, the user-defined attributes are
not associated with a value set, but the values are stored and
displayed as free-form text.
All user-defined attributes published without an internal name prefix of "XX_" are sent
to the target application connector service. The target application connector service
ignores these attributes unless the target application connector service is extended to
map these attributes to the corresponding attributes in the target application.
Transaction Attributes
When publishing transaction attributes (see: Defining Transaction Attributes, page 4-33
) along with ICCs to a Siebel system, you must associate a value set with each
transaction attribute assigned to an ICC. If you select the Check Eligibility field for a
transaction attribute in Oracle Product Hub, then verify that a defined eligibility
procedure for the corresponding transaction attribute exists in the target Siebel system.
This preserves the enrichment of the transaction attributes in Siebel.
If a parent ICC and a child ICC both have a transaction attribute with the same name,
the transaction attribute from the child ICC takes precedence.
Setting Up the Item Catalog 3-47
Value Sets Published with an Item Catalog Category
You can publish value sets associated to attributes with an ICC or you can publish value
sets independently. For more information about publishing value sets, refer to
Publishing Value Sets, page 4-16.
Structures Published with an Item Catalog Category
If a default ICC structure is defined for an ICC (see: Creating an Item Catalog Category
Structure, page 8-11), the structure and any associated component attributes are
published along with the ICC. You must publish the component items in the ICC
structure before publishing the ICC.
Prerequisites
❒ Before publishing any data, you must set up Oracle Data Integrator Artifacts and
Web Services for Oracle Product Hub. For set up instructions, refer to My Oracle
Support ID 1336146.1. For more information about the Web Services used during
publishing, see: Oracle Product Hub Web Services Overview, page G-1.
❒ It is possible to create duplicate ICCs if multiple records with the same ICC name
are simultaneously imported. To prevent creation of duplicate ICCs, create a
custom unique index for the MTL_ITEM_CATALOG_GROUPS_B table. To create
this index, determine which segments are enabled for the Item Catalogs flexfield
(Flexfield Code MICG). If, for example, a two segment flexfield is used, with
SEGMENT8 and SEGMENT12 enabled, then use the following command:
SQL> create unique index MTL_ITEM_CATALOG_GROUPS_B_UC2 ON
MTL_ITEM_CATALOG_GROUPS_B(SEGMENT8,SEGMENT12)
❒
Optionally, define the oracle.apps.ego.item.publishItemCatalogCategory event
subscription if an external system requires an email notification when an ICC is
published. When using Oracle Product Hub for Communications integrated with
Oracle Communications Design Studio, Oracle recommends defining this event
subscription before publishing an ICC to Design Studio.
To define an event subscription:
You only need to perform this task if you want to send an email notification to a system
owner when an ICC is published. In order to send an email notification to a user or a
group of users, you must:
• Create a user and, optionally, a group of users, with associated e-mail addresses.
• Define a system.
• Define a subscription for the business event oracle.apps.ego.item.
publishItemCatalogCategory.
Once an item catalog category is published to a system, an email is sent to the user or
group associated with the oracle.apps.ego.item.publishItemCatalogCategory event
3-48 Oracle Product Hub Implementation Guide
subscription.
Tip: If you plan to publish an ICC to two or more systems, you only
need to define an event subscription for the systems that require an
email notification upon ICC publication. Not every system requires
notification.
To create a user
1. Refer to Maintaining People and Users, Oracle E-Business Suite Security Guide for
instructions on how to create a user. Associate the person's e-mail address with
their user account.
To create a group of users
2.
Refer to Administering People, Groups, and Companies, page 11-6 for
instructions on how to create a group.
To define a system
3. Refer to Defining Source Systems, page 12-5 for instructions on how to define a
source system.
To create an event subscription
Refer to Defining Event Subscriptions, Oracle Workflow Developer's Guide for instructions
on how to define an event subscription. The following steps explain how to define an
event subscription specifically for oracle.apps.ego.item.publishItemCatalogCategory.
4.
From the Workflow Administrator responsibility, navigate to Web Application >
Administrator Workflow > Business Events.
5. Search for the event oracle.apps.ego.item.publishItemCatalogCategory.
6. For the event oracle.apps.ego.item.publishItemCatalogCategory, click the
'Subscription' icon, then click 'Create Subscription'.
7. In the Create Event Subscriptions page, specify the following field values:
• System = Local System (for more information about the local system properties,
refer to "Local System" in the Managing Business Events chapter, Oracle
Workflow Developer's Guide).
• Source Type = Local
• Event Filter = oracle.apps.ego.item.publishItemCatalogCategory
• Phase = Set this between 1-99. The execution of the subscription is deferred for
phases larger than 100.
Setting Up the Item Catalog 3-49
• Status = Enabled
• Rule Data = Key
• Action Type = Custom
8. Click Next.
9. In the Create Event Subscription: Custom page, specify the following field values:
• PL/SQL Rule Function = WF_PUB_ICC.SEND_NOTIFICATION. When
executing the event subscription, Oracle Workflow calls this procedure to
handle the event message.
• Enter the following Subscription Parameters:
• PUB_SYSTEM: Mandatory parameter. This is the internal name of the
system interested in the published ICC.
• WF_ADMINISTRATOR: Optional parameter. This can be either a person or
a group of persons. The administrator is notified of any errors during the
workflow process (for example, if the receiver of the notification is invalid).
• MAIL_TO: Mandatory parameter. This can be either a person or a group of
persons. The person listed here is the receiver of the notification about the
published ICC.
Important: Input the values for WF_ADMINISTRATOR and
MAIL_TO using the following format: For a single person, use
the value PER:<User_Name>. User_Name is the user name
used to log in to the application. For a group of people, use the
value HZ_GROUP:<GROUP_NAME>. GROUP_NAME
represents the internal name of the group.
To publish an item catalog category:
1. From the Oracle Applications Home Page, select an appropriate responsibility,
then Setup Workbench. Select the Items tab.
2. In the Item Catalog Categories page, search for and select an item catalog category.
3.
In the Basic Information page, click Publish.
4.
In the ICC Publish Parameters page, enter the following:
• Batch Name. Enter a unique name.
3-50 Oracle Product Hub Implementation Guide
• Version. Select one of the existing item catalog category versions to publish.
When publishing to an Oracle Product Hub system, you must select a current
or future effective version.
• Publish to PIM Systems Only. Check this box to publish to other Oracle Product
Hub systems. Leave it unchecked to publish to external systems. You cannot
publish to both Product Hub and external systems within the same Publish
action.
• Publish Parent ICC(s). Select this box to publish any parent ICCs along with the
selected ICC (item catalog category).
• Publish Children ICC(s). Select this box to publish any children ICCs along with
the selected ICC.
5.
Click Continue.
The Publish page appears. This page contains different fields depending on
whether the Publish to PIM Systems Only field is checked or not.
To publish an item catalog category to an external system (when the Publish to
PIM Systems Only field is NOT selected)
6. In the Publish page, enter the following:
• Workspace Name. Required. This field is used by Siebel for grouping multiple
batches into a single group. Enter the name of the Siebel workspace project. If
you are not using Siebel, enter any value.
• Auto-Release. Required. Select Default, Yes, or No from the list. This field refers
to auto-releasing a Siebel workspace project.
• Default - the workspace project auto-releases based on the setting of Auto
Release within Siebel.
• Yes - once the items are published to Siebel, the workspace project is
automatically released.
• No - once the items are published to Siebel, you need to manually release
the workspace project.
• Systems. Systems previously associated with the ICC are listed, but you can
add additional systems or remove any existing systems.
7. Click Save as Draft or Publish.
The Publish Batch Search page opens, displaying the status of the batch submitted.
From here you can delete, copy, or update the batch, as well as view the batch's
Setting Up the Item Catalog 3-51
history. See: Managing Publishing Batches, Oracle Product Hub User's Guide.
Additional Information: Possible statuses for the batch include:
• Batch Submitted - The batch has been submitted for processing,
but the EGO Import Metadata concurrent program has not run
yet.
• Draft Batch - The batch has been saved as a draft. You must
update the batch, then select Publish to submit the batch.
• Failed - The ICC failed the import process for the specified
target systems.
• Ignored - The system either does not intend or does not have
the capability to consume the published entity.
• In Process - The Publish action is in process.
• Not Published - The ICC has previously been submitted for
publishing to this system. It remains unpublished, in Draft
batch status.
• Partially Succeeded - The ICC and some of the associated
attribute groups and value sets have been successfully passed
to the target systems. One or more associated attribute groups
or value sets have failed the import process for one or more
specified target systems.
• Succeeded - The ICC and all associated attribute groups and
value sets have been successfully passed to the target systems..
• Warning - This is an aggregated status for a publish batch. An
ICC publish batch could contain one ICC and multiple systems.
Each ICC and system combination has an individual publish
status.. Among all of the individual publish statuses, if one or
more individual publish statuses is Ignored, Not Published,
Fail, Partial Fail, or Partially Succeeded and none have the In
Progress status, the aggregated status for the batch is Warning.
To publish an item catalog category to an Oracle Product Hub system (when the
Publish to PIM Systems Only field is selected)
Important: Verify that the profile option "Enable PIM for Telco
Features" is set to the same value in both the source and target Oracle
3-52 Oracle Product Hub Implementation Guide
Product Hub systems.
8. In the Publish page, optionally select Auto Import.
Checking the Auto Import box automatically launches the EGO Import Metadata
(EGOIMDCP) concurrent program in the target Oracle Product Hub system.
If you leave this box unchecked, you must manually run the EGO Import Metadata
concurrent program in the target Oracle Product Hub system. When manually
running this program, you can choose to import or not import the attribute groups
and value sets associated with the ICC.
The following entities and relationships associated with the ICC are also published
and imported, regardless of whether you check the Auto Import box or not:
• The selected ICC Version (if ICC Versions are in use).
• Item pages.
• Attribute groups and their attributes, including value sets associated to the
attributes.
• Transaction attributes.
• Number Generation setting along with the function reference if function
generated.
• Description Generation setting along with the function reference if function
generated.
Important: Verify that the function definition referenced in the
Number Generation or Description Generation settings (if
function generated) in the source system already exists in the
target systems. The function name, function parameters, and
function parameter mappings are published, but not the
function definition (for example, PL/SQL or a Java code).
• Parent ICCs (If selected in the ICC Publish Parameters page earlier).
• Child ICCs (If selected in the ICC Publish Parameters page earlier).
Warning:
The publish and import process can create and update
entities associated with an ICC (such as attribute groups, attributes,
and value sets), but cannot delete entities already associated in the
target system. For example:
Setting Up the Item Catalog 3-53
• Publish ICC1 and it's associated attribute group, AG1, to a
target system. ICC1 and AG1 now exist in the target system.
• Delete attribute group AG1 from the source system.
• Associate attribute group AG2 to ICC1 in the source system.
• Publish ICC1 and it's associated attribute group, AG2, to the
target system.
• ICC1 in the target system now has two attribute groups, AG1
and AG2, associated with it.
To remove attribute group AG1 from the target system, you must
manually delete it in the target system.
9.
In the Select Systems region, click the Add Another Row icon as many times as
necessary to select the target systems to which you want to publish.
Systems previously associated with the ICC are listed, but you can add additional
systems or remove any existing systems.
10.
Click Save as Draft or Publish.
The Publish Batch Search page opens, displaying the status of the batch submitted.
From here you can delete, copy, or update the batch, as well as view the batch's
history. See: Managing Publishing Batches, Oracle Product Hub User's Guide.
Additional Information: Possible statuses for the batch include:
• Batch Submitted - The batch has been submitted for processing,
but the EGO Import Metadata concurrent program has not run
yet.
• Draft Batch - The batch has been saved as a draft. You must
update the batch, then select Publish to submit the batch.
• Failed - The ICC failed the import process for the specified
target systems.
• Ignored - The system either does not intend or does not have
the capability to consume the published entity.
• In Process - This status appears for the following reasons:
• When Auto Import is selected - The Publish action is in
3-54 Oracle Product Hub Implementation Guide
process. If there are any errors or time out issues, the
system appends the status with an appropriate message
indicating that either the EGO Import Metadata concurrent
program did not process the updated records or the
concurrent program is still running. Check the status of the
EGO Import Metadata concurrent program in the target
system and take appropriate action.
• When Auto Import is not selected - The Publish action is in
process. The target interface tables were loaded
successfully. Manually invoke the EGO Import Metadata
concurrent program in the target system.
• Not Published - The ICC has previously been submitted for
publishing to this system. It remains unpublished, in Draft
batch status.
• Partially Succeeded - The ICC and some of the associated
attribute groups, value sets, and attributes have been
successfully passed to a particular target system. One or more
associated attribute groups, value sets, or attributes have failed
the import process for the target system.
• Succeeded - The ICC and all associated attribute groups and
value sets have been successfully passed to the target systems.
• Warning - This is an aggregated status for a publish batch. An
ICC publish batch could contain one ICC and multiple systems.
Each ICC and system combination has an individual publish
status.. Among all of the individual publish statuses, if one or
more individual publish statuses is Ignored, Not Published,
Fail, Partial Fail, or Partially Succeeded and none have the In
Progress status, the aggregated status for the batch is Warning.
Related Topics
Publishing Overview, Oracle Product Hub User's Guide
Assigning Systems to an Item Catalog Category, page 3-44
Publishing Value Sets, page 4-16
Publishing Attribute Groups, page 4-54
Publishing Items and Structures, Oracle Product Hub User's Guide
Using PL/SQL Public APIs to Publish Objects, Oracle Product Hub User's Guide
Setting Up the Item Catalog 3-55
Viewing the Publishing History, Oracle Product Hub User's Guide
Oracle Product Hub Web Services Overview, page G-1
For more information about how product data synchronizes with participating
applications using the publishing process, see Chapter 2: Oracle Product Master Data
Management Integration Base Pack, Oracle Product Master Data Management Integration
2.5 - Implementation Guide. This guide is part of the Oracle Application Integration
Architecture Release 2.5 Media Pack , which you can download from http://edelivery.
oracle.com.
Defining Report Templates Using Business Intelligence Publisher
Creating a template file consists of two basic steps:
1. Design your template layout - Use the formatting features of a word processing
application and save the file as RTF.
2. Mark up your template layout - Insert the Business Intelligence Publisher simplified
tags.
To create a template, you need to create or use any of the existing seeded data
definitions and associate or assign the template file with the corresponding data
definition file. For example, if you have a Change Order template file, associate it to a
Change Order data definition file.
When you create a template, you need to assign it a data definition and upload the RTF.
There are several seeded "Summary" templates available in the system. These cannot be
updated. Initially, upload one template file for a specific language and territory
combination. This file will become the Default Template File. To upload additional
template files or to change the Default Template File, use the View Template page.
To create a template:
1. Using the XML Publisher Administrator responsibility, navigate to the Templates
page.
2.
Select the Create Template button.
3. Provide the following information:
Name
Enter a user-friendly name for your template.
Code
Assign a template code using the product short name and a descriptive ending.
Application
While creating templates, select the correct application from the LOV. This
3-56 Oracle Product Hub Implementation Guide
application should be the same as the application of the Data definition. For Change
Templates, the supported application is "Engineering".
Data Definition
Select the product's data definition from the LOV. Oracle Engineering (Application
Short Name = ENG) and Oracle Product Hub (Application Short Name = EGO)
come seeded with many different data definitions for changes and items. For
example, for an Issue Report Template, select the seeded Oracle Engineering Data
Definition for Issues. This will result in the Template being available for Issue
Reports. Select the input template type (RTF, PDF, or XSL-FO) from the LOV.
Start Date
Enter the date from which the template will be active.
End Date
To make the template inactive, enter an end date.
Subtemplate
If this is a subtemplate, select the check box.
Additional Information: A subtemplate is referenced by other
templates, but cannot run on its own.
File
Use the Browse button to upload your RTF or PDF template layout file.
Language
Select the template language from the LOV. Add more language template files to
your template definition from the View Template page.
Territory
Select the language territory from the LOV.
Important: After the template definition is created, the following
fields cannot be updated: Application, Code, and Type. You can
update the template from the View Template page.
In the template file, you can include simplified XML tags to refer to the Item
information you want Business Intelligence Publisher to print while generating the
report.
For further information, see: Oracle Fusion Middleware Report Designer's Guide for
Oracle Business Intelligence Publisher.
Setting Up the Item Catalog 3-57
Associating Report Templates to Item Catalog Categories:
Associating a Report Template with an item catalog category makes these templates
available for all items in the item catalog category. Report Templates are inherited
throughout the item catalog category hierarchy—child categories inherit the report
templates from the parent category.
To associate a report template to an item catalog category
1. On the Search: Item Catalog Categories page, locate the item catalog category to
which you wish to associate a report template.
2. On the Basic Information page of the item catalog category, click the Report
Templates link.
3. In the Report Templates page, click Add Report Templates.
4. In the Add Report Templates page, search for templates to add using the Name or
Description field.
Enter a search term in either or both fields. Use the percent (%) sign before and/or
after a search term as needed to perform a Wildcard search.
5.
Select all report templates that you want to add to the item catalog category.
6.
Click Apply.
Related Topics
Generating Reports, Oracle Product Hub User's Guide
Defining Cross Reference Types
Items can have many cross-references. Examples of cross-references include customer
part numbers and superseding/preceding item numbers. An administrator can define
their own cross-reference types based on their business need. User-defined flex-fields
and value sets can be associated with each cross-reference type. You can also activate or
inactivate cross-reference types using effectivity dates.
To create a cross reference type:
1.
On the Search: Item Catalog Categories page, click the Cross Reference Types tab.
2. In the Search: Cross Reference Types page, click Create.

3-58 Oracle Product Hub Implementation Guide
Defining Cross Reference Types
3. On the Create/Update Cross-Reference Type page, provide the following
information:
• Type - the name of the cross reference type. Required.
• Description. Optional.
• Inactive On - the date the cross reference type becomes inactive. Optional.
4. Click Apply.
Importing Item Catalog Metadata
Oracle provides the following methods for importing item catalog metadata:
• FNDLOAD
• iSetup
• Interfaces and Public APIs
• Import from Excel
• Webservices
Refer to My Oracle Support ID 1504980.1 for a description each method's benefits and
limitations, as well as examples of how to use each method. You can find additional
information about some of the above methods in the following topics:
• Using Oracle iSetup, page 1-2
• Import from Excel
Setting Up the Item Catalog 3-59
• Importing Item Categories Using a Spreadsheet, Oracle Product Hub User's Guide
• Importing Items Using a Spreadsheet, Oracle Product Hub User's Guide
• Importing Item Revisions Using a Spreadsheet, Oracle Product Hub User's Guide
• Importing Item Organization Assignment Using a Spreadsheet, Oracle Product
Hub User's Guide
• Importing Item People Assignment Using a Spreadsheet, Oracle Product Hub
User's Guide
• Web Services for Publishing, page G-12
The rest of this topic provides more information about using FNDLOAD and the open
interface tables used to import item catalog metadata.
Using FNDLOAD to Import Item Catalog Metadata
The Generic Loader (FNDLOAD) is a concurrent program that can move Oracle E-
Business Suite data between database and text file representations. The loader reads a
configuration file to determine what data to access. It can download data from an
application entity into a portable, editable text file. You can then upload the file into any
other database to copy the data. Conversion between database store and file format is
specified by a configuration file read by the loader. FNDLOAD downloads data from a
database according to a configuration (.lct) file, and converts the data into a data file (.
ldt file). The Generic Loader can then upload this data to another database using a
configuration file. Use FNDLOAD to import and export item catalog categories and the
following related entities:
• Attribute Groups, page 4-21
• Value Sets, page 4-1
• Attribute Group Associations, page 4-48
• Item Pages and Item Page entries, page 3-28
• Display Formats, page 3-35
• Import Formats, page 3-40
• Search Criteria, page 3-29
In addition, you can use FNDLOAD to import and export the following entities:
• Alternative Catalogs, page 5-4

3-60 Oracle Product Hub Implementation Guide
• Roles, Privileges, and Role Mappings, page 11-3
• Structure Types, Structure Names, and Structure Name Associations, page 8-4
Refer to My Oracle Support (https://support.oracle.com) ID 1504980.1 for specific
instructions on how to import and export each entity using FNDLOAD.
Data Transfer Using FNDLOAD
Using Open Interface Tables to Import Item Catalog Metadata
Use open interface tables to import the following item catalog metadata:
• Item catalog categories (ICCs)
• ICC definition
See: Defining Item Catalog Categories, page 3-2
• Attribute group association
See: Associating Attribute Groups with an Item Catalog Category, page 4-48
• Item pages association
See: Creating Pages for an Item Catalog Category, page 3-28
• Item number and description generation methods
See: Defining Item Numbers and Descriptions, page 3-26
• New item request association
See: Associating New Item Requests with an Item Catalog Category, page 3-22
• ICC versions
• Transaction attributes
Setting Up the Item Catalog 3-61
See: Defining Transaction Attributes, page 4-33
• Value sets
See: Defining Value Sets for User-Defined Attributes, page 4-1
• Non-versioned value sets and its values
• Versioned value sets and its values
See: Defining Value Set Versions for Transaction Attributes, page 4-7
• Child value sets and its values
• Attribute groups and attributes
See: Defining Item Attributes and Attribute Groups, page 4-21
• Functions
See: Creating User-Defined Functions for Item Attributes, page 4-38
• Function header
• Function parameter
Using the concurrent program EGO Import Metadata (EGOIMDCP), you can choose to
validate and import the above data from the open interface tables into the production
tables collectively or one at a time by selecting one of the following parameters:
• Import Value Sets
• Import Attribute Groups
• Import Item Catalog Categories
• Batch Id (Null for All).
Selecting the Batch Id parameter imports all batch data into the production tables.
• Delete Successfully Processed Records
Tip: When troubleshooting this import process, leave this
parameter set to No.

3-62 Oracle Product Hub Implementation Guide
Item Catalog Metadata Open Interface Tables
Table Name Description
EGO_FLEX_VALUE_SET_INTF This table stores intermediate information
about value sets. It stores information for both
value set versions and non-versioned value
sets, as well as the parent-child relationship
for a value set.
EGO_FLEX_VALUE_INTF This table stores intermediate values for an
associated value set. It also stores table and
column information for a table type value set.
It stores values corresponding to each version
for a value set with versions.
EGO_FLEX_VALUE_TL_INTF This table stores translations for value set
values in each of the installed languages.
EGO_ATTR_GROUPS_INTERFACE This table stores the definitions for attribute
groups.
EGO_ATTR_GROUPS_DL_INTERFACE This table stores the definitions for attribute
group business entities (data levels).
EGO_ATTR_GROUP_COLS_INTF This table stores the definitions for attributes.
EGO_PAGES_INTERFACE This table stores the definitions for Item
Catalog Category pages.
EGO_PAGE_ENTRIES_INTERFACE This table stores the definitions for Item
Catalog Category page entries.
EGO_FUNCTIONS_INTERFACE This table stores the function header
information.
EGO_FUNC_PARAMS_INTERFACE This table stores the function parameters
information.
MTL_ITEM_CAT_GRPS_INTERFACE This table stores the ICC header record
mimicking the base table
MTL_ITEM_CATALOG_GROUPS_B.

Setting Up the Item Catalog 3-63
Table Name Description
EGO_ATTR_GRPS_ASSOC_INTERFACE This table stores the Attribute Group
associations with ICCs.
EGO_ICC_VERS_INTERFACE This table stores version related information.
It links to the Transaction Attributes interface
table (EGO_TRANS_ATTRS_VERS_INTF) by
ICC name/ID and version sequence number.
EGO_TRANS_ATTRS_VERS_INTF This table stores information about the
transaction attributes for a specific ICC
version.
EGO_FUNC_PARAMS_MAP_INTERFACE This table stores function parameters mapping
for number generation and description
generation for ICCs.
Warning: It is possible to create duplicate ICCs if multiple records with
the same ICC name are simultaneously imported. To prevent creation
of duplicate ICCs, create a custom unique index for the
MTL_ITEM_CATALOG_GROUPS_B table. To create this index,
determine which segments are enabled for the Item Catalogs flexfield
(Flexfield Code MICG). If, for example, a two segment flexfield is used,
with SEGMENT8 and SEGMENT12 enabled, then use the following
command:
SQL> create unique index MTL_ITEM_CATALOG_GROUPS_B_UC2 ON
MTL_ITEM_CATALOG_GROUPS_B(SEGMENT8,SEGMENT12)
Warning:
The following columns in the open interface tables are either
used by the system during record processing or are not supported at
this time. Do not populate these columns with values.
Column Appears in Table
ASSOCIATION_ID EGO_ATTR_GRPS_ASSOC_INTERF
ACE
DATA_LEVEL EGO_ATTR_GRPS_ASSOC_INTERF
ACE

3-64 Oracle Product Hub Implementation Guide
Column Appears in Table
DATA_LEVEL_ID EGO_ATTR_GRPS_ASSOC_INTERF
ACE
END_DATE EGO_ICC_VERS_INTERFACE
VERSION_SEQ_ID EGO_ICC_VERS_INTERFACE
INVENTORY_ITEM_ID EGO_TRANS_ATTRS_VERS_INTF
ORGANIZATION_ID EGO_TRANS_ATTRS_VERS_INTF
REVISION_ID EGO_TRANS_ATTRS_VERS_INTF
ASSOCIATION_ID EGO_TRANS_ATTRS_VERS_INTF
Caution: Do not populate this
column if the Transaction Type =
Create. You must populate this
column for all other transaction
types.
ATTR_ID EGO_TRANS_ATTRS_VERS_INTF
Caution: Do not populate this
column if the Transaction Type =
Create. You must populate this
column for all other transaction
types.
CREATED_BY Appears in all item catalog metadata
open interface tables
CREATION_DATE Appears in all item catalog metadata
open interface tables
LAST_UPDATE_LOGIN Appears in all item catalog metadata
open interface tables

Setting Up the Item Catalog 3-65
Column Appears in Table
LAST_UPDATED_BY Appears in all item catalog metadata
open interface tables
LAST_UPDATE_DATE Appears in all item catalog metadata
open interface tables
REQUEST_ID Appears in all item catalog metadata
open interface tables
PROGRAM_APPLICATION_ID Appears in all item catalog metadata
open interface tables
PROGRAM_ID Appears in all item catalog metadata
open interface tables
PROGRAM_UPDATE_DATE Appears in all item catalog metadata
open interface tables
TRANSACTION_ID Appears in all item catalog metadata
open interface tables
START_DATE_ACTIVE MTL_ITEM_CAT_GRPS_INTERFAC
E
END_DATE_ACTIVE MTL_ITEM_CAT_GRPS_INTERFAC
E
SUMMARY_FLAG MTL_ITEM_CAT_GRPS_INTERFAC
E
ITEM_DESC_ACTION_ID MTL_ITEM_CAT_GRPS_INTERFAC
E
ITEM_NUM_ACTION_ID MTL_ITEM_CAT_GRPS_INTERFAC
E
To import item catalog metadata using open interface tables:
1.
Load the item catalog metadata open interface tables with the data you want to
import. For detailed help on loading the Open Interface tables, refer to the
3-66 Oracle Product Hub Implementation Guide
Integration Repository. See: Oracle Integration Repository User's Guide.
What's Next
Here are some suggestions if you encounter problems while importing item catalog
metadata using the open interface tables:
• Consider writing errors into the MTL_INTERFACE_ERRORS table.
• Perform the following steps before logging a bug:
• Set the profile option 'INV: Debug Trace' to Yes. This will write detailed debug
messages into the concurrent program log file.
• Turn ON the trace for the concurrent program 'EGO Import Metadata' (short
name EGOIMDCP).
• While launching the concurrent program, set the parameter 'Delete Successfully
Processed Records' to 'No'.
• In the bug, provide the following information:
• Concurrent Program log file
• Raw Trace file. If it is a performance issue, then generate the tkprof file for this
raw trace file and provide both the raw trace file as well as the tkprof file.
• Set of records from the table mtl_interface_errors for this specific request_id.
• Set of records from the specific entity's interface table before and after
launching the concurrent program.
• List of invalid objects in EGO schema.

Setting Up Attributes and Functions 4-1
4
Setting Up Attributes and Functions
This chapter covers the following topics:
• Defining Value Sets for User-Defined Attributes
• Defining Value Set Versions for Transaction Attributes
• Defining Table Value Sets
• Creating Independent Values
• Publishing Value Sets
• Defining Item Attributes and Attribute Groups
• Defining Transaction Attributes
• Using Seeded Attributes
• Using Additional Attributes
• Creating User-Defined Functions for Item Attributes
• Defining Attribute Usages
• Displaying Attachments on Item Attribute Pages
• Associating Attribute Groups with an Item Catalog Category
• Adding Actions to an Attribute Group
• Publishing Attribute Groups
Defining Value Sets for User-Defined Attributes
User-defined attributes capture all the detailed information (such as cost information)
about an object (items, change requests or change orders). The item catalog enables you
to create user-defined attributes with validation logic to support the needs of your
organization. To do so, create value sets and associate the value sets with user-defined
attributes. Attributes can have a static or dynamic list of valid values, or a range of
values.

4-2 Oracle Product Hub Implementation Guide
For each user-defined attribute, you can optionally specify a value set with data type
and validation rules to be applied when the user inputs data. Once created, value sets
can be reused for different attributes. It is recommended that you create your value set
before defining your attribute groups.
You can also create child value sets that are subsets of a parent value set. The parent
value set includes all possible values while the child value sets include some of the
values from the parent value set. Use parent and child value sets for variant attributes
when creating SKUs from style items (see: Overview of Style and SKU Items, Oracle
Product Hub User's Guide).
Parent and Child Value Set Example
A clothing retailer sells a certain style of shirt in different colors for different seasons.
Define all colors in the parent value set, then define a child value set for each season.
When creating the color variant attribute, specify the parent value set for the attribute.
When creating the style item, you can choose either the parent or one of the child value
sets for the color variant attribute.
Prior to creating value sets for user-defined attributes establish the validation rules for
each attribute as follows:
• Choose the data type for the values.
• Know the range of the values.
• Know which set of actual values will satisfy the required condition for the attribute.
For static values, specify a fixed set of values. Dynamic values are retrieved from a
database table or view.
• Select the manner in which the values will be displayed: list of values (LOV), pop
list (dropdown) or radio group.
The following table shows the validation rules for the attribute group Benchmark
Rating.

Setting Up Attributes and Functions 4-3
Attribute
Group
Attributes Data Type Value
Range
Values Display Create
Value Sets
Benchmark
Rating
Risk Rating Number 1 to 5 Static:
1,2,3,4,5
Pop list Rating
Benchmark
Rating
Quality
Rating
Number 1 to 5 Static:
1,2,3,4,5
Pop list Rating
Benchmark
Rating
I/O
Subsystem
Rating
Number 1 to 5 Static:
1,2,3,4,5
Pop list Rating
Benchmark
Rating
Video
System
Number 1 to 5 Static:
1,2,3,4,5
Pop list Rating
Benchmark
Rating
Overall
Rating
Number 1 to 5 Static:
1,2,3,4,5
Pop list Rating
Benchmark
Rating
Failure
Rate
Number Min 0
Max100
Within the
range
Text Field Percent
Range
Benchmark
Rating
Supplier Char N/A Dynamic:
Queried
from tables
in the
database
LOV Primary
Supplier
If you need a Yes or No value set, you can use the seeded value set EGO_YES_NO. This
value set automatically displays when you set the Display As field to "Checkbox" for
the attribute. You can see some of the seeded value sets on the Value Set page; these are
used to support images and attachments in the long description on the Item Summary
pages.
Additional Information: You can import value sets using open interface
tables and the concurrent program EGO Import Metadata
(EGOIMDCP). For more information, refer to Importing Item Catalog
Metadata, page 3-58
For more information about User Defined Attributes in Oracle Purchasing and Oracle
Contract Lifecycle Management, see:
• Oracle Purchasing Help Index, Oracle Purchasing User's Guide
4-4 Oracle Product Hub Implementation Guide
• Oracle CLM Purchasing Help Index, Oracle Contract Lifecycle Management for Public
Sector Purchasing User Guide
To create a value set:
1. In the Applications tree menu, click the "Setup Workbench" link.
2. On the Search: Catalog Categories page, click the Value Sets tab.
3. On the Maintain Value Sets page, click Create.
4. On the Create Value Set page, enter the following information:
Value Set Name
The name by which the system and users keep track of the value set. You can only
enter alphanumeric (a, b, c,..., 1, 2, 3,...) and the underscore ( _) characters for the
value set name. You cannot use spaces or special characters. The length is limited to
15 characters.
Important: Once specified, you cannot edit the value set name.
Description
Optionally, enter a description of the value set.
Data Type
The data type of the value set. The data type that you select determines the values
that are available in the value set. An attribute's data type must match the data type
specified for that attribute's value set. The different data types are:
• Character
• Number
• Standard Date
• Standard Date Time
Important: You cannot edit the data type once the value set has
been created.
Warning: You cannot create SKUs with the following variant
attribute data types:
• Standard Date
Setting Up Attributes and Functions 4-5
• Standard Date Time
• Translatable Text
Maximum Size
Specify the value for Maximum Size if you wish to limit the user's input in the
attribute text field. For example, in some cases you may wish to limit the number of
characters in the attribute Date to 10 characters, or the number of characters in
Name to 50. Keep the default value of 0 if you wish to omit this particular
validation.
Validation Type
A set of values against which the values entered by users are validated. Choices are:
• None
There is no explicit set of values against which the user's input is validated.
• Independent
The explicit values against which the user's input is validated are defined here.
To create explicit values, select Table and click Apply and Continue to edit
information on the Enter Validation Table Information page. If you select this
validation type, see: Creating Independent Values, page 4-14. Select the
"Poplist" radio button to display valid values as a drop-down list. Select the
"List of Values" radio button to display valid values as a searchable list of
values.
• Translatable Independent
This validation type behaves the same as Independent, but enables the display
of values in another language.
• Table
The explicit values against which the user's input is validated comes from a
database table. To create explicit values, select Independent and click Add
Values or click Table and then click Edit Table Information. If you select this
validation type, see: Defining Table Value Sets, page 4-12.
Additional Information: Display value sets using the Table
validation type as a list of values (LOV) or as a pop list.
Display Type
• Poplist
4-6 Oracle Product Hub Implementation Guide
Additional Information: Display as Radio Group can be set
while creating or editing attributes. See: Defining Item
Attributes and Attribute Groups, page 4-21. Oracle
recommends that when you use the value set type
Independent, you save it as a pop list.
• List of Values
Important: You can associate the Value Set to an attribute only if
the above conditions are satisfied and the Security Type is 'No
Security'. Value sets created in forms with a security type are not
applicable for PLM/PIM and are not visible in the HTML user
interface.
5.
Optionally specify a Minimum Value and Maximum Value in the "Value Range"
section. If you selected the Validation Type "None" and a data type of "Number,"
"Standard Date," or "Standard Date Time," you can enter a minimum and maximum
value for your value set. If the data type is "Standard Date" or "Standard Date
Time," you can substitute the $SYSDATE$ token for the current date. $SYSDATE$ is
a min/max value placeholder that is replaced by the current day on the day the user
enters a value for the attribute. You can also add or subtract whole numbers from
$SYSDATE$. For example, "$SYSDATE$ - 4" would be four days prior to the current
date.
6. Click Apply to stop after creating one value set or click Apply and Continue to
create another value set.
Important: The system's user-defined attributes framework does
not support the following value set options. These options can be
defined using the flex-fields value set forms.
• Uppercase only
• Number only
• Precision
The Value Set Details page is displayed upon completion. You can edit certain
settings after creation by clicking Update. You can find all existing value sets on the
Value Sets page. You can search for value sets using the criteria Name, Description,
Data type, or Validation type, as well as search for values within value sets.
Optionally, add a description to a value.
Setting Up Attributes and Functions 4-7
To create a child value set:
After creating a value set, the system returns you to the Maintain Value Sets page. You
can create a child value set directly from this page or from the Value Set Details page.
You can only create a child value set when the parent value set has a validation type of
Independent or Translatable Independent.
1. In the Applications tree menu, click the "Setup Workbench" link.
2. On the Search: Catalog Categories page, click the Value Sets tab.
3. On the Maintain Value Sets page, click the Create Child Value Set icon for a value
set.
Alternatively, select the value set name. From the Value Set Details page, in the
Child Value Sets region, click Create.
4. In the Create/Edit Child Value Set page, enter the following information:
• Child Value Set Name
The name by which the system and users keep track of the child value set. You
can only enter alphanumeric (a, b, c,..., 1, 2, 3,...) and the underscore ( _)
characters for the child value set name. You cannot use spaces or special
characters. The length is limited to 15 characters.
Important:
Once specified, you cannot edit the child value set
name.
Description
Optionally, enter a description of the child value set.
Select Values
Select a value from the parent value set and use the arrow buttons to move (or
remove) the value into the child value set.
5. Once you have selected all of the values for the child value set, click Apply.
Related Topics
Defining Table Value Sets, page 4-12
Creating Independent Values, page 4-14
Defining Value Set Versions for Transaction Attributes
You can represent date-dependent item characteristics using transaction attributes
4-8 Oracle Product Hub Implementation Guide
applied to the item during a transaction (not during item creation, like user-defined
attributes). The value sets used by the transaction attributes are also date-dependent.
This date dependency is enabled by creating versions of a value set. Each released
version of the value set is valid for a different time period. Only transaction attributes
use value set versions; all other attributes use non-version value sets (See: Defining
Value Sets for User-Defined Attributes, page 4-1). The following example shows how
multiple value set versions might work in the cellular phone industry.
Mobile Phone Service Plan Example
Currently (February 1), when a customer purchases a mobile phone service plan, they
can choose from the following amounts of included minutes defined in the TALKTIME
value set, version 1:
• 100 minutes
• 200 minutes
• 500 minutes
There is a promotion scheduled for a limited time, through (March 1-31). During this
promotion, customers can select one of the following TALKTIME, version 2, values:
• 200 minutes
• 500 minutes
• Unlimited minutes
When the promotion ends (April 1), the following options are available indefinitely by
selecting one of the following TALKTIME, version 3, values:
• 100 minutes
• 200 minutes
• 500 minutes
• 1000 minutes
Additional Information:
You can import value set versions using open
interface tables and the concurrent program EGO Import Metadata
(EGOIMDCP). For more information, refer to Importing Item Catalog
Metadata, page 3-58
Prerequisites
❒ Set the profile option "Enable PIM for Telco Features" to Yes.
Setting Up Attributes and Functions 4-9
To create a value set draft version:
1. From the Oracle Applications Home Page, click the Setup Workbench link.
2. On the Item Catalog Categories page, click the Value Sets tab.
3. On the Maintain Value Sets page, click Create.
4. On the Create Value Set page, enter the following information:
Value Set Name
The name by which the system and users identify the value set. You can only enter
alphanumeric (a, b, c,..., 1, 2, 3,...) and the underscore ( _) characters for the value set
name. You cannot use spaces or special characters. The length is limited to 15
characters.
Important: Once you have created the value set, you cannot edit the
value set name.
Description
Optionally, enter a description of the value set.
Data Type
The data type of the value set. The data type that you select determines the values
that are available in the value set. An attribute's data type must match the data type
specified for that attribute's value set. The different data types are:
• Character
• Number
• Standard Date
• Standard Date Time
Important: You cannot edit the data type once the value set has
been created.
Maximum Size
Specify the value for Maximum Size if you wish to limit the user's input in the
attribute text field. For example, in some cases you may wish to limit the number of
characters in the attribute value field to 10 characters. Enter the value of 0 if you
wish to omit this particular validation. The default value is 150.
4-10 Oracle Product Hub Implementation Guide
Note: The maximum number of characters for a character type
attribute is 150 characters. Translatable text fields have a limit of
4,000 characters. Number type fields have a maximum size and
precision of 22.5 (22 digits to the left of the decimal and 5 digits to
the right).
Enable Versioning
Optionally, you can enable the creation of value set versions for use with
transaction attributes only by selecting Enable Versioning. This box only appears
when the profile option "Enable PIM for Telco Features" is set to Yes.
Important: If you choose not to enable versioning, then follow the
instructions for creating value sets at Defining Value Sets for User-
Defined Attributes, page 4-1 .
Validation Type
Select the type of values against which the values entered by users are validated.
Choices are:
• Independent
This option requires the specification of explicit values against which the user's
input is validated. If you select this validation type, see: Creating Independent
Values, page 4-14. .
• Translatable Independent
This validation type behaves the same as Independent, but enables the display
of values in another language.
Display Type
• Poplist
Select the "Poplist" radio button to display valid values as a drop-down list.
• List of Values
Select the "List of Values" radio button to display valid values as a searchable
list of values
5. Click Apply to stop after creating one value set or click Apply and Continue to
create another value set.
The Value Set Details page is displayed upon completion. You can edit certain
settings after creation by clicking Update. You can find all existing value sets on the
Value Sets page. You can search for value sets using the criteria Name, Description,
Setting Up Attributes and Functions 4-11
Data type, or Validation type, as well as search for values within value sets.
Optionally, add a description to a value.
To add values to the value set
6. After creating a value set for transaction attributes, you must define the values. See:
Creating Independent Values, page 4-14.
You must add values to the value set in order to release the value set for use by
transaction attributes.
To release a version of the value set
Only the user listed in the Locked By field can release a version of a value set. Once you
release a value set, you cannot update the released version. Only released versions can
be associated to transaction attributes.
7.
On the Value Set Details page, select the Draft version, then click Release.
8. Optionally, on the Release Value Set Version page, you can update the version
description and enter a start date. The start date defaults to the current date if this
field is left blank.
• If you release another version with a later start date, the system
assigns an end date to the previous version that is 1 second
before the next version's start date. You cannot have two
versions that are valid at the same time.
• Once you release a version, the new Draft version has the same
definition as the latest released version. In order to release the
draft, you must change the definition.
9.
Click Apply.
To lock and unlock a draft value set
A version enabled value set is automatically locked upon creation of the draft. Only the
user listed in the Locked By field can update the value set details or release the value set
to create a version. To enable another user to update the value set details, unlock the
value set. The other user can then lock it and make updates or release the value set.
Locking the value set only locks the draft version's value set details. You can update the
value set primary information, such as description, regardless of the lock status. This
primary information applies to all versions.
10.
On the Value Set Details page, select the Draft version.
11.
If the draft is locked, and you are the user who locked it, the Unlock button is
visible. Click Unlock.
4-12 Oracle Product Hub Implementation Guide
The Locked By field displays the name of the person who locked it. Only the person
displayed in the Locked By field can unlock the draft.
12. If the draft is unlocked, the Locked By field is blank and the Lock button is visible.
Click Lock.
To update a value set
Before updating a value set draft version, you must lock it.
Warning: Only update value set versions from the Setup Workbench
(HTML interface). Updating value set versions from the Forms interface
could lead to data corruption.
13. To change the value set primary (header) information for all value set versions, in
the Value Set Details page, click the Update button.
14.
To change the draft version's description or start date, in the Value Set Details
page, select the draft version, then click the draft version's Update icon.
15. To change the draft version's values, you can click the Update or Delete icon for a
particular value or click Create to create a new value.
To revert the draft value set to an earlier version
The Revert Draft to button enables you to refresh the draft version's values with a
released version's values.
16.
Select a released version that contains the values you want the draft version to
contain.
17.
Click Revert Draft to.
The draft version now contains the same values as the released version selected.
What's Next
After defining and releasing a value set version, you can use this version to define a
transaction attribute. See: Defining Transaction Attributes, page 4-33.
Defining Table Value Sets
When creating a value set, you must specify a validation type. If you select the
validation type "Table", then you must define the table whose values comprise the value
set.
Table value sets build queries that draw valid values from a table/view. For example,
you have identified the table EMP as having a value column EMP_ID, and the ID
Setting Up Attributes and Functions 4-13
column EMP_NAME. If a user searches for a person named "Smith", the query is
directed to the table EMP. The search value entered is "Sm", so the actual search value
used is "Sm%". The value set builds a search of the EMP table to find all employees
whose names begin with "Sm". A list of values containing all employees whose last
names begin with "Sm" is returned to the user. Then the user selects the correct
employee, and that employee ID is the value that gets stored for the attribute.
Note: Identifying a table is part of the process of creating a value set.
Before identifying a table, you must create a value set. See: Defining
Value Sets for User-Defined Attributes, page 4-1.
To identify a table for a value set:
1. In the Applications tree menu, click the "Setup Workbench" link.
2. On the Search: Catalog Categories page, click the Value Sets tab. Find and select
the value set for which you want to enter validation table information.
3. In the Value Set Details page, Validation Table Information region, click Update.
4. On the Enter Validation Table Information page, enter the following information:
Application Name
The name of the application in which the table is located.
Table Name
The name of the database table or view in the schema.
5.
In the Value Column section, enter the following information:
Name
The name of the column that stores the value displayed to the user.
Type
The data type of the value column.
Size
The size of the value column.
6. In the Meaning Column section, enter the following information:
Name
The name of the column that stores the description of the value.
Type
The data type of the meaning column.
4-14 Oracle Product Hub Implementation Guide
Size
The size of the meaning column.
7. In the ID Column section, enter the following information:
Name
The name of the column that stores the value internally in the table.
Type
The data type of the ID column.
Size
The size of ID column.
8. In the "Where Clause" section, enter an additional Where clause to further constrain
a query. For example, go back to the example above. Say you wish to further
constrict the search results by only searching for current employees. In this case,
you would add an additional Where clause defining the JOB_STATUS as ACTIVE.
You can also use bind values in Where clauses in the following ways:
• You can refer to other attributes in the same attribute group as the attribute that
uses this value set by using the following syntax:
:$ATTRIBUTEGROUP$.<your attribute's internal name>
For example:
(lookup_type='EGO_EF_Industry_TYPE' and instr(:$ATTRIBUTEGROUP$.
Attr1 , tag) > 0 )
Important: In the example above, you must include a space
between the comma and the word "tag" in order for the sql
string to parse correctly.
• You can refer to primary keys for the object to which the attribute group is
associated by using the following syntax:
:$OBJECT$.<the object's primary key column name>
9.
Click Apply.
Creating Independent Values
When creating a value set, you must specify a validation type. If you select the
validation type "Independent", then you must define the independent values that
comprise the value set.
Setting Up Attributes and Functions 4-15
Prerequisites
❒ Creating an independent value is part of the process of creating a value set. Before
creating an independent value, you must create a value set. See: Defining Value Sets
for User-Defined Attributes, page 4-1.
❒
When you initially install or upgrade to Release 12.2.2 or later, no users are allowed
to view, insert or update any value set values. You must explicitly set up access for
specific users by enabling appropriate grants and roles for those users. For more
information about setting up access, refer to Flexfield Value Set Security, Oracle E-
Business Suite Flexfields Guide.
To create an independent value type:
1. In the Applications tree menu, click the "Setup Workbench" link.
2. On the Search: Catalog Categories page, click the Value Sets tab.
Find and select the value set for which you want to enter values.
3.
In the Value Set Details page, Values region, click Create.
4.
On the Create Value page, enter the following information:
Value (Internal Name)
The internal name of the value; this is a valid value in your value set. The internal
name must be of the same data type as the value set data type.
Translated Value
The display name of the value in another language. This field only appears if the
value set validation type is Translatable Independent.
Description
The description of the value. The description does not have to be the same data type
as the value set data type.
Enabled
Specify whether or not the value is enabled (and available for use) or disabled (and
not available for use).
Sequence
The order or sequence in which the independent values are displayed.
Start Date
The date on which this value becomes a valid value in the value set.
End Date
4-16 Oracle Product Hub Implementation Guide
The date on which this value is no longer a valid value in the value set.
5. Click Apply or Add Another. Both buttons save the value to the database.
Publishing Value Sets
You can search for and select one or more value sets and publish them to one or more
systems, such as Siebel Customer Relationship Management, Oracle Billing and
Revenue Management, or another Oracle Product Hub instance. Alternatively, you can
publish value sets with their associated item catalog category (see: Publishing Item
Catalog Categories, page 3-45). When you publish a value set, all associated child value
sets are also published. You can only publish value sets associated with attributes:
• Associate value set versions to transaction attributes in the ICC.
• Associate value sets without versions to user-defined, seeded, or component
attributes in the ICC.
Oracle Product Hub does not support value sets with a data type of Boolean or Integer,
yet Siebel Customer Relationship Management uses value sets with these data types. In
order to enable the process integration between Oracle Product Hub and Siebel, use the
suffixes _BOOL and _INT in the Value Set Name field as appropriate when creating a
value set. The process integration to Siebel parses the name to create the corresponding
value sets in Siebel with data type Boolean and Integer, respectively.
Additional Information:
Alternatively, you can use a PL/SQL Public API
to publish value sets. See: Using PL/SQL Public APIs to Publish Objects,
Oracle Product Hub User's Guide.
For more information about creating value sets, refer to:
• Defining Value Sets for User-Defined Attributes, page 4-1
• Defining Value Set Versions for Transaction Attributes, page 4-7
For more information about publishing, refer to the Publishing Overview, Oracle
Product Hub User's Guide.
Prerequisites
❒
Before publishing any data, you must set up Oracle Data Integrator Artifacts and
Web Services for Oracle Product Hub. For set up instructions, refer to My Oracle
Support ID 1336146.1. For more information about the Web Services used during
publishing, see: Oracle Product Hub Web Services Overview, page G-1.
Setting Up Attributes and Functions 4-17
To publish value sets:
1. From the Oracle Applications Home Page, select an appropriate responsibility,
then Setup Workbench. Select the Value Sets tab.
Alternatively, navigate to the Publish Batch Search page (Setup > Setup
Workbench (T) Publish). In the View field, select Value Sets. Click Create. See: To
create a draft publication batch, Managing Publishing Batches, Oracle Product Hub
User's Guide.
2. In the Maintain Value Sets page, search for one or more value sets to publish.
3. Select the value sets to publish, then click Publish.
4. In the Valueset Publish Parameters page, enter a batch name.
You can assign any unique name to the batch. The Batch ID also uniquely identifies
the batch. The Batch ID and Created By fields are automatically filled when you
click Publish.
5. If the value set has versions, select the version number to publish.
Additional Information: By default, the system selects the current
effective version. You can publish value set versions or value sets
without a version. You cannot publish a draft version.
6.
Select the Publish to PIM Systems Only box to publish to other Oracle Product Hub
systems. Leave it unchecked to publish to external systems.
You cannot publish to both Product Hub and external systems within the same
Publish action.
7. If you want to remove a value set from the batch, select the value set, then click
Remove.
8.
Click Continue.
The ValueSet Publish Systems page appears. This page contains different fields
depending on whether the Publish to PIM Systems Only field is checked or not.
To publish value sets to an external system (when the Publish to PIM Systems
Only box is NOT selected)
9.
In the ValueSet Publish Systems page, Enter values in the following fields:
• Workspace Name. Required. This field is used by Siebel for grouping multiple
batches into a single group. Enter the name of the Siebel workspace project. If
you are not using Siebel, enter any value.
4-18 Oracle Product Hub Implementation Guide
• Auto-Release. Required. Select Default, Yes, or No from the list. This field refers
to auto-releasing a Siebel workspace project.
• Default - the workspace project auto-releases based on the setting of Auto
Release within Siebel.
• Yes - once the items are published to Siebel, the workspace project is
automatically released.
• No - once the items are published to Siebel, you need to manually release
the workspace project.
10. Select the systems where you want to publish the value sets by clicking Add
Another Row as many times as needed.
11.
In the Value Sets: Select Systems region, select a system name for each row added.
If you need to delete a system, select the system's row and click Remove.
12.
Once you are satisfied with the batch details selected, click Finish to publish the
batch.
If you need to review or change any batch details, click Back to return to the
Valueset Publish Parameters page.
13. Click Save as Draft or Publish.
The Publish Batch Search page opens, displaying the status of the batch submitted.
From here you can delete, copy, merge, or update the batch, as well as view the
batch's history or create a new batch. See: Managing Publishing Batches, Oracle
Product Hub User's Guide.
Additional Information: Possible statuses for the batch include:
• Draft Batch - The batch has been saved as a draft. You must
update the batch, then select Publish to submit the batch.
• Batch Submitted - The batch has been submitted for processing,
but the EGO Import Metadata concurrent program has not run
yet.
• In Process - This status appears for the following reasons:
• When Auto Import is selected - The Publish action is in
process. If there are any errors or time out issues, the
system appends the status with an appropriate message
indicating that either the EGO Import Metadata concurrent
Setting Up Attributes and Functions 4-19
program did not process the updated records or the
concurrent program is still running. Check the status of the
EGO Import Metadata concurrent program in the target
system and take appropriate action.
• When Auto Import is not selected - The Publish action is in
process. The target interface tables were loaded
successfully. Manually invoke the EGO Import Metadata
concurrent program in the target system.
• Succeeded - The value set has been successfully passed to the
target systems.
• Failed - The value set failed the import process for the specified
target systems.
• Partially Succeeded - The some of the value sets have been
successfully passed to the target systems. One or more value
sets have failed the import process for one or more specified
target systems.
To publish value sets to an Oracle Product Hub system (when the Publish to PIM
Systems Only box is selected)
Important: Verify that the profile option "Enable PIM for Telco
Features" is set to the same value in both the source and target Oracle
Product Hub systems.
14.
In the ValueSet Publish Systems page, enter the following:
• Auto Import. Checking this box automatically launches the EGO Import
Metadata (EGOIMDCP) concurrent program in the target Oracle Product Hub
system. If you leave this box unchecked, you must manually run the EGO
Import Metadata concurrent program.
Important: Before publishing a value set with a Table
validation type, verify that the table referenced in the query of
a table type value set in the source system already exists in the
target system. The referenced table is not published. If the table
does not exist in the target system, the value set import process
fails.
The following entities and relationships associated with the value set are
4-20 Oracle Product Hub Implementation Guide
published and imported, regardless of whether you check the Auto Import box
or not:
• Value Set definition.
• Value Set values.
• Associated child value sets, if any.
• Systems. Add systems or remove added systems as desired.
15. Click Save as Draft or Publish.
The Publish Batch Search page opens, displaying the status of the batch submitted.
From here you can delete, copy, merge, or update the batch, as well as view the
batch's history. See: Managing Publishing Batches, Oracle Product Hub User's Guide.
Additional Information: Possible statuses for the batch include:
• Draft Batch - The batch has been saved as a draft. You must
update the batch, then select Publish to submit the batch.
• Batch Submitted - The batch has been submitted for processing,
but the EGO Import Metadata concurrent program has not run
yet.
• In Process - This status appears for the following reasons:
• When Auto Import is selected - The Publish action is in
process. If there are any errors or time out issues, the
system appends the status with an appropriate message
indicating that either the EGO Import Metadata concurrent
program did not process the updated records or the
concurrent program is still running. Check the status of the
EGO Import Metadata concurrent program in the target
system and take appropriate action.
• When Auto Import is not selected - The Publish action is in
process. The target interface tables were loaded
successfully. Manually invoke the EGO Import Metadata
concurrent program in the target system.
• Succeeded - The value set has been successfully passed to the
target systems.
• Failed - The value set failed the import process for the specified
Setting Up Attributes and Functions 4-21
target systems.
• Partially Succeeded - The some of the value sets have been
successfully passed to the target systems. One or more value
sets have failed the import process for one or more specified
target systems.
Related Topics
Publishing Overview, Oracle Product Hub User's Guide
Assigning Systems to an Item Catalog Category, page 3-44
Publishing Item Catalog Categories, page 3-45
Publishing Attribute Groups, page 4-54
Publishing Items and Structures, Oracle Product Hub User's Guide
Using PL/SQL Public APIs to Publish Objects, Oracle Product Hub User's Guide
Managing Publishing Batches, Oracle Product Hub User's Guide
Viewing the Publishing History, Oracle Product Hub User's Guide
Oracle Product Hub Web Services Overview, page G-1
For more information about how product data synchronizes with participating
applications using the publishing process, see Chapter 2: Oracle Product Master Data
Management Integration Base Pack, Oracle Product Master Data Management Integration
2.5 - Implementation Guide. This guide is part of the Oracle Application Integration
Architecture Release 2.5 Media Pack , which you can download from http://edelivery.
oracle.com.
Defining Item Attributes and Attribute Groups
Every catalog item has a set of operational attributes that determines the behavior of
features in other E-Business Suite applications. In addition, you can create user-defined
attributes that more specifically identify items, their characteristics and specifications,
and capture business process information. User-defined attributes can also possess
certain validation logic (for example, value sets) and indexes.
Attributes are defined by their names and values, and are saved within attribute
groups. You can associate attribute groups with the following business entities (see:
Assigning Suppliers to Items, Oracle Product Hub User's Guide):
• item
• item revision
4-22 Oracle Product Hub Implementation Guide
• item organization
• item supplier
• item supplier site
• item supplier site organization
Item business entity attribute values default from entity to entity in the following order
when an attribute group is associated with multiple business entities:
• item to item supplier
• item supplier to item supplier site
• item supplier site to item supplier site organization
• item to item organization
Attribute values only default from the parent to the child level during item business
entity creation. You can override the defaulted attribute value at the child level. For
example, define an initial cost attribute value at the parent or style item level and it
defaults to the child item business entities and/or SKU items. You can update the initial
cost at the child level later.
You can set up as many attribute groups as necessary to define an item business entity,
with the following limitations on the number of attributes within each attribute group:
• 40 character attributes
• 20 number attributes
• 10 date attributes
• 40 translatable attributes
Later, users can enter the values for the attributes on the item business entity pages.
Configure how attribute groups are displayed on these pages to improve usability (see:
Associating Attribute Groups with an Item Catalog Category, page 4-48).
Note: You can also create user-defined attribute groups and attributes
for change objects (see: Defining Header/Line Type Attributes and
Attribute Groups, page 7-25).
For each user-defined attribute, you can optionally specify a value set (see: Defining
Value Sets for User-Defined Attributes, page 4-1) with data type and validation rules
that are applied when the user inputs data. Once created, you can reuse value sets for
different attributes. Create value sets before defining your attribute groups.
Setting Up Attributes and Functions 4-23
An attribute group can be single-row, multi-row, or variant. Multi-row attribute groups
enable you to associate multiple sets of attribute values with the same object instance.
For example, if your item is a book, you can create an attribute group called "chapters"
with attributes "chapter number," "name" and "number of pages." Multiple rows of
"chapters" can be associated with a book, while "name" and "number of pages" each
require a single row. The attribute "chapter number" is identified as Part of Unique Key
(see: Part of Unique Key, page 4-30 later in this section). Use variant attribute groups
only with style and SKU items (see: Using Style and SKU Items, Oracle Product Hub
User's Guide)
Caution: Style items can have an unlimited number of attribute groups.
The restrictions on the number of variant attributes within each group
are the same as for any other type of attribute. Oracle Retail only allows
4 variant attributes per style item, however. When integrating Oracle
Product Hub with Oracle Retail, limit the number of variant attributes
to four per style item.
Third-party systems integrators can easily generate a database view of existing
attributes and attribute groups. These views are particularly useful when users wish to
read the Oracle-provided data as they write code for integration with Oracle
applications. To generate database views, on the Search: Attribute Groups page, select
the attribute groups for which you wish to generate the view and click Generate
Database View.
Additional Information: You can import attribute groups and attributes
using open interface tables and the concurrent program EGO Import
Metadata (EGOIMDCP). For more information, refer to Importing Item
Catalog Metadata, page 3-58.
For more information about User Defined Attributes in Oracle Purchasing and Oracle
Contract Lifecycle Management, see:
• Oracle Purchasing Help Index, Oracle Purchasing User's Guide
• Oracle CLM Purchasing Help Index, Oracle Contract Lifecycle Management for Public
Sector Purchasing User Guide
Prerequisites
❒ Create value sets. See: Defining Value Sets for User-Defined Attributes, page 4-1.
❒ Group related attributes within the same attribute group. The following table shows
some examples of attribute groups.

4-24 Oracle Product Hub Implementation Guide
Attribute Group Attributes Data Type
Capacitor Specifications Dielectric Char
Voltage Number
Tolerance Number
Minimum Temperature Number
Maximum Temperature Number
Capacitor Packaging Specs Package Type Char
Size Number
Case Size Number
❒ Create custom privileges. See: Creating Custom Privileges, page 11-27.
❒ Create an object role (item) with custom privileges to define attribute group
security (if necessary). You can secure the attribute group by setting Edit/View
privileges. Later on, only users with certain roles can view or edit those attributes.
See: To implement attribute group security, page 11-19.
❒ For attributes with a data type of Number, set up the Unit of Measure Classes (for
example, Currency) and Units of Measure (for example, US Dollars). See: Defining
Unit of Measure Classes, Oracle Inventory User's Guide and Defining Units of
Measure, Oracle Inventory User's Guide.
Also, see Display As, page 4-29 later in this section for related information.
❒ Establish the validation rules for each attribute, if necessary. See: Defining Value
Sets for User Defined Attributes, page 4-1.
To create and maintain attribute groups:
1.
From the Home page, click the Setup Workbench link.
2.
On the Search: Item Catalog Categories page, click the Attribute Groups subtab.
3. On the Attribute Groups page, click Create.
4.
On the Create Attribute Group for Item Management page, enter the following:
Setting Up Attributes and Functions 4-25
Internal Name
Enter the internal name of the attribute group.
Display Name
Enter the name of the attribute group as it will be displayed in the user interface.
Description
Optionally, enter the description of the attribute group.
Behavior
Select the Behavior of the attribute group:
• Multi-Row to associate multiple sets of attribute values with the same object
instance.
• Single-Row to associate one attribute value with each object instance.
• Variant to use with style and SKU items. Variant attribute groups contain
attributes that differentiate SKUs within one style item. See: Using Style and
SKU Items, Oracle Product Hub User's Guide
Caution:
You can only associate a variant attribute group with
an item business entity.
Number of columns in the page layout
Enter the number of attribute columns to appear when you view the attribute group
from within an item's user defined attribute page. The default value is 2. This field
does not appear when defining a variant attribute group.
Number of rows in the page layout
This field only appears for multi-row attribute groups. Enter the number of
columns to appear within an item's user defined attribute page. The default value is
5.

4-26 Oracle Product Hub Implementation Guide
5. Select the business entities to which you want to apply the attribute group. For each
business entity selected, specify the following:
• Style to SKU
Select one of the following:
• Defaulting - when an attribute defaults from a style item to a SKU during
SKU creation, you can change the attribute at the SKU level later without
affecting the style item. Conversely, if you change a defaulted attribute at
the style item level after SKU creation, the change does not automatically
appear at the SKU level. You must manually make the change at the SKU
level or use a mass update function to change the SKUs.
• Inheritance - when a SKU inherits an attribute from its style item, the
attribute is always controlled at the style item level. You can only change an
inherited item level user defined attribute at the style item level. Once the
style item attribute is changed, all related SKUs reflect the new attribute
value.
Tip: When updating an attribute group, you can change the
Style to SKU field as long as the attribute group is not
associated with any item catalog category. If you need to
update the Style to SKU field, delete the association and then
make the update.
Setting Up Attributes and Functions 4-27
• View Privilege
Select a viewing privilege. Users must have a view privilege for any object to
which this attribute group is associated. Then, you can narrow the definition of
viewing privileges to meet the needs of your enterprise. For example, you may
create a privilege called View Item Cost and associate it with an attribute group
called "Costs." Users who have view privileges for the item can view the item,
but not necessarily the cost information associated with it. To view the costs
associated with the item, users must have the additional View Item Cost
privilege.
Note: The lock icon (viewed on the Search Results page)
indicates that a user does not have the privilege required to
view a particular attribute group. If you wish to create a
custom privilege, see Creating Custom Privileges, page 11-27.
• Edit Privilege
Select an edit privilege. Users must have an edit privilege to edit information in
this particular attribute group. Privileges are granted by roles assigned to users.
If no view or edit privilege is specified for the attribute group, then users'
ability to view and edit the attribute group is controlled by the view and edit
privileges on the object to which the attribute group is associated. You can
define editing privileges to meet the needs of your enterprise.
• Raise Pre Attribute Change Event
Click Raise Pre Attribute Change Event to raise a business event every time you
want to test a proposed attribute change. This enables you to test a proposed
attribute change against validating criteria before committing the attribute
value to the database. See: Item Business Events, page B-1 .
• Raise Post Attribute Change Event
Click Raise Post Attribute Change Event to raise a business event every time an
attribute is changed. Based on this event, you can choose to execute other
functions or workflows to implement your company's business processes. See:
User-Defined Attributes Business Event within the Synchronizing Item User-
Defined Attributes With Item Descriptive Elements Overview, page D-1.
6.
Click Apply and Add Attributes to add user-defined attributes to your attribute
group. Note that clicking Apply and Add Attributes saves the attribute group and
commits it to the database, even if you click Cancel while on the Create Attribute
page. Alternatively, click Apply to only save the attribute group and stop the
process.
If choosing Apply and Add Attributes, continue on to the next step.
4-28 Oracle Product Hub Implementation Guide
7. On the Create Attribute page, provide the following information:
Internal Name
The internal name of the attribute. The name by which the attribute is tracked
internally.
Display Name
The name of the attribute as it appears within the user interface.
Sequence
The sequence number for the attribute. The sequence determines the order in which
the attribute is displayed on the page, and also determines the order in which the
attribute is processed.
Tip
The description of the attribute; this description also appears as tip text on pages
that have attributes that can be updated.
Data Type
Lists the available data types. The data type that you select determines the values
that are available in the column and value set. An attribute's data type must match
the data type specified for that attribute's value set. The list of values for a value set
only displays value sets whose data type matches the data type of the attribute.
Note that selecting a data type always clears the column and value set. For example,
say you selected the Number data type. Then you select your column and value
set--remember that your column and value set choices are determined by the data
type you chose. Then you decide to change the data type from Number to Date.
Notice that after you change the data type, your column and value set are cleared;
you need to select new ones based on your new data type. Additionally, the data
type determines the values that are available in the Display As field. You cannot
change the data type once an attribute is created.
Note: The maximum number of characters for a character type
attribute is 150 characters. Translatable text fields have a limit of
4,000 characters. Number type fields have a maximum size and
precision of 22.5 (22 digits to the left of the decimal and 5 digits to
the right).
Column
A list of values that enables you to specify the column in which the attribute is
stored in the database table. The column list of values only returns columns with
the data type you specified in Data Type. The list of values also indicates whether
or not the column is indexed. If you want the attribute to be searchable, then select a
column in the database. Ensure that the Indexed checkbox is selected before you
complete the attribute definition. If no indexed columns are available in the
Setting Up Attributes and Functions 4-29
database, and you still want a searchable attribute, select a non-indexed column,
and ensure the Indexed checkbox is selected before completing the attribute
definition; then the database column is automatically indexed. If you do not want
the attribute to be searchable, and the only columns available in the database are
indexed, then ensure that the Indexed checkbox is not selected before completing
the attribute definition.
Enabled
Specify whether or not the attribute is enabled (and available for use) or disabled
(and not available for use). If the attribute is enabled, specify whether or not the
attribute is optional or required. If required, the user cannot save data for an object
using the attribute group without entering a value for that attribute. You can
disable attributes, unless the attributes are mapped to functions. However, you
cannot delete attributes after an attribute group has been associated with an item
catalog category.
Required
Specify whether or not the user must enter an attribute value.
Display As
Determines how the attribute appears within the user interface. For example, if you
select Text Field for an attribute called "Cost Center", then "Cost Center" appears in
the user interface as a text field. The available values for Display As are determined
by the data type selected.
If you choose Checkbox, then the value set defaults to EGO_YES_NO.
If you select Radio Group, then you must choose an independent value type set (in
other words, the value set has a discrete set of values that you have already
specified). If, while updating the value set, you select the Long List of Values
validation type, attributes will be displayed as a text field with a list of values,
thereby ignoring your choice of Radio Group.
If you select Text Field, and choose a value set whose type is independent, then your
display would be either a poplist or list of values (whether or not you get the
poplist or list of values is determined by the way you define the value set). Also,
when the data type is Number, and Display As is a Text Field, a Unit of Measure list
of values is presented. You can choose either the Unit of Measure or the Value Set;
they are mutually exclusive.
Hidden attributes do not show up in the user interface; this attribute is primarily
populated via user-defined functions.
Selecting Dynamic URL refreshes the page with a new section for specifying the
dynamic URL. Enter a URL and use any attribute Internal Name in the attribute
group, enclosed between $$ symbols, as a token for the value of a parameter. When
users click on the URL, the value for that attribute will replace the token in the
URL's query string.

4-30 Oracle Product Hub Implementation Guide
Selecting Static URL enables you to input a web page address.
The following table describes which display types are supported for the various
data types.
Display Types Supported by Data Types
Display
Type
String Number Date Date Time Translatable
Text
Attachment No Yes No No No
Check Box Yes No No No No
Dynamic
URL
Yes Yes No No Yes
Hidden Yes Yes Yes Yes Yes
Radio Group Yes Yes Yes Yes No
Static URL Yes No No No Yes
Text Area Yes No No No Yes
Text Field Yes Yes Yes Yes Yes
Indexed
Specify whether or not you want the attribute to be indexed. If you choose to make
this an indexed attribute, it will appear as an indexed attribute on the criteria
template page. Only indexed attributes are available as sort criteria in result
formats.
Part of Unique Key
If the attribute group is multi-row, the Part of Unique Key checkbox determines
whether or not the attribute is part of the key that uniquely identifies a row. A
unique key is any set of attributes whose values can be used to uniquely identify a
row within the attribute group. You can define the unique key on the attribute
group Detail page. You can add/edit the unique key as long as doing so does not
destroy the uniqueness (creating duplicates) of existing records.
Note: You can specify that each attribute is part of a unique key
when creating the attribute, or--more conveniently--you can specify
Setting Up Attributes and Functions 4-31
all unique key attributes in the group via the attribute group Detail
page.
Value Set
Select a value set that will serve as a set of constraints for an attribute. For details
about creating value sets, see Defining Value Sets for User-Defined Attributes, page
4-1.
Caution: If versions are enabled, assign a value set to an attribute
from the Setup Workbench (HTML interface) rather than from the
Forms interface to avoid data corruption. Forms behavior has not
been enhanced to support versions.
Default Value
The default value of this attribute. If you've selected a value set, the value set's
constraints apply to the default value. This value defaults upon object creation.
Caution:
In an attribute group with at least one required attribute,
no default values are applied for any attributes when a required
attribute does not have an assigned default value.

4-32 Oracle Product Hub Implementation Guide
8. Click Apply and Add Another to save and create another attribute or click Apply to
save and stop the process.
To copy an attribute group and its attributes:
When you copy an attribute group, all of the attribute group's field values and
attributes default to the new attribute group. You can override all defaulted values and
attributes except for the attribute group Behavior field.
1. On the Attribute Groups page, search for the attribute group to copy.
2. In the attribute group search results, click the Copy icon for the attribute group.
3. On the Create Attribute Group for Item Management page, the field values from
the original attribute group appear. You must enter a new internal name for the
copied attribute group, but you have the option to change all field values except for
the Behavior field; you cannot change the original Single-Row, Multi-Row, or
Variant value in the Behavior field.
4.
Click Apply.
The Attribute Details page appears. The attributes from the original attribute group
are attached to the newly copied attribute group. From this page, you can edit or
delete the existing attributes and add new attributes.
Setting Up Attributes and Functions 4-33
Defining Transaction Attributes
Transaction attributes enable you to capture the attribute value for an item at the time
of order or at the time of the transaction. They differ from user-defined attributes,
which capture the attribute value for an item at the time of item creation. Examples of
transaction attributes include:
• The cut length of a piece of vinyl extrusion in a custom window assembly.
• The number of megabytes or gigabytes of email storage on a DSL account.
• The monogram text on a shirt pocket.
Prerequisites
❒ Create a draft version of an item catalog category. See: Defining Item Catalog
Categories, page 3-2
❒ Optionally, create value sets with versions enabled. See: Defining Value Set
Versions for Transaction Attributes, page 4-7. Transaction attributes cannot use
non-version value sets.
❒ For attributes with a data type of Number, set up the Unit of Measure Classes (for
example, Currency) and Units of Measure (for example, US Dollars). See: Defining
Unit of Measure Classes, Oracle Inventory User's Guide and Defining Units of
Measure, Oracle Inventory User's Guide.
❒ You must have the Edit Transaction Attribute privilege in order to make transaction
attribute updates and to enter a transaction attribute value for an item. See:
Implementing Role Based Security, page 11-11.
To add a transaction attribute to an item catalog category:
1. From the Oracle Applications Home Page, click the Setup Workbench link.
2.
In the Items tab, on the Item Catalog Categories page, search for and select the item
catalog category to which you want to add a transaction attribute.
Note: You can only add transaction attributes to an item catalog
category when the profile option "Enable PIM for Telco Features" is
set to Yes.
3. In the Versions region of the Basic Information page for the item catalog category,
click the Draft link.
4-34 Oracle Product Hub Implementation Guide
Note: The start date of the draft ICC version defaults to the current
date. To select a future start date, select the Update icon for the
version before selecting the Draft link. The transaction attribute
uses a value set version with a start date on or after the ICC
version's start date.
4. On the Transaction Attributes page, click Add Attribute.
5. On the Add Transaction Attribute page, enter the following:
Additional Information: The following field values are inherited by
any child item catalog categories, but can be changed at the child
level.
Internal Name
Enter the internal name of the transaction attribute.
Display Name
Enter the name of the transaction attribute as it will be displayed in the user
interface.
Sequence
Enter the sequence number for the attribute. The sequence determines the order in
which the attribute is displayed on the page, and also determines the order in
which the attribute is processed.
Data Type
Select an available data type. The data type that you select determines the values
that are available in the value set. An attribute's data type must match the data type
specified for that attribute's value set. The list of values for a value set only displays
values whose data type matches the data type of the attribute. You cannot change
the data type once an attribute is created.
Note:
The maximum number of characters for a character type
attribute is 150 characters. Translatable text fields have a limit of
4,000 characters. Number type fields have a maximum size and
precision of 22.5 (22 digits to the left of the decimal and 5 digits to
the right).
Value Set Name
Select a value set that will serve as a set of constraints for the attribute. For details
about creating value sets, see Defining Value Set Versions for Transaction
Attributes, page 4-7.
Setting Up Attributes and Functions 4-35
Default Value
The default value of this attribute. If you have selected a value set, the value set's
constraints apply to the default value. This value defaults upon transaction
creation.
Note: You must enter a default value for an attribute that is
required or read only.
Rejected Value
This display only field is relevant when an attribute is marked as required. If the
attribute is required, the value in this field is the value that the Siebel Configurator
interprets as not valid. The system marks this attribute as not entered if the rejected
value is entered as the attribute's value.
Required
Specify whether or not the user must enter an attribute value.
Read Only
Selecting Read Only prevents the user from updating the default value of the
attribute.
Hidden
Specify whether or not the user can see the transaction attribute when performing a
transaction. This check box prevents the attribute from displaying in quote,
agreement, order, or asset views.
Searchable
Enables use of the attribute in parametric searches within Siebel software.
Check Eligibility
Select this checkbox to require a Siebel system to check the customer's eligibility to
buy this product.
6.
Click Apply to stop after creating one attribute or click Add Another to create
another attribute.
To update a transaction attribute:
1.
On the Transaction Attributes page, click the Update icon for a particular attribute.
You can also click the Delete icon for an attribute on this page.
2.
In the Update Transaction Attribute page, change field values in the Attribute
Details and Attribute Data regions as necessary.
4-36 Oracle Product Hub Implementation Guide
Tip: You can also update, but cannot delete, transaction attributes
at the item and item revision level.
3. Click Apply.
The system returns you to the Transaction Attributes page. Select the changed
attribute, then the Attribute Data tab. If you changed an inherited attribute (the
Inherited field value is Yes), the Modified field value is Yes to indicate that this
attribute has changed from it's original inherited state. Once you change an
inherited attribute, changes to the attribute in the parent item catalog category are
not inherited in the child item catalog category.
What's Next
Release the draft version of the item catalog category containing the transaction
attributes. See: "To release an item catalog category draft version" in Defining Item
Catalog Categories, page 3-2.
Using Seeded Attributes
Oracle Product Hub provides many seeded attribute groups, attributes, and value sets
for different industries and uses. Seeded attribute groups behave similarly to user-
defined attribute groups; you can associate them to item catalog categories, modify
them and their attributes, and delete them if you have no need for them. The seeded
attributes are grouped into the seeded attribute groups, and some seeded attribute
groups are even grouped into seeded item pages. The attribute groups with seeded item
pages automatically attach to every item catalog category created unless you remove
them from the seeded item page or delete the item page itself. For example, when you
create an item catalog category, operational attributes (for example, order management,
purchasing, and inventory attribute groups) are automatically associated at the item
organization level.
You can customize seeded attributes within the seeded attribute groups. For example:
• Create a value set and associate it to the attribute as appropriate.
• Customize a seeded value set. If you only use certain values, you can customize the
value set by disabling the unused values or you can add a new value.
• Specify a default value for a seeded attribute.
• Disable unused seeded attributes from within an item catalog category.
• Delete unused seeded attributes or attribute groups
For more information about specific types of seeded attributes, see the appendix of
Setting Up Attributes and Functions 4-37
seeded item metadata libraries, which includes the:
• Sellable Product Information Library - Horizontal, page F-1
• Communications Services Billing Library - Vertical, page F-25
• Product Management Library - Horizontal, page F-23
• Communications Product Details Library - Vertical, page F-44
Understanding Seeded Operational Attributes
When you create a new item catalog category that does not have a parent node
(meaning it is a top node), the system associates all operational attribute groups and
pages with the item catalog category at the item organization level. You cannot delete
the attribute associations, but you can delete the pages. When you create a new item
catalog category that has a parent node, all operational attributes and pages are
inherited from the parent. If a page is deleted at the parent node, then it is also deleted
within all its child nodes. So if you wish to display pages in a particular item catalog
category, but they have been deleted at the parent node, you must explicitly add them
in the child item catalog category.
For a complete listing of the seeded operational attributes associated with new item
catalog categories, seeItem Attributes Listed in Alphabetical Order, Oracle Inventory
User Guide.
The following operational attribute pages are configured for all new item catalog
categories:
• Physical Attributes
• Sales and Order Management
• Planning
• Purchasing
• Inventory
• Manufacturing
• Service
Managing Seeded Attribute Changes
You can use change orders to manage changes to seeded attributes, regardless of your
role or privileges. This change control process ensures that the proposed attribute
values have been reviewed, before they are changed.
4-38 Oracle Product Hub Implementation Guide
Note: Before you use change orders to manage seeded attributes, you
must set up change policies for the attribute group.
For more information about change orders, see: Creating Change Orders, Oracle Product
Hub User's Guide.
Related Topics
Managing Item Specifications, Oracle Product Hub User's Guide
Associating Attribute Groups with an Item Catalog Category, page 4-48
Defining Item Attributes and Attribute Groups, page 4-21
Associating Component Attribute Groups with a Structure Type, page 8-6
Using Additional Attributes
On the Basic Information page for an item catalog category, a region named Additional
Attributes appears if the Item Catalog Groups descriptive flexfield is enabled. The
following list provides details about this descriptive flexfield:
• Application - Inventory
• Title - Item Catalog Groups
• Name - MTL_ITEM_CATALOG_GROUPS
• Table Name - MTL_ITEM_CATALOG_GROUPS
You can use descriptive flexfields to track additional information, important and unique
to your business, that would not otherwise be captured on a page. For more
information about setting up the Item Catalog Groups descriptive flexfield, refer to the
Oracle E-Business Suite Flexfields Guide.
Creating User-Defined Functions for Item Attributes
To define your own custom logic, you can add user-defined functions and actions to
existing pages in the Item Catalog and in Change Management without having to
customize the entire page. By first setting up user-defined attributes, you can then
execute user-defined functions with those attributes.
Using different algorithms, you can calculate values by passing attribute values to
functions. User-defined functions can be Java, URL, or PL/SQL functions. Functions use
input and/or output parameters of various data types such as string, integer, or
Boolean. You can also map these parameters to attributes and object primary key
values. Actions are trigger points for functions displayed as buttons or links on the
Setting Up Attributes and Functions 4-39
page. You can determine the conditional visibility of the button and the label displayed
on the button itself. You can also prompt the user based on the user's input. See:
Adding Actions to an Attribute Group, page 4-52
Additional Information: You can import functions using open interface
tables and the concurrent program EGO Import Metadata
(EGOIMDCP). For more information, refer to Importing Item Catalog
Metadata, page 3-58
User-defined functions can be Java, URL, or PL/SQL functions. Prior to setting up user-
defined functions and actions you should:
For more information about User Defined Attributes in Oracle Purchasing and Oracle
Contract Lifecycle Management, see:
• Oracle Purchasing Help Index, Oracle Purchasing User's Guide
• Oracle CLM Purchasing Help Index, Oracle Contract Lifecycle Management for Public
Sector Purchasing User Guide
Prerequisites
❒ Set up user defined attributes. See: Defining Item Attributes and Attribute Groups,
page 4-21
❒ Create item pages associated with item catalog categories. See: Creating Pages for
an Item Catalog Category, page 3-28
❒ Determine which attributes are functions of other attributes. Create user-defined
functions to perform the necessary calculations (for example, summation of costs,
efforts, ratings).
❒
Create custom privileges and roles if you need to secure access and control who
can/cannot execute the function/action. See: To implement attribute group security,
page 11-19
❒ Determine the conditions for displaying or changing the prompt of the button/link
that executes the function. For example, the button may not be displayed until
certain required attributes have values entered. The name of the button may change
depending on the values of certain attributes. See: Adding Actions to an Attribute
Group, page 4-52
To create a user-defined function:
1.
In the Applications tree menu, click the "Setup Workbench" link.
2. On the Search: Item Catalog Categories page, click the Functions tab.
4-40 Oracle Product Hub Implementation Guide
3. On the Search and Select: Functions page, click Create Function.
4. On the Create Function page, enter the following information:
Internal Name
The internal name of the function.
Display Name
The name of the function as it appears in the user interface.
Description
The description of the function.
Function Type
Whenever you define a function, there must be an underlying implementation of
that function. The type specifies the manner of implementation to which the
function maps. The supported function types are:
Java
Specifies that the implementation is via a Java method. When you select Java, the
page refreshes and you must specify the following:
• Class
The class in which the method resides.
• Method
The method that implements your custom logic.
Note: Place the Java class files in any directory and append this
directory to the Apache servlet classpath.
PL/SQL
Specifies that the implementation is via a PL/SQL stored procedure. When you
select PL/SQL, the page refreshes and you must specify the following:
• Package
The package in which the procedure resides.
• Procedure
The procedure that implements your custom logic.
Note: Run the PL/SQL package in your custom schema and then
create a synonym for this package in the APPS schema.
Setting Up Attributes and Functions 4-41
URL
Specifies that the implementation is a simple URL link. When you select URL, the
page refreshes and you must specify the following:
• URL
Specify either absolute or relative URLs. For absolute URLs, begin the URL with
the protocol (in most cases, the protocol will be http://).
5. Click Apply.
Note: You can only delete a function when it is no longer associated
with an action.
To create parameter mappings for a function:
After creating a user-defined function, specify the parameters to pass when that
function is called.
1. On the Search and Select: Functions page, click the name of the function you just
created.
2. On the Function Details page, click Add.
3.
On the Create Function Parameter page, enter the following information:
Internal Name
The internal name of the parameter.
Display Name
The name of the parameter as it appears in the user interface.
Sequence
The order in which this parameter appears relative to other parameters associated
with this function. Sequence must be unique among all parameters associated with
this function.
Specify the order sequence of the function parameters; this is the order in which the
parameters are passed to a function or procedure. For example, you need to
calculate time duration in days by using the attribute group "Duration in days"
where Duration = End Date – Start Date.

4-42 Oracle Product Hub Implementation Guide
Sequence Attribute
Group:
Duration in
Days
Attribute
Group:
Duration in
Days
Mapping
Attribute
&
Parameter
s
Java
Function:
Duration
Java
Function:
Duration
Java
Function:
Duration
Sequence Attribute
Name
Data Type ---------
@--------
Parameter
Name
Data Type Parameter
Type
1 Start Date Standard
Date
---------
@--------
Date 1 Date Input
2 End Date Standard
Date
---------
@--------
Date 2 Date Input
3 Duration Number ---------
@--------
Result Integer Return
Value
Data Type
Lists the available data types. The values available are dependent on the type of
function for which you are defining parameters.
Parameter Type
Select the parameter type for each parameter based on whether the corresponding
attribute is providing an input parameter to the function or expecting a return value
from the function (for example, input, output, input/output).
The parameter options for a parameter depend on the function type and parameter
data type you have already selected. For example, if the Function Type is URL, then
the Data Type is constrained to String, and the Parameter type is constrained to
Input.
The valid parameters for Java functions are:
• Boolean
• Standard Date
• Error Array
• Float
• Integer
• Long
Setting Up Attributes and Functions 4-43
• Double
• Transaction
• String
• Standard Date Time
The valid parameters for PL/SQL functions are:
• Date
• Error Array
• Number
• Varchar
The valid parameter for URL function is:
• String
The system supports Java function parameters to be used as input, output,
input/output or return. For output or input/output parameter types, you have to
pass back the changed value as the same object. But you cannot change the values
for immutable data types. Therefore, wrapper classes are created for these data
types.
Boolean - oracle.apps.ego.common.EgoBoolean
Double - oracle.apps.ego.common.EgoDouble
Float - oracle.apps.ego.common.EgoFloat
Integer - oracle.apps.ego.common.EgoInteger
Long - oracle.apps.ego.common.EgoLong
Date - oracle.apps.ego.common.EgoDate
Timestamp - oracle.apps.ego.common.EgoTimestamp
All these wrapper classes have getValue () and setValue () that return/take the basic
parameters respectively. For example, EgoInteger - setValue(Integer i) Integer
getValue()
Other Java parameters supported are:
String - java.lang.StringBuffer
Transaction - oracle.jbo.Transaction
Additional Information: ErrorArray data type is a java.util.Vector to
4-44 Oracle Product Hub Implementation Guide
which you can add translated Error messages. This is an output
parameter and the errors are displayed on the rendering page.
While writing Java Custom functions, use the above data types. When a user enters
a decimal value for an attribute and this attribute is mapped to EgoInteger or
EgoLong, the value is truncated before it passes to the function. For EgoBoolean, the
value "Y" is considered TRUE. All other values are considered FALSE.
4. Click Apply.
Related Topics
Adding Actions to an Attribute Group, page 4-52
Creating Pages for an Item Catalog Category, page 3-28
Defining Item Attributes and Attribute Groups, page 4-21
Defining Attribute Usages
You can export user-defined attributes to other applications for their use. For example,
export user-defined attributes to Oracle Configurator for use as item properties (See:
Item Types and Imported BOM Properties within Imported BOM Models, Oracle
Configurator Developer User's Guide). Oracle Configurator uses item properties to create
generic rules for configured items, such as this rule:
Rule
The voltage of the adapter must be equal to the voltage supplied in the country of
installation.
In the rule above, an Item Property of Voltage could be created either:
• directly, in Oracle Configurator Developer.
• in Oracle Inventory, as a Descriptive Element, and imported into Configurator
Developer as an Item Property (see: Defining Descriptive Elements, Oracle Inventory
User's Guide).
• in Oracle Product Hub, as a user-defined attribute, and exported to Configurator
Developer, where it becomes an Item Property.
To export user-defined attributes to Oracle Configurator Developer:
1.
From the Setup Workbench Item Catalog Categories page, Items tab, click the
Attribute Usages sub-tab.

Setting Up Attributes and Functions 4-45
2. In the Attribute Group field, search for the attribute groups that you want to export
to Oracle Configurator Developer.
3. Click Go to list all of the attribute groups matching your search.
4.
Select the attributes that you want to export.
5.
Click Update to export the attributes.
Related Topics
Defining Item Attributes and Attribute Groups, page 4-21
Displaying Attachments on Item Attribute Pages
You can display items or change attachments as attributes on an item attribute page.
Select a specific file from the existing item/change attachment list to display the file as a
link within an attribute group on an item or change object page. You can then set up a
Display Format that includes the attachment attribute as a column. Consequently, the
link to the attachment is displayed in the search results.
To display an attachment on an item attribute page:
1.
Create a value set that queries the values for the object primary key and retrieves
the information for the object attachment data. See: Defining Table Value Sets, page
4-12
When creating a value set to display item attachments, select the Table validation
type and the Number data type (as shown in the following table).

4-46 Oracle Product Hub Implementation Guide
Attribute Group:
Computer
Specifications
Attribute Group:
Computer
Specifications
Attribute Group:
Computer
Specifications
Attribute Group:
Computer
Specifications
Attribute: Release
Notes
Attribute: Release
Notes
Value Set: Item
Attachment
Value Set: Item
Attachment
Data Type Display as Data Type Validation Type
Number Attachment Number Table
Create a value set for an attribute to display an item attachment
Important: In the above screenshot, the value set table refers to
Value Column = FND_DOCUMENTS_TL.TITLE. Alternatively, the
value set table could refer to Value Column =
FND_DOCUMENTS_TL.DESCRIPTION. Remember, though, that
the file description is not a mandatory field when adding
attachments. If an attachment has no description, then no name
appears for the attachment in the value set if Value Column =

Setting Up Attributes and Functions 4-47
FND_DOCUMENTS_TL.DESCRIPTION.
2. Create an attribute group with an attribute where Display As is set to Attachment.
See: Defining Item Attributes and Attribute Groups, page 4-21
To see Attachments in the Display As dropdown, use the Number data type for
your attribute.
3. Associate the value set to the attribute.
Associate value set to the attribute
4.
Associate the attribute group to an item catalog category. See: Associating Attribute
Groups with an Item Catalog Category, page 4-48
5.
Create an item page to display the attribute group. See: Creating Pages for an Item
Catalog Category, page 3-28
6.
Add attachments to the item attachment list. See: Adding Attachments, Oracle
Product Hub User's Guide
7.
Select an attachment for display on the item attribute page. For more information
about updating attributes, see: Managing Item Specifications, Oracle Product Hub
User's Guide

4-48 Oracle Product Hub Implementation Guide
Select attachments to be displayed on attribute page
Item attribute page displays link to one of the attached files
Associating Attribute Groups with an Item Catalog Category
Attributes are details that further define the item and specify the item's behavior. For
example, Physical item attributes identify the size, shape, and color of an item.
Setting Up Attributes and Functions 4-49
Attribute groups represent the logical grouping of similar item attributes. They collect
characteristics (attributes) that can be used to record specifications or represent the
properties of an item belonging to an item catalog category. Attribute groups can be
associated with an item catalog category at the item or item revision levels, thereby
determining whether attribute values change over revisions.
Note: Attribute groups inherited from a parent catalog category cannot
be deleted at the child catalog category level. Attribute groups can be
inherited from a parent catalog category and explicitly added to the
catalog category itself. Administrators should not associate the same
attribute group with an item catalog category in this manner.
Additional Information: Common attribute group values will be
retained even after moving to the target item catalog category.
To display user-defined item attributes, associate the corresponding attribute groups
with an item catalog category and specify the item page upon which the attribute group
should appear.
Note: You can re-use the same attribute group throughout the item catalog for different
item catalog categories. Children categories inherit attribute groups from the parent
category. You cannot edit inherited data.
Consider which item catalog categories in the item catalog hierarchy need to display the
attribute groups.
Associate an attribute group to a parent category only if you need to view those
attributes in all items within that hierarchy. For example, the Benchmark Rating
attribute group is associated with the Computer System item catalog category. The
Computer System category is the parent category for Desktop and Laptop. All items
belonging to the parent category Computer System, as well as to its children Desktop
and Laptop, will have Benchmark Rating attributes displayed on the items pages.
To associate an attribute group with an item catalog category:
1.
From the Home page, click the Setup Workbench link.
2.
On the Search: Item Catalog Categories page, search for the item catalog category
(see:Browsing Item and Alternate Catalogs , Oracle Product Hub User's Guide) and
click its corresponding name link.
3.
From the Basic Information page, click the Attribute Groups link.
4.
On the Attribute Groups page, click Add Attribute Groups.
5. In the Add Attribute Groups to Catalog Categories page, search for and then select
an attribute to add. Click Apply.
4-50 Oracle Product Hub Implementation Guide
The system automatically adds the attribute group to all business entities eligible
for that attribute group. Possible eligible business entities include:
• Item
• Item Organization/Store
• Item Revision
• Item Supplier
• Item Supplier Site
• Item Supplier Site Store
Additional Information: Item level attributes are set only in the
Master Organization and copied to all child organizations in the
organization hierarchy. Users cannot edit item level attributes in
child organizations.
Item organization/store level attributes are organization specific.
They default to the child organization during organization
assignment. You can override the defaulting values at the child
level.
Item revision level attributes are revision and organization-specific.
For example, the Benchmark Rating attribute group is an item level
attribute group and Desktop Specifications is associated at the item
revision level. Item VI1004 is assigned to the master organization
Vision Operations and to Seattle Manufacturing. Benchmark Rating
attributes remain the same across the Vision Operations hierarchy
while Desktop Specifications attributes vary from organization to
organization and across different revisions in each organization.
Note: When you search for attribute groups, the system only
returns those attributes eligible for the particular business entity
selected in the View Attribute Groups For field. Define which
attribute groups are eligible for which business entities when
defining or editing an attribute group. See: Defining Item
Attributes and Attribute Groups, page 4-21
To delete an attribute group from an item catalog category:
You can delete an attribute group from an item catalog category as long as the attribute
group is not associated with item pages, display formats, or import formats. Once you
remove any of these associations, you can delete the attribute group from the item

Setting Up Attributes and Functions 4-51
catalog category. Deleting the attribute group deletes it from all business entities within
the item catalog category.
1. View the attributes for any business entity, select the attribute group to delete, then
click Delete.
To define the item pages for attribute groups:
You can specify one or more attribute groups on a page or create a separate page for
each attribute group. Item pages are also inherited from the parent item catalog
categories.
1. On the Basic Information page of the item catalog category, click the Item Pages
link.
The Item Pages page lists all of the item pages created for the item catalog category
by business entity.
Item Pages
2.
In the View Attribute Groups For field, select the business entity for which you
want to create an item page.
3.
Click Create Page to add a page to the item catalog category and business entity
selected.
Note: Navigate to the item Overview page to view the associated

4-52 Oracle Product Hub Implementation Guide
attribute group item pages.
Item pages for attributes on the item Overview page
Important:
This note applies only to Oracle Product Hub users
upgrading from a release prior to Release 12.1.1.
Prior to Release 12.1.1, users were unable to define item pages by
business entity, so all item and item organization attribute groups
appeared on item pages together. Any item organization attribute
groups in existence prior to Release 12.1.1 must be added to item
pages for the item organization business entity.
Adding Actions to an Attribute Group
You can associate user-defined actions with an attribute group in the context of an item
catalog category. A user-defined action describes a function that, at run-time, can be
invoked by the user. Attributes of the attribute group can be mapped to function
parameters, so that their values are dynamically passed during function invocation.
Setting Up Attributes and Functions 4-53
To add an action to an attribute group associated with an item catalog
category:
1. From the Home page, select the Setup Workbench link.
2. On the Search: Item Catalog Categories page, locate the appropriate item catalog
category and click its name link.
3. On the Basic Information page, click the Attribute Groups link.
4.
On the Attribute Groups page, click the Update Actions icon.
5. On the View Actions page, click Create Actions.
6. On the Create Action page, provide the following information:
Sequence
If there are multiple actions associated with an attribute group, the sequence
number determines the order in which they are displayed to the user.
Action Name
The name of the action.
Description
The description of the action.
Function
Associates an existing function with the action. The function has a name, type, and
specified parameters.
Security Privilege
The privilege required by a user in order for that user to execute this action.
Execution Method
The manner in which the action is executed.
Display Style
Defines the user interface element that executes the action.
Prompt Application
The application of the prompt for the action if the prompt is defined in the
database.
Prompt Message Name
The message name of the prompt if the prompt is defined in the database.
Otherwise, the actual prompt.
Dynamic Prompt Function
4-54 Oracle Product Hub Implementation Guide
Selects an existing function whose return value will define the prompt of the action.
Must have parameter of type Return, with data type String.
Dynamic Visibility Function
Selects an existing function whose value will determine whether or not the action is
rendered.
7. Click Apply.
To create parameter mappings for an action:
After creating an action, specify the values to pass to its associated functions when that
action is executed. You can have up to three associated functions: the main function, the
dynamic prompt function and the dynamic visibility function.
1.
On the View Actions page, click the name of the action you just created.
2. On the Action Details page, within the appropriate function heading, click Edit.
3. On the Create Mappings page, for each function parameter select the following:
Mapping Group Type
The type of attribute that will be mapped to this parameter.
Mapped Attribute
The actual attribute that is mapped. Only attributes with the data type that matches
the parameter data type are available.
4.
Click Apply.
Related Topics
Creating User-Defined Functions for Item Attributes, page 4-38
Publishing Attribute Groups
You can search for and select one or more attribute groups and publish them (and their
associated attributes and value sets) to one or more other Oracle Product Hub systems.
You cannot publish attribute groups to external systems. For more information about
publishing in general, refer to Publishing Overview, Oracle Product Hub User's Guide.
Additional Information: Alternatively, you can use a PL/SQL Public API
to publish attribute groups. See: Using PL/SQL Public APIs to Publish
Objects, Oracle Product Hub User's Guide.
Setting Up Attributes and Functions 4-55
Prerequisites
❒ Before publishing any data, you must set up Oracle Data Integrator Artifacts and
Web Services for Oracle Product Hub. For set up instructions, refer to My Oracle
Support ID 1336146.1. For more information about the Web Services used during
publishing, see: Oracle Product Hub Web Services Overview, page G-1.
To publish attribute groups:
Important: Verify that the profile option "Enable PIM for Telco
Features" is set to the same value in both the source and target Oracle
Product Hub systems.
1. From the Oracle Applications Home Page, select an appropriate responsibility,
then Setup Workbench. On the Search: Item Catalog Categories page, click the
Attribute Groups subtab.
Alternatively, navigate to the Publish Batch Search page (Setup > Setup
Workbench (T) Publish). In the View field, select Attribute Groups. Click Create.
See: To create a draft publication batch, Managing Publishing Batches, Oracle
Product Hub User's Guide.
2.
In the Attribute Groups page, search for one or more attribute groups to publish.
3. Select the attribute groups to publish, then click Publish.
4. In the Attribute Group Publish Parameters page, enter a batch name.
You can assign any unique name to the batch. The Batch ID also uniquely identifies
the batch. The Batch ID and Created By fields are automatically filled when you
click Publish. The Publish to PIM Systems Only box is automatically checked. You
can only publish attribute groups to another Oracle Product Hub system.
If you want to remove an attribute group from the batch, select the attribute group,
then click Remove.
5.
Click Continue.
6.
In the Attribute Group Publish Systems page, enter the following:
• Auto Import. Checking this box automatically launches the EGO Import
Metadata (EGOIMDCP) concurrent program in the target Oracle Product Hub
system.
If you leave this box unchecked, you must manually run the EGO Import
Metadata concurrent program in the target Oracle Product Hub system. When
manually running this program, you can choose to import or not import the
4-56 Oracle Product Hub Implementation Guide
value sets associated with the attribute groups.
The following entities and relationships associated with the attribute group are
published and imported by the EGO Import Metadata concurrent program:
• Attribute group definition.
• Associated Business entity relationships.
• Attributes of the attribute group.
• Value sets associated with the attributes.
Warning: The publish and import process can create and
update an attribute group entity relationship (such as attribute
group business entities Item, Item Organization, Item Supplier,
and so on), attributes, and value sets, but cannot delete already
existing entity relationships, attributes, and value sets in the
target system.
• Systems. Add systems or remove added systems as needed.
7.
Click Save as Draft or Publish.
The Publish Batch Search page opens, displaying the status of the batch submitted.
From here you can delete, copy, merge, or update the batch, as well as view the
batch's history and create a batch. See: Managing Publishing Batches, Oracle Product
Hub User's Guide.
Additional Information: Possible statuses for the batch include:
• Draft Batch - The batch has been saved as a draft. You must
update the batch, then select Publish to submit the batch.
• Batch Submitted - The batch has been submitted for processing,
but the EGO Import Metadata concurrent program has not run
yet.
• In Process - This status appears for the following reasons:
• When Auto Import is selected - The Publish action is in
process. If there are any errors or time out issues, the
system appends the status with an appropriate message
indicating that either the EGO Import Metadata concurrent
program did not process the updated records or the
concurrent program is still running. Check the status of the
Setting Up Attributes and Functions 4-57
EGO Import Metadata concurrent program in the target
system and take appropriate action.
• When Auto Import is not selected - The Publish action is in
process. The target interface tables were loaded
successfully. Manually invoke the EGO Import Metadata
concurrent program in the target system.
• Succeeded - The attribute group has been successfully passed
to the target systems.
• Failed - The attribute group failed the import process for the
specified target systems.
• Partially Succeeded - Some attribute groups and some
associated value sets have been successfully passed to the
target systems. One or more attribute groups and associated
value sets have failed the import process for one or more
specified target systems.
Related Topics
Publishing Overview, Oracle Product Hub User's Guide
Assigning Systems to an Item Catalog Category, page 3-44
Publishing Item Catalog Categories, page 3-45
Publishing Value Sets, page 4-16
Publishing Items and Structures, Oracle Product Hub User's Guide
Using PL/SQL Public APIs to Publish Objects, Oracle Product Hub User's Guide
Managing Publishing Batches, Oracle Product Hub User's Guide
Viewing the Publishing History, Oracle Product Hub User's Guide
Oracle Product Hub Web Services Overview, page G-1

Setting Up Catalogs 5-1
5
Setting Up Catalogs
This chapter covers the following topics:
• Overview of Catalogs
• Defining Catalog Categories
• Defining Catalogs
• Assigning a Category to a Catalog
• Mapping Catalog Categories
• Administering a Category Hierarchy within a Catalog
Overview of Catalogs
A catalog is a collection of items classified within a hierarchical taxonomy. A catalog
consists of a hierarchy of catalog categories, each containing items assigned to the
catalog category. Catalogs provide a convenient way to organize and present your
items under various taxonomies. For example, you can set up a Product Catalog of sales
items that the Sales and Marketing organizations, as well as your customers, can browse
to find products. You can set up a Purchasing Catalog, which contains all the
purchasable items that the Engineering, Manufacturing and Procurement organizations
can browse to locate parts. You can also set up a Service Catalog that contains all
serviceable items and service products for your field repair and customer service
departments. The following figure shows the catalog hierarchies for a Product catalog,
Purchasing catalog, and Service catalog. You can define any number of catalogs and
assign an item to more than one catalog. Depending on your setup, you can also assign
an item to more than one catalog category within a catalog.
Additional Information: The category sets defined in the E-Business Suite
appear as catalogs. The categories within each of these category sets
appear as catalog categories in the respective catalog.
5-2 Oracle Product Hub Implementation Guide
Example of Catalog Hierarchies

Setting Up Catalogs 5-3
The following tasks described in this chapter are required in order to use a catalog. All
other tasks in this chapter are optional.
• Defining Catalog Categories.
• Defining Catalogs.
5-4 Oracle Product Hub Implementation Guide
Related Topics
Defining Catalog Categories, page 5-4
Defining Catalogs, page 5-6
Assigning a Category to a Catalog, page 5-9
Mapping Catalog Categories, page 5-10
Administering a Category Hierarchy within a Catalog, page 5-10
Defining Catalog Categories
A category is a logical classification of items that have similar characteristics. Before
creating a catalog, you must have first created the appropriate category.
Use a catalog category to classify items within a catalog. You can define unlimited catalog
categories and reuse catalog categories in more than one catalog. Before creating catalog
categories, consider all the catalogs you need to define throughout your enterprise (for
example, Product catalog, Purchasing catalog, Service catalog). Then create a list of all
the catalog categories and sub-categories you will need to correctly classify each item
within your catalogs. For example, you may have a catalog category for Hard Drives in
each of your catalogs since you sell hard drives to customers, purchase hard drives
from your supplier, and service hard drives. You should use the same flex structure for
catalog categories so you can reuse them in different catalogs.
Additional Information: You can automatically trigger actions based on
creating, updating, or deleting a category. See: Item Business Events,
page B-1 and Managing Business Events, Oracle Workflow Developer's
Guide.
To create a category:
1.
On the Search: Item Catalog Categories page, click the Catalogs tab.
2. On the Search: Catalogs page, click the Categories tab.
3.
On the Search: Categories page, click the "Create Category" link.
4. On the Create Category page, select a Flex Structure and click Continue.
You must enter a flexfield structure. You can define multiple segment structures for
the item categories flexfield structure. Each segment in the structure can have its
own display name and its own prompt.
If you choose a multi-segment flexfield structure you can assign a specific meaning
to each segment. For example, if you want to group items according to product line
Setting Up Catalogs 5-5
and product information, then you can use the first segment to represent product
line and the second segment to represent the product.
Note that the categories that you assign to a catalog must have the same flexfield
structure as the catalog itself. This is true even if you choose not to validate the
category list.
The "Category" section of the Create Category page is refreshed and populated
with fields defined by the flexfield structure you have chosen. Provide the
information in the remaining fields of the "Category" section.
5. In the "Category Details" section, provide the following information:
Description
Enter a meaningful description of the category.
Inactive on
Select an inactive date for this category. As of the inactive date, you can no longer
assign this category:
• As the default category of a new catalog.
• As a valid category of a catalog.
• To an item.
• As a valid category of an item catalog category.
You cannot set the inactive date to a date in the past. However, you can change the
inactive date to one that is in the future. You cannot assign an inactive date to a
category that is the default for a mandatory catalog set.
Iprocurement
The default is disabled (unchecked); this field cannot be modified unless the
category is the default category for the purchasing functional area.
Viewable By Supplier
The default is enabled (checked); this field cannot be modified unless it is the
default category for the purchasing functional area.
6.
Click Apply
Related Topics
Overview of Catalogs, page 5-1
Defining Catalogs, page 5-6
Assigning a Category to a Catalog, page 5-9

5-6 Oracle Product Hub Implementation Guide
Mapping Catalog Categories, page 5-10
Administering a Category Hierarchy within a Catalog, page 5-10
Defining Catalogs
A catalog is a hierarchy of catalog categories used to classify items defined in your item
catalog. Once you have defined all of your catalog categories you can create each of
your catalogs. When you construct your catalog category hierarchy keep in mind that
only the leaf nodes of the catalog can contain items.
Before creating a catalog, it is a good idea to first understand its purpose and function.
It may be easiest if you first understand what makes up an item catalog. The item
catalog basically contains all items defined for your company or organization. Item
catalogs are hierarchical, and relationships between the various item catalog categories
(such as an item's catalog category attributes) are inherited. Catalogs are also
hierarchical; however, relationships between the categories are not inherited. Instead,
relationships between the categories are explicitly defined by the administrator. A
catalog contains some user-defined subset of items that exist in the item catalog. The
following table highlights some of the key differences between an item catalog and a
catalog.
Important:
Category sets (in Oracle Inventory) are available for use in
the system as catalogs. You can add people to catalogs and enable them
to browse. You can also create a hierarchy to reflect the category set
taxonomy (which appears in the system as a flat list using categories
and subcategories).
Comparing the Item Catalog to a Catalog used for classification purposes only
Area of Comparison Item Catalog Catalog
Purpose Set up all item-level
attributes, lifecycles,
attachment categories, etc.
Create taxonomies related to
lines of business (such as
Assets, Purchasing, Service,
etc.).
Contains All items. Logical subsets of items that
are typically based on lines of
business.
Security Control inherited roles for
items.
Control access to catalog
(basically, who can view or
edit the catalog).

Setting Up Catalogs 5-7
Area of Comparison Item Catalog Catalog
Lifecycle Set up valid lifecycles for
items.
N/A
Before creating a catalog, you should have already created the necessary categories.
Note that a category is a logical classification of items that have similar characteristics,
while a catalog is a distinct grouping scheme and consists of categories.
To create a catalog:
1. In the Applications tree menu, click the "Setup Workbench" link.
2. On the Search: Item Catalog Categories page, click the Catalogs tab.
3.
On the Search: Catalogs page, click the "Create Catalog" link.
4. On the Create Catalog page, provide the following information:
Name
Enter the name of the catalog.
Description
Enter a meaningful description of the catalog. A description is required so that
users can browse the catalog by either the name or description.
Flex Structure
Select a flexfield structure. Flexfield structures contain multiple segment structures
for the product catalog flexfield; each segment structure has its own display
prompts and fields.
When you install the system, Oracle provides two flexfield structures by default:
Item Categories and PO Item Category. You can define your own segment
structures that have their own display prompts and fields.
Note that the categories that you assign to a catalog must have the same flexfield
structure as the catalog itself. This is true even if you choose not to validate the
category list.
Controlled At
Select one of the two available control levels.
• Master Level
Items assigned to this catalog have the same catalog category value in all
organizations in which the item is assigned.
5-8 Oracle Product Hub Implementation Guide
• Org Level
Important: Once you assign the control level to the
Organization Item level, you cannot change it back to Item
level.
Default Category
Select a default category. This is the default category used when you assign an item
to a catalog. You can override the default category and replace it with a more
relevant category for each item.
Allow Multiple Item Category Assignments
Selecting this checkbox indicates that an item can be assigned to multiple categories
within this catalog. If you do not select this checkbox, an item can be assigned to
exactly one category in the catalog.
Note:
If you select this checkbox, you can assign multiple items to
multiple categories within this catalog, but if multiple assignments
exist, then you cannot deselect this checkbox until you delete the
assignments and are left with only one.
Enforce List of Valid Categories
Select this checkbox if you wish to assign items only to those categories defined as
valid categories for this catalog. When selected, the default category is
automatically added to the list of valid categories for this catalog. If you do not
select this checkbox, then you can assign an item to any defined category that uses
the same flexfield structure as this catalog.
You can specify flex structures for both category sets and categories. You can also
associate different categories with a category set; if you do this, they must share the
same flex structure. However, this does not make a valid category set. The category
set and category must also be associated. Once the catalog and category set share
the same flex structure and are associated, you have a valid category set.
Enable Hierarchy for Categories
Selecting this checkbox enables you to define explicit hierarchies of categories
within a catalog. Once made, you cannot revise this selection.
Business Events for Catalogs
Enable the appropriate business event to raise notifications for changes to the
catalog information:
• Raise Item Catalog Assignment Change Event
• Raise Catalog Category Change Event
Setting Up Catalogs 5-9
• Raise Alternate Catalog Hierarchy Change Event
See:
• Item and Catalog Business Events, page B-1
• Managing Business Events, Oracle Workflow Developer's Guide
5. Click Apply.
Related Topics
Overview of Catalogs, page 5-1
Defining Catalog Categories, page 5-4
Assigning a Category to a Catalog, page 5-9
Mapping Catalog Categories, page 5-10
Administering a Category Hierarchy within a Catalog, page 5-10
Assigning a Category to a Catalog
You can assign different categories to a catalog; however, the only categories that you
can assign to a catalog are categories with the same flexfield structure as the catalog.
When you assign a category to a catalog, you can also define a hierarchical category
structure, page 5-10.
Additional Information:
You can automatically trigger actions based on
assigning a category to a catalog. See: Item Business Events, page B-1
and Managing Business Events, Oracle Workflow Developer's Guide.
To assign a category to a catalog:
1.
On the Search: Item Catalog Categories page, click the Catalogs tab.
2.
On the Search: Catalogs page, select the catalog to which you wish to assign a
category.
3.
On the Basic Information page for the catalog, click the "Categories" link.
4. On the Categories page, click Add Category.
5.
On the Search: Categories page, locate the category you wish to assign to the
catalog. Note that you search for the category by Name, Description, Flex Structure
or Inactive On date. Select the category and click Apply.
5-10 Oracle Product Hub Implementation Guide
Related Topics
Overview of Catalogs, page 5-1
Defining Catalog Categories, page 5-4
Defining Catalogs, page 5-6
Mapping Catalog Categories, page 5-10
Administering a Category Hierarchy within a Catalog, page 5-10
Mapping Catalog Categories
Users can use Catalog Category mapping to map categories of different category sets to
the reporting category set.
To view the Catalog Category Mapping page:
1. In the Applications tree menu, click the "Setup Workbench" link.
2. On the Search: Item Catalog Categories page, click the Catalogs tab.
3.
On the Search: Catalogs page, click the "Catalog Category mapping" link. The
Catalog Category Mapping page is displayed.
Related Topics
Overview of Catalogs, page 5-1
Defining Catalog Categories, page 5-4
Defining Catalogs, page 5-6
Assigning a Category to a Catalog, page 5-9
Administering a Category Hierarchy within a Catalog, page 5-10
Administering a Category Hierarchy within a Catalog
You can define a hierarchy of categories within the context of a catalog, thereby making
it easier to browse all the categories within a particular catalog. Creating category
hierarchies within a catalog eases use because you are logically grouping categories
even further within the context of a catalog. You can define multiple hierarchies within
a catalog.
When you define a hierarchy, you add categories to a catalog. You can choose to add a
category as a top level category, or as a child of an existing category. Note that the
categories appearing in the category list all have the same flexfield structure as the
catalog.
Setting Up Catalogs 5-11
You can update a category hierarchy within a catalog by changing parent categories in
the list of categories for that catalog.
Note: You cannot assign the parent category of a valid category to a
child (also known as a descendant) because it would create loops in the
hierarchy.
You can delete categories from a catalog as long as you have not already assigned items
to it. In other words, if you have already assigned items to a category within a catalog,
then you cannot delete the category.
Additional Information: You can automatically trigger actions based on
deleting a category to a catalog. See: Item Business Events, page B-1
and Managing Business Events, Oracle Workflow Developer's Guide.
To create a category hierarchy within a catalog:
1. In the Applications tree menu, click the "Setup Workbench" link.
2. On the Search: Item Catalog Categories page, click the Catalogs tab.
3. On the Search: Catalogs page, select the catalog in which you wish to create a
category hierarchy.
4.
On the Basic Information page for the catalog, click the "Categories" link.
5.
On the Categories page, you can add a parent category by clicking Add Category,
or you can add sub-categories by selecting an existing category and then selecting
Add Sub-category from the Actions pulldown.
6. On the Search: Categories page, locate the category you wish to assign as a sub-
category. Select the category and click Apply.
To update a category hierarchy within a catalog:
1.
On the Search: Item Catalog Categories page, click the Catalogs tab.
2.
On the Search: Catalogs page, select the catalog in which you wish to update the
category hierarchy.
3.
On the Basic Information page for the catalog, click the "Categories" link.
4. On the Categories page, select the name link of the category whose parent category
you wish to update.
5. On the Category Details page, click Update.
5-12 Oracle Product Hub Implementation Guide
6. On the Edit Catalog Category page, select a new Parent Category, and then click
Apply.
To delete a category from a catalog:
You can only delete a category from a catalog other than the Item Catalog using this
procedure. You cannot delete an item catalog category from the Item Catalog; you can
only inactivate an item catalog category.
1. Navigate to the Search: Catalogs page using the following navigation path from the
Development Manager responsibility:
Setup > Setup Workbench (Tab) Catalogs
2. On the Search: Catalogs page, select the catalog in which you wish to delete a
category.
The catalog's Basic Information page opens.
3. On the Basic Information page for the catalog, click the "Categories" link.
A hierarchical list of categories in the catalog displays on the Categories page.
4. On the Categories page, select the category that you wish to delete, and then select
Delete from the Select Category: field's list of actions.
5.
Click Go.
Related Topics
Overview of Catalogs, page 5-1
Defining Catalog Categories, page 5-4
Defining Catalogs, page 5-6
Assigning a Category to a Catalog, page 5-9
Mapping Catalog Categories, page 5-10

Administering Item Business Rules 6-1
6
Administering Item Business Rules
This chapter covers the following topics:
• Overview of Item Business Rules
• Administering Rule Sets
• Building Rule Expressions
• Viewing Attributes Used in Rule Sets
• Including other Rule Sets
• Viewing Rule Set Dependencies
• Assigning Rule Sets to Entities
• Using On-Demand Rule Set Execution
• Copying Item Rules Data to Other Instances
Overview of Item Business Rules
Oracle Product Hub enables you to define and manage items and bills of material
(BOMs) in multiple organizations and organization hierarchies. Item business rules
define integrity constraints on the attributes of those items. You can define integrity
constraints on primary, operational, and user-defined attributes (UDAs). A typical
constraint, known as a validation expression, might check that a certain attribute is less
than another. For example:
PhysicalAttributes.UNIT_WEIGHT <= Logistics.Shipping_Weight
In other words, the net weight of an item must be less than or equal to the shipping
weight.
You can also define assignment expressions. For example, use the following expression
for the "Daily Waste Percent", where the daily waste percent equals the total waste
percent divided by the shelf life in days.
Inventory.Total_Waste_Percent / Inventory.Shelf_Life
6-2 Oracle Product Hub Implementation Guide
In order to use item business rules, you must define:
1. Rules and rule sets. See: Administering Rule Sets, page 6-4
2. Validation and assignment expressions. See: Building Rule Expressions, page 6-16
To activate a rule set, you must assign it to a business entity. See: Assigning Rule Sets to
Entities, page 6-40
Rules and Rule Sets
Rules encapsulate a single integrity constraint or assignment expression, for example:
• Constraint:
PhysicalAttributes.UNIT_WEIGHT <= Logistics.Shipping_Weight
• Assignment:
Inventory.Total_Waste_Percent / Inventory.Shelf_Life
Rule sets group multiple rules together. You can associate a rule set with both:
• An attribute group or item catalog category (ICC)
• A list of valid business entities (such as an item, item revision, item supplier, item
supplier site, item organization, or item supplier site organization)
This enables the system to validate that the rules include only attributes from the
associated attribute group or ICC. A rule set associated with an attribute group can only
use the attributes in that group within its expressions. A rule set associated with an ICC
can only use the attribute groups valid for that ICC.
Apply a rule set to each business entity separately - rule expressions cannot default
from one business entity to another. For example, you cannot check an item attribute
against an item organization attribute. Also, a multi-row attribute group cannot use
attributes from any other attribute groups in its expressions.
You can create composite rule sets to aggregate rule sets that operate using different
attribute groups and ICCs. Activate a rule set by assigning it to a business entity. The
composite rule set assigned to a business entity must include all of the attribute group
and ICC-specific rule sets relevant to that business entity because you can only assign
one rule set to each business entity.
Validation and Assignment Expressions
Create validation and assignment expressions after defining rules and rule sets. The
expressions that make up the integrity validation and assignments follow a
spreadsheet-like syntax. Each attribute is referenced by its attribute group name,
followed by the attribute name:
PhysicalAttributes.UNIT_WEIGHT

Administering Item Business Rules 6-3
In the above example, PhysicalAttributes is the internal name of the attribute group,
and "UNIT_WEIGHT" is the internal name of the attribute.
Combine attributes into more complex expressions using build-in operators and
functions such as:
Comparison Operators == != < <= > >= in
Logical Operators and or not (you can also use && and ||)
String Functions compare contains endsWith match startsWith
+ indexOf length lowercase substring trim
uppercase
Math Functions + - * / sum abs amount min max round
roundup rounddown
Date Functions + (Date + days) - (Date - days)
Comparison to current Production Value
Functions
changed delta percent previous
For example, the following expression checks if the item name's 3rd letter is "A" or "E":
substring(Item_Primary.Name,2,3) == "A" or substring(Item_Primary.Name,
2,3) == "E"
Example
The following integrity constraints are typical of what you might expect for an item, in
this case, a computer motherboard:
Assignments
• Lead Percent equals Total Lead Mass divided by Unit Weight
• Sellable Date (date when item can be sold) equals 10 days after the Availability Date
Validations
• The Minimum CPU Speed (in MHz) must be less than the Maximum CPU Speed.
• If the Purchasable Flag equals Yes, then the List Price cannot be null.
• Unit Height cannot change by more than 3% without requiring approval.
To implement the above rules, create the appropriate rule sets and then assign them to
the item entity:
6-4 Oracle Product Hub Implementation Guide
1. Create assignment rule set.
2. Create validation rule set.
3. Create composite rule set.
4. Assign composite rule set to the business entity.
Note: There is no limit to the number of rule sets that you can define for
a business entity. Typically, define one rule set for each attribute group
and ICC. If you create multiple rule sets for a business entity, you must
create one composite rule set that contains all of these rule sets, then
assign the composite rule set to the business entity. You can only assign
one rule set to a business entity.
Related Topics
Administering Rule Sets, page 6-4
Assigning Rule Sets to Entities, page 6-40
Building Rule Expressions, page 6-16
Viewing Attributes Used in Rule Sets, page 6-37
Including other Rule Sets, page 6-38
Viewing Rule Set Dependencies, page 6-39
Using On-Demand Rule Set Execution, page 6-42
Copying Item Rules Data to Other Instances, page 6-43
Administering Rule Sets
When you create the rule sets to address your business needs, first create the rule sets
for all necessary attribute groups and item catalog categories (ICCs). Typically, assign
one rule set for each attribute group and ICC. Next, determine if you can consolidate
rule sets together into composite rule sets. There is no limit to the number of rule sets
that you can define for a business entity, but, ideally, assign only one composite rule set
to each business entity.
Generally, rule sets that perform assignments should execute before validation rule sets,
since validation rule sets ensure that the results of the assignment rule sets are valid.
Computer Motherboard Rule Set Example
The following integrity constraints are typical of an item, in this case a computer
motherboard:
Administering Item Business Rules 6-5
Assignments
• Lead Percent equals Total Lead Mass divided by Unit Weight.
• Sellable Date (date when you can sell the item) equals 10 days after the Availability
Date.
Validations
• Minimum CPU Speed (in MHz) must be less than the Maximum CPU Speed.
• If Purchasable Flag is set to Yes, then List Price has to be set.
• Unit Height cannot change more than 3% without requiring approval.
To implement the above rules, create the appropriate rule sets and then assign the sets
to the Item entity following these steps:
1. Create Assignment Rule Set
See steps below.
2.
Create Validation Rule Set
See steps below.
3.
Create Composite Rule Set
See: Including Other Rule Sets, page 6-38
4. Assign Composite Rule Set to business entity
See: Assigning Rule Sets to Entities, page 6-40
The procedures below refer to this example while explaining how to enter rules.
To create a new rule set:
1.
Navigate to the Setup Workbench. In the Items tab, click the Rules subtab.
2.
In the Update Rule Set Assignment page, select Item Rules from the left side menu.
3. In the Item Rule Sets page, click Create.
4.
In the Item Rules: Create Rule Set page, enter Name, Description and Internal
Name for the rule set.
Caution: You cannot change the Internal Name after the rule set is
created.
5.
In the Composite field, select NO.
6-6 Oracle Product Hub Implementation Guide
For rule sets containing rules, set the Composite field to NO. For rule sets that
contain other rule sets, set the Composite field to YES.
To create a new assignment rule
The process for creating assignment and validation rules is the same up to this point.
Follow the next set of steps to create assignment rules. Otherwise, skip to "To create a
new validation rule:".
6. In the Type field, select Assignments.
7. Select the Item Catalog Category radio button.
8. Enter or search for and select an ICC.
9. Select all appropriate business entities for this rule set.
10.
Click Continue.
This creates an empty rule set with the appropriate ICC context. All of the attribute
groups within the selected ICC are available for creating assignment rules. The
following steps create the actual rules.
11. Within the Item Rules: Rule List page, select the Rules tab (if not already selected).
12. Click Add Above.
You can also click Add Below. When you have more than one rule, these buttons
enable you to create rules in a particular sequence.
13. In the Item Rules: Create Attribute Assignment Rule page, create an assignment
rule by entering the following information:
• Name - assignment rule name
• Description
• Set Value of Attribute - the name of the attribute where the computed value of
the assignment rule is stored.
Additional Information: You can use all item primary
attributes as read-only values for rule evaluation at all business
entity levels (for example: Item, Item Revision, Item Supplier,
and so on) while creating rules. Only Item business entity level
assignment rules can set the value of the following item
primary attributes: Item, Description, and Status. Modifying
item primary attributes only triggers Item business entity rules.

Administering Item Business Rules 6-7
• If Expression - enter the If part of an if/then expression, if required. If the
attribute assignment rule has no requirements, then leave this field blank.
This If expression must be blank or equal True for the assignment to take place.
• If Expressions in the Then Expression region - You can add multiple If
expressions in the Then Expression region. They are nested within the previous
If expression located above the Then Expression region. If there is no If
expression to enter here, then leave this field blank. It defaults to true and is
always selected.
Example of Nested If/Then Expressions
The following example explains how the system reads multiple nested if/then
expressions entered in the Item Rules: Create Attribute Assignment Rule
page.
if (main rule expression) = true
if (If Expression #1 in the Then Expressions region) = true,
then (Then Expression #1)
else if (If Expression #2 in the Then Expressions region) =
true, then (Then Expression #2)
else if (If Expression #3 in the Then Expressions region) =
true, then (Then Expression #3)
end if
• Then Expression - enter an expression that assigns an attribute value
• Explanation Message - Optional. Use this field to inform the user about the
assignment that took place.
Additional Information: You do not need to verify that attributes do
not equal null, or, in the case of division, zero. The system ignores
the assignment in this case.
Computer Motherboard Rule Set Example
To define the first assignment rule for the Computer Motherboard Rule Set
Example described above, the field values are entered as follows:
Create Assignment Rule: Lead Percent is Total Lead Mass divided by Unit Weight
Field Name Value
Name Lead_Percent
Description Lead Percent is Total Lead Mass divided by
Unit Weight.

6-8 Oracle Product Hub Implementation Guide
Field Name Value
Set Value of Attribute Hazard.Lead_Percent
If Expression
Select If Expression
Then Expression round((Hazard.Lead_Mass /
PhysicalAttributes.UNIT_WEIGHT) * 100,
2)
Explanation Message Percent is Mass ($Hazard.Lead_Mass$)
divided by Weight ($PhysicalAttributes.
UNIT_WEIGHT$).
14.
Click Validate to ensure that you typed the attribute names correctly.
Important: You must know the internal names of the attribute
groups and attributes that you want to use in expressions. You

Administering Item Business Rules 6-9
cannot look up valid attribute groups and attributes from this page.
15. Click Apply.
This enters the first assignment rule into the rule set and returns you to the Rule
Set: Rule List page. From this page, you can continue to add assignment rules to
the rule set using the Add Above or Add Below buttons and repeating the above
steps. Rules execute in the order listed within the rule set. Use the Sequence field
and the Update Sequence button to change the rule order. If an attribute's
expression depends on a previously calculated value, you must ensure that the
previous value calculation occurs before it is needed in a later rule.
Computer Motherboard Rule Set Example
The following if/else if expression describes the second assignment rule for the
Computer Motherboard Rule Set Example described above.
if (Item_Primary.Sellable_Flag == "Yes")
if (assignedTo("VeryFastDelivery")
then Marketing.Sellable_Date = Planning.Availability_Date + 3
else if (assignedTo("FastDelivery")
then Marketing.Sellable_Date = Planning.Availability_Date + 6
else Marketing.Sellable_Date = Planning.Availability_Date + 10
The "assignedTo" function verifies that an item is assigned to a particular Alternate
Catalog Category.
From the Rule Set: Rule List page, click Add Below to add this second assignment
rule. The table below shows the field values to enter in the Item Rules: Create
Attribute Assignment Rule page.
Create Assignment Rule: Calculate Sellable Date based on the Availability Date
Field Name Value
Name Sellable_Date_Calculation
Description Calculate Sellable date based on the
Availability Date.
Set Value of Attribute Marketing.Sellable_Date
If Expression Item_Primary.Sellable_Flag == "Yes"
Select If Expression assignedTo("Delivery", "VeryFastDelivery")

6-10 Oracle Product Hub Implementation Guide
Field Name Value
Then Expression Planning.Availability_Date + 3
Select If Expression assignedTo("Delivery", "FastDelivery")
Then Expression Planning.Availability_Date + 6
Select If Expression (field value is Null)
Then Expression Planning.Availability_Date + 10
Explanation Message (field value is Null)
To create a new validation rule
16. In the Item Rule Sets page, click Create.
17. In the Item Rules: Create Rule Set page, enter Name, Description and Internal
Name for the rule set.
Caution: You cannot change the Internal Name after the rule set is
created.
18.
In the Composite field, select NO.
For rule sets containing rules, set the Composite field to NO. For rule sets that
contain other rule sets, set the Composite field to YES.
19. In the Type field, select Validations.
20.
Select the Item Catalog Category radio button.
21. Enter or search for and select an ICC.
22.
Select all appropriate business entities for this rule set.
23. Click Continue.
This creates an empty rule set with the appropriate ICC context. All of the attribute
groups within the selected ICC are available for creating validation rules. The
following steps create the actual rules.
24.
Within the Item Rules: Rule List page, select the Rules tab (if not already selected).
Administering Item Business Rules 6-11
25. Click Add Above.
You can also click Add Below. When you have more than one rule, these buttons
enable you to create rules in a particular sequence.
26. In the Item Rules: Create Validation Rule page, create a validation rule by entering
the following information:
• Name - validation rule name
• Description
• Severity - determines the action taken if the validation fails. Severity actions
include:
• Reject - You cannot save the business entity until the validation passes.
• Needs Approval - requires a change order.
• Warning - The Explanation Message displays, but you can still save the
entity.
• If Expression - enter the If part of an if/then expression, if required. If the
attribute validation rule has no requirements, then leave this field blank.
• Validation Condition - enter an expression that determines if a condition is true
or false.
• Explanation Message - Optional. Use this field to inform the user about the
validation that took place.
Additional Information: You do not need to verify that attributes do
not equal null, or, in the case of division, zero. The system ignores
the validation in this case. If you want to explicitly test for a null
value, use the "isnull" function.
Computer Motherboard Rule Set Example
To define the first validation rule for the Computer Motherboard Rule Set Example
described above, the field values are entered as follows:

6-12 Oracle Product Hub Implementation Guide
Create Validation Rule: Minimum CPU Speed (in MHz) must be less than the Maximum
CPU Speed.
Field Name Value
Name Max_Min_CPU_Check
Description Check that Minimum CPU Clock Speed is
less than Maximum CPU Clock Speed.
Severity Reject
If Expression
Validation Condition Motherboard_Spec.Min_CPU_Speed <=
Motherboard_Spec.Max_CPU_Speed
Explanation Message Minimum CPU Speed must be less than or
equal to Maximum CPU Speed.

Administering Item Business Rules 6-13
27. Click Validate to ensure that you typed the attribute names correctly.
Important: You must know the internal names of the attribute
groups and attributes that you want to use in expressions. You
cannot look up valid attribute groups and attributes from this page.
28. Click Apply.
This enters the first validation rule into the rule set and returns you to the Rule Set:
Rule List page. From this page, you can continue to add validation rules to the rule
set by selecting the checkbox next to the first rule, using the Add Above or Add
Below buttons, and repeating the above steps. Rules execute in the order listed
within the rule set. Use the Sequence field and the Update Sequence button to
change the rule order. If an attribute's expression depends on a previously
calculated value, you must ensure that the previous value calculation occurs before
it is needed in a later rule.
Computer Motherboard Rule Set Example
From the Rule Set: Rule List page, click Add Below to add this second validation
rule. The table below shows the field values to enter in the Item Rules: Create
Attribute Validation Rule page.

6-14 Oracle Product Hub Implementation Guide
Create Validation Rule: If the Purchasable Flag equals Yes, then the List Price cannot
be null.
Field Name Value
Name Require_List_Price
Description List Price must be set if Purchasable Flag is
set to "Yes".
Severity Reject
If Expression Purchasing.Purchasable == "Yes"
Validation Condition (!isnull(Purchasing.List_Price))
Explanation Message If Purchasable is set to Yes then List Price
cannot be null.
Tip: The "!" in "!isnull" is used for "not".
Now, create the third validation rule in the example:
Validation Rule: Unit Height cannot change by more than 3% without requiring
approval.
Name Height_Change
Description Unit Height cannot change by more than
3%.
Severity Needs Approval
If Expression
Validation Condition abs(percent(PhysicalAttributes.
Unit_Height)) > 3.0
Explanation Message A Unit Height change of 3% or more
requires a Change Order.
Administering Item Business Rules 6-15
Note: The percent function returns the percentage change of the
new value to the value in Production. This change can be positive
or negative. The abs function converts it to an absolute change.
To include other rule sets within a rule set (create a composite rule set)
29. See: Including Other Rule Sets, page 6-38
To delete a rule set:
1. In the Item Rule Sets page, search for and select the rule sets to delete.
2. Click Delete.
To copy a rule set:
1.
In the Item Rule Sets page, search for and locate the rule set to copy.
2.
In the row containing the rule set, click the Copy icon.
The PIM Rules: Copy Rule Set page appears.
3. Enter a unique Internal Name for the rule set.
The Name, Description, and Business Entities default from the original rule set, but
you can change them.
4. Click Continue.
This takes you to the Rule Set: Rule List page. All of the rules from the original rule
set are copied into this new rule set, too. You can now update the attached rules
and rule set as needed.
To update a rule set:
1.
In the Item Rule Sets page, search for and locate the rule set to update.
2. In the row containing the rule set, click the Update icon.
The Item Rules: Rule List page appears. From here, you can update the rule set
description and the attached rules, as well as add or delete rules and update the
rule sequence.
Related Topics
Overview of Item Business Rules, page 6-1
Assigning Rule Sets to Entities, page 6-40

6-16 Oracle Product Hub Implementation Guide
Building Rule Expressions, page 6-16
Viewing Attributes Used in Rule Sets, page 6-37
Including other Rule Sets, page 6-38
Viewing Rule Set Dependencies, page 6-39
Using On-Demand Rule Set Execution, page 6-42
Copying Item Rules Data to Other Instances, page 6-43
Building Rule Expressions
The rule administrator writes assignment and validation rules based on the components
of the logical data model. This topic describes the logical data model components and
the syntax used to write business rules.
You can use the following data model components when building rule expressions:
• attributes
• attribute groups
• records, when using multi-row attribute groups
• alternate catalog categories
• business entities
• current production values
Item Business Rule Expression Reference
Use the syntax described in this section to build rule expressions.
Constants
All values used in rule expressions consist of the following simple types:
Type Description
String All strings and characters.
Strings are delimited by double or single
quotes. The escape character is "\".

Administering Item Business Rules 6-17
Type Description
Number All decimals, integers, and so on.
Depending on the user's Oracle E-Business
Suite preferences, numbers can have a "." or ","
as a decimal point. If "," is used as a decimal
point, then function arguments use ";" as the
argument delimiter.
Date Date only.
Enter dates in the format specified in your
Preference Option. Date constants
automatically reformat if a user logs in with a
different preference.
You can add days to the date using numbers.
For example, compute the sell date by adding
30 days to the availability date.
DateTime Combination of date and time
Time Time only
Attributes and Catalogs
• Attributes
Indicate a user defined or operational attribute by appending it to its attribute
group (separated by a period). For example:
<Attribute Group Name>.<Attribute Name>
Use the internal name of the attribute group and attribute. The internal name must
not contain any spaces. You can find the internal names of attribute groups and
attributes from the Attribute Groups page (see: Defining Item Attributes and
Attribute Groups, page 4-21) or from the attribute groups associated with a
particular item catalog category (see: Associating Attribute Groups with an Item
Catalog Category, page 4-48).
Important: Attribute names are case sensitive. For example,
Item_Primary.Secondary_UOM is not the same as Item_Primary.
Secondary_uom.
• Attribute Units of Measure
6-18 Oracle Product Hub Implementation Guide
For attributes with a defined unit of measure (UOM), add the UOM to the end of
the expression. For example:
<Attribute Group Name>.<Attribute Name>.UOM
Tip: Note that all comparisons between amounts are automatically
adjusted to take into account different UOMs, so accessing the
UOM is not necessary for comparison purposes.
• Item Catalog Categories
You cannot use item catalog categories in expressions. To make a rule set specific to
an item catalog category (ICC), assign it to that ICC during rule set creation. That
rule set then applies to each entity with the ICC attached as a parent or as an
ancestor.
• Alternate Catalogs
An administrator can define many alternate catalogs. For example, GS1, the supply
chain standards organization, defines a categorization system named GPC. GPC
contains four levels: Segment, Family, Class and Brick. The figure below illustrates
some levels within the Audio Visual/Photography segment:

Administering Item Business Rules 6-19
GPC Categorization System Example
You can access alternate catalog information two ways with item rules:
• Determine if an entity is assigned to an alternate catalog or category.
• Access the values of an alternate catalog category.
If an item is assigned to an alternate category, all of the parent categories are also
searchable.
Note: You can not use item business rules to assign an item to an
alternate category.
Item rules referring to ICCs and Alternate Catalogs can use levels to identify the level in
a catalog hierarchy tree. The root of the tree equals 1 and level 0 designates the node
that the entity is assigned to, no matter what level in the hierarchy that this node
actually appears. The following table shows the levels of the catalog hierarchy from the
above GPC Categorization System example:

6-20 Oracle Product Hub Implementation Guide
Level Code Description
1 68000000 Audio Visual/Photography
2 68020000 Photography/Optics
3 68020100 Photography
4 or 0 10001487 Digital Camera
AssignedTo Function
The AssignedTo function can use levels:
Syntax
• assignedTo(catalog)
• assignedTo(catalog, category)
•
assignedTo(catalog, category, level)
You can use assignedTo with one, two, or three parameters:
Parameter Type Explanation
catalog String (constant) Name of Alternate Catalog. Use only
constant names (no expressions). If
this is the only parameter provided,
then determine if the item is assigned
to any category in this catalog.
category String (constant) Name of Category. If no other
parameter is provided, then
determine if the category matches any
ancestor category of the item.
level Number Determine if the category matches at a
specific level. Numbers count from
the root category through the
branches in the hierarchy. Level 0 is
always the parent node.
assignedTo Examples
• Determine if an item is assigned to the Spring Collection alternate catalog:
assignedTo("Spring Collection")
Administering Item Business Rules 6-21
• Determine if an item is assigned to a category starting with 68:
assignedTo ("GPC", "68000000")
• Determine if Level 2 of a Geographic Categorization is Washington:
assignedTo ("Location", "Washington", 2)
The assignedTo functions work for any item-related business entity. For example, if you
are checking an Item Supplier entity, then the function runs for the relevant item
belonging to that Item Supplier entity.
Accessing Alternate Catalog Attributes
To write expressions that go beyond determining assignment to a category, you can
access the categories and its attributes directly. If an expression referencing the alternate
catalog occurs, the system loops through all of the selected categories and evaluates the
expression by instantiating each one. Use the following syntax:
<Catalog Specifier>.<Category Specifier>.<Attribute Specifier>
For example:
Catalog[Retail Hierarchy].AncestorCategory.Name == "USWest"
Caution: You can use only one alternate catalog per expression.
You can use multiple ParentCategory and AncestoryCategory specifiers, as long as they
all refer to the same alternate catalog. The following list provides more information
about each specifier:
• <Catalog Specifier>
The catalog is specified by the keyword "Catalog" followed by the name of the
catalog in square brackets.
• <Category Specifier>
We support 2 category specifiers, ParentCategory and AncestorCategory.
ParentCategory references the immediate category(s) assigned to the item.
AncestorCategory references the immediate category, its parents, its parent's
parents, and so on, to the root category.
• <Attribute Specifier>
The Attribute Specifier is the internal name of the attribute. This also retrieves the
Name and Description of the attribute. Other information about the attribute is
represented and stored as flexfields and is accessed using the Flexfield keyword.
Examples include:
•
Catalog[Medical].AncestorCategory.Name == "Pediatrics"
•
Catalog[RMS].ParentCategory.Name == "Fashion"
6-22 Oracle Product Hub Implementation Guide
• [Electronics].ParentCategory.FlexField[HDTV] == "Yes"
Multi-Row Attribute Groups
Multi-row attribute group expressions can only include attributes from a single multi-
row attribute group. The system only processes the modified rows of a multi-row
attribute group.
Operators and Functions
The following section describes how to use operators and functions when building rule
expressions.
Null Values
Any attribute can have an empty (null) value. In a typical business process, not all
attribute values are entered at the same time. Multiple people enter data for an item
over a period of time. For example, the Production Engineer enters an item's weight,
while the Marketing Manager enters the description. To facilitate this form of
processing, rules referencing attributes that have no (null) value are ignored. This
means that the expression is neither true or false; expressions that evaluate to null are
ignored.
Therefore, there is no need to write a validation rule with the following logic:
if (not isnull(PhysicalAttributes.UNIT_WEIGHT)) then PhysicalAttributes.
UNIT_WEIGHT <= 10
The "if" part of the above rule is unnecessary. If Weight equaled null, the validation
would be ignored. If you want to verify that an attribute has a non null value, use the
"isnull" function. "isnull" verifies that an attribute contains a value. "isnull" is the only
way to test for empty values.
Boolean Expressions
Boolean expressions return TRUE, FALSE or null. Use them in "If" expressions or in
validations. Consider the following when writing Boolean expressions:
General Comparison Operators: == != < <= > >=
Use the following syntax:
expression1 == expression2
expression1 != expression2
expression1 < expression2
expression1 <= expression2
expression1 > expression2
expression1 >= expression2
expression1 in (expression2, expression3, ?)
If one or both expressions are null, then the result is null. To check for null values, you
must use the "isnull" function. A string comparison is case insensitive. For case sensitive

Administering Item Business Rules 6-23
comparisons, use the string "compare" function. The "in" function is equivalent to
(expression1 == expression2) or (expression1 == expression3) or …(and so on).
Null Comparison: isnull
Use the following syntax:
isnull(expression)
The function "isnull" returns TRUE if its argument is a NULL value. Otherwise, it
returns FALSE. This function lets you explicitly test whether a value is null. Other
functions are ignored if the value of the argument is null. Use !isnull to check that an
attribute is not null.
String Search: compare contains endsWith match startsWith
Use the following syntax:
compare(string1, string2)
contains(look_for_string, look_in_string)
endsWith(look_for_string, look_in_string)
match(pattern, look_in_string)
startsWith(look_for_string, look_in_string)
All string search functions are case sensitive. If you want to do a case insensitive
comparison, use the "==" comparison operator. "compare" returns 0 when string1 is
exactly equal to string2, -1 if string1 is lexicographically less than string2, and +1 if
string1 is lexicographically greater than string2. "match" performs a regular expression
search on a string. For a description of regular expression construct behavior, see Friedl,
Jeffrey E. F. (2002). Mastering Regular Expressions. 2nd Edition. O'Reilly and Associates.
Logical Operators: and or not
Use the following syntax:
expression1 and expression2
expression1 or expression2
not expression1
The logical "and" function returns the following results based on whether or not
expressions A and B are true:
A B A and B
False False False
False True False
True False False
True True True

6-24 Oracle Product Hub Implementation Guide
A B A and B
False null False
null False* null
* The processor stops after it finds the first False. Therefore, there is a difference
between "False and null" and "null and False".
The logical "or" function returns the following results based on whether or not
expressions A and B are true:
A B A or B
False False False
False True True
True False True
True True True
True null True
null True* null
* The processor stops after it finds the first True. Therefore, there is a difference between
"True and null" and "null and True".
The logical "not" function returns the following results based on whether or not
expression A is true:
A not(A)
False True
True False
null null
Comparison to Current Production: changed delta percent previous
When using tolerance rules, you can compare the new value of an attribute to the

Administering Item Business Rules 6-25
current production value.
Use the following syntax:
changed(attribute)
changed(attributeGroup)
delta(attribute)
percent(attribute)
previous(attribute)
"changed" returns TRUE if the new value of an attribute differs from the current
production value. This function also works with null values. If you specify only the
Attribute Group, then the function returns TRUE if any attribute in that Attribute
Group changes.
"delta" returns the difference between new and existing attributes. String comparisons
are case-insensitive. For Booleans expressions, TRUE is considered greater than FALSE.
The following table shows the result of different scenarios:
Operator Number, Date, or DateTime
new < current production new - current production value
new >current production new - current production value
new == current production 0
current production value does not exist null
both new and current production value are
null
0
either new or current production value are
null (but not both)
null
"percent" is only valid for numbers. It returns:
(delta(attribute)/"current production value")*100
"previous" accesses the actual previous value.
Number Operators
Use the following operators in numerical expressions:
Math: + - * / sum
Use the following syntax:
expression1 + expression2
expression1 - expression2

6-26 Oracle Product Hub Implementation Guide
expression1 * expression2
expression1 / expression2
sum(expression1, expression2, ?)
All of the above mathematical expressions return null if any argument is null and
division by zero returns null. The number of decimal digits returned by division is the
maximum number of digits from expression1 and expression2. Use "sum" to add up a
series of values.
abs
Use the following syntax to return the absolute value of an expression.
abs(expression)
Example
For example, the percentage weight change must be less than 10.
abs(percent(PhysicalAttributes.UNIT_WEIGHT))<=10
amount
Use the following syntax to return an amount in a given unit of measure. This ensures
that comparisons or calculations occur in the desired unit of measure.
amount(expression,target UOM)
Example
The weight must be less than or equal to 10 kg:
PhysicalAttributes.UNIT_WEIGHT<=amount(10,'kg')
min, max
Use the following syntax to return the minimum or maximum value in a series of
values. You can also use this function for arrays or in query expressions.
min(expression1,expression2,?)
Example
In the following example, the result is "2006-11-30".
max("2006-10-12","2006-11-30")
round, roundup, rounddown
Use the following syntax to round a number to the specified decimal places. "round"
rounds to the nearest value. "roundup" rounds away from zero and "rounddown"
rounds toward zero.
round(expression,decimals)
roundup(expression,decimals)
rounddown(expression,decimals)
Example
Example Expression Result
round(1.5758,2)
1.58

Administering Item Business Rules 6-27
Example Expression Result
roundup(1.5758,2)
1.58
rounddown(1.5758,2)
1.57
String Functions
Use the following functions with string data types.
+
Use the following syntax to concatenate two expressions and return the resulting string.
This syntax also returns a valid string if the expressions consist of other data types.
expression1 + expression2
indexOf
Use this syntax to return a position of "look_for_string" in "look_in_string". The string
position starts at zero. If "look_for_string" is not found, then the processor returns a
value of -1. The search is case sensitive. If either expression is null, the resultant value is
null.
indexOf(look_for_string, look_in_string)
length
Use this syntax to return the length of the given string. If the expression is null, then the
resultant value is null.
length(expression)
lowercase
Use this syntax to return the lowercase equivalent of the given expression. If the
expression is null, then the resultant value is null.
lowercase(expression)
substring
Use this syntax to return a substring of "string" starting at "start" and ending before
"end". If "end" is omitted, then return to the end of the string. The string position begins
at zero. If "start" is less than zero, then start at the beginning of the string. If "end" is
greater than the length of the string, then return up to the end of the string. If any
expression is null, then the resultant value is null.
substring(string,start)
substring(string,start,end)
trim
Use this syntax to remove all leading and trailing (but not middle) whitespace
characters from a string. If the expression is null, then the resultant value is null.
trim(expression)
uppercase
Use this syntax to return the uppercase equivalent of the given expression. If the
6-28 Oracle Product Hub Implementation Guide
expression is null, then the resultant value is null.
uppercase(expression)
Date Functions
Use the following functions with date data types.
+ -
Use the following syntax to add or subtract a certain number of days from a date. A
single number is interpreted as days. Otherwise, use the ISO 8601 format.
expression1 + expression2
expression1 - expression2
For example, Item.Logistics.LeadTime + 3 equals 3 days after the Item Lead Time.
Supported Attributes
You can access all attributes for the following business entities using the <Attribute
Group Name>.<Attribute> syntax.
• item
• item revision
• item organization
• item supplier
• item supplier site
• item supplier site organization
Attributes in the supplier, supplier site, and organization business entities do not use
attribute group names; access the attributes directly using the <Business Entity>.
<Attribute> syntax (for example, Supplier.Supplier_Name).
See below for more information about using the following types of attributes.
• Rule Set Context Attributes
• Item Primary Attributes
• Item Supplier Attributes
• Supplier Attributes
• SupplierSite Attributes
• Organization Attributes

Administering Item Business Rules 6-29
Rule Set Context Attributes
Rule set context attributes are a special set of seeded attributes that give some context to
the rule execution.
Context Attributes Description
Context.RuleSetVersion Always set to "1.0"
Context.ExecutionDate Date that rules are invoked.
Context.ExecutionDateTime Date and time that rules are invoked.
Context.BatchID Enter the Batch ID when running Import.
Context.BatchName Enter the Batch Name when running Import.
Example
Context.ExecutionDate>="7/6/2007"
Item Primary Attributes
You can use all item primary attributes as read-only values for rule evaluation (in
If/Then expressions) at all business entity levels (for example: Item, Item Revision, Item
Supplier, and so on) while creating rules. Changes to an item's primary attributes only
trigger Item business entity rules. The item primary attributes available for rule
evaluation include:
• Item_Primary.Name
• Item_Primary.Description
• Item_Primary.Status
• Item_Primary.Primary_UOM
• Item_Primary.Secondary_UOM
• Item_Primary.Engineering_Item
• Item_Primary.Approval_Status
• Item_Primary.Defaulting
Only Item business entity assignment rules can set the value of the following item
primary attributes:
6-30 Oracle Product Hub Implementation Guide
• Name
• Description
• Status
You cannot change the value of any other item primary attributes using a rule.
Example
Item_Primary.Sellable_Flag == "Yes"
Item Supplier Attributes
Use the following two attributes for the item supplier, item supplier site, and item
supplier site organization business entities when creating rules. The attribute group is
Intersection_Primary.
• Primary_Flag
• Status
Item Supplier Attribute Example
Intersection_Primary.Primary_Flag
Intersection_Primary.Status=="Production"
Supplier Attributes
Use the following supplier attributes when creating rules. Access the supplier attributes
using the attribute group "Supplier".
• Supplier_Name
• Supplier_Number
• DUNS
• Taxpayer_ID
• Tax_Registration_Number
Supplier Attribute Example
Supplier.Supplier_Name == "Acme"
SupplierSite Attributes
Use the following supplier site attributes when creating rules. Access the supplier site
attributes using the attribute group "SupplierSite".
• Supplier_Site_Name
• City
Administering Item Business Rules 6-31
• State
• Country
Supplier Site Attribute Example
SupplierSite.State=="CA"
Organization Attributes
Use the organization attribute "Code" when creating rules. Access the organization
attribute using the attribute group "Organization".
Organization Attribute Example
Organization.Code=="9289"
Execution Behavior
Rules only run during item creation, when attributes change, or when assigning an
alternate catalog and the rule contains an alternate catalog reference.
Additional Information: Rules run before the item number and
description generating functions, so the Item Number and Description
fields do not contain values when the rules run. However, the item
number and description generating functions can use attribute values
assigned by rules.
Rules and Change Management
An attribute requires a change order if one of the following conditions are met:
• an attribute's status equals "Change Order Required"
• A validation rule (using an attribute) with severity equal to "Needs Approval" runs
If an attribute requires a change order, any related attributes must also require change
orders. Related attributes include any attribute used in a validation or assignment rule
that contains another attribute requiring a change order.
Related Attribute Example
If Condition: General.Shippable == "Yes"
Assignment: Logistics.PostalLength = Physical.Length + Physical.Girth
If General.Shippable, Logistics.PostalLength, Physical.Length or Physical.Girth requires
a change order, then all other attributes require a change order, also.
Note:
For validation rules, if any attribute requires a change order, then
all updated attributes in the validation rule must be included in the
same change order.
If the attributes computed in assignment rules are used in subsequent rules, then they

6-32 Oracle Product Hub Implementation Guide
can form a chain of dependencies. In order to ensure that the data remains consistent,
the system propagates the change order requirement along the dependency chain. For
example, consider the following two assignment rules:
• Physical.Girth = Physical.Width + Physical.Depth
• Logistics.PostalLength = Physical.Length + Physical.Girth
If "Physical.Depth" is updated and requires a change order, then the change order
requirement propagates to Logistics.PostalLength. Note that the change order only
propagates along updated attributes. If an attribute is not updated, then it does not
require a change order (for example, Physical.Length above).
If an assignment rule assigns a value to an attribute in an attribute group with a change
policy of "Not Allowed", then the application treats this item like a failed validation and
rejects it. For example, consider the following assignment:
Logistics.PostalLength = Physical.Length + Physical.Girth
If the "Logistics.PostalLength" change policy is "Not Allowed" and "Physical.Length"
changes, then the item is rejected.
This prevents inconsistent data from entering the database. If the system ignores the
assignment rule, then the relationship between PostalLength, Length and Girth no
longer holds. To avoid an error, ensure that all attributes dependent upon each other
have change policies of "Not Allowed". In the above example, the "Logistics" and
"Physical" attribute group change policies should be the same (see: Defining Change
Policies, page 3-16). If setting "Physical" to "Not Allowed" is not feasible, then ensure
that Length and Girth do not change by other means, because the changed entity will be
rejected.
Regular Expression Syntax
Use the following syntax when building rule expressions.
Characters
x The character x
\\ The backslash character
\0n The character with octal value 0n (0 <= n <= 7)
\0nn The character with octal value 0nn (0 <= n <=
7)
\0mnn The character with octal value 0mnn (0 <= m
<= 3, 0 <= n <= 7)

Administering Item Business Rules 6-33
\xhh The character with hexadecimal value 0xhh
\uhhhh The character with hexadecimal value 0xhhhh
\t The tab character ('\u0009')
\n The newline (line feed) character ('\u000A')
\r The carriage-return character ('\u000D')
\f The form-feed character ('\u000C')
\a The alert (bell) character ('\u0007')
\e The escape character ('\u001B')
\cx The control character corresponding to x
Character classes
[abc] a, b, or c (simple class)
[^abc] Any character except a, b, or c (negation)
[a-zA-Z] a through z or A through Z, inclusive (range)
[a-d[m-p]] a through d, or m through p: [a-dm-p] (union)
[a-z&&[def]] d, e, or f (intersection)
[a-z&&[^bc]] a through z, except for b and c: [ad-z]
(subtraction)
[a-z&&[^m-p]] a through z, and not m through p: [a-lq-z]
(subtraction)

6-34 Oracle Product Hub Implementation Guide
Predefined character classes
. Any character (may or may not match line
terminators)
\d A digit: [0-9]
\D A non-digit: [^0-9]
\s A whitespace character: [ \t\n\x0B\f\r]
\S A non-whitespace character: [^\s]
\w A word character: [a-zA-Z_0-9]
\W A non-word character: [^\w]
Boundary matchers
^ The beginning of a line
$ The end of a line
\b A word boundary
\B A non-word boundary
\A The beginning of the input
\G The end of the previous match
\Z The end of the input but for the final
terminator, if any
\z The end of the input

Administering Item Business Rules 6-35
Greedy quantifiers
X? X, once or not at all
X* X, zero or more times
X+ X, one or more times
X{n} X, exactly n times
X{n,} X, at least n times
X{n,m} X, at least n but not more than m times
Reluctant quantifiers
X?? X, once or not at all
X*? X, zero or more times
X+? X, one or more times
X{n}? X, exactly n times
X{n,}? X, at least n times
X{n,m}? X, at least n but not more than m times
Possessive quantifiers
X?+ X, once or not at all
X*+ X, zero or more times
X++ X, one or more times
X{n}+ X, exactly n times

6-36 Oracle Product Hub Implementation Guide
X{n,}+ X, at least n times
X{n,m}+ X, at least n but not more than m times
Logical operators
XY X followed by Y
X|Y Either X or Y
(X) X, as a capturing group
Precedence
The precedence of character-class operators is as follows, from highest to lowest:
1. Literal escape \x
2. Grouping [...]
3. Range a-z
4. Union [a-e][i-u]
5. Intersection [a-z&&[aeiou]]
Note that a different set of metacharacters are in effect inside a character class versus
outside a character class. For instance, the regular expression "." loses its special
meaning inside a character class, while the expression "-" becomes a range forming
metacharacter.
For a more precise description of the behavior of regular expression constructs, refer to
Mastering Regular Expressions, 2nd Edition, Jeffrey E. F. Friedl, O'Reilly and
Associates, 2002.
Related Topics
Overview of Item Business Rules, page 6-1
Administering Rule Sets, page 6-4
Assigning Rule Sets to Entities, page 6-40
Viewing Attributes Used in Rule Sets, page 6-37
Including other Rule Sets, page 6-38
Administering Item Business Rules 6-37
Viewing Rule Set Dependencies, page 6-39
Using On-Demand Rule Set Execution, page 6-42
Copying Item Rules Data to Other Instances, page 6-43
Viewing Attributes Used in Rule Sets
To view attributes used in rule sets:
1. Navigate to the Setup Workbench. In the Items tab, click the Rules subtab.
2. In the Update Rule Set Assignment page, select Item Rules from the left side menu.
3. In the Item Rule Sets page, search for and select the name of a rule set.
4.
In the Item Rules: Rule List page, select the Attributes tab.
You can search for the attributes included in the rule set using the following
parameters:
• Business Entity
• Attribute Group
• Attribute
• Data Type
5. Click Go once you have entered your search parameters.
The search results display below the search parameters.
Related Topics
Overview of Item Business Rules, page 6-1
Administering Rule Sets, page 6-4
Assigning Rule Sets to Entities, page 6-40
Building Rule Expressions, page 6-16
Including other Rule Sets, page 6-38
Viewing Rule Set Dependencies, page 6-39
Using On-Demand Rule Set Execution, page 6-42
Copying Item Rules Data to Other Instances, page 6-43
6-38 Oracle Product Hub Implementation Guide
Including other Rule Sets
Since you can only assign one rule set to each business entity, create composite rule sets
to bundle rule sets together. You can create a hierarchy of rule sets. For example, create
a composite assignment rule set, a composite validations rule set, then a master
composite mixed rule set that contains the above two rule sets. Assign the master
composite mixed rule set to the business entity.
To include other rule sets within a rule set:
1. Navigate to the Setup Workbench. In the Items tab, click the Rules subtab.
2. In the Update Rule Set Assignment page, select Item Rules from the left side menu.
3. In the Item Rule Sets page, click Create.
4.
In the Item Rules: Create Rule Set page, enter Name, Description and Internal
Name for the rule set.
Caution:
You cannot change the Internal Name after the rule set is
created.
5. In the Composite field, select YES.
For rule sets containing rules, set the Composite field to NO. For rule sets that
contain other rule sets, set the Composite field to YES.
6. In the Type field, select the type of rules you plan to include in the composite rule
set. Choose from:
• Assignments
• Validations
• Mixed - select Mixed if you plan to include assignment and validation rule sets
in the composite rule set.
Note: You have the option to create multiple layers of composite
rule sets, some of which might only contain assignment or
validation rules. Use a mixed composite rule set to include both
types of rule sets together in one composite rule set.
7. Click Continue.
The Item Rules: Rule List page appears.
Administering Item Business Rules 6-39
8. In the Included Rule Sets tab of the Item Rules: Rule List page, click Add Above or
Add Below to add a rule set.
Note: The rule sets execute in the order listed in the Included Rule
Sets tab. List validations after assignments if you want to validate
some of the assignments.
9. In the Rule Set Search page, search for and select the rule sets to add to your
composite rule set.
The system returns you to the Item Rules: Rule List page.
10. Enter the sequence for the rules to run. Click Apply.
To remove a rule set from a composite rule set:
Select the composite rule set. In the Item Rules: Rule List page, select the rule to
remove, then click Remove.
To update the rule set sequence in a composite rule set:
Select the composite rule set. In the Item Rules: Rule List page, enter a new sequence
number in the Sequence field for each rule set. Click Apply.
Related Topics
Overview of Item Business Rules, page 6-1
Administering Rule Sets, page 6-4
Assigning Rule Sets to Entities, page 6-40
Building Rule Expressions, page 6-16
Viewing Attributes Used in Rule Sets, page 6-37
Viewing Rule Set Dependencies, page 6-39
Using On-Demand Rule Set Execution, page 6-42
Copying Item Rules Data to Other Instances, page 6-43
Viewing Rule Set Dependencies
From the Item Rules: Rule List page for a rule set, you can view the attributes used in
the rule set, if the rule set is included in other rule sets (part of a composite rule set), and
what business entities use the rule set.
6-40 Oracle Product Hub Implementation Guide
To view the attributes used in a rule set:
Navigate to the Item Rules: Rule List page for a rule set. In the lower region of the
page, select the Attributes tab.
The search results region within the Attributes tab lists all attributes used in the rule set.
Use the search parameters to filter the attributes listed in the search results.
To view which rule sets include the selected rule set:
Navigate to the Item Rules: Rule List page for a rule set. In the lower region of the
page, select the Rule Sets Where Included tab.
The search results region within the Rule Sets Where Included tab lists all composite
rule sets that include the rule set appearing in the Item Rules: Rule List page. Use the
search parameters to filter the composite rule sets listed in the search results.
To view which entities use the rule set:
Once a rule set (typically a composite rule set) is assigned to an entity, you can view
which entity uses the rule set.
Navigate to the Item Rules: Rule List page for a rule set. In the lower region of the
page, select the Where Used tab. The search results region lists the business entity that
the rule set validates.
Related Topics
Overview of Item Business Rules, page 6-1
Administering Rule Sets, page 6-4
Assigning Rule Sets to Entities, page 6-40
Building Rule Expressions, page 6-16
Viewing Attributes Used in Rule Sets, page 6-37
Including other Rule Sets, page 6-38
Using On-Demand Rule Set Execution, page 6-42
Copying Item Rules Data to Other Instances, page 6-43
Assigning Rule Sets to Entities
After creating rule sets, you must activate them by assigning them to the appropriate
business entity. You can activate them directly by assigning the rule set to a business
entity, but you can only assign one rule set to each business entity. Activate a rule set
indirectly by using composite rule sets to group multiple rule sets together (see:
Including other Rule Sets, page 6-38). You can then assign one composite rule set to a
business entity. Once a rule set is activated, the rules are applied the next time a user

Administering Item Business Rules 6-41
updates the business entity data.
To assign a rule set to an entity:
1. Navigate to the Setup Workbench. In the Items tab, click the Rules subtab.
2. In the Update Rule Set Assignment page, click Add Another Row.
3.
Select a business entity and a rule set to validate it.
• You can only create one assignment per business entity.
• If you need to update an assignment, select the existing
assignment, click Delete, then click Apply. Finally, click Add
Another Row.
• Assign a rule set for each business entity that you want
validated.
4. Click Apply.
Test the rules in the item specification pages by updating attribute values in the
appropriate attribute groups. The rules should validate any updated values and any
defined error messages should appear.
Related Topics
Overview of Item Business Rules, page 6-1
Administering Rule Sets, page 6-4
6-42 Oracle Product Hub Implementation Guide
Building Rule Expressions, page 6-16
Viewing Attributes Used in Rule Sets, page 6-37
Including other Rule Sets, page 6-38
Viewing Rule Set Dependencies, page 6-39
Using On-Demand Rule Set Execution, page 6-42
Copying Item Rules Data to Other Instances, page 6-43
Using On-Demand Rule Set Execution
You can use On-Demand Rule Set Execution to quickly select one or more items, then
apply item business rules to them. Search for items using the same criteria you can use
when conducting a simple or advanced item search. The search results displays the
items as well as the rule sets to apply to those items before giving you the opportunity
to submit the rule set execution concurrent program. The execution results display
whether each item passed or failed any validation rules applied, as well as any updates
made to each item as a result of assignment rules applied.
To execute rule sets across a group of items:
1. Navigate to the Update Rule Set Assignment page. Click the Item Rules link.
2. In the Item Rules page, search for an item rule to execute on-demand. Select the
name link for the rule that you want to execute.
3. In the Item Rule Set Details page, in the Selected Business Entity field, select the
business entity for which to apply the rule set.
If the rule set selected applies to more than one business entity, then you must
choose one business entity over which to execute the rule set.
4.
Click On-demand Execution.
5.
In the On-demand Rule Execution : Select Item page, search for items over which
to apply the rule set. See: Searching for Items, Oracle Product Hub User's Guide.
6. After specifying the item search criteria, click Continue.
7.
In the Search Results page, a message appears, informing you of the rule set that
will be applied to the items in the search results if you submit the results.
8.
Click Submit.
You are returned to the Item Rule Set Details page. A message appears, providing
the On-demand Rule Execution concurrent request Batch ID and Concurrent
Request ID.
Administering Item Business Rules 6-43
To review rule set execution results:
1. Navigate to the Requests page. Search for and select the details for the Request ID
submitted earlier.
2. In the Request: (Request ID) page, verify that the request completed normally. If
so, click View Log.
The log lists the items to which the rule set was applied.
Related Topics
Overview of Item Business Rules, page 6-1
Administering Rule Sets, page 6-4
Assigning Rule Sets to Entities, page 6-40
Building Rule Expressions, page 6-16
Viewing Attributes Used in Rule Sets, page 6-37
Including other Rule Sets, page 6-38
Viewing Rule Set Dependencies, page 6-39
Copying Item Rules Data to Other Instances, page 6-43
Copying Item Rules Data to Other Instances
Oracle provides a method for copying item rules data from one instance to another.
This method is useful when you want to define rules in a test environment to ensure the
rules function as expected before defining the rules in your production environment.
To copy item rules data from one instance to another, use FNDLOAD, a generic loader
used to export and import many types of data between instances. Oracle provides a
configuration file, egorules.lct, that specifies the conversion between the database store
and file records, and is read by FNDLOAD. When exporting, FNDLOAD uses egorules.
lct to generate an output file, egorules.ldt, that contains the item rules data. When
importing, use these same files with FNDLOAD to create or update item rules data in
the target instance.

6-44 Oracle Product Hub Implementation Guide
Copying Item Rules Data Between Instances
Item Rules Data Copied Between Instances
Data Description Database Table Name
Rule Set Information EGO_RULE_SETS_B, EGO_RULE_SETS_TL
Included Rule Set EGO_INCLUDED_RULESETS
Business Entity EGO_INCLUDED_BUSINESS_ENTITIES
User Rules EGO_USER_RULES_B,
EGO_USER_RULES_TL
Attributes Used in Rules EGO_RULE_ATTRIBUTE_USAGES
To download the rule set data from the source environment into a data
file:
First, use the a command to download the egorules.lct file. Next, use the FNDLOAD
download command to download the rule set data from the source environment into a
data file. If you want to download a composite rule set, comprised of other rule sets,
then FNDLOAD downloads all of the rule sets related to the selected rule set.
1. Log on to the application server and initialize the application environment variable.
2.
Run the following command to download the egorules.lct file.
FNDLOAD apps 0 Y DOWNLOAD $EGO_TOP/patch/115/import/egorules.lct .
/out.ldt EGO_RULE_SETS [RULESET_NAME=<ruleset name>]
[BUSINESS_ENTITY=<business entity>]
ORACLE Password:
Administering Item Business Rules 6-45
To upload the rule set data from a data file into the target environment:
First, upload the item rules data syntax, then upload the rule set data from a data file
into the target environment.
1. Log on to the application server and initialize the application environment variable.
2. Run the following command to upload the item rules data syntax.
FNDLOAD apps 0 Y UPLOAD $EGO_TOP/patch/115/import/egorules.lct .
/out.ldt
[- CUSTOM_MODE=FORCE] [LOG_NAME=<log file name>]
ORACLE Password:
Important:
Before FNDLOAD applies the data to the target
instance, some item rule validation checks occur (the upload scripts
of the egorules.lct file contain the validation logic). If the rule
cannot pass the validation checks, then the upload process skips
the rule and logs the information in the upload log file. The
following errors are generated when a rule fails the validation
checks:
• ICC is not defined: The rule-related ICC is not defined.
• Attribute group is not defined: The attribute group used in the
rule is not defined.
• Attribute group is not associated with the ICC: The attribute
group used in the rule is not associated with the ICC.
• Attribute has the wrong data type: The attribute has a different
data type in the target environment.
Caution: FNDLOAD uses the following strategies to avoid writing
over rules data in target environments:
• If the last update time of the rule set in the target environment
is later than the last update time in the egorules.ldt file, then
the rule set in the target environment is not updated.
• If the last update time of the rule set in the target environment
is equal to or earlier than the last update time in the egorules.
ldt file, then the rule set in the target environment is updated.
• You have the option to use the FORCE parameter to skip the
check on the rule set last update time.
6-46 Oracle Product Hub Implementation Guide
To view the download/upload log file:
The validation and import results appear in the FNDLOAD log file after the upload
process completes. The log file contains:
• The last update time comparison results.
• Validation results for the rules.
• Other exceptions that occurred during the FNDLOAD execution.
If you specified the LOG_NAME when uploading the item rules data syntax, the log
was created under the directory specified in the target database's utl_file_dir parameter.
Determine the value of this parameter (and, therefore, determine the directory) using
the following command.
select substr(value,1,instr(value||',', ',')-1) from v$parameter where
name = 'utl_file_dir'
To validate the rule set in a target instance:
Oracle recommends that you validate rule sets imported to the target instance. For rule
sets associated with an ICC, the import process is unable to validate that the attribute
groups associated with the ICC in the target instance are used at the same business
entity level (for example, item vs. item organization level) as they are in the source
instance. Update rules in either the Update Assignment Rule page or the Update
Validation Rule page.
1. In the target instance, navigate to the Update Rule Set Assignment page. Select
Item Rules from the left side menu.
2. Search for the item rule set that you want to validate.
3. In the search results, click the Update icon for the item rule set.
4. In the Item Rules: Rule List page, Rules tab, search for a rule that you want to
validate.
5.
Click the Update icon for the rule.
6.
In the Update Assignment Rule or Update Validation Rule page, click Validate.
If you receive validation errors, then fix the attributes used in the expressions as
needed.
Related Topics
Overview of Item Business Rules, page 6-1
Administering Rule Sets, page 6-4

Setting Up Change Categories and Types 7-1
7
Setting Up Change Categories and Types
This chapter covers the following topics:
• Overview of Change Categories and Types
• Defining Change Categories
• Enabling Change Category Function Security
• Creating Priority, Reason, and Classification Codes
• Creating Statuses
• Defining Workflow Templates
• Creating Task Templates
• Defining Header/Line Type Attributes and Attribute Groups
• Defining Header Types
• Defining Line Types
• Optimizing the Change Management Text Index
• Defining Change Category Search Criteria and Display Formats
• Defining Change Category Reports
• Subscribing to a Change Management Business Event
• Customizing Change Management Workflows
• Implementing User Defined Functions for Change Type Attributes
Overview of Change Categories and Types
You must perform the following tasks to define Change categories and their associated
types.

7-2 Oracle Product Hub Implementation Guide
Task Required?
Defining Change Categories
Defining Change Types Yes
Defining Line Types
Defining Change Type Attribute Groups
Defining Change Line Attribute Groups
Setting Up Change Attribute Group Security
Implementing User-Defined Functions for Change
Type Attributes
Associating Change Type Attributes
Customizing Change Management Workflows
Defining Approval Routing Templates Yes
Creating User-Defined Priority Codes Yes
Creating User-Defined Reason Codes
Creating User-Defined Statuses
Defining Change Category Criteria Templates
Defining Change Category Results Formats
Defining Change Reports
Defining Change Categories
You can use change categories to define and manage changes required by your enterprise.
In addition to the seeded change categories (ideas, issues, change requests, change
notifications, change orders, new item requests, file approval, file review) you can
create change categories specific to your business needs. For example, you can create
the change category Enhancement Requests to track your customers' product
Setting Up Change Categories and Types 7-3
enhancement requests. You cannot delete seeded change categories; however, you can
disable them.
You can configure each change category to have revised items or request lines based on
the business purpose of the category. For example, a Change Order can have revised
items as they allow a change order to implement item related changes. A request line
enables you to request a change or specify a task related to an item and assign the line
to a person or group. You can associate criteria templates and result formats to a change
category for frequently executed search criteria. See: Managing Search Criteria, page 3-
29 and Managing Display Formats, page 3-35.
The system provides five base change categories that can be used to create other
categories:
• Ideas - To capture suggestions, innovations, improvements etc. from customers and
internal users.
• Issues - to track, manage and resolve various product/process related issues.
• Change Request - to request changes and get approval for requested changes.
• Change Order - to implement requested changes and revise items.
• Change Notification - to distribute documents and files to multiple recipients.
The system also provides the following three change categories, but does not allow you
to duplicate them:
• File Review - to allow for an informal process of review and feedback on
attachments.
• File Approval - to allow for a formal process of review and approval of
attachments.
• New Item Request (NIR) - to provide a formal process of definition and approval of
a new item.
To create a new change category:
1. On the Categories page in the Setup Workbench, select one of the following change
categories and click Duplicate.
• Idea
• Issue
• Change Request
• Change Order
7-4 Oracle Product Hub Implementation Guide
• Change Notification
Note: Creating new categories by duplicating existing categories
enables your enterprise to better control the general change
categories in use. It also makes it easier to introduce new categories
that are similar to the basic issue, change request and change order
categories. Note, however, that duplication is not allowed for the
following change categories:
• File Review
• File Approval
• New Item Request (NIR)
2.
On the Duplicate Category page, change the data in the fields as necessary to create
your new category.
Important:
When duplicating a change category, all information
from the Basic Information subtab is copied. For new change
categories based on existing change order categories, the following
seeded line types are copied:
• Item AML changes
• Item attachment changes
• Item attribute changes
Note the following fields:
• Plural Name
Enter alphanumeric text to specify the plural of the name that appears in the
user interface.
• Sort Sequence
Enter a number to specify the tab sequence in which the categories will appear
in the user interface.
• Autonumbering
If you select the Number Generation method Override at Type Level, then
autonumbering must be specified at the Type level, and therefore does not
inherit the numbering schema used for the parent change category.
Setting Up Change Categories and Types 7-5
3. Click Apply to complete creation of the new change category.
If, after creating a new change category you wish for the new category to be
displayed as a tab in the item workbench, you must create a form function passing
the change category name as a parameter, then assign the form function to the
appropriate Menu in the user interface, and finally assign the Menu to a
Responsibility, which in turn is granted to a user. For more information, see:
Enabling Change Category Function Security, page 7-5.
All new change categories created will be available to the user for search and
reporting under the general Change Management Menu.
After creating a new change category, you can configure the Header Types, Line Types
and Reports. For more details see:
• Defining Header Types, page 7-28
• Defining Line Types, page 7-35
• Defining Change Category Reports, page 7-42
Enabling Change Category Function Security
You can specify form functions to control who can view and create change category
objects. A form function must be added to the change management security menu
(EGO_CHGMGMT_USER_SECURITY), which in turn is referenced by a user
responsibility (such as Development Manager or Development Engineer). You can also
enable (in the Item Catalog workbench) a tab to show all instances of a change category
for the item in context. For example, create an item enhancement request tab function
that enables you to view enhancement requests from the item workbench by clicking on
an Enhancement Requests tab.
To create a subtab for a change category function within an item's Change
Management tab:
1. Using the System Administrator responsibility, navigate to the Form Functions
window.
2.
In the Function field, enter the name of the function for a particular change
category. Do not include any spaces when naming the function.
For example, when creating the function for the Item Enhancement Request tab, use
the name EGO_ITEM_ENHANCEMENT_REQUESTS.
3.
In the User Function Name field, enter a descriptive name of the function.
For example, a description appropriate for the
EGO_ITEM_ENHANCEMENT_REQUESTS function is EGO User Item
Enhancement Requests Subtab.

7-6 Oracle Product Hub Implementation Guide
4. Optionally, in the Description field, enter a description of the function.
5. Select the Properties tab.
6. In the Type field, select the Function Type Meaning "SSWA jsp function".
7. Select the Web HTML tab.
8. In the HTML Call field, enter OA.jsp?
page=/oracle/apps/ego/item/eu/webui/EGOITEMCHANGEMGMTLISTPGL&akReg
ionApplicationId=431&addBreadCrumb=RP&OAHP=EGO_USER_WORKBENCH_
HOMEPAGE=EGO_ITEM_ENHANCEMENT_REQUESTS=
ENHANCEMENT_REQUEST.
Note:
Boldfaced characters represent the form function and the
internal name of the change category, respectively.
Accept the default values for all other fields.
9.
Click Save.
To create a form function that lists all instances of a change category for
an item:
1.
Using the System Administrator responsibility, navigate to the Form Functions
window.
2.
In the Function field, enter the name of the function for all instances of a change
category for an item. Do not include any spaces when naming the function.
For example, when creating the function for the instances of enhancement requests,
Setting Up Change Categories and Types 7-7
use the name ENG_CREATE_ENHANCEMENT_REQUEST.
3. In the User Function Name field, enter a descriptive name of the function.
For example, a description appropriate for the
ENG_CREATE_ENHANCEMENT_REQUEST function is Engineering Create
Enhancement Request.
4. Optionally, in the Description field, enter a description of the function.
5. Select the Properties tab.
6.
In the Type field, select the Function Type Meaning "SSWA jsp function".
7. Select the Web HTML tab.
8. In the HTML Call field, enter OA.jsp?
page=/oracle/apps/eng/changemgmt/webui/SelectChgTypePG&changeMgmtTypeC
ode=ENHANCEMENT_REQUEST
Note:
Boldfaced characters represent the internal name of the
change category.
Accept the default values for all other fields.
9. Click Save.
To secure who can view and create a change category object:
To control who can view and create change category objects, add the form function that
shows all instances of a change category for an item to the change management security
menu (EGO_CHGMGMT_USER_SECURITY), then reference this menu by a user
responsibility (such as Development Manager or Development Engineer).
In order to secure who can view and create change category objects, consider
performing the following subtasks:
• Add a form function to the change management navigation menu,
EGO_CHG_MGMT_MENU.
• Add a form function to the change management security menu,
EGO_CHGMGMT_USER_SECURITY.
• Add a form function to the item change management tab menu.
1.
Using the System Administrator responsibility, navigate to the Menu window.
7-8 Oracle Product Hub Implementation Guide
To add a form function to the change management navigation menu
2. In the Menus window, find and select the change management navigation menu,
EGO_CHG_MGMT_MENU.
The menu displays a list of change management functions in sequential order.
3. In the Seq field, select a row where you would like to insert your form function.
For example, to insert your form function between rows 5 and 6, select the Seq = 5
row.
4. Click New.
An empty row appears between rows 5 and 6.
5. Select the empty Seq field. Enter the sequence in which this form function will
appear in the change management security menu.
For example, enter Seq = 5.5.
6.
In the Prompt field, enter the name of the form function that will appear in the
change management navigation menu.
For example, enter Create Enhancement Request.
7. In the Function field, search for and select the function that shows all instances of a
change category for an item.
For example, select Engineering Create Enhancement Request.

Setting Up Change Categories and Types 7-9
8.
Click Save.
A note informs you that your request to recompile your menus in the database has
been submitted. Click OK.
To add a function to the change management security menu
Next, add the function for all instances of a change category for an item to the change
management security menu EGO_CHGMGMT_USER_SECURITY.
9. In the Menu field, find and select the EGO_CHGMGMT_USER_SECURITY menu.
10.
In the Seq field, select a row where you would like to insert your form function.
For example, to insert your form function between rows 5 and 6, select the Seq = 5
row.
11.
Click New.
An empty row appears between rows 5 and 6.
12.
Select the empty Seq field. Enter the sequence in which this form function will
appear in the change management security menu.
For example, enter Seq = 5.5.
13.
In the Function field, search for and select the function that shows all instances of a
change category for an item.
For example, select Engineering Create Enhancement Request.
7-10 Oracle Product Hub Implementation Guide
14. Click Save.
A note informs you that your request to recompile your menus in the database has
been submitted. Click OK.
To add a function to the item change management tab menu
15. In the Menu field, find and select the
EGO_USER_CHANGE_MANAGEMENT_TAB menu.
16. In the Seq field, select a row where you would like to insert your form function.
For example, to insert your form function between rows 5 and 6, select the Seq = 5
row.
17. Click New.
An empty row appears between rows 5 and 6.
18.
Select the empty Seq field. Enter the sequence in which this form function will
appear in the change management security menu.
For example, enter Seq = 5.5.
19. In the Prompt field, enter the name of the change category object.
For example, enter Enhancement Requests.
20. In the Function field, search for and select the function for the change category.
For example, select EGO User Item Enhancement Requests Subtab.
21. Click Save.
A note informs you that your request to recompile your menus in the database has
been submitted. Click OK.

Setting Up Change Categories and Types 7-11
What's Next
After enabling a subtab for a change category function within an item's Change
Management tab, navigate to an item's Overview page, then select the Change
Management tab. A subtab for the change category function is now available.

7-12 Oracle Product Hub Implementation Guide
New Subtab in EGO_USER_CHANGE_MANAGEMENT_TAB Menu
Adding a form function to the Change Management navigation menu enables you to
perform a new change management function directly from the Oracle Applications
Home Page.

Setting Up Change Categories and Types 7-13
New Form Function in EGO_CHG_MGMT_MENU
Creating Priority, Reason, and Classification Codes
Change priority, reason, and classification codes are set up similarly, but are used for
different purposes as described below.
Change priorities enable you to define the degree of urgency of change requests and
change orders in a way that accommodates your business processes. You can create
priority codes to capture different priorities (such as High, Medium, or Low). Priority
codes are applicable to all change categories and their types.
Use change reasons to categorize and identify causes for changes. The system uses
reasons for reference only. Reason codes enable you to track the reason for which the
change has been created. Create reason codes to capture reasons for the change (such as
quality improvement, design improvement, cost reduction, test failure and
nonconformance). Reason codes are applicable to all change categories and their types.
Classifications provide a mechanism for companies to categorize change orders and to
also indicate to users exactly how the change order will impact their production. The
user selects a valid classification code from a list of values. Specify a valid classification
code in the change header type. Classifications are available only to change categories
whose base category is Change Order.
You cannot delete seeded priority, reason, or classification codes. You can delete user-
7-14 Oracle Product Hub Implementation Guide
defined priority, reason, or classification codes before they have been used. Instead of
deleting, disable a code and define a new one specific to your use. You can disable a
code on a given date by specifying a date in the Inactive On field.
To create a change priority:
1. On the Search: Item Catalog Categories page in the Setup Workbench, click the
Change Management tab.
2. On the Categories page, click the Codes tab.
3. On the Priorities page, click Add Another Row.
4. In the new row, enter the following:
Priority
Enter alphanumeric text to specify the name of the priority.
Priority Sequence
Enter a number between 0 and 9. Use 0 to denote the highest priority and 9 the
lowest. Priority sequence is used to determine the sort sequence.
Description
Enter a description for the priority.
Note:
You can delete a change priority as long as it has not yet been
used--once in use, a priority cannot be deleted.
To create a change reason:
1. On the Search: Item Catalog Categories page in the Setup Workbench, click the
Change Management tab.
2.
On the Categories page, click the Codes tab.
3.
On the Priorities page, click the Reasons link.
4.
On the Reasons page, click Add Another Row. In the new row, enter the following:
Reason
Enter alphanumeric text to describe a unique reason for initiating a change. For
example, you could define a reason named OBSOLETE to indicate an obsolete part,
or WAIVER to indicate a component change on a bill of material.
Description
Enter a description of the reason.
Setting Up Change Categories and Types 7-15
Note: You can delete a change reason as long as it has not yet been
used--once in use, a reason cannot be deleted.
To create classifications:
1. On the Search: Item Catalog Categories page in the Setup Workbench, click the
Change Management tab.
2. On the Categories page, click the Codes tab.
3. On the Priorities page, click the Classifications link.
4. On the Classifications page, click Add Another Row.
5.
In the new row, provide the name of the Classification Code and a Description.
Note: You can delete a classification code as long as it has not yet
been used. Once in use, a classification code cannot be deleted.
Creating Statuses
Statuses enable you to manage an issue/change through its lifecycle. You define statuses
to indicate various states of an issue/change (for example, Open, On Hold, Complete
and Cancelled).
Statuses are applicable to all change categories and their types. You cannot delete or
disable seeded statuses; however, you can define new statuses specific to your business
processes. You can disable user-defined statuses on a given date by specifying a date in
the Inactive On field.
Change categories are managed through their statuses and an approval workflow. Each
status can have one workflow associated with it, and that workflow is automatically
launched when changes enter into the status.
Note:
You can change the name of any status, even those provided by
the system. If a status is already in use you cannot delete it. Also, you
cannot delete any of the system provided status.
To create a status:
1.
On the Search: Item Catalog Categories page in the Setup Workbench, click the
Change Management tab.
2.
On the Categories page, click the Workflow tab.
7-16 Oracle Product Hub Implementation Guide
3. On the Statuses page, click Add Another Row.
4. In the new row, enter the following:
• Status
Provide a name for the new status.
• Status Type
Select the type that applies to the status:
• Open
When a change order has a status of Open, users can update it. However,
when the workflow is running and Update Allowed is not selected, users
cannot update it. Note that Update Allowed specifies that even if a
workflow is running, the change object can still be updated. Otherwise, if a
workflow is running, it cannot be updated , except for the posting of
comments.
• Scheduled
Once in use, the change cannot be updated. Scheduled change orders are
picked up and implemented by auto-implement manager (when auto-
implement is set up).
• Released
Cannot be updated.
• Approval
A workflow is mandatory for this status. Once the Approval is granted, the
status cannot be updated. You can associate a workflow template
containing an approval request step for Approval status types only.
• Implemented
For each change header type, only one status can use Implemented.
Implemented change orders cannot be reopened and canceled.
Implemented must always be the final status.
Note:
Once in use, you cannot delete or update Status Types
(except for the Display Name).
• Description
Enter a description of the status.
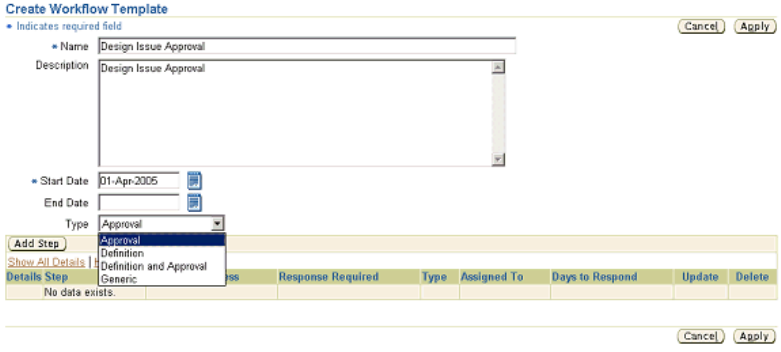
Setting Up Change Categories and Types 7-17
• Inactive On
Optionally, enter a date on which the status becomes inactive. As of this date,
you can no longer assign the status.
Defining Workflow Templates
Workflow templates enable you to predefine a business approval process. Change
categories such as issues, change requests and change orders can only be approved via
the successful completion of an approval routing. Workflows are supported at change
header and line levels. You can create and maintain header and line workflow
templates for each change type using workflow templates listed in the Setup
Workbench under the Change Management Workflow tab.
Creation of a new Workflow Template
Workflow templates enable you to define a workflow for a change object; you can use
workflows for a variety of purposes, some of which include informational messages
(FYI), request for comment, or approval requests. Create workflow templates for change
header and line level usage separately and associate them at the change header and
change line level, respectively.
Workflow templates are made up of steps--each step describes a workflow process and
specifies the assignees. For example, you can create steps to request approval, request
comment, or send an FYI notification.
When creating a workflow template, you must specify the type of template.
Important:
You cannot change a workflow template's type after
creation.
The following workflow template types are supported:

7-18 Oracle Product Hub Implementation Guide
Approval
The Approval workflow template type is valid only for workflows with a status type of
Approval.
Definition
The Definition workflow template type is used primarily for workflows in New Item
Requests with a status type of Open.
Definition and Approval
The Definition and Approval workflow template type is used primarily for New Item
Requests of status type Approval.
Generic
The Generic workflow template type is used for all other status types.
You can only associate certain workflow types with specific statuses, as shown in the
following table:
Valid Workflow Types for Change Categories (except New Item Request)
Status Type Valid Workflow Type
Approval/Review Approval
Others Generic
Valid Workflow Types for New Item Requests
Status Type Valid Workflow Type
Open Definition
Approval/Review, Definition and Approval,
or Approval
Approval
Others Generic
Workflow templates are comprised of approval steps; each approval step describes a
workflow process and specifies the assignees. For example, you can create steps to
request approval, request comment, or send an FYI notification.
You can use any of the following seeded workflow processes in a workflow template:
Request Approval
Setting Up Change Categories and Types 7-19
The Request Approval workflow enables you to request approvals from a person or
group.
FYI
The FYI workflow enables you to send an FYI notification to a person or group.
Request Comment
The Request Comment workflow enables you to request comments from a person or
group.
Definition
The New Item Request process uses a Definition workflow to enable the step assignee
to associate item attribute groups to an item.
Definition and Approval
The Definition and Approval workflow is similar to the Definition workflow, but also
requires an approval by the step assignee. For more details, see: Defining New Item
Request Workflows, page 3-21.
Plan and document the approval processes needed for specific types of changes in your
enterprise. Pre-planning of these processes enables you to define workflow templates
that adhere to your business processes.
You can manage parallel and serial approvals by assigning individual people, a specific
role, multiple people, or groups to a routing step. Item roles need to be mapped to the
change roles assigned on an approval routing step to ensure a person or group is
assigned when the change is created (see Implementing Change Management Role
Based Security, page 11-24 for details on mapping item roles to change roles).
To create a header workflow template:
1.
In the Applications tree menu, click the Setup Workbench link.
2. On the Search: Item Catalog Categories page, click the Change Management tab.
3.
On the Categories page, click the Workflow tab.
4. On the Workflow Templates page, select Header Templates and click Create.
5.
On the Create Header Workflow Template page, note the following fields:
Start Date
Defaults to the current date. Start date is the date from which the workflow
template is available.
End Date
The date upon which this workflow template is no longer unavailable.
Type

7-20 Oracle Product Hub Implementation Guide
Identifies the type of workflow template that you are creating. Available workflow
template types are:
• Approval
The Approval workflow template type is valid only for workflows with status
type Approval.
• Definition
The Definition workflow template type is used primarily for workflows in New
Item Requests with status type Open.
• Definition and Approval
The Definition and Approval workflow template type is used primarily for
New Item Requests of status type Approval.
• Generic
The Generic workflow template type is used for all other status types.
Certain workflow types can be associated with specific statuses. The following table
shows the association between the header status type and the workflow type for all
change categories:
Header Workflow Types and their Usage in Change Categories and Statuses
Change
Category/
Workflow
Type
Definition Definition
and
Approval
Approval Generic Notification
NIR Available for
Open Status
Available for
Approval
Status
Available for
Approval
Status
Available for
all Statuses
-
Idea - - Available for
Approval
Status
Available for
all Statuses
-
Issue - - Available for
Approval
Status
Available for
all Statuses
-
Change
Request
- - Available for
Approval
Status
Available for
all Statuses
-

Setting Up Change Categories and Types 7-21
Change
Category/
Workflow
Type
Definition Definition
and
Approval
Approval Generic Notification
Change
Notification
- - Available for
Approval
Status
Available for
all Statuses
-
Change
Order
- -- Available for
Approval
Status
Available for
all Statuses
-
File Review - - - Use in All
Statuses
-
File
Approval
- - Available for
Approval
Status
Available for
all Statuses
-
6. Click Add Step.
7. On the Add Step page, provide the following information:
Step
Enter the number of the step. This determines the order in which the steps are
executed.
Workflow Process
Select the workflow process that describes this step. After selecting a workflow
process, click Go. Selecting FYI changes the fields that follow; only the Instructions
field appears. You can create custom workflow processes using Oracle Workflow
Builder.
Important: Users receive a role based on the workflow process that
is chosen here. If Request Comment is selected, the person from
whom you are requesting the comment receives the Change
Reviewer role. If Request Approval is selected, the person from
whom you are requesting the approval receives the Change
Approver role. If FYI is selected, the person to whom you are
sending the FYI receives the Change Reviewer role. These roles are
assigned in addition to any other roles these users may already
have on the change object. The administrator can edit the privileges
for these roles.
7-22 Oracle Product Hub Implementation Guide
Assignee
Following are the choices for Assignee:
• User Entered
You must select a particular user who is restricted to the Roles or Groups
specified in the Assignees list.
• Derived
The assignee is derived based on user's roles. Hence, the list of available
assignees (in the Assignees section) all have the same role.
Response Required
Following are the rule choices for responses:
• All Assignees
All assignees must respond (or approve).
• One Assignee
Only one of the assignees must respond (or approve).
• Mandatory Assignees
When you add assignees, you specify that they are Optional or Mandatory. You
must always have at least one Mandatory responder/approver.
Days to Respond
Enter the number of days--from the time this step is executed--in which you will
need a response. Note that this is not the amount of time that transpires from the
time the approval routing is submitted, but that it is the number of days from the
time this particular step begins.
Instructions
Optionally, enter instructions for the assignees to follow in their responses.
Assignees
You can add assignees based on roles, membership in groups, or by selecting a
specific person.
Note:
When you select a role, you are selecting either a change
management or item role. If you assign someone by item role, then
all users with this role on the item become Reviewers. If you assign
someone by change management role, then all users with this role
on the change become Approvers.
Setting Up Change Categories and Types 7-23
8. Click Apply to save this step.
9. On the Update Workflow Template page, verify that all steps required for the
template have been added, and then click Apply.
To create a line workflow template:
Create line workflow templates using the same steps described in To create a header
workflow template, page 7-19.
• Workflows are not associated to a particular status for change lines.
• Approval workflows are not supported at the line level, so the only
two seeded workflow processes that you can select are Request
Comment and FYI.
The following workflow types are supported at the line level:
• Notification
The notification workflow template type is available at the line level only. The
workflow process associated to this type enables users to track assignee responses
and manage the change line. You can assign notification workflows to Change
Notification lines only.
• Generic
Use the generic workflow template type for change lines across the categories that
support lines (the Change Request and Change Notification categories).
Creating Task Templates
Task templates define the various tasks that must be completed for a change order. You
can create task templates only for categories whose base change category is Change
Order. After creating task templates, you can use them to define the organization
policies for change order header types.

7-24 Oracle Product Hub Implementation Guide
Creation of a Task Template
Create task templates for specific organizations. This enables you to associate multiple
task templates with a change order type. The organization in which you create the
change order determines the task template used. Specifying a task as Mandatory
ensures that the task must be completed before the change order can proceed to the next
status.
After creating task templates, you can use them to define the organization policies for
change order header types. Refer to the topic Defining Header Types, page 7-28 for
more information about this.
To create a task template:
1. On the Categories page in the Setup Workbench, click the Task Templates tab.
2. On the Task Templates page, click Create.
3.
On the Create Task Template page, provide data in the required fields and click
Add Another Row in the Change Tasks table to specify the tasks associated with the
change order header type. Note the following fields:
• Sequence
Determines the order in which the tasks appear on the page.
• Task
The name of the task.
• Assignee Type
Setting Up Change Categories and Types 7-25
Specify whether you wish to assign the task to a person or group.
• Assignee
The person (or group) to whom the task is assigned.
• Mandatory
Specifies that the task must be completed before the change order can proceed
to the next status.
Defining Header/Line Type Attributes and Attribute Groups
Defining change header and line attributes and attributes groups enables you to capture
additional information related to issues, change requests, and change orders. You can
create user-defined attributes with validation logic and associate them to change types
as a collection of attributes within an attribute group.
Attributes are defined by their names and values, and are saved within attribute
groups. You can associate attribute groups to a change header type or change line type.
You must define separate attribute groups for header types and line types. You can
reuse the same attribute group across different change categories and their change
types. Users enter the values for the attributes on the pages that you create for each
change type. You can also define how attributes are displayed for your change objects
to improve usability.
Prior to creating user-defined attributes, do the following:
• Group related attributes within the same attribute group.
• Create a change object role with custom privileges to define attribute group
security, if necessary. You can secure the attribute group by setting Edit/View
privileges. Later on, only users with certain roles can view or edit those attributes.
• Determine the data type of the attributes (for example, number, char, date).
Important: You cannot edit the data type after you save the
attribute.
• Set up the Unit of Measure Classes (for example, Currency) and Units of Measure
(for example, US Dollars).
• Establish the validation rules for each attribute and create the corresponding value
sets. For more details, see Defining Value Sets for User-Defined Attributes, page 4-1.
• Decide how you want the attribute group to be displayed - single-row or multi-row.
The figure below shows how the display options are set for the different attributes. The

7-26 Oracle Product Hub Implementation Guide
figure on Defining Change Attribute Types shows the results of these display option
settings. For example, you can see that the attribute Customer is set to display as a text
field, and indeed it does. Note that the attribute Customer uses the value set Customer,
which is really a table that is displayed as a list of values (LOV) text field. Also notice
that the attribute Customer is maintained as part of a unique key. You can add to/edit
the unique key as long as doing so does not destroy the uniqueness (creating
duplicates) of existing records.
Also note in the figure below that Enabled parameter is set to No for the Company
Name attribute, indicating that this attribute will not be displayed on the change page.
You can always disable attributes; however, you cannot delete attributes if the attribute
group has already been associated with a change type.
Defining change attributes and attribute groups
Defining change type attributes (setting attribute values)
To create a change attribute and attribute group:
1.
From the Oracle Applications Home Page, select an appropriate responsibility,
then Setup Workbench. Select the Change Management tab.
2.
Select the Header Attributes link.
Setting Up Change Categories and Types 7-27
3. In the Header Attributes Search page, find an existing change header attribute
group or create a new one. To create a new one, click Create.
4. On the Create Attribute Group page, enter the following:
• Internal Name - Required. The internal name of the attribute group. This name
must be unique.
• Display Name - Required. The display name of the attribute group. This name
is not required to be unique.
• Description - Optional. Describes the attribute group.
• Behavior - Select whether to create a Single-Row or Multi-Row attribute group.
The default behavior is single-row.
5.
If you select Single-Row, then enter the Number of columns in the page layout.
Required.
This determines the number of columns used to display the attributes within the
attribute group.
6.
If you select Multi-Row, then enter the Number of columns shown in the table and
the Number of rows shown in the table. Required.
These two fields determine how the multi-row attributes within the attribute group
are displayed.
7. In the View field, optionally select a view privilege.
If you leave this field blank, then anyone can view attribute values within this
attribute group when this attribute group is associated with a change object. If you
select a view privilege, then only those users with the privilege can view the
associated attribute values.
8. In the Edit field, optionally select an edit privilege.
If you leave this field blank, then anyone can add or change attribute values within
this attribute group when this attribute group is associated with a change object. If
you select an edit privilege, then only those users with the privilege can edit the
associated attribute values.
Related Topics
Defining Item Attributes and Attribute Groups, page 4-21
7-28 Oracle Product Hub Implementation Guide
Defining Header Types
Change header types provide enterprises a way to accommodate business processes
and classify types of changes within a change category. For example, you can define
different change header types such as Quality Change, Product Change, and
Performance Change to capture the various types of changes in your enterprise.
After creating and saving the basic information for a change header type, you can
associate the following to the type:
• Attribute Groups and Pages
• Codes
• Workflow
• Configuration
• Organization Policies
To create a change header type:
1. On the Change Management Categories page in the Setup Workbench, select a
change category, then select the Types tab in the lower half of the page.
2. If you already know of a similar change header type, select it and click Duplicate.
Otherwise, click Create.
3. On the Create <Change Category Name>Type page, enter information in the
following fields:
• Name- Required. Enter the name of the new change header type.
• Description - Optional.
• Start Date and End Date - Required. Use the Start Date and End Date fields to
designate the date range in which you can use the change header type.
• Number Generation
Required. Select a number generation method.
Note: To enable autonumbering, you must enter both a prefix
and the next available number.
• Sequence Generated
Setting Up Change Categories and Types 7-29
If the change header type numbering method is sequence generated, then
all change headers will be automatically generated based on the sequence
generation rules specified here. You can specify a prefix, starting number,
and increment.
• User Entered
If you specify user entered, then the user is required to manually enter a
number for new headers of this change header type.
Note: The User Entered number generation method is not
supported for the New Item Request change category.
• Function Generated
Enables you to associate user-defined functions based on change type
attributes. These functions will automatically create change numbers in the
sequenced defined in the function.
See: Creating User-defined Functions, page 4-38.
• Inherit From Parent
If the change header type numbering method is inherited from the parent,
then the change header type number generation method will be the same as
that defined for the parent change category.
Note: Inherit From Parent only appears as a Number
Generation selection choice for the change header type
when the associated change category's (the parent)
Number Generation is set to Override at Type Level.
Note: When importing new item requests using a spreadsheet,
the associated change header type must have Sequence
Generated or Function Generated autonumbering. User
Entered autonumbering results in an import error.
• Subject - Required. You can specify that the subject of the change header type is
an item, item revision, item and component, or nothing. Add Subject Selection
Criteria to optionally restrict the subject by other related attributes such as
catalog category, item lifecycle phase or item type. For example, you can set up
a change order header type named Production Motherboard Change where the
subject of the change is restricted to items in the Motherboard catalog category
with an item lifecycle phase of Production.
7-30 Oracle Product Hub Implementation Guide
• Assignee Type - Optional. You can set up the change header type to assign
change objects by Person, Group, or Item Role. A user may have more than one
role for an item because you can assign item roles at the organization, item
catalog category, and item level. If you choose to assign change objects by item
role, then you need to choose an Assignee Type that specifies the level in which
to look up the assignee by item role:
• Group - Assigns the change header to members of the specified group.
• Item Role at Catalog Category Level - Assigns the change header to users
with a role on the subject item that is inherited from the item catalog
category.
• Item Role at Item Level - Assigns the change header to users with a role on
the subject item.
• Item Role at Organization Level - Assigns the change header to users with a
role on the subject item that is inherited within the organization.
• Person - Assigns the change header to the person specified.
• Assignee - If you selected an assignee type, then select an item role or group for
the assignee type.
4. Click Apply.
After creating and saving the basic information for the change header type, you can
complete the change header type setup as described in the following tasks.
To associate attribute groups and pages with a change header type:
Associate attribute groups defined for headers to a change type. These attribute groups
enable you to capture additional information regarding the type of change created, or
business process-specific attributes required to process the change. You can create
pages for a change header type and then organize the attribute groups associated with
the change header type in a logical manner.
1. On the Basic Information page of the change header type to which you wish to
associate attributes groups, click Attribute Groups.
2.
Click Add Attribute Groups.
3.
Search for and select the attribute groups you wish to associate and click Apply.
To associate pages with a change header type
4. On the Basic Information page of the change header type to which you wish to
associate attributes groups, click Pages.
Setting Up Change Categories and Types 7-31
5. On the Pages page, click Create Page.
6. Enter the basic information in the required fields. Note that the number entered in
Sequence determines the order in which the page links appear on the change
object's detail page.
7. Click Add Another Row in the Attribute Groups section. Enter the Sequence
number to specify the order in which the attribute groups will appear on the page.
8. Click Apply.
To associate codes with a change header type:
Specify the valid codes for Priority, Reason and Classifications for the change header
type (Classification codes are only available to change header types based on the
Change Order category). This enables you to limit the available values for a user to only
the selected values for each of these codes. To create these codes, refer to Creating
Priority, Reason, and Classification Codes, page 7-13.
1. On the Basic Information page of the change header type to which you wish to
associate attributes groups, click Codes.
2.
On the Codes page, select the valid priorities and reasons codes for the change
header type.
3.
Click Apply.
To configure a change header type:
Depending on your business process, you can elect to enable only certain primary
attributes and sections for a change header type. For example, for a Supplier Requested
Issue, you can disable the People section, as you may not want the Supplier to have
visibility on who has what role in your organization.
1. On the Basic Information page of the change header type, click Configuration.
2.
On the Configuration page, select the sections and primary attributes to enable for
the change header type.
3.
Click Apply.
To associate workflows with a change header type:
Define the various statuses for the change header type under the workflow tab. You
can specify the valid statuses for promotion and demotion as well as associate one or
more workflows with each status. For an Approval status, you can only select an
Approval type workflow.
You can associate multiple workflows to a change status and specify one of them as a
7-32 Oracle Product Hub Implementation Guide
default. Use any one of the associated workflows at run time.
Note: If a mandatory workflow step is unassigned in an approval
workflow, the workflow does not launch until all mandatory steps have
valid assignees. If a workflow is associated to the first status (Open) on
a change and a mandatory step in the workflow is unassigned, the
change can only be saved as a draft. The change can move to the Open
status after the step is assigned.
When you create a status you specify a status type. These status types determine some
of the operational characteristics of the change header during its workflow:
• Open
When a change header has a status of Open, users can update the change object.
However, there are two exceptions:
• If the workflow is running and Update Allowed is not selected, you cannot
update the change object.
• If an Open status follows an Approval status within a workflow, you cannot
update the change object. You cannot update a change object once it has gone
through an approval process.
• Scheduled
Users cannot update the change object (unless reopened). Scheduled change objects
are picked up and implemented by the auto-implement manager. Change headers
must be Scheduled before they can enter the Implemented status.
• Released
Ready to be scheduled or implemented. Cannot be updated (unless the change is
reopened).
• Approval
A workflow is mandatory for this status. Once the Approval is granted, the change
object cannot be updated. You can associate a workflow template containing an
approval request step for Approval status types only.
• Implemented
The changes specified in the change object take effect. Implemented change objects
cannot be reopened and canceled. Once implemented, no further changes can be
made. For each change header type, only one status can use Implemented.
Implemented must always be the final status.
Certain workflow types can be associated with the statuses defined here. Following are
the associations between status type and workflow type for non-new item requests:

Setting Up Change Categories and Types 7-33
Status Type Valid Workflow Type
Approval Approval
Others Generic
Following are the associations between status types and workflow types for new item
requests:
Status Type Valid Workflow Type
Open Definition
Approval Definition & Approval, or Approval
Others Generic
1. On the Basic Information page of the change header type, click Workflow to define
the workflow for the change header type.
2. On the Workflow page, click Add Another Row in the Statuses section.
Note: The statuses of Open and Completed were automatically
associated with the header type when the header type was created.
3.
Specify a number that indicates the order in which the statuses are executed, and
select a status.
4. Optionally, select a default workflow for the status.
5.
Click Apply.
6.
After creating a workflow for a change header type, you can click the Update
Properties icon to specify for each status the valid promotion and demotion statuses
and assign one or more workflows. For workflows that contain an Approval status,
you must assign a workflow template that contains at least one Request Approval
step. You can also select the following for each Approval workflow:
• Enable Digital Signature
The Enable Digital Signature list only appears when electronic records and
signatures are enabled for Oracle Engineering.
7-34 Oracle Product Hub Implementation Guide
• Allow Updates
Selecting this option enables the user to cancel a change line during the
Approval status.
• Auto Promote
Selecting this option and specifying a valid promotion status enables the system
to automatically promote the change to this status after successful completion
of the Approval status.
• Auto Demote
Selecting this option and specifying a valid demotion status enables the system
to automatically demote the change to this status after failing the Approval
process.
7.
Click Apply.
To specify organization policies for change headers:
For change orders only, you can specify organization policies for change header types
such that task templates and propagation rules are applied to every change order
created in a specific organization. Task templates identify the specific tasks that must be
performed before a status is considered complete (for details, see Creating Task
Templates, page 7-23). If a business is comprised of hierarchically related organizations,
the changes specified in a change order may need to be propagated to several other
organizations in your company. For example, you may have an organization, Vision
Operations, which has two manufacturing organizations in the VisionMfg hierarchy
named Seattle Manufacturing and Chicago Manufacturing. You initially create change
orders in the Vision Operations organization. Once the change orders reach a certain
status in the workflow (for example, Scheduled), the change orders can be propagated
(for example, copied to the destination organization with the Status initially set to
Open) to the two manufacturing organizations in the hierarchy.
You can set up the organization policy such that a change order is automatically
propagated downward to the other organizations in the hierarchy whenever the change
order reaches a particular status. However, the changes only propagate to the
organizations within the hierarchy to which the user entering the change order has
access. For example, if another user who only has security access to the Vision
Operations and Seattle Manufacturing organizations enters change orders under this
organization policy, the change orders only propagate to Vision Operations and Seattle
Manufacturing and not to Chicago Manufacturing.
1.
On the Basic Information page of the change order header type for which you wish
to create organization policies, click Organization Policies.
2.
On the Organization Policies page, add the organization to which you want to add
the organization policy.
Setting Up Change Categories and Types 7-35
Click Add Another Row.
3. Select the newly added organization, then click the Task Template tab.
4. Click Add Another Row to specify the task template you wish to use. Note that you
can assign more than one task template. You can specify the status in which to start
the task and the status in which to complete the task.
5. Click the Propagation Rules tab. Before specifying the organization hierarchy for
propagation, you have the option of selecting a particular status that, when entered,
will automatically propagate the change order to a default organization hierarchy.
To do so, select Auto Propagate and specify the Status for Propagation. If you wish
to manually propagate change orders, do not select Auto Propagate.
6.
In the Organization Hierarchy for Propagation table, click Add Another Row, then
select the Organization Hierarchy to which the change order will be propagated.
While you can add more than one organization hierarchy to the propagation rules,
the change order can only be propagated to one. Also, you can select one
organization hierarchy as the default to which all change orders are propagated.
Note: Both an organization and the task templates/propagation rules
must be specified before you click Apply. If you select an organization
only and click Apply, no organization policy has been defined, thus
nothing is saved.
Defining Line Types
Change orders employ tasks and revised items to capture their various elements or "to
do's." Change orders do not support ad-hoc line types. Issues, Change Notifications,
Ideas, and Change Requests, however, use change lines, which serve a similar role. NIR
and File Approval and File Review do not support line types. Change lines capture all
the details required for a change.
Change line types enable you to capture specific changes to an item or tasks related to a
change. For example, you can define different line types to capture item related changes
(such as Item Attribute changes, Component redesign changes, Attachment changes
and Part Obsolescence).

7-36 Oracle Product Hub Implementation Guide
Change Line Types
Creation of a Line type is similar to that of the Change Header type. Each Line type
could have a default assignee as well as an associated Subject.
Defining a Change Line Type
You can associate workflows at the line level. Generic and Notification workflow types
are supported for lines—approval workflows are not supported for lines. You have the
option to associate multiple workflows to a line type, with one of the workflows set as
the default.
Setting Up Change Categories and Types 7-37
To create a change line type:
1. On the Categories page in the Setup Workbench, select any change category that
supports line types, and click the Line Types tab.
2. If you already know of a similar line type, select it and click Duplicate. Otherwise,
click Create.
3. On the Create <Change Category Name> Line Type page, note the following fields:
• Subject
You can specify an object upon which to base the line type. Restrict the subject
object further by item catalog category, lifecycle phase, or item type. For
example, you can create an issue line type to restrict the subject to all items in a
particular catalog category whose value you specify. Then, when users file
issues, they select from a list of values. If you do not restrict the subject, then all
items are available for the line type.
• Assignee Type
Typically users have different roles at different levels within an enterprise. To
ensure users are assigned the correct role on line types, you can choose from the
following Assignee Types:
• Group
The change line type is assigned to members of the group that is specified.
• Item Role at Catalog Category Level
The change line type is assigned to users who have a role on the subject
item that is inherited from the item catalog category.
• Item Role at Item Level
The change line type is assigned to users who have a role on the subject
item.
• Item Role at Organization Level
The change line type is assigned to users who have a role on the subject
item that is inherited within the organization.
• Person
The change line type is assigned to the person specified.
To associate workflows with a change line type
You can associate multiple workflow templates to a change line type, setting one of
7-38 Oracle Product Hub Implementation Guide
them as the default workflow.
Note: Only Generic and Notification workflow types are supported for
change line types. The Approval workflow type is not supported.
4. In the Workflows section of the Create <Change Category Name> Line Type page,
click Add Another Row.
5. Search for and select a workflow template.
6. Optionally, with the workflow template selected, click Set as Default to select this
template as the default workflow for the change line type.
7. Click Apply.
To associate attributes, attribute groups, and pages with a change line
type:
You can associate attribute groups to a change line type, then associate the attribute
groups to a change line type page. These attribute groups enable you to capture
additional information regarding the type of change being created, or business process-
specific attributes that are required to process the change. Use pages for a line type to
organize the attribute groups associated with the line type in a logical manner. For
example, you may have created and specified the attribute groups Cost Information and
Inventory Impact for a particular change line type. Now you wish to make them
available via the user interface. Set up a new page (for example, Related Information)
on which to make available the interface for the attributes Cost Information and
Inventory Impact.
1.
On the Basic Information page of the change line to which you wish to associate
attributes groups, click the Attribute Groups link.
2.
On the Attribute Groups page, search for and select the attribute groups you wish
to associate.
3.
Click Apply.
To associate pages with a change line type
Associate the item change type's attribute groups to a page.
4.
On the Basic Information page of the change line to which you wish to associate
pages, click the Pages link.
5.
On the Pages page, click Create Page.
6.
Enter the basic information in the required fields. Note that the number entered in
Sequence determines the order in which the page links appear on the change line's
Setting Up Change Categories and Types 7-39
detail page.
7. Click Add Another Row in the Attribute Groups section. Enter the Sequence
number to specify the order in which the attribute groups will appear on the page.
Note: You cannot associate pages with the following change order
line types:
• AML changes
• Attribute changes
• Attachment changes
8. Once you have added all of the attribute groups that you want to appear on the
page, click Apply.
Optimizing the Change Management Text Index
To take advantage of the Oracle text search features such as keyword search, stemming
search, and fuzzy search— run the concurrent program Optimize Change Management
Text Index. Any user with the Development Manager responsibility can submit this
concurrent program.
As change management data changes over time due to ongoing additions, deletions, or
update operations, the query response time may gradually decrease. Optimizing the
change management text index using the Optimize Change Management Text Index
concurrent program removes old data and minimizes index fragmentation, and
therefore can improve query response time.
Optimize the Change Management Text Index:
• After performing many change actions.
• After updating many change actions.
• On a regular basis (optimize the text index at regular intervals, for example, twice a
week.).
• When you notice slow performance for change simple search.
Note: This program optimizes at most 16,000 change objects per single
run. To continue optimizing more changes, re-run the program.
7-40 Oracle Product Hub Implementation Guide
To optimize the Change Management Text Index:
1. In the Development Manager responsibility, click the "View Concurrent Requests"
link.
2. In the Requests page, click Submit Request.
3. In the Schedule Request: Name page, select New Request and then search for and
select the program name Optimize Change Management Text Index.
4. Optionally, enter a request name to use later when searching for the request.
5. Select one of the following language and numeric display options:
• American English
• Arabic
• Korean
6. Click Next to continue setting parameters or Submit to use the default parameters.
7. In the Schedule Request: Parameters page, click Next.
8. In the Schedule Request: Schedule page, specify whether to use a new or saved
schedule.
When using a new schedule, specify the following:
• Start Date
• Recurrence
Specify whether to repeat the request or not, how often to repeat, and when to
end the recurrence.
• Apply the Interval
Specify whether to optimize the index from the completion of the prior index
run or from the start of the prior index run.
Optionally, click Advanced Schedule. This provides additional scheduling options.
When using a saved schedule, search for and select the name of the saved schedule.
Click Next.
9. On the Schedule Request: Notifications page, specify the recipients to receive any
of the following notifications:
• Normal - The request completed normally.
Setting Up Change Categories and Types 7-41
• Warning - Lists any warnings received upon completion.
• Error - Lists any errors received upon completion.
Click Next.
10. On the Schedule Request: Delivery page, select printer, email fax, or FTP options
for delivery of program results.
Click Next.
11. On the Schedule Request: Review page, review the options selected.
If you are satisfied with the options selected, click Submit. Otherwise, click Back to
choose different options.
Once you click Submit, an Information page appears, listing the request ID.
Defining Change Category Search Criteria and Display Formats
Criteria templates offer you a way to save frequently used search criteria—essentially,
acting as a saved list of specific attributes and attribute values. Criteria templates that
an administrator creates are available to all users and serve to expedite searches for
issues, ideas, change requests and change orders, thereby saving users the time it would
take to specify search criteria and execute frequent change management searches.
Users also have the option of creating criteria templates for their own private use. When
both a user and administrator define a default criteria template for a particular change
category, the user-defined criteria template takes precedence. Because criteria templates
contain user-defined attributes, you must always define them in the context of a change
category. You can define as many criteria templates as you wish, and you can also
denote the most commonly used as the default criteria template. For example, you may
define criteria templates to quickly find Open Change Requests, My Issues, or
Scheduled Change Orders.
Display formats enable you to predefine search results views for each change category.
You can use these views to look at different sets of attributes of the change objects (for
example, issues, change requests, change orders) that are returned by a search. Both
administrators and users can create display formats. Administrator-created display
formats are available to all users. User-created display formats are available only to the
users who created them. You can define as many display formats as you wish, and you
can also denote the most commonly used as the default display format. You can include
any primary, operational, or user-defined attributes in your display format definitions.
You can include display sections in your display formats that provide links directly to
the section from your search results. This enables you to display links in your search
results to any user-defined change type page (such as Cost Information) or any of the
standard display sections: Lines, Attachments, Action Log, Approval, Approval
History, Dependencies, Revisions, and People.
7-42 Oracle Product Hub Implementation Guide
Change category search criteria templates and display formats are set up and function
similarly to item catalog category search criteria templates and display formats. The
topics Managing Search Criteria, page 3-29 and Managing Display Formats, page 3-35
in the Setting Up the Item Catalog chapter describe in detail how to set up and use
search criteria templates and display formats (for change objects as well as items).
Defining Change Category Reports
Change management reports are basically search criteria and display formats that you
can save, browse, e-mail, or print. You can create reports for any change management
category. You can also browse a report sequentially or using a summary view.
Browsing a report sequentially enables you to step through each change object in a
report. A summary view displays the report in tabular column format. You can send a
report to other users including registered suppliers and customers.
An administrator can create a report for the most common or frequent searches that
users of the system perform. These administrator-defined reports save an ordinary user
the time of selecting a change category, search criteria, and display format, and
repeating the same search over and over again. You can give reports meaningful names
as well. For example, a search for all open high priority issues may yield dozens of
issues, each identified by issue name and number. You can name the report for these
search results High Priority Open Issues Report as shown in the figure below. Report
security is consistent with search security: you can only access a change object on which
you have the required role. Also, administrator-created reports are available to all users,
although only the administrator can edit these reports.

Setting Up Change Categories and Types 7-43
High Priority Issue Report
To create a report:
1.
In the Setup Workbench, on the Categories page, click the Reports tab. When the
page refreshes, click Create Report.
2.
When the Create Report page refreshes, provide the following:
Name
Provide a name for the Report.
Description
Optionally, provide a description of the Report.
Criteria
Select the criteria to be used in the search. You can use an existing search criteria
template (if one exists for the change category selected), or add criteria here by
clicking Add Criteria.
Format
Select a format for the report. You can use an existing display format by selecting it
from the Display Format pulldown and clicking Go.
3.
In the Export Format section, you can optionally select an export template and
output format, such as .pdf , .rtf, .html, .xls, and .xml, in which you want to

7-44 Oracle Product Hub Implementation Guide
generate the report.
4. Click Apply.
Related Topics
Defining Change Category Search Criteria and Display Formats, page 7-41
Managing Search Criteria, page 3-29
Managing Display Formats, page 3-35
Subscribing to a Change Management Business Event
Change management business events represent an activity or task that can be extended
or customized. For example, creation of items and engineering change orders (ECO's)
are examples of business events.
Change Management business events enable you to extend and customize your
environment. You subscribe to Change Management business events to:
• Execute custom code on the event information
• Send event information to a workflow process
• Send event information to other queues or systems
Business events are represented within workflow processes by event activities. Business
events can be synchronous or asynchronous. That is, when a local event occurs, the
subscribing event can be executed during the same time as the transaction
(synchronous), or the subscribing event can be deferred (asynchronous).
You use Oracle Workflow to set up business events.
You can subscribe to the following business events:
Business Event Event Type Description
oracle.apps.eng.cm.
changeObject.
changeApprovalStatus
CM Approval Status Change Business event for change
object approval status change.
oracle.apps.eng.cm.
changeObject.changePriority
CM Priority Change Business event for change
object priority changes.
oracle.apps.eng.cm.
changeObject.changeStatus
CM Status Change Business event for change
object status changes.

Setting Up Change Categories and Types 7-45
Business Event Event Type Description
oracle.apps.eng.cm.
changeObject.
changeWorkflowStatus
CM Workflow Status Change Business event for change
object Workflow Status
changes.
oracle.apps.eng.cm.
changeObject.create
CM Create Business event for the
creation of a change object.
oracle.apps.eng.cm.
changeObject.postComment
CM Post Comment Business event for a posted
comment on a change object.
oracle.apps.eng.cm.
changeObject.reassign
CM Reassign Business event for the
reassignment of a change
object.
oracle.apps.eng.cm.
changeObject.
requestComment
CM Request Comment Business event for a comment
request of a change object.
oracle.apps.eng.cm.
changeObject.submit
CM Submit Business event for the
submission of a change object.
oracle.apps.eng.cm.
changeObject.update
CM Update Business event for the update
of a change object.
oracle.apps.eng.cm.
changeOrder.
changeScheduleDate
CM Schedule Date Change Business event for change
order schedule date change.
oracle.apps.eng.cm.import.
complete
CM Import Complete Change Management Import
is completed.
oracle.apps.eng.cm.
revisedItem.
changeScheduleDate
CM Revised Item Schedule
Date Change
Business event for revised
item schedule date change.
oracle.apps.eng.cm.
revisedItem.changeStatu
CM Revised Item Status
Change
Business event for revised
item status changes.
To enable Change Management business events:
1.
Log into Oracle Applications as Workflow Administrator.

7-46 Oracle Product Hub Implementation Guide
2. Select the Business Events tab.
3. Search for the business event to which you want to subscribe.
Note:
If you do not know the name of the event that you want to
search for, use the following search string: Oracle.apps.eng.cm.
The search results include a list of change management business events. By default,
all business events are disabled.
4.
To enable a business event, click the Update icon, which opens a page for the
selected event where you can enable the event.
5.
Click the Subscription icon to define the subscription code (also known as the Event

Setting Up Change Categories and Types 7-47
trigger).
Related Topics
Setting Up the Business Event System, Oracle Workflow Administrator's Guide
Change Management Business Events, page E-1
Customizing Change Management Workflows
Oracle supports the extension of workflows. Extensions include using existing seeded
processes to build new workflow processes and modifying parameters of an activity
without changing process logic (for example, adding custom logic in an Abort Approval
Routing subprocess).
If the Change Management seeded workflows do not meet your business processing
needs, you can customize or extend the seeded Change Management Workflow
processes by creating your own processes, modifying the seeded ones, adding a new
activity to a seeded process, and/or modifying custom hook PL/SQL procedures.
Suggestions for Customizing Workflows
• If you decide to create a new workflow process for Priority Change rather than
modifying the seeded workflow, you must write your own custom logic to start
your custom workflow in the custom hook called in Start Workflow.
• If you add a new workflow process in the Change Approval Routing Step
(ENGCSTEP), then the process will be enabled as an Approval Routing Step
Workflow in the Approval Routing pages. The workflow process is automatically
7-48 Oracle Product Hub Implementation Guide
called from the Approval Routing workflow.
• The activity will be shared by more than one object's process, so create the activity
in the ENG: Standard (ENGWFSTD) item type. Otherwise, create the activity in the
appropriate object's item type.
• Instead of modifying workflow notifications, you should create new messages.
Oracle Workflow Builder does not maintain version information for objects such as
item types, item type attributes, messages, and lookup types. For these objects, the
latest definition always applies, so you must consider whether a change to any of
these objects is backward compatible. If the modification affects existing processes,
you should create a new object rather than edit the existing object.
Important: Oracle provides support only for its seeded activities,
processes, and the types of extensions described in this guide. Oracle
does not provide support for your custom activities and processes.
Related Topics
Workflows for Change Management, page A-1
Implementing User Defined Functions for Change Type Attributes
You can define your own custom logic by adding user-defined functions and actions to
existing change pages. In such cases you do not need to customize the entire page.
You can register user-defined functions for executing customer-specific business rules
and calculations. These functions can be written in Java or PL/SQL. URL functions can
also pass the values of certain parameters to the URL string and redirect users to a
secure page. For each function, you need to register the list of parameters, their data
types, and how they get their values by specifying parameter types.
Actions are trigger points for functions and can be displayed as buttons or links. You
can determine the conditional visibility of the button/links and also prompt the user
based on his or her input.
Example: Implement User-Defined Functions for Change Type Attributes
The following example shows how you would calculate Total Cost by using the
attribute group Implementation Cost.

Setting Up Change Categories and Types 7-49
Sequence Attribute
Group:
Implement
Cost
Attribute
Group:
Implement
Cost
Attribute
Group:
Implement
Cost
PL/SQL
Function:
Calculate
Cost
PL/SQL
Function:
Calculate
Cost
PL/SQL
Function:
Calculate
Cost
Sequence Attribute
Name
Data Type Mapping
Attribute &
Parameter
s
Parameter
Name
Data Type Parameter
Type
1 Suppliers
Charges
Number --a` ---a` ---
a`
Cost 1 Number Input
2 Manufactu
ring
Number --a` ---a` ---
a`
Cost 2 Number Input
3 Engineerin
g
Number --a` ---a` ---
a`
Cost 3 Number Input
4 Field/Repai
r
Number --a` ---a` ---
a`
Cost 4 Number Input
5 Total
Implement
Cost
Number --a` ---a` ---
a`
Cost Result Number Return
Value
1.
Register the PL/SQL function "Calculate Cost" (based on the PL/SQL procedure that
resides in the PL/SQL package) with all required parameters.
2.
Navigate to the "ECO" change order type and add the action to the attribute group
"Implement Cost" by clicking Update Action. The action executes the function on
the change pages. After creating the action, map the function parameters to the
corresponding attributes.
The mapping section on the Action Detail page provides the mapping information for
function parameters. You can also map parameters of functions to the object's primary
key value (for example, CHANGE_ID for change objects).
When setting up an action:
1.
Specify a role-based privilege to secure the action.
See: Creating Custom Privileges, page 11-27.
2.
Add the Dynamic Visibility Function (written in Java only) to your action if there is
a certain condition that needs to be satisfied before users can view the action button

7-50 Oracle Product Hub Implementation Guide
or link. For example, if one or all of the fields are empty, then the user cannot see
the button/link to execute the action.
3. Add the Dynamic Prompt Function (written in Java only) to your action if the label
for the button/link needs to be changed depending on a certain condition. For
example, it the Total Implement Cost attribute is empty, then the button label is
Apply, otherwise the button label is Apply Changes.
Important: Dynamic Prompt and Dynamic Visibility function
parameters must be mapped to the corresponding attributes as
well.
Associate action with attribute group to execute a function
Change type attribute page displays action button
Related Topics
Creating User-Defined Functions for Item Attributes, page 4-38

Setting Up Item Structures 8-1
8
Setting Up Item Structures
This chapter covers the following topics:
• Overview of Item Structures
• Defining Structure Types
• Associating a Structure Name with a Structure Type
• Defining Structure Attributes
• Defining Component Attributes
• Defining Display Formats and Search Criteria for Structures
• Creating an Item Catalog Category Structure
Overview of Item Structures
You can define item structures in the Product Workbench (see: Creating Structures,
Oracle Product Hub User's Guide) or in Oracle Bills of Material (see: Creating a Bill of
Material, Oracle Bills of Material User's Guide). However, before defining structures, you
must complete the following tasks:
Task Required?
Create structure types. See: Defining Structure
Types, page 8-2
Yes
Create structure names. See: Associating a
Structure Name with a Structure Type, page 8-
4
Yes

8-2 Oracle Product Hub Implementation Guide
Task Required?
Associate structure names with structure
types. See: Associating a Structure Name with
a Structure Type, page 8-4
Yes
Define structure attributes. See: Defining
Structure Attributes, page 8-6
No
Define component attributes. Defining
Component Attributes, page 8-8.
No
Define search criteria templates for a structure
type. See: Defining Display Formats and
Search Criteria for Structures, page 8-9
No
Define search results display formats for a
structure type. See: Defining Display Formats
and Search Criteria for Structures, page 8-9
No
Create an item catalog category structure. See:
Creating an Item Catalog Category Structure,
page 8-6
No
Related Topics
Product Workbench Overview, Oracle Product Hub User's Guide
Searching for Items in a Structure, Oracle Product Hub User's Guide
Defining Structure Types
A structure type enables you to classify and characterize item structures throughout the
lifecycle of an item. For example, you can have structure types for Engineering,
Manufacturing, and Service. You can define an unlimited number of structure names
for a structure type, enabling you to create several different structures of the same type
that you can use for comparison. For example, you can create several different
engineering BOMs (EBOM1, EBOM2, EBOM3) using the structure type Engineering
BOM with different component costs and BOM grading attributes. Comparing these
BOMs enables you to make better decisions earlier in the lifecycle of your products.
You can associate item attachment categories, search criteria templates and search
results formats with a structure type. Structure types are hierarchical, with structure
names, item attachments categories, search criteria templates and search results formats
inherited throughout the hierarchy.

Setting Up Item Structures 8-3
To create a structure type:
To help classify your existing structures, you can use the following seeded structure
types, or create your own structure types.
Internal Name Display Name Allow Subtypes
All-Structure Types Root Y
Packaging Hierarchy Packaging BOM N
Asset BOM Asset BOM Y
Cad BOM Cad BOM Y
Design Structure Design Structure Y
MBOM Manufacturing BOM Y
Important:
When you upgrade to a new software release, ensure that
you use the newest seeded Packaging Hierarchy instead of an older
version. Either delete or rename any older versions of a Packaging
Hierarchy structure type.
1. On the Search: Item Catalog Categories page in the Setup Workbench, click the
Structures tab.
2. On the Search: Structure Types page, click the "Create Structure Type" link.
3. On the Create Structure Type page, enter the following information:
Internal Name
The structure type's internal name.
Display Name
The structure type's display name.
Description
A brief description of the structure type.
Parent Structure Type
Select a parent structure type. The parent structure type specifies the immediate
parent of the structure type being created, thereby determining the structure type
8-4 Oracle Product Hub Implementation Guide
hierarchy.
If you leave this field blank, the parent structure type displays as Root. If you use a
root structure type as a parent, then the following information defaults to the
descendants of the parent:
• Structure Header Attributes
• Item Attachment Categories
• Display Formats
• Import Formats
• Search Criteria
• Component Attribute Groups
See: Viewing Item Structures, Oracle Product Hub User's Guide
Inactive On
Optionally, you can specify a date on which the structure type will become inactive.
Making a type inactive has the following implications:
• You cannot create structures of that type or any of its descendants.
• You cannot use that type or any of its descendants as a parent structure type
upon creation of a structure type.
Allow Subtypes
Select Allow Subtypes if you want this structure type to be a parent structure type
or a member of a structure type hierarchy.
4. Click Apply.
Related Topics
Creating a Bill of Material , Oracle Bills of Material User's Guide
Managing the Packaging Hierarchy, Oracle Product Hub User's Guide
Associating a Structure Name with a Structure Type
You can define multiple structure names for each structure type and enable them in
different organizations. For example, you can have three engineering BOMs (EBOM1,
EBOM2, EBOM3) that use the structure type Engineering BOM; you can use these to
compare designs. Manufacturing BOMs might be slightly different in each global
region, because similar parts are procured from different suppliers. You can have a
Setting Up Item Structures 8-5
structure type Manufacturing BOM with different structure names (MBOM_US,
MBOM_EMEA, MBOM_APAC) for each of your manufacturing regions around the
globe. Structures within a structure type share the same common characteristics.
To create a structure name:
1. On the Search: Item Catalog Categories page in the Setup Workbench, click the
Structures tab.
2. On the Search: Structure Types page, click the Structure Names tab.
3. On the Search: Structure Names page, click the "Create Structure Names" link.
4. On the Create Structure Name page, provide the following information:
Display Name
The display name of the structure.
Description
The description of the structure name.
Structure Type
The associated structure type.
Preferred for Structure Type
Specifies this structure name to be the default name for all structures created within
this structure type.
Organization Assignment
A structure name can be assigned to one or more organizations with different
inactive dates. This enables you to use the structure name within the assigned
organizations.
Inactive Date
The date on which the organization assignment is no longer valid. One or more
organizations may have different inactive dates.
5.
Click Apply.
To associate a structure name with a structure type:
1.
On the Search: Item Catalog Categories page in the Setup Workbench, click the
Structures tab.
2. On the Search: Structure Types page, find the structure type you wish to associate
and click its corresponding name link.
8-6 Oracle Product Hub Implementation Guide
3. On the Basic Information page, click the "Structure Names" link.
4. On the Structure Names page, click Create.
5. On the Create Structure Name page, enter the following information:
• Internal Name
• Display Name
• Description
• Preferred for Structure Type
Select this box if you want this structure name to be the default name for all
structures created within this structure type.
6. On the Create Structure Name page, assign the structure name to one or more
organizations by selecting the Assign box in an organization row(s). This enables
you to use the structure name within the assigned organizations.
Optionally, click Assign All to assign the structure name to all organizations.
7.
For each assigned organization, you can optionally specify an Inactive On date. This
makes the structure name no longer valid as of the Inactive On date.
8. Click Apply to create and save the structure name.
Optionally, click Add Another to create another new structure name.
Related Topics
Defining Structure Types, page 8-2
Defining Structure Attributes
Structure attributes capture user-defined information about a structure. Structure
attributes are defined similarly to item attributes. First, define a structure attribute
group, then the structure attributes within the group. Instead of associating the
structure attribute group with an item catalog category as you would for item
attributes, associate the structure attribute group with your structure type. Next, create
structure pages (similar to item pages) and associate the structure attribute group with
the page and the page with the structure type.
To define a structure attribute group and its attributes
1. On the Search: Structure types page, click the Attributes link.
Setting Up Item Structures 8-7
2. On the Search: Attribute Groups page, click Create.
3. On the Create Attribute Group for Bom Structure User Attributes page, create an
attribute group that can apply to a particular structure name.
The fields on this page function the same as they do for item user defined attribute
groups. For information about each field, refer to Defining Item Attributes and
Attribute Groups, page 4-21.
4. Click Apply and Add Attributes.
5.
In the Create Attribute page, create an attribute for the structure attribute group.
The fields on this page function the same as they do for item user defined attributes.
For information about each field, refer to Defining Item Attributes and Attribute
Groups, page 4-21.
6.
Click Apply if you are finished creating attributes or click Apply and Add Another
to continue adding attributes to the structure attribute group.
If you click Apply, then you are returned to the Attribute Group Details page.
To associate a structure attribute group with a structure type:
1.
On the Attribute Group Details page, click the Structure Types link.
2.
On the Search: Structure Types page, select a structure type.
3.
On the Basic Information page, click the Structure Header Attribute Groups link.
4.
On the Attribute Groups page, click Add Attribute Groups.
5.
on the Add Attribute Groups page, search for and select the attribute groups to
add to the structure type.
6. Click Apply.
You are returned to the Attribute Groups page.
To create a structure attribute page:
Create a structure page that enables you to define attribute values for a structure.
1.
On the Attribute Groups page, click the Structure Pages link.
2.
On the Structure Pages page, click Create Page.
3. On the Create/Edit Structure Pages page, enter values in the following required
fields:
8-8 Oracle Product Hub Implementation Guide
• Display Name - the display name of the structure attribute page.
• Internal Name - the internal name of the structure attribute page.
• Sequence - the order in which this page is listed compared to other pages.
4. In the Attribute Groups region of the page, click Add Another Row.
5. In the Sequence field, enter the order in which this attribute group appears on the
structure attribute page.
6. In the Display Name field, search for and select an attribute group.
7.
Once you have added all of the structure attribute groups you want to appear on
the page, click Apply.
Related Topics
Defining Structure Types, page 8-2
Defining Component Attributes
You can define user defined attributes for components in a structure to capture
additional information at the component level on a BOM. Component attributes are
defined similarly to item attributes. First, define a component attribute group, then the
component attributes within the group. Instead of associating the component attribute
group with an item catalog category as you would for item attributes, associate the
component attribute group with your structure type. You do not need to create a page
to display component attribute values; component attribute values are only viewable
and maintainable from the Product Workbench and the Product Workbench does not
use pages.
Note: Child structure types can inherit component attribute groups
from a parent structure type. You cannot delete component attribute
groups inherited from a parent structure type at the child structure type
level.
To define a component attribute group and its attributes:
1. On the Search: Structure Types page, click Attributes.
2.
On the Search: Attribute Groups page, click Component Attribute Groups.
3. Click Create to create a new component attribute group.
Setting Up Item Structures 8-9
4. On the Create Attribute for BOM Component User Attributes page, create an
attribute group that can apply to a particular structure.
The fields on this page function the same as they do for item user defined attribute
groups. For information about each field, refer to Defining Item Attributes and
Attribute Groups, page 4-21.
5. Click Apply and Add Attributes.
6. In the Create Attribute page, create an attribute for the structure attribute group.
The fields on this page function the same as they do for item user defined attributes.
For information about each field, refer to Defining Item Attributes and Attribute
Groups, page 4-21.
7.
Click Apply if you are finished creating attributes or click Apply and Add Another
to continue adding attributes to the structure attribute group.
If you click Apply, then you are returned to the Attribute Group Details page.
To associate a component attribute group with a structure type:
1. On the Attribute Group Details page, click the Structure Types link.
2.
On the Search: Structure Types page, select a structure type.
3.
On the Basic Information page, click the Component Attribute Groups link.
4.
On the Component Attribute Groups page, click Add Attribute Groups.
5.
on the Add Component Attribute Groups page, search for and select the
component attribute groups to add to the structure type.
6. Click Apply.
You are returned to the Component Attribute Groups page.
The page now shows the selected component attribute groups associated with the
structure type.
Related Topics
Defining Structure Types, page 8-2
Defining Display Formats and Search Criteria for Structures
Search Criteria
You can search for structure names based on different search criteria such as display

8-10 Oracle Product Hub Implementation Guide
name, internal name, description or parent structure type. Criteria templates enable you
to save frequently performed search criteria based on a list of attributes. Criteria
templates for structures enable you to search components within a structure. You can
associate with a structure type an existing criteria template for a given item catalog
category, or create a new criteria template to search items within a structure. You can
specify a default criteria template for each structure type.
Administrators and users can define search criteria for a given structure type. All search
criteria defined by administrators are available to all users viewing a structure of the
given structure type to which the search criteria is associated. All search criteria defined
by a user are only available to that user. On selecting a search criteria, only those
components that satisfy the criteria will be listed in the hierarchy and the components
that do not match the criteria will be filtered out. Intermediate nodes will be listed even
though they might not satisfy the criteria to maintain the context for a lower level
component. Primarily search criteria are useful to filter only relevant components in a
bill having a large number of components. Search criteria templates can be built using
item and component primary, operational, and user defined attributes.
For instructions on how to create and maintain search criteria for structures, see:
Managing Search Criteria, page 3-29.
Display Formats
Administrators and users can define display formats for a given structure type. All
display formats defined by administrators are available to all users viewing a structure
of the given structure type to which the display format is associated. User display
formats are only available to that user. Display formats enable users to view attribute
information across an entire structure. The display formats can include item and
component primary, operational, and user defined attributes. You can define as many
results formats as you wish, and you can also denote the most commonly used as the
default results format.
For instructions on how to create and maintain display formats for structures, see:
Managing Display Formats, page 3-35.
Oracle provides the following system defined display formats:
Display Format Name Fields Included in the Display Format
Component Information Component Name, Description, Revision,
Category
Component Details Component Name, Description, Revision,
Item Sequence, Operation Sequence, UOM,
Quantity, Planning%, Yield, Item type
Change Order Component Name, Description, Revision,
Implemented, Change Order

Setting Up Item Structures 8-11
Comments Component Name, Description, Revision,
Comments
Effectivity Component Name, Description, Revision,
Effectivity Control, Effective From, Effective
To, Change Order
Lifecycle Status Component Name, Description, Revision,
Lifecycle Phase, Approval Status, Item Status,
Percent Complete, Schedule End Date,
Progress Status
Long Description Component Name, Description, Revision,
Long Description
Material Control Component Name, Description, Revision,
Supply Type, Subinventory, Locator, Auto
Request Material, Enforce Integer
Requirements
Order Management Component Name, Description, Revision,
Check ATP, Optional, Mutually Exclusive,
Minimum Quantity, Maximum Quantity,
Basis
Reference Designators Component Name, Description, Revision,
Quantity, Quantity Related, Reference
Designator
Shipping Component Name, Description, Revision,
Shippable, Include on Shipping documents,
Required to Ship, Required for Revenue
Creating an Item Catalog Category Structure
You can define a default item catalog category (ICC) structure for use by items created
within the ICC. To use the default structure, you must define items as follows:
• Engineering box checked
• Revision effectivity enabled
When creating a structure for the item, use the same structure type and structure name
as the ICC structure. The ICC structure components then automatically default to the
item's new structure.
8-12 Oracle Product Hub Implementation Guide
Child ICC structures can inherit components from parent ICC structures as long as a
valid parent ICC structure version falls within the child ICC version's effective date
range.
Prerequisites
❒
Enable the use of item catalog category versions by setting the profile option
"Enable PIM for Telco Features" to Yes.
❒ Create an item catalog category draft version. See: Defining Item Catalog
Categories, page 3-2.
To create an item catalog category structure:
1. In the Item Catalog Categories page, search for and select an item catalog category
(ICC).
Additional Information: You can only associate a structure to a root
(parent) item catalog category.
2.
In the Basic Information page, click Draft.
3.
In the Transaction Attributes page, click Structure.
4.
In the Structure page, select a structure type and structure name.
Optionally, enter a structure description.
Note: You cannot select a structure type and structure name if the
parent ICC has a structure. The child ICC inherits the parent's
structure type and structure name along with the parent ICC
structure components. However, you can add components to the
inherited structure at the child ICC level.
5.
Click Create Structure.
The Structure page refreshes with the structure header information and the First
Level Components region.
6.
Click Update to add components to the structure.
In the Update Structure page, you can update the structure header information and
add components.
Additional Information: Any inherited components display, along
Setting Up Item Structures 8-13
with the name of the category from which they were inherited. If a
parent ICC has a defined structure header, then the structure
header information (structure type, structure name) defaults the
child ICC structure.
7. Click Search and Add Components.
You can perform a simple search in the Search and Add Components: Simple
Search page or click Advanced Search.
Alternatively, you can click Add Another Row.
8. In the Search and Add Components: Search Results page, select the items that you
want to add as components to the structure.
9.
Click Apply.
This returns you to the Update Structure: (structure name) page.
10.
In the Update Structure: (structure name) page, change the quantity of each
component if desired.
11.
Click Apply.
To remove a component from the structure
12. Optionally, in the Update Structure page, select the component to remove, then
click Remove.
Note: You cannot remove components inherited from a parent ICC
structure.
13.
Click Apply.
To add attribute values to the structure components
14.
In the Structure page, you can add attributes to any component. Click the
Additional Attributes icon for a particular component.
15. In the View Additional Attributes: (component) page, select the attribute group
that contains the attributes you want to define.
Note: You cannot update attributes for inherited components.
16.
Click Update.
In the Update Additional Attributes: (component) page, enter the attribute values.
8-14 Oracle Product Hub Implementation Guide
17. Click Apply.
This returns you to the View Additional Attributes: (component) page.
You can add attribute values to as many attributes and attribute groups as
necessary. Once you define all of the component's attributes, click Return to
Structure Page.
Once you have finished defining the item catalog category's structure and transaction
attributes, release the ICC to create a new version. See: "To release an item catalog
category draft version" in Defining Item Catalog Categories, page 3-2.
To update an item catalog category structure:
To update an item catalog category structure, you must lock the Draft version of the
ICC.
1. In the item catalog category's Basic Information page, click Lock.
If only the Unlock button is visible, then the ICC is already locked.
2. Click Draft.
3. In the Transaction Attributes page, click Structure.
4.
In the Structure page, click Update.
Additional Information:
You cannot update inherited components
or the structure type and structure name if they are inherited. If
you change a structure type or structure name at the root ICC level,
a warning appears, saying that this change will cause the deletion
of any associated structure components and attribute values. If you
accept the change, you can add new components and attribute
values.
To update the components within a structure
5. In the Update Structure: (ICC Name) page:
• Add or remove components as described above in "To create an item catalog
category structure".
• Change the quantity of components as necessary.
• Click Apply.
To validate the structure
When updating the components within a parent ICC's structure, it is possible to create
duplicate components further down the hierarchy. You can use the Validate Structure
Setting Up Item Structures 8-15
button to warn you when this problem occurs. The following example explains how the
duplicate components problem can occur.
Duplicate Components Example
In this example, you create the following initial ICC structures.
Parent (Root) ICC Structure
• Component 1
• Component 2
Child ICC Structure
• Component 1 (inherited from Parent ICC Structure)
• Component 2 (inherited from Parent ICC Structure)
• Component 3
Later, you decide that Component 3 must exist at the Parent ICC structure level. When
you add Component 3 to the Parent ICC structure and release this draft ICC version,
you receive a warning that, by adding Component 3, Component 3 becomes a duplicate
component in the Child ICC structure.
The draft version of the Child ICC structure now contains a duplicate component. You
cannot release a draft version in this state. You have three choices:
1. Release a new version of the Parent ICC with Component 3 removed from the ICC
structure.
2. Remove the initial Component 3 added at the Child ICC structure level.
3. Change the effective version date of either the Parent ICC or Child ICC so
Component 3 is no longer inherited in this version of the Child ICC.
Users can avoid duplicate components by using the Validate Structure button before
releasing an updated draft ICC.
6.
After updating the components within a structure, in the Structure page, click
Validate Structure.
The Structure Validation Results page opens. It displays any duplicate
components in relevant versions of other item catalog categories within the
hierarchy.
You can release the parent ICC version even though it causes duplicate components
in child ICC structures, however you cannot release any draft child ICC versions
that contain duplicate components.
To update structure component attributes
7.
In the Structure page, you can change the attributes of any component. Click the
8-16 Oracle Product Hub Implementation Guide
Additional Attributes icon for a particular component.
8. In the View Additional Attributes: (component) page, select the attribute group
that contains the attributes you want to change.
9. Click Update.
In the Update Additional Attributes: (component) page, enter the new attribute
values.
10. Click Apply.
To update the structure header:
You can change the structure type and structure name of an ICC structure, but doing so
deletes all components and their attributes.
1. In the Update Structure: (ICC Name) page, select a different structure type or
structure name.
The following warning message appears:
Changing the structure type and/or the structure name will delete all components
and their attributes. Do you still want to continue?
If you click Yes, then the Update Structure: (ICC Name) page appears again, with
all components removed.
2.
Select the new structure type and structure name you want to use for the updated
ICC structure.
3.
Add components and attributes as described previously in "To create an item
catalog category structure:".
Related Topics
To associate an ICC structure with an item, Managing Item Structures, Oracle Product
Hub User's Guide

Setting Up Content Management Repositories 9-1
9
Setting Up Content Management
Repositories
This chapter covers the following topics:
• Integrating Oracle E-Business Suite Applications with Content Management
Repositories
• Setting Up a Content Management Repository
Integrating Oracle E-Business Suite Applications with Content
Management Repositories
You can attach unstructured data to many different business objects or entities in Oracle
E-Business Suite (EBS). For example, attach a product data sheet in PDF format (the
unstructured data) to an item (the business object). The following table lists other
examples of objects and unstructured data:
Examples of Objects Types of Unstructured Data
Change objects such as a change order or
change request
Files such as word processing documents,
spreadsheets, videos, images, and Web pages.
Items Folders containing related item information
such as material safety data sheets.
Structures URL
Store unstructured data in one or more content management repositories and set up
EBS to integrate with the repositories. Integrate EBS with a repository using one of the
following technologies:

9-2 Oracle Product Hub Implementation Guide
• WebDAV (Web-based Distributed Authoring and Versioning) - a set of extensions
to the HTTP protocol, enabling users to collaboratively manage files on remote Web
servers. For more information, refer to www.webdav.org.
The following content management repositories are certified for use in three EBS
applications - Oracle Projects, Oracle Internal Controls Manager, and Oracle Product
Hub:
• Oracle Files, releases 9.0.3 and 9.04, using WebDAV, is certified for use with EBS
release 11i10
• Oracle Content Services, release 10.1.2, using WebDAV, is certified for use with EBS
release 11i10
• Oracle Universal Content Management (UCM), using WebDAV, is certified for use
with EBS release 12 and higher.
Theoretically, EBS integrates with any WebDAV-enabled, non-Oracle content
management repository (for example, Documentum), but it is only certified with the
Oracle content management repositories for the Oracle applications listed above.
Integrating Oracle Universal Content Management with EBS using WebDAV gives you
the most robust set of content management features. The following table lists examples
of features available when using UCM
Feature
Upload a new file to a folder in the content repository and attach the file to an EBS object.
Attach an existing file/folder in the content repository to an EBS object.
Render content of an attached content repository file from EBS.
Detach files/folders from an EBS object.
Use the Where Attached feature to find all EBS objects to which a content repository file/folder
is attached to.
Browse content repository folders within the EBS.
Single sign-on integration between the EBS and content repository.
Attach a specific version of a file in the content repository to an EBS object.
Submit a review/approval from the EBS for specific versions of files in the content repository.
Setting Up Content Management Repositories 9-3
Related Topics
Setting Up a Content Management Repository, page 9-3
E-Business Suite Attachments chapter, Oracle Product Hub User's Guide
Setting Up a Content Management Repository
Oracle recommends using Oracle Universal Content Management (UCM) as the
repository to store files. UCM can integrate with EBS using WebDAV.
The following instructions also apply to setting up repositories other than UCM,
although Oracle only certifies the use of the Oracle content management repositories for
the Oracle applications listed in Integrating Oracle E-Business Suite Applications with
Content Management Repositories, page 9-1.
Caution: Consider restricting access to the Repository Setup page. By
default, any user assigned a seeded responsibility has access to this
page and can register any URL as an external content repository . To
restrict access, see: Creating Responsibilities, page 2-1.
Prerequisites
❒ Set up attachment categories. See the Attachments chapter in the Oracle E-Business
Suite Developer's Guide.
To set up the repository:
1.
Navigate to the Repository Setup page.

9-4 Oracle Product Hub Implementation Guide
2.
Click on Update to add a repository
3.
Enter data in the following fields:
• Short Name - the short name of the repository.
• Name - the descriptive name of the repository.
• Description - optional. The description of the repository.
• Integration Mode - select either WebDAV or Web Service.
• Service URL - URL pointing to the Web Service servlet of the Repository
instance.
For example: http(s)://<host>:<port>/content/ws See the content repository
installation guide (for example, Oracle Content Database Installation Guide) for
the correct URL.
• WebDAV Connection URL - URL pointing to the DAV servlet of the Content
Repository instance.
For example: http(s)://<host>:<port>/content/dav or http(s)://<host>:<port>/files.
See the content repository installation guide (for example, Oracle Content
Database Installation Guide) for the correct URL.
• Sequence - If you have more than one repository, the sequence determines the
order in which the repositories display during user selection.
• Certificate path - If the repository is SSL enabled, then this field contains the
location to the repository digital certificate stored in the EBS mid-tier. The
certificate must be accessible and readable.

Setting Up Content Management Repositories 9-5
4. Click Apply.
To test the repository connection:
1. In the Repository Setup page, select a repository and click Test Connection.
2.
In the Repository Confirmation page, enter the user ID and password for the
repository and click Test.
If the user ID and password for the repository are correct and the repository is
operational, a message appears notifying you that the connection with the
repository is successful.
To remove a repository:
Before removing a repository, you must first detach all of the attachments stored in the
repository from EBS objects.
1.
In the Repository Setup page, select the repository to remove.
2. Click Remove.
This deletes the repository definition from the EBS. The installed repository
instance remains intact.
Related Topics
Integrating Oracle E-Business Suite Applications with Content Management
Repositories, page 9-1
E-Business Suite Attachments, Oracle Product Hub User's Guide
My Oracle Support (https://support.oracle.com), Document ID 1061947.1

Setting Up E-Business Suite Attachments 10-1
10
Setting Up E-Business Suite Attachments
Overview of E-Business Suite Attachments
Oracle Product Hub provides integration to Oracle Files, Oracle Content Services, and
Oracle Universal Content Management (UCM). These content repositories provide
users with a wide range of file management capabilities. UCM, however, provides the
most flexibility for organizing unstructured data and Oracle recommends using UCM
over other repositories. The content of this chapter explains how to set up E-Business
Suite attachments with UCM. Some of the set up steps, features, and processes do not
apply to other repositories.
Structuring Folders
Oracle Universal Content Management (UCM) provides a great deal of flexibility in the
structuring of data. The following security considerations should factor in to
implementation decisions about the organization of unstructured data (files/folders):
• Examine what content is internal to the enterprise and what may be shared
externally as part of the collaboration process or on a website.
• Access privileges by organizations modeled as Organizations in EBS.
• Access controlled by item catalog categories or types of items.
• Access controlled by business objects in EBS such as Items, Change Management,
and Purchase Orders.
• Access controlled by the lifecycle state of the item.
Following are some examples for structuring folders/libraries.

10-2 Oracle Product Hub Implementation Guide
Example 1: Model Libraries as Item Catalog Categories
Example 2: Model Libraries as Organizations or Divisions in a Company

Setting Up E-Business Suite Attachments 10-3
Example 3: Model Libraries as Business Objects in EBS
Example 4: Model Libraries as Lifecycle Phases
Attachment Review and Approval
Attachment Review or Approval provides:
10-4 Oracle Product Hub Implementation Guide
• Flexible and scalable way of defining different types of reviews/approvals;
• Capture of user-defined attributes for them;
• Secure collaboration
• Flexible and advanced approval routing definition.
Complex parallel and serial approval routes can be created as predefined templates to
enforce strict approval processes, or ad hoc routings to obtain additional approvals
within the enterprise can be specified.
Attachments can be selected and submitted for Review or Approval. The Review and
Approval workflows can be independent of each other. The Approval and Review
process use predefined approval templates with support for ad-hoc addition of new
steps. You can add steps to the process only if a workflow routing is associated with the
particular status. You cannot delete predefined (in the item catalog category) steps. You
can add additional assignees to a step, but you cannot delete predefined assignees.
Based on the Approval or Review type chosen, the workflow/approval routing is
determined. Appropriate notifications are sent at the various stages of the approval
process including a final notification of approval. Approvers can be derived from a
user's role on the business object.
The system indicates the current status of the attachment. For files residing in a Oracle
Universal Content Management (UCM) repository, the status refers to the file itself.
When you submit a file for review and approval from within UCM, you are asking for
review and approval of the file content.
An attachment could have one of the following statuses of Approved/ Reviewed /
Submitted for Approval/Submitted for Review or Rejected. If the file status is not one of
these, then it means that the attachment has not been submitted through a formal
review and approval process and is in a status of Draft or Unapproved. As the
attachment progresses through the Approval process the attachment status should be
automatically updated and the approval or review itself should be appropriately routed
to different users for their review or approval.
The Attachment Review and Approval process is built using the Change Management
Framework with Approval and Review being modeled as Change Categories. Thus,
creating the different Approval and Review types is similar to Defining the Header
Types for a Change Category, with a few minor differences. For example Lines and
associated Line types cannot be defined for the Approval and Review types. Similarly
the References, Dependencies and Attachments sections are not available.
Once an Attachment Approval or Review type has been defined, then with each status a
workflow could be associated. An Approval type must have an Approval status with an
approval workflow associated with it. For more details about creating workflows, see
Defining Workflow Templates, page 7-17.
Setting Up E-Business Suite Attachments 10-5
Related Topics
Managing Attachments, Oracle Product Hub User's Guide
Change Management for Attachments
Change Management for attachments provides change control functionality for all types
of attachments, a crucial and important piece of non-structured information about the
product.
Types of attachment changes supported using a change order include:
• adding a specific version of an attachment at the item or item revision level
• creating a new version for an existing attachment using by checking out the current
version and checking in a new version.
• changing the attached version for an existing attachment.
• changing attachment attributes. Supported attributes include Name, Description,
and Attachment Category.
• deleting attachments.
Change control is achieved by providing a mechanism to author, track and manage
changes to attachments through a change order approval and implementation process.
You can:
• Specify items and attachments that are revised or effected in a change order.
• Author and specify the exact changes that are desired or required to resolve an
issue or change request.
• Route the change order for approval to the appropriate people responsible for the
revised item based on item roles, change desired and lifecycle of item.
Once the change order is approved, implement the changes manually or automatically
on the specified implementation date.
Change Management for attachments is supported through the Change Management
functionality. User can create a change order and specify changes to the attachments of
a reviewed item. There are no additional steps required in the setting up of a change
order to be able to do attachment changes for a revised item.
Related Topics
Defining Change Categories and Types, Oracle Product Hub Implementation Guide

Implementing Roles and Role Based Security 11-1
11
Implementing Roles and Role Based
Security
This chapter covers the following topics:
• Overview of Roles and Role Based Security
• Administering Roles
• Administering People, Groups, and Companies
• Implementing Role Based Security
• Implementing Change Management Role Based Security
• Creating Custom Privileges
Overview of Roles and Role Based Security
Role-based data security enables users to secure individual data objects and user-
defined attribute groups. Your ability to view, edit and perform certain actions on an
object or attribute group is determined by your role on it. Users with the privilege to
add people can assign users to object roles. You can assign roles for the following
objects:
• Catalog
• Catalog Category
• Change
• Group
• Item
• Item Catalog Category
Roles
11-2 Oracle Product Hub Implementation Guide
A role is a collection of privileges. Roles are a convenient way to group privileges into a
bundle that can later on be assigned to users, groups, or companies. For example, a user
with the Design Engineer role on an item is granted the privilege to View Item, Edit
Item, Add/Delete Item Attachments and more. However, the Design Engineer is not
granted the privilege to Promote Item/Item Revision Lifecycle Phase.
You can assign roles to a person, group, company, or all users. To simplify item
security maintenance, you can assign item roles at the catalog category, catalog,
organization, item catalog category, or item level. You can specify default roles for all
items in an organization. For example, you can assign the Item Reviewer role to the
Engineering group so that all engineers can search for and view all items in the item
catalog. For each item catalog category, you can specify which people can create items
by assigning them the Catalog Category User role. For example, you can assign just the
New Product Introduction engineers the Catalog Category User on the item catalog
categories for which they are responsible for maintaining. Next, you can assign default
role assignments to people by organization for all items in the item catalog category. For
example, you can assign your Motherboard engineers a Design Engineer role for the
Motherboard item catalog category. You can assign the buyer for Motherboards a Buyer
role. At the item level, you can assign direct roles to enable access to specific items. For
example, you can assign the role of Supplier Engineer to suppliers with whom you are
collaborating on specific items.
Privileges
A privilege defines a user's access to an object. For example, a user's ability to view an
item and edit it is determined by his or her privileges on that item. You can define
additional privileges to secure user-defined attribute groups. See: To implement
attribute group security, page 11-19.

Implementing Roles and Role Based Security 11-3
Example of an Item Role
To implement roles and role-based security, perform the following tasks:
Task Required?
Administering Roles, page 11-3 Yes
Administering People, Groups, and
Companies, page 11-6
No
Implementing Role-based Security, page 11-
11
Yes
Implementing Change Management Role-
based Security, page 11-24
Yes
Creating Custom Privileges, page 11-27 No
Administering Roles
You can create roles for the following objects:
11-4 Oracle Product Hub Implementation Guide
• Catalog
A catalog role assigned to a user determines which actions that user can perform on
items in a catalog.
• Catalog Category
A catalog category role assigned to a user determines which actions that user can
perform on items in a catalog category.
• Change
The change role assigned to a user for a change object (for example, issue, change
request, change order) determines which actions that user can perform on the
change object. For example, a user with an Approver role on a change request is
granted the View Basic Change Information and Edit/Delete Change privileges.
• Group
A group role assigned to a user for a group determines which actions that user can
perform on the group.
• Item
The item role assigned to a user for an item determines which actions that user can
perform on the item. You can also inherit item privileges assigned at the catalog,
catalog category, and item catalog category levels. For example, a user with the
seeded Catalog Category User role on the Motherboard catalog category is granted
the "Create Item of this Catalog Category" privilege, which enables him or her to
create Motherboard items.
• Item Catalog Category
The item catalog category role assigned to a user determines which actions that user
can perform on items in a specific item catalog category.
Additional Information: In order to administer roles, a system
administrator must grant you a role at the Oracle Applications user
level. This role is granted by default in seeded responsibilities that
include the Role submenu. The Role submenu, which includes the
Roles link, is available from the Development Manager and
Development Engineer responsibilities, as well as others.
If you cannot access the Roles link from your responsibility or if you
cannot view, create, or update roles, then contact your system
administrator. For more information, see:
• Creating and Updating Roles, Oracle E-Business Suite Security Guide.
Implementing Roles and Role Based Security 11-5
• Excluding functions in the Menu Exclusions tab, Responsibilities
Window, Oracle E-Business Suite Security Guide.
To view roles:
You can view roles to examine the privileges that are associated with them.
1. Click the Roles link in the Application tree menu.
2. On the Roles page, enter the role name and click Go. If you know the specific object
that the role is associated with, select it.
3. On the Roles Search Results page, click the name link of the role for which you
were searching.
4. On the Role Detail page, you can view all the privileges associated with the role.
You can also view the role mappings, which identify item roles and their
corresponding change object roles.
To create a role:
1. From the applications tree menu, click Roles.
2. On the Roles page, click Create Role.
3. On the Create Role page, select the object for which you are creating a role and click
Next.
4. Provide a name and description for the new role. Select the object privileges you
want to associate with this new role and click Apply. Be aware that selecting the
Edit privilege does not implicitly grant the view privilege. So, if you want someone
to be able to edit an item, they must be able to view it first. Every role must have at
least one privilege associated with it.
Note:
Click Save and Map Roles if you wish to map an item role to
a change object role.
To update a role:
1. In the applications tree menu, click Roles.
2.
On the Roles page, enter the role name and click Go. If you know the specific object
that the role is associated with, select it.
3.
On the Role Search Results page, click the name link of the role for which you were
11-6 Oracle Product Hub Implementation Guide
searching.
4. On the Role: (Role Name) page, click Update in the Privileges region.
5. On the Update Role: (Role Name) page, you can edit the role name, description, or
select/unselect the privileges associated with it.
6. Click Apply.
To update role mappings
7. On the Role: (Role Name) page, click Update in the Role Mappings region.
8. On the Role Mappings page, you can select a different role name or no role name
for each change object.
9.
Click Apply.
To delete a role:
On the Role Search Results page, select the role you want to delete and click Delete.
Note: Once a role has been granted it cannot be deleted.
Related Topics
Overview of Roles and Role Based Security, page 11-1
Administering People, Groups, and Companies, page 11-6
Implementing Role Based Security, page 11-11
Implementing Change Management Role Based Security, page 11-24
Creating Custom Privileges, page 11-27
Administering People, Groups, and Companies
You can assign a person, group, company, or all users a role on a particular object, such
as the Product Catalog (a catalog object) or a mobile phone (an item object). Groups are
useful for managing role assignments for items, catalogs, and change management.
Groups are also useful in change management approval routings, where one or all
people in a group must approve a change, or all people in a group should be notified of
a change.
You can create groups of people that include internal users, suppliers and customers. A
group consists of one or more members. You can create groups of people for different
teams or departments that serve similar business functions. The person that creates the

Implementing Roles and Role Based Security 11-7
group is by default a member and the Group Administrator. Each member in a group is
assigned a group role that determines which privileges are granted to the member of
that group. There are three privileges a group role may grant a member: View Group
Header, View Group Members, and Manage Group. For example, you can create a
Supplier group made up of all your suppliers; however, you do not want any of the
members to see who else is in the group. In this case, each of the members would be
assigned the Group Reviewer role, which only allows them to see the group header
information, but not the other members. In another scenario, you may wish to create an
Engineering group where you want members to be aware of who else is in the group. In
this case, you can grant each member the View Group Members role. Only a person or
group with the Group Administrator role can also manage the group. The Manage
Group privilege enables a user to add/delete members and change their roles.
Group details
You can add three types of people to a group or assign them to a role on an object
directly. The Type attribute on the People Search and Person: (Person Name) pages
corresponds to the three basic types of people in the system:
• Internal
When you create a user using the E-Business Suite Define User form, you define an
employee in the People field. This person, now identified by the username entered,
is classified as Internal in the system. You can search for and view details about this
person.
• Customer
11-8 Oracle Product Hub Implementation Guide
When you create a user using the E-Business Suite Define User form, you define a
customer in the Customer field. This person, now identified by the username
entered, is classified as a Customer in the system. You can search for and view
details about this person.
• Vendor
When you create a user using the E-Business Suite Define User form, you define a
supplier in Supplier field. This person, now identified by the username entered, is
classified as a Vendor in the system. You can search for and view details about this
person.
Customer and Vendor are external people.
Important: You may have defined people, such as contractors and
temporary employees, in Oracle HRMS. You may also have defined
people as customers in Oracle Customer Online. These people are not
recognized as valid people in the system despite the fact that they are in
HRMS and Customer Online. You cannot search for or view details
about these people.
Prerequisites
❒ Before adding people to a group, you must run the concurrent program "EGO
Setup Default Organization for User".
To search for people:
1. In the Applications tree menu, click People, Groups and Companies.
2. Click the People tab.
3.
On the People page, enter the name of the person for whom you are searching in
the Search field.
You can search by first name, last name or user name. You can enter a partial name
and search on this. For example, enter "wil". A list of all people with a name
beginning with "wil" is returned.
4.
Click Go.
The name you entered is returned in the People Search Results region. If the name
you entered is not listed in the People Search Results, check the spelling of the name
and try searching again. If you are unable to locate the name, the person is not
registered in E-Business Suite, or is not valid in the system. Try registering the
person in the E-Business Suite first, or make sure the person is valid in the system.
Implementing Roles and Role Based Security 11-9
To create a group:
Groups are communities of people you can define in order to collaborate. You can
represent all your teams as groups in the system and give your group access to the
system's objects. You can send an e-mail to everyone in a group with a click of a button.
To view and create a group, you must have the following list of privileges, such as in
the seeded Group Administrator role:
• View Group Header
• View Group Members
• Manage Group
1. In the Applications tree menu, click People, Groups and Companies.
2. Click the Groups tab.
3. On the Groups page, click Create Group.
4. On the Create Group page, provide the following:
Group
Provide a name that identifies the group.
Description
Provide a brief description of the group.
Group Email Address
Specify the group mailing list, if you have one, as your group's Email address.
5.
Click Apply to save the group, or click Add Another Row to create another group.
After clicking Apply, the Group Details page appears.
6.
On the Group Details page, you can perform the following actions:
• Click Update in the Group Detail region to edit group information.
• Click Add to add additional members to the group.
• If you wish to delete a member, select that group member and click Delete.
• Click Update in the Group People region to assign a group object role to a
specific person, group or company.
The system automatically assigns the following seeded roles:
• Group Administrator to the person who created the group
11-10 Oracle Product Hub Implementation Guide
• View Group Members to all members of the group
• Group Reviewer to any member of the group creator's company
Tip: Assign the Group Administrator role to an additional
person as a backup.
To add/remove members to a group:
1. In the Applications tree menu, click People, Groups and Companies.
2. Click the Groups tab.
3. On the Groups page, click My Own Groups.
4.
Select a group and click Edit Membership.
5. On the Group Detail page, click Add, and select one or more persons from the list
of values.
6. To remove members, select each member to delete and click Delete.
To search for a group:
1. In the Applications tree menu, click People, Groups and Companies.
2. Click the Groups tab.
3. On the Groups page, enter the full or partial name of the group. Click Go.
• To locate all groups in which you are a member, click My Group Memberships.
• To locate all groups that you own, click My Own Groups.
4. If the group name you entered is not listed in the Group Search Results, check the
spelling of the name and try searching again. If you are unable to locate the group,
it has not yet been created. Create the group using the "Create Group" link on the
Groups page.
5.
On the Group Search Results page, select a group and click Request Membership
to join a group. The owner is sent an Email notification and can add you as a
member of that group.
6.
Click a group name to see all the members of a group (only if you are the owner or
a member of that group or have the View Group Members privilege assigned to
Implementing Roles and Role Based Security 11-11
you).
To find groups that you own:
1. In the Applications tree menu, click the "People, Groups and Companies" link.
2. Click the Groups tab.
3. On the Groups page, click the "My Own Groups" link to locate all groups that you
own.
See "To create a group:" above for more details about updating groups.
To search for a company:
1. In the Applications tree menu, click the "People, Groups and Companies" link.
2.
Click the Companies tab.
3.
On the Companies page, enter the name of the company for which you are
searching, or enter a letter from the alphabet. If you only know part of the name of
the company for which you are searching, enter that name. For example, if you are
searching for a company named "AAA Supplier," type "AAA" in the search field.
You will then see a list of all companies with "AAA" in their name.
4. Click Go. The name you entered is displayed in the Company Search Results field.
If the company name you entered is not listed in the Company Search Results,
check the spelling of the name and try searching again. If you are unable to locate
the company, it is likely not registered in E-Business Suite. Try registering the
customer company using Oracle Customer Online or Oracle Order Management.
Try registering the Vendor/Supplier Company using Oracle Purchasing.
Related Topics
Overview of Roles and Role Based Security, page 11-1
Administering Roles, page 11-3
Implementing Role Based Security, page 11-11
Implementing Change Management Role Based Security, page 11-24
Creating Custom Privileges, page 11-27
Implementing Role Based Security
To implement role based security on a particular object, attach a role to the object and a
person, group, company, or all users to the role on the object. For example, for each

11-12 Oracle Product Hub Implementation Guide
item catalog category, you can specify which people can create items by assigning them
the Catalog Category User role on the item catalog category.
To implement role based security on a user-defined attribute group, assign people to an
item role containing custom privileges for the attribute group.
Prerequisites
❒ Create roles. See: Administering Roles, page 11-3
❒ Optionally, create groups. See: Administering People, Groups, and Companies,
page 11-6
To assign people to a catalog:
Depending on their assigned role, people can assign items to a catalog or view the
catalog hierarchy. You can assign either of the following seeded roles to people in a
catalog:
Catalog Manager
The Catalog Manager role enables users to view the catalog hierarchy and also enables
them to assign items to this catalog.
Catalog Viewer
The Catalog Viewer role enables users to view the catalog hierarchy, but they cannot
assign items to it.
Assigning Catalog Roles
1.
On the Search: Item Catalog Categories page, click the Catalogs tab.
2.
On the Search: Catalogs page, select the catalog to which you wish to assign
people.
Implementing Roles and Role Based Security 11-13
3. On the Basic Information page for the catalog, click the "People" link.
4. On the People page, click Update. After the page refreshes, click Add Another Row.
5. After the Update People page refreshes, select a role, the type of people to use the
role, and the name of the company, group, or person given the role on the catalog.
Specify a start date and, optionally, an end date.
6. Click Apply.
To delete people from a catalog
7. In the Update People page, select a row and click Remove.
8. Click Apply.
To assign people to a catalog category:
Note: There are no seeded roles for the catalog category object. You
must create a role for the catalog category before you can assign people.
1. On the Search: Item Catalog Categories page, click the Catalogs tab.
2.
On the Search: Catalogs page, select the catalog containing the category to which
you wish to assign people.
3.
On the catalog's Basic Information page, click the Categories link on the left side of
the page.
The Categories page displays the valid categories for the selected catalog.
4. Click on the name link of the valid category to which you wish to assign people.
5. On the Category Details page, click the People link.
6. On the People page, under the Category People heading, click Update. After the
page refreshes, click Add Another Row.
7. After the Category People page refreshes, select a role, the type of people to use the
role, and the name of the company, group, or person given the role on the catalog.
Specify a start date and, optionally, an end date.
8.
Click Apply.
To delete people from a catalog category
9.
In the Category People page, select a row and click Remove.
11-14 Oracle Product Hub Implementation Guide
10. Click Apply.
To grant group roles to people:
You can grant a person, group or company a specific role for a group. You must have
the Manage Groups privilege for the group in order to grant others a role on the group.
1. In the Applications tree menu, click People, Groups and Companies.
2. Click the Groups tab.
3. On the Groups page, click My Own Groups or search for a group for which you
have the Manage Groups privilege.
4. Click on a group name.
5. In the Group Details page, under the Group People heading, click Update.
6. In the Update Group People page, click Add Another Row.
7. Select a role, the type of people to use the role, and the name of the company,
group, or person given the role on the group. Specify a start date and, optionally, an
end date.
8. Click Apply.
To assign people to an item:
You can assign roles for certain users directly to a single item or assign roles indirectly
using roles inherited from the following objects that contain the item:
• an alternate catalog
• an alternate catalog category
• an item catalog category
• an organization

Implementing Roles and Role Based Security 11-15
Item-specific role assignments
1. In the Applications tree menu, use either the "Simple Search" or "Advanced Search"
links to search for the item to which you wish to add people.
2. Click the item's link in the search results.
3. On the item's Overview page, click People.
4. On the Item People page, click Update.
Note: You can only update the People page for an item from within
the master organization.
5.
On the Update Item People page, click Add Another Row. Provide the following
information:
Role
Specify the role of the person you are adding.
Type
Specify the type of person you are adding (All Users, Company, Person, Group).
Name
Enter the name of the company, person, or group.
Start Date

11-16 Oracle Product Hub Implementation Guide
Specify the date on which the person/group gains access to the item.
End Date
Optionally, specify the date on which the person/group no longer has access to the
item.
6. Click Apply.
To assign people to an item catalog category:
You can grant roles to people by item catalog category for all organizations or by item
catalog category in a particular organization. Item catalog categories at a lower level in
the catalog hierarchy inherit roles granted to people at a higher level item catalog
category. You cannot remove or edit inherited roles.
Item Catalog Category People
1. Navigate to the Setup Workbench. On the Item Catalog Categories page, search for
and select an item catalog category.
2.
On the Basic Information page, click the People link.
Implementing Roles and Role Based Security 11-17
To assign people to an item catalog category for all organizations
3. On the People page, under the Item Catalog Category People heading, click
Update.
This updates roles for the item catalog category across all organizations.
4. In the Edit People page, click Add Another Row. Provide the following
information:
Role
Specify the role of the person you are adding.
Type
Specify the type of person you are adding (All Users, Company, Person, Group).
Name
Enter the name of the company, person, or group.
Start Date
Specify the date on which the person/group gains access to the item catalog
category.
End Date
Optionally, specify the date on which the person/group no longer has access to the
item catalog category.
5. Click Apply.
To assign people to an item catalog category for a particular organization
6.
On the People page, under the Item People heading, search for and select an
organization.
7.
Under the Organization field, click Update.
This updates roles for the item catalog category only in the selected organization.
8. In the Edit Item People page, click Add Another Row. Provide the following
information:
Role
Specify the role of the person you are adding.
Type
Specify the type of person you are adding (All Users, Company, Person, Group).
Name
Enter the name of the company, person, or group.

11-18 Oracle Product Hub Implementation Guide
Start Date
Specify the date on which the person/group gains access to the item catalog
category.
End Date
Optionally, specify the date on which the person/group no longer has access to the
item catalog category.
9. Click Apply.
To assign people to all items in an organization:
You can grant a specific role to a certain person, group, company, or all users that
applies to all items in an organization. This is useful when you want to grant one
person access to many items.
Note: You can grant organization-level roles if you are assigned the
Item Administration function through one of your responsibilities.
If you cannot grant organization-level roles, then contact your system
administrator. For more information, see:
• Creating and Updating Roles, Oracle E-Business Suite Security Guide.
• Excluding functions in the Menu Exclusions tab, Responsibilities
Window, Oracle E-Business Suite Security Guide.
Organization Level Item Role Assignments
1.
In the Applications tree menu, click Setup Workbench.
2.
On the Item Catalog Categories page, click the Security tab.
3.
On the Organization Roles page, select an Organization to which to grant a role
and click Go. The table returns all people, groups and companies who have been
Implementing Roles and Role Based Security 11-19
granted roles in the selected organization.
4. Click Update.
5. On the Update Organization Roles page, click Add Another Row. A new row
appears in the table. Enter the following information:
• Role
Select a role for this grant.
• Type
Select the type of grant: a grant to a single person, a group, a company, or all
users.
• Name
Enter the name of the person, group, or company to which you are making this
grant.
• Start Date
Select a start date from which this grant is effective.
• End Date
Select an end date on which the grant will no longer be effective.
6. Click Apply.
To revoke a specific role from a person for all items in the organization
7. On the Update Organization Roles page, select the person(s) or group(s) whose
role you wish to delete, and click Remove.
8.
Click Apply.
To edit a role grant of a person for all items in an organization
9.
On the Update Organization Roles page, select the person or group whose role you
wish to edit, and provide a new start date or end date.
10. Click Apply.
To implement attribute group security:
When implementing role-based item security, you can create custom privileges to
control the view and edit permissions for specific item attribute groups. You can control
which users can view and/or edit certain attribute groups for an item by assigning a role
granting those specific privileges. By default, an item role's View Item and Edit Item

11-20 Oracle Product Hub Implementation Guide
privileges control whether or not you can view or edit item attributes that are not
controlled specifically at the item attribute group level. In other words, when
implementing item security you do not have to specify a view or edit privilege for each
item attribute group.
Example: Attribute Group Security
Suppose your company is designing, along with your supplier, a new motherboard for
its next generation of desktop computers. To improve design collaboration you would
like to securely share item information about the motherboard—both internally
between departments and externally with your suppliers and contract manufacturers.
The Supplier Engineer should only be able to view specific item attribute groups such
as the Technical Specifications. The Supplier Engineer should not be able to view the
Market Research attributes. The Engineering Manager and Marketing Manager should
be able to view and edit the Market Research attributes, while a Design Engineer should
only view the Market Research attributes. There are three sets of Market Research
attributes (attribute groups): Key Metrics, Target Markets, and Competitors.
1. Select the Application Developer responsibility, navigate to the Form Functions
form, and create Form Functions for each privilege that controls view and edit
permissions for the Market Research attribute groups. See: Creating Custom
Privileges, page 11-27.
Defining form functions to create user-defined item role privileges
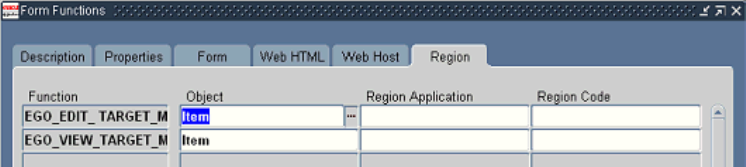
Implementing Roles and Role Based Security 11-21
2. Select the Development Manager responsibility and navigate to the Setup
Workbench. In the Attribute Group Details page for each Market Research-related
attribute group (for example, Target Markets) specify the View Privilege (for
example, View Target Markets) and Edit Privilege (for example, Edit Target
Markets) in the Business Entities region.

11-22 Oracle Product Hub Implementation Guide
Defining Item Attribute group with view and edit privileges
3.
On the Item Role Detail page for the Marketing Manager and Engineering
Manager roles, grant the following privileges:
• View Target Markets
• View Key Metrics
• View Competitors
• Edit Target Markets
• Edit Key Metrics
• Edit Competitors
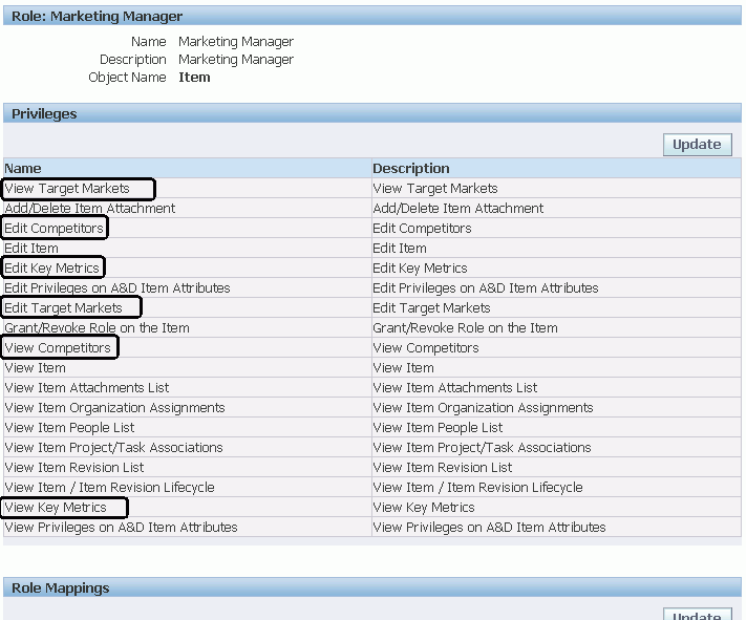
Implementing Roles and Role Based Security 11-23
Defining the Marketing Manager role with specific item attribute group privileges
For the Design Engineer role, grant the following privileges:
• View Target Markets
• View Key Metrics
• View Competitors
Do not grant any of the Market Research privileges to the Supplier Engineer role.

11-24 Oracle Product Hub Implementation Guide
Defining the Supplier Engineer role with no specific item attribute group privileges
Related Topics
Overview of Roles and Role Based Security, page 11-1
Administering Roles, page 11-3
Administering People, Groups, and Companies, page 11-6
Implementing Change Management Role Based Security, page 11-24
Creating Custom Privileges, page 11-27
Implementing Change Management Role Based Security
You can assign change roles to a person, group, company, or all users. To simplify
maintaining change management security, you can assign change roles directly to the
change object or inherit them through item role mapping from the subject item of the
change object. For example, you can map the Design Engineer item role to the Change
Design Engineer role for issues, change requests, and change orders. So users with the
Design Engineer role on the subject item of the change request header will inherit the
Change Design Engineer role as well. You can also assign a default role to all internal
users with the site level profile ENG: Internal User Default Role for Changes. A role that
is explicitly granted to a user for a change object is a direct role assignment. Roles
inherited from an item are inherited role assignments.
All seeded item roles are mapped to seeded change object roles. User-created item roles
Implementing Roles and Role Based Security 11-25
do not have to be mapped to change roles. If you do not want a seeded item role
mapped to a change role, edit that item role (such as Item Author) explicitly.
The change role assigned to a user for a change object (for example, issue, change
request, change order) determines which actions that user can perform on the change
object. For example, a user with an Approver role on a change request is granted the
View Basic Change Information and Edit/Delete Change privileges. You can also
specify which user-defined attribute groups a user can view and/or edit when granted a
change role.
Following are the seeded change roles:
• Approver
• Assignee
• Creator
• Requestor
• Reviewer
To assign change roles directly to the change object:
Change roles are assigned directly to the change object by the change type. When you
defined your change types in Defining Header Types, page 7-28, you specified a
workflow. Each workflow step with an Approval status requires at least one associated
workflow template (see: Defining Workflow Templates, page 7-17). Each person, role,
or group specified in the workflow template receives a role on the change object based
on the approval routing activity. All Request Approval assignees get an Approver role.
Request Comment and FYI assignees get a Reviewer role on the change object. You can
also specify a Default Assigned To role for a person/group when you define a change
type. The Assigned To person for every change object gets an Assignee role.
To inherit change roles through item role mapping:
1.
In the applications tree menu, click Roles.
2.
On the Roles page, select the item object, enter the role name, and then click Go.
3. On the Role Search Results page, click the name link of the role for which you were
searching.
4. On the Role: (Role Name) page, click Update in the Role Mappings region.
5.
On the Role Mappings page, you can map each change object type to a specific
change role.
6.
Click Apply.

11-26 Oracle Product Hub Implementation Guide
Mapping an Item Role to Change Roles
To assign a default change role to all internal users:
You can assign a default role to all internal users with the site level profile option ENG:
Internal User Default Role for Changes.
1. Within the System Administrator responsibility, click System.
2. In the System Profile Values window, search for and select the site level profile
option ENG: Internal User Default Role for Changes.
3.
In the Site field, select the default change role for the site from the list of values.
4. Save your work.
To implement attribute group security for change management:
When implementing role-based change management security you can set up privileges
to control the view and edit permissions for specific change management attribute
groups. You can control which users can view and/or edit certain attribute groups for a
change object by assigning a role granting those specific privileges. By default, a change
role's View Basic Change Information and Edit/Delete Change privileges control
whether you can view or edit attributes that are not controlled specifically at the
attribute group level. In other words, when implementing change management security
you do not have to specify a view or edit privilege for each attribute group.
Suppose your company is co-designing with your supplier a new motherboard for its
next generation of desktop computers. To improve communication with your supplier
Implementing Roles and Role Based Security 11-27
on design changes to the motherboard, you would like to securely share change request
information externally with your suppliers and contract manufacturers. The Supplier
Engineer should only be able to view specific attribute groups.
1. Select the Application Developer responsibility, navigate to the Form Functions
form, and create Form Functions for each privilege that controls view and edit
permissions for the attribute groups. Specify "Change" or "Change Line" in the
Object field for each Form Function.
See: Creating Custom Privileges, page 11-27
2. Select the Development Manager responsibility and navigate to the Setup
Workbench. On the Attribute Group Details page for each attribute group, specify
the View Privilege and Edit Privilege in the Business Entities region.
3. On the Change Role Detail page, grant the privileges that you defined as Form
Functions in the previous steps.
Related Topics
Overview of Roles and Role Based Security, page 11-1
Administering Roles, page 11-3
Administering People, Groups, and Companies, page 11-6
Implementing Role Based Security, page 11-11
Creating Custom Privileges, page 11-27
Creating Custom Privileges
The system includes a number of seeded privileges. However, you have the option to
create custom privileges to meet the needs of your business.
To create a custom privilege:
1.
Log into Oracle Forms using the System Administrator responsibility.
2. In the Application menu, select Function.
3.
In the Form Functions window, provide the following information:
Function
Enter a unique function name. You may use this name when calling your function
programmatically.
User Function Name
Enter a unique name that describes your function. You see this name when
11-28 Oracle Product Hub Implementation Guide
assigning functions to roles.
Description
Provide a description of the function.
4. Click the Region tab, and select the Object for which you are creating this privilege.
5. Click Save.
Related Topics
Overview of Roles and Role Based Security, page 11-1
Administering Roles, page 11-3
Administering People, Groups, and Companies, page 11-6
Implementing Role Based Security, page 11-11
Implementing Change Management Role Based Security, page 11-24

Setting Up Inbound Product Data Synchronization and Data Quality Management 12-1
12
Setting Up Inbound Product Data
Synchronization and Data Quality
Management
This chapter covers the following topics:
• Setup Overview of Inbound Product Data Synchronization
• Creating Match Rules
• Defining Source Systems
Setup Overview of Inbound Product Data Synchronization
Oracle Product Hub uses the Import Workbench to bring product data from disparate
systems into a master product information repository, known as the Product
Information Management Data Hub (PIMDH).
While importing data into a centralized data model, the Import Workbench identifies
and resolves duplicates and errors while at the same time enriching existing data with
external information. This process creates a blended record, known as the single source
of truth. You can then create business reports and other documents related to the
updates.
In order to import data from an external source system, you must define a source
system for each data source and create match rules to help match imported data to
existing data in the product information repository.
Related Topics
Creating Match Rules, page 12-2
Defining Source Systems, page 12-5
Overview of Inbound Product Data Synchronization and Data Quality Management,
Oracle Product Hub User's Guide

12-2 Oracle Product Hub Implementation Guide
Creating Match Rules
A match rule defines matching criteria in order to find matches between the incoming
external (source system) items and Oracle Product Information Management Data Hub
(PIMDH) items. Create match rules at the item catalog level.
After uploading the records into the interface table, PIMDH determines if cross-
references for items exist in the production table. If the source system item matches a
PIMDH item name, the system confirms the match. At the source system batch level,
users can define the default matching rule and choose whether to run the matching rule
automatically upon data upload. If you choose to run the matching rule automatically,
then a concurrent request launches to find a match using the default matching rule for
all unconfirmed records. Alternatively, you can select a match rule and launch the
concurrent request to find a match for all unconfirmed items. You can run different
matching rules against each batch one at a time while searching to match batch items to
the appropriate PIMDH items. The matching process only applies to unconfirmed
items. You cannot make changes to the batch while the matching concurrent request
executes. The system searches to match source system items against all PIMDH items,
including unapproved items.
To create a match rule for an item catalog:
1. Navigate to the Setup Workbench. From the Items tab, click the Match Rules sub-
tab. Click Create.
2.
Name the match rule and provide a Description. Check Set as Default to have this
match rule automatically appear as the default item catalog match rule for source
systems. Optionally, you can select another default match rule when defining a
source system.
Setting Up Inbound Product Data Synchronization and Data Quality Management 12-3
3. Click Add Criteria.
4. Find and select the item attributes for which you want to add criteria using either
the Attribute Name, Business Entity, or Attribute Group field. Click Apply.
Choose from the following business entities:
• Item
• Item Organization/Store
• Item Revision
• Item Supplier
Tip: You can match the following attributes by keywords, using
fuzzy, stemming, and synonym searches:
• item
• item description
• item long description
• item catalog category
• manufacturer
• manufacturer part number
• supplier
• supplier part number
All other attributes must match exactly. To use synonym searches,
you must load a thesaurus into the database and set the site level
EGO: Thesaurus for Matching profile option to Yes.

12-4 Oracle Product Hub Implementation Guide
5. Once you have added all of the criteria, click Apply.
To optionally create a match rule for an item catalog category:
After defining match rules at the item catalog level, you can optionally create additional
match rules for individual item catalog categories.
1. Navigate to the Setup Workbench. Click the Item Catalog Categories tab. Search for
the item catalog category, then click an item catalog category name link.
2. Select Match Rules from the list of options under the Item Catalog Categories sub-
tab. From here, follow the same procedure to create match rules for the item catalog
category as you did to create match rules for an item catalog.
Note: The item catalog match rules are listed along with the item
catalog category match rules, but you cannot update them from
within the item catalog category.

Setting Up Inbound Product Data Synchronization and Data Quality Management 12-5
Related Topics
Overview of Inbound Product Data Synchronization and Data Quality Management,
Oracle Product Hub User's Guide
Defining Source Systems, page 12-5
Defining Source Systems
When importing data from a source other than Oracle Product Information
Management Data Hub (PIMDH), you must create a source system within Import
Workbench.
To define a source system:
1.
Navigate to the Import Workbench and select the Source System Setup tab.
2. Click Define Source System to create a new source system.

12-6 Oracle Product Hub Implementation Guide
3.
Alternatively, you can search for and view any existing source system item that is
enabled only for customer items. Enable it for items.
4.
On the Define Source System page, enter the following for the source system:
• a unique name
• a unique code
Note: The code can be alphanumeric, but must not contain any
spaces. Ensure that the code matches the System Code defined
on the System Setup page within the corresponding Oracle
Application Integration Architecture (AIA).
Select the Enable For Items check box if you plan to use this source system for item-
related data.
Additional Information: Oracle Product Hub uses the same
architecture as Oracle Customer Data Hub. The Enable For Items
check box communicates that you plan to enter item-related data.
You can always uncheck this box at a later time.
Select the Enable for Data Pool check box if the source system is a GDSN data pool.
The system can perform certain tasks for GDSN batches, such as:
Setting Up Inbound Product Data Synchronization and Data Quality Management 12-7
• using a group ID to process an entire item hierarchy
• automatically sending a message to the data pool once data is imported
• enabling you to send messages to the data pool as needed
Additional Information: You can specify a GDSN-enabled source
system for both GDSN and non-GDSN batches. However, you
cannot specify a non-GDSN source system for a GDSN batch.
5. On the Define Source System page, Click the Data Load Options sub-tab.
6. Select Yes by Automatically Match on Data Load if you want to run match rules.
Tip: If you want to load data from a source system and manually
inspect it before running match rules, then select No.
7.
If you are using match rules, then select a Default Item Catalog Match Rule from
the list.
8.
Determine whether to check or uncheck Apply Default Match Rule To All Records
.
• Uncheck - The system applies the default item catalog category-level match rule
to unconfirmed items with an assigned item catalog category. The system
assigns the item catalog level match rule for items with no item catalog
category.
Check - The system applies the default item catalog-level match rule to all
unconfirmed items.
9.
Select Yes if you want to Automatically Confirm Single Matches that you find
when running match rules for the entire batch. If you select No, then the system
tries to match all unconfirmed records using the default match rule.
10.
Select Yes if you want to Automatically Confirm New Item on No Match. When
you run match rules for the entire batch, this option enables you to automatically
confirm an item with no matches as a new item. If you select No, then you must
manually move any unmatched items from the Unconfirmed tab to the Confirmed
tab, where they are marked with the match status of New.
Note: If the Item Number and Description are not provided, the
Source System Item Reference and Description will be used as the
Item Number and Description by default.
12-8 Oracle Product Hub Implementation Guide
11. Select the appropriate Import option:
• Immediately on data load - automatically updates the Oracle Item Master table
with matched data.
• Schedule Data and Time - select the date and time to import the confirmed
items or structures in the batch.
• None - leaves the data in the Import Workbench. You can manually import the
data at a later time.
12.
Select the appropriate Default Revision Import Policy:
• Create New - creates a new version of the item.
• Update Latest - updates the latest item revision upon import.
13.
Click the Import Options sub-tab.
Define default import options here. You can change the import options for a
particular batch later, if necessary.

Setting Up Inbound Product Data Synchronization and Data Quality Management 12-9
14. Select one of the following Change Order options:
• Add To Existing - associates the imported data with an existing change order.
• Create New - creates a new change order for the imported data.
Additional Information: When creating a new change order,
you have the opportunity to enter or select the following:
• Change Order Category
• Change Order Type
• Change Order Name
• Change Order Description
Once you select the change order type, depending on the setup,
the Change Order Number field is automated or you must
manually enter a change order number.
• None - imports the data into PIMDH without going through a change approval
process.
12-10 Oracle Product Hub Implementation Guide
15. Select one of the following New Item Request options:
• None - you cannot create any new item requests from this source system.
Instead, the system creates draft items. Later, you can navigate to the Item
Workbench, further define the draft items, and add it to a new item request.
See:
• One per Item Catalog Category - create one new item request per item catalog
category within an imported batch. This new item request can contain multiple
line items.
• One per Item - create one new item request per item.
For more information about new item requests, see: Creating New Item Requests,
Oracle Product Hub User's Guide.
16.
If you are importing structures, select the following default options:
• Structure Type
Caution:
Oracle Product Hub recommends avoiding the use of
the Root structure type. User-defined attributes and import
formats are not supported for the Root structure type.
• Structure Name
• Effectivity Control Type - choose Date or Model/Unit Number
• Structure Contains - choose All Components or Changed Components Only
17. Select one of the following Data Import options:
• Import All Data
• Create Cross References Only - Select this option if you want to create cross-
references only. It will not import the data.
18.
Click the Mapping sub-tab. Select one of the following Mapping Process options:
• Define in PIMDH - Enables you to define the mapping of attributes between an
external source system and PIM Data Hub within PIM Data Hub.
• External - Enables you to upload an XSLT file containing mapping information
between an external source system and PIM Data Hub.
• None - No mapping occurs.


Workflows for Change Management A-1
A
Workflows for Change Management
This appendix covers the following topics:
• Workflows for Change Management
Workflows for Change Management
The system uses Oracle Workflow technology to automate business processes in
Change Management and Group Member registration. You must set up Oracle
Workflow to implement Oracle Product Hub.
Additional Information: Run wfver.sql under $FND_TOP/sql for
detailed information about workflow versions.
Workflow Setup
Refer to the Oracle Workflow Implementation and User Documentation required for
setup.
Overview of Change Management Workflows
Change Management uses Oracle Workflow technology to execute workflow routing
for change objects and events occurring in a change object (such as Submit, Reassign,
Priority Change, and Status Change actions). Change Management enables you to
model your business processes in terms of generic order processes. You can model your
business processes by customizing or extending seeded workflow processes and/or
modifying custom hook PL/SQL procedures.
For more information about customizing workflow processes, refer to Customizing
Change Management Workflows, page 7-47.

A-2 Oracle Product Hub Implementation Guide
Viewing Processes in Oracle Workflow Builder
From within the Oracle Workflow Builder you can view the different workflow
processes and their associated functions, messages, subprocesses, notifications, and
properties.
To view processes in Oracle Workflow Builder:
1. Within Oracle Workflow Builder, select Open from the File menu and connect to
the database. Alternatively, you can connect to the workflow definitions file
engchgmt.wft located in the product directory tree of your Oracle Applications
server.
2. Expand the data source, and then select the item type branch within that data
source.
3.
Expand the processes branch within your item type and select a process activity to
display the diagram of the process in a Process window.
Display Name (Internal
Name)
Purpose Location of Flat File Store
on Server (Location of other
Flat File Stores with Item
Type embedded)
ENG: Standard(ENGWFSTD) Contains a collection of
commonly used (by other Eng
Workflow Item Types)
Function Activities and
Lookup Types.If the activity
will be shared by more than
one object's process, create the
activity in the ENG: Standard
(ENGWFSTD) item type.
Otherwise, create the activity
in the appropriate object's
item type
$ENG_TOP/patch/115/import
//engchmgt.wft
Change (ENGCACT) Contains activities, attributes,
notifications, and processes
used by Change Action
Process
$ENG_TOP/patch/115/import
//engchmgt.wft
Change Line (ENGCLACT) Contains activities, attributes,
notifications, and processes
used by Change Line Action
Process
$ENG_TOP/patch/115/import
//engchmgt.wft

Workflows for Change Management A-3
Display Name (Internal
Name)
Purpose Location of Flat File Store
on Server (Location of other
Flat File Stores with Item
Type embedded)
Change Workflow Routing
(ENGCRT)
Contains activities, attributes,
notifications, and processes
used by Change Approval
Routing Process
$ENG_TOP/patch/115/import
//engchmgt.wft
Change Workflow Routing
Step(ENGCSTEP)
Contains activities, attributes,
notifications, and processes
used by Change Approval
Routing Step Process
$ENG_TOP/patch/115/import
//engchmgt.wft
Pre-Seeded Workflow Processes
Change (ENGCACT)
Process Internal Name Process Display Name Description
INITIATE_CHANGE Initiate Change Sends an assignment
notification to assignee and
starts "Initiate Change Line"
workflow if Change has a
line. This workflow is started
when users submit a Change
Object.
PRIORITY_CHANGE Priority Change Sends a priority change
notification to Requestor,
Owner, and Assignee for
changes. This workflow is
started when users change the
priority for a Change Object.
REASSIGN_CHANGE Reassign Change Sends an assignment
notification to assignee. This
workflow is started when
users reassign a Change
Object.

A-4 Oracle Product Hub Implementation Guide
Process Internal Name Process Display Name Description
REQUEST_COMMENT Request Comment Sends a notification to request
comment to specified people
on the Request Comment
Action page. When the
recipient responds to the
request notification,
Workflow sends a response
notification to the requestor.
This workflow is started
when users request comment
for a Change Object.
RESPONSE_FYI Send Response FYI This process is called when
the recipient responds to the
request notification in
Request Comment workflow
process.
STATUS_CHANGE Status Change Sends a status change
notification to Requestor,
Owner, and Assignee for a
change. This workflow is
started when users change the
status for a Change Object.
Change Line (ENGCLACT)
Process Internal Name Process Display Name Description
INITIATE_CHANGE Initiate Change Sends an assignment
notification to assignee. This
workflow is started from the
Change Header's Initiate
Change Workflow or when a
user creates a Change Line if
Change Header is Open.
REASSIGN_CHANGE Reassign Change Sends an assignment
notification to the assignee.
This workflow is started
when a user reassigns a
Change Line.

Workflows for Change Management A-5
Process Internal Name Process Display Name Description
STATUS_CHANGE Status Change Sends a status change
notification to Header
Requestor, Header Owner,
Header Assignee, Line Owner
and Line Assignee. This
workflow is started when a
user changes status for a
Change Line.
Change Workflow Routing (ENGCRT)
Process Internal Name Process Display Name Description
ROUTE_AGENT Workflow Routing Agent Controls Workflow Routing
and sends Approval Status
change notification to
Requestor, Owner, and
Assignee for a Change. This
workflow is started when a
user submits an Workflow
Routing for a Change Object.
Also this workflow is aborted
when user aborts an
Workflow Routing.

A-6 Oracle Product Hub Implementation Guide
Change Workflow Routing Step (ENGCSTEP)
Process Internal Name Process Display Name Description
REQUEST_DEFINITION Definition Sends a definition request
notification to specified
assignees on Workflow
Routing page and controls
definition request for New
Item Request. If the assignees
do not respond by the
specified period, workflow
will also send a reminder
notification. Once the step is
completed, workflow will
return control parent
Workflow Routing Agent
workflow. This workflow is
started from Workflow
Routing Agent based on the
definition of Workflow
Routing.
REQUEST_DEFIINITION_A
ND_APPR
Definition and Approval Sends a definition and
approval request notification
to specified assignees on
Workflow Routing page and
controls definition and
approval request for New
Item Request. If the assignees
do not respond by the
specified period, workflow
will also send a reminder
notification. Once the step is
completed, workflow will
return control parent
Workflow Routing Agent
workflow. This workflow is
started from Workflow
Routing Agent based on the
definition of Workflow
Routing.

Workflows for Change Management A-7
Process Internal Name Process Display Name Description
REQUEST_APPROVAL Request Approval Sends an approval request
notification to specified
assignees on Workflow
Routing page and controls
approval request. If the
assignees do not respond by
the specified period,
workflow will also send a
reminder notification. Once
the step is approved,
workflow will return control
parent Workflow Routing
Agent workflow. This
workflow is started from
Workflow Routing Agent
based on the definition of
Workflow Routing.
REQUEST_COMMENT Request Comment Sends a comment request
notification to specified
assignees on Workflow
Routing page and controls
comment requests. If the
assignees do not respond by
the specified period,
workflow will also send a
reminder notification. Once
the step is completed,
workflow will return control
parent Workflow Routing
Agent workflow. This
workflow is started from
Workflow Routing Agent
based on the definition of
Workflow Routing.

A-8 Oracle Product Hub Implementation Guide
Process Internal Name Process Display Name Description
SEND_FYI FYI Sends an FYI notification to
specified assignees on
Workflow Routing page.
Once the step is completed,
workflow will return control
parent Workflow Routing
Agent workflow. This
workflow is started from
Workflow Routing Agent
based on the definition of
Workflow Routing.
Following are two Process Attributes for the Workflow Routing Step workflow process:
1. Default Change Role Instance Set (DEFAULT_CHANGE_ROLE)
Assigned on current or last Workflow Routing. Implicit grants securely based on
the steps workflow process.
ENG_CHANGE_WF_APPROVERS -> Granted Role: Approver
(ENG_CHANGE_APPROVER)
ENG_CHANGE_WF_REVIWERS -> Granted Role: Reviewer
(ENG_CHANGE_REVIEWER).
Implicit Role (Instance Set) to be granted is defined in the Step workflow process
attributes
DEFAULT_CHANGE_ROLE
In case of seeded Step Workflow Process
Request Approval (DEFAULT_CHANGE_ROLE:
"ENG_CHANGE_WF_APPROVERS")
The step assignees get "Approver" implicit role from instance set
ENG_CHANGE_WF_APPROVERS.
Request Comment & FYU (DEFAULT_CHANGE_ROLE:
"ENG_CHANGE_WF_REVIEWERS")
The step assignees get "Reviewer" implicit role from instance set
ENG_CHANGE_WF_REVIEWERS. Oracle Workflow does not support other roles
by default.
2. Activity Condition Code (ACTIVITY_CONDITION_CODE)
Attribute will indicate whether or not the Condition radio box is displayed on the
Workflow Routing Create/Update step page. Acceptable values are Y or N.
Workflows for Change Management A-9
3. Enable Flag in Type: Definition (DEFINITION)
Attribute will indicate whether or not the this process is displayed in the Workflow
Process pull-down list based on the Definition Type of Workflow Routing
(Template) on the Workflow Routing Create/Update step page. Acceptable values
are Y or N.
4. Enable Flag in Type: Approval (APPROVAL)
Attribute will indicate whether or not the this process is displayed in the Workflow
Process pull-down list based on the Approval Type of Workflow Routing
(Template) on the Workflow Routing Create/Update step page. Acceptable values
are Y or N.
5. Enable Flag in Type: Definition and Approval (DEFINITION_APPROVAL)
Attribute will indicate whether or not the this process is displayed in the Workflow
Process pull-down list based on the Definition and Approval Type of Workflow
Routing (Template) on the Workflow Routing Create/Update step page. Acceptable
values are Y or N.
6. Enable Flag in Type: Generic (GENERIC)
Attribute will indicate whether or not the this process is displayed in the Workflow
Process pull-down list based on the Generic Type of Workflow Routing (Template)
on the Workflow Routing Create/Update step page. Acceptable values are Y or N.
7. Association Enabled Flag (ASSOC_ENABLED)
Attribute will indicate whether or not the the association for the assignee is
available in the Workflow Routing Step for New Item Request on the
Create/Update step page. Acceptable values are Y or N. This atttribute is only
applicable for "Definition" and "Definition and Approval" Workflow.
Seeded Workflow Item Attributes
The following table describes the common item attributes for Change Management
Workflow. Each Workflow Item Type should have these attributes.

A-10 Oracle Product Hub Implementation Guide
All Item Type
Internal
Name
Display
Name
Description Type Length Misc info
(used for
etc)
CHANGE_ID Change Id Engineering
Change
Unique
Identifier
Number - Primary Key
Values.
CHANGE_N
OTICE
Change
Number
Engineering
Change
Number
Text 30 Old Primary
Key Values.
CHANGE_N
AME
Change
Name
Engineering
Change
Name
Text 240 Token
replacement
for messages.
ORGANIZAT
ION_ID
Organization
Id
Organization
Id
Number - Old Primary
Key Values.
ORGANIZAT
ION_CODE
Organization
Code
Organization
Code
Text 3 Token
replacement
for messages.
CHANGE_M
ANAGEMTE
NT_TYPE
Change
Management
Type
Change
Management
Type
Text 40 Token
replacement
for messages.
DESCRIPTIO
N
ECO
Description
ECO
Description
Text 2000 Token
replacement
for messages.
STATUS Status Change
Status
Text 80 Token
replacement
for messages.
APPROVAL_
STATUS
Approval
Status
ECO
Approval
Status
Text 80 Token
replacement
for messages.
PRIORITY Priority Priority Text 50 Token
replacement
for messages.

Workflows for Change Management A-11
Internal
Name
Display
Name
Description Type Length Misc info
(used for
etc)
REASON Reason Reason Text 50 Token
replacement
for messages.
ASSIGNEE_
NAME
Assignee
Name
Assignee
Name
Text 360 Token
replacement
for messages.
ASSIGNEE_C
OMPANY
Assignee
Company
Assignee
Company
Text 360 Token
replacement
for messages.
WF_USER_R
OLE
WF Owner
User Role
Role of
Person Who
Started the
Workflow
Role - Runtime
information
for the work
item.
WF_USER_I
D
WF Owner
User Id
User Id of
Person Who
Started the
Workflow
NUMBER - Runtime
information
for the work
item.
HOST_URL Host URL
and port
Host URL
and port
Text - Runtime
information
for the work
item.
DEFAULT_S
TYLE_SHEET
Default Style
Sheet
Default Style
Sheet
Text 100 /OA_HTML/c
abo/styles/bla
f.
cssTemporar
y
placeholders
for HTML
notifications.
CHANGE_D
ETAIL_PAGE
_URL
Change
Detail Page
URL
Change
Detail Page
URL
URL - -

A-12 Oracle Product Hub Implementation Guide
Internal
Name
Display
Name
Description Type Length Misc info
(used for
etc)
MESSAGE_T
EXT_BODY
Message Text
Body
Message Text
Body
Document - Temporary
placeholders
for
notifications.
MESSAGE_H
TML_BODY
Message
HTML Body
Message
HTML Body
Document - Temporary
placeholders
for
notifications.
REVIEWERS
_ROLE
Change
Standard
Reviewer
Role
Change
Standard
Reviewer
Role
Role - Temporary
placeholders
for
notifications.
ASSIGNEE_R
OLE
Assignee
Role
Assignee
Role
Role - Temporary
placeholders
for
notifications.
ACTION_ID Change
Action Id
Change
Action Id
Number - Primary Key
for Change
Actions
(ENG_CHAN
GE_ACTION
S.
ACTION_ID)
Runtime
information
for the work
item.
ADHOC_PA
RTY_LIST
Adhoc Party
List
Adhoc Party
List
Text - Runtime
information
for the work
item.
ADHOC_PA
RTY_ROLE
Adhoc Party
Role
Adhoc Party
Role for
Change
Action
Role - Temporary
placeholders
for
notifications.

Workflows for Change Management A-13
Internal
Name
Display
Name
Description Type Length Misc info
(used for
etc)
RESPONSE_
TIMEOUT
Response
Timeout
Response
Timeout in
Minutes for
Action
calculated
from
Response_By
_Date
Number - -
RESPONSE_
COMMENT
Response
Comment
Response
Comment
Text - Temporary
placeholders
for
notifications.
ATTACHME
NTS
Attachments Attachments Document - Temporary
placeholders
for
notifications:
Notification
Detail Page
Attachment
LinkFND:
entity===
WF_USER_I
D
WF Owner
User Id
User Id of
Person Who
Started/Abort
ed the
Workflow
NUMBER - Runtime
information
for the work
item.
WF_USER_R
OLE
WF Owner
User Role
Role of
Person Who
started/aborte
d the
Workflow
Role - Runtime
information
for the work
item.

A-14 Oracle Product Hub Implementation Guide
Internal
Name
Display
Name
Description Type Length Misc info
(used for
etc)
WF_ADMINI
STRATOR
WF
Administrato
r
WF
Administrato
r
Role - Constant:
SYSADMINF
or
WFERROR:
DEFAULT_E
RROR
(Default
Error
Process.)
WF_SIG_POL
ICY
Signature
Policy
Signature
Policy
Text - To use
Signature
Policy
defaulting in
future.
ERROR_TIM
EOUT
WF Error
Timeout
Value
Timeout
Value in Days
Number - Constant:
0For
WFERROR:
DEFAULT_E
RROR
(Default
Error
Process.)
RCS RCS version RCS version Text 240 RCS version
FROM_ROLE From Role From Role Role - Item
Attribute
which holds
the From
Role.
(Message
#FROM_ROL
E)

Workflows for Change Management A-15
ENGCLACT Specific Item Attributes
Internal
Name
Display
Name
Description Type Length Misc info
(used for
etc)
CHANGE_LI
NE_ID
Change Line
Id
Engineering
Change Line
Unique
Identifier
Number - Primary Key
Values.
LINE_NAME Change Line
Name
Engineering
Change Line
Name
Text 240 Token
replacement
for messages.
LINE_DESCR
IPTION
Change Line
Description
Change Line
Description
Text 4000 Token
replacement
for messages.
LINE_SEQUE
NCE_NUMB
ER
Change Line
Sequence
Number
Change Line
Sequence
Number
Number Token
replacement
for messages.
LINE_STATU
S
Change Line
Status
Change Line
Status
Text 80 Token
replacement
for messages.
LINE_ASSIG
NEE_NAME
Change Line
Assignee
Name
Change Line
Assignee
Name
Text 360 Token
replacement
for messages.
LINE_ASSIG
NEE_COMP
ANY
Change Line
Assignee
Company
Change Line
Assignee
Company
Text 360 Token
replacement
for messages.
LINE_REVIE
WERS_ROLE
Change Line
Reviewer
Role
Change Line
Reviewer
Role
Role - Temporary
placeholders
for
notifications.
LINE_ASSIG
NEE_ROLE
Change Line
Assignee
Role
Change Line
Assignee
Role
Role - Temporary
placeholders
for
notifications.

A-16 Oracle Product Hub Implementation Guide
Internal
Name
Display
Name
Description Type Length Misc info
(used for
etc)
LINE_ATTA
CHMENTS
Attachments Attachments Document - Temporary
placeholders
for
notifications:
Notification
Detail Page
Attachment
LinkFND:
entity===
ENGCRT Specific Item Attributes
Internal
Name
Display
Name
Description Type Length Misc info
(used for
etc)
ROUTE_ID Route Id
(Workflow
Routing Id)
Route Id Number - Primary Key
Values for
Change
Route.
STEP_ID Current Step
Id (Workflow
Routing Step
Id)
Current Step
Id
Number - Primary Key
Values for
Current Step
Id.
ROUTE_PEO
PLE_ROLE
Route
(Workflow
Routing)
People Role
All people in
the Workflow
Routing
workflow
that have
already been
notified (i.e.
completed or
in process
steps).
Role - Temporary
placeholders
for
notifications.

Workflows for Change Management A-17
ENGCSTEP Specific Item Attributes
Internal
Name
Display
Name
Description Type Length Misc info
(used for
etc)
ROUTE_ID Workflow
Routing Id
Workflow
Routing Id
Number - Primary Key
Values for
Change
Route.
STEP_ID Workflow
Routing Step
Id
Current Step
Id
Number - Primary Key
Values for
Step Id.
ROUTE_PEO
PLE_ROLE
Workflow
Routing
People Role
All people in
the Workflow
Routing
workflow
that have
already been
notified (i.e.
completed or
in process
steps).
Role - Temporary
placeholders
for
notifications.
STEP_SEQ_N
UM
Workflow
Routing Step
Sequence
Number
Workflow
Routing Step
Sequence
Number
Number - Temporary
placeholders
for
notifications.
STEP_PEOPL
E_ROLE
Workflow
Routing Step
People Role
Workflow
Routing Step
People Role
Role - Temporary
placeholders
for
notifications.
STEP_COND
ITION
Workflow
Routing Step
Activity
Condition
Workflow
Routing Step
Activity
Condition
Text 30 Temporary
placeholders
for
notifications.

A-18 Oracle Product Hub Implementation Guide
Internal
Name
Display
Name
Description Type Length Misc info
(used for
etc)
STEP_VOTIN
G_OPTION
Workflow
Routing Step
Voting
Option for
Activity
Condition
Workflow
Routing Step
Voting
Option for
Activity
Condition
Lookup - Standard
Voting
Option.
YES_RESPO
NSE_PERCE
NT
Yes Response
Percentage of
Votes
Yes Response
Percentage of
Votes
Number - Temporary
placeholders
for
notifications
NO_RESPON
SE_PERCEN
T
No Response
Percentage of
Votes
No Response
Percentage of
Votes
Number - Temporary
placeholders
for
notifications
Change Management Workflow PL/SQL Packages
Change Management Workflow Private APIs will contain the following list of packages.
These are private APIs for reference purposes only for your customization.
Package Name File Name Description Location of Flat File
Store on Server
ENG_WORKFLOW_
PUB
ENGBWKFS.pls
ENGBWKFB.pls
Private APIs: for
developers or
consultants at Oracle:
This package contains
All PL/SQL Function
for Workflow
Function Activity.
$ENG_TOP/patch/115
/sql
ENG_WORKFLOW_
UTIL
ENGUWKFS.pls
ENGUWKFS.pls
Private APIs: This
package contains
utility functions and
procedures for Eng
Workflows.
$ENG_TOP/patch/115
/sql

Workflows for Change Management A-19
Package Name File Name Description Location of Flat File
Store on Server
ENG_WORKFLOW_
NTF_UTIL
ENGUNTFS.pls
ENGUNTFS.pls
This package contains
utility functions and
procedures for Eng
Workflow
Notifications.
$ENG_TOP/patch/115
/sql

A-20 Oracle Product Hub Implementation Guide
Package Name File Name Description Location of Flat File
Store on Server
ENG_WORKLFOW_
EXT
ENGXWKFS.pls
ENGXWKFB.pls
This package contains
procedures that serve
as "hooks" into the
Eng Workflows for
customization of the
workflows.
The
"StartCustomWorkflo
w " and the
"AbortCustomWorkfl
ow" are called from
ENG_WORKFLOW_
UTIL package when a
workflow process is
started and aborted,
respectively. Users
with customized
workflows can add
their custom logic in
these two procedures
to be executed at the
appropriate times.
Also
GetCustomMessageB
ody is called from the
seeded PL/SQL
Document APIs when
system generates
notification. Users
can customize the
PL/SQL procedure to
modify notification
contents.
Additionally, users
can create new
procedures in this
package for custom
workflow activities.
$ENG_TOP/patch/115
/sql

Item and Catalog Business Events B-1
B
Item and Catalog Business Events
This appendix covers the following topics:
• Business Events
Business Events
Using Oracle Workflow, you can automatically trigger actions based on the following
business events. Examples of actions you can trigger include issuing notifications and
launching a workflow.
The following table lists business events, as well as a description and the event
parameters of each event.
Item Business Events
Event Name Event Description Event Parameter Names
and Descriptions
oracle.apps.ego.item.
postAML.Change
Item AML is changed (such as
a manufacturer part number
is added, updated, or deleted)
Applicable: SSWA, FORMS
DML_TYPE: CREATE,
UPDATE, DELETE
INVENTORY_ITEM_ID: Item
ID
ORGANIZATION_ID:
Organization ID
MANUFACTURER_ID:
Manufacturer ID
MFG_PART_NUM:
Manufacturer Part Number

B-2 Oracle Product Hub Implementation Guide
Event Name Event Description Event Parameter Names
and Descriptions
oracle.apps.ego.item.
postItemCreate
Item Creation
Applicable: SSWA, FORMS,
API
INVENTORY_ITEM_ID: Item
ID
ITEM_NUMBER: Item ID
ORGANIZATION_ID:
Organization ID
ORGANIZATION_CODE:
Organization Code
ITEM_DESCRIPTION: Item
Description
oracle.apps.ego.item.
postItemUpdate
Item Update
Applicable: SSWA, FORMS,
API
INVENTORY_ITEM_ID: Item
ID
ITEM_NUMBER: Item ID
ORGANIZATION_ID:
Organization ID
ORGANIZATION_CODE:
Organization Code
ITEM_DESCRIPTION: Item
Description
oracle.apps.ego.item.
postGTINAttributeChange
This event is obsolete. -
oracle.apps.ego.item.
postItemApproved
On Item Approval
Applicable: SSWA
INVENTORY_ITEM_ID: Item
ID
ORGANIZATION_ID:
Organization ID
oracle.apps.ego.item.
postItemBulkload
Bulk Item processing
(creation, update)
Applicable: XL import, IOI
REQUEST_ID: Concurrent
Request ID that processed the
bulk item import

Item and Catalog Business Events B-3
Event Name Event Description Event Parameter Names
and Descriptions
oracle.apps.ego.item.
postXrefChange
Item cross-reference creation,
update, or deletion
Applicable : SSWA, FORMS
DML_TYPE: CREATE,
UPDATE, DELETE
INVENTORY_ITEM_ID: Item
ID
ORGANIZATION_ID:
Organization ID
CROSS_REFERENCE_TYPE:
Cross-reference Type
CROSS_REFERENCE: Cross-
reference
oracle.apps.ego.item.
postRevisionChange
Item revision is created or
updated
Applicable: SSWA, FORMS,
IOI, XL import, API
DML_TYPE: CREATE,
UPDATE, DELETE
INVENTORY_ITEM_ID: Item
ID
ORGANIZATION_ID:
Organization ID
REVISION_ID: Revision ID
REQUEST_ID: Concurrent
Request ID
oracle.apps.ego.item.
postItemRoleChange
An item role grant is changed
(added, modified, or
removed)
Applicable: SSWA
DML_TYPE: CREATE,
UPDATE, DELETE
INVENTORY_ITEM_ID: Item
ID
ORGANIZATION_ID:
Organization ID
ROLE_ID: Role ID
PARTY_TYPE: Party Type
(Person, Group or Company)
PARTY_ID: Party ID
START_DATE: Start Date

B-4 Oracle Product Hub Implementation Guide
Event Name Event Description Event Parameter Names
and Descriptions
oracle.apps.ego.batch.
postbatchprocess
Post Batch Import of Item and
Item Related Entities
This event is raised when a
batch is processed.
REQUEST_ID: Concurrent
Request ID that processes the
batch.
oracle.apps.ego.item.
preAttributeChange
Item Attribute group row is
created, updated, or deleted.
This event is raised before the
change is committed.
Applicable: SSWA,
Concurrent Program,
WebADI, API
DML_TYPE: CREATE,
UPDATE, DELETE
ATTR_GRP_NAME:
Attribute Group Name
EXTENSION_ID: Extension
ID that uniquely identifies the
record in the UDA extension
table
INVENTORY_ITEM_ID: Item
ID
ORGANIZATION_ID:
Organization ID
REVISION_ID: Revision ID

Item and Catalog Business Events B-5
Event Name Event Description Event Parameter Names
and Descriptions
oracle.apps.ego.item.
postAttributeChange
Item Attribute group row is
created, updated, or deleted.
This event is raised after the
change is committed.
Applicable: SSWA
DML_TYPE: Indicates the
type of operation. Values can
be CREATE, UPDATE, or
DELETE.
ATTR_GRP_NAME:
Attribute Group Name
EXTENSION_ID: Extension
ID that uniquely identifies the
record in the UDA extension
table
INVENTORY_ITEM_ID: Item
ID
ORGANIZATION_ID:
Organization ID
REVISION_ID: Revision ID
PK1_VALUE: Supplier ID
PK2_VALUE: SupplierSite ID
DATA_LEVEL_ID: Data
Level ID
oracle.apps.ego.item.
associations.create
Item Association Creation
This event is raised after an
item's association with a
supplier, suppliersite, or
suppliersite organization is
created.
INVENTORY_ITEM_ID: Item
ID
ORGANIZATION_ID:
Organization ID
ASSOCIATION_ID:
Association Id
ASSOCIATION_TYPE_CODE
: Indicates the type of
association (supplier,
suppliersite, or suppliersite
organization).

B-6 Oracle Product Hub Implementation Guide
Event Name Event Description Event Parameter Names
and Descriptions
oracle.apps.ego.item.
associations.delete
Item Association Deletion
This event is raised after an
item's association with a
supplier, suppliersite, or
suppliersite organization is
deleted.
INVENTORY_ITEM_ID: Item
ID
ORGANIZATION_ID: Org ID
SUPPLIER_ID: Supplier ID
SUPPLIER_SITE_ID: Supplier
Site ID
oracle.apps.ego.item.
associations.update
Item Association Update
This event is raised after an
item's association with a
supplier, suppliersite, or
suppliersite organization is
updated.
INVENTORY_ITEM_ID: Item
ID
ORGANIZATION_ID:
Organization ID
ASSOCIATION_ID:
Association Id
ASSOCIATION_TYPE_CODE
: Indicates the type of
association (supplier,
suppliersite, or suppliersite
organization).
Catalog Business Events
Event Name Event Description Event Parameter Names
and Descriptions
oracle.apps.ego.item.
postCatalogCategoryChange
Catalog category is changed
such as when categories are
created, updated or deleted
Applicable: SSWA, FORMS
DML_TYPE: Indicates the
type of operation. Values can
be CREATE, UPDATE, or
DELETE.
CATEGORY_NAME:
Category Name
CATEGORY_ID: Category ID

Item and Catalog Business Events B-7
Event Name Event Description Event Parameter Names
and Descriptions
oracle.apps.ego.item.
postCatalogAssignmentChan
ge
Post Item Catalog Assignment
Change Event
This event is raised when an
item's assignment to a
category (within a catalog) is
created, updated or deleted.
Applicable: SSWA, FORMS,
IOI
DML_TYPE: Indicates the
type of operation. Values can
be CREATE, UPDATE, or
DELETE.
INVENTORY_ITEM_ID: Item
ID
ORGANIZATION_ID:
Organization ID
CATALOG_ID: Catalog ID
CATEGORY_ID: Category ID
REQUEST_ID: Concurrent
Request ID
oracle.apps.ego.item.
postValidCategoryChange
Post Valid Category Change
Event
This event is raised when a
category is added to or
removed from a catalog.
This event is also raised when
the attributes of catalog are
changed.
Applicable: SSWA, FORMS
DML_TYPE: Indicates the
type of operation. Values can
be CREATE, UPDATE, or
DELETE.
CATEGORY_SET_ID:
Category Set ID
CATEGORY_ID: Category ID
PARENT_CATEGORY_ID:
Parent Category ID

B-8 Oracle Product Hub Implementation Guide
Publishing Business Events
Event Name Event Description Event Parameter Names
and Descriptions
oracle.apps.ego.item.
syncItemCatalogCategory
A seeded event used when
publishing Item Catalog
Categories to other Oracle
Product Hub systems. The
seeded subscription invokes
the Item Catalog Category
Web Service, page G-18 for
publishing through the
Service Invocation
Framework of SOA Gateway
and should not be modified.
Refer to Implementing Service
Invocation Framework, Oracle
E-Business Suite Integrated
SOA Gateway Implementation
Guide for details about using
the SIF framework.
Event Data: Input Payload for
the webservice.
WFBES_SOAP_USERNAME:
SOAP user name to invoke
webservice.
WFBES_SOAP_PASSWORD_
MOD: Module Name to
retrieve the password stored
using the FND vault.
WFBES_SOAP_PASSWORD_
KEY: Module Key to retrieve
the password stored using the
FND vault.

Item and Catalog Business Events B-9
Event Name Event Description Event Parameter Names
and Descriptions
oracle.apps.ego.extfwk.
syncValueSet
A seeded event used when
publishing Value Sets to other
Oracle Product Hub systems.
The seeded subscription
invokes the Value Set Web
Service, page G-2 for
publishing through the
Service Invocation
Framework of SOA Gateway
and should not be modified.
Refer to Implementing Service
Invocation Framework, Oracle
E-Business Suite Integrated
SOA Gateway Implementation
Guide for details about using
the SIF framework.
Event Data: Input Payload for
the webservice.
WFBES_SOAP_USERNAME:
SOAP user name to invoke
webservice.
WFBES_SOAP_PASSWORD_
MOD: Module Name to
retrieve the password stored
using the FND vault.
WFBES_SOAP_PASSWORD_
KEY: Module Key to retrieve
the password stored using the
FND vault.
oracle.apps.ego.extfwk.
syncAttributeGroup
A seeded event used when
publishing Attribute Groups
to other Oracle Product Hub
systems. The seeded
subscription invokes the
Attribute Group Web Service,
page G-12 for publishing
through the Service
Invocation Framework of
SOA Gateway and should not
be modified.
Refer to Implementing Service
Invocation Framework, Oracle
E-Business Suite Integrated
SOA Gateway Implementation
Guide for details about using
the SIF framework.
Event Data: Input Payload for
the webservice.
WFBES_SOAP_USERNAME:
SOAP user name to invoke
webservice.
WFBES_SOAP_PASSWORD_
MOD: Module Name to
retrieve the password stored
using the FND vault.
WFBES_SOAP_PASSWORD_
KEY: Module Key to retrieve
the password stored using the
FND vault.

B-10 Oracle Product Hub Implementation Guide
Event Name Event Description Event Parameter Names
and Descriptions
oracle.apps.ego.item.
publishItemCatalogCategory
A seeded event used when
publishing Item Catalog
Categories to external systems
such as Siebel, Oracle Billing
and Revenue Management
(BRM), and Oracle Design
Studio via Batch Mode. It is
raised from the Publish Item
Catalog Categories Batch
page and indicates the
submittal of an ICC batch for
publishing.
BATCH_ID: Unique ID for
the ICC batch to publish.
PUBLISH_PARENT_HIERAR
CHY: Indicates whether or
not to publish the parent ICC
hierarchy along with an ICC.
Values include:
•
Y - publish parent ICC
hierarchy.
•
N - do not publish parent
ICC hierarchy.
PUBLISH_CHILD_HIERARC
HY: Indicates whether or not
to publish the child ICC
hierachy along with an ICC.
Values include:
•
Y - publish child ICC
hierarchy.
•
N - do not publish child
ICC hierarchy.
oracle.apps.ego.extfwk.
publishValueSet
A seeded event used when
publishing Value Sets to
external systems such as
Siebel and BRM via Batch
Mode. It is raised from the
Publish Value Sets Batch
page and indicates the
submittal of a Value Set batch
for publishing.
BATCH_ID: Unique ID for
the batch of ValueSets to
publish.

Item and Catalog Business Events B-11
Event Name Event Description Event Parameter Names
and Descriptions
oracle.apps.ego.item.
publishItem
A seeded event used when
publishing Items to external
systems such as Siebel and
BRM via Batch Mode. It is
raised from the Publish Items
Batch page and indicates the
submittal of an Items batch
for publishing.
BATCH_ID: Unique ID for
the batch of Items to publish.
STRUCTURE_FLAG:
Indicates whether or not to
publish an item's structure
along with the item. Values
include:
•
Y - publish structure.
•
N - do not publish
structure.
Note: oracle.apps.bom.
structure.publishStructure
is no longer raised when
publishing structures.
Other Business Events
Event Name Event Description Event Parameter Names
and Descriptions
oracle.apps.ego.gtin.
uccnetEvent
UCCnet GDSN Event -
oracle.apps.ego.item.
postCustItemXrefChange
Post Customer Item Cross
Reference Change
-
oracle.apps.ego.item.
postRelatedItemChange
Post Related Item Change -
oracle.apps.ego.orchestration.
postProcessMessage
Send Post Process
Confirmation Message Event
-

B-12 Oracle Product Hub Implementation Guide
Common Event Parameters
Event Parameter Name Description
Event_Type This parameter identifies the type of
transaction that raised the event. The values
are Single or Bulk.
Last_Updated_By Identifier of the user.
Last_Update_Date Identifies the date the transaction occurred.
Created_By Identifier of the user.
Note: In bulk events that include both
creation and update transactions, this
parameter is does not apply and is not
available.
Creation_Date Identifies the date the creation transaction
occurred.
Note: In bulk events that include both
creation and update transactions, this
parameter is does not apply and is not
available.
Request_Identifier When Event_Type = Bulk, this identifies the
concurrent request that processed the bulk
data set.
Related Topics
To view sample subscription functions, see Sample Subscription Functions, Business
Event Data for Oracle Bills of Material, Oracle Bills of Material User's Guide.
Using Item Business Events, Oracle Product Hub User's Guide

Reading Data for User-Defined Attributes C-1
C
Reading Data for User-Defined Attributes
This appendix covers the following topics:
• Overview
Overview
You can define an unlimited number of attribute groups for items without
programming them. You can define attributes using the setup user interface; definitions
are stored in metadata tables. However, you may also need to read attribute data to
interface with third party or custom systems.
Generate database views to read User-defined attributes data
Using the attribute group setup screens, you can generate database views for reading
user-defined attributes data. These views hide the complexity of dealing with the
attribute meta-data.
Using PL/SQL to Access Data for Attributes
Another way to access user-defined attribute data for a particular item is to use PL/SQL.
The EGO_USER_ATTRS_DATA_PUB procedure follows:
Additional Information: You can run EGO_USER_ATTRS_DATA_PUB.
GET_USER_ATTRS_DATA instead of
EGO_USER_ATTRS_DATA_PUB.GET_USER_ATTRS_EXT_DATA, but
EGO_USER_ATTRS_DATA_PUB.GET_USER_ATTRS_DATA does not
retrieve the following WHO column values:
• CREATED_BY
• CREATION_DATE
• LAST_UPDATED_BY

C-2 Oracle Product Hub Implementation Guide
• LAST_UPDATE_DATE
• LAST_UPDATE_LOGIN
Procedure GET_USER_ATTRS_EXT_DATA
p_api_version IN NUMBER
,p_object_name IN VARCHAR2
,p_pk_column_name_value_pairs IN
EGO_COL_NAME_VALUE_PAIR_ARRAY
,p_attr_group_request_table IN EGO_ATTR_GROUP_REQUEST_TABLE
,p_user_privileges_on_object IN EGO_VARCHAR_TBL_TYPE DEFAULT
NULL
,p_entity_id IN VARCHAR2 DEFAULT NULL
,p_entity_index IN NUMBER DEFAULT NULL
,p_entity_code IN VARCHAR2 DEFAULT NULL
,p_debug_level IN NUMBER DEFAULT 0
,p_init_error_handler IN VARCHAR2 DEFAULT FND_API.
G_FALSE
,p_init_fnd_msg_list IN VARCHAR2 DEFAULT FND_API.
G_FALSE
,p_add_errors_to_fnd_stack IN VARCHAR2 DEFAULT FND_API.
G_FALSE
,p_commit IN VARCHAR2 DEFAULT FND_API.
G_FALSE
,x_attributes_row_table OUT NOCOPY
EGO_USER_ATTR_ROW_TABLE

Reading Data for User-Defined Attributes C-3
,x_attributes_data_table OUT NOCOPY
EGO_USER_ATTR_DATA_EXT_TABLE
Caution: If you use procedure
GET_USER_ATTRS_DATA instead of
GET_USER_ATTRS_EXT_DATA, then use
OUT NOCOPY
EGO_USER_ATTR_DATA_TABLE instead.
,x_return_status OUT NOCOPY VARCHAR2
,x_errorcode OUT NOCOPY NUMBER
,x_msg_count OUT NOCOPY NUMBER
,x_msg_data OUT NOCOPY VARCHAR2
p_api_version
Callers should pass a constant value of 1.0.
p_object_name
Callers should pass a constant value of 'EGO_ITEM'
p_pk_column_name_value_pairs
This is a table of EGO_COL_NAME_VALUE_PAIR_OBJ objects specifying the
Inventory Item ID and Organization ID for which the caller wants attribute data. Callers
should create the table with code like the following:
l_pk_column_values EGO_COL_NAME_VALUE_PAIR_ARRAY;
l_pk_column_values := EGO_COL_NAME_VALUE_PAIR_ARRAY(
EGO_COL_NAME_VALUE_PAIR_OBJ('INVENTORY_ITEM_ID', <your inventory item
ID>) ,EGO_COL_NAME_VALUE_PAIR_OBJ('ORGANIZATION_ID', <your
organization ID>));
p_attr_group_request_table
This is a table of EGO_ATTR_GROUP_REQUEST_OBJ objects, one for each attribute
group whose values the caller wants. The objects also support requests for only some of
the attributes in the attribute group. Each EGO_ATTR_GROUP_REQUEST_OBJ object
in the table will look like the following:
EGO_ATTR_GROUP_REQUEST_OBJ(
NULL,
431,
C-4 Oracle Product Hub Implementation Guide
'EGO_ITEMMGMT_GROUP',
<your Attribute Group internal name>,
<your Revision ID if the Attribute Group is associated at the Revision level; otherwise
NULL>,
NULL,
NULL
<an optional comma-delimited list of the Attribute internal names whose values you
want, or NULL>);
p_user_privileges_on_object
This is an optional table of VARCHAR2s, one for each privilege the caller wants
validated against the View privileges of the attribute groups being requested. For
example, if a user invokes a procedure that calls Get_User_Attrs_Data, and the calling
procedure wants to enforce attribute group data security, the calling procedure could
pass a list of the user's privileges based on his/her role on the current item. If this
parameter is non-null, Get_User_Attrs_Data will enforce data security for those
attribute groups that have a View privilege defined.
p_entity_id, p_entity_index, p_entity_code
Parameters for use with ERROR_HANDLER package. Can safely be defaulted unless
caller wants to distinguish among errors for multiple items; if so, please investigate the
ERROR_HANDLER package for more details.
p_debug_level
Parameter to control debug logging; can safely be defaulted.
p_init_error_handler, p_init_fnd_msg_list, p_add_errors_to_fnd_stack
More parameters for use with ERROR_HANDLER package; can safely be defaulted.
p_commit
Controls whether or not Get_User_Attrs_Data issues a COMMIT statement at the end
of processing; present to comply with API standards, but since Get_User_Attrs_Data
does not perform any DML, can safely be defaulted.
x_attributes_row_table
This is a table of EGO_USER_ATTR_ROW_OBJ objects, each one representing a row of
user-defined attributes data (for example, one database table row of data). It contains
the Extension ID value from EGO_MTL_SY_ITEMS_EXT_VL (stored as
ROW_IDENTIFIER) and serves mainly as a way to organize the objects in
x_attributes_data_table.
x_attributes_data_table
This is a table of EGO_USER_ATTR_DATA_OBJ objects, each one representing a single
attribute value. All of the attribute values for a given row of data will share the same
ROW_IDENTIFIER value; as with x_attributes_row_table, the ROW_IDENTIFIER value
Reading Data for User-Defined Attributes C-5
is the Extension ID from EGO_MTL_SY_ITEMS_EXT_VL. Each object also contains the
attribute internal name (stored as ATTR_NAME) and its value (stored as
ATTR_DISP_VALUE).
x_return_status, x_errorcode, x_msg_count, x_msg_data
Four standard OUT parameters indicating what happened in processing. The first,
x_return_status, will equal FND_API.G_RET_STS_SUCCESS if processing succeeded,
FND_API.G_RET_STS_ERROR if an expected error case was encountered, or FND_API.
G_RET_STS_UNEXP_ERROR if something went wrong during processing. X_errorcode
is not used. X_msg_count indicates how many error messages were logged with
ERROR_HANDLER; if x_msg_count is 1, then x_msg_data contains that message (to
save the caller the inconvenience of interacting with ERROR_HANDLER for only one
message).

Synchronizing Item User-Defined Attributes with Item Descriptive Elements D-1
D
Synchronizing Item User-Defined Attributes
with Item Descriptive Elements
This appendix covers the following topics:
• Overview
Overview
You can define an unlimited number of user-defined attributes for items without
programming. These attributes can have different data types, value sets, and can be
parametrically searched. This appendix describes how to synchronize user-defined
attribute values with descriptive element values. Oracle provides a public API to
update Item Descriptive Element values. It also raises a business event when any pre-
selected user-defined attribute values change. You can subscribe to this event and then
call the Item Descriptive Element API to synchronize the descriptive elements with the
attribute values. A business event is raised when any pre-selected item user-defined
attribute values change.
See: Event Manager, and Standard API for an Event Rule Function, Oracle Workflow
Developer's Guide.
User-Defined Attributes Business Event
You can configure user-defined attribute groups to raise a Business Event every time a
row is added, altered, or deleted The name of the Business Event raised is
oracle.apps.ego.item.attributesChanged
The parameters passed by this Business Event are
INVENTORY_ITEM_ID
ORGANIZATION_ID
EXTENSION_ID
ATTR_GROUP_NAME
D-2 Oracle Product Hub Implementation Guide
The Event is disabled by default and must be explicitly enabled for synchronization to
work.
Item Descriptive Elements API
Oracle provides the following API (with accompanying data type) to maintain
Descriptive Elements for a given item.
The data type used by the API follows:
ITEM_DESC_ELEMENT_TABLE: this is an associative array (also known as a
PL/SQL table or an index-by table) of ITEM_DESC_ELEMENT records:
ITEM_DESC_ELEMENT IS RECORD
(
ELEMENT_NAME VARCHAR2(30)
,ELEMENT_VALUE VARCHAR2(30)
,DESCRIPTION_DEFAULT VARCHAR2(1)
);
ELEMENT_NAME: Column ELEMENT_NAME from
MTL_DESCRIPTIVE_ELEMENTS
ELEMENT_VALUE: Column ELEMENT_VALUE from MTL_DESCR_ELEMENT_VALUES
DESCRIPTION_DEFAULT: Column DEFAULT_ELEMENT_FLAG from
MTL_DESCR_ELEMENT_VALUES (indicates whether this Descriptive Element
will be used in the description generation)
The API signature is:
INV_ITEM_CATALOG_ELEM_PUB.Process_Item_Descr_Elements
(
p_api_version IN NUMBER
,p_init_msg_list IN VARCHAR2 DEFAULT fnd_api.g_FALSE
,p_commit_flag IN VARCHAR2 DEFAULT fnd_api.g_FALSE
,p_validation_level IN NUMBER DEFAULT
INV_ITEM_CATALOG_ELEM_PUB.g_VALIDATE_ALL
,p_inventory_item_id IN NUMBER DEFAULT -999
,p_item_number IN VARCHAR2 DEFAULT NULL
,p_item_desc_element_table IN ITEM_DESC_ELEMENT_TABLE
,x_generated_descr OUT VARCHAR2
,x_return_status OUT VARCHAR2
,x_msg_count OUT NUMBER
,x_msg_data OUT VARCHAR2
);
p_api_version
Pass the value 1.0 for this parameter.
p_init_msg_list
This parameter can safely be defaulted.
p_commit_flag
Indicates whether or not the API commits the transaction.
p_validation_level
Determines how much validation occurs; can safely be defaulted.
p_inventory_item_id
Synchronizing Item User-Defined Attributes with Item Descriptive Elements D-3
Pass the value 1.0 for this parameter.
p_item_number
This parameter can safely be defaulted.
p_item_desc_element_table
Data type defined above.
x_generated_descr
Returns the Item Description generated from the updated Descriptive Elements. If you
want to update the Item Description with this value, use Item Open Interface.
x_return_status
Returns one of the following:
FND_API.G_RET_STS_SUCCESS, FND_API.G_RET_STS_ERROR, FND_API.
G_RET_STS_UNEXP_ERROR
x_msg_count
Number of messages logged by the API.
x_msg_data
The message logged if exactly one message was logged.
Subscribing to the Event and Calling the API
As mentioned earlier, the Business Event oracle.apps.ego.item.attributesChanged must
be explicitly enabled through the graphical user interface in order for synchronization
to work. After this step is complete, you must subscribe to the User-Defined Attributes
Business Event. See: Event Manager, Oracle Workflow Developer's Guide.
oracle.apps.ego.item.attributesChanged
As part of Event Subscription, define an Event Subscription Rule Function that will be
called when the Event is raised. See Standard API for an Event Rule Function, Oracle
Workflow Developer's Guide.
This Rule Function should:
• Identify the attribute group that raised the Event and determine the correct
Descriptive Elements for that attribute group (perhaps through customer-supplied
mapping metadata).
• Fetch the data altered by the Event (see the following Sample Rule Function for
more details) and process it as necessary.
• Call the Item Descriptive Elements API that is passing the processed data.
D-4 Oracle Product Hub Implementation Guide
Sample Rule Function
FUNCTION Synch_Attrs_With_Desc_Elems (
p_subscription_guid IN RAW
,p_event IN OUT NOCOPY WF_EVENT_T
)
RETURN VARCHAR2
IS
TYPE ATTR_TO_DESC_ELEM_MAPPING_REC IS RECORD
(
ATTR_NAME VARCHAR2(30)
,DESC_ELEM_NAME VARCHAR2(30)
,DESCRIPTION_DEFAULT VARCHAR2(1)
);
TYPE ATTR_TO_DESC_ELEM_MAPPING_TBL IS TABLE OF
ATTR_TO_DESC_ELEM_MAPPING_REC
INDEX BY BINARY_INTEGER;
l_parameter_list WF_PARAMETER_LIST_T;
l_next_parameter WF_PARAMETER_T;
l_dml_type_param WF_PARAMETER_T;
l_attr_group_name_param WF_PARAMETER_T;
l_inventory_item_id_param WF_PARAMETER_T;
l_organization_id_param WF_PARAMETER_T;
l_revision_id_param WF_PARAMETER_T;
l_pk_column_values EGO_COL_NAME_VALUE_PAIR_ARRAY;
l_request_table EGO_ATTR_GROUP_REQUEST_TABLE;
x_attributes_row_table EGO_USER_ATTR_ROW_TABLE;
x_attributes_data_table EGO_USER_ATTR_DATA_TABLE;
x_return_status VARCHAR2(1);
x_errorcode NUMBER;
x_msg_count NUMBER;
x_msg_data VARCHAR2(1000);
l_current_mapping_rec ATTR_TO_DESC_ELEM_MAPPING_REC;
l_mapping_rec_table ATTR_TO_DESC_ELEM_MAPPING_TBL;
l_attributes_data_index NUMBER;
l_current_row_obj EGO_USER_ATTR_ROW_OBJ;
l_current_data_obj EGO_USER_ATTR_DATA_OBJ;
l_current_item_desc_elem INV_ITEM_CATALOG_ELEM_PUB.
ITEM_DESC_ELEMENT;
l_item_desc_elem_table INV_ITEM_CATALOG_ELEM_PUB.
ITEM_DESC_ELEMENT_TABLE;
x_generated_descr VARCHAR2(240);
l_return_status VARCHAR2(30) := 'SUCCESS';
BEGIN
l_parameter_list := p_event.getParameterList();
--------------------------------------------------------
-- Sort the parameters that the Business Event passed
--------------------------------------------------------
FOR i IN l_parameter_list.FIRST .. l_parameter_list.LAST
LOOP
l_next_parameter := l_parameter_list(i);
IF (l_next_parameter.getName() = 'DML_TYPE') THEN
l_dml_type_param := l_next_parameter;
ELSIF (l_next_parameter.getName() = 'ATTR_GROUP_NAME') THEN
Synchronizing Item User-Defined Attributes with Item Descriptive Elements D-5
l_attr_group_name_param := l_next_parameter;
ELSIF (l_next_parameter.getName() = 'INVENTORY_ITEM_ID') THEN
l_inventory_item_id_param := l_next_parameter;
ELSIF (l_next_parameter.getName() = 'ORGANIZATION_ID') THEN
l_organization_id_param := l_next_parameter;
ELSIF (l_next_parameter.getName() = 'REVISION_ID') THEN
l_revision_id_param := l_next_parameter;
END IF;
END LOOP;
---------------------------------------------------------
Copy the PK values into our EGO_COL_NAME_VALUE_PAIR_ARRAY object
---------------------------------------------------------
l_pk_column_values :=
EGO_COL_NAME_VALUE_PAIR_ARRAY(
EGO_COL_NAME_VALUE_PAIR_OBJ('INVENTORY_ITEM_ID',
l_inventory_item_id_param.getValue())
,EGO_COL_NAME_VALUE_PAIR_OBJ('ORGANIZATION_ID',
l_organization_id_param.getValue())
);
---------------------------------------------------------------
Prepare an EGO_ATTR_GROUP_REQUEST_TABLE object with one element, an
EGO_ATTR_GROUP_REQUEST_OBJ for the Attr Group that raised the Event
----------------------------------------------------------------
l_request_table := EGO_ATTR_GROUP_REQUEST_TABLE();
l_request_table.EXTEND();
l_request_table(l_request_table.LAST) :=
EGO_ATTR_GROUP_REQUEST_OBJ(
NULL --ATTR_GROUP_ID
,431
,'EGO_ITEMMGMT_GROUP'
,l_attr_group_name_param.getValue()
,l_revision_id_param.getValue()
,NULL --DATA_LEVEL_2
,NULL --DATA_LEVEL_3
,NULL --ATTR_NAME_LIST
);
--------------------------------------------------
Get the data for this Event, if there is any
--------------------------------------------------
IF (l_dml_type_param.getValue() <> 'DELETE') THEN
EGO_USER_ATTRS_DATA_PUB.Get_User_Attrs_Data(
p_api_version => 1.0
,p_object_name => 'EGO_ITEM'
,p_pk_column_name_value_pairs => l_pk_column_values
,p_attr_group_request_table => l_request_table
,p_user_privileges_on_object => NULL
,p_entity_id => NULL
,p_entity_index => NULL
,p_entity_code => NULL
,p_debug_level => 0
,p_init_error_handler => FND_API.G_FALSE
,p_init_fnd_msg_list => FND_API.G_FALSE
,p_add_errors_to_fnd_stack => FND_API.G_FALSE
,p_commit => FND_API.G_FALSE
,x_attributes_row_table => x_attributes_row_table
,x_attributes_data_table => x_attributes_data_table
,x_return_status => x_return_status
,x_errorcode => x_errorcode
,x_msg_count => x_msg_count
D-6 Oracle Product Hub Implementation Guide
,x_msg_data => x_msg_data
);
------------------------------------------------------------
If the call failed, we report that an error occurred
(in a production situation, we would retrieve and pass
on all errors on the ERROR_HANDLER message stack)
------------------------------------------------------------
IF (x_return_status IS NULL OR
x_return_status <> FND_API.G_RET_STS_SUCCESS) THEN
IF (x_return_status = FND_API.G_RET_STS_ERROR) THEN
RAISE FND_API.G_EXC_ERROR;
ELSE
RAISE FND_API.G_EXC_UNEXPECTED_ERROR;
END IF;
END IF;
END IF;
------------------------------------------------
Process the Descriptive Elements according to the
Attr Group that raised the Event and the DML type
----------------------------------------------
IF (l_attr_group_name_param.getValue() = 'Pella_Windows') THEN
----------------------------------------------
Find mappings from Attr Group Attrs to Desc Elems; in this example,
hard code the mapping from Attr Group Attrs to Desc Elems, but in a
production situation customers may have some stored mapping between
the Attrs in an Attr Group associated to a Catalog Category and the
Descriptive Elements for that Catalog Category (similarly, in this
example we always set DESCRIPTION_DEFAULT as 'Y' for simplicity)
------------------------------------------------
l_current_mapping_rec.ATTR_NAME := 'Style';
l_current_mapping_rec.DESC_ELEM_NAME := 'Style';
l_current_mapping_rec.DESCRIPTION_DEFAULT := 'Y';
l_mapping_rec_table(l_mapping_rec_table.COUNT + 1) :=
l_current_mapping_rec;
l_current_mapping_rec.ATTR_NAME := 'GB_Options';
l_current_mapping_rec.DESC_ELEM_NAME := 'Grille Bar Options';
l_current_mapping_rec.DESCRIPTION_DEFAULT := 'Y';
l_mapping_rec_table(l_mapping_rec_table.COUNT + 1) :=
l_current_mapping_rec;
l_current_mapping_rec.ATTR_NAME := 'Wood_Type';
l_current_mapping_rec.DESC_ELEM_NAME := 'Wood Type';
l_current_mapping_rec.DESCRIPTION_DEFAULT := 'Y';
l_mapping_rec_table(l_mapping_rec_table.COUNT + 1) :=
l_current_mapping_rec;
l_current_mapping_rec.ATTR_NAME := 'Frame_Area';
l_current_mapping_rec.DESC_ELEM_NAME := 'Frame Area';
l_current_mapping_rec.DESCRIPTION_DEFAULT := 'Y';
l_mapping_rec_table(l_mapping_rec_table.COUNT + 1) :=
l_current_mapping_rec;
l_current_mapping_rec.ATTR_NAME := 'GRADE';
l_current_mapping_rec.DESC_ELEM_NAME := 'Grade';
l_current_mapping_rec.DESCRIPTION_DEFAULT := 'Y';
l_mapping_rec_table(l_mapping_rec_table.COUNT + 1) :=
l_current_mapping_rec;
l_current_mapping_rec.ATTR_NAME := 'PW_Exterior';
l_current_mapping_rec.DESC_ELEM_NAME := 'Primed Wood Exterior';
l_current_mapping_rec.DESCRIPTION_DEFAULT := 'Y';
l_mapping_rec_table(l_mapping_rec_table.COUNT + 1) :=
Synchronizing Item User-Defined Attributes with Item Descriptive Elements D-7
l_current_mapping_rec;
l_current_mapping_rec.ATTR_NAME := 'DATE';
l_current_mapping_rec.DESC_ELEM_NAME := 'Date';
l_current_mapping_rec.DESCRIPTION_DEFAULT := 'Y';
l_mapping_rec_table(l_mapping_rec_table.COUNT + 1) :=
l_current_mapping_rec;
ELSIF (l_attr_group_name_param.getValue() = 'WD_Attributes') THEN
l_current_mapping_rec.ATTR_NAME := 'STYLE';
l_current_mapping_rec.DESC_ELEM_NAME := 'WD Style';
l_current_mapping_rec.DESCRIPTION_DEFAULT := 'Y';
l_mapping_rec_table(l_mapping_rec_table.COUNT + 1) :=
l_current_mapping_rec;
l_current_mapping_rec.ATTR_NAME := 'WD_Grade';
l_current_mapping_rec.DESC_ELEM_NAME := 'WD Grade';
l_current_mapping_rec.DESCRIPTION_DEFAULT := 'Y';
l_mapping_rec_table(l_mapping_rec_table.COUNT + 1) :=
l_current_mapping_rec;
l_current_mapping_rec.ATTR_NAME := 'DATETIME';
l_current_mapping_rec.DESC_ELEM_NAME := 'Date';
l_current_mapping_rec.DESCRIPTION_DEFAULT := 'Y';
l_mapping_rec_table(l_mapping_rec_table.COUNT + 1) :=
l_current_mapping_rec;
l_current_mapping_rec.ATTR_NAME := 'URL_link';
l_current_mapping_rec.DESC_ELEM_NAME := 'URL';
l_current_mapping_rec.DESCRIPTION_DEFAULT := 'Y';
l_mapping_rec_table(l_mapping_rec_table.COUNT + 1) :=
l_current_mapping_rec;
END IF;
-----------------------------------------------------------------
For every Desc Elem, get its value (a NULL value, or a DML_TYPE of
DELETE,
will result in a NULL Elem value), set its DESCRIPTION_DEFAULT flag,
and
add it to the ITEM_DESC_ELEMENT_TABLE
-----------------------------------------------------------------
FOR i IN l_mapping_rec_table.FIRST .. l_mapping_rec_table.LAST
LOOP
l_current_mapping_rec := l_mapping_rec_table(i);
l_current_item_desc_elem.ELEMENT_NAME := l_current_mapping_rec.
DESC_ELEM_NAME;
l_current_item_desc_elem.DESCRIPTION_DEFAULT := l_current_mapping_rec.
DESCRIPTION_DEFAULT;
-------------------------------------------------------------------
This example uses single-row Attr Groups, so we don't need to make use
of the EGO_USER_ATTR_ROW_TABLE object; but for a multi-row Attr Group,
we would use the ROW_IDENTIFIER field of each EGO_USER_ATTR_ROW_OBJ to
find all the EGO_USER_ATTR_DATA_OBJ objects for that particular row
------------------------------------------------------------------
IF (x_attributes_row_table IS NOT NULL AND
x_attributes_row_table.COUNT > 0 AND
x_attributes_data_table IS NOT NULL AND
x_attributes_data_table.COUNT > 0) THEN
l_attributes_data_index := x_attributes_data_table.FIRST;
WHILE l_attributes_data_index <= x_attributes_data_table.LAST
LOOP
D-8 Oracle Product Hub Implementation Guide
EXIT WHEN l_current_item_desc_elem.ELEMENT_VALUE IS NOT NULL;
l_current_data_obj := x_attributes_data_table
(l_attributes_data_index);
IF (l_current_data_obj.ATTR_NAME = l_current_mapping_rec.
ATTR_NAME) THEN
l_current_item_desc_elem.ELEMENT_VALUE := SUBSTRB
(l_current_data_obj.ATTR_DISP_VALUE, 1, 30);
END IF;
l_attributes_data_index := x_attributes_data_table.NEXT
(l_attributes_data_index);
END LOOP;
END IF;
--------------------------------------------------------
-- Now we add the ITEM_DESC_ELEMENT record into our table
-------------------------------------------------------
l_item_desc_elem_table(l_item_desc_elem_table.COUNT + 1) :=
l_current_item_desc_elem;
END LOOP;
----------------------------------------------------
Now that we have all the necessary data and metadata, we
call the API to update the Desc Elems for this Attr Group
(note that the API returns the Item Description generated
from the updated Descriptive Elements; if required, you
can update the Description through Item Open Interface)
---------------------------------------------------
INV_ITEM_CATALOG_ELEM_PUB.Process_Item_Descr_Elements(
p_api_version => 1.0
,p_inventory_item_id => l_inventory_item_id_param.
getValue()
,p_item_desc_element_table => l_item_desc_elem_table
,x_generated_descr => x_generated_descr
,x_return_status => x_return_status
,x_msg_count => x_msg_count
,x_msg_data => x_msg_data
);
RETURN l_return_status;
EXCEPTION
WHEN OTHERS THEN
WF_CORE.CONTEXT('EGO_EF_QA_PUB', 'Synch_Attrs_With_Desc_Elems',
p_event.getEventName(), p_subscription_guid);
WF_EVENT.setErrorInfo(p_event, 'ERROR');
RETURN 'ERROR';
END Synch_Attrs_With_Desc_Elems;

Change Management Business Events E-1
E
Change Management Business Events
This appendix covers the following topics:
• Description of Change Management Business Events
Description of Change Management Business Events
Change Management business events can be triggered for the following actions:
• Approval status change
• Priority changes
• Status changes
• Workflow status changes
• Creation of a change object
Note:
To subscribe to any of the following business events, refer to
Subscribing to a Change Management Business Event, page 7-44.
Business Event Name Triggering Event
oracle.apps.eng.cm.changeObject.changeApprovalStatus Approval status
changes
oracle.apps.eng.cm.changeObject.changePriority Priority changes
oracle.apps.eng.cm.changeObject.changeStatus Status changes

E-2 Oracle Product Hub Implementation Guide
Business Event Name Triggering Event
oracle.apps.eng.cm.changeObject.changeWorkflowStatus Workflow status
changes
oracle.apps.eng.cm.changeObject.create Creation of a
change object
oracle.apps.eng.cm.changeObject.postComment Posted comment on
a change object
oracle.apps.eng.cm.changeObject.reassign Reassignment of a
change object
oracle.apps.eng.cm.changeObject.requestComment Common request of
a change object
oracle.apps.eng.cm.changeObject.submit Submission of a
change object
oracle.apps.eng.cm.changeObject.update Update of a change
object
oracle.apps.eng.cm.changeOrder.changeScheduleDate Schedule date
change
oracle.apps.eng.cm.import.complete Import is
completed
oracle.apps.eng.cm.revisedItem.changeScheduleDate Revised item
schedule date
change
oracle.apps.eng.cm.revisedItem.changeStatus Revised item status
changes
Change Management Dependencies and Interactions
Change Management business events, depend on the following systems and
applications:
• Workflow
• Business events
Change Management Business Events E-3
• Business Intelligence Publisher
• Oracle TCA
Change Management business events can interact with the following:
• Items
• Multiple modules in Oracle Discrete Manufacturing, including: Engineering, Bills of
Materials, Work In Process, and Planning
• Projects

Seeded Item Metadata Libraries F-1
F
Seeded Item Metadata Libraries
This appendix covers the following topics:
• Sellable Product Information Library - Horizontal
• Product Management Library - Horizontal
• Communications Services Billing Library - Vertical
• Communications Product Details Library - Vertical
Sellable Product Information Library - Horizontal
Oracle Product Hub provides the following seeded library containing attribute groups,
attributes, and value sets. For more information about using data libraries, see: Using
Seeded Attributes, page 4-36. The attribute groups in this library are assigned to the
Item Revision business entity.
This library is not automatically installed. The system administrator must perform the
following steps to upload the library after installing the Oracle Product Hub for
Communications patch.
Installing the Library
1.
Upload the value set library file. This file contains all of the value sets required by
the Sellable Product Information Library, as well as those required by all other
Oracle Product Hub for Communications libraries.
Tip: You only need to install this file once for all Oracle Product
Hub for Communications libraries.
• Filename
$EGO_TOP/patch/115/import/US/egomstrlibvs.ldt
• Command

F-2 Oracle Product Hub Implementation Guide
FNDLOAD apps 0 Y UPLOAD
$EGO_TOP/patch/115/import/egoefval.lct
$EGO_TOP/patch/115/import/US/egomstrlibvs.ldt
ORACLE Password:
2. Upload the Sellable Product Information Library file.
• Filename
$EGO_TOP/patch/115/import/US/egospilib.ldt
• Command
FNDLOAD apps 0 Y UPLOAD
$EGO_TOP/patch/115/import/egoefag.lct
$EGO_TOP/patch/115/import/US/egospilib.ldt
ORACLE Password:
Sellable Product Information Library - Horizontal
Attribute Group
Display Name
(Internal Name)
Behavior
Attribute Display
Name (Internal
Name)
Attribute Description Value Set
Additional Billing
Information
(Additional_Billing_I
nformation)
Single-Row
Assigned to the Item
business entity.
Billing Entity Type
(Billing_Entity_Type)
Identifies the type of
billing product. Use
the DVM for mapping
these values.
Note:
You can use
the billing type
instead and ignore
this attribute
during integration.
Billing_Type
- Billing Service Type
(Billing_Service_Typ
e)
The service type
associated with the
product. It represents
the service the
product belongs to.
BRM_PERMITTED

Seeded Item Metadata Libraries F-3
Attribute Group
Display Name
(Internal Name)
Behavior
Attribute Display
Name (Internal
Name)
Attribute Description Value Set
Additional Entity
Details
(Additional_Entity_D
etails)
Single-Row
Assigned to the Item
business entity.
Effective Start Date
(Effective_Start_Date
)
Start date of the
product.
EGO_Lib_NumVS
- Effective End Date
(Effective_End_Date)
End date of the
product.
EGO_Lib_NumVS
- Internal Reference
Code
(Internal_Reference_
Code)
Alphanumeric value
that identifies the
item. The value is
immutable (does not
change across
instances). No
validations or
constraints are
provided. Users must
define rules and
constraints to ensure
uniqueness and to
prevent updates.
-
- Entity Type
(Entity_Type)
- Entity_Type

F-4 Oracle Product Hub Implementation Guide
Attribute Group
Display Name
(Internal Name)
Behavior
Attribute Display
Name (Internal
Name)
Attribute Description Value Set
Product Details:
Definitions
(Prod_Details_Definit
ions)
Single-Row
Price Type
(Price_Type)
Select the price type.
The options are:
•
One time. The
customer pays
once to buy the
product.
•
Recurring. The
customer pays a
fixed recurring
fee to use the
product. An
example is a fixed
monthly fee for
local telephone
service.
•
Usage. The
customer pays for
the product based
on usage. An
example is the
charge for
electricity, based
on how much
you consume.
Price_Type
- Structure Type
(Structure_Type)
Indicates whether an
item has children or a
bundle. Sample
values include
Bundle, None,
Customizable.
Structure_Type
- Sales Product (Sales_
Product)
Indicates that the item
can be used for order
type 'SalesOrder'.
EGO_Lib_Yes_No
- Service Product
(Service_Product)
Indicates whether the
item is a service.
EGO_Lib_Yes_No

Seeded Item Metadata Libraries F-5
Attribute Group
Display Name
(Internal Name)
Behavior
Attribute Display
Name (Internal
Name)
Attribute Description Value Set
- Product Level
(Product_Level)
The numeric product
level in the product
hierarchy.
EGO_Lib_NumVS
- Format (Format) For training products,
select a training
format such as
Instructor led or Web-
based.
Format
- Parent Product
(Parent_Product)
Select the parent
product. This field is
for information only.
It is not used for
creating or managing
products with
components.
Parent_Product
- Quantity (Quantity) The number of items
in the unit of measure.
EGO_Lib_PosNumVS
- Pricing Code
(Pricing_Code)
Identifies the type of
pricing associated
with the item. None =
No pricing associated,
Standard = Simple
pricing model
associated, Billing =
BRM pricing model.
Pricing_Code
- Product Line
(Product_Line)
The product belongs
to this product line.
Object_Product_Line
- Check Eligibility
(Check_Eligibility)
System check
customers' eligibility
to buy the product.
Used by Siebel.
EGO_Lib_Yes_No

F-6 Oracle Product Hub Implementation Guide
Attribute Group
Display Name
(Internal Name)
Behavior
Attribute Display
Name (Internal
Name)
Attribute Description Value Set
- Inclusive Eligibility
(Inclusive_Eligibility)
Used to ensure that
the Eligibility matrix
is validated when a
quote or an order is
created for the item.
EGO_Lib_Yes_No
Product Details:
Marketing
(Product_Details_Ma
rketing)
Single-Row
Targeted Industry
(Targeted_Industry)
The industry to target
with this product.
Targeted_Industry
- Targeted Min Age
(Targeted_Min_Age)
The minimum age of
buyers for this
product.
EGO_Lib_PosNumVS
- Targeted Max Age
(Targeted_Max_Age)
The maximum age of
buyers for this
product.
EGO_Lib_PosNumVS
- Targeted Postal Code
(Targeted_Postal_Co
de)
The postal code to
target for sales of this
product.
-
- Targeted Country
(Targeted_Country)
The country where
you want to sell this
product.
Targeted_Country
Product Details:
Service
(Product_Details_Ser
vice)
Single-Row
MTBF (MTBF) The mean time
between failure for
the product.
EGO_Lib_PosNumVS
- MTTR (MTTR) The mean time to
repair the product.
EGO_Lib_PosNumVS
- Field Replacable
(Field_Replaceable)
Indicates if this is a
field-replaceable unit.
EGO_Lib_Yes_No

Seeded Item Metadata Libraries F-7
Attribute Group
Display Name
(Internal Name)
Behavior
Attribute Display
Name (Internal
Name)
Attribute Description Value Set
- Return if Defective
(Return_if_Defective)
Indicates if a defective
product should be
returned by the
customer when a
replacement is
shipped.
EGO_Lib_Yes_No
- Tool (Tool) Indicates if this
product is a tool, such
as one used by field
service engineers.
EGO_Lib_Yes_No
Product Details:
Logistics
(Product_Details_Log
istics)
Single-Row
Vendor Part Number
(Vendor_Part_Numb
er)
The vendor's part
number for this
product.
Vendor_Part_Number
- Lead Time
(Lead_Time)
The standard lead
time for ordering the
product, measured in
weeks.
-
- Ship Carrier
(Ship_Carrier)
The name of the
shipping carrier for
this product.
Ship_Carrier
- Ship Method
(Ship_Method)
The shipping mode.
For example, air,
ground, and so on.
Ship_Method
- Allocate Below
Safety
(Allocate_Below_Saf
ety)
Indicates if you allow
allocation below the
safe inventory level of
this product.
EGO_Lib_Yes_No
- Auto Substitute
(Auto_Substitute)
Indicates if you allow
auto-substitutions.
EGO_Lib_Yes_No

F-8 Oracle Product Hub Implementation Guide
Attribute Group
Display Name
(Internal Name)
Behavior
Attribute Display
Name (Internal
Name)
Attribute Description Value Set
- Auto Allocate
(Auto_Allocate)
Indicates if you use
automatic allocation
during the fulfillment
process.
EGO_Lib_Yes_No
- Auto Explode
(Auto_Explode)
Flag to indicate
explosion of child
components.
EGO_Lib_Yes_No
- Shipping Required
(Shipping_Required)
Flag to indicate if
shipping is required.
EGO_Lib_Yes_No
Product Details:
Additional
Information
(Prod_Detail_More_I
nfo)
Single-Row
Division Code SAP
(Division_Code_SAP
)
User defined access
code for the item.
-
- Global Product
Identifier
(Global_Product_Ide
ntifier)
A unique product
identification string.
This field is intended
for use by integrators
who need to move
product information
between applications.
-
- Serialized
(Serialized)
Indicates if instances
of this product are
tracked as serialized
assets or simply as
quantities of product
EGO_Lib_Yes_No
- Model Product
(Model_Product)
This field is obsolete.
It is provided as a
reference for upgrade
users of Configurator.
EGO_Lib_Yes_No

Seeded Item Metadata Libraries F-9
Attribute Group
Display Name
(Internal Name)
Behavior
Attribute Display
Name (Internal
Name)
Attribute Description Value Set
- Tax Subcomponent
Flag
(Tax_Subcomponent
_Flag)
Indicates whether to
compute the tax on a
bundle by adding up
the tax on its
components.
EGO_Lib_Yes_No
- Project Resource
(Project_Resource)
Indicates if the
product is a service
for a project.
EGO_Lib_Yes_No
- Compensable
(Compensable)
Indicates if sales
personnel can receive
compensation for
selling the product.
EGO_Lib_Yes_No
Additional Entity
Details
(Additional_Entity_D
etails)
Single-Row
Defined at the item
level.
Effective Start Date
(Effective_Start_Date
)
Start date of the
product.
-
- Effective End Date
(Effective_End_Date)
End date of the
product.
-
- Internal Reference
Code
(Internal_Reference_
Code)
Identifies the type of
product. This is a user
defined list.
-
Subject
Compatibility Rules
(Sub_Compatible_Rul
e)
Multi-Row
Serial Number
(Serial_Number)
Unique identifier of
the record in the
multi-row.
-

F-10 Oracle Product Hub Implementation Guide
Attribute Group
Display Name
(Internal Name)
Behavior
Attribute Display
Name (Internal
Name)
Attribute Description Value Set
- Subject Product
(Subject_Product)
Select the subject
product. The default
is the product that is
selected in the
Products list, but you
can select any product
to replace it. NOTE:
Make an entry in only
one of the following
fields:
•
Subject Product
•
Subject Product
Line
•
Subject Product
Class
Product
- Rule Type
(Rule_Type)
Select the type of the
rule.
Rule_Type
- Object Product
(Object_Product)
Select the object
product.
Product
- Object Product Line
(Object_Product_Lin
e)
Select the object
product line.
Object_Product_Line
- Object Product Class
(Object_Product_Cla
ss
Select the object
product class.
Product_Class
- Start Date
(Start_Date)
The date when the
rule goes into effect.
-
- End Date (End_Date) The date when the
rule is no longer in
effect.
-

Seeded Item Metadata Libraries F-11
Attribute Group
Display Name
(Internal Name)
Behavior
Attribute Display
Name (Internal
Name)
Attribute Description Value Set
- Matrix Name
(Matrix_Name)
The compatibility
group used for
grouping this rule.
Matrix_Name
Pricing:Simple Price
List
(Simple_Price_List)
Multi-Row
Price List Name
(Price_List_Name)
Name of the price list. Pricelist_Name
- Currency (Currency) Currency associated
with the price list.
Currency_Code_Selec
ted
- Price Type
(Price_Type)
Charge type
associated with the
price.
Price_Type
- Charge Period
(Charge_Period)
Frequency of
applying the charge.
Charge_Period
List Price (List_Price) The standard price
used for most
transactions and the
most commonly used
target price for price
adjustments.
-
- Promotional Price
(Promotional_Price)
If you enter a
promotional price, it
will be used instead of
the list price in all
functions that do not
explicitly identify the
list price as the target
price.
-

F-12 Oracle Product Hub Implementation Guide
Attribute Group
Display Name
(Internal Name)
Behavior
Attribute Display
Name (Internal
Name)
Attribute Description Value Set
- Pricing Commit Type
(Pricing_Commit_Ty
pe)
Field that identifies
whether a price
override (Committed)
or a discount override
(Dynamic) is defined
for the charge.
Pricing_Commit_Typ
e
- Dynamic Discount
Method
(Dynamic_Discount_
Method)
Whenever a discount
override is applied to
the charge, this field
identifies the type of
discount (either
'Percent' or 'Amount').
Dynamic_Discount_M
ethod
- Service Price Percent
(Service_Price_Perce
nt)
A percentage that is
used to mark up the
price of the service
product.
-
- Service Pricing
Method
(Service_Pricing_Met
hod)
Specify the basis used
for calculating the
price markup of the
service product from
the covered product.
Service_Pricing_Meth
od
- Volume Discount
(Volume_Discount)
A volume discount is
an adjustment to the
price of a product
based on the quantity
of that product that is
requested in the
quote. For example, a
5% discount when the
user requests five to
10 of the item.
Volume_Discount

Seeded Item Metadata Libraries F-13
Attribute Group
Display Name
(Internal Name)
Behavior
Attribute Display
Name (Internal
Name)
Attribute Description Value Set
- Attribute
Adjustment
(Attribute_Adjustme
nt)
Specifies the attribute
pricing table name
that provides
attribute-based
pricing adjustments
for this line item
product. This attribute
pricing table uses
attribute data from
the Class to which the
product belongs.
Attribute_Adjustment
- Maximum Price
(Maximum_Price)
Maximum price that
can be charged.
-
- Minimum Price
(Minimum_Price)
Minimum price that
can be charged.
-
- Description
(Description)
Description about the
charge.
-
- Start Date
(Start_Date)
Start date of the price. -
- End Date (End_Date) End date of the price. -
Promotion:More
Information
(Promotion_More_Inf
ormation)
Single-Row
Promotion Type
(Promotion_Type)
The type of the
promotion. Options
include coupon and
bundled promotion.
Promotion_Type
- Score (Score) The ranking of
promotion
Score
- Message (Message) The message for the
promotion.
Message

F-14 Oracle Product Hub Implementation Guide
Attribute Group
Display Name
(Internal Name)
Behavior
Attribute Display
Name (Internal
Name)
Attribute Description Value Set
- Instances (Instances) The value that
specifies how many
times a customer is
allowed to use this
promotion. Options
are One Per
Customer, One Per
Order, and No Limit.
Instances
- Show In Catalog
(Show_In_Catalog)
Indicates whether to
display the promotion
in the product
catalogs.
Show In Catalog
- Track As Agreement
(Track_As_Agreeme
nt)
Indicates whether to
track the promotion
as an agreement.
Track As Agreement
- Period (Period) Identifies the duration
on the promotion
after which the
penalty is not applied
if it is discontinued.
Period
- Period UOM
(Period_UOM)
Unit of measure for
the period.
Period UOM
- Grace Period
(Grace_Period)
Identifies the grace
period before which
the promotion can be
discontinued without
application of the
penalty.
Grace Period
- Grace UOM
(Grace_UOM)
Unit of measure for
the grace period.
Grace UOM

Seeded Item Metadata Libraries F-15
Attribute Group
Display Name
(Internal Name)
Behavior
Attribute Display
Name (Internal
Name)
Attribute Description Value Set
Promotion:Charge
Plan:Non Recurring
Charge Details
(Charge_Plan_Non_R
ecurring)
Non Recurring
Charge
(Non_Recurring)
The total amount of
the nonrecurring
charge.
EGO_Lib_NumVS
- NRC Quantity
(NRC_Quantity)
Non recurring
quantity.
EGO_Lib_PosNumVS
Promotion:Charge
Plan:Recurring
Charge Details
(Charge_Plan_Recurr
ing)
Single-Row
Recurring Charge
(Recurring)
The schedule for the
recurring charge.
EGO_Lib_NumVS
- RC Adjust Amount
(RC_Adjust)
The adjustment for a
recurring charge.
EGO_Lib_NumVS
- RC Adjust U/M
(RC_Adjust_UM)
The time period to
which the recurring
charge adjustment
applies. Options
include Per Day and
Per Week.
RC_Adjust_UM
Promotion:Charge
Plan: Charges,
Adjustment,Usage
Plan Details
(Charge_Plan_Adjust
_Usage)
Single-Row
Adjust Charge
(Adjust_Charge)
A special adjustment
to the amount the
customer is charged.
EGO_Lib_NumVS
- Adjust Reason
(Adjust_Reason)
The reason for the
special adjustment.
-

F-16 Oracle Product Hub Implementation Guide
Attribute Group
Display Name
(Internal Name)
Behavior
Attribute Display
Name (Internal
Name)
Attribute Description Value Set
Commit (Commit) Indicates if the user is
finished making
changes to the record.
EGO_Lib_Yes_No
- Charge Basis
(Charge_Basis)
Specify when the
charge for a period is
generated. Options
include:
•
Schedule.
Charges are
generated after
the usage period.
For example, June
charges are
generated on July
1.
•
Advance.
Charges are
generated in
advance of the
usage period. For
example, June
charges are
generated on
June 1.
Charge_Basis
Promotion:
Commitment:
Charges Credits
(Commit_Charge_Cre
dits)
Multi-Row
Charge Credits Type
(Charge_Credits_Typ
e
Select the penalty. Charge_Credits_Type
- Amount (Amount) The amount of the
penalty.
EGO_Lib_NumVS

Seeded Item Metadata Libraries F-17
Attribute Group
Display Name
(Internal Name)
Behavior
Attribute Display
Name (Internal
Name)
Attribute Description Value Set
- Plan (Plan) The name of the
charge plan that is
associated. The plan
defines the charges
that must be applied
if the commitment for
the promotion is
terminated.
Plan
Promotion:
Commitment:Terms
(Commitment_Terms
)
Multi-Row
Number
(Number_Value)
Enter a number to
control what order
this text will be
displayed in within
the list of terms.
EGO_Lib_NumVS
- Name (Name) Name of the
commitment term.
-
- Description
(Description)
Enter a brief
description of the
term.
-
- Commitment Terms
Type
(Commitment_Terms
_Type)
Select the type of the
term. Options include
Standard, Non-
Standard, and Special.
When you design
screens and reports,
you can decide to
display only terms of
certain types.
Term_Type
Promotion:Upgrade
(Promotion_Upgrade
)
Multi-Row
Original Promotion
(Original_Promotion
)
The earlier promotion
that customers can
break without
penalty.
Promotion

F-18 Oracle Product Hub Implementation Guide
Attribute Group
Display Name
(Internal Name)
Behavior
Attribute Display
Name (Internal
Name)
Attribute Description Value Set
- Commitment Start
(Commitment_Start)
Specify when the
commitment starts for
the new promotion.
Options include:
•
Original Start.
The commitment
starts at the same
time the
commitment for
the earlier
promotion
started.
•
Now. The
commitment
starts when the
customer accepts
the new
promotion.
•
Original End. The
commitment
starts when the
commitment for
the earlier
promotion ends.
Commitment_Start

Seeded Item Metadata Libraries F-19
Attribute Group
Display Name
(Internal Name)
Behavior
Attribute Display
Name (Internal
Name)
Attribute Description Value Set
- Duration (Duration) Specify the duration
of the new promotion.
Options include:
•
Original
Duration. The
duration of the
new promotion is
the same as the
duration of the
original
promotion.
•
New Duration.
The duration of
the new
promotion is
different from the
duration of the
original
promotion. If you
select this, you
must enter the
new duration in
the Commitments
view.
Duration
- Penalty (Penalty) The penalty for
upgrading from the
old to the new
promotion, if any.
EGO_Lib_NumVS
- Currency (Currency) Currency in which the
penalty is defined.
-

F-20 Oracle Product Hub Implementation Guide
Attribute Group
Display Name
(Internal Name)
Behavior
Attribute Display
Name (Internal
Name)
Attribute Description Value Set
Product Promotions:
Components
(Prod_Promotions_C
omponents)
Single-Row
Important:
This is
a component
attribute group.
Min (Min) Minimum cardinality
for the component of
the promotion.
EGO_Lib_PosNumVS
- Max (Max) Maximum cardinality
for the component of
the promotion.
EGO_Lib_PosNumVS
- Default
(Default_Value)
Default cardinality for
the component of the
promotion.
EGO_Lib_PosNumVS
- Recommendable
(Recommendable)
Select this check box
to enable the system
to recommend this
product promotion to
end users when the
product exists in a
quote or order and is
not associated with
any other product
promotion.
EGO_Lib_Yes_No
- Commitment
(Commitment)
Select this check box if
the product involves a
commitment.
EGO_Lib_Yes_No

Seeded Item Metadata Libraries F-21
Attribute Group
Display Name
(Internal Name)
Behavior
Attribute Display
Name (Internal
Name)
Attribute Description Value Set
Component Pricing
(Component_Pricing)
Single-Row
Important: This is
a component
attribute group.
Adjustment Type
(Adjustment_Type)
Select the type of price
adjustment applied to
the component
product of the
promotion.
Adjustment_Type
- Value (Value) Value of the
adjustment.
EGO_Lib_NumVS
- Currency Code
(Currency_Code)
Currency associated
with the value of the
adjustment.
Currency_Code_Selec
ted
- Exchange Date
(Exchange_Date)
Exchange date for the
currency.
-
Version: Structure
(Version_Structure)
Single-Row
Important:
This is
a component
attribute group.
Relationship Name
(Relationship_Name)
Identifies the name of
the association of the
child to the parent. If
not specified then it
defaults to product
name.
-
- Domain Type
(Domain_Type)
Identifies the type of
association of the
child to the parent. It's
a Domain Value Map
(DVM) and the values
are 'product' and
'class'.
Domain_Type

F-22 Oracle Product Hub Implementation Guide
Attribute Group
Display Name
(Internal Name)
Behavior
Attribute Display
Name (Internal
Name)
Attribute Description Value Set
- Product Class
(Product_Class)
If the relationship
name is 'Class', this
refers to the Class
name.
Product_Class
- Default Product
(Default_Product)
If the domain type =
'class', then the
domain for that child
will have more than
one product. This
represents the default
product among the set
of products.
Product
- Max Cardinality
(Max_Cardinality)
Maximum cardinality
of the child in context
of the parent.
EGO_Lib_PosNumVS
- Min Cardinality
(Min_Cardinality)
Minimum cardinality
of the child in context
of the parent.
EGO_Lib_PosNumVS
- Default Cardinality
(Default_Cardinality)
Default cardinality of
the child in context of
the parent.
EGO_Lib_PosNumVS
Product Promotions:
Pricing: Components:
Adjustments
(Product_Promotion_
Com_Adj)
Single-Row
Important: This is
a component
attribute group.
Start Date
(Start_Date)
Start date for the
adjustment defined
for the components of
a customizable item
included in a
promotion.
-

Seeded Item Metadata Libraries F-23
Attribute Group
Display Name
(Internal Name)
Behavior
Attribute Display
Name (Internal
Name)
Attribute Description Value Set
- End Date (End_Date) End date for the
adjustment defined
for the components of
a customizable item
included in a
promotion.
-
- Adjustment Type
(Adjustment_Type)
Type of adjustment. -
- Adjustment Value
(Adjustment_Value)
Value of the
adjustment.
EGO_Lib_NumVS
- Maximum Price
(Maximum_Price)
Maximum price that
can be charged.
EGO_Lib_PosNumVS
- Minimum Price
(Minimum_Price)
Minimum price
EGO_Lib_PosNumVS
that can be charged.
-
Product Management Library - Horizontal
Oracle Product Hub provides the following seeded library containing attribute groups,
attributes, and value sets. For more information about using data libraries, see: Using
Seeded Attributes, page 4-36. The attribute groups in this library are assigned to the
Item Revision business entity.
This library is not automatically installed. The system administrator must perform the
following steps to upload the library after installing the Oracle Product Hub for
Communications patch.
Installing the Library
1.
Upload the value set library file. This file contains all of the value sets required by
the Product Management Library, as well as those required by all other Oracle
Product Hub for Communications libraries.
Tip: You only need to install this file once for all Oracle Product
Hub for Communications libraries.

F-24 Oracle Product Hub Implementation Guide
• Filename
$EGO_TOP/patch/115/import/US/egomstrlibvs.ldt
• Command
FNDLOAD apps 0 Y UPLOAD
$EGO_TOP/patch/115/import/egoefval.lct
$EGO_TOP/patch/115/import/US/egomstrlibvs.ldt
ORACLE Password:
2. Upload the Product Management Library file.
• Filename
$EGO_TOP/patch/115/import/US/egopmtlib.ldt
• Command
FNDLOAD apps 0 Y UPLOAD
$EGO_TOP/patch/115/import/egoefag.lct
$EGO_TOP/patch/115/import/US/egopmtlib.ldt
ORACLE Password:
Product Management Library - Horizontal
Attribute Group
Display Name
(Internal Name)
Behavior
Attribute Display
Name (Internal
Name)
Attribute
Description
Value Set
Destination System
Specification
(Destination_Sys_Spe
cification)
Multi-Row
Destination System
(Destination_System)
Users can add
multiple destination
locations. Either PIM
ABCS or the
Destination ABCS can
look at this info and
'ignore' or 'accept' the
product. The list of
systems is driven by a
value set that
contains a list of
spoke systems.
Destination_System
- Sync Item
(Sync_Item)
This defines if the
item should be
synchronized or not.
EGO_Lib_Yes_No

Seeded Item Metadata Libraries F-25
Attribute Group
Display Name
(Internal Name)
Behavior
Attribute Display
Name (Internal
Name)
Attribute
Description
Value Set
Destination Product
Role
(Destination_Product
_Role)
Multi-Row
Destination System
(Destination_System)
Users can add
multiple destination
locations. Either PIM
ABCS or the
Destination ABCS can
look at this info and
'ignore' or 'accept' the
product. The list of
systems is driven by a
value set that
contains a list of
spoke systems.
Destination_System
- Role (Role) The Value Set is
driven by
Configurator, Billing,
Fulfillment, Order
Capture etc.
(whatever role the
product performs in
that particular
system).
Role
- Selection (Selection) - Selection
- Selection Code
(Selection_Code)
Customers use this as
a discriminator to
write code against
this Code. NULL by
defaut.
Selection_Code
Communications Services Billing Library - Vertical
Oracle Product Hub provides the following seeded library containing attribute groups,
attributes, and value sets. For more information about using data libraries, see: Using
Seeded Attributes, page 4-36. All seeded attribute groups in this library are assigned to
the Item Revision business entity.
This library is not automatically installed. The system administrator must perform the
following steps to upload the library after installing the Oracle Product Hub for
Communications patch.

F-26 Oracle Product Hub Implementation Guide
Installing the Library
1. Upload the value set library file. This file contains all of the value sets required by
the Communications Services Billing Library, as well as those required by all other
Oracle Product Hub for Communications libraries.
Tip: You only need to install this file once for all Oracle Product
Hub for Communications libraries.
• Filename
$EGO_TOP/patch/115/import/US/egomstrlibvs.ldt
• Command
FNDLOAD apps 0 Y UPLOAD
$EGO_TOP/patch/115/import/egoefval.lct
$EGO_TOP/patch/115/import/US/egomstrlibvs.ldt
ORACLE Password:
2. Upload the Communications Services Billing Library file.
• Filename
$EGO_TOP/patch/115/import/US/egocsblib.ldt
• Command
FNDLOAD apps 0 Y UPLOAD
$EGO_TOP/patch/115/import/egoefag.lct
$EGO_TOP/patch/115/import/US/egocsblib.ldt
ORACLE Password:
Communications Services Billing Library - Vertical
Attribute Group
Display Name
(Internal Name)
Behavior
Attribute Display
Name (Internal
Name)
Attribute
Description
Value Set
Billing Products
Attributes General
(Billing_Prod_Attr_G
eneral)
Single-Row
Priority (Priority) This priority sets the
order in which the
billing application
analyzes products
during the rating
process. The higher
the number, the
higher the priority;
zero is the lowest
priority you can set.
EGO_Lib_NumVS

Seeded Item Metadata Libraries F-27
Attribute Group
Display Name
(Internal Name)
Behavior
Attribute Display
Name (Internal
Name)
Attribute
Description
Value Set
- Multi-RUM Support
(Multi_RUM_Support
)
Flag to indicate
support of ratable
usage metrics.
EGO_Lib_Yes_No
- Provisioning Tag
(Provisioning_Tag)
This tag provides a
framework to
associate extended
rating attributes that
can enable rating or
discounting to vary
for a service.
Provisioning_Tag
- Supplier Tax ID
(Tax_Supplier)
This is the company
or corporate division
that sells the product
and is responsible for
collecting taxes.
Tax_Supplier
- Allow partial
purchase
(Allow_Partial_Purch
ase
Indicates whether
customers are
allowed to purchase a
part of the product.
For example, if a
product gives
customers 30 hours of
internet connection
for $10, you can allow
customers to
purchase half the
amount for half the
cost.
EGO_Lib_NumVS
- Purchase Max
Quantity
(Purchase_Max)
Represents the
maximum quantity of
the product that can
be purchased per
transaction.
EGO_Lib_PosNumVS

F-28 Oracle Product Hub Implementation Guide
Attribute Group
Display Name
(Internal Name)
Behavior
Attribute Display
Name (Internal
Name)
Attribute
Description
Value Set
- Purchase Min
Quantity
(Purchase_Min)
Represents the
minimum quantity of
the product that can
be purchased per
transaction.
EGO_Lib_PosNumVS
- Ownership Max Qty
(Own_Max)
Represents the
maximum quantity of
the product that can
be owned by the
customer at any given
point of time.
EGO_Lib_PosNumVS
- Ownership Min Qty
(Own_Min)
Represents the
minimum quantity of
the product that can
be owned by the
customer at any given
point of time.
EGO_Lib_PosNumVS
Billing Products
Event Map
(Billing_Products_
Event_Map)
Multi-Row
Dynamic Discount
Method
(Dynamic_Discount_
Method)
Whenever a discount
override is applied to
the charge, the field
identifies the type of
discount, such as
'Percent' 'Amount'.
Dynamic_Discount_
Method
- Event (Event) The name of the
billable event, or
charges modeled as
the event in the
billing application.
Event
- Measured By
(Measured_By)
Represents the ratable
usage metric (RUM).
RUM defines the
quantity measured
and the units used.
Measured_By

Seeded Item Metadata Libraries F-29
Attribute Group
Display Name
(Internal Name)
Behavior
Attribute Display
Name (Internal
Name)
Attribute
Description
Value Set
- Pricing Commit Type
(Pricing_Commit_Ty
pe)
Field that identifies
whether a discount
override or a price
override is defined
for the charge.
Pricing_Commit_Typ
e
Rate Plan Structure
(Rate_Plan_Structure)
This identifies the
type of rate plan
associated with the
product. Single rate
plan - Only one rate
plan can be associated
with the event. Rate
Plan Selector – More
than one rate plan can
be selected from a
selector. Custom
event analysis –
custom rate plan.
BRM_Rate_Plan_Stru
cture
Rate Plan ID
(Rate_Plan_ID)
The identifier of the
rate plan associated
with the billable
event.
-
Rate Plan (Rate_Plan)
Multi-Row
Price List Name
(Pricelist_Name)
Price list associated
with Rate plan of an
item.
Pricelist_Name
- Currency (Currency) Currency associated
with rate plan.
Currency_Code_Selec
ted
- Rate Plan ID
(Rate_Plan_ID)
Rate plan unique
identifier.
-
- Rate Plan Name
(Rate_Plan_Name)
Rate plan name -
- Rate Plan Description
(Rate_Plan_Desc)
Rate Plan Description -

F-30 Oracle Product Hub Implementation Guide
Attribute Group
Display Name
(Internal Name)
Behavior
Attribute Display
Name (Internal
Name)
Attribute
Description
Value Set
- Rate Plan Selector ID
(Rate_Plan_Selector_I
D)
Rate plan selector
unique identifier. The
rate plan selector
provides a framework
to define attribute
based pricing in
billing systems.
-
- Rate Plan Selector
Name
(Rate_Plan_Selector_
Name)
Rate Plan selector
name.
-
- Rate Plan Selector
Description
(Rate_Plan_Selector_
Desc)
Rate Plan Selector
Description.
-
- Tax When
(Tax_When)
Identifies when the
tax must be applied.
Tax_When
- (Tax_Code) This is user defined.
Identifies the tax code
that is applied.
Tax_Code
- Bill in Advance
(Advance_Billing)
Flag to indicate
whether advance
billing is allowed.
EGO_Lib_Yes_No
- Charge Cycle Fees
(Charge_Cycle_Fees
Field to indicate
when the monthly
charge is billed in
advance of the billing
cycle.
-
- Charge Cycle Fees
UOM
(Charge_Cycle_Fee_U
OM)
Unit of measure for
the 'Charge cycle fees
in advance of billing
cycle'.
Charge_Cycle_Fee_U
OM

Seeded Item Metadata Libraries F-31
Attribute Group
Display Name
(Internal Name)
Behavior
Attribute Display
Name (Internal
Name)
Attribute
Description
Value Set
- Apply Cycle Fee
(Apply_Cycle_Fee)
Flag to indicate that
the monthly charge
must be applied on
the billing date.
EGO_Lib_Yes_No
Rate Data (Rate_Data)
Multi-Row
Rate Data ID
(Rate_Data_ID)
Rate data unique
identifier.
-
- Rate Data Name
(Rate_Data_Name)
Rate data name. -
- Override Credit Limit
(Override_Credit_Li
mit)
Flag to identify
whether the credit
limit is overridden. A
credit limit is the
maximum amount of
a resource, such as
currency or hours,
that can accumulate
in an account before
the customer is
prevented from using
the service.
EGO_Lib_Yes_No

F-32 Oracle Product Hub Implementation Guide
Attribute Group
Display Name
(Internal Name)
Behavior
Attribute Display
Name (Internal
Name)
Attribute
Description
Value Set
- Quantity Discount
Bracket Basis
(Qty_Dis_Bracket_Ba
sis)
You can group
charges together into
quantity discount
brackets to charge
different amounts
based on quantity.
For example, for a
telephony service,
you could charge 10
cents a minute for the
first 120 minutes and
5 cents per minute
after 120 minutes.
Specifies how the
billing application
determines the
quantities it uses to
select the quantity
discount bracket.
Qty_Disc_Bracket_Ba
sis
- Quantity Discount
Bracket Basis
Resources
(Qty_Dis_Bracket_Ba
sis_Resource)
If the discount
bracket basis is
'resource balance', it
identifies the
resource.
Qty_Disc_Bracket_Ba
sis_Resource
- Purchase Proration
Information
(Pur_Proration)
Specify how to charge
customers when they
purchase the product
in the middle of the
accounting cycle.
Proration
- Cancel Proration
Information
(Cancel_Proration)
Specify how to charge
customers when they
cancel the product in
the middle of the
accounting cycle.
Proration
Balance Impact
(Balance_Impact)
Multi-Row
Sequence Number
(Seq_Number)
Identifies the
sequence of the
balance impact.
-

Seeded Item Metadata Libraries F-33
Attribute Group
Display Name
(Internal Name)
Behavior
Attribute Display
Name (Internal
Name)
Attribute
Description
Value Set
- Rate Plan ID
(Rate_Plan_ID)
Rate plan unique
identifier.
-
- Rate Tier ID (Tier_ID) Rate tier unique
identifier.
-
- Day Time Range ID
(Day_Time_Range_ID
)
Day Time Range
unique identifier.
-
- Day of the Week
Range ID
(Day_of_the_Week_R
ange_ID)
Day of the week
unique identifier.
-
- Rate Data ID
(Rate_Data_ID)
Rate data unique
identifier
-
- Rate Data Minimum
(Rate_Data_Min)
Minimum quantity of
an event a customer
must use for the
balance impact or
charge to be valid.
-
- Rate Data Maximum
(Rate_Data_Max)
Maximum quantity of
an event a customer
must use for the
balance impact or
charge to be valid.
-
- Resource ID
(Resource_ID)
Identifies the resource
that will be charged
for the product. For
example, dollars, free
minutes, etc.
Resource_ID
- GLID (GLID) An ID assigned to
events or charges to
record revenue.
GLID

F-34 Oracle Product Hub Implementation Guide
Attribute Group
Display Name
(Internal Name)
Behavior
Attribute Display
Name (Internal
Name)
Attribute
Description
Value Set
- Impact Category
(Impact_Category)
Defines the impact
category associated
with the rate.
Impact_Category
- Proratable
(Proratable)
Flag to identify that
the resource is pro-
rated.
EGO_Lib_Yes_No
- Discountable
(Discountable)
Flag to identify that
the resource is
discounted.
EGO_Lib_Yes_No
- Sponsorable
(Sponsorable)
Enables the resource
to be sponsored by
another account as
part of a sponsor
group. In the billing
application, you can
create sponsor groups
where a group owner
is billed for certain
charges for all of the
group's members.
EGO_Lib_Yes_No
- Grantable (Grantable) Flag to identify that
the resource is
granted by the
balance impact. This
will allow specifying
the start date and end
date on the balance
impact.
EGO_Lib_Yes_No
- Fixed Amount
(Fixed_Amount)
Represents the fixed
amount/price that is
applied on the
resource that is
associated with the
billing product.
-

Seeded Item Metadata Libraries F-35
Attribute Group
Display Name
(Internal Name)
Behavior
Attribute Display
Name (Internal
Name)
Attribute
Description
Value Set
- Scaled Amount
(Scaled_Amount)
Represents the
amount that can be
credited/debited
based on rating of the
resource. For
example, usage of
minutes or internet
download limits.
-
- Units (Units) Represents the units
for the rating. Usually
a picklist [Second,
Minute, Kilobyte,
Megabyte,…]
Balance_Impact_Unit
s
- Promotional Price
(Promotional_Price)
Indicates a
promotional or
introductory price.
-
- Service Pricing
Method
(Service_Pricing_Met
hod)
- Service_Pricing_Meth
od
- Service Price Percent
(Service_Price_Percen
t)
A percentage that is
used to mark up the
price of the service
product.
-
- Start Date
(Start_Date)
Start date of the
balance impact.
-
- End Date (End_Date) End date of the
balance impact.
-
Tier Group
(Tier_Group)
Multi-Row
Tier Name
(Tier_Name)
Name of the rate tier. -

F-36 Oracle Product Hub Implementation Guide
Attribute Group
Display Name
(Internal Name)
Behavior
Attribute Display
Name (Internal
Name)
Attribute
Description
Value Set
- Tier ID (Tier_ID) Unique identifier of
the rate tier.
-
- Effectivity Mode
(Effectivity_Mode)
Identifies the
effectivity mode
associated with the
date and time of the
tier.
'Absolute' - sets the
time period when the
rate tier is in effect by
specifying dates.
'Relative' -sets the
time period when the
rate tier is in effect by
specifying the
number of days
relative to the
product purchase
date.
Effectivity_Mode
- Start Date Time
(Start_Date_Time)
Start date and time of
the tier.
-
- End Date Time
(End_Date_Time)
End date and time for
the tier.
-
- Relative Start
(Relative_Start)
Relative start from
the product purchase
date.
-
- Relative Start UOM
(Relative_Start_UOM
)
UOM for the relative
start date.
Relative_Start_End_U
OM
- Relative End
(Relative_End)
Relative end when
the rate tier is no
longer active.
-

Seeded Item Metadata Libraries F-37
Attribute Group
Display Name
(Internal Name)
Behavior
Attribute Display
Name (Internal
Name)
Attribute
Description
Value Set
- Relative End UOM
Relative_End_UOM
UOM for the relative
end date.
Relative_Start_End_U
OM
- Time Day Restrictions
Time_Day_Restrictio
ns
Indicates whether
Day Time restrictions
are associated with
the Rate Tier.
1.
No Restrictions:
The rate tier has
no day or time
restrictions. If
you have a day
or time of day
range in your
rate structure,
selecting this
removes it.
2.
Day Restrictions:
Set day of week
and month of
day restrictions
for a rate.
3.
Time
Restrictions: Set
time of day
restrictions for a
rate.
Time_Day_Restrictio
ns

F-38 Oracle Product Hub Implementation Guide
Attribute Group
Display Name
(Internal Name)
Behavior
Attribute Display
Name (Internal
Name)
Attribute
Description
Value Set
Day Time Range
(Day_Time_Range)
Multi-Row
Additional
Information: All
date and time
attributes within
this group are time
zone independent,
meaning there is
no need to change
the time entered
for different time
zones.
Day Time Range ID
(Day_Time_Range_ID
)
Day and time range
unique identifier.
-
- Day Range Name
(Day_Range_Name)
Day restrictions
name.
-
- Day Range Start Date
(Day_Range_Start_Da
te2)
Starting day. -
- Day Range End Date
(Day_Range_End_Da
te2)
Ending day. -
- Use Time of Day
Ranges
(Use_Time_Day_Ran
ges)
Select whether or not
to use time of day
ranges.
EGO_Lib_Yes_No
- Time of Day Range
Name
(Time_Day_Range_N
ame)
Time range
restrictions name.
-
- Start Time
(Start_Time2)
Start time. -

Seeded Item Metadata Libraries F-39
Attribute Group
Display Name
(Internal Name)
Behavior
Attribute Display
Name (Internal
Name)
Attribute
Description
Value Set
- End Time
(End_Time2)
End time. -
Days of the Week
Range
(Days_of_the_Week_
Range)
Multi-Row
Additional
Information:
All
date and time
attributes within
this group are time
zone independent,
meaning there is
no need to change
the time entered
for different time
zones.
Day of the Week
Range ID
(Day_of_the_Week_R
ange_ID)
Day of the week
unique identifier.
-
- Day of the Week
Range Name
(Day_of_the_Week_R
ange_Name)
Day of the week
restrictions name.
-
- Starting Week Day
(Start_Day_of_the_W
eek)
Starting week day. Days_of_the_Week
- Ending Week Day
(End_Day_of_the_We
ek)
Ending week day. Days_of_the_Week
- Start Date for the
Week
(Start_Date_for_the_
Week2)
Starting date for the
week.
-

F-40 Oracle Product Hub Implementation Guide
Attribute Group
Display Name
(Internal Name)
Behavior
Attribute Display
Name (Internal
Name)
Attribute
Description
Value Set
- End Date for the
Week
(End_Date_for_the_
Week2)
Ending date for the
week.
-
- Use Time in Day of
the Week
(Use_Time_in_Day_o
f_the_Week)
Flag to indicate
whether time range is
specified.
EGO_Lib_Yes_No
- Time in Day of week
range name
(Time_in_Day_of_we
ek_range_name)
Time range
restrictions name.
-
- Start Time in Day of
the Week
(Start_Time_in_Day_
of_the_Week2)
Start time. -
- End Time in Day of
the Week
(End_Time_in_Day_o
f_the_Week2)
End time. -
Billing Discount
Attributes
(Billing_Discount_Att
ributes)
Single-Row
Discount Type
(Discount_Type)
Identifies the type of
discount. It is
equivalent to Product
Type. Possible values
include:
Subscription and
System.
Discount_Type
- Priority (Priority) Priority for applying
the discount.
EGO_Lib_NumVS

Seeded Item Metadata Libraries F-41
Attribute Group
Display Name
(Internal Name)
Behavior
Attribute Display
Name (Internal
Name)
Attribute
Description
Value Set
- Multiple Discounts
per Event
(Multi_Discounts_Per
_Event)
Identifies the way
discounts are applied,
if there are multiple
discounts associated
per event/charge.
Cascading discounts:
only apply to parts of
the charge packet that
have not already been
considered for
discount. Parallel
discounts: Evaluated
independently of
each other and are
always considered.
The entire charge
packet is discounted,
regardless of whether
it has been
discounted
previously.
Sequential discounts:
Applied as long as a
customer charge
remains.
Multi_Discounts_Per
_Event
- Ownership
Maximum Quantity
(Ownership_Qty_Ma
ximum)
Total quantity of
services/products
owned above which
the discount does not
apply. If set to 0
(default) then it is not
used.
EGO_Lib_NumVS
- Ownership Minimum
Quantity
(Ownership_Qty_Min
imum)
Total Quantity of
services/products
owned below which
the discount does not
apply. If set to 0
(default) then it is not
used.
EGO_Lib_NumVS

F-42 Oracle Product Hub Implementation Guide
Attribute Group
Display Name
(Internal Name)
Behavior
Attribute Display
Name (Internal
Name)
Attribute
Description
Value Set
- Provisioning Tag
(Provisioning_Tag)
Provides a
framework to
associate extended
rating attributes that
can enable rating or
discounting to vary
for a service.
Provisioning_Tag
- Purchase Maximum
Quantity
(Purchase_Qty_Maxi
mum)
Represents the
maximum quantity of
the discount that can
be purchased per
transaction.
EGO_Lib_NumVS
- Purchase Minimum
Quantity
(Purchase_Qty_Mini
mum)
Represents the
minimum quantity of
the discount that can
be purchased per
transaction.
EGO_Lib_NumVS
- Usage Discount -
Valid from middle of
the cycle
(Usage_Discount_Val
id_From)
The field defines
validity rules for
discounting a usage
charge. Identifies the
method of handling a
discount purchased
in the middle of an
accounting cycle. Full
Discount: Grants the
discount for the
whole accounting
cycle. Prorated
Discount: Grants the
discount for the
portion of the
accounting cycle the
discount is owned.
No Discount: Grants
no discount for the
accounting cycle.
Usage_Cycle_Discou
nt

Seeded Item Metadata Libraries F-43
Attribute Group
Display Name
(Internal Name)
Behavior
Attribute Display
Name (Internal
Name)
Attribute
Description
Value Set
- Usage Discount -
Valid to middle of the
cycle
(Usage_Discount_Val
id_To)
Identifies the method
of handling a
discount canceled in
the middle of an
accounting cycle.
Usage_Cycle_Discou
nt
- Usage Discount -
Valid only part of the
cycle
(Usage_Discount_Val
id_Only)
Identifies the method
of handling a
discount purchased
and canceled in the
middle of an
accounting cycle.
Usage_Cycle_Discou
nt
- Cycle Discount -
Valid from middle of
the cycle
(Cycle_Discount_Vali
d_From)
The field defines
validity rules for
discounting a cycle
charge. Identifies the
method of handling a
discount purchased
in the middle of an
accounting cycle.
Usage_Cycle_Discou
nt
- Cycle Discount -
Valid to middle of the
cycle
(Cycle_Discount_Vali
d_To)
Identifies the method
of handling a
discount canceled in
the middle of an
accounting cycle.
Usage_Cycle_Discou
nt
- Cycle Discount -
Valid only part of the
cycle
(Cycle_Discount_Vali
d_Only)
Identifies the method
of handling a
discount purchased
and canceled in the
middle of an
accounting cycle.
Usage_Cycle_Discou
nt
Billing Discount
Event Map
(Billing_Discount_Ev
ent_Map)
Multi-Row
Event (Event) Represents the name
of a billable event or
charges modeled as
an event in the billing
application.
Event

F-44 Oracle Product Hub Implementation Guide
Attribute Group
Display Name
(Internal Name)
Behavior
Attribute Display
Name (Internal
Name)
Attribute
Description
Value Set
- Discount Structure
Type
(Discount_Structure_
Type)
Identifies the type of
discount model
associated with the
product. Discount
Model - Only one
discount model can
be associated with the
event. Discount
Model Selector– More
than one discount
model can be selected
from a selector.
Discount_Structure_T
ype
- Model / Model
Selector
(Model_Selector)
The name of the
discount model
associated with the
discount.
-
- Snowball (Snowball) If this discount/event
combination is a
snowball discount. A
snowball discount
enables distribution
of group discounts to
group members.
EGO_Lib_Yes_No
- Stop Discounting
(Stop_Discounting)
Identifies when to
stop applying the
discounts. [Never,
When inactive, When
canceled, When
inactive or canceled]
Stop_Discounting
Communications Product Details Library - Vertical
Oracle Product Hub provides the following seeded library containing attribute groups,
attributes, and value sets. For more information about using data libraries, see: Using
Seeded Attributes, page 4-36. All seeded attribute groups in this library are assigned to
the Item Revision business entity.
This library is not automatically installed. The system administrator must perform the

Seeded Item Metadata Libraries F-45
following steps to upload the library after installing the Oracle Product Hub for
Communications patch.
Installing the Library
1. Upload the value set library file. This file contains all of the value sets required by
the Communications Product Details Library - Vertical, as well as those required by
all other Oracle Product Hub for Communications libraries.
Tip: You only need to install this file once for all Oracle Product
Hub for Communications libraries.
• Filename
$EGO_TOP/patch/115/import/US/egomstrlibvs.ldt
• Command
FNDLOAD apps 0 Y UPLOAD
$EGO_TOP/patch/115/import/egoefval.lct
$EGO_TOP/patch/115/import/US/egomstrlibvs.ldt
ORACLE Password:
2. Upload the Communications Product Details Library - Vertical file.
• Filename
$EGO_TOP/patch/115/import/US/egocpdlib.ldt
• Command
FNDLOAD apps 0 Y UPLOAD
$EGO_TOP/patch/115/import/egoefag.lct
$EGO_TOP/patch/115/import/US/egocpdlib.ldt
ORACLE Password:
Communications Product Details Library - Vertical
Attribute Group
Display Name
(Internal Name)
Behavior
Attribute Display
Name (Internal
Name)
Attribute
Description
Value Set
Communications:
Product Info
(Comms_Product_Inf
o)
Single-Row
Network Element
Type
(Network_Element_T
ype)
Indicates whether the
network item
represents a node,
connection, or
network.
Network_Element

F-46 Oracle Product Hub Implementation Guide
Attribute Group
Display Name
(Internal Name)
Behavior
Attribute Display
Name (Internal
Name)
Attribute
Description
Value Set
- Compound Product
(Compound_Product)
Specifies if this is a
networking product
which uses
compound product
validation rules.
EGO_Lib_Yes_No
- Special Rating Max
Items
(Special_Rating_Max
_Items)
Identifies the number
of phone numbers
allowed for the item
when the Item
represents a Special
rating list. (Friends
and Family list)
-
- Special Rating Type
(Special_Rating_Type
)
Identifies the type of
data in the special
rating list.
Special_Rating_Type
- Composition Type
(Composition_Type)
This is fulfillment
dependent
information. It
identifies what the
item is composed of.
1. PartialItem 2.
Wholeitem.
Composition_Type
- Success Dependency
(Success_dependency
)
This field is used
during order
submission. It
declares if all order
items must fulfill
successfully or else
the whole order fails.
1. None 2. All or
None.
Success_Dependency

Seeded Item Metadata Libraries F-47
Attribute Group
Display Name
(Internal Name)
Behavior
Attribute Display
Name (Internal
Name)
Attribute
Description
Value Set
- Billable (Billable) This flag identifies
the purchased
products that will be
sent to billing
applications during
order submission.
EGO_Lib_Yes_No
- Service Instance
Enabled
(Service_Instance_En
abled)
This flag identifies a
billing product which
is also a bundle.
EGO_Lib_Yes_No
- Fulfillment Item Code
(Fulfillment_Item_Co
de)
This defaults to the
ICC associated with
the product, but there
is a drop down to
pick any ICC in the
hierarchy.
-
- MSISDN Required
(MSISDN_Required)
MSISDN Required EGO_Lib_Yes_No

Web Services for Publishing G-1
G
Web Services for Publishing
This appendix covers the following topics:
• Oracle Product Hub Web Services Overview
• Value Set Web Service
• Attribute Group Web Service
• Item Catalog Category Web Service
• Item Web Service
• Controlling the Output Payload
• Error Reporting
Oracle Product Hub Web Services Overview
Users can publish item catalog categories, attribute groups, value sets, or items and
extract more information about these entities by invoking entity specific Web Services
for Oracle Product Hub. The following Web Services are available to Product Hub
users:
• Item catalog category web service
• Attribute group web service
• Value set web service
• Item web service
The figure below shows a sample implementation that consumes one of these Web
Services.

G-2 Oracle Product Hub Implementation Guide
System Flow and Interaction Diagram
Related Topics
Publishing Overview, Oracle Product Hub User's Guide
Item Catalog Category Web Service, page G-18
Attribute Group Web Service, page G-12
Value Set Web Service, page G-2
Item Web Service, page G-30
Value Set Web Service
The value set Web Service includes the getValueSetDetails method, which returns the
details of the value set according to the parameters requested in the output. Users can
invoke the method on both value set versions and non-version value sets.
Important: Before using Publication Web Services, you must complete
some manual post-installation steps. Complete the steps documented in
My Oracle Support ID 1336146.1. This My Oracle Support ID also
includes troubleshooting tips.

Web Services for Publishing G-3
Method: getValueSetDetails
This Web Service method provides an interface to extract the information about the
value set and/or its hierarchy based on input.
Modes
You can invoke the getValueSetDetails method using two modes:
Batch Mode
• Retrieves the details of the value set(s) published as part of a batch from the PIM
Publication user interface.
• Use this mode when you can directly provide the batch ID to use the value set
services. The parameters provided while creating the batch take precedence over
the values provided for the parameters below while invoking the service.
List Mode
• Passes a list of value set identifiers directly as input to the getValueSetDetails
method.
• Optionally provides any number of value set IDs for invoking the services.
While invoking the value set services in either mode, provide the following WS-Security
and Parameter inputs:
WS-Security
Parameter
Name
Type Optional Description
User Name String NO EBS "Applications User name"
Password String NO Password for EBS "Applications User"

G-4 Oracle Product Hub Implementation Guide
Parameters
Parameter
Name
Type Optional Description
BatchId Integer No (batch
mode)
Yes (non-batch
mode)
The identifier of the Batch that was published from the PIM UI.
ValueSetId Integer Yes (batch
mode)
No (non-batch
mode)
Value set ID for which the details need to be extracted/published.
In Batch Mode, the Value Set ID is derived for the selected value
set, so there is no need to provide an ID.
In List Mode:
•
When publishing to external systems, you must provide the
ValueSetId.
•
When publishing to other Oracle Product Hub systems, you
must provide either the ValueSetId or the ValueSetName.
ValueSetName String Yes
Note: This
parameter
is not
considered
when
publishing
to external
systems.
The name of the value set to publish to other Oracle Product Hub
systems.
In Batch Mode, the value set name is derived for the selected
value set, so there is no need to provide a name.
In List Mode, when publishing to other Oracle Product Hub
systems, you must provide either the ValueSetId or the
ValueSetName.
VersionSeqId Integer Yes Version for which the service is needed. If left blank, the default
is the current effective version.
ChildValueSets String No Flag that indicates whether to publish child value sets associated
with the selected value sets.

Web Services for Publishing G-5
Parameter
Name
Type Optional Description
Sync
Additional
Information
: This
appears as
the "Publish
to PIM
Systems
Only"
checkbox in
the batch
publishing
flow.
String No (batch
mode),
No (non-batch
mode)
Flag to indicate whether to publish to external systems or other
Oracle Product Hub systems.
A value of Y indicates publishing to Oracle Product Hub systems.
A value of N indicates publishing to external systems.
TriggerImport String No
Note:
This
parameter
is not
considered
when
publishing
to external
systems.
Flag to control whether to launch the 'EGO Import Metadata'
concurrent program in the target Oracle Product Hub system or
not. If it is set to 'N', the metadata interface tables in the target
OPH systems are loaded with the data from the source OPH
system. Users must manually launch this concurrent program to
import the data in the interface tables into the production tables.
If it is set to 'Y', this concurrent program is automatically
launched in the target OPH system, which then imports the data
from the interface tables into the production tables.
Default Value: N
ReturnPayload Boolean Yes
Default: True
Flag to control whether the output payload includes the details of
the ICC(s)

G-6 Oracle Product Hub Implementation Guide
Multi Selection Parameters
Parameter Name Type Optional Description
LanguageCode String Yes (batch mode)
Yes (non-batch mode)
Note: This
parameter is not
considered when
publishing to
Oracle Product
Hub systems.
The language code in
which to return the
output.
For example: US (for
American English).
Default: Return
output in all installed
languages.
Note: Repeat this
parameter
multiple times to
return output in
more than one
language.
When publishing to
external systems:
The language code in
which to return the
output, for example,
US (for American
English).
Default: Return
output in all installed
languages.
Note: Repeat this
parameter
multiple times to
return output in
more than one
language.
When publishing to
Oracle Product Hub
systems:
The value set
translatable column

Web Services for Publishing G-7
Parameter Name Type Optional Description
values are published
in all of the installed
languages common
between the source
and target OPH
systems.
LanguageName String Yes (batch mode),
Yes (non-batch mode)
Note: This
parameter is not
considered when
publishing to
Oracle Product
Hub systems.
When publishing to
external systems:
The language name in
which to return the
output, for example,
English.
When publishing to
Oracle Product Hub
systems:
Value set translatable
column values are
published in all of the
installed languages
common between the
source and target
OPH systems.
SystemCode String Yes (batch mode)
No (non-batch mode)
Note: This
parameter is not
considered when
publishing to
external systems.
The system code for a
target OPH system to
which you plan to
publish the ICC(s).
Default behavior: at
least one target OPH
system must be
selected/provided.
Note: Repeat this
parameter
multiple times
when publishing
to multiple
systems.

G-8 Oracle Product Hub Implementation Guide
Parameter Name Type Optional Description
SystemName String Yes (batch mode)
No (non-batch mode)
Note: This
parameter is not
considered when
publishing to
external systems.
The system name for
a target OPH system
to which you plan to
publish the ICC(s).
Default behavior: at
least one target OPH
system must be
selected/provided.
Note: Repeat this
parameter
multiple times
when publishing
to multiple
systems.
FND Security Parameters
Parameter Name Type Optional Description
RESPONSIBILITY_N
AME
String No (batch mode)
No (non-batch mode)
Provide the
Responsibility name
for the user.
For example:
EGO_DEVELOPMEN
T_MANAGER
Note: In batch
mode (using the
UI flow), it is
derived from the
EBS Login.

Web Services for Publishing G-9
Parameter Name Type Optional Description
RESPONSIBILITY_A
PPL_NAME
String No (batch mode)
No (non-batch mode)
Application name for
the above
responsibility.
For example: EGO
Note: In batch
mode (using the
UI flow), it is
derived from the
EBS Login.
SECURITY_GROUP_
NAME
String Yes (batch mode)
No (non-batch mode)
Security group name.
NLS_LANGUAGE String Yes (batch mode)
No (non-batch mode)
The current session
language to use for
the Web Service
invocation.
Output
The output payload includes value set details based on the configurable parameters
selected by the user.
Payload when publishing to external systems:
• ListOfValueSets
• Valueset
• ValueSetId - Value set identifier.
• ValueSetName - Name.
• Description - Description.
• DataType - Data type of the value set.
• MaximumSize - Maximum size limit.
• ValidationType - Validation type of the value set.
• MinimumValue - Minimum value (applicable for only Number, Date, and
G-10 Oracle Product Hub Implementation Guide
Date Time data types).
• MaximumValue - Maximum value (applicable for only Number, Date, and
Date Time data types).
• ParentValueSetName - Parent value set name if this is a child value set.
• ValuesetValue - List of values for this value set (only for non-version value
sets).
• TranslatableAttributes
• ValuesetVersion - List of versions for a value set with versions.
• VersionSeqId - Sequence ID of the version.
• Description - Description.
• StartActiveDate - Effective start date.
• EndActiveDate - Effective end date.
• VersionedVSValue - List of values for this version.
• TableInfo - Validation information for a table type value set.
• TableName - Database table name.
• WhereClause - Where clause.
• ValueColumn - Value column.
• IDColumn - ID Column.
• MeaningColumn - Meaning column.
• Status - Status information
• Error - Error information
• Code - Error code.
• Message - Error message.
• AdditionalInfo - Additional info section when returnPayload input flag is set to
false.
Web Services for Publishing G-11
• SessionId - Session ID for invocation.
• EntityCount - Output entity count.
Payload when publishing to Oracle Product Hub systems:
• Status - Status information
• Error - Error information
• Code
• Message
• Language Code
• System Code
• Warning - Warning information
• Code
• Message
• Language Code
• System Code
• AdditionalInfo – Additional Info Section
• SessionId
• EntityCount
Related Topics
Oracle Product Hub Web Services Overview, page G-1
Publishing Overview, Oracle Product Hub User's Guide
Defining Source Systems, page 12-5
Publishing Item Catalog Categories, page 3-45
Publishing Attribute Groups, page 4-54
Publishing Value Sets, page 4-16
Publishing Items and Structures, Oracle Product Hub User's Guide
Viewing the Publishing History, Oracle Product Hub User's Guide
G-12 Oracle Product Hub Implementation Guide
Controlling the Output Payload, page G-79
Error Reporting, page G-80
Attribute Group Web Service
The attribute group Web Service includes the getAGDetails method, which publishes
the details of an attribute group and its associated entities to target Oracle Product Hub
(OPH) systems based on input to these systems.
Important: Before using Publication Web Services, you must complete
some manual post-installation steps. Complete the steps documented in
My Oracle Support ID 1336146.1. This My Oracle Support ID also
includes troubleshooting tips.
Method: getAGDetails
The getAGDetails method provides an interface to extract information about attribute
groups and their associated entities ( which include business entities, attributes, and
value sets/child value sets associated to the attributes) based on input and then publish
them to target OPH systems.
Modes
You can invoke the getAGDetails method using two modes:
Batch Mode
• Retrieves the details of the attribute group(s) published as part of a batch from the
PIM Publication user interface and publishes them to target OPH systems.
• Use this mode when you can directly provide the batch ID to use the attribute
group services. The parameters provided while creating the batch take precedence
over the values provided for the parameters below while invoking the service.
List Mode
• Passes a list of attribute group identifiers directly as input to the getAGDetails
method.
• Optionally provides any number of attribute group IDs for invoking the services.
While invoking the attribute group services in either mode, provide the following WS-
Security and Parameter inputs:

Web Services for Publishing G-13
WS-Security
Parameter
Name
Type Optional Description
User Name String NO EBS "Applications User name"
Password String NO Password for EBS "Applications User"
Parameters
Parameter
Name
Type Optional Description
BatchId Integer No (batch
mode)
Yes (non-batch
mode)
The identifier of the Batch that was published from the PIM UI.
AGId Integer Yes (batch
mode)
No (non-batch
mode)
Attribute Group ID for which the details need to be published.
Note: In Batch Mode, there is no need to provide the AGId. It
is derived for the selected attribute group(s) in the batch. In
List Mode, you must provide either the AGId or the AGName.
Agname String Yes (batch
mode),
No (non-batch
mode)
The name of the attribute group to be published.
Note: In Batch Mode, there is no need to provide the
AGname. It is derived for the selected attribute group(s) in the
batch. In List Mode, you must provide either the AGId or the
AGName.
Valuesets String Yes (batch
mode),
No (non-batch
mode)
Default Value:
Y
Flag to control whether to publish the value sets associated with
the user defined attributes to target OPH systems.

G-14 Oracle Product Hub Implementation Guide
Parameter
Name
Type Optional Description
ChildValuesets String Yes (batch
mode),
No (non-batch
mode)
Default Value:
Y
Flag to control whether to publish the child value sets associated
with the user defined attributes to target OPH systems.
Sync (In Batch
flow - Publish
to PIM Systems
Only checkbox)
String Yes (batch
mode),
No (non-batch
mode)
Default Value:
Y
Flag to indicate whether to publish to external systems or OPH
systems. Value Y indicates publishing to OPH systems. The
attribute group Webservice supports publishing to OPH systems
only.
Auto Import String Yes (batch
mode),
No (non-batch
mode)
Default Value:
N
Flag to control whether to launch the 'EGO Import Metadata'
concurrent program in the target OPH system or not.
If it is set to 'N', the metadata interface tables in the target OPH
systems are loaded with the data from the source OPH system.
Users must manually launch this concurrent program to import
the data in the interface tables into the production tables.
If it is set to 'Y', this concurrent program is automatically
launched in the target OPH system. The program imports the
data from the interface tables into the production tables.
Return Payload String No (non-batch
mode)
Default Value:
N
Note: This
parameter
is honored
only in List
mode.
Flag to control whether user wants to display the concurrent
program errors and warnings that occur in the target OPH
systems, as well as any additional information provided about
the attribute groups.

Web Services for Publishing G-15
Multi Selection Parameters
Parameter Name Type Optional Description
LanguageCode String Yes (batch mode),
Yes (non-batch mode)
This parameter is not
considered when
publishing to OPH
systems.
When publishing to
OPH systems,
attribute group
translatable column
values are published
in all the installed
languages common
between the source
and target OPH
systems.
LanguageName String Yes (batch mode),
Yes (non-batch mode)
This parameter is not
considered when
publishing to OPH
systems.
When publishing to
OPH systems,
attribute group
translatable column
values are published
in all of the installed
languages common
between the source
and target OPH
systems.
SystemCode String Yes (batch mode)
No (non-batch mode)
Default behavior: You
must select at least
one target OPH
system.
Note: Repeat this
parameter
multiple times to
publish to multiple
systems.
The system code for a
target OPH system.

G-16 Oracle Product Hub Implementation Guide
Parameter Name Type Optional Description
SystemName String Yes (batch mode),
No (non-batch mode)
Default behavior:
Select at least one
target OPH system.
Note:
Repeat this
parameter
multiple times to
publish to multiple
systems.
The system name for
a target OPH system.
FND Security Parameters
Parameter Name Type Optional Description
RESPONSIBILITY_N
AME
String No (batch mode)
No (non-batch mode)
Provide the
Responsibility name
for the user. For
example:
EGO_DEVELOPMEN
T_MANAGER.
Note:
In batch
mode (UI flow),
the responsibility
name is derived
from the EBS
Login.

Web Services for Publishing G-17
Parameter Name Type Optional Description
RESPONSIBILITY_A
PPL_NAME
String No (batch mode),
No (non-batch mode)
Application name for
the above
responsibility. For
example: EGO
Note: In batch
mode (UI flow),
the application
name is derived
from the EBS
Login.
SECURITY_GROUP_
NAME
String Yes (batch mode)
No (non-batch mode)
Security group name.
NLS_LANGUAGE String Yes (batch mode)
No (non-batch mode)
The current session
language to use for
the Web Service
invocation.
Output
The output payload includes details based on the configurable parameters selected by
the user.
Payload when publishing to Oracle Product Hub systems:
• Status - Status information
• Error - Error information
• Code
• Message
• Language Code
• System Code
• Warning - Warning information
• Code
G-18 Oracle Product Hub Implementation Guide
• Message
• Language Code
• System Code
• AdditionalInfo – Additional Info Section
• SessionId
• EntityCount
Related Topics
Oracle Product Hub Web Services Overview, page G-1
Publishing Overview, Oracle Product Hub User's Guide
Defining Source Systems, page 12-5
Publishing Value Sets, page 4-16
Publishing Attribute Groups, page 4-54
Publishing Item Catalog Categories, page 3-45
Publishing Items and Structures, Oracle Product Hub User's Guide
Viewing the Publishing History, Oracle Product Hub User's Guide
Controlling the Output Payload, page G-79
Error Reporting, page G-80
Item Catalog Category Web Service
The item catalog category (ICC) Web Service includes the getICCDetails method, which
returns the details of the ICC according to the parameters requested in the output.
Users can invoke the method on both ICC versions and non-version ICCs. It can also be
used to publish an ICC and its associated entities to other Oracle Product Hub systems.
Important: Before using Publication Web Services, you must complete
some manual post-installation steps. Complete the steps documented in
My Oracle Support ID 1336146.1. This My Oracle Support ID also
includes troubleshooting tips.
Method: getICCDetails
This Web Service method provides an interface to extract the information about the ICC

Web Services for Publishing G-19
and/or its hierarchy based on input. It can also be used to publish this data to other
Oracle Product Hub systems.
Modes
You can invoke the getICCDetails method using two modes:
Batch Mode
• Retrieves the details of the ICC(s) published as part of a batch from the PIM
Publication user interface.
• Use this mode when you can directly provide the batch ID to use the ICC services.
The parameters provided while creating the batch take precedence over the values
provided for the parameters below while invoking the service.
List Mode
• Passes a list of ICC identifiers directly as input to the getICCDetails method.
• Optionally provides any number of ICC IDs for invoking the services.
While invoking the ICC services in either mode, provide the following WS-Security and
Parameter inputs:
WS-Security
Parameter
Name
Type Optional Description
User Name String NO EBS "Applications User name"
Password String NO Password for EBS "Applications User"
Parameters
Parameter
Name
Type Optional Description
BatchId Integer No (batch
mode)
Yes (non-batch
mode)
The identifier of the Batch that was published from the PIM UI.

G-20 Oracle Product Hub Implementation Guide
Parameter
Name
Type Optional Description
ICCId Integer Yes (batch
mode)
No (non-batch
mode)
The identifier of the ICC to be extracted/published.
Note: In Batch Mode, the ICCId is derived from the
selected ICC.
In List Mode:
•
When publishing to external systems, you must
provide the ICCId.
•
When publishing to Oracle Product Hub systems, you
must provide either the ICCId or the ICCName.
ICCName String Yes
Note: This
parameter is
not
considered
while
publishing
to external
systems.
The name of the ICC to be published to other Oracle Product
Hub systems.
In Batch Mode, the ICCName is derived from the selected ICC.
In List Mode, provide either the ICCId or the ICCName.
VersionSequence Integer Yes (batch
mode)
No (non-batch
mode)
Version for which the service is needed. If left blank, the
default is the current effective version.
UserDefAttrGrps Boolean Yes Flag to control whether to include the user defined attribute
groups associated with the ICC(s) in the output payload or
when publishing to Oracle Product Hub systems.
Default Value : True

Web Services for Publishing G-21
Parameter
Name
Type Optional Description
Valuesets String Yes
Note: This
parameter is
not
considered
when
publishing
to external
systems.
Flag to control whether to publish value sets associated with
user defined attributes when publishing to Oracle Product
Hub systems.
Default Value : True
ICCVersions String Yes
Note: This
parameter is
not
considered
when
publishing
to other
Oracle
Product
Hub
systems.
Flag that controls whether the version information for the ICC
(s) is included in the output payload.
Default Value: True
TransAttrs String Yes
Note: This
parameter is
not
considered
when
publishing
to other
Oracle
Product
Hub
systems.
Flag to control whether the transaction attributes for the ICC(s)
are included in the output payload.
Default Value: True

G-22 Oracle Product Hub Implementation Guide
Parameter
Name
Type Optional Description
ICCPages String Yes
Note: This
parameter is
not
considered
when
publishing
to external
systems.
Flag that controls whether to publish pages associated with
ICCs to Oracle Product Hub systems.
Default Value: True
ICCFunctions String Yes
Note: This
parameter is
not
considered
when
publishing
to external
systems.
Flag that controls whether to publish functions associated with
ICCs to Oracle Product Hub systems.
Default Value: True
ICCStructure String Yes
Note:
This
parameter is
not
considered
when
publishing
to other
Oracle
Product
Hub
systems.
Flag to control whether the structures for ICC(s) are included
in the output payload.
Default Value: True

Web Services for Publishing G-23
Parameter
Name
Type Optional Description
ParentICCs String Yes Flag to control whether the parent hierarchy for the ICC(s) is
included in the output payload or published to Oracle Product
Hub systems.
Default Value: True
Note: This parameter is honored only during "List" mode
calls to the getICCDetails method.
ChildICCs String Yes Flag to control whether the child hierarchy for ICC(s) is
included in the output payload or published to Oracle Product
Hub systems.
Default Value: True
Note: This parameter is honored only during a "List" mode
call to the getICCDetails method.
Sync
Note: This
appears as the
"Publish to
PIM Systems
Only"
checkbox in
the batch
publishing
flow.
String No (batch
mode)
No (non-batch
mode)
Flag to indicate whether to publish to external systems or other
Oracle Product Hub systems.
A value of Y indicates publishing to Oracle Product Hub
systems.
a value of N indicates publishing to external systems.

G-24 Oracle Product Hub Implementation Guide
Parameter
Name
Type Optional Description
Auto Import String Yes
Note: This
parameter is
not
considered
when
publishing
to external
systems.
Flag to control whether to launch the 'EGO Import Metadata'
concurrent program in the target Oracle Product Hub system
or not.
If it is set to 'N', the metadata interface tables in the target OPH
systems are loaded with the data from the source OPH system.
Users must manually launch this concurrent program to
import the data in the interface tables into the production
tables.
If it is set to 'Y', this concurrent program is automatically
launched in the target OPH system, which then imports the
data from the interface tables into the production tables.
Default Value: N
ReturnPayload String Yes
Note: This
parameter is
honored
only in List
mode.
Publishing to external systems: Flag to control whether the
output payload includes the ICC(s) details.
Publishing to other Oracle Product Hub systems: Flag to
control whether to display concurrent program errors and
warnings occurring in the target OPH systems as well as any
additional ICC information provided for publishing.
Default Value: True

Web Services for Publishing G-25
Multi Selection Parameters
Parameter Name Type Optional Description
LanguageCode String Yes (batch mode)
Yes (non-batch
mode)
Note: This
parameter is not
considered when
publishing to
Oracle Product
Hub systems.
When publishing to
exteral systems:
The language code in
which to return the
output, for example,
US (for American
English).
Default: Return
output in all installed
languages.
Note: Repeat this
parameter
multiple times to
return output in
more than one
language.
When publishing to
Oracle Product Hub
systems:
When publishing to
OPH systems, the
attribute group
translatable column
values are published
in all of the installed
languages common
between the source
and target OPH
systems.

G-26 Oracle Product Hub Implementation Guide
Parameter Name Type Optional Description
LanguageName String Yes (batch mode),
Yes (non-batch mode)
Note: This
parameter is not
considered when
publishing to
Oracle Product
Hub systems.
When publishing to
external systems:
The language name
in which to return the
output, for example,
English.
When publishing to
Oracle Product Hub
systems:
When publishing to
OPH systems,
attribute group
translatable column
values are published
in all of the installed
languages common
between the source
and target OPH
systems.
SystemCode String Yes (batch mode)
No (non-batch mode)
Note: This
parameter is not
considered when
publishing to
external systems.
The system code for a
target OPH system to
which you plan to
publish the ICC(s)
. Default behavior: at
least one target OPH
system must be
selected/provided.
Note: Repeat this
parameter
multiple times
when publishing
to multiple
systems.

Web Services for Publishing G-27
Parameter Name Type Optional Description
SystemName String Yes (batch mode)
No (non-batch mode)
Note: This
parameter is not
considered when
publishing to
external systems.
The system name for
the target OPH
system to which you
plan to publish the
ICC(s) .
Default behavior: at
least one target OPH
system must be
selected/provided.
Note:
Repeat this
parameter
multiple times
when publishing
to multiple
systems.
FND Security Parameters
Parameter Name Type Optional Description
RESPONSIBILITY_N
AME
String No (batch mode)
No (non-batch mode)
Provide the
Responsibility name
for the user.
For example:
EGO_DEVELOPMEN
T_MANAGER
Note: In batch
mode (using the
UI flow), it is
derived from the
EBS Login.

G-28 Oracle Product Hub Implementation Guide
Parameter Name Type Optional Description
RESPONSIBILITY_A
PPL_NAME
String No (batch mode)
No (non-batch mode)
Application name for
the above
responsibility.
For example: EGO
Note: In batch
mode (using the
UI flow), it is
derived from the
EBS Login.
SECURITY_GROUP_
NAME
String Yes (batch mode)
No (non-batch mode)
Security group name.
NLS_LANGUAGE String Yes (batch mode)
No (non-batch mode)
The current session
language to use for
the Web Service
invocation.
Output
The output payload includes details based on the configurable parameters selected by
the user.
Payload when publishing to external systems:
• ListOfICCs
• ItemCatalogCategory
• ItemCatalogGroupId - The ICC ID for which the details have been
produced.
• EnabledFlag - Flag indicating whether ICC is enabled.
• InactiveDate - Inactive Date
• ItemCreationAllowedFlag - Flag indicating ICC is available for item
creation.
• ParentCatalogGroupId - Parent ICC ID for the given ICC ID.
• ParentCatalogGroupName - Parent ICC name for the given ICC ID.
Web Services for Publishing G-29
• CategoryName - The concatenated name of the category formed from all
segments.
• Segment1..20 - Segments containing the ICC Name.
• TranslatableAttributes
• Language
• Description
• ICCVersion
• TransactionAttribute - Transaction attributes list and metadata for the
ICC version.
• ICCStructure - Structure associated with the ICC version and its
metadata.
• UserDefAttrGrpAssociation - List of user defined attribute groups and their
metadata associated to the ICC.
• UserDefinedAttrGroup
• TranslatableAttributes
• UserDefAttrGrpBusEntity
• UserDefinedAttribute - List of user defined attributes and their
metadata.
• TranslatableAttributes
• Valueset
• Status - Status information
• Error - Error information
• Code
• Message
• AdditionalInfo - Additional Info Section
• SessionId
G-30 Oracle Product Hub Implementation Guide
• EntityCount
Payload when publishing to Oracle Product Hub systems:
• Status - Status information
• Error - Error information
• Code
• Message
• Language Code
• System Code
• Warning - Warning information
• Code
• Message
• Language Code
• System Code
• AdditionalInfo – Additional Info Section
• SessionId
• EntityCount
Related Topics
Publishing Overview, Oracle Product Hub User's Guide
Oracle Product Hub Web Services Overview, page G-1
Defining Source Systems, page 12-5
Publishing Item Catalog Categories, page 3-45
Controlling the Output Payload, page G-79
Error Reporting, page G-80
Item Web Service
The item Web Service includes the getItemDetails and getStructureDetails methods,
which return the details of the item according to the parameters requested in the
Web Services for Publishing G-31
output.
Important: Before using Publication Web Services, you must complete
some manual post-installation steps. Complete the steps documented in
My Oracle Support ID 1336146.1. This My Oracle Support ID also
includes troubleshooting tips.
Method: getItemDetails
This Web Service method provides an interface to extract the information about the
item and/or its hierarchy based on input.
Modes
You can invoke the getItemDetails method using three modes:
Batch Mode
• Retrieves the details of the item(s) published as part of a batch from the PIM
Publication user interface.
• Use this mode when you can directly provide the batch ID to use the item services.
The parameters provided while creating the batch take precedence over the values
provided for the parameters below while invoking the service.
Single Item Mode
• Use to pass item identifiers for a single item to the getItemDetails method.
• Use the basic input identifiers (InventoryItemId or InventoryItemName) and
(OrganizationId or OrganizationCode) and (RevisionId or Revision or
RevisionDate) in this mode.
List of Items Mode
• Apart from the single item mode, this passes a list of item identifiers directly as
input to the getItemDetails method.
• Optionally provides any number of item identifiers for invoking the services.
• Use the list of basic input identifiers (InventoryItemId or InventoryItemName) and
(OrganizationId or OrganizationCode) and (RevisionId or Revision or
RevisionDate) in this mode.
While invoking the item services in either mode, provide the following WS-Security and
Parameter inputs:

G-32 Oracle Product Hub Implementation Guide
WS-Security
Parameter
Name
Type Optional Description
User Name String NO EBS "Applications User name"
Password String NO Password for EBS "Applications User"
Parameters
itemQueryPara
meters
Parameter
Name
Type Optional Description
BatchId Integer No (batch mode)
Yes (list mode)
Yes (single item
mode)
The batch identifier that was published from the PIM user
interface.
InventoryItemI
d
Integer Yes (batch mode)
Yes (list mode)
No (single item
mode)
Item identifier for which to extract the details.
OrganizationId Integer Yes (batch mode)
Yes (list mode)
No (single item
mode)
Organization identifier to which the publishing item belongs.
OrganizationC
ode
String Yes (batch mode)
Yes (list mode)
No (single item
mode)
Organization code to which the publishing item belongs.

Web Services for Publishing G-33
Parameter
Name
Type Optional Description
RevisionId Integer Yes (batch mode)
Yes (list mode)
No (single item
mode)
Revision ID of the publishing item.
Revision String Yes (batch mode)
Yes (list mode)
No (single item
mode)
Revision code of the publishing item.
RevisionDate Date Yes (batch mode)
No (list mode)
No (single item
mode)
Revision date of the publishing item. If the structure name is
provided, this date is considered for explosion of the
structure in list or single item mode.
StructureName String Yes (batch mode)
No (list mode)
No (single item
mode)
Structure name of the publishing item. All components of this
structure are published along with the publishing item in list
and single item mode.
Note:
For the primary structure, provide the value as
"Primary".
InventoryItem
Name
Segment1
through
Segment19
String Yes (batch mode)
Yes (List mode)
Single item mode:
•
Yes – If
InventoryItemI
d is provided.
•
No – If
InventoryItemI
d is not
provided.
The name of each individual segment that comprises the
Publishing item name.
Note: The characteristics for all 19 segments are the same.

G-34 Oracle Product Hub Implementation Guide
Parameter
Name
Type Optional Description
BomExploderP
arameters
LevelsToExplo
de
Integer Yes Number of levels (0-60) to explode for a structure.
Default: 60
ExplodeOption Integer Yes The explode option for structure:
1.
All
2.
Current
3.
Current and future. By default, current is considered.
ExplodeStanda
rd
String Yes Whether to explode the standard structure or not.
•
Y – Explodes the standard structure.
•
N – Do not explode the standard structure.
By default, standard structures are exploded.
PublishEntitie
s
OperationalAtt
ributeGroups
String Yes Used to turn operational attribute groups on and off in the
payload.
•
Y – turn on
•
N – turn off
Default Value: Y
UserDefinedAt
tributeGroups
String Yes Used to turn user defined attribute groups on and off in the
payload.
•
Y – turn on
•
N – turn off
Default Value: Y

Web Services for Publishing G-35
Parameter
Name
Type Optional Description
ItemRevision String Yes Used to turn item revision details on and off in the payload.
•
Y – turn on
•
N – turn off
Default Value: Y
TransactionAtt
ributes
String Yes Used to turn transaction attributes on and off in the payload.
•
Y – turn on
•
N – turn off
Default Value: Y
RelatedItems String Yes Used to turn related items on and off in the payload.
•
Y – turn on
•
N – turn off
Default Value: Y
CustomerItems String Yes Used to turn customer items on and off in the payload.
•
Y – turn on
•
N – turn off
Default Value: Y
ManufacturerP
artNumbers
String Yes Used to turn manufacturer part numbers on and off in the
payload.
•
Y – turn on
•
N – turn off
Default Value: Y

G-36 Oracle Product Hub Implementation Guide
Parameter
Name
Type Optional Description
GTINCrossRef
erences
String Yes Used to turn GTIN cross references on and off in the payload.
•
Y – turn on
•
N – turn off
Default Value: Y
AlternateCateg
oryAssignment
s
String Yes Used to turn alternate category assignments on and off in the
payload.
•
Y – turn on
•
N – turn off
Default Value: Y
SupplierAssign
ments
String Yes Used to turn supplier assignments on and off in the payload.
•
Y – turn on
•
N – turn off
Default Value: Y
ReturnPayload String Yes Flag to control whether the output payload includes the
details of the item(s).
•
Y – includes the details of the item in the payload.
•
N – does not include the details of the item in the
payload.
Default Value: Y
PublishOperat
ionalAttribute
Groups

Web Services for Publishing G-37
Parameter
Name
Type Optional Description
ItemCatalog String Yes Used to turn the item catalog on or off in the payload.
•
Y – turn on
•
N – turn off
Default Value: Y
If OperationalAttributeGroups is Y, then only the value for
this parameter is considered. For example, if:
•
OperationalAttributeGroups = Y and either:
•
ItemCatalog = N, then ItemCatalog is turned off in
the payload.
•
ItemCatalog = Y, then ItemCatalog is turned on in
the payload.
•
OperationalAttributeGroups = N and either:
•
ItemCatalog = N, then ItemCatalog is turned off in
the payload.
•
ItemCatalog = Y, then ItemCatalog is turned off in
the payload

G-38 Oracle Product Hub Implementation Guide
Parameter
Name
Type Optional Description
InventoryChar
acteristics
String Yes Used to turn InventoryCharacteristics on or off in the
payload.
•
Y – turn on
•
N – turn off
Default Value: Y
If OperationalAttributeGroups is Y, then only the value for
this parameter is considered. For example, if:
•
OperationalAttributeGroups = Y and either:
•
InventoryCharacteristics = N, then
InventoryCharacteristics is turned off in the payload.
•
InventoryCharacteristics = Y, then
InventoryCharacteristics is turned on in the payload.
•
OperationalAttributeGroups = N and either:
•
InventoryCharacteristics = N, then
InventoryCharacteristics is turned off in the payload.
•
InventoryCharacteristics = Y, then
InventoryCharacteristics is turned off in the payload

Web Services for Publishing G-39
Parameter
Name
Type Optional Description
PhysicalCharac
teristics
String Yes Used to turn PhysicalCharacteristics on or off in the payload.
•
Y – turn on
•
N – turn off
Default Value: Y
If OperationalAttributeGroups is Y, then only the value for
this parameter is considered. For example, if:
•
OperationalAttributeGroups = Y and either:
•
PhysicalCharacteristics = N, then
PhysicalCharacteristics is turned off in the payload.
•
PhysicalCharacteristics = Y, then
PhysicalCharacteristics is turned on in the payload.
•
OperationalAttributeGroups = N and either:
•
PhysicalCharacteristics = N, then
PhysicalCharacteristics is turned off in the payload.
•
PhysicalCharacteristics = Y, then
PhysicalCharacteristics is turned off in the payload

G-40 Oracle Product Hub Implementation Guide
Parameter
Name
Type Optional Description
BillsOfMaterial
Characteristics
String Yes Used to turn BillsOfMaterialCharacteristics on or off in the
payload.
•
Y – turn on
•
N – turn off
Default Value: Y
If OperationalAttributeGroups is Y, then only the value for
this parameter is considered. For example, if:
•
OperationalAttributeGroups = Y and either:
•
BillsOfMaterialCharacteristics = N, then
BillsOfMaterialCharacteristics is turned off in the
payload.
•
BillsOfMaterialCharacteristics = Y, then
BillsOfMaterialCharacteristics is turned on in the
payload.
•
OperationalAttributeGroups = N and either:
•
BillsOfMaterialCharacteristics = N, then
BillsOfMaterialCharacteristics is turned off in the
payload.
•
BillsOfMaterialCharacteristics = Y, then
BillsOfMaterialCharacteristics is turned off in the
payload

Web Services for Publishing G-41
Parameter
Name
Type Optional Description
WorkInProcess
Characteristics
String Yes Used to turn WorkInProcessCharacteristics on or off in the
payload.
•
Y – turn on
•
N – turn off
Default Value: Y
If OperationalAttributeGroups is Y, then only the value for
this parameter is considered. For example, if:
•
OperationalAttributeGroups = Y and either:
•
WorkInProcessCharacteristics = N, then
WorkInProcessCharacteristics is turned off in the
payload.
•
WorkInProcessCharacteristics = Y, then
WorkInProcessCharacteristics is turned on in the
payload.
•
OperationalAttributeGroups = N and either:
•
WorkInProcessCharacteristics = N, then
WorkInProcessCharacteristics is turned off in the
payload.
•
WorkInProcessCharacteristics = Y, then
WorkInProcessCharacteristics is turned off in the
payload

G-42 Oracle Product Hub Implementation Guide
Parameter
Name
Type Optional Description
CostingCharact
eristics
String Yes Used to turn CostingCharacteristics on or off in the payload.
•
Y – turn on
•
N – turn off
Default Value: Y
If OperationalAttributeGroups is Y, then only the value for
this parameter is considered. For example, if:
•
OperationalAttributeGroups = Y and either:
•
CostingCharacteristics = N, then
CostingCharacteristics is turned off in the payload.
•
CostingCharacteristics = Y, then
CostingCharacteristics is turned on in the payload.
•
OperationalAttributeGroups = N and either:
•
CostingCharacteristics = N, then
CostingCharacteristics is turned off in the payload.
•
CostingCharacteristics = Y, then
CostingCharacteristics is turned off in the payload

Web Services for Publishing G-43
Parameter
Name
Type Optional Description
ProcessingLead
TimeCharacteri
stics
String Yes Used to turn ProcessingLeadTimeCharacteristics on or off in
the payload.
•
Y – turn on
•
N – turn off
Default Value: Y
If OperationalAttributeGroups is Y, then only the value for
this parameter is considered. For example, if:
•
OperationalAttributeGroups = Y and either:
•
ProcessingLeadTimeCharacteristics = N, then
ProcessingLeadTimeCharacteristics is turned off in
the payload.
•
ProcessingLeadTimeCharacteristics = Y, then
ProcessingLeadTimeCharacteristics is turned on in
the payload.
•
OperationalAttributeGroups = N and either:
•
ProcessingLeadTimeCharacteristics = N, then
ProcessingLeadTimeCharacteristics is turned off in
the payload.
•
ProcessingLeadTimeCharacteristics = Y, then
ProcessingLeadTimeCharacteristics is turned off in
the payload

G-44 Oracle Product Hub Implementation Guide
Parameter
Name
Type Optional Description
PlanningChara
cteristics
String Yes Used to turn PlanningCharacteristics on or off in the payload.
•
Y – turn on
•
N – turn off
Default Value: Y
If OperationalAttributeGroups is Y, then only the value for
this parameter is considered. For example, if:
•
OperationalAttributeGroups = Y and either:
•
PlanningCharacteristics = N, then
PlanningCharacteristics is turned off in the payload.
•
PlanningCharacteristics = Y, then
PlanningCharacteristics is turned on in the payload.
•
OperationalAttributeGroups = N and either:
•
ProcessingLeadTimeCharacteristics = N, then
ProcessingLeadTimeCharacteristics is turned off in
the payload.
•
ProcessingLeadTimeCharacteristics = Y, then
ProcessingLeadTimeCharacteristics is turned off in
the payload

Web Services for Publishing G-45
Parameter
Name
Type Optional Description
PurchasingCha
racteristics
String Yes Used to turn PurchasingCharacteristics on or off in the
payload.
•
Y – turn on
•
N – turn off
Default Value: Y
If OperationalAttributeGroups is Y, then only the value for
this parameter is considered. For example, if:
•
OperationalAttributeGroups = Y and either:
•
PurchasingCharacteristics = N, then
PurchasingCharacteristics is turned off in the
payload.
•
PurchasingCharacteristics = Y, then
PurchasingCharacteristics is turned on in the
payload.
•
OperationalAttributeGroups = N and either:
•
PurchasingCharacteristics = N, then
PurchasingCharacteristics is turned off in the
payload.
•
PurchasingCharacteristics = Y, then
PurchasingCharacteristics is turned off in the
payload

G-46 Oracle Product Hub Implementation Guide
Parameter
Name
Type Optional Description
ReceivingChar
acteristics
String Yes Used to turn ReceivingCharacteristics on or off in the
payload.
•
Y – turn on
•
N – turn off
Default Value: Y
If OperationalAttributeGroups is Y, then only the value for
this parameter is considered. For example, if:
•
OperationalAttributeGroups = Y and either:
•
ReceivingCharacteristics = N, then
ReceivingCharacteristics is turned off in the payload.
•
ReceivingCharacteristics = Y, then
ReceivingCharacteristics is turned on in the payload.
•
OperationalAttributeGroups = N and either:
•
ReceivingCharacteristics = N, then
ReceivingCharacteristics is turned off in the payload.
•
ReceivingCharacteristics = Y, then
ReceivingCharacteristics is turned off in the payload

Web Services for Publishing G-47
Parameter
Name
Type Optional Description
OrderManage
mentCharacteri
stics
String Yes Used to turn OrderManagementCharacteristics on or off in
the payload.
•
Y – turn on
•
N – turn off
Default Value: Y
If OperationalAttributeGroups is Y, then only the value for
this parameter is considered. For example, if:
•
OperationalAttributeGroups = Y and either:
•
OrderManagementCharacteristics = N, then
OrderManagementCharacteristics is turned off in the
payload.
•
OrderManagementCharacteristics = Y, then
OrderManagementCharacteristics is turned on in the
payload.
•
OperationalAttributeGroups = N and either:
•
OrderManagementCharacteristics = N, then
OrderManagementCharacteristics is turned off in the
payload.
•
OrderManagementCharacteristics = Y, then
OrderManagementCharacteristics is turned off in the
payload

G-48 Oracle Product Hub Implementation Guide
Parameter
Name
Type Optional Description
InvoicingChara
cteristics
String Yes Used to turn InvoicingCharacteristics on or off in the payload.
•
Y – turn on
•
N – turn off
Default Value: Y
If OperationalAttributeGroups is Y, then only the value for
this parameter is considered. For example, if:
•
OperationalAttributeGroups = Y and either:
•
InvoicingCharacteristics = N, then
InvoicingCharacteristics is turned off in the payload.
•
InvoicingCharacteristics = Y, then
InvoicingCharacteristics is turned on in the payload.
•
OperationalAttributeGroups = N and either:
•
InvoicingCharacteristics = N, then
InvoicingCharacteristics is turned off in the payload.
•
InvoicingCharacteristics = Y, then
InvoicingCharacteristics is turned off in the payload

Web Services for Publishing G-49
Parameter
Name
Type Optional Description
WebOptionsCh
aracteristics
String Yes Used to turn WebOptionsCharacteristics on or off in the
payload.
•
Y – turn on
•
N – turn off
Default Value: Y
If OperationalAttributeGroups is Y, then only the value for
this parameter is considered. For example, if:
•
WebOptionsCharacteristics = Y and either:
•
WebOptionsCharacteristics = N, then
WebOptionsCharacteristics is turned off in the
payload.
•
WebOptionsCharacteristics = Y, then
InvoicingCharacteristics is turned on in the payload.
•
OperationalAttributeGroups = N and either:
•
WebOptionsCharacteristics = N, then
WebOptionsCharacteristics is turned off in the
payload.
•
WebOptionsCharacteristics = Y, then
WebOptionsCharacteristics is turned off in the
payload

G-50 Oracle Product Hub Implementation Guide
Parameter
Name
Type Optional Description
ServiceCharact
eristics
String Yes Used to turn ServiceCharacteristics on or off in the payload.
•
Y – turn on
•
N – turn off
Default Value: Y
If OperationalAttributeGroups is Y, then only the value for
this parameter is considered. For example, if:
•
OperationalAttributeGroups = Y and either:
•
ServiceCharacteristics = N, then
ServiceCharacteristics is turned off in the payload.
•
ServiceCharacteristics = Y, then
ServiceCharacteristics is turned on in the payload.
•
OperationalAttributeGroups = N and either:
•
ServiceCharacteristics = N, then
ServiceCharacteristics is turned off in the payload.
•
ServiceCharacteristics = Y, then
ServiceCharacteristics is turned off in the payload

Web Services for Publishing G-51
Parameter
Name
Type Optional Description
AssetCharacter
istics
String Yes Used to turn AssetCharacteristics on or off in the payload.
•
Y – turn on
•
N – turn off
Default Value: Y
If OperationalAttributeGroups is Y, then only the value for
this parameter is considered. For example, if:
•
OperationalAttributeGroups = Y and either:
•
AssetCharacteristics = N, then AssetCharacteristics
is turned off in the payload.
•
AssetCharacteristics = Y, then AssetCharacteristics is
turned on in the payload.
•
OperationalAttributeGroups = N and either:
•
AssetCharacteristics = N, then AssetCharacteristics is
turned off in the payload.
•
AssetCharacteristics = Y, then AssetCharacteristics is
turned off in the payload

G-52 Oracle Product Hub Implementation Guide
Parameter
Name
Type Optional Description
ProcessMfgCha
racteristics
String Yes Used to turn ProcessMfgCharacteristics on or off in the
payload.
•
Y – turn on
•
N – turn off
Default Value: Y
If OperationalAttributeGroups is Y, then only the value for
this parameter is considered. For example, if:
•
OperationalAttributeGroups = Y and either:
•
ProcessMfgCharacteristics = N, then
ProcessMfgCharacteristics is turned off in the
payload.
•
ProcessMfgCharacteristics = Y, then
ProcessMfgCharacteristics is turned on in the
payload.
•
OperationalAttributeGroups = N and either:
•
ProcessMfgCharacteristics = N, then
ProcessMfgCharacteristics is turned off in the
payload.
•
ProcessMfgCharacteristics = Y, then
ProcessMfgCharacteristics is turned off in the
payload
ListOfPublish
UserDefinedAt
tributeGroups
AttributeId Integer - The attribute ID identifies the transaction attribute to include
in the payload. Use to configure the list of transaction
attributes for a given revision to show in the payload. Use this
to provide a list of attribute IDs.

Web Services for Publishing G-53
Parameter
Name
Type Optional Description
AttributeName String - The attribute internal name identifies the transaction attribute
to include in the payload. Use this to provide a list of
transaction attribute internal names. If neither AttributeId or
AttributeName are provided, then all transaction attributes
associated with the item for a given revision are published in
the payload.
Note: AttributeName takes precedence over AttributeId.
ListOfLanguag
es
LanguageCode String Yes The language code in which to return the translatable
attributes in the payload.
For example, US (for American English).
By Default, the translatable attributes return in all installed
languages.
Note: Repeat this parameter multiple times to return
output in more than one language.
LanguageNam
e
String Yes The language name in which to return the translatable
attributes in the payload.
For example: English.
ItemsList
Important:
Provide the
following
parameters
multiple
times to
publish
multiple
items.

G-54 Oracle Product Hub Implementation Guide
Parameter
Name
Type Optional Description
InventoryItemI
d
Integer Yes (batch mode)
No (list mode)
Yes (single item
mode)
Item ID for which to extract the details.
OrganizationId Integer Yes (batch mode)
No (list mode)
Yes (single item
mode)
Organization ID to which the publishing item belongs.
OrganizationC
ode
String Yes (batch mode)
No (list mode)
Yes (single item
mode)
Organization code to which the publishing item belongs.
RevisionId Integer Yes (batch mode)
No (list mode)
Yes (single item
mode)
Revision ID of the publishing item.
Revision String Yes (batch mode)
No (list mode)
Yes (single item
mode)
Revision code of the publishing item.

Web Services for Publishing G-55
Parameter
Name
Type Optional Description
InventoryItem
Name
Important:
Provide the
following
parameters
multiple
times to
publish
multiple
items.
Segment1..
Segment20
Note:
Segment1
through
Segment20
all have the
same
characteristi
cs.
String Batch mode: Yes
Single item mode:
Yes
List of items mode:
•
Yes – If
InvetoryItemId
is provided for
an item.
•
No – If
InventoryItemI
d is not
provided for an
item.
The individual segment's name that comprises the Publishing
item name.
FndSecurity
RESPONSIBILI
TY_NAME
String No
(Mandatory for any
mode other than
batch mode.)
Provide the responsibility name for the user.
For example: EGO_DEVELOPMENT_MANAGER
RESPONSIBILI
TY_APPL_NA
ME
String No
(Mandatory for any
mode other than
batch mode.)
Application name for the responsibility.
For example: EGO

G-56 Oracle Product Hub Implementation Guide
Parameter
Name
Type Optional Description
SECURITY_GR
OUP_NAME
String Yes Security group name.
For example: STANDARD
NLS_LANGU
AGE
String Yes The current session language to be used for the Web Service
invocation.
Output
The output payload includes item details based on the configurable parameters selected
by the user.
Payload
• ListOfItems
• Item
• MainCharacteristics - Main characteristics of the item.
• MainCharTransalation - Translatable values item description and
operating unit name.
• ItemCatalog - Contains the item catalog to which the item belongs.
• InventoryCharacteristics - Inventory characteristics of the item.
• PhysicalCharacteristics - Physical characteristics of the item.
• BillsOfMaterialCharacteristics - Bills of material characteristics of the item.
• WorkInProcessCharacteristics - Work in process characteristics of the item.
• CostingCharacteristics - Costing characteristics of the item.
• ProcessingLeadTimeCharacteristics - Processing lead time characteristics of
the item.
• PlanningCharacteristics - Planning characteristics of the item.
• PurchasingCharacteristics - Purchasing characteristics of the item.
• ReceivingCharacteristics - Receiving characteristics of the item.
Web Services for Publishing G-57
• OrderManagementCharacteristics - Order management characteristics of
the item.
• InvoicingCharacteristics - Invoicing characteristics of the item.
• WebOptionsCharacteristics - Web options characteristics of the item.
• ServiceCharacteristics - Service characteristics of the item.
• AssetCharacteristics - Asset characteristics of the item.
• ProcessMfgCharacteristics - Process manufacturing characteristics.
• Organization - Organization details of the published item.
• OrganizationTranslation - Translatable values organization name and
operating unit name.
• OrganizationAttributeGroup - Organization level attribute group.
• ItemUDA - Organization level user defined attributes.
• AttributeGroup - Item level attribute groups.
• ItemUDA - Item level user defined attributes.
• ItemRevision - Revision details of the item.
• ItemRevisionTranslation - Translatable value of the revision
description.
• TransactionAttribute - Details of the transaction attributes for a
revision.
• RevisionAttributeGroup - Revision level attribute group.
• ItemUDA - Revision level user defined attributes.
• CustomerItem - Customer items associated to the published item.
• ManufacturerPartNumber - Manufacturer part numbers associated to the
published item.
• SupplierAssignment - Supplier assignments associated to the published
item.
• SupplierAttributeGroup - Supplier level attribute groups.
G-58 Oracle Product Hub Implementation Guide
• ItemUDA -Supplier level user defined attributes.
• SupplierSiteAssignment - Supplier site assignments associated to the
published item.
• SupplierSiteAttributeGroup - Supplier site level attribute groups.
• ItemUDA -Supplier site level user defined attributes.
• SupplierSiteOrganizationAssignment - Supplier site organization
assignments associated to the published item.
• SupplierSiteOrgAttributeGroup - Supplier site organization level
attribute groups.
• ItemUDA - Supplier site organization level user defined attributes.
• AlternateCategoryAssignment - Alternate category assignment associated
to the published item.
• AlternateCategoryTranslation - Translatable values of alternate catalog
name and category description.
• RelatedItem - Related Items associated to the published item.
• RelatedItemTranslations - Translatable values of the related item
description.
• GTINCrossReference - GTIN cross references associated to the published
item.
• GTINCrossRefTranslation - Translatable values of the GTIN
description.
• Status - Status information
• Error - Details of the errors, if any, along with input identifiers.
• Code - Error code.
• Message - Error message.
Method: getStructureDetails
This Web Service method provides an interface to extract the information about an
item's structure based on input. The payload only contains the details about the
Web Services for Publishing G-59
structure and its components. The payload does not contain item definition information
for the components.
Modes
You can invoke the getStructureDetails method using three modes. The mode used is
derived from the XML elements provided.
Batch Mode
• Retrieves the details of the structure payload for the items defined in a specific
batch published from the PIM Publication user interface. Create the publication
batch with the list of items and the structure name using PIM Publication user
interface.
• Invoke this mode by providing the batch ID. The Web Service returns the structure
payload for all items defined in that batch. The parameters provided while creating
the batch take precedence over the values provided for the parameters below while
invoking the service.
Single Item Mode
• Use this web service to retrieve the structure payload for a given item without
creating a publication batch. Provide the single item information directly in the
input payload to retrieve the structure details.
• Use the basic input identifiers (InventoryItemId or InventoryItemName) and
(OrganizationId or OrganizationCode) and (RevisionId or Revision or
RevisionDate) in this mode.
List of Items Mode
• You can also use this web service to retrieve the structure payload for a list of items
without creating a publication batch. Apart from the single item mode, this passes a
list of item identifiers directly as input to the getStructureDetails method.
• Optionally provides any number of item identifiers for invoking the services.
• Use the list of basic input identifiers (InventoryItemId or InventoryItemName) and
(OrganizationId or OrganizationCode) and (RevisionId or Revision or
RevisionDate) in this mode.
While invoking the item services in any mode, provide the following WS-Security and
Parameter inputs:

G-60 Oracle Product Hub Implementation Guide
WS-Security
Parameter
Name
Type Optional Description
User Name String NO EBS "Applications User name" (FND User Name)
Password String NO Password for EBS "Applications User"
Parameters
Parameter
Name
Type Optional Description
StructureQuery
Parameters
Complex Yes Use this part of the XML document for single item mode.
InventoryItemI
d
Integer Yes (batch
mode)
Yes (list
mode)
No (single
item mode)
Use in single item mode to query the payload for a given inventory
item ID.
OrganizationId Integer Yes (batch
mode)
Yes (list
mode)
No (single
item mode)
Use with the single item mode to query the payload for an item in a
specific organization. Use an existing organization ID in the PIM
instance. Use either the Organization Code or the Organization ID
to retrieve a payload in this mode.
OrganizationCo
de
String Yes (batch
mode)
Yes (list
mode)
No (single
item mode)
Use with the single item mode to query the payload for an item in a
specific organization. Use an existing organization code in the PIM
instance. Use either the Organization Code or the Organization ID
to retrieve a payload in this mode.

Web Services for Publishing G-61
Parameter
Name
Type Optional Description
RevisionId Integer Yes (batch
mode)
Yes (list
mode)
No (single
item mode)
Revision ID of the publishing item.
Revision String Yes (batch
mode)
Yes (list
mode)
No (single
item mode)
Revision code of the publishing item.
RevisionDate Date Yes (batch
mode)
No (list
mode)
No (single
item mode)
Use in single item mode to query the payload for a specific
revision's structure of an item. Use a valid revision ID for the item
provided in InventoryItemId or segments.
Provide one of the following fields as input for this mode:
Revisionid /RevisionCode/RevisionDate.
StructureName String Yes (batch
mode)
Yes (list
mode)
No (single
item mode)
Use in single item mode to specify the name of the structure for
which to query the payload. This is a mandatory input for single
item mode.
Segment1
through
Segment15
String Yes (batch
mode)
Yes (list
mode)
No (single
item mode)
Use in single item mode to specify the name of the item for which
to query the payload. Depending on the customer setup for item
name segments, provide values for any of the 15 segment fields.
Either a value in inventoryItemid or value(s) in one or more of
these segments are required in single item mode.

G-62 Oracle Product Hub Implementation Guide
Parameter
Name
Type Optional Description
ListofLanguage
Information
Complex Yes Use this part of the XML input to provide the language
information. Repeat this tag multiple times as needed to specify
multiple language information.
LanguageCode String Yes Use in the single item mode to specify the language in which to
return the payload. If no value is specified in both LanguageCode
and LanguageName tags, the payload returns the information in all
languages defined within the PIM instance.
LanguageName String Yes Use in single item mode to specify the language in which to return
the payload. If no value is specified in both LanguageCode and
LanguageName tags, the payload returns the information in all
languages defined within the PIM instance.
LevelsToExplo
de
Integer Yes Use in single item mode to specify the number of levels to explode
(0-60) for a structure.
Default: 60
BomExploderP
arameters
Complex Yes Use to specify the BOM exploder behavior options as input. All the
child elements control BOM explosion behavior.
ExplodeOption Integer Yes The explode options for the structure include:
1.
All
2.
Current
3.
Current and future. By default, current is considered.
Default: Current
ExplodeStandar
d
String Yes Determines whether to explode the standard structure or not.
•
Y – Explodes the standard structure.
•
N – Do not explode the standard structure.
By default, standard structures are exploded. The explosion only
explodes the model and option class.

Web Services for Publishing G-63
Parameter
Name
Type Optional Description
PublishEntities Complex Yes This specifies configurability options for the payload. By default,
the payload includes all information about the structure. This
enables users to pick and choose what information to include in the
payload by providing values to the elements in this section. Valid
values for any configurability options elements are Y or N.
StructureRevisi
on
String Yes Specify whether to include the structure revision information as
part of the payload.
StructureHeade
r
AttributeGroup
s
String Yes Specify whether to include the structure attribute group
information as part of the payload.
StructureComp
onents
String Yes Specify whether to include the structure components information
as part of the payload.
ReturnPayload String Yes Flag that controls whether to include details in the output payload.
For details, see Controlling the Output Payload, page G-79.
PublishStructur
eAttributeGrou
p
Complex Yes By default, the payload includes all attribute groups. However, you
can specify the list of attribute groups to include. If attribute groups
are specified, then only those attribute groups are included in the
payload.
AttributegroupI
d
Integer Yes UDA Attribute Group ID
AttributeGroup
Name
String Yes UDA attribute group name. Specify either the attribute group id or
the attribute group name.
PublishStructur
eComponents
Complex Yes Provides payload configurability options for structure component
details. All configurability option elements accept Y or N values.
Default: Y, so, by default, the payload includes all information.
StructureRefere
nceDesignators
String Yes Specify whether to include the reference designator in the payload.

G-64 Oracle Product Hub Implementation Guide
Parameter
Name
Type Optional Description
StructureSubstit
uteComponents
String Yes Specify whether to include the substitute component details in the
payload.
ComponentAttr
ibuteGroups
String Yes Specifies whether to include the component UDAs in the payload.
ComponentExcl
usions
String Yes Specifies whether to include the component exclusions in the
payload.
ComponentUD
AOverrides
String Yes Specifies whether to include the component UDA override details
in the payload.
ValueSetExclusi
ons
String Yes Specifies whether to include the value set exclusions in the payload.
ListofPublishCo
mponentAttrib
utegroups
Complex Yes By default, the payload includes all attribute groups. However, you
can specify the list of attribute groups to include. If you specify
attribute groups, then only those attribute groups are included in
the payload.
AttributegroupI
d
Integer Yes UDA attribute group ID
AttributeGroup
Name
String Yes UDA attribute group name. You can specify either the attribute
group ID or attribute group name.
BatchStructure
QueryParamete
rs
Complex Yes Use this part of the input payload when using batch mode.
BatchId Integer Yes Batch mode creates this batch ID during the item publication
process. The return payload includes structure information for all
items in this batch.
Configurability Complex Yes All configurability options described for single item mode apply to
batch mode.
ListofItemStruc
tureQueryPara
ms
Complex Yes Use this part of the input payload when using list item mode.
All configurability options described for single item mode apply to
the list item mode. The options apply to the whole list.

Web Services for Publishing G-65
Parameter
Name
Type Optional Description
InventoryItemI
d
String Yes Specifies in list item mode the inventory item ID in the list. You can
either specify the ID or name.
OrganizationId String Yes Specify the organization for the item structure. You can either
specify the organization ID or organization code.
OrganizationCo
de
String Yes Specify the organization for the item structure. You can either
specify the organization ID or organization code.
RevisionId String Yes Specify the revision of the item in the list. Provide either the
revision ID or revision code.
Revision String Yes Specify the revision of the item in the list. Provide either the
revision ID or revision code.
RevisionDate String Yes Specify the revision date of the item in the list.
StructureName String Yes Specify the structure name for which to return the payload.
Configurability Complex Yes The configurability options are same as single item mode.
FNDSecurity Complex Yes Specifies the FND securities information.
RESPONSIBILI
TY_NAME
String No
(Mandatory
for list
mode.)
Provide the responsibility name for the user.
For example: EGO_DEVELOPMENT_MANAGER
RESPONSIBILI
TY_APPL_NA
ME
String No
(Mandatory
for list
mode.)
Application name for the responsibility.
For example: EGO
SECURITY_GR
OUP_NAME
String Yes Security group name.
For example: STANDARD
NLS_LANGUA
GE
String Yes The current session language used for the Web Service invocation.
G-66 Oracle Product Hub Implementation Guide
Output
The output payload includes structure details based on the configurable parameters
selected by the user.
Payload
• ListOfStructureHeaders
• StructureHeader
• AssemblyItemId - Inventory item identifier.
• AssemblyItemName - Name of the assembly item.
• Segment1..segment20 - Item name Segment1 through Segment20.
• CommonAssemblyItemId - The inventory item ID of the common BOM
assembly. This is applicable only for common BOMs.
• CommonAssemblyItemName - Name of the common assembly item.
• OrganizationId - Organization identifier.
• OrganizationCode - Organization code.
• SpecificAssemblyComment - Comment.
• AssemblyType - 1 indicates a Manufacturing Bill. 2 indicates an
Engineering Bill.
• AlternateBomDesignator - Alternate designator code or structure name.
• CommonBillSequenceId - Identifier of the common bill.
• BillSequenceId - Bill Identifier.
• CommonOrganizationId - Organization identifier of common bill.
• CommonOrganizationCode - Organization Code for the common bill.
• OperatingUnitId - Operating unit of the structure organization.
• PendingFromEcn - Name of the ECN.
• NextExplodeDate - Next date when pre-explosion will be refreshed.
• ProjectId - Project identifier for Project Manufacturing.
Web Services for Publishing G-67
• TaskId - Task identifier for Project Manufacturing.
• OriginalSystemReference - Original system that data for the current record
has come from.
• StructureTypeId - Structure Type ID.
• ImplementationDate - Implementation date.
• ObjName - Object name identified if this is an assembly structure for an
ICC structure.
• EffectivityControl - Specifies effectivity control for the structure.
• IsPreferred - Identifies if this is a preferred BOM.
• SourceBillSequenceId
• LastUpdateDate - Standard Who column.
• LastUpdateLogin - Standard Who column.
• AttributeCategory - Descriptive flexfield structure defining column.
• Attribute1..Attribute15 - Descriptive flexfield segment.
• Pk1Value..PK5Value - Additional primary key of the structure object.
• Language - Language code.
• PlanLevel - Plan level.
• StructureRevision - Structure revision details.
• RevisionId - Assembly item revision ID.
• Revision - Assembly item revision code.
• RevisionLabel - Assembly item revision label.
• RevisionReason - Revision reason.
• ChangeNotice -Engineering change order number.
• EcnInitiationDate - ECO Initiation date.
• ImplementationDate - ECO implementation date.
G-68 Oracle Product Hub Implementation Guide
• ImplementedSerialNumber - Implemented serial nmber.
• Description - Description
• LifecycleId - Lifecycle identifier
• CurrentPhaseId -Current Phase ID
• ObjectVersionNumber - Object version number tracks row updates.
• LastUpdateDate - Standard Who columns.
• …
• LastUpdateLogin - Standard Who columns.
• EffectivityDate - Revision effectivity date.
• RevisedItemSequenceId - Revised item unique identifier.
• AttributeCategory - Descriptive flexfield structure defining column.
• Attribute1 - Descriptive flexfield segment.
• …
• Attribute15 - Descriptive flexfield segment.
• RevisionDescription
• LanguageCode - Language code
• Description - Item revision translated description.
• StructureHeaderAttributeGroup
• AttributegroupId - Identifier of user defined attribute group.
• AttributeGroupName - User defined attribute group name.
• ExtensionId - Row identifier in table BOM_STRUCTURES_EXT_B.
• StructureHeaderUDA
• Name - Internal name of structure header attribute group.
• CharValue - Character value of the UDA.
Web Services for Publishing G-69
• …
• TranslatedCharValue - Translated char value for an UDA
• HeaderTranslatableUDA - Translatable UDA details.
• LanguageCode - Language code
• TranslatedCharValue - Translated value of user defined
attribute.
• HeaderUDADescription - Header UDA description.
• Description - Description of user defined attribute.
• LanguageCode - Language code.
• HeaderUDADisplayName
• DisplayName - Display name of user defined attribute.
• LanguageCode - Language code.
• HeaderAGDescription
• Description - Description of attribute group.
• LanguageCode - Language code.
• HeaderAGDisplayName
• DisplayName - Display name of attribute group.
• LanguageCode - Language code.
• StructureComponent - List of this assembly structure's direct child
components with their operational attributes.
• AssemblyItemId - Inventory Item Id of assembly item.
• OrganizationId - Organization Id
• CommonComponentSequenceId - Common component sequence ID.
• ComponentSequenceId - Component sequence ID.
G-70 Oracle Product Hub Implementation Guide
• OperationSeqNum - Operation sequence number to which this
component belongs.
• ComponentItemId - Inventory Item ID for the component item.
• ComponentCode - Path of component in an assembly structure.
• ComponentItemName - Concatenated component item name.
• Segment1 - Individual Segment1 of component name.
• …
• Segment20 - Individual Segment20 of component name.
• Description - Component item description.
• ItemSequenceNumber - Item number of this component on parent
structure.
• PrimaryUomCode - Component UOM code.
• PrimaryUnitOfMeasure - Component UOM name.
• BasisType - Component basis type.
• ComponentQuantity - Component quantity.
• AutoRequestMaterial - Auto request flag.
• CurrentFuturePastFlag - Flag indicating if component is current or
future effective.
• EffectivityDate - Effectivity date.
• DisableDate - Disable Date
• ImplementationDate - Implementation Date
• ChangeNotice - Change order name.
• PlanningFactor - Planning factor.
• ComponentYieldFactor - Yield factor.
• EnforceIntRequirements - Enforce Integer Requirements.
Web Services for Publishing G-71
• IncludeInCostRollup - Include in cost rollup.
• BomItemType - BOM item type of component.
• WipSupplyType - WIP supply type.
• SupplySubinventory - Supply subinventory.
• SupplyLocatorId - Supply locator ID
• CheckAtp - Check ATP flag.
• Optional - Optional flag.
• MutuallyExclusiveOptions - Mutually exclusive options.
• LowQuantity - Low quantity.
• HighQuantity - High quantity.
• SoBasis - Sales order basis.
• ShippingAllowed - Shipping allowed.
• IncludeOnShipDocs - Include on shipping docs.
• RequiredToShip - Required to ship.
• TopItemId - Inventory item ID of top assembly.
• TopBillSequenceId - Bill sequence ID of top assembly.
• ParentBomItemType - Item type of parent assembly.
• ExplosionType - Explosion type.
• PlanLevel - Plan level.
• ExtendedQuantity - Extended quantity.
• SortOrder - Sort order for the hierarchy.
• CompBillSeqId - Component bill sequence ID.
• CompCommonBillSeqId - Common bill sequence ID.
• ParentSortOrder - Parent assembly sort order for the hierarchy.
G-72 Oracle Product Hub Implementation Guide
• CompSourceBillSeqId - Component source bill sequence ID.
• SourceBillSequenceId - Source bill sequence ID.
• EcoForProduction - Indicates if this component on an Engineering
Change Order is only for WIP jobs.
• OptionalOnModel - Optional on model.
• IncludeOnBillDocs - Include on billing documents.
• BaseItemId - Base item identifier.
• AtpComponentsFlag - Flag indicating whether an item has components
requiring an ATP check.
• AtpFlag - Flag indicating whether to check ATP when item is ordered.
• PickComponentsFlag - Flag indicating to pick all shippable
components.
• ReplenishToOrderFlag - Replenish to order flag.
• ShippableItemFlag - Shippable item flag.
• CustomerOrderFlag - Customer order flag.
• InternalOrderFlag - Internal order flag.
• CustomerOrderEnabledFlag - Customer Order Enabled Flag
• InternalOrderEnabledFlag - Internal Order Enabled Flag
• SoTransactionsFlag - Sales Order Transactions Flag
• LoopFlag - Flag indicating a loop in the hierarchy.
• ItemNum - Sequence number of item on parent structure.
• RexplodeFlag - ReExplode Flag
• SuggestedVendorName - Suggested vendor name
• VendorId - Vendor ID
• UnitPrice - Unit Price
Web Services for Publishing G-73
• CreationDate - Standard Who column
• CreatedBy - Standard Who Column
• LastUpdateDate - Standard Who Column
• Context - Description flex field context
• Attribute1 - Descriptive flex field segment
• …
• Attribute15 - Descriptive flex field segment
• QuantityRelated - Identifier to indicate if this component has quantity
related reference designators.
• FromEndItemRevId - From End Item Revision ID
• ToEndItemRevId - To End Item Revision ID
• RevisionId - Revision ID
• Revision - Revision code
• StructureSubstituteComponents - List of substitute components for this
structure component.
• SubstituteComponentId - Inventory item ID of substitute
component.
• SubstituteCompItemName - Concatenated substitute component
item name.
• Segment1 - Individual segment1 of substitute component name
…
• Segment20 - Individual Segment20 of substitute component name.
• SubstituteItemQuantity - Quantity of substitute items needed to
replace the full component quantity.
• ComponentSequenceId - Component Sequence ID of parent
component.
• AcdType - Type to indicate add or delete on an engineering change
G-74 Oracle Product Hub Implementation Guide
order.
• ChangeNotice - Engineering change order number.
• EnforceIntRequirements - Enforce integer requirements.
• CommonComponentSequenceId - Common component sequence
ID.
• LastUpdateDate - Standard Who Column
• …
• LastUpdateLogin - Standard Who Column
• AttributeCategory - Descriptive flexfield structure defining column.
• Attribute1 - Descriptive flexfield segment.
• …
• Attribute15 - Descriptive flexfield segment
• OriginalSystemReference - Original system from where the data for
the current record came.
• StructureReferenceDesignators - List of reference designators for the
parent component.
• ComponentSequenceId - Component Sequence ID of the parent
component.
• ComponentReferenceDesignator - Component reference
designator.
• RefDesignatorComment - Reference designator comment.
• CommonComponentSequenceId - Common component sequence
ID.
• ChangeNotice - Engineering change order number.
• AcdType - Type to indicate add or delete on an engineering change
order.
• LastUpdateDate - Standard Who column
Web Services for Publishing G-75
• …
• LastUpdateLogin - Standard Who Column
• AttributeCategory - Descriptive flexfield structure defining column.
• Attribute1 - Descriptive flexfield segment.
• …
• Attribute15 - Descriptive flexfield segment.
• OriginalSystemReference - Original system from where data for the
current record came.
• ComponentAttributeGroup - List of attribute groups associated with
this component.
• AttributegroupId - Attribute Group ID
• AttributeGroupName - Attribute group name
• ExtensionId - Unique identifier for an attribute group and row.
• ComponentUDA - List of attributes and their values associated
with this attribute group.
• Name - Attribute name
• CharValue - Attribute character value
• …
• DatetimeValue - Attribute datetime value
• TranslatedCharValue - Attribute translated character value in
the default language.
• ComponentTranslatableUDA - Translatable attributes values in
given languages.
• LanguageCode - Language code.
• TranslatedCharValue - Attribute translated character value
in this language.
G-76 Oracle Product Hub Implementation Guide
• ComponentUDADescription - List of component UDA
descriptions in given languages.
• Description - Translated description in given language.
• LanguageCode - Language code.
• ComponentUDADisplayName - List of component UDA
display names in given languages.
• DisplayName - Translated display name in given language.
• LanguageCode - Language code.
• ComponentAGDescription - List of component attribute group
descriptions in given languages.
• Description - Translated description in given language.
• LanguageCode - Language code.
• ComponentAGDisplayName - List of component attribute
group display names in given languages.
• DisplayName - Translated display names in given
languages.
• LanguageCode - Language code.
• Status - Status information.
• ListOfErrors - Error information.
• Message - Error message.
• Code - Error code.
• LanguageCode - Language code of the error message in the payload.
• InputIdentifier - The input identifier of the error record in the input
payload.
• ListOfWarnings - Warning information
• Message - Warning message
Web Services for Publishing G-77
• Code - Warning Code
• LanguageCode - Language code in which the warning details are
specified in the output payload.
• AdditionalInfo - Additional info section when returnPayload input flag is set to
false.
• SessionId - Session ID for invocation.
• EntityCount - Output entity count.
• ContextInfo - The part of the XML document containing the context specific
information for the top item in the Structure.
• ComponentPath - Component path details.
• ComponentItemList - List of items in the component path order.
• ItemReference - Component item details in the component path
order.
• Name - Name of the item
• Sequence - Sequence number specifying the component path
for this component.
• BomItemType - BOM item type of the component in the
component path.
• CatalogCategoryName - Item catalog category name of the
component item.
• ComponentCode - The internal component code of the component
path.
• OverrideAttrGrp - Override attribute group details.
• AttributegroupId - Component attribute group name for which
an override is defined in the above component path.
• AttributeGroupName - Component attribute group name.
• ExtensionId - Internal extension ID stored to refer the row in
the extension table.
G-78 Oracle Product Hub Implementation Guide
• ComponentCode - Component code that corresponds to the
override component path.
• ComponentOverrideUDA - Details about the override UDA
columns.
• Name - Name of the UDA.
• CharValue - Char value.
• …
• TranslatedCharValue - Translated values.
• ComponentTranslatableUDA - Translated UDA values.
• ComponentExclusion Component - Exclusion details for the above component
path. This exists only if the user defined an exclusion.
• ComponentCode - Internal component code for the component path.
• FromRevisionId - The effective revision from ID for the exclusion.
• ToRevisionId - The effective revision to ID for the exclusion.
• FromRevision - The effective revision from for the exclusion.
• ToRevision - The effective revision to for the exclusion.
• ValuesetExclusion - Valueset exclusion details. This part of the payload
includes information if the user defined any specific valueset exclusions in this
component path.
• ExcludedValue - Excluded value for the value set.
• ComponentCode - Internal component code for the component path.
• FromRevisionId - The effective revision from ID for the exclusion.
• ToRevisionId - The effective revision to ID for the exclusion.
• FromRevision - The effective revision from for the exclusion.
• ToRevision - The effective revision to for the exclusion.

Web Services for Publishing G-79
Related Topics
Oracle Product Hub Web Services Overview, page G-1
Publishing Overview, Oracle Product Hub User's Guide
Publishing Items and Structures, Oracle Product Hub User's Guide
Controlling the Output Payload, page G-79
Error Reporting, page G-80
Controlling the Output Payload
The output payload of Web Services when publishing to external systems can grow
very large due to the number of entities and sub-entities returned. This can become a
bottleneck in performance when the Web Service client consumes the payload.
To facilitate processing smaller portions of the entire payload at a time, use the optional
parameter ReturnPayload as part of the input parameter list for every Web Service.
When the Web Service client intends to process smaller payloads, the client invokes the
Web Service method with the ReturnPayload parameter set to 'False'.
If the ReturnPayload parameter is set to 'False', the Web Service method does not return
the payload and instead returns a set of parameters in the payload to use for retrieving
the information from a database view.
Example when ReturnPayload = False
The output returned contains the following information in AdditionalInfo:
<listOfStructureHeaders
xmlns:ns0="http://xmlns.oracle.com/apps/bom/structure/service"
xmlns="">
<AdditionalInfo>
<SessionId>7612</SessionId>
<EntityCount>0</EntityCount>
</AdditionalInfo>
.........
</listOfStructureHeaders>
Using the values of SessionId and EntityCount, the Web Service consumer can retrieve
the payloads for individual entities from the database view EGO_PUB_WS_OUTPUT_V
in the Oracle Product Hub instance. The columns of the database view
EGO_PUB_WS_OUTPUT_V that you can use to retrieve the output payload in parts is
provided below:
Column Name Description
SESSION_ID Session ID corresponding to this call to Web
Service.

G-80 Oracle Product Hub Implementation Guide
Column Name Description
WEB_SERVICE_NAME Webservice method name.
SEQUENCE_ID Sequence of the entity in the payload.
STATUS Marker column for consuming the Web
Service entity.
XMLCONTENT Output payload corresponding to one entity
in the payload.
XMLCLOB Output in clob.
CREATION_DATE Creation Date
Each row in the view corresponds to one entity returned by the Web Service method.
Related Topics
Item Catalog Category Web Service, page G-18
Value Set Web Service, page G-2
Item Web Service, page G-30
Error Reporting, page G-80
Error Reporting
Any errors in the execution of the Web Service are reported in the output payload
Status section. The following two tables show the different errors that display when
publishing to external systems or to Oracle Product Hub systems. The error information
is contained in the format shown below.
Output Payload Status Section When Publishing to External Systems
Payload Description
<Status>
-
<Error>
-

Web Services for Publishing G-81
Payload Description
<Code>EGO_INVALID_ITEM_ID</Code>
Error code
<Message>Invalid Inventory Item
Id</Message>
Error message
<InputIdentifier>
Input that caused the error.
<Parameter>
Parameters list for the input.
<Name>OrganizationId</Name>
Parameter name
<Value>204</Value>
Parameter value
?..
-
?..
-
</InputIdentifier>
-
</Error>
-
</Status>
-
Output Payload Status Section When Publishing to Oracle Product Hub Systems
Payload Description
<Status>
-
<Error>
-
<Code>EGO_SYNC_ENTITY_ERROR</Code>
Error code
<Message>Entity VS115_0006
failed the import process in
target system USER_ENTERED.
</Message>
Error message
<LanguageCode>US</LanguageCode>
Language code

G-82 Oracle Product Hub Implementation Guide
Payload Description
<SystemCode>USER_ENTERED</SystemCo
de>
System code for the destination Oracle
Product Hub system where the error occurred.
<InputIdentifier>
Input that caused the error.
<Parameter>
Parameters list for the input.
<Name>VS</Name>
Parameter name
<Value>VS115_0006</Value>
Parameter value
?..
-
?..
-
</InputIdentifier>
-
</Error>
-
<Warning>
-
<Code>EGO_SYNC_ENTITY_WARNING</Cod
e>
Warning code
<Message>One of the entities
associated with AG115_0006 failed
the import process in target
system USER_ENTERED.</Message>
Warning message
<LanguageCode>US</LanguageCode>
Language code
<SystemCode>USER_ENTERED</SystemCo
de>
System code for the destination Oracle
Product Hub system where the error occurred.
<InputIdentifier>
Input that caused the warning.
<Parameter>
Parameters list for the input.
<Name>AG</Name>
Parameter name
<Value>AG115_0006</Value>
Parameter value

Web Services for Publishing G-83
Payload Description
?..
-
?..
-
</InputIdentifier>
-
<Warning>
-
</Status>
-
TheWeb Service client can extract and make use of this information to report errors
returned from the Web Service call.
Related Topics
Oracle Product Hub Web Services Overview, page G-1
Publishing Overview, Oracle Product Hub User's Guide
Item Catalog Category Web Service, page G-18
Attribute Group Web Service, page G-12
Value Set Web Service, page G-2
Item Web Service, page G-30

Index-1
Index
A
Attachment
change management, 10-5
review and approval, 10-3
set up repository, 9-3
attribute group
adding actions, 4-52
attributes
additional attributes, 4-38
seeded, 4-36
Attributes
transaction, 4-33
attribute usage, 4-44
C
catalog
assigning category, 5-9
assigning people, 11-12
Catalogs
defining, 5-6
defining categories, 5-4
overview, 5-1
category hierarchy
create, 5-10
Category hierarchy
deleting, 5-11
updating, 5-11
category mapping, 5-10
Change categories, 7-1
defining, 7-2
display formats, 7-41
function security, 7-5
search criteria, 7-41
Change category reports
defining, 7-42
change headers
organization policies, 7-34
change header types
associate attribute groups, 7-30
associate codes, 7-31
associate pages, 7-30
associate workflows, 7-31
configure, 7-31
create, 7-28
change line types
associate pages, 7-38
create, 7-37
Change management
text index, 7-39
change management business event, 7-44
Change Management Business Events
Describing Business Events, E-1
Change management text index, 7-39
Change management workflows
customize, 7-47
Change policies, 3-16
Classification codes
creating, 7-13
content management
set up repository, 9-3
creating parameter mappings, 4-52
Creating statuses, 7-15
Cross reference types, 3-57
Customer users

Index-2
set up, 2-5
custom privileges, 11-27
D
default options, 1-15
Defining catalog categories, 5-4
Defining catalogs, 5-6
defining item numbers, 3-26
Defining workflow templates, 7-17
display formats
administrator level, 3-36
user level, 3-38
Display formats, 3-35
E
E-business suite
overview of attachments, 10-1
EGO_DEFAULT_OPTIONS table, 1-15
expressions
rules, building, 6-16
F
folders
structure, 10-1
H
Header/Line type attributes, 7-25
Header types
defining, 7-28
I
Import
attribute groups and attributes, 3-58
functions, 3-58
item catalog categories, 3-58
value sets, 3-58
import formats, 3-40
Import Workbench
match rules, 12-2
source system, 12-5
independent values, 4-14
Internal users, 2-4
Item attachment
associate categories, 3-10
define categories, 3-9
Item attribute
display attachment, 4-45
group security, 11-19
user-defined functions, 4-38
Item attributes, 4-21
item business events
technical information, B-1
item business rules
copying item rules data to other instances, 6-
43
creating, 6-4
including in other rule sets, 6-38
overview, 6-1
using on-demand rule set execution, 6-42
viewing rule use and attributes, 6-39
Item catalog
associate attributes, 4-48
display formats, 3-35
import formats, 3-40
overview, 3-2
search criteria, 3-29
text index, 3-2
item catalog category
adding attachment categories, 3-10
create, 3-2
creating pages, 3-28
Item catalog category
associating attribute groups, 4-48
associating new item requests, 3-22
Item change policy, 3-16
Item number
generation rules, 3-26
item request
define new item request, 3-19
Item request
setting up, 3-18
item status, 3-15
create, 3-15
edit, 3-15
item templates
setting up, 3-12
L
libraries
Communications Product Details Library -
Vertical, F-44

Index-3
Communications Services Billing Library -
Vertical, F-25
Product Management Library - Horizontal, F-
23
Sellable Product Information Library -
Horizontal, F-1
Line types
associate attribute groups, 7-35
Change line type attributes, 7-35
defining, 7-35
M
managing roles
add or remove members, 11-10
create group, 11-9
find group, 11-11
search company, 11-11
search group, 11-10
search people, 11-8
managing roles , 11-6
Match rules, 12-2
N
New item request
associate with an item catalog category, 3-22
define types, 3-18
define workflows, 3-21
O
Oracle applications technology
profile options, 1-3
set up, 1-1
set up prerequisites, 1-2
set up steps, 1-3
Oracle isetup, 1-2
P
people and roles administration
creating roles, 11-3
deleting roles, 11-3
role mapping, 11-3
updating roles, 11-3
view roles, 11-1
Priority codes
create, 7-13
profile options
default options, 1-15
publishing
attribute groups, 4-54
default source systems, 3-44
item catalog categories, 3-45
value sets, 4-16
R
Reason codes
creating, 7-13
Report templates, 3-55
repository
overview of setting up, 9-1
Responsibilities and users
create responsibility, 2-1
define, 2-1
Role based security, 11-11
rule expressions
building, 6-16
rules
copying item rules data to other instances, 6-
43
creating, 6-4
including in other rule sets, 6-38
using on-demand rule set execution, 6-42
viewing rule use and attributes, 6-39
rule sets
creating, 6-4
S
search criteria templates, 3-29
administrator level, 3-31
user level, 3-33
security
catalog, 11-12
Security, 11-11
seeded attributes, 4-36
seeded data
Communications Product Details Library -
Vertical, F-44
Communications Services Billing Library -
Vertical, F-25
Product Management Library - Horizontal, F-
23
Sellable Product Information Library -

Index-4
Horizontal, F-1
Source system, 12-5
Statuses
creating, 7-15
Structure names
defining, 8-5
Structures
associating a name with a type, 8-4
associating component attribute groups, 8-8
associating structure attribute groups, 8-6
creating structure names, 8-4
creating structure types, 8-2
display formats, 8-9
overview, 8-1
search criteria, 8-9
user-defined attributes, 8-6, 8-8
Structure types
associating structure names, 8-5
Supplier users
set up, 2-5
T
table value sets, 4-12
identify, 4-13
Task templates
creating, 7-23
U
user-defined attributes
create, 4-24
User-defined attributes, 4-21
reading data, C-1
value sets, 4-1
user-defined functions
create, 4-39
create parameter mapping, 4-41
User-defined functions, 4-38
V
value sets
create, 4-1
versions, 4-7
W
Web Services
attribute groups, G-12
error reporting, G-80
item catalog categories, G-18
items, G-30
Output Payload, G-79
overview, G-1
value sets, G-2
Workflows
change management, A-1
Workflow templates
defining, 7-17
