
Mitel One Web Application
User Guide
June 14 2024
Notices
The information contained in this document is believed to be accurate in all respects but is not
warranted by Mitel Networks Corporation (MITEL
®
).The information is subject to change without
notice and should not be construed in any way as a commitment by Mitel or any of its affiliates or
subsidiaries. Mitel and its affiliates and subsidiaries assume no responsibility for any errors or omissions
in this document. Revisions of this document or new editions of it may be issued to incorporate such
changes. No part of this document can be reproduced or transmitted in any form or by any means -
electronic or mechanical - for any purpose without written permission from Mitel Networks Corporation.
Trademarks
The trademarks, service marks, logos and graphics (collectively "Trademarks") appearing on Mitel's
Internet sites or in its publications are registered and unregistered trademarks of Mitel Networks
Corporation (MNC), its affiliates, parents, or subsidiaries (collectively "Mitel") or others. Use of
the Trademarks is prohibited without the express consent from Mitel. Please contact our legal
department at [email protected] for additional information. For a list of the worldwide Mitel Networks
Corporation registered trademarks, please refer to the website:http://www.mitel.com/trademarks.
®
,
™
Trademark of Mitel Networks Corporation
©
Copyright 2024, Mitel Networks Corporation
All rights reserved

Getting Started
1
This chapter contains the following sections:
• What is Mitel One Web Application?
• Register and Access the Mitel One Web Application
• Log In / Log Out
• Reset your Password
• Permissions and Notifications
• Mitel One Progressive Web Application
• Mitel One Web Application Overview
• Manage Mitel One Settings
This chapter will help you understand how to install, register, and log in to the Mitel One web application; reset
your password; get acquainted with the Home screen; and access your settings, permissions to be enabled to
use the application, and the notifications generated by the application.
1.1 What is Mitel One Web Application?
The Mitel One web application is a next-generation collaboration application that provides advanced
communication features and integrates with the MiVoice Office 400 PBX to improve work efficiency and
enhance workplace communication. It provides seamless transitions between voice, video, and messaging
capabilities for a complete collaboration experience. From your PC or Mac, you can find and connect with
individuals and groups through calls and messages, answer and handle multiple calls in real time, and
attend multi-party video conferencing with your contacts.
The Mitel One web application consolidates telephony, messaging, and meetings within a single
application and user experience. It provides the following features:
• Voice features such as place, answer, hold, retrieve, and transfer a call; and multi-call handling
User Guide 1
Getting Started
• Calendar integrated video conferencing and meeting collaboration
• Secure personal one-to-one messaging, group messaging, public and private Streams
• Corporate directory integration and Global Search functionality
• Manage communications and voice-centric workflows more effectively
• Record calls and meetings
• Store frequently used function types in the MiVoice Office 400 PBX as Quick Functions
• Control the call features on the MiVoice Office 400 desk phone
• Live status (presence) of users with PBX integrated availability
• Dynamic call history
• Contact synchronization and management (business and personal contacts)
To access the latest version of the app, click https://one.mitel.io. For more information about how to log in
to the application, see Log In / Log Out on page 6.
1.2 Register and Access the Mitel One Web Application
Note:
The following procedure applies only to users who do not have Single Sign-On (SSO) configured
for their Mitel account. Users who have SSO configured by their IT administrator need not register
their information with Mitel. They can use the SSO functionality to access the application. For more
information, contact your IT administrator or see Configuring Single Sign-On for CloudLink with
Microsoft Azure AD.
Before you log in to the application for the first time, you must register and set up your Mitel One account.
Perform the following steps to set up your account.
1. Ensure that you have received an email bearing the subject line 'Welcome to Mitel One' from no-
[email protected]. This is a welcome email sent when a Mitel One license is assigned to you by the Mitel
Partner or Account Administator in the Mitel Administration. If you do not find this email in your mailbox,
check your Junk or Spam folders for recent emails sent to you from [email protected].
Note:
The link provided in the welcome email will expire after 4 days and can be used only once.
User Guide 2

Getting Started
2. The welcome email includes a Set up Mitel One button.
Clicking this button takes you to the Finish building your account page, where you can provide the
details required to complete the account registration process.
3. In the Name field, your name will get automatically populated. This is the name that will be visible to
other users when you use the application. Create a new password for the Mitel One web application
3 User Guide

Getting Started
and click Complete after accepting the terms and conditions to complete the account registration
process.
User Guide 4

Getting Started
4. Upon successful registration, you will be logged in to the application and the Complete your profile
dialog box is displayed where you can upload your photo, or add a status message.
Click DONE to continue to the Home screen (shown in the following screenshot).
5 User Guide

Getting Started
From the Home screen, you can Place and Receive calls, Send or Receive Messages, Enable/Disable any
quick functions, Create or Join a Stream, Manage Contacts and Contacts Groups, Create Favorites, and
Start or Join a Meeting.
1.3 Log In / Log Out
Log In
Note:
For using certain features of the Mitel One web application, you must grant permission to the app
to access certain areas of your computer when the app generates on-screen messages asking for
permissions when you log in for the first time after installation. To learn more, see Permissions and
Notifications on page 10.
Access the application by clicking the URL https://one.mitel.io. The Welcome to Mitel One page opens.
Click SIGN IN .
The Mitel user login page opens.
User Guide 6

Getting Started
To log in:
1. Enter your email id (specified in the account for you) or the User Principal Name (if you are an Azure
user with SSO) as the user name and the Account Number received in the welcome email (if prompted)
in the respective fields. Click Next.
2. From the screen that opens, continue to log in to the application using either of the following methods:
• Using Single Sign-On (SSO)
Note:
You can use SSO to log in to the application only if your IT administrator has configured Single
Sign-On (SSO) for your Mitel account.
a. Click Single Sign On. You will be redirected to your SSO provider to sign in to your account.
b. Enter your credentials in the fields provided, and click Sign in to log in to the application.
7 User Guide

Getting Started
Note:
Contact your IT administrator if you are not able to sign in to the application using the SSO
option or if you get the following error.
• Using the Mitel account password
Enter the password you specified while registering your account in the Password field, and click
Next to log in to the application. See Register and Access the Mitel One Web Application on page
2 for more details about how to register a user.
Note:
If you forget your password, see Reset your Password on page 9 to learn how to set a new
password.
After successful sign in, the End User License Agreement (EULA) is displayed.
3. Select the check box to accept the end user agreement, and click CONFIRM to log in to the application.
User Guide 8
Getting Started
Note:
The end user agreement dialog box appears only when a user logs in to the Mitel One application for
the first time. If you accept the agreement from one of the type of Mitel One client (that is Mobile, or
Web), the agreement will not appear again when the user logs in from other types of Mitel One client.
If you log in to the application using the Google Chrome or Microsoft Edge browser, you can install
the Mitel One Progressive Web Application. For more information, see Mitel One Progressive Web
Application on page 13.
Log Out
To log out of the application, click your avatar, and from the drop-down panel that opens, click Logout.
Note:
After you log out, you will no longer receive any notifications for incoming calls and messages. The
next time you log in, all your missed calls, unread messages, and meeting invitations will be there for
you to access.
1.4 Reset your Password
Note:
The following procedure applies only to users who do not have Single Sign-On (SSO) configured for
their Mitel account.
If you are logged out of the Mitel One web application and have forgotten or want to reset your login
password, perform the following steps to reset your password:
1. Access the application by clicking the URL https://one.mitel.io. The Mitel user login page opens.
2. Click SIGN IN, and enter your username.
3. If prompted, enter the Account Number.
4. Click Next.
5. Click the Forgot Password.
6. Enter your username and click Next.
9 User Guide

Getting Started
7. An email containing a Reset Password link, and a 6-digit code number is sent to the email address
you provided. If you do not find this email in your mailbox, check your Junk or Spam folders for recent
emails sent to you from [email protected].
8. Click the Enter Code tab displayed in the web page and enter the 6-digit code number. Click Submit to
reset your password.
9. Alternately, in the email that you received, click the Reset Password link. In the Set a New Password
page that opens, enter a new password and confirm the entry. Click Next. Your password is reset.
1.5 Permissions and Notifications
When you log in to the Mitel One application for the first time, the use of certain features will generate
a prompt asking for permission to access areas of your browser. To enable the application to be fully
functional, select the Allow option for each prompt that asks for your permission. If you choose to Block or
Don't Allow any of these prompts, you will not be able to use the associated features.
The following list describes each type of permission and the associated features.
• Notifications — Allows the app to display notifications when you receive calls and messages.
Note:
If you choose to Block or Don't Allow the application the permission to send notifications during
the initial prompt, the message Notifications are disabled, please allow them in your browser
if you wish to receive them is displayed in the Home screen and you will not receive notifications
for incoming calls and messages.
• Microphone — Allows the app to record your voice during a call.
Note:
If you choose to Block or Don't Allow the application access to your microphone during the initial
prompt, the message Audio access for this site is blocked. Please modify your browser
settings to allow voice calls is displayed in the Home screen and your microphone will be
disabled. Your contacts will not be able to hear you during voice calls.
• Location — Allows the application to access your device's precise location.
To change the permission settings, follow instructions pertinent to your browser.
User Guide 10

Getting Started
• Notifications
• Google Chrome
• Mozilla Firefox
• Apple Safari
• Microsoft Edge
To receive native notification in your PC or Mac, you must enable permission for the browser to send
notification to your PC or Mac. This is done from the Control panel/Settings menu of your operating
system. To select a browser to send notifications, follow the instructions pertinent to your operating
system.
• Windows
• macOS
• Microphone
• Google Chrome
• Mozilla Firefox
• Apple Safari
• Microsoft Edge
To enable the microphone, a common prerequisite is that you must have already enabled permission
for the browser to access your microphone. This is done from the Control panel/Settings menu of your
operating system. To enable the microphone, follow the instructions pertinent to your operating system.
• Windows
• macOS
• Location
• Google Chrome
• Mozilla Firefox
• Apple Safari
• Microsoft Edge
To enable the location service, a common prerequisite is that you must have already enabled
permission for the browser to access your location. This is done from the Control panel/Settings menu
of your operating system. To enable the location service, follow the instructions pertinent to your
operating system.
• Windows
• macOS
Error/Warning Notifications
The following table lists the error and warning notifications that is displayed in the Mitel One web
application.
11 User Guide

Getting Started
Notification Description
Phone registration failed. All phone services within
Mitel One are currently disabled
This notification appears when multiple attempts
to register the softphone in the application fails.
The CloudLink Platform or the PBX will send the
registration failure notification to the application
and telephony in the application will be disabled.
There may be a problem with your audio device.
You may not be able to make and receive calls.
This notification appears when the app cannot
detect an audio device required to make and
receive calls.
Call failed This notification appears when the app receives
call failed state from the CloudLink Platform or the
PBX.
Call service is not available, please refresh This notification appears when there are problems
with the softphone in the application. The
softphone might be unregistered due to a network
outage or the CloudLink Platform or the PBX might
be blocking the softphone registration. When this
occurs, you will not be able to place or answer
calls using the application. If this issue persists,
contact your IT administrator.
Phone is not available because Mitel One is
opened in another tab or window on this device
This notification appears if you have opened the
application in multiple tabs in your browser or in
PWA. Mitel One call features will be supported
only in the first tab you opened. In all other tabs
in which you have opened the application, the call
features will be disabled.
The device is currently offline This notification appears if there are problems
with your network connectivity. When this occurs,
you may be unable to use the app features. If this
issue persists, contact your IT administrator.
Your quick function list is not up-to-date This notification appears when the quick functions
stored in the application fails to synchronize with
the CloudLink platform.
Call Notifications
Incoming calls generate different on-screen notifications depending on a variety of scenarios for your
application and your computer. To learn more, see Answer or Decline a Call on page 45.
User Guide 12

Getting Started
Message Notifications
Incoming messages generate different on-screen notifications depending on a variety of scenarios for your
application and your computer. To learn more, see Respond to a Message on page 91.
1.6 Mitel One Progressive Web Application
Mitel One Progressive Web Application (PWA) combines the best of both the web application and the
native desktop application to provide faster, immersive, and an app-like experience on your desktop
device. The PWA provides key functionalities such as push notifications and device hardware access, to
provide a user experience similar to the native application on desktop devices.
The PWA is supported on Google Chrome and Microsoft Edge browsers.
Install Mitel One PWA
To install the PWA:
1. Log in to the Mitel One Web Application.
2. Click your avatar and from the drop-down panel that appears, click Install app. Alternately, click the
icon that appears at the right of the browser's address bar.
3. You will be prompted to install the application on your desktop device. In the prompt dialog box, click
Install to install the PWA. Clicking Cancel cancels the operation.
4. The PWA opens, displaying the Home screen.
Note:
When you log in to the PWA for the first time after installation, the use of certain features will generate
on-screen messages asking for permission to access areas of your computer. For more information,
see Permissions and Notifications on page 10.
After you install the PWA, you can toggle between the PWA and the web application (in the browser). To
switch to the web application while using the PWA, click the three-dots icon ( ) at the top right of the PWA
window, and from the panel that opens, click Open in (Browser name). To switch to the PWA while using
the web application, click the icon at the right of the browser address bar. In the prompt screen that
opens, click Open.
Uninstall Mitel One PWA
To uninstall the PWA:
13 User Guide

Getting Started
1. Click the three-dots icon at the top right of the PWA window. A panel opens.
2. Click Uninstall Mitel One Web.
3. A prompt screen appears. Select the check box Also Clear Data from (Browser name) if you want to
remove browsing data and cookies related to the PWA.
4. Click Remove. The PWA is uninstalled from your device. Clicking Cancel cancels the uninstallation.
1.7 Mitel One Web Application Overview
The main window of the Mitel One web application has three main sections: Header bar, Navigation menu,
and Home screen.
Note:
• What features are available in the Mitel One application for a user depends on the
license that the user has purchased. For more details about licensing, see Licensing. A
CloudLink Administrator can enable or disable specific Mitel One features for a user. Contact
your CloudLink Administrator if you do not have access to the features mentioned in the license
subscribed by you.
• Because Ray Baum is not supported on the MiVoice Office 400 PBX, telephony is disabled on the
Mitel One web application for MiVoice Office 400 PBX users in North America.
User Guide 14

Getting Started
A
Header bar — Displays the Search bar, the device
selection button, and the avatar.
B
Navigation menu — Displays the basic navigation
menu for the application. Only the features you are
licensed to use are displayed.
C
Home screen — Displays the following widgets:
• FAVORITES
• Phone
• Messages
• Meetings
• Quick Functions
Header Bar
The Header bar at the top displays:
• The avatar of the user. Click the avatar to update the presence status and status message, access the
Settings panel, access the help documentation, and to log out of the application.
• The Search bar where you can enter a text and search among Contacts, Meetings, Messages, or
Streams.
•
The device selection button ( ) which allows you to choose how to place or receive calls in the
application.
For more information, see Manage Mitel One Settings.
Navigation Menu
The navigation menu displays the icons for accessing various features of the application.
15 User Guide

Getting Started
•
Home — The Home screen provides easy access to all features of the application and enables
quick communications with your contacts. For more information, see Home Screen on page 16.
•
Phone — The Phone menu displays the call history on the left side, and the Keypad on the right
side for the user to dial the phone number. For more information, see Phone on page 42.
•
Messages — The Messages menu allows you to connect in real time to any other Mitel One
contact or group of contacts. The Messages screen displays all existing messages on the left-half of
the screen and the selected message thread on the right-half. For more information, see Messages on
page 73.
•
Meetings — The Meetings menu allows you to schedule or join a meeting with any of your
contacts (with email id). For more information, see Meetings on page 98.
•
Contacts — The Contacts menu provides access to all business contacts and groups. It also
enables you to search through the contact list quickly to find the contact you want to communicate with.
Click the contact or hover over the contact to view the communication options. For more information,
see Contacts on page 173.
•
Quick Functions — The Quick Functions menu displays and provides access to all the quick
function keys you have stored in the application. You can activate or deactivate a function by clicking
the corresponding quick function key. For more information, see Quick Functions on page 184.
Home Screen
The Home screen stores frequently used contacts, contact groups, and speed dials as Favorites and
displays the recent messages you received and the calls that you have missed.
FAVORITES
The FAVORITES widget displays your favorite contacts and contact groups, and speed dials. For more
information, see Set Your Favorites on page 28.
Messages
The space below the FAVORITES widget on the right side of the Home screen is the Messages widget.
The Messages widget lists all the recent messages you received, in chronological order.
• To reply to a message in the Messages widget, click the message. You can also hover over the
message and click the icon. This opens the message screen for that individual, which displays
the messages you received.
•
To call back a contact from the Messages widget, hover over the contact, and click the icon.
The call screen opens, and a call is placed to the contact.
For more information, see Messages on page 73.
Phone
User Guide 16

Getting Started
The Phone widget displays the calls you have missed. Clicking the widget opens the Phone menu where
you can:
• View all outgoing and incoming calls in the All Calls list.
• View only incoming calls that were not answered in the Missed Calls list
• View all the voicemail you received in the Voicemail list
• Place a call to a contact using the Keypad
• Search for a contact in the directory using the Search bar.
For more information, see Phone on page 42.
Meetings
The Meetings widget displays the recent Mitel One meetings of the user. Clicking the widget opens the
Meetings menu that provides easy access to all Mitel One Meetings features and enables you to quickly
manage your meetings. For more information, see Meetings on page 98.
Quick Functions
The Quick Functions widget displays the recent quick function keys used or stored by you in the
application. Clicking the widget opens the Quick Functions menu that provides access to all the quick
function keys you have stored in the application. For more information, see Quick Functions on page
184.
1.8 Manage Mitel One Settings
You can personalize the settings of your Mitel One web application from the Settings panel. You can edit
your avatar; access the personal contacts on your Office 365 application; choose the call option; choose
the type of messages for which you want to receive notifications; submit an issue and share feedback
about the application; and access the online help documentation, release information, the privacy policy,
the End User License Agreement, and view the application version number.
To access the Settings panel:
1. Click your avatar on the top right hand corner.
2. From the panel that appears, click Settings and preferences. The Settings panel opens.
To personalize the settings in your application, do the following.
17 User Guide


Getting Started
• Click the Meetings tab to enable or disable features for your meetings.
• Show audio and video preview before joining a meeting – Select this check box to display the
Audio and video preview panel before you connect to a meeting.
• Always send me an email for meeting invites – Select this check box to receive an email invite to
a meeting you are invited to.
• Turn on chat notification bubbles in a meeting – Select this check box to receive chat
notifications during a meeting.
In the Audio section:
• Choose the preferred Microphone and Speaker from the respective drop-down lists.
• Turn on my microphone when joining a meeting – Select this check box to always join a meeting
with your microphone turned on.
• Enable noise cancellation – Select this check box to cancel background noise.
In the Camera section:
• Choose your preferred Camera from the drop-down list.
• Turn on video when joining a meeting – Select this check box to always join a meeting with your
video turned on.
• Always turn on incoming video – Select this check box to display the video of other participants in
the meeting who have turned on their video.
19 User Guide

Getting Started
• Blur my video background – Select this check box to blur your video background.
• Click the Phone tab to choose how to place or receive calls in the application, and to choose the device
for which you want to have a ringtone for incoming calls.
In the Call answering rules section:
• To place or receive calls through the softphone in the web application, click the All phone calls use
option, and from the drop-down panel that opens, click Computer audio.
Note:
When you choose the default audio option from the All phone calls use drop-down list, the
application uses the audio device determined by the operating system.
• To place or receive calls through the deskphone associated with your account click the All phone
calls use option, and from the drop-down panel that opens, click Deskphone.
In the Audio section:
• Click the drop-down menu below Choose ringtone device for incoming calls and select the
device for which you want to have a ringtone for incoming calls.
Note:
This feature is supported only in the following browsers:
• Google Chrome
• Microsoft Edge
For more information, see Manage Calls using Deskphone on page 63.
User Guide 20

Getting Started
• Click the Messages tab to personalize the following settings.
• To choose the type of messages for which you want to receive notifications, click the icon associated
with the message type.
• To opt out from receiving notifications for a Stream, click the icon associated with the Stream.
• To unmute the notifications for a Direct message received from a contact, click the Unmute option
associated with the contact.
21 User Guide

• Click the About tab to view the version details of the application, URLs to the online help, release
information, privacy policy, and End User License Agreement.
• Click the Issues and Feedback tab to report a problem you encountered while using the application
and to share your ideas and feature suggestions about the application. For instructions on how to report
issues and provide feedback, see Report an Issue and Share Feedback on page 202.

Setting up your Mitel One Web
Application
2
This chapter contains the following sections:
• Set Up Your Profile
• Upload Your Avatar
• Set Your Presence and Status Message
• Set Your Favorites
Note:
• For the best audio quality, better reliability and stability, reduced latency, and for prompt real-time delivery
of the notifications in the Mitel One application, Mitel recommends that you use a wired network over a
wireless network.
• Mitel One web application UI elements may appear scaled depending on the screen size and system
settings used on Windows and MAC operating systems. Therefore, it is recommended that the Mitel One
web application user manually control the zoom settings in the browser in which Mitel One is deployed
for an ideal experience. This can be done as follows:
• On Windows: Press Ctrl and 0 to reset your zoom to 100%. Press Ctrl and + to zoom in or Ctrl and
----– to zoom out.
• On Mac: Press Command and 0 to reset your zoom to 100%. Press Command and + to zoom in or
Command and ----– to zoom out.
The browser will save the setting and open the application in that scale subsequently.
This chapter will help you understand how to change your profile picture, or your availability status, and to set
your favorite contacts and speed dials.
2.1 Set Up Your Profile
You can edit your profile at any time to change your avatar.
Note:
You cannot change your email address from the Mitel One web application. To change your email
address, you must log in to the MiVoice Office 400 server manager.
To edit your profile:
User Guide 23

Setting up your Mitel One Web Application
1. Access the profile panel by performing the following steps:
a. Click your avatar and from the panel that opens, click Settings and preferences. The Settings
panel opens, displaying the General tab.
b.
Click the Edit icon ( ).
Note:
You cannot edit your name in the Mitel One application.
2. To change your avatar:
• Click Upload photo and follow the prompts. For help, see Upload Your Avatar on page 24.
•
Click the Delete icon ( ) to delete your avatar.
3.
Click to save the changes, or click to discard the changes and to navigate away from the
profile panel.
2.2 Upload Your Avatar
Your avatar is the icon or image that is displayed with your profile, which helps other Mitel One users
recognize you. When you first register your application, your avatar displays your initials until you upload
an avatar.
User Guide 24

Setting up your Mitel One Web Application
To upload an avatar:
1. Click your avatar, and then click Settings and preferences. The Settings panel opens, displaying the
General tab.
2.
Click the Edit icon ( ).
3. Click the Upload photo option. A window opens.
4. Select the image you want to upload, and click Open. The image is added as your avatar.
5.
Click to save the changes, or click to discard the changes, and to navigate away from the
profile panel.
Note:
The maximum image size is 4.5 MB for the avatar. Supported image types are .jpg, .png, and .bmp.
2.3 Set Your Presence and Status Message
You can set your presence and a personalized status message in the Mitel One web application. Your
presence enables other Mitel One users know your availability status as explained below:
•
Indicates you are Available to message or receive calls.
•
Indicates you are Busy and not ready to message or receive calls. However, you will still receive
calls, messages, and message notifications when your presence is set to Busy. Note that your
presence automatically changes to Busy while you are on a call or in a meeting.
•
Indicates that you are Away or currently locked your system or mobile. However, you will still
receive calls, messages, and message notifications.
•
When you enable Not available your calls are routed following the Not Available profile in the
MiVoice Office 400. You will still receive messages and message notifications. To disable Not available
on your application, set your availability status to Available or Busy.
25 User Guide

Setting up your Mitel One Web Application
Note:
• The Mitel One application will show the presence status of a user as Busy when the user joins a
meeting, and as Available when the user leaves the meeting.
• When a user disables Not available in the Mitel One web application, the presence status of
the user will be shown as Available in the application and in the MiVoice Office 400 deskphone
associated with the user’s account.
• Synchronizing the Mitel One web application with Office 365 does not update the Mitel One
presence status according to Office 365 Calendar. It only synchronizes the meetings in your Office
365 calendar with the Meetings widget in the Mitel One web application.
Setting your Presence
To set your presence, hover over your avatar from the Home screen and click the corresponding option to
set your presence to Available, Busy, Away, or Not available.
Set or Update your Status Message
To set or update your status message:
1. Click your avatar from the Home screen. A panel opens.
2.
Click the icon associated with Update your status message.
Note:
Click the icon to delete your existing status message.
3.
In the field provided, enter your preferred message, and click to save the message as your
status message.
User Guide 26

Setting up your Mitel One Web Application
Mitel One web application presence with MiVoice Office 400 desk phone
Setting the presence status in your Mitel One web application also updates the presence status in the
user’s MiVoice Office 400 desk phone display presence menu and vice versa. The following table lists the
presence status in the web application and the corresponding presence status in the MiVoice Office 400
desk phone display presence menu.
Mitel One Web Application MiVoice 400 Deskphone
Available Available
Away Absent
Busy (when the user joins a Mitel One meeting) Meeting
Not available Not Available
Busy Busy
Presence Status - Considerations
• When the desk phone has a DND forward button configured with “Global call forwarding
destination for do not disturb field in the MiVoice Office 400 PBX”
• Setting the presence status to Not available in the Mitel One web application will update the
presence status in the MiVoice Office 400 desk phone to Not Available. If the DND forward button is
enabled, the web application and the desk phone will not receive incoming calls.
• Enabling the DND forward button on the MiVoice Office 400 desk phone will update the presence
status in the desk phone to Not Available. However, it will not update the presence status in the
Mitel One web application.
• Disabling the DND forward button on the MiVoice Office 400 desk phone will update the presence
status in the desk phone and the Mitel One web application to Available.
• Dialing the MiVoice Office 400 enable /disable DND forward FAC code from the Mitel One
web application will enable / disable the DND forward button on the MiVoice Office 400 desk
phone. Enabling the DND forward button on the MiVoice Office 400 desk phone will block incoming
calls on the web application and the desk phone.
Note:
Dialing the MiVoice Office 400 DND forward FAC code from the web application will fail if the
Global call forwarding destination for do not disturb field is not configured in the MiVoice
Office 400 PBX.
• When the desk phone presence status is set to Not Available, the DND forward button on the
MiVoice Office 400 desk phone must be disabled to have the calls forwarded to the destination
number configured for the desk phone Not Available status. Otherwise the calls will be forwarded to
the global call forwarding number in the PBX.
27 User Guide

2.4 Set Your Favorites
The FAVORITES widget will display your favorite contacts and contact groups, and speed dials making it
easier for you to communicate with your most important contacts.
Note:
You can add up to a maximum of 48 entries in the FAVORITES widget.
• To add contacts as Favorites:
1.
In the Home screen, click the icon in the FAVORITES widget. The widget panel opens.
2. In the Search field, type the name, phone number, or the email address of the contact you want to
add. The Search field displays a list of contacts whose names, email addresses, or phone numbers
match the letters or numbers that you type.
3. Click a name to add that contact as your favorite.
• To add a speed dial entry:
1.
In the Home screen, click the icon in the FAVORITES widget. The widget panel opens.
2. Click Create a speed dial. The Add Speed Dial panel opens.
3. Enter a name for the speed dial in Speed dial name field.
4. Enter the telephone number or the MiVoice Office 400 function code in the Phone number or
operation code field.
5. Click ADD SPEED DIAL. Clicking CANCEL cancels the operation.
• For information about adding User Groups in the FAVORITES widget, see Manage User Groups on
page 180.

Global Search
3
Mitel One has a global Search bar at the top of the home screen, which is always visible and available. This
Search bar allows you to search for contacts, meetings, messages, and streams.
To access the Search bar, press CTRL+K for Windows OS, press CMD+K for macOS, or click anywhere on
the Search bar for either operating system. When you type some text in the Search bar, the search results are
displayed under the All, Contacts, Meetings, Messages, and Streams category tabs. The All category tab
displays a summary of the other specific categories. Some of the specific categories have filter capabilities as
well.
User Guide 29

Global Search
Note:
The following are the only supported special characters for search:
Character Description
@ At or at symbol
- Hyphen
_ Underscore
. Dot or period
+ Plus symbol
# Hash symbol
Space character
All
The All tab displays results from all the categories (two results from each category by default). Click a category
or click the show all links to expand the results for a category. For example, to expand the list of results for
contacts, click the Contacts header or click Show all matching contacts. Similarly, to expand the list of results
for meetings, messages, and streams, click the respective header or click Show all matching meetings, Show
all matching messages, and Show all matching streams respectively.
User Guide 30

Global Search
Contacts
Type a complete or partial contact name, phone number, extension number or email address to search for
contacts from the directory. While using contact names or email addresses, type the complete or partial name
or address ensuring that consecutive characters including space, if any, are used. Users can sort the names
alphabetically from A to Z or from Z to A by selecting the corresponding option from the drop-down list. Users
can also filter the search results by contact type. Click the drop-down list under CONTACT TYPE and select the
contact type.
31 User Guide

Global Search
Note:
If your screen resolution is below 900 pixels, click the icon to filter the search results by contact type.
From the search results, hover over any contact to make a call, set up a meeting, or send a message instantly.
Click the contact to view the contact information.
Note:
For a feature (telephony, meetings, or message) to be available for a contact, the feature must be enabled
for the contact’s account. For business contacts, telephony, message, and meetings features are available
by default.
When you search for contacts using the global Search bar, the application displays a consolidated list of contacts
in the Contacts tab that includes results from all the directories configured through the PBX; that is, Open
Interfaces Platform (OIP), Active Directory (AD), and Public and Private Phonebook.
When the consolidated directory search is in progress, the Mitel One web application shows a loading indicator
in the Contacts tab. The loading indication stops when the search is complete. Subsequent searches use
results cached in the Mitel One web application.
Note:
Desk phones use the consolidated directory name search service. Therefore, the contact names listed in the
Mitel One web application are identical to those displayed on desk phones.
The consolidated directory name search is available to you with or without an OIP connected, depending on the
configuration made by your Account Administrator.
When the PBX directory name search is available without OIP connected, then the PBX Directory option will be
listed in the CONTACT TYPE drop-down list. The results displayed include only those from the PBX Phonebooks
(Public and Private).
User Guide 32

Global Search
To perform a PBX directory name search, do the following:
1. In the global Search bar, enter a name.
2. Click the Contacts tab.
The Contacts page is displayed.
3. From the CONTACT TYPE drop-down list, select PBX Directory.
All the relevant results from the PBX Phonebooks are displayed in the Contacts tab.
When the PBX directory search is available with OIP connected, then the PBX Directory option will be listed in
the CONTACT TYPE drop-down list, and the PBX extended search toggle button will be displayed above the
CONTACT TYPE drop-down list.
• When the PBX extended search toggle button is disabled, the search is a basic search in the OIP
directories.
• When the PBX extended search toggle button is enabled, the search is an extended search in the OIP
directories.
Note:
The PBX extended search toggle button will not be displayed when OIP is not connected.
33 User Guide

Global Search
To perform a PBX extended name search, do the following:
1. In the global Search bar, enter a name.
2. Click the Contacts tab.
The Contacts page is displayed.
3. From the CONTACT TYPE drop-down list, select PBX Directory.
Note:
As the PBX extended search toggle button is in the disabled mode, a basic search is performed in the
OIP directories, and the search result is displayed in the Contacts tab.
4. Enable the PBX extended search toggle button above the CONTACT TYPE drop-down list.
All the relevant results from the PBX Phonebooks or from the OIP directories are displayed in the Contacts
tab.
User Guide 34

Global Search
Note:
The results displayed for the PBX Directory name search and the PBX extended search depend on the
configuration made by your Account Administrator in the MiVoice 400 PBX and in the OIP Alpha Quick &
Dial Service settings. The Account Administrator can update the OIP directory configurations in the OIP web
portal (Configurations > Server > Services > Alpha Quick & Dial Service).
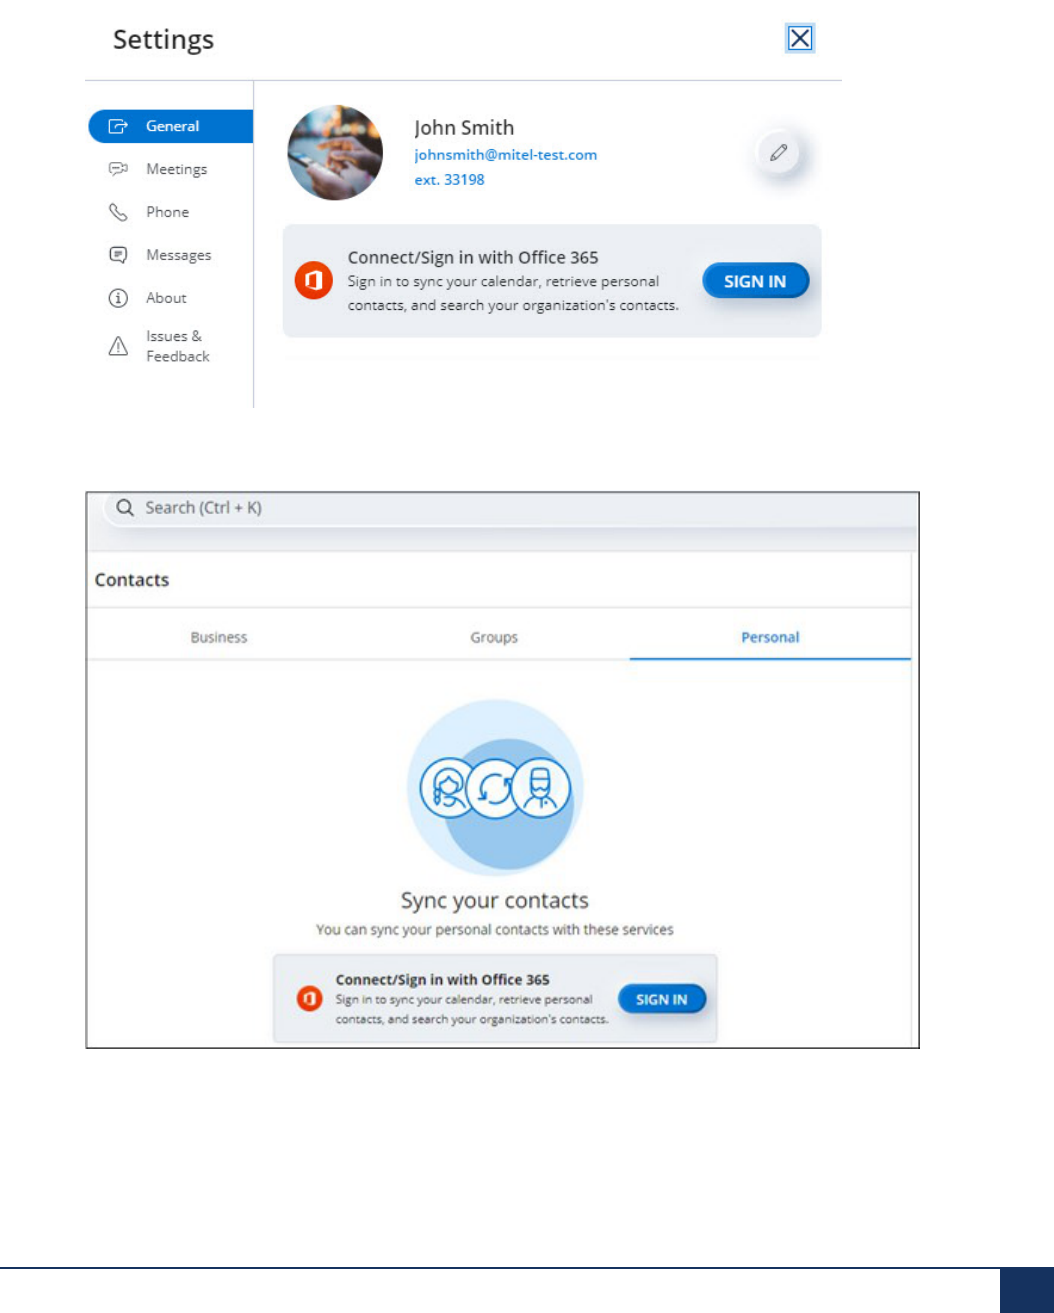
Mitel One users can search for their Office 365 personal and Office 365 contacts in Mitel One. To do this:
1. A CloudLink Account Administrator must enable Microsoft Office 365 integration for your account in the
CloudLink Accounts Console. For more information about integrating Microsoft Office 365, contact your
Account Administrator or see Integrating Microsoft Office 365 with Mitel Administration.
2. The IT administrator of your organization must enable Office 365 contact synchronization for your user
account. For more information, contact your Azure administrator or see Set up directory synchronization for
Microsoft 365.
35 User Guide
Global Search
3. After Microsoft Office integration is enabled for your account, you must sign in with Microsoft Office 365 in
Mitel One. To sign in, do either of the following:
• Click your avatar and navigate to Settings and preferences. From the settings page that is displayed,
click SIGN IN to sign in with Microsoft Office 365.
• From the left navigation menu, navigate to Contacts > Personal tab. Click SIGN IN to sign in with
Microsoft Office 365.
You will be signed in with Microsoft Office 365 and can search for personal and organizational contacts.
User Guide 36

Global Search
Note:
The warning message Your organizational contacts have not yet been enabled by your Office 365
system administrator (as shown in the following screenshot) is displayed if the Azure administrator of your
organization has not enabled Office 365 contact synchronization for your user account. Contact the Azure
administrator for more information.
Meetings
Users can search for a meeting by typing the complete or partial meeting name or the name of any of the
participants ensuring that consecutive letters, including space, if any are used. From the search results, hover
over any relevant result and click the ( ) icon to view the details of that meeting.
37 User Guide

Global Search
Messages
Users can search for a message by typing single or multiple words from that message. You can also select a
date range to search for messages sent or received within that range.
From the search results, hover over any message and click the ( ) icon to view the message.
User Guide 38

Global Search
Note:
• Only complete words are valid for the search criteria.
•
If your screen resolution is below 900 pixels, click the icon to select a date range to search for
messages sent or received within that range.
If you search for a message by typing the words in the Search bar while you are viewing or engaged in a group
conversation, or direct conversation, Mitel One will search for the words only in that conversation. Whereas,
if you type words in the Search bar on the home screen, Mitel One searches for results globally. Whereas, if
you type words in the Search bar on the home screen, Mitel One searches for results globally. Following check
boxes are displayed when:
• you search for words in group messages
• you search for words in direct messages
39 User Guide

Global Search
Streams
Users can search for streams by typing the stream name, stream description, or single or multiple words from
the stream. Click any stream from the result or click the ( ) icon associated with the stream to view the
stream details. Users can also filter the search results by search type. Click the field to expand the drop-down list
under SEARCH TYPE and select the contact type.
Note:
• Only complete words are valid for the search criteria.
•
If your screen resolution is below 900 pixels, click the icon to filter the search result by search type.
If you search for a message by typing the words in the Search bar while you are viewing or engaged in a stream,
Mitel One will search for the words only in that conversation and the following check box is displayed. Whereas,
if you type words in the Search bar on the home screen, Mitel One searches for results globally.
User Guide 40


Phone
4
This chapter contains the following sections:
• Call Features
• Answer or Decline a Call
• Place a Call
• Handle Multiple Calls
• Transfer a Call
• Call History
• Manage Calls using Deskphone
• Click to Dial Using Mitel One Web Application
Note:
Because Ray Baum is not supported on the MiVoice Office 400 PBX, telephony is disabled on the Mitel One
web application for MiVoice Office 400 PBX users in North America.
The topics listed will help you learn how to best utilize the telephony feature provided by the Mitel One web
application.
User Guide 42

Phone
4.1 Call Features
During an active call, the Mitel One web application call screen provides access to the following call control
features:
• Mute — Prevents the other party from hearing your voice and any background noise.
• Dialpad — Enter the phone number of a contact using the keypad to call the contact. Also, you can use
DTMF tones on IVR to call the number.
• Add call — Add a new call to the ongoing call.
•
Hold — Place the caller on hold.To place a call on hold, click the Hold icon ( ). This also disables
all the other icons and a On Hold banner is displayed on your call screen. While you place a call on
hold, the contact at the other end is alerted with a beep. To retrieve the held call, click the Hold icon
( ) again.
• Transfer — Transfer an active call to one of your contacts or another phone number. For more
information, see Transfer a Call on page 56.
43 User Guide
Phone
•
End call — Click the icon to end the call.
•
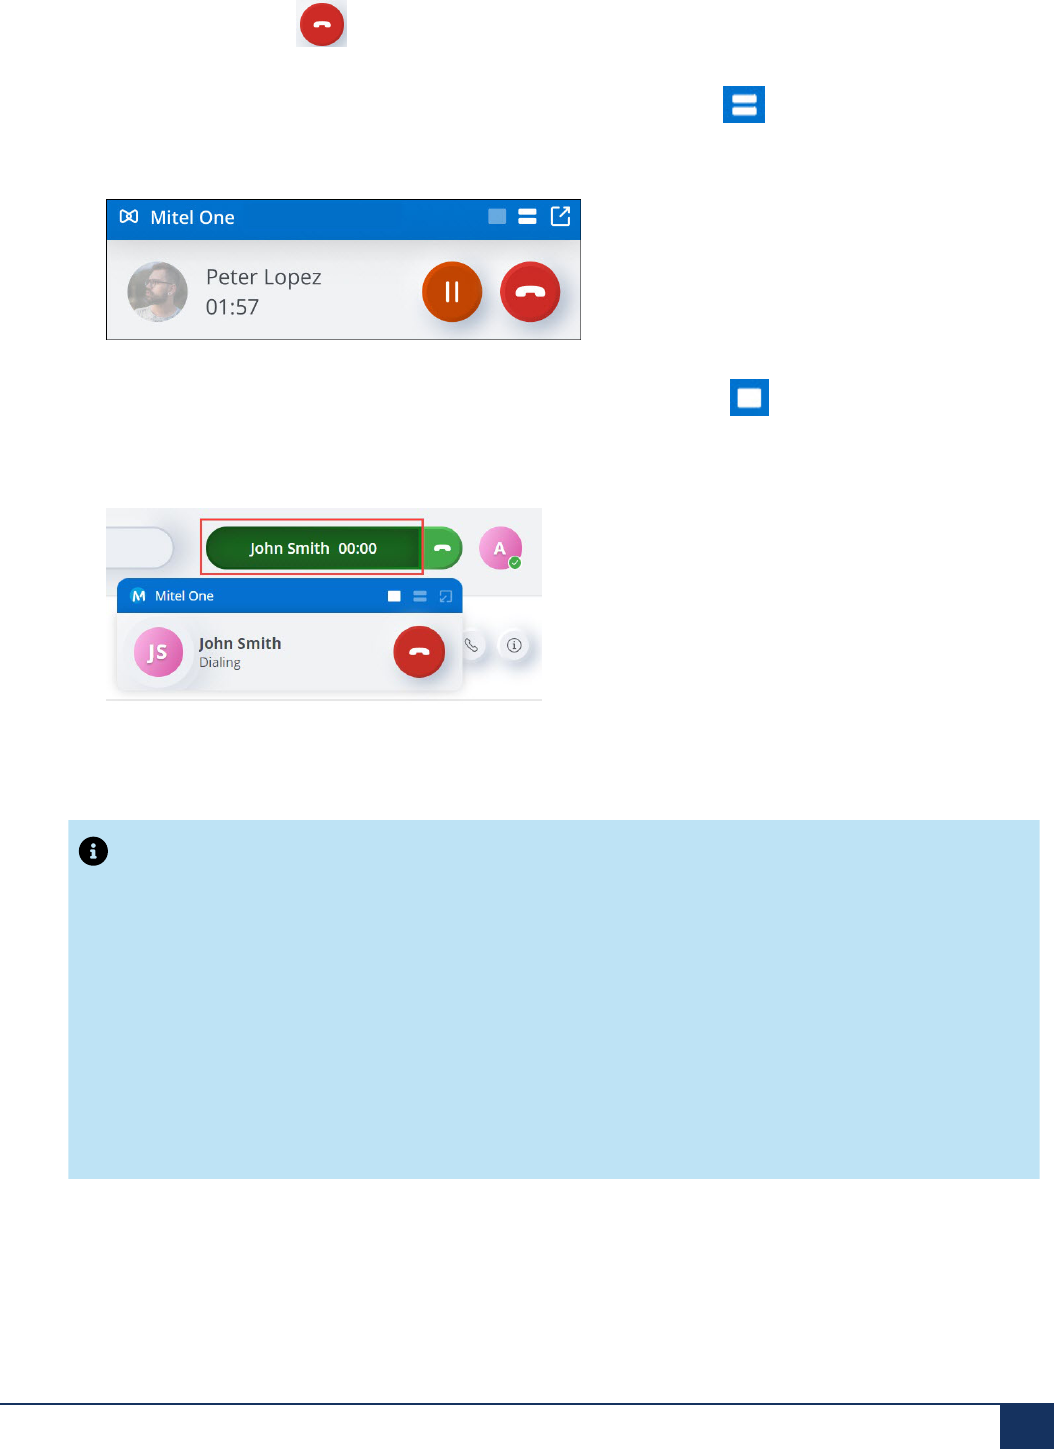
During an active call, you can minimize the call screen by clicking the icon available at the at the
top right corner of the call screen. Upon minimizing, the call screen displays the name of the contact,
call duration, the hold button, and the end call button.
To return to default call window (or maximize the call screen), click the icon.
• During an active call, you can close the call screen by clicking the banner displaying the name and call
duration that appears at the top of the call screen.
To open the call screen, click the banner again.
Note:
• Call history, incoming caller ID, and outgoing caller ID are synchronized with consolidated directory
contacts . Hence, the name and details displayed in the call history, incoming call screen, and
outgoing call screen are from the consolidated directory if the application is not synchronized with
the Office 365 account of a user. If the application is synchronized with Office 365, all details in the
call history, incoming call screen, and outgoing call screen that are from the consolidated directory
are overridden with details from personal contacts in Office 365.
• If you have opened the application in multiple tabs in your browser, the call features will be
supported only in the first tab you opened. In all other tabs in which you have opened the
application, an error message Phone is not available because Mitel One is opened in another
tab or window on this device will be displayed and the call features will be disabled.
User Guide 44

Phone
4.2 Answer or Decline a Call
The Mitel One web application displays a call screen with the options to accept or decline every incoming
call. Click to answer the call or to ignore the call.
Note:
When using Bluetooth headsets with the Mitel One web application, users might experience a 2-
second delay before audio is heard after they click to answer an incoming call.
When an incoming call is not answered during the time when the call rings and on-screen notifications
are presented, the call is recorded in the application as a missed call. A red notification dot is displayed
along with the Phone icon ( ) in the navigation menu of the application and also in the Phone widget
indicating that you have a missed call.
For all incoming calls that you receive:
• When the caller is one of your contacts, the application displays the caller's name.
• When the caller is not one of your contacts, the application displays the name if a name is available in
the caller ID; otherwise, the application displays the phone number.
• When caller information is marked private, the application displays Unknown.
45 User Guide

Phone
Note:
• If you have saved two or more contact names with the same number, the application displays the
first of these names in the contact list when you dial that number or receive a call from that number.
• If you place or receive a call during an ongoing meeting, it is recommended that you set the
Speaker to None (to mute the audio of the meeting) in Google Chrome or Microsoft Edge browser,
so that the meeting audio does not distract the call audio.
Call Notifications
Incoming calls generate different on-screen notifications depending on the following scenarios for your
Mitel One web application:
• When your application (browser or PWA) is open and visible, an incoming call sound is played and the
call screen opens displaying options for you to accept or decline the call.
• When your application (browser or Progressive Web Application) is running in the background (open,
but not visible), an incoming call sound is played and an on-screen notification appears. Click Accept or
User Guide 46
Phone
Decline to accept or decline the call. You can also click the notification to open the web application with
the call screen displaying options for you to accept or decline the call.
• When your computer is locked, an incoming call sound is played and an on-screen notification appears.
Clicking the notification opens the web application with the call screen displaying options for you
to accept or decline the call.
• If you are a Mitel One user and have installed the Progressive Web Application, you will receive calls
and call notifications even if the application on your computer is not running (closed). If you are a Mitel
One user, but have not installed the Progressive Web Application, you will need to log in to the web
application via the browser to receive calls and call notifications.
Note:
• MiVoice Office 400 users will not receive incoming call notifications in the Mitel One web application
if the All phone call use setting is set to Deskphone and if you are not logged in to your
application.
• To receive native call notifications in your PC or Mac, you must enable permission for the browser
or the PWA to send notification to your PC or Mac. This is done from the Control panel / Settings
menu of your operating system. For more information, see Permissions and Notifications on page
10.
4.3 Place a Call
The Mitel One web application provides calling icons throughout the application to facilitate you to place
calls.
Note:
You will hear a call waiting tone when you place a call to a contact who is already on another call.
Place a call using the Keypad
To place a call using the keypad:
1.
Click the icon in the navigation menu of your Mitel One web application. The Phone menu opens.
47 User Guide

Phone
2. Dial the telephone number using the Keypad, or enter or paste the number in the field provided.
3.
Press ENTER or click the icon.
Place a call from FAVORITES
Hover over any contact in the FAVORITES widget and click the phone icon to dial the primary telephone
number for this contact.
Place a call from Contacts
To place a call from the Contacts menu, do one of the following:
User Guide 48

Phone
• To place a call while searching the directory for contacts, hover over the contact you want to call and
click the blue phone icon ( ) to dial the primary telephone number for this contact.
Alternately, click the contact and then click the blue phone icon ( ) from the contact card that
appears.
49 User Guide

Phone
• In the Search area, type the first few letters of the contact's first name or last name. From the contact
list, hover over the contact you want to call and click the phone icon ( ).
Place a call from Messages
To place a call while viewing your messages from the Messages menu, hover over the contact you want to
call, and click the phone icon ( ) that appears to dial the primary telephone number for this contact.
Place a call from the messaging window
To place a call when you are messaging a contact, click the phone icon ( ) displayed at the top-right
of the messaging window to dial the primary telephone number for the contact.
Place a call from the Phone menu
To call a contact while viewing your call history in the Phone menu, hover over that contact from the list
and click the phone icon ( ) to dial the primary telephone number for the contact.
4.4 Handle Multiple Calls
In a busy work environment, you may need to answer more than one call at a time. The Mitel One web
application enables you to answer an incoming call while you are already on another call.
• The Mitel One web application can simultaneously handle three connected calls; an ongoing call and
two calls on hold.
User Guide 50

Phone
Note:
To enable the application to handle three calls, the MiVoice Office 400 SIP terminal representing
the application WebRTC SIP soft phone must be configured with the Multi lines value set to 3 and
the mobile application value set to 2. For more information, see Configure SIP Multi Lines and
Manage Call Permission within the topic Configure MiVO400 on Standalone Platform.
• If there is an incoming call when you are already on an active call:
• you will hear a ringing tone and the call screen is displayed if the Computer audio mode is enabled.
• there is no ringing tone, but the call screen is displayed if the Deskphone mode is enabled.
• If you answer an incoming call when you are already on an active call, the active call is put on hold.
• If you decline a call, the call is routed to the voicemail system associated with your desk phone
depending on how the application is configured in the MiVoice Office PBX for your Mitel CloudLink
account.
Options for Handling a Second Incoming Call
When you are on a call and you receive a second call:
•
Accept the second call and place the first call on hold, by clicking the icon.
•
Decline the second call and stay on the first call, by clicking the icon.
Options for Handling a Third Incoming Call
When you are on two calls and you receive a third call:
•
Accept the third call and place the first and the second call on hold, by clicking the icon.
•
Decline the third call and stay on the second call, by clicking the icon.
51 User Guide

Phone
Options for Managing Multiple Calls
When you have multiple calls connected at the same time, you have the following options on the active
call:
• Mute — Prevents the other party from hearing your voice and any background noise.
• Keypad — Enter a phone number using the dialpad.
• Hold — Place the caller on hold.
• Add call — Add a new call to the ongoing call.
• Transfer — Transfer an active call to one of your contacts or another phone number (Blind Transfer).
•
End call — Click the icon to end the call.
The following is the expected call behavior when a user is active in both Mitel One web application and
Mitel One mobile application simultaneously.
• While on an active call in the web application, the user can place or engage in another call on the
mobile application. The cloud call history will track both calls correctly.
• When there are two calls on the web application (an on-hold call and an active call), the user can place
or engage in another call on the mobile application. The cloud call history will track all the calls correctly.
• When there are two calls on the web application (an on-hold call and an active call), the user can have
two calls (an on-hold call and an active call) on the mobile application. The cloud call history will track all
the calls correctly.
• The web application handling of two or more calls is different from that of the mobile application. The
mobile application UI presents one call screen at a time, which is the active call. The web application
displays a separate call screen for each call.
User Guide 52

Phone
• The call information and options presented on the web application call screens will be the same as
those presented on the mobile application call screens except that the mobile application call screen
shows an on-hold call with an option for swap call because the mobile application always shows only
one call screen. In the web application, there is a call screen for each call; therefore, the call screen UI
does not show an on-hold call or provide an option for call swap because the call screen for the other
call is displayed and can be directly accessed.
4.4.1 Conference Calls
The Mitel One web application supports three-person conference calls. You can talk to two persons at the
same time by starting a conference call between them.
Note:
• A conference call in Mitel One is limited to 3 participants.
• During a conference call, the participants in the call can either only mute or end a call. All other
options are disabled.
• During a conference call, if one of the participants drops, the remaining two participants can
continue the call as a regular call with all the basic call features.
• The call screen of each participant in a conference call will display the name (if provided) or
number of the other two participants in the call.
You can convert an ongoing call into a conference call by following these steps:
1.
During an ongoing call, click the Add Call icon ( ) in the call screen of the application.
53 User Guide

Phone
2. The ongoing call is placed on hold, and the Add call screen opens where you can select the contact
you want to call by doing one of the following:
• In the Search field, type the name of the contact. The Search field displays a list of contacts whose
names match the letters that you type. Click the name to select that contact.
• In the Search field, enter the number of the contact and press ENTER to select that number.
3. After selecting the contact, click CALL to place a call to the selected contact. Clicking CANCEL cancels
the operation and returns you to the call screen.
User Guide 54

Phone
4.
After the contact answers the call, click the Merge Call icon ( ).
The calls are merged into a conference call involving these contacts.
55 User Guide

Phone
4.5 Transfer a Call
The Call Transfer feature in the Mitel One web application allows you to redirect an ongoing call from your
computer to another number. When the transfer is successful, you are disconnected from the call and the
call to the redirected number becomes the active call. Either person on a call can transfer the call. Mitel
One web application supports two types of call transfers: Blind Transfer and Supervised Transfer.
Blind Transfer
In Blind Transfer, you can transfer an ongoing call immediately without waiting for a response from the
contact to whom you want to transfer the call.
To Blind Transfer a call:
1.
During the ongoing call, click the Transfer icon ( ) in the call screen of the application.
2. The Transfer screen opens, where you can select the contact to whom you want to transfer the call by
doing one of the following:
• In the Search field, type the name of the contact. The search field displays a list of contacts whose
names match the letters that you type. Click the name to select that contact.
• In the Search field, enter the number of the contact and press ENTER to select that number.
User Guide 56

Phone
3. After selecting the contact, click TRANSFER to transfer the call to the contact. Click CANCEL to cancel
the transfer and to return to the call screen.
4. This completes the Blind Transfer. The call ends for you and the contact at the other end is placed on
the transferred call. Click OK! to close the call screen.
Supervised Transfer
Supervised Transfer allows you to transfer an ongoing call after consulting with the contact to whom you
want to transfer the call. You will remain on the ongoing call until you transfer the call.
To transfer an ongoing call through Supervised Transfer:
57 User Guide

Phone
1.
Call the contact to whom you want to transfer the call by clicking the Add call icon ( ) on the Mitel
One web application call screen.
2. The active call is placed on hold and the Add call screen opens where you can select the contact you
want to call by doing one of the following:
• In the Search field, type the name of the contact. The search field displays a list of contacts whose
names match the letters that you type. Click the name to select that contact.
• In the Search field, enter the number of the contact and press ENTER to select that number.
3.
After selecting the contact, click the icon to place a call to the contact. Click CANCEL to
cancel the call and return to the call screen.
4. If the contact to whom you want to transfer the call agrees to accept the call being transferred, click the
Transfer to held icon ( ) to transfer the call. This ends the call for you and the contact who is at
User Guide 58
Phone
the other end on hold is placed in a call with the contact to whom you transferred the call. Click OK! to
close the call screen.
For details on call history records for a transferred call, see Call History records for a transferred call on
page 62.
Consolidated Directory Contact Transfer
When you want to transfer a call to a consolidated directory contact, perform the following steps:
1. During the ongoing call, search for the contact that you want to transfer the call.
2.
Click the call icon associated with the contact.
3. The call is placed, and the original call will be put on hold. When the call is answered, the call screen
will have the Transfer To Held Call. Click the Transfer To Held Call icon.
59 User Guide

Phone
The transfer will be completed.
4.6 Call History
The call history screen of the Mitel One web application enables you to view all outgoing, incoming, missed
calls, and voicemails, place a call, start a message or a meeting with any individual or group contacts in the
call history, and delete a call history item.
Call history is synchronized with the consolidated directory contacts configured through the PBX (OIP/AD/
Public and Private Phonebook). If the application is synchronized with the Office 365 account of a user, the
call history screen will display the user's name and details from the personal contacts in Office 365.
The call history is stored in the Mitel CloudLink Platform. Therefore:
• you can access the call history from any Mitel One application (web, desktop, or mobile).
• when you delete the Mitel One web application, the call history is not deleted. When you reinstall the
application, and log in, the call history is synced and displayed in the application.
• call history displays last 40 calls including missed, incoming, and voice calls.
User Guide 60

Phone
Note:
• After a user leaves a conference, the call history in the application displays an incoming call entry
from each participant in the conference and also an outgoing call entry to the conference bridge.
• When the application is synchronized with the Office 365 account of a user, the call history screen
will display the name and details of the personal contact when the user calls or receives a call from
a personal contact by using the application. However, when the application and the Office 365
account are not synchronized, the call history screen will display the details from the consolidated
directory contacts.
• Declined incoming calls are displayed as missed calls in the call history of the application while
the call history in the MiVO400 deskphone associated with your account displays such calls as
answered calls.
• If a Mitel One user enters a function code (for example, *74#), a call history log is created only if
the function code action results in a call connection with another user endpoint. For example, if
the user enters a function code to call into the voice mail system, no call history log is recorded.
However, if the user makes an announcement call to another user (for example, *7998+call
number), it is recorded in the call history as a call to that user.
• After a user who placed a group call ends the call, the Call History in Mitel One Web Application for
that user may display an outgoing call entry to the group and to the member who has answered the
group call.
Access Call History
To access your call history, click the Phone icon ( ) from the navigation menu of the application.
The Phone menu opens displaying your recent call history in the left side of the screen. You can do the
following from the Call History screen.
• View all calls placed, received, and missed, by clicking All Calls.
• View only incoming calls not answered, by clicking Missed Calls.
• View all voicemails by clicking Voicemails.
61 User Guide

Phone
Note:
• The application does not display the number of unread voicemails the user has. Every time a
user receives a voicemail, it displays:
•
an indicator along with the Voicemails tab ( ) in the Phone menu.
•
an indicator along with the Phone icon ( ) in the navigation menu of the application.
• In case of MiVoice Office 400 PBX deployments, for the voicemail feature to work, the CloudLink
Gateway must be running version 1269 or later. Contact your CloudLink administrator for more
details.
• Place a call to a contact in the Call history, by hovering over the contact and clicking the phone icon
( ).
• Start a messaging session with a contact in the Call History, by hovering over the contact and clicking
the messages icon ( ).
•
Start a meeting with a contact in the Call History, by clicking the contact and then clicking the
icon from the screen that appears.
• Hide a Call History item by clicking the item, and then clicking Hide activity from the contact profile
screen that appears.
•
Delete a Call History item by hovering over that item and clicking the delete icon ( ).
•
Report an issue by clicking the icon. The Submit and issue form is displayed with auto
populated Call ID to track the call in the logs.
Call History records for a transferred call
• Blind Transfer:
• After a Blind Transfer is complete, the application call history records of the users involved in the
Blind Transfer will display the following call logs:
• The call log of the user who initiated the call will show two outgoing calls to the user who
performed the Blind Transfer.
• The call log of the user who performed the Blind Transfer will show an incoming call from the user
who initiated the call.
User Guide 62

Phone
Note:
If the Blind Transfer was performed using the deskphone associated with the account, the
application call history records will show an incoming call from the user who initiated the call
and an outgoing call to the user to whom the call was transferred.
• The call log of the user to whom the Blind Transfer was made will show an incoming call from the
user who initiated the call, and an incoming call from the user who performed the Blind Transfer.
• If a Blind transferred call is not answered by the user and is redirected back, the application call
history records of the users involved in the Blind Transfer will display the following call logs:
• The call log of the user who initiated the call will show two outgoing calls to the user who
performed the Blind Transfer.
Note:
If the Blind Transfer is performed using a MiVO400 terminal, the call log of the user who
initiated the call will show an outgoing call each; to the user who performed the Blind
Transfer, and to the user to whom the Blind Transfer was made.
• The call log of the user who performed the Blind Transfer will show an incoming call from the user
who initiated the call.
• The call log of the user to whom the Blind Transfer was made will show a missed call from the
user who initiated the call, and an incoming call from the user who performed the Blind Transfer.
• Supervised Transfer: During a Supervised Transfer, the call history of both, the contact that first
received the call and the contact to whom the Supervised Transfer was made will display the number
from which the first call was made as the incoming call number.
4.7 Manage Calls using Deskphone
Mitel One web application allows you to control the call features on the MiVoice Office 400 desk phone
associated with your account from the call screen of the application. You can place, answer, hold, retrieve,
transfer, or end a call in the desk phone from the application call screen.
63 User Guide

Phone
Note:
• The device type determines which call features are available. Consult the CSTA features available
on the terminal within the MiVoice Office 400 Feature Overview Table available on Documentation
Center. Third party certified devices are not supported for the Deskphone feature.
• By default, for all call-related features, the application uses the SIP softphone embedded in the
application.
To enable Deskphone to handle calls on the Mitel One web application, perform either of the following
procedures:
• From Avatar
1.
Click the desktop icon ( ). The SELECT options are displayed.
2. From the options displayed, select Deskphone.
After you have successfully enabled deskphone to handle calls, the desktop icon ( ) will be
displayed.
User Guide 64

Phone
• From Settings:
1. Click your avatar, and from the drop-down panel, click Settings and preferences. The Settings
panel opens.
2. Click the Phone tab. The Call answering rules panel is displayed.
3. Click the All phone calls use option, and select Deskphone from the drop-down menu that
appears.
The application will restart, after which, the new configuration becomes active. All your calls will now be
routed to your desk phone.
When you enable the Deskphone setting in the Call answering rules panel, the
icon appears in the Keypad, and in the call screen during a call, to indicate that
the call is being routed through the desk phone
To switch back to the softphone, follow the steps 1 and 2 described above, and click Computer audio from
the All phone calls use drop-down menu.
Note:
• The Deskphone setting will be disabled when you log out of the application. Therefore, you must
enable this setting each time you log in to the application to allow the application to control the call
features on your desk phone.
• The Free Seating feature is supported on Mitel One Web.
If the Deskphone setting is enabled, then after logging out of the desk phone, the user will not be
able to use the call features of the application and will not receive incoming call notifications. To
continue using these features and to receive call notifications, the user must either log in to the
desk phone or enable the All phone calls use Computer audio setting in the application.
65 User Guide

Phone
Limitations
If the Deskphone setting is enabled:
• You cannot use the Mute / Unmute button from the application. You can mute or unmute a call from the
desk phone keypad.
• The application does not support conference calls made using the desk phone.
• You cannot make a group call.
4.8 Click to Dial Using Mitel One Web Application
The Click to Dial feature of the Mitel One web application allows you to dial numbers available in your
browser. You can call the phone number of your contacts or any other phone number available in websites,
documents, and calendar invitations.
Note:
The Click to Dial feature is not supported on Apple Safari web browser.
Pre-requisites
You must set the following prerequisites before you can use this feature:
1. Set your preferred browser as the default calling app (TEL URI) in your device.
Note:
If you want the Mitel One Progressive Web Application (PWA) to be used to place a call when you
use the Click to Dial feature, you must set Google Chrome or Microsoft Edge as the default calling
app. This is because PWA is supported only on these browsers.
The option to change the default app for calling is specific to the operating system in which you have
deployed the extension. Click the following links for instructions on changing the default calling app
specific to your operating system.
• Windows
• Mac OS
Restart your browser for the new configuration to become active.
User Guide 66

Phone
2. You must grant permission for the application to be the default handler to place calls to all the
telephonic links in your browser. To do this, perform the following steps:
a.
In the address bar of your browser, click the icon. In the Allow one.mitel.io to open all tel
links? prompt dialog box that opens, select the Allow option and click Done. If you choose to Deny
or Ignore this prompt, you will not be able to use the Click to Dial feature.
b. In the Allow one.mitel.io to open all web+mowa links? prompt dialog box that opens, select the
Allow option and click Done. If you choose to Deny or Ignore this prompt, you will not be able to
use the Click to Dial feature.
67 User Guide

Phone
Note:
Refresh your browser if the browser does not present this prompt message.
You can now use the Click to Dial feature to call the phone numbers in your browser.
To change the handler permission settings, follow instructions specific to your browser.
• Google Chrome: Menu > Settings > Privacy and security > Site settings > Additional
permissions > Protocol handlers
• Microsoft Edge: Menu > Settings > Cookies and site permissions > Site permissions >
Protocol handlers
• Mozilla Firefox: Menu > Options > General > Applications
User Guide 68

Phone
Note:
If any user is previously registered with any other tel URI handler (For example, http://
office.mitel.io/) in their browser, they will need to remove the old handler, log out and then log in
again to the application, and click Allow in the Allow one.mitel.io to open all tel links? prompt
dialog box.
If Click to Dial still does not work on the application, then the user will need to remove
one.mitel.io from the Protocol handlers section in the Google Chrome settings, refresh the
application, and click Allow in the Allow one.mitel.io to open all tel links? prompt dialog box.
3. You must allow the application to display notifications. For more information, see Permissions and
Notifications on page 10.
4. You must turn off or disable all other Tel: URI features in the browser.
Supported Phone Number Formats
The following table lists the phone number formats supported with the Click to Dial feature in the
application.
Format Examples
Phone number in INTERNATIONAL format +1 213 373 4253
Phone number in E.164 format +12133734253
Phone number in RFC3966 format tel:+12133734253;ext=123
US Phone number in NATIONAL format (213) 373-4253
Phone numbers in NATIONAL format is not supported for countries other than the US.
69 User Guide

Phone
Using the Click to Dial feature
This section describes how to use the Click to Dial feature in the application.
1. From the phone numbers available in websites, documents, or calendar invitations click the phone
number to which you want to place a call.
Alternately, type tel:xxxxxxxx (phone number) in the address bar of your browser and press ENTER to
dial the telephone number.
Note:
When you dial a number, a country code is added to it as a prefix by default. The country code
depends on the default language set in your browser. For example: If the default language of your
browser is set to English (United States), when you dial 345xxxxxxx, the country code of UK (+1)
will automatically be added to the number and the application will dial +1345xxxxxxx.
User Guide 70

Phone
2. A confirmatory prompt Make call to xxxxx (phone number) is displayed. Click the prompt to launch the
call.
For Mac OS
For Windows OS
71 User Guide

3. The call is placed to the phone number using one of the following options depending upon the Call
using settings enabled in your application.
• If Call using is set to Computer audio, the PWA, if installed opens, and if the PWA is not installed,
the web application opens in a new tab in your browser and places the call.
• If the Call using is set to Deskphone, the call will be placed using your deskphone.
An in-call window is displayed with the caller's name (if available), telephone number, and picture (if
available).

Messages
5
This chapter contains the following sections:
• Message Features
• Start a Messaging Session
• Respond to a Message
• Streams
The Messages feature in the Mitel One web application allows you to connect in real time to any other Mitel
One contact or group of contacts. The topics listed will help you learn how to best utilize the messages feature
provided by the application.
5.1 Message Features
Individual and Group Messages
The message feature in the Mitel One web application allows you to start and respond to individual and
group conversations to communicate with others. After a message is initiated, participants cannot be
removed from or added to the conversation. To add others to a conversation, create a new message and
add all of the contacts you want to message to. There is no limit to the number of contacts that can be
added to a new group message.
Message History
The Messages screen displays all existing conversations on the left-half of the screen and the selected
conversation thread on the right-half of the screen. The conversations are listed in alphabetical order
of senders' names. The Streams list displays the list of Streams you are added to whereas the Direct
User Guide 73

Messages
Messages list displays a list of the individual and group contacts with whom you have interacted via a
message.
Selecting a Stream or a direct message in the list opens the messaging window for that Stream, or the
individual or group contact, displaying messages from previous conversations including the time of day and
a top banner with the date for each message.
When viewing a Stream, the name of the Stream and the number of members in the Stream are
displayed at the top of the messaging window. When viewing a group message, the names of the first
few participants are displayed at the top of the messaging window. To view the list of all participants for
a Stream or a group message, click the icon, and from the Information panel that opens, click
Members.
In the Streams list, the messages history shows all Streams of which you are a participant. However, in
the Direct Messages list, the messages history shows only the recent 10 messages. Earlier messages are
auto hidden every 96 hours after the last message was sent to or received. The message will reappear if
you receive another message from the participant of that conversation. A user can also access a hidden
message by initiating a direct message with the contact.
Message Typing Indications
During an individual or group message, when a participant begins typing, the application provides a visual
indication ( ) to the other participants that this person is typing. This indication appears every
10 seconds while the typing continues. If typing is stopped for more than 10 seconds, the indication no
longer appears. Also, if the chat screen is open the application provides a visual indication below the Type
a message... field to the other participants that this person is typing. When a participant, while typing
one message clicks away to another message without sending the first one, the message avatar of the
intended recipient of the unsent changes to icon.
Read Receipts
The read receipts in the application indicate who has read your message in real-time. A miniature version
of the contacts' avatar is displayed right below a message and the icon associated with the contact
name indicates that they have read the message. Hover over the mini avatar to see the contacts' name. If
the icon is displayed, it indicates that the message is delivered but not read by the recipient.
Browse a Message
To browse and access a message, do the following:
User Guide 74
Messages
1.
Click the Messages icon ( ) in the navigation menu of the application. The Messages screen opens.
2. Access the Browse DMs option by doing either of the following:
•
Click the icon in the Direct messages section. A panel opens displaying the Browse DMs
option.
•
Hover over a message, and click the More icon ( ). A panel opens displaying the Browse
DMs option.
3. Click Browse DMs.
4. The All Direct Messages panel opens displaying a list of all the existing messages in the chronological
order.
5. Click the message you want to access. You can also search for the message you want to access by
typing the name of the contact in the Search for a Message field. The search field displays a list of
messages (direct and group) for which the contact is a part of, that match the letters you type. Click the
message you want to join.
Start a Meeting while Messaging
You can start a meeting with a contact or a group during a message conversation by clicking the meeting
icon ( ) in the top-right corner of the message screen. The meeting pop-up window opens, and a new
meeting session is created with the contacts. A Join now action card is displayed in the message for the
contacts to join the meeting.
75 User Guide

Messages
Place a Call while Messaging
During an message conversation, click the phone icon ( ) at the top-right of the messages screen to
call that person.
When you are in a group message, there is no option to call the group. However, you can create a group
on the FAVORITES widget to include multiple contacts and then call that group. To learn how to create a
group, see Manage User Groups on page 180.
Information Panel
The Information panel in the Messages screen displays the following information.
• For Streams
The Information panel in a Stream displays Stream start date, name of the contact who started the
Stream, the members in the Stream, the files shared in the Stream, the option to enable or disable
notifications for the Stream, the option to invite contacts to the stream, the option to leave the stream,
and the option to edit the details of the Stream.
• To view the participants involved in the Stream, click the Members option. To add more contacts to
the Stream from the Members panel, click ADD PEOPLE .
• To view the files shared in the Stream, click the Files option. For more information about how to
manage the files, see Manage Files on page 85.
• To enable or disable notifications for the stream, click the Notification settings option and click
ENABLE or DISABLE respectively.
User Guide 76

Messages
Note:
You can enable notifications for 10 Streams only.
• To leave a Stream, click LEAVE STREAM.
•
To edit the details of a Stream, click the icon.
For more information, see Manage Streams in Streams on page 92.
• For Direct Messages
The Information panel in a Direct Message displays the information of the contacts (name, extension
number, email address, and avatar) with whom you are messaging, the members involved in the
message, the files shared in the message, the option to mute or unmute the notification for the
message, and the option to hide the message.
• To view the participants involved in the message, click the Members option.
• To view the files shared with the contact or the group, click the Files option. For more information
about how to manage the files, see Manage Files on page 85.
• To mute or unmute the notifications for a message, click the Notifications settings option and
follow the steps mentioned in Mute or Unmute Message Notifications on page 78.
• To hide the message, click HIDE DIRECT MESSAGE.
77 User Guide

Messages
Mute or Unmute Message Notifications
Mitel One allows users to mute or unmute specific conversations to stop getting notifications for messages
they receive in these conversation threads.
Note:
• You can mute notifications for a maximum of 10 conversations threads.
•
If an individual or group message is muted, the icon appears beside the display names of the
contact involved in the message.
To mute the notifications for a conversation for a specific period of time:
1.
Click the conversation, and from the message screen that appears, click the icon. The
Information panel opens.
2. Click the Notification settings option.
User Guide 78

Messages
3. Click the Mute drop-down list and select for how long you want to mute the notifications from the
options Mute for one hour, Mute for one day, and Always.
A confirmation message is displayed.
4. Click GOT IT to accept the changes and close the panel. Clicking UNMUTE NOW cancels the
operation.
The Notifications Settings panel will display the updated changes as shown in the following screenshot.
79 User Guide

Messages
To mute the notifications for a conversation all the time:
1.
Hover over the conversation, and click the More icon ( ). A panel opens.
2. Click Mute notifications .
The notifications for the conversation will be muted all the time.
To unmute notifications for a conversation:
1.
Click the conversation, and from the message screen that appears, click the icon. The
Information panel opens.
2. Click the Notification settings option.
3. Click Unmute.
Alternately, hover over the conversation, and click the More icon ( ). From the panel that opens, click
Unmute notifications.
Hide a Message
You can hide a specific conversation displayed in the Direct Messages list in the application. To hide a
conversation, do either of the following:
•
Hover over that conversation, and click the More icon ( ). From the panel that opens, click Hide
Direct message.
•
Click that conversation, and from the message screen that appears, click the icon. The
Information panel opens. Click Hide direct message.
The conversation will reappear if you receive another message from the participant of that conversation.
User Guide 80

Messages
Note:
In the current release of the Mitel One web application, a conversation cannot be deleted.
Edit or Delete a Message
Registered Mitel One users can edit the messages that they have sent. They can also delete the files, and
the media that they have sent.
Note:
• This option will be displayed only if a Mitel Partner or the Account Administrator of your CloudLink
account has selected the Allow editing and deleting of messages check box under Chat
integration for your account in the Mitel Administration. For more information, contact your Account
Administrator or see the section Allow Users to Edit or Delete Chat Messages in CloudLink
Applications.
• Only text messages can be edited.
To edit a message, do the following:
1.
Hover over the message you want to edit and click the More icon ( ).
2. From the dialog box that opens, click Edit message.
81 User Guide

Messages
3. In the text box that opens, edit the message.
4. Click UPDATE MESSAGE. The original message will be replaced with the edited message and will be
marked as (Edited). Clicking CANCEL cancels the operation.
To delete a sent message, do the following:
1.
Hover over the message you want to delete and click the More icon ( ).
2. From the dialog box that opens, click Delete message.
A confirmation message is displayed.
User Guide 82

Messages
3. Click DELETE MESSAGE. Clicking CANCEL cancels the operation.
The message is deleted permanently.
To delete sent messages in bulk, do the following:
1.
Hover over any message you want to delete and click the More icon ( ).
2. From the dialog box that opens, click Select Messages.
83 User Guide

Messages
3. Select the messages you want to delete, and click DELETE MESSAGE.
A confirmation message is displayed.
4. Click DELETE MESSAGE and close the panel. Clicking CANCEL cancels the operation.
The selected messages are deleted permanently.
Mark a Message as Unread
Mitel One allows a user to mark a specific read message as unread so that you can flag the conversation
for follow-up. To mark a message as unread:
1.
Hover over the message, and click the More icon ( ). A panel opens.
User Guide 84

Messages
2. Click Mark as unread.
The contact’s name appears in bold letters, and a red dot appears to the right of the contact’s name
marking the message as unread.
Manage Files
Mitel One allows users to preview, download, and delete the files shared in a Stream or a chat
conversation.
Note:
You can preview only file types that are in PDF or Image format.
To manage files from the Information panel of a Stream or a conversation:
1.
Click the Stream or the conversation, and from the message screen that appears, click the icon.
The Information panel opens.
85 User Guide

Messages
2. Click the Files option.
3. Hover over the file, and
•
click the Download icon ( ) to download the file
•
click the Preview icon ( ) to preview the file
•
click the More icon ( ), and then click Delete message to delete the file.
Alternately, to manage the files shared in a Stream or a conversation, click the Stream or the conversation,
and from the message screen that appears, hover over the file, and
• click Click to download to download the file
•
click the Preview icon ( ) to preview the file
•
click the More icon ( ), and then click Delete message to delete the file.
Sort Messages
You can sort the Streams list or the Direct Messages list alphabetically, or based on the recent activity in
a conversation. To do this:
User Guide 86
Messages
1.
Hover over the message, and click the More icon ( ). A panel opens.
2. Click Sort, and then click Alphabetically or Recent Activity to specify your preference.
The Streams list or the Direct Messages list will be sorted based on your choice.
Customize the Sidebar
You can customize the sidebar in the Messages menu to choose which option you want to appear at the
top, Streams or Direct Messages. To do this:
1.
Hover over the message, and click the More icon ( ). A panel opens.
2. Click Customize Sidebar. Drag the option you want to appear on top and click SAVE. Clicking
CANCEL will discard the changes.
5.2 Start a Messaging Session
To start a messaging session:
1.
Click the Messages icon ( ) from the navigation menu of the Mitel One web application.
2. In the Messages menu that opens, do one of the following:
• To continue with a previous message, click the message from the list of messages displayed on the
screen.
• To start a new individual or group message:
a. Do either of the following:
•
Click the icon, and click Direct message.
•
Click the icon in the Direct messages section.
The Start a conversation panel opens.
b. In the Search to add users field, type the name of the contact you want included in the
message. The Search field displays a list of contacts whose names match the letters that you
type. Click a name to add that contact.
87 User Guide

Messages
Note:
If you add more than one contact, it becomes a group message.
c. Click CREATE.
You can also choose to start an individual message or continue with a previous message with a contact
by doing one of the following:
•
Hover over a contact in the Home screen (in the FAVORITES section) and click the icon.
• In the Home screen, click the message from a contact in the Messages section to continue with the
message.
•
Hover over a contact in the Contacts menu and click the icon.
•
Hover over a contact in the Phone menu and click the icon.
Clicking the icon creates a new message or continues with the previous message and opens the
messaging window.
User Guide 88

Messages
3. Start messaging using the following options:
• Send a text message
a. Type the message in the text area. You can also copy and paste a message from existing
messages.
b.
Click or press ENTER.
• Send a voice message
a.
Click the Click to record icon ( ) in the text area. This enables the microphone and starts
recording the audio.
b.
Once finished, click the Click to stop recording icon ( ) to end the recording.
c.
Click to send the audio file within the message or click the Delete icon ( ) to delete the
recorded audio file. To listen to the audio file, click the Play audio file icon ( ).
• Send your location
a.
Click the Send your location icon ( ) in the text area.
Note:
To send your location, you must give permission for the application to access your location. For
more information, see Permissions and Notifications on page 10.
• Send a file
a.
Click the Send file icon ( ) in the text area.
b. Select the file or image you want to send, and click Open. The selected file is added in the text
area. Click or press Enter to send the file. If you do not want to send the file, you can
remove it from the text area by clicking the icon associated with the file.
89 User Guide

Messages
Note:
The maximum file size for an in-session file sharing is approximately 10 MB.
• Send an image
You can send an image while messaging by either of the following methods:
•
Using the Send file icon :
a.
Click the Send file icon ( ) in the text area.
b. Select the image you want to send, and click Open. The selected image is added to the text
area. Click or press Enter to send the image. If you do not want to send the image, you
can remove it from the text area by clicking the icon associated with the image.
• By copying and pasting the image directly from your web browser:
a. From your browser, copy the image you want to send using the Copy image option.
b. In the text area of your application, right-click and select the Paste option or press CTRL + V
on your keyboard. The selected image is added to the text area. Press ENTER to send the
image. To remove the image before sending, click the icon associated with the image.
Note:
The maximum file size for an in-session image sharing is approximately 10 MB.
• Send an emoji
a.
Click the emoji icon ( ) in the text area.
b. Select the emoji you want to send from the emoji gallery.
c.
Once you have inserted the emoji in the text area, click or press ENTER to send the emoji.
User Guide 90

Messages
Note:
After a messaging session starts, additional participants cannot be added. Additionally, after a group
messaging session starts, participants in the conversation cannot leave the group. When you need
to change the participants in a group message, create a new message to add all of the contacts you
want to message to. There is no limit to the number of contacts that can be added to a new group
message.
5.3 Respond to a Message
Incoming messages generate different on-screen notifications depending on the following scenarios for
your Mitel One web application.
• When your application is open and accessible, the number of unread messages is displayed along with
the Messages icon ( ) in the navigation menu of the application. However, there is no message
notification audio or notification banner.
• When your application is running in the background (open, but not visible), a message notification
audio is played and a banner appears on the screen. Click the notification banner to go directly to the
message screen for the individual or group who sent the message.
• When your computer is locked, a message notification audio is played and a banner appears on the
screen. Click the notification banner to go directly to the message screen for the individual or group who
sent the message.
• If you are a Mitel One web application user and have installed the Progressive Web Application (PWA),
you will receive messages and message notifications even if the application on your computer is not
running (closed). If you are a Mitel One web application user, but have not installed the PWA, you will
need to log in to the web application via the browser to receive messages and message notifications.
Note:
To receive native message notifications in your PC or Mac, you must enable permission for the
browser or the PWA to send notification to your PC or Mac. This is done from the Control panel/
Settings menu of your operating system. For more information, see Permissions and Notifications on
page 10.
If you have unread messages, the application displays the following:
• In the navigation menu of the application, the number of unread messages is displayed along with the
Messages icon ( ).
• The Messages widget in the Home screen of the application displays the latest message from a contact
with the sender's name in bold letters to indicate that the message is unread.
To respond to messages:
91 User Guide

Messages
1.
Click the Messages icon ( ) in the navigation menu of the application. The Messages screen opens.
2. Click the message you want to respond to. The messaging window opens.
3. In the text area, type a response. You can react (send emojis) or reply to instant messages. To react
to an instant message, from a conversation window, hover over the message and select emojis or the
reply option.
• To react to a specific message:
a. Hover over the message. The available reactions are displayed.
b. Click any reaction to select it.
• To reply to a specific message:
a.
Hover over the message you received, and click the Reply icon ( ).
b. This will quote the message, and you can reply by typing the message in the text area.
c.
Click or press ENTER to send the reply.
5.4 Streams
A Stream is a collaboration space designed to enable collaboration between teams, projects, and topics.
In a Stream, you can add several members, message to those members, and share images among them.
You can add new members to an existing Stream and these members can view the previous conversation
history inside the Stream.
Create Stream
To create a Stream:
1.
Click the Messages icon ( ) in the navigation menu of the application. The Messages screen opens.
User Guide 92

Messages
2. Do either of the following:
•
Click the icon, and then click Stream.
•
Click the icon in the Streams section, and then click Create Stream.
The Start a Stream panel opens.
3. You can create a public or a private Stream.
• Public Stream
A public Stream is a collaboration space in which any Mitel One user can join any Stream that is
displayed in the Streams search results list. To create a public Stream, do the following:
a. In the Stream name field, enter a name for the stream. If a Stream with the name you entered
already exists, an error message A stream with this name already exists is displayed.
b. Choose a different name and provide a description about what the Stream is about in the
Description field. Click CREATE. A messaging window opens displaying the Stream name. The
Stream will be displayed in your Streams list.
• Private Stream
A private Stream is a collaboration space, to join which, users must be invited. To create a private
Stream, do the following:
93 User Guide

Messages
Note:
A private Stream is displayed in the Streams search results list of only those users who have
joined that Stream.
a. In the Start name field, enter a name for the Stream. If a Stream with the name you entered
already exists, an error message A stream with this name already exists is displayed.
b. Choose a different name, and describe what the Stream is about in the Description field. To set
the Stream as private, slide the Make Stream private toggle button to the right.
c. Click CREATE. A messaging window opens displaying the Stream name. The Stream will be
displayed in your Streams list.
Browse Streams
To browse and join a public Stream, do the following:
1.
Click the Messages icon ( ) in the navigation menu of the application. The Messages screen opens.
User Guide 94

Messages
2.
Click the icon in the Streams section, and from the panel that opens, click Browse Streams. A
panel opens displaying a list of public Streams.
3.
Hover the Stream you want to join and click . Alternately, click the Stream you want to
join and click the Join option.
You can also search for the Stream you want to join by typing the name of that Stream in the Search
for a Stream field. The search field displays a list of Streams that match the letters you type. Click the
Stream you want to join and click the Join option. To create a new Stream, click Create Stream on page
92.
Manage Streams
You can edit the name and description of a Stream; invite members to a Stream; view the existing
members, and files in a Stream; view and manage the notification settings of a Stream; or leave a Stream
by performing the following steps.
1.
Click the Messages icon ( ) in the navigation menu of the application. The Messages screen opens.
2. From the Streams section click the Stream you want to manage.
95 User Guide

Messages
3.
Click the icon at the top-right corner. The Information panel opens.
User Guide 96

4. • To edit the name and description of a Stream:
a.
Click the icon. The Edit Stream Details panel opens.
b. Edit the name and description of the Stream, and slide the Make Stream private toggle button to
the right to make the Stream private.
c. Click SAVE to save the changes.
• To view the members in a Stream, click Members. All members currently in the Stream are
displayed in a drop-down list.
• To invite members to a Stream:
a. Click Members, and then click ADD PEOPLE. The Invite members to the Stream panel opens.
b. In the Search to add users field, type the name of all the contacts you want included in the
conversation. The search field displays a list of contacts whose names and email addresses
match the letters that you type. Click the name to add that contact.
c. Click ADD. The selected contacts are added as members to the Stream.
• To view and download the files shared in a Stream:
a. Click Files. The drop-down displays all the files currently shared in the Stream.
b.
Click the icon associated with a file to download that file.
• To view the notification settings for a Stream:
a. Click Notification settings . The panel displays the option to enable or disable the notifications
for the Stream.
b. Click OPT-IN to enable the notification and OPT-OUT to disable the notification.
• To leave a Stream:
a. Click Leave Stream.
The Stream will be automatically removed from the Streams list until the participant is re-invited.
Start a meeting in a Stream
You can start a meeting with all your contacts in the Stream by clicking the meeting icon ( ) at
the top-right corner of the messaging window. The meeting pop-up window opens, and a new meeting
session is created with the contacts in the Stream. AJoin now action card is displayed in the Stream for
the contacts to join the meeting.

Meetings
6
This chapter contains the following sections:
• Meetings Menu
• Manage Meetings Settings
• Types of Users
• Start an Ad Hoc Meeting
• Scheduling a Meeting
• Search a Meeting
• Invite-only Meeting
• Join a Meeting
• Delete or Leave a Meeting
• Edit or Delete a Message
• Meeting Controls
• Screen Sharing
• Recording a Meeting
• Huddle Room for Mitel One Meetings
• Blur Your Background
• Reduce Background Noise During a Meeting
• Smart Video in Mitel One Meetings
• Integrating Office 365 Calendar with Mitel One Meetings
• Meetings Add-In (Web and Desktop)
• Frequently Asked Questions
Meetings is a multi-party video solution that offers seamless transitions between voice, video, and chat
capabilities for a complete collaboration experience. It enables users to access features such as:
• Collaborate: Perform audio, video, and web sharing
• Chat: Hold chat sessions and receive chat notifications within a meeting
• File Sharing: Store and share files, and recordings
The topics listed will help you learn more about Mitel One Meetings.
6.1 Meetings Menu
User Guide 98

Meetings
Note:
The display and certain functionality (such as editing or deleting a meeting among others) of the Mitel
One Meetings UI depend on whether or not Office 365 calendar integration is enabled with Meetings.
The UI screenshots and the behavior described in this document are based on the default scenario
in which Office 365 calendar integration is not enabled with Meetings. For more information about the
UI changes and the app behaviour when Office 365 calendar is enabled, see Integrating Office 365
Calendar with Mitel One Meetings on page 148.
Meetings menu provides easy access to all Mitel One Meetings features and enables you to quickly
manage your meetings.
The left side of the menu is the Meetings section that lists all the meetings created and attended by you,
and those for which you have an invite. It also displays the MEET NOW button that allows you to start an
ad-hoc meeting, and the SCHEDULE button that allows you to schedule a meeting.
The right side of the menu is the meeting details page. When you click a meeting in the Meetings section,
the meetings details page displays the JOIN button; Edit a meeting title icon; Meeting Details; About;
Participants in the meeting; and Messages shared in the meeting.
Start an ad-hoc meeting
To start and join an ad-hoc meeting, click MEET NOW. For more information, see Start an Ad Hoc Meeting
on page 102.
Schedule a meeting
To schedule a meeting, click SCHEDULE. For more information, see Scheduling a Meeting on page 104.
99 User Guide

Meetings
Join a meeting
To join a meeting, click the JOIN button at the top right of the meeting details page of the meeting.
Edit a meeting title
To edit a meeting title, click the Edit icon ( ) at the top right of the meetings details page, and enter
the new meeting title. Click to save the changes or click to discard it.
Copy Invitation
Click Copy Invitation to copy the meeting URL and paste it elsewhere.
Meetings Details
Clicking the icon associated with Meetings Details maximises the pane and displays the meeting
URL, Meeting ID, and Dial in information. Click to copy the meeting URL to the clipboard. Click
Global call in numbers to view the list of dial-in numbers available to join the meeting.
About
The About tab displays the files shared in the meeting under the Files section, and the recordings made in
the meeting under the Recordings section. Hover over a file or recording and click click to download to
download the file or recording.
Participants
The Participants tab displays the meeting organizer and list of participants in the meeting.
Meeting organizers can use the INVITE option available to them in the Participants tab to invite
participants to a meeting.
Messages
The Messages tab displays all the previous chat messages sent during the meeting.
6.2 Manage Meetings Settings
You can personalize the general application settings, and the audio and video settings for Meetings from
the Mitel One Settings panel, or during an ongoing meeting. To personalize the settings:
User Guide 100

Meetings
1. Access the Meetings tab in the Settings panel by doing either of the following:
• Click your avatar from the top left corner of the Mitel One application. From the panel that appears,
click Settings and preferences. The Settings panel opens. Click the Meetings tab.
•
During an ongoing meeting, click the Settings icon ( ) from the control panel.
2. After accessing the Meetings tab, see Manage Mitel One Settings for more information about
personalizing your Meetings settings.
6.3 Types of Users
In Mitel One Meetings, there are two types of users: registered user, and guest user.
Registered User: A licensed Mitel One user.
Guest User: An unlicensed Mitel One user.
Mitel One users can join a meeting through the Mitel One application, PSTN dial-in, or both. An attendee
joining a meeting through the application, has access to video, voice, and screen share. Dialing in through
PSTN will allow an attendee to have a voice only meeting. An attendee can also choose to join a meeting
through the application to access only the video and screen share features and at the same time dial-in
through PSTN for audio. For better audio quality, make sure that your device mic and speaker is muted
when you dial-in via PSTN.
The following table shows the features available for each of the attendees.
Features Registered Attendees Guest Attendees PSTN Attendees
Create meeting Yes No No
Schedule meeting Yes No No
Leave meeting Yes Yes Yes
Edit meeting name Yes No No
Accept/Decline users Yes No No
Invite users Yes No No
Edit/Delete chat message Yes No No
Screen Share Yes Yes No
Chat Yes Yes No
Video Yes Yes No
Voice Yes Yes Yes
Desktop Client Yes No No
Web Client Yes Yes No
Meetings Home page Yes No No
Waiting Room No Yes No
101 User Guide

Meetings
Features Registered Attendees Guest Attendees PSTN Attendees
Preview Audio/Video Sett
ings
Yes Yes No
CAUTION:
Customers should exercise caution to prevent accidental disclosure of Meeting Access Codes. For
more information, see the latest version of Mitel One Security Guidelines.
6.4 Start an Ad Hoc Meeting
A registered user can create an ad hoc meeting by following these steps:
1. Click MEET NOW from the Meetings section.
2. A pop-up window opens displaying the default Meeting title, the meeting URL, the Dial in information,
and the Meeting ID. You can edit the title of the meeting in the Meeting title bar.
User Guide 102

Meetings
Note:
It is highly recommended that a meeting be given a unique humanly identifiable name that is easy
to remember for the participants. This will enable registered users to easily identify which meeting
space to use for their collaboration and facilitate meeting searches.
Click Copy to clipboard to copy the meeting details to the clipboard.
3. Ensure that all the information entered is correct and click Enter to start the meeting. Click Cancel to
cancel the meeting. If you edit the meetings title:
• click Save to save the updated meeting title.
• click Save and enter to start the meeting with the updated title.
After you start a meeting, you can invite both registered users and guest users as participants for a
meeting. To invite users to a meeting, click the Invite ( ) icon from the control panel. The Invite
Participants dialog box opens.
Note:
A meeting can have a maximum of 100 participants.
103 User Guide

Meetings
• To invite a registered user to a meeting
1. In the Search bar, type the name of the user you are searching for. The search field displays a list of
registered users whose names or email addresses match the letters that you type.
2. Click the name to invite the user as a participant to the meeting, and click Invite.
A meeting invite containing the URL of the meeting, and the dial-in numbers will be sent to the user’s
email address from [email protected]. Also, a messaging session will be created with the user in the
application, and a Join now action card is displayed in the message. The user can join the meeting
either by clicking the meeting URL or the Join now action card.
Note:
To receive an email for meeting invites, a registered user must select the Always send me an
email for meeting invites check box in the Meetings tab of the Settings panel. For details on how
to select this check box, see Manage Mitel One Settings.
• To invite a guest user to a meeting
1. In the Search bar, type the email address of the participant you want to invite to the meeting. Note
that you must type the exact email address of the participant you want to invite. The email address
you type appears in the search field.
2. Click the name to invite the user as a participant to the meeting, and click Invite.
A meeting invite will be sent to the user’s email address from [email protected]. The user can join the
meeting by clicking the meeting URL.
CAUTION:
Customers should exercise caution to prevent accidental disclosure of Meeting Access Codes. For
more information, see the latest version of Mitel One Security Guidelines.
6.5 Scheduling a Meeting
A registered user can schedule a meeting by following these steps:
User Guide 104

Meetings
1. From the Meetings section, click SCHEDULE.
The Schedule a meeting panel opens.
2. In the Meeting title bar, specify a title for the meeting.
105 User Guide
Meetings
Note:
It is highly recommended that a meeting be given a unique humanly identifiable name that is easy
to remember for the participants. This will enable registered users to easily identify which meeting
space to use for their collaboration and facilitate meeting searches.
3. Click Calendar and from the drop-down list, choose the calendar to which you want to add the meeting
invite.
4. Invite participants to the meeting. You can invite both registered users and guest users as participants
to a meeting.
Note:
A meeting can have a maximum of 100 participants.
• To invite a registered user to a meeting
a. In the Search bar, type the name of the user you are searching for. The search field displays a list
of registered users whose names or e-mail addresses match the letters that you type.
b. Click the name to invite the user as a participant to the meeting.
A meeting invite containing the URL of the meeting, and the dial-in numbers will be sent to the user’s
email address from [email protected]. Also, a messaging session will be created with the user in
the Mitel One application, and a Join now action card is displayed in the message. The user can
join the meeting by clicking either the meeting URL or the Join now action card.
Note:
To receive an email for meeting invites, a registered user must select the Always send me an
email for meeting invites check box in the Meetings tab of the Settings panel. For details on
how to select this check box, see Manage Mitel One Settings.
• To invite a guest user to a meeting
a. In the Search bar, type the email address of the participant you want to invite to the meeting.
Note that you must type the exact e-mail address of the participant you want to invite. The email
address you type appears in the search field.
b. Click the email address to invite the user as a participant to the meeting.
A meeting invite will be sent to the user’s email address from [email protected]. The user can join
the meeting by clicking the meeting URL.
User Guide 106

Meetings
5. In the Meeting options section, choose either of the following depending upon the type of meeting you
wish to create.
• Invite-only meetings – To create a meeting in which only the meeting creator can admit uninvited
participants into the meeting, select the Invite-only meeting checkbox. For more information, see
Invite-only Meeting on page 108.
• Meeting with no waiting room – To create a meeting in which the waiting room is disabled, thereby
allowing all participants to automatically enter into the meeting directly, select the Remove waiting
room checkbox.
Note:
• This option will be displayed only if a Mitel Partner or the Account Administrator of your
CloudLink Account have enabled the Optional Waiting Room toggle button for your account
in the Mitel Administration. For more information, contact your Account Administrator or see
Allow Users to Manage Waiting Room in Meetings.
• For more information regarding which users will go to the waiting room, see the FAQ Who
goes to the waiting room before joining a meeting? on page 170
• For guest users to be automatically accepted into a meeting that has the waiting room
disabled, at least one registered user must join the meeting.
6. Click Add to Calendar. The Scheduling proceeds based on the calendar type you selected from the
Calendar drop-down list.
a. Default Calendar (.ics download) – downloads an ICS file with meeting join details, title, and
participants, which you can view in your default calendar app (such as Outlook desktop) and send to
users as part of a meeting invite.
Note:
If you choose this calendar type while the Mitel One web application runs on the Google
Chrome browser, the warning message XXXX (meeting name).ics may be dangerous, so
Chrome has blocked it. might be displayed. To continue downloading the invite, click the Keep
option beside the warning message. Clicking Discard cancels the download.
b. Google Calendar – opens a new tab in Gmail with a prepopulated calendar invite with meeting join
details, title, and participants.
c. Exchange / Office 365 – opens a new tab in Office 365 with a prepopulated calendar invite with
meeting join details and title; but does not carry over the participants. You must add the participants
directly in the open calendar in Office 365.
CAUTION:
Customers should exercise caution to prevent accidental disclosure of Meeting Access Codes. For
more information, see the latest version of Mitel One Security Guidelines.
107 User Guide

Meetings
6.6 Search a Meeting
You can search for a meeting using the Global Search feature of the Mitel One application. Type the name
of the meeting you are searching for in the Search bar. A list of meetings with matching names will be
displayed as you type the characters in the Meetings tab of the Global Search menu. The meetings will be
listed based on their occurrence with the most recent meeting displayed first on the list. Click associated
with a meeting to go to the meetings details page of that meeting.
6.7 Invite-only Meeting
An invite-only meeting ( ) is a type of meeting in which only the meeting creator can admit
uninvited participants into the meeting.
Registered users invited to the meeting are admitted to the meeting directly. A registered user is
considered invited only if the meeting creator invites them to the meeting by doing either of the following:
• By clicking the Invite icon from the meetings control panel during an ongoing meeting.
• By entering their name or email address in the corresponding field while creating the meeting.
Registered users and guests who do not have an invite but want to join an invite-only meeting must wait in
the waiting room and can join the meeting only after the meeting creator admits them into the meeting. For
more information regarding which users will go to the waiting room, see the FAQ Who goes to the waiting
room before joining a meeting? on page 170
User Guide 108

Meetings
Scheduling an invite-only meeting
To schedule an invite-only meeting, follow step 1 through step 5 mentioned in Scheduling a Meeting on
page 104 and select the Invite-only meeting check box.
An invite-only meeting is scheduled and will appear in the list of meetings in your Meetings section.
Note:
•
For invite-only meetings, the icon is displayed beside the meeting name in the meeting
details page.
• Once scheduled, an Invite-only meeting cannot be changed to a normal meeting and vice-versa. It
is recommended to create a new meeting instead.
Managing Participants
• Only the meeting creator can allow or decline access to a user waiting in the waiting room.
• You must use the Meetings add-in to update the meeting after adding (or modifying) the attendees in
the meeting.
109 User Guide

Meetings
• Registered users and guests without an invite admitted into the meeting are not considered invited.
Every time they want to join a meeting, they must either be invited or admitted from the waiting room by
the meeting creator.
• Registered users and guests without an invite will have access to the shared files and the recordings in
a meeting only while the meeting is in progress and after they have joined the meeting.
• Registered users who were invited to a meeting by the meeting creator may invite other participants to
the meeting by doing either of the following:
•
Click the Invite icon ( ) during an ongoing meeting.
• From the meetings details page, click the Participants tab and then click INVITE.
The Invite Participants dialog box opens. See step 4 mentioned in Scheduling a Meeting on page
104 for more information about inviting participants to a meeting.
• A registered user in a meeting can cancel the invite of a participant (including other registered users)
using the following procedure.
1. Click the Participants tab. The list of participants in the meeting is displayed.
2.
Hover over the participant whose invite you want to cancel, and click the icon. The Cancel invite
pop-up appears.
3. Click Cancel invite to cancel the invite of the participant.
The participant will no longer have access to the meeting until invited again or admitted from the waiting
room by the meeting creator.
Note:
The participants cannot cancel the invite of the meeting creator.
6.8 Join a Meeting
You can join a meeting as a registered user, or as a guest user. Both type of users can join a meeting
through PSTN by clicking the dial-in number mentioned in the meeting invite.
6.8.1 Join a Meeting as a Registered User
As a registered user, you can join a meeting by:
• clicking the meeting link in the invite received in Outlook or in any other email service provider
User Guide 110

Meetings
Note:
To receive an email for meeting invites, a registered user must select the Always send me an
email for meeting invites check box in the Meetings tab of the Settings panel. For details on how
to select this check box, see Manage Mitel One Settings.
• clicking the Join now action card received in the messaging session
• clicking on the meeting from the Meetings menu of your Mitel One application, and then clicking the
JOIN button from the meeting details page that opens
• dialing in to the meeting through PSTN using the dial-in number mentioned in the invite. For more
information, see Join a Meeting using PSTN on page 120.
Note:
• A message (as shown in the following image) is displayed if you try to join a meeting that is
deleted.
• If you are joining a meeting from your mobile device using a meeting link (received through chat or
email), you will be redirected to the MiTeam Meetings mobile application if you have the application
installed in your mobile device. If you do not have the application installed, a link to download this
application from your app store appears on the browser.
111 User Guide

Meetings
To join a meeting directly from the meeting invite or the Join now action card
1. Click the meeting invite link or the Join now action card. A pop-up window opens in the Mitel One
application and the Audio and video preview panel is displayed.
User Guide 112

Meetings
Note:
• For the Audio and video preview panel to appear, you must ensure that the Show audio and
video preview before joining a meeting check box is selected in the Meetings tab of the
Settings panel. This setting is enabled by default.
• When you join a meeting for the first time using the Mitel One application, the panel shown in
the following figure is displayed. Click Let’s Go to access the Audio and video preview panel.
2. Choose how you want to connect to the audio, whether you want to mute or unmute your microphone
and turn on or turn off your video before you join the meeting. Click Connect to join the meeting.
Clicking Leave will abort the operation and redirect you to the Meetings menu of the application.
113 User Guide

Meetings
Note:
• Select the Don’t ask me again check box to save the selected settings.
•
Click ( ) at the top right of the panel to access the options to report an issue with the
application, and to view the online help document.
• For help resolving issues you face while enabling microphone, speaker, or camera, see the FAQ
How do I enable the camera and the microphone for Mitel One Meetings? on page 170
To join a meeting listed in the Meetings list
1. Click the meeting you want to join. The details of the meeting are displayed on the right side of the
application.
User Guide 114

Meetings
2. Click the JOIN button to join as a participant. The Audio and video preview panel opens in a new pop-
up window.
Note:
For the Audio and video preview panel to appear, you must ensure that the Show audio and
video preview before joining a meeting check box is selected in the Meetings tab of the
Settings panel. This setting is enabled by default.
3. Choose how you want to connect to the audio, mute or unmute your microphone, and turn on or turn off
your video before you join a meeting, and then click Connect to join the meeting. Clicking Leave will
abort the operation and redirect you back to the Meetings menu.
115 User Guide

Meetings
Note:
• Select the Don’t ask me again check box to save the selected settings.
•
Click ( ) at the top right of the panel to access the options to report an issue with the
application, and to view the online help document.
• For help resolving issues you face while enabling microphone, speaker, or camera, see the FAQ
How do I enable the camera and the microphone for Mitel One Meetings? on page 170
6.8.2 Join a Meeting as a Guest User
As a guest user, you can join a meeting by
• clicking the meeting link in the invite received in Outlook or any other email service provider
• clicking the meeting link shared via messages
• dialing in to the meeting through PSTN using the dial-in number mentioned in the invite. For more
information, see Join a Meeting using PSTN on page 120.
Note:
If you are joining a meeting from your mobile device using a meeting link (received through chat or
email), you will be redirected to the MiTeam Meetings mobile application if you have the application
installed in your mobile device. If you do not have the application installed, a link to download this
application from your app store appears on the browser.
To join a meeting as a guest user, use the following procedure:
1. Click the meeting invite link you received. The Mitel One Meetings web application is launched, and
the Welcome page opens.
User Guide 116

Meetings
2. Enter your name and email address, and click CONTINUE.
Note:
You can view the dial-in numbers and the meeting ID, raise an issue or share feedback about the
application, and view the URLs to the online help, and privacy policy from the Welcome page.
117 User Guide

Meetings
3. You must wait until any registered user who has already joined the meeting accepts you as a guest user
in the meeting. Clicking LEAVE will abort the operation and redirect you to the Welcome page.
User Guide 118

Meetings
4. When a registered user accepts you in to the meeting, there is an audial notification and the Audio and
video preview panel is displayed.
Note:
When you join a meeting for the first time using the Mitel One application, the panel shown in the
following figure is displayed. Click Let’s Go to access the Audio and video preview panel.
5. Choose how you want to connect to the audio, whether you want to mute or unmute your microphone
and turn on or turn off your video before you join the meeting. Click Connect to join the meeting.
Clicking Leave will abort the operation and redirect you to the Meetings menu of the application.
119 User Guide

Meetings
Note:
• Select the Don’t ask me again check box to save the selected settings.
•
Click ( ) at the top right of the panel to access the options to report an issue with the
application, and to view the online help document.
• For help resolving issues you face while enabling microphone, speaker, or camera, see the FAQ
How do I enable the camera and the microphone for Mitel One Meetings? on page 170.
6.8.3 Join a Meeting using PSTN
Registered users and guest users can join a meeting through PSTN by entering the dial-in number
mentioned in the meeting invite.
Note:
• When joining a meeting through PSTN, even registered users must wait in the waiting room until
any registered user who has already joined the meeting accepts you into the meeting.
• When you are dialed in to a meeting from your iPhone using the PSTN, you will not be able to use
the Mitel One web application on the Safari browser in your iPhone.
To join a meeting through PSTN, use the following procedure:
1. Call in to the meeting by doing either of the following:
• Dialing the dial-in number
a. Dial the dial-in number mentioned in the meeting invite.
b. When prompted, choose the language of your choice.
c. Enter the Meeting ID.
• Clicking the dial-in number
a. Click the dial-in number mentioned in the meeting invite.
b. This will cross launch the telephony application installed in your device and the dial-in number
along with the meeting ID is displayed. Click the Call icon to place the call.
2. There is a ringing tone followed by the message: you are in the waiting room. You will join the
meeting when someone lets you in.
User Guide 120

Meetings
Note:
• This message repeats every fifteen seconds until you are in the waiting room.
• This message appears only if the meeting creator has enabled the waiting room for users to join
a meeting.
• If the meeting creator has disabled the waiting room for users to join a meeting, you will be
connected directly to the meeting if there is at least one registered user already in the meeting.
If the meeting creator has enabled the waiting room, you must wait in the waiting room until a
registered user joins the meeting, and accepts you into the meeting.
3. If you are accepted, there is an audial message: you have been accepted to join the meeting and
you will be connected to the meeting. If your request is declined, there is an audial message: your
request to join this meeting has been declined and your call gets disconnected.
Note:
By default, you will join the meeting with your microphone turned on.
6.9 Delete or Leave a Meeting
A meeting creator has the option of deleting the meeting. Both meeting creators and participants have the
option of leaving the meeting from the Meetings list.
Note:
You cannot delete or leave a meeting if your Office 365 calendar is synced with the Mitel One
Meetings application.
To delete a meeting
To delete a meeting for which you are the creator:
1. From the list of meetings in the Meetings section, right-click the meeting you want to delete. A pop-up
window opens.
2. Click Delete meeting. From the confirmatory window that appears, click Delete meeting. The meeting
will be deleted, along with all associated chats and files, from your Meetings section, and from the
Meetings section of all participants of the meeting.
To leave a meeting
Both meeting creators and participants can leave a meeting from their Meetings list.
121 User Guide

Meetings
To leave a meeting:
1. From the list of meetings in the Meetings section, right-click the meeting you want to remove. A pop-up
window opens.
2. To remove the meeting from your list, click Leave. The meeting will be removed from your Meetings
section.
After you remove a meeting from you Meetings list, you will not see the meeting in your list, and you will
not receive any notifications regarding this meeting.
All others will continue to be part of the meeting, and the meeting will be listed in their Meetings list. The
existing chat messages sent by you will continue to be visible to them in their chat conversation history.
You will be able to join the meeting again and receive notifications if you are invited to this meeting, and
accept the invitation. After you join the meeting, the meeting will again be listed in the Meetings list of your
Mitel One application.
6.10 Edit or Delete a Message
Registered users can edit the messages that they have sent during a meeting. They can also delete the
messages, files, and the media that they have sent during a meeting.
For more information, see Edit or Delete a Message on page 81.
6.11 Meeting Controls
User Guide 122

Meetings
Following are the various controls displayed during an ongoing meeting. Click any of these controls to
invoke the feature:
Control Function
Click this icon to leave an ongoing meeting.
• If you are the meeting organizer, a panel opens.
• Click Leave meeting to leave the meeting. The other participants
will continue to be active in the meeting.
• Click End meeting for all to end the meeting for all the participants.
• If you are a participant, the meeting will immediately end for you. The
other participants will continue to be active in the meeting.
Click this icon alternately to turn on and turn off your camera.
Click this icon alternately to mute and unmute your mic.
Click this icon alternately to start and stop screen sharing during a meeting.
Click from the control panel and then click this icon to record a meeting.
For more information, see Recording a Meeting on page 130.
Click from the control panel and then click this icon to invite more users
to an ongoing meeting.
Click from the control panel and then click this icon to open the Settings
menu.
This icon indicates that all the participants invited to the meeting will be
automatically accepted into the meeting.
Note:
This icon will be displayed only if you have joined a meeting as a
registered user.
123 User Guide

Meetings
Control Function
During Gallery Layout, click from the control panel and then click this
icon to switch to Active Talker Layout. The Active Talker Layout will switch
the large video window between whoever speaks during a meeting.
During Active Talker Layout, click from the control panel and then click
this icon to switch to Gallery Layout. The Gallery Layout will display the
video of all the participants in the meeting who have their video turned on,
and the avatar of the participants who have their video turned off.
Note:
By default, you will join a meeting in Gallery Layout.
During Active Talker Layout or during Screenshare, if you have the video
tiles of participants turned on, click this icon to switch to List view. You will
no longer see the video of other participants, even though others in the
meeting can see your video.
During Active Talker Layout or during Screenshare, if you have the video
tiles of participants turned off, click this icon to switch to Video tiles view,
which will enable you to view the video of all the participants in the meeting
who have their video turned on.
User Guide 124

Meetings
Control Function
The meeting creator will see this icon on the top right of the screen. Clicking this
icon opens a panel where the meeting creator can select which users will be sent to
the waiting room before being accepted into the meeting.
• Only guest users — Select this option to enable waiting room for
guest users. Guest users who want to join a meeting after this option is
enabled must enter the waiting room and be accepted into the meeting
by a registered user. If this option is not enabled, guest users who want
to join a meeting will be automatically accepted into the meeting.
Note:
By default, all registered users will be automatically accepted into
the meeting.
• No one — Select this option to automatically accept all users directly
into the meeting. The waiting room will be disabled for all users.
Note:
At least one registered user must join the meeting for guest users
to be automatically accepted into the meeting.
For more information about which users goes to the waiting room before
joining a meeting, see the Who goes to the waiting room before joining a
meeting? on page 170
Click this icon to view the chat window. All the chat messages shared
during a meeting can be viewed in the chat window.
Note:
You can also click the chat notification that you receive to open the
chat window.
125 User Guide

Meetings
Control Function
Clicking this icon opens the meeting information panel where you can do
the following:
• Copy the meeting invitation
• Copy the meeting URL
• View the the dial-in number, and the meeting ID.
• View the files shared, and recordings in the meeting by clicking the
About tab.
• View the meeting organizer and list of participants in the meeting by
clicking the Participants tab. Meeting organizers can use the INVITE
option available in the Participants tab to invite participants to the
meeting.
This icon on the top left of your screen is the Screenshare indicator. It
displays the name of the participant who is sharing the screen during
a meeting. The Screenshare indicator will also display an Undock icon
( ) for participants viewing the shared content during a meeting.
Clicking the Undock icon ( ) allows a user to undock the screenshare.
For more information, see Screen Sharing on page 128.
This icon on the top left of your screen indicates that you are on mute. You
can click this icon to unmute your mic. When you Push to Talk, the icon
changes to .
This icon on the top right of your screen is the Active Talker indicator. It
displays the name of the speaker during a meeting.
This icon appears in the User Tile of users encountering issues with the
network or an outage during the call. The audio and video communication
with these users might be affected while this icon is displayed. This
icon will disappear when the connection with these users is properly re-
established.
A registered user will see this prompt during an ongoing meeting to accept
or reject the guest users in the Waiting Room into the meeting. Click
Accept All to allow these users into the meeting. Click Decline All to
prevent these users from joining the meeting. To accept or decline specific
users, click the icon or the icon beside their names.
User Guide 126

Meetings
Control Function
Push to Talk
When you are on mute, press and hold the Spacebar to unmute your
mic. Releasing the Spacebar will mute your mic again. You can also mute
and unmute your mic alternately by quickly tapping the Spacebar twice in
succession.
Push to Mute
When your mic is unmuted, press and hold the Spacebar to mute your mic.
Releasing the Spacebar will unmute your mic again. You can also mute
and unmute your mic alternately by quickly tapping the Spacebar twice in
succession.
When you are on Mute, a icon is displayed next to your user name in the user tiles.
In addition to the various controls mentioned above, there are controls that are displayed on hovering over
the user tile.
Note:
These controls are displayed only when you join a meeting as a registered User.
Control Function
To mute a user during the meeting in a video tile view, hover over the video
tile of that user, and click the icon.
To mute a user during the meeting in a list view, hover over the tile of that
user and click the icon. Click Mute
Remove To remove a user from a meeting, hover over the user tile of that user.
The icon is displayed at the top right corner of the tile. Click the
icon and click Remove. From the confirmatory panel that appears, click
Remove to remove that user from the meeting. Clicking Cancel discards
the operation.
127 User Guide

Meetings
Control Function
Pin
A registered user or a guest user can pin a user tile during an ongoing
meeting. To pin a user tile, hover over the user tile. The icon is
displayed at the top right corner of the tile. Click the icon and click
Pin to pin that user tile. The view changes to Active Talker mode and the
pinned tile is displayed as the main user tile. To unpin a pinned user tile
and return to User Tiles mode, click .
6.12 Screen Sharing
During a meeting, you can share your screen with the other participants in the meeting. This enables you
to display any media including documents, presentations, images, and videos, on your computer to all the
participants without having to send them those files. Following are the steps for sharing your screen in
Mitel One Meetings.
1.
During an ongoing meeting, click the Share icon ( ) from the control panel. The Share your
screen prompt window opens.
2. You will be prompted to select Your Entire Screen, Application Window, or Chrome Tab to share
from the prompt window.
• If you choose to share the Entire Screen, your entire desktop will be shared and displayed to all
participants. You can toggle between multiple applications or windows during the meeting, and if
these are displayed on your screen, these will be displayed on the screens of all participants.
• If you choose to share an Application, only that application will be shared and displayed in the
meeting. You can toggle between multiple applications or windows during the meeting, but these will
not be displayed to the participants.
Note:
• To share an audio, you must select the Share audio check box from the Share your screen
prompt window.
• On Mac devices, if the Mitel One application is in full screen mode, you can share only the
application. To share other applications, you must exit the full screen mode.
• If you choose to share a Chrome Tab, only that tab in your Chrome browser will be shared and
displayed in the meeting. You can toggle between other tabs in Chrome, but these will not be
displayed to the participants.
User Guide 128

Meetings
3.
Click the required option and click Share screen to start sharing. The Share icon ( ) turns green,
and a blue screen share button with the user's name ( ) appears at the
bottom-left of your user tile when you start sharing. Click in the top right corner of the Share your
screen window to cancel the sharing before the sharing begins.
4.
After you start sharing, click the Stop Share icon ( ) from the control panel to stop the sharing.
Undocking the Shared Screen
When viewing shared content, you can undock the shared screen in your Meetings window and make
it a floating window. You can do this by clicking the Undock icon ( ) displayed in the screen share
indicator ( ). The shared screen opens in a separate window, allowing you to
move that window to a new position. The original window (ongoing meeting screen) will continue to show
the video tiles, and the various meeting controls.
Close the undocked window or click the Dock ( ) icon displayed in the Screenshare indicator to re-
dock the window back to its original location.
Note:
Even after the screenshare ends, the undocked window will remain open until the meeting ends or
until you close the window.
Layout when screen sharing
When viewing the shared content, you will see a layout like Active Talker Layout, where the shared content
is displayed alongside the User tiles. By default, when screen share is initiated, all participants will be
displayed in Video tiles view. The Video tiles view will display the video of all the participants who have
their video turned on, and the avatar of the participants who have their video turned off. The List view will
display only the name of all the participants in the meeting.
During Video tiles view, click the List icon ( ) to change to List view.
129 User Guide

Meetings
During List view click the Video tiles ( ) icon to change to Video tiles view.
6.13 Recording a Meeting
Note:
The Recording feature is available only with Mitel One Premier and Elite subscriptions.
Recording allows a registered Mitel One user to record a meeting. Recording a meeting is useful for those
who could not attend the meeting and for those who want to refer to what was discussed in the meeting.
The recordings are stored in the cloud in MP4 format.
User Guide 130

Meetings
Recording a Meeting
To record an ongoing meeting, click the More icon ( ) in the control panel and then click the Record icon
( ). A Preparing to record icon appears in the top of your meeting screen indicating that Meetings is
setting up the cloud recording.
An audial notification indicates that the recording has started and a message (as shown in the following
image) indicates that the recording has started.
131 User Guide

Meetings
Note:
• Only one user can record a meeting at a time.
•
If the recording fails to start after you click , the following error will appear. To start the
recording again, you must refresh the application and click .
Stopping a Recording
During a meeting, only the participant who is recording can stop the recording at any given time by doing
either of the following:
•
Click the stop icon ( ) from the recording indicator in the top of your screen
•
Click the Stop icon ( ) from the control panel.
The recording will stop, and will be saved to the cloud. A confirmation message (as shown in the following
image) indicates that the recording is saved.
The following table lists the impact of various scenarios on an ongoing recording of a meeting.
Scenario Result
The user who is recording leaves the meeting. The recording stops.
The user who is recording is removed from the meeting. The recording stops.
Creator ends the meeting for all participants. The recording stops.
The meeting expires after the 24 hour limit. The recording stops.
The user who is recording reloads the Mitel One applicat
ion.
The recording continues.
The user who is recording experiences a low bandwidth;
is disconnected from the meeting for a brief period of ti
me and is reconnected to the meeting.
The recording continues.
User Guide 132

Meetings
Scenario Result
The user who is recording closes the tab or browser
where the Meetings web client is deployed and thereby
leaves the meeting without clicking the Leave button.
The recording continues.
Accessing a Recording
A registered user or a guest user can access the recordings for a meeting by using the following steps:
Note:
Recordings of a meeting that is not an Invite-only Meeting on page 108 can be accessed by any
user (registered or guest) who is a participant of the meeting or by a registered user who has the
meeting URL, which could pose a privacy issue. To prevent this, Mitel recommends that you create
Invite-only meetings as recordings of an Invite-only meeting can be accessed only by registered users
who are invited to the meeting. Registered users and guests without an invite will have access to
the recordings only while the meeting is in progress and after they have joined the meeting. It is also
recommended that after a recording is complete, you download the recording to your device and
delete it from your meeting for privacy reasons.
• As a Registered user
All registered users who are invited to a meeting can access the recordings for that meeting by doing
either of the following:
1. Click the meeting from the Meetings section.
2. From the meeting details page, click the About tab. Scroll down to the Recording section. All the
recordings made in the meeting are displayed here.
• As a Guest user
Guest users can access the recordings of a meeting only while the meeting is in progress and after they
have joined the meeting. To access a recording during a meeting:
1.
Click the icon at the bottom left corner of the Meetings screen. The chat window opens.
2.
Click the icon at the top right corner of the chat window. A dialog box opens.
3. Click Files. The About panel opens.
4. Click Recordings.
The Recordings panel opens displaying all the recordings made in the meeting. To download a
recording, hover over the recording and click the click to download option. The recording will be
downloaded to your device in MP4 format.
133 User Guide

Meetings
Renaming a Recording
A meeting creator or the user who performed the recording can rename a recording. To do this:
1. Click the meeting from the Meetings section.
2. From the meeting details page, click the About tab. Scroll down to the Recording section. All the
recordings made in the meeting are displayed here.
3.
Hover over the recording you want to rename, and click the icon.
4. From the dialog box that appears, click Rename.
5. Enter the new name for the recording. Click Save to save the changes or click Cancel to discard it.
Deleting a Recording
A meeting creator or the user who performed the recording can delete a recording. To do this:
1. Click the meeting from the Meetings section.
2. From the meeting details page, click the Agenda tab. Scroll down to the Recording section. All the
recordings made in the meeting are displayed here.
3.
Hover over the recording you want to delete, and click the icon.
4. From the dialog box that appears, click Delete.
5. From the confirmatory panel that appears, click Delete recording.
The recording will be deleted permanently.
Managing Recordings
The following table lists the task each user can perform with regard to recordings.
Type of user Can
start re
cord
ing?
Can stop rec
ording?
Can dele
te a rec
ording?
Can access and downl
oad a recording?
Can rename a
recording?
Meeting creator Yes Only if you star
ted the recordin
g.
Yes Yes Yes
User Guide 134

Meetings
Type of user Can
start re
cord
ing?
Can stop rec
ording?
Can dele
te a rec
ording?
Can access and downl
oad a recording?
Can rename a
recording?
Registered user Yes Only if you star
ted the recordin
g.
Only if you
performed
the record
ing.
• For a meeting that
is not an Invite-only
meeting you can
access the recording at
all times if you have the
meeting URL.
• For an Invite-only
meeting, you can
access the recording
at all times only if
you are invited to the
meeting. If you do not
have an invite, you
will have access to
the recordings only
while the meeting is
in progress and after
you have joined the
meeting.
Only if you perf
ormed the re
cording.
Guest user No No No Only while the meeting is in
progress and after you have
joined the meeting.
No
6.14 Huddle Room for Mitel One Meetings
Mitel One Meetings supports huddle rooms, which allow users to gather together for impromptu meetings,
discussions, brainstorming, and problem solving sessions. The following topics will help you learn how to
set up a huddle room system for Mitel One Meetings, and to join a Mitel One meeting using the huddle
room system.
6.14.1 Setting up a Huddle Room for Mitel One Meetings
An IT administrator can set up a video conference huddle room system for Mitel One Meetings in kiosk
mode.
System Requirements
• A computer with Windows 10 or later.
• Huddle room for Mitel One meetings is supported only with the Microsoft Edge browser.
Procedure
Complete the following procedure to set up a huddle room system for Mitel One Meetings in kiosk mode in
a Windows 10 device:
135 User Guide

Meetings
1. In your Windows device, go to Settings > Accounts > Other Users and select Assigned access
under the Set up a kiosk section. The Set up a kiosk screen opens.
2. Click Get started. The Create an account pop-up window opens.
3. In the Add a name text box, type a name for the kiosk account. You can also choose an existing
account for the kiosk by clicking Choose an existing account. Click Next. The Choose a kiosk app
pop-up window opens.
4. From the list of apps, select Microsoft Edge, and click Next.
5. In the How will this kiosk be used? pop-up window that opens, select the As a public browser check
box.
6. Click Next. In the Set up Microsoft Edge pop-up window that opens:
• Enter http://one.mitel.io/guest?room=roomname&[email protected] (room email address) in the
Enter a URL field.
User Guide 136

Meetings
Note:
It is mandatory to enter the room name. However, the room email address is optional.
• choose 10 hours as the time to restart a session if no one is using the device.
137 User Guide

Meetings
7. Click Next. A message as shown in the following screen shot is displayed indicating that the kiosk is set
up.
8. Click Close.
9. In the kiosk, configure authorized access to the camera and microphone of the device by creating the
following entries in the registry of the device.
• [HKEY_LOCAL_MACHINE\SOFTWARE\Policies\Microsoft\Edge\AudioCaptureAllowedUrls]
"1"="https://one.mitel.io/guest"
• [HKEY_LOCAL_MACHINE\SOFTWARE\Policies\Microsoft\Edge\VideoCaptureAllowedUrls]
"1"="https://one.mitel.io/guest"
This will ensure that the camera and microphone settings are saved in the kiosk.
Note:
The value name “1” is a placeholder that can be any number.
After you complete these steps, restart your computer to start in kiosk mode to join a Mitel One meeting in
a huddle room system.
For more information, see Set up a single-app kiosk.
User Guide 138

Meetings
6.14.2 Join a Meeting using Huddle Room
You can join a Mitel One meeting as a guest using the huddle room system set up in your conference room
by simply entering the meeting URL or the meeting ID from the PC controller.
To join a meeting:
139 User Guide

Meetings
1. Enter the meeting link or the meeting ID in the field provided, and click CONTINUE.
The Welcome page opens, displaying the meeting room name and the email address.
2. Click Continue to enter the waiting room.
User Guide 140

Meetings
Note:
You can view the dial-in numbers and the meeting ID, and view the URLs to the online help, and
privacy policy from the Welcome page.
3. You must wait until any registered user who has already joined the meeting accepts you as a guest user
in the meeting. Clicking Leave will abort the operation and redirect you to the Welcome page.
4. When a registered user accepts you into the meeting, there is an audial notification and the Audio and
video preview panel is displayed.
141 User Guide

Meetings
5. In the Audio and video preview panel, choose whether you want to mute or unmute your microphone
and turn on or turn off your video before you join the meeting. Click Connect to join the meeting.
Clicking Leave will abort the operation and redirect you to the Welcome page.
6.15 Blur Your Background
You can blur your background in Mitel One Meetings to prevent other participants from seeing your
background. Mitel One Meetings allows you to blur your background before a meeting or during a meeting.
Note:
Blurring the background involves using your computer's Graphic Processing Unit (GPU) for achieving
the best results. If your computer has older GPU's, using this feature might add a load to your
computer, which adversely impacts the meeting experience. If you experience lag in your videos,
update your video driver. If updating your video driver does not resolve the issue, you must turn off
the Blur Background feature.
To blur your background before joining a meeting
From the Audio and Video Preview Panel
User Guide 142

Meetings
1.
Click the Settings icon ( ) in the Audio and video preview panel that is displayed before you join a
meeting.
2. Select the Blur my video background check box.
This will blur your background, which can be verified in the Preview.
From the Mitel One Settings Panel
1. Click your avatar from the top left corner of the Mitel One application.
2. From the panel that appears, click Settings and preferences. The Settings panel opens.
3. Click the Meetings tab.
143 User Guide

Meetings
4. Scroll down to the Camera section, and select the Blur my video background check box to blur your
background.
To blur your background during a meeting
1.
During an ongoing meeting, click the More icon ( ) from the control panel, and then click the Settings
icon ( ). The Settings panel opens displaying the Meetings tab.
User Guide 144

Meetings
2. Scroll down to the Camera section, and select the Blur my video background check box. Close the
Settings panel to return to the meeting.
This will blur your background.
To ensure best experience
Background blurring needs contrast to distinguish between you and your background. Follow these best
practices whenever possible:
• Wear clothes that stand out from what is behind you.
• If your video appears grainy, turn on some lights. Most webcams, especially the cameras in laptops, do
not perform well in dim light.
• Try to sit within 3 feet (a meter) of the camera. Try to sit directly in front of, and look squarely into the
camera.
• The feature does recognize hats or other headwear and might blur them.
145 User Guide

Meetings
6.16 Reduce Background Noise During a Meeting
You can reduce the background noise picked up from your mic during a meeting by enabling the Noise
Cancellation feature in Mitel One Meetings.
Note:
The Noise Cancellation feature will not be enabled by default. You must enable it from the Settings
panel of the application during a meeting.
Enabling noise cancellation reduces the volume of noises that can interfere during a meeting, such as:
• Background noises – traffic noise, construction work.
• Environment noises – electrical machines such as refrigerators, air conditioning, power supplies, and
motors.
• Foreground noises – keyboard typing, papers shuffling.
Note:
Enabling noise cancellation does not eliminate the type of noises mentioned above; it reduces their
volume. Use the Mute button in the control panel to silence yourself to others.
How to Enable Noise Cancellation
To enable noise cancellation:
1.
During an ongoing meeting, click the More icon ( ) from the control panel, and then click the Settings
icon ( ). The Settings panel opens displaying the Meetings tab.
User Guide 146

Meetings
2. In the Audio section, select the Enable noise cancellation check box. Close the Settings panel to
return to the meeting.
This enables noise cancellation.
Repeat these steps, and clear the Enable noise cancellation check box to disable noise cancellation. You
can disable noise cancellation at any time during a meeting. For example:
• When you are in a conference room and you want remote attendees to hear the conversation between
the other people in the room.
• You want other attendees to hear your ambient noise, such as music playing, before the start of a
presentation.
147 User Guide

Meetings
Note:
• If your browser does not support noise cancellation, the Enable noise cancellation checkbox
will be greyed out and the message Your browser does not support noise cancellation will be
displayed.
• If you have cleared the Show audio and video preview before joining a meeting check box, and
selected the Turn on my microphone when joining a meeting check box in the Settings panel of
your application, a message Would you like to turn on noise cancellation? will appear after 30
seconds of joining a meeting and if you have not clicked anything/anywhere in the meeting.
You must click Confirm when this message appears to enable noise cancellation. Clicking Cancel
will disable noise cancellation.
6.17 Smart Video in Mitel One Meetings
Smart Video allows all participants in the meeting to turn on their video. The smart video algorithm will
intelligently select which user video tiles to stream to the audience. Smart Video prioritizes the people who
are talking. A user’s video stream might stop streaming to the audience to allow another user’s video to be
streamed because of this prioritization.
Note:
Smart Video will never stream your video if your camera is set to off.
How does it work?
Registered users and guests in a meeting can turn on their camera at any time. Users will be shown their
local preview at the top left corner of the screen. When the number of user video tiles being streamed in
a meeting is close to the video stream limit, Smart Video starts choosing which video tiles to stream and
might turn off some of the video streams. The video tiles of participants who are currently talking will have
priority in being broadcasted to the audience.
6.18 Integrating Office 365 Calendar with Mitel One Meetings
User Guide 148

Meetings
Note:
The display and certain functionality (such as editing or deleting a meeting among others) of the Mitel
One Meetings UI depend on whether or not Office 365 calendar integration is enabled with Meetings.
The UI screenshots and the behavior described in this document are based on the scenario in which
Office 365 calendar integration is enabled with Meetings. For more information about the UI changes
and the app behaviour when Office 365 calendar is not enabled, see Meetings Menu on page 98.
You can integrate your Office 365 Calendar with the Mitel One Meetings so that the meetings on your
Office 365 calendar are synced with the Mitel One Meetings web application. This will make it easy for you
to view all the meetings in your Office 365 Calendar and to start or join them.
To set up calendar integration, the CloudLink Account Administrator must have enabled Microsoft Office
365 integration for your account in the Mitel Administration. For more information, contact your Account
Administrator or see Integrating Microsoft Office 365 with Mitel Administration.
Setting up Calendar Integration
To set up Office 365 calendar integration with Mitel One Meetings, do the following:
1. Navigate to the Meetings menu in your Mitel One web application.
149 User Guide
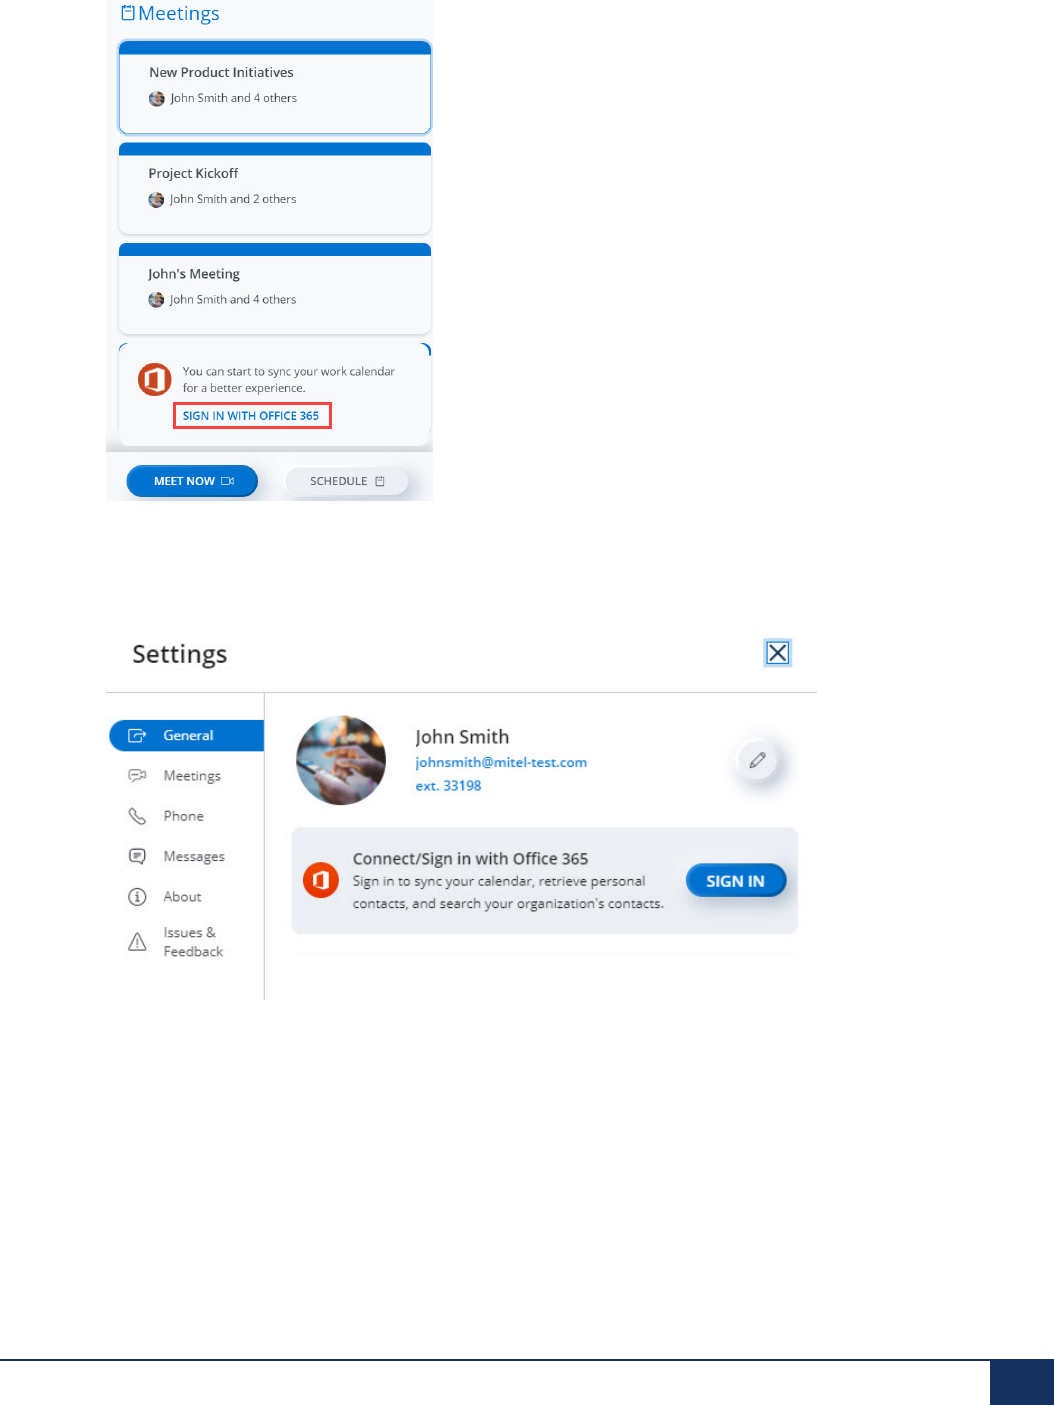

Meetings
Note:
• The SIGN IN WITH OFFICE 365 option will be displayed only if the Microsoft Office 365
integration is enabled for your account in the Mitel Administration.
• If an error message such as Bad Request - Header Field Too Long is displayed when you
click the SIGN IN WITH OFFICE 365 option, restart the Mitel One application or the browser in
which you have deployed the application. If the issue persists, clear the browser cache and try
again.
• If third-party cookies are disabled, or the application remains inactive for a long period of time,
then Office 365 might prompt you to log in when you try to access the application.
• For Office 365 integration to work properly, you must disable pop-up blockers for Mitel One web
application in your browser or in Progressive Web Application (PWA). If you do not disable pop-
up blockers, meetings might not be displayed in the Meetings list of the application.
3. In the Microsoft Sign in page that opens, enter your credentials in the fields provided, and click Sign in.
After a successful sign in, the page will redirect to the Meetings menu and then close automatically.
The Upcoming tab in the Meetings list will display all the meetings in your Office 365 calendar.
Note:
Only meetings that have Office 365 as the calendar type are displayed. Meetings that have Google
Calendar or ICS as the calendar type are not displayed.
Meetings Menu
After successful integration of Office 365 calendar with your Mitel One application, the Meetings menu will
be displayed as shown in the following screen capture. The menu provides easy access to all Mitel One
Meetings features and enables you to manage your meetings quickly.
151 User Guide

Meetings
The Upcoming tab
This tab lists all the upcoming meetings in the Office 365 calendar. These include meetings you created
and those for which you have an invite. The meetings are listed in the chronological order in which they are
scheduled.
The Past tab
This tab lists all the meetings attended by you.
Note:
If you attend a meeting multiple times, the Past tab lists the meeting multiple times in the chronological
order in which they were attended.
About
When Office 365 calendar integration is enabled, the About tab in the meetings details page displays
Description from Outlook section that contains the body/message of the meeting invitation you received
from Outlook. It also displays the Files and Recordings section.
Participants
When Office 365 calendar integration is enabled, the Participants tab displays the meeting organizer and
list of participants to whom the meeting invitation was sent from Outlook.
Types of Meeting
User Guide 152

Meetings
•
A recurring meeting will have the icon associated with it in the Meetings section.
•
A non-recurring meeting will have the icon associated with it in the Meetings section.
•
An Invite-only meeting will have the icon adjacent to the meeting name in the meeting details
page.
Editing a Meeting
To edit a scheduled meeting:
1. Click the meeting from the Meetings section. The meeting details page appears.
2.
Click at the top right corner of the page. The Office 365 Calendar invite for the meeting opens.
Note:
On Mac devices, when you click for the first time, the Office 365 Calendar invite for the
meeting might display a blank page. To view the meeting details that you want to edit, you must
close this page, and click again.
3.
Click , and make the necessary changes.
4. Click Send to save the changes and send an update to the attendees. Clicking Discard discards the
changes.
Deleting a Meeting
To delete a scheduled meeting:
1. Click the meeting from the Meetings section. The meeting details page appears.
2.
Click at the top right corner of the page. The Office 365 Calendar invite for the meeting opens.
3.
Click . In the dialog box that appears, type a message (optional) and click Send to send
the cancellation. After a meeting is canceled, it is automatically deleted from the Meetings list of the
meeting creator and of the participants.
153 User Guide

Meetings
Removing the Calendar Integration
To remove the Office 365 calendar integration:
1. Click your avatar from the top left corner of the Mitel One web application.
2. From the panel that appears, click Settings and preferences. The Settings panel opens.
3. Click the General tab, and click SIGN OUT. After successful sign out, the page will redirect to the
Meetings menu.
This removes the Office 365 calendar integration. The meetings in your Office 365 calendar are no
longer synced with your Mitel One Meetings application.
6.19 Meetings Add-In (Web and Desktop)
The Meetings add-in allows you to schedule a Mitel One meeting from your Outlook application. The add-in
enables you to add a Mitel One meeting to any new or existing event in your calendar.
Note:
• The add-in does not support Delegate Access. The add-in is disabled for Delegates.
• The add-in cannot be used for scheduling meetings from a shared calendar. For more information,
refer to the section Office add-ins aren't available from a shared calendar in the Microsoft
support documentation.
Supported Outlook Clients
• Office 365 on Windows and Mac
• Outlook 2019 on Windows and Mac
• Outlook 2016 on Windows
• Outlook 2013 on Windows
• Outlook Web App for Office 365
• Outlook Web App for Exchange 2016
• Outlook Web App for Exchange 2019
User Guide 154

Meetings
Installing the add-in
• Outlook Web Application for Office 365
You can install the Meetings add-in by performing the following steps:
1. Open the Outlook web application and switch to calendar view.
2. Click New event. The Calendar panel opens.
3.
Click and from the panel that opens, click Get Add-ins.
4. In the Add-Ins for Outlook panel that opens, type Meetings in the Search field.
5. From the result panel, select Meetings. The add-in information panel opens.
6. Click Add. Meetings will be added as an add-in to your Outlook Web Application.
155 User Guide

Meetings
• Outlook Web Application for Exchange 2016/2019
You can install the Meetings add-in by performing the following steps:
1.
Open the Outlook web application and select > Manage add-ins from the top right of the web
application window.
2. In the Manage add-ins panel that opens, click the + sign, and select Add from the Office Store
from the drop-down list that appears. You can also click the URL Find more add-ins from Outlook
at the Office Store to access the Office Store.
3. In the Microsoft Apps store that opens, type Meetings in the Search field.
4. From the result panel, select Meetings and click GET IT NOW. The add-in information panel opens.
5. Click Install. Meetings will be added as an add-in to your Outlook Web Application.
User Guide 156

Meetings
• Outlook 2016 application on Desktop and Outlook 2019/Office 365 application on Desktop/MAC
You can install the Meetings add-in by performing the following steps:
1. Open the Outlook Desktop/MAC application and click Home > Get Add-ins on the ribbon.
Note:
For Outlook 2019 on MAC devices, click Home > Store on the ribbon.
2. In the Add-Ins for Outlook panel that opens, type Meetings in the Search field.
3. From the result panel, select Meetings. The add-in information panel opens.
4. Click Add. Meetings will be added as an add-in to your Outlook Web Application.
157 User Guide

Meetings
• Outlook 2013 application on Desktop
You can install the Meetings add-in by performing the following steps:
1. Open the Outlook Desktop application and click File > Manage Add-ins. The Outlook Web
Application opens. Enter your credentials and log in to the application.
2. In the Manage add-ins panel that opens, click the + sign, and select Add from the Office Store
from the drop-down that appears. You can also click the URL Find more apps for Outlook at the
Office Store to access the Office Store.
3. In the Microsoft Apps store that opens, type Meetings in the Search field.
4. From the result panel, select Meetings and click GET IT NOW. The add-in information panel opens.
5. Click Install. Meetings will be added as an add-in to your Outlook Web Application.
Signing in to your MiTeam Meetings Account from Outlook
After installing the Meetings add-in on your Outlook, you must sign in to your Mitel One account before
scheduling a meeting. This is done from the Meetings task panel in Outlook.
User Guide 158

Meetings
1. Access the Meetings task panel by performing the following steps:
• Outlook Web application for Office 365
a. Open the Outlook web application and switch to calendar view.
b. Click New event. The Calendar panel opens.
c.
Click and from the panel that opens, click Meetings. The Meetings task panel opens to
the right of the Calendar panel.
• Outlook Web application for Exchange 2016/2019
a. Open the Outlook web application and switch to calendar view.
b. Click New > Calendar event. The Details panel opens.
c.
Click the icon at the top of the panel.
The Meetings task panel is displayed to the right of the Details panel.
159 User Guide

Meetings
• Outlook Desktop/MAC application
a. Open your Outlook Desktop/MAC application and click Home > New Items > Meeting. The
Meeting panel opens.
b. In the Meeting tab, click Meetings.
The Meetings task panel is displayed to the right of the Meeting panel.
2. Sign in to your Mitel One account by clicking Sign in to Meetings. The Mitel Accounts login page
opens in a new window.
User Guide 160

Meetings
Note:
If you are using Outlook Web Application, you will be prompted to allow permission to display a
new window when you click Sign in to Meetings. Click Allow.
3. Enter the email address and the password for your Mitel One account and follow the prompts to log in.
161 User Guide

Meetings
Note:
• If your email address is registered with multiple customer accounts, a Multiple accounts
located. Additional account information needed to proceed message is displayed and the
Account ID field appears. Enter the Account ID in this field.
• You must have a valid Mitel One subscription to log in to the Meetings account. If you do not
have a valid subscription, the application will display the message shown in the following figure.
After successful login, you will be redirected to the Outlook application, and the Meetings task panel is
displayed as shown in the following figure.
User Guide 162

Meetings
Note:
You can change the default language set on Meetings task panel by clicking the language selector
option, and selecting any language from the dropdown list.
Scheduling a Meeting
To schedule or create a Mitel One meeting from your Outlook, use the following procedure.
1. Open your Outlook Calendar and create a new meeting. A panel opens where you must enter the
necessary information for the meeting.
2. Access the Meetings task panel by performing the following steps:
• Outlook Web application for Office 365
Click and from the panel that opens, click Meetings.
• Outlook Web application for Exchange 2016/2019
Click the icon at the top of the panel.
• Outlook Desktop/MAC application
In the Meeting tab, click Meetings.
163 User Guide

Meetings
3. The Meetings task panel is displayed to the right of the meeting panel.
4. Enter the meeting details such as Title, Start Time, End time and Location, and add the invitees.
5. In the Meetings task panel, click the down arrow beside Dial-in Country. A list of countries for which
there is a dial-in number is displayed. Choose the country you want to add to the invite by selecting the
check box associated with that country.
Note:
The selected dial-in country will become the default country for all future meetings.
6. Click Add Meeting. A meeting is created and appears in the Meetings section of your Mitel One
application. The meeting also appears in the Meetings section of the invitees. The calendar invite in
User Guide 164

Meetings
Outlook is automatically populated with a Join meeting option, the dial-in number, and the link to the
Global call in numbers. The URL of the meeting is populated in the Location field.
The invitees on your calendar invite will be added to the Invited list of the meeting in the Mitel One
application.
Editing a Meeting
To edit a Mitel One meeting created from your Outlook, use the following procedure.
1. Open Outlook Calendar.
2. Double-click the meeting you want to edit. The meeting panel opens.
3. Access the Meetings task panel by performing the following steps:
• Outlook Web application for Office 365
Click and then click . From the panel that opens, click Meetings.
• Outlook Web application for Exchange 2016/2019
Click the icon at the top of the panel.
• Outlook Desktop/MAC application
In the Meeting tab, click Meetings.
165 User Guide

Meetings
4. The Meetings task panel is displayed to the right of the meeting panel.
5. Make the necessary changes to the meeting (edit the meeting title, add, or remove participants, or
change the dial-in country) and click Update Meeting to apply the changes.
Note:
• If you update the title of the meeting in Outlook and click Update Meeting, the name of the
meeting in the Mitel One application will also be updated.
• If you update the participants list in Outlook and click Update Meeting, the Invited list of the
meeting in the Mitel One application will also be updated.
6. Click Send in the Outlook Web application or click Send Update in the Outlook Desktop/MAC
application to send an update to the invitees.
Remove a Meeting
To remove a Mitel One meeting created from your Outlook, use the following procedure.
1. Open Outlook Calendar.
2. Click the meeting you want to remove. The meeting panel opens.
User Guide 166
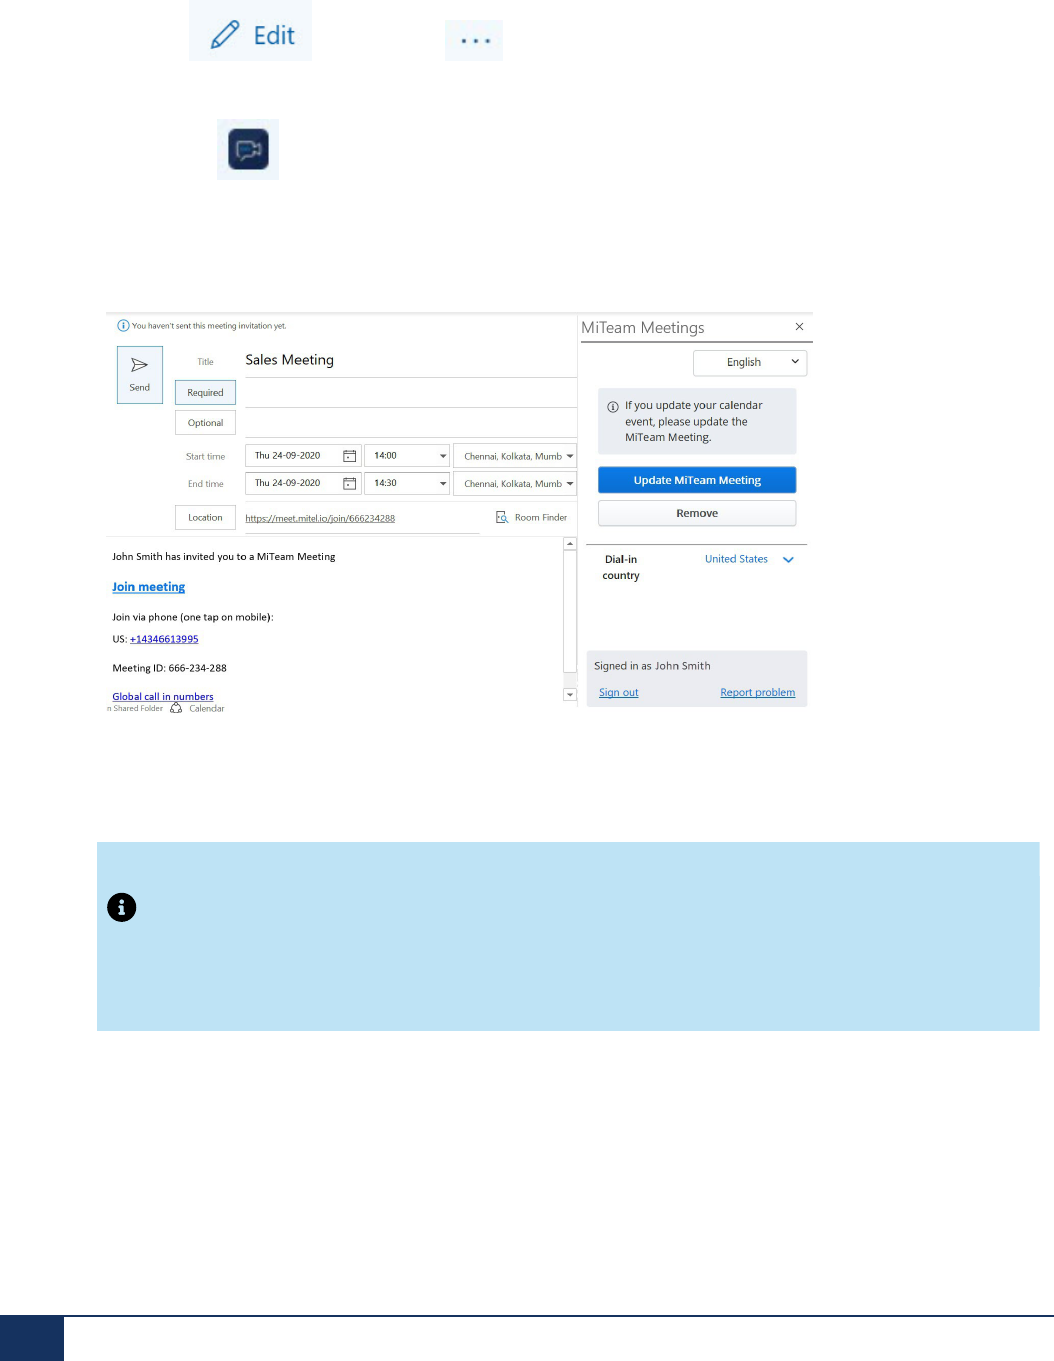
Meetings
3. Access the Meetings task panel by performing the following steps:
• Outlook Web application for Office 365
Click and then click . From the panel that opens, click Meetings.
• Outlook Web application for Exchange 2016/2019
Click the icon at the top of the panel.
• Outlook Desktop/MAC application
In the Meeting tab, click Meetings.
4. The Meetings task panel is displayed to the right of the meeting panel.
5. Click Remove from the Meetings task panel. The meeting details in the calendar invite will be deleted,
and the meeting will be removed from the meetings list in your Meetings section and that of the
invitees, in the Mitel One application. However, the title of the calendar invite and the invitees will
remain the same.
Note:
Cancelling a meeting from the Outlook Calendar will not delete the meeting from the Mitel One
application.
Report a Problem
To report a problem you faced with the Meetings add-in, use the following procedure.
1. In the Meetings task panel, click Report Problem. The Submit an issue panel opens.
167 User Guide

Meetings
2. Enter a title for the issue and provide a brief description of the issue including the steps to reproduce the
issue. Click Add Screenshot if you want to attach a screenshot of the issue. Click Send.
Signing out of the Meetings Add-In
Click Sign out in the Meetings task panel to sign out of your Meetings add-in.
Note:
Signing out from the Meetings task panel will not sign you out from the Mitel One application.
6.20 Frequently Asked Questions
• What is Mitel One Meetings? on page 169
• What is the capacity for MiTeam Meetings? on page 169
• How does the Mitel One application notify users that they have been invited to a meeting? on page
169
• Can I provide toll-free meeting attendance when I invite customers to a meeting? on page 169
• I would like to use Mitel One Meetings for presentations and brainstorming sessions. Can I use video
conferencing in multiple modes? on page 169
• What do green borders around video tiles represent? on page 169
• How do I report a bug or submit feedback during a meeting? on page 169
• Where can I find dial-in information to call in by phone? on page 169
• Is Mitel One Meetings integrated with Outlook Calendar so that I can schedule a meeting directly from
Outlook? on page 170
• Do you support huddle rooms? on page 170
• Can I join a meeting from an existing room system? on page 170
• Can Mitel One meetings be recorded? on page 170
• Who goes to the waiting room before joining a meeting? on page 170
• How do I enable the camera and the microphone for Mitel One Meetings? on page 170
• Windows
• macOS
• Do anti-malware programs block access to camera, speaker, or microphone? on page 171
• How can I choose the speaker for Mitel One Meetings in Firefox and Safari browsers? on page 171
• How can I restore meeting audio after reloading the Mitel One web application during a meeting in
Firefox browser? on page 171
• How can I enable screen sharing in macOS? on page 172
• How do I enable screen recording permission for the Screen Share feature? on page 172
• What happens to my problem report? on page 172
User Guide 168

Meetings
What is Mitel One Meetings?
Mitel One Meetings is a multi-party video solution that offers seamless transitions between voice, video,
and chat capabilities for a complete collaboration experience. It enables users to access features such as:
Collaborate: Perform audio, video, and web sharing
Chat: Hold chat sessions and receive chat notifications within a meeting
File Sharing: Store and share files, and recordings
What is the capacity for MiTeam Meetings?
For details, see Scalability on page 198.
How does the Mitel One application notify users that they have been invited to a
meeting?
• A registered user will get a notification (Join now action card) in the message conversation to join a
meeting.
• A guest user will receive an email invitation.
Can I provide toll-free meeting attendance when I invite customers to a meeting?
Toll-free attendance for Mitel One Meetings is not currently supported.
I would like to use Mitel One Meetings for presentations and brainstorming
sessions. Can I use video conferencing in multiple modes?
Yes, Mitel One Meetings has two video modes – video tiles and active speaker. You can also enable
screenshare at any time.
What do green borders around video tiles represent?
The green border indicates the active speaker.
How do I report a bug or submit feedback during a meeting?
During an ongoing meeting, click the More icon ( ) from the control panel and then click . The Settings
panel opens. Click the Issues and Feedback tab. The Submit an issue panel opens. Enter a title for the
issue, provide a brief description of the issue and click Submit issue to submit the issue. Click Share to
share a new feature idea. For more information, see Report an Issue and Share Feedback on page 202.
Where can I find dial-in information to call in by phone?
The dial-in phone numbers will be listed in the meeting invite that you have received. Registered users can
also get this information from the Meetings details section of the Meetings menu. Guest users can also
get this information from the Welcome page when they try to join a meeting.
169 User Guide

Meetings
Is Mitel One Meetings integrated with Outlook Calendar so that I can schedule a
meeting directly from Outlook?
Mitel One Meetings can be integrated with your Outlook Calendar. You can now schedule a Mitel
One meeting directly from Outlook using the Meetings Add-In (Web and Desktop) on page 154.
Do you support huddle rooms?
Yes, Mitel One Meetings supports huddle rooms. For more information, see Huddle Room for Mitel One
Meetings on page 135.
Can I join a meeting from an existing room system?
This feature is not supported in this release.
Can Mitel One meetings be recorded?
Mitel One meetings can be recorded. For more information, see Recording a Meeting on page 130.
Who goes to the waiting room before joining a meeting?
The following table lists which users will go to the waiting room before joining a Mitel One meeting.
Type of Meeting Meeting Creator Registered User Guest User PSTN (Meeting
Creator, Regis
tered, and Guest
User)
Meeting with waiting
room
No No Yes Yes
Meeting without wait
ing room
No No No No
Invite Only No You can directly ent
er the meeting if yo
u are invited to the
meeting. If you do
not have an invite,
you must wait in the
waiting room. For m
ore information, see
Invite-only Meeting.
Yes Yes
How do I enable the camera and the microphone for Mitel One Meetings?
The option to enable the camera and the microphone for Mitel One Meetings is specific to the browser in
which you have deployed the application. A common prerequisite is that you must have already enabled
permission for the browser to have access to the camera and microphone. This is done from the Control
panel/Settings menu of your operating system. Click the following links for instructions on enabling the
camera and the microphone specific to your operating system.
Windows
Mac OS
User Guide 170

Meetings
• Camera
• Microphone
• close all other applications that are using your camera or microphone
• restart you computer
After the prerequisite is set, you are prompted to choose device permissions for camera and microphone in
the Welcome page. Click Allow to enable access for the camera and microphone or click Don’t Allow to
deny access. To change these permissions subsequently, follow instructions pertinent to your browser.
• Google Chrome
• Mozilla Firefox
• Apple Safari
• Microsoft Edge
Do anti-malware programs block access to camera, speaker, or microphone?
Instances of some anti-malware programs blocking access to the camera on the PC have been reported.
We have confirmed one such case with the anti-malware program 'HitmanPro'. If you face issues with
accessing the camera or other PC resources, check whether any of these programs are running. You must
either stop such programs, or if you have such programs running, you must whitelist our installed client or
the browser.
How can I choose the speaker for Mitel One Meetings in Firefox and Safari
browsers?
With Firefox and Safari browsers, Mitel One Meetings uses the speaker currently selected as the default
speaker in the operating system to play the meeting audio. Neither the Mitel One web application nor
the browsers provide the option of switching to a different speaker to play the audio during an ongoing
meeting. Hence, in Firefox and Safari browsers, to choose a specific speaker for Mitel One Meetings, the
user must choose that speaker as the default in the default settings of the native operating system before
joining the meeting. To choose the default speaker, follow instructions pertinent to your operating system.
• Mac OS
• Windows
1. In the search box on the taskbar, type Control Panel, then select it from the results.
2. Select Hardware and Sound from the Control Panel, and then select Sound.
3. In the Playback tab, right-click the listing for your audio device, select Set as Default Device, and
then select OK.
How can I restore meeting audio after reloading the Mitel One web application
during a meeting in Firefox browser?
After joining a meeting via the Mitel One web application using Firefox, if you reload the application
during the meeting, you may lose the meeting audio and the Autoplay icon ( ) will be displayed in
the address bar. This is because, by default, Firefox blocks all voice media from playing. To restore the
meeting audio you must modify the Autoplay settings in Firefox. See https://support.mozilla.org/en-US/kb/
block-autoplay for more information.
171 User Guide

How can I enable screen sharing in macOS?
On macOS devices, when you proceed to share your screen for the first time during a meeting, a system
prompt appears: “Meetings” would like to record this computer’s screen. This is because of the
increased security and permissions in macOS. Hence, you must allow Mitel One Meetings access to
Screen Recording to share your screen during a meeting on macOS devices.
To do this,
1. In the prompt dialog box, choose Open System Preferences and enable Screen Recording for Mitel
One Meetings by using the instructions in Control access to screen recording on Mac. After you save
the changes, a window opens asking you to quit Mitel One application.
2. Click Quit Now and then reopen the Mitel One application. You can now join the meeting and share
your screen.
Note:
If you choose to Deny Mite One Meetings access during the initial prompt or if the Screen Recording
access becomes disabled, you must go into your OS System Preferences to allow access by using
the instructions in Control access to screen recording on Mac and then repeat step 2.
How do I enable screen recording permission for the Screen Share feature?
The option to enable screen recording permission for Mitel One Meetings is specific to the operating
system. Click the following links for instructions on enabling screen recording permission.
Windows
Mac OS
What happens to my problem report?
• While submitting a problem report, provide as much information as possible. This will help troubleshoot
your problem quickly. Specific details are needed to correctly investigate and resolve an issue.
• Date, time, device information, and logs are collected as part of your problem report.
• After you report an issue, the onsite Support Contact for your account will receive an email notifying that
you have reported a problem. The onsite Support Contact, while investigating the issue, might reach out
to you for additional information.
• If your Support Contact needs assistance to resolve your issue, they will escalate the report through
their standard support procedures.
• You can follow up directly with your onsite Support Contact for updates about your report.

Contacts
7
This chapter contains the following sections:
• Contacts Menu
• Find a Contact
• View Contact’s Status
• Manage User Groups
The Mitel One web application provides convenient options for communicating with your business and personal
contacts.
For information about managing contacts, see the listed topics.
7.1 Contacts Menu
The Contacts menu in the Mitel One web application provides access to your business and personal
contacts.
By default, contacts are displayed in alphabetical order. The number displayed below a contact’s name is
the primary number. The primary number will be the first business phone number by default. If the contact
does not have a business number, the mobile number becomes the primary number, and if there is no
mobile number, the home number becomes the primary number.
To access the personal contacts, you must allow the application to access your Office 365 application. For
more information, see Find a Contact on page 176.
Note:
The Mitel One web application does not display the personal contacts saved on your mobile phone.
User Guide 173

Contacts
The Contacts menu has the following tabs:
• Business — Displays all the business contacts of the user.
• Groups — Displays all the User Groups created in the PBX that is synced with the user's customer
account.
• Personal — Displays all the personal contacts synced from the user’s Office 365 account.
Your contacts in the directory are represented by the different types of avatars listed below:
• If a contact has uploaded an image, it is displayed as that person's avatar.
• If a contact has not uploaded an image, the avatar defaults to that person's initials.
•
If a contact does not have the Mitel One application, the avatar displays a blue phone icon ( ),
which means you can call this person (at the person's Mitel desk phone), but cannot message that
person.
•
The avatar of a User Group created in the PBX displays the icon followed by the Name of the
Group, if any.
The Search icon ( ) in the Contacts menu enables you to search through the contact list to quickly find
the contact you want to communicate with. For more information, see Find a Contact on page 176.
Note:
The Office 365 contacts are supported in the Mitel One web application. For more information, see
Global Search.
To view the contact details and your recent call history with a contact, click the contact from the Contacts
menu or the Home screen. The contact's information page appears. The Details section displays the
phone number and email address of the user. The Activity section displays your recent call history with the
user.
User Guide 174

Contacts
Following is a summary of how to use the icons and contact options shown in the preceding image.
•
— Click this icon to call the primary telephone number of the contact.
•
— Click this icon to open the messaging window where you can send a message to the contact.
•
— Click this icon to start a meeting with the contact.
•
MOBILE — Displays the contact's mobile phone number. Click the associated icon to call the
contact's mobile phone number. Click the associated icon to message the contact's mobile
phone number.
•
WORK — Displays the contact's work phone number. Click the associated icon to call the
contact's work phone number.
•
EMAIL — Displays the contact's email address. Click the associated icon to send an email to the
contact.
175 User Guide

Contacts
7.2 Find a Contact
The Contacts menu enables you to search for contacts, User Groups, and optionally, personal contacts, to
quickly find the people you want to call, message, or initiate a meeting with.
All of your business contacts are available in the Mitel One web application by default.
To enable the app to access the personal contacts on your Office 365 application, do the following:
Note:
To set up Office 365 integration, a Mitel Partner or the Account Administrator of your CloudLink
Account must have enabled Microsoft Office 365 integration for your account in the Mitel
Administration. For more information, contact your Account Administrator or see Integrating Microsoft
Office 365 with Mitel Administration.
1. Click the Personal tab in the Contacts menu.
2. Click the Sign in button associated with Office 365. The Microsoft login page opens.
3. Enter your Office 365 credentials and click Sign in. Select the Keep me signed in check box to stay
signed in to your Office 365 account.
User Guide 176

Contacts
Note:
Contact your CloudLink Account administrator or see the topic Integrating Microsoft Office 365 with
Mitel Administration if you are not able to synchronize the Office 365 contacts using this option or if
the message shown in the following screen capture is displayed.
The personal contacts in your Office 365 account will be synced with the application and will be
displayed within the Personal tab.
177 User Guide

Contacts
Note:
• When you log in to your Office 365 account, all details in the incoming call screen, outgoing call
screen, and call history that are from the consolidated directory will be overridden with details from
personal contacts in Office 365.
• Only the personal contacts and details added by users to their Office 365 account will be synced
with the application.
• The maximum number of contacts that will be synced is 5000. If the user has more than 5000
contacts, an error message will be displayed, and no contacts will be synced.
• After synchronization, the linked contacts in Office 365 will appear as two separate contacts in the
application.
• After you add a personal contact in your Office 365 account, you must restart the Mitel One web
application for the contact details to be updated in the application.
• After you edit or delete a personal contact in your Office 365 account, for the contact to be updated
in the Mitel One web application, you must perform a manual re-sync of the application with Office
365 if your Office 365 authentication has expired. You can do this by clicking the Sync contacts
option in the Personal tab of the Contacts menu of the application.
• The personal contacts in your Office 365 account will not be synchronized when you log out of
the Mitel One web application. Therefore, you must enable the application to access the personal
contacts on your Office 365 application by signing in to the Office 365 account each time you log in
to the application.
To search for a contact:
1.
Click the icon in the navigation menu. The Contacts menu opens.
2.
Click the Search icon ( ) at the top of the contact list.
3. In the Search area that appears, type the first few letters of the contact's first name or last name.
Note:
If you are searching by last name, you must type # followed by the first few letters of the last name
(the # is not required if an OIP is used for an external contact database).
4. When a match is listed, click the contact.
5. The contact's information page appears, where you can click the respective icons to call, message,
meet, or click Activity to view your call history with this contact.
To remove the personal contacts:
1. Click your avatar from the header bar. From the drop-down menu, click Settings and preferences. The
Settings panel opens displaying the General tab.
User Guide 178

Contacts
2. Click the Sign out button to remove the personal contacts from the application.
7.3 View Contact’s Status
You can view a contact's availability status (presence) in the following ways:
• Contact Tiles on the Home Screen — Access the Home screen. Each contact's availability status is
displayed as a colored circle on the lower-right side of each tile.
• Group Tiles on the Home Screen — Access the Home screen, and click any Group. In the Group
screen that opens, each group member's availability status is displayed as a colored circle to the lower-
right of each tile.
• In the Contacts menu — Access the Contacts menu and click any contact. The contact's status is
displayed as a colored circle to the lower-right of the contact's avatar.
• In the Phone widget — Access the Home screen. The availability status is displayed as a colored
circle on the lower-left side of each entry in the widget.
The following describes the different presence status for a contact:
•
— Indicates that a contact is available to message or receive calls.
•
— Indicates that a contact is busy on a call or does not want to message or receive calls.
•
— Indicates that a contact is not available and does not want to message or receive calls.
179 User Guide

Contacts
•
— Indicates that a contact is away or have locked their system or mobile.
•
— Indicates that a contact has not yet set their own presence in the Mitel One web application.
To learn more about managing your own availability status, see Set Your Presence and Status Message on
page 25.
Note:
Regardless of a contact's availability status, you can always send them a message.
7.4 Manage User Groups
Mitel One users can create User Groups in the FAVORITES widget of the Mitel One web application. User
Groups typically consist of contacts who are members of a specific team or contacts with whom you need
to have recurring group conversations.
Note:
You can edit the members in a User Group, or start a messaging session or a meeting with the
members of the group from the application. However, you cannot place a group call to a User Group.
Create a Group
To create a new User Group:
1.
Click the icon in the FAVORITES widget. The widget panel opens.
2. Click Create a group. The Create a group panel opens.
3. Enter a name for the group in the Group name field.
User Guide 180

Contacts
4. To add Group members, in the Search to add members field type the name or email address of the
contact you want to add. The search field displays a list of contacts whose names or email addresses
match the letters that you type.
5. Click a name to add that contact to the group.
6. Click CREATE. Clicking CANCEL cancels the operation.
Edit a Group
To edit an existing User Group:
1.
Click the icon in the FAVORITES widget. The widget panel opens.
181 User Guide

Contacts
2.
Hover over the User Group you want to edit and click the icon. The Group details panel opens.
• To add contacts to the Group:
a.
Click the icon. The Add Users panel opens.
b. In the Search to add members field type the name or email address of the contact you want
to add. The search field displays a list of contacts whose names or email addresses match the
letters that you type.
User Guide 182

c. Click a name to select that contact.
d. Click ADD to add the contact to the group. Clicking CANCEL cancels the operation.
•
To remove a contact from the User Group, click the icon displayed on the contact you want
removed.
• To edit the Group name, enter the new name in the Group name field.
3. Click SAVE to save the changes, or click CANCEL to discard the changes.
Note:
Any time while editing the Group, to navigate back to the FAVORITES widget screen, click the
icon at the top-right corner of the Group details panel. If you do this before clicking SAVE, all the
changes will be discarded.
Delete a Group
To delete an existing User Group:
1.
Click the icon in the FAVORITES widget. The widget panel opens.
2.
Click the icon displayed on the User Group you want to delete.

Quick Functions
8
This chapter contains the following sections:
• Adding a Quick Function
• Using a Quick Function
• Editing a Quick Function
• Deleting a Quick Function
• Supported Quick Functions
The Mitel One web application allows you to store frequently used function types in the MiVoice Office 400 PBX
as Quick Functions in the application. You can activate or deactivate a function by selecting the corresponding
quick function key.
Note:
You must have telephony enabled in your CloudLink account to use the Quick Functions feature.
For more information about how to configure a quick function key, and how these keys function, see the latest
version of MiVoice Office 400 System Functions and Features documentation.
8.1 Adding a Quick Function
User Guide 184

Quick Functions
Note:
You can add a maximum of 50 quick function keys in the Mitel One application.
To add a quick function key:
1. Access the Quick Functions menu by doing either of the following:
• Click SHOW ALL in the Quick Functions widget from the Home screen of the application.
•
Click the Quick Function icon ( ) from the navigation menu of the application.
The Quick Functions menu opens.
185 User Guide

Quick Functions
2. If you are adding a quick function for the first time, click ADD QUICK FUNCTION. If you are adding a
new quick function to an existing list of quick functions, click ADD at the top right of the menu. The Add
Quick Function panel opens.
User Guide 186

Quick Functions
3. Choose the function you want to add from the Choose Function type drop-down menu. Enter the
required details (function attribute, and UI display name), and click SAVE. Clicking CANCEL will cancel
the operation.
The function will be added to the Quick Functions menu.
Note:
The first four quick functions displayed in the Quick Functions menu will also be displayed in the
Quick Functions widget in the home screen of the Mitel One web application. You can re-arrange
the order in which the quick functions are displayed in the Quick Functions menu by using the EDIT
option. For more information, see Editing a Quick Function.
187 User Guide

Quick Functions
8.2 Using a Quick Function
After adding a quick function key in the Mitel One web application, you can trigger the function key by
selecting the icon corresponding to it, in the Quick Functions menu. When you trigger a quick function,
the application displays a call screen to indicate that the quick function is being executed. You will hear a
success tone if the function is successful, and a failure tone if the function fails.
Note:
• When a quick function is successful, it is indicated by two slowly alternating tones. A fast
intermittent tone indicates that the quick function has failed.
• For more information about why a quick function fails, see the latest version of MiVoice Office
400 System Functions and Features document. This document describes the pre-requisites that
must be ensured before using the quick functions, and the minimum system requirements and
permissions required for using the quick functions. You must ensure that these requirements and
permissions are in place in order to activate a quick function successfully.
User Guide 188

Quick Functions
8.3 Editing a Quick Function
To edit or update an existing quick function key:
1. Click the EDIT icon at the top right of the menu.
Note:
To re-arrange the quick functions, click EDIT and drag and drop the quick function icons to the
desired locations in the Quick Functions menu, and then click DONE.
2.
Click the icon associated with the function key you want to edit.
The Edit Quick Function panel opens.
189 User Guide

Quick Functions
3. Edit the required details (function attribute, and UI display name), and click SAVE to update the quick
function. Clicking CANCEL cancels the operation.
8.4 Deleting a Quick Function
To delete an existing quick function key:
1. Click the EDIT icon at the top right of the menu.
User Guide 190

Quick Functions
2.
Click the icon associated with the function key you want to delete. A confirmation message is
displayed.
3. Click DELETE to delete the quick function key. Clicking CANCEL cancels the operation.
8.5 Supported Quick Functions
Following is a list of quick functions supported by the Mitel One web application. For more information
about each function key, see the latest version of MiVoice Office 400 System Functions and Features
documentation.
Quick Function Name Description MiVoice Office 400 Access Co
de
Custom function This quick function type allows a
user to create a single-action or
double-action function. For more
information see, Custom Quick
function.
You must provide the correct
codes specific to a quick
function. For more information
about the codes needed, see
the latest version of MiVoice
Office 400 System Functions
and Features.
191 User Guide

Quick Functions
Quick Function Name Description MiVoice Office 400 Access Co
de
Fast take This quick function combines
the features of the two quick
functions - Take a call and Pick
up a call.
*88
Log in / Log out of one user
group
This quick function allows a user
to log out of a single user group
and log in again.
*48 / #48
Log in / Log out of all user
groups
This quick function allows a user
to log out of all the user groups
and log in again.
*4800 / #4800
Switch switching group This quick function allows a
user to manually switch the call
routing between the predefined
routes; for example, Night
service.
*85
Activate Personal call routing This quick function allows a user
to specify, the terminal to which
a call must be routed to from the
call terminals assigned to the
user.
*45
Enable / Disable Call Forward
unconditional to destination
This quick function allows a
user to set the predetermined
location the call will be forwarded
to, when the unconditional call
forward feature is enabled.
*21 / #21
Enable / Disable Call Forward
unconditional pre-configured
This quick function allows a
user to enable or disable the
unconditional call forward to the
predetermined destination.
*22 / #22
Set Call Forward Busy
destination
This quick function allows a
user to set the predetermined
location the call will be forwarded
to, when the call forward busy
feature is enabled.
*67
User Guide 192

Quick Function Name Description MiVoice Office 400 Access Co
de
Enable / Disable Call Forward
Busy to destination
This quick function allows a user
to enable or disable the busy call
forward to the predetermined
destination.
*67 / #67
Enable/Disable Call Forward No
Reply to destination
This quick function allows a user
to set the predetermined location
the call will be forwarded to,
when the call forward no reply
feature is enabled.
*61 / #61
Enable / Disable Call Forward
No Reply pre-configured
This quick function allows a
user to activate or deactivate
Call Forwarding on No Reply
(CFNR).
*62 / #62
Call Pickup This quick function allows a user
to pick up and answer a call from
a different terminal or device
than the one to which the call is
routed to.
*86
Activate / Deactivate CLIR
permanently
This quick function allows a
user to permanently activate
or deactivate suppressing the
display of the call number to the
called party (CLIR).
*31# / #31#
Clear Configuration This quick function allows a user
to clear all the personal functions
that are activated except logging
in/out in user groups, and status
of CLIR permanent.
*00

Technical Guidelines
9
This chapter contains the following sections:
• System Requirements
• Bandwidth Requirements
• Firewall Settings
• Network Handling and Requirements
• Scalability
9.1 System Requirements
Supported Browsers
The Mitel One web application supports the following browsers:
Browser Version
Apple Safari 14.1 or later
Google Chrome 94 or later
Microsoft Edge 90 or later
Mozilla Firefox 90 or later
Note:
When you join a Mitel One meeting using the Firefox browser, you are prompted to allow device
permissions for microphone and camera in the Welcome page. You must click Allow and then select
the check box Remember this decision. If you do not select the check box, you are prompted again
for device permissions after you join the meeting.
Supported Headsets
Audio routing on Mitel One web application works with various brands and models of headsets and
external audio devices. Mitel recommends a USB headset with an extended microphone for an ideal audio
experience. Because numerous headset options are available to customers, Mitel does not currently
guarantee full interoperability between Mitel One web application and specific headsets. You must exercise
your own due diligence to make sure that your headset has the capabilities to fulfill your requirements.
User Guide 194

Technical Guidelines
Note:
When using Bluetooth headsets with the Mitel One web application, users might experience a 2-
second delay before audio is heard after they click to answer an incoming call.
For information regarding the minimum system requirements for using the Mitel One web application, see
System Requirements.
9.2 Bandwidth Requirements
Mitel One web application works with IPv4 and IPv6 networks. The application will connect to the
user’s preferred Wi-Fi network if that network is available. If there are problems with your Wi-Fi network
connectivity, a Trying to connect, or a Device offline. Functionality will be limited alert appears.
When this occurs, you may be unable to log in to the application. If this issue persists, contact your IT
administrator. The voice quality and the connectivity depends on the network strength.
The following table specifies the recommended bandwidth for a single Mitel One call.
Network Kbps Codec
Wi-Fi 220 G.711 and Opus
Following are the bandwidth requirements for using various features of Mitel One Meetings.
Upload Bandwidth (Send)
No. of Participants Audio Video Screen Share
2 or more 54 kbps 1600 kbps 1200 kbps
Download Bandwidth (Receive)
No. of Participants Audio Video Screen Share
2-16 54 kbps 1600 + (( n-2) * 400) kbps 1200 kbps
n is the number of participants in a meeting.
The upload and download bandwidth mentioned in the table are the maximum values obtained during
testing. The actual values will vary depending on the following factors:
• The resolution of the camera used for the meeting.
• The type of camera used for the meeting.
195 User Guide

Technical Guidelines
• The user’s Internet speed.
• The actual bandwidth utilization of other activities during the meeting such as desktop sharing or screen
sharing.
Note:
Using Active Talker further increases the download bandwidth because this feature tile alone requires
1600 kbps of bandwidth.
Bandwidth requirements depend on the number of participants in a meeting, and the features that are
being used by the participants during the meeting (video, screen share, and so on.)
For more information about bandwidth requirements, the call flows, and bandwidth optimization, see
System Requirements.
9.3 Firewall Settings
For information about the performance profile and network requirement prerequisites, see the following
sections in the CloudLink Gateway User Guide.
• Configuration Prerequisites
• Network View
• Mitel One Web
9.4 Network Handling and Requirements
VPN Recommendations
• Configure VPN to connect over UDP
• Use split tunneling configuration when possible
• Do not set MTU limit unless necessary
The following table summarizes the expected behavior when you switch between access points or
networks during an ongoing call.
User Guide 196

Technical Guidelines
Call Flows Call behavior on the app for
calling party
Call behavior on the app for
receiving party
During an ongoing call, if
you switch between access
points of the same type and
configuration within the same
WiFi network having the same
access password
The call will continue as normal. The call will continue as normal.
During an ongoing call, if you
switch between access points
of different types within the
same Wi-Fi network, or between
different WiFi networks with
different access passwords
The call is disconnected.
Note:
If you are not the one who
switched between the
access points, your screen
will continue to display the
ongoing call screen until
you disconnect the call.
The call is disconnected.
Note:
If you are not the one who
switched between the
access points, your screen
will continue to display the
ongoing call screen until
you disconnect the call.
During an ongoing call, if you
switch to no network
The call is disconnected after 3
seconds.
The call is disconnected after 3
seconds.
During an ongoing call
connected on WiFi if you switch
to no network and then back to
WiFi
The call will continue without
audio and if switched back to
WiFi within 3 seconds, the call
may continue with audio.
The call will continue without
audio and if switched back to
WiFi within 3 seconds, the call
may continue with audio.
During an ongoing call, if you
switch between access points
of the same network but of a
different type; for example, if you
switch from a WiFi network to a
wired network or vice-versa
The call is disconnected.
Note:
If you are not the one who
switched between the
access points, your screen
will continue to display the
ongoing call screen until
you disconnect the call.
The call is disconnected.
Note:
If you are not the one who
switched between the
access points, your screen
will continue to display the
ongoing call screen until
you disconnect the call.
197 User Guide

Technical Guidelines
The voice service in the Mitel One application is VoIP-based (voice over IP); it uses your internet
connection to route calls. Therefore a good signal strength is necessary to place or receive calls using the
application. The following dBm values can be used as a reference to determine whether the signal strength
is sufficient to successfully use the application.
Scenario Signal Strength
Signal strength RSSI or dBm > = -50 Excellent
Signal strength RSSI or dBm > + -70 and < -50 Good
If none of the above conditions are met Poor
9.5 Scalability
The following table summarizes the maximum number of participants, duration, and file size supported in
Mitel One Meetings.
Maximum number of participants supported in a meeting 100
Maximum number of video participants supported in a meeting 16
Maximum duration of a meeting 20 hours
Maximum recording storage per user 5 GB
Maximum file size supported per participant in a meeting 10 MB
The following table summarizes the maximum number of Mitel One users, and the maximum number of
simultaneous calls supported on the MiVoice 400 PBX.
Testing
Envi
ronment
Mini
mum
Rele
ases
MiVo
ice Offi
ce 400
Clou
dLink Ga
teway
Maxi
mum
Mitel
One Us
ers
Maximum Simultan
eous Call (Direct Sw
itching)
Maximum Simultan
eous Call (Indirect
Switching)
SMBC -
Internal
CloudLink
Gateway
6.3 or
later
SMBC Embedded
in SMBC
50 • 25 Mitel One to
Mitel One
• 50 Mitel One to
Internal
• 50 Mitel One to
PSTN
• 16 Mitel One to
Mitel One (GSM)
• 12 Mitel One
(GSM) to Mitel
One (GSM)
• 15 Mitel One to
Mitel One
• 15 Mitel One to
Internal
• 15 Mitel One to
PSTN
• 16 Mitel One to
Mitel One (GSM)
• 12 Mitel One
(GSM) to Mitel One
(GSM)
User Guide 198

Technical Guidelines
Testing
Envi
ronment
Mini
mum
Rele
ases
MiVo
ice Offi
ce 400
Clou
dLink Ga
teway
Maxi
mum
Mitel
One Us
ers
Maximum Simultan
eous Call (Direct Sw
itching)
Maximum Simultan
eous Call (Indirect
Switching)
Mitel
470 -
External
CloudLink
Gateway
Physical
Mitel
470
CloudLink
Gateway
300 • 25 Mitel One to
Mitel One
• 50 Mitel One to
Internal
• 50 Mitel One to
PSTN
• 16 Mitel One to
Mitel One (GSM)
• 12 Mitel One
(GSM) to Mitel
One (GSM)
• 25 Mitel One to
Mitel One
• 50 Mitel One to
Internal
• 50 Mitel One to
PSTN
• 16 Mitel One to
Mitel One (GSM)
• 12 Mitel One
(GSM) to Mitel One
(GSM)
Virtual
Appliance
-
Virtualized
CloudLink
Gateway
Virtual
Appliance
OVA 300 Default appliance
with 1 core CPU and
2GB RAM
• 25 Mitel One to
Mitel One
• 50 Mitel One to
Internal
• 50 Mitel One to
PSTN
• 16 Mitel One to
Mitel One (GSM)
• 12 Mitel One
(GSM) to Mitel
One (GSM)
Default appliance
with 1 core CPU and
2GB RAM
• 25 Mitel One to
Mitel One
• 50 Mitel One to
Internal
• 50 Mitel One to
PSTN
• 16 Mitel One to
Mitel One (GSM)
• 12 Mitel One
(GSM) to Mitel One
(GSM)
199 User Guide

Technical Guidelines
Testing
Envi
ronment
Mini
mum
Rele
ases
MiVo
ice Offi
ce 400
Clou
dLink Ga
teway
Maxi
mum
Mitel
One Us
ers
Maximum Simultan
eous Call (Direct Sw
itching)
Maximum Simultan
eous Call (Indirect
Switching)
Large appliance
with 8 core CPU and
4GB RAM
• 125 Mitel One to
Mitel One
• 125 Mitel One to
Internal
• 125 Mitel One to
PSTN
• 16 Mitel One to
Mitel One (GSM)
• 12 Mitel One
(GSM) to Mitel
One (GSM)
Note:
125
simultaneous
calls are
supported only
if the appliance
is upgraded to
OVA version
1.1.3 or later.
Large appliance with
8 core CPU and 4GB
RAM
• 125 Mitel One to
Mitel One
• 125 Mitel One to
Internal
• 125 Mitel One to
PSTN
• 16 Mitel One to
Mitel One (GSM)
• 12 Mitel One
(GSM) to Mitel One
(GSM)
Note:
125
simultaneous
calls are
supported only if
the appliance is
upgraded to OVA
version 1.1.3 or
later.
User Guide 200

Testing
Envi
ronment
Mini
mum
Rele
ases
MiVo
ice Offi
ce 400
Clou
dLink Ga
teway
Maxi
mum
Mitel
One Us
ers
Maximum Simultan
eous Call (Direct Sw
itching)
Maximum Simultan
eous Call (Indirect
Switching)
MSL
7.0
HF2 or
later
Virtual
Appliance/
MSL
OVA/MSL 300 Default appliance
with 1 core CPU and
2GB RAM
• 25 Mitel One to
Mitel One
• 50 Mitel One to
Internal
• 50 Mitel One to
PSTN
• 16 Mitel One to
Mitel One (GSM)
• 12 Mitel One
(GSM) to Mitel
One (GSM)
Large appliance
with 8 core CPU and
4GB RAM
• 125 Mitel One to
Mitel One
• 125 Mitel One to
Internal
• 125 Mitel One to
PSTN
• 16 Mitel One to
Mitel One (GSM)
• 12 Mitel One
(GSM) to Mitel
One (GSM)
Default appliance
with 1 core CPU and
2GB RAM
• 25 Mitel One to
Mitel One
• 50 Mitel One to
Internal
• 50 Mitel One to
PSTN
• 16 Mitel One to
Mitel One
• 12 Mitel One to
Mitel One
Large appliance with
8 core CPU and 4GB
RAM
• 125 Mitel One to
Mitel One
• 125 Mitel One to
Internal
• 125 Mitel One to
PSTN
• 16 Mitel One to
Mitel One (GSM)
• 12 Mitel One
(GSM) to Mitel One
(GSM)
Note:
The maximum values mentioned in the table are subject to available bandwidth. For information
regarding the best practices recommended for CloudLink site deployments, see Best Practices for Site
Deployments.

Report an Issue and Share Feedback
10
Let us know of any issues you encounter while using the Mitel One web application. We also encourage you
to share your ideas and suggestions about improving the application features. Use the following procedure to
report a problem or to share your feedback.
1. Click your avatar at the top left corner of the Mitel One web application.
2. From the drop-down panel, click Settings and preferences. The Settings panel opens.
3. Click the Issues & Feedback tab. The Submit an issue panel opens.
4. To submit an issue about the application, enter a title for the issue, choose which feature the problem belongs
to, and provide a brief description of the issue. Click Upload a file if you want to attach a screenshot that
clarifies the issue.
5. Click SUBMIT.
User Guide 202

Note:
• While submitting a problem report, provide as much information as possible. This will help troubleshoot
your problem quickly. Specific details are needed to correctly investigate and resolve an issue.
• Date, time, device information, and logs are collected as part of your problem report.
• After you report an issue, the Support Contact for your account will receive an email notifying that you
have reported a problem. The Support Contact, while investigating the issue, might reach out to you for
additional information.
• If your Support Contact needs assistance to resolve your issue, they will escalate the report through their
standard support procedures.
• You can follow up directly with your Support Contact for updates about your report.
To submit a new feature idea or feedback, click SHARE FEEDBACK. You will be redirected to a Mitel One
Feedback page in UserVoice, a third-party website where you can submit your ideas. Here, you can also vote on
the ideas submitted by other users.

mitel.com
Copyright 2024, Mitel Networks Corporation. All Rights Reserved. The Mitel word and logo are trademarks of
Mitel Networks Corporation, including itself and subsidiaries and authorized entities. Any reference to third party
trademarks are for reference only and Mitel makes no representation of ownership of these marks.
