
1
ACKNOWLEDGEMENTS:
The Colorado State 4-H Office/University Extension expresses gratitude and
appreciation to the following contributors for their revisions to the Creative Cake
Decorating Manual Units 4–6:
Helen Sembra, Professional Wilton Instructor
Kathy Hettinger, Colorado State Fair 4-H Cake Decorating Exhibit Superintendent
Pat Candelaria, Douglas County 4-H Leader
Connie Harris, Bent County 4-H Leader
Stephanie Morrison, Larimer County 4-H Leader
Julia Hurdelbrink, Adams County 4-H Agent
Gisele Jefferson, Golden Plains Area 4-H and Family & Consumer Science Agent
Karen Johnson, Class Content Manager, Wilton Brands
Jennifer Adams, Park County 4-H Agent
Special appreciation is expressed to Wilton Brands for permission to use illustrations
from its website and books.
Revised Fall 2019
Colorado State University, U.S. Department of Agriculture and Colorado counties cooperating and Colorado State University
Extension programs are available to all without discrimination. To simplify technical terminology, trade names of products and
equipment occasionally will be used. No endorsement of products names is intended nor is criticism implied of products not
mentioned.

2
The 4-H program encourages a process that allows youth to first learn by doing before being
told or shown how, and then to examine the experience. The experiential learning model
developed by Pfieffer and Jones (1985), modified by 4-H, includes five specific steps:
The Experiential Learning Process guides youth through a process of discovery with little
guidance from others. A situation, project or activity is presented that allows for individual
thought and problem solving. Outside assistance is provided only at a minimum and supports
learning by questioning at each stage. Youth in activities reflect on what they did, how they
learned and what could be applied to a life situation.
1) Experience Questions: How is it working? What else might you try? What might make it
easier?
2) Share Questions: What happened? How did you feel? What was the most difficult part?
3) Process Questions: What problems seemed to reoccur? What similar experiences have you
had?
4) Generalize Questions: What did you learn about yourself? What did you learn about the
activity? How does this relate to something else in life? How did you decide what to do?
5) Apply Questions: Where else can this skill be used? How will you use this in the future? What
will you do differently after this experience?
Colorado State University, U.S. Department of Agriculture and Colorado counties cooperating, and Colorado State University
Extension programs are available to all without discrimination. To simplify technical terminology, trade names or products and
equipment occasionally will be used. No endorsement of products names is intended nor is criticism implied of products not
mentioned. 2012
3
Table of Contents
Creative Cake Decorating Manual Units 4 – 6 (Overview) …………………8
Unit 4 (Character Cakes)………………………………………………………….…………..8
Unit 5 (Small Treats) ………………………………………………………………………..…8
Decorated Cupcakes …………………………………………………………..………8
Decorated Cookies ……………………………………………………………..………8
Cookie Construction ……………………………………………………………………8
Unit 6 (Cut-up and Sculptured Cakes) ……………………………………………………...8
Creative Cake Decorating Unit 4 (Character Cakes)……………………....….9
Goals for Unit 4…………………….…………………………………………………..………9
Exhibit for Unit 4 ..…………………….……………………………………………………… 9
Decorated Cake…………………………………………………………………..……………9
Frosting………….…………………………………………………………………………….10
Design……………………….…………………………………...……………………………10
Tips for e-Records……………………………………………………………………………10
Be Creative………………………………….…………………….….…………….…………11
Selecting Your Character Plan………………………………………………...……………11
Baking the Cake ………………………………………………………………….………….12
Pound Cake Recipe…………………………………………...………………………12
3-D Cakes…...……………………………………………...……………………………..….14
Preparing a Cake Board.….……………………….……………………………………..…15
Frosting the Cake.……………………………………………………………………………16
Suggested Steps …………………………………………………...…………………16
Decorating Help ……………………………………………………………………….17
4
Pressure………………………………………………………………………...………17
Frosting Your Character Cake …………………………………………………..…..17
Caring for Decorator Bags ………………………………………………….………..18
Icing Recipes ………………………………………………………………………………...18
References ……………………………………………………………………………...……21
Creative Cake Decorating Unit 5 (Small Treats) ………….…………………..22
Goals for Unit 5……………….…………………………………………..……………….....22
Decorated Cupcakes …………………………………………..……………………..22
Decorated Cookies ……………………………………………………………………22
Constructed Cookies …………………………………………..……………………..22
Exhibit for Unit 5 (three classes)…………………………………………..……………….23
Cupcakes ………………………………………………………………….…………..23
Themed ………………………………………………………….……………..23
Stacking ………………………………………………………………..………23
Character/Design ……………………………………………………..………23
Decorated Cookies ……………………………………………………..………….…23
Themed ………………………………………………………………………..23
Stacking ………………………………………………………………….…….23
Cookie Construction …………………………………………………………………..23
e-Record……………………………………………………………………………………....24
Tips for e-records ………………………………………………………………..………….24
Cupcakes ……………………………………………………………………..……………….25
Tips for Baking Cupcakes …………………………………………………………………..25
Cupcake Mix (recipe included) ………………………………………………………25
Preparing the Pan…………...…………………………………………………...……26
5
Baking Tools ……………………………………………………………………………....…26
Pans, Cups and Paper Lines ………………………………...………………………27
Filling the Cupcake Liners or Pans ………………………………………………….28
Frosting ……………………………………………………………………………………….30
How to Pipe a Cupcake Swirl …………………………………..……………………31
Buttercream recipe ………………………………………………………………...….32
Decorating Your Character Cupcake ………………………………….……………32
Design and Themes ………………………………………………………………………...33
Cupcake Characters ………………………………………………………………….33
Themed Cupcakes…………………………………………………………………….34
Stacking Cupcakes ……………………………………………………………………35
Storing Cupcakes ………………………………………………..……………………36
Transporting Cupcakes ………………………………………………..……………..36
Attaching Cupcakes to a Board ……………………………………………..………36
References .………………………………………………………………………………..…36
Decorated Cookies ……………………………………………..………………………….37
Tips for Baking Cookies …………………………………………………………………….37
Cookie Recipes ……………………………………………………………….……………..37
Tips for Rolling Dough ………………………………………………………..…………….38
Preparing Baking Pans ………………………………………………..……………………41
Baking Tools …………………………………………………………………………………42
Tips for Successful Cookies ………………………………………………………………..42
Icing Recipes …………………………………………………………………………………43
Decorating ……………………………………………………………………………………44
Transporting ……………………………………………………………………………...…..44
6
How to Make a Cookie Box ……………………………………………….………………..44
Themed Cookies …………………………………………………………………...………..44
Stacked Cookies ……………………………………………………...……………………..46
Cookie Constructions ……………………………………….…………………………….47
Tips for Construction ……………………………………………………….……………….47
Tips for Baking Cookie Structures ………………………………..………………………..47
Gingerbread Recipes …………………………………………..……………………………48
Rolling and Cutting Gingerbread……………………………………………………..50
Building Basics ……………………………………………………………………..…50
Baking Tools ………………………………………………………………..…………51
Assemble a Gingerbread House …………………………………………………………..51
Prepare Icing (two recipes) …………………………………………………………..53
Decorating ……………………………………………………………………………..54
Transporting ………………………………………………………………….………..55
Design ………………………………………………………………………………….55
Creative Cake Decorating Unit 6 (Cut-up and Sculpture Cakes) …...….56
Goals for Unit 6 ………………………………………………………………………………56
Exhibit for Unit 6 ……………………………………………..………………………………56
Decorated Cake ………………………………………………………..……………………57
Frosting Your Cake …………………………………………………….……………………57
Design …………………………………………………………………………...……………57
Tips for e-Records …………………………………..………………………………………57
Baking the Cake ………………………………………..…………………………………..58
Recipes …………………………………………………………...…………………………..58
Tips for Cut-up and Sculpted Cakes ………………………………………………………60
7
Preparing a Cake Board ………………………………………………………..…………60
Cutting the Cake ………………………………………………………………………..….60
Suggested Patterns for Cut-up Cakes ……………………………………………………61
Boat …………………………………………………………………………………....61
Fish …………………………………………………………………………….………62
Elephant ……………………………………………………………………………….62
Flat Bunny …………………………………………………………………………..…63
House Pattern………………………………………………………………………….64
Assembling and Decorating the Cake ……………………………….……………………65
Stacking ………………………………………………………………………………..65
Decorating ………………………………………………………………………..……65
Sculpturing Cakes ………………………………………………………………..………….66
Sculptured Bunny ……………………………………………………….…………….66
Sneakers …………………………………………………………………………….…67
References ………………………………………………………….………………………..68

8
CREATIVE CAKE DECORATING MANUAL UNITS 4-6
Learning Experiences Emphasized
(Refer to manuals and state fair requirements for exhibit requirements)
UNIT 4: One decorated character real cake (an entire cake which resembles the shape
of a character or object made without cutting) other than square, round, oblong, heart,
hexagon, oval or petal cake shape. Three-dimensional cakes are acceptable; they
should be primarily decorated with star tips and/or other tips appropriate to the design.
(Fondant or royal icing can be used only for decorations). Bottom base border that
frames the cake is required.
UNIT 5: Small Treats is divided into three sections: Decorated Cupcakes, Decorated
Cookies, and Cookie Construction.
A. Decorated Cupcakes – using decorating tips and edible items.
There are three classes in this unit that can be chosen for an exhibit.
1. Cupcake Design or Theme
2. Stacking Cupcakes
3. Character or Design using multiple cupcakes
B. Decorated Cookies – using decorating tips and edible items.
There are two classes in this unit that can be chosen for an exhibit
1. Themed Decorated Cookies
2. Stacked Decorated Cookies
C. Cookie Construction – using decorating tips and edible items.
There is one class in this unit.
1. Cookie Structure
UNIT 6: One decorated real cut-up or sculpted cake using three different types of
decorating tips (not different sizes of the same tip) and edible materials for decorations.
(Non-edible items can NOT be used). (Fondant or royal icing can be used only for
decorations). Non-edible internal supports are allowed but must not show.
Note: Units 4 and up do not have to be taken in order as numbered.

9
Creative Cake Decorating Unit 4—Character Cakes
This year you will use cake decorating tips and character pans. It will take practice to
learn to control the tips but many fun and interesting cakes can be created.
Practice does not always have to be done on a cake. It can be done on waxed paper, a
smooth plastic place mat or cutting board, or practice board. Then the icing can be
scraped up and used over and over.
Goals for Unit 4
1. Learn to use a character cake pan (a pan with shaped sides and molded top).
2. Begin to develop skill in using the tips recommended for decorating the cake
selected. Example: star tips, grass tip, round tip, leaf tip, also #2010-triple star
tip.
3. Develop skill in mixing colors and using them effectively.
4. Bake and decorate a minimum of three cakes plus your exhibit cake (total of 4).
Exhibit for Unit 4
1. One decorated character real cake (an entire cake which resembles the shape
of a character or object made without cutting) other than square, round, oblong,
heart, hexagon, oval or petal cake shape. 3-D shapes are acceptable. Cakes
should be primarily decorated using the star, grass, round, leaf tips and/or other
tips appropriate to the design.
2. Your completed Cake Decorating e-Record in a sturdy binder/notebook should
accompany the cake. Note: Take a picture or make a simple drawing. Then
write a short explanation of what you did and what you learned with each cake
you decorated.
3. Fair Secret — Let the cake air dry; DO NOT FREEZE or refrigerate.
Decorated Cake
1. The cake must be baked by the exhibitor. This should be noted in the e-Record.
It also may be discussed at interview judging.
2. The cake should be placed on a very firm disposable cardboard surface (foam
core, cardboard, particle board, etc.) which will not sag with the weight of the
cake. Cut the base board to be approximately the shape of the cake. Note: this
10
is required so the member and/or the judge do not accidently put their finger into
the border.
3. The cake board must be covered with a food safe material –examples are
aluminum foil, Wilton --Fanci-Foil wrap, or freezer paper. If you use a decorative
or gift wrap paper or fabric, it must be covered in food quality plastic wrap.
Frosting
1. All areas should be covered with frosting with no cake showing through.
2. Decorator icing should be the proper consistency for work being done. (No
Royal Icing may be used.)
Design
1. Decorations covering each area of the cake should be uniform in size and evenly
spaced.
2. Colors should not “bleed” into each other.
3. Non-edible items (plastic, paper, toothpicks) cannot be used on the cake.
4. Tips used should be appropriate for the design selected. Example: Star tips –
large or small stars depending on the detail; grass tip—for hair. #2010 triple star
tip (remove the coupler from the bag and drop the tip in the bag), outline with a
round tip, etc.
5. Edible items may be used for decorations. Example: gum drops or mini Oreos
for eyes on an animal pan, etc.
Tips for e-Records
1. Cake Decorating e-Records should be neat and complete. Instructions should
be followed.
2. Cake Decorating e-Records should show that a minimum of three cakes plus the
fair exhibit have been made (total 4).
3. Cake Decorating e-Record books will count 25 percent of the placing score.

11
Be Creative
Look at pictures in books and online to see how you can use one pan for several
characters. For example: a panda bear might be made into many different “care”
bears. Experiment with different decorating tips to see how you can use them to create
different effects on the cake.
Selecting Your Character Pan
Many choices of pans are available to you. They may be light or medium weight,
aluminum or old cast iron pans. They may just have the outline of the character or they
can be shaped on the bottom to give contours. They can be flat or stand-up characters.
1. If you are not sure that you want to get into cake decorating on a large scale,
you might want to choose a character pan kit as found in craft stores or online.
This contains:
A light-weight aluminum pan
Plastic decorating bags
Plastic decorating tips
Food coloring for this design
Directions
2. If you are sure that you want to continue in cake decorating, you will probably
want to get a permanent set of cake decorating tools and a regular weight
character pan. You could exchange pans with other club members or your
leader to have different characters available and different experiences in
decorating. You might also want to watch garage sales for character pans.
NOTE: If you can stack or layer them, they are not character pans (i.e. petal pans,
heart, round or square pans).

12
Baking the Cake
Refer to the Units 1-3 manual for information on baking the cake. You will want to keep
the following points in mind for character cakes.
Use pound cake or Bundt cakes for 3-D or stand-up character cakes. Other types of
cakes are too fragile. If you use Helen’s Box Cake recipe from Units 1-3, substitute milk
for water (1-1/3 cup) and add an additional egg (for a total of 4 eggs) and a small box of
instant pudding and pie filling mix (your choice of flavor) and required vegetable oil
according to mix instructions. Bake according to instructions. This makes a great
pound cake.
Helen Sembra’s Pound Cake Recipe
1 Cake Mix
2 Tablespoons Meringue Powder
1/3 cup Wesson or Crisco Oil
1 (3.4 ounce) Instant Pudding & Pie Filling Mix
1/4 cup Flour
1-1/3 cup Milk
Combine all the above ingredients and beat at medium speed until satiny smooth
and thick.
Add:
4 Eggs
Beat on low speed only until eggs are incorporated. Do not over beat.
Bake at 325˚ for approximately 60-minutes. Test cake for doneness with
toothpick.

13
1. Preheat oven to temperature specified in recipe or on packaged mix.
2. Generously grease the inside of the character
cake pan with solid vegetable shortening. Use a
pastry brush or paper towel to spread the
shortening evenly, and make sure that all inside
surfaces (sides, corners, indentations) are well
covered.
3. Sprinkle flour inside the pan and shake the pan
back and forth so the flour covers all the greased
surfaces. Tap out excess flour, and if any shiny spots
remain, touch up with more shortening and flour. This
important step will help prevent the cake from sticking
to the pan.
You may also use an aerosol spray product that has
the grease and flour mixed in it.
4. Bake the cake according to the temperature and time specifications in the
recipe or on the package instructions.
5. Before removing the cake from the pan, check to make sure that the sides are
released (pulled away from the pan). If the cake has a slightly risen top, place
parchment paper over the cake and put the cake rack on top and slightly press
down, holding down for a minute or two to even the cake. Or you may cut it off
with a long-serrated knife or a
long piece of dental floss while
the cake is in the pan to be sure it
is level. To remove the cake
from the pan, place the cake rack
against the top of the cake and
turn both the cake pan and the
rack over.

14
Lift pan carefully.
If the cake will not release from the pan, return it to a warm oven, 250°, for a few
minutes and repeat the procedure. Cool the cake completely or freeze. Placing
the cake in the freezer until frozen will keep the cake moist and firm and easier to
decorate. Then brush the loose crumbs off the cake and it’s ready to ice.
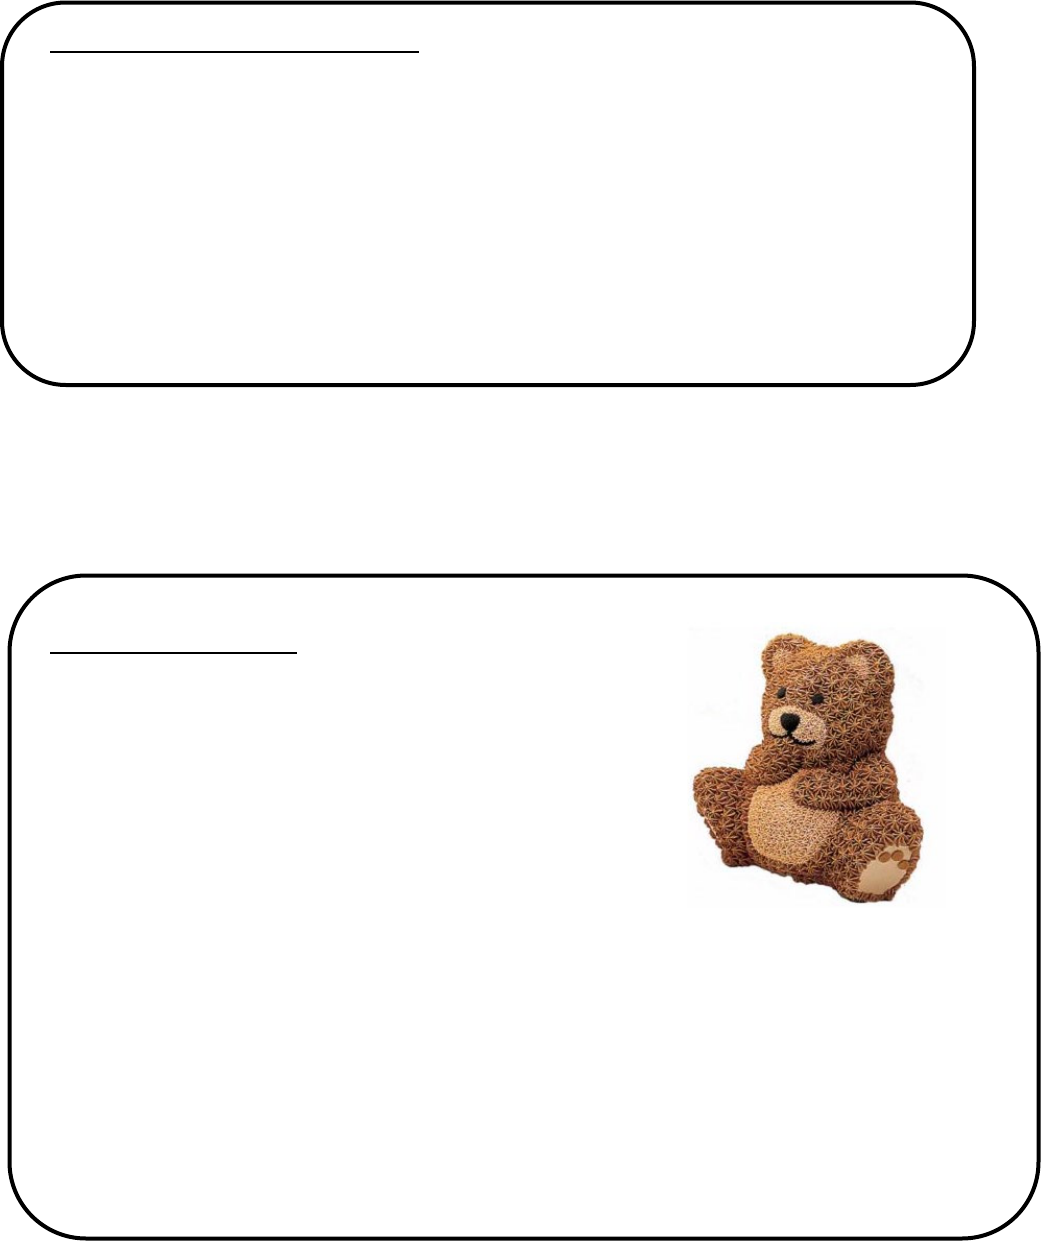
3-D Cakes
3-D pans are also available for your character cakes
and are acceptable for this unit. The two-piece pans
form both sides of a stand-up figure. Be sure to use a
pound or Bundt cake or a recipe which produces a very
firm cake.
Prepare the mold by generously greasing both inside
halves. If the mold has a hollow baking core, grease the
outside. Then lightly dust all surfaces with flour.
1. Shake off excess flour and make sure there are no shiny parts of the mold or
baking core exposed. It is important to have all the mold’s indentations and
the baking core well coated as it prevents the cake from sticking.
2. Fasten the mold with the clamps provided, making sure both halves fit snugly
together. Invert the assembled mold and place on a baking pan or aluminum
foil to catch any batter that may seep through or overflow during baking. Pour
the amount of cake batter called for in pan directions into the inverted mold.
3. Insert the hollow baking core, which has been greased and floured, into the
center of the 3-D mold and twist flanges to secure.
4. Bake the 3-D cake in a 325°F oven for 60 minutes or until done. When
finished baking, remove cake mold from the oven and cool upright for about
10 minutes.
5. After cooling for 10 minutes, gently turn the center core clockwise, easing it
out of the cake. With the baking core removed, place mold face down,
release clamps and tap the back of the mold free with the handle of a spatula.
Figure 1: Picture taken from Wilton website:
www.wilton.com

15
Replace mold on this loosened back half, turn the mold face up and tap the
front of the mold free. Now remove the front half of the mold and let the cake
rest face up until cool to the touch. This will prevent cracking. Total cooling
time should be at least 35 minutes. Stand the cake upright, remove the other
half of the mold and place the cake on a board for decorating.
6. Spaghetti sticks may be used inside stand-up characters to reinforce weak
areas (ears, etc.).
7. Decorate the cake as recommended with recipe instructions or use your own
ideas.
Preparing a Cake Board
Your shaped cakes will look best on a cake board that follows the contours of the pan.
1. Select smooth, clean corrugated cardboard, foam core board, plywood or particle
board.
2. Measure and cut one piece of base material to the desired size. Turn your pan
upside down on the base material and draw a line 1-½ to 3 inches (2 inches is good)
from the edge of the pan on all sides. Cut out board with a knife.
3. If using cardboard turn a second piece so the corrugation is going in the opposite
direction. Cut the same shape. Having the pieces go in opposite directions will make
the finished board stronger and prevent warping. Glue the boards together. If using
foam core board or wood, only one thickness is needed.
4. Trace board shape onto foil, or other covering material, making outlines 2 inches
larger than the board all the way around.

16
5. Put a circle of glue on side and center of board. To secure the covering to the
surface of the board, outline the board with glue as well as placing glue in multiple
places throughout the board. Be sure it is centered on the covering.
6. Slash to within 1/4 to 1/2 inch of the board
about every 1/2 to 3/4 inch around the edge.
Be sure there is a slash where the pan
changes direction sharply.
7. Put glue around back side of board and
glue all pieces to the back.
8. Cut a piece 1/2 to 1 inch smaller in diameter than the board being covered. Glue on
back of board to cover the bottom and edge which have been turned back.
Frosting the Cake
Select a Good Frosting
Use one of the recipes you found in Units 1-3 or one which your instructor or leader
recommends.
Suggested Steps to Follow When Frosting a Character Cake
1. Cool cake thoroughly before frosting. If possible, bake the cake the day before
decorating day and freeze in foil or a plastic bag. Freezing helps eliminate crumb
problems. Be sure to thaw the cake slightly before beginning to frost.
2. Place a “dob” of frosting on cake board. Place the cake on top and center the cake
on the board. Gently twist to secure. This prevents the cake from slipping.
3. Be sure the contoured side of the cake is on top.

17
4. Brush loose crumbs from sides and top of cake.
5. Use a crumb coating, if needed. This is made by slightly
thinning the frosting to a soft consistency and applying a thin layer
to the cake. Crumb coating done in the color to be used will help
to prevent cake showing through if stars, etc., are not close
enough. Air dry the cake before applying the finish coat of frosting.
6. Be sure to clean the edge of your board.
Decorating Help (refer to the cake decorating website at:
http://co4h.colostate.edu/projects/manuals/4-HCakeDecoratingOnline.pdf
Pressure
The steadiness and amount of pressure applied to the decorating bag will determine the
size and uniformity of any frosting design. Some decorations require an even pressure,
others a varying application of light, medium or heavy pressure. The more you control
the pressure, the more exact your decoration will be.
Frosting Your Character Cake
The shape and design of your cake will determine the techniques you use in decorating.
Basic steps will include the following:
1. Ice any larger background areas which will be smooth when finished.
Areas to be completely covered with stars, etc., need not be iced.
2. With a toothpick, mark the dividing lines on the design. Cover these
marks with a string (outline) of frosting using a round tip.
3. Fill in the areas with the tip suggested, keeping the size consistent and
lines straight. Dark colors should be allowed to dry before adding
adjoining colors so the colors will not “bleed.”
4. Some shaping can be done with a spatula dipped in cornstarch or your
finger dipped in cornstarch.

18
Caring for Decorator Bags
(refer to website page):
https://youtu.be/q7GwMI3qO8k
Buttercream Recipe 1
1-1/2 cup Crisco or Sweetex
1-1/2 sticks of butter, softened but not melted
2 pounds confectioners’ sugar
2 tablespoons milk or water
1 teaspoon flavoring
Pinch of salt
Cream shortening, butter, flavoring, water and salt. Add sugar and blend slowly. Beat
on medium speed until color becomes a little whiter, about 3 to 5 minutes. Note: If
beaten on high speed, too much air will be incorporated into the frosting and it will be
more difficult to smooth.
Figure 2: Picture taken from
Wilton website: www.wilton.com
19
Chocolate Buttercream Recipe 1
Add to Buttercream Recipe 1:
3⁄4 cup cocoa or three 1-ounce unsweetened chocolate squares, melted
1 to 2 additional tablespoons of milk if needed to soften.
Mix until well blended.
If the icing is too thin add more powdered sugar. If the icing is too thick, add small
amounts (1/2 teaspoon at a time) of milk or water until proper consistency is reached.
Buttercream Recipe 2
1-1⁄2 cups Crisco or Sweetex
1 teaspoon salt
2 teaspoons flavoring (clear or no color)
2 pounds confectioners’ sugar sifted (pure cane
confectioners’ sugar if available)
2 tablespoons of water
(1⁄4 cup of milk if you are going to use lavender color)
Blend the shortening, salt, and flavorings. Add the powdered sugar, then, add water
slowly and blend on medium speed until all the ingredients are mixed well. Blend 1 to 2
minutes until all the ingredients are creamy. Note: Altering the sugar, shortening, and
water ratio too much will cause the icing to break down and look greasy. Add 3 to 4
tablespoons of light corn syrup per recipe to thin for icing the cake.
Figure 3: Picture taken from www.wilton.com

20
Chocolate Buttercream Recipe 2
Add to Buttercream Recipe 2:
1⁄2 to 2/3 cup cocoa powder. If the icing is too thin add more powdered sugar. If the
icing is too thick, add small amounts of milk or water until the proper consistency is
reached
Snow White Buttercream Recipe
2/3 cup water
4 tablespoons meringue powder
12 cups sifted confectioners’ sugar (approximately 3 pounds)
1-1/4 cup Crisco or Sweetex
3/4 teaspoon salt
1/2 teaspoon almond flavoring
1/2 teaspoon clear vanilla flavoring
1/4 teaspoon butter flavoring
Combine the water and meringue powder. Whip at high speed until peaks form. Add 4
cups of sugar, 1 cup at a time, beating at low speed after each addition. Add the
shortening and the remainder of the sugar alternately. Add the salt and flavorings.
Beat at low speed until smooth.

21
Helen Sembra’s Buttercream for Fondant Looking Cakes Recipe (Stiff
Consistency)
2 pounds powdered sugar
4 tablespoons meringue powder
1 teaspoon salt (popcorn salt preferred—finer
in texture so will dissolve quickly)
1 cup Crisco
1/3 to ½ cup water (lukewarm)
2 teaspoon vanilla or flavoring of your choice
Combine powdered sugar, meringue powder
and salt together. Add remaining ingredients
and mix at low to medium speed until smooth.
Note: Experiment with each of these recipes until you decide which recipe works best
for you. Snow white buttercream icing has an ideal consistency for frosting cakes to
exhibit at shows and fairs.
References:
www.wilton.com
www.bettycrocker.com
http://co4h.colostate.edu/projects/manuals/4-HCakeDecoratingOnline.pdf
Key words:
Character Cakes
Also, YouTube has videos on character cakes that you might want to check out.
Figure 4: Easter Bunny: www.wilton.com

22
Creative Cake Decorating Unit 5—Small Treats
(Cupcakes, Decorated Cookies & Cookie Construction)
Goals for Unit 5
Decorated Cupcakes
1. Learn to bake cupcakes that are uniform in size and suitable for decorating.
2. Practice skills in using frosting and edible food items to create attractive and tasty
individual cake portions (cupcakes).
3. Practice skills in using decorating tips, mixing colors, textures, sizes, and edible
add-ons to effectively create a design or theme.
4. Bake and decorate a minimum of three batches of cupcakes plus your exhibit
cupcakes (total of 4). One batch = 12 cupcakes.
Decorated Cookies
1. Learn to bake cookies that are uniform in size and suitable for decorating.
2. Practice skills in using frosting and edible food items to create attractive and tasty
cookies.
3. Practice skills in using decorating tips, mixing colors, textures, sizes, and edible
add-ons to effectively create a design or theme.
4. Bake and decorate a minimum of three batches of cookies plus your exhibit
cookies (total of 4). One batch = 12 cookies.
Constructed Cookies
1. Learn to bake cookies that are suitable for constructing.
2. Practice skills in using frosting and edible food items to create attractive and
sturdy sound structures.
3. Practice skills in using frosting tips, mixing colors, textures, sizes, and edible add-
ons to effectively create a design.
4. Bake and decorate a minimum of 3 structures plus your exhibit structure (total of
4).
23
Exhibit for Unit 5
Class: Decorated Cupcakes using frosting and edible items. Fondant and royal icing
can be used only for decorations.
There are three classes in this unit that may be chosen for an exhibit.
1. Cupcakes
A. Themed Cupcakes. A minimum of 3 and maximum of 6 regular size (2-¾
inches) cupcakes in liners. Cupcakes should be of a similar design or
theme. Cupcakes should be displayed in a 6-cup muffin tin or placed in
foil or paper liners and placed on sturdy paper/plastic plate that is labeled
with the Exhibitor’s name and county.
B. Stacking Cupcakes. A minimum of 4 and a maximum of 8 cupcakes
creating one design or theme where cupcakes are stacked on top of each
other and decorated. Cupcakes (at least 2 and not more than 4 stacked
cupcakes) should be secured to a sturdy covered board for display. Board
size should be appropriate to design (use guideline for cakes).
C. Character or Design Cupcakes. Using multiple cupcakes, a character
design is created by grouping and decorating several cupcakes. The
character must be displayed on one cake board with a maximum size of 9
x 13 inches or 14 inch round.
2. Decorated Cookies
A. Themed Cookies. A minimum of 3 and maximum of 6 regular size (3
inches) cookies displayed on a disposable base. Cookies should be of a
similar design or theme. Cookies should be displayed on a 12-inch
disposable platter that is labeled with the Exhibitor’s name and county.
B. Stacking Cookies. A minimum of 6 inches in height and maximum 12
inches in height cookies creating one design or theme where cookies are
stacked on top of each other and decorated. Cookies should be secured
to a sturdy covered board for display not to exceed 12 x 12 inches.
3. Cookie Construction
A. A cookie structure that is no more than 11 inches wide with a maximum
height of 20 inches. The structure should be placed on a 14 x 14 inch
disposable base and labeled with the Exhibitor’s name and county. The
structure may be placed in a glass case.
24
e-Record -- Your completed Cake Decorating e-Record in a sturdy binder/notebook
should accompany the cupcakes, cookies and cookie structure. Note: Take a picture or
make a simple drawing. Then write a short explanation of what you did and what you
learned with each batch you decorated.
Tips for e-Records
Cupcakes
1. Cake Decorating e-Records should be neat and complete. Instructions should
be followed.
2. Cake Decorating e-Record book should contain evidence of the skills learned in
this unit.
3. Cake Decorating e-Records should show a minimum of three batches of
cupcakes, plus the fair exhibit cupcakes, for a minimum of four baking and
decorating experiences.
4. Cake Decorating e-Records will count 25 percent of the placing score.
Decorated Cookies
1. Cake Decorating e-Records should be neat and complete. Instructions should
be followed.
2. Cake Decorating e-Record book should contain evidence of the skills learned in
this unit.
3. Cake Decorating e-Records should show a minimum of three batches of cookies,
plus the fair exhibit cookies, for a minimum of four baking and decorating
experiences.
4. Cake Decorating e-Records will count 25 percent of the placing score.
Cookie Construction
1. Cake Decorating e-Records should be neat and complete. Instructions should
be followed.
2. Cake Decorating e-Record book should contain evidence of the skills learned in
this unit.
3. Cake Decorating e-Records should show a minimum of three structures, plus the
fair exhibit structure, for a minimum of four structures.
4. Cake Decorating e-Records will count 25 percent of the placing score.

25
Cupcakes
Tips for Baking Cupcakes
Use a proven scratch cake recipe or brand name cake mixes such as Duncan
Hines or Betty Crocker for best results.
Do not use generic cake mixes.
One cake mix will usually make 30 cupcakes.
Use a medium cookie scoop to consistently fill the liners.
Bake at 325°F, test for doneness. To test for doneness, press gently down on top
of the cupcake. If it springs back then it is done.
Put cupcakes in freezer once cooled to hold in moisture.
Use Crisco or Sweetex in the icing.
Follow high altitude adjustments, if needed.
Perfect Cake Mix Cupcakes
Use any of the brand name cake mixes for a firm cupcake. Avoid cake mixes with
pudding in the mix and lighter kinds such as angel food; cupcakes require a firm cake.
Cupcake Mix
1 box (18.25 ounces) cake mix (such as classic vanilla or devil’s food)
1 cup buttermilk (in place of the water called for on the box)
Vegetable oil (the amount on the box)
4 large eggs (in place of the number called for on the box)
Combine all the ingredients in a large bowl. Beat using an electric mixer until
moistened, about 30 seconds. Increase the speed to high and beat until thick, about 2
minutes longer.
Bake at 325°F. Test cake for doneness with toothpick.
24 cupcakes can be baked side by side in the oven.
Remove from oven and place in freezer on wire racks.
Take from www.wilton.com

26
Helen Sembra’s Pound Cake Recipe
1 cake mix
2 tablespoons meringue powder
1/3 cup Wesson or Crisco Oil
1 (3.4 ounce) instant pudding & pie filling mix
1/4 cup flour
1-1/3 cup milk
Combine all the ingredients and beat at medium speed until satiny smooth and thick.
Add:
4 eggs
Beat on low speed only until eggs are incorporated. Do not over beat.
Bake at 325-degrees for approximately 12-15-minutes. Test cake for doneness with
toothpick.
When using scratch recipes, use the information on High Altitude Cooking found on the
Colorado State University Extension website.
Preparing the Pan
If you are baking in a pan with a dark or non-stick surface, you should lower the
recommended recipe temperature by 25°F to avoid overbrowning. Dark pans give your
cakes a darker finish when baked at 325°F.
Baking Tools
• Muffin Pan
• Baking Cups
• Silicone Cups
• Cookie Sheet

27
With Paper/Foil Cups (in metal muffin pan)
Cups create a pretty fluted surface and allow you to bake without
grease or pan spray. They also help keep cupcakes from drying out. Be
sure to spread cups evenly in pan cavities and check that cups are level
before filling. When using foil cups, remove paper liners, if included,
before filling and baking. Liners are included to help separate the thin
foil cups. (Note: Themed Cupcakes are to use liners.)
Without Paper/Foil Cups (in metal muffin pan)
Even non-stick pans must be prepared before baking. Prepare pan
cavities by spraying with non-stick vegetable oil pan spray. Or brush
cavities with vegetable shortening and flour for perfect release without
sticking. (Note: Themed cupcakes are to use liners.)
With Silicone Cups
These are oven-safe flexible cups. These cups release cupcakes with
ease and are dishwasher safe. Prepare the cups with a non-stick pan
spray before baking. Place cups on a cookie sheet or sheet pan for
level baking and easy removal from the oven. To remove cupcakes,
invert cup and apply gentle pressure to the bottom while gently peeling
cup away. You may need to add more baking time for some shapes.
(Note: Themed cupcakes are to use liners.)
Cupcake Pans and Paper Liners
Cupcake baking pans are available in three sizes: small (mini – about 2 inches),
medium (regular – about 2-¾ inches), and large – about 3-½ inches. This variety allows
you to experiment with different decorating ideas. Recipes can be baked in any size
pan, but the baking time will need to be adjusted for mini and large pans. Mini cupcakes
usually take 5-7 minutes less than the medium-sized cupcakes, and the large cupcakes
usually take 5-10 minutes more than the medium-sized pans.
Figure 5: Information and pictures taken
from:
www.wilton.com

28
Pan Size
Batter Amt.
Baking Temp
Baking Time
Yield – 1 mix
Standard Muffin
Pan
1/4 – 1/3 cup
325°F
18-20 minutes
About 2
dozen
Mini Muffin Pan
1 heaping
tablespoon
325°F
8-10 minutes
About 5
dozen
King-Size Muffin
Pan
Slightly less than 1
cup
325°F
24-26 minutes About 6
Jumbo Muffin Pan 1/2 – 2/3 cup
325°F
20-22 minutes
About 1
dozen
Mini Fanci-Fill Pan
1/2 cup (per pan)
325°F
18-20 minutes
Taken from: www.witon.com
Cupcakes can be baked in greased cupcake pans or in paper liners. When using the
paper liners, the cupcakes are easier to handle and stay fresh longer. Paper liners are
available in a wide range of sizes, colors and patterns. If you want the sides of the
cupcake to be smooth or if it will be completely frosted in a design or grouping, then
bake the cupcakes directly in the pan. Grease the cups with shortening or cooking
spray, and then lightly flour the cups. You might need to run a knife around the edge of
the cupcakes to release them from the pan.
Filling the Cupcake Liners or Pans
For a consistent cupcake size, fill cups 1/2 to 2/3 full.
Decorating Bag
The best way we've found to add the batter is to squeeze it into the cup
using a decorating bag. Just fill the bag about halfway with batter and
squeeze perfect portions into your cups. Using a bag will give you
better control, especially when making mini cupcakes. The bag keeps
batter from spilling over the cavities.
Ice Cream Scoop (Portion Scoops)
Another way to fill is by using a standard ice cream scoop in half-circle
shape with lever handle. Fill the scoop with batter and place in baking
cup and repeat until cavity is filled 1/2 to 2/3 full.

29
Spoon
When using a heaping tablespoon, it will take 3 to 4 tablespoons of
batter to fill a cavity 1/2 to 2/3 full.
Measuring Cup
The purpose of using a measuring cup is to give you a small and
convenient container into which to put the batter. You will not be using
it to actually measure the amount of batter going into cavities. Follow
the same procedure as with the decorating bag, ice cream scoop and
spoon; fill the cavity with batter 1/2 to 2/3 full.
Pancake Batter Dispenser
The purpose of this dispenser is to select the size
on handle for perfect portions.
Figure 6: Information and pictures taken from www.
wilton.com
Figure 7: Picture taken from www. wilton.com

30
Perfect Fill Batter Dispenser –www.wilton.com
Fill cups and pan cavities easily with no drips or mess! Built-in
valve controls batter flow for uniform filling, so you get great-
looking cupcakes and cakes every time.
Frosting
For a smooth experience, keep the frosting at room temperature and stir before using.
Place a dollop of frosting at the center of the cupcake.
Spread frosting across the top, pushing toward the edges. For a
smooth look, run a small (4 to 4-½ inch) spatula edge across the top.
(4 to 4-½ inch spatula)
For a fluffier look, lightly touch the iced surface with a small spatula
blade and lift-up.
Figure 9: Information and pictures from
www.wilton.com
Figure 8: Information and picture taken from www.
wilton.com

31
How to Pipe a Cupcake Swirl
Instructions
Step 1
Using a decorating bag fitted with tip 1M, 2D or 2A, hold the bag straight up,
with the tip about half an inch above the surface of the cupcake.
Step 2
Squeeze to form the center of the swirl. Without releasing pressure, raise
the tip a little bit and move it slightly to the side. This will be the starting
point of your swirl.
Step 3
Pipe a line of frosting toward the top of the star. Using a circular motion,
pipe a “C” until it connects to the starting point.
Step 4
After completing the first rotation, move the tip slightly inward and repeat the
circular motion. Continue spiraling until you reach the desired height. End
the spiral at the center of the cupcake. Stop squeezing before pulling tip
away.
Figure 10: How to Pipe a Cupcake Swirl. https://www.wilton.com/tip-1m-swirl/WLTECH-

32
Buttercream Recipe 1
1-1⁄4 cup Crisco or Sweetex
1-1⁄2 sticks butter, softened but not melted
2 pounds confectioners’ sugar
2 tablespoons milk or water
1 teaspoon flavoring
Pinch of salt (only if using unsalted butter)
Cream Crisco or Sweetex, butter, flavoring, water & salt. Add sugar and blend slowly.
Beat on medium speed until color becomes a little whiter, about 3 to 5 minutes. Note: If
beaten on high speed, too much air will be incorporated into the frosting and it will be
more difficult to smooth.
Decorating Your Character Cupcake
The shape and design of your cupcake will determine the techniques you will use in
decorating. Basic steps will include the following:
1. Ice any larger background areas which will be smooth when finished. Areas to
be completely covered with stars, etc., need not be iced.
2. With a toothpick, mark the dividing lines on the design. Cover these marks with a
string (outline) of frosting using a round tip.
3. Fill in areas with tip suggested, keeping size consistent and lines straight. Dark
colors should be allowed to dry before adding adjoining colors, so the colors will
not “bleed.”
4. Some shaping can be done with a spatula dipped in cornstarch or your finger
dipped in cornstarch.

33
Designs and Themes
Cupcake Characters
Cupcake characters use multiple, individually decorated cupcakes that come together to create
the character. That is, if a cupcake is removed, the design or character will be ruined. Or any
design that cannot be displayed in a cupcake pan as individual cupcakes. The design should
be one dimension with no stacking.
Figure 11: Pictures taken from Pinterest.

34
Themed Designs
There are various techniques that can be used to design cupcakes. Think about the
theme or occasion that you want the cupcakes for, then decorate your cupcakes
according to the theme. For example: if you are doing a garden theme party, decorate
your cupcakes as butterflies, ladybugs, flowers, spiders, etc. If your theme is
Halloween, then you can decorate your cupcakes as witches, ghosts, pumpkins, etc.
The possibilities are endless.
Figure 12: Pictures taken from Wilton website: www.wilton.com
For more ideas on designs and themes for your cupcakes go to: www.wilton.com and
search cupcakes. Also, there are many books on the market about cupcakes such as:
Hello, Cupcakes! What’s New? and Crazy About Cupcakes. The internet has many
interesting sites on cupcakes.
Key Word Search:
• Theme cupcakes
• Character cupcakes
• Stacked Cupcakes
• Pull apart cakes
Books: Hello, Cupcake! What’s New? and Crazy About Cupcakes

35
Stacking Cupcakes
Stacking cupcakes can be a fun way to create new designs and themes.
2 Layered Stacked Cupcake
(Example)
Bake a standard and a mini cupcake and cool.
Cover standard cupcake with tip 16 number pull-out
stars in green buttercream icing. Stack mini cupcake on
top of standard cupcake and cover with tip number 16
pull-out stars in green buttercream icing. Sprinkle both
with nonpareils and position cookie on top.
https://www.wilton.com/two-tiered-tree-
cupcakes/WLPROJ-
4321.html#q=christmas+cupcakes&prefn1=contentType&sz=90&start=200&prefv1=dec
orating
Cupcake Tower (Example)
This cupcake tower uses a giant cupcake pan, jumbo muffin pan,
standard muffin pan and mini muffin pan.
Bake and cool 1 of each size pan and trim off crowns. Bake and
cool 2 additional swirl tops for tiers 2 and 3 using a Dimensions
pan; use only 1/2 cup cake batter for tier 2 then 1/3 cup for tier 3.
Trim off pointed tops and trim sides to match diameters of Jumbo
and Standard muffins. Ice bottoms smooth in assorted colors.
Tint 2 oz fondant in each color. Roll out 1/16 inch thick. For bottom
tier cut 17 wavy strips, 3-1/2-inch long fitted with 2 wavy wheels and
1/4-inch spacer. Brush backs with damp brush and attach, about 1
inch apart. Cut 17 plain strips, 3-1/2-inch long, using cutter fitted
with 2 straight wheels and 1/4 inch spacer. Attach over wavy strips.
For 2
nd
tier, cut 12 circles using wide end of tip 12; attach. Use
frosting to pipe tip 2 swirls. For 3
rd
tier, cut 12 zigzag strips, 1-1/2
inch long, using cutter fitted with 2 zigzag wheels and no spacer.
Attach about ½ inch apart. For top tier, cut 10 dots using small end
of tip 12; attach. Frost tops fluffy for bottom 3 tiers.
Figure 13: Picture taken from www.wilton.com
Figure 14: Information and picture
taken from www.wilton.com

36
Assemble bottom tiers. Insert wooden dowel rod into stacked cupcakes. Ice mini
muffin top and position on tower.
https://www.wilton.com/cupcake-stack-cake/WLPROJ-
5249.html#q=stacked+cupcakes&prefn1=contentType&sz=90&prefv1=decorating&start
=10
Storing Cupcakes
Store your cupcakes in an airtight plastic container in the refrigerator. They will stay
fresh for several days. Cupcakes also keep well in the freezer in an airtight plastic
container. You also can freeze the cupcakes before frosting. Then, frost and decorate
them before serving.
Fair Secret
For exhibit let cupcakes air dry and do not freeze or refrigerate before or after
decorating.
Transporting Cupcakes
Use plastic packaging designed for cupcakes to transport to events or other locations.
Look for these special containers at cake and restaurant supply stores or online
suppliers.
Also, a clean cupcake pan is a good way to transport your cupcakes. Be sure to lightly
cover the decorated cupcakes with aluminum foil, being care not to touch the top of the
cupcakes. Carefully remove the cupcakes onto a platter or serving tray.
Cupcakes can be packed in a cake box, using tissue paper between cupcakes.
Attaching Cupcakes to a Board
A dab of frosting or piping gel on the bottom of the cupcake will secure it to the cake
board.
References
Books:
www.wilton.com
www.bettycrocker.com
Key Words: cupcakes

37
Decorated Cookies
Tips for Baking Cookies
Use a proven scratch cookie recipe or brand name cookie mixes such as
Krusteaz, Pillsbury, or Betty Crocker for best results.
Do not use generic cookie mixes.
One cookie mix will usually make approximately 24 3-inch cookies.
Use a medium cookie scoop a make a round or roll them or slice them into a
round.
Bake according to recipe.
Use Crisco or Sweetex in the frosting.
Follow high altitude adjustments, if needed.
Cookies Recipes
Sugar Cookie
1 cup (8oz) unsalted butter
1 cup (8oz) granulated sugar
2 large eggs
1 tsp vanilla extract (can use other flavors such as lemon, almond, anise, etc.)
15 oz all-purpose flour
2 tsp baking powder (adjust for altitude: 1tsp at 5000- 6500’, ¾ tsp above 6500’)
1 tsp Kosher salt
1. Preheat oven to 325°F.
2. Cream butter and sugar until light yellow and well blended.
3. Add in eggs one at a time, scraping bowl in between additions of eggs. Mix well.
4. Add in vanilla extract.
5. Combine flour, baking powder and salt in a separate bowl.
6. Add flour mix into egg and sugar mix and combine well into a dough.
7. Remove from bowl and roll out to 1/4 -inch thickness on well-floured surface.
8. Cut into desired shapes and place on parchment-lined or nonstick baking pan.
9. Bake for 8 minutes or until just golden brown on the edges.
10. Remove from pan and cool on wire rack.
11. Decorate as desired.

38
Shortbread: King Arthur Flour Baker’s Companion, All Purpose Baking Cookbook
1 cup (8oz) unsalted butter
1 tsp Kosher salt
3/4 cup (5-1/4 oz) granulated sugar
2 cup (8-1/2 oz) all-purpose flour
1. Preheat oven to 300°F.
2. In medium bowl, cream butter, salt and sugar together with a mixer or by hand.
3. Add the flour and blend until the mixture resembles fine cornmeal.
4. To shape: roll the dough into 1-1/2 inch balls, press with a cookie stamp or the
bottom of a glass dipped in sugar to prevent sticking. Chill in the freezer for 30
minutes before baking. If pressing dough into a shortbread mold, no need to
freeze it.
5. Bake on ungreased baking sheets for about 20 minutes. Watch cookies carefully.
When bottoms are a light sand color, remove them from the oven and transfer to
a rack to cool.
6. Store cookies in tins lined with waxed or parchment paper.
Recipes/information located at the Wilton website:
o Roll-Out Cookie Dough
o Gingerbread Cookies
o Shortbread Cookie
o 4 Common Cookie Fails and How to Avoid Them
Tips for rolling out cookie dough
o Roll dough out on back of cookie sheet or on parchment so you don’t have
to pick up cut cookie dough. Cookies may become misshaped when
moved.
o Lift excess dough away from cookies rather than lifting cookie from dough.
o Dip cookie cutter in flour before cutting. Make cut, then wiggle the cutter
slightly to make sure you have a clean cut.
o Roll out dough on a floured surface. Flour rolling pin before each use. Use
flour sparingly as adding too much flour into the dough will make it
tougher. Try using confectioners’ sugar instead as it will not toughen the
dough.
o If rolled cookie dough puffs too much when baking, add a little flour to
dough. Excess moisture in the dough will over activate the baking powder.

39
Buttercream Recipe 1
1-1⁄4 cup Crisco or Sweetex
1-1⁄2 sticks butter, softened but not melted
2 pounds confectioners’ sugar
2 tablespoons milk or water
1 teaspoon flavoring
Pinch of salt (only if using unsalted butter)
Cream Crisco or Sweetex, butter, flavoring, water & salt. Add sugar and blend slowly.
Beat on medium speed until color becomes a little whiter, about 3 to 5 minutes. Note: If
beaten on high speed, too much air will be incorporated into the frosting and it will be
more difficult to smooth.
Poured Cookie Icing Recipe
1 cup confectioners’ sugar (sifted)
2 teaspoons of milk
2 teaspoons light corn syrup
Place sugar and milk in bowl. Stir until mixed thoroughly. Add corn syrup and mix well.
For filling in areas, use thinned icing (add small amounts or light corn syrup until desired
consistency is reached).

40
Some character designs require run-in sugar or flood work. This should be done with a
Royal Icing.
Royal Icing (Wilton Recipe)
3 level tablespoons meringue powder
4 cups (approx. 1 lb.) sifted confectioners’ sugar
6 tablespoons water*
Yield: 3 cups
Beat all ingredients at low speed for 7-10 minutes (10-12 minutes at high speed for
portable mixer) until icing forms peaks.
*When using large countertop mixer or for stiffer icing, use 1 tablespoon less water.
Helen Sembra’s Special Royal Icing
Mix together in a large bowl…
1/2 tsp. cream of tartar
1-1/2 tbsp. *Gum Arabic
2 pounds powdered sugar (lump free—sift if necessary)
In a large electric mixing bowl, Combine…
2/3 cups lukewarm water
1/4 cup meringue powder
Mix the meringue and water until frothy at a medium speed. Add at low speed the dry
ingredients and beat until it holds a firm peak for flowers made with royal, medium peak
for extension and drop work and finally, soft peak for embroidery and scripting on cakes.
Caution: All utensils and equipment must be absolutely grease free.
*Specialty cake stores or online websites.
Remember that all utensils and tools must be grease free.

41
To use run-in sugar or flood work for eyes, nose, etc., on cookies:
1. Seal the area to be covered with run-in sugar or flood work with piping gel.
2. Outline the area with a round tip using either butter cream or royal icing. This
creates a dam or dike to hold the run-in sugar.
3. Prepare run-in sugar by taking the quantity of royal icing needed for the design
area. Add one drop of water at a time until thinned to the consistency of heavy
cream. (When dropped from a spoon it will dissipate or smooth out to the slow
count of 10.) Make certain all utensils are free of grease when preparing run-in
sugar.
4. Fill in the area desired. Do not break the outline (dam) or icing will overflow onto
cookie.
Preparing Baking Pans
Follow the recipe for pan preparation.
Non-stick bakeware large cookie pan
With the Bake-N-Coat and Pan Set, you can bake cookies in
the pan and decorate them on the rack.

42
Non-stick Bakeware Cookie Sheet (Medium)
Use for medium sized cookies
Make sure that your pans are flat and not warped. Darker pans will heat up faster and
will hold the heat therefore taking less time to bake the cookies. Lighter pans take
longer to heat up therefore the baking time will be a little more. When using a stone pan
you will need to cool the stone before putting another set of cookies on it. Baking
stones retain heat longer than metallic pans do, so this might take a while. Make sure
you adjust your baking time depending on the type of pan used.
Baking Tools
Cookie Spatula
Cookie cutters
Cookie scoop
Parchment
Flat cooling racks
Sharp paring knives
Rolling pins
Tips for successful cookies
Spacing—1-inch between cookies and edges of pan
Roll cookies out on parchment paper or on a silicon mat
Flour surface before rolling out the cookie dough
Figure 15: Pictures taken from www.wilton.com

43
Move cookies onto baking pan with spatula or you can place the parchment paper with
the cookies onto the baking pan.
Icing Recipes
Royal Icing (Wilton Recipe)
3 level tablespoons meringue powder
4 cups (approx. 1 lb.) sifted confectioners’ sugar
6 tablespoons water*
Yield: 3 cups
Beat all ingredients at low speed for 7-10 minutes (10-12 minutes at high speed for
portable mixer) until icing forms peaks.
*When using large countertop mixer or for stiffer icing, use 1 tablespoon less water.
Helen Sembra’s Special Royal Icing
Mix together in a large bowl…
1/2 tsp. cream of tartar
1-1/2 tbsp. *Gum Arabic
2 pounds powdered sugar (lump free—sift if necessary)
In a large electric mixing bowl, Combine…
2/3 cups lukewarm water
1/4 cup meringue powder
Mix the meringue and water until frothy at a medium speed. Add at low speed the dry
ingredients and beat until it holds a firm peak for flowers made with royal, medium peak
for extension and drop work and finally, soft peak for embroidery and scripting on cakes.
Caution: All utensils and equipment must be absolutely grease free.
*Specialty cake stores or online websites.
Remember that all utensils and tools must be grease free

44
Decorating
o Covering Cookies with Thinned Icing – shows step outs
o Covering a Cookie with Cookie Icing – No images but better written
instructions
o Outline and Fill Cookies – shows step outs
o Color Flow Dragging – same technique as using royal icing, shows step
outs
o Coloring Cookie Dough
o Cookies 101: Using Royal Icing
Transporting
• Bake cookies 2 days before transporting.
• Always cool before packing to prevent sticking.
• Line cardboard containers with foil or plastic wrap to keep cookies fresh.
• Place sheets of parchment between layers of cookies, especially those
which are iced or decorated with royal icing. Cookies iced with
buttercream don't stack well.
• Pack delicate and decorated cookies in shallow containers; the fewer
layers, the better.
• Wrap cookies singly or in pairs and group wrapped cookies in a pretty box,
bag or basket.
How to Make a Cookie Box
• How to Make a Cookie Box (Taken from www.wilton.com)
Themed Cookies
There are various techniques that can be used to design cookies. Think about the
theme or occasion that you want the cookies for, and then decorate your cookies
according to the theme. For example: if you are doing a garden theme party, decorate
your cookies as butterflies, ladybugs, flowers, spiders, etc. If your theme is Halloween,
then you can decorate your cookies as witches, ghosts, pumpkins, etc. The possibilities
are endless.


46
Stacked Cookies (example -Christmas tree)
Step 1
Mold bases. Use Cordial Cups mold to make 1 solid candy
cup for each tree. Chill until firm.
Step 2
Prepare dough. Roll out small amount for yellow stars (1 per
tree); cut using smallest cutter from set. Tint remaining dough
green. For each tree, cut 2 stars with each of the 4 smallest
cutters from set. Bake and cool.
Step 3
Brush cookies with Piping Gel; sprinkle with green
or yellow sugar. Assemble tree using melted candy in cut parchment bag. Attach
confetti trims with melted candy.
https://www.wilton.com/stacked-christmas-tree-cookie/WLPROJ-
6304.html#q=christmas+cupcakes&prefn1=contentType&sz=90&start=4&prefv1=decora
ting
Figure 17: Picture taken fromwww.wilton.com
47
Cookie Constructions
Tips for Construction
Plan your design well ahead
Cut out pattern pieces and make sure that they fit
o Plastic file folders or card stock paper are the best template for cutting
patterns
Keep the design simple
Creativity can come from the decorating of the structure
No pre-made kits are allowed
Be aware that this is a multi-day project. It cannot be rushed.
Prepare a base that is sturdy, at least 1/2 inch thick using cardboard, foam core,
particle board, or plywood, and cover with food safe aluminum.
Tips for Baking Cookie Structures
Use a proven gingerbread cookie recipe
Bake according to recipe. Adjust as need for High Altitude.
Roll dough to 1/4 to 3/8 inch thick
For minimum distortion, roll dough on parchment or silicon mat or on the back
side of the cookie sheet
If rolling on parchment, transfer pieces on the parchment to baking pan
Label piece name on parchment (not on gingerbread)
Keep similar sizes together on baking pan
Bake according to recipe. Larger sizes may take longer to cook .
Pieces may spread slightly as they bake. Carefully recut the pieces while they
are warm (cooled pieces may be trimmed with a serrated bread knife if
necessary)
Allow pieces to cool over night
Use Crisco or Sweetex in the frosting

48
Gingerbread Recipe for Cookie Construction
15 oz all-purpose flour
2 tsp ground ginger
1 tsp ground cinnamon; tsp ground nutmeg
1 tsp baking soda (adjust for altitude: 1/2 tsp at 5000- 6500’, 1/4 tsp above 6500’)
1/4 tsp Kosher salt
6 oz unsalted butter at room temperature
6 oz brown sugar
6.5 oz molasses
1 large egg
1 tsp vanilla extract
1. Combine all dry ingredients in a bowl.
2. Cream butter and brown sugar in medium bowl using a mixer or by hand.
3. Add molasses, egg, and vanilla to creamed mixture and mix to combine. Scrape
sides of bowl to make sure all ingredients are blended.
4. Add dry ingredients to wet ingredients slowly, blending well with each addition.
Remove dough from bowl and shape into a ball or log. Wrap tightly with plastic
wrap and refrigerate a minimum of 4 hours or overnight.
5. Preheat oven to 350°F when ready to work with dough.
6. Work with half the dough at a time and keep the other half refrigerated. Place
dough onto a well-floured surface. Roll dough to 1/4 inch thick. Cut dough into
desired shapes using a knife or cutters.
7. Bake for 8-10 minutes on ungreased baking sheets. Cookies will still be slightly
soft when done. Cookies will firm up as they cool.

49
Wilton Gingerbread House Recipe
Ingredients:
5 to 5-1/2 cups all-purpose flour
1 teaspoon baking soda
1 teaspoon salt
2 teaspoon ground ginger
2 teaspoon ground cinnamon
1 teaspoon ground nutmeg
1 teaspoon ground cloves
1 cup solid vegetable shortening
1 cup granulated sugar
1-1/4 cup molasses
2 eggs (beaten)
Note: Recipe can be halved for smaller houses.
Instructions:
Preheat oven to 375º.
Thoroughly mix flour, soda, salt and spices.
Melt shortening in large saucepan over low heat until just melted,not hot. Add in order,
sugar, molasses and eggs; mix well. Cool slightly, then add four cups dry ingredients
and mix well.
Turn mixture onto lightly floured surface. Knead in remaining dry ingredients by hand.
Add a little more flour, if necessary, to make a firm dough.
If you’re not going to make your gingerbread house right away, wrap dough in plastic
and refrigerate. Refrigerated dough will keep for a week but be sure to remove it 3
hours prior to rolling so it softens and is workable.
After cutting out house, wrap any remaining gingerbread dough in plastic. This extra
dough can be used in case one of your house pieces cracks or breaks. Small cracks
can be repaired with icing.
Bake at 375º for 10-15 minutes for large pieces, 6-8 minutes for average to small sizes.
Check frequently for over-browning. After baking, loosen gingerbread pieces with
spatula to prevent sticking. While warm, place your patterns on gingerbread pieces to
check sizes. If a piece has baked too big or crooked, trim excess or uneven edges with
a sharp knife. Then let cool for 10 minutes. Remove gingerbread pieces from cookie
sheet and cool uncovered overnight on cooling rack.

50
Rolling out and cutting gingerbread
Note: Gingerbread should be baked 48 hours before assembling.
Working with one recipe of kneaded gingerbread dough, place a third of the dough on a
lightly floured cookie sheet surface. Large pieces can be cut out directly on a cookie
sheet or on the back of a cookie pan. Or you can roll it out on parchment, then transfer
the pieces on the parchment to the cookie sheet for baking. Place dampened towel
under cookie sheet or pan to prevent slippage as you roll out dough. Keep remainder of
dough wrapped in plastic to prevent drying. Press dough to flatten. Lightly dust rolling
pin with flour to keep gingerbread from sticking and roll out dough to approximately 1/4
inch thickness. As you roll, work dough out from the center. Do not worry about thin
edges; these will be trimmed.
Place patterns on top of the rolled-out dough. Cut around the patterns with a sharp knife
or pizza cutter. Carefully remove pattern and excess dough. Lift smaller pieces on to
cookie sheet with spatula. Be sure to bake small sizes together to avoid burning.
Repeat rolling and cutting procedures, using additional cookie sheets as needed.
Building Basics
Ice bottom edge of first piece and attach to board. Position a heavy jar or can on each
side for support until completely dry. Ice bottom and side of next piece, attach to first
piece. Repeat to build the 4 walls. Don’t worry about icing squeezing through seams. It
will be covered with decorations later.
When wall panels seem sturdy enough, add the roof in the same manner. Squeeze
icing onto peaks, side wall and center side of roof. Position one side of roof so it meets
house peaks and side wall. Hold this half in place while you add the other side. Adjust
so that each side is evenly pitched, and center seams meet. Hold in place several
minutes to allow icing to set.

51
Baking Tools
Patterns
Flat baking sheets
Rolling pin
Rolling mat or parchment paper
Pizza cut
Paring Knife
Cookie cutter
Exacto knife
Ruler
Serrated bread knife for trimming
How to Assemble a Gingerbread House
Step 1
Join one side wall to one peaked wall. Pipe icing along the bottom of the side wall and
along the bottom and inside of the peaked wall. Join the panels so that the side wall is
positioned on the inside edge of the peaked wall. Press the sides together and attach to
the base. Hold in place for several minutes until the icing begins to set.

52
Step 2
Attach the other side wall and peaked wall in the same way.
Step 3
Press together and let dry at least one hour before going to the next step.
Step 4
Pipe the icing along the roof angle of both peaked wall panels and along the top side
walls. Pipe icing along one long side of one roof panel. (This will be the peak of the
roof.) Position one roof section, so it meets the peaked wall and side wall edges.
Step 5
Hold this half in place while you add the other roof section.

53
Step 6
Adjust so that each side is evenly pitched, and the center seam meets. Press and hold
in place several minutes to allow the icing to set.
Step 7
Let your house dry at least two to three hours before decorating.
Prepare icing
You may use royal icing or Isomalt to put your structure together.
Tips for Structure
Use cans, foams, or books for support
Cover icing with damp towel over the top of it so it won’t dry out
Allow walls or bottom to dry thoroughly before adding roof or upper sections
Allow to dry 48 hours before decorating
Work from top to bottom when decorating
Humidity is your enemy
Put in dry place for storage
Gingerbread can be decorated for all seasons
Figure 18: Information and Pictures taken from
www.wilton.com

54
Royal Icing (Wilton Recipe)
3 level tablespoons meringue powder
4 cups (approx. 1 lb.) sifted confectioners’ sugar
6 tablespoons water*
Yield: 3 cups
Beat all ingredients at low speed for 7-10 minutes (10-12 minutes at high speed for
portable mixer) until icing forms peaks.
*When using large countertop mixer or for stiffer icing, use 1 tablespoon less water.
Helen Sembra’s Special Royal Icing
Mix together in a large bowl…
1/2 tsp. cream of tartar
1-1/2 Tbsp. *Gum Arabic
2 pounds powdered sugar (lump free—sift if necessary)
In a large electric mixing bowl, Combine…
2/3 cups lukewarm water
1/4 cup meringue powder
Mix the meringue and water at a medium speed until frothy. Add at low speed the dry
ingredients and beat until it holds a firm peak for flowers made with royal, medium peak
for extension and drop work and finally, soft peak for embroidery and scripting on cakes.
Caution: All utensils and equipment must be absolutely grease free.
*Specialty cake stores or online websites.
Remember that all utensils and tools must be grease free.

55
Decorating
• Ways to Decorate a Gingerbread House (Taken from www.wilton.com )
Transporting
• Make sure all icing is dry and structure is sturdy before transporting.
• Place some kind of padding underneath the structure to absorb vibrations and
bumps.
Design
• Look for patterns on the internet or pick a style you like.
• Once you find a pattern, begin by creating a template out of cardboard or plastic.
• Keep proportions in mind.
• Assemble your template with tape to make sure the pieces will fit together
correctly.
• Disassemble and use template pieces to cut gingerbread pieces.
Figure 19: Pictures taken from Pinterest.

56
Creative Cake Decorating Unit 6—Cut-Up & Sculpted Cakes
In this unit you will cut up or sculpt cakes to form different shapes. Decorator tips
should be used in creating your design; however, edible materials may also be used.
A cut-up cake is cut into different shapes and assembled to
create shapes of animals, vehicles and other items. A sculpted
cake is when layers of cake are carved carefully into shapes (like
shoes, pillows, animals, etc.).
Goals for Unit 6
1. Build on skills learned in units 1 through 3.
2. Frost and decorate cut-up or sculpted cakes.
3. Develop skill in using a variety of decorating tips.
4. Learn to cut up flat cakes and put them together to form different shapes.
5. Learn how to sculpt cakes or form cereal treats into different shapes.
6. Learn how to treat cut surfaces to eliminate unnecessary and unsightly crumbs.
7. Develop more skills in mixing colors.
8. Bake and decorate a minimum of three cakes plus your exhibit cake (total of 4).
Exhibit for Unit 6
1. One decorated cut-up or sculpted real cake using three different types of
decorating tips (not different sizes of the same tip) to decorate along with edible
materials. Nonedible items can NOT be used on the cake. Fondant or royal
icing can be used only for decorations. Nonedible internal supports are allowed
but must not show. 14-inch x 14-inch base—12-inch x 12-inch x 12-inch cake
size.
2. Diagram or pattern used must be included in the e-Records.
3. Your completed Cake Decorating e-Record in a sturdy binder/notebook should
accompany the cake. Note: Take a picture or make a simple drawing. Then
write a short explanation of what you did and what you learned with each cake
you decorated.
4. Fair Secret — Let the cake air dry; DO NOT FREEZE or refrigerate.
Figure 20: Pictures taken
from www.wilton.com
57
Decorated Cake
1. The cake must be baked by the exhibitor. This should be noted in the e-Record.
It also may be discussed at interview judging.
2. The cake should be placed on a firm disposable surface (foam core, cardboard,
particle board, etc.) which will not cause the cake to crack in transportation.
3. The shape of the board should be the shape of the cake. Board should be 1-1/2
inches larger than bottom border of cake on all sides.
4. The cake board must be covered with a food safe material---examples:
aluminum foil, Wilton-Fanci-Foil or freezer paper. If you use a decorative or gift
wrap paper or fabric to cover your board, it must then be covered in food quality
plastic wrap to it make food safe.
Frosting Your Cake
1. All areas should be covered with frosting or edible materials with no cake
showing through. Fondant and royal icing can only be used for decorations.
2. The cut pieces should be attached securely to each other and the board to form
the design.
3. There should be no crumbs showing through the frosting.
4. Frosting should be the proper consistency for the work being done.
Design
1. Color and design should be balanced and pleasing to the eye.
2. The design should be applied using at least three different decorator tips of your
choice (i.e., closed star tip and open star tip are the same tips). However, parts
of the design may be created with edible materials (coconuts, candies, etc.).
3. Only edible items may be used on the cake.
Tips for E-records
1. Cake Decorating e-Records should be neat and complete. Instructions should
be followed.
2. Cake Decorating e-Records should show that a minimum of three cakes plus the
fair exhibit have been made (total of 4).
3. Cake Decorating e-Record books will count 25 percent of the placing score.

58
Baking the Cake
Most cut-ups begin with 8, 9, or 10-inch layers, or a 9 x13-inch cake. Select the design
you want to use, and then select a recipe which will give the size cake needed.
Follow the instructions for baking cakes that you have learned in previous units. Be
sure the cake is level before cutting because the pieces need to be the same height
when piecing the design together.
Pound Recipes: Cut-up and Sculpted Cakes
Helen Sembra’s Pound Cake Recipe
1 cake mix
2 tablespoons meringue powder
1/3 cup Wesson or Crisco Oil
1 (3.4 ounce) instant pudding & pie filling mix
1/4 cup flour
1-1/3 cup milk
Combine all the above ingredients and beat at medium speed until satiny smooth and
thick.
Add:
4 eggs
Beat on low speed only until eggs are incorporated. Do not over beat.
Bake at 325˚ for approximately 60-minutes. Test cake for doneness with toothpick.

59
Wilton Classic Pound Cake
Ingredients:
1-1/2 teaspoon Wilton Pure Vanilla Extract
2-3/4 cups all-purpose flour
2 teaspoons baking powder
1/2 teaspoon salt
2 cups (4 sticks) butter, softened
1-3/4 cups granulated sugar
6 eggs
vegetable pan spray
Instructions:
Step 1
Preheat oven to 350º F. Generously grease inside of pan and coat with flour.
Step 2
In medium bowl, stir together flour, baking powder and salt.
Step 3
In large bowl, beat butter and sugar with electric mixer until light and fluffy. Add eggs
one at a time, beating well after each addition. Add vanilla and beat until well combined.
Add flour mixture and beat on low speed for 1 minute, scraping bottom and sides of
bowl as needed. Pour batter into prepared pan.
Step 4
Bake 50-55 minutes or until toothpick inserted in center of cake comes out clean. Cool
in pan on cooling grid 15 minutes. Loosen sides of cake and remove from pan; cool
completely on grid.
60
Tips for Cut-up and Sculpted Cakes
Use a sharp knife
Crumb coating is very necessary –all cut edges
It is very important when attempting to carve a cake that you choose a recipe that
is dense enough to carve successfully.
Cakes that are moist, firm and smooth and soft enough for easy carving will
provide the best results. Pound cake or cakes of a similar consistency are highly
recommended because they are moist and won’t crumble (a necessity) when
working with them.
Choose a pan that best fits the general shape of the cake (i.e. round if carving
snowman, square if carving gift box, etc.)
Consider proportions when designing your cake. That will help you determine
how many cakes you will need.
Avoid recipes that include raisins, nuts or chocolate chips.
Preparing a Cake Board
Follow instructions in Units 1 and 4 on preparing a cake board. The shape of the design
will determine whether you want a shaped board as was done with character cakes or a
round, square or oblong board.
The shape of the board should be the shape of the cake. Board should be 1 ½ inches
larger than bottom border of cake on all sides.
Cutting the Cake
1. Draw an actual size pattern of the basic cake and how it is to be cut to form the
design. Plan to use most of the cake in your design. This will reduce crumbs.
2. Cool cakes completely before cutting and decorating.
3. Measure and mark the cake with wooden toothpicks before actually cutting.
Then cut exactly.
4. Use a large serrated knife to cut pieces and make a straight vertical cut unless
design requires different cut.
5. Crumb coat the cake. (See previous units for information on crumb coating.)
6. Freeze the cake before cutting. A frozen cake is easier to carve than a fresh
cake. If it is too hard to carve, allow cake to defrost slightly.
7. Use a very sharp, strong knife for cutting. It should not bend when cutting the
cake.
8. Carve the cake on your prepared board so you don’t have to move it.
9. Remove cake in small pieces. It is easier to cut more off than try to put pieces
back on the cake.
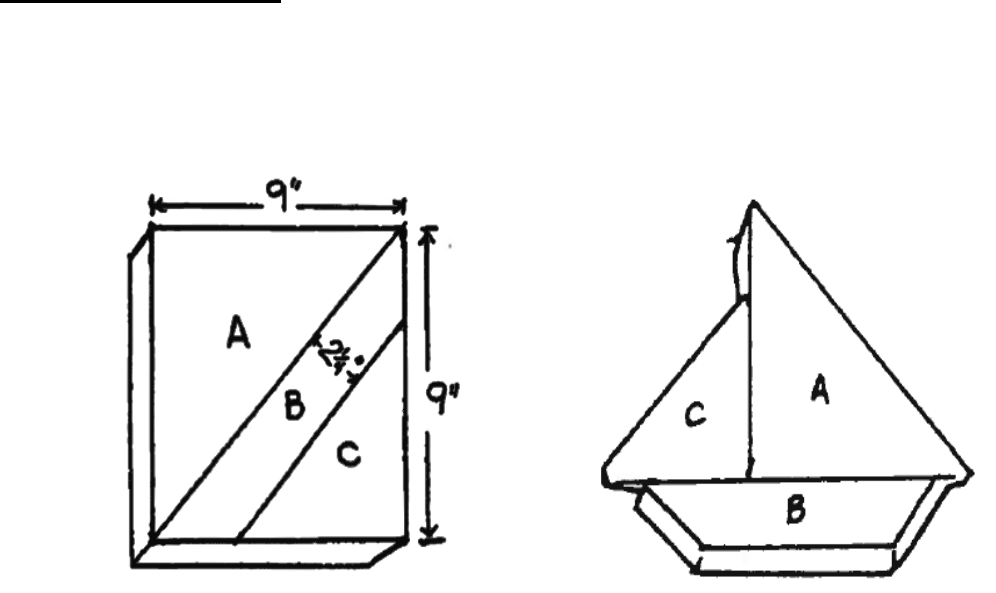
61
10. Exaggerate the shape when cutting so when you add icing you don’t lose the
detailed shape.
11. If covering cake in fondant, make sure surfaces are smooth. Fondant will pick up
any bumps or imperfections.
12. Use dowel rods where needed for stability.
Suggested Patterns for Cut-Up Cakes
There are many patterns for cut-up cakes. You may want to collect them or develop
your own patterns. A few suggestions are given here:
Boat (9-inch square pan)
You may use white frosting on sails, chocolate frosting for hull, licorice or chocolate
frosting for mast, round candies for portholes and cut gumdrops for anchor or boat
insignia. Or use decorator tips for applying details.

62
Fish (9 x 9-inch square pan)
You may use pale green frosting, gumdrops for eye and mouth, slivers of licorice for a
flirty eyelash, candy scales and bubbles. At least three decorator tips should be used.
Elephant (two 9-inch round pans)
You may use pink frosting, chocolate cookie for ear, gumdrop for eye and twist of
licorice for the tail. At least three decorator tips should be used.

63
Flat Bunny Cake (two 9-inch round cakes)

64
This house pattern would require extra supports under the roof area (two 8-inch square
pans).
Measure one dowel rod at the cake’s lowest point. Using this dowel rod for measuring,
cut five other rods (using small saw or wire cutters, or a new dog nail trimmer) the same
size. The size must be exact, and the ends
smooth to keep the cake level. Push the
dowel rods into the cake 2 inches from the
sides so they are centered under the
upright section of the cake. Two dowel
rods should support each of the pieces
above. Care should be taken not to shift
dowel rods after they have been placed in
the cake.
65
Completing the Cake
Assembling and Decorating the Cake
1. Assemble all cake pieces on the board before frosting.
2. Clean the side of the board.
3. Frost the pieces together to hold them in place.
4. Then frost all cut edges, leaving tops and uncut edges for last.
5. A crumb coating may be used to control the crumbs. Use frosting which has
been slightly thinned. Let this dry completely, and then apply the regular frosting.
Stacking
Make sure the layers are level. The thicker, more solid each layer is, the more
solid your cake will be.
Choose a filling that will give you a firm consistency such as a crusting
buttercream. Stay away from jams and puddings as they are more likely to cause
layers to slip.
Decorating
Chill the cake before crumb coating
Cover cake with buttercream or fondant
Smaller pieces of the figure can be molded using rice cereal treats.
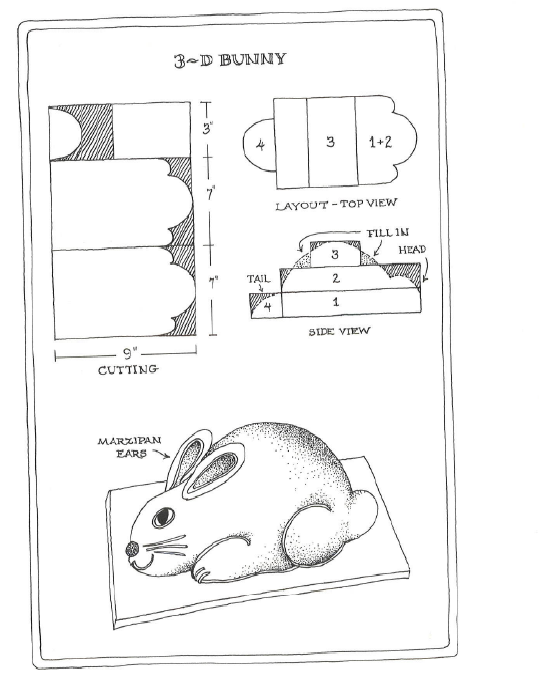
66
Sculpting Cakes
If you stack pieces more than two layers high, you may need to put supports inside to
hold the weight. The supports do not need to be edible and should not be visible.
Sculptured Bunny Cake (13 x 9 inch cake)

67
Sneakers (11x 17-inch oblong cake pan)
(Patterns from Creative Cakes by Stephanie Crookston)
More Resources for Cut-Up Cakes
“Bakers Easy Cut-Up Party Cakes” by Bakers
“Easy Cut-UP Cakes for Kids by Melissa Barlow

