
Oracle Fusion
Cloud Human
Resources
Implementing Global Human
Resources
24C
Oracle Fusion Cloud Human Resources
Implementing Global Human Resources
24C
F97495-02
Copyright © 2011, 2024, Oracle and/or its affiliates.
Author: Alison Firth, Ashita Mathur, Jyothi Meruva, Sweta Bhagat, Megan Wallace, Suzanne Kinkead, Hema Hardikar, Richard Kellam, Angela Brown,
Srinivas Vellikad, Lakshmi Venkat, Phyllis Simons, Timothy Bisset, Carla Fabrizio, Jan Somers, Janet McCandless, Tina Brand, Kathryn Wohnoutka,
Asra Alim, Jacqui Wood, Essan Ni Jirman, Barbara Snyder, Santosh Radhakrishnan, Gayathri Akkipeddi

Oracle Fusion Cloud Human Resources
Implementing Global Human Resources
Contents
Get Help ................................................................................................................................ i
1
Overview
1
Overview of Global Human Resources ....................................................................................................................................... 1
Overview of Implementing Global Human Resources ........................................................................................................... 2
2
Enterprise Structures
7
Overview of Enterprise Structures ............................................................................................................................................. 7
Model Your Enterprise Management Structure ..................................................................................................................... 10
Guidelines for Configuring Global Enterprises ....................................................................................................................... 13
Design an Enterprise Configuration ......................................................................................................................................... 14
Enterprise Information for Non-HCM Users ........................................................................................................................... 15
3
Legal Entities, Business Units, and Reference Data Sets
17
Overview of Legal Entities, Business Units, and Divisions .................................................................................................. 17
Overview .......................................................................................................................................................................................... 17
Model Legal Entities ..................................................................................................................................................................... 18
Overview of Legal Jurisdiction and Authorities ..................................................................................................................... 21
Jurisdictions ................................................................................................................................................................................... 21
Legal Authorities .......................................................................................................................................................................... 22
Create Legal Jurisdictions, Addresses and Authorities ....................................................................................................... 22
Create Legal Entities, Registrations, and Reporting Units .................................................................................................. 24
Legislative Data Groups .............................................................................................................................................................. 26
How Legal Employers Work with Payroll Statutory Units and Tax Reporting Units ....................................................... 26
Examples of HCM Organization Models ................................................................................................................................. 27
Examples of Creating Calculation Cards for Deductions at Different Levels .................................................................. 33
Business Units ............................................................................................................................................................................... 34
How Business Units Work with Reference Data Sets ........................................................................................................... 35
Associate Business Unit with Legal Employer ....................................................................................................................... 38
FAQs for Legal Entities, Business Units, and Reference Data Sets ................................................................................... 39

Oracle Fusion Cloud Human Resources
Implementing Global Human Resources
4
Enterprise Structures Configurator (ESC)
45
How You Establish Enterprise Structures Using the Enterprise Structures Configurator ............................................. 45
Configuration Workbench .......................................................................................................................................................... 47
How You Create Legal Entities in the Enterprise Structures Configurator ...................................................................... 47
Considerations for Creating Business Units in the Enterprise Structures Configurator ............................................... 49
How You Create Reference Data Sets in the Enterprise Structures Configurator ........................................................... 52
How You Roll Back an Enterprise Structure Configuration ................................................................................................. 52
FAQs for Enterprise Structures Configurator ......................................................................................................................... 53
5
Divisions, Departments, Worker Unions, Locations, and Trees
55
Guidelines for Using Single or Multiple Classifications for an Organization ................................................................... 55
How You Configure Your Enterprise Structure After an Acquisition ................................................................................ 55
Divisions ......................................................................................................................................................................................... 60
Example of Adding a New Division After Acquiring a Company ....................................................................................... 61
Departments .................................................................................................................................................................................. 63
How You Create a Chart of Account to Create a Department ........................................................................................... 64
Cost Centers and Departments ................................................................................................................................................. 71
Department Classifications ........................................................................................................................................................ 72
How You Configure the Department Title .............................................................................................................................. 73
Disability Organizations .............................................................................................................................................................. 74
Worker Union Management ....................................................................................................................................................... 75
Collective Agreement Flexfields ............................................................................................................................................... 80
Locations ......................................................................................................................................................................................... 81
Associate Legal Employers with Locations ............................................................................................................................ 83
HCM Trees ..................................................................................................................................................................................... 84
FAQs for Divisions, Departments, Worker Unions, Locations, and Trees ........................................................................ 89
6
Jobs and Positions
93
Jobs ................................................................................................................................................................................................. 93
Examples of Jobs ......................................................................................................................................................................... 93
Examples of Positions ................................................................................................................................................................ 94
Considerations for Using Jobs and Positions ........................................................................................................................ 96
Job and Position Structures ...................................................................................................................................................... 98
Scheduling Group Attribute for Jobs ..................................................................................................................................... 100
Workforce Structures Code Generation Methods ................................................................................................................ 101
Evaluation Criteria for Jobs and Positions ............................................................................................................................ 102
View Details of Associated Profiles and Open Profiles Pages from Redwood Job or Position Pages ...................... 103

Oracle Fusion Cloud Human Resources
Implementing Global Human Resources
Create a Position Profile ........................................................................................................................................................... 104
Associate Action Reasons in Position with Role ................................................................................................................. 104
How FTE is Calculated in Positions ........................................................................................................................................ 105
Work Hours and Duration ........................................................................................................................................................ 106
Workday Information Defaults ................................................................................................................................................. 107
How You Match Position Valid Grades with Job Grades ................................................................................................... 109
Position Budgeting .................................................................................................................................................................... 109
Position Synchronization ........................................................................................................................................................... 115
Set Up Position Synchronization ............................................................................................................................................. 117
How Assignment Values Are Inherited from Position ........................................................................................................ 118
Synchronize Assignment Action Reason From Position .................................................................................................... 119
Example of Action Reason Synchronization in Assignments ............................................................................................ 121
Synchronize Assignment Flexfields From Position Flexfields ........................................................................................... 122
Considerations for Flexfield Mapping in Position Synchronization ................................................................................. 124
Synchronize Person Assignment from Position Process ................................................................................................... 125
HCM Position Hierarchy ............................................................................................................................................................ 126
Graphical Position Hierarchy .................................................................................................................................................... 127
How You Create a Graphical Position Hierarchy .................................................................................................................. 127
Parent Position Isn’t Defaulted for Professional Users ........................................................................................................ 131
Considerations for Using Position or Position Hierarchy for Synchronizing Assignment Manager .......................... 132
How You Route Position Approvals ........................................................................................................................................ 133
Upload Workforce Structures Using a Spreadsheet ............................................................................................................ 137
FAQs for Jobs and Positions .................................................................................................................................................... 138
7
Grades, Grade Rates, and Grade Ladders
141
Grades ............................................................................................................................................................................................ 141
Grade Rates .................................................................................................................................................................................. 143
Grade Ladders ............................................................................................................................................................................. 144
Lookup Types for Grades ......................................................................................................................................................... 145
Grade Ladder on Worker Assignment ................................................................................................................................... 145
How Grades, Grade Rates, and Sets Work with Legislative Data Groups ....................................................................... 146
How Grades and Grade Rates Work with Jobs, Positions, Assignments, Compensation, and Payroll ..................... 148
Examples of Grades, Grade Rates, and Grade Ladders ..................................................................................................... 149
How You Set Up Grade Ladders for Pay Scale Requirements ........................................................................................... 152
Example of Setting Up Grade Ladders for Spine Point Requirements ........................................................................... 156
FAQs for Grades, Grade Rates, and Grade Ladders ............................................................................................................ 159

Oracle Fusion Cloud Human Resources
Implementing Global Human Resources
8
Workforce Structures - Configuration Options
161
Workforce Structures Enterprise-Level Configuration ........................................................................................................ 161
Workforce Structures Profile Options .................................................................................................................................... 164
Workforce Structures Lookups ................................................................................................................................................ 166
Workforce Structures Flexfields .............................................................................................................................................. 166
Parameters for Work Structure Extensible and Descriptive Flexfields ............................................................................ 168
9
Person
175
Person Number Generation Methods .................................................................................................................................... 175
Person Types ............................................................................................................................................................................... 176
Person Names and Languages ................................................................................................................................................ 177
Person Name Styles ................................................................................................................................................................... 178
Person Name Formats .............................................................................................................................................................. 180
How You Specify Work Phones ............................................................................................................................................... 182
Apply Name Formats to Person Names, Keywords, and LDAP ........................................................................................ 182
How You Update Person Search Keywords .......................................................................................................................... 184
Person-Record Keyword Searches .......................................................................................................................................... 186
How You Optimize Person Search Keywords ....................................................................................................................... 188
How You Communicate Person and Assignment Changes to Consumer Applications .............................................. 189
Guidelines for Synchronizing Person Records ..................................................................................................................... 192
Guidelines for Batch Loading Workers .................................................................................................................................. 193
Person Lookups .......................................................................................................................................................................... 197
Use Gender Lookup Type in the EEO Report ....................................................................................................................... 201
Considerations for Duplicate Checks When Importing Person Records ........................................................................ 202
Considerations for Loading Person Photos ......................................................................................................................... 203
How You Cache Person Photos .............................................................................................................................................. 204
How National Identifiers are Validated ................................................................................................................................. 205
How Person Addresses Are Validated .................................................................................................................................. 206
User and Role-Provisioning Setup Options ......................................................................................................................... 206
Considerations for Configuring the Personal Info Pages in the Transaction Design Studio ..................................... 208
Considerations for Deleting Tags from Lookup Codes ..................................................................................................... 208
Deep Links for Person Spotlight Public Info ........................................................................................................................ 208
FAQs for Person .......................................................................................................................................................................... 212
10
Employment
217
Employment Model .................................................................................................................................................................... 217
When to Select the Employment Model ............................................................................................................................... 219

Oracle Fusion Cloud Human Resources
Implementing Global Human Resources
Employment Configuration Options ...................................................................................................................................... 220
Employment Profile Options .................................................................................................................................................... 222
Employment Lookups ............................................................................................................................................................... 233
Employment Flexfields .............................................................................................................................................................. 235
Parameters for Assignment Extensible and Descriptive Flexfields ................................................................................. 237
Configure Flexfield Parameters in Value Sets for Worker Assignments ......................................................................... 241
People Group .............................................................................................................................................................................. 243
How You Configure the Default Expense Account ............................................................................................................. 243
Secured Approval Notifications for Employment Flows ................................................................................................... 244
Check and Correct Employment-Related Data Issues ....................................................................................................... 247
Add Additional Content to the Guided Flow for Promote Action ................................................................................... 249
How You Access a Report of Employer Comments for Terminated Workers ............................................................... 250
Personalize the Universal Header for Employment Flows ................................................................................................. 251
Action Framework ...................................................................................................................................................................... 253
Assignments ................................................................................................................................................................................ 270
Areas of Responsibility ............................................................................................................................................................. 275
Terminations ................................................................................................................................................................................ 276
FAQs for Employment ............................................................................................................................................................... 277
11
Seniority Dates
279
Overview of Seniority Dates .................................................................................................................................................... 279
Seniority Date Attributes .......................................................................................................................................................... 279
Seniority Date Versions ............................................................................................................................................................. 281
Considerations for Migrating to V3 Seniority Dates .......................................................................................................... 282
Process to Migrate Seniority Dates ........................................................................................................................................ 282
V3 Seniority Dates Profile Options ........................................................................................................................................ 283
How to Change V3 Seniority Dates Rule Configuration .................................................................................................... 284
How You Configure Seniority Dates ...................................................................................................................................... 286
Fast Formulas for V3 Seniority Dates ................................................................................................................................... 289
How to Override Seniority Basis ............................................................................................................................................. 291
Common Rule Configurations for V3 Seniority Dates ....................................................................................................... 292
Seniority Dates User Entities ................................................................................................................................................... 293
FAQs for Seniority Dates .......................................................................................................................................................... 294
12
Journeys
297
Overview of Journeys ............................................................................................................................................................... 297

Oracle Fusion Cloud Human Resources
Implementing Global Human Resources
13
Document Records
299
Document Types and Categories ........................................................................................................................................... 299
Restrict Management of Document Records ...................................................................................................................... 303
Configure Labels for Standard Document Type Attributes .............................................................................................. 305
Document Type Lookups ......................................................................................................................................................... 307
Document Records Profile Options ....................................................................................................................................... 307
Document Type Descriptive Flexfields .................................................................................................................................. 309
Document Record Descriptive Flexfields .............................................................................................................................. 310
Configure Flexfield Parameters in Value Sets for Document Records ............................................................................. 311
Create and Default Context for Descriptive Flexfield Based on Document Type .......................................................... 313
Generate Letter from Document Record for a Specific Document Type ........................................................................ 316
Move Deleted Document Records to Archive Table ........................................................................................................... 320
How You Configure Archiving and Purging for Document Records ................................................................................ 321
Set Document Record Availability .......................................................................................................................................... 323
Document Type Attributes You Can Change ....................................................................................................................... 324
Control Access to Document Records ................................................................................................................................... 325
Methods of Creating Document Records ............................................................................................................................. 326
Document Records Available in Other HCM Flows ............................................................................................................ 326
Restrict Document Types During Mass Download of Document Records .................................................................... 330
Deep Links for Document Records ........................................................................................................................................ 330
How You Set Preferences for Document Delivery .............................................................................................................. 342
FAQs for Document Records ................................................................................................................................................... 343
14
Workforce Records
345
Overview of Workforce Records ............................................................................................................................................. 345
Directory and Organization Chart Lookups ......................................................................................................................... 345
Overview of Work Schedules .................................................................................................................................................. 346
Calendar Events and Geographic Hierarchy ........................................................................................................................ 350
Calendar Event Setup Examples ............................................................................................................................................. 357
Workforce Scheduling ............................................................................................................................................................... 360
Work Schedules .......................................................................................................................................................................... 367
15
Set Up Connections
375
Set Up Connections ................................................................................................................................................................... 375
Profile Options Considerations for Connections Search ................................................................................................... 376
Roles Required for Connections ............................................................................................................................................. 376


Oracle Fusion Cloud Human Resources
Implementing Global Human Resources

Oracle Fusion Cloud Human Resources
Implementing Global Human Resources
Get Help
Get Help
There are a number of ways to learn more about your product and interact with Oracle and other users.
Get Help in the Applications
Use help icons to access help in the application. If you don't see any help icons on your page, click your user image
or name in the global header and select Show Help Icons.
Get Support
You can get support at My Oracle Support. For accessible support, visit Oracle Accessibility Learning and Support.
Get Training
Increase your knowledge of Oracle Cloud by taking courses at Oracle University.
Join Our Community
Use Cloud Customer Connect to get information from industry experts at Oracle and in the partner community. You
can join forums to connect with other customers, post questions, suggest ideas for product enhancements, and watch
events.
Learn About Accessibility
For information about Oracle's commitment to accessibility, visit the Oracle Accessibility Program. Videos included in
this guide are provided as a media alternative for text-based topics also available in this guide.
Share Your Feedback
We welcome your feedback about Oracle Applications user assistance. If you need clarification, find an error, or just
want to tell us what you found helpful, we'd like to hear from you.
You can email your feedback to oracle_fusion_applications_help_ww_grp@oracle.com.
Thanks for helping us improve our user assistance!
i

Oracle Fusion Cloud Human Resources
Implementing Global Human Resources
Get Help
ii

Oracle Fusion Cloud Human Resources
Implementing Global Human Resources
Chapter 1
Overview
1 Overview
Overview of Global Human Resources
To start an implementation of Global Human Resources, a user with the Application Implementation Consultant role
(ORA_ASM_APPLICATION_IMPLEMENTATION_CONSULTANT_JOB) must opt into the offerings applicable to your
business requirements.
Refer to the Oracle Fusion Cloud Applications Using Functional Setup Manager guide to manage the opt-in and setup of
your offerings.
Workforce Deployment Offering
Use this offering to align resources and people with business objectives, and enter and maintain information related to
people, employment, and work structures.
The following table specifies the primary functional areas of this offering. For the full list of functional areas and
features in this offering, use the Associated Features report that you review when you plan the implementation of your
offering.
Functional Area Description
Enterprise Profile
Manage geographies, file import, reference data, and data access for users.
Legal Structures
Manage information related to legal entities - jurisdictions, authorities, addresses, registration, and tax
profile.
Organization Structures
Manage business units and business unit set assignment.
Workforce Structures
Manage work structures including legislative data groups, enterprise information, locations,
departments, divisions, reporting establishments, department, position, and organization trees,
disability organizations, grades, grade rates, grade ladders, jobs, and positions. You can also define
seniority dates, collective agreements, and worker unions.
HCM Data Loader
Configure HCM Data Loader and HCM Spreadsheet Data Loader for bulk data loading. Import and load
data using HCM Data Loader. Manage access to spreadsheet templates, and configure spreadsheets to
suit business needs.
Workforce Information
Manage your workforce information including banks, actions, assignment statuses, checklist
templates, document types, and eligibility profiles.
Elements and Formulas
Define elements for base pay, absences, benefits, time and labor, and payroll. You can also define
formulas for specific areas such as payroll calculation.
Payroll
Manage payroll legislations, payroll and time definitions, fast formulas, and rate definitions.
1

Oracle Fusion Cloud Human Resources
Implementing Global Human Resources
Chapter 1
Overview
Functional Area Description
Benefits
Configure eligibility profiles for checklists.
Absence Management
Configure absence plans, types, categories, certifications, and reasons for employees, including
formulas, eligibility profiles, and rates.
HCM Data Extract
Define extract definitions for HCM.
Time and Labor
Define time entry, processing, and device processing configurations, including entry field and layouts,
time categories and consumers, validation and calculation rules, groups and profiles.
Workforce Health and Safety Incidents
Define settings for environment, health, and safety.
Related Topics
•
Plan Your Implementation
Overview of Implementing Global Human Resources
This guide describes how to use the task lists and tasks in the Workforce Deployment offering to implement Oracle
Fusion Cloud Global Human Resources. This topic explains the scope of this guide and summarizes the setup tasks.
The following table lists the task lists within Workforce Deployment that are covered in other guides:
Task List Guide
Define Batch Data Loads
Define Extracts
Oracle Fusion Cloud HCM HCM Data Loading Business Objects
Note:
This guide also covers Oracle Taleo Recruiting Cloud Service Integration.
Oracle Fusion Cloud HCM HCM Extracts
Define Security for Human Capital
Management
Oracle Fusion Cloud HCM Securing HCM
Define Payroll
Define Payroll Legislations
Oracle Fusion Cloud Human Resources Implementing Global Payroll
Define Absences
Oracle Fusion Cloud Human Resources Implementing Absence Management
Define Transactional Business Intelligence
Configuration
Oracle Fusion Cloud HCM Administering Analytics and Reports for HCM
2

Oracle Fusion Cloud Human Resources
Implementing Global Human Resources
Chapter 1
Overview
Task List Guide
Setup Tasks for Implementing Oracle Global Human Resources
To implement Oracle Global Human Resources, sign-in as a user with Application Implementation Consultant role and
opt into the offerings applicable to your business requirements. Other users must include the Functional Setup User role
in addition to other roles or privileges needed to perform specific setup activities.
Before you begin implementing Oracle Global Human Resources, you must complete the initial application setup.
This table lists the setup tasks required to implement the Oracle Global Huamn Resources. You can do the task
configurations using the Setup and Maintenance work area on the My Enterprise tab on the Home page.
Implementation Tasks List Task Name What You Must Do Where to Find Information
(Search on the Oracle Help
Center for titles listed in this
column)
Prerequisite Tasks for Oracle Global Human Resources Setup
Define Common Applications
Configuration for Human
Capital Management or Define
Geographies for HCM
Manage Geographies Use the territory code to verify
predefined geographies and load
any additionally required local
geographies. You can import
Oracle-licensed data from Loqate,
for those countries where the data
is available.
• Overview of Geographies
Select Address Style and Address
Validation
Check the address style and
address validation for your country.
• Change Address Style and
Address Validation Settings
Define Common Applications
Configuration for Human Capital
Management
Manage Currencies Create or enable any currency for
displaying monetary amounts,
assigning currency to ledgers,
entering transactions, recording
balances, or for any reporting
purposes.
• When do I create or enable
currencies?
Set Up Enterprise Structures
Manage Enterprise HCM
Information
Manage enterprise HCM
information to specify work day
information, person, worker, and
assignment number generation,
peson name languages, user
and role provisioning, psoition
management, and so on.
• Enterprise Structures
Manage Legal Addresses Create legal addresses for all
organizational units of the
enterprise before you create legal
entities.
• What's a legal address?
Define Enterprise Structures for
Human Capital Management
Manage Legislative Data Groups Define at least one legislative
data group for each country your
enterprise operates in.
• Legislative Data Groups
3

Oracle Fusion Cloud Human Resources
Implementing Global Human Resources
Chapter 1
Overview
Implementation Tasks List Task Name What You Must Do Where to Find Information
(Search on the Oracle Help
Center for titles listed in this
column)
Manage Legal Entity Create all legal entities that apply
to your enterprise. Designate the
legal entity as a legal employer and
as a payroll statutory unit (PSU) for
payroll.
• Legal Entities, Business Units,
and Reference Data Sets
• How Legal Employers Work
with Payroll Statutory Units
and Tax Reporting Units
Manage Legal Entity HCM
Information
Manage legal entity HCM
information to include statutory
components as required.
• Legal Entities
• Legal Entities, Business Units,
and Reference Data Sets
Manage Legal Jurisdictions Review the predefined jurisdictions
for your country and create any
jurisdictions you require for
specific local taxes.
• Overview of Legal Jurisdiction
and Authorities
• Create Legal Jurisdictions,
Addresses and Authorities
Manage Legal Reporting Units Define legal reporting units (LRU)
also known as tax reporting units,
to group employee records for tax
and social reporting.
Create Legal Entities, Registrations,
and Reporting Units
Create Reference Data Sets and Business Units
Define Reference Data Sharing for
Human Capital Management
Manage Reference Data Sets Identifier for sets of rows in control
tables (set IDs)
• How Business Units Work
with Reference Data Sets
Manage Business Units Define a logical entity for your
company's structure that uses
the business unit classification to
group sets of data.
• Business Units
Define Business Units for Human
Capital Management
Manage Business Unit
SetAssignment
Map set IDs to a business unit for
each record data object such as
locations, departments, jobs, and
grades.
• How Business Units Work
with Reference Data Sets
Set Up Workforce Structures
Manage Location Create locations where business
is conducted, including physical
location of a workforce structure
and workers’ physical work
locations.
• Locations
Manage Departments Create organizational units
assigned to an employee, cost
center, or for data security
• Departnments
• Departments and Cost
Centers
Manage Jobs Define a job and its attributes.
• Jobs
Define Workforce Structures
Manage Actions Define actions to track changes
to Human Capital Management
(HCM) records, such as changesto
employment and assignment
records, for example, assignment
• How Action Components
Work Together
4
Oracle Fusion Cloud Human Resources
Implementing Global Human Resources
Chapter 1
Overview
Implementation Tasks List Task Name What You Must Do Where to Find Information
(Search on the Oracle Help
Center for titles listed in this
column)
change, transfer, termination, and
so on.
Manage Action Reasons Configure the reason for HCM
actions such as reorganiztion or
performance for the promote
action.
Define Person Record and Employment Record Values
Manage Person Types Define person types to maintain
information for a group of people
inyour enterprise.
• Person Types
Manage Person Name Formats Configure the predefined person
name format types according to
your choice.
• Person Name Formats
Managing Person Name Styles Define the person name
components for a country
• Person Name Styles
• Offering: Workforce
Deployment
• Functional Area: Workforce
Information
Assignment Statuses Define assignment status that
changes according to changes in
HR and payroll statuses.
• How You Set Up Assignment
Statuses
Manage Common Lookups Review common lookups that are
employment-related and have user
or extensible configurationl evels,
and update them as appropriate to
suit enterprise requirements
Security Reference
The tasks that people can do and the data that they can see depend on their roles, duties, and privileges. For
information about these factors, see these two guides:
• Securing HCM
• Securing Reference for HCM
5

Oracle Fusion Cloud Human Resources
Implementing Global Human Resources
Chapter 1
Overview
6

Oracle Fusion Cloud Human Resources
Implementing Global Human Resources
Chapter 2
Enterprise Structures
2 Enterprise Structures
Overview of Enterprise Structures
Oracle Fusion Applications have been designed to ensure your enterprise can be modeled to meet legal and
management objectives.
The decisions about your implementation of Oracle Fusion Applications are affected by your:
• Industry
• Business unit requirements for autonomy
• Business and accounting policies
• Business functions performed by business units and optionally, centralized in shared service centers
• Locations of facilities
Every enterprise has three fundamental structures that describe its operations and provide a basis for reporting.
• Legal
• Managerial
• Functional
In Oracle Fusion, these structures are implemented using the chart of accounts and organization hierarchies. Many
alternative hierarchies can be implemented and used for reporting. You are likely to have one primary structure that
organizes your business into:
• Divisions
• Business Units
• Departments
Align these structures with your strategic objectives.
This figure illustrates a grid with Business Axis, representing the enterprise division, Legal Axis representing the
companies, and the Functional Axis representing the business functions.
7

Oracle Fusion Cloud Human Resources
Implementing Global Human Resources
Chapter 2
Enterprise Structures
Legal Structure
The figure illustrates a typical group of legal entities, operating various business and functional organizations. Your
ability to buy and sell, own, and employ comes from your charter in the legal system. A corporation is:
• A distinct legal entity from its owners and managers.
• Owned by its shareholders, who may be individuals or other corporations.
Many other kinds of legal entities exist, such as sole proprietorships, partnerships, and government agencies.
8

Oracle Fusion Cloud Human Resources
Implementing Global Human Resources
Chapter 2
Enterprise Structures
A legally recognized entity can own and trade assets and employ people in the jurisdiction in which the entity is
registered. When granted these privileges, legal entities are also assigned responsibilities to:
• Account for themselves to the public through statutory and external reporting.
• Comply with legislation and regulations.
• Pay income and transaction taxes.
• Process value added tax (VAT) collection on behalf of the taxing authority.
Many large enterprises isolate risk and optimize taxes by incorporating subsidiaries. They create legal entities to
facilitate legal compliance, segregate operations, optimize taxes, complete contractual relationships, and isolate risk.
Enterprises use legal entities to establish their enterprise's identity within the laws of each country in which their
enterprise operates.
The figure illustrates:
• A separate card represents a series of registered companies.
• Each company, including the public holding company, InFusion America, must be registered in the countries
where they do business.
• Each company contributes to various divisions created for purposes of management reporting. These are
shown as vertical columns on each card.
For example, a group might have a separate company for each business in the United States (US), but have its United
Kingdom (UK) legal entity represent all businesses in that country.
The divisions are linked across the cards so that a business can appear on some or all of the cards. For example, the
air quality monitoring systems business might be operated by the US, UK, and France companies. The list of business
divisions is on the Business Axis.
Each company's card is also horizontally striped by functional groups, such as the sales team and the finance team.
This functional list is called the Functional Axis. The overall image suggests that information might, at a minimum, be
tracked by company, business, division, and function in a group environment. In Oracle Fusion Applications, the legal
structure is implemented using legal entities.
Management Structure
Successfully managing multiple businesses requires that you segregate them by their strategic objectives, and measure
their results. Although related to your legal structure, the business organizational hierarchies don't have to be reflected
directly in the legal structure of the enterprise. The management structure can include divisions, subdivisions, lines
of business, strategic business units, profit, and cost centers. In the figure, the management structure is shown on the
Business Axis. In Oracle Fusion Applications, the management structure is implemented using divisions and business
units as well as being reflected in the chart of accounts.
Functional Structure
Straddling the legal and business organizations is a functional organization structured around people and their
competencies. For example, sales, manufacturing, and service teams are functional organizations. This functional
structure is represented by the Functional Axis in the figure. You reflect the efforts and expenses of your functional
organizations directly on the income statement. Organizations must manage and report revenues, cost of sales, and
functional expenses such as research and development and selling, general, and administrative expenses. In Oracle
Fusion Applications, the functional structure is implemented using departments and organizations, including sales,
marketing, project, cost, and inventory organizations.
9

Oracle Fusion Cloud Human Resources
Implementing Global Human Resources
Chapter 2
Enterprise Structures
Model Your Enterprise Management Structure
This example uses a fictitious global company to demonstrate the analysis that can occur during the enterprise
structure configuration planning process.
Scenario
Your company, InFusion Corporation, is a multinational conglomerate that operates in the United States (US) and the
United Kingdom (UK). InFusion has purchased an Oracle Fusion Cloud Enterprise Resource Planning (ERP) solution
including Oracle General Ledger and all of the Oracle Fusion Cloud Applications subledgers. You are chairing a
committee to discuss creation of a model for your global enterprise structure including both your US and UK operations.
InFusion Corporation
InFusion Corporation has 400 plus employees and revenue of 120 million US dollars. Your product line includes all
the components to build and maintain air quality monitoring applications for homes and businesses. You have two
distribution centers and three warehouses that share a common item master in the US and UK. Your financial services
organization provides funding to your customers for the initial costs of these applications.
The following are elements you must consider in creating your model for your global enterprise structure.
• Your company is required to report using US Generally Accepted Accounting Principles (GAAP) standards and
UK Statements of Standard Accounting Practice and Financial Reporting Standards. How many ledgers do you
want to achieve proper statutory reporting?
• Your managers need reports that show profit and loss (revenue and expenses) for their lines of business. Do
you use business units and balancing segments to represent your divisions and businesses? Do you secure data
by two segments in your chart of accounts which represents each department and legal entity? Or do you use
one segment that represents both to produce useful, but confidential management reports?
• Your corporate management requires reports showing total organizational performance with drill-down
capability to the supporting details. Do you need multiple balancing segment hierarchies to achieve proper
rollup of balances for reporting requirements?
• Your company has all administrative, account payables, procurement, and Human Resources functions
performed at their corporate headquarters. Do you need one or more business units in which to perform all
these functions? How is your shared service center configured?
Global Enterprise Structure Model
The following figure and table summarize the model that your committee has designed and uses numeric values to
provide a sample representation of your structure. The model includes the following recommendations:
• Creation of three separate ledgers representing your separate legal entities:
◦
InFusion America Inc.
◦
InFusion Financial Services Inc.
◦
InFusion UK Services Ltd.
10

Oracle Fusion Cloud Human Resources
Implementing Global Human Resources
Chapter 2
Enterprise Structures
• Consolidation of results for application components, installations, and maintenance product lines across the
enterprise
• All UK general and administrative costs processed at the UK headquarters
• US Systems' general and administrative costs processed at US Corporate headquarters
• US Financial Services maintains its own payables and receivables departments
11

Oracle Fusion Cloud Human Resources
Implementing Global Human Resources
Chapter 2
Enterprise Structures
In this chart, the green globe stands for required and gold globe stands for optional setup. The following statements
expand on the data in the chart.
• The enterprise is required because it serves as an umbrella for the entire implementation. All organizations are
created within an enterprise.
• Legal entities are also required. They can be optionally mapped to balancing segment values or represented
by ledgers. Mapping balancing segment values to legal entities is required if you plan to use the intercompany
functionality. The InFusion Corporation is a legal entity but isn't discussed in this example.
• At least one ledger is required in an implementation in which you record your accounting transactions.
• Business units are also required because financial transactions are processed in business units.
• A shared service center is optional, but if used, must be a business unit.
• Divisions are optional and can be represented with a hierarchy of cost centers or by a second balancing
segment value.
• Departments are required because they track your employees.
• Optionally, add an item master organization and inventory organizations if you're tracking your inventory
transactions in Oracle Fusion Applications.
12

Oracle Fusion Cloud Human Resources
Implementing Global Human Resources
Chapter 2
Enterprise Structures
Note: Some Oracle Fusion Cloud Human Capital Management implementations don't require recording accounting
transactions and therefore, don't require a ledger.
Guidelines for Configuring Global Enterprises
Start your global enterprise structure configuration by discussing what your organization's reporting needs are and how
to represent those needs in the Oracle Fusion Cloud Applications.
The following are some questions and points to consider as you design your global enterprise structure in Oracle Fusion
Applications.
• Enterprise Configuration
• Business Unit Management
• Security Structure
• Compliance Requirements
Enterprise Configuration
• What is the level of configuration needed to achieve the reporting and accounting requirements?
• What components of your enterprise do you need to report on separately?
• Which components can be represented by building a hierarchy of values to provide reporting at both detail and
summary levels?
• Where are you on the spectrum of centralization versus decentralization?
Business Unit Management
• What reporting do I need by business unit?
• How can you set up your departments or business unit accounts to achieve departmental hierarchies that
report accurately on your lines of business?
• What reporting do you need to support the managers of your business units, and the executives who measure
them?
• How often are business unit results aggregated?
• What level of reporting detail is required across business units?
Security Structure
• What level of security and access is allowed?
• Are business unit managers and the people that report to them secured to transactions within their own
business unit?
• Are the transactions for their business unit largely performed by a corporate department or shared service
center?
13

Oracle Fusion Cloud Human Resources
Implementing Global Human Resources
Chapter 2
Enterprise Structures
Compliance Requirements
• How do you comply with your corporate external reporting requirements and local statutory reporting
requirements?
• Do you tend to prefer a corporate first or an autonomous local approach?
• Where are you on a spectrum of centralization, very centralized or decentralized?
Design an Enterprise Configuration
This example illustrates how to set up an enterprise based on a global company operating mainly in the US and the UK
with a single primary industry.
Scenario
InFusion Corporation is a multinational enterprise in the high technology industry with product lines that include all
the components that are required to build and maintain air quality monitoring systems for homes and businesses.
Its primary locations are in the US and the UK, but it has smaller outlets in France, Saudi Arabia, and the United Arab
Emirates (UAE).
Enterprise Details
In the US, InFusion employs 400 people and has company revenue of 120 million US dollars. Outside the US, InFusion
employs 200 people and has revenue of 60 million US dollars.
InFusion requires three divisions.
• The US division covers the US locations.
• The Europe division covers UK and France.
• Saudi Arabia and the UAE are covered by the Middle East division.
InFusion requires legal entities with legal employers, payroll statutory units, tax reporting units, and legislative data
groups for the US, UK, France, Saudi Arabia, and UAE, to employ and pay its workers in those countries.
InFusion requires a number of departments across the enterprise for each area of business, such as sales and
marketing, and a number of cost centers to track and report on the costs of those departments.
InFusion has general managers responsible for business units within each country. Those business units may share
reference data. Some reference data can be defined within a reference data set that multiple business units may
subscribe to. Business units are also required for financial purposes. Financial transactions are always processed within
a business unit.
Resulting Enterprise Configuration
Based on this analysis, InFusion requires an enterprise with multiple divisions, ledgers, legal employers, payroll statutory
units, tax reporting units, legislative data groups, departments, cost centers, and business units.
This figure illustrates the enterprise configuration that results from the analysis of InFusion Corporation.
14

Oracle Fusion Cloud Human Resources
Implementing Global Human Resources
Chapter 2
Enterprise Structures
Enterprise Information for Non-HCM Users
The Manage Enterprise HCM Information task includes default settings for your enterprise such as the employment
model, worker number generation, and so on.
If you're not implementing Oracle Fusion Human Capital Management (HCM), then the only action you may need to
perform using this task is to change the enterprise name, if necessary. The other settings are HCM-specific and aren't
relevant outside of Oracle Fusion HCM.
15

Oracle Fusion Cloud Human Resources
Implementing Global Human Resources
Chapter 2
Enterprise Structures
16

Oracle Fusion Cloud Human Resources
Implementing Global Human Resources
Chapter 3
Legal Entities, Business Units, and Reference Data Sets
3 Legal Entities, Business Units, and
Reference Data Sets
Overview of Legal Entities, Business Units, and Divisions
The setup tasks for legal entities, divisions, business units and other organizations are in different functional areas in
the Setup and Maintenance work area.
The Legal Structures functional area covers tasks related to legal entity setup, the Organization Structures functional
area includes tasks related to business unit setup, and the Workforce Structures functional area includes tasks related to
department, division, trees, jobs, positions, and other organizations setup.
Overview
A legal entity is a recognized party with rights and responsibilities given by legislation.
Legal entities have the following rights and responsibilities to:
• Own property
• Trade
• Repay debt
• Account for themselves to regulators, taxation authorities, and owners according to rules specified in the
relevant legislation
Their rights and responsibilities may be enforced through the judicial system. Define a legal entity for each registered
company or other entity recognized in law for which you want to record assets, liabilities, expenses and income, pay
transaction taxes, or perform intercompany trading.
A legal entity has responsibility for elements of your enterprise for the following reasons:
• Facilitating local compliance
• Minimizing the enterprise's tax liability
• Preparing for acquisitions or disposals of parts of the enterprise
• Isolating one area of the business from risks in another area. For example, your enterprise develops property
and also leases properties. You could operate the property development business as a separate legal entity to
limit risk to your leasing business.
17

Oracle Fusion Cloud Human Resources
Implementing Global Human Resources
Chapter 3
Legal Entities, Business Units, and Reference Data Sets
The Role of Your Legal Entities
In configuring your enterprise structure in Oracle Fusion Cloud Applications, the contracting party on any transaction is
always the legal entity. Individual legal entities:
• Own the assets of the enterprise
• Record sales and pay taxes on those sales
• Make purchases and incur expenses
• Perform other transactions
Legal entities must comply with the regulations of jurisdictions, in which they register. Europe now allows for companies
to register in one member country and do business in all member countries, and the US allows for companies to register
in one state and do business in all states. To support local reporting requirements, legal reporting units are created and
registered.
You are required to publish specific and periodic disclosures of your legal entities' operations based on different
jurisdictions' requirements. Certain annual or more frequent accounting reports are referred to as statutory or external
reporting. These reports must be filed with specified national and regulatory authorities. For example, in the United
States (US), your publicly owned entities (corporations) are required to file quarterly and annual reports, as well as other
periodic reports, with the Securities and Exchange Commission (SEC), which enforces statutory reporting requirements
for public corporations.
Individual entities privately held or held by public companies don't have to file separately. In other countries, your
individual entities do have to file in their own name, as well as at the public group level. Disclosure requirements are
diverse. For example, your local entities may have to file locally to comply with local regulations in a local currency, as
well as being included in your enterprise's reporting requirements in different currency.
A legal entity can represent all or part of your enterprise's management framework. For example, if you operate in a
large country such as the United Kingdom or Germany, you might incorporate each division in the country as a separate
legal entity. In a smaller country, for example Austria, you might use a single legal entity to host all of your business
operations across divisions.
Model Legal Entities
Oracle Fusion Cloud Applications support the modeling of your legal entities. If you make purchases from or sell to
other legal entities, define these other legal entities in your customer and supplier registers.
These registers are part of the Oracle Trading Community Architecture.
When your legal entities are trading with each other, represent them as legal entities and as customers and suppliers in
your customer and supplier registers. Use legal entity relationships to determine which transactions are intercompany
and require intercompany accounting. Your legal entities can be identified as legal employers and therefore, are
available for use in Human Capital Management (HCM) applications.
Several decisions you should consider when you create legal entities.
• The importance of using legal entity on transactions
• Legal entity and its relationship to business units
• Legal entity and its relationship to divisions
• Legal entity and its relationship to ledgers
18

Oracle Fusion Cloud Human Resources
Implementing Global Human Resources
Chapter 3
Legal Entities, Business Units, and Reference Data Sets
• Legal entity and its relationship to balancing segments
• Legal entity and its relationship to consolidation rules
• Legal entity and its relationship to intercompany transactions
• Legal entity and its relationship to worker assignments and legal employer
• Legal entity and payroll reporting
• Legal reporting units
The Importance of Using Legal Entities on Transactions
All of the assets of the enterprise are owned by individual legal entities. Oracle Fusion Cloud Financials allow your users
to enter legal entities on transactions that represent a movement in value or obligation.
For example, a sales order creates an obligation on the legal entity that books the order and promises to deliver the
goods on the acknowledged date. The creation also creates an obligation on the purchaser to receive and pay for those
goods. Contract law in most countries contains statutes that state damages can be sought for both:
• Actual losses, putting the injured party in the same state as if they had not entered into the contract.
• What is called loss of bargain, or the profit that would have made on a transaction.
In another example, if you revalued your inventory in a warehouse to account for raw material price increases,
the revaluation and revaluation reserves must be reflected in your legal entity's accounts. In Oracle Fusion Cloud
Applications, your inventory within an inventory organization is managed by a single business unit and belongs to one
legal entity.
Legal Entity and Its Relationship to Business Units
A business unit can process transactions on behalf of many legal entities. Frequently, a business unit is part of a single
legal entity. In most cases, the legal entity is explicit on your transactions. For example, a payables invoice has an explicit
legal entity field. Your accounts payables department can process supplier invoices on behalf of one or many business
units.
In some cases, your legal entity is inferred from your business unit that's processing the transaction. For example,
Business Unit ACM UK has a default legal entity of InFusion UK Ltd. When a purchase order is placed in ACM UK,
the legal entity InFusion UK Ltd is legally obligated to the supplier. Oracle Procurement, Oracle Fusion Cloud Project
Management, and Oracle Fusion Cloud Supply Chain and Manufacturing applications rely on deriving the legal entity
information from the business unit.
Legal Entity and Its Relationship to Divisions
The division is an area of management responsibility that can correspond to a collection of legal entities. If wanted, you
can aggregate the results for your divisions by legal entity or by combining parts of other legal entities. Define date-
effective hierarchies for your cost center or legal entity segment in your chart of accounts to facilitate the aggregation
and reporting by division. Divisions and legal entities are independent concepts.
Legal Entity and Its Relationship to Ledgers
One of your major responsibilities is to file financial statements for your legal entities. Map legal entities to specific
ledgers using the Oracle General Ledger Accounting Configuration Manager. Within a ledger, you can optionally map a
legal entity to one or more balancing segment values.
19

Oracle Fusion Cloud Human Resources
Implementing Global Human Resources
Chapter 3
Legal Entities, Business Units, and Reference Data Sets
Legal Entity and Its Relationship to Balancing Segments
General Ledger supports up to three balancing segments. Best practices recommend one segment represents your legal
entity to ease your requirement to account for your operations to regulatory agencies, tax authorities, and investors.
Accounting for your operations means you must produce a balanced trial balance sheet by legal entity. If you account
for many legal entities in a single ledger, you must:
1. Identify the legal entities within the ledger.
2. Balance transactions that cross legal entity boundaries through intercompany transactions.
3. Decide which balancing segments correspond to each legal entity and assign them in General Ledger
Accounting Configuration Manager. Once you assign one balancing segment value in a ledger, then all your
balancing segment values must be assigned. This recommended best practice facilitates reporting on assets,
liabilities, and income by legal entity.
Represent your legal entities by at least one balancing segment value. You may represent it by two or three balancing
segment values if more granular reporting is required. For example, if your legal entity operates in multiple jurisdictions
in Europe, you might define balancing segment values and map them to legal reporting units. You can represent a legal
entity with more than one balancing segment value. Do not use a single balancing segment value to represent more
than one legal entity.
In General Ledger, there are three balancing segments. You can use separate balancing segments to represent your
divisions or strategic business units to enable management reporting at the balance sheet level for each. This solution
is used to empower your business unit and divisional managers to track and assume responsibility for their asset
utilization or return on investment. Using multiple balancing segments is also useful when you know at the time of
implementation that you're disposing of a part of a legal entity and want to isolate the assets and liabilities for that
entity.
Implementing multiple balancing segments requires every journal entry that isn't balanced by division or business unit,
to generate balancing lines. You can't change to multiple balancing segments after you begin using the ledger because
your historical data isn't balanced by the new balancing segments. Restating historical data must be done at that point.
If your enterprise regularly spins off businesses or holds managers accountable for utilization of assets, identify the
business with a balancing segment value. If you account for each legal entity in a separate ledger, no requirement exists
to identify the legal entity with a balancing segment value.
While transactions that cross balancing segments don't necessarily cross legal entity boundaries, all transactions that
cross legal entity boundaries must cross balancing segments. If you make an acquisition or are preparing to dispose of
a portion of your enterprise, you may want to account for that part of the enterprise in its own balancing segment even
if the portion isn't a separate legal entity. If you don't map legal entities sharing the same ledger to balancing segments,
you can't distinguish them using intercompany functionality or track individual equity.
Legal Entity and Its Relationship to Consolidation Rules
In Oracle Fusion Applications you can map legal entities to balancing segments and then define consolidation rules
using your balancing segments. You are creating a relationship between the definition of your legal entities and their
role in your consolidation.
Legal Entity and Its Relationship to Intercompany Transactions
Use Oracle Intercompany features to create intercompany entries automatically across your balancing segments.
Intercompany processing updates legal ownership within the enterprise's groups of legal entities. Invoices or journals
are created as needed. To limit the number of trading pairs for your enterprise, set up intercompany organizations
and assign then to your authorized legal entities. Define processing options and intercompany accounts to use when
creating intercompany transactions and to assist in consolidation elimination entries. These accounts are derived
20

Oracle Fusion Cloud Human Resources
Implementing Global Human Resources
Chapter 3
Legal Entities, Business Units, and Reference Data Sets
and automatically entered on your intercompany transactions based on legal entities assigned to your intercompany
organizations.
Intracompany trading, in which legal ownership isn't changed but other organizational responsibilities are, is also
supported. For example, you can track assets and liabilities that move between your departments within your legal
entities by creating departmental level intercompany organizations.
Tip: In the Oracle Fusion Supply Chain and Manufacturing applications, you can model intercompany relationships
using business units, from which legal entities are derived.
Legal Entity and Its Relationship to Worker Assignments and Legal
Employer
Legal entities that employ people are called legal employers in the Legal Entity Configurator. You must enter legal
employers on worker assignments in Oracle Fusion Cloud HCM.
Legal Entity and Payroll Reporting
Your legal entities are required to pay payroll tax and social insurance such as social security on your payroll. In Oracle
Fusion Applications, you can register payroll statutory units to pay and report on payroll tax and social insurance for
your legal entities. As the legal employer, you might be required to pay payroll tax, not only at the national level, but
also at the local level. You meet this obligation by establishing your legal entity as a place of work within the jurisdiction
of a local authority. Set up legal reporting units to represent the part of your enterprise with a specific legal reporting
obligation. You can also mark these legal reporting units as tax reporting units, if the legal entity must pay taxes as a
result of establishing a place of business within the jurisdiction.
Overview of Legal Jurisdiction and Authorities
You are required to register your legal entities with legal authorities in the jurisdictions where you conduct business.
Register your legal entities as required by local business requirements or other relevant laws.
For example, register your legal entities for tax reporting to report sales taxes or value added taxes.
Define jurisdictions and related legal authorities to support multiple legal entity registrations, which are used by Oracle
Fusion Tax and Oracle Fusion Payroll. When you create a legal entity, the Oracle Fusion Legal Entity Configurator
automatically creates one legal reporting unit for that legal entity with a registration.
Jurisdictions
Jurisdiction is a physical territory such as a group of countries, country, state, county, or parish where a particular piece
of legislation applies.
French Labor Law, Singapore Transactions Tax Law, and US Income Tax Laws are examples of particular legislation
that apply to legal entities operating in different countries' jurisdictions. Judicial authority may be exercised within a
jurisdiction.
21

Oracle Fusion Cloud Human Resources
Implementing Global Human Resources
Chapter 3
Legal Entities, Business Units, and Reference Data Sets
Types of jurisdictions are:
• Identifying Jurisdiction
• Income Tax Jurisdiction
• Transaction Tax Jurisdiction
Identifying Jurisdiction
For each legal entity, select an identifying jurisdiction. An identifying jurisdiction is your first jurisdiction you must
register with to be allowed to do business in a country. If there's more than one jurisdiction that a legal entity must
register with to commence business, select one as the identifying jurisdiction. Typically the identifying jurisdiction is the
one you use to uniquely identify your legal entity.
Income tax jurisdictions and transaction tax jurisdictions don't represent the same jurisdiction. Although in some
countries, the two jurisdictions are defined at the same geopolitical level, such as a country, and share the same legal
authority, they're two distinct jurisdictions.
Income Tax Jurisdiction
Create income tax jurisdictions to properly report and remit income taxes to the legal authority. Income tax jurisdictions
by law impose taxes on your financial income generated by all your entities within their jurisdiction. Income tax is a key
source of funding that the government uses to fund its activities and serve the public.
Transaction Tax Jurisdiction
Create transaction tax jurisdictions through Oracle Tax in a separate business flow, because of the specific needs and
complexities of various taxes. Tax jurisdictions and their respective rates are provided by suppliers and require periodic
maintenance. Use transaction tax jurisdiction for legal reporting of sales and value added taxes.
Legal Authorities
A legal authority is a government or legal body that's charged with powers to make laws, levy and collect fees and taxes,
and remit financial appropriations for a given jurisdiction.
For example, the Internal Revenue Service is the authority for enforcing income tax laws in United States. In some
countries, such as India and Brazil, you're required to print legal authority information on your tax reports. Legal
authorities are defined in the Oracle Legal Entity Configurator. Tax authorities are a subset of legal authorities and are
defined using the same setup flow.
Legal authorities aren't mandatory in Oracle Fusion Cloud Human Capital Management (HCM), but are recommended
and are generally referenced on statutory reports.
Create Legal Jurisdictions, Addresses and Authorities
Define legal jurisdictions and related legal authorities to support multiple legal entity registrations, which are used by
Oracle Fusion Tax and Oracle Fusion Payroll.
22

Oracle Fusion Cloud Human Resources
Implementing Global Human Resources
Chapter 3
Legal Entities, Business Units, and Reference Data Sets
Legal Jurisdictions
Create a legal jurisdiction by following these steps:
1. In the Setup and Maintenance work area, go to the Manage Legal Jurisdictions task.
2. Select Create.
3. Enter a unique Name, United States Income Tax.
4. Select a Territory, United States.
5. Select a Legislative Category, Income tax.
6. Select Identifying, Yes. Identifying indicates the first jurisdiction a legal entity must register with to do business
in a country.
7. Enter a Start Date if desired. You can also add an End Date to indicate a date that the jurisdiction may no
longer be used.
8. Select a Legal Entity Registration Code, EIN or TIN.
9. Select a Legal Reporting Unit Registration Code, Legal Reporting Unit Registration Number.
10. Optionally enter one or more Legal Functions.
11. Save and Close.
Legal Addresses for Legal Entities and Reporting Units
Create a legal address for legal entities and reporting units by following these steps:
1. In the Setup and Maintenance work area, go to the Manage Legal Address task.
2. Select Create.
3. Select Country.
4. Enter Address Line 1, Oracle Parkway.
5. Optionally enter Address Line 2, and Address Line 3.
6. Enter or Select the postal code, 94065.
7. Select Geography 94065 and Parent Geography Redwood Shores, San Mateo, CA.
8. Optionally enter a Time Zone, US Pacific Time.
9. OK.
10. Save and Close.
Legal Authorities
Create a legal authority by following these steps:
1. In the Setup and Maintenance work area, go to the Manage Legal Authorities task.
2. Enter the Name, California Franchise Tax Board.
3. Enter the Tax Authority Type, Reporting.
Note: Create an address for the legal authority.
4. Select Create.
5. The Site Number is automatically assigned.
6. Optionally enter a Mail Stop.
7. Select Country, United States
8. Enter Address Line 1, 121 Spear Street, Suite 400.
23

Oracle Fusion Cloud Human Resources
Implementing Global Human Resources
Chapter 3
Legal Entities, Business Units, and Reference Data Sets
9. Optionally enter Address Line 2, and Address Line 3.
10. Enter or Select the postal code, 94105.
11. Select Geography 94105 and Parent Geography San Francisco, San Francisco, CA.
12. OK.
13. Optionally enter a Time Zone, US Pacific Time.
14. Optionally click the One-Time Address check box.
15. The From Date displays today's date. Update if necessary.
16. Optionally enter a To Date to indicate the last day the address can be used.
Note: You can optionally enter Address Purpose details.
17. Select Add Row.
18. Select Purpose.
19. The Purpose from Date will default to today's date.
20. Optionally enter a Purpose to Date.
21. OK.
22. Save and Close.
Related Topics
•
Legal Authorities
•
Overview of Legal Jurisdiction and Authorities
•
How do I update existing setup data?
Create Legal Entities, Registrations, and Reporting Units
Define a legal entity for each registered company or other entity recognized in law for which you want to record assets,
liabilities, and income, pay transaction taxes, or perform intercompany trading.
Legal Entity
Create a legal entity by following these steps:
1. In the Setup and Maintenance work area, go to the Manage Legal Entity task.
2. Accept the default Country, United States.
3. Enter Name, InFusion USA West.
4. Enter Legal Entity Identifier, US0033.
5. Optionally enter Start Date. When the start date is blank the legal entity is effective from the creation date.
6. Optionally enter an End Date.
7. Optionally, if your legal entity should be registered to report payroll tax and social insurance, select the Payroll
statutory unit check box.
8. Optionally, if your legal entity has employees, select the Legal employer check box.
9. Optionally, if this legal entity isn't a payroll statutory unit, select an existing payroll statutory unit to report
payroll tax and social instance on behalf of this legal entity.
10. Enter the Registration Information
11. Accept the default Identifying Jurisdiction, United States Income Tax.
24

Oracle Fusion Cloud Human Resources
Implementing Global Human Resources
Chapter 3
Legal Entities, Business Units, and Reference Data Sets
12. Search for and select a Legal Address, 500 Oracle Parkway, Redwood Shores, CA 94065.
The legal address must have been entered previously using the Manage Legal Address task.
13. OK.
14. Optionally enter a Place of Registration.
15. Enter the EIN or TIN.
16. Enter the Legal Reporting Unit Registration Number.
17. Save and Close.
18. In the Setup and Maintenance work area, go to the Manage Legal Entity page and Select to set scope.
19. Select the Manage Legal Entity.
20. In the *Legal Entity list, select Select and Add.
21. Click Apply and Go to Task.
22. Select your legal entity.
23. Save and Close.
This sets the scope for your task list to the selected legal entity.
24. Save and Close.
Legal Entity Registrations
A legal entity registration with the same name as that of the legal entity is created by default. To verify this, locate the
Manage Legal Entity Registrations task and then select Go to Task. To create another registration for the legal entity
follow these steps:
1. In the Setup and Maintenance work area, go to the Manage Legal Entity Registrations task. Verify that the
Legal Entity scope value is set correctly.
2. Go to Task.
3. Select Create.
4. Enter Jurisdiction.
5. Enter Registered Address.
6. Enter Registered Name.
7. Optionally enter Alternate Name, Registration Number, Place of Registration, Issuing Legal Authority, and
Issuing Legal Authority Address, Start Date, and End Date.
8. Save and Close.
Legal Reporting Unit
When a legal entity is created, a legal reporting unit with the same name as that of the entity is also automatically
created. To create more legal reporting units or modify the settings follow these steps:
1. In the Setup and Maintenance work area, go to the Manage Legal Reporting Unit task. Verify that the Legal
Entity scope value is set correctly.
2. Go to Task
3. Select Create.
4. Enter Territory, United States.
5. Enter Name.
6. Optionally enter a Start Date.
7. Enter Registration Information.
8. Search for and select Jurisdiction.
9. Enter Main Legal Reporting Unit information.
25

Oracle Fusion Cloud Human Resources
Implementing Global Human Resources
Chapter 3
Legal Entities, Business Units, and Reference Data Sets
10. Select the value Yes or No for the Main Legal Reporting Unit. Set value to yes only if you're creating a new
main (primary) legal reporting unit.
11. Enter the Main Effective Start Date, 1/1/11.
12. Save and Close.
Related Topics
•
Overview
•
Model Legal Entities
•
Plan Legal Reporting Units
•
How do I update existing setup data?
Legislative Data Groups
Legislative data groups are a means of partitioning payroll and related data. At least one legislative data group is
required for each country where the enterprise operates.
Each legislative data group is associated with one or more payroll statutory units. Each payroll statutory unit can belong
to only one legislative data group.
Payroll-related information, such as elements, is organized by legislative data group. Each legislative data group:
• Marks a legislation in which payroll is processed.
• Is associated with a legislative code, currency, and its own cost allocation key flexfield structure.
• Is a boundary that can share the same set up and still comply with the local laws.
• Can span many jurisdictions as long as they're within one country.
• Can contain many legal entities that act as payroll statutory units.
How Legal Employers Work with Payroll Statutory Units
and Tax Reporting Units
You can designate legal entities as legal employers and payroll statutory units, which makes them available for use in
Oracle Fusion Human Capital Management (HCM).
You can have only one legal entity that's also a payroll statutory unit and legal employer, or multiple legal entities,
payroll statutory units and legal employers. Payroll statutory units and tax reporting units share a parent child
relationship with the payroll statutory unit being a parent of a tax reporting unit
Legal Employers and Payroll Statutory Units
You can designate payroll statutory units to group legal employers to do statutory calculations at a higher level. For
example, you can use payroll statutory units for court orders, or to calculate the United Kingdom (UK) statutory sick pay.
A legal employer can exist independently of an enterprise or be a part of a payroll statutory unit. There can be many
legal employers belonging to a payroll statutory unit, but a legal employer can belong only to one payroll statutory unit.
26

Oracle Fusion Cloud Human Resources
Implementing Global Human Resources
Chapter 3
Legal Entities, Business Units, and Reference Data Sets
Legal Employers and Tax Reporting Units
Tax reporting units are indirectly associated with a legal employer through the payroll statutory unit. One or more
tax reporting units can be used by a single legal employer, and a tax reporting unit can be used by one or more legal
employers.
For example, if a single tax reporting unit is linked to a payroll statutory unit and two legal employers are associated with
this payroll statutory unit, then both legal employers are associated with the tax reporting unit. Use the Manage Legal
Reporting Unit HCM Information task to designate an existing legal reporting unit as a tax reporting unit. You need to
select a parent payroll statutory unit when you create a legal reporting unit belonging to a legal employer (that isn't a
payroll statutory unit as well). Next, you need to designate the legal reporting unit as a tax reporting unit and select the
legal employer.
Related Topics
•
Examples of HCM Organization Models
•
Overview
•
What's a legal employer?
•
What's a payroll statutory unit?
•
What's a tax reporting unit?
Examples of HCM Organization Models
You can use any of these HCM organization models.
• Simple Configuration
• Multiple Legal Employers and Tax Reporting Units
• One Payroll Statutory Unit and Two Tax Reporting Units
• One Payroll Statutory Unit with Several Tax Reporting Units
• Multiple Payroll Statutory Units with Several Tax Reporting Units
These models include a legislative data group (LDG) that isn't an organization classification and show how you can
partition payroll data by associating them with a payroll statutory unit
Simple Configuration
This is an example of a simple configuration without any tax reporting units. The enterprise has only one legal entity,
which is both a payroll statutory unit and a legal employer, and shares the same boundaries. In this type reporting can
be done only at a single level. Countries such as Saudi Arabia and the United Arab Emirates (UAE) might use this type of
model, as these countries report at the legal entity level.
27

Oracle Fusion Cloud Human Resources
Implementing Global Human Resources
Chapter 3
Legal Entities, Business Units, and Reference Data Sets
This figure illustrates a simple configuration where the enterprise has only one legal entity, which is both a payroll
statutory unit and a legal employer.
Multiple Legal Employers and Tax Reporting Units
In this configuration, you define one legal entity, InFusion US as a payroll statutory unit with two separate legal entities,
which are also legal employers. This model shows multiple legal employers that are associated with a single payroll
statutory unit. Tax reporting units are always associated with a specific legal employer (or employers) through the
payroll statutory unit.
The implication is that payroll statutory reporting boundaries vary from human resources (HR) management, and you
can categorize the balances separately as either a payroll statutory unit, legal employer, or a tax reporting unit.
This configuration is based on tax filing requirements, as some tax-related payments and reports are associated with a
higher level than employers. An example of a country that might use this model is the US
28

Oracle Fusion Cloud Human Resources
Implementing Global Human Resources
Chapter 3
Legal Entities, Business Units, and Reference Data Sets
This figure illustrates an enterprise that has one payroll statutory unit and multiple legal employers and tax reporting
units.
One Payroll Statutory Unit and Two Tax Reporting Units
This model makes no distinction between a legal employer and a payroll statutory unit. You define tax reporting units as
subsidiaries to the legal entity.
In this enterprise, legal entity is the highest level of aggregation for payroll calculations and reporting. Statutory
reporting boundaries are the same for both payroll and HR management. An example of a country that might use this
model is France.
29

Oracle Fusion Cloud Human Resources
Implementing Global Human Resources
Chapter 3
Legal Entities, Business Units, and Reference Data Sets
This figure illustrates an example of an organization with one legal entity. The legal entity
is both a legal employer and a payroll statutory unit and that has two tax reporting units.
One Payroll Statutory Unit with Several Tax Reporting Units
In this model, the enterprise has one legal entity. Legal employers and tax reporting units are independent from each
other within a payroll statutory unit, because there is no relationship from a legal perspective. Therefore, you can report
separately on both entities
Using this model, you can't report on tax reporting unit balances within a legal employer, and categorize balances by
either or both organizations, as required. An example of a country that might use this model is India.
30
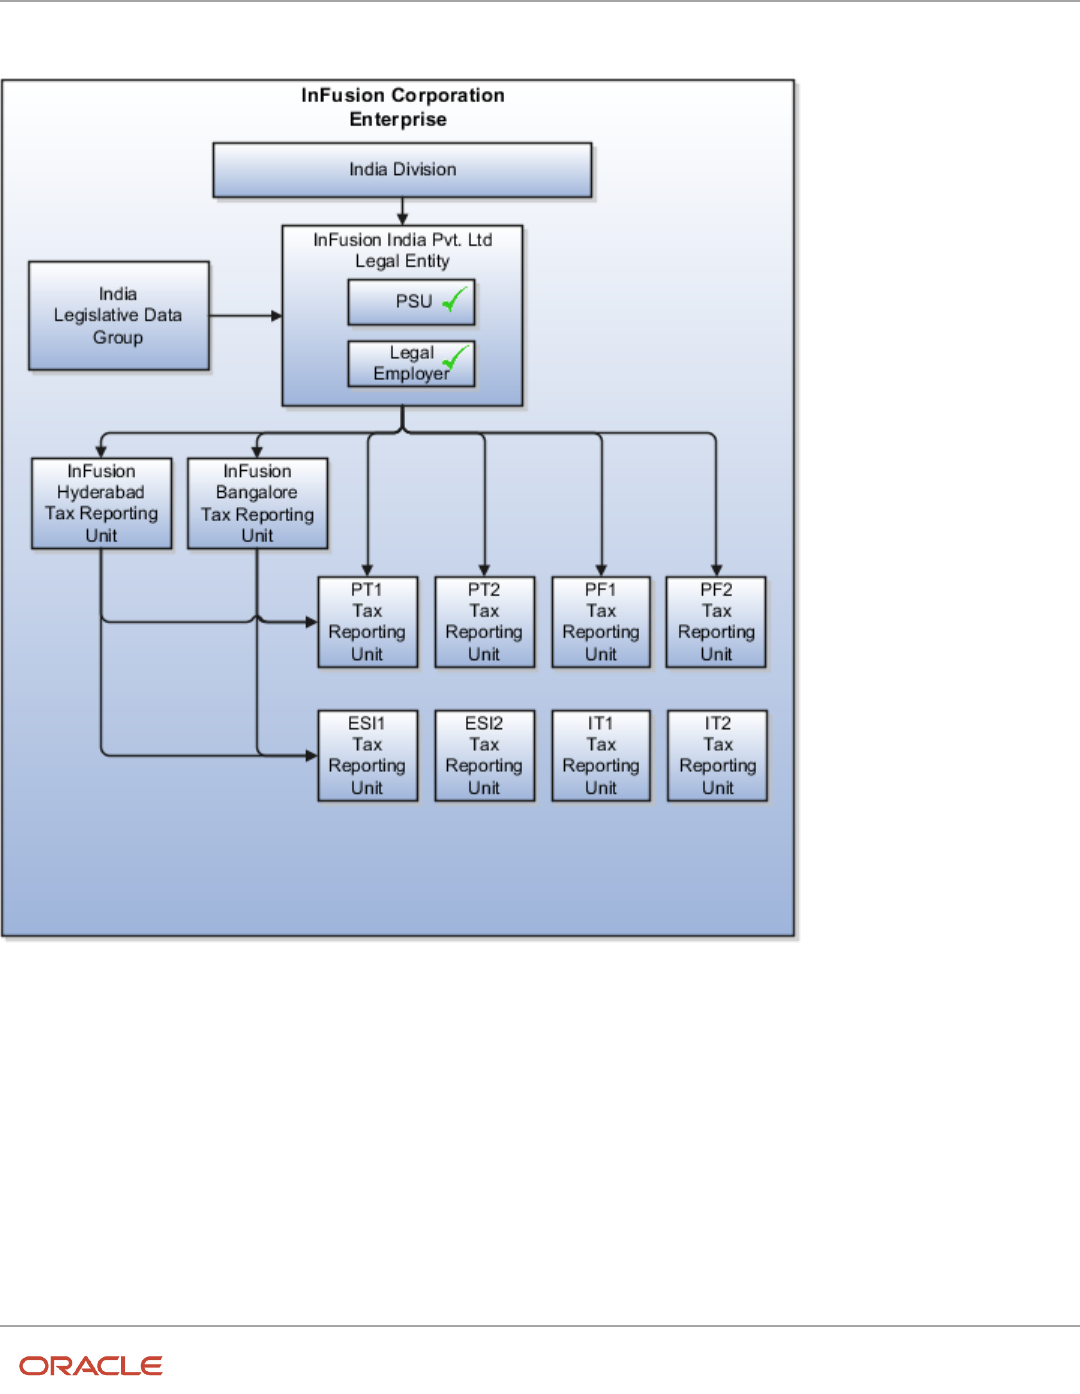
Oracle Fusion Cloud Human Resources
Implementing Global Human Resources
Chapter 3
Legal Entities, Business Units, and Reference Data Sets
This figure illustrates an enterprise with one legal entity that's a payroll statutory unit
and a legal employer. The tax reporting units are independent from the legal employer.
Multiple Payroll Statutory Units with Several Tax Reporting Units
In this model, the enterprise has two legal entities. The legal employers and tax reporting units are independent from
each other within a payroll statutory unit, because there is no relationship from a legal perspective. Therefore, you can
report separately on both entities.
Using this model, you can't report on tax reporting unit balances within a legal employer, and categorize balances by
either or both organizations, as required. An example of a country that might use this model is the United Kingdom
(UK).
31

Oracle Fusion Cloud Human Resources
Implementing Global Human Resources
Chapter 3
Legal Entities, Business Units, and Reference Data Sets
This figure illustrates an enterprise with two legal entities, and legal employers and tax reporting units are independent
from each other.
Related Topics
•
How Legal Employers Work with Payroll Statutory Units and Tax Reporting Units
•
Legislative Data Groups
•
Overview
32

Oracle Fusion Cloud Human Resources
Implementing Global Human Resources
Chapter 3
Legal Entities, Business Units, and Reference Data Sets
Examples of Creating Calculation Cards for Deductions
at Different Levels
You can create and manage calculation cards at several different levels, from an individual person to a payroll statutory
unit.
Use the cards to capture information specific to a person or organization, such as an employee's tax filing status or
an employer's tax identification number. Calculation card entries override default values defined at other levels. The
priority of information, from highest to lowest, is as follows:
1. Personal calculation card (payroll relationship level)
2. Tax reporting unit calculation card
3. Payroll statutory unit calculation card
4. Calculation value definitions (legislative data group level)
Note: Not all countries or territories support creating calculation cards for payroll statutory units and tax reporting
units. The enterable values at each level also vary by country or territory. The basic steps to create and manage
calculation cards are the same at all levels.
Use these examples to understand when you might define calculation cards at each level.
Personal Calculation Card
Scenario: An employee qualifies for a special reduced tax rate.
Task: Calculation Cards task in the Payroll section under My Client Groups.
Tax Reporting Unit Card
Scenario: The income tax exemption amount is 2000 at the legislative data group level, but a tax reporting unit in a
particular state or province uses an exemption amount of 2500. Enter this default value for the tax reporting unit, which
can be overridden on personal calculation cards.
Task: Manage Legal Reporting Unit Calculation Cards task in the Setup and Maintenance section.
Payroll Statutory Unit Card
Scenario: During application setup, the implementation team defines default contribution rates for the payroll statutory
unit.
Task: Manage Legal Entity Calculation Cards task in the Setup and Maintenance section.
Calculation Value Definition
Scenario: You can view the predefined income tax rates for your country, but you can't edit them.
Task: Calculation Value Definitions task in the Payroll section.
If an employer qualifies for a special tax rate, enter these values on a calculation card at the appropriate level.
33

Oracle Fusion Cloud Human Resources
Implementing Global Human Resources
Chapter 3
Legal Entities, Business Units, and Reference Data Sets
Business Units
A business unit is a unit of an enterprise that performs one or many business functions that can be rolled up in a
management hierarchy. A business unit can process transactions on behalf of many legal entities.
Normally, it has a manager, strategic objectives, a level of autonomy, and responsibility for its profit and loss. Roll
business units up into divisions if you structure your chart of accounts with this type of hierarchy.
Though there’s no direct relationship between business units and legal employers, it’s recommended that you either
maintain a 1:1 relationship between the two or have many business units within a legal employer. Typically, a business
unit is used to roll up financial transactions within a legal entity. So, if you set up business units at a higher level than
legal entities, your financial transactions may fail.
In Oracle Fusion Cloud Applications you do the following:
• Assign your business units to one primary ledger. For example, if a business unit is processing payables
invoices, then it must post to a particular ledger. This assignment is required for your business units with
business functions that produce financial transactions.
• Use a business unit as a securing mechanism for transactions. For example, if you run your export business
separately from your domestic sales business, then secure the export business data to prevent access by the
domestic sales employees. To accomplish this security, set up the export business and domestic sales business
as two separate business units.
The Oracle Fusion Applications business unit model provides the following advantages:
• Enables flexible implementation
• Provides consistent entity that controls and reports on transactions
• Shares sets of reference data across applications
Business units process transactions using reference data sets that reflect your business rules and policies and can differ
from country to country. With Oracle Fusion Application functionality, you can share reference data, such as payment
terms and transaction types, across business units, or you can have each business unit manage its own set depending
on the level at which you want to enforce common policies.
In summary, use business units for:
• Management reporting
• Transaction processing
• Transactional data security
• Reference data sharing and definition
Brief Overview of Business Unit Security
A number of Oracle Fusion Applications use business units to implement data security. You assign roles like Accounts
Payable Manager to users to permit them to perform specific functions, and you assign business units for each role to
users to give them access to data in those business units. For example, users who have been assigned a Payables role
for a particular business unit, can perform the function of payables invoicing on the data in that business unit. Roles can
be assigned to users manually using the Security Console, or automatically using provisioning rules. Business Units can
be assigned to users using the Manage Data Access for Users task found in Setup and Maintenance.
34

Oracle Fusion Cloud Human Resources
Implementing Global Human Resources
Chapter 3
Legal Entities, Business Units, and Reference Data Sets
Related Topics
•
Reference Data Sets and Sharing Methods
How Business Units Work with Reference Data Sets
Reference data sharing enables you to group set-enabled reference data such as jobs or grades to share the data across
different parts of the organization.
Sets also enable you to filter reference data at the transaction level so that only data assigned to certain sets is available
to be selected. To filter reference data, Oracle Fusion Human Capital Management (HCM), applications use the business
unit on the transaction. To set up reference data sharing in Oracle Fusion HCM, you create business units and sets, and
then assign the sets to the business units.
Common Set Versus Specific Sets
Some reference data in your organization may be considered global, and should therefore be made available for use
within the entire enterprise. You can assign this type of data to the Common Set, which is a predefined set. Regardless
of the business unit on a transaction, reference data assigned to the Common Set is always available, in addition to the
reference data assigned to the set that corresponds to the business unit on the transaction.
Other types of reference data can be specific to certain business units, so you can restrict the use of the data to those
business units. In this case, you can create sets specifically for this type of data, and assign the sets to the business
units.
Business Unit Set Assignment
When you assign reference data sets to business units, you assign a default reference data set to use for all reference
data types for that business unit. You can override the set assignment for one or more data types.
Example: Assigning Sets to Business Units
InFusion Corporation has two divisions: Lighting and Security, and the divisions each have two locations. Each location
has one or more business functions.
35

Oracle Fusion Cloud Human Resources
Implementing Global Human Resources
Chapter 3
Legal Entities, Business Units, and Reference Data Sets
The following figure illustrates the structure of InFusion Corporation.
When deciding how to create business units, InFusion decides to create them using the country and business function
level. Therefore, they created the following business units:
• Sales_Japan
• Marketing_Japan
• Sales_US
• Sales_UK
• Marketing_India
• Sales_India
Because locations, departments, and grades are specific to each business unit, InFusion does not want to share these
types of reference data across business units. They create a reference data set for each business unit so that data
of those types can be set up separately. Because the jobs in the Sales business function are the same across many
locations, InFusion decides to create one additional set called Jobs. They override the set assignment for the Jobs
reference data group and assign it to the Jobs set. Based on these requirements, they create the following sets:
• Sales_Japan_Set
• Mktg_Japan_Set
• Sales_US_Set
• Sales_UK_Set
• Mktg_India_Set
• Sales_India_Set
• Grades_Set
The following table describes the default set assignment and the set assignment overrides for each business unit in
InFusion:
36

Oracle Fusion Cloud Human Resources
Implementing Global Human Resources
Chapter 3
Legal Entities, Business Units, and Reference Data Sets
Business Unit Default Set Assignment Set Assignment Overrides
Sales_Japan
Sales_Japan_Set for grades, departments, and
locations
Jobs set for jobs
Marketing_Japan
Mktg_Japan_Set for grades, departments, and
locations
None
Sales_US
Sales_US_Set for grades, departments, and
locations
Jobs set for jobs
Sales_UK
Sales_UK_Set for grades, departments, and
locations
Jobs set for jobs
Marketing_India
Mktg_India_Set for grades, departments, and
locations
None
Sales_India
Sales_India_Set for grades, departments, and
locations
Jobs set for jobs
When setting up grades, departments, and locations for the business units, InFusion assigns the data to the default set
for each business unit. When setting up jobs, they assign the Jobs set and assign the Common Set to any jobs that may
be used throughout the entire organization.
When using grades, departments, and locations at the transaction level, users can select data from the set that
corresponds to the business unit they enter on the transaction, and any data assigned to the Common Set. For example,
for transactions for the Marketing_Japan business unit, grades, locations, and departments from the Mktg_Japan_Set is
available to select, as well as from the Common Set.
When using jobs at the transaction level, users can select jobs from the Jobs set and from the Common Set when they
enter a sales business unit on the transaction. For example, when a manager hires an employee for the Sales_India
business unit, the list of jobs is filtered to show jobs from the Jobs and Common sets.
The following figure illustrates what sets of jobs can be accessed when a manager creates an assignment for a worker.
37

Oracle Fusion Cloud Human Resources
Implementing Global Human Resources
Chapter 3
Legal Entities, Business Units, and Reference Data Sets
Associate Business Unit with Legal Employer
You can associate multiple business units with a legal employer. This enables filtering business units by legal employer,
on responsive pages that have implemented this feature.You use the Associated Business Units extensible flexfield (EFF)
context for the business unit - legal entity association.
These are some key points to note:
• By default, the Associated Business Units context isn't associated with any page. You need to configure the
mapping on the Manage Extensible Flexfields page. Thereafter, you can associate multiple business units with
the legal employer. Once the context is associated, it appears for all legal employers.
• A legal employer must have at least one associated business unit to filter the business unit by legal employer.
• You can associate multiple business units with a legal employer, but can't associate the same business unit
twice with a legal employer.
• You can associate the same business unit with multiple legal employers.
• You can delete the legal employer - business unit association.
• You can associate business units when updating or correcting a legal employer.
• The business unit list of values displays all active and inactive business units configured. There isn't any
filtering for only active business units.
• Business units are listed in the ascending order of business unit name.
In this example, Vision Enterprise has 3 legal employers in India - Vision India, Vision Corp India, and Vision India
Financial Services. Each legal employer has 5 business units defined. You want to filter the business units according
to the Vision India legal employer. So, you associate the business units with the legal employer using the Associated
Business Units extensible flexfield context.
Let's look at the steps to update the key values for this association. For other fields, you can use the default values.
Add Context to Manage Legal Entity HCM Information Page
1. Go to My Enterprise > Setup and Maintenance.
2. Search and select the Manage Extensible Flexfields task.
3. Search for Organization Information EFF on the Manage Extensible Flexfields page.
4. Click Edit.
5. Expand the Organization category and select Legal Employer.
6. In the Legal Employer: Details section, select the Associated Business Units delivered context and click the
Pages tab.
7. In the Legal Employer: Associated Contexts Details section, click the Select and Add icon.
8. In the Select and Add: Contexts window, enter Associated Business Units in the Name field and click Search.
9. Select the context.
10. Click Apply.
11. Click Save and Close.
12. Select the Organization Information EFF context on the Manage Extensible Flexfields page and click the
Deploy Flexfield button.
Associate Business Units to Vision India
1. Go to My Client Groups > Quick Actions > Workforce Structures.
38

Oracle Fusion Cloud Human Resources
Implementing Global Human Resources
Chapter 3
Legal Entities, Business Units, and Reference Data Sets
2. Search and click the Manage Legal Entity HCM Information task.
3. Search and click the Vision India legal entity to associate the business units.
4. Click Edit > Update or Correct.
5. Click the Add Row icon in the Associated Business Units section.
6. Search and select these business units.
Number Business Unit
1
Legal
2
Human Resources
3
Facilities
4
Administration
5
Operations
Note: As a prerequisite, these business units should already exist.
Repeat step 5 to add more business units.
7. Click Submit.
Related Topics
•
Filter Business Units Based on Legal Employers
FAQs for Legal Entities, Business Units, and Reference
Data Sets
What's a legal employer?
A legal employer is a legal entity that employs workers. You define a legal entity as a legal employer in the Oracle Fusion
Legal Entity Configurator.
The legal employer is captured at the work relationship level, and all assignments within that relationship are
automatically with that legal employer. Legal employer information for worker assignments is also used for reporting
purposes.
39

Oracle Fusion Cloud Human Resources
Implementing Global Human Resources
Chapter 3
Legal Entities, Business Units, and Reference Data Sets
What's a legal address?
A legal address is the mailing address of a legal entity or legal authority. A legal address is also the address a legal entity
uses to register with a legal authority.
You can use legal addresses to send correspondence, such as invoices, bills, reports, and so on, to a legal entity or
authority.
Note:
• You must create legal addresses before creating legal entities
• You can create legal addresses for legal authorities when creating legal authorities
What's a payroll statutory unit?
Payroll statutory units are legal entities that are responsible for paying workers, including the payment of payroll tax and
social insurance.
A payroll statutory unit can pay and report on payroll tax and social insurance on behalf of one or many legal entities,
depending on the structure of your enterprise. For example, if you're a multinational, multiple company enterprise,
then you register a payroll statutory unit in each country where you employ and pay people. You can optionally register
a consolidated payroll statutory unit to pay and report on workers across multiple legal employers within the same
country. You associate a legislative data group with a payroll statutory unit to provide the correct payroll information for
workers.
What's a tax reporting unit?
Use a tax reporting unit to group workers for the purpose of tax and social insurance reporting. A tax reporting unit is
the Oracle Fusion Human Capital Management (HCM) version of the legal reporting unit in Oracle Fusion Applications.
To create a tax reporting unit, you use the Oracle Fusion Legal Entity Configurator to define a legal entity as a payroll
statutory unit. When you identify a legal entity as a payroll statutory unit, the application transfers the legal reporting
units that are associated with that legal entity to Oracle Fusion HCM as tax reporting units. You can then access the tax
reporting unit using the Manage Legal Reporting Unit HCM Information task.
If you identify a legal entity as a legal employer, and not as a payroll statutory unit, you must enter a parent payroll
statutory unit. The resulting legal reporting units are transferred to Oracle Fusion HCM as tax reporting units, but as
children of the parent payroll statutory unit that you entered, and not the legal entity that you identified as a legal
employer.
40

Oracle Fusion Cloud Human Resources
Implementing Global Human Resources
Chapter 3
Legal Entities, Business Units, and Reference Data Sets
What's an ultimate holding company?
The legal entity that represents the top level in your organization hierarchy, as defined by the legal name entered for the
enterprise. This designation is used only to create an organization tree, with these levels:
• Ultimate holding company as the top level
• Divisions and country holding companies as the second level
• Legal employers as the third level
What reference data objects can be shared across business units?
The following table contains the reference data objects for the Oracle Fusion Applications that can be shared across
business units and the method in which the reference data for each is shared.
Application Name Reference Data Object Method of Sharing
Trading Community Model
Customer Account Relationship
Assignment to one set only, no common values
allowed
Trading Community Model
Customer Account Site
Assignment to one set only, no common values
allowed
Trading Community Model
Salesperson
Assignment to one set only, no common values
allowed
Opportunity Management
Sales Method Group
Assignment to one set only, with common
values
Work Management
Assessment Templates
Assignment to one set only, with common
values
Enterprise Contracts
Contract Types
Assignment to one set only, with common
values
Sales
Sales Method
Assignment to one set only, with common
values
Common Components
Activity Templates
Assignment to one set only, with common
values
Payables
Payment Terms
Assignment to multiple sets, no common values
allowed
41

Oracle Fusion Cloud Human Resources
Implementing Global Human Resources
Chapter 3
Legal Entities, Business Units, and Reference Data Sets
Application Name Reference Data Object Method of Sharing
Receivables
Accounting Rules
Assignment to one set only, with common
values
Receivables
Aging Buckets
Assignment to one set only, with common
values
Receivables
Auto Cash Rules
Assignment to one set only, with common
values
Receivables
Collectors
Assignment to one set only, with common
values
Receivables
Lockbox
Assignment to one set only, with common
values
Receivables
Memo Lines
Assignment to one set only, with common
values
Receivables
Payment Terms
Assignment to one set only, with common
values
Receivables
Remit To Address
Assignment to one set only, with common
values
Receivables
Revenue Contingencies
Assignment to one set only, with common
values
Receivables
Transaction Source
Assignment to one set only, with common
values
Receivables
Transaction Type
Assignment to one set only, with common
values
Advanced Collections
Collections Setups
Assignment to one set only, with common
values
Advanced Collections
Dunning Plans
Assignment to one set only, with common
values
Tax
Tax Classification Codes
Assignment to multiple sets, no common values
allowed
Human Resources
Departments
Assignment to one set only, with common
values
Human Resources
Jobs
Assignment to one set only, with common
values
42

Oracle Fusion Cloud Human Resources
Implementing Global Human Resources
Chapter 3
Legal Entities, Business Units, and Reference Data Sets
Application Name Reference Data Object Method of Sharing
Human Resources
Locations
Assignment to one set only, with common
values
Human Resources
Grades
Assignment to one set only, with common
values
Project Billing
Project and Contract Billing
Assignment to multiple sets, no common values
allowed
Project Foundation
Project Accounting Definition
Assignment to one set only, no common values
allowed
Project Foundation
Project Rates
Assignment to one set only, with common
values
Order Management
Hold Codes
Assignment to one set only, with common
values
Order Management
Orchestration Process
Assignment to one set only, with common
values
What happens if I override the set assignment?
For the selected business unit, you can override the default reference data set for one or more reference data groups.
For example, assume you have three reference data groups: Vision 1 SET, Vision 2 SET, and Vision 3 SET, where Vision
SET 1 is the default set for business unit United Kingdom Vision 1 BU. You can override the default so that:
• Grades are assigned to Vision 2 SET.
• Departments are assigned to Vision 3 SET.
• Jobs are assigned to the default set, Vision 3 SET.
43

Oracle Fusion Cloud Human Resources
Implementing Global Human Resources
Chapter 3
Legal Entities, Business Units, and Reference Data Sets
44

Oracle Fusion Cloud Human Resources
Implementing Global Human Resources
Chapter 4
Enterprise Structures Configurator (ESC)
4 Enterprise Structures Configurator (ESC)
How You Establish Enterprise Structures Using the
Enterprise Structures Configurator
The Enterprise Structures Configurator is an interview-based tool that guides you through the process of setting up a
basic enterprise structure.
By answering questions about your enterprise, the tool creates a structure of divisions, legal entities, business units,
and reference data sets that reflects your enterprise structure. After you create your enterprise structure, you also
follow a guided process to determine whether to use positions, and whether to set up additional attributes for jobs and
positions. After you define your enterprise structure and your job and position structures, you can review them, make
any necessary changes, and then load the final configuration.
This figure illustrates the process to configure your enterprise using the Enterprise Structures Configurator.
To be able to use the Enterprise Structures Configurator, you must select the Enterprise Structures Guided Flow feature
for your offerings on the Configure Offerings page in the Setup and Maintenance work area. If you don't select this
45

Oracle Fusion Cloud Human Resources
Implementing Global Human Resources
Chapter 4
Enterprise Structures Configurator (ESC)
feature, then you must set up your enterprise structure using individual tasks provided elsewhere in the offerings, and
you can't create multiple configurations to compare different scenarios.
Establish Enterprise Structures
To define your enterprise structures, use the guided flow within the Establish Enterprise Structures task to enter basic
information about your enterprise, such as the primary industry. You then create divisions, legal entities, business
units, and reference data sets. The Establish Enterprise Structures task enables you to create multiple enterprise
configurations so that you can compare different scenarios. Until you load a configuration, you can continue to create
and edit multiple configurations until you arrive at one that best suits your enterprise.
Establish Job and Position Structures
You also use a guided process to determine whether you want to use jobs only, or jobs and positions. The primary
industry that you select in the Establish Enterprise Structures task provides the application with enough information to
make an initial recommendation. You can either accept the recommendation, or you can answer additional questions
about how you manage people in your enterprise, and then make a selection. After you select whether to use jobs or
positions, you're prompted to set up a descriptive flexfield structure for jobs, and for positions if applicable. Descriptive
flexfields enable you to get more information when you create jobs and positions.
Review Configuration
You can view a result of the interview process prior to loading the configuration. The review results, show the divisions,
legal entities, business units, reference data sets, and the management reporting structure that the application will
create when you load the configuration.
Load Configuration
You can load only one configuration. When you load a configuration, the application creates the divisions, legal entities,
business units, and so on. After you load the configuration, you then use individual tasks to edit, add, and delete
enterprise structures.
This table lists the order of creation of business objects by the Enterprise Structures Configurator
Business Object Task
Location Location Details
Division Manage Divisions
Business Unit Manage Business Units
Set Assignment Override Manage Set Assignments
Legislative Data Group Manage Legislative Data Groups
Enterprise Manage Enterprise HCM Information
Job and Position Flexfield
Definitions
Manage Descriptive Flexfields
Legal Entity
• Manage Legal Entities
• Manage Legal Entity HCM Information
46
Oracle Fusion Cloud Human Resources
Implementing Global Human Resources
Chapter 4
Enterprise Structures Configurator (ESC)
Business Object Task
• Manage Legal Reporting Unit HCM Information
Organization Tree Manage Organization Trees
Configuration Workbench
The Oracle Fusion Enterprise Structures Configurator is an interview based tool to help you analyze how to represent
your business in the Oracle Fusion Applications.
The interview process poses questions about the name of your enterprise, legal structure, management reporting
structure, and primary organizing principle for your business. Based on your answers, the applications suggest the best
practices to use to implement business units in your enterprise. You can use or modify these answers to ensure that
both your reporting and administrative goals are met in your Oracle Fusion deployment.
How You Create Legal Entities in the Enterprise
Structures Configurator
Use the Enterprise Structures Configurator, to create legal entities for your enterprise automatically, based on the
countries in which divisions of your business operate, or you can upload a list of legal entities from a spreadsheet.
Automatically Creating Legal Entities
If you are not certain of the number of legal entities that you need, you can create them automatically. To use this
option, you first identify all of the countries in which your enterprise operates. The application opens the Map Divisions
by Country page, which contains a matrix of the countries that you identified, your enterprise, and the divisions that you
created. You select the check boxes where your enterprise and divisions intersect with the countries to identify the legal
entities that you want the application to create. The enterprise is included for situations where your enterprise operates
in a country, acts on behalf of several divisions within the enterprise, and is a legal employer in a country. If you select
the enterprise for a country, the application creates a country holding company.
The application automatically creates the legal entities that you select, and identifies them as payroll statutory units
and legal employers. For each country that you indicated that your enterprise operates in, and for each country that you
created a location for, the application also automatically creates a legislative data group.
Any legal entities that you create automatically cannot be deleted from the Create Legal Entities page within the
Enterprise Structures Configurator. You must return to the Map Divisions by Country page and deselect the legal
entities that you no longer want.
Example: Creating Legal Entities Automatically
InFusion Corporation is using the ESC to set up its enterprise structure. The corporation has identified two divisions,
one for Lighting, and one for Security. The Lighting division operates in Japan and the US, and the Security division
operates in the UK and India.
47

Oracle Fusion Cloud Human Resources
Implementing Global Human Resources
Chapter 4
Enterprise Structures Configurator (ESC)
This figure illustrates InFusion Corporation's enterprise structure.
This table represents the selections that InFusion Corporation makes when specifying which legal entities to create on
the Map Divisions by Country page.
Country Enterprise InFusion Lighting InFusion Security
Japan
No
Yes
No
US
No
Yes
No
UK
No
No
Yes
India
No
No
Yes
Based on the selections made in the preceding table, the ESC creates the following four legal entities:
• InFusion Lighting Japan LE
• InFusion Lighting US LE
• InFusion Security UK LE
• InFusion Security India LE
Creating Legal Entities Using a Spreadsheet
If you have a list of legal entities already defined for your enterprise, you can upload them from a spreadsheet. To use
this option, you first download a spreadsheet template, then add your legal entity information to the spreadsheet, and
then upload directly to your enterprise configuration. You can export and import the spreadsheet multiple times to
accommodate revisions.
48

Oracle Fusion Cloud Human Resources
Implementing Global Human Resources
Chapter 4
Enterprise Structures Configurator (ESC)
Related Topics
•
Examples of HCM Organization Models
•
What's an ultimate holding company?
•
How Legal Employers Work with Payroll Statutory Units and Tax Reporting Units
•
Guidelines for Using Desktop Integrated Excel Workbooks
Considerations for Creating Business Units in the
Enterprise Structures Configurator
Business units are used within Oracle Fusion applications for management reporting, processing of transactions,
and security of transactional data. Using the Enterprise Structures Configurator, you create business units for your
enterprise either automatically or manually.
Automatically Creating Business Units
To create business units automatically, you must specify the level at which to create business units. Business units
within your enterprise may be represented at one of two levels:
• Business function level, such as Sales, Consulting, Product Development, and so on.
• A more detailed level, where a business unit exists for each combination of countries in which you operate and
the functions in those countries.
You can automatically create business units at the following levels:
• Country
• Country and Division
• Country and business function
• Division
• Division and legal entity
• Division and business function
• Business function
• Legal entity
• Business function and legal entity
Select the option that best meets your business requirements, but consider the following:
• If you use Oracle Fusion Financials, the legal entity option is recommended because of the manner in which
financial transactions are processed.
• The business unit level that you select determines how the application automatically creates reference data
sets.
After you select a business unit level, the application generates a list of business units, and you select the ones you
want the application to create. If you select a level that has two components, such as country and division, then
49

Oracle Fusion Cloud Human Resources
Implementing Global Human Resources
Chapter 4
Enterprise Structures Configurator (ESC)
the application displays a table listing both components. You select the check boxes at the intersections of the two
components.
The business units listed by the application are suggestions only, and are meant to simplify the process to create
business units. You aren't required to select all of the business units suggested. When you navigate to the next page in
the ESC guided flow, the Manage Business Units page, you can't delete any of the business units created automatically.
You must return to the Create Business Units page and deselect any business units that you no longer want.
Example: Selecting Business Unit Levels
InFusion Corporation is using the Enterprise Structures Configurator to set up its enterprise structure. InFusion has
identified two divisions, one for Lighting, and one for Security. They operate in four countries: US, UK, Japan, and India,
and they have created a legal entity for each of the countries. The sales and marketing functions are based in both India
and Japan, while the US and the UK have only the sales function.
This figure illustrates InFusion Corporation's enterprise structure.
The following table lists the options for business unit levels and the resulting business units that the application
suggests for InFusion Corporation.
Business Unit Level Suggested Business Units
Country
• US
• UK
• Japan
• India
Country and Division
• InFusion Lighting: Japan
• InFusion Lighting: US
• Infusion Security: UK
• Infusion Security: India
50

Oracle Fusion Cloud Human Resources
Implementing Global Human Resources
Chapter 4
Enterprise Structures Configurator (ESC)
Business Unit Level Suggested Business Units
Country and business function
• Sales: Japan
• Marketing: Japan
• Sales: US
• Sales: UK
• Marketing: India
• Sales: India
Division
• InFusion Lighting
• InFusion Security
Division and Legal Entity
• InFusion Lighting: Japan
• InFusion Lighting: US
• Infusion Security: UK
• Infusion Security: India
Division and Business Function
• InFusion Lighting, Sales
• InFusion Lighting, Marketing
• InFusion Security, Sales
• InFusion Security, Marketing
Business Function
• Sales
• Marketing
Legal Entity
• Legal Entity: Japan
• Legal Entity: US
• Legal Entity: UK
• Legal Entity India
Legal Entity and Business Function
• Legal Entity: Japan, Sales
• Legal Entity: Japan, Marketing
• Legal Entity: US, Sales
• Legal Entity: UK, Sales
• Legal Entity India, Marketing
• Legal Entity India, Sales
Manually Creating Business Units
If none of the levels for creating business units meets your business needs, you can create business units manually, and
you create them on the Manage Business Units page. If you create business units manually, then no reference data sets
are created automatically. You must create them manually as well.
51

Oracle Fusion Cloud Human Resources
Implementing Global Human Resources
Chapter 4
Enterprise Structures Configurator (ESC)
Related Topics
•
Business Units
•
Reference Data Sets and Sharing Methods
•
What reference data objects can be shared across asset books?
How You Create Reference Data Sets in the Enterprise
Structures Configurator
If you created business units automatically, then the Enterprise Structures Configurator automatically creates reference
data sets for you. The Enterprise Structures Configurator creates one reference data set for each business unit.
You can add additional sets, but you cannot delete any of the sets that were created automatically. The Enterprise
Structures Configurator creates one reference data set for each business unit. You can add additional sets, but you
cannot delete any of the sets that were created automatically. A standard set called the Enterprise set is predefined.
Common Set
The Common set is a predefined set that enables you to share reference data across business units. When you select
set-enabled data at the transaction level, the list of values includes data in the:
• Common set
• Set associated with the data type for the business unit on the transaction
For example, when you create an assignment, the list of values for grades includes grade in the:
• Common set
• Set that is assigned to grades for the business unit in which you creating the assignment
How You Roll Back an Enterprise Structure Configuration
The Enterprise Structures Configurator provides the ability to roll back an enterprise configuration.
Roll Back a Configuration Manually
You can manually roll back an enterprise configuration after loading it, for example, because you decide you don't
want to use it. Clicking the Roll Back Configuration button on the Manage Enterprise Configuration page rolls back any
enterprise structures that were created as a part of loading the configuration.
52

Oracle Fusion Cloud Human Resources
Implementing Global Human Resources
Chapter 4
Enterprise Structures Configurator (ESC)
Roll Back a Configuration Automatically
If an error occurs during the process of loading the configuration, then the application automatically rolls back any
enterprise structures that were created before the error was encountered.
FAQs for Enterprise Structures Configurator
What happens if I don't use the Enterprise Structures Configurator
to set up my enterprise structures?
The Enterprise Structures Configurator is an interview-based tool that guides you through setting up divisions, legal
entities, business units, and reference data sets.
If you don't use the Enterprise Structures Configurator, then you must set up your enterprise structure using the
individual tasks that correspond to each enterprise component. In addition, you can't set up multiple configurations and
compare different scenarios. Using the Enterprise Structures Configurator is the recommended process for setting up
your enterprise structures.
53

Oracle Fusion Cloud Human Resources
Implementing Global Human Resources
Chapter 4
Enterprise Structures Configurator (ESC)
54

Oracle Fusion Cloud Human Resources
Implementing Global Human Resources
Chapter 5
Divisions, Departments, Worker Unions, Locations, and
Trees
5 Divisions, Departments, Worker Unions,
Locations, and Trees
Guidelines for Using Single or Multiple Classifications for
an Organization
Organization classifications define the purpose of the organization, whether it's a department, a division, or a legal
entity. In some enterprises, organization classifications overlap, which means that the same organization can be
assigned multiple classifications.
For example, one organization within an enterprise might be both a project organization and a department. The
classifications of organizations vary according to business objectives, legal structure, industry, company culture, size
and type of growth. You can create organizations in Oracle Fusion with one or more classifications to reflect your
enterprise structure.
Defining an Organization with One Classification
Define each organization in your enterprise as a separate organization with a single classification to reflect your
enterprise structure and provide flexibility for expansion. The advantage of setting up separate organizations is the
ability to add further organizations to expand the enterprise easily. For example, if your enterprise acquires another
company which has a different line of business in a country in which you employ people, you can create a division, a
legal entity, and additional departments. Classify the new legal entity as a legal employer and payroll statutory unit for
the company's payroll tax and social insurance.
Defining an Organization with Multiple Classifications
Define an organization with multiple classifications if the organization has multiple purposes. For example, use an
organization within the sales applications as a department that employs salespeople and classify it as a department and
a sales organization. Or, if your enterprise operates and employs people in multiple business verticals, create a division
for each such business using the Manage Divisions task. Then use the Manage Departments task to classify the division
as a department.
Related Topics
•
Model Your Financial Reporting Structure
How You Configure Your Enterprise Structure After an
Acquisition
The InFusion Corporation is a global company with organizations in the United States (US), the United Kingdom (UK),
France, China, Saudi Arabia, and the United Arab Emirates (UAE).
55

Oracle Fusion Cloud Human Resources
Implementing Global Human Resources
Chapter 5
Divisions, Departments, Worker Unions, Locations, and
Trees
Its main area of business is in the high tech industry, but it recently acquired a financial services business, based in
Germany. InFusion wants to retain the financial services company as a separate business with all the costs and reporting
managed by the Financial Services division.
You need to set up organizations to reflect the newly acquired company and its organizations.
The following figure illustrates how to set up the new division for Germany, and how the new division fits into the
enterprise.
The following table summarizes the key decisions for setting up the new division:
Decisions to Consider In This Example
Create a separate division?
Yes, as you want to keep the Financial Services company as a separate line of business. By creating a
separate division, you can manage the costs and reporting separately from the InFusion Corporation.
Additionally, you don't have to modify any existing organizations in your enterprise setup.
How many departments?
The Financial Services company currently has three departments for sales, accounting, and marketing.
As InFusion has no plans to downsize or change the company, you can create the three departments to
retain the structure.
How many cost centers? Three, to track the costs of each department.
56

Oracle Fusion Cloud Human Resources
Implementing Global Human Resources
Chapter 5
Divisions, Departments, Worker Unions, Locations, and
Trees
Decisions to Consider In This Example
How many legal entities?
You need one legal entity defined as a legal employer and payroll statutory unit. As the new division
operates only from Germany, you can configure the legal entity to suit Germany's legal and statutory
requirements.
Create legislative data group?
Yes, you need a legislative data group as you currently don't employ or pay people in Germany. Create
one legislative data group to run payroll for your workers in Germany.
Create location?
Create a new location address for each organization located differently. The financial services company
is based in Frankfurt, and the headquarters and departments are all in the same location.
You can use the following tasks to set up the enterprise structures that you need to include in the new Financial Services
company:
• Creating a Location
• Creating a Division
• Creating Departments
• Creating a Legislative Data Group
• Creating Legal Entities
• Defining Legal Employer and Payroll Statutory Unit Information
Creating a Location
1. In the Workforce Structures work area, click the Manage Locations tab to open the Manage Locations page.
2. On the Manage Locations page, click Create, and complete the fields shown in the following table. Use the
default values except where indicated.
Field Value
Name
Germany
Code
DE
Country
Germany
Address Line 1
Hauptstrasse 85
Postal Code
6000
City
Frankfurt
57

Oracle Fusion Cloud Human Resources
Implementing Global Human Resources
Chapter 5
Divisions, Departments, Worker Unions, Locations, and
Trees
3. Click Submit.
Creating a Division
1. In the Workforce Structures work area, click Manage Divisions to open the Manage Divisions page.
2. On the Manage Divisions page, click Create.
3. On the Create Division: Division Description page, select the Create New option to create a division with a
single classification.
4. In the Division Description region, complete the fields shown in the following table. Use the default values
except where indicated.
Field Value
Name
Germany Financial Services
Location
Germany
5. Click Next.
6. On the Create Division: Division Details page, complete the fields shown in the following table. Use the
default values except where indicated.
7. Click Next.
8. On the Create Division: Review page, review the division details, and click Submit.
9. Click Yes.
10. Click OK.
Creating Departments
1. In the Workforce Structures work area, click the Manage Departments tab to open the Manage Department
page.
2. On the Manage Departments page, click Create.
3. On the Create Department: Description page, select the Create New option to create a department with a
single classification.
4. Enter the details of the accounting department by completing the fields shown in the following table. Use the
default values except where indicated.
Field Value
Department Name
Accounting
Location
Germany
5. Click Next.
6. Associate a cost center in the Create Department: Department Details page.
7. Click Next.
8. On the Create Department: Review page, review the details of the department, and click Submit.
58

Oracle Fusion Cloud Human Resources
Implementing Global Human Resources
Chapter 5
Divisions, Departments, Worker Unions, Locations, and
Trees
9. Repeat steps 2 through 8 to create the sales and marketing departments.
Creating a Legislative Data Group
1. In the Setup and Maintenance work area, locate the Manage Legislative Data Groups task. Click Go to Task
to open the Manage Legislative Data Group page.
2. On the Manage Legislative Data Groups page, click Create.
3. On the Create Legislative Data Groups page, complete the fields shown in the following table. Use default
values except where indicated.
Field Value
Name
Germany Financial Services
Country
Germany
Currency
Eur
4. Click Submit.
Creating Legal Entities
1. In the Setup and Maintenance work area, locate the Manage Legal Entity task. Click Go to Task to open the
Manage Legal Entity page.
2. On the Manage Legal Entity page, click Create.
3. On the page, complete the fields shown in the following table. Use default values except where indicated.
Field Value
Name
Legal Entity
Legal Entity Identifier
123456
Payroll Statutory Unit
Selected
Legal Employer
Selected
Legal Address
123
EIN or TIN
123
Registration Number
123
59

Oracle Fusion Cloud Human Resources
Implementing Global Human Resources
Chapter 5
Divisions, Departments, Worker Unions, Locations, and
Trees
4. Click Save and Close.
Defining Legal Employer and Payroll Statutory Unit Information
1. In the Setup and Maintenance work area, locate the Manage Legal Entity HCM Information task. Click Go to
Task to open the Manage Legal Entity page.
2. Search for the new legal entity that you created in the "Creating Legal Entities" task.
3. Enter the payroll statutory unit and legal employer details.
4. Associate the legislative data group with the payroll statutory unit.
5. Click Save.
Divisions
Managing multiple businesses requires that you segregate them by their strategic objectives and measure their results.
Responsibility to reach objectives can be delegated along the management structure. Although related to your legal
structure, the business organizational hierarchies don't reflect directly the legal structure of the enterprise. The
management entities and structure can include:
• Divisions and subdivisions
• Lines of business
• Other strategic business units
• Their own revenue and cost centers
These organizations can be included in many alternative hierarchies and used for reporting, as long as they have
representation in the chart of accounts.
Divisions
A division refers to a business-oriented subdivision within an enterprise, in which each division organizes itself
differently to deliver products and services or address different markets. A division can operate in one or more
countries, and can be many companies or parts of different companies that are represented by business units.
A division is a profit center or grouping of profit and cost centers, where the division manager is responsible for
achieving business goals including profits. A division can be responsible for a share of the company's existing product
lines or for a separate business. Managers of divisions may also have return on investment goals requiring tracking of
the assets and liabilities of the division. The division manager generally reports to a corporate executive.
By definition a division can be represented in the chart of accounts. Companies can use product lines, brands, or
geographies as their divisions: their choice represents the primary organizing principle of the enterprise.
Historically, divisions were implemented as a node in a hierarchy of segment values. For example, Oracle E-Business
Suite has only one balancing segment, and often the division and legal entity are combined into a single segment where
each value stands for both division and legal entity.
60
Oracle Fusion Cloud Human Resources
Implementing Global Human Resources
Chapter 5
Divisions, Departments, Worker Unions, Locations, and
Trees
Use of Divisions in Oracle Fusion Cloud Human Capital Management
(HCM)
Divisions are used in HCM to define the management organization hierarchy, using the generic organization hierarchy.
This hierarchy can be used to create organization-based security profiles.
Example of Adding a New Division After Acquiring a
Company
This example describes how you can restructure your enterprise after acquiring a new division.
Scenario
You are part of a senior management team at InFusion Corporation. InFusion is a global company with organizations in
the following countries:
• United States (US)
• United Kingdom (UK)
• France
• China
• Saudi Arabia
• United Arab Emirates (UAE)
The company's main area of business is in the high tech industry, and it recently acquired a new company. You must
analyze the company's current enterprise structure and determine the new organizations to create in the new company.
Details of the Acquired Company
The acquired company is a Financial Services business based in Germany. The Financial Services business differs
significantly from the high tech business. Therefore, you want to keep the Financial Services company as a separate
business with all the costs and reporting managed by the Financial Services division.
The following table summarizes the key decisions that you must consider when determining what new organizations to
set up and how to structure the enterprise.
Decision to Consider In This Example
Create location?
The Financial Services company and its departments are based in Frankfurt. Therefore, you only have
to create one location.
Create separate division?
Yes. Although the new division will exist in the current enterprise structure, you want to keep the
Financial Services company as a separate line of business. By creating a separate division, you can
manage the costs and reporting separately from the InFusion Corporation. Additionally, you don't have
to modify any organizations in the enterprise setup.
61

Oracle Fusion Cloud Human Resources
Implementing Global Human Resources
Chapter 5
Divisions, Departments, Worker Unions, Locations, and
Trees
Decision to Consider In This Example
Create business unit?
Yes. The Financial Services business requires you to create several jobs that don't exist in your high
tech business. You can segregate the jobs that are specific to financial services in a new business unit.
How many departments?
The Financial Services company currently has departments for sales, accounting, and marketing. As
you have no plans to downsize or change the company, you can create three departments to retain the
structure.
How many cost centers?
Although you can have multiple cost centers to track the department costs, you decide to create one
cost center for each department.
How many legal entities?
Define a legal entity for each registered company or some other entity recognized by law. Using the
legal entity, you can:
• Record assets
• Record liabilities
• Record income
• Pay transaction taxes
• Perform intercompany trading
In this case, you only need one legal entity.
You must define the legal entity as a legal employer and payroll statutory unit. As the new division
operates only from Germany, you can configure the legal entity to suit Germany's legal and statutory
requirements.
Note:
You can identify the legal entity as a payroll statutory unit. When you do so, the application transfers
the legal reporting unit associated with the legal entity to Oracle Fusion HCM as a tax reporting unit.
Create legislative data group?
Yes. Because you currently don't employ or pay people in Germany, you must create one legislative
data group to run payroll for the workers in Germany.
Resulting InFusion Enterprise Structure
Based on the analysis, you must create the following:
• One new division
• One new location
• Three new departments
• Three new cost centers
• One new legal entity
• One new legislative data group
62

Oracle Fusion Cloud Human Resources
Implementing Global Human Resources
Chapter 5
Divisions, Departments, Worker Unions, Locations, and
Trees
The following figure illustrates the structure of InFusion Corporation after adding the new division and the other
organizations.
Departments
A department is an organization to which you assign workers. It is an organization with one or more operational
objectives or responsibilities that exist independently of its manager.
You track the department's financial performance through one or more cost centers. For example, sales, research and
development, and human resources. You can report and keep track of headcount by creating a department hierarchy
using Oracle Fusion Trees.
Departments and cost centers example:
63

Oracle Fusion Cloud Human Resources
Implementing Global Human Resources
Chapter 5
Divisions, Departments, Worker Unions, Locations, and
Trees
This figure illustrates how departments belong to legal entities within the enterprise structure.
Departments and Cost Centers
A cost center represents the smallest segment of an organization for which you allocate and report on costs. The
manager of a department is typically responsible for cost control by meeting a budget and may be responsible for the
assets used by the department. You can track the financial performance of a department through one or more cost
centers.
Uploading Departments Using a Spreadsheet
If you have a list of departments already defined for your enterprise, you can upload them from a spreadsheet. To use
this option, you first download a spreadsheet template, add your department information to the spreadsheet, and
then upload directly to your enterprise configuration. You can upload the spreadsheet multiple times to accommodate
revisions.
Related Topics
•
Upload Workforce Structures Using a Spreadsheet
How You Create a Chart of Account to Create a
Department
In this example you can see how to create a chart of account for HCM implementations. You must set up a minimal
chart of account to associate a company and cost center with departments.
64

Oracle Fusion Cloud Human Resources
Implementing Global Human Resources
Chapter 5
Divisions, Departments, Worker Unions, Locations, and
Trees
This topic describes a simple scenario primarily intended for use within HCM. For more detailed information on setting
up a chart of account, refer to the Financials product documentation.
Vision Corporation US is a US-based legal entity with cost centers in Arizona and California. In this example, we will
create a Arizona cost center and associate it with the Sales Department.
The following table summarizes key decisions that you must consider when creating a chart of .
Decisions to Consider In this Example
What should be the validation type for the
value set?
Independent. Only this type is supported for creating General Ledger (GL) cost center information for
departments in HCM.
What should be the segment labels for the
chart of account?
The first segment is Primary Balancing Segment and the second segment is Cost Center Segment.
Selecting these labels in this order is crucial in specifying the General Ledger cost center information
for a department.
Summary of Tasks
In the Setup and Maintenance work area, create a chart of account and cost center value sets to create a chart of
account structure and instance, and then associate it with the department.
1. Create the chart of account value set for the Vision Corporation US enterprise.
2. Specify Arizona and California as the values for the chart of account value set
3. Create the cost center value set for the Vision Corporation US enterprise.
4. Specify Arizona and California as the values for the cost center value set.
5. Create the chart of account structure by associating it with the chart of account and cost center value sets you
created earlier.
6. Create the chart of account structure instance by associating it with the structure.
7. Specify the General Ledger cost center information by associating it with the chart of account and the cost
center you created earlier, for creating the sales department.
Create a Chart of Account Value Set
1. In the Setup and Maintenance work area, go to the following:.
◦
Offering: Workforce Deployment
◦
Functional Area: Financial Reporting Structures
◦
Task: Manage Chart of Accounts Value Sets
2. Click Create.
3. Complete the fields as shown in this table.
Field Value
Value Set Code
Vision Corporation US Value Set 1
Description
Vision Corporation US Value Set 1
65

Oracle Fusion Cloud Human Resources
Implementing Global Human Resources
Chapter 5
Divisions, Departments, Worker Unions, Locations, and
Trees
Field Value
Module
Common Shared Setups
Validation Type
Independent
Value Data Type
Character
Value Subtype
Text
Maximum Length
5
4. Click Save and Close.
Specify Values for the Chart of Account Value Set
1. On the Manage Chart of Accounts Value Sets page, search and select Vision Corporation US Value Set 1 from
the search results.
2. Click Manage Values.
3. Click Create.
4. Complete the fields as shown in this table.
Field Value
Value
AZ
Description
Arizona
Enabled
Select the check box
5. Click Save and Close.
6. Create additional values for the Vision Corporation US Value Set 1 as shown in this table.
Field Value
Value
CA
Description
California
Enabled
Select the check box
66

Oracle Fusion Cloud Human Resources
Implementing Global Human Resources
Chapter 5
Divisions, Departments, Worker Unions, Locations, and
Trees
7. On the Manage Values page, click Save and Close.
Create a Cost Center Value Set
1. In the Setup and Maintenance work area, go to the following:
◦
Offering: Workforce Deployment
◦
Functional Area: Financial Reporting Structures
◦
Task: Manage Chart of Accounts Value Sets
2. Click Create.
3. Complete the fields as shown in this table.
Field Value
Value Set Code
Vision Corporation US Cost Center Value Set 1
Description
Vision Corporation US Cost Center Value Set 1
Module
Common Shared Setups
Validation Type
Independent
Value Data Type
Character
Value Subtype
Text
Maximum Length
5
4. Click Save and Close.
Create a Chart of Account Structure
1. In the Setup and Maintenance work area, go to the following:.
◦
Offering: Workforce Deployment
◦
Functional Area: Financial Reporting Structures
◦
Task: Manage Chart of Accounts Structures
2. Search and select the GL# key flexfield code.
3. Click Manage Structures.
4. Click Create.
67

Oracle Fusion Cloud Human Resources
Implementing Global Human Resources
Chapter 5
Divisions, Departments, Worker Unions, Locations, and
Trees
5. Complete the fields as shown in this table.
Field Value
Structure Code
Vision Corp CoA Cost Center
Name
Vision Corp CoA Cost Center
Description
Vision Corporation Chart of Account Cost Center
Delimiter
Select any value
6. Click Save.
7. In the Segments section, click Create.
8. Complete the fields as shown in this table.
Field Value
Segment Code
Vision_Corp_COA
API Name
visionCorpCoa
Name
Vision Corporation COA
Sequence Number
1
Prompt
Vision Corporation COA
Short Prompt
Vision
Enabled
Select the check box
Display Width
1
Range Type
Low
Column Name
SEGMENT1
Default Value Set Code Vision Corporation US Value Set 1
68

Oracle Fusion Cloud Human Resources
Implementing Global Human Resources
Chapter 5
Divisions, Departments, Worker Unions, Locations, and
Trees
Field Value
Selected Labels
Primary Balancing Segment
9. Click Save and Close.
10. Create another segment with the following values
Field Value
Segment Code
Vision_Corp_CostCenter_COA
API Name
visionCorpCostcenterCoa
Name
Vision Corporation Cost Center COA
Sequence Number
2
Prompt
Vision Corporation Cost Center COA
Short Prompt
Vision1
Enabled
Select the check box
Display Width
1
Range Type
Low
Column Name
SEGMENT2
Default Value Set Code
Vision Corporation US Cost Center Value Set 1
Selected Labels
Cost Center Segment
11. Click Save and Close.
12. On the Create Key Flexfield Structure page, click Save and Close.
69
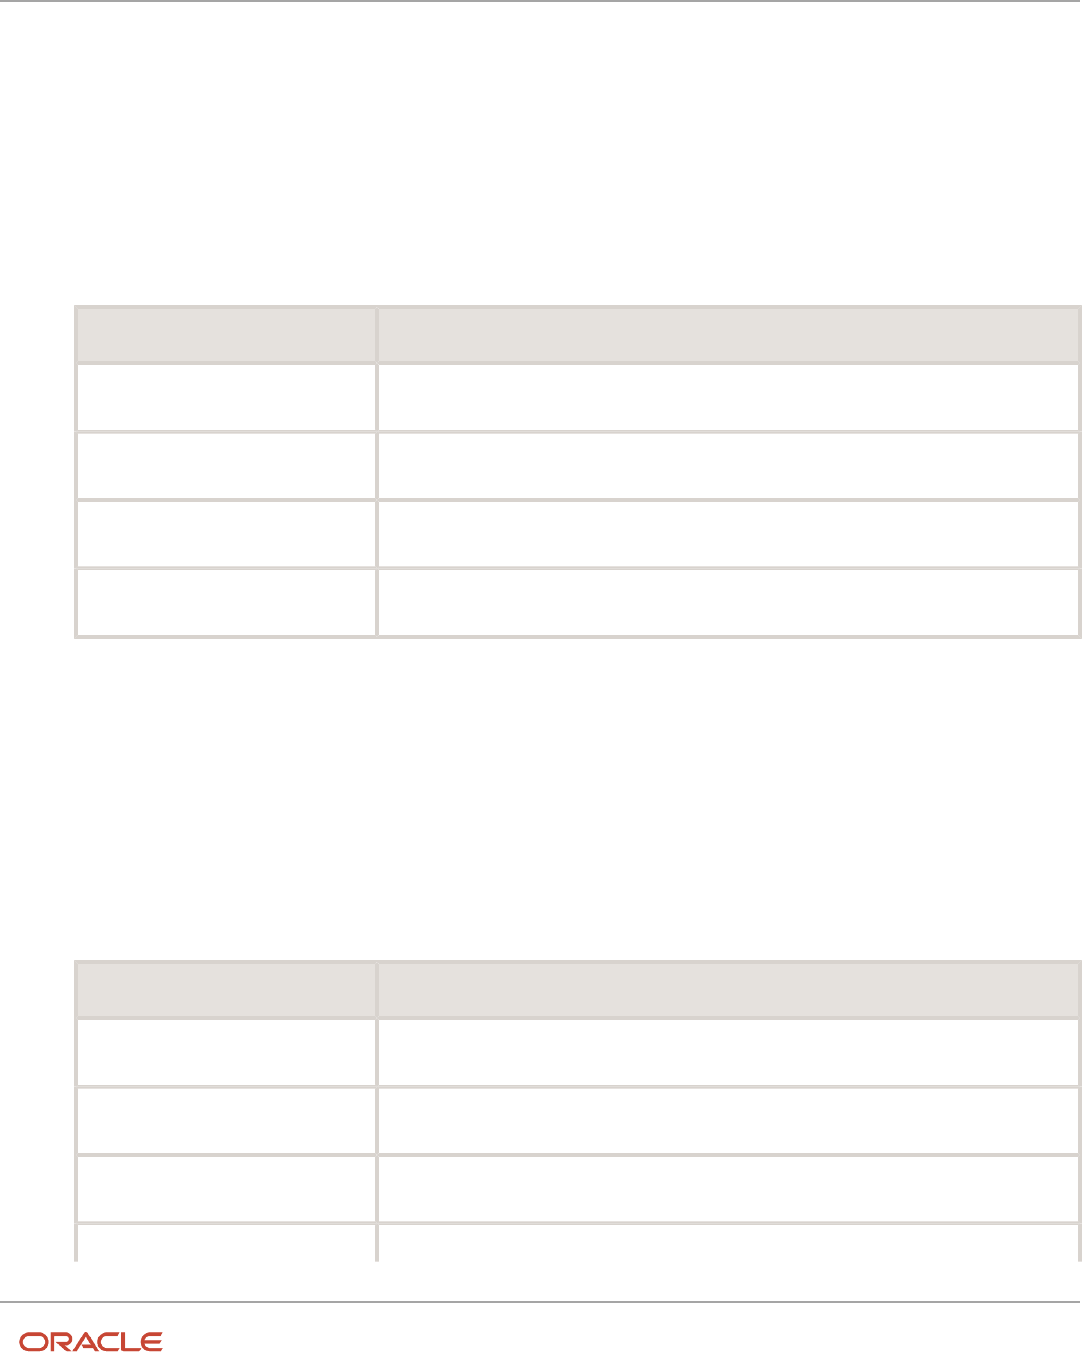
Oracle Fusion Cloud Human Resources
Implementing Global Human Resources
Chapter 5
Divisions, Departments, Worker Unions, Locations, and
Trees
Create a Chart of Accounts Structure Instance
1. In the Setup and Maintenance work area, go to the following:
◦
Offering: Workforce Deployment
◦
Functional Area: Financial Reporting Structures
◦
Task: Manage Chart of Accounts Structure Instances
2. Search and select the GL# key flexfield code.
3. Click Manage Structure Instances.
4. Click Create.
5. Complete the fields as shown in this table.
Field Value
Structure Instance Code
Vision COA Structure Instance
API name
VisionCoaStructureInstance
Name
Vision Corporation COA Structure Instance
Structure Name
Vision Corp CoA Cost Center
6. Click Save and Close.
Specify the General Ledger Cost Center Information for Creating a
Department
1. In the Workforce Structures work area, click the Manage Departments tab.
2. Click Create.
3. Select the Create new option.
4. Enter Sales Department in the Name field.
5. Click Next.
6. In the GL Cost Center Information section, complete the fields as shown in this table.
Field Value
Record Identifier
10
Company Value Set
Vision Corporation US Value Set 1
Company
AZ
Cost Center Value Set Vision Corporation US Cost Center Value Set 1
70

Oracle Fusion Cloud Human Resources
Implementing Global Human Resources
Chapter 5
Divisions, Departments, Worker Unions, Locations, and
Trees
Field Value
Cost Center
AZ
7. Click Next to review the specified information.
8. Click Submit.
Cost Centers and Departments
The two important components to be considered in designing your enterprise structure are cost centers and
departments.
A cost center represents the smallest segment of an organization for which you collect and report costs. A department
is an organization with one or more operational objectives or responsibilities that exist independently of its manager
and has one or more workers assigned to it.
Cost Centers
A cost center represents the destination or function of an expense rather than the nature of the expense which is
represented by the natural account. For example, a sales cost center indicates that the expense goes to the sales
department.
A cost center is generally attached to a single legal entity. To identify the cost centers within a chart of accounts
structure use one of these two methods:
• Assign a cost center value in the value set for each cost center. For example, assign cost center values of
PL04 and G3J1 to your manufacturing teams in the US and India. These unique cost center values allow easy
aggregation of cost centers in hierarchies (trees) even if the cost centers are in different ledgers. However, this
approach requires defining more cost center values.
• Assign a balancing segment value with a standardized cost center value to create a combination of segment
values to represent the cost center. For example, assign the balancing segment values of 001 and 013 with
cost center PL04 to represent your manufacturing teams in the US and India. This creates 001-PL04 and 013-
PL04 as the cost center reporting values. The cost center value of PL04 has a consistent meaning. This method
requires fewer cost center values to be defined. However, it prevents construction of cost center hierarchies
using trees where only cost center values are used to report results for a single legal entity. You must specify a
balancing segment value in combination with the cost center values to report on a single legal entity.
Departments
A department is an organization with one or more operational objectives or responsibilities that exist independently of
its manager. For example, although the manager may change, the objectives don't change. Departments have one or
more workers assigned to them.
A manager of a department is typically responsible for:
• Controlling costs within their budget
• Tracking assets used by their department
71

Oracle Fusion Cloud Human Resources
Implementing Global Human Resources
Chapter 5
Divisions, Departments, Worker Unions, Locations, and
Trees
• Managing employees, their assignments, and compensation
The manager of a sales department may also be responsible for meeting the revenue targets.
The financial performance of departments is generally tracked through one or more cost centers. In Oracle Fusion Cloud
Applications, departments are defined and classified as Department organizations. Oracle Fusion Cloud Human Capital
Management (HCM) assigns workers to departments, and tracks the headcount at the departmental level.
The granularity of cost centers and their relationship to departments varies across implementations. Cost center
and department configuration may be unrelated, identical, or consist of many cost centers tracking the costs of one
department.
Department Classifications
A department can be classified as a project organization, sales and marketing organization, or cost organization.
A point to note is that a department name must be unique. This rule applies even when the department is classified as
a project organization or an inventory organization. For example, if you create a department with name Vision Corp.
Sales, you can't create another department with the same name. Also, if you classify this department as a project
organization, you can't create another project organization as well with the same name.
Or, if you create a division with the name Vision Corp. Marketing that is classified as a department, which in turn is
classified as a project organization, you can't create another division, department or project organization with the same
name.
Oracle Fusion Cloud Human Capital Management (HCM) uses trees to model organization hierarchies. It provides
predefined tree structures for department and other organizational hierarchies that can include organizations with any
classification.
Project Organization
Classify departments as a project owning organization to enable associating them with projects or tasks. The project
association is one of the key drivers for project access security.
In addition, you must classify departments as project expenditure organizations to enable associating them to project
expenditure items. Both project owning organizations and project expenditure organizations can be used by Oracle
Subledger Accounting to derive accounts for posting Oracle Fusion Cloud Project Management accounting entries to
Oracle General Ledger.
Sales and Marketing Organization
In sales applications, you can define sales and marketing organizations. Sales organization hierarchies are used to
report and forecast sales results. Salespeople are defined as resources assigned to these organizations.
In some enterprises, the HCM departments and hierarchies correspond to sales organizations and hierarchies.
Examining the decision on how to model sales hierarchies in relationship to department hierarchies when implementing
Customer Relationship Management to eliminate any possible redundancy in the definition of the organizations is
important.
The following figure illustrates a management hierarchy, in which the System Components Division tracks its
expenses in two cost centers, Air Compressors and Air Transmission. At the department level, two organizations with a
classification of Department are defined, the Marketing Department and Sales Department. These two departments can
72

Oracle Fusion Cloud Human Resources
Implementing Global Human Resources
Chapter 5
Divisions, Departments, Worker Unions, Locations, and
Trees
be also identified as a Resource Organizations, which enable assigning resources, such as salespeople, and other sales
specific information to them. Each department is represented in the chart of accounts by more than one cost center,
enabling granular as well as hierarchical reporting.
Cost Organization
Oracle Project Costing uses a cost organization to represent a single physical inventory facility or group of inventory
storage centers, for example, inventory organizations. This cost organization can roll up to a manager with responsibility
for the cost center in the financial reports.
A cost organization can represent a costing department. Consider this relationship when determining the setup of
departments in HCM. No system dependencies are required for these two entities, cost organization and costing
department, to be set up in the same way.
How You Configure the Department Title
The Title field for a department is hidden and optional, by default. You need to do these 2 steps to enable the field and
make it mandatory.
Enable Title Field
These are the steps to set the value of the profile option ORA_PER_ENABLE_DEPARTMENT_TITLE to Y.
1. Navigate to the Setup and Maintenance work area.
2. Search for and click the Manage Administrator Profile Values task.
3. Search for the ORA_PER_ENABLE_DEPARTMENT_TITLE profile option code and select the profile option in
the search results.
73

Oracle Fusion Cloud Human Resources
Implementing Global Human Resources
Chapter 5
Divisions, Departments, Worker Unions, Locations, and
Trees
4. In the Profile Values section, enter Y in the Profile Value field.
5. Click Save and Close.
Once you set the profile option value to Y, you can see the Title field in all the department pages, including Create,
Update, Correct, and Review pages. Currently, the Title field appears in the Department LOV only on the responsive
position pages.
Make Title Field Mandatory
Prerequisite Tasks:
1. Create a sandbox and add the Page Composer tool.
2. Create a department from the Workforce Structures work area on the My Client Groups tab.
Do these steps to make the title field mandatory:
1. Click Edit Pages from the Settings and Actions menu.
2. Click Structure and place your cursor in the Title field.
3. Click Edit in the Confirm Shared Component Edit window.
4. Search for InputText:Title in the component list and click the Edit icon.
5. Scroll down to the Required field in the Edit Properties window and click the down arrow.
6. Select Expression Builder.
7. Add the #{pageFlowScope.makeTitleMandatory eq 'Y'} condition in the expression editor.
8. Click OK.
9. Scroll down to the Show Required field in the Edit Properties window and click the down arrow.
10. Select Expression Builder.
11. Add the #{pageFlowScope.makeTitleMandatory eq 'Y'} condition in the expression editor.
12. Click OK.
Disability Organizations
You can set up disability organizations to identify the external organizations with which disabled employees are
registered, and assess the degree of disability in the employee.
You set up disability organizations using the Manage Disability Organizations task in the Workforce Structures work area
under My Client Groups.
Purpose of Disability Organizations
Disability organizations provide information and support to people with disabilities, for example, the Royal National
Institute of Blind People. You can create a disability organization as a Trading Community Architecture party using the
Manage Integration of Additional Applications task in the Setup and Maintenance work area. You can then select a
disability organization party usage code.
For employees with disability, you can select the disability organization in their person records, identify the registration
and expiration dates, and enter any other descriptive or legislative information about the disability.
Related Topics
•
Person Records
•
Third Parties Overview
74

Oracle Fusion Cloud Human Resources
Implementing Global Human Resources
Chapter 5
Divisions, Departments, Worker Unions, Locations, and
Trees
Worker Union Management
These three components manage worker union information in Human Capital Management (HCM) Cloud:
• Worker Unions
• Bargaining Units
• Collective Agreements
Worker Unions
The worker union is a HCM organization. You can create a new worker union or select an existing organization to define
a worker union. The details of a worker union are country-specific and the country value is mandatory for a worker
union. You can optionally attach any supporting documents for the worker union. A worker union holds date-effective
attributes. Therefore, you can track the changes to the worker union over a period of time. You can also inactivate
the worker union. You can configure additional attributes specific to any legislation or customer using the available
descriptive flexfields and extensible flexfields.
You can optionally associate worker unions with their affiliated bargaining units. The values in the Bargaining Unit and
Location fields are filtered to match the country you selected. You can add more than one work union contact and enter
the contact details, such as contact name, union title, work phone, and work Email.
This figure illustrates the association between worker union, bargaining unit, and collective agreement:
A worker union can be associated with multiple bargaining units. However, a bargaining unit can be associated with only
one worker union. A collective agreement can be associated with only one worker union and bargaining unit. A worker
union or bargaining unit can be associated with multiple collective agreements.
This figure illustrates the association between position or assignment and worker union, bargaining unit, and collective
agreement:
75

Oracle Fusion Cloud Human Resources
Implementing Global Human Resources
Chapter 5
Divisions, Departments, Worker Unions, Locations, and
Trees
A position or worker assignment can be associated with only one collective agreement, bargaining unit, and worker
union. However, a bargaining unit, worker union, or collective agreement can be associated with multiple positions or
worker assignments.
Bargaining Units
A bargaining unit is a specific group of employees who are represented by one authorized union or association for
purposes of collective bargaining. A bargaining unit is defined as a lookup type.
Collective Agreements
A collective agreement is a special type of commercial agreement that's negotiated collectively between the
management (on behalf of the company) and trade unions (on behalf of employees). The agreement regulates the
terms and conditions of employees in their workplace, their duties, and the duties of the employer.
Let's take a look at the collective agreement details:
A collective agreement is country-specific. You may enter the bargaining unit, legal employer, and union values
depending on the country. For example, you can create a collective agreement without the bargaining unit and legal
employer, or only with the legal employer. When you select the value in the Country field, the values in the Bargaining
Unit, Legal Employer, and Union fields are filtered to match the country selected. You can optionally associate collective
agreements with worker unions and attach documents to the collective agreement.
76

Oracle Fusion Cloud Human Resources
Implementing Global Human Resources
Chapter 5
Divisions, Departments, Worker Unions, Locations, and
Trees
You can provide details of the parties negotiating the collective agreement, such as the employee and employer
organizations. The employee organization can be the trade union or bargaining unit representing the employee while
the employer organization is represented by the company management.
A collective agreement is date-effective, therefore, you can track changes to a collective agreement over time.
You can also inactivate the collective agreement. You can configure additional attributes specific to a legislation or
customer using the available descriptive flexfields and extensible flexfields. If you specify a Valid To date for a collective
agreement, it lapses after that date and you can't link it to an employee.
Note: If the collective agreement is linked to an assignment, you can't edit the Identification Code, Country,
Bargaining Unit, Union, and Legal Employer fields. Additionally, you can't delete the collective agreement.
Here's how you can link collective agreements:
You can link a collective agreement to an assignment provided the bargaining unit, country, and legal employer of the
collective agreement are consistent with the assignment. If you created a collective agreement without associating
it with a legal employer or bargaining unit, you can link the collective agreement to any assignment within the same
country.
You can link a union, bargaining unit, or collective agreement with a worker assignment provided that its country and
legal employer is consistent with the assignment.
The union, bargaining unit, and collective agreement list of values (LOV) that you can select for linking with an
assignment or position are filtered as described in this table:
Attribute Linking Object Filter Conditions
Union
Assignment
The LOV is filtered to show unions that are
active as of the start date and whose country
matches the country of the legal employer on
the worker assignment.
Union
Position
The LOV is filtered to show unions that are
active as of the position start date. As there is
no legislation context available for a position,
the LOV isn't filtered based on the union
country. All unions configured in the application
are listed in the LOV.
Bargaining Unit
Assignment
• If you don't select a union, the LOV is
filtered to show bargaining units that are
active as of the start date, and whose
country matches the legal employer
country or have no country tag itself.
• If you select a union, the LOV is filtered to
show bargaining units that are active as of
the start date and are associated with the
selected union.
Bargaining Unit
Position
As there is no legislation context available for a
position, the LOV isn't filtered based on country
tags configured for the bargaining unit lookup
codes.
77

Oracle Fusion Cloud Human Resources
Implementing Global Human Resources
Chapter 5
Divisions, Departments, Worker Unions, Locations, and
Trees
Attribute Linking Object Filter Conditions
• If you don't select a union, the LOV is
filtered to show bargaining units that are
active as of the position start date.
• If you select a union, the LOV is filtered to
show bargaining units that are active as of
the position start date and are associated
with the selected union.
Collective Agreement
Assignment
Note:
The LOV is filtered to show only those values
that match the country of the legal employer
on the worker assignment.
If you don't select a union or bargaining unit,
the LOV is filtered to show all active collective
agreements as of the start date.
If you select a union without selecting a
bargaining unit, the LOV is filtered this way:
• Shows collective agreements that are
active and match the selected union, but
don't have an associated bargaining unit
(union-specific values).
• Shows collective agreements that are
active and don't have an associated union
or bargaining unit value (global values).
If you select a bargaining unit without selecting
a union, the LOV is filtered this way:
• Shows collective agreements that are
active and match the selected bargaining
unit, but don't have an associated union
(bargaining unit-specific values).
• Shows collective agreements that are
active and don't have an associated union
or bargaining unit value (global values).
If you select a union and a bargaining unit, the
LOV is filtered this way:
• Shows collective agreements that are
active and match the selected union and
bargaining unit (union and bargaining
unit-specific values).
• Shows collective agreements that are
active and don't have an associated union
or bargaining unit value (global values).
Collective Agreement
Position
As there is no legislation context available on
for a position, the LOV isn't filtered based on
the collective agreement country.
If you don't select a union or bargaining unit,
the collective agreement LOV is filtered to
78

Oracle Fusion Cloud Human Resources
Implementing Global Human Resources
Chapter 5
Divisions, Departments, Worker Unions, Locations, and
Trees
Attribute Linking Object Filter Conditions
show all active collective agreements as of the
position start date.
If you select a union without selecting a
bargaining unit, the LOV is filtered this way:
• Shows collective agreements that are
active and match the selected union, but
don't have an associated bargaining unit
(union-specific values).
• Shows collective agreements that are
active and don't have an associated union
or bargaining unit value (global values).
If you select a bargaining unit without selecting
a union, the LOV is filtered this way:
• Shows collective agreements that are
active and match the selected bargaining
unit, but don't have an associated union
(bargaining unit-specific values).
• Shows collective agreements that are
active and don't have an associated union
or bargaining unit value (global values).
If you select a union and a bargaining unit, the
LOV is filtered this way:
• Shows collective agreements that are
active and match the selected union and
bargaining unit (union and bargaining
unit-specific values).
• Shows collective agreements that are
active and don't have an associated union
or bargaining unit value (global values).
79

Oracle Fusion Cloud Human Resources
Implementing Global Human Resources
Chapter 5
Divisions, Departments, Worker Unions, Locations, and
Trees
Attribute Linking Object Filter Conditions
Note:
• The global collective agreement values
can be used on a position by configuring
the following profile option:
◦
Code: ORA_PER_ALLOW_GLOBAL_
CAGR_ON_POSITIONS
◦
Display Name: Allow Global Collective
Agreements on Position
• By default, the profile value is set to
N. In this case, the global collective
agreement values can't be used on a
position even though the values are
available for selection in the LOV. If you
select a global collective agreement
value, the application will display an
error message when you submit the
position change or creation.
• If you set the profile value to Y, the
global collective agreement values can
be used on a position.
Collective Agreement Flexfields
Use the Manage Descriptive Flexfields and Manage Extensible Flexfields tasks in the Setup and Maintenance work
area to manage flexfields. You can configure these collective agreement-related flexfields as required, to meet your
enterprise requirements:
Application Table Name Descriptive Flexfield Code Name Used Availability
PER_COL_AGREEMENTS_F
PER_COL_AGREEMENTS_
DDF
Collective Agreements
Legislative Information
For storing additional
legislative information
regarding collective
agreements.
Available only for Oracle
localization use.
PER_COL_AGREEMENTS_F
PER_COL_AGREEMENTS_
DFF
Collective Agreements
Attributes
For storing additional
information regarding
collective agreements.
Available for use.
80

Oracle Fusion Cloud Human Resources
Implementing Global Human Resources
Chapter 5
Divisions, Departments, Worker Unions, Locations, and
Trees
Application Table Name Descriptive Flexfield Code Name Used Availability
PER_COL_AGRS_EXTRA_
INFO_F
PER_COL_AGREEMENTS_
EFF
Collective Agreements EIT
Information EFF
For storing additional
collective agreement
information as single and
multiple row extensible
flexfield contexts.
Available for use.
Locations
A location identifies physical addresses of a workforce structure, such as a department or a job. You create and manage
locations using the Location Details quick action in the Workforce Structures area on the My Client Groups tab.
You can also create locations to enter the addresses of external organizations that you want to maintain, such as
employment agencies, tax authorities, and insurance or benefits carriers.
When specifying the location address, you can default the country in the location responsive pages. You configure the
default location country on the Manage Enterprise HCM Information page. If you don't configure any default country,
then the country is automatically defaulted to United States in the location address.
The locations that you create exist as separate structures that you can use for reporting purposes, and in rules that
determine employee eligibility for various types of compensation and benefits. You enter information about a location
only once. Subsequently, when you set up other workforce structures you select the location from a list.
A point to note is that the Ship-to Site, Receiving Site, Bill-to Site, Office Site, and Designated Receiver fields in the
Shipping Details section of a location setup are for information purpose only and can be used to report upon. They
aren’t currently used by any feature or process within HCM.
Location Sets
When you create a location, you must associate it with a set. Only those users who have access to the set's business unit
can access the location set and other associated workforce structure sets, such as those that contain departments and
jobs.
Note the following:
• You can also associate the location to the common set so that users across your enterprise can access the
location irrespective of their business unit.
• You can also configure a location as an employee location on the Location Details page.
• When users search for locations, they can see the locations that they have access to along with the locations in
the common set.
81

Oracle Fusion Cloud Human Resources
Implementing Global Human Resources
Chapter 5
Divisions, Departments, Worker Unions, Locations, and
Trees
The following figure shows how locations sets restrict access to users.
Upload Locations Using a Spreadsheet
If you have a list of locations already defined for your enterprise, you can upload them from a spreadsheet.
To use this option:
• Download a spreadsheet template
• Add your location information to the spreadsheet
• Upload directly to your enterprise configuration
You can upload the spreadsheet multiple times to accommodate revisions.
Update Location Details
If you need to update or correct the details of a location, here's how you can do that:
1. Go to My Client Groups > Location Details.
2. On the page, click Show Filters.
3. Search for the location you need to correct or update using the filters and select it.
4. On the location's details page, click Actions and select Update or Correct.
5. Update the details as required and click Submit.
Related Topics
•
Why can't I see my location in the search results?
•
What happens if I inactivate a location?
•
Upload Workforce Structures Using a Spreadsheet
82

Oracle Fusion Cloud Human Resources
Implementing Global Human Resources
Chapter 5
Divisions, Departments, Worker Unions, Locations, and
Trees
Associate Legal Employers with Locations
You can associate multiple legal employers with a location. This enables filtering locations by legal employer on pages
that have implemented this feature. You use the Legal Employers Operating At This Location extensible flexfield (EFF)
context for the legal employer - location association.
These are some key points to note:
• A location must have at least one associated legal employer to filter the location by legal employer.
• You can associate multiple legal employers operating at a location, but can't associate the same legal employer
twice with a location.
• You can associate the same legal employer with different locations.
• You can delete the legal employer - location association.
• The legal employer - location mapping is copied when you duplicate a location.
• You can associate legal employers when creating, updating, or correcting a location.
• The legal employer list of values displays all active and inactive legal employers configured. There isn't any
filtering for only active legal employers. Similarly, there is no filtering of legal employers by matching the legal
employer country with the location address country.
• Legal employers are listed in the ascending order of legal employer name.
• Locations are first filtered based on the set. And thereafter, if an association exists, they're filtered based on the
legal employers.
In this example, Vision Enterprise has 3 legal employers Vision Corporation, Vision US, and Vision Consulting operating
at multiple locations in the US. You want to filter locations from where Vision Corporation is operating.
Let's look at the steps to update this association.
Associate Vision Corporation with the Pleasanton Location
1. Go to My Client Groups > Quick Actions > Workforce Structures.
2. Click the Location Details task.
3. Click Add.
4. Select the Additional Info option on the questionnaire page and click Continue.
5. Enter these required details to create a location.
Section Field Value
When and Why
When does this location start?
8/25/21
Location Details
Name
Pleasanton
Code
PLS
Main Address Address Line 1 603
83

Oracle Fusion Cloud Human Resources
Implementing Global Human Resources
Chapter 5
Divisions, Departments, Worker Unions, Locations, and
Trees
Section Field Value
ZIP Code
94588
City
Pleasanton
State
CA
County
Alameda
6. In the Additional Info section, click Add in the Legal Employers Operating At this Location section to associate
the Vision Corporation legal employer to this location.
7. Select Vision Corporation from the Legal Employer list.
Note: As a prerequisite, the legal employer should already exist.
8. Click OK.
9. Click Submit.
Related Topics
•
Filter Locations Based on Legal Employers
HCM Trees
Trees graphically represent the hierarchical structures of your organization. You manage trees in the Workforce
Structures work area under My Client Groups.
These tree structures are supported - department, organization, position, and geography. What nodes can be added
to the tree is controlled by each structure type. With the exception of geography trees, you can create multiple trees for
each HCM tree type, and multiple versions of each tree. However, only one version of a tree is active at any time.
Each tree version contains a root node that's at the highest level in the hierarchy. The lines connecting the elements in
a tree structure are branches and the elements are referred to as nodes. These relationships are explained as follows: a
node is a parent of another node if it's one step higher in the hierarchy. Child nodes share the same parent node.
For example, in the Department Tree figure, Operations is the parent of Human Resources, Legal, and Finance, which
are its child nodes.
Department Trees
A department tree is a hierarchical representation of your departments. You can create versions of department trees but
only one tree version is active at a time. A department can’t be added more than once in the same tree version.
84

Oracle Fusion Cloud Human Resources
Implementing Global Human Resources
Chapter 5
Divisions, Departments, Worker Unions, Locations, and
Trees
Department Tree Uses
• Maintain a hierarchy of all departments under one or multiple trees.
• Select the department hierarchy tree structure in the Secure by Organization Hierarchy setup of the
organization security profiles to secure access to departments within that tree.
• Secure Areas of Responsibility (AOR) data using the Hierarchy Type list. The areas of responsibility defined
for a hierarchy type can be used in securing by areas of responsibility while creating person security profiles to
secure person records.
• Use the responsibility types defined in the AOR setup to define approval rules so that representatives defined
using department tree can be approvers.
• Use the department hierarchy in your analysis to build roll-up analysis reports.
• Default the line manager from the department manager in a worker assignment using the department tree. You
can use the PER_DEPARTMENT_TREE_FOR_MANAGER profile option to configure this setting.
Example of a Department Tree
The following figure illustrates a department hierarchy that you can establish using a department tree.
Organization Trees
An organization tree is a hierarchical representation of your various organizational entities. You can select any
organization including divisions, legal employers, business units, departments, and so on to create your organization
tree. You can create versions of organization trees but only one tree version is active at a time. An organization can’t be
added more than once in the same tree version.
85

Oracle Fusion Cloud Human Resources
Implementing Global Human Resources
Chapter 5
Divisions, Departments, Worker Unions, Locations, and
Trees
Organization Tree Uses
• Maintain a hierarchy of different organizational structures.
• Select the Generic organization hierarchy tree structure option in the Secure by Organization Hierarchy setup
of organization security profiles to secure access to organizations within that tree.
• Secure Areas of Responsibility (AOR) data using the Hierarchy Type list. The areas of responsibility defined
for a hierarchy type can be used in securing by areas of responsibility while creating person security profiles to
secure person records.
• Use the responsibility types defined in the AOR setup to define approval rules so that representatives defined
using organization tree can be approvers.
• Use the organization hierarchy in your analysis to build roll-up analysis reports, if departments are at the lowest
level of the hierarchy.
Example of an Organization Tree
The following figure illustrates an organization hierarchy that you can establish using an organization tree.
86

Oracle Fusion Cloud Human Resources
Implementing Global Human Resources
Chapter 5
Divisions, Departments, Worker Unions, Locations, and
Trees
Position Trees
You can create multiple position trees using the predefined position tree structure in the Workforce Structures work
area. You can then create multiple versions to establish reporting relationships among positions. Position trees can have
only one top node.
Position Tree Uses
• Use position hierarchies for budgeting and organizational planning.
• Secure access to positions by identifying a position hierarchy in a position security profile. For example, you
can create a position security profile that includes all positions in a position hierarchy under a specified first
position. You can also include the position security profile in a person security profile to secure access to person
records. In this case, the person security profile includes the person records of the people who occupy the
positions in the position security profile.
Example of a Position Tree
The following figure illustrates a position hierarchy that you can establish using a position tree.
Geography Trees
You can create versions of the predefined geography tree structure to represent countries in which your enterprise
operates. For each country, you can define lower-level nodes such as states and cities. For example, United Kingdom -
England - London. You manage trees in the Workforce Structures work area.
Although you can create multiple versions, you can create only one tree in the hierarchy. Geography trees also have only
one first node.
Calendar Events
You use the geography tree to specify the locations to which calendar events apply. You can create the tree using these
conditions.
• If an event applies to your entire enterprise, you can attach it to the first node in the tree, for example, Global.
87

Oracle Fusion Cloud Human Resources
Implementing Global Human Resources
Chapter 5
Divisions, Departments, Worker Unions, Locations, and
Trees
• If an event applies only to specific countries in your enterprise, you can attach it to the nodes for those specific
countries, for example, United Kingdom.
• If an event applies only to specific states or cities in a country, you can attach it to the state or city level nodes.
For example, England, London.
Example of a Geography Tree
This figure illustrates the geographical hierarchy that you can establish using a geography tree.
Related Topics
•
Employment Profile Options
•
Guidelines for Managing Trees and Tree Versions
88

Oracle Fusion Cloud Human Resources
Implementing Global Human Resources
Chapter 5
Divisions, Departments, Worker Unions, Locations, and
Trees
FAQs for Divisions, Departments, Worker Unions,
Locations, and Trees
What's a reporting establishment?
A reporting establishment is an organization that's used for statutory reporting other than tax and social insurance
reporting. In some countries, such as France, a reporting establishment can also be a tax reporting unit.
A reporting establishment and a legal employer share a parent-child relationship with the legal employer being the
parent organization. A legal employer can be the parent of multiple reporting establishments. You create reporting
establishments using the Manage Legal Reporting Unit HCM Information task in the Setup and Maintenance work area.
Can I delete an organization?
No you can't. However, you can disable an organization if it's no longer required. For example, if the enterprise is
downsizing, then you can set the status of the organization to inactive.
Changing the status of the organization disables the organization and the organization is no longer available to select.
How do I create a disability organization?
Use the Manage Integration of Additional Applications task in the Setup and Maintenance work area. Disability
organizations are one of the choices when creating third-party organizations.
How can I identify my organization in a report?
Use the organization manager information in the Create and Edit Department pages to enter a reporting name to
identify the organization in a report. You use organization hierarchies for statutory, legal and management reporting.
You can see all employees in the Manager list.
What's the purpose of the legislative action attributes?
When you create transfer or termination related actions using the Configure Actions task in the Workforce Structures
work area, you can also enter legislative attributes for the actions. You can use the attributes to:
• Indicate whether an action is transfer-related.
• Specify the termination type for termination-related actions.
89

Oracle Fusion Cloud Human Resources
Implementing Global Human Resources
Chapter 5
Divisions, Departments, Worker Unions, Locations, and
Trees
For example, the termination-related action Resignation can have the termination type as voluntary and the action
Reduction in Force can have the termination type as involuntary. Typically you enter this information to meet specific
legislative requirements or for reporting purposes.
What's the difference between department name and title?
A department name is unique but the department title is non-unique and can be the same across departments. You
can't have 2 or more departments with the same name, but you can have multiple departments with the same title.
For example, you can have a Human Resources department (title) that can be common across the enterprise but there
can only be one unique US Human Resources department (name) in the enterprise. A department name is mandatory
but the title is hidden and optional, by default. You can enable the Title field and make it mandatory.
Why can't I see my location in the search results?
You can search for approved locations only. Also, if you created a location in Oracle Fusion Trading Community Model,
then you can't access that location from Oracle Fusion Global Human Resources.
For use in Oracle Fusion HCM, you must recreate the location from the Manage Locations page.
How can I associate a location with an inventory organization?
From the Oracle Fusion Global Human Resources, go to the Manage Locations page. Use the Manage Locations task in
the Workforce Structures work area.
To appear on the Create or Edit Location pages, your inventory organization must be effective as of the current date and
must exist in the location set that you selected.
What happens if I select an inventory organization when I am
creating or editing a location?
The location is available for selection in purchase documents of that inventory organization in Oracle Fusion Inventory
Management. If you don't select an inventory organization, then the location is available in purchase documents across
all inventory organizations.
What happens if I select a geographic hierarchy node when I
create or edit a location?
The calendar events that you created for the geographic node start to apply for the location and may impact the
availability of worker assignments at that location.
90

Oracle Fusion Cloud Human Resources
Implementing Global Human Resources
Chapter 5
Divisions, Departments, Worker Unions, Locations, and
Trees
You manage locations using the Manage Locations task in the Workforce Structures work area.
The geographical hierarchy nodes available for selection on the Locations page display from a predefined geographic
hierarchy.
Related Topics
•
How an Individual's Schedule Is Identified
What happens if I inactivate a location?
Starting from the effective date that you entered, you can no longer associate the location with other workforce
structures, assignments, or applications.
If the location is already in use, it will continue to be available to the components that currently use it.
91

Oracle Fusion Cloud Human Resources
Implementing Global Human Resources
Chapter 5
Divisions, Departments, Worker Unions, Locations, and
Trees
92

Oracle Fusion Cloud Human Resources
Implementing Global Human Resources
Chapter 6
Jobs and Positions
6 Jobs and Positions
Jobs
Jobs are typically used without positions by service industries where flexibility and organizational change are key
features. As part of your initial implementation, you specify whether to use jobs and positions, or only jobs.
Basic Details
Basic details for a job include an effective start date, a job set, a name, and a code.
A job code must be unique within a set. Therefore, you can create a job with the code DEV01 in the US set and another
job with the same code in the UK set. However, if you create a job with the code DEV01 in the Common set, then you
can't create a job with the same code in any other set.
Benchmark Information
You can identify a job as being a benchmark job. A benchmark job represents other jobs in reports and salary surveys.
You can also select the benchmark for jobs. Benchmark details are for informational purposes only.
Progression Information
A progression job is the next job in a career ladder. Progression jobs enable you to create a hierarchy of jobs and are
used to provide the list of values for the Job field in the Promote Worker and Transfer Worker tasks.
The list of values includes the next job in the progression job hierarchy. For example, assume that you create a job called
Junior Developer and select Developer as the progression job. Progression jobs show as suggested jobs; so when you
promote a junior developer, the Suggested Jobs list of values for the new job will show Developer. You can select this
value, or select another one.
Jobs and Grades
You can assign grades that are valid for each job. If you're using positions, then the grades that you specify for the job
become the default grades for the position.
Related Topics
•
Considerations for Enforcing Grades at Assignment Level
•
Guidelines for Using Desktop Integrated Excel Workbooks
Examples of Jobs
Jobs are typically used without positions by service industries where flexibility and organizational change are key
features.
93

Oracle Fusion Cloud Human Resources
Implementing Global Human Resources
Chapter 6
Jobs and Positions
Software Industry
For example, XYZ Corporation has a director over the departments for developers, quality assurance, and technical
writers.
• Recently, three developers have resigned from the company.
• The director decides to redirect the headcount to other areas.
• Instead of hiring all three back into development, one person is hired to each department, quality assurance,
and technical writing.
In software industries, the organization is fluid. Using jobs gives an enterprise the flexibility to determine where to use
headcount, because the job only exists through the person performing it. In this example, when the three developers
leave XYZ Corporation, their jobs no longer exist, therefore the corporation has the flexibility to move the headcount to
other areas.
This figure illustrates the software industry job setup.
Examples of Positions
Positions are typically used by industries that use detailed approval rules, which perform detailed budgeting and
maintain headcounts, or have high turnover rates.
Retail Industry
ABC Corporation has high turnovers. It loses approximately 5% of its cashiers monthly. The job of the cashier includes
three positions: front line cashier, service desk cashier, and layaway cashier. Each job is cross-trained to take over
another cashier's position. When one cashier leaves from any of the positions, another existing cashier from the
front line, service desk or layaway can assist where needed. But to ensure short lines and customer satisfaction, ABC
Corporation must replace each cashier lost to turnover. Since turnover is high in retail it's better for this industry to use
positions.
94

Oracle Fusion Cloud Human Resources
Implementing Global Human Resources
Chapter 6
Jobs and Positions
Note the following:
• You have to create a vacancy manually when position synchronization is used and an employee terminates
employment (when an incumbent moves out of the position).
• The position exists even when there are no holders. Having the position continue to exist is important if the
person who leaves the company is a manager or supervisor with direct reports.
• All direct reports continue reporting to the position even if the position is empty.
• You don't have to reassign these employees to another manager or supervisor. The replacement manager is
assigned to the existing position.
Also, an added advantage to using Positions is when you hire somebody new, many of the attributes are inherited from
the position. This speeds up the hiring process.
This figure illustrates the retail position setup.
Health Care Industry
Health care is an industry that must regulate employment, roles, and compensation according to strict policies and
procedures. Fixed roles tend to endure over time, surviving multiple incumbents. Industries that manage roles rather
than individuals, where roles continue to exist after individuals leave, typically model the workforce using positions.
The hospital has a structured headcount and detailed budgeting. For example, a specific number of surgeons, nurses,
and interns of various types are needed. These positions must be filled in order for the hospital to run smoothly. Use
jobs and positions when you apply detailed headcount rules.
95

Oracle Fusion Cloud Human Resources
Implementing Global Human Resources
Chapter 6
Jobs and Positions
This figure illustrates the hospital position setup.
Considerations for Using Jobs and Positions
Jobs and positions represent roles that enable you to distinguish between tasks and the individuals who perform those
tasks.
Note the following:
• The key to using jobs or positions depends on how each is used.
• Positions offer a well-defined space independent of the person performing the job.
• Jobs are a space defined by the person.
• A job can be defined globally in the Common Set, whereas a position is defined within one business unit.
• You can update the job and department of a position at any time. For example, if you hire someone into a new
role and want to transfer the position to another department.
During implementation, one of the earliest decisions is whether to use jobs or a combination of jobs and positions. The
determinants for this decision are:
• The primary industry of your enterprise
• How you manage your people
Primary Industry of Your Enterprise
The following table outlines information about Primary industries and how they set up their workforce.
Primary Industry Workforce Setup
Mining
Positions
Utilities Positions
96

Oracle Fusion Cloud Human Resources
Implementing Global Human Resources
Chapter 6
Jobs and Positions
Primary Industry Workforce Setup
Manufacturing
Positions
Retail Trade
Positions
Transportation and Warehousing
Positions
Educational Services
Positions
Public Transportation
Positions
Agriculture, Forestry, Fishing, and Hunting
Jobs
Construction
Jobs
Wholesale Trade
Jobs
Information
Jobs
Finance and Insurance
Jobs
Professional, Scientific, and Technical
Services
Jobs
Management of Companies and
Enterprises
Jobs
Administrative and Support and Waste
Management and Remediation Services
Jobs
Arts, Entertainment, and Recreation
Jobs
Accommodation and Food Services
Jobs
Other Services (Except Public
Administration)
Jobs
Management of People
Consider the following scenarios how industries manage their employee turnover:
• Scenario 1: Replace employees by rehiring to the same role.
• Scenario 2: Replace headcount but the manager uses the headcount in a different job.
97

Oracle Fusion Cloud Human Resources
Implementing Global Human Resources
Chapter 6
Jobs and Positions
• Scenario 3: Rehire employees to the same position, but the manager requests reallocation of budget to a
different post.
The following table displays suggestions of what the industry should use, either jobs or positions, in these three
scenarios:
Industry Scenario 1 Scenario 2 Scenario 3
Project (An industry that
supports project-based forms of
organization in which teams of
specialists from both inside and
outside the company report to
project managers.)
Positions
Jobs
Jobs
Controlled (An industry that's
highly structured in which all
aspects of work and remuneration
are well organized and regulated.)
Positions
Positions
Positions
Manufacturing
Positions
Jobs
Positions
Retail
Positions
Jobs
Positions
Education
Positions
Jobs
Positions
Other
Positions
Jobs
Jobs
Related Topics
•
How Grades and Grade Rates Work with Jobs, Positions, Assignments, Compensation, and Payroll
Job and Position Structures
Job and position structures identify the descriptive flexfield structure that enables you to specify additional attributes
that you want to capture when you define jobs and positions.
Job and position attributes provide further detail to make jobs and positions more specific. You also use attributes to
define the structure of your jobs and positions. You can specify attributes at the enterprise level for jobs and positions,
at the business unit level for positions, and at the reference data set level for jobs. Job and position structures are
optional.
Enterprise-Level Job Attributes
When you define a job, you enter a value for the name of the job. To make job names more specific, set up attributes
to identify additional details about the job. This includes the nature of the work that is performed or the relative skill
98

Oracle Fusion Cloud Human Resources
Implementing Global Human Resources
Chapter 6
Jobs and Positions
level required. If these attributes apply to all jobs within your enterprise, set up enterprise-level job attributes. Standard
capabilities mean that you can use the different segments of the name to:
• Identify common jobs or job holders for analysis or compensation.
• Group records in reports, such as to find all jobs of a specific job type.
Don't use attributes with values that change regularly, for example, salary ranges or expense approval levels that change
every year.
This figure illustrates how job type and job level provide further details for the HR Application Specialist job.
Enterprise-Level Position Attributes
Position attributes at the enterprise level are similar to those for jobs. Each position that you define identifies a specific
role in the enterprise, which you can manage independently of the person in the position. A position belongs to one
specific department or organization. The name of each position must be unique. To simplify the process of managing
unique names for positions, set up enterprise-level attributes to identify separate components of the position name.
For example, you can set up an attribute for position title and one for position number. When defining the attributes
that make up the structure of a position name, consider whether any of your attributes are part of the definition of
a common job type. Using job types for a position can help you manage common information that applies to many
different positions.
For example, you can:
1. Define a job type of Manager.Level 1.
2. Use it for comparison of positions across departments or lines of business or for setting common job
requirements.
3. Define multiple manager-type positions in your HR department, each of which has responsibility for a different
management function or group.
99

Oracle Fusion Cloud Human Resources
Implementing Global Human Resources
Chapter 6
Jobs and Positions
This figure illustrates how title and position number provide further details for the manager position.
Business Unit-Level Attributes for Positions
If you have information that you want to capture for positions that are specific to each business unit, then you can
define attributes at the business unit level for positions. When you create positions, these attributes appear in addition
to any enterprise-level attributes. For example, you might want to identify the sales region for all positions in the sales
business unit. You can set up a text attribute called Sales Region and use it to enter the necessary information when
creating positions for the sales business unit.
Reference Data Set-Level Attributes for Jobs
If you have information for jobs that applies to specific reference data sets, set up attributes for jobs at the reference
data set level. When you create jobs, these attributes appear in addition to any enterprise-level attributes. For example,
you might want to identify all information technology (IT) jobs within a specific set. You can set up a text attribute called
Function and use it to enter IT in jobs that you create that perform an IT function within a specific set.
Scheduling Group Attribute for Jobs
You can use scheduling groups to group similar jobs for the purpose of workforce scheduling.
For example: In healthcare, the skill set of a Registered Nurse or RN may include multiple jobs in HCM such as
Registered Nurse (RN), Charge Nurse (CN), and Certified Nurse Assistant (CNA). A staffing need for an RN can be
fulfilled by any one of these different jobs defined in HCM.
Scheduling group is an optional attribute that you can add to jobs. It’s defined as a lookup, and it's supported by the
ORA_PER_SCHEDULING_GROUP lookup type. You can define the lookup values according to your requirement by using
the Manage Common Lookups task.
Here are some more details about this attribute:
• Scheduling group isn't a required attribute.
• Its default value is blank.
100

Oracle Fusion Cloud Human Resources
Implementing Global Human Resources
Chapter 6
Jobs and Positions
• In the Job Duplicate flow, the value of this field is copied from the source job.
• You can upload data for this attribute using HCM Data Loader (HDL) and HCM Spreadsheet Data Loader
(HSDL).
• The Scheduling Group attribute is also migrated when you migrate your job configuration using the export and
import functionality in Functional Setup Manager (FSM).
• You can make date-effective updates and correct the existing value of this attribute.
• The Scheduling Group attribute is added to the ManageJobs data model. You can add this attribute to the
UpdateJobReport, CreateJobReport, and DTDeleteJobReport reports by customizing the BIP templates, if
required.
Workforce Structures Code Generation Methods
A code uniquely identifies either a position or a job. Currently, you can generate a code for position and job workforce
structures. Use the Manage Enterprise HCM Information task in the Workforce Structures work area to configure the
code generation method for positions and jobs.
You can generate the position code or the job code in one of these 3 ways:
• Manually
• Automatically prior to submission
• Automatically upon final save
Manual: Use this method to manually enter the code when creating a position or a job. You can update the code in the
Details page. This is the default method for generating the position and job code.
Automatic prior to submission: Use this method to automatically create and display the code when you create a
position or job. This method may create gaps in the code sequence if the transaction is canceled after the position or
job code is generated.
Automatic upon final save: Use this method to create position or job codes only after the create transaction is
approved. You can't see the position or job code when you're creating the respective workforce structure, but can see it
on the Details page after the transaction is approved. This method has less possibility of creating gaps in the generated
codes.
The Automatic prior to submission and Automatic upon final save methods use an enterprise number sequence. All
workforce structures' codes that are generated using the automatic methods are numeric only. By default, the sequence
starts from 1; however, you can change the starting number. The code increments by one for each new position or job
created.
You can change the position or job code generation method from Automatic prior to submission method to the
Automatic upon final save method and the other way around. You can also change from the automatic method to the
manual method and the other way around but you must be careful which method you choose if you have existing data.
You can't edit an automatically generated position or job code.
Initial Position and Job Code
You can specify the initial position or job code for your enterprise when you generate the code automatically. The
application uses this number for the first record that you create using the automatic position and job code setting and
increments the number by one for subsequent records. By default, the initial code is 1. The validation on the initial
101

Oracle Fusion Cloud Human Resources
Implementing Global Human Resources
Chapter 6
Jobs and Positions
position and job code helps you identify the starting code in automatic code generation when the method is changed
from manual to automatic.
Using the initial position and job code, you can retain the legacy codes for existing positions and jobs respectively.
Additionally, you can automate the number generation for new positions and jobs, starting from the last legacy person
number plus one. You can change the initial code.
Note: To avoid duplicate codes being generated, follow these recommendations.
• If you have been using the manual method of position or job code generation for sometime and now moving
to the automatic method, we recommend setting an initial code to a value higher than the old position or job
codes that were specified manually.
• When using HDL to load positions or jobs, the position and job code can be automatically generated, hence we
recommend you leave the code blank in the dat file.
Evaluation Criteria for Jobs and Positions
You can define evaluation criteria such as evaluation system, date, unit of measure, for for jobs and positions
By default, 2 evaluation systems are available. The Hay system is a predefined evaluation system. Another custom
evaluation system is available for which you need to define your own criteria and values..
Enable Evaluation Criteria Section
The Evaluation Criteria section is hidden by default, you need to enable it in the Transaction Design Studio. For example,
here's how you can enable it in the Position Details page
1. Click My Client Groups > HCM Experience Design Studio.
2. Select the Position Details action.
3. Click Add to add a rule.
4. Enter a name and description for the rule.
5. In the Page Attributes section, select the Configure Save Options and Regions option.
6. For the Evaluation Criteria region, select Visible.
7. Select Evaluation Criteria from the Region list to ensure that the Evaluation System field is enabled in the
section.
8. Click Save and Close.
You can enable for the Job Details page similarly by selecting the Job Details action in Transaction Design StudioIn the
Request a New Position and Request a Position Change flow, the Evaluation Criteria section is available in the Show or
Hide Regions section.
Points to Consider
• The evaluation criteria data associated to a job or position isn't copied when a job or position is duplicated.
• You can see only the Evaluation Date and the Evaluation System fields in the read-only job or position pages, if
there isn't any evaluation data.
• The Evaluation Date doesn't default to the start date of the job or position unlike the classic job and position
pages.
102

Oracle Fusion Cloud Human Resources
Implementing Global Human Resources
Chapter 6
Jobs and Positions
• The Evaluation Date can't be earlier than the start date of the job or position.
• Any updates to evaluation data are retained in the cache until you submit the data. Only the data submitted or
committed to the database is displayed on the page, irrespective of the earlier data updates.
• If you want to remove the evaluation data for a job or position, you need to remove the Evaluation System
value. However, if the Evaluation System is defaulted and the field is hidden, you have to first unhide the field
and then remove the Evaluation System to delete the evaluation data.
Default Evaluation System
You can specify a default evaluation system for job and position flows on the Manage Enterprise HCM Information
page. If you specify a default evaluation system it applies to both jobs and positions. However, you can change it in the
respective flows.
Here are some key points to note about the evaluation system defaulting.
• The Evaluation System is defaulted when you specify an evaluation date in the Evaluation Criteria section.
• The Default Evaluation System configuration isn’t date effective on the Manage Enterprise HCM Information
page.
Related Topics
•
Workforce Structures Flexfields
•
Workforce Structures Lookups
View Details of Associated Profiles and Open Profiles
Pages from Redwood Job or Position Pages
On the read-only, create, and edit pages for jobs and positions in Redwood, you can see a read-only view of all the
associated profiles. You can view all the profile details without leaving the job or position page.
This feature is available only in the Redwood job and position pages.
The Associated Profiles section of the job or position page shows all the profiles associated with a job or position. For
each of the associated profiles, an individual Profile details link is displayed. When you click the link for an associated
profile, a panel drawer opens, showing the entire details for that particular associated profile.
Note: The Associated Profiles read-only section appears in the view, create, and edit pages for jobs and positions. If
you add an associated profile to this section while creating or editing a job or position, the Profile details link for the
profile that you’re adding will appear only after you click the Save button for that profile.
You can also open the job profiles and position profiles search pages from within a view-only job or position page
respectively in Redwood. All the profiles associated with that particular job or position will show up by default on the
profiles page. If you clear this search by closing the Job Name or Position Name filter chip, you will see a list of all the
available job profiles or position profiles respectively.
You can create or edit a profile on the profile page, and then associate it with the same job or position, or with any other
job or position. Clicking the Back arrow will take you back to the same view page.
103

Oracle Fusion Cloud Human Resources
Implementing Global Human Resources
Chapter 6
Jobs and Positions
Create a Position Profile
Profiles help you in identifying the requirements and competencies for a position. You can associate an existing profile.
You can also create a new profile and associate it with the position by updating or correcting the position.
You can associate a profile to a position using any of these pages - Position Details, Position Change, and Request a
New Position. Here's how you create a position profile.
1. On the Home page, click My Client Groups.
2. Navigate to the quick actions and click the Show More link.
3. Under Workforce Structures, click Position Details.
4. Search for and click the position for which you want to associate the profile.
5. On the Position Details page, click Create Profile under the Actions menu.
6. On the Create Position Profile page, enter these details.
Field Description
Position Responsibility
Responsibilities that are required for the position.
Position Qualifications
Qualifications that are required of the people in the position.
7. Click Save.
Associate Action Reasons in Position with Role
You can make the action and action reason role-specific on these position pages by selecting the applicable roles when
you configure the action and action reason.
• Request a New Position
• Request a Position Change
• Update Position (from Position Details)
• Correct Position (from Position Details)
• Duplicate Position (from Position Details)
After the configuration, the position pages will display the action and action reason that are specific to the worker's
logged in user role. You need to associate the action reasons on the Configure Actions page. In these steps, we will
create a new action reason and associate the role.
1. On the Home page, click My Client Groups > Workforce Structures > Action Reasons.
2. Click Add.
3. Enter a name, code, and description for the action.
4. Click Submit.
5. On the Home page, click My Client Groups > Workforce Structures > Configure Actions.
104

Oracle Fusion Cloud Human Resources
Implementing Global Human Resources
Chapter 6
Jobs and Positions
6. Search and click the action with which you want to associate the specific action reason, for example, Update.
This table lists the flows associated with the action.
Action Code Applies to
Create PER_POS_NEW
◦
Request a New Position
◦
Duplicate Position
Update PER_POS_UPD
◦
Update Position
◦
Correct Position
◦
Request a Position Change
7. On the Edit Action page, click Continue in the Action section.
8. Click Associate.
9. Select the action reason you created.
10. Enter a start date for the association.
11. Select the roles you want to associate.
12. Click Submit.
In addition to the action reasons associated with the role, you can also see the action reasons that are available for all
users and not associated with any role in the Action Reasons LOV.
How FTE is Calculated in Positions
The full-time equivalent (FTE) value is the result of multiplying the working hours with the headcount and dividing by
the standard working hours.
For example, if the working hours are 30, the headcount is 2 and the standard working hours are 40, then the FTE value
is 1.5.
Ways to Calculate the FTE
You can either enter the FTE manually or calculate it automatically.
• Manually: Use the FTE field in the Budget Details section to enter a FTE value manually. If an FTE value is
already provided, you can update it based on the ratio of the working hours to standard working hours.
• Automatically: Select the Calculate FTE option in the Budget Details section to automatically calculate the FTE.
This check box is shown only when the Enable FTE Calculation in Positions profile option is set to Yes. Earlier,
the FTE value was automatically calculated only when a position was created. However, when this check box is
deselected automatic FTE calculation is disabled even when a position is created.
When the Calculate FTE option is selected and you edit the working hours or the headcount in the position
pages, the FTE is automatically calculated and the FTE field becomes read-only. However, you can override the
automatic calculation of FTE by deselecting the Calculate FTE option on the position pages.
This check box is available in these flows - Request a New Position, Request a Position Change, Update or
Correct Position, and Duplicate Position flows.
105

Oracle Fusion Cloud Human Resources
Implementing Global Human Resources
Chapter 6
Jobs and Positions
The Calculate FTE Option
Here are some points to note about Calculate FTE option.
• The Calculate FTE option is disabled for positions created before enabling automatic FTE calculation.
• The Calculate FTE setting is copied when a position is duplicated.
• If FTE is configured as hidden in the Transaction Design Studio (TDS), then the Calculate FTE option is also
hidden even though the profile option is enabled.
Work Hours and Duration
Full-time equivalent (FTE) is the number of hours worked by an employee on a full-time basis.
It’s calculated by dividing the working hours by standard working hours. For example, if the working hours are 20 and
the standard working hours are 40, the FTE is 0.5.
Organizations use FTE to determine their employees’ workload; specifically the number of part-time employees
required and the hours they work to add up to the same number of hours worked by full-time employees. Hence, the
general assumption is that an employee works 2,080 hours annually. This value is derived by calculating the number of
hours worked by a full-time worker in a week multiplied by the number of weeks in a year - 8 hours per day x 5 days per
week x 52 weeks per year = 2,080 hours.
However, the working hours duration might vary across industries. For example, in the manufacturing sector, an annual
number of working hours contract may be in place due to seasonal fluctuations, with only premium pay applicable when
the prorated annual hours exceed the specified annual hours. In the education sector, the duration may be linked to the
academic teaching timetable.
In such cases, the FTE calculation needs to be adjusted for such employees. These work hours attributes defined in a
position help in determining the adjusted FTE.
Standard Working Hours - Standard working hours are usually those of a full-time worker. You define them for the
enterprise, legal employer, department, location, job, or position.
If you define standard working hours for more than one work structure, the application uses this hierarchy to derive
standard working hours for the position: Job > Location > Department > Enterprise. The application uses this hierarchy
to derive standard working hours for the worker assignment: Position > Job > Location > Department > Legal Employer
> Enterprise.
Working Hours - Working hours are the same as standard working hours, by default.
Working hours and standard working hours may remain the same. For example, if an employee is working the
department's standard working hours, standard working hours and working hours are the same. For part-time workers,
there is usually a difference between standard working hours and working hours. Where there is a difference, you
update the working hours for the position and the assignment.
Standard Annual Working Duration – You define the standard annual working duration for the enterprise, legal
employer, department, location, job, or position.
If you define the standard annual working duration for more than one work structure, the hierarchy to derive the
standard annual working duration is same as standard working hours.
106

Oracle Fusion Cloud Human Resources
Implementing Global Human Resources
Chapter 6
Jobs and Positions
Annual Working Duration – Annual working duration is same as the standard annual working duration. The value may
differ but the duration is the same as the duration defined for the standard annual working duration.
Workday Information Defaults
The Full-Time Equivalent (FTE) is the number of hours worked by a worker on a full-time basis and is typically used to
determine the workload.
You can either specify your own values or default the standard working hours, standard annual working duration, and
the unit of measure (UOM) values. The workday information is used to calculate the full-time equivalent (FTE) of a
worker.
You can default the workday information attributes from these entities in this order.
1. Job
2. Location
3. Department
4. Enterprise
Let’s look at how this works with the help of a diagram.
107

Oracle Fusion Cloud Human Resources
Implementing Global Human Resources
Chapter 6
Jobs and Positions
The defaulting logic for the standard working hours, frequency, standard annual working duration, and units of
measure is given below.
Entity How it Works
Job The first check is on the job specified in the position. If values for any of these attributes are available
in the job, then these values are defaulted on the position.
Location If any of the attribute values aren't specified on the job, then the check is done on the location
specified in the position. If these values are specified in the location, then these values are defaulted on
the position.
Department If any of the attribute values aren't specified on the location, then the check is done on the department
specified in the position. If these values are specified in the department, then these values are
defaulted on the position.
108

Oracle Fusion Cloud Human Resources
Implementing Global Human Resources
Chapter 6
Jobs and Positions
Enterprise If any of the attribute values aren't specified on the department, then the check is done on the
enterprise. If these values are specified in the enterprise, then these values are defaulted on the
position.
If you change the business unit, department, location, or job in the position, then the existing defaulted workday
information is also removed, if they are defaulted from any of these objects. However, this doesn't apply when you
duplicate a position.
In addition, the defaulting hierarchy gets recalibrated when you provide a value in any of the entities. For example, if
the standard annual working duration was earlier defaulted from the enterprise and you have specified a value for the
standard annual working duration for a department now. The latest standard annual working duration value will now be
defaulted from the department.
How You Match Position Valid Grades with Job Grades
You can enforce that valid grades of the position match with valid grades of the associated job by setting this profile
option value to yes: Validation to Match Position's Valid Grades With Job Valid Grades Enabled.
When the profile option is enabled, only valid grades specified in the selected job can be added in the position. An error
is shown when you add grades that aren’t specified for the job.
A new position inherits the valid grades defined in the selected job. Valid grades for the position are those that are
active and associated with the common set or the set associated with the business unit. Valid grades are used in
assignments that use the position and subsequently in payroll calculation.
Position Budgeting
Position Budgeting helps to capture the budgetary values and to enforce them while creating or updating budgets for
positions. You can now define a budgetary period and measure your activity against these values.
You can define the position budget for full-time equivalent (FTE), Headcount, and Budget Amount at the following
levels in an enterprise:
• Business Unit
• Department
• Location
• A combination of any two or all three of the above
A position budget table, budget configuration options, and a mechanism to load and store position budgets using HDL
is provided. You can use this budget information to alert the users when they exceed the position budget. You can load
budget definitions by using the PositionBudget.dat file in HDL. Once the budget data is loaded in the application, the
validations for FTE, headcount, and budget amount take effect when a position is created or updated.
The budget values that you load in the budget table are applicable for a specified set of budget allocation criteria. These
budget values are cumulative, and they include the total budget values across all positions that match the budget
allocation criteria defined at the enterprise level. This overall budget can be utilized by a single position or multiple
positions. The budget allocation criteria can be business unit, department, location, or a combination of these three.
109

Oracle Fusion Cloud Human Resources
Implementing Global Human Resources
Chapter 6
Jobs and Positions
Before You Begin
1. Set the ORA_PER_POSITION_BUDGETING_ENABLED profile option to Y to enable position budgeting.
2. Add the Position Budgeting Configuration extensible flexfield context to the Associated Context and Pages
section as follows:
a. Navigate to the Setup and Maintenance work area.
b. Search for and click the Manage Extensible Flexfields task.
c. Search for and edit the Organization Information EFF flexfield.
d. On the Edit Extensible Flexfield: Organization Information EFF page, in the Category section, expand
Organization.
e. Select Enterprise and scroll down to the Enterprise Details section.
f. On the Associated Contexts tab, click Select and Add.
g. In the Select and Add: Contexts dialog box, search for and select Position Budgeting Configuration.
h. Click Apply.
i. On the Pages tab, in the Enterprise Details: Associated Contexts Details section, click Select and Add.
j. In the Select and Add: Contexts dialog box, search for and select Position Budgeting Configuration.
k. Click Apply.
l. Click Save and Close.
m. Redeploy the flexfield.
Configure Position Budgeting
Before you start defining position budgets, you need to configure the following position budgeting settings on the
Manage Enterprise Information page.
Attribute What you need to do What happens when you
configure this attribute
Example behaviour
Allocate By Select your budget level as
Business Unit, Department,
Location, or a combination of these
attributes. For example:
• Business Unit and
Department
• Business Unit, Department,
and Location
Whenever you define position
budgets, you must ensure that the
definition adheres to the Allocate
By values that have been specified
at the enterprise level.
Let’s say Allocate By has been
selected as Business Unit and
Department at the enterprise level.
But in the budget table, the data
is loaded using only the Business
Unit. A validation is done during
the HDL load to check whether
there’s a mismatch between what
was selected at the enterprise level
and what’s being loaded in HDL.
Budget Amount Currency Select the currency to use for
Amount-based budgeting.
The currency in the budget section
of a position will get defaulted
to the currency selected at the
enterprise level.
USD is defined as Budget Amount
Currency on Enterprise. The
currency on Position UI will also be
defaulted as USD and the attribute
is made as read-only.
Budget Period Start Day Day of the month when the budget
period starts.
This start day will be used to
identify the Budget Period Start
Date and the Budget Period End
Date while loading the data.
Assuming that the Budget Period
starts on April 1, the Budget Period
Start Day will be 1 and the Budget
Period Start Month will be April.
That means the end date of the
period is March 31.
Budget Period Start Month Month of the year when the budget
period starts.
This start month will be used to
identify the Budget Period Start
Assuming that the Budget Period
starts on April 1, the Budget Period
110

Oracle Fusion Cloud Human Resources
Implementing Global Human Resources
Chapter 6
Jobs and Positions
Attribute What you need to do What happens when you
configure this attribute
Example behaviour
Date and the Budget Period End
Date while loading the data.
Start Day will be 1 and the Budget
Period Start Month will be April.
That means the end date of the
period is March 31.
Convey FTE Overshoot As Configure whether you want
warning or error as the validation.
If you select Error here, then the
user won’t be able to proceed if the
budget is exceeded.
If you select Warning here, then the
user will be able to proceed even if
the budget is exceeded, by clicking
Allow.
Depending on what you configure
at the enterprise level, the user will
see an error or warning.
Convey Headcount Overshoot As Configure whether you want
warning or error as the validation.
If you select Error here, then the
user won’t be able to proceed if the
budget is exceeded.
If you select Warning here, then the
user will be able to proceed even if
the budget is exceeded, by clicking
Allow.
Depending on what you configure
at the enterprise level, the user will
see an error or warning.
Convey Amount Overshoot As Configure whether you want
warning or error as the validation.
If you select Error here, then the
user won’t be able to proceed if the
budget is exceeded.
If you select Warning here, then the
user will be able to proceed even if
the budget is exceeded, by clicking
Allow.
Depending on what you configure
at the enterprise level, the user will
see an error or warning.
Example of Position Budget Definition
The following table shows an example of a budget definition. Let’s assume the following:
• The budget is being utilized for only 1 position.
• Error is selected for the Convey Headcount Overshoot As field in the enterprise configuration.
• Warning is selected for the Convey FTE Overshoot As and Convey Amount Overshoot As fields in the enterprise
configuration.
Budget Definition
Business Unit Department Location Allocated FTE:
FTE allocated for the
budgetary period.
Sum of FTE of all
applicable positions
must not exceed this
value.
Allocated Headcount:
Headcount allocated
for the budgetary
period. Sum of
headcount of all
applicable positions
must not exceed this
value.
Allocated Amount:
Amount allocated
for the budgetary
period. Sum of
amount of all
applicable positions
must not exceed this
value.
Vision Corporation
Enterprise
Cardiology Vision University 700 200 200,000
111

Oracle Fusion Cloud Human Resources
Implementing Global Human Resources
Chapter 6
Jobs and Positions
Business Unit Department Location Allocated FTE:
FTE allocated for the
budgetary period.
Sum of FTE of all
applicable positions
must not exceed this
value.
Allocated Headcount:
Headcount allocated
for the budgetary
period. Sum of
headcount of all
applicable positions
must not exceed this
value.
Allocated Amount:
Amount allocated
for the budgetary
period. Sum of
amount of all
applicable positions
must not exceed this
value.
Vision Corporation
Enterprise
Cardiology Redwood Shores 200 100 100,000
Vision Corporation
Enterprise
General Surgery Redwood Shores 50 50 300,000
Examples of Budget Definition for One Position
In these two examples, let’s assume that the budget is being utilized for only 1 position with a combination that matches
row 1 of the Budget Definition table: Business Unit as Vision Corporation Enterprise, Department as Cardiology, and
Location as Vision University. When the user enters the FTE, Headcount, and Budget Amount for the position that
they’re creating, the remaining allocation for FTE, Headcount, and Budget Amount is calculated as follows:
Remaining Allocation = Allocated Value - Value Entered by User
Note: The amount by which a budget is exceeded is shown as a negative value in the corresponding Remaining
Allocation field.
Example 1
This table shows the budget definition and user input for the first example.
Example 1 for Budget Definition and User Input for One Position
Parameter FTE Headcount Budget Amount
Allocated Value 700 200 200,000
Value Entered by User 690 220 250,000
Remaining Allocation 10 -20 -50,000
An error message is displayed, indicating that the Headcount has exceeded the budget. That’s because Error is selected
for the Convey Headcount Overshoot As field in the enterprise configuration.
A warning message is displayed, indicating that the Budget Amount has exceeded the budget. That’s because Warning
is selected for the Convey Amount Overshoot As field in the enterprise configuration.
The Remaining FTE Allocation has a positive value, which means that it hasn’t exceeded the budget.
Example 2
This table shows the budget definition and user input for the second example.
112

Oracle Fusion Cloud Human Resources
Implementing Global Human Resources
Chapter 6
Jobs and Positions
Example 2 for Budget Definition and User Input for One Position
Parameter FTE Headcount Budget Amount
Allocated Value 700 200 200,000
Value Entered by User 730 200 190,000
Remaining Allocation -30 0 10,000
A warning message is displayed, indicating that the FTE has exceeded the budget. That’s because Warning is selected
for the Convey FTE Overshoot As field in the enterprise configuration.
The Remaining Headcount Allocation value is 0 and the Remaining Budget Amount Allocation has a positive value,
which means that they haven’t exceeded the budget.
Example of a Budget Definition for Multiple Positions
Let’s assume that multiple positions exist for the combination of Business Unit, Department, and Location specified
in row 1 of the Budget Definition table. When a user enters the FTE, Headcount, and Budget Amount for the position
they’re creating, the remaining allocation is calculated by considering the cumulative utilization of the budget specified
in the Budget Definition table.
In such cases, the remaining allocation for FTE, Headcount, and Budget Amount is calculated as follows:
Resulting Cumulative Value = Current Cumulative Utilized Value + Value Entered by User
Remaining Allocation = Allocated Value – Resulting Cumulative Value
This table shows an example.
Example of Budget Definition for Multiple Positions
Parameter FTE Headcount Budget Amount
Allocated Value 700 200 200,000
Current Cumulative Utilized Value 600 195 160,000
Value Entered by User 110 10 40,000
Resulting Cumulative Value 600 +110 = 710 195 + 10 = 205 160,000 + 40,000 = 200,000
Remaining Allocation 700 – 710 = -10 200 – 205 = -5 200,000 – 200,000 = 0
An error message is displayed, indicating that the Headcount has exceeded the budget. That’s because Error is selected
for the Convey Headcount Overshoot As field in the enterprise configuration.
A warning message is displayed, indicating that the FTE has exceeded the budget. That’s because Warning is selected
for the Convey FTE Overshoot As field in the enterprise configuration.
The Remaining Budget Amount Allocation value is 0, which means that it hasn’t exceeded the budget.
113

Oracle Fusion Cloud Human Resources
Implementing Global Human Resources
Chapter 6
Jobs and Positions
Approval Rule for Position Budgeting
You can create an approval rule to route the transaction for approval when any of the values exceed the budget. Use
these attributes to create approval rules:
• FTE Over Budget Percentage
• Headcount Over Budget Percentage
• Amount Over Budget Percentage
For example, you can create an approval rule indicating that if the percentage is within a certain limit, route the approval
notification to the regular approver, else route to different approvers.
The approval notification also displays the remaining position budget details for approvers to review before approving.
Key Points about Position Budgeting
Here are some key points about position budgeting:
• Allocate By on enterprise can’t be changed if budget definitions already exist.
• When the ORA_PER_POSITION_BUDGETING_ENABLED profile option is set to No, you can't load the budget
data using HDL.
• When the ORA_PER_POSITION_BUDGETING_ENABLED profile option is set to Yes, you can load the budget
data using HDL only if budget data doesn't exist already for the provided budget period.
• A budget period is currently for one calendar year.
• Budgetary Year will be an input in the HDL file and will be used along with the Budget Period Start Day and
Budget Period Start Month segments on the enterprise to identify and populate the Budget Period Start Date.
• Budget Period End Date is always one calendar year after the Budget Period Start Date.
• If you update your budget definition in between the budget period, then only the allocations can be modified.
• The current budget period’s budget definition won't be rolled over automatically to the next calendar year.
• Budget definition data for a maximum of 2 budget periods can exist in the table at any given point in time -
Past and Current, Current and Future, or only Current.
• If the budget table has data for 2 budget periods at a given point of time, then you need to delete the budget
data for one period in order to load the third period’s budget definitions.
• Budget Amount Currency on the position will be defaulted from the Budget Amount Currency specified at the
enterprise level, and it won’t be editable.
• If the Budgeted Position flag is enabled on the position and Allocate By includes Location, then the Location
field on the position will be required.
• For calculating the remaining budget values, only those active and budgeted positions will be considered, which
have an approved hiring status or a frozen hiring status with at least 1 incumbent as of the budget period end
date. While calculating the remaining balance, the position type isn’t considered, irrespective of whether the
type is Single, Shared, or Pooled.
• Validation will be applicable on all Redwood and responsive position pages.
• Validations and calculations of remaining allocations will take place only if a budget definition is present for the
calendar year in which the current date falls.
• The Remaining Budget, Remaining FTE, and Remaining Headcount attributes are available only on the
position details section of Redwood UIs.
114

Oracle Fusion Cloud Human Resources
Implementing Global Human Resources
Chapter 6
Jobs and Positions
• If the allocation for the next budget period is less than what you're already utilizing in the current budget
period, then once the next budget period starts, you will start seeing the warnings or errors while creating or
editing the positions. For example: In FY 2022-23, the allocation for FTE is 200 and you have utilized 150. In the
next FY 2023-24, if the new allocation for FTE is 120, then the FTE will be over budget by 30. So, you will see
warnings or errors while creating or editing positions.
• Approval notifications will always display the remaining balance percentage for the proposed changes of FTE,
Headcount, or Budget Amount.
• Enterprise configuration related to budgeting is also migrated when you migrate your enterprise configuration
using the Functional Setup Manager (FSM) export and import functionality.
• Position budget data isn't migrated using the export and import functionality in Functional Setup Manager
(FSM).
• Database Items (DBI) and User Entities (UE) aren't yet available for position budget data.
Position Synchronization
If position synchronization is enabled, assignments inherit specified values from the associated position.
Synchronized Attributes
You can select any of the following attributes for synchronization when position synchronization is enabled:
• Department
• Job
• Location
• Grade
• Grade Ladder
• Manager
• Full Time or Part Time
• Regular or Temporary
• Assignment Category
• FTE and Working Hours
• Start Time and End Time
• Probation Period
• Union, Bargaining Unit and Collective Agreement
• Synchronize Mapped Flexfields
Position Changes
All active assignments that are synchronized from position automatically inherit changes from the position. Assignment
attributes synchronized from position automatically inherit changes from the position. For those attributes not
synchronized from position, you can either retain the existing values or update values from the position.
115

Oracle Fusion Cloud Human Resources
Implementing Global Human Resources
Chapter 6
Jobs and Positions
The Review page in the Edit Position page displays the list of impacted assignments with a status for each assignment.
The status indicates if there are any issues due to the position change. You must correct all errors before submitting the
position changes.
Assignment Changes
When you change the position in existing assignments you have a choice whether to inherit the values for those
attributes which aren't synchronized from the position. If you choose not to inherit, then the previous values remain
unchanged.
Position Synchronization Configuration Changes
If the position synchronization configuration is changed after person and assignments are created, then the
Synchronize Person Assignment from Position process must be run to apply the changes in assignments.
Position Hierarchy Configuration Changes
When the manager is synchronized from the HCM position hierarchy and you change the parent position, all
assignments inherit the new manager from the current parent position. When you remove a position from the hierarchy,
all child positions move one level up in the hierarchy. Hence, the grandparent position is the new parent position.
The incremental flattening process is triggered when you add or change a parent position. The flattening process will
update the changes in the position hierarchy.
When you change the position in an existing assignment, the manager value is updated based on the parent position of
the changed position. If the parent position doesn't have an incumbent, the incumbent in the position in the next level
up in the hierarchy is the new manager.
Uploading Changes Using HCM Data Loader and Workers REST API
When you create or update assignments using HCM Data Loader or Workers REST API, you can synchronize them from
positions. In this case, you must:
• Enable position synchronization before you load the assignments. If you enable it after the assignments are
loaded, then you can synchronize from positions for current and future dates only.
• Set the Synchronize from Position (Position Override) attribute on the employment terms or assignment
object to Y.
After loading the assignments using HCM Data Loader or Workers REST API, you must run the Synchronize Person
Assignments from Position process to synchronize the assignments.When you run the process, set the Past Period
to Be Considered in Days parameter to an appropriate value. For example, if you set this parameter to 60 days, then
any assignment records with start dates during the previous 60 days are synchronized from positions. By default, Past
Period to Be Considered in Days is set to 30 days.
Note: If you're using the Compensation Workbench to promote your workers and have enabled position
synchronization, then after running the Transfer Workforce Compensation Data to HR process, you need to also
run the Synchronize Person Assignments from Position process. This will update the other synchronized position
attributes in the assignment.
116

Oracle Fusion Cloud Human Resources
Implementing Global Human Resources
Chapter 6
Jobs and Positions
Related Topics
•
How Assignment Values Are Inherited from Position
•
Synchronize Person Assignment from Position Process
Set Up Position Synchronization
Position synchronization is inheritance of values in an assignment from the values specified in the associated position.
You can enable position synchronization at the enterprise and legal entity levels using the Manage Enterprise HCM
Information and Manage Legal Entity HCM Information tasks (in the Setup and Maintenance work area) respectively.
Enterprise Level Setup
You can enable position synchronization either at the enterprise or the legal employer levels. Select the Enable Position
Synchronization attribute in the Edit Enterprise page to enable position synchronization for the enterprise. By default,
this attribute is deselected. You can also specify whether the inherited values can be overridden at the assignment level.
If you enable position synchronization at the legal entity and the enterprise levels, then the settings specified at the
legal employer level takes precedence over the settings specified at the enterprise level.
Legal Employer Level Setup
Set the Enable Position Synchronization attribute to Yes in the Position Synchronization page to specify the attributes to
be configured with the position for the legal employer.
Select No for the Enable Position Synchronization attribute, to exclude a specific legal employer.
You can also use the same settings as defined for the enterprise. In this case, you must select the Use Enterprise
option, which is the default value. If position synchronization is configured at the enterprise level, then the assignment
inherits the attribute values from the position selected. You can also override these values at the assignment level.
Enabling Position Synchronization Post Setup
Here are the steps to enable position synchronization for the enterprise or legal entity post setup..
1. On the Home page, under My Client Groups tab, click the Show More link to access more quick actions.
2. Navigate to Workforce Structures > Manage Enterprise HCM Information page or Manage Legal Entity
HCM Information page.
3. Under Position Synchronization Configuration section, select the attributes that you want to synchronize.
4. Select the Allow Override at the Assignment option if you want to exclude an assignment from
synchronization.
5. Using HCM Data Loader, you need to update all assignments that you want to must be synchronized from the
position (as of the date you want to enable position synchronization).
6. Set the Synchronize from Position (position override check in HCM Data Loader) attribute on these
assignments to Y. This enables position synchronization even if you don't want to allow override at the
assignment.
7. Run the Synchronize Person Assignments from Position process to synchronize the assignments.
117

Oracle Fusion Cloud Human Resources
Implementing Global Human Resources
Chapter 6
Jobs and Positions
Related Topics
•
Synchronize Person Assignment from Position Process
How Assignment Values Are Inherited from Position
If you enable position synchronization, assignments inherit specified values from the associated position. You can also
specify whether the inherited values can be overridden in the assignment.
You can specify this at the enterprise and legal entity levels using the Manage Enterprise HCM Information and Manage
Legal Entity HCM Information tasks respectively.
Overriding of Assignment Values
When you enable position synchronization, you specify which attributes the assignment inherits from the position
due to synchronization. Assignment attributes synchronized from position inherit their values from the position and
aren't editable. The restriction on editing values in the assignment applies only to the information that's entered in the
position. For example, if the Bargaining Unit isn't entered in the position, you can edit this value in the assignment even
though it's one of the attributes inherited from the position. If override is allowed at the assignment level, then you can
specify at the assignment level whether you want to synchronize from position or not. By default, the Synchronize from
Position attribute on the Edit Assignments page is set to Yes. If you prevent override at the assignment level, users can't
update the specified attributes that the assignment has inherited from the position. You can use personalization to
enable managers to specify a value for the Synchronize from Position field.
You can choose to either retain the existing values in the assignment or update the values from the position for any
attributes that aren't synchronized. So, if you don't select the grade attribute for synchronization and update the grade
value in the position, you can either retain the existing grade value in the assignment or update it from the position.
If a synchronized attribute is empty at the position, then this attribute won't be synchronized in the assignment. You can
enter any value for this attribute in the assignment. If a value already exists for this attribute, it will be retained and you
can change it to any other value.
Let’s see how assignments are impacted when position and position synchronization details are modified using
different applications.
Parameters Responsive
Employment Flows
HDL or HSDL REST Request a Position
Change - Impacted
Assignments
Synchronize Person
Assignment from
Position Process
Position Attributes Yes Yes Yes Yes Yes
Position Flexfields Yes
Note: Only if the
mapping is defined
for the assignment
flexfield.
N/A N/A N/A Yes
Manager from
Position Hierarchy
Yes N/A N/A N/A Yes
118

Oracle Fusion Cloud Human Resources
Implementing Global Human Resources
Chapter 6
Jobs and Positions
Parameters Responsive
Employment Flows
HDL or HSDL REST Request a Position
Change - Impacted
Assignments
Synchronize Person
Assignment from
Position Process
Manager from
Position
Yes N/A N/A Yes Yes
Synchronize Reports
from Position
Hierarchy
N/A N/A N/A N/A Yes
Calculate FTE as per
Position Working
Hours
Yes N/A N/A N/A Yes
For example, if position synchronization is enabled and you change the position in the responsive employment flows,
all position parameters are synchronized except direct reports. If you load the position parameters changes using HCM
Data Loader (HDL), HCM Spreadsheet Data Loader (HSDL), or REST, then only the position attributes are synchronized.
The Synchronize Person Assignment from Position process updates all assignments irrespective of the application used.
These are some key points to note.
• Position attributes are synchronized irrespective of the application used for the update.
• Position flexfields are synchronized in responsive employment flows and when you run the Synchronize Person
Assignment from Position process. Flexfield data can also be updated in responsive employment flows.
• Line manager is defaulted from the position hierarchy in responsive employment flows, and when you run the
Synchronize Person Assignment from Position process.
• Line manager is defaulted from the position in responsive employment flows, when there is change in the
position, and when you run the Synchronize Person Assignment from Position process.
• Direct reports can be synchronized only when you run the Synchronize Person Assignment from Position
process.
• The assignment FTE is recalculated when you change the standard working hours, and the FTE and working
hours are selected attributes for synchronization.
• FTE is calculated based on the position working hours in responsive employment flows and when you run the
Synchronize Person Assignment from Position process.
For more information on the attributes that can be synchronized, refer to the topic Position Synchronization.
Note: If you choose to specify your own values for an assignment, then that assignment won't be synchronized with
any future position changes.
Synchronize Assignment Action Reason From Position
You can synchronize the action reason in assignments with the action reason specified when a position is updated using
these flows and process.
• Update Position (from Position Details)
• Request a Position Change
119

Oracle Fusion Cloud Human Resources
Implementing Global Human Resources
Chapter 6
Jobs and Positions
• Synchronize Person Assignments from Position ESS process
The action reason is synchronized in the assignment if these conditions are satisfied.
• Position synchronization is enabled at the legal entity level.
• Action reason attribute is selected for synchronization in the position synchronization setup.
• Action reason is specified in the selected position.
• Synchronization from Position action has associated reasons configured.
• Action reason specified in the position is one of the reasons associated with Synchronization from Position
(ORA_POS_SYNC) action and to action of type Update Position (PER_POS_UPD)
• At least one of the synchronized attributes is updated in the position apart from action reason.
A point to note is that the action reason is synchronized only when the first position synchronization record is created in
the assignment. If there’s a correction in the position, then all changed attributes from position will be synchronized in
the assignment apart from the action reason.
How You Enable Action Reason Synchronization
You need to enable position synchronization at the enterprise or legal entity level. These are the steps to enable position
synchronization at the enterprise-level.
1. On the Home page, click My Client Groups > Workforce Structures.
2. Click the Manage Enterprise HCM Information task.
3. Click Edit > Update.
4. Click OK.
5. In the Position Synchronization Configuration section, select Enable Position Synchronization and Action
Reason check boxes. Select any other attributes for synchronization.
6. Click Review to check your changes.
7. Click Submit.
8. Click OK.
After position synchronization is enabled, let's add action reasons to the Synchronization from Position and Update
position actions.
1. On the Home page, click My Client Groups > Workforce Structures.
2. Click the Configure Actions task.
3. Search for Synchronization from Position (ORA_POS_SYNC) action.
4. Click Continue.
5. In the Action Reasons section, Click Associate to associate the action reasons with the action.
6. Click Ok.
7. Click Submit.
8. Click Configure Actions task
9. Search for and click Update (PER_POS_UPD) action.
10. Click Continue in the Action section.
11. Click Associate and add the same action reason you added to the Synchronization from Position action, for
example, Promotion.
12. Click Ok.
13. Click Submit.
120

Oracle Fusion Cloud Human Resources
Implementing Global Human Resources
Chapter 6
Jobs and Positions
Example of Action Reason Synchronization in
Assignments
You can synchronize the action reason in the position with the action reason in the assignment. Let's understand how
this works with an example.
Position synchronization is enabled at the Global Business Institute enterprise level and department, job, full time or
part time, and action reason attributes are enabled for synchronization.
There are 3 positions - Architect, Sales Manager, and Director with these action reasons and jobs respectively.
Position Info
Position Name Action Reason Job
Architect Promotion Software Development
Sales Manager Organization Change Sales Manager - SAAS
Director Assignment Change Director - Operations
The Synchronization from Position action is associated with only promotion and Organization Change action reasons
and the Update Position action is associated with Assignment Change and Organization Change action reasons.
Action Reason Info
Action Associated Action Reason
Synchronization from Position
• Promotion
• Organization Change
Update Position
• Assignment Change
• Organization Change
Assignment Info
Person Position Job Action Reason Updated Job Updated Action
Reason
John Doe Architect Software Development NA NA (no update in the
assignment action
reason)
Bonnie Vickers Sales Manager Sales Manager - SAAS NA Software Development Organization Change
David Steward Director Director - Operations NA Software Development (no update in the
assignment action
reason)
121

Oracle Fusion Cloud Human Resources
Implementing Global Human Resources
Chapter 6
Jobs and Positions
Action Reason Synchronization in Assignment
• John Doe - There is no update in the assignment action reason because none of the attributes were updated in
the Architect position.
• Bonnie Vickers - The Sales Manager position was updated with a new job and the action reason specified
in the position is Organization Change. The Organization Change action reason is associated with both -
Synchronization from Position and Update position actions. Since all conditions are met, the assignment is
updated with the Organization Change action reason.
• David Steward - Though the Director position was updated with a new job, but the action reason (Assignment
Change) wasn't updated in the assignment because the action reason is associated only with Update Position
action type and not the Synchronization from Position action.
Synchronize Assignment Flexfields From Position
Flexfields
You map position flexfields with assignment flexfields using the Manage Assignment Flexfields Mapping task in the
Functional Setup Manager.
Use the task to map assignment descriptive flexfield segments to position descriptive flexfield segments. Synchronizing
mapped flexfields includes the following steps:
1. Define flexfield mapping
2. Enabling flexfield synchronization
3. Synchronizing assignment flexfields from position flexfields
Define Flexfield Mapping
To map flexfields, follow these steps.
1. In the Functional Setup Manager, click the Manage Assignment Flexfields Mapping task.
2. Specify the following information.
Field Description
Source Context
The context for the position descriptive flexfield. If you want to map a global position flexfield
segment, leave the source context blank
Source Segment
The position descriptive flexfield segment of the selected context or the global segment if the
context was left blank
Destination Context
The context for the assignment descriptive flexfield you want to map the position flexfield to.
If you want to map it to a global assignment flexfield segment, leave the destination context
blank.
Destination Segment
The assignment descriptive flexfield segment of the selected assignment context or the global
segment if the context was left blank.
122

Oracle Fusion Cloud Human Resources
Implementing Global Human Resources
Chapter 6
Jobs and Positions
Field Description
Enterprise Configuration: Enable
Position Synchronization
Specify whether you want to use this flexfield mapping for position synchronization for the
enterprise. Leave this field blank if the flexfield mapping applies to a specific legal employer.
Legal Employer Configuration: Legal
Employer
Use this option if the flexfield mapping doesn't apply to the enterprise. You can select multiple
legal employers. Select the legal employer.
Legal Employer Configuration: Enable
Position Synchronization
Specify whether you want to use this flexfield mapping for position synchronization for the
selected legal employer.
3. Add more mappings as required and specify information described in step 2 for each row.
4. Save the mapping.
Enabling Flexfield Synchronization
To enable flexfield synchronization, follow these steps.
1. In the Setup and Maintenance work area, click the Manage Enterprise HCM Informationtask to enable the
setting for the enterprise, or click the Manage Legal Entity HCM Information task to enable the setting for a
specific legal entity.
2. Click Edit and select Update.
3. Select the Enable Position Synchronization and Synchronize Mapped Flexfields check boxes in the Position
Synchronization Configuration section.
4. Click Submit.
Synchronizing Assignment Flexfields from Position Flexfields
To synchronize assignment flexfields from position flexfields, follow these steps.
1. In the Navigator, click Scheduled Processes.
2. Click Schedule New Process.
3. Run the Synchronize Person Assignments from Positions process.
Related Topics
•
Position Synchronization
•
Considerations for Flexfield Mapping in Position Synchronization
•
Synchronize Person Assignment from Position Process
123

Oracle Fusion Cloud Human Resources
Implementing Global Human Resources
Chapter 6
Jobs and Positions
Considerations for Flexfield Mapping in Position
Synchronization
You map position descriptive flexfields to assignment descriptive flexfields using the Manage Assignment Flexfield
Mapping task in Oracle Fusion Functional Setup Manager.
Use this mapping to automatically populate values for those assignment flexfields mapped to the position flexfields,
when position synchronization is enabled. This topic describes what to consider when you're mapping flexfields.
Enterprise or Legal Entity Levels
Before you map flexfields, you must decide whether you want the mapping to be available for the enterprise or for
specific legal entities only. You can reuse a mapping across different legal entities. Settings at the legal employer level
takes precedence over enterprise settings, if both are specified.
You need to define the enterprise or legal employer mapping for each position flexfield segment by selecting each row
corresponding to the flexfield segment.
Note: If you have defined position synchronization at the legal employer level and haven’t defined flexfield mapping
for a legal employer, the position flexfields won’t be synchronized at the assignment for that legal employer.
Context Specific or Global
You must decide whether to map context specific or global flexfield segments because you can't map a context specific
flexfield segment to a global flexfield segment. You can't map two or more segments of different contexts or multiple
position segments to the same assignment segment.
When you change the position value in an assignment, all synchronized global segments inherit the value from the new
position. You can manually update those segments that have a blank value in the position.
When you change the position value in an assignment, all context specific segments inherit the value from the new
position. If the new position has similar values to the old position and additional contexts defined, the assignments
retain the same values and inherit the additional values from the new position.
Selecting and removing a position in an assignment makes the context and segments editable but the current values
aren't removed if they're synchronized from the position.
Numeric or Character
You can map flexfields of the same type (for example, numeric-to-numeric or character-to-character only), same
precision, and the same value set (same value set ID).
Related Topics
•
Position Synchronization
•
Considerations for Managing Descriptive Flexfields
124

Oracle Fusion Cloud Human Resources
Implementing Global Human Resources
Chapter 6
Jobs and Positions
Synchronize Person Assignment from Position Process
To synchronize the position changes with the affected assignments, run the Synchronize Person Assignments
from Position process. The Initialize Position Synchronization process to load position synchronization changes is
incorporated into the Synchronize Person Assignments from Position process.
The Synchronize Person Assignments from Position process is triggered in these scenarios.
Assignment
• Assignment update causing a date-effective split.
• Direct report assignment change because of change in assignment. This might be due to either position
change or termination of the manager.
Position
• Position update causing a date-effective split.
• Parent position change.
Position Synchronization Configuration
• Position synchronization configuration update either at the enterprise or the legal entity level.
Run the Synchronize Person Assignment from Position to:
• Update affected assignments in the enterprise or legal entity if position synchronization is enabled (either
initially or later, as a change).
• Prevent data corruption
• Synchronize the line manager based on the HCM position hierarchy.
• Synchronize action reason based on the position action reason and the available action reasons under
Synchronization from Position action.
• Update assignments affected by the position changes, uploaded using HCM Data Loader.
Note: You must schedule this process to run on a regular basis. If you’re synchronizing the manager, then it's
recommended to run this process daily.
Use the Schedule New Process page in the Scheduled Processes work area to run the Synchronize Person Assignment
from Position process.
Before you run the process, you must enable position synchronization on the Manage Enterprise HCM Information or
Manage Legal Entity HCM Information tasks in the Setup and Maintenance work area
Process Parameters
Past Period to Be Considered in Days
Number of days in the past to be considered for updating the attribute in the assignments. The default value is 30
days. Note that even if position synchronization was enabled in the past and you loaded position data with an effective
date of 6 months back, you don’t need to specify 180 days as the number of days. This is because the process detects
the effective date and the last updated date of the position data. You can enter 2 days as the parameter value though
changes are effective 6 months back.
125

Oracle Fusion Cloud Human Resources
Implementing Global Human Resources
Chapter 6
Jobs and Positions
Run at Enterprise Level
Select Yes to run the process for the enterprise, or No to run it for a specific legal entity.
Legal Entity
Legal entity for which you want to run the process.
Process Results
This process updates all affected assignments with the changes from the position. This includes:
• Changes due to position synchronization.
• Past or future-dated changes to the position hierarchy.
• Rollback of line manager changes in assignments for reverse termination.
• Line manager hierarchy changes
• Flexfield-mapping changes.
• Changes in position loaded using HCM Data Loader
HCM Position Hierarchy
Position hierarchy defines positions' relationships. The HCM position hierarchy is built based on these relationships.
You enable the HCM position hierarchy on the Manage Enterprise HCM Information page in the Setup and Maintenance
work area.
When you enable HCM position hierarchy:
• You can specify the parent position for a position on the Create and Edit Position pages in the Workforce
Structures work area. When you search for positions based on a parent position, it will show all child positions
for the specific parent position.
• You can also use the hierarchy to synchronize the line manager in the assignment from the line manager value
in the parent position.
• You can view the positions that are part of the HCM position hierarchy on the My Team page and view the
incumbents for a position.
• You can inactivate a position only if an incumbent with an inactive assignment exists.
Note: You can open the existing HCM Position Hierarchy from the Redwood Positions read-only page by clicking the
HCM Position Hierarchy option in the Actions drop-down menu.
Updating the Position Hierarchy
You can only correct the HCM position hierarchy. You can enable or disable the position hierarchy configuration by
flattening the existing hierarchy. You must run the Synchronize Person Assignments from Position process to flatten the
position hierarchy.
When the position hierarchy is flattened, then schedule to run the Synchronize Person Assignments from Position
process. This will apply the manager changes in assignments if the position hierarchy is changed after person and
assignments are created. The assignment changes can exist on the current date, date in the future, or in the past.
126

Oracle Fusion Cloud Human Resources
Implementing Global Human Resources
Chapter 6
Jobs and Positions
You can't change the position hierarchy configuration if the line manager is synchronized based on the HCM position
hierarchy. However, if line manager synchronization was configured as of a date in the past, then you can correct the
position hierarchy configuration.
Graphical Position Hierarchy
The HCM position hierarchy shows the relationship between positions and their parent positions. You can view and edit
the hierarchy on the HCM Position Hierarchy page, if your data security profile allows you.
You can identify a position's parent on the Manage Positions page if the Use HCM Position Hierarchy option is enabled
for the enterprise.
The nodes of the position hierarchy represent positions and parent positions. You can:
• Add child positions under a position either by creating a new position or by selecting an existing position as the
child.
• Create a copy of an existing position by specifying a new name and code. The rest of the information is copied
from the original position to the copy. You can change any information that you want.
• Edit the position.
• View the incumbent details including name, person type, person number, position entry and exit dates, and
their status as of the current date.
• Delete any position that doesn't have any incumbents or child positions.
In each position node, you can view:
• Position name and code.
• Business unit, job, department, and location.
• Number of incumbents for the position.
• Open Full Time Equivalent (FTE)
• Current incumbents in the position.
How You Create a Graphical Position Hierarchy
Vision Corporation is reorganizing its workforce and defining the hierarchy for all positions. You must create a position
hierarchy as shown here.
127

Oracle Fusion Cloud Human Resources
Implementing Global Human Resources
Chapter 6
Jobs and Positions
The following table summarizes the key decisions for this scenario.
Decisions to Consider In this Example
Which business unit do these positions
belong?
Vision Corp. US
What is the method for position code
generation?
Manual
You must do the following before creating the position hierarchy:
1. On the Manage Enterprise HCM Information page, enable HCM Position Hierarchy.
128

Oracle Fusion Cloud Human Resources
Implementing Global Human Resources
Chapter 6
Jobs and Positions
2. Ensure you have the Manage HCM Position Hierarchy privilege, which enables you to update the hierarchy.
3. Create the following positions -Executive Vice President, Vice President, Senior Sales Manager, and Senior
Operations Manager.
4. Display additional fields on the Create and Edit Position pages using personalization, if required.
Add a Parent Position to an Existing Position
1. On the My Client Groups tab, click Workforce Structures.
2. On the Manage Positions page, search and select the Vice President position.
3. On the Position: Vice President page, click Edit and select Update.
4. Select Reorganization.
5. Click OK.
6. Search and select the Executive Vice President position as the parent position.
7. Click Review.
8. Click Submit.
9. Click Yes.
10. Click OK.
Create a New Child Position
1. On the HCM Position Hierarchy page, click the orange arrow icon in the Vice President node and select Create
Child Position.
2. On the Create Child Position page, enter the following details:
Field Value
Name
Sales Director
Code
SALES_DIR
Job
Director
Type
Single Incumbent
FTE
1
Headcount
1
3. Click Save and Close.
4. For the Vice President node, repeat steps 1 and 2 using the following details:
Field Value
Name
Operations Director
129

Oracle Fusion Cloud Human Resources
Implementing Global Human Resources
Chapter 6
Jobs and Positions
Field Value
Code
OPS_DIR
Job
Director
Type
Single Incumbent
FTE
1
Headcount
1
5. Click Save and Close.
Add an Existing Position as a Child Position
1. In the Sales Director node, click the orange arrow icon and select Add Existing Position as a Child.
2. Search and select the Senior Sales Manager position.
3. Click OK.
4. On the Edit Position: Senior Sales Manager page, click Save and Close.
5. In the Operations Director node, click the orange arrow icon and select the Add Existing Position as Child
option.
6. In the Select Position window, search and select the Senior Operations Manager position.
7. Click OK.
8. On the Edit Position: Senior Operations Manager page, click Save and Close.
Create Duplicate Positions
1. In the Senior Sales Manager node, click the orange arrow icon. and select Duplicate Position.
2. On the Create Duplicate Position page, enter the following details:
Field Value
Name
Sales Manager
Code
SALES_MGR
Type
Single Incumbent
FTE
1
Headcount
1
130

Oracle Fusion Cloud Human Resources
Implementing Global Human Resources
Chapter 6
Jobs and Positions
3. Click Save and Close.
4. In the Senior Operations Manager node, click the orange arrow icon. and select Duplicate Position.
5. On the Create Duplicate Position page, enter the following details:
Field Value
Name
Operations Manager
Code
OPS_MGR
Type
Single Incumbent
FTE
1
Headcount
1
6. Click Save and Close.
Move the Sales Manager Node
You added the Sales Manager node under the Sales Director node instead of under the Senior Sales Manager node. You
can drag the node and drop it on the Senior Sales Manager node.
1. Select the Sales Manager node and drop it on the Senior Sales Manager node. The Sales Manager position
automatically becomes a child of the Senior Sales Manager position.
If you created a node in a wrong place, you can just drag and drop the node to the correct place. The hierarchy
automatically adjusts itself when you do so.
Review and Submit the Position Hierarchy Changes
1. On the HCM Position Hierarchy page, click Review. This page shows the positions that you added to the
hierarchy or the changes made to existing positions.
2. Click Submit.
3. Click Yes.
4. Click OK. If approval rules are set up, you'll be able to see the hierarchy changes after they are approved/
Parent Position Isn’t Defaulted for Professional Users
In the Request a New Position process and the Create Position page, the parent position is defaulted to the parent
position of the currently logged in user.
This helps managers as they often create a position in their team. A line manager requests a new position from the My
Team tab. In the Position details step of the process, the parent position is defaulted from the logged-in user.
131

Oracle Fusion Cloud Human Resources
Implementing Global Human Resources
Chapter 6
Jobs and Positions
For the professional user, it's less likely that the new position is within their own team. So the parent position isn’t
defaulted in the Request a New Position process if it’s opened from the My Client Groups tab. The parent position is
blank, and you need to select a value from the drop-down list.
Similarly, when a professional user creates a new position from the Positions quick action, the parent position isn’t
defaulted. In the New Position page, the parent position is blank, and it’s not defaulted to the parent position of the
currently logged in user. You need to select the parent position from the drop-down list.
Considerations for Using Position or Position Hierarchy
for Synchronizing Assignment Manager
To select a line manager synchronization option for the enterprise or for individual legal entities, use the Manage HCM
Enterprise Information and Manage HCM Legal Entity Information in the Setup and Maintenance work area respectively.
This topic discusses the line manager synchronization options available.
HCM Position Hierarchy
Use the HCM Position Hierarchy to synchronize the line manager on the assignment with the incumbent of the parent
position in the position hierarchy.
When there is a change in the position hierarchy, you need to run the Synchronize Person Assignments from Position
process to update the affected assignments. Alternately, when you update a position using the HCM Data Loader also
you must run the Synchronize Person Assignments from Position process for the assignments to inherit the position
changes. For example, if a position is moved under a different parent position, if there are any direct reports they're
automatically reassigned to the incumbent in the new parent position. If there is no manager in the parent position, the
application checks for the incumbent in the grandparent position, or until it finds an incumbent. If there are multiple
incumbents in a parent position, the incumbent with the longest tenure in the position is assigned as the new manager,
You can change the manager to the other incumbent on the Employment page.
If you move a position or remove it from the hierarchy, the grandparent position becomes the new parent position for
all the child positions. For example, if you have a hierarchy as follows: Manager (grandparent), Team lead (parent), and
Developer (child), and you move the Team Lead position to a different branch. The Manager position is the new parent
position for the Developer position.
Note: If you're using HCM position hierarchy, remove the function privilege for the Manage Position Trees task in the
Setup and Maintenance work area for your users. You can also hide the Manager field on the Create Position and Edit
Position pages using personalization if you synchronize the line manager using position hierarchy.
Position Manager
Use the position manager to synchronize the line manager on the assignment with the line manager defined for the
position. You can use this option if you're not using the HCM Position Hierarchy and want to manually maintain the
manager at the position. .
Related Topics
•
Guidelines for Loading Positions
132

Oracle Fusion Cloud Human Resources
Implementing Global Human Resources
Chapter 6
Jobs and Positions
How You Route Position Approvals
You can route position approval rules to incumbents in the parent position instead of just the initiator’s hierarchy.
The routing of approvals to incumbents in the parent position is for these processes:
• Create Position
• Edit Position
• Request New Position
• Request Position Change
The position approval can be routed to either All Parent Position Incumbents or to a specific Identified Parent
Position Incumbent.
Routing Options for Position Approvals
Routing Option Description
All Parent Position Incumbents Approval notification will be routed to all incumbents in the parent position.
Identified Parent Position Incumbents Approval notification will be routed to only a specific incumbent in the parent position.
The incumbent to whom the approval will be routed depends on the value defined in the ORA_PER_
POS_INCUMBENT_TENURE_ASG_SUP profile option:
• Longest tenure in assignment
• Longest tenure in enterprise
• Longest tenure in position
• Shortest tenure in enterprise
• Shortest tenure in position
This diagram describes how position approvals work.
133

Oracle Fusion Cloud Human Resources
Implementing Global Human Resources
Chapter 6
Jobs and Positions
You can define the approvals to be routed to either all incumbents or only a specific incumbent in the parent position. To
route the approval to a specific incumbent only, you need to set the appropriate value in the profile option.
Examples of Tenure Calculation
Let’s look at how the tenure is calculated for the purpose of approval routing to a specific incumbent in some of these
scenarios.
1. Multiple Managers in Parent Position in Single Assignment and Assignment Changes
Two managers, Amit Shukla and Donna Smith are in the same position. The former spent the longest in the same
assignment and the latter spent the longest tenure in the enterprise but with changes in assignment.
Employee Action Date Position Status Tenure Comments
Amit Shukla Hire 1-Jan-2009 Assistant Manager Active 12 years Active in the
position for 12
years
Donna Smith Hire 1-Jan-2000 Assistant Manager Active 5 years NA
Donna Smith Change
Assignment
1-Jan-2005 Sales Analyst Active 6 years NA
134

Oracle Fusion Cloud Human Resources
Implementing Global Human Resources
Chapter 6
Jobs and Positions
Employee Action Date Position Status Tenure Comments
Donna Smith Change
Assignment
1-Jan-2010 Assistant Manager Active 11 years Adding the tenure
for the Assistant
Manager position,
16 years (11 + 5)
Even if the profile
value was set to
Longest Tenure
in Enterprise, the
approval will be
routed to Donna
Smith.
2. Multiple Managers in Parent Position in Single Assignment and with Inactive Assignment
Two managers, Amit Shukla and Jason King are in the same position. The former spent the longest in the same
assignment and the latter spent the longest tenure in the enterprise but was transferred to a different legal employer
(global transfer).
Employee Action Date Position Status Tenure Comments
Amit Shukla Hire 1-Jan-2009 Assistant Manager Active 12 years Active in the
position for 12
years
Jason King Hire 1-Jan-2005 Assistant Manager Active 6 years NA
Jason King End Assignment 31-Dec-2010 Sales Analyst Inactive NA The last day of
this assignment
is 31-Dec-2010.
The effective
start date of the
assignment's
inactive status is 1-
Jan-2011.
Jason King Add Assignment 1-Jan-2010 Assistant Manager Active 11 years Adding the tenure
in the Assistant
Manager position
and removing the
overlap period, we
get:
16 years (6 + 11 - 1 )
years
(Overlap Removed)
3. Multiple Managers in Parent Position in Single Assignment and with Rehire
Two managers, Amit Shukla and Paul Smith are in the same position. The former spent the longest in the same
assignment and the latter spent the longest tenure same assignment and position even after being rehired into the
same position.
135

Oracle Fusion Cloud Human Resources
Implementing Global Human Resources
Chapter 6
Jobs and Positions
Employee Action Date Position Status Tenure Comments
Amit Shukla Hire 1-Jan-2009 Assistant Manager Active 12 years Active in the
position for 12
years
Paul Smith Hire 1-Jan-1995 Assistant Manager Active 6 years NA
Paul Smith Termination 31-Dec-2000 Assistant Manager Inactive NA NA
Paul Smith Rehire 1-Jan-2010 Assistant Manager Active 11 years Adding the tenure
the person is
active in the given
position: 17 years
(6 + 11) years
Note: If more than one incumbent fulfills the tenure criteria, then the person record creation date and time are
considered for approval routing.
Profile Option for Routing Position Approvals
The Identified Parent Position Incumbent option is based on the ORA_PER_POS_INCUMBENT_TENURE_ASG_SUP
profile option.
By default, this profile option is set to Longest tenure in assignment.
Use the Manage Administrator Profile Values task in the Setup and Maintenance work area to configure this profile
option. Search for and select the ORA_PER_POS_INCUMBENT_TENURE_ASG_SUP profile option. Select one of these
profile values as required, to meet your enterprise requirements.
Profile Option Value Description
Longest tenure in assignment The approval is routed to the parent position incumbent with the longest tenure in the assignment.
This option considers both, active and suspended assignments.
This is the default value.
Longest tenure in enterprise The approval is routed to the parent position incumbent with the longest tenure in the enterprise. This
option considers only active assignments.
Longest tenure in position The approval is routed to the parent position incumbent with the longest tenure in the position. This
option considers only active assignments.
Shortest tenure in enterprise The approval is routed to the parent position incumbent with the shortest tenure in the enterprise. This
option considers only active assignments.
Shortest tenure in position The approval is routed to the parent position incumbent with the shortest tenure in the position. This
option considers only active assignments.
136

Oracle Fusion Cloud Human Resources
Implementing Global Human Resources
Chapter 6
Jobs and Positions
Route Position Approvals to the Representative of the Parent Position
Incumbent
You can also route position approvals to the representative of the incumbents of the parent position for these processes:
• Request New Position
• Request Position Change
• Edit Position
• Delete Position
• Delete Date Effective Position Record
Suppose you want to route the Request New Position approval to the representative of the incumbent of the parent
position. While configuring the approval rule for the Request New Position process, select the following:
• Representative in the Approvers list
• A value for Representative Type
• Identified Parent Position Incumbent's Representative in the Representative Of LOV
Now, when you create a new position using the Request a New Position UI by associating a parent position which has
incumbents with representatives, the approval is routed to the Identified Parent Position Incumbent's Representative.
Related Topics
•
Workforce Structures Profile Options
Upload Workforce Structures Using a Spreadsheet
Using a spreadsheet, you can upload multiple objects at a time, for the following workforce structures:
• Jobs
• Locations
• Departments
For example, to upload multiple jobs at a time:
• Select Manage Jobs in the Workforce Structures work area
• Display the Create menu
• Select Create in Spreadsheet
Uploading Using a Spreadsheet
For each workforce structure, you can do the following:
• Download a predefined spreadsheet template from the application
• Work on the spreadsheet offline, and upload the spreadsheet to the application when your changes are
complete
• Upload the spreadsheet multiple times to accommodate revisions
137

Oracle Fusion Cloud Human Resources
Implementing Global Human Resources
Chapter 6
Jobs and Positions
Effective Start Date
Ensure that the effective start date of the workforce structure is same as or earlier than the hire date of persons
associated with the workforce structure; for example, enter a job start date earlier than the hire date of persons
associated with the job. You may want to consider creating all objects as of a common early date, for example, create all
locations with the start date 1-1-1950.
Entering Descriptive Flexfield Values
Use the Attribute columns in the main sheet to enter values for the descriptive flexfields that are already defined for the
object. Use the DFF Reference sheet to understand which attribute columns map to which descriptive flexfields, since
this information isn't displayed in the main sheet.
Note: You can't enter values in the DFF Reference sheet, you can only view details of the descriptive flexfields.
Uploading Jobs Using a Spreadsheet
When uploading jobs using a spreadsheet, you:
• Can't create a new job profile
• Can only associate an existing job profile
• Must enter the name of an existing job profile in the spreadsheet
Related Topics
•
Guidelines for Using Desktop Integrated Excel Workbooks
FAQs for Jobs and Positions
What's the difference between a job set and a job family?
A job family is a group of jobs that have different but related functions, qualifications, and titles. They are beneficial for
reporting. You can define competencies for job families by associating them with model profiles.
A job set is an organizational partition of jobs. For example, a job set can include global jobs for use in all business units,
or jobs for a specific country or line of business. When you select a job for a position or an assignment, you can view the
available jobs in your business unit set and the common set.
Related Topics
•
What's a job set?
138

Oracle Fusion Cloud Human Resources
Implementing Global Human Resources
Chapter 6
Jobs and Positions
Why can't I see the position code for the new position?
Based on your enterprise settings, the position code is generated after the Create Position transaction is approved. For
example, once the transaction is approved, you can see the position code on the Position Details page.
When can I enable position synchronization?
You can enable position synchronization at any time but if there are existing assignments in an enterprise or legal
employer, you can enable it only as of the current or future date.
If you update an assignment as of a past date the values from the new position won't be updated in the assignment.
For example, if you create a transfer as of a past date before enabling position synchronization, the values from the new
position won't be updated in the assignment.
What happens if I specify a parent position?
You can specify a parent position when you enable HCM position hierarchy using the Manage Enterprise HCM
Information task in the Setup and Maintenance work area. A parent position is one, which is the next position up in the
position hierarchy.
On the Manage Positions page, click the parent position link to view the position details and click the icon next to the
parent position to refresh the search with the parent position.
As a prerequisite, you specify a parent position to synchronize the line manager from the parent position. When you
select to synchronize the line manager using the position hierarchy the incumbent in the parent position is populated as
the new manager.
Related Topics
•
Position Synchronization
What happens if I specify the standard working hours in a
position?
In an assignment, the standard working hours are inherited from the position. The working hours and the standard
working hours provided in the position are used to calculate the FTE (Full Time Equivalent) in the assignment.
If there is a FTE value already existing in the position, you can choose to update it based on the ratio of the working
hours to standard working hours.
When position synchronization is enabled, even if FTE value exists for the position, it is not copied to the assignment
during synchronization. Instead, the assignment FTE value is calculated as a ratio of working hours to standard working
hours, if specified.
139

Oracle Fusion Cloud Human Resources
Implementing Global Human Resources
Chapter 6
Jobs and Positions
What happens when grades are synchronized?
The profile options to default or enforce valid grades are ignored when grades are synchronized.
If multiple valid grades exist at the position, then you can select an appropriate grade in the assignment. If you hire a
person into the position, which has an entry grade specified, then the entry grade will be the default value in case of
multiple valid grades.
If the assignment has both position and job, then synchronization from the position always takes precedence and the
values at the job will be ignored. Let's say you haven't defined any valid grades for the position. However, valid grades
are defined for the job and the assignment has a position. Then any valid grades for the job are ignored.
How can I exclude some assignments from position
synchronization?
If you want to use position synchronization only for a section of workers, you need to enable position synchronization at
the legal employer level.
To exclude some assignments from synchronization, select Allow Override at the Assignment in the Position
Synchronization Configuration section on the Manage Enterprise HCM Information page.
To exclude a specific assignment from synchronization, select No in the Synchronize from Position field in the
assignment (even if override is allowed). All read-only fields become editable but the assignment won't be synchronized
and will no longer inherit any changes made at the position level. However, it isn't possible to exclude only some
synchronized attributes.
How do I override position synchronization at the attribute level?
If you want to capture a different value for one attribute only, leave that attribute blank at the position
Let's say the location attribute is synchronized from the position but except in a few cases it doesn't matter into which
location the person is hired, then you can leave the location field blank at the position. Since blank values aren't
synchronized, the location will be editable in the assignment enabling you to select a value manually.
What happens if I select Synchronize Mapped Flexfields?
When you select this option, assignment flexfields are synchronized with the mapped position flexfields.
You must first map position flexfields to assignment flexfields using the Manage Assignment Flexfield Mapping task
in the Functional Setup Manager, and then select this option in the Manage Enterprise HCM Information task. When
position synchronization is enabled, the position flexfields are inherited in the assignments.
140

Oracle Fusion Cloud Human Resources
Implementing Global Human Resources
Chapter 7
Grades, Grade Rates, and Grade Ladders
7 Grades, Grade Rates, and Grade Ladders
Grades
From the Manage Grades page, create grades to record the level of compensation for workers.
You can do these actions.
• Create grades for multiple pay components, such as salary, bonus, and overtime rates
• Define one or more grades that are applicable for jobs and positions
This list of valid grades, combined with the settings for two profile options, enables you to restrict the grades that can
be selected when you set up assignments for a worker.
Grades and Sets
You assign each grade to a set. If you assign a grade to the common set, then the grade is available for use in all
business units. To limit a grade to a single business unit, you can assign it to a set that's specific to that business unit.
Grade Steps
Grade steps are distinct increments of progression within a grade. You can set up grades with or without grade steps.
141

Oracle Fusion Cloud Human Resources
Implementing Global Human Resources
Chapter 7
Grades, Grade Rates, and Grade Ladders
The following figure illustrates the difference between grades with and without steps.
Grade Rates
Grade rate values are the compensation amounts associated with each grade. You can set up rates at the same time that
you create grades, or set them up independently from grades.
For grades with steps, you set up the step rates when you include them in a grade ladder. Grade rates are optional.
Grade Ladders
You can combine grades into grade ladders to group your grades or grades with steps in the sequence in which your
workers typically progress. For example, you might create three grade ladders for your enterprise: one for technical
grades, another for management grades, and a third for administrative grades.
Related Topics
•
Grade Rates
•
Grade Ladders
•
How Grades and Grade Rates Work with Jobs, Positions, Assignments, Compensation, and Payroll
•
Examples of Grades, Grade Rates, and Grade Ladders
142

Oracle Fusion Cloud Human Resources
Implementing Global Human Resources
Chapter 7
Grades, Grade Rates, and Grade Ladders
Grade Rates
Grade rates contain the pay values that are related to each grade.
Grade rate values can be either a fixed amount or a range of values, and you can set up rates for different types of pay
such as salary, overtime, and bonuses.
Note the following:
• Grade rates for some jobs or positions might include an hourly salary rate and an overtime rate.
• Grade rates for other jobs or positions might contain a salary rate type with a range of amounts and a bonus
rate type with a fixed amount.
• Grade rates typically serve only as a guideline to validate that the salary you propose during the compensation
process for a worker on a certain grade is appropriate for that grade.
This figure illustrates a grade that has two rate types associated with it: Salary rate type that has a range of valuesBonus
rate type with a fixed amount
This figure illustrates a different grade that has two rate types associated with it:Salary rate type that has a fixed
amountOvertime rate type that also has a fixed amount
143

Oracle Fusion Cloud Human Resources
Implementing Global Human Resources
Chapter 7
Grades, Grade Rates, and Grade Ladders
Rate Types
The types of rates that you can set up depend on the values for lookup type GRADE_PAY_RATE_TYPE. Examples of rate
types are salary, bonus, and overtime pay.
Grade Rates and Legislative Data Groups
You assign a legislative data group to each grade rate. Depending on how your enterprise is configured, you may have
several legislative data groups. You can set up grades that are shared across different areas of your business, and enter
rates that are specific to each legislative data group.
Grade Rates and Grades
You can do the following:
• Set up grade rates when you set up grades
• Set up grade rates independently from grades
For grades with steps, you enter rates when you attach the grades to a grade ladder.
Related Topics
•
How Grades, Grade Rates, and Sets Work with Legislative Data Groups
•
How Grades and Grade Rates Work with Jobs, Positions, Assignments, Compensation, and Payroll
•
Examples of Grades, Grade Rates, and Grade Ladders
Grade Ladders
Grade ladders group grades and grades with steps in the sequence in which your workers typically progress.
You create grade ladders either from the Manage Progression Grade Ladders page (in the Compensation work area) or
from the Manage Grade Ladders page (in the Workforce Structures work area).
Grade ladders describe the grades and steps to which a worker is eligible to progress and compensation value
associated with that grade and step. You may create different grade ladders for your enterprise: one for technical grades,
another for management grades, and a third for administrative grades.
Ladders with Grades
You create ladders with grades by building a hierarchy of grades that were created without steps. When you set up
this type of ladder, only grades without steps are available to add to the ladder. You can't create a grade ladder with a
combination of both grades and grades with steps.
You don't define any grade rates when you set up a ladder with grades; the rates for the grades within the ladder are
inherited from the rates that were added when you set up the grades. To add or edit rates for grades, you must use the
Manage Grade Rates task.
144

Oracle Fusion Cloud Human Resources
Implementing Global Human Resources
Chapter 7
Grades, Grade Rates, and Grade Ladders
Ladders with Grade Steps
You create ladders with grade steps using grades that were created with steps. When you set up this type of ladder, only
grades with steps are available to add to the ladder.
You define step rates when you set up the ladder, and the rates are unique to each ladder. You can't share step rates
between grade ladders.
Related Topics
•
Grade Rates
•
Grades
•
Examples of Grades, Grade Rates, and Grade Ladders
•
How You Set Up Grade Ladders for Pay Scale Requirements
Lookup Types for Grades
The Lookup type for Grades task identifies the lookup type for managing grades that has an extensible configuration
level.
The GRADE_PAY_RATE_TYPE lookup type identifies compensation components you want to set up for grade rates. The
predefined values are salary, bonus, and overtime. Review these lookup values, and update them as appropriate to suit
enterprise requirements.
Grade Ladder on Worker Assignment
You can use the grade ladder in the worker assignment to ensure that workers are compensated according to the grade
structure defined in the job or position.
Selecting Grade Ladder for Worker Assignment
Transactions, such as New Hire, Add Assignment, and Create Work Relationship involve creating a new assignment.
During assignment creation, the grade ladder is automatically populated based on the selected job or position. This isn't
true for transactions that involve an assignment update (for example, promotion, transfer). You must manually select
the grade ladder when you update the assignment.
Note: The Grade Ladder field isn't displayed if a grade ladder isn't defined for the worker organization.
You must select from the grades populated for the grade ladder. If the selected grade includes steps, you can view
the steps and the associated salary rates by clicking the Grade Details icon. The step rate is displayed based on the
legislative data group associated with the assignment business unit.
The grade step progression process evaluates a worker's eligibility to progress to a new grade or step based on the
defined rules and updates the salary rate. The process can be run for workers associated with a particular grade ladder
to move them to a new grade or step and update their salary rate.
145

Oracle Fusion Cloud Human Resources
Implementing Global Human Resources
Chapter 7
Grades, Grade Rates, and Grade Ladders
If the grade ladder selected in the assignment is associated with an automatic grade step progression process, you can
exclude the worker from the process. To exclude the worker, deselect the Include in grade step progression check box.
Note: The Include in grade step progression check box isn't displayed if a grade ladder isn't defined for the worker
organization.
Related Topics
•
Grade Ladders
•
Grades
•
Grade Rates
How Grades, Grade Rates, and Sets Work with Legislative
Data Groups
You assign grades to sets, and grade rates to legislative data groups from the Workforce Structures > Manage Grade
Rates page.
If you have grades that are common across multiple business units, you can:
• Assign them to the set that's associated with business units.
• Set up grade rates that are specific to each legislative data group.
146

Oracle Fusion Cloud Human Resources
Implementing Global Human Resources
Chapter 7
Grades, Grade Rates, and Grade Ladders
The following figure illustrates how you can use sets to share grades across multiple business units and change the
grade rates for each legislative data group.
Grades and Sets
Sets enable you to share grades that are common across business units in your enterprise. You can assign grades to
either a specific set or to the common set to each grade. If you assign the grade to the common set, then the grade is
available for use in all business units.
Grade Rates and Legislative Data Groups
Grade rate values are associated with each component of compensation for your workers. While grades may be
common across different areas of your enterprise, grade rates vary among the countries in which you employ people.
For example, if your enterprise has engineer jobs in the United States, the United Kingdom, and Australia, you can
set up grades for a set that's shared between the countries, but set up different grade rates for each country in the
applicable currency.
147

Oracle Fusion Cloud Human Resources
Implementing Global Human Resources
Chapter 7
Grades, Grade Rates, and Grade Ladders
Related Topics
How Grades and Grade Rates Work with Jobs, Positions,
Assignments, Compensation, and Payroll
You use grades and grade rates in the following components of Oracle Fusion HCM to ensure that workers are
compensated according to the grade structure that you create.
• Jobs
• Positions
• Assignments
• Compensation
• Payroll
How Grades Work with Jobs and Positions
You can define one or more grades that are applicable for each job and position. Using this list of valid grades,
combined with the settings for two profile options you restrict the grades that can be selected when you set up
assignments for a worker.
Note the following:
• If you use positions, then the grades that you assign to jobs are the default grades for the positions that you
associate with each job.
• You can use the default grades for the position, remove ones that don't apply, or add new ones.
How Grades Work with Assignments
When you set up assignments, you can select the applicable grade for the job or position.
Two profile options determine the grades that are available for selection:
Profile Option Description
PER_ENFORCE_VALID_GRADES
If you set this site-level profile option to Yes:
• Users can select a grade only from the list that you defined for the job or position.
◦
If users select both job and position for the assignment, they can select grades that are valid for
the position only.
◦
If valid grades are defined for neither job nor position, then users can select from all grades.
If you set this site-level profile option to No:
• User can select from all the grades
• This is also the default value
148

Oracle Fusion Cloud Human Resources
Implementing Global Human Resources
Chapter 7
Grades, Grade Rates, and Grade Ladders
Profile Option Description
PER_DEFAULT_GRADE_FROM_JOB_
POSITION
If you set this site-level profile option to Yes and there is only one valid grade for a job or position:
• The grade is used by default in the assignment.
◦
If an entry grade is defined for a position, then that grade is used by default when the user creates
a new assignment.
If you set this site-level profile option to No:
• User can select from all the grades
• This is also the default value
How Grades and Grade Rates Work with Compensation and Payroll
Depending on the configuration of the legal employer to which workers belong, their salary can be stored at the
assignment level. The grade rate can be linked to the salary basis within the salary record, in which case their salaries
are validated using the grade rates.
For example, assume an assignment record for a worker indicates they're in Grade A1 with the salary of USD 40000.00:
• The grade rate range that's attached to Grade A1 is 30,000.00 USD to 50,000.00 USD. Therefore, the salary is
within the grade rate range and no warnings are issued.
• If their manager or a human resource (HR) specialist changes their salary to 55,000.00 USD, a warning is issued
that the new salary is outside their salary range.
In addition, compa-ratios and salary range positions for workers are calculated using the minimum and maximum
amounts that are defined in the grade rates for their grades.
Payroll elements reference grades in the eligibility criteria. For example, assume you want to process a bonus for all
workers who are at grade level A2. To accomplish this, you would create an earnings element for the bonus and specify
A2 for the grade in the eligibility criteria. The result of this setup, when combined with additional eligibility criteria that
may be applied by the bonus plan, is that when payroll is processed, workers who are at grade level A2 and who meet
the additional eligibility criteria would receive the bonus.
Related Topics
•
How Many Salary Bases to Create
Examples of Grades, Grade Rates, and Grade Ladders
The following examples illustrate how InFusion Corporation might set up different types of grades, rates, and ladders
for the different types of jobs within the company. The examples include grade structures for administrative workers,
managers, senior executives, and line workers.
Note: All amounts in the examples are US dollars.
149

Oracle Fusion Cloud Human Resources
Implementing Global Human Resources
Chapter 7
Grades, Grade Rates, and Grade Ladders
Grades with Steps
The grade structure for annual salary amounts for administrative workers in InFusion Corporation includes five grades,
and each grade includes five steps.
• When workers move from one grade to another in this ladder, they don't always start at step 1 of a grade.
• The next step is based on their previous salary plus two steps.
For example, a worker could move from Step 5 in Grade 1 to Step 3 in Grade 2.
The following table lists the five grades, steps, and the rates associated with them for administrative workers at InFusion
Corporation.
Grade Step 1 Step 2 Step 3 Step 4 Step 5
1
17, 803
18, 398
18, 990
19, 579
20, 171
2
20, 017
20, 493
21, 155
21, 717
21, 961
3
21, 840
22, 568
23, 296
24, 024
24, 752
4
24, 518
25, 335
26, 152
26, 969
27, 786
5
27, 431
28, 345
29, 259
30, 173
31, 087
To set up your grade structure to reflect this table, perform the following tasks:
• Set up five different grades and add five steps for each grade.
• Set up a grade ladder using the Grades with Steps type, and select all five grades.
• Set up step rates for annual salary amounts using the rates in the preceding table.
Grades Without Steps
The grade structure for annual salary amounts for level 3 managers at InFusion Corporation includes grades without
steps. The grade rates are fixed amounts.
The following table lists the grades and associated rates for level 3 managers at InFusion Corporation.
Grade Annual Salary Amount
1
103, 900
2
111, 800
3
119, 900
150

Oracle Fusion Cloud Human Resources
Implementing Global Human Resources
Chapter 7
Grades, Grade Rates, and Grade Ladders
Grade Annual Salary Amount
4
127, 800
5
135, 900
6
143, 700
7
151, 800
8
155, 500
To set up your grade structure to reflect this table, perform the following tasks:
• Set up eight separate grades.
• For each grade, enter the rates from the preceding table.
• Set up a grade ladder with the Grades type and add all eight grades to the ladder.
Grades with Grade Rate Ranges
The grade structure for annual salary amounts for senior executives at InFusion Corporation includes grades with no
steps, and the rates are set up using ranges.
The following table lists the rate range for senior executives at InFusion Corporation.
Grade Minimum Annual Salary Amount Maximum Annual Salary Amount
SNREXEC
154, 300
243, 900
To set up a grade structure to reflect this table, perform the following tasks:
• Create a single grade.
• Create a grade rate and enter the minimum and maximum amounts from the preceding table for the grade rate
range.
Grade Rates with Hourly Amounts
The grade structure for line workers at InFusion Corporation includes grades with steps, and the rates are hourly
amounts.
The following table lists the hourly rates for line workers at InFusion Corporation.
Grade Step 1 Step 2 Step 3 Step 4 Step 5
1
10.64
11.07
11.49
11.96
12.40
151

Oracle Fusion Cloud Human Resources
Implementing Global Human Resources
Chapter 7
Grades, Grade Rates, and Grade Ladders
Grade Step 1 Step 2 Step 3 Step 4 Step 5
2
11.77
12.27
12.76
13.24
13.72
3
12.92
13.46
13.98
14.55
15.07
4
14.03
14.63
15.21
15.80
16.39
5
15.20
15.83
16.46
17.12
17.75
To set up your grade structure to reflect this table, perform the following tasks:
• Create five grades, each with five steps.
• Set up a grade ladder using the Grades with Steps type, and select all five grades.
• Set up step rates for hourly amounts using the rates in the table.
How You Set Up Grade Ladders for Pay Scale
Requirements
This example illustrates how to use a grade ladder to create a pay scale that's typical of technicians in the metal industry
in Germany. The ladder includes four grades, and each grade includes four steps.
The following table summarizes key decisions for the grades, rates, and grade ladder in this scenario.
Decision to Consider In This Example
Are steps required for the grades?
Yes.
Which step in each grade should be the
ceiling step?
The last step in each grade.
What type of rates are necessary?
Salary rates only.
Will the ladder be created using grades or
grades with steps?
Grades with steps.
Summary of the Tasks
To set up the pay scale, complete these tasks:
• Create grades
• Create a grade ladder
152

Oracle Fusion Cloud Human Resources
Implementing Global Human Resources
Chapter 7
Grades, Grade Rates, and Grade Ladders
Create Grades
1. Under My Client Groups, In the Workforce Structures work area, click Manage Grades to open the Manage
Grades page.
2. On the Manage Grades page, click Create to open the Create Grade: Grade Details page.
3. In the Grade Details region of the Create Grade: Grade Details page, complete the fields as shown in this table,
using the default values unless otherwise indicated.
Field Value
Grade Set
Common
Name
Technicians 03
Code
Tech03
4. Click Next to access the Create Grade: Grade Steps page.
5. In the Grade Steps region of the Create Grade: Grade Steps page, click Add Row.
6. Add four steps for the grade by completing the fields as shown in this table. You must click Add Row after
adding each step.
Field Value
Step Name
Year 1
Step Name
Year 2
Step Name
Year 3
Step Name
Year 4
7. Verify that Year 4 is the ceiling step.
8. Click Submit. You will add the grade rates when you create the grade ladder.
9. In the Warning dialog, click Yes.
10. In the Confirmation dialog, click OK.
11. Repeat steps 2 through 9 to add three more grades with steps. Complete the information for each grade using
the information in these tables. The ceiling step in each grade is Year 4.
Field Grade 2 Grade 3 Grade 4
Grade Set
Common
Common
Common
153
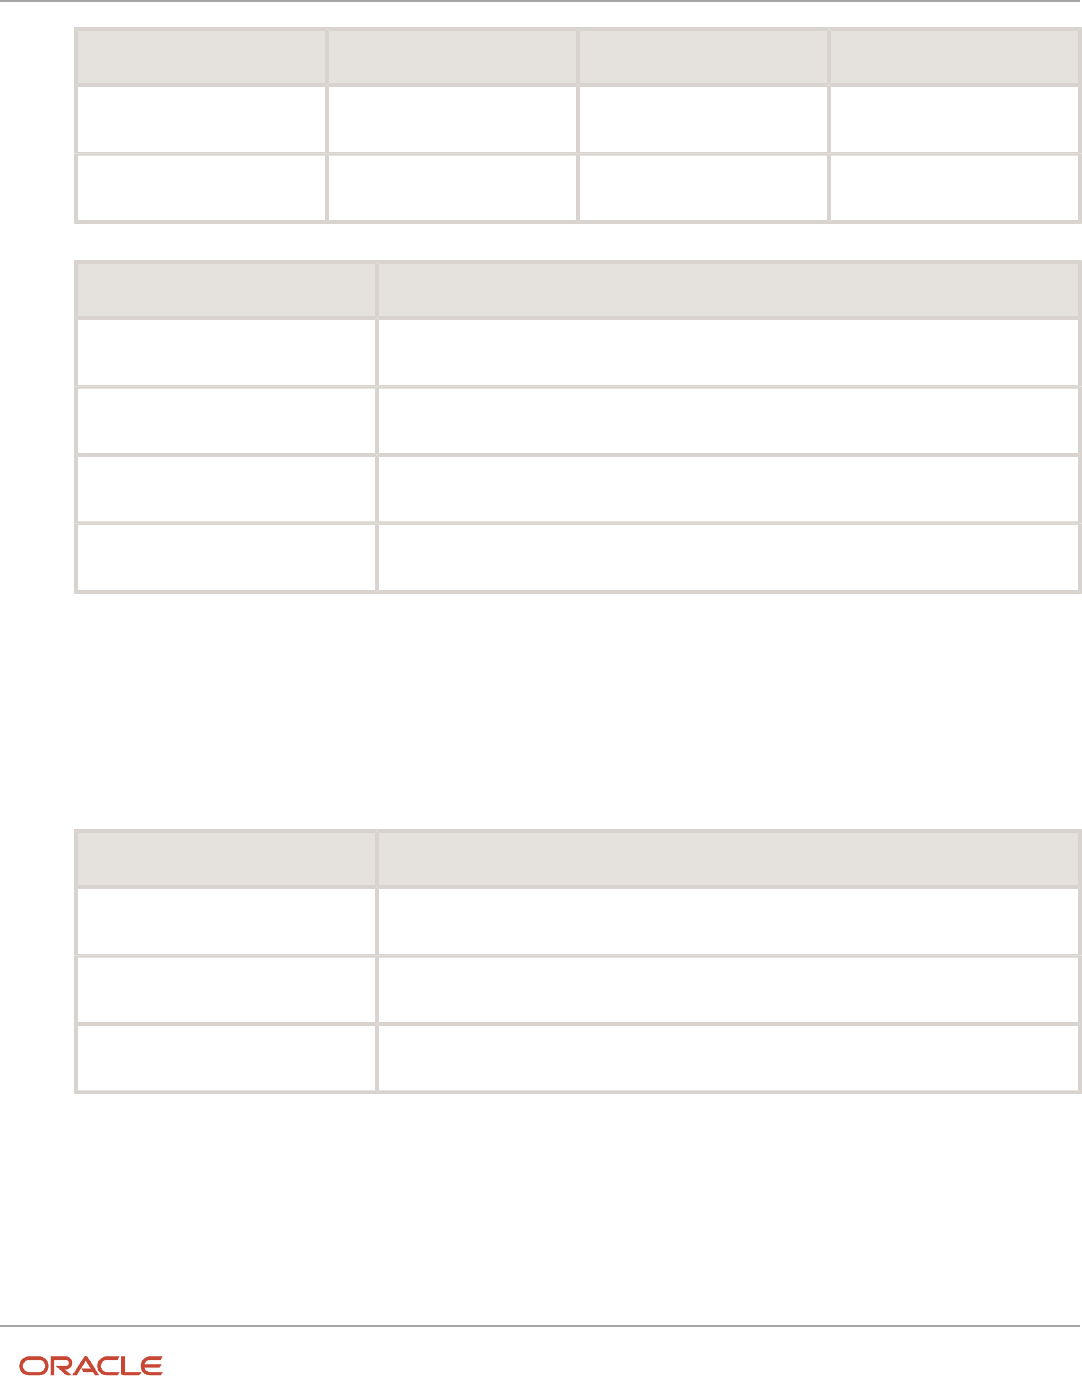
Oracle Fusion Cloud Human Resources
Implementing Global Human Resources
Chapter 7
Grades, Grade Rates, and Grade Ladders
Field Grade 2 Grade 3 Grade 4
Name
Technicians 04
Technicians 05
Technicians 06
Code
Tech04
Tech05
Tech06
Field Value
Step Name
Year 1
Step Name
Year 2
Step Name
Year 3
Step Name
Year 4
Create a Grade Ladder
1. In the Workforce Structures work area, click Manage Grade Ladders to open the Manage Grade Ladders page.
2. On the Manage Grade Ladders page, click Create to access the Create Grade Ladder: Grade Ladder Details
page.
3. In the Grade Ladder Details region of the Create Grade Ladder: Grade Ladder Details page, complete the fields
as shown in this table, using default values unless otherwise indicated.
Field Value
Grade Set
Common
Name
Metal Technicians
Grade Type
Grade with steps
4. Click Next to access the Create Grade Ladder: Grades page.
5. In the Search Grades region of the Create Grade Ladder: Grades page, enter TECH in the Code field and click
Search.
6. Select Tech03 and click Add to Grade Ladder.
7. Select Tech04 and click Add to Grade Ladder.
8. In the Add to Grade Ladder Hierarchy dialog, select At the top and click OK.
9. Select Tech05 and click Add to Grade Ladder.
10. In the Add to Grade Ladder Hierarchy dialog, select At the top and click OK.
154

Oracle Fusion Cloud Human Resources
Implementing Global Human Resources
Chapter 7
Grades, Grade Rates, and Grade Ladders
11. Select Tech06 and click Add to Grade Ladder.
12. In the Add to Grade Ladder Hierarchy dialog, select At the top and click OK.
13. Verify that the grades appear in numerical order, with Tech06 at the beginning of the ladder and Tech03 at the
end of the ladder.
14. Click Next to access the Create Grade Ladder: Rate Values page.
15. On the Create Grade Ladder: Rate Values page, select the legislative data group for Germany.
16. In the Grade Step Rates region, click Add Row.
17. Complete the following fields as shown in this table.
Field Value
Name
Technician Ladder Rates
Rate Type
Salary
Frequency
Monthly
Annualization Factor
12
Currency
EUR
18. In the Step Rate Values region, enter rates for the four steps in each grade by completing the fields as shown in
this table.
Grade Name Step Name Value
Technicians 03
Step 1
1,750.73
Technicians 03
Step 2
1,878.90
Technicians 03
Step 3
2,009.79
Technicians 03
Step 4
2,143.92
Technicians 04
Step 1
2,238.57
Technicians 04
Step 2
2,408.39
Technicians 04
Step 3
2,577.68
Technicians 04 Step 4 2,744.81
155

Oracle Fusion Cloud Human Resources
Implementing Global Human Resources
Chapter 7
Grades, Grade Rates, and Grade Ladders
Grade Name Step Name Value
Technicians 05
Step 1
2,831.87
Technicians 05
Step 2
3,047.14
Technicians 05
Step 3
3,257.52
Technicians 05
Step 4
3,469.00
Technicians 06
Step 1
3,586.36
Technicians 06
Step 2
3,851.38
Technicians 06
Step 3
4,122.34
Technicians 06
Step 4
2,143.92
19. Click Next.
20. On the Create Grade Ladder: Review page, review the grade ladder hierarchy and the rates, and click Submit.
21. In the Warning dialog, click Yes.
22. In the Confirmation dialog, click OK.
Related Topics
•
Example of Setting Up Grade Ladders for Spine Point Requirements
•
Examples of Grades, Grade Rates, and Grade Ladders
Example of Setting Up Grade Ladders for Spine Point
Requirements
This example illustrates how you can use grades, rates, and a grade ladder to represent spine points. You manage grade
ladders using the Manage Grade Ladders task in the Workforce Structures work area.
Spine Points
Some public sector organizations in the United Kingdom (UK) use spine points to structure their grades. Each spine
point corresponds to one or more steps within a grade, as grades often overlap each other.
156

Oracle Fusion Cloud Human Resources
Implementing Global Human Resources
Chapter 7
Grades, Grade Rates, and Grade Ladders
Grade Structure
You can use grade ladders to meet the requirements of a grade structure with spine points. The following table
illustrates a grade structure with spine points that's similar to the one used for university workers in the UK.
To set up grades for the spine point structure, you must:
• Create three grades with steps and name each step using the spine point number.
• Create a grade ladder with all three grades.
• Create step rates with annual salary amounts.
Resulting Grades, Rates, and Grade Ladder
The following table lists the grades and steps needed to meet the requirements of the grade structure with spine points.
Grade Name Steps Ceiling Step
Grade 1
• Spine Point 1
• Spine Point 2
Spine Point 5
157

Oracle Fusion Cloud Human Resources
Implementing Global Human Resources
Chapter 7
Grades, Grade Rates, and Grade Ladders
Grade Name Steps Ceiling Step
• Spine Point 3
• Spine Point 4
• Spine Point 5
• Spine Point 6
Grade 2
• Spine Point 6
• Spine Point 7
• Spine Point 8
• Spine Point 9
• Spine Point 10
• Spine Point 11
• Spine Point 12
Spine Point 11
Grade 3
• Spine Point 12
• Spine Point 13
• Spine Point 14
• Spine Point 15
• Spine Point 16
• Spine Point 17
Spine Point 17
The following table lists the grades, steps, and rates to add to the ladder.
Grade Name Steps Rates
Grade 1
• Spine Point 1
• Spine Point 2
• Spine Point 3
• Spine Point 4
• Spine Point 5
• Spine Point 6
• 25, 674
• 26, 631
• 27, 068
• 27, 796
• 30, 394
• 31, 778
Grade 2
• Spine Point 6
• Spine Point 7
• Spine Point 8
• Spine Point 9
• Spine Point 10
• Spine Point 11
• Spine Point 12
• 31, 778
• 32, 648
• 33, 542
• 34, 466
• 35, 425
• 38, 441
• 39, 510
Grade 3
• Spine Point 12
• Spine Point 13
• 39, 510
• 40, 634
158

Oracle Fusion Cloud Human Resources
Implementing Global Human Resources
Chapter 7
Grades, Grade Rates, and Grade Ladders
Grade Name Steps Rates
• Spine Point 14
• Spine Point 15
• Spine Point 16
• Spine Point 17
• 41, 746
• 42, 914
• 44, 118
• 45, 358
Related Topics
•
Examples of Grades, Grade Rates, and Grade Ladders
•
How You Set Up Grade Ladders for Pay Scale Requirements
FAQs for Grades, Grade Rates, and Grade Ladders
Can I edit the legislative data group for a grade rate?
No. If you need to change the legislative data group for a grade rate, you must change the grade rate to inactive and
create a new grade rate with the correct legislative data group.
How can I add rates to grade steps?
Rates can be added to a grade with steps, when you add the grade to a grade ladder.
What's the difference between grade ladders and progression
grade ladders?
Grade ladders group grades and grades with steps in the sequence in which your workers typically progress.
Progression grade ladders are hierarchies used to group grades and steps and define their sequence.
They include the associated progression rules and rates for each grade and step within the ladders. Oracle Fusion
Human Capital Management has both a Grade Ladder and a Progression Grade Ladder For a specific grade ladder
definition; you should use one of these, but not both.
The differences between them are:
Progression Grade Ladders Grade Ladder
• Viewed in Manage Progression Grade
Ladders page in Compensation work
area
• Viewed in Manage Grade Ladders page in Workforce Structures work area
159

Oracle Fusion Cloud Human Resources
Implementing Global Human Resources
Chapter 7
Grades, Grade Rates, and Grade Ladders
Progression Grade Ladders Grade Ladder
• Required if you're using grade step
progression or rate synchronization
processes
• Enables population of worker salary
record from grade or step rates
during employment transactions
• Only one rate (grade rate or step rate)
allowed per progression grade ladder
• Associated with a single legislative
data group
How can I edit rates for a grade?
You can edit rates using the Manage Grade Rates task. However, you can't edit rates within the Manage Grades task,
because grades and rates have separate effective dates.
What's a grade ladder hierarchy?
The grade ladder hierarchy consists of grades. You can move the grades up and down within the hierarchy, and add or
remove grades. You can click any grade to view the details.
What's a ceiling step?
A ceiling step is typically the highest step within a grade to which a worker may progress. When a worker reaches the
ceiling step within a grade, typically any further progress must be made by moving the worker to another grade.
You can override the ceiling for individual assignments. In most cases, the ceiling step is the last step in the sequence.
For example, if the grade has steps 1 through 5, step 5 is the ceiling step. However, you may have situations where you
want another step to be the ceiling. For example, in a grade with steps 1 through 5, you might indicate that step 4 is the
ceiling step, and workers can progress from step 1 to step 4, and then on to the next grade. You can use step 5 when
a worker isn't entitled to move to the next grade, perhaps because he doesn't yet have the required qualifications or
certificates, but you still want to increase his pay to reward him for many years of experience and good performance.
You can provide the pay increase by moving him to step 5.
160
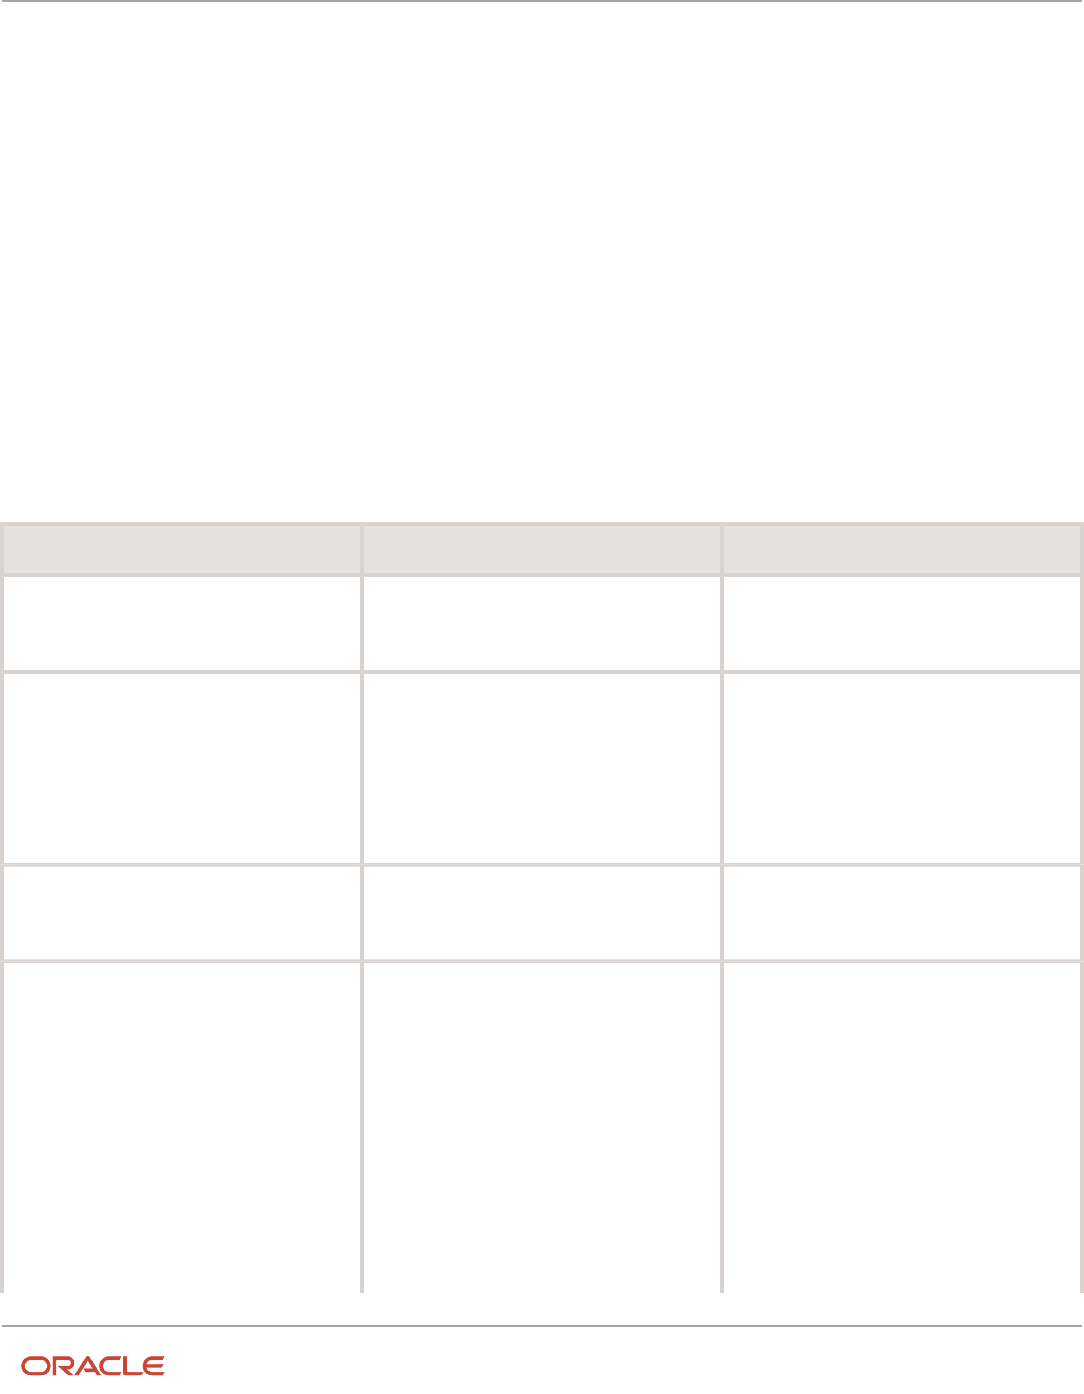
Oracle Fusion Cloud Human Resources
Implementing Global Human Resources
Chapter 8
Workforce Structures - Configuration Options
8 Workforce Structures - Configuration
Options
Workforce Structures Enterprise-Level Configuration
Let's look at the different configuration options for workforce structures and the minimum search characters
configuration for each workforce structure at the enterprise-level.
Workforce Structure Configuration Options
You can configure workforce structure-related options at the enterprise level using the Manage Enterprise HCM
Information task in the Setup and Maintenance work area. This table provides the description and default value for each
option.
Option Description Default Value
Default Effective Start Date You can default the effective start date when
creating workforce structure objects such as
position, job, location and so on in responsive
and classic pages.
None
Default Location Country You can default a country for the location at
the enterprise level. This defaults the selected
country under the country field (Main Address)
from Location Details (Add) Quick Actions.
If the country value is not defaulted at
Enterprise setup then the default country is
United States
None
Default Evaluation System You can set a default evaluation system at
the enterprise level which would default the
specified evaluation system for both job and
position
None
Guided Flows: Future-Dated Records Validation You can use this option to control whether
users can update work structures with future-
dated records using the self-service work
structure related pages. You can select from
these values:
• None: No validation is displayed.
• Error: An error message is displayed
indicating that the work structure has
a future-dated record, and the user
is prevented from updating the work
structure.
• Warning: A warning message is displayed
indicating that the work structure has a
future-dated record. The user can choose
None
161

Oracle Fusion Cloud Human Resources
Implementing Global Human Resources
Chapter 8
Workforce Structures - Configuration Options
Option Description Default Value
to ignore the message and continue with
the transaction.
Initial Position Code You can specify the initial position for your
enterprise when you generate the code
automatically.
The application uses this number for the first
record that you create using the automatic
position code setting and increments the
number by one for subsequent records. By
default, the initial code is 1.
1
Initial Job Code You can specify the initial job for your
enterprise when you generate the code
automatically.
The application uses this number for the first
record that you create using the automatic job
code setting and increments the number by one
for subsequent records. By default, the initial
code is 1.
1
Job Code Generation Method You can generate a code for job workforce
structure. Use the Manage Enterprise HCM
Information task in the Workforce Structures
work area to configure the code generation
method for jobs for your enterprise.
You can generate the job code in one of these 3
ways:
• Manually
• Automatically prior to submission
• Automatically upon final save
None
Position Code Generation Method You can generate a code for position workforce
structure. Use the Manage Enterprise HCM
Information task in the Workforce Structures
work area to configure the code generation
method for positions for your enterprise.
You can generate the position code in one of
these 3 ways:
• Manually
• Automatically prior to submission
• Automatically upon final save
None
Minimum Search Characters
You can define the minimum number of characters to search for workforce structure objects using the Manage
Enterprise HCM Information task in the Setup and Maintenance work area.
162

Oracle Fusion Cloud Human Resources
Implementing Global Human Resources
Chapter 8
Workforce Structures - Configuration Options
The minimum search characters are used to search for the name and code for each search page depending on the
number of objects. For performance reasons, the minimum value is 1.
Note: If your organization has a detailed department structure with a large number of departments, it's
recommended that you use 3 characters to search for departments. But, if you have a few departments, then you can
set the value to 1 character to make the search easier.
Workforce Structure Minimum Search Suggested Characters Default Value
Grade 1 None
Grade Ladder 1 None
Grade Rate 1 None
Job 2 None
Job Family 1 None
Location 1 None
Organization 3 None
Position 2 None
Effective Start Date Defaults
You can set the default effective start date for workforce structure objects in responsive and classic pages using the
Manage Enterprise HCM Information task in the Setup and Maintenance work area.
This table lists the behavior of the effective date on responsive and classic pages in certain scenarios.
Scenario Behavior in Responsive Pages Behavior in Classic Pages
Default Effective Start Date field is blank on
the Manage Enterprise HCM Informtion page
and an effective date isn't specified on the
search pages.
Current date is defaulted when creating a new
workforce structure.
1-Jan-1951 is defaulted when creating a new
workforce structure.
Default Effective Start Date field is blank on
the Manage Enterprise HCM Informtion page
and an effective date is selected on the search
pages.
Current date is defaulted when creating a new
workforce structure.
When you search for a workforce structure
using an effective date, then this date is
defaulted when creating a new workforce
structure from the search page .
Default Effective Start Date isn't blank on
the Manage Enterprise HCM Informtion page
and an effective date is selected on the search
pages.
Configured default date specified for the
enterprise is defaulted when creating a new
workforce structure.
When you search for a workforce structure
using an effective date, then this date is
defaulted when creating a new workforce
structure from the search page ..
Default Effective Start Date field on the
Manage Enterprise HCM Information page isn't
blank and an effective date isn't specified on
the search pages.
Configured default date specified for the
enterprise is defaulted when creating a new
workforce structure.
Configured default date specified for the
enterprise is defaulted when creating a new
workforce structure.
163

Oracle Fusion Cloud Human Resources
Implementing Global Human Resources
Chapter 8
Workforce Structures - Configuration Options
Workforce Structures Profile Options
Use the Manage Administrator Profile Values task in the Setup and Maintenance work area to manage profile options.
You can configure these workforce structure-related profile options as required, to meet your enterprise requirements:
Profile Option Code Profile Display Name Default Value Description
ORA_PER_ALLOW_GLOBAL_
CAGR_ON_POSITIONS
Allow global Collective Agreements
on Position
No Allow global Collective Agreements
to be associated to a Position.
ORA_PER_DEPARTMENT_LOV_
STARTSWITH_NUMROWS
Search LOV Departments Starts
With Row Count Threshold
10000 Enable department search to start
with characters entered when row
count is high. Row count is across
organization units, organization
unit classifications, location details
and sets
ORA_PER_DEPTTREE_LOV_
STARTSWITH_NUMROWS
Search LOV Department Tree
Nodes Starts With Row Count
Threshold
10000 Enable department tree node
search to start with characters
entered when row count is high.
Row count is across department
tree nodes, organization units/
classifications
ORA_PER_ENABLE_
DEPARTMENT_TITLE
Title Attribute in Departments
Enabled
N Enable the Title attribute in
Departments.
ORA_PER_GRADESTEP_LOV_
STARTSWITH_NUMROWS
Search LOV Grade Steps Starts
With Row Count Threshold
10000 Enable grade step search to start
with characters entered when row
count is high. Row count includes
rows across tables for grade steps
ORA_PER_GRADE_LOV_
STARTSWITH_NUMROWS
Search LOV Grades Starts With
Row Count Threshold
10000 Enable grade search to start with
characters entered when row count
is high. Row count includes rows
across tables for grades and sets
ORA_PER_JOB_LOV_
STARTSWITH_NUMROWS
Search LOV Jobs Starts With Row
Count Threshold
10000 Enable job search to start with
characters entered when row count
is high. Row count includes rows
across tables for jobs, job families
and sets
ORA_PER_LOCATION_LOV_
STARTSWITH_NUMROWS
Search LOV Locations Starts With
Row Count Threshold
10000 Enable location search to start
with characters entered when row
count is high. Row count includes
rows across tables for locations,
territories and sets
ORA_PER_LOV_COMPACT_
DEPARTMENT_SEARCH
Department LOV Compact Search
Enabled
No Enable compact search to use only
department name when searching
for departments
ORA_PER_LOV_COMPACT_JOB_
SEARCH
Job LOV Compact Search Enabled No Enable compact search to use only
job name and code when searching
for jobs
164

Oracle Fusion Cloud Human Resources
Implementing Global Human Resources
Chapter 8
Workforce Structures - Configuration Options
Profile Option Code Profile Display Name Default Value Description
ORA_PER_LOV_COMPACT_
LOCATION_SEARCH
Location LOV Compact Search
Enabled
No Enable compact search to use only
location name and code when
searching for locations
ORA_PER_LOV_COMPACT_
POSITION_SEARCH
Position LOV Compact Search
Enabled
No Enable compact search to use only
position name and code when
searching for positions
ORA_PER_ORGTREE_LOV_
STARTSWITH_NUMROWS
Search LOV Departments Starts
With Row Count Threshold
10000 Enable organization tree node
search to start with characters
entered when row count is high.
Row count is across organization
tree nodes, organization units/
classifications
ORA_PER_POSITIONTREE_LOV_
STARTSWITH_NUMROWS
Search LOV Position Tree Nodes
Starts With Row Count Threshold
10000 Enable position tree node search
to start with characters entered
when row count is high. Row count
is across position tree nodes,
positions, organization units/
classifications
ORA_PER_POSITION_LOV_
STARTSWITH_NUMROWS
Search LOV Positions Starts With
Row Count Threshold
10000 Enable position search to start with
characters entered when row count
is high. Row count includes rows
across tables for positions, jobs
and departments
ORA_POS_HIRING_STATUS_FILTER ORA_POS_HIRING_STATUS_FILTER N Enable Position List of Values
filtering based on Hiring Status.
In pending worker pages, the
position LOV isn't filtered, but
instead an error message is shown
if the user selects a position that
isn't approved for hiring. The same
validation also applies when using
HCM Data Loader (HDL). The
position filtering doesn't apply for
nonworkers.
ORA_PER_POS_NUM_VALID_
GRADES_ALLWD
Number of Valid Grades Allowed
on a Position
0 Specify a number between 1 and
5 to restrict the number of valid
grades allowed on a position.
Select 0 to specify any number of
valid grades.
ORA_PER_MATCH_POS_GRADES_
WITH_JOB_GRADES_ENABLED
Validation to Match Position's Valid
Grades With Job Valid Grades
N Enable validation to match valid
grades on the position with valid
grades of the job.
Note: Compact Search/NUMROWS Profile Options – For all the above listed Compact Search Profiles a scheduled
process, "Optimize Workforce Structures LOV to Use Starts With" runs automatically on a daily basis. The process
switches the search from 'contains' to 'starts with' for all large workforce structures LOVs when the row threshold is
exceeded. The default for the threshold for the number of rows is 10,000. You can change the default value as per
your requirements. You can set it to 0 if you don't want the application to change the LOV search. This is because the
scheduled process won’t consider the profile option if the value is <= 0, or if it contains a non-numeric character.
165

Oracle Fusion Cloud Human Resources
Implementing Global Human Resources
Chapter 8
Workforce Structures - Configuration Options
Workforce Structures Lookups
This topic identifies common lookups that are work structure-related and have user or extensible configuration levels.
Review these lookups and update them as appropriate to suit enterprise requirements. You review lookups using the
Manage Common Lookups task in the Setup and Maintenance work area.
Lookup Type Description Configuration Level
BARGAINING_UNIT_CODE Identifies a legally organized group of people
which has the right to negotiate on all aspects
of terms and conditions with employers or
employer federations. This is applicable for
positions.
User
EVAL_SYSTEM Identifies the evaluation system used for the job
or position.
Extensible
EVAL_SYSTEM_MEAS Measurement unit for evaluation criteria on job
or position
Extensible
GRADE_PAY_RATE_TYPE Shows rate types like salary, bonus, and over
time.
Extensible
JOB_FUNCTION_CODE Description of the primary function of a job.
Used for grouping and reporting jobs of like
function.
User
MANAGER_LEVEL Description of the seniority of a manager on the
job
User
PROBATION_PERIOD Specifies the unit of measurement for the
Probation Period of a Position. For example,
365 "Day", 52 "Week", 12 "Month", 1 "Year", and
so on.
Extensible
SECURITY_CLEARANCE Classifies if security clearance is needed. Extensible
Workforce Structures Flexfields
Use the Manage Descriptive Flexfields and Manage Extensible Flexfields tasks in the Setup and Maintenance work area
to manage flexfields. You can configure these workforce structure-related flexfields as required, to meet your enterprise
requirements:
Application Table Name Descriptive Flexfield Code Name Used Availability
Organizations
HR_ALL_ORGANIZATION_
UNITS_F
PER_ORGANIZATION_
UNIT_DFF
Organization Attributes For storing additional
information on
organizations
Available for use.
166

Oracle Fusion Cloud Human Resources
Implementing Global Human Resources
Chapter 8
Workforce Structures - Configuration Options
Application Table Name Descriptive Flexfield Code Name Used Availability
HR_ORGANIZATION_
INFORMATION_F
PER_ORGANIZATION_
INFORMATION_EFF
Organization Information
EFF
For storing additional
organization information
as single and multiple
row extensible flexfield
contexts.
Available for use.
Grade and Grade Rates
PER_GRADES_F PER_GRADES_DF Grade Additional Details For storing additional grade
information.
Available for use.
PER_GRADE_LEG_F PER_GRADES_LEG_EFF Grade Legislative
Information
For storing additional
legislative information
for grades as single and
multiple row extensible
flexfield contexts
Available only for Oracle
localization use.
PER_GRADE_LADDERS_F PER_GRADE_LADDERS_DF Grade Ladder Additional
Details
For storing additional
information related to
grade ladder.
Available for use.
PER_RATES_F PER_RATES_DF Rate Additional Details For storing additional grade
rate details.
Available for use.
Jobs
PER_JOB_EVALUATIONS PER_EVALUATION_
CRITERIA_DFF
Evaluation Criteria
Attributes
For storing additional job
evaluation information.
Available for use.
PER_JOBS_F PER_JOBS_DFF Job Attributes For storing additional job
information.
Available for use.
PER_JOB_EXTRA_INFO_F PER_JOBS_EIT_EFF Job EIT Information For storing additional job
information as single and
multiple row extensible
flexfield contexts.
Available for use.
PER_JOB_LEG_F PER_JOBS_LEG_EFF Job Legislative Information For storing additional
legislative information
related to job as single and
multiple row extensible
flexfield contexts
Available only for Oracle
localization use.
PER_JOB_FAMILY_F PER_JOB_FAMILY_DFF Job Family Attributes For storing additional job
family information.
Available for use.
Locations
PER_LOCATION_DETAILS_F PER_LOCATIONS_DF Location Attributes For storing additional
location information.
Available for use.
PER_LOCATION_EXTRA_
INFO_F
PER_LOCATION_
INFORMATION_EFF
Location Information EFF For storing additional
location information
as single and multiple
row extensible flexfield
contexts.
Available for use.
PER_LOCATION_LEG_F PER_LOCATION_LEG_EFF Location Legislative EFF For storing additional
location legislative
information as single and
multiple row extensible
flexfield contexts.
Available only for Oracle
localization use.
167

Oracle Fusion Cloud Human Resources
Implementing Global Human Resources
Chapter 8
Workforce Structures - Configuration Options
Application Table Name Descriptive Flexfield Code Name Used Availability
Positions
PER_POSITION_EXTRA_
INFO_F
PER_POSITIONS_EIT_EFF Position EIT Information For storing additional
position legislative
information as single and
multiple row extensible
flexfield contexts.
Available for use.
PER_POSITION_LEG_F PER_POSITIONS_LEG_EFF Position Legislative
Information
For storing additional
position legislative
information as single and
multiple row extensible
flexfield contexts.
Available only for Oracle
localization use.
HR_ALL_POSITIONS_F PER_POSITIONS_DFF Position Attributes For storing additional
position information.
Available for use.
Parameters for Work Structure Extensible and
Descriptive Flexfields
Flexfield segments have list of values that are dependent on standard attributes. Workforce structure attributes can be
used as these objects:
• Flexfield parameters for workforce structure descriptive flexfields.
• Input parameters when creating a value set for a flexfield segment.
You can use workforce structure attributes and descriptive flexfields as parameters when you configure workforce
structure extensible flexfields (EFF) and workforce structure descriptive flexfields (DFF).
Note: If you have configured the value set or default conditions using parameters for the EFF, these values will be
reinitialized only when you navigate to the EFF field.
Grades
This table shows the parameters that you can use for these grade workforce structures EFF.
• PER_GRADES_LEG_EFF
Flexfield Code Parameter Code Data Type Parameter Description
PER_GRADES_LEG_EFF EFFECTIVE_START_DATE DATE Effective Start Date
168

Oracle Fusion Cloud Human Resources
Implementing Global Human Resources
Chapter 8
Workforce Structures - Configuration Options
Jobs
This table shows the parameters that you can use for these job workforce structures DFF and EFF.
• PER_JOBS_DFF
• PER_JOBS_EIT_EFF
• PER_JOBS_LEG_EFF
Flexfield Code Parameter Code Data Type Parameter Description
PER_JOBS_DFF EFFECTIVE_START_DATE DATE Effective Start Date
PER_JOBS_DFF SET_ID NUMBER Set ID
PER_JOBS_EIT_EFF EFFECTIVE_START_DATE DATE Effective Start Date
PER_JOBS_EIT_EFF SET_ID NUMBER Set ID
PER_JOBS_LEG_EFF EFFECTIVE_START_DATE DATE Effective Start Date
Locations
This table shows the parameters that you can use for these location workforce structures DFF and EFF.
• PER_LOCATIONS_DF
• PER_LOCATION_INFORMATION_EFF
• PER_LOCATION_LEG_EFF
Flexfield Code Parameter Code Data Type Parameter Description
PER_LOCATIONS_DF EFFECTIVE_START_DATE DATE Effective Start Date
PER_LOCATIONS_DF SET_ID NUMBER Set ID
PER_LOCATION_INFORMATION_
EFF
ACTION_REASON_CODE VARCHAR2 Action Reason Code
PER_LOCATION_INFORMATION_
EFF
ACTIVE_STATUS_CODE VARCHAR2 Active Status Code
PER_LOCATION_INFORMATION_
EFF
ADDRESS_LINE_1 VARCHAR2 ADDRESS_LINE_1
PER_LOCATION_INFORMATION_
EFF
ADDRESS_LINE_2 VARCHAR2 ADDRESS_LINE_2
PER_LOCATION_INFORMATION_
EFF
ADDRESS_LINE_3 VARCHAR2 ADDRESS_LINE_3
PER_LOCATION_INFORMATION_
EFF
ADDRESS_LINE_4 VARCHAR2 ADDRESS_LINE_4
PER_LOCATION_INFORMATION_
EFF
BILL_TO_SITE VARCHAR2 Bill-to Site Flag
169

Oracle Fusion Cloud Human Resources
Implementing Global Human Resources
Chapter 8
Workforce Structures - Configuration Options
Flexfield Code Parameter Code Data Type Parameter Description
PER_LOCATION_INFORMATION_
EFF
BUILDING VARCHAR2 BUILDING
PER_LOCATION_INFORMATION_
EFF
COUNTRY VARCHAR2 COUNTRY
PER_LOCATION_INFORMATION_
EFF
DESIGNATED_RECEIVER_ID NUMBER Designated Receiver ID
PER_LOCATION_INFORMATION_
EFF
DESIGNATED_RECEIVER_LIST_
NAME
VARCHAR2 Designated Receiver List Name
PER_LOCATION_INFORMATION_
EFF
EFFECTIVE_END_DATE DATE Effective End Date
PER_LOCATION_INFORMATION_
EFF
EFFECTIVE_START_DATE DATE Effective Start Date
PER_LOCATION_INFORMATION_
EFF
FLOOR_NUMBER VARCHAR2 FLOOR_NUMBER
PER_LOCATION_INFORMATION_
EFF
GEOGRAPHIC_HIEARCHY_CODE VARCHAR2 Geographic Hierarchy Code
PER_LOCATION_INFORMATION_
EFF
INTERNAL_LOCATION_CODE VARCHAR2 Location Code
PER_LOCATION_INFORMATION_
EFF
INVENTORY_ORGANIZATION_
CODE
VARCHAR2 Inventory Organization Code
PER_LOCATION_INFORMATION_
EFF
LEGISLATION_CODE VARCHAR2 Legislation Code
PER_LOCATION_INFORMATION_
EFF
LOCATION_ID NUMBER Location ID
PER_LOCATION_INFORMATION_
EFF
OFFICE_SITE VARCHAR2 Office Site Flag
PER_LOCATION_INFORMATION_
EFF
POSTAL_CODE VARCHAR2 POSTAL_CODE
PER_LOCATION_INFORMATION_
EFF
RECEIVING_SITE VARCHAR2 Receiving Site Flag
PER_LOCATION_INFORMATION_
EFF
REGION_1 VARCHAR2 REGION_1
PER_LOCATION_INFORMATION_
EFF
REGION_2 VARCHAR2 REGION_2
PER_LOCATION_INFORMATION_
EFF
REGION_3 VARCHAR2 REGION_3
PER_LOCATION_INFORMATION_
EFF
SET_CODE VARCHAR2 Set Code
PER_LOCATION_INFORMATION_
EFF
SET_ID NUMBER Set ID
PER_LOCATION_INFORMATION_
EFF
SHIP_TO_LOCATION_CODE VARCHAR2 Ship-to Location Code
170

Oracle Fusion Cloud Human Resources
Implementing Global Human Resources
Chapter 8
Workforce Structures - Configuration Options
Flexfield Code Parameter Code Data Type Parameter Description
PER_LOCATION_INFORMATION_
EFF
SHIP_TO_LOCATION_SET_ID NUMBER Ship-to Location Set ID
PER_LOCATION_INFORMATION_
EFF
SHIP_TO_SITE_FLAG VARCHAR2 Ship-to Site Flag
PER_LOCATION_INFORMATION_
EFF
TOWN_OR_CITY VARCHAR2 TOWN_OR_CITY
PER_LOCATION_LEG_EFF ACTION_REASON_CODE VARCHAR2 Action Reason Code
PER_LOCATION_LEG_EFF ACTIVE_STATUS_CODE VARCHAR2 Active Status Code
PER_LOCATION_LEG_EFF ADDRESS_LINE_1 VARCHAR2 ADDRESS_LINE_1
PER_LOCATION_LEG_EFF ADDRESS_LINE_2 VARCHAR2 ADDRESS_LINE_2
PER_LOCATION_LEG_EFF ADDRESS_LINE_3 VARCHAR2 ADDRESS_LINE_3
PER_LOCATION_LEG_EFF ADDRESS_LINE_4 VARCHAR2 ADDRESS_LINE_4
PER_LOCATION_LEG_EFF BILL_TO_SITE VARCHAR2 Bill-to Site Flag
PER_LOCATION_LEG_EFF BUILDING VARCHAR2 BUILDING
PER_LOCATION_LEG_EFF COUNTRY VARCHAR2 COUNTRY
PER_LOCATION_LEG_EFF DESIGNATED_RECEIVER_ID NUMBER Designated Receiver ID
PER_LOCATION_LEG_EFF DESIGNATED_RECEIVER_LIST_
NAME
VARCHAR2 Designated Receiver List Name
PER_LOCATION_LEG_EFF EFFECTIVE_END_DATE DATE Effective End Date
PER_LOCATION_LEG_EFF EFFECTIVE_START_DATE DATE Effective Start Date
PER_LOCATION_LEG_EFF FLOOR_NUMBER VARCHAR2 FLOOR_NUMBER
PER_LOCATION_LEG_EFF GEOGRAPHIC_HIEARCHY_CODE VARCHAR2 Geographic Hierarchy Code
PER_LOCATION_LEG_EFF INTERNAL_LOCATION_CODE VARCHAR2 Location Code
PER_LOCATION_LEG_EFF INVENTORY_ORGANIZATION_
CODE
VARCHAR2 Inventory Organization Code
PER_LOCATION_LEG_EFF LEGISLATION_CODE VARCHAR2 Legislation Code
PER_LOCATION_LEG_EFF LOCATION_ID NUMBER Location ID
PER_LOCATION_LEG_EFF OFFICE_SITE VARCHAR2 Office Site Flag
PER_LOCATION_LEG_EFF POSTAL_CODE VARCHAR2 POSTAL_CODE
PER_LOCATION_LEG_EFF RECEIVING_SITE VARCHAR2 Receiving Site Flag
PER_LOCATION_LEG_EFF REGION_1 VARCHAR2 REGION_1
PER_LOCATION_LEG_EFF REGION_2 VARCHAR2 REGION_2
PER_LOCATION_LEG_EFF REGION_3 VARCHAR2 REGION_3
171

Oracle Fusion Cloud Human Resources
Implementing Global Human Resources
Chapter 8
Workforce Structures - Configuration Options
Flexfield Code Parameter Code Data Type Parameter Description
PER_LOCATION_LEG_EFF SET_CODE VARCHAR2 Set Code
PER_LOCATION_LEG_EFF SHIP_TO_LOCATION_CODE VARCHAR2 Ship-to Location Code
PER_LOCATION_LEG_EFF SHIP_TO_LOCATION_SET_ID NUMBER Ship-to Location Set ID
PER_LOCATION_LEG_EFF SHIP_TO_SITE_FLAG VARCHAR2 Ship-to Site Flag
PER_LOCATION_LEG_EFF TOWN_OR_CITY VARCHAR2 TOWN_OR_CITY
Organizations
This table shows the parameters that you can use for these organization workforce structures DFF and EFF.
• PER_ORGANIZATION_UNIT_DFF
• PER_ORGANIZATION_INFORMATION_EFF
Flexfield Code Parameter Code Data Type Parameter Description
PER_ORGANIZATION_UNIT_DFF EFFECTIVE_START_DATE DATE Effective Start Date
PER_ORGANIZATION_UNIT_DFF ORGANIZATION_ID NUMBER Organization Id
PER_ORGANIZATION_UNIT_DFF SET_ID NUMBER Set ID
PER_ORGANIZATION_
INFORMATION_EFF
EFFECTIVE_START_DATE DATE Effective Start Date
PER_ORGANIZATION_
INFORMATION_EFF
ORGANIZATION_ID NUMBER Organization Id
PER_ORGANIZATION_
INFORMATION_EFF
SET_ID NUMBER Set Id
Positions
This table shows the parameters that you can use for these position workforce structures DFF and EFF.
• PER_POSITIONS_DFF
• PER_POSITIONS_EIT_EFF
• PER_POSITIONS_LEG_EFF
Flexfield Code Parameter Code Data Type Parameter Description
PER_POSITIONS_DFF ASSIGNMENT_CATEGORY VARCHAR2 Assignment Category
PER_POSITIONS_DFF BARGAINING_UNIT_CD VARCHAR2 Bargaining Unit Code
PER_POSITIONS_DFF BUSINESS_UNIT_ID NUMBER Business Unit Id
PER_POSITIONS_DFF COLLECTIVE_AGREEMENT_ID NUMBER Collective Agreement Id
172

Oracle Fusion Cloud Human Resources
Implementing Global Human Resources
Chapter 8
Workforce Structures - Configuration Options
Flexfield Code Parameter Code Data Type Parameter Description
PER_POSITIONS_DFF EFFECTIVE_END_DATE DATE Effective End Date
PER_POSITIONS_DFF EFFECTIVE_START_DATE DATE Effective Start Date
PER_POSITIONS_DFF ENTRY_GRADE_ID NUMBER Entry Grade Id
PER_POSITIONS_DFF ENTRY_STEP_ID NUMBER Entry Step Id
PER_POSITIONS_DFF GRADE_LADDER_ID NUMBER Grade Ladder Id
PER_POSITIONS_DFF JOB_ID NUMBER Job Id
PER_POSITIONS_DFF LOCATION_ID NUMBER Location Id
PER_POSITIONS_DFF ORGANIZATION_ID NUMBER Organization Id
PER_POSITIONS_DFF UNION_ID NUMBER Union Id
PER_POSITIONS_EIT_EFF ASSIGNMENT_CATEGORY VARCHAR2 Assignment Category
PER_POSITIONS_EIT_EFF BARGAINING_UNIT_CD VARCHAR2 Bargaining Unit Code
PER_POSITIONS_EIT_EFF BUSINESS_UNIT_ID NUMBER Business Unit
PER_POSITIONS_EIT_EFF COLLECTIVE_AGREEMENT_ID NUMBER Collective Agreement
PER_POSITIONS_EIT_EFF EFFECTIVE_END_DATE DATE Effective End Date
PER_POSITIONS_EIT_EFF EFFECTIVE_START_DATE DATE Effective Start Date
PER_POSITIONS_EIT_EFF ENTRY_GRADE_ID NUMBER Entry Grade Id
PER_POSITIONS_EIT_EFF ENTRY_STEP_ID NUMBER Entry Step Id
PER_POSITIONS_EIT_EFF JOB_ID NUMBER Job Id
PER_POSITIONS_EIT_EFF LOCATION_ID NUMBER Location Id
PER_POSITIONS_EIT_EFF POSITION_TYPE VARCHAR2 Position Type
PER_POSITIONS_EIT_EFF UNION_ID NUMBER Union Id
PER_POSITIONS_LEG_EFF EFFECTIVE_START_DATE DATE Effective Start Date
173

Oracle Fusion Cloud Human Resources
Implementing Global Human Resources
Chapter 8
Workforce Structures - Configuration Options
174

Oracle Fusion Cloud Human Resources
Implementing Global Human Resources
Chapter 9
Person
9 Person
Person Number Generation Methods
You can select one of the following person number generation methods for your enterprise on the Edit Enterprise page
of the Manage Enterprise HCM Information task in the Setup and Maintenance work area:
• Manual
• Automatic prior to submission
• Automatic upon final save
Manual: You can use the Manual method to manually enter a person number when creating person records. You can
update person numbers in the Manage Person page.
Automatic prior to submission: The Automatic prior to submission method automatically creates person numbers
when creating person records. This method is the default method for person number generation.
Note: The Automatic prior to submission method may create gaps in the person number sequence if the transaction
is canceled after the person number is generated.
Automatic upon final save: The Automatic upon final save method creates person numbers only after the Add Person
transaction is approved. You can't view the person number when creating the person record. However, you can view the
person number on the Person page after the transaction is approved. This method generates person numbers without
gaps in the sequence.
Note: Person numbers are also assigned to contacts if they are created as a part of the Add Person transaction. For
example, if a person is assigned person number 5 and two contacts are created during the Add Person transaction,
then the contacts will be assigned person number 6 and 7. This means the next new person will be assigned person
number 8.
The Automatic prior to submission and Automatic upon final save methods use an enterprise number sequence. By
default, the sequence starts from 1; however, you can change the starting number. The person number increments by
one for each new person record created.
You can change the person number generation method but you must be careful of the method that you select if you
have existing data. You can change from Automatic prior to submission method to the Automatic upon final save
method and change it back again. You can also change from the automatic method to the manual method and change
this to the former.
Initial Person Number
You can specify the initial person number for your enterprise when you generate person numbers automatically. The
application uses this number for the first person record that you create using the automatic person number setting, and
increments the number by one for subsequent person records. By default, the initial person number is 1.
Using the initial person number option, you can retain the legacy person numbers for existing persons. Additionally, you
can automate the number generation for new persons, starting from the last legacy person number plus one. You can
change the initial person number.
175

Oracle Fusion Cloud Human Resources
Implementing Global Human Resources
Chapter 9
Person
Person Numbers for Contact Records
Workers and contacts have the same number sequence when the generation method is Automatic. You can correct
automatically generated person numbers for contacts on the Manage Person page if the person number generation
method is Manual. If contacts are later hired as workers, they retain their original person numbers.
Related Topics
•
Worker Numbers
Person Types
You use person types to identify different groups of people in your enterprise.
For example, for purposes of reporting, you might want to identify the following:
• Contractual workers in your enterprise with the Contingent Worker person type.
• Regular employees with the Employee person type.
On the basis of the person type, you can:
• Maintain information for a group of people
• Secure access to information
System Person Types
These are predefined person types that the application uses to identify a group of people. You can't change, delete, or
create additional system person types.
Not Managed by HR System Person Type
You might need to add nonworkers to your organization who aren't employees but can participate in company-related
activities. For example, people that are added to the application for badging or application system integration purposes
where you enter only minimal person information about these people. You can add such nonworkers using the system
person type, Not Managed by HR.
You can’t do these things for nonworkers categorized as Not Managed by HR:
• Manage their absences.
• Manage any assignment transactions such as working hours, promotions, adding grades, and so on.
• Manage Talent Management records: performance, goals, talent profiles, succession plans, and so on.
• Manage any workforce compensation, individual compensation, or salary.
Note: If you have existing people that fall in this category, you need to terminate the existing work relationship. After
that you need to create a new work relationship using the ‘Not Managed by HR’ work relationship. You can use HCM
Data Loader (HDL), HCM Spreadsheet Data Loader (HSDL), or update worker records in the UI as needed.
Person Security Profile
176

Oracle Fusion Cloud Human Resources
Implementing Global Human Resources
Chapter 9
Person
You need to review your person security profiles if you want to search and view people that are created with this system
person type. You can choose any of these options.
• The person security profile might be defined without a reference to person types. In such case, you can review
and test the profile to ensure that the criteria includes people with this system person type.
• You can create a new person security profile with Not Managed by HR system person type.
◦
You must not use Employee, Contingent Worker, Nonworker, or Pending Worker person types in the same
security profile. This is a known limitation of the person security profile.
◦
You need to create a new role associated with this security profile and assign it to users who need access
to people with this system person type.
• You can create a new person security profile and use custom SQL.
• You can use the Oracle-delivered 'View All People' person security profile.
User Person Types
Each system person type contains a user person type that you can configure to your requirements. You can change,
remove, or create additional user person types to suit your enterprise requirements. For example:
• If your enterprise refers to its employees as associates instead of employees, you change the Employee user
person type to Associate.
• You can also add user person types under the Employee system person type. For example, if you want to
classify employees further as equity partners, nonequity partners, and associates,
Note: When you create, delete, or cancel a person type work relationship record, then the person type
usages record is deleted and recreated for that worker. As a result, a new person type usage ID is generated
for the worker.
Related Topics
•
What happens if I change the status of a user person type?
•
What's the purpose of the default user person type?
•
Candidate Duplicate Check and Merge After Job Offers
Person Names and Languages
You can define how to display people's names in the application and in which language. You can define whether to
display a person's name in the global or the local language.
Person name has two parts, style and format.
Name Styles
The name style determines these things:
• Which components of a person's name to display. For example, one country may display first name and last
name while another may display the middle name too
177

Oracle Fusion Cloud Human Resources
Implementing Global Human Resources
Chapter 9
Person
• What's the order of display of the components
• Which components are required and which are optional. For example, title may be optional in some countries.
The legal employer sets the legislative context for the person record. So, if the legal employer is a Canadian
legal entity, the Canadian name style is used. When a country-specific name style doesn't exist, a universal
name style (last name, first name, title, and middle names) is used
Note: A person's contacts have the same name style as the person for whom they're contacts.
Name Formats
A name format is an arrangement of the name components.
• The format is an arrangement of these name components: first name, last name, and title. You can choose from
these predefined name formats: Display name, List name, Full name, and Order name.
• The format can differ based on the display context. For example, in an ordered list of names, last name may
appear before first name, but in other contexts first name appears before last name.
Global or Local
The profile option HR: Local or Global Name Format controls whether users see local names or global names. The
profile option HR: Local or Global Name Format controls whether users see local names or global names by default.
Global names use one name format. Users who manage people across countries may want to see the names displayed
consistently so may use global names for example. Users who view or manage persons in a single country may prefer to
see local names
Person-Name Languages
Each enterprise has a global-name language. Person names appear in this language by default. When you create a
person record, you can define what language to use for the local name. Names appear in this language for users whose
HR: Local or Global Name Format profile option value matches the language.
Let's look at an example:
• The global-name language for the enterprise is American English.
• You set the local-name language in a person record to Japanese. Users whose HR: Local or Global Name Format
profile option is set to Japanese see the person's name in Japanese.
• All other users (those who are viewing global-format names or whose HR: Local or Global Name Format
profile option is set to a value other than Japanese) see the person's name in American English. Users can set
preferences to select the language in which they want to see person names displayed in.
Person Name Styles
Person name styles define the person name components for a country. Only one style can exist for a country, while you
can predefine name styles for some countries.
178

Oracle Fusion Cloud Human Resources
Implementing Global Human Resources
Chapter 9
Person
Note the following:
• You can create name styles for countries that have none.
• You can copy an existing style to use as the basis.
• You can create a new name style in case of specific requirements for a country
For countries that don't have a predefined person name style, the universal name style applies by default.
You can edit predefined name styles by doing the following:
• creating additional components
• selecting mandatory components
• changing order of components
• selecting list of values for the components
You can mark a predefined component as inactive, unless it’s a required component. But you can't delete predefined
components and make required components optional. You can delete only those components that were added to a
predefined name style. You can't delete a predefined name style.
You can mark Oracle-delivered non-required name attributes as inactive by deselecting the Mark as Active check box.
But you can’t mark the Last Name attribute and the Oracle-delivered required name attributes as inactive. When you
mark a name attribute as inactive, the attribute won't be displayed on the pages where a name can be managed, such as
Hire an Employee, Family and Emergency Contacts, and Personal Details.
Note: You can create, edit, and delete a user-defined name style and its components any time. If a user-defined
name style is deleted after person names have been created using that style, the universal name style applies by
default.
Person Name Components
Last Name is a mandatory name component for all person name styles. You can set other person name components as
mandatory, based on specific requirements for a country.
Note the following:
• The name components Name Information 1 through Name Information 14 are reserved for localization
requirements.
• You can use the components Name Information 15 through Name Information 30 to define specific person
name components for a country.
For example, if you want to capture Mother's Maiden Name for a country, you can use the name component Name
Information 15, and denote the display name for this component as Mother's Maiden Name.
Related Topics
•
What's the difference between person name formats and person name styles?
•
Person Names and Languages
•
Person Name Formats
179

Oracle Fusion Cloud Human Resources
Implementing Global Human Resources
Chapter 9
Person
Person Name Formats
A person name format type determines how a person's name appears across applications.
• Each person name format type contains a sequence of name components that represents different parts of a
person's name, for example, first name, last name, and punctuation marks.
• You can change the sequence of, remove, or include additional name components according to your
requirements.
The following figure displays a sample name format, including the components and punctuation marks.
Predefined Name Format Types
Oracle Fusion HCM provides the following predefined format types.
Format Type Usage Default Structure
Full Name
Names that appear in reports.
[Last Name], [First Name] [Middle Name] [Title]
Display Name
Names that appear singly, for example, on the
Personal Details page header.
[First Name] [Prefix] [Last Name]
List Name
Names that appear in lists
[Prefix] [Last Name], [First Name]
180

Oracle Fusion Cloud Human Resources
Implementing Global Human Resources
Chapter 9
Person
Format Type Usage Default Structure
Order Name
Names that appear in name-ordered lists where
the full name alone isn't sufficient to sort the
list.
[Last Name] [First Name]
Note: When you create or edit format types, to avoid creating blank person names, ensure that you include at least
one name component that's never blank.
Local and Global Name Formats
Oracle Fusion HCM includes local and global formats for each format type.
When you create a new format on the basis of an existing format type, you identify it as either local or global. For local
format types, you must also select the legislation that the format type applies to
• A local format is suitable for users in a single legislation who prefer to see person names in a character set
appropriate to their legislation.
• A global format is suitable for users in a multinational enterprise who prefer to see person names in a single
(typically, Western) character set, so that all names, regardless of origin, have the same representation.
Conditional Name Format
Use the conditional name component to add conditions to person name formats. If there's a value in the first name
attribute that's displayed else the value in the second name attribute is displayed. For example, let's say you create a
display name format with a conditional name component including Known As and First Name as the first and second
attributes respectively. If the person name attribute has a value in both Known As and First Name fields, then the Known
As value is displayed. If the person name attribute doesn't have a value in the Known As field but has a value in the First
Name field then the First Name value is displayed.
These are some of the key points to note about the conditional name component.
• You can use only 2 core name attributes for the conditional name component.
• You can have multiple conditional name components in the same person name format but you can't nest one
conditional name component within another.
• You can't use punctuation such as space, open bracket, and closed bracket, or use sub-components or
separators within the conditional name component.
• After updating the person name formats, you need to run the Apply Name Formats to Person Names,
Keywords and LDAP job set from the Scheduled Processes page in the Tools work area with these parameters
◦
Country Name for which you want to change the name format, and the
◦
Format Type to apply the name format set.
• A person's first name and last name initials are displayed even when a person hasn't uploaded an image.
Related Topics
•
When does the application update stored names with a person name format?
•
How can I switch between local and global formats to display person names?
181

Oracle Fusion Cloud Human Resources
Implementing Global Human Resources
Chapter 9
Person
How You Specify Work Phones
A person can have only one primary phone. Typically, employees see others' phone details only if it's work related and
primary. If you specify a nonwork phone as primary then workers can't see the phone details.
Who can see which phone number is controlled by Oracle's virtual private database policy, which can't be changed
Access Security and Privileges
You can see a coworker's work and nonwork phone numbers if your role has these privileges
• Manage person phones data
• View person phones data
• Report person phones data
It's important to understand these phone lookup codes since the virtual private database policy relies on the lookup
codes:
Lookup Code Meaning
W1
Work Phone
W2
Second Work Phone
W3
Third Work Phone
WF
Work Fax
WM
Work Mobile Phone
If you want to change the phone type, keep in mind the lookup code and how the VPD policy works with that lookup
code. Lookup codes starting with W indicate the phone number is public and can be viewed by all. Lookup codes not
starting with W indicate the phone number is private and can be seen only by people with the required privileges.
Apply Name Formats to Person Names, Keywords, and
LDAP
When you change a person name format, the change isn't reflected in person records until you run the Apply Name
Formats to Person Names, Keywords, and LDAP job set.
182

Oracle Fusion Cloud Human Resources
Implementing Global Human Resources
Chapter 9
Person
The job set includes these required child processes so you just need to run the parent process and not run these
processes individually:
• Apply Name Formats to Person Names
• Send Personal Data for Multiple Users to LDAP
• Update Search Person Keywords
How the Process Works
When you run the process, this is what happens:
1. The Apply Name Formats to Person Names process is first executed.
2. The Update Search Person Keywords and Send Personal Data for Multiple Users to LDAP processes are then
executed in parallel.
Let's say the Apply Name Formats to Person Names job set is executed successfully in the first step but either the
Update Search Person Keywords or the Send Personal Data for Multiple Users to LDAP processes fails in the second
step. The parent process and the child processes that failed are marked as failed. The successful processes are
implemented, failed jobs aren't.
When the Apply Name Formats to Person Names, Keywords and LDAP job set is running, you can't schedule or run
the Apply Name Formats to Person Names, Send Personal Data for Multiple Users to LDAP, and Update Search Person
Keywords processes independently.
How You Run the Process
You run the job set from the Scheduled Processes task using these steps.
1. Navigate to Tools > Scheduled Processes.
2. Click Schedule a Process.
3. Select Job set and search for Apply Name Formats to Person Names, Keywords and LDAP.
4. Click OK
5. Select each job and enter the parameters.
6. Click OK
Apply Name Formats to Person Names
This process applies the name formats for Display Name, Full Name, List Name, and Order Name based on the
corresponding name format defined.
Parameters usage:
• Format Type
◦
Name format type to be applied
- Display Name
- Full Name
- List Name
- Order Name
• Country
◦
Modifies the name format for the specific country
183

Oracle Fusion Cloud Human Resources
Implementing Global Human Resources
Chapter 9
Person
For more information about this process, see When does the application update stored names with a person name
format?
Best Practices for Applying Name Formats on Person Names
Here are some best practices for applying name formats on person names.
Do's
You must run the Apply Name Formats to Person Names job only manually. You can run it for these scenarios:
• If the name format is changed
• If a new language is installed
• After P2T and data masking
Don'ts
Don’t schedule the Apply Name Formats to Person Names job to run regularly. Unless there’s a valid reason to apply a
name format, a schedule will simply do redundant processing.
Related Topics
•
When does the application update stored names with a person name format?
•
What are scheduled processes?
How You Update Person Search Keywords
Several attributes of person, employment, and profile records are used as person-search keywords. Keyword values
are copied automatically from the originating records to the PER_KEYWORDS table, where they're indexed to improve
search performance.
Process to Update Person Keywords
An event is raised when the value of a keyword attribute changes, for example, if a person acquires a language skill or
a different phone number. In response, services run a process to update the relevant attributes for the person in the
PER_KEYWORDS table. Therefore most changes are made in PER_KEYWORDS immediately and automatically. When
you create a new person record, keyword values for that person are copied automatically to the PER_KEYWORDS table.
Why You Run the Process
Although most changes to the PER_KEYWORDS table are automatic, you need to run the Update Person Search
Keywords process regularly because of these reasons:
• The automatic process doesn't apply future-dated changes to the PER_KEYWORDS table.
• The process ensures that all changes are copied to the PER_KEYWORDS table, despite any temporary failures of
the automatic process.
184

Oracle Fusion Cloud Human Resources
Implementing Global Human Resources
Chapter 9
Person
When You Don’t Need to Run the Process
Let's say a person’s data is modified from anywhere in the Fusion Apps UI, except from Work Structures or CRM
Resource Information. Then the keywords are updated directly and this job isn’t required.
When You Run the Process
Here are some of the scenarios where you run the Update Person Search Keywords process:
• For a specific Batch ID
◦
If post-processing is disabled during HDL load of Workers data, then run the “HCM Data Loader Worker
Post processing” job using the specific UCM content ID.
• For a specific Person
◦
Select person name in the Name parameter.
◦
For a specific person, the job can be executed as and when required.
◦
Estimated Execution Time: approximately 30 seconds to 1 minute.
• For only Delta population
◦
To update keywords for the changed workers and to create keywords for new workers loaded, submit the
job with only After Batch Load = Y.
◦
Use this option only if the number of person records changed is less than 20,000.
◦
Estimated Execution Time: approximately 20 minutes for every 20,000 records.
• For all the Persons in the system
◦
Submit a request with all parameters as null to recreate keywords for all persons in the system.
◦
Use this option only if a new language is installed or if the number of person records changed is more
than 20,000.
How to Schedule the Process
You can run the Update Person Search Keywords process manually or schedule it to run at regular intervals (for
example, weekly at a specified time).
The likely volume and frequency of changes to person records in your enterprise will determine how often you run the
process:
• If the volume and frequency are high, you need to schedule the process to run frequently.
• If the volume and frequency are low, running the process once a month is recommended.
Running the Update Person Search Keywords process refreshes the whole PER_KEYWORDS table. Therefore, you must
run the process at times of low activity to avoid performance issues.
Best Practices for Updating Person Search Keywords
Here are some best practices for updating person search keywords.
Do’s
• Schedule the process at least once a day during off peak hours to run with parameter After Batch Load = Y to
process any changed worker data (delta population) and keep keywords up-to-date.
185

Oracle Fusion Cloud Human Resources
Implementing Global Human Resources
Chapter 9
Person
• When loading workers by using HDL, enable post-processing to process keywords for the workers that were just
loaded.
If the number of worker records loaded exceeds 20,000, then disable post-processing and manually run the job
with all parameters as null, which will process the entire worker population.
• If you’re running 'Refresh Manager Hierarchy' daily, then set the 'Updated Within the Last N Days' parameter
value as 1 for incremental updates. This prevents the delta population size from getting larger than 20,000,
which would require the job to be run for the entire person population.
Don’ts
• Don’t schedule the process to run at frequent intervals with all parameters as null.
◦
Running the job with all parameters as null processes all person records in the system, which is
unnecessary and can potentially leave the index in an inconsistent state.
◦
You must run the job manually with all parameters as null only if the number of worker records for whom
keywords should be updated exceeds 20,000.
• Don’t run or schedule the process with Batch ID values as -100 and -200. These are unsupported values and
can cause issues with keyword search.
Related Topics
•
Person-Record Keyword Searches
Person-Record Keyword Searches
The application searches for keywords in these attributes: department, person number, job name and code, position
name and code, person name, primary email, primary phone, work location, competencies, language skills, licenses and
certifications, school education, awards and honors, memberships, interest areas, and areas of expertise.
Access to Restricted Information
Line managers can access their workers' restricted information such as competencies, language skills, licenses and
certifications, school education, awards and honors, and affiliations. Restricted information is included in search results
when the searcher is a line manager. For example, if a line manager searches for a language skill and a match is found
in any direct or indirect reports, that information appears in the search results. However, if the match is found in public
information such as areas of expertise, it appears in the search results for any user.
Keyword Indexing
Keywords are indexed values, which means that they're copied from person records and organized in a keywords table
for fast retrieval. Most changes to person records are copied to ensure that the source and indexed values don't differ.
Your enterprise can also run a keyword-refresh process to update all keywords and fix any discrepancies. Depending on
when this process was last run, some recent changes to person records may not appear in search results.
Name and Keyword Search
The person search uses a person's full name instead of the first name or last name. The full name definition may vary
for each country. For example, the full name definition for India may be First Name Middle Name Last Name, while the
186

Oracle Fusion Cloud Human Resources
Implementing Global Human Resources
Chapter 9
Person
full name definition for Canada may be First Name Known As Last Name Suffix. You control the definition of the full
name using the Manage Person Name Formats task in the Setup and Maintenance work area.
There's an implied OR condition between the search criteria when you use keyword search. When you use the name
search, there's an implied AND condition between the search criteria For example, when you enter Chris Harper in the
Name field, all person records that have both Chris and Harper in the full name are shown in the search results. Here are
some examples:
You enter... Search Results
Harper Chris
• Jenner, Chris
• Harper, Smith
• Chris, Ray
• Harper, Liam
• Harper, Chris
• Harper, Christopher
Chris Harper
• Jenner, Chris
• Harper, Smith
• Chris, Ray
• Harper, Liam
• Harper, Chris
• Harper, Christopher
Chris%
• Jenner, Chris
• Black, Chris
• Blake, Christopher
• Simpson, Christy
• Harper, Chris
• Harper, Christopher
• Christ Johnson
Chris
• Jenner, Chris
• Black, Chris
• Harper, Chris
"Chris Harper"
• Harper, Chris
Chris and Harper
• Harper, Chris
"Chris" "Harper"
• Harper, Chris
187

Oracle Fusion Cloud Human Resources
Implementing Global Human Resources
Chapter 9
Person
Date-Effective Search
In the person search UI, you can enter an effective as-of date. When date-effective values such as work location are
copied to the keywords table, their history isn't copied: only the latest change is stored in the keywords table. Therefore,
if you enter both a keyword value and an effective as-of date, the search results may not be as expected. Here's an
example:
• You change the work location of assignment 12345 from Headquarters to Regional Office on 27 January, 2011.
• The changed work location is copied automatically to the keywords table on 27 January, 2011.
• You search for a person on 1 February, 2011 using the keyword Headquarters and the effective as-of date 10
January, 2011.
Although the work location on 10 January, 2011 was Headquarters, assignment 12345 doesn't appear in the search
results because the work location stored in the keywords table at the time of the search is Regional Office.
How You Optimize Person Search Keywords
The Oracle Text index in the PER_KEYWORDS table is utilized for person searches in My Client Groups, and the
Directory. This index may become fragmented over a period of time and may cause a delay in displaying search results.
Why You Run the Process
You run the Optimize Person Search Keywords Index process to identify the fragmented indexes and help improve the
overall search performance. To launch this process, use the Navigator > Tools > Scheduled Processes > Schedule New
Process button in the search results table.
Note: You must run the Update Person Search Keywords process first and then the Optimize Person Search Keywords
process. You cant schedule both processes simultaneously. If you schedule them at the same time, the second
process will wait for the first process to complete before it starts.
When to Run the Process
You must run the Optimize Person Search Keywords Index process daily at times of low activity with the options, Full
mode and the appropriate maximum time. The default time is 180 minutes. Although, if the process is run consistently
over time it may take about 10 to 30 minutes only. You can decide the frequency of running the process based on the
size of your customer base, system usage, database usage, data loaders used, index fragmentation, and schedule of the
Update Person Search Keywords process.
Best Practices for Optimizing Person Search Keywords
Here are some best practices for optimizing person search keywords.
Do's
• Schedule the Optimize Person Search Keywords Index process to run at least once a week during off peak
hours with all parameters null, to prevent the keywords index from being fragmented.
• It’s recommended that you don’t schedule both these processes to run simultaneously:
188

Oracle Fusion Cloud Human Resources
Implementing Global Human Resources
Chapter 9
Person
◦
Update Person Search Keywords
◦
Optimize Person Search Keywords Index
Even if you do, the second process waits for the first process to complete before it starts.
• Let’s say a large volume of person records are updated every day, and the Update Person Search Keywords
process is scheduled to run daily. Then you need to schedule the Optimize Person Search Keywords Index
process with all parameters as null to run immediately after the Update Person Search Keywords process.
Don'ts
Don’t schedule the Optimize Person Search Keywords Index process to run more frequently than once daily. That’s
because the keywords index isn’t expected to be fragmented heavily in such a short period of time.
How You Communicate Person and Assignment
Changes to Consumer Applications
You may need to alert other Oracle Fusion applications when you make changes to person and assignment details to
synchronize their information with Oracle Fusion Global Human Resources.
To share the changes made to person and assignment details with consumer applications, you need to run the
Synchronize Person Records process. The process generates an HCM event, ChangedPersonDetails that consumer
applications listen to.
The Synchronize Person Records process generates events and notifies about the person and assignment for
Contingent Worker and Employee worker types only.
189

Oracle Fusion Cloud Human Resources
Implementing Global Human Resources
Chapter 9
Person
When you start the process, you can specify the start and end dates. The process generates events for the changes
made between the start and end dates that you specified. If you don’t specify the dates, the process runs on the
application date, and generates events for changes made on that date.
Note: If you make changes to person records daily, it's recommended that you schedule the Synchronize Person
Records to run once daily at the end of the day (without specifying start and end dates). Don’t schedule the process
multiple times in a day.
Note that in the Coexistence for HCM environment, you can run Synchronize Person Records after you upload person
records to Oracle Fusion for the first time.
You must keep these points in mind when you run the Synchronize Person Records process:
• When you run the process for the first time, specify the start date and end date. Start date refers to the date
when the oldest existing record for that person was created in the application, and end date refers to the
application date.
Example for start date:
Let's say a person was hired on 01/01/2009 as an employee. But their employment was cancelled for some
reason. Though they're no longer an employee, their person record exists in the application. The date on which
this person’s record was created in the application is their start date, which is 01/01/2009.
Now, if the same person is rehired on 05/05/2015, then the hire date is 05/05/2015. But their start date still
remains as 01/01/2009, which is the oldest record for that person in the application.
• When you load person records subsequently, run Synchronize Person Records on the application date (without
specifying the start and end dates).
• To ensure optimum performance, ensure that the start date and end date of the process has a maximum
difference of only up to 7 days.
This table summarizes the process parameters.
Parameter Data Type Default Value Purpose
From Date Date Application date (Today’s date) Used along with the To Date
parameter. The date range
identifies all changes stored in
Oracle HCM Cloud that should
generate an event. The date range
must not be longer than 7 days.
To Date Date Application date (Today’s date) Used along with the From Date
parameter. The date range
identifies all changes stored in
Oracle HCM Cloud that should
generate an event. The date range
must not be longer than 7 days.
After Batch Load Character No (N) Use this parameter when you
are loading data through HCM
Data Loader (HDL) or HCM
Spreadsheet Loader (HSDL). The
ChangedPersonDetails event is
suppressed for these batch loading
processes. Because of this data
isn’t synchronized during the data
190

Oracle Fusion Cloud Human Resources
Implementing Global Human Resources
Chapter 9
Person
Parameter Data Type Default Value Purpose
load. To enable synchronization,
you need to run the process with
this parameter set to Yes. When
this parameter is set to Yes, the
process considers all changes
during the period by considering
these dates.
• Effective_start_date
• Last_update_date of the
person or employment tables
When the parameter value is set to
No, only the Effective_Start_Date is
considered
When You Run the Process
Let’s look at the common use cases when you need to run the process and the parameters that you need to specify.
Use Case Execution Type Parameter Values Guidelines
When future dated hires or
work relationships become
effective. When pending workers
are converted as employees or
contingent workers.
Daily (To handle future dated
changes)
• From Date: Null
• To Date: Null
• After Batch Load: No
When you specify the dates
as NULL, it’s assumed that the
changes that happened on the
application date (today’s date)
must be picked up by the process.
When data load contains active
employees or contingent workers.
After loading data
• From Date: Date when the
data load started
• To Date: Date when the data
load completed
• After Batch Load: Yes
Person or assignment data, or both
is loaded in 1 or 2 days. Hence, the
date range between loads is 1-2
days. When you provide the date
range, ensure it’s less than 7 days,
else the process will terminate with
a warning message.
When future-dated hires or work
relationships become effective
as on today's date, OR when
pending workers are converted to
employees or contingent workers,
and are effective as of today’s date
Future-dated changes that are
effective on that day
191

Oracle Fusion Cloud Human Resources
Implementing Global Human Resources
Chapter 9
Person
Changes Notified to Consumer Applications
When you run Synchronize Person Records, the process generates the ChangedPersonDetails event when you make
changes to the following person and assignment details:
• Person details:
◦
Name
◦
Work email
◦
Work phones
◦
Service dates
• Assignment details:
◦
Job
◦
Position
◦
Department
◦
Work location
◦
Work location address
◦
Manager
◦
Work type
Note: Please note these important considerations:
• The ChangedPersonDetails event isn't generated if you make changes to the following workforce structure
setup objects.
◦
Job
◦
Position
◦
Department
◦
Work location
◦
Work location address
• The event isn't generated for data changes in these cases.
◦
Changes to ex-employees and ex-contingent worker records as of the application date (current date).
◦
Changes to employee records with a future hire or start date.
Guidelines for Synchronizing Person Records
This topic lists the guidelines you need to follow when running the Synchronize Person Records process.
192

Oracle Fusion Cloud Human Resources
Implementing Global Human Resources
Chapter 9
Person
Batch Load Processing
• After every batch load of workers, run the process with From Date and To Date values covering the date range
when workers were loaded and After Batch Load = Y to process all workers that were loaded. This is required
because the ChangedPersonDetails event isn’t raised for the loaded workers during HDL load.
• Run this process immediately after loading the data using HDL, HSDL or any other loaders. However, if data
loading has to be done multiple times in a day, it’s recommended to run the process after the execution of the
final load.
• Run this process with From Date and To Date parameters as start date of data load and completion date of data
load respectively.
• The After Batch Load parameter must be set to Yes, if the process is run after a data upload using HDL or HSDL
or any other data loader that suppresses the events. Otherwise, set the parameter to No.
Submit the process for a given date only once
• Synchronize Person Records process generates events to inform TCA application about the changes to person
and corresponding assignment records.
• Larger the number of events raised, heavier the processing by TCA application in SOA server. To avoid
unnecessary and duplicate processing, it’s strongly recommended to run this process only once for a given date
range. Hence:
◦
Schedule once a day with no values for From Date and To Date, and After Batch Load = N at the start of
each day to process future dated employees and contingent workers becoming active that day.
◦
You may optionally schedule the job to run once a day at the end of the day with no date parameter
values and After Batch Load = Y. This schedule will pick up all person records loaded that day and may
not have been processed already.
Submit only one instance of the process at any given time
• At any given time, only one instance of this process must be running
• If the process is already in running state, then don’t submit the process again
• If a second instance of the process is submitted by mistake, cancel it immediately and let the first one complete.
Guidelines for Batch Loading Workers
This topic lists the guidelines to follow when loading over 100,000 workers during cut-over activities as part of go-live,
and complete the related processing with minimal overhead.
Prerequisites
Prepare Worker HCM Data Loader (HDL) Data File
1. Set INVOKE_POST_PROCESS to N to avoid automatic submission of each HDL Worker data load post-processing
jobs. This will avoid submitting too many post-processing jobs that can get blocked with each other. Once
the planned workers dat files are loaded, post-processing can be done manually. Refer the Disable Postload
Processing topic for more information.
2. Set GeneratedUserAccountFlag to N for workers for whom a user account isn’t required.
3. Don't configure any role mappings yet. This is to ensure that no role memberships are provisioned at the time
of account creation. Role provisioning can be done in a later step.
4. Ensure these processes aren’t running or scheduled to run.
193

Oracle Fusion Cloud Human Resources
Implementing Global Human Resources
Chapter 9
Person
◦
Synchronize Person Records
◦
Maintain Party and Location Current Record Information
◦
Refresh Manager Hierarchy
◦
Update Person Search Keyworkds
◦
Optimize Person Search Keywords Index
◦
Send Pending LDAP Requests
◦
Autoprovision Roles for All Users
◦
Send Personal Data for Multiple Users to LDAP
5. Ensure the Apply Name Formats to Person Names, Keywords and LDAP process set isn’t running.
You need to do these steps in the listed order after you complete the steps in Preparing the Worker HDL Data File.
1 - Load Workers and Synchronize Person Records
Typically, you run the Synchronize Person Records process to synchronize workers' person records in HCM with party
records in Trading Community Architecture (TCA) to manage HR Help Desk, Payroll, Expenses, and so on.
Since a large number of worker records are created, updated, or both this process can result in events processing
overhead for the Enterprise Scheduler Service (ESS) or the Service Oriented Architecture (SOA) servers. Hence, it’s
recommended to use this approach.
1. Split the workers data file into batches if there are more than 100,000 workers to load. It's recommended not to
exceed 100,000 workers per batch.
2. Ensure the Synchronize Person Records ESS process isn’t running.
3. Set these profile options.
◦
ORA_HZ_ENABLE_MPLCRI_ACTIVE_WORKER to Yes
◦
HRC_DISABLE_HCM_EVENTS_PROCESSING to Yes
4. Load worker data in batches of 100,000 or less and synchronize them to create party records. Repeat these
steps until all workers are loaded and synchronized.
a. Load a batch of worker data
b. Run Update Person Search Keywords ESS process with Batch ID as 1 to create Person Type Usage records
that are required by the next step. This step doesn’t create person search keywords, it only creates Person
Type Usage records required for the next step.
c. Run Maintain Party and Location Current Record Information ESS process with these parameters.
Parameter Value
Synchronization Type Worker
Person Type Null or Default
From Date Date on or after which worker records are loaded
To Date Date on or before which worker records are loaded
Person Number Null or Default
5. After all worker data is loaded and synchronized successfully, set these profile options to No. This step is
extremely important to make sure the application functions normally after go-live.
194

Oracle Fusion Cloud Human Resources
Implementing Global Human Resources
Chapter 9
Person
◦
ORA_HZ_ENABLE_MPLCRI_ACTIVE_WORKER to No
◦
HRC_DISABLE_HCM_EVENTS_PROCESSING to No
CAUTION: These profile options are set to Yes only when you’re synchronizing a large number of person records to
create parties. When you set the HRC_DISABLE_HCM_EVENTS_PROCESSING profile option to Yes, it disables all HCM
events across all modules including HCM approval transactions. Hence, this profile option should be set to No at all
other times. Since the above steps will synchronize person records in bulk, don't run the Synchronize Person Records
ESS process at this time.
2 - Refresh Manager Hierarchy
Run the Refresh Manager Hierarchy ESS process to de-normalize manager hierarchy information for all workers.
3 - Create Person Search Keywords and Optimize Keywords Index
After all workers are loaded for the first time, create person search keywords for people.
1. Run Update Person Search Keywords ESS process with all parameters left blank to create keywords for all
workers.
2. Run Optimize Person Search Keywords ESS process with default parameters.
4 - Create User Accounts
After all the workers are loaded, these LDAP requests are created.
1. CREATE - Request to create a new user account
2. UPDATE - Request to update an existing user account
3. TERMINATE - Request to terminate the user account. Created only if workers with termination dates are loaded.
The following points are expected because when workers are loaded there shouldn't be any role mappings:
1. For CREATE request types, there are no records in PER_LDAP_ROLE_MEMBERSHIPS
2. No requests of type USERROLE should exist.
Create User Accounts
Create user accounts for all eligible workers without assigning any roles to users.
1. Don't load the Users HDL dat file to assign any role memberships.
2. Go to Manage Enterprise HCM Information → Edit → Correct (do not use Update) and set User Account
Maintenance to None..
◦
This option controls whether to suspend user accounts if the user has no roles provisioned.
◦
When set to None, SUSPEND requests are created as SUPPRESSED.
3. Run Send Pending LDAP Requests ESS process with Batch Size = 20. This creates User Accounts for eligible
workers in Identity Store, and creates SUSPEND requests in SUPPRESSED status and user accounts without
roles aren't suspended.
4. Go to Manage Enterprise HCM Information → Edit → Correct (do not use Update) and set User Account
Maintenance to Both Person and Party.
195

Oracle Fusion Cloud Human Resources
Implementing Global Human Resources
Chapter 9
Person
CAUTION: If all workers have the same email address, it's recommended not to set the username generation rule
to email address because it can cause performance issues with the Send Pending LDAP Requests ESS process. The
application has to make multiple trips to the LDAP server to generate unique usernames based on the same email
address for all workers. Therefore, it's recommended to use a username generation rule other than Email or pre-
generate unique usernames and load the Workers dat file instead of the application generating it.
5 - Provision Roles to Users
Assign roles to user accounts created in step 4.
1. Configure all required role mappings.
2. Enable bulk operation for the Autoprovision Roles for All Users ESS job using these steps.
a. Go to Setup and Maintenance → Manage Profile Options.
b. Create a new profile option with these details. The profile option must be updatable only for SITE level.
Field Value
Profile Option Code PER_AUTO_PROVISION_ROLES_ENABLE_BULK
Profile Display Name Enable Bulk Mode for Autoprovision Roles
Application Global Human Resources
Module Users
Start Date <Today's date>
c. Set the profile value to Y at the SITE level.
3. Run the Autoprovision Roles for All Users ESS process with default input parameters. Roles are provisioned to
users based on role mapping rules. If roles are provisioned to suspended user accounts, those accounts will be
activated.
6 - Synchronize Personal Data for Users from HCM to Identity Store
1. After workers are loaded for the first time and user accounts are created, run the Send Personal Data for
Multiple Users to LDAP ESS process with All users as the parameter. This step updates all personal information
including manager details for the workers in their user account details.
2. Depending on the user population size, this process can take time to complete. Enable concurrent processing to
improve throughput.
a. Go to Setup and Maintenance → Manage Profile Options.
b. Create a new profile option with these details. The profile option must be updatable only for the SITE
level.
Field Value
Profile Option Code PER_IIP_SEND_PERSONAL_DATA
Profile Display Name PER_IIP_SEND_PERSONAL_DATA
Application Global Human Resources
196

Oracle Fusion Cloud Human Resources
Implementing Global Human Resources
Chapter 9
Person
Field Value
Module Users
Start Date <Today's date>
c. Go to Setup and Maintenance → Manage Administrator Profile Values.
d. Set the execution_mode_concurrent=Y for the profile option at SITE level
7 - Schedule Required ESS Processes
After cut-over is completed and the Fusion HCM application is in regular use, schedule these processes as per the
recommendations in this documentation on My Oracle Support.
• Fusion Global HR: ESS Jobs - Person Area (Doc ID 1593212.1)
• Best Practices for User and Role Provisioning in HCM
Person Lookups
This topic identifies common lookups that are person-related and have user or extensible configuration levels. Review
these lookups, and update them as appropriate to suit enterprise requirements using the Manage Common Lookups
task.
Person Information Lookups
Person information lookups are described in the following table:
Lookup Type Description Configuration Level
ORA_PER_EXT_IDENTIFIER_TYPES
Type of a person's identifier in an external
application, such as time device badge
identifier, third-party payroll identifier, or third-
party payroll alternate identifier
User
PER_NATIONAL_IDENTIFIER_TYPE
Type of a person's national identifier, such
as social security number, civil registration
number, or national insurance number
User
PERSON_TYPE_STATUS
Status of a user person type, such as active or
inactive
User
EMAIL_TYPE
Type of a person's email address, such as home
email or work email
Extensible
197

Oracle Fusion Cloud Human Resources
Implementing Global Human Resources
Chapter 9
Person
Lookup Type Description Configuration Level
Note:
A person can have only one work email by
default. If you want to add a secondary work
email, you must define another lookup type.
ADDRESS_TYPE
Type of a person's address, such as home
address or mailing address
Extensible
PHONE_TYPE
Type of a person's phone, such as home phone
or mobile phone
Extensible
PER_CM_MTHD
Communication methods for a person, such as
email or instant messenger
Extensible
PER_CONTACT_TIMES
Times of day when a specified phone number
can be used, such as evenings or weekends
Extensible
PER_ETHNICITY
Person's ethnicity, such as Hispanic, Asian, or
American Indian
User
PER_RELIGION
Person's religion, such as Christianity,
Hinduism, or Islam
Extensible
PROFESSION
Person's profession reported on a visa or work
permit, such as engineer, nurse, or teacher
Extensible
TITLE
Person's title, such as Miss, Doctor, or Professor,
forming part of the person's name
Extensible
HONORS
Higher qualifications, such as CPA, PhD, or DDS,
forming part of the person's name
Extensible
PER_HIGHEST_EDUCATION_LEVEL
Person's highest level of academic qualification,
such as BSc, Diploma, or MA.
User
MILITARY_RANK
Person's military rank, such as private, sergeant,
or corporal, forming part of the person's name
Extensible
BLOOD TYPE
Person's blood group, such as A rhesus
negative or B rhesus positive
User
CONTACT
Relationship between a person and the person's
contact, such as partner, child, or brother
User
MAR_STATUS
Person's marital status, such as single, married,
or legally separated
User
198

Oracle Fusion Cloud Human Resources
Implementing Global Human Resources
Chapter 9
Person
Lookup Type Description Configuration Level
SEX
Person's gender, such as male or female.
User
PER_VISA_PERMIT_TYPE
Person's visa permit type, such as study visa,
visit visa, or work visa.
User
For some of the person lookups that have a configuration level of User, Oracle has mapped and delivered corresponding
system lookup types. This is because Oracle delivers reports and processes that only permit specific values. If you
add or modify existing lookup codes, you need to map new or modified lookup codes to the Oracle-delivered lookup
codes. If this isn't done, the report will be incorrect. Use the Manage Extended Lookup Codes task in the Setup and
Maintenance work area to map the user or extensible lookup codes to system lookup codes.
User-Configurable Lookup Type System Lookup Type
CONTACT
ORA_PER_CONTACT
MAR_STATUS
ORA_PER_MAR_STATUS
PER_HIGHEST_EDUCATION_LEVEL
ORA_PER_HIGHEST_EDUCATION_LEVE
PER_NATIONAL_IDENTIFIER_TYPE
ORA_PER_NATIONAL_IDENTIFIER_TY
PER_ETHNICITY
ORA_PER_ETHNICITY
PER_VISA_PERMIT_TYPE
ORA_PER_VISA_PERMIT_TYPE
SEX
ORA_PER_SEX
These are some key points.
• If you change any of the details in an Oracle delivered lookup code in the user lookup types, you take ownership
of the lookup code. The lookup code won't be updated when Oracle delivers any updates to that lookup code.
But, if you delete the lookup code in the user lookup type, it will be replaced when Oracle delivers updates to
the lookup type.
• If the lookup code is specific to a country then the country is selected in the Extended Lookup Codes table. If
a lookup code has multiple countries, then there will be multiple entries, one for each country in the Extended
Lookup Codes table. Alternatively, if no country is selected, the lookup code is considered global.
Document Information Lookups
Document information lookups are described in the following table.
199

Oracle Fusion Cloud Human Resources
Implementing Global Human Resources
Chapter 9
Person
Lookup Type Description Configuration Level
PER_DRIVERS_LICENSE_TYPE
Type of a person's driver's license, such as
permanent or temporary
Extensible
PER_CITIZENSHIP_STATUS
Status of a person's citizenship, such as active
or expired
Extensible
PER_PASSPORT_TYPE
Type of a person's passport, such as emergency
or regular
Extensible
PER_VISA_PERMIT_TYPE
Type of a person's visa or work permit, such as
temporary worker or residence permit
User
PER_VISA_PERMIT_STATUS
Status of a person's visa or work permit, such
as pending or active
Extensible
Disability Information Lookups
Disability information lookups are described in the following table.
Lookup Type Description Configuration Level
DISABILITY_CATEGORY
Type of a person's disability, such as hearing
loss or visual impairment
User
DISABILITY_REASON
Causes of a person's disability, such as accident
or illness
Extensible
DISABILITY_STATUS
Status of a person's disability registration, such
as approved or pending
User
ORA_PER_SELF_DISCLOSE_DISABILITY
Type of self-disclosure responses for a disability
based on the country selection.
User
ORA_PER_DISABILITY_COUNTRY
List of all countries for which disability
information can be defined.
This lookup is used to manage the display
of countries when workers specify their own
disabilities.
Extensible
200

Oracle Fusion Cloud Human Resources
Implementing Global Human Resources
Chapter 9
Person
Use Gender Lookup Type in the EEO Report
In this example, you will learn what you need to do so that the Oracle delivered United States Equal Employment
Opportunity (EEO) report operates correctly if you add a new lookup code in the SEX lookup type.
Kate Williams is the Director of Human Resources and she wants her employees in the United States to be able to select
a value of "Undeclared" while specifying the gender.
As a part of this, you will create a new lookup code in the SEX lookup type with a value of "Undeclared" and a tag of
"+US", and map this to the Oracle delivered Gender of a person (System Lookup).
Note: This is an example of the mapping that needs to be done if you add a new lookup code. Oracle doesn't
recommend that the "Undeclared" value always be mapped to the "Male" value for EEO reporting purposes.
Create a New Code
1. Click Setup and Maintenance under the name menu.
2. Search for and click the Manage Common Lookups task.
3. Enter SEX as the Lookup Type and click Search.
4. Click the + icon (New) in the SEX: Lookup Codes section and enter this information.
Field Value
Lookup Code
UNDECLARED
Enabled
Select the check box
Start Date
01/01/2000
Meaning
Undeclared
Tag
+ US
5. Click Save and Close.
Map the New Lookup Code to the System Lookup
1. Click Setup and Maintenance link under the name menu.
2. Search for and click the Manage Extended Lookup Codes task.
3. Navigate to and select Gender of a person (System Lookup) in the Lookup Type region.
201

Oracle Fusion Cloud Human Resources
Implementing Global Human Resources
Chapter 9
Person
4. Click Add to enter this information.
Field Value
Country
United States
Lookup Code
Male
Extended Code
UNDECLARED (this is the value added in the Lookup Code in the above task)
Extended Name
Undeclared (this is the value added in the Meaning in the above task)
All Enterprises
Yes
5. Click Save and Close.
The EEO report will now display all employees who have selected a gender of "Undeclared" as "Male".
Related Topics
•
Overview of Lookups
Considerations for Duplicate Checks When Importing
Person Records
You can specify at the enterprise level whether to search for duplicates when creating person records using HCM Data
Loader or the new hire flows (except the classic pages).
Use the Manage Enterprise HCM Information task in the Setup and Maintenance work area to set duplicate checks when
importing or creating person records. You can also request a duplicate person check for individual worker objects that
you load using HCM Data Loader. Any setting specified on the worker object takes precedence over the enterprise-level
setting.
If one or more criteria is missing when the other criteria produce a match, the application identifies the record as a
matching record. All records that are a match aren't imported.
You can select from any of these Person Creation Duplicate Check settings
None
The application doesn't check for any matching person records.
202

Oracle Fusion Cloud Human Resources
Implementing Global Human Resources
Chapter 9
Person
National ID Country-Type-ID
The application checks for the national identifier country, type, and country in a person's record. If the national identifier
value is null, no duplicates are found.
Last Name, First Initial, DOB Or NID Country-Type-ID
The application checks for the national identifier record with the same country and type, or if either one is null.
Alternatively, it checks for the last name, first initial and date of birth.
Last Name, First Initial, DOB, Gender Or NID Country-Type-ID
The application checks for the last name, the first name initial, and the date of birth, or only the national identifier with
the same country and type.
Last Name, First Name, DOB, Gender Or NID Country-Type-ID
The application checks for the last name, the first name, the date of birth, and the gender, or only the national identifier
with the same country and type.
Other Options
The other options are 1) NID 2) Last Name, First Initial, Date of Birth or National ID 3) Last Name, First Initial, Date of
Birth, Gender or National ID, and 4) Last Name, Full First Name, Date of Birth, Gender or National ID.
Related Topics
•
How Person Records Are Matched
Considerations for Loading Person Photos
You can load employees' photos in the employee's public information page, from the Change Photo quick action on the
Me tab, or the HCM Data Loader. Employees can also upload their own photos using the person spotlight window.
In this topic, you will learn about the important considerations to note when loading person photos.
Employee Personal Health Data
Before loading employee photos, consider whether the photos might create an unintended connection to employee's
personal health data. Privacy and security protections in your country may apply.
Include or Exclude Photos
To upload multiple photos at a time use the Worker object in the HCM Data Loader.
When uploading the photo,
• Ensure that the file size is less than 20 megabytes.
• Upload a photo in any format, but the typical format is either a .png or .jpeg file.
203

Oracle Fusion Cloud Human Resources
Implementing Global Human Resources
Chapter 9
Person
• Ensure that the photo dimensions are 90 x 120 pixels to help reduce the distortion of photo. If the photo isn't 90
x 120 pixels, it's recommended to maintain a 3 x 4 aspect ratio.
If you want to disable workers from uploading photos, you must either remove the related security privilege from the
Worker role or hide the photo section using page composer.
Note: Contact your administrator to remove the security privilege.
Shape of Photo Section
To set the shape of the photo section, you must specify a value in the PER_PERSON_IMAGE_DISPLAY profile option. You
can set the value for this profile as Circle or Square.
Caching Images
To cache person photos to improve performance of pages that display many images, for example, organization chart,
you must specify Y in the PER_IMAGE_ENABLE_CACHING profile option. You can also choose not to cache photos
especially if people at your site use kiosks to access the application.
Related Topics
•
How You Cache Person Photos
How You Cache Person Photos
You can cache person photos to improve performance, using the profile option PER_IMAGE_ENABLE_CACHING. You
create the profile option using the Manage Profile Options task.
After you create the profile option, set the value using the Manage Administrator Profile Values task in the Setup and
Maintenance work area.
Creating the Profile Option and Setting the Value
You can improve the performance of pages that display many photos (for example, organization chart) by caching the
person photo.
You create the profile option by providing PER_IMAGE_ENABLE_CACHING as the profile option code, Per Image Enable
Caching as the display name, and Global Human Resources as the application and module. As this is a site-level profile,
select the Enabled and Updatable check boxes at the Site level. After creating the profile option, set the profile value to Y
using the Manage Administrator Profile Values task.
You can choose not to cache the photos especially if people at your site use kiosks to access the application.
Related Topics
•
Create and Edit Profile Options
204

Oracle Fusion Cloud Human Resources
Implementing Global Human Resources
Chapter 9
Person
How National Identifiers are Validated
A national identifier is unique when it doesn't match any other national identifier in the application.
You can set up validation to check for the country-type-number combination by setting the Person Creation Duplicate
Check enterprise option to one of the options that contains these 3 attributes. For example, when you specify the option
National Identifier Country and National Identifier Type and National Identifier Number as the enterprise option, then
the check for national identifier uniqueness is done on national identifiers having these 3 attributes. A national identifier
- United States, SSN, 887-2234 will be considered unique to the national identifier - United Kingdom, SSN, 887-2234,
simply because the countries don't match even if the type and number are the same.
The national identifier is validated when you add a national identifier during any of the add new person processes or
while changing a person's information. The ID is also validated when you add it when creating a person record using any
of these services:
• Worker v2 service
• Worker REST service
• HCM Data Loader and HCM Spreadsheet Data Loader
A point to note is that Oracle Recruiting candidates aren't included in the check when a person record is created using
the methods mentioned earlier. However, the national identifier of these candidates can be checked against the national
identifiers of all non-candidates when they become pending workers.
Profile Option to Validate the National Identifier
You need to enable the National Identifier Uniqueness Validation Mode profile option to check if the national identifier
in a person record is unique. You can choose any of these values at the site-level.
Profile Option Value Description
None
The national identifier isn't checked for uniqueness.
Warning
A warning is displayed indicating the national identifier isn't unique. You can continue with the same
value however.
Error
An error message is displayed preventing you from entering a national identifier, which isn't unique.
Duplicate Person Check
The duplicate person check identifies whether a person record is unique based on the first and last names, date of
birth, and national identifier. The national identifier validation checks for the uniqueness of the national identifier in the
person record. The differences between the two are indicated in this table:
205

Oracle Fusion Cloud Human Resources
Implementing Global Human Resources
Chapter 9
Person
Attribute National Identifier Validation Duplicate Person Check
How is it configured?
Configured using the National Identifier
Uniqueness Validation Mode profile option.
Configured using the Person Creation Duplicate
Check enterprise option.
When is it triggered?
When you create or update a person's national
identifier record (excluding Oracle Recruiting
candidates)
When you hire an employee, a contingent
worker, a nonworker, a pending worker, or
when a candidate is transformed into a pending
worker, depending on the configuration in
Oracle Recruiting.
How does it work?
Enabled using a profile option and checks
uniqueness of national identifier.
When enabled, each new or updated national
identifier record is checked for uniqueness
against the records of all other people
(excluding Oracle Recruiting candidates), to
show a warning or error to prevent the action if
a national identifier number is found to belong
to another person.
This is independent of national identifier
uniqueness validation. When enabled, each
new person record will first be checked for
any existing duplicate records. If any possible
duplicates are found, the user can decide
how to proceed. The definition of duplicate is
configured in the enterprise option, and can
include comparing the names, dates of birth,
and even genders, or the national identifiers
and their countries and types.
Related Topics
•
Candidate Duplicate Check and Merge After Job Offers
How Person Addresses Are Validated
When a user enters the postal code from the UI, the other corresponding address fields are updated automatically and a
validation is done to check whether the value entered is correct.
However, from REST and HDL, no such validation is done to check whether the geography hierarchy or the combination
of address values entered are invalid. For such scenarios, you can run the Validate Geographies of Addresses Against
Master Geographies ESS process with these parameters: Location Table Name = PER_ADDRESSES_F, Run Type = ALL,
Country Code. This ESS process will give the list of addresses that don't match the validation. You can then correct these
addresses.
Related Topics
•
Guidelines for Loading Person Address
User and Role-Provisioning Setup Options
User and role-provisioning options control the default management of some user account features. To set these
options, perform the Manage Enterprise HCM Information task in the Workforce Structures functional area for your
offering. You can edit these values and specify an effective start date.
206

Oracle Fusion Cloud Human Resources
Implementing Global Human Resources
Chapter 9
Person
User Account Creation
The User Account Creation option controls:
• Whether user accounts are created automatically when you create a person, user, or party record
• The automatic provisioning of roles to users at account creation
Note: User accounts without roles are suspended automatically. Therefore, roles are provisioned
automatically at account creation to avoid this automatic suspension.
The User Account Creation option may be of interest if:
• Some workers don't need access to Oracle Applications Cloud.
• Your existing provisioning infrastructure creates user accounts, and you plan to integrate it with Oracle
Applications Cloud.
User Account Role Provisioning
After a user account exists, users both acquire and lose roles as specified by current role-provisioning rules. For
example, managers may provision roles to users manually, and the termination process may remove roles from users
automatically. You can control role provisioning by setting the User Account Role Provisioning option.
Note: Roles that you provision to users directly on the Security Console aren't affected by this option.
User Account Maintenance
The User Account Maintenance option controls whether user accounts are suspended and reactivated automatically.
By default, a user's account is suspended automatically when the user is terminated and reactivated automatically if the
user is rehired.
User Account Creation for Terminated Workers
The User Account Creation for Terminated Workers option controls whether user account requests for terminated
workers are processed or suppressed. This option takes effect when you run the Send Pending LDAP Requests
process.
Related Topics
•
User Account Creation Option
•
User Account Role Provisioning Option
•
User Account Maintenance Option
•
User Account Creation for Terminated Workers Option
207

Oracle Fusion Cloud Human Resources
Implementing Global Human Resources
Chapter 9
Person
Considerations for Configuring the Personal Info Pages
in the Transaction Design Studio
Let’s look at the key considerations when configuring these responsive pages in the Transaction Design Studio -
Personal Details, Contact Info, Family and Emergency Contacts, Identification Info, and Additional Person Info.
• You can’t use the Country parameter along with the Page Attributes but you can use the Country parameter
in conjunction with the Available Attributes to show or hide, or make the fields required. This is because the
Country parameter works based on the country of the record. For example, for the country of the national
Identifier, visa, or passport, you can use this parameter to display different attributes per country. For the
national Identifier, you can display the Expiration Date for one country but not for other countries.
• Email and Biographical Info objects don’t have a country stripe. So, the Country parameter can’t be used even
with Available Attributes for these objects.
• You can’t configure the Name and Address regions in the Transaction Design Studio. The display of these
regions is controlled by the settings specified in the Manage Person Name Styles and Manage Address Format
configuration tasks. Hence, they are excluded from the Transaction Design Studio to avoid conflicts between
the configuration setup and the Transaction Design Studio settings.
• Because of the global person model, a single country setting doesn’t apply for a person.
Considerations for Deleting Tags from Lookup Codes
Tags are used in the HCM application to identify either a specific legislation or a group of legislations for a specific
lookup code
Before you delete a tag from a lookup code, you need to first check to make sure that you do not have any records that
reference that tag. If you do, you should first delete the record with the lookup code associated with that tag, then delete
the tag from the lookup code.
If you delete the tag before deleting the identified record, then you need to add the tag back, delete the identified
record, then delete the tag.
Deep Links for Person Spotlight Public Info
You can use deep links to open the Person Spotlight Public Info responsive pages without navigating through the menu
structure. Deep links are useful when you want users to go directly from various locations to Oracle Applications Cloud.
You can add deep links to a business intelligence report, an email notification, or a company website hosted on Oracle
Cloud. For example, you can enable direct navigation to the My Team page. To see a complete list of the available deep
links, use the Deep Links work area (Navigator > Tools > Deep Links). To access this work area, you need to have the
View Administration Link (FND_VIEW_ADMIN_LINK_PRIV) privilege.
208

Oracle Fusion Cloud Human Resources
Implementing Global Human Resources
Chapter 9
Person
How Deep Links Work
You can copy a URL from the Deep Links page and use it on your company website or other content, such as your
reports and analytics. You can use deep links as is, or edit the link details to open product-specific pages and then add
them to external sources. For more information, refer to your product-specific documents.
Note: If users click a deep link URL from your company website, but aren't yet signed in to Oracle Applications Cloud,
they're automatically redirected to the Sign In page.
URL Pattern of Deep Links
Here's the typical URL pattern of a deep link.
https://<pod-name>/fndSetup/faces/deeplink?
objType=<objID>&objKey=<name1=value1;name2=value2>&action=<action>&returnApp=<returnappURL>&returnAppParams=<returnAppParameter>
To direct users to a product-specific action page, you need to add specific parameters to the deep link URL.
You can use these parameters in the person spotlight public info deep links:
• Person ID
• Assignment ID
Note: Here are a few points to keep in mind:
• You must not click deep links that require parameters directly on the deep links page. If the signed-in user
doesn’t have an associated person record, then a blank page is displayed when the user clicks the deep link.
• If the signed-in user doesn’t have an associated person record, then a blank page is displayed when the user
clicks the deep link.
This table lists the parameters for deep links, along with their descriptions and some examples of parameter values.
Parameters with Descriptions and Values
Parameter Description Example of Parameter Values
pod-name Identifies the host name.
pod.oraclecloud.com
objType Identifies the object type, such as work areas. DIRECTORY_ORG_CHART
objKey Identifies the specific object ID. personId
action Identifies the specific action that you want the
users to do on the UI.
Here are a few points to keep in mind:
• If you don't add any value for the action
parameter, this value is considered as
NONE by default. So users will be taken
to a high-level page, such as an overview
page or a search page. But you can also
add other actions, such as EDIT.
NONE
VIEW
CREATE
EDIT
209

Oracle Fusion Cloud Human Resources
Implementing Global Human Resources
Chapter 9
Person
Parameter Description Example of Parameter Values
• If the value that you add for the action
parameter doesn't match with any action
on the UI, or the user doesn't have the
privileges to access that action, they will
be taken to a high-level page.
returnAppURL Specifies the application URL to which the users
will be automatically redirected, when they try
to return to the previous page or after they
complete their task.
If you're using a third party URL, make sure
the application name is registered using the
Manage Integration of Additional Applications
page in the Setup and Maintenance work area.
MyOracle
returnAppParams If required, you can add parameters to your
returnAppURL.
type=photo
List of Available Deep Links and Their Security Requirements
When you add deep links to a business intelligence report or a company website, users can simply click those links to
go directly to the application pages they need to use, without any additional clicks or navigation. You can find all of the
available deep links in the Deep Links work area. Some deep links, such as those assigned the NONE action, are ready
to use as is. Other deep links, such as those assigned the VIEW action, require you to edit the link details before you can
use them.
This table lists the deep links for Person Spotlight Public Info and Organization Chart that are available in the Deep links
work area.
Deep Links for Person Spotlight Public Info
Deep Link Purpose ObjKey Needed? (Y/N) Name and Description of
ObjKey Parameter
ObjKey Parameter Values
Directory (DIRECTORY_
ORG_CHART,NONE)
Opens the ORG chart page
of the signed-in user.
N NA NA
Directory (DIRECTORY_
SEARCH,NONE)
Opens the directory search
landing page.
N NA NA
Person (PUBLIC_PERSON_
PAGE,NONE)
Opens the public person
page of the signed-in user.
N NA NA
Person Spotlight (PERSON_
SPOTLIGHT,NONE)
Opens the person spotlight
page of the signed-in user.
N NA NA
Person Spotlight (PERSON_
SPOTLIGHT_ANY,NONE)
Opens the person spotlight
page of any person.
Y pPersonId : Person
Identifier of Person
pAssignmentId :
Assignment Identifier of
Person
pPersonId: PERSON_ID
column in PER_PERSONS
or PER_ALL_PEOPLE_F
tables
pAssignmentId:
ASSIGNMENT_ID column in
PER_ALL_ASSIGNMENTS_
M table
210

Oracle Fusion Cloud Human Resources
Implementing Global Human Resources
Chapter 9
Person
This table lists the target audience and security requirements for different Person Spotlight Public Info deep links.
Note: When you use the URLs mentioned in the examples:
• Replace instances of pod.oraclecloud.com with your pod name.
• For the pPersonId and pAssignmentId objKey parameters, use the actual person ID and assignment ID. In the
examples, these are indicated with sample values.
Security Requirements for Person Spotlight Deep Links
Deep Link Audience Security Requirements Examples
Directory (DIRECTORY_ORG_
CHART,NONE)
Employee Functional Security:
• Access FUSE Directory Page
Data Security:
• Search Person Deferred
• (Access Person Gallery)
https://
pod.oraclecloud.com/
fscmUI/faces/deeplink?
objType=DIRECTORY_ORG_
CHART&action=NONE
Directory (DIRECTORY_SEARCH,
NONE)
Employee, Manager, HR Functional Security:
• Access FUSE Directory Page
Data Security:
• Search Person Deferred
• (Access Person Gallery)
https://
pod.oraclecloud.com/
fscmUI/faces/deeplink?
objType=DIRECTORY_
SEARCH&action=NONE
Person (PUBLIC_PERSON_PAGE,
NONE)
Employee, Manager, HR Functional Security:
• Access FUSE Directory Page
Data Security:
• Search Person Deferred
• (Access Person Gallery)
https://
pod.oraclecloud.com/
fscmUI/faces/deeplink?
objType=PUBLIC_PERSON_
PAGE&action=NONE
Person Spotlight (PERSON_
SPOTLIGHT,NONE)
Employee, Manager, HR Functional Security:
• Access Person Spotlight
Data Security:
• Search Person Deferred
• (Access Person Gallery)
https://
pod.oraclecloud.com/
fscmUI/faces/deeplink?
objType=PERSON_
SPOTLIGHT&action=NONE
Person Spotlight (PERSON_
SPOTLIGHT_ANY,NONE)
Employee, Manager, HR Functional Security:
• Access Person Spotlight
Data Security:
• Search Person Deferred
• (Access Person Gallery)
https://
pod.oraclecloud.com/
fscmUI/faces/deeplink?
objType=PERSON_SPOTLIGHT_
ANY&action=NONE&objKey=pPersonId=300100077923877;pAssignmentId=300100077923906
211

Oracle Fusion Cloud Human Resources
Implementing Global Human Resources
Chapter 9
Person
FAQs for Person
What happens if I change the status of a user person type?
The status of a user person type determines whether it's available across Oracle Fusion HCM.
If you inactivate a user person type, there is no impact on worker assignments that are currently associated with that
person type. However, starting from the date of inactivation, you can't select that person type to associate with worker
assignments.
Note: You cannot inactivate a default user person type. You must first select a different user person type as the
default.
What's the purpose of the default user person type?
Each system person type contains a default user person type that the application uses to associate with person records
for reporting and display purposes.
When you hire a worker and specify assignment information, the application associates the default user person type
with that worker assignment. However, if you select a different person type, then the application considers the selected
person type as the default one for that worker.
When does the application update stored names with a person
name format?
When you update a name format, you run the Apply Name Formats to Person Names process so that the application
updates the stored names according to the updated format type rules. You run the process for a specific name format
and legislation combination.
You then run the Update Person Search Keywords process followed by the Synchronize Person Records process. For
these processes, use the same date as when the Apply Name Formats to Person Names process was run and set After
Batch Load to Yes. This is because the last_update_date in the PER_PERSON_NAMES_F table is updated when the Apply
Name Formats to Person Names process is run.
How can I switch between local and global formats to display
person names?
You use the HR: Local or Global Name Format profile option. If you select the global name format, then person names
appear in the same format across all legislations.
212

Oracle Fusion Cloud Human Resources
Implementing Global Human Resources
Chapter 9
Person
If you select a particular legislation, then person names appear in a format specific to that legislation. For example, if
you set the profile option to Japan, then Japanese person names appear in the local name format that was created for
Japan. However, person names that were stored using formats other than those of the Japanese legislation appear
according to the global name format.
What's the difference between person name formats and person
name styles?
Person name formats determine the order of the person name components for a specific format type.
The sequence of components for predefined name format types can be configured for a country. For example: Display
Name can be defined as First Name, Last Name, and List Name can be defined as Last Name, First Name.
Person name styles define the person name components that can be captured for a country; for example, first name,
last name, title, previous last name, known as, and so on. Person name styles can be configured by selecting the
required name components for a country.
Why can't I see the people I just imported?
After you load person data, you need to run these processes in order.
1. Synchronize Person Records process with the required date range and the After Batch Load parameter set to
Yes.
2. Update Person Search Keywords process with After Batch Load parameter set to Yes.
3. Send Pending LDAP Requests process with the User Type parameter set to All and Batch Size parameter set to
A.
What are the lookup types associated with person identifiers?
The ORA_PER_EXT_IDENTIFIER_TYPES lookup type provides the predefined identifier types. You can add more types
such as a person's parking pass identifier by adding values to this lookup type. The predefined identifier types are Time
Device Badge identifier, Third-Party Payroll identifier, and Third-Party Payroll Alternate identifier.
How can I enable the Employment Details tab in the Personal
Information work area?
The tab isn't available out of the box. To enable the tab, you must create a sandbox and set the Visible property of the
tab to Yes.
To do this, select Configuration > Structure from the Navigator menu, expand the Me category, and click Personal
Information. Then, set the property for the tab in the Tabs area.
213

Oracle Fusion Cloud Human Resources
Implementing Global Human Resources
Chapter 9
Person
How can I add additional content on the questionnaire pages?
You can enable and configure an additional content card for each HCM app that uses the questionnaire page such as
Pay, Personal Info, and Absences, on the Me tab in the main menu.
When you click he additional content card, a blank page is displayed that you can configure. On this page, you can
provide employees information and content specific to your organization such as policy and procedures, links, and
instructional videos. Here's how you add the additional content card on the questionnaire page.
1. Activate a sandbox.
2. In the main menu, click Configuration > Structure.
3. Click Me and expand the application for which you want to enable the additional content card (for example,
Personal Info).
4. Select Additional Content for Personal Info.
5. Change the Name and Image as per your requirements, and change Visible to Yes, or enter an EL expression
to determine who sees the card.
6. Click Save and Close.
7. Use Page Composer to add additional content
Related Topics
•
Create and Activate Sandboxes
•
Guidelines for Using Page Composer
•
Add Additional Content to the Guided Flow for Promote Action
What are the parameters that I can use for different flexfield
configurations?
You can use these parameters for the flexfield configurations.
• PER_PASSPORT_DFF - LegislationCode and LEGISLATION_CODE
• PER_PERSON_EIT_EFF - EFFECTIVE_START_DATE and PERSON_ID
• PER_VISA_PERMIT_DFF - LEGISLATION_CODE and LegislationCode
How can I hide the Comments or the Attachments fields on the
Family and Emergency Contacts page?
You can hide or display the Comments or Attachments fields using the Transaction Design Studio (TDS).
In the TDS > Family and Emergency Contacts > Page Attributes > New Contact,
• The Comments attribute controls the Comments field in the Comments and Attachments section.
• The Attachments attribute controls the Attachments field in the Comments and Attachments section.
• The Comments and Attachments attribute controls the entire Comments and Attachments section.
214

Oracle Fusion Cloud Human Resources
Implementing Global Human Resources
Chapter 9
Person
If you don’t want either the Comments or Attachments fields to be displayed, you can set the Comments and
Attachments attribute to Not Visible. But, if you want just one of the fields or both fields to be visible, then you need to
set the Comments or the Attachments fields, or both to Visible and also set the Comments and Attachments field to
Visible.
215

Oracle Fusion Cloud Human Resources
Implementing Global Human Resources
Chapter 9
Person
216

Oracle Fusion Cloud Human Resources
Implementing Global Human Resources
Chapter 10
Employment
10 Employment
Employment Model
The employment model comprises two types of entities, which are work relationships and assignments.
To configure employment models for the enterprise or for individual legal employers, use the Manage Enterprise HCM
Information and Manage Legal Entity HCM Information tasks in the Setup and Maintenance work area respectively.
When you configure the employment model for the enterprise or legal employer (when you create or update the
enterprise or legal employer), you can select from four options:
• Single Assignment
• Single Assignment with Contract
• Multiple Assignments
• Multiple Contracts with Single Assignment
Single Assignment
If you select Single Assignment, each work relationship of any type has one assignment only.
The assignment is created automatically when the work relationship is created.
Single Assignment with Contract
If you select Single Assignment with Contract, users can include contract information in the single assignment.
217

Oracle Fusion Cloud Human Resources
Implementing Global Human Resources
Chapter 10
Employment
Creating the work relationship automatically creates the assignment. Including contract information in the assignment
is optional.
Multiple Assignments
If you select Multiple Assignments, each work relationship of any type can include one or more assignments.
Creating the work relationship automatically creates one assignment. Additional assignments are optional; you create
those manually.
Multiple Contracts with Single Assignment
If you select Multiple Contracts with Single Assignment, users can include multiple contracts. Each contract is associated
with a single assignment. However, if you're using the responsive Employment Contracts page, then you can associate a
single contract with multiple assignments during the responsive Add Assignment process.
Creating the work relationship automatically creates one assignment. Additional assignments are optional; you create
those manually. Including contract information in the assignment is optional.
218

Oracle Fusion Cloud Human Resources
Implementing Global Human Resources
Chapter 10
Employment
Related Topics
•
When to Select the Employment Model
•
Assignments
•
Work Relationships
When to Select the Employment Model
By default, every enterprise uses the single-assignment employment model. To select a different employment model for
the enterprise or for individual legal employers, use the Manage Enterprise HCM Information and Manage Legal Entity
HCM Information tasks in the Setup and Maintenance work area respectively.
This topic discusses the choices you can make and identifies any restrictions.
You can select a different employment model for individual legal employers.
Single Assignment v. Multiple Assignment
If you select:
• Single Assignment or Single Assignment with Contract, all work relationships in the enterprise or legal
employer are restricted to a single assignment.
Note: Even if the employment model is Single Assignment or Single Assignment with Contract, you can
still add a temporary or permanent assignment using the Add Assignment quick action. Single assignment
employment models don't display the Add Assignment action in the Actions list of values on the classic
Manage Employment page.
• Multiple Assignments, all work relationships in the enterprise or legal employer can include one or more
assignments; therefore, work relationships can include a single assignment when appropriate.
Note: If you don't want multiple assignments, make the Add Assignment action codes as inactive and
remove the security privileges related to the Add Assignment action.
219

Oracle Fusion Cloud Human Resources
Implementing Global Human Resources
Chapter 10
Employment
• Multiple Contracts with Single Assignment, all assignments in the enterprise or legal employer can be
associated with its individual contract.
Changing the Employment Model for the Enterprise or Legal Employer
In general, you can change the employment model for the enterprise or legal employer both during initial
implementation and later. However, there are some restrictions on switching to and from particular employment
models.
The following table identifies the valid and restricted switching options.
From To Single Assignment To Single Assignment
with Contract
To Multiple Assignments To Multiple Contracts with
Single Assignment
Single Assignment
N/A
Yes
Yes
Yes
Single Assignment with
Contract
See note
N/A
See note
Yes
Multiple Assignments
Yes
Yes
N/A
Yes
Multiple Contracts with
Single Assignment
See note
See note
See note
N/A
Note: Yes, provided that no work relationships exist in the enterprise or legal employer.
Note: Use HCM Data Loader when you're changing the employment model from a Single Assignment or Multiple
Assignments models to either Single Assignment with Contract or Multiple Contracts with Single Assignment and you
want to add a contract for existing workers.
Employment Configuration Options
You can configure employment-related options at the enterprise level by using the Manage Enterprise HCM Information
task in the Setup and Maintenance work area. This table provides the description and default value for each option.
Option Description Default Value
Guided Flows: Future-Dated Records Validation
You can use this option to control whether
users can update assignments with future-
dated records using the self service
employment pages. You can select from these
values:
None: No validation is displayed.
None
220

Oracle Fusion Cloud Human Resources
Implementing Global Human Resources
Chapter 10
Employment
Option Description Default Value
Error: An error message is displayed indicating
that the assignment has a future-dated record
and the user is prevented from updating the
assignment.
Warning: A warning message is displayed
indicating that the assignment has a future-
dated record. The user can choose to ignore the
message and continue with the transaction.
Validation For Existing Subordinates
Termination
You can use this option to control whether
users can terminate workers with direct reports
using the Terminate Work Relationship page.
You can select from these values:
None: No validation is displayed.
Error: An error message is displayed indicating
that the worker has direct reports and the user
is prevented from terminating the worker.
Warning: A warning message is displayed
indicating that the worker has direct reports.
The user can choose to ignore the message and
continue with the transaction.
Warning
Employment: Approver Region Collapsed
You can use this option to control whether
the Approvers region appears expanded or
collapsed in the Review pages in employment
flows. You can select from these values:
Y: The Approvers region appears collapsed.
N: The Approvers region appears expanded.
Y
Automatically Convert Pending Workers
You can use this option to apply the setting to
all new pending worker records. You can select
from these values:
Y: All new pending worker records have a
default value of Yes in the Include for Automatic
Conversion field. The records that match
the conversion criteria will be automatically
converted when the Convert Pending Workers
Automatically process is run.
N: All new pending worker records have
a default setting of No for the Include for
Automatic Conversion field. These records
aren't converted when the scheduled process is
run.
Null or Blank: The behavior is similar to N.
Null or Blank
Default Enterprise Seniority Date
You can use this option to control whether the
enterprise seniority date must be defaulted to
the first hire date. You can select from these
values:
Null or Blank
221

Oracle Fusion Cloud Human Resources
Implementing Global Human Resources
Chapter 10
Employment
Option Description Default Value
Y: The enterprise seniority date will be
defaulted to first hire date.
N: The enterprise seniority date will be blank.
Null or Blank: The behavior is similar to N.
Note:
This configuration option is applicable only
for version 1 (V1) seniority dates.
Recruiting Integration
This field isn't available for use currently.
N/A
Employment Profile Options
Use the Manage Administrator Profile Values task in the Setup and Maintenance work area to manage profile options.
You can configure these employment-related profile options as required, to meet your enterprise requirements:
Profile Option Code Profile Display Name Default Profile Value Applicability Description
HR_DISABLE_PENDING_
APPROVALS_CHECK_IN _
HCM_DATA_LOADER
HR: Disable pending
approvals check in HCM
Data Loader
N
• HDL
If you set the profile option
to Y, the pending approval
check is disabled when
loading data using HCM
Data Loader.
ORA_PER_ASSIGNMENT_
LEVEL_DATA_SECURITY_
ENABLED
PER: assignment level
security enabled
N
• Redwood
• Responsive
Enables assignment-level
security.
ORA_PER_CLE_COPY_FUT_
ASG
Future Assignment
Changes Copy Enabled
N
• Responsive
By default, the future
assignment updates won't
be moved to the new
assignment during a legal
employer change. To move
the future assignment to
the new assignment, you
must set the profile option
to Y.
If you set the profile option
to Y, these things happen:
• Future assignment
updates are copied.
• Future updates for
these Payroll objects
are copied:
◦
Overtime Period
222

Oracle Fusion Cloud Human Resources
Implementing Global Human Resources
Chapter 10
Employment
Profile Option Code Profile Display Name Default Profile Value Applicability Description
◦
Timecard Required
◦
Element entries not
linked to Calculation
Cards, including future
non-recurring entries.
• Assignment updates
are also copied to
the new assignment
if there are date
effective updates on
the source assignment
past the termination
date of the source
work relationship.
ORA_PER_CLE_COPY_FUT_
TERMINATION
Future Termination Copy
Enabled
Y
• Responsive
By default, the future
termination will be
moved to the new work
relationship during a legal
employer change. To stop
the future termination from
being moved to the new
work relationship, you must
set the profile option to N.
If you set the profile option
to Y, these things happen:
• Future termination
will be copied even
if future assignment
updates are set to not
copy.
• Future termination
will be copied even
if future assignment
updates fail to copy
successfully.
ORA_PER_DOR_ASG_LVL_
DELETE_ON_CANCEL_WR
Delete Assignment Level
Document Records During
Cancel Work Relationship
Enabled
No
• Redwood
• Responsive
Enables you to delete
assignment-based
document records during
the cancel work relationship
process.
ORA_PER_DOR_ASG_LVL_
DELETE_ON_DELETE_ASG
Delete Assignment Level
Document Records During
Delete Assignment Enabled
No
• Redwood
• Responsive
Enable you to delete
assignment-based
document records during
the assignment deletion
process.
ORA_PER_DOR_ASG_LVL_
MOVE_ON_CHANGE_LE
Move Assignment Level
Document Records During
Change Legal Employer
Enabled
No
• Responsive
Enables moving of
assignment-based
document records during
the change legal employer
process.
223

Oracle Fusion Cloud Human Resources
Implementing Global Human Resources
Chapter 10
Employment
Profile Option Code Profile Display Name Default Profile Value Applicability Description
ORA_PER_DOR_DELETE_
ON_DELETE_ASG_DATE_
EFFECTIVE_CHG
Delete All Document
Records Associated with
the Deleted Assignment
Record
No
• Responsive
By default, the feature to
delete document records
associated with the deleted
assignment record isn’t
enabled. To enable the
feature, you must set the
profile option to Yes.
ORA_PER_EMP_RETAIN_
CHANGES
Retain employment
changes
N
• Responsive
By default, your changes
won't be retained in the
employment flows. To
retain your changes, you
need to set the profile
option to Y.
When the profile option
is set to Y, only valid
employment and person
changes are retained as
of the new effective date.
Changes for other sections,
such as Payroll and
Absences aren't retained.
To retain the salary
changes, you need to
navigate to the Salary
section after changing the
effective date. If the salary
basis changes when you
change the effective date,
the salary changes won't be
retained.
If you change the
transaction date, and the
date is earlier than the
previous assignment record
or later than the future
assignment record, your
changes won't be retained.
In this case, the current
application behavior of
resetting your changes will
continue.
When you enter a value
that's not valid as of the
newly changed date, the
value will be reverted to the
old value.
ORA_PER_EMPL_ADD_
ASG_COPY_FRM_SRC_
ENABLED
Copy Data from Source
Assignment While Adding a
New Assignment Enabled
Yes
• Redwood
Enables you to copy data
from source assignment
while adding a new
assignment. If the profile
option is set to No, then
data from the source
assignment won’t be
copied.
224

Oracle Fusion Cloud Human Resources
Implementing Global Human Resources
Chapter 10
Employment
Profile Option Code Profile Display Name Default Profile Value Applicability Description
ORA_PER_EMPL_ADD_
ASG_DEL_INFO
Add Additional Information
While Deleting an
Assignment Update
N
• Responsive
Specify additional
information when deleting
an assignment update.
In the Redwood Delete
Employment Details
process, additional
information is enabled
during deletion,
irrespective of this profile
option setting.
ORA_PER_EMPL_ADD_
ASG_DFLT_TEMP_
ENABLED
Default Add Assignment to
Temporary Enabled
Yes
• Redwood
Enables you to default the
assignment to temporary
while adding a new
assignment. If the profile
option is set to No, then the
assignment is defaulted as
permanent.
ORA_PER_EMPL_
COMBINED_CORRECTION_
DELETION
Combined Correction
and Deletion Enabled for
Employment Records
No
• Responsive
By default, the combined
correction and deletion
feature isn’t enabled for
employment records. To
enable the feature, you
must set the profile option
to Yes.
In the Redwood
Employment Info page, the
salary details are displayed
in the Historical Changes
and Future Changes
sections irrespective of this
profile option setting.
ORA_PER_EMPL_
DEFAULT_BUSINESS_
TITLE_FROM
Business Title Defaulting
Option
Retain User Changes
• Redwood
• Responsive
• REST
• HDL
By default, the current
application behavior of
retaining the user changes
is followed. When the
profile option is set to
Retain User Changes, the
application defaults the
business title to the job
name whenever there is
a change in job on the
worker's assignment.
However, if the user has
manually updated the
business title on the
worker's assignment, the
changes entered by the
user are retained even if
there is a change in job on
the worker's assignment.
If you set the profile option
to Automatically Update
Based on Job Change, the
application defaults the
business title to the job if
225

Oracle Fusion Cloud Human Resources
Implementing Global Human Resources
Chapter 10
Employment
Profile Option Code Profile Display Name Default Profile Value Applicability Description
there is a change in job on
the worker's assignment.
If you set the profile option
to Automatically Update
Based on Position Change,
the application defaults
the business title to the
position if there is a change
in position on the worker's
assignment.
ORA_PER_EMPL_
DEFAULT_EFFECTIVE_
DATE
Employment Transaction
Date Set by Default
Y
• Responsive
By default, the effective
start date is defaulted in
employment flows. If you
don't want the effective
start date to be defaulted,
you must set the profile
option to N.
In Redwood processes, the
transaction date is never
set by default, irrespective
of this profile option
setting.
ORA_PER_EMPL_DFLT_
LOGGED_USER_AS_LINE_
MGR_ENABLED
Default Logged in User as
Line Manager Enabled
Yes
• Redwood
• Responsive
Defaults the logged in user
as the line manager in Add
Person and Create Work
Relationship flows.
ORA_PER_EMPL_DISABLE_
TIME_CARD_CHK_
CANCEL_WR
Time Card Check
Disabled for Cancel Work
Relationship and Delete
Assignment
N
• Redwood
• Responsive
• REST
• HDL
By default, the application
prevents cancellation of
the work relationship and
deletion of the assignment
when a time card exists.
If you don't want the
application to prevent
cancellation and deletion
when a time card exists, set
the profile value to Y.
ORA_PER_EMPL_DISPLAY_
GT_HISTORY
Display assignment history
across global transfers
No
• Responsive
If you set the profile
option to Yes, the
assignment history
across legal employer
changes is displayed on
the Employment Info
responsive page.
To view the worker's
assignment history
across legal employer
changes, their source and
destination assignments
must be linked.
226

Oracle Fusion Cloud Human Resources
Implementing Global Human Resources
Chapter 10
Employment
Profile Option Code Profile Display Name Default Profile Value Applicability Description
Note:
For more information
about linking
assignments during a
legal employer change,
see the Process to Link
Source and Destination
Assignments for Global
Transfer topic in the
Related Topics section.
In the Redwood
Employment Info page, the
assignment history across
global transfers is always
displayed irrespective of
this profile option setting.
ORA_PER_EMPL_ENABLE_
WRK_ASG_REST_LOV
Enable Worker Assignment
REST LOV
N
• Responsive
By default, the REST LoV
isn’t used in the Business
Title LoV. To use the REST
LoV in the Business Title
LoV, set the profile value to
Y.
Note: The ORA_PER_
EMPL_ENABLE_WRK_
ASG_REST_LOV profile
option setting isn't
specific to Employment
Info. It applies to all HCM
products that use the
new Business Title LoV.
ORA_PER_EMPL_ELIG_
JOBS_RELIEF_TYPE_
ENABLED
Employment eligible jobs
relief type selection enabled
N
• Redwood
Enables you to select
eligible jobs relief type
as derived or manual. If
this isn't enabled then
the eligible jobs will be
added with the relief type
as derived.
ORA_PER_EMPL_FLOW_
REPLACED
Banner to Display Replaced
Employment Flow
Y
• Not Applicable
This profile option is no
longer being used by the
application.
By default, the banner
message is displayed which
says that the employment
flow will be replaced. If you
don't want to display the
banner message, you must
set the profile option to N.
ORA_PER_EMPL_GTA_
POP_DIRECTS
Defaulting of Direct Reports
in Selected Section
Reassign Existing Reports
• Responsive
By default, the existing
direct reports of the
manager will be copied
to the Reassign Existing
227

Oracle Fusion Cloud Human Resources
Implementing Global Human Resources
Chapter 10
Employment
Profile Option Code Profile Display Name Default Profile Value Applicability Description
Reports section. To display
existing direct reports in
the Add Direct Reports
section, you must set the
profile option to Add Direct
Reports.
If you set the profile
option to Reassign
Existing Reports, the
application defaults the
manager's existing direct
reports in the Reassign
Existing Reports section
of the Global Temporary
Assignment flow.
If you set the profile option
to Add Direct Reports,
these things happen:
• The application
defaults the
manager's existing
direct reports in
the Add Direct
Reports section of
the Global Temporary
Assignment flow.
• The application
doesn't display
direct reports in the
Add Direct Reports
section if there is a
pending employment
transaction for the
direct report.
• Direct reports who
don't have line
manager relationship
with the source
assignment continue
to stay in the source
assignment and
aren't moved to
the assignment
which is newly
created as part of
the global temporary
assignment.
• The Reassign Existing
Reports section won't
be shown in the global
temporary assignment
regardless of whether
you select the section
in the questionnaire
page.
Only those direct reports
with which the source
assignment has a line
228

Oracle Fusion Cloud Human Resources
Implementing Global Human Resources
Chapter 10
Employment
Profile Option Code Profile Display Name Default Profile Value Applicability Description
manager relationship will
be populated in the Add
Direct Reports section.
For example, Donna is a
line manager of Jeff and
Marry, and project manager
for Shaun. In this case,
only Jeff and Marry will
be defaulted in the Add
Direct Reports section
when the global temporary
assignment is started for
Donna.
ORA_PER_EMPL_REV_
TERM_PWK_WHEN_
CANCEL_WR
Reverse Terminate Pending
Worker When Employee
or Contingent work
relationship is canceled
No
• Redwood
Reverses the pending
worker termination
transaction when the
employee or contingent
worker work relationship is
canceled.
ORA_PER_ENABLE_
BUSINESS_TITLE_IN_
UNIVERSAL_PANEL
Enable Business Title in
Universal Panel
N
• Not Applicable
This profile option is no
longer being used by the
application.
Enable the business title
to be displayed along with
the person’s name in the
universal panel
ORA_PER_ENABLE_
PERSON_NUMBER_IN_
UNIVERSAL_PANEL
Enable Person Number in
Universal Panel
N
• Not Applicable
This profile option is no
longer being used by the
application.
Enable the person number
to be displayed along with
the person name in the
universal panel.
ORA_PER_POS_
INCUMBENT_TENURE_
ASG_SUP
Identifies the tenure
to aid in defaulting the
manager during position
synchronization
Shortest Tenure in
Enterprise
• Responsive
• Enterprise Scheduler
Service (ESS)
By default, the shortest
tenure in the enterprise
is used to identify the
incumbent of a position
with multiple incumbents
as part of defaulting the
manager during position
synchronization. The
other tenures you can use
to set the profile option
are: Longest Tenure in
Assignment, Longest
Tenure in Enterprise,
Longest Tenure in Position,
and Shortest Tenure in
Position.
ORA_POS_HIRING_
STATUS_FILTER
ORA_POS_HIRING_
STATUS_FILTER
N
• Responsive
Enable Position List of
Values filtering based on
Hiring Status.
229

Oracle Fusion Cloud Human Resources
Implementing Global Human Resources
Chapter 10
Employment
Profile Option Code Profile Display Name Default Profile Value Applicability Description
In pending worker pages,
the position LOV isn't
filtered, but instead an error
message is shown if the
user selects a position that
isn't approved for hiring.
The same validation also
applies when using HCM
Data Loader (HDL). The
position filtering doesn't
apply for nonworkers.
PER_DEFAULT_GRADE_
FROM_JOB_POSITION
PER_DEFAULT_GRADE_
FROM_JOB_POSITION
N
• Responsive
If you set this site-level
profile option to Y, and
there's only one valid grade
for a job or position, then
these conditions apply in
these flows:
• Hire and Add
Assignment
◦
If the selected position
has an entry grade,
then the entry grade is
defaulted.
◦
If the selected position
doesn't have an entry
grade and has a single
valid grade, then the
single valid grade is
defaulted.
◦
If the selected position
doesn't have any valid
grades (entry grade
is also a valid grade),
then no grade is
defaulted.
◦
If no position is
selected and the
job has a single
valid grade, then the
single valid grade is
defaulted.
• Employment,
Promote, and Transfer
◦
The grade isn't
overridden except
when the PER_
ENFORCE_VALID_
GRADES and PER_
DEFAULT_GRADE_
FROM_JOB_POSITION
profile options are set
to Yes and the single
valid grade is defined
at the position or job.
230

Oracle Fusion Cloud Human Resources
Implementing Global Human Resources
Chapter 10
Employment
Profile Option Code Profile Display Name Default Profile Value Applicability Description
If you set this site-level
profile option to N, the
grade is defaulted only if
it's an entry grade for the
position and the flow is Hire
or Add Assignment.
PER_DEPARTMENT_TREE_
FOR_MANAGER
PER_DEPARTMENT_TREE_
FOR_MANAGER
Null
• Redwood
• Responsive
If you set this profile option
to the department tree
value, the application
defaults the line manager
from the selected
department tree.
If no department manager
is defined, the application
searches higher levels in
the department tree and
fetches the manager from
the defined department.
If the transaction is
performed on the
department manager
assignment, the application
defaults the line manager
from a higher level in the
department tree.
If the department tree
has an active tree version,
then the line manager is
defaulted from the active
tree version.
If the department tree
doesn’t have an active
tree version, then the line
manager is defaulted from
the tree version that’s in
draft status and has the
latest last updated date.
PER_EMP_MANAGER_
NAME_LOV
PER_EMP_MANAGER_
NAME_LOV
Y
• Responsive
If you set the profile option
to N, the application
displays assignment
numbers in the manager
name list of values in the
employment classic page.
PER_ENFORCE_VALID_
GRADES
PER_ENFORCE_VALID_
GRADES
N
• Responsive
• REST
• HDL
If you set this site-level
profile option to Y, users
can do these actions:
• Select a grade only
from the list of
valid grades that
are defined for the
assignment set in
231

Oracle Fusion Cloud Human Resources
Implementing Global Human Resources
Chapter 10
Employment
Profile Option Code Profile Display Name Default Profile Value Applicability Description
the selected job or
position.
Note:
You can add grades
belonging to multiple
sets as valid grades for
the job or position.
• If users select the
job and position for
the assignment or
employment terms,
they can only select
grades that are valid
for the position. Also,
if the position doesn't
have any valid grades,
then the valid grades
of the job aren't
applied.
• If you don't define
valid grades for the
job or position, then
users can select
grades from the grade
ladder. If the grade
ladder doesn't have
any grades, then the
user can select from
all grades.
If you set this site-level
profile option to N, users
can select grades from
the grade ladder. If the
grade ladder doesn't have
any grades, then the user
can select from all grades
defined for the assignment
set.
PER_MANAGE_
CONTRACTS_
RESPONSIVE_ENABLED
PER_MANAGE_
CONTRACTS_
RESPONSIVE_ENABLED
Y
• Responsive
By default, the responsive
pages are enabled. If for
some reason you can't
move to the responsive
pages at this time, you
need to change the default
by setting the profile option
to N.
232

Oracle Fusion Cloud Human Resources
Implementing Global Human Resources
Chapter 10
Employment
Profile Option Code Profile Display Name Default Profile Value Applicability Description
Note:
Until release 20D,
the PER_MANAGE_
CONTRACTS_
RESPONSIVE_ENABLED
profile option had no
impact on the classic
Manage Employment
pages. However, from
release 21A, the contract
details won't be available
in the classic Manage
Employment pages
if the profile option
is set to Y. You can
manage employment
contracts using either
the responsive or
the classic Manage
Employment page, but
not both.
Related Topics
•
Process to Link Source and Destination Assignments for Global Transfer
•
Business Title Defaulting for Assignment in Employment Flows
•
Control Default of Effective Start Date in Employment Flows
Employment Lookups
This topic identifies common lookups that are employment-related and have user or extensible configuration levels.
Review these lookups, and update them as appropriate to suit enterprise requirements. You review lookups using the
Manage Common Lookups task in the Setup and Maintenance work area.
Worker Contract Lookups
Lookup Type Description Configuration Level
CONTRACT_TYPE
Type values, such as fixed-term, full-time, and
seasonal
User
Assignment Lookups
233

Oracle Fusion Cloud Human Resources
Implementing Global Human Resources
Chapter 10
Employment
Lookup Type Description Configuration Level
BARGAINING_UNIT_CODE
Codes that identify bargaining units, such as
health professionals, steel workers, and public
service workers
User
BUDGET_MEASUREMENT_TYPE
Work measure values, such as headcount and
FTE
Extensible
EMP_CAT
Assignment categories, such as full-time
regular and part-time temporary
User
EMPLOYEE_CATG
Worker type values, such as white collar, blue
collar, and civil servant
User
HOURLY_SALARIED_CODE
Identifier for the hourly assignment or salary
assignment
Extensible
PER_NON_WORKER_TYPES Lists all nonworker system person types Extensible
PER_SUPERVISOR_TYPE
Manager types, such as line manager, project
manager, and technical manager
Extensible
Note: If your enterprise uses matrix management (where a worker assignment has multiple managers of different
types), then you must review the predefined manager types in the PER_SUPERVISOR_TYPE lookup and add any
missing types. You may also need to create job roles for managers other than line managers and ensure that they
have appropriate access to the records of workers who report to them.
Seniority Dates Lookups
Lookup Type Description Configuration Level
ORA_PER_SENIORITY_ITEMS
Seniority date rules, such as enterprise
seniority, legal employer seniority, and so on.
User
Terminations Lookups
Lookup Type Description Configuration Level
ORA_PER_YES_NO_NOT_SPECIFIED For rehire recommendation Extensible
PER_PDS_REHIRE_REASON
Reasons, such as misconduct and poor
performance, for not recommending rehire of a
worker
User
234

Oracle Fusion Cloud Human Resources
Implementing Global Human Resources
Chapter 10
Employment
Areas of Responsibility Lookups
Lookup Type Description Configuration Level
PER_RESPONSIBILITY_TYPES
Worker responsibilities, such as benefits
representative, union representative and fire
warden
Extensible
Note: For Lookups in general, a relatively small number of lookup codes are created. Responsibility types lookups are
to support your typical responsibility classifications. The lookup codes must not exceed 500 values, or you'll run into
errors where the responsibility type is referenced.
Employment Flexfields
Use the Manage Descriptive Flexfields and Manage Extensible Flexfields tasks in the Setup and Maintenance work
area to manage flexfields. You can configure these employment-related flexfields as required, to meet your enterprise
requirements:
Assignment Flexfields
Application Table Name Descriptive Flexfield Code Name Used Availability
PER_ALL_ASSIGNMENTS_
M
PER_ASG_DF
Assignment Attributes
For storing additional
assignment information.
Available for use.
PER_ASSIGNMENT_
EXTRA_INFO_M
PER_ASSIGNMENT_EIT_
EFF
Assignment EIT
Information EFF
For storing additional
assignment information
as single and multiple
row extensible flexfield
contexts.
Available for use.
PER_ALL_ASSIGNMENTS_
M
PER_ASG_LEG_DDF
Legislative Assignment
Attributes
For storing additional
legislative assignment
information.
Available only for Oracle
localization use.
PER_ASSIGN_GRADE_
STEPS_F
PER_ASG_GRADE_STEPS_
LEG_DDF
Assignment Grade Steps
Legislative Information
For storing additional
legislative information
regarding assignment
grade steps.
Not available for use.
PER_ASSIGN_WORK_
MEASURES_F
PER_ASG_WORK_
MEASURES_DF
Assignment Work Measures
Attributes
For storing additional
information regarding
assignment work measures.
Not available for use.
235

Oracle Fusion Cloud Human Resources
Implementing Global Human Resources
Chapter 10
Employment
Application Table Name Descriptive Flexfield Code Name Used Availability
PER_ASSIGNMENT_
SUPERVISORS_F
PER_ASG_SUPERVISOR_DF
Assignment Supervisors
Attributes
For storing additional
information regarding
assignment supervisors.
Not available for use.
Action Occurrence Flexfields
Application Table Name Descriptive Flexfield Code Name Used Availability
PER_ACT_OCCURRENCE_
EXTRA_INFO
PER_ACTION_OCC_EIT_EFF ActionOccurrence EIT
Information EFF
For storing extra
information about the
deleted assignment record
in the Employment Info
page.
Available for use.
Work Relationship Flexfields
Application Table Name Descriptive Flexfield Code Name Used Availability
PER_PERIODS_OF_SERVICE
PER_PPS_DF
Work Relationship
Attributes
For storing additional work
relationship information.
Available for use.
PER_PERIODS_OF_SERVICE
PER_PPS_LEG_DDF
Work Relationship
Legislative Information
For storing additional
legislative information
regarding the work
relationship.
Available only for Oracle
localization use.
Employment Contract Flexfields
Application Table Name Descriptive Flexfield Code Name Used Availability
PER_CONTRACTS_F
PER_CONTRACT_DF
Contract Attributes
For storing additional
contract information.
Available for use.
PER_CONTRACTS_F
PER_CONTRACT_LEG_DDF
Contract Legislative
Information
For storing additional
legislative information
regarding the contract.
Available only for Oracle
localization use.
236
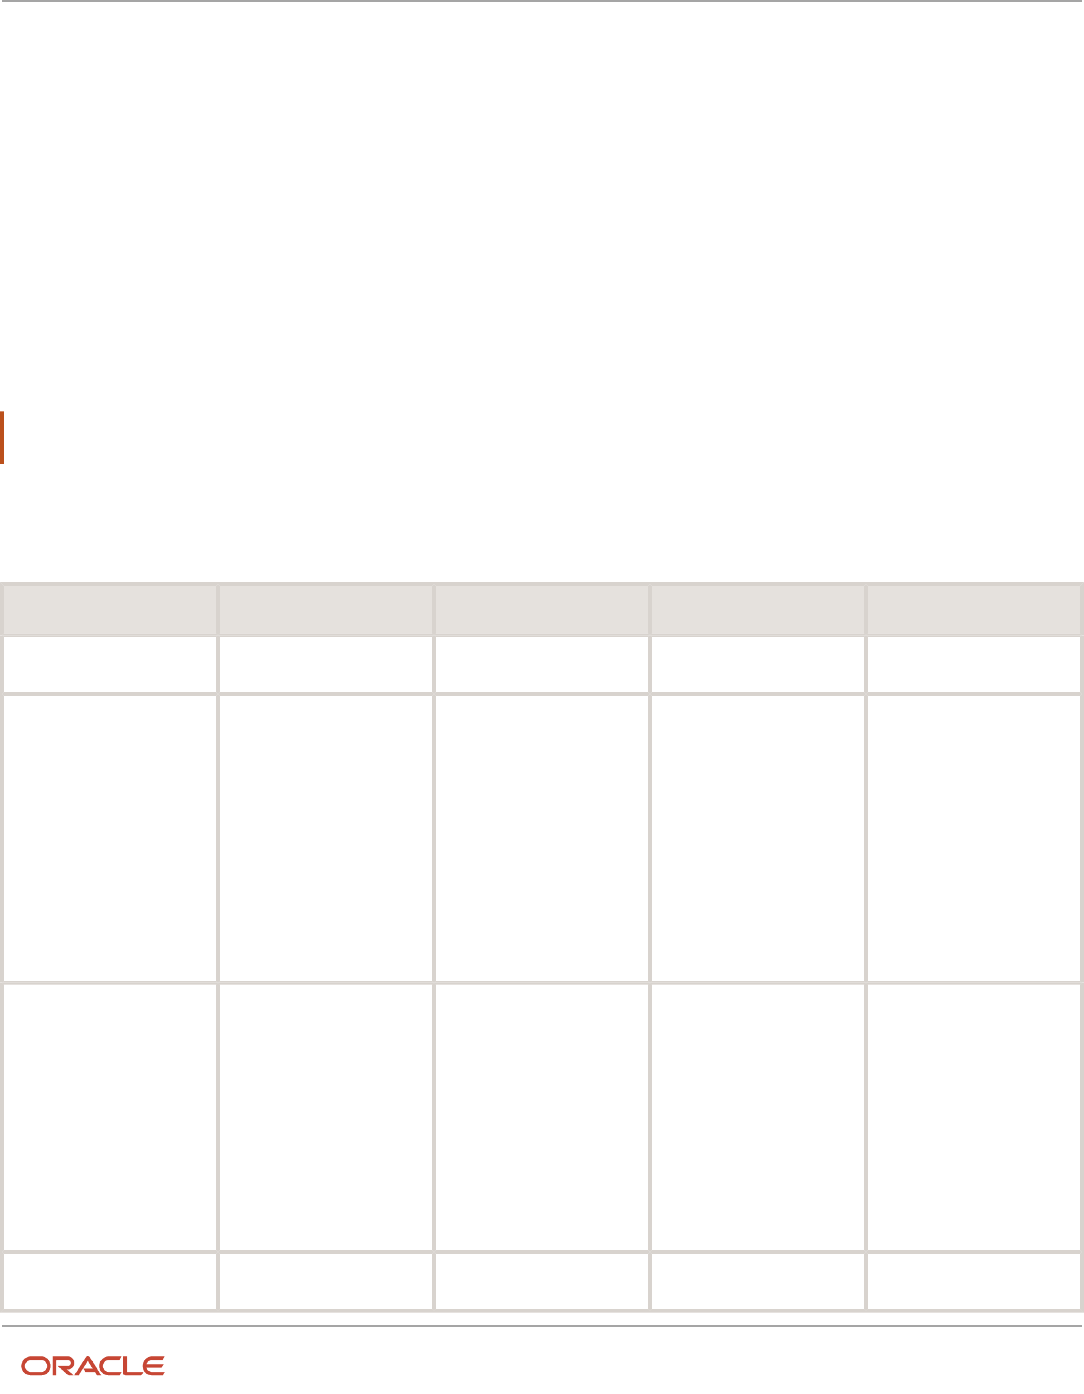
Oracle Fusion Cloud Human Resources
Implementing Global Human Resources
Chapter 10
Employment
Parameters for Assignment Extensible and Descriptive
Flexfields
Flexfield segments have list of values that are dependent on standard attributes. Assignment and work relationship
attributes can be used as these objects:
• Flexfield parameters for assignment and work relationship descriptive flexfields.
• Input parameters when creating a value set for a flexfield segment.
You can use assignment attributes and descriptive flexfields as parameters when you configure assignment extensible
flexfields (EFF) and assignment descriptive flexfields (DFF).
Note: If you have configured the value set or default conditions using parameters for the EFF, these values will be
reinitialized only when you navigate to the EFF field.
This table shows the parameters that you can use in the assignment EFF (PER_ASSIGNMENT_EIT_EFF) and assignment
DFF (PER_ASG_DF):
Parameter Code Parameter Description Data Type Supported in DFF Supported in EFF
ACTION_CODE
Action
Varchar2
Yes
Yes
ASG_INFORMATON_DATE1
to ASG_INFORMATION_
DATE15
ASG_INFORMATION_
NUMBER1 to ASG_
INFORMATION_NUMBER20
ASG_INFORMATION1 to
ASG_INFORMATION50
ASG_INFORMATION_
CATEGORY
Legislative flexfields
Date
Number
Varchar2
Varchar2
Yes
Yes
ASS_ATTRIBUTE_DATE1 to
ASS_ATTRIBUTE_DATE15
ASS_ATTRIBUTE_NUMBER1
to ASS_ATTRIBUTE_
NUMBER20
ASS_ATTRIBUTE1 to ASS_
ATTRIBUTE50
ASS_ATTRIBUTE_
CATEGORY
Customer flexfields
Date
Number
Varchar2
Varchar2
Yes
Yes
ASSIGNMENT_ID
Assignment identifier
Number
Yes
Yes
237

Oracle Fusion Cloud Human Resources
Implementing Global Human Resources
Chapter 10
Employment
Parameter Code Parameter Description Data Type Supported in DFF Supported in EFF
ASSIGNMENT_STATUS_
TYPE
Assignment status type
Varchar2
Yes
Yes
ASSIGNMENT_STATUS_
TYPE_ID
Assignment status type
identifier
Number
Yes
Yes
ASSIGNMENT_TYPE
Assignment type
Varchar2
Yes
Yes
BARGAINING_UNIT_CODE
Bargaining unit code
Varchar2
Yes
Yes
BUSINESS_UNIT_ID
Business unit identifier
Number
Yes
Yes
COLLECTIVE_
AGREEMENT_ID
Collective agreement
identifier
Number
Yes
Yes
CONTRACT_ID
Contract identifier
Number
Yes
Yes
EFFECTIVE_END_DATE
Effective end date
Date
Yes
Yes
EFFECTIVE_START_DATE
Effective start date
Date
Yes
Yes
EMPLOYEE_CATEGORY
Worker category
Varchar2
Yes
Yes
EMPLOYMENT_CATEGORY
Assignment category
Varchar2
Yes
Yes
ESTABLISHMENT_ID
Reporting establishment
Varchar2
Yes
Yes
EXPENSE_CHECK_
ADDRESS
Expense check send-to
address
Varchar2
Yes
Yes
FULL_PART_TIME
Full time or part time
Varchar2
Yes
Yes
GRADE_ID
Grade
Number
Yes
Yes
GRADE_LADDER_PGM_ID
Grade ladder
Number
Yes
Yes
GSP_ELIGIBILITY_FLAG
Include in grade step
progression
Varchar2
Yes
Yes
HOURLY_SALARIED_CODE
Hourly paid or salaried
Varchar2
Yes
Yes
JOB_ID
Job
Number
Yes
Yes
238

Oracle Fusion Cloud Human Resources
Implementing Global Human Resources
Chapter 10
Employment
Parameter Code Parameter Description Data Type Supported in DFF Supported in EFF
LABOUR_UNION_
MEMBER_FLAG
Union member
Varchar2
Yes
Yes
LEGAL_ENTITY_ID
Legal employer
Number
Yes
Yes
LEGISLATION_CODE_
VALUE
Legislation code value
Varchar2
Yes
Yes
LOCATION_ID
Location
Number
Yes
Yes
MANAGER_FLAG
Working as a manager
Varchar2
Yes
Yes
ORGANIZATION_ID
Organization
Number
Yes
Yes
PERIOD_OF_SERVICE_ID
Period of service identifier
Number
Yes
Yes
PERMANENT_
TEMPORARY_FLAG
Regular or temporary
Varchar2
Yes
Yes
PERSON_ID
Person
Number
Yes
Yes
PERSON_TYPE_ID
Person type
Number
Yes
Yes
POSITION_ID
Position identifier
Number
Yes
Yes
POSITION_OVERRIDE_
FLAG
Synchronize from position
option
Varchar2
Yes
Yes
PRIMARY_ASSIGNMENT_
FLAG
Primary assignment option
Varchar2
Yes
Yes
PRIMARY_FLAG
Primary option
Varchar2
Yes
Yes
PRIMARY_WORK_
RELATION_FLAG
Primary work relationship
indicator
Varchar2
Yes
Yes
PROPOSED_WORKER_
TYPE
Proposed person type
Varchar2
Yes
Yes
REASON_CODE
Action reason
Varchar2
Yes
Yes
SENIORITY_BASIS
Basis for seniority
calculation
Varchar2
Yes
Yes
239

Oracle Fusion Cloud Human Resources
Implementing Global Human Resources
Chapter 10
Employment
Parameter Code Parameter Description Data Type Supported in DFF Supported in EFF
SET_OF_BOOKS_ID
Set of books identifier
Number
Yes
Yes
SOURCE_ASSIGNMENT_ID
Source assignment
identifier
Number
Yes
Yes
SYSTEM_EFFECTIVE_DATE
System effective date
Date
Yes
Yes
SYSTEM_PERSON_TYPE
Worker type
Varchar2
Yes
Yes
UNION_ID
Union
Number
Yes
Yes
WORK_AT_HOME
Working at home
Varchar2
Yes
Yes
You can't use Contract ID as a parameter in Assignment DFF and Assignment EFF in these flows:
• Create flows, such as Hire an Employee, Add a Contingent Worker, Add a Pending Worker, and Add a
Nonworker
• Local and Global Transfer (Global Transfer and Global Temporary Assignment)
• Create Work Relationship
• Add Assignment
This table shows the parameters that you can use in the work relationship DFF (PER_PPS_DF):
Parameter Code Parameter Description Data Type
DATE_START
Start date
Date
LEGAL_ENTITY_ID
Legal entity identifier
Number
LEGISLATION_CODE
Legislation
Varchar2
PERIOD_OF_SERVICE_ID
Period of service identifier
Number
PERIOD_TYPE
Period type
Varchar2
PERSON_ID
Person identifier
Number
PRIMARY_FLAG
Primary indicator
Varchar2
240

Oracle Fusion Cloud Human Resources
Implementing Global Human Resources
Chapter 10
Employment
Using Attribute Values for Value Sets
You can use the assignment or work relationship attributes as input parameters when you create a value set by selecting
the table validation type. The following is the syntax that you can use for the WHERE Clause field:
FIELD NAME = :{PARAMETER.<parameter name>}
For example, JOB_ID = :{PARAMETER.JOB_ID} and COUNTRY_CODE = :{PARAMETER.LEGISLATION_CODE}
You can use the following syntax when using flexfield segments:
Flexfield Segment = :{SEGMENT.<flexfield segment code>}
For example, if PayGroup is a segment code, you can use paam.ASS_ATTRIBUTE6= :{SEGMENT.PayGroup}
Note: You can't use flexfield segments that have a space.
Related Topics
•
Default Segment Values
•
Overview of Value Sets
Configure Flexfield Parameters in Value Sets for Worker
Assignments
You want to use assignment or work relationship attributes as input parameters when creating a value set for a flexfield
segment.
Using parameters, you have the flexibility to control the list of values in the assignment descriptive flexfields (DFF)
based on the assignment or work relationship attributes. Consider the following use case:
The Vision India company wants to capture the job and the job specialty at the worker's assignment and filter the job
specialty value based on the selected job. To achieve this, the company does these things:
• Defines the job specialty using the job extensible flexfield (EFF) and provides a one-to-many relationship
between the job and the job specialty.
• Allows the user to select from the list of job specialties at the worker's assignment. The job specialties are
defined using the job EFF for the selected assignment job.
Summary of Tasks
1. Set up the job EFF.
2. Set up the assignment DFF.
241

Oracle Fusion Cloud Human Resources
Implementing Global Human Resources
Chapter 10
Employment
Set up Job EFF
1. Define a multi-row EFF at the job level using these values:
◦
Name: Job Specialty
◦
Type: Multi-Row EFF
◦
Data Type: Character
◦
Table Column: JEI_INFORMATION1 (You can use any available column)
2. After you define the EFF, populate it with the value you want for different jobs.
Set Up Assignment DFF
1. Create the value set to be used in the assignment DFF by using the job as the parameter.
a. Go to the task Manage Value Set.
b. In the Create Value Set page, enter these values:
- Value Set Code: Job Speciality
- Module: Search and select Employment
- Validation Type: Table
- Value Data Type: Character
c. In the FROM Clause field, enter the following syntax:
PER_JOB_EXTRA_INFO_F
d. In the Value Column Name field, enter JEI_INFORMATION1 (or the column which is defined while
creating the job EFF).
e. In the WHERE Clause field, enter the following syntax:
Job_ID = :{PARAMETER.JOB_ID}
AND JEI_INFORMATION_CATEGORY = 'Job Speciality'
and INFORMATION_TYPE = 'EIT'
2. Create the assignment DFF by using the value set defined in the previous step.
a. In the Setup and Maintenance work area, go to the following:
- Functional Area: Workforce Information
- Task: Manage Employment Descriptive Flexfields
b. On the Manage Employment Descriptive Flexfields page, select the PER_ASG_DF row and click Edit on
the Actions menu.
c. Select the Assignment Attributes row and click Edit on the Actions menu.
d. Click the Create (+) icon in the Global Segments area and create a segment by entering these values:
- Name: Job Speciality
- Data Type: Character
e. Use the value set defined in the previous step.
f. Deploy the flexfield.
3. In the assignment section of the employment flows, verify that the values in the newly defined flexfield are
filtered based on the selected job and job specialty values defined in the job setup.
242

Oracle Fusion Cloud Human Resources
Implementing Global Human Resources
Chapter 10
Employment
People Group
Use the People Group key flexfield to record people group information and assign people to specific groups, such
as unions or working groups. For example, you may want to assign people to unions or pension plans to determine
eligibility or regulate access to payrolls.
The key flexfield is part of the Global Human Resources application and is identified by the PPG flexfield code and
People Group Flexfield name.
How to Enable People Group for Use in HCM
You can enable the flexfield either at the enterprise level (using the Manage Enterprise HCM Information task) or the
legal employer level (using the Manage Legal Entity HCM Information task).
People Group is an optional field and is available on all assignment and employment pages (except the Change Manager
page).
Note: The People Group field is hidden out-of-the-box, you can enable it through personalization.
Where People Group Information is Stored
• The information is stored in the PEOPLE_GROUP_ID column of the PER_ALL_ASSIGNMENTS_M table.
• The PEOPLE_GROUP_ID column is a foreign key to the PEOPLE_GROUP_ID column in the
PER_PEOPLE_GROUPS table.
Related Topics
•
Overview of Key Flexfields
How You Configure the Default Expense Account
You need to set up a default expense account in your human resources application for every person who uses expenses
in the Oracle Financials Cloud.
Note: If you don't set up default expense accounts for all users, they can't submit expense reports.
Default Expense Account is a key flexfield. It is part of the General Ledger application and is identified by the GL#
flexfield code and Accounting Flexfield name.
Enable Default Expense Account for use in HCM
1. Navigate to the Setup and Maintenance work area.
2. In the Tasks panel drawer, click Search.
243

Oracle Fusion Cloud Human Resources
Implementing Global Human Resources
Chapter 10
Employment
3. Search and click the View Business Units task name.
4. Search for the business unit.
5. Select the business unit row in the search results.
6. On the Actions menu, click Assign Business Functions.
7. Select the primary ledger and default legal entity.
8. Click Save.
Where You Maintain the Default Expense Account
The Default Expense Account and Expense Check Send-to Address fields are optional and displayed on all assignment
and employment related pages, except these pages:
• Change Location
• Change Working Hours
• Change Manager
In the Expense Check Send-to Address field, you specify where to send the worker's expense reimbursement check. The
values for this field are populated using the PER_WORKER_ADDRESS_TYPE application lookup. There are two values,
Home and Office that are available out-of-the-box. You can't modify these values or add new values because this is an
application lookup.
Note: These fields are hidden out-of-the-box. You can unhide the fields using personalization.
Where the Default Expense Account is Stored
• The information is stored in the DEFAULT_CODE_COMB_ID column of the PER_ALL_ASSIGNMENTS_M table.
• The DEFAULT_CODE_COMB_ID column is a foreign key to the CODE_COMBINATION_ID column in the
GL_CODE_COMBINATIONS table.
Related Topics
•
Overview of Key Flexfields
•
Example of Loading a Default Expense Account for a Worker
Secured Approval Notifications for Employment Flows
Employment approval notifications are secured using security privileges in responsive employment flows. This table
lists the different security privileges:
Employment Flow Security Privilege Securing BIP
Notification
Security Privilege Securing Edit
by Approver
Securing Business Object
Add Assignment
N/A
Add Worker Assignment
N/A
Add Contingent Worker
N/A
Add Contingent Worker
N/A
244

Oracle Fusion Cloud Human Resources
Implementing Global Human Resources
Chapter 10
Employment
Employment Flow Security Privilege Securing BIP
Notification
Security Privilege Securing Edit
by Approver
Securing Business Object
Add Nonworker
N/A
Create Nonworker
N/A
Add Pending Worker
N/A
Hire Pending Worker
N/A
Additional Assignment Info
Manage Additional Assignment
Info
View Additional Assignment Info
Manage Additional Assignment
Info
PER_ALL_ASSIGNMENTS_M
Cancel Work Relationship
Cancel Work Relationship
Edit Work Relationship
Manage Work Relationship
View Work Relationship
N/A
PER_PERIODS_OF_SERVICE
Change Assignment
Change Worker Assignment
View Employment Information
Summary
Change Worker Assignment
PER_ALL_ASSIGNMENTS_M
Change Location
Change Worker Location
View Employment Information
Summary
Change Worker Location
PER_ALL_ASSIGNMENTS_M
Change Manager
Change Worker Manager
View Employment Information
Summary
Change Worker Manager
PER_ALL_ASSIGNMENTS_M
Change Working Hours
Change Worker Working Hours
View Employment Information
Summary
Change Worker Working Hours
PER_ALL_ASSIGNMENTS_M
Correct Termination
Terminate Work Relationship
View Terminate Work Relationship
Terminate Work Relationship
PER_PERIODS_OF_SERVICE
Create Work Relationship
N/A
Create Work Relationship
N/A
Delete Assignment
Delete Worker Date Effective
Assignment
View Employment Information
Summary
N/A
PER_ALL_ASSIGNMENTS_M
Edit Work Relationship Edit Work Relationship Edit Work Relationship PER_PERIODS_OF_SERVICE
245

Oracle Fusion Cloud Human Resources
Implementing Global Human Resources
Chapter 10
Employment
Employment Flow Security Privilege Securing BIP
Notification
Security Privilege Securing Edit
by Approver
Securing Business Object
Manage Work Relationship
View Work Relationship
Manage Work Relationship
Eligible Jobs
Manage Eligible Jobs
View Eligible Jobs
Manage Eligible Jobs
PER_ALL_ASSIGNMENTS_M
Employment Contract
Manage Worker Contract
View Worker Contract
Search Worker
Manage Worker Contract
PER_ALL_ASSIGNMENTS_M
Employment Details
Manage Person Assignment Data
Correct Worker Assignment Data
View Employment Information
Summary Data
Manage Person Assignment
Correct Worker Assignment
PER_ALL_ASSIGNMENTS_M
Hire
N/A
Hire Employee
N/A
Local and Global Transfer
N/A
Perform Worker Local and Global
Transfers
N/A
Manage Directs
Manage Direct Reports
View Employment Information
Summary
Manage Direct Reports
PER_ALL_ASSIGNMENTS_M
Promotion
Promote Worker
View Employment Information
Summary
Promote Worker
PER_ALL_ASSIGNMENTS_M
Resignation
Terminate Work Relationship
View Terminate Work Relationship
Terminate Work Relationship
PER_PERIODS_OF_SERVICE
Reverse Termination
Terminate Work Relationship
View Terminate Work Relationship
Terminate Work Relationship
PER_PERIODS_OF_SERVICE
Termination
Terminate Work Relationship
View Terminate Work Relationship
Terminate Work Relationship
PER_PERIODS_OF_SERVICE
Transfer
Transfer Worker
Transfer Worker
PER_ALL_ASSIGNMENTS_M
246

Oracle Fusion Cloud Human Resources
Implementing Global Human Resources
Chapter 10
Employment
Employment Flow Security Privilege Securing BIP
Notification
Security Privilege Securing Edit
by Approver
Securing Business Object
View Employment Information
Summary
Withdraw Resignation
Terminate Work Relationship
View Terminate Work Relationship
Terminate Work Relationship
PER_PERIODS_OF_SERVICE
Employment Start Dates
View Employment Information
Summary Data
Employment Start Dates Data
Employment Start Dates
PER_ALL_ASSIGNMENTS_M
Check and Correct Employment-Related Data Issues
Use the Correct Employment Data Integrity Issues process to detect and correct any employment data integrity-related
issues. Run this process from the Scheduled Processes work area.
The process reports and fixes the following issues:
• Invalid Person Type Usage Records
• Legal Employer Varies for Assignment and Work Relationship
• Work Terms With Primary Assignment Field Set to Y
• Business Unit Varies for Assignment and Work Terms
• Inactive Work Relationship Active Work Terms or Assignment
• Legislation Varies for Assignment and Work Relationship
• Assignment With People Group Without Structure Information
• Person Type Missing in Assignment Record
• User and System Person Types Vary in Assignments
• Supervisor Records Created After Termination Date
• Supervisor Records Extending Beyond Termination Date
• User and System Person Types Vary in Person Type Usages
• Overlapping Working Hour Pattern Records
• Flexfield Structure and People Group Vary in Assignments
• Primary Field Set to Y When Manager Type Not Line Manager
You must run the following procedures in the order specified to detect and correct any issues, and verify the results:
1. Selecting the process
2. Using Summary mode
3. Using Report mode
4. Using Update mode
5. Confirming whether issues are corrected
247

Oracle Fusion Cloud Human Resources
Implementing Global Human Resources
Chapter 10
Employment
Selecting the Process
1. Click Navigator > Tools > Scheduled Processes.
2. Click Schedule New Process, and click Job in the Type field.
3. Expand the Name list, and click Search.
4. Type Employment in the Name box, and click Search.
5. In the search results table, select Correct Employment Data Integrity Issues, and click OK.
6. In the Schedule New Process dialog box, click OK.
Using Summary Mode
Run the process in Summary mode to generate a .csv file listing the count of the issues, if any. You can run the process
in this mode for a person or all people.
1. In the Process Details dialog box, select Summary from the Mode list.
2. In the Name list, select the person for whom you want to run the process.
Note: If you don't select a name from the list, the process runs for all people.
3. Click Submit, and click OK in the Confirmation dialog box. Note the process ID.
4. Click Close in the Process Details dialog box.
You can view the .zip file when you select the row containing the process ID in the search results table in the Overview
page.
Using Report Mode
If you find any issues in the .csv file, run the process in Report mode to generate a .zip file. The .zip file contains a .csv
file for each integrity check. The .csv file provides details of the issues and the people affected by it
1. Click Schedule New Process. Select Correct Employment Data Integrity Issues from the Name list, and click
OK.
2. In the Process Details dialog box, select Report from the Mode list.
3. Click Submit, and click OK in the Confirmation dialog box. Note the process ID.
4. Click Close in the Process Details dialog box.
You can view the .zip file when you select the row containing the process ID in the search results table in the Overview
page.
Using Update Mode
Run the process in Update mode to correct the issues. After you run the process, a .zip file is generated that contains
a .csv file for each integrity check. The .csv file provides details of the issues post the update.
1. Click Schedule New Process. Select Correct Employment Data Integrity Issues from the Name list, and click
OK.
2. In the Process Details dialog box, select Update from the Mode list.
3. Click Submit, and click OK in the Confirmation dialog box. Note the process ID.
4. Click Close in the Process Details dialog box.
You can view the .zip file when you select the row containing the process ID in the search results table in the Overview
page.
248

Oracle Fusion Cloud Human Resources
Implementing Global Human Resources
Chapter 10
Employment
Confirming Whether Issues are Corrected
Run the process again in Summary mode to confirm that the issues are corrected.
Related Topics
•
Submit Scheduled Processes and Process Sets
Add Additional Content to the Guided Flow for Promote
Action
You want to include information about the company's employee promotion policies within the promotion flow for an
employee. To do this, you need to first enable the Additional Content card on the Promote page, using the Transaction
Design Studio.
You can use the Page Composer to add information on the Additional Content page for the employee.
Note: This content in the Additional Content section is read-only. You can't enter any data in this section.
Prerequisites
1. Sign in as an administrator user who has the access to create and manage sandboxes.
2. Activate a sandbox where you can create a rule in the Transaction Design Studio.
3. Enable the HCM Experience Design Studio and Page Composer options for the sandbox.
4. Enable page-level configuration at the Site level.
Select the Action
1. On your Home page, select My Client Groups > Employment > HCM Experience Design Studio.
2. Select the Transaction Design Studio tab.
3. Select Promote from the Actions list.
Configure Rule
1. Click Add to add a new rule.
2. Enter these rule details.
Field Value
Name
Promote With Additional Content Rule
Description
Enable Read-Only Additional Content for Promote Action
Active Select the check box.
249

Oracle Fusion Cloud Human Resources
Implementing Global Human Resources
Chapter 10
Employment
Field Value
3. In the Show or Hide Regions section, enter these details.
Field Value
Show questionnaire page
Yes
Additional Content
Required
and
Visible
4. Click Save and Close.
5. Click Done.
Add Content
1. On your Home page, select My Client Groups > Employment > Promote.
2. Select a worker.
3. On the Promote page, enter the basic and promotion details.
4. Select Edit Pages from the Settings and Actions menu in the global area (select the drop-down list next to the
login name).
5. From the View menu, select Source .
6. Use Page Composer to add content related to the company's promotion policy in the Additional Content region.
Related Topics
•
Create and Activate Sandboxes
•
Overview of Page Modification
•
Guidelines for Using Page Composer
•
HCM Experience Design Studio
How You Access a Report of Employer Comments for
Terminated Workers
The Comments and Attachments section in the responsive UI replaces the Employer Comments field in the classic UI.
In the classic UI, navigate to My Client Groups > Person Management > Work Relationship > Actions > Terminate. You
can create a report for the values in the Employer Comments field that are stored in the PER_PERIODS_OF_SERVICE
table using OTBI or BIP.
250

Oracle Fusion Cloud Human Resources
Implementing Global Human Resources
Chapter 10
Employment
If you use in-flight classic termination transactions, move the comments from the Employer Comments field to the
Comments and Attachments section. The comments and attachments are available in the BPM tables. It is best practice
to keep the transaction details, including comments and attachments in the BPM tables until you are ready to archive
the approval details. Once you archive the BPM comments and attachments, you can access the comments from the
BPM archive tables.
For more information on OTBI reports, see the Oracle Human Capital Management Cloud Creating and Administering
Analytics and Reports for HCM guide on the Oracle Help Center (https://docs.oracle.com/en/cloud/saas/index.html).
For more information on BI Publisher, see the Report Designer's Guide for Oracle Business Intelligence Publisher guide
on the Oracle Help Center (https://docs.oracle.com/en/middleware/)
For more information about archiving BPM workflows, see Archive and Purge Transactions in the Implementing
Applications guide on Oracle Help Center.
Related Topics
•
How You Configure the Report Task Type in Journeys
•
Archive and Purge Transactions
Personalize the Universal Header for Employment Flows
You want to personalize the page sub header with the person's display name and assignment number in the Promote
employment flow. You can use the procedure similarly for other employment flows. Let's look at the steps to personalize
the universal header.
For any mandatory fields not mentioned in the steps, you can use the default values.
Create and Enable Sandbox
1. Click Navigator > Configuration > Sandboxes.
2. Click Create Sandbox.
3. Enter the Name.
4. Select the Active check box for the Page Composer option.
5. Click Create and Enter.
Edit Page Header
1. On the home page, click the My Client Groups tab.
2. Navigate to the quick actions and click the Show More link.
3. Under Employment, click Promote.
4. Search and select the person for whom you want to personalize the page sub header.
5. The Promote questionnaire page if enabled will be displayed. Click Continue.
Note: This is a common page for which you can't customize the page sub header.
6. The Promote container page is displayed.
7. Click the user name in the global header region, and then click Edit Pages from the Settings and Actions menu.
8. The Promote customization page is displayed. Click Source from the View menu.
9. Click the display name. Click Edit in the confirmation dialog box.
251

Oracle Fusion Cloud Human Resources
Implementing Global Human Resources
Chapter 10
Employment
10. Scroll down to the bottom of the page and hover the mouse pointer at the bottom left. Click Show More Links,
and then click simplePanel. Drag the region above the tool bar upward so that you see the page components.
11. Select simplePanel, and then click Close next to it.
12. Click Edit in the confirmation dialog box.
13. The universalPanel header is displayed. Select universalPanel, and then click Show the properties of
universalPanel icon in the tool bar.
14. The Component Properties: universalPanel dialog box is displayed. Scroll down to the Sub Header field. Click
the drop down arrow next to the field, and then select Expression Builder.
15. The Expression Editor dialog box is displayed. Click Choose a value, and select the binding parameter that
you want to display in the page sub header. For example, if you want to display the person's display name,
select BindingParams and Display Name from the drop-down lists. The expression for the display name
is automatically populated in the Type a value or expression field. Click OK. The Component Properties:
universalPanel dialog box is displayed.
Note: When you select the binding parameter, only the expression for that parameter is displayed in
the Type a value or expression field. However, if you want to enter more than one expression in the
field, click Type a value or expression and combine the expressions by using a separator, such as
hyphen (-) or asterisk (*). For example, you can enter this expression to display the person's display
name and assignment number in the universal panel sub header: #{bindings.DisplayName.inputValue} -
#{bindings.AssignmentNumber.inputValue}.
To see the different expression value for each binding parameter, refer the table after the steps in this section.
16. Click Apply, and then click OK.
17. Click Close on the Promote customization page.
18. The universal panel sub header is customized with the person's display name and assignment number.
This table shows the binding parameters and their corresponding expression values. You can use these values
to display worker identification information in the page sub header:
Binding Parameter Expression
Display Name
#{bindings.DisplayName.inputValue}
Person Number
#{bindings.PersonNumber.inputValue}
Assignment Number
#{bindings.AssignmentNumber.inputValue}
Assignment Name (Business Title)
#{bindings.AssignmentName.inputValue}
Tips and Considerations
1. All the four binding parameters (display name, person number, assignment number, and business title) if
enabled, will appear in a single line in the page sub header.
2. The business title and assignment number won't be refreshed in the page sub header when it's updated in
flows, such as promote, transfer, and employment details. The changes are reflected after the transaction is
committed.
252
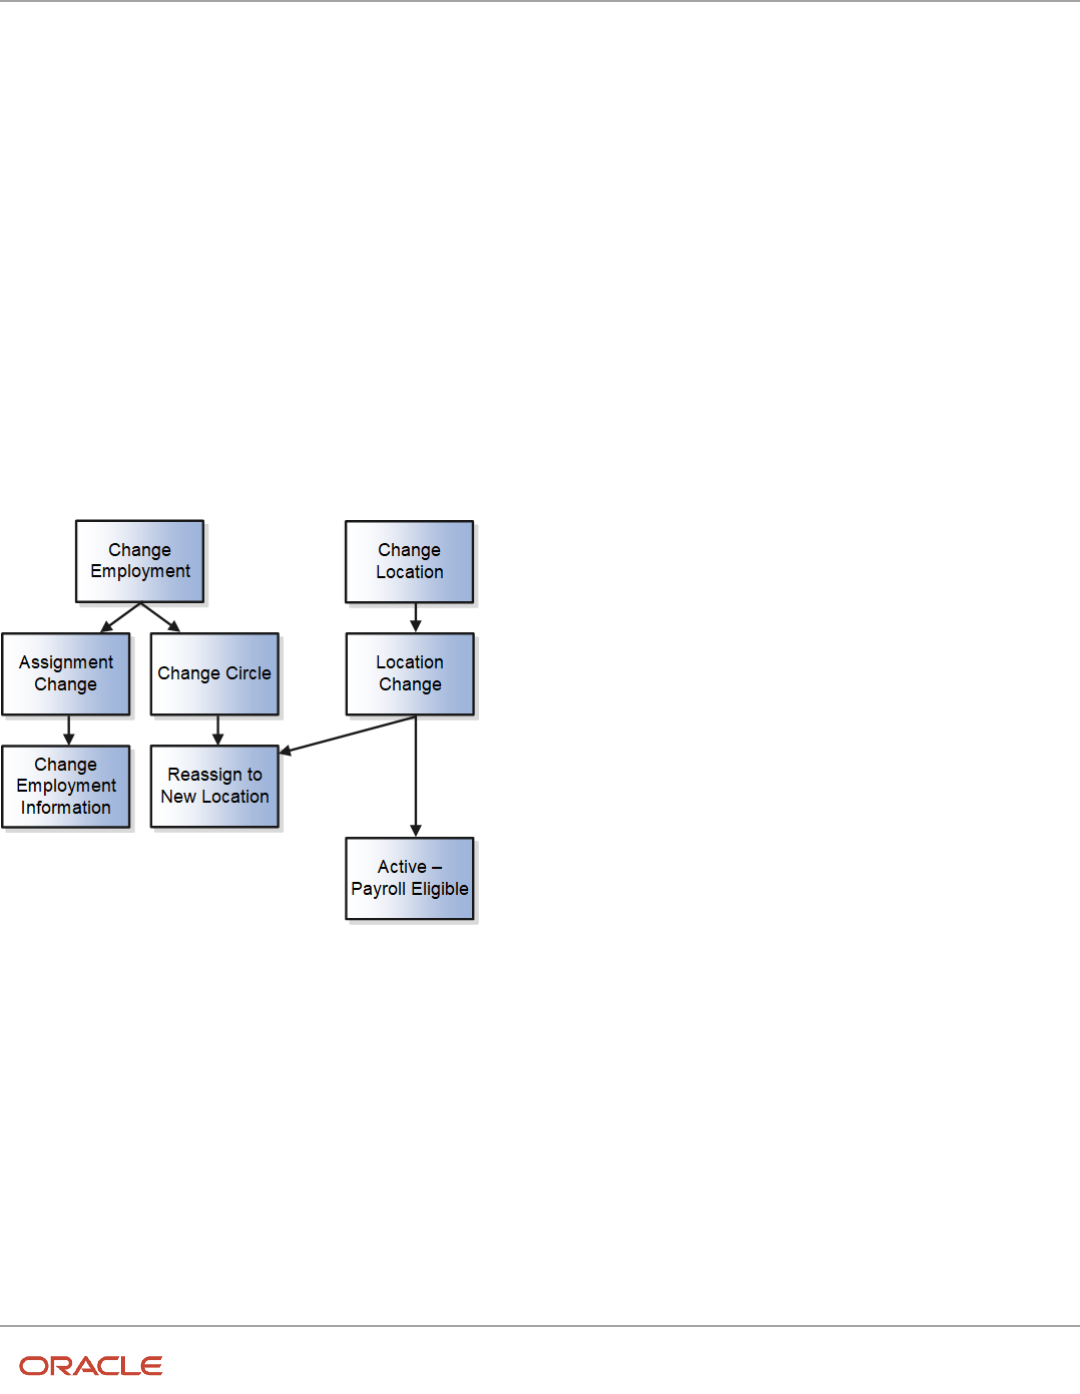
Oracle Fusion Cloud Human Resources
Implementing Global Human Resources
Chapter 10
Employment
Action Framework
The action framework consists of the action type, action, action reason, and assignment status components.
The action type identifies the business process associated with the action and can have one or more predefined actions.
The action tracks changes to the employment and assignment record. You can associate the actions you create with the
predefined action types.
Each action has an action reason and you can optionally associate the action reason with the action for analysis and
reporting purposes. You can associate the same action reason with multiple actions or with a specific action according
to your business need.
Each assignment contains an assignment status. When you create or edit an assignment, you select an action that
categorizes the change and determines what are the next steps. Some actions make an automatic change to the
assignment status. Otherwise, you must set the assignment status directly.
This figure illustrates an action framework example using the Change Employment and Change Location action types.
The Assignment Change and Change Circle actions are associated with the Change Employment action type. The
Assignment Change action updates the assignment record and the reason for the change is indicated by the Change
Employment Information action reason. Similarly, the Change Circle action updates the assignment record and the
reason for the change is indicated by the Reassign to New Location action reason.
The Location Change action is associated with the Change Location action type. The Location Change action updates
the assignment record and the reason for the change is indicated by the Reassign to New Location action reason. When
you select the Location Change action to update the assignment, the assignment status is automatically set to Active -
Payroll Eligible.
253

Oracle Fusion Cloud Human Resources
Implementing Global Human Resources
Chapter 10
Employment
Action Type
An action type:
• Identifies the type of business process associated with the action and determines what happens when you
select an action.
• Is associated with one or more predefined actions.
You can associate the actions you create with the predefined action types. For example, the Hire an Employee action
type is associated with the Hire action. You could create an action Hire Part-Time and associate it with the Hire an
Employee action type. Your action will then appear in the Actions list in the Hire an Employee page. To hire a part-time
employee, users can select the Hire Part-Time action instead of the predefined Hire action.
This table shows the list of employment flows and its associated action types:
Employment Flow Action Type
Hire an Employee Hire an Employee
Add a Contingent Worker Add Contingent Worker
Add a Pending Worker Add Pending Worker
Add a Nonworker Add Nonworker
Create Work Relationship
• Add Employee Work Relationship
• Add Contingent Worker Relationship
• Add Nonworker Relationship
• Add Pending Worker Relationship
• Renew Placement
Note: The action based on this action type is displayed only if the selected assignment that’s used
to start this flow belongs to an inactive contingent worker work relationship.
• Rehire an Employee
Note: The action based on this action type is displayed only if the selected assignment that’s used
to start this flow belongs to an inactive employee work relationship.
Add Assignment (Permanent) Add Assignment
Add Assignment (Temporary) Temporary Assignment
Change Assignment
• Change Employment
• Start Probation Period
• End Probation Period
• Demote Employment
• Suspend Assignment
254

Oracle Fusion Cloud Human Resources
Implementing Global Human Resources
Chapter 10
Employment
Employment Flow Action Type
• End Assignment
Note: The action based on this action type is displayed only if the selected worker has more than
one active assignment.
• End Temporary Assignment
Note: The action based on this action type is displayed only if the selected worker has more than
one active assignments and the assignments are created using the Add Assignment (Temporary)
flow.
• Extend Temporary Assignment
Note: The action based on this action type is displayed only if the selected worker has more than
one active assignments and the assignments are created using the Add Assignment (Temporary)
flow.
• Promote
Note: The action based on this action type is displayed only if this flow is started from the Offer
page.
• Transfer
Note: The action based on this action type is displayed only if this flow is started from the Offer
page.
Change Location Change Location
Change Manager Change Manager
Change Working Hours Change Working Hours
Direct Reports Change Manager
Employment Contracts The actions which has the Used in Contract field set to Yes in the action configuration will be available
for selection on the Employment Contract page.
Local and Global Transfer (Local) Transfer
Local and Global Transfer (Permanent
Global Transfer)
Global Transfer
Local and Global Transfer (Global
Temporary Assignment)
Global Temporary Assignment
Promote Promote
Resignation Terminate Work Relationship
Transfer Transfer
Termination Terminate Work Relationship
End Global Temporary Assignment
255

Oracle Fusion Cloud Human Resources
Implementing Global Human Resources
Chapter 10
Employment
Employment Flow Action Type
Note: The action based on this action type is displayed only if the selected worker has more than
one active work relationship and the work relationship is created using the Global Temporary
Assignment action.
Terminate Employment Terminate Work Relationship
End Global Temporary Assignment
Note: The action based on this action type is displayed only if the selected worker has more
than one active work relationship and the work relationship is created using Global Temporary
Assignment action.
End Assignment
Note: The action based on this action type is displayed only if the selected worker has more than
one active assignment.
Create Mass Assignment Change
• Change Employment
• Change Location
• Change Manager
• Change Working Hours
• Demote Employment
• End Probation Period
• Promote
• Start Probation Period
• Suspend Assignment
• Transfer
Mass Legal Employer Change Global Transfer
This table shows the list of seeded action types:
Action Type Code Action Type
CMP_CHANGE_SALARY Salary Change
CMP_GRADE_STEP_PROGRESSION Grade Step Progression
CMP_GROUP_COMPENSATION Group Compensation
CMP_INDIVIDUAL_COMPENSATION Manage Individual Compensation
CMP_MANAGE_CONTRIBUTIONS Manage Contributions
CMP_RATE_RECALCULATION Rate Recalculation
EMPL_ADD_ASG Add Assignment
256

Oracle Fusion Cloud Human Resources
Implementing Global Human Resources
Chapter 10
Employment
Action Type Code Action Type
EMPL_ADD_CWK Add Contingent Worker
EMPL_ADD_EMP Hire an Employee
EMPL_ADD_NWK Add Nonworker
EMPL_ADD_PWK Add Pending Worker
EMPL_ADD_TERMS Add Employment Terms
EMPL_CHANGE Change Employment
EMPL_CHG_LOCATION Change Location
EMPL_CHG_MANAGER Change Manager
EMPL_CHG_WORK_HOURS Change Working Hours
EMPL_GLB_TEMP_ASG Global Temporary Assignment
EMPL_GLB_TRANSFER Global Transfer
EMPL_IRC_ACCEPT_JOB_OFFER Accept Job Offer
EMPL_POS_SYNC Position Synchronization
EMPL_PRIMARY_WR_CHANGE Primary Work Relationship Change
EMPL_PROMOTION Promote
EMPL_REHIRE Rehire an Employee
EMPL_RENEW_CWK Renew Placement
EMPL_TEMP_ASG Temporary Assignment
EMPL_TERMINATE Terminate Work Relationship
EMPL_TRANSFER Transfer
EMPL_WR_CWK Add Contingent Worker Relationship
EMPL_WR_EMP Add Employee Work Relationship
EMPL_WR_NWK Add Nonworker Relationship
ORA_EMPL_CANCEL_WR Cancel Work Relationship
ORA_EMPL_CHG_HIRE_DATE Change Hire Date
ORA_EMPL_DELETE_CHANGE Delete this change
ORA_EMPL_OFFER_CHANGE Change Offer
257

Oracle Fusion Cloud Human Resources
Implementing Global Human Resources
Chapter 10
Employment
Action Type Code Action Type
ORA_EMPL_OFFER_CREATE Create Offer
ORA_EMPL_REV_TERMINATION Reverse Termination
ORA_EMPL_WR_PWK Add Pending Worker Relationship
PER_GRD_CREATE Create Grades
PER_GRD_DELETE Delete Grades
PER_GRD_LDR_CREATE Create Grade Ladder
PER_GRD_LDR_DELETE Delete Grade Ladder
PER_GRD_LDR_UPDATE Update Grade Ladder
PER_GRD_RATE_CREATE Create Grade Rate
PER_GRD_RATE_DELETE Delete Grade Rate
PER_GRD_RATE_UPDATE Update Grade Rate
PER_GRD_UPDATE Update Grades
PER_JOB_CREATE Create Job
PER_JOB_FAMILY_CREATE Create Job Family
PER_JOB_FAMILY_DELETE Delete Job family
PER_JOB_FAMILY_UPDATE Update Job Family
PER_JOB_UPDATE Update Job
PER_LOC_CREATE Create Location
PER_LOC_UPDATE Update Location
PER_ORG_CREATE Create Organization
PER_ORG_UPDATE Update Organization
PER_POS_CREATE Create Position
PER_POS_DELETE Delete Position
PER_POS_UPDATE Update Position
258

Oracle Fusion Cloud Human Resources
Implementing Global Human Resources
Chapter 10
Employment
Action
Actions track changes to Human Capital Management (HCM) records, such as changes to employment and assignment
records. When you create or update these records, the action identifies the cause of the creation or change.
You can view a history of effective-dated changes (assignment history, for example), and the action and reason details
are particularly useful for reporting and tracking.
You can use actions to categorize the type of change. Each predefined termination action is associated with a
termination type (either voluntary or involuntary) to help categorize the termination. For example, the termination
actions Death and Reduction in Force are categorized as voluntary and involuntary respectively.
In certain cases, actions determine the business flow. For example, you can select from a list of employment-related
actions, such as Assignment Change, Transfer, or Termination. The action you select determines the path you take
through the current business flow.
To create your own actions, use the Configure Actions quick action under My Client Groups > Workforce Structures on
the Home page.
Note: It's recommended that you follow these practices:
• If you're creating your own termination-related action, you need to specify the termination type for the action,
whether it's voluntary or involuntary. This information is useful for analysis and reporting purposes.
• Select at least one active action code within each action type that's applicable for all countries.
The application defaults the action in the Termination and Resignation pages by searching for the first Voluntary
termination action which doesn't have any role or country associated with it.
This table shows the list of seeded actions that must not be end dated:
Action Type Code Action Type Action Code Action Name Description
CMP_CHANGE_SALARY Salary Change CHANGE_SALARY Change Salary Change Salary
CMP_GRADE_STEP_
PROGRESSION
Grade Step Progression CMP_GRADE_STEP_
PROGRESSION
Automated Grade Step
Progression
Automated Grade Step
Progression
CMP_GRADE_STEP_
PROGRESSION
Grade Step Progression CMP_GSP_RATE_
SYNCHRONIZATION
Grade Step Rate
Synchronization
Grade Step Rate
Synchronization
CMP_GRADE_STEP_
PROGRESSION
Grade Step Progression CMP_GSP_UPD_SAL_ON_
ASG_CHG
Grade Step Change Grade Step Change
CMP_GROUP_
COMPENSATION
Group Compensation ALLOCATE_GRP_CMP Allocate Workforce
Compensation
Allocate Workforce
Compensation
CMP_INDIVIDUAL_
COMPENSATION
Manage Individual
Compensation
MNG_INDIV_CMP Manage Individual
Compensation
Manage Individual
Compensation
CMP_MANAGE_
CONTRIBUTIONS
Manage Contributions MNG_CONTRIB Manage Contributions Manage Contributions
259

Oracle Fusion Cloud Human Resources
Implementing Global Human Resources
Chapter 10
Employment
Action Type Code Action Type Action Code Action Name Description
CMP_RATE_
RECALCULATION
Rate Recalculation CMP_RECALCULATE_
RATES
Recalculate Rates Recalculate Rates
EMPL_CHG_MANAGER Change Manager MANAGER_CHANGE Manager Change Manager Change
EMPL_IRC_ACCEPT_JOB_
OFFER
Accept Job Offer ORA_IRC_ACCEPT_JOB_
OFFER
Accept Job Offer Accept Job Offer
EMPL_POS_SYNC Position Synchronization ORA_POS_SYNC Synchronization From
Position
Synchronization From
Position
EMPL_POS_SYNC Position Synchronization ORA_SYNC_CONFIG_
CHANGE
Position Synchronization
Configuration Change
Position Synchronization
Configuration Change
EMPL_POS_SYNC Position Synchronization ORA_SYNC_POS_TREE Synchronization from
Position Tree
Synchronization from
Position Tree
EMPL_PRIMARY_WR_
CHANGE
Primary Work Relationship
Change
PRIMARY_WR_CHANGE Primary Work Relationship
Change
Primary Work Relationship
Change
ORA_EMPL_CANCEL_WR Cancel Work Relationship EMPL_CANCEL_WR Cancel Work Relationship Cancel Work Relationship
ORA_EMPL_CHG_HIRE_
DATE
Change Hire Date ORA_EMPL_CHG_HIRE_
DATE
Changes Hire Date Change Hire Date
ORA_EMPL_DELETE_
CHANGE
Delete this change EMPL_DELETE_CHANGE Delete Date Effective
Change
Delete Date Effective
Change
ORA_EMPL_OFFER_
CHANGE
Change Offer EMPL_OFFER_CHANGE Change Offer Change Offer
ORA_EMPL_OFFER_
CREATE
Create Offer EMPL_OFFER_CREATE Create Offer Create Offer
ORA_EMPL_REV_
TERMINATION
Reverse Termination ORA_EMPL_REV_
TERMINATION
Reverse Termination Reverse Termination
ORA_PER_EMPL_
TERMINATE_OFFER
Terminate Offer Work
Relationship
ORA_PER_EMPL_
TERMINATE_OFFER
Terminate Offer Terminate Offer Work
Relationship
PER_GRD_CREATE Create Grades PER_GRD_NEW Create Create
PER_GRD_DELETE Delete Grades PER_GRD_DELETE Delete Delete
PER_GRD_LDR_CREATE Create Grade Ladder PER_GRD_LDR_NEW Create Create
PER_GRD_LDR_DELETE Delete Grade Ladder PER_GRD_LDR_DELETE Delete Delete
PER_GRD_LDR_UPDATE Update Grade Ladder PER_GRD_LDR_UPD Update Update
PER_GRD_RATE_CREATE Create Grade Rate PER_GRD_RATE_NEW Create Create
PER_GRD_RATE_DELETE Delete Grade Rate PER_GRD_RATE_DELETE Delete Delete
260

Oracle Fusion Cloud Human Resources
Implementing Global Human Resources
Chapter 10
Employment
Action Type Code Action Type Action Code Action Name Description
PER_GRD_RATE_UPDATE Update Grade Rate PER_GRD_RATE_UPD Update Update
PER_GRD_UPDATE Update Grades PER_GRD_UPD Update Update
PER_JOB_CREATE Create Job PER_JOB_NEW Create Create
PER_JOB_FAMILY_CREATE Create Job Family PER_JOB_FAMILY_NEW Create Create
PER_JOB_FAMILY_DELETE Delete Job family PER_JOB_FAMILY_DELETE Delete Delete
PER_JOB_FAMILY_UPDATE Update Job Family PER_JOB_FAMILY_UPD Update Update
PER_JOB_UPDATE Update Job PER_JOB_UPD Update Update
PER_LOC_CREATE Create Location PER_LOC_NEW Create Create
PER_LOC_UPDATE Update Location PER_LOC_UPD Update Update
PER_ORG_CREATE Create Organization PER_ORG_NEW Create Create
PER_ORG_UPDATE Update Organization PER_ORG_UPD Update Update
PER_POS_CREATE Create Position PER_POS_NEW Create Create
PER_POS_DELETE Delete Position PER_POS_DELETE Delete Delete
PER_POS_UPDATE Update Position PER_POS_UPD Update Update
Employment-Contract-Specific Actions
You can add the contract action on the employment contract page. To do this, you need to select Yes in the Used in
Contract field when you configure the action. After the configuration, the contract action will be available for selection
on the employment contract page.
For more information on the Action Framework, see the document Employment - Action Framework (https://
community.oracle.com/customerconnect/discussion/630984) on Customer Connect.
Action Occurrences
When certain actions, such as Hire an Employee and Promote occur in different product areas of the application, a
record of the action occurrence is stored in the PER_ACTION_OCCURENCES table.
The table stores information about different product areas and if required, the information can be retrieved by providing
the appropriate entity type and parent entity type.
For example, when you cancel a work relationship, the assignment record is deleted. However, the record of the cancel
action is stored in the PER_ACTION_OCCURENCES table. You can search for a person whose work relationship was
canceled by querying the table. The PARENT_ENTITY_KEY_ID column in the table stores the person ID of the person
whose work relationship was canceled.
261

Oracle Fusion Cloud Human Resources
Implementing Global Human Resources
Chapter 10
Employment
This table lists the entity type and parent entity type for the objects that generate an action occurrence record. You can
use this information to build your own reports to access the various actions that have occurred on the objects.
Flow Entity Type - Entity ID Parent Entity Type - Parent Entity Key ID
Employment pages No entity type or ID is populated. Person - Person ID
Delete record from Employment Details page Assignment - Assignment ID Person - Person ID
Salary when managed from the standalone
salary pages
Salary - Salary ID Assignment - Assignment ID
Grades Grade - Grade ID No parent entity type or ID is populated.
Grade Ladders Grade Ladder - Grade Ladder ID No parent entity type or ID is populated.
Grade Rates Grade Rate - Rate ID No parent entity type or ID is populated.
Jobs Job - Job ID No parent entity type or ID is populated.
Job Families Job Family - Job Family ID No parent entity type or ID is populated.
Locations Location - Location ID No parent entity type or ID is populated.
Organizations Organization - Organization ID No parent entity type or ID is populated.
Positions Position - Position ID No parent entity type or ID is populated.
Default Action Based on Country and Role
When the action is defaulted based on country and role, the defaulting is derived based on the sequence in this table:
Evaluation Sequence Is the Country Configured for
Action?
Is the Role Configured for
Action?
How Default Action is Derived
1 No No When the actions don't have
countries and roles configured,
the first action in the Action LoV
(sorted alphabetically by action
name) is defaulted.
2 Yes Yes When the actions match the
requestor's role and worker's
legal employer country, the first
action in the Action LoV (sorted
alphabetically by action name) is
defaulted.
3 Yes No When the actions match the
worker's legal employer country,
the first action in the Action LoV
262

Oracle Fusion Cloud Human Resources
Implementing Global Human Resources
Chapter 10
Employment
Evaluation Sequence Is the Country Configured for
Action?
Is the Role Configured for
Action?
How Default Action is Derived
(sorted alphabetically by action
name) is defaulted.
4 No Yes When the actions match the
requestor's role, the first action
in the Action LoV (sorted
alphabetically by action name) is
defaulted.
The application will default the first action in the Action LoV (sorted alphabetically by action name) in these scenarios:
• There is no match between the configured action countries and roles.
• There is a country match, but the roles don’t match.
• There is a role match, but the countries don’t match.
Note: In all scenarios, the action is derived within the context of allowed action types for the employment flow.
The resultant list of actions is displayed sorted alphabetically by the action name.
For the termination flow, here’s the sequence of how the application derives the default action:
• Use the evaluation sequence 1 to 4 in the table for actions configured as voluntary.
• Use the evaluation sequence 1 to 4 for actions configured as involuntary.
• If no match is found, default the first action in the Action list (sorted alphabetically by action name) of voluntary
actions.
• If no match is found, default the first action in the Action list (sorted alphabetically by action name) of
involuntary actions.
Examples of How the Action is Defaulted Based on Sequence
Example 1:
Action Country Role
Hire Null Null
Deputation India HR Specialist India
Leave of Absence United States Null
Absconding Null HR Administrator
Local Transfer United Kingdom HR Specialist United Kingdom
In example 1, when the user performs a worker transaction, Hire action will be defaulted because it’s a global action with
no country and role.
Example 2:
263

Oracle Fusion Cloud Human Resources
Implementing Global Human Resources
Chapter 10
Employment
Action Country Role
Deputation India HR Specialist India
Leave of Absence United States Null
Absconding Null HR Administrator
Local Transfer United Kingdom HR Specialist United Kingdom
For example 2, this table shows the defaulted actions:
User Worker Country User Role Defaulted Action
Vijay Singh India HR Specialist India Deputation
Boris Klose United States HR Specialist United States Leave of Absence
Stefan Anderson Sweden HR Administrator Absconding
Donna Paulson France HR Specialist France Absconding
For Donna Paulson, even though the Absconding action is defaulted, the action value won’t be displayed in the Action
LoV. If the user changes the value in the LoV, they can’t enter the Absconding action value.
Action Reason
You can optionally associate reasons with actions, which is primarily useful for analysis and reporting purposes.
For example, a generic action of termination could have reasons such as voluntary retirement or involuntary layoff. You
can view the action and reason details in the Employee Termination Report. Line managers can view predictions about
who's likely to leave voluntarily, which are based on existing and historical terminations data.
The process that generates the predictions uses the action and reason data to identify whether a termination is
voluntary or involuntary. When managers allocate compensation to their workers, they can select from a list of action
reasons that help identify the type of or reason for the compensation allocation.
To create your own action reasons, use the Action Reasons quick action under My Client Groups > Workforce Structures
on the Home page.
You can specify the code, name, and description when you create the action reason. You can't specify the action reason
start date and end date because these dates are internally defaulted by the application as 1-Jan-1951 and 31-Dec-4712
respectively. You can't create an action reason while creating an action.
You can then associate the action reason with an action when creating the action or updating it. When you associate an
action reason with an action, you can do these things:
• Select the countries for which you can associate the action and action reason.
• Select the roles that can see the action reason during worker transactions.
• Select the duration (start date and end date) for which the action reason will remain associated with the action.
264

Oracle Fusion Cloud Human Resources
Implementing Global Human Resources
Chapter 10
Employment
You can associate the same action reason with multiple actions or with a specific action according to your business
need. This makes the action reason list as global and reduces the effort of creating multiple action reasons.
The country you select for the action reason must match with any one of the countries selected for the action.
Country and Role-Specific Action and Action Reasons
You can make the action and action reason country-specific or role-specific on employment pages by selecting the
required country or role when you configure the action and action reason. After the configuration, the employment
pages will display the action and action reason that are specific to the worker's legal employer country or logged in
user's role.
You can set the default assignment status for an employment-related action. To do this, ensure that all countries
associated with the assignment status match the countries associated with the action type. After you configure, the
employment pages will default the assignment status for the selected action type.
Note:
• If you want to keep the action and action reason global and not specific to any country or role, don't select
any value for the country or role. The blank value signifies that the action or action reason is applicable for all
countries.
• The country and role you selected for the action reason must match with any one of the countries or roles for
the action.
How to Increase the Value Limit in the Action Reason Client LoV
You can increase the limit of 25 values in any client list of values (LoV) used in Oracle HCM Cloud. Here’s an example
procedure to increase the values to more than 25 in the action reason client LoV used in termination pages.
The example uses this test data:
• Action: Resignation
• Associated Action Reasons (30 count): Resignation Reason 01 to Resignation Reason 30
Note: Increasing the count of values in the client LoV may lead to performance degradation and affect user
experience.
Create and Enable Sandbox
1. Click Navigator > Configuration > Sandboxes.
2. Click Create Sandbox.
3. Enter the Name.
4. Select the Active check box for the HCM Experience Design Studio and Page Composer options.
5. Click Create and Enter.
Verify Count of Action Reasons on Termination Page
1. On the Home page, select My Client Groups > Employment > Termination.
265

Oracle Fusion Cloud Human Resources
Implementing Global Human Resources
Chapter 10
Employment
2. Search and select the person for whom you want to see the action reasons.
3. On the Terminate Work Relationship page, select the Resignation action and expand the action reason.
Note: You will see 25 action reasons are displayed (Personal Reasons, Resignation Reason 01 to Resignation
Reason 24).
Configure the Action Reason LOV to Display More Than 25 Items
1. On the Tools menu, select Page Composer.
2. Click the Structure tab, and then select the action reason field.
3. In the Confirm Shared Component Edit dialog box, click Edit.
4. Scroll down to the bottom of the page and drag the tool bar upward so that you see the page components.
5. Click the Edit Component link next to the secureInputSearch component.
6. In the Confirm Shared Component Edit dialog box, click Edit.
7. Click the searchSection component, and then click the Show the properties of searchSection icon on the
toolbar. The data URL for the component is displayed in the dialog box.
8. Copy the value in the Data Url field to a text editor. The value will be as follows:
#{backingBeanScope.TerminationWhenAndWhyBean.terminationReasonDataURL}
Note: The Data URL value is used to fetch the REST API response. By default, this value is limited to 25. You
can increase the default value by adding your desired parameter limit.
9. Edit the value to append a limit clause at the end (#{'&limit=50'}). The number 50 signifies
that 50 rows need to be shown in the action reason field. The edited value will be as follows:
#{backingBeanScope.TerminationWhenAndWhyBean.terminationReasonDataURL}#{'&limit=50'}
10. Expand the Data Url field and select Override.
11. Expand the Data Url field again and select Expression Builder.
12. Copy the edited value from step 9 to the Type a value or expression field and then click OK.
13. Click Apply, and then click OK.
14. Click Close to exit Page Composer.
15. Navigate to the action reason field in the Terminate Work Relationship page. You will see all the configured
values in the action reason field.
Action and Action Reason Flexfields
Use the Manage Descriptive Flexfields task in the Setup and Maintenance work area to manage flexfields. You can
configure these action-related and action reason-related flexfields as required, to meet your enterprise requirements:
Application Table Name Descriptive Flexfield Code Name Used Availability
PER_ACTION_REASON_
USAGES
PER_ACT_REASON_USG_
DFF
Additional Action Reason
Usages Attributes
For storing additional
information regarding
action reason usages.
Available for use.
PER_ACTION_REASONS_B
PER_ACT_REASONS_DFF
Additional Action Reason
Attributes
For storing additional
information regarding the
action reason.
Available for use.
266

Oracle Fusion Cloud Human Resources
Implementing Global Human Resources
Chapter 10
Employment
Application Table Name Descriptive Flexfield Code Name Used Availability
PER_ACTIONS_B
PER_ACT_DFF
Additional Action Attributes
For storing additional
information regarding the
action.
Available for use.
PER_ACTIONS_B
PER_ACT_LEG_DDF
Legislative Action
Attributes
For storing additional
legislative information
regarding the action.
Available only for Oracle
localization use.
Assignment Status
Each assignment contains an assignment status. The assignment status contains an HR status, a payroll status ,
and optionally user statuses. The HR status and payroll status values are linked to the assignment status and are set
automatically when the assignment status changes.
This table summarizes the values of the three statuses.
Assignment Status HR Status Payroll Status
Active - payroll eligible
Active
Process
Active - no payroll
Active
Do not process
Active - process when earning
Active
Process when earning
Active - process nonrecurring element entry
Active
Process nonrecurring element entry
Suspended - payroll eligible
Suspended
Process
Suspended - no payroll
Suspended
Do not process
Suspended - process when earning
Suspended
Process when earning
Suspended - process nonrecurring element
entry
Suspended
Process nonrecurring element entry
Inactive - payroll eligible
Inactive
Process
Inactive - no payroll
Inactive
Do not process
Inactive - process when earning
Inactive
Process when earning
Inactive - process nonrecurring element entry Inactive Process nonrecurring element entry
267

Oracle Fusion Cloud Human Resources
Implementing Global Human Resources
Chapter 10
Employment
Assignment Status HR Status Payroll Status
When you create or edit an assignment, you select an action that categorizes the change and determines what are
the next steps. Some actions make an automatic change to the assignment status. For example, when you create an
assignment, its status is set automatically to Active - payroll eligible. The same action sets the HR status to Active and
the payroll status to Process. Otherwise, you must set the assignment status directly.
To create your own assignment status, use the Assignment Statuses quick action under My Client Groups > Workforce
Structures on the Home page.
You can set the default assignment status for an employment-related action. To do this, ensure that all countries
associated with the assignment status match the countries associated with the action type. After you configure, the
employment pages will default the assignment status for the selected action type.
The assignment status is only applicable for action types related to employment and not for action types, such as
compensation, workforce structures, and recruiting.
For global transfer, global temporary assignment, and temporary assignment, the default assignment status applies to
the destination assignment.
Payroll Status
The payroll status Process When Earning indicates that payroll is processed only during payroll periods with earnings.
The Process When Earning status typically is used in countries with cumulative tax rules, to stop tax refunds when
payments are not issued. The status Process Nonrecurring Element Entry indicates that only the active element entry
for the nonrecurring element is processed. The Process Nonrecurring Element Entry status typically is used for one-
time payments for terminated employees.
User Status
You can define one or more user names for each assignment status value, using the Manage Assignment Status task in
the Setup and Maintenance work area. If multiple user statuses exist for an HR status, you must designate any one user
status as the default status corresponding to the HR status. The default assignment status is attached to an assignment
unless you specify a default user status. For example, when you create an assignment, its status is set automatically to
the default assignment status corresponding to the HR status Active.
Default Assignment Status Based on Action
You can default the assignment status for the action code related to the employment action type. After this mapping,
responsive employment pages will default the assignment status that is mapped to the selected action code.
To map an assignment status with the action, ensure that all countries associated with the assignment status matches
the countries associated with the action.
Note:
• This feature is only applicable for action types related to employment. It is not applicable for action types
related to compensation, workforce structures, and recruiting.
• For global transfer, global temporary assignment, and temporary assignment, the default assignment status
applies to the destination assignment.
268

Oracle Fusion Cloud Human Resources
Implementing Global Human Resources
Chapter 10
Employment
To default the assignment status based on action, select a value in the Assignment Status list of values (LoV) when you
add an action in the Add Action page.
The following action types don’t support the defaulting of assignment status:
• Cancel Work Relationship
• Change Hire Date
• Change Location
• Change Manager
• Change Offer
• Change Working Hours
• Create Offer
• Delete this change
• Extend Employment Contract
• Position Synchronization
• Primary Work Relationship Change
• Reverse Termination
• Termination (Voluntary)
FAQs for Action Framework
Can I delete an action or action reason?
No. If you no longer want users to select an action or action reason you can enter an end date, beyond which the action
or reason is unavailable.
Can I create additional action types?
No. You can't create your own action types. You can associate the actions you create with the predefined action types,
using the Configure Actions task in the Workforce Structures work area.
Which action and action type should I use for withdrawing a resignation?
There's no predefined action available for withdrawing a resignation. You need to create a new action using the
Configure Actions task in the Workforce Structures work area.
You need to then associate the action with the Reverse Termination action type (Code: ORA_EMPL_REV_TERMINATION)
and the Voluntary termination type. The newly created action will then appear in the Actions list in the Withdraw
Resignation page.
Related Topics
•
Action Framework
•
What's the purpose of the legislative action attributes?
269

Oracle Fusion Cloud Human Resources
Implementing Global Human Resources
Chapter 10
Employment
Assignments
Considerations for Enforcing Grades at Assignment Level
This topic describes the effects of the following employment-related profile options:
• PER_ENFORCE_VALID_GRADES
• PER_DEFAULT_GRADE_FROM_JOB_POSITION
Enforce Valid Grades (PER_ENFORCE_VALID_GRADES)
If you set the PER_ENFORCE_VALID_GRADES site-level profile option to Yes, users can select a grade for an assignment.
The grades can be selected only from those grades that are valid for the job or position.
• If users select a job and position for the assignment, they can select grades that are valid for the position only.
• If valid grades are defined for neither the job nor the position, users can select from all grades.
If you set this profile option to No (default value), users can select from all grades.
Default the Grade from the Job or Position
(PER_DEFAULT_GRADE_FROM_JOB_POSITION)
You set the PER_DEFAULT_GRADE_FROM_JOB_POSITION site-level profile option to Yes, when there is only one valid
grade for a job or position. In this scenario, by default, the valid grade is used in the assignment. Additionally, if an entry
grade is defined for a position, by default, the grade is used when the user creates a new assignment.
If you set this profile option to No (default value), users can select from all grades.
Considerations for Using Worker Numbers
Every person record in the enterprise has a person number. You can also allocate worker numbers to employee and
contingent worker work relationships.
Worker numbers are optional: they're provided primarily for Oracle E-Business Suite customers who have used
employee and contingent worker numbers and want to continue using them.
Enabling Worker Numbers
By default, worker numbers aren't used. You can enable worker numbers at the enterprise and legal-employer levels
using the Manage Enterprise HCM Information and Manage Legal Entity HCM Information tasks in the Setup and
Maintenance work area respectively. If you enable worker numbers, each employee and contingent worker work
relationship must have a worker number. If you don't enable worker numbers, they can't be used. If you enable
the worker number at both the enterprise and legal employer levels, then the setting at the legal employer takes
precedence.
270

Oracle Fusion Cloud Human Resources
Implementing Global Human Resources
Chapter 10
Employment
Selecting the Number-Generation Method
Use the Manage Enterprise HCM Information task in the Setup and Maintenance work area, to select the number
generation method for the enterprise. Worker numbers can be generated either manually or automatically.
If you select manual generation, you're recommended to define a numbering scheme to suit local requirements. For
example, determine whether uniqueness within the enterprise or at the legal-employer level is important, and define
the numbering scheme accordingly.
If you select automatic worker-number generation, numbers can be allocated from either an enterprise sequence or
a legal employer sequence. If you use a legal-employer sequence, worker numbers aren't guaranteed to be unique in
the enterprise. When you use a legal-employer sequence, the worker number doesn't change if you rehire in the same
legal employer. However, the worker number changes if you rehire in a different legal employer or globally transfer to a
different legal employer.
If you use an enterprise sequence, the worker number doesn't change when you:
• Rehire in the same legal employer.
• Rehire in a different legal employer.
• Globally transfer to a different legal employer.
Setting the Number-Generation Method for a Legal Employer
All legal employers automatically inherit the enterprise number-generation method if a method isn't specified at the
legal employer level. You can override the number-generation method at the legal employer level by
• Selecting manual worker-number generation for a legal employer at any time.
• Selecting automatic worker-number generation for a legal employer, provided that no employee or contingent
worker work relationships exist for that legal employer.
Use the Manage Legal Entity HCM Information task in the Setup and Maintenance work area, to select the number
generation method for the legal employer.
Create Grade Retention Page and Associate With Retained Grade
Context
In certain organizations, an employee is entitled to retain their previous grade even after moving to a position of lower
responsibility.
The grade can be retained for a fixed time beginning on the date the employee is placed in the lower-graded position,
unless grade retention is terminated.
A context is seeded for the assignment extensible flexfield to record this retained grade information. You need to
associate this context to a page to use this functionality. You can associate this context with an existing page or you
could create a new page based on your business requirements. Here's how you can associate it with a new page:
1. Search and click the Manage Extensible Flexfields task name in the Setup and Maintenance work area.
2. Enter PER_ASSIGNMENT in the Flexfield Code field, and then click Search.
3. In the Search Results area, click the Edit icon.
4. Select the PerAssignmentEITCategory item in the Category area, and then click the Pages tab in the
PerAssignmentEITCategory: Details area.
271

Oracle Fusion Cloud Human Resources
Implementing Global Human Resources
Chapter 10
Employment
5. Click the Create icon.
6. In the Create Page dialog box, enter Grade Retention Info in the Display Name field.
7. Enter PER_RETAINED_GRADES_PAGE in the Code field.
8. Enter the information in the Description field. For example, you can enter: Provides additional assignment
information for grade retention.
9. Select the Assignment EIT Information EFF value from the Usage list.
10. Click OK.
11. Select the Grade Retention Info page that you created from the PerAssignmentEITCategory: Details area. The
list of associated contexts for the page is displayed in the Grade Retention Info: Associated Contexts Details
area.
12. Click the Select and Add icon in the Grade Retention Info: Associated Contexts Details area.
13. Search for the Retained Grade name in the Select and Add: Contexts dialog box.
14. Select the Retained Grade row from the search results.
15. Click Apply, and then click OK.
16. Click Save and Close.
17. In the Search Results area, select the Assignment EIT Information EFF row and deploy the flexfield.
Related Topics
•
Overview of Extensible Flexfields
Retained Grade Context of the Assignment Extensible Flexfield
This table describes the lookup and SQL information for the different grade-related fields in the Retained Grade context
of the Assignment extensible flexfield (EFF).
Grade Field Related Lookup and Usage SQL Clause
Start Date and End Date
The start and end date of the retained grade
entered by the user.
Note:
The start and end date fields are different
from the effective start and end date fields.
The start and end date fields contain user
entered values whereas effective start
and end date fields contain application
maintained values for the retained grade
records.
Not applicable.
Pay Table ID
The ORA_PER_RETGRD_GRADE_LADDER_
VS lookup controls the Pay Table ID field.
By default, the field displays all active grade
ladders between the selected start and end
date of the retained grade.
These are the SQL code clauses used by the Pay
Table ID field:
FROM Clause : PER_GRADE_LADDERS_F_VL
GradeLadder, FND_SETID_SETS_VL SetId
Value Column Name: SUBSTR(NAME,1,100)
WHERE Clause : GradeLadder.GRADE_SET_ID
= SetId.SET_ID(+) AND :{SEGMENT.ORA_PER_
RETGRD_START_DATE_S} <= EFFECTIVE_END_
272

Oracle Fusion Cloud Human Resources
Implementing Global Human Resources
Chapter 10
Employment
Grade Field Related Lookup and Usage SQL Clause
DATE and :{SEGMENT.ORA_PER_RETGRD_
END_DATE_S} >= EFFECTIVE_START_DATE
Grade
The ORA_PER_RETGRD_GRADE_VS lookup
controls the Grade field. By default, the field
displays all active grades that belong to the
selected grade ladder.
Note:
If the grade ladder isn't selected, the
Grade field displays all active grades in
the application that are valid between the
selected start and end date of the retained
grade.
These are the SQL code clauses used by the
Grade field:
FROM Clause : per_grades_f_vl grades left
outer join PER_GRADES_IN_LADDERS_
F gradeinladder ON grades.grade_id =
gradeinladder.grade_id
Value Column Name: SUBSTR(grades.NAME,1,
100)
WHERE Clause : {SEGMENT.ORA_
PER_RETGRD_START_DATE_S} <=
grades.EFFECTIVE_END_DATE and :
{SEGMENT.ORA_PER_RETGRD_END_DATE_
S} >= grades.EFFECTIVE_START_DATE and
grades.ACTIVE_STATUS = 'A' and (1= (CASE
WHEN (:{SEGMENT.ORA_PER_RETGRD_
GRADE_LADDER_S} is NULL) THEN 1 ELSE 2
END) OR gradeinladder.GRADE_LADDER_ID =
to_number(:{SEGMENT.ORA_PER_RETGRD_
GRADE_LADDER_S}))
Step
The ORA_PER_RETGRD_GRADE_STEP_VS
lookup controls the Step field. By default, the
field displays all grade steps that belong to the
selected grade, and are active between the
selected start and end date of the retained
grade.
Note:
If the grade isn't selected, the Step field
doesn't display any value.
These are the SQL code clauses used by the
Step field:
FROM Clause : per_grade_steps_f_vl
Value Column Name: SUBSTR(NAME,1,100)
WHERE Clause : GRADE_ID = to_number(:
{SEGMENT.ORA_PER_RETGRD_GRADE_S})
and :{SEGMENT.ORA_PER_RETGRD_START_
DATE_S} <= EFFECTIVE_END_DATE and :
{SEGMENT.ORA_PER_RETGRD_END_DATE_S}
>= EFFECTIVE_START_DATE
Pay Basis The ORA_PER_RETGRD_PAY_BASIS_VS
lookup controls the Pay Basis field. The
lookup is SQL query-based and displays
the existing retained grade data entered
by the user in the Pay Basis field from the
PER_ASSIGNMENT_EXTRA_INFO_M table.
These are the SQL code clauses used by the Pay
Basis field:
FROM Clause : (SELECT DISTINCT AEI_
ATTRIBUTE6 FROM PER_ASSIGNMENT_
EXTRA_INFO_M_V)
Value Column Name: SUBSTR(AEI_
ATTRIBUTE6,1,100)
WHERE Clause : AEI_ATTRIBUTE6 IS NOT NULL
Pay Plan The ORA_PER_RETGRD_PAY_PLAN_VS
lookup controls the Pay Plan field. The
lookup is SQL query-based and displays
the existing retained grade data entered
by the user in the Pay Plan field from the
PER_ASSIGNMENT_EXTRA_INFO_M table.
These are the SQL code clauses used by the Pay
Plan field:
FROM Clause : ( SELECT DISTINCT AEI_
ATTRIBUTE7 FROM PER_ASSIGNMENT_
EXTRA_INFO_M_V )
273

Oracle Fusion Cloud Human Resources
Implementing Global Human Resources
Chapter 10
Employment
Grade Field Related Lookup and Usage SQL Clause
Value Column Name: SUBSTR(AEI_
ATTRIBUTE7,1,100)
WHERE Clause : AEI_ATTRIBUTE7 IS NOT NULL
How to Configure Matrix Managers for an Assignment
You need to configure the common lookup codes to add new types of matrix managers. Do these steps to add a new
matrix manager:
1. Log in as an administrative user.
2. Navigate to the Setup and Maintenance work area.
3. Search for and select the Manage Common Lookups task.
4. In the Manage Common Lookups page, search for the PER_SUPERVISOR_TYPE lookup type.
Note: In the Lookup Codes section, you will see only one line manager entry if you haven't configured any
other matrix manager in your instance.
5. Click the New icon (+) to add the new matrix manager and enter these field values for example:
Lookup Code Enabled Meaning
PROJECT_MANAGER
Select the check box.
Project manager
6. Click Save and Close, and then click Done.
FAQs for Assignments
How can I display assignment numbers in the manager name list of values in
employment flows?
Use the Manage Administrator Profile Values task in the Setup and Maintenance work area. Search for the profile option
PER_EMP_MANAGER_NAME_LOV and update the profile value to N. The profile value is Y by default.
What happens if the position that I selected in an assignment has no open headcount
or FTE?
If the Overlap Allowed attribute is set to Yes in Edit Position page, then a warning is displayed and you can continue with
the assignment.
If the attribute is set to No, then you must select a different position as the number of incumbents for the selected
position has already been reached.
274

Oracle Fusion Cloud Human Resources
Implementing Global Human Resources
Chapter 10
Employment
Related Topics
•
How do I enable Position Incumbents validation?
How do I enable Position Incumbents validation?
The Position Incumbents validation prevents users from selecting a position in an assignment that doesn't have vacant
Full Time Equivalents (FTEs) or headcount.
If overlap of headcount is allowed at the position, then a warning is displayed if the open FTE or headcount is exceeded.
If overlap isn't allowed, users can't continue unless they select a different position that has vacant FTE or headcount.
This validation is available out of the box if users have installed Oracle Fusion HCM for the first time. If users are already
using Oracle Fusion HCM and upgrading it, then you must enable the validation to use it. To enable the validation:
1. Select the predefined Position Incumbent Validation (ORA_PER_EMP_POS_INCUMBENT_VALIDATION) context in the
Organization Information extensible flexfield to view the Apply Incumbent Validation attribute in the Manage Enterprise
page.
2. Select the Apply Incumbent Validation attribute in the Position Incumbent Validation section in the Edit Enterprise
page.
Related Topics
•
Considerations for Managing Extensible Flexfields
What happens to existing assignments when a position's attributes are changed?
If position synchronization is enabled for an enterprise or legal employer and you change a position's attributes, you can
view all assignments that will inherit the change.
After the changes are approved, all incumbents with active assignments automatically inherit the change, if they have
set the Synchronize from Position option to Yes in the Assignments page.
Areas of Responsibility
Configure the Areas of Responsibility Page Header
You want to configure the page header properties for Bob Price's area of responsibility record.
Let's look at the steps to configure the page header. For any mandatory fields not mentioned in the steps, you can use
the default values.
Create and Enable Sandbox
1. Click Navigator > Configuration > Sandboxes.
2. Click Create Sandbox.
3. Enter the Name.
4. Select the Active checkbox for the Page Composer option.
5. Click Create and Enter.
275

Oracle Fusion Cloud Human Resources
Implementing Global Human Resources
Chapter 10
Employment
Edit Panel Header Properties
1. Click Home > My Client Groups > Show More.
2. In the Employment group, click Areas of Responsibility.
3. Select Bob Price's record from the list of employees. The Areas of Responsibility page for Bob Price is shown.
4. Click Page Composer from the Tools menu.
5. Navigate to the Structure menu of the Page Composer.
6. Hover your cursor towards the bottom of the page to display the source code window. You can click or drag-up
and release to expand the source window.
7. Click over the name (Bob Price) in the header.
8. Click Edit in the Confirm Shared Component Edit window.
9. In the Structure, select <>outputText: Bob Price.
10. Click the Show properties of Bob Price icon.
11. Click the Value menu and select Expression Builder.
12. Click the Type a value or expression option and enter any of these expressions. We will add only the person
number in this example.
To add Expression
Person Number
#{bindings.PersonNumber.inputValue}
Assignment Number
#{bindings.AssignmentNumber.inputValue}
Assignment Name
#{bindings.AssignmentName.inputValue}
13. Click OK.
14. Click Apply.
Bob Price's area of responsibility record page header displays the additional attributes, person number,
assignment number, and assignment name.
15. Test the Area of Responsibility page and verify results, then publish the sandbox changes.
Related Topics
•
Guidelines for Using Page Composer
Terminations
Process to Migrate to Version 3 Termination
You run the Migrate Employment Data process to migrate the existing version 2 (V2) termination data to the new
version 3 (V3).
You must run this process before you perform termination or resignation using the Terminate Employment or Resign
from Employment quick actions. Use the Scheduled Processes work area to schedule and run the process.
276

Oracle Fusion Cloud Human Resources
Implementing Global Human Resources
Chapter 10
Employment
Points to Consider
• Before you migrate to V3, you must first disable V2 termination. If you migrate before disabling V2 termination,
you will receive an error message when you try to access V2 termination.
• You can run the process only once to migrate V2 termination data to the new V3. In principle, after you migrate
to V3, you can’t revert to V2.
• Before you decide to opt for the new V3 termination in a production environment, you must first thoroughly
test the feature in a stage environment.
• If you decide to revert to V2 in the stage environment, you can do so by using the Migrate to V2 Termination
diagnostic test. This test can only be run in a stage environment and not in a production environment. For more
information about the diagnostic test, refer to this document on My Oracle Support: Migrate to V2 Termination
(Doc ID 2851332.1)
• The Migrate to V2 Termination diagnostic test is intended for use only in stage environments and not
production environments. Oracle is not responsible for any possible data corruption or loss of data integrity if
the diagnostic test is run in a production environment.
• The Migrate to V3 Termination process migrates both termination and resignation data from V2 to V3.
◦
You can’t just migrate termination data to V3 and retain resignation data in V2.
◦
Similarly, you can’t just migrate resignation data to V3 and retain termination data in V2.
Process Parameter
You run the Migrate Employment Data process using the Migrate to V3 Termination parameter.
Parameter Process Results
Migrate to V3 Termination Version 2 termination data is moved to version 3.
For more information about the steps to enable for version 3 termination, see this document on My Oracle Support
(https://support.oracle.com): Version 3 Termination and Resignation (Doc ID 2821906.1)
Related Topics
•
What are scheduled processes?
•
Submit Scheduled Processes and Process Sets
FAQs for Employment
How can I create separate notification titles for resignation and
termination?
When you specify a user-defined notification title for resignation and termination, you need to create two translation
records, one each for resignation and termination.
277

Oracle Fusion Cloud Human Resources
Implementing Global Human Resources
Chapter 10
Employment
Related Topics
•
Change Workflow Task Titles
How can I disable the termination date field for employees?
You can do this using page composer. You need to make the Termination Date field on the Submit Resignation page
read-only for employees and editable for approvers and other users accessing the page.
To do this, you use this EL expression in the page composer:
#{pageFlowScope.resignTerminateFlowMap.sameUserLoggedInFlag == 'Y'}
For more information about using expression language, see Using Expression Language in Oracle Fusion Applications
(Doc ID 1982300.1) on My Oracle Support at https://support.oracle.com.
Related Topics
•
Examples of EL Expressions
Where can I add personalized content for employment guided
processes?
You can add in the Additional Content region. You need to enable this region for individual self-service transactions
using the HCM Experience Design Studio. You have the option to make the region required or optional.
You can then use the ADF page composer to add your personal content such as a video, company policies, or links to
internal documents.
Related Topics
•
How can I add additional content on the questionnaire pages?
•
Add Additional Content to the Guided Flow for Promote Action
278

Oracle Fusion Cloud Human Resources
Implementing Global Human Resources
Chapter 11
Seniority Dates
11 Seniority Dates
Overview of Seniority Dates
All topics in this section pertain to version 3 (V3) of the seniority dates functionality. You can define and manage the
seniority of workers using version 3 of the seniority dates functionality.
You can configure seniority dates using the Configure Seniority Dates task and a fast formula. You can manage them
using the Seniority Dates task under Quick Actions.
For more information, see these documents on Customer Connect:
• Seniority Dates - Comparison between Different Seniority Dates Versions (https://community.oracle.com/
customerconnect/discussion/631037)
• Seniority Dates - Troubleshooting Seniority Dates - Frequently Asked Questions (https://
community.oracle.com/customerconnect/discussion/631046)
• Seniority Dates V3 - Calculating Seniority Dates Using Fast Formula (https://community.oracle.com/
customerconnect/discussion/631033)
• Seniority Dates V3 - Common Use Cases Configured Using V3 Seniority Dates (https://community.oracle.com/
customerconnect/discussion/631036)
• Seniority Dates V3 - Enabling Enterprise and LE Seniority During Hire (https://community.oracle.com/
customerconnect/discussion/631039)
• Seniority Dates V1 - Seniority Dates Version 1 Frequently Asked Questions (https://community.oracle.com/
customerconnect/discussion/631042)
Note: If you're using V3 seniority dates, you can't view and manage V1 seniority dates of the legal employer and
enterprise on the Work Relationship page.
Related Topics
•
Seniority Dates
•
Examples of Calculating Seniority Dates
•
Examples of Calculating Cumulative and Noncumulative Seniority Dates
Seniority Date Attributes
You can configure seniority using these attributes:
Attribute Where You Use it Example
Enterprise and Legal Employer
• Termination
• Absence entitlements
• Workers with lower seniority are
considered first for layoff.
279

Oracle Fusion Cloud Human Resources
Implementing Global Human Resources
Chapter 11
Seniority Dates
Attribute Where You Use it Example
• Benefits
• Payments
• Team schedules and availability
• Awards and recognition
• Workers who have completed five years of
service are entitled to additional vacation
time or study leave.
• Workers need to meet minimum service
criteria to be eligible for long term
disability plan.
• Only workers who have completed eleven
months of continuous service receive an
annual bonus. Or, only workers with five
years of continuous service are eligible for
gratuity payments when they resign from
the company.
• Workers who have higher seniority are
given preference for working in the normal
shift.
• Workers who have completed five years of
service are presented with a certificate and
company memento.
Grade, Job, and Position
• Promotion
• Key additional assignments
• Mentorship opportunities
• Travel opportunities
• Preference for public speaking and
presentations
• When performance is the same, workers
with higher grade seniority are promoted.
• Workers with higher job seniority are
selected for greenfield assignments.
• Workers with more experience are likely to
be better mentors.
• Workers with a longer tenure in certain
sectors are more likely to be given
preference for international travel.
Grade Step
Pay scales and pay increases
In certain sectors and industries, a worker is
eligible for automatic movement to the next
grade step in the progression. This eligibility is
based on twelve continuous months of service
at a particular grade step.
Union, Bargaining Unit, and Collective
Agreement
Union office and benefits
Union members with higher seniority in the
union become eligible for union offices and
other union benefits.
Country
• Global temporary assignments
• Visas and permits renewals
• Payments
• Workers who have spent specific time in
a particular country may not be eligible to
work in that country for a cooling period.
• Workers who have spent specific time on
a particular type of visa or permit, may
have to re-apply or return to their home
country.
• Workers who have stayed for one year
in a particular country may no longer be
eligible for expenses and may be moved to
that country payroll.
Location, Department, and Business Unit
Transfer
In certain public offices, workers who have
spent three years in a specific location,
280

Oracle Fusion Cloud Human Resources
Implementing Global Human Resources
Chapter 11
Seniority Dates
Attribute Where You Use it Example
department, or business unit have to be
transferred.
Assignment Category
• Benefits
• Pay scales and pay increases
In certain organizations, seniority in a certain
assignment category, such as full-time
regular is used to drive benefits, pay changes,
employee eligibility to work certain hours, and
wage progression rules.
Seniority Date Versions
You can manage the seniority of workers using V1 or V3 versions of the Seniority Dates functionality. This table
describes these versions:
Version Description
V1
Seniority dates that are managed using the Work Relationship task are referred to as V1 seniority
dates. You can only manage the Enterprise Seniority Date and Legal Employer Seniority Date using V1
seniority dates. V1 seniority dates are stored in the PER_PERIODS_OF_SERVICE table.
V3
Seniority dates that are configured using the Configure Seniority Dates task and advanced
configuration options are referred to as V3 seniority dates. You can configure multiple seniority
dates as per your requirement. These seniority dates are managed using the Seniority Dates task. V3
seniority dates are stored in the PER_SENIORITY_DATES_F table.
Note:
The seniority dates aren't calculated during run time. You must run the Calculate seniority Dates
process to calculate seniority dates. You need to schedule this process because V3 seniority dates
are populated only after the process is completed.
If you have a new environment, there's no seniority date version activated.
• If you want to use seniority dates V1, you need to create a new rule using the Configure Seniority Dates task and
deactivate or delete the rule.
• If you want to use seniority dates V3, you need to create a new rule using the Configure Seniority Dates task
and run the Migrate to Version 3 of Seniority Dates process.
For more information, see the document Seniority Dates - Comparison between Different Seniority Dates Versions
(https://community.oracle.com/customerconnect/discussion/631037) on Customer Connect.
281

Oracle Fusion Cloud Human Resources
Implementing Global Human Resources
Chapter 11
Seniority Dates
Considerations for Migrating to V3 Seniority Dates
Here are some points to consider before you migrate to the new version (V3) from the earlier V1 version.
• Migrate from V1 to V3
◦
Select the Migrate Seniority Data from V1 version of Seniority process parameter.
◦
After the migration, you can't view or modify V1 seniority dates.
Note: Even though you can see V2 seniority dates related process parameters, they are no longer supported. V2
seniority dates have been deprecated from release 23B.
Related Topics
•
Seniority Date Versions
•
Process to Migrate Seniority Dates
Process to Migrate Seniority Dates
You run the Migrate to Version 3 of Seniority Dates process to migrate the seniority dates data to the new version (V3)
from an earlier version (V1). Use the Scheduled Processes work area to schedule and run the process.
Note: Before you migrate from V1 to V3, you need to review all reports, extracts, fast formulas, and derived factors,
which are using V1 seniority dates and make necessary changes so that after migration these point to V3 seniority
dates instead of V1.
You can run the process only once to migrate seniority data from V1 to V3.
If you want to roll back to V1 after migrating to V3, run the Migrate from V3 to V2/V1 - Correct diagnostic test. For more
information, refer to the Migrate from V3 to V2 or V1 - Correct attachment in the document Self-Service Data Integrity
Framework for Employment Flows - Part 1 (Doc ID 2548287.1) on My Oracle Support (https://support.oracle.com).
Note: Even though you can see V2 seniority dates related process parameters, they are no longer supported. V2
seniority dates have been deprecated from release 23B.
What Happens When You Run the Process
V1 to V3 conversion: V1 seniority dates only display the hire date and seniority date for the enterprise and legal employer
and you don't configure any seniority rules. When you run the process to migrate seniority data from V1 to V3, the
application automatically creates these seniority rules:
• Legal Employer Seniority Date - Work Relationship Level - Migrate
282

Oracle Fusion Cloud Human Resources
Implementing Global Human Resources
Chapter 11
Seniority Dates
• Enterprise Seniority Date - Person Level - Migrate
The process hides the seniority dates on the Work Relationship page and the application stops populating V1 seniority
dates. However, the application will retain the value of the V1 seniority dates. If there are adjusted values for V1 seniority
dates, the application automatically creates the corresponding adjustments for V3 seniority rules. Therefore, the
resulting seniority dates values are the same in V3. The seniority dates region in the employment information UI will
display V3 seniority dates instead of V1 seniority dates. After the migration to V3, seniority data is maintained in the
PER_SENIORITY_DATES_F table and the PER_PERIODS_OF_SERVICE table is no longer used to maintain V1 seniority
dates.
Note: All existing V1 seniority data are retained in the PER_PERIODS_OF_SERVICE table.
Note: You must re-evaluate the integrations, extracts, reports, derived factors, eligibility profiles, and fast formulas.
This is because these items may be using the tables or database items where the underlying seniority dates version is
V1. All existing V1 seniority data are retained in the PER_PERIODS_OF_SERVICE table.
Process Parameter
The Migrate to Version 3 of Seniority Dates process uses the Migrate Seniority Data From parameter. This parameter
indicates whether you want to migrate seniority dates data to V3 from V1.
Parameter Process Results
V1 Seniority to Non-Cumulative V3
Seniority
• V1 seniority dates are moved to V3.
• V3 seniority rules corresponding to V1 seniority are created as non-cumulative.
Note: Even though you can see V2 seniority dates related process parameters, they are no longer supported. V2
seniority dates have been deprecated from release 23B.
Related Topics
•
Seniority Date Versions
•
Considerations for Migrating to V3 Seniority Dates
•
What are scheduled processes?
•
Submit Scheduled Processes and Process Sets
V3 Seniority Dates Profile Options
For version 3 (V3) seniority dates, you can configure multiple seniority dates. However, for V1 seniority dates, only
enterprise and legal employer seniority dates are available.
In the scenario where you want to identify two V3 seniority rules (enterprise and legal employer), these profile options
can be used. The profile options indicate which V3 seniority rules should be considered as enterprise and legal employer
283

Oracle Fusion Cloud Human Resources
Implementing Global Human Resources
Chapter 11
Seniority Dates
seniority dates for use by other products and downstream or external applications. For example, the compensation
product uses this mapping.
Note: You must configure these profile options only if you're using V3 seniority dates.
Use the Manage Administrator Profile Values task in the Setup and Maintenance work area to manage profile options.
You can configure these V3 seniority dates-related profile options as required, to meet your enterprise requirements:
Profile Option Code Profile Display Name Default Profile Value Description
ORA_PER_SENIORITY_DATE_AT_
ENT
Seniority Date code to fetch
Seniority Date at Enterprise
Enterprise Seniority Date - Person
Level - Migrate
Select the seniority rule for this
profile option that you want to map
as the enterprise seniority date for
V3 seniority dates. If you don't set
any value for the profile option,
the compensation product uses
the Enterprise Seniority Date -
Person Level - Migrate seniority
rule (created during V1 seniority
dates migration).
ORA_PER_SENIORITY_DATE_AT_
LE
Seniority Date code to fetch
Seniority Date at Legal Employer
Legal Employer Seniority Date -
Work Relationship
Select the seniority rule for this
profile option that you want to map
as the legal employer seniority
date for V3 seniority dates. If you
don't set any value for the profile
option, the compensation product
uses the Legal Employer Seniority
Date - Work Relationship
Level - Migrate seniority rule
(created during V1 seniority dates
migration).
How to Change V3 Seniority Dates Rule Configuration
You can change the version 3 (V3) seniority rule configuration only if transactional data isn’t already generated for a V3
seniority date rule.
Use the Seniority Dates V3 - Remove Seniority Dates Transaction Data diagnostic process to change the version 3
(V3) seniority rule configuration by deleting transaction data for the selected seniority rule. You can change the seniority
configuration for a single seniority rule even if it’s used in the calculation.
Note: The V3 seniority rules setup doesn’t allow the configuration to be changed for a seniority rule if transaction
data exists for the rule.
Diagnostic Process Details
This table describes the diagnostic process:
284

Oracle Fusion Cloud Human Resources
Implementing Global Human Resources
Chapter 11
Seniority Dates
Diagnostic Test Name Description
Seniority Dates V3 - Remove Seniority
Dates Transaction Data
Remove transaction data for seniority dates version 3. Once this process is completed, you can make
configuration changes for the selected seniority rule.
The diagnostic process can be run only for a single V3 seniority rule which can be active or inactive. The test can be run
in these two modes:
• Validate: The seniority rule transaction data is not deleted in this preview mode.
• Commit: The seniority rule transaction data is deleted for the selected rule.
When the process is run in the Validate mode, user can choose to automatically generate manual adjustments in the
HCM Data Loader format. The adjustments can be loaded back after the configuration change, hence making the
overall process simpler.
Note: The application generates the HCM Data Loader output in the process log file, and generates only in the
Validate mode.
These are the steps to change the configuration for a V3 seniority rule:
1. Run the Seniority Dates V3 - Remove Seniority Dates Transaction Data process in Validate mode and
generate the manual adjustments in the HCM Data Loader format.
2. Verify the results.
3. Run the Seniority Dates V3 - Remove Seniority Dates Transaction Data process in Commit mode. This will
remove the transaction data, and you can make configuration changes in the seniority rule.
4. Perform the configuration changes for the seniority rule you want.
5. Run the Calculate Seniority Dates process for the selected seniority rule.
6. Load the manual adjustments using HCM Data Loader with the data generated in step 1.
7. Run the Calculate Seniority Dates process for the selected seniority rule.
You can migrate V1 seniority dates to V3 seniority dates in one go and choose to create your V3 seniority rules as
cumulative or non-cumulative when migrating from V2. Also, you can change the seniority configuration for a single
seniority rule even if it’s used in the calculation.
For more information, see the following documents:
• Self-Service Data Integrity Framework for Employment Flows - Part 1 (Doc ID 2548287.1) > Migrate from V3 to
V2 or V1 - Correct on My Oracle Support
• Seniority Dates - Troubleshooting Seniority Dates - Frequently Asked Questions (https://
community.oracle.com/customerconnect/discussion/631046) on Customer Connect.
Related Topics
•
Process to Migrate Seniority Dates
•
Guidelines for Loading Seniority Dates
285

Oracle Fusion Cloud Human Resources
Implementing Global Human Resources
Chapter 11
Seniority Dates
How You Configure Seniority Dates
You can configure the rules for creating seniority dates using the Configure Seniority Dates task.
The seniority date rule defines the name and behavior of the seniority date. For example, you can define an enterprise
seniority date at person level. When the first work relationship is created for a person, the enterprise seniority date is
calculated from the start date of the work relationship.
Note: After the seniority dates are calculated for a worker using a seniority rule, you can't change the configuration of
the seniority rule. However, you can disable the seniority date rule by setting the active option to No.
Configuration Options
You can use the following options in the Configure Seniority Date Rules page:
• Active: You can enable or disable the seniority date rule using this option. If the rule is active, seniority dates
are automatically generated when the employment data is changed, according to the rule definition. If the rule
isn't active, seniority dates aren't generated.
Note: You can't edit or delete a seniority date rule if the corresponding seniority date rule has been used to
populate seniority dates for a person in the application. However, you can disable the seniority date rule in
the Active field.
• Seniority Rule Name: You must select from one of the predefined values, such as the bargaining unit seniority
date - assignment level, enterprise seniority date - person level, and legal employer seniority date - work
relationship level. These values are defined in the ORA_PER_SENIORITY_ITEMS lookup type. You can add a new
value to the Seniority Rule Name list by adding the value as a lookup code to this common lookup type.
• Attribute: You can define the seniority date configuration based on this attribute. For example, legal employer
is the seniority attribute in case of a legal employer seniority date and enterprise is the seniority attribute in
case of an enterprise seniority date. When the seniority attribute is created or modified, the corresponding
seniority date will be populated in the application according to the rules in the setup.
• Level: You can configure seniority dates at the person, work relationship, and assignment levels. Here's what's
considered when deriving the seniority date for each level:
◦
Person: All the work relationships and assignments of the person.
◦
Work relationship: All the assignments in the work relationship.
◦
Assignment: Only the individual assignment is considered while deriving the seniority date at the
assignment level.
• Adjustment Formula: This option is hidden out-of-the-box in the Seniority Date Rule List table. You can
display this option using the View menu from the table. You can configure an adjustment formula to calculate
the seniority date adjustments using the Employment Seniority Date Adjustment formula type. This formula
is evaluated for all assignment records that are used in the seniority calculation. If the formula-calculated
seniority date adjustment has a zero value, the adjustment formula will be ignored in the seniority date
calculation. You need to configure the formula such that it calculates a non-zero value for the effective date
where the adjustment needs to be updated or corrected.
286

Oracle Fusion Cloud Human Resources
Implementing Global Human Resources
Chapter 11
Seniority Dates
• Cumulative: Identifies the calculation logic of seniority when there is a gap in service. When you create a new
seniority rule, the default value of this option is No. When this option is set to yes, the application also considers
the previous seniority calculations for the calculation of seniority. For example, consider a worker who was
associated with an organization from 1-Jan-2001 to 31-Dec-2009 and the Cumulative option is set to yes for
both the seniority dates. The details of his association and the seniority calculation is shown in the following
table.
Action Start Date End Date Legal Employer Legal Employer
Seniority
Enterprise
Seniority
Comments
Hire
1-Jan-2001
31-Dec-2001
Vision US
1 year
1 year
Global Transfer
1-Jan-2002
31-Dec-2002
Vision CA
1 year
2 years
The enterprise
seniority is the
sum of 1 year
in the current
work relationship
and 1 year in the
previous work
relationship.
Termination
31-Dec-2002
Rehire
1-Jan-2007
31-Dec-2007
Vision UK
1 year
3 years
The enterprise
seniority date
is configured to
be cumulative.
Therefore,
the enterprise
seniority is the
sum of 1 year in
the current work
relationship and
2 years in the
previous work
relationship.
Global Transfer
1-Jan-2008
31-Dec-2009
Vision US
3 years
6 years
The legal
employer
seniority date
is configured to
be cumulative.
Therefore, the
seniority for the
Vision US legal
employer is the
sum of 2 years
in the current
287

Oracle Fusion Cloud Human Resources
Implementing Global Human Resources
Chapter 11
Seniority Dates
Action Start Date End Date Legal Employer Legal Employer
Seniority
Enterprise
Seniority
Comments
work relationship
and 1 year in the
previous work
relationship.
The enterprise
seniority date
is configured to
be cumulative.
Therefore,
the enterprise
seniority is the
sum of 2 years in
the current work
relationship and
4 years in the
previous work
relationship.
Termination
31-Dec-2009
• Allow Edit: Specify whether users can override the seniority date using the Seniority Dates task. If you set the
value in this field to No, you can't edit the corresponding seniority date on the Seniority Dates page.
• Display in Guided Flows: Specify whether the seniority date can be displayed in the guided processes. If this
option is set to yes for a seniority date, the seniority date is displayed in the guided processes in view-only
mode.
• Override Seniority Basis: Seniority is calculated in days or hours based on the seniority basis value in the
worker's assignment. You can define an override for the seniority basis at the individual seniority rule level.
For example, you can specify that a seniority rule must always be calculated in hours even though the worker's
assignment basis is days.
• Conversion of Hours: When you can't use a single set of conversion rules, you can convert hours to days using
the Employment Seniority Hours to Days Conversion formula type. You can define the hours for:
◦
Hours to day conversion
◦
Hours to month conversion
◦
Hours to year conversion
288

Oracle Fusion Cloud Human Resources
Implementing Global Human Resources
Chapter 11
Seniority Dates
• Seniority Filters: This option is hidden out-of-the-box in the Seniority Date Rule List table. You can display this
option using the View menu from the table. This table shows you examples of how the filter conditions can be
used:
Seniority Filter Example
Worker Type
To exclude only pending workers from the seniority dates calculation, you must select all other
values except the Pending Worker value. By default, the Employee value is selected which
means that only employees are included in the seniority date calculation.
Country
To calculate the seniority rule only for workers whose legal employers are in the United States,
you must select the United States value.
Legal Employer
To calculate the seniority rule only for workers in two specific legal employers (for example, LE1
and LE2), you must select the LE1 and LE2 values.
Union and Collective Agreement
To calculate the seniority rule only for workers in one specific union and collective agreement
(for example, UN1 and CA1), you must select the UN1 and CA1 values in the corresponding filter.
The application will apply both the filter conditions when evaluating workers for the seniority
rule.
Union Member
To calculate the seniority rule only for union workers, you must select the Yes value.
Related Topics
•
Seniority Dates
Fast Formulas for V3 Seniority Dates
Fast formulas are generic expressions of calculations or comparisons that you want to repeat with different input
variables. You can use fast formula to calculate the seniority dates of a worker.
Version 3 (V3) seniority dates support these fast formulas:
• Employment Seniority Date Adjustment
• Employment Seniority Hours to Days Conversion
This table lists the input parameters, return variables, and context for the fast formulas:
Fast Formula Type Input Parameters Return Variables Context
Employment Seniority Date
Adjustment
• EFFECTIVE_START_DATE
(DATE)
• EFF_DATE (DATE) • HR_RELATIONSHIP_ID
289

Oracle Fusion Cloud Human Resources
Implementing Global Human Resources
Chapter 11
Seniority Dates
Fast Formula Type Input Parameters Return Variables Context
• EFFECTIVE_END_DATE
(DATE)
• SENIORITY_DATE_CODE
(TEXT)
• SENIORITY_BASIS (TEXT)
• CUMULATIVE_FLAG (TEXT)
• BASE_SENIORITY_DATE
(DATE)
• PREVIOUS_SENIORITY_EXIT_
DATE (DATE)
• SENIORITY_LEVEL_OBJECT_
ID (NUMBER)
• SENIORITY_TRIGGERING_
FIELD_CODE (TEXT)
• ACTION_CODE (TEXT)
• CHANGED_VALUE_NEW
(TEXT)
• CHANGED_VALUE_OLD
(TEXT)
• SENIORITY_LEVEL_CODE
(TEXT)
• TOTAL_SENIORITY_HOURS
(NUMBER)
• PREVIOUS_TOTAL_
SENIORITY_HOURS
(NUMBER)
• SENIORITY_DATE (DATE)
• LEGAL_EMPLOYER_ID
(NUMBER)
• LEGAL_EMPLOYER_NAME
(TEXT)
• ENTERPRISE_ID (NUMBER)
• ENTERPRISE_NAME (TEXT)
• BARGAINING_UNIT_CODE
(TEXT)
• BARGAINING_UNIT_NAME
(TEXT)
• GRADE_ID (NUMBER)
• GRADE_NAME (TEXT)
• GRADE_STEP_ID (NUMBER)
• GRADE_STEP_NAME (TEXT)
• JOB_ID (NUMBER)
• JOB_NAME (TEXT)
• POSITION_ID (NUMBER)
• POSITION_NAME (TEXT)
• SENIORITY_ADJUST_
COMMENT (TEXT)
• SENIORITY_ADJUST_IN_DAYS
(NUMBER)
• SENIORITY_ADJUST_IN_
HOURS (NUMBER)
• HR_TERM_ID
• PAYROLL_RELATIONSHIP_ID
• PAYROLL_TERM_ID
• DATE_EARNED
• HR_ASSIGNMENT_ID
• PERSON_ID
• EFFECTIVE_DATE
• PAYROLL_ASSIGNMENT_ID
• LEGISLATIVE_DATA_GROUP_
ID
• LEVEL_OBJECT_ID
• SENIORITY_DATE_CODE
• SENIORITY_FIELD_NUMBER
• UNIT_OF_MEASURE
290

Oracle Fusion Cloud Human Resources
Implementing Global Human Resources
Chapter 11
Seniority Dates
Fast Formula Type Input Parameters Return Variables Context
• UNION_ID (NUMBER)
• UNION_NAME (TEXT)
• LOCATION_ID (NUMBER)
• LOCATION_NAME (TEXT)
• DEPARTMENT_ID (NUMBER)
• DEPARTMENT_NAME (TEXT)
• COLLECTIVE_AGREEMENT_
ID (NUMBER)
• COLLECTIVE_AGREEMENT_
NAME (TEXT)
• PAST_PERIOD_IN_DAYS
(NUMBER)
• EFFECTIVE_SEQUENCE
(NUMBER)
• EFFECTIVE_LATEST_CHANGE
(TEXT)
Employment Seniority Hours to
Days Conversion
• EFFECTIVE_START_DATE
(DATE)
• EFFECTIVE_END_DATE
(DATE)
• DIRECTION (TEXT)
• HOURS (NUMBER)
• YEARS (NUMBER)
• MONTHS (NUMBER)
• DAYS (NUMBER)
• RETURN_HOURS (NUMBER)
• RETURN_YEARS (NUMBER)
• RETURN_MONTHS
(NUMBER)
• RETURN_DAYS (NUMBER)
• HR_RELATIONSHIP_ID
• HR_TERM_ID
• PAYROLL_RELATIONSHIP_ID
• PAYROLL_TERM_ID
• DATE_EARNED
• HR_ASSIGNMENT_ID
• PERSON_ID
• EFFECTIVE_DATE
• PAYROLL_ASSIGNMENT_ID
• LEGISLATIVE_DATA_GROUP_
ID
• LEVEL_OBJECT_ID
• SENIORITY_DATE_CODE
• SENIORITY_FIELD_NUMBER
• UNIT_OF_MEASURE
How to Override Seniority Basis
You calculate seniority in days or hours using the seniority basis value in the worker's assignment. Using the Configure
Seniority Dates task, you can override the seniority basis for a particular seniority rule.
For example, you can say that a seniority rule must always be calculated in hours even though the worker's assignment
basis is days. The default value for the override in the application is Either Days or Hours.
291

Oracle Fusion Cloud Human Resources
Implementing Global Human Resources
Chapter 11
Seniority Dates
Let's see how seniority rule is calculated depending on the override values you specify for the seniority basis.
Seniority Basis on the Assignment Overridden Seniority Basis Basis for Calculating Seniority Rule
Days
Days
Calendar days
Hours
Days
Calendar days
Days
Hours
Hours loaded in the seniority hours table
Hours
Hours
Hours loaded in the seniority hours table
Days
Either Days or Hours
Calendar days
Hours
Either Days or Hours
Hours loaded in the seniority hours table
Common Rule Configurations for V3 Seniority Dates
Let’s see some examples of configuring version 3 (V3) seniority dates by using these seniority rules:
• Enterprise Seniority Date: You want the application to automatically account for the break in service.
• Legal Employer Seniority Date: You want to track the start date with each legal employer work relationship.
• Latest Hire Date: You want to track the last hire or rehire date for a worker.
Configuration Options
Rule Name Level Attribute Cumulative Flag Fast Formula
Enterprise Seniority Date Person Enterprise Yes Not required
Legal Employer Seniority
Date
Work Relationship Legal Employer No Not required
Latest Hire Date Person Enterprise No Not required
Sample Data Used
This table displays the sample data used in the example. In this table, the worker is hired for legal employer 1 (LE1 -
GBI_GHR_2TSA) on 01-JAN-2014 and globally transferred from LE1 on 01-JAN-2015. The global transfer is to legal
employer 2 (LE2 - GBI_GHR_2TSCSA) and the worker resigns from LE2 on 01-JAN-2016. The worker is then rehired for
legal employer 3 (LE3 - GBI_GHR_2TMCSA) on 01-JAN-2017.
292

Oracle Fusion Cloud Human Resources
Implementing Global Human Resources
Chapter 11
Seniority Dates
Action Date Legal Employer
Hire 01-JAN-2014 GBI_GHR_2TSA
Global Transfer 01-JAN-2015 GBI_GHR_2TSCSA
Resignation 01-JAN-2016 GBI_GHR_2TSCSA
Rehire 01-JAN-2017 GBI_GHR_2TMCSA
This table displays the seniority date calculation for the seniority rules used in the example.
Action Date Legal Employer Enterprise Seniority
Date
Legal Employer
Seniority Date
Latest Hire Date
Hire 01-JAN-2014 LE1 - GBI_GHR_2TSA 01-JAN-2014 01-JAN-2014 01-JAN-2014
Global Transfer 01-JAN-2015 LE2 -
GBI_GHR_2TSCSA
01-JAN-2014 LE2 - 01-JAN-2015
LE1 - 01-JAN-2014
01-JAN-2014
Resignation 01-JAN-2016 LE2 -
GBI_GHR_2TSCSA
01-JAN-2014 LE2 - 01-JAN-2015
LE1 - 01-JAN-2014
01-JAN-2014
Rehire 01-JAN-2017 LE3 -
GBI_GHR_2TMCSA
01-JAN-2015
Seniority date is auto
adjusted by 366 days
due to 2016 being
a leap year and the
worker not being in
service during 2016.
LE3 - 01-JAN-2017
LE2 - 01-JAN-2015
LE1 - 01-JAN-2014
01-JAN-2017
Enterprise Seniority Date: The worker had a break in service for one year from the organization. The seniority date is
automatically adjusted for this seniority rule because the cumulative option is set to yes.
Legal Employer Seniority Date: Since the worker was associated with 3 legal employers in the given period, the 3 legal
employers are listed in the attribute list (GBI_GHR_2TMCSA, GBI_GHR_2TSA, and GBI_GHR_2TSCSA).
Note: The active legal employer will be listed first in the attribute list (GBI_GHR_2TMCSA).
Latest Hire Date: The worker had a break in service for one year from the organization. The last hire date is displayed in
the Seniority Date field (01-JAN-2017).
Seniority Dates User Entities
You can use user entities to describe seniority date information for V3 seniority dates.
293

Oracle Fusion Cloud Human Resources
Implementing Global Human Resources
Chapter 11
Seniority Dates
The following table describes the user entities that are available for seniority dates:
User Entity Name Description User Entity Context
PER_SENIORITY_DATES_V3_SDC_UE
This user entity is used to describe the seniority
date information for V3 seniority dates.
The following contexts must be provided for
this user entity:
• PERSON_ID
• EFFDT
• SENIORITY_DATE_CODE
PER_SENIORITY_DATES_V3_UE
This user entity is used to describe the seniority
date information for V3 seniority dates.
The following contexts must be provided for
this user entity:
• PERSON_ID
• EFFDT
PER_SENIORITY_HOURS_V3_UE
This user entity is used to describe the seniority
hours information for an hours-based worker in
V3 seniority dates.
The following context must be provided for this
user entity:
• PERSON_ID
FAQs for Seniority Dates
How can I find out which version of seniority dates I am using?
Run this query in your database instance: SELECT VERSION_CODE FROM FUSION.PER_EMPL_CONFIGURATIONS
Why does the seniority dates version show V2 even though I’m
using V1 seniority dates?
Earlier seniority dates V1 and V2 could co-exist but now that V2 is deprecated, even though the application tables show
V2, it implies you’re using V1.
Why can't I see the seniority rule on the Employment Info page
when it's displayed on the Seniority Dates page?
To display the rule on the Employment Info page, set the Display in Guided Flows option to Yes on the Configure
Seniority Date Rules page.
294

Oracle Fusion Cloud Human Resources
Implementing Global Human Resources
Chapter 11
Seniority Dates
How can I find the most recent hire date when using V3 seniority
dates?
You can do so by configuring a non-cumulative rule at the person level for the enterprise attribute. For more
information, see the document Seniority Dates V3 - Common Use Cases Configured Using V3 Seniority Dates (https://
community.oracle.com/customerconnect/discussion/631036) on Customer Connect.
How can I exclude pending workers from the seniority dates
calculation?
You must clear the Pending worker check box in the Worker Type seniority filter on the Configure Seniority Date Rules
page.
What's the source for the seniority hours used in calculating
hours-based seniority?
The source is the hours loaded in the PER_SENIORITY_HOURS table.
How can I load hours in the seniority hours table?
By using HCM Data Loader. For more information, see the Oracle Human Capital Management Cloud Integrating with
HCM guide on Help Center at https://docs.oracle.com/en/cloud/saas/index.html
Can I use assignment or standard working hours when calculating
hours-based seniority?
No. To calculate hours-based seniority, you must load hours in the PER_SENIORITY_HOURS table using HCM Data
Loader.
295

Oracle Fusion Cloud Human Resources
Implementing Global Human Resources
Chapter 11
Seniority Dates
Why can't I calculate V3 seniority dates by running the Populate
Seniority Dates process?
The Populate Seniority Dates process was used to calculate version 2 (V2) seniority dates after the initial conversion. You
must run the Calculate Seniority Dates process to calculate the V3 seniority dates.
296

Oracle Fusion Cloud Human Resources
Implementing Global Human Resources
Chapter 12
Journeys
12 Journeys
Overview of Journeys
A journey is a collection of tasks to facilitate a business process.
You can configure a journey with one or more tasks with each task having its own performer. You can assign the journey
to workers during their personal and professional transitions. Tasks help workers when they experience an event, be it
work related, such as transfer or personal, such as an update to their marital status. Irrespective of the journey category,
journeys enables all stakeholders involved in a journey to track and manage their tasks effectively.
You can create a journey by building on an existing template or create a brand new template. A journey can be assigned
manually or automatically. You can assign a journey to other people or assign it to yourself.
These are some journey categories that you can use for specific purposes:
• Contextual Journeys to configure tasks that need to be performed by different performers before a HR
transaction. For example, tasks that a manager needs to do before a transfer action.
• Guided Journeys to support users by providing guidance, such as tutorials, company policies, and best
practices in the context of an HCM flow. For example, tasks to help a line manager transfer an employee.
• Survey Journeys to create a survey and assign it to people in your organization. For example, regular pulse
surveys to seek feedback on workplace satisfaction or a general survey to provide feedback on the onboarding
process.
For more information about journeys, refer to the Implementing and Using Journeys guide on Oracle Help Center. To
access the guide, click the overview topic in the Related Topics section.
Related Topics
•
Overview of Journeys
297

Oracle Fusion Cloud Human Resources
Implementing Global Human Resources
Chapter 12
Journeys
298

Oracle Fusion Cloud Human Resources
Implementing Global Human Resources
Chapter 13
Document Records
13 Document Records
Document Types and Categories
Use document records to create and manage documents such as medical certificates, licenses, and visas. You can create
your own document types to supplement the predefined document types, categories, and subcategories.
Use the Document Records task from Quick Actions, person spotlight, My Team work area, or person smart navigation
to create and maintain document records for a person.
The system document type displays on the setup page after you create the document type. Here are the attributes you
can configure for a document type:
Field What You Use it For
System Document Type Read-only field that's displayed when the document type is saved.
Document Type Level Specify whether the document type you want to create is at the person or assignment level. The
default type is Person. If you specify Person, the assignment ID isn't populated for document records.
Type
Categorize the document. You can translate the document type using the Translation Editor icon.
Description
Compose and format content using the built-in rich text format when you create or edit a document
type. The character limit of the field is 4000 characters. The formatted content is displayed in the read-
only Description field on the responsive Document Records page and plugin region for the document
type. You can view the read-only Description field when you create or edit a document record.
Note: If you add an image in the Description field, it will take up the 4000 character limit specified
for the field. Instead, you can use the Reference Info (document type attachments) field to add the
image.
Expiration Notification Period
Specify an expiration period for this document type. This is an information-only field and doesn't
determine any automatic notification.
Note: This field must be populated in the Document Type Setup page to display the document
records in the Document Expiry report.
Minimum Attachments
Specify the number of attachments users should include for the document record.
You can control the display of the Attachments section on the Document Records page by entering a
numeric value in the Minimum Attachments field. If you enter a value of -1, the Attachments section is
hidden. You can use this feature to restrict users from uploading attachments to document types that
don't need supporting documents.
Here are a few points to consider about the feature:
• It’s only applicable for transactions done using the UI.
• It’s not applicable when you use HCM Data Loader and REST API.
299

Oracle Fusion Cloud Human Resources
Implementing Global Human Resources
Chapter 13
Document Records
Field What You Use it For
• If there are existing attachments and the attribute value is set to -1, then the Attachments section
is read-only and you can't update the attachment. You can only view the attachment in read-only
mode.
• Even if you set the value of the Minimum Attachments attribute to -1:
◦
You can still use the Add from Attachment feature to prefill Document Record attributes by
scanning an attachment.
◦
It allows attachments to be automatically uploaded as part of the Generate Letter feature, but the
Attachments section will be read-only.
• You can enable this feature even for existing document types.
Report Path
Specify the path of the BI publisher template that enables a report or letter to be generated when
creating a document record for the document type.
For example, /Custom/Human Capital Management/Document Records/Visa
Application.xdo
Country
Indicate the country the document type applies to. Default is All Countries.
When workers create a document record this displays as a read-only field. It isn't available for
selection and can't be updated once the document type is created. It also doesn't restrict selection of a
document type by matching any assignment information of the worker.
Category
Group documents into meaningful categories at a higher level. For example, absence. You can use the
DOCUMENT_CATEGORY lookup type to define new document categories and subcategories
When workers create a document record this displays as a read-only field. It isn't available for selection
when creating the document record and can't be updated after the document type is created.
Subcategory
Further group documents into subcategories. For example, general or medical. Define document
categories as values for the DOCUMENT_CATEGORY lookup type and document subcategories as
extended lookup values for the selected category.
This is read-only. It isn't available for selection when creating a document record and can't be updated
after the document type is created.
The subcategory that you specify for a document type will be displayed in the Document Type LoV
when you add or mass download document records. You can use the subcategory value to accurately
search and filter the document type.
Note: It’s recommended that you select a value for the Subcategory attribute when configuring a
document type to further classify document records.
Tags
Classify and group document types during creation and editing. These tags are used as a starting
point:
• Employment
• Identification
• Legal
However, you can add additional values to the ORA_PER_DOC_TYPE_TAGS lookup type.
You can also classify and group related document types under the same tag for higher-level reporting
and filtering on the Document Records landing page.
300

Oracle Fusion Cloud Human Resources
Implementing Global Human Resources
Chapter 13
Document Records
Field What You Use it For
Status
Indicate whether new document records can be created for this document type.
Note: Document records of this type can be viewed, edited, and deleted even if the status of the
document type is inactive.
Approval Required
Indicate whether document records created for this document type need approval. If you set this
attribute to No, document records won't go through document approval.
Allow Multiple Occurrences
Indicate whether multiple records of this document type can be created for the person.
Note: This check is performed against the individual assignments of the person and not against the
person. This lets you create a document record per assignment instead of one document record per
person.
For example, if you have the following configuration in the Document Type Infomation page:
• Document Type: Employment Agreement
• Document Type Level: Assignment
• Allow Multiple Occurrences: No
In a situation where you have 2 assignments titled A1 and A2 and you need to upload a signed copy of
the Employment Agreement for each assignment. With the above configuration, it's possible to create
2 document records of the same type (one document record per assignment) even when the Allow
Multiple Occurrences option is set to No.
Publish Required
Indicate whether documents are available from a specified date or immediately. If this is set to Yes, it
displays as a required field in the Add Document Record flow. You can edit the publish date using REST,
HDL, or HSDL.
Note:
If the publish date is in the future, the document record won't display on the Document Records list
page until that date. However, users having the View Unpublished Document Records privilege can
select Show in the Future Published field to see such document records.
See the topic, Make Document Records Available from a Specific Date
Enable Document Delivery Preferences
Indicate delivery preferences for the document.
301

Oracle Fusion Cloud Human Resources
Implementing Global Human Resources
Chapter 13
Document Records
Use these tabs to configure other information for the document type:
• Document Record Preferences - includes document record attributes, settings for restricting and archiving, and
flexfield preferences.
These are the archive options:
◦
Archive Criteria Basis: By default this LoV is blank. You can select either the Creation Date, From Date,
To Date, or Issued On.
◦
Archive After Days: By default this field is blank. It’s a required field where you enter a number that’s
greater than 0 and less than or equal to 18000. For example, if you enter 2, the document records will be
archived 2 days after the date selected for Archive Criteria Basis.
◦
Purge After Days: By default this field is blank. It’s a required field where you enter a number that’s
greater than 0 and less than or equal to 18000. For example, if you enter 2, the document records will be
purged 2 days after the archive date.
Flexfield preferences: You can configure display preferences for the document record flexfield (global and
context) for each document type and configure the default value for the document record flexfield context.
These are some points to consider when you configure the preferences:
◦
The configuration for the context attributes of the document record flexfield is optional.
◦
By default, the context attributes of the document record flexfield have a value of null.
◦
The context attribute fields of the document record flexfield are displayed as read-only or are hidden
based on the configuration done for the document type in the Add Document Records and View
Document Records pages.
◦
It is recommended that you don’t make the context attribute of the document record flexfield as required
if you set it as Hide or Read only. Otherwise, the user will see an error message when adding or editing a
document record.
◦
The context preferences of the document record flexfield are applicable only when adding or editing a
document record from the UI. They don’t apply when adding or editing document records using HCM
Data Loader or HCM Spreadsheet Data Loader.
◦
The existing page Composer customizations always take precedence. You need to remove the existing
customizations and configure the document record flexfield preferences accordingly.
◦
It’s recommended that you configure the document record flexfield preferences instead of using page
composer personalization.
◦
You can export and import the context attributes of the document record flexfield by using Functional
Setup Manager (FSM).
• Additional Information - includes flexfield information, if it is configured.
• Document Delivery Preferences - includes delivery preferences, if enabled.
• Attachments - includes reference files for a document type that workers can use when creating a document
record of that type. You can optionally add titles for the document type attachments that you upload in
the Reference Info section when you add or edit a document record. The URL or file name that you enter is
defaulted in the Title field, you can change the title. These are some points to consider when you add a title:
◦
The title won't be displayed in the Reference Info section of the document record when viewed on a
mobile device.
◦
Titles are not supported for attachments that are added as part of a document record. For such
attachments, only the file name or URL is displayed.
◦
The Title field has a limit of 80 characters. If the file name is more than 30 characters, the first 30
characters are defaulted in the Title field. You can manually update the document title up to 80
characters.
302

Oracle Fusion Cloud Human Resources
Implementing Global Human Resources
Chapter 13
Document Records
◦
If you're adding a URL as an attachment on the Redwood document type page, you can use only lower
case.
For more information, see these documents on Customer Connect:
• Document Records - Frequently Asked Questions and Troubleshooting Guide (https://community.oracle.com/
customerconnect/discussion/630975)
• Document Records - How to Store BI Report Output as DOR Using HCM Extracts (https://
community.oracle.com/customerconnect/discussion/630994)
• Document Records - Controlling Security of Document Records (https://community.oracle.com/
customerconnect/discussion/630973)
• Document Records - Generate Letter from Document Record for Specific Doc Type (https://
community.oracle.com/customerconnect/discussion/630980)
• Document Records - Document Records Approvals - Frequently Asked Questions (https://
community.oracle.com/customerconnect/discussion/630977)
• Document Records - Personalization-Frequently Asked Questions and Troubleshooting Guide (https://
community.oracle.com/customerconnect/discussion/630979)
Related Topics
•
Restrict Management of Document Records
•
Document Type Descriptive Flexfields
•
How You Set Preferences for Document Delivery
•
Document Type Security Profiles
Restrict Management of Document Records
You can restrict the creation, update, and deletion of document records post approval for a document type. By default,
the preferences for document records aren't restricted. To access the document record preferences, use the Document
Types task in the Setup and Maintenance work area.
These are the restrict options:
• Restrict Create: By default, No is selected. You can restrict document records for the document type from
being created by selecting Yes.
• Restrict Update: By default, No is selected. You can restrict document records for the document type from
being updated by selecting Yes.
• Restrict Delete: By default, No is selected. You can restrict document records for the document type from
being deleted by selecting Yes.
The following table describes the different combinations that you can select for the document record preferences.
Restrict Create Restrict Update Restrict Delete Impact on Page When Creating
and Viewing Document Records
No
No
No
-
303

Oracle Fusion Cloud Human Resources
Implementing Global Human Resources
Chapter 13
Document Records
Restrict Create Restrict Update Restrict Delete Impact on Page When Creating
and Viewing Document Records
No
No
Yes
Delete button isn't visible when
viewing the document record.
No
Yes
Yes (Yes is automatically selected
and can't be changed.)
Edit and Delete buttons aren't
visible when viewing the document
record.
Yes
Yes (Yes is automatically selected
and can't be changed.)
Yes (Yes is automatically selected
and can't be changed.)
Document Type LOV won’t display
the document type when adding a
new document record.
Edit and Delete buttons aren't
visible when viewing the document
record.
Note: Here are some points to be considered:
• The process of creating document records through journey tasks is secured with the Manage Person
Documentation by Worker privilege.
• If you've associated document types with your journey tasks, you must include the document types in the
Document Type Security Profile of the journey task performer.
• You must not configure the Restrict Create option to Yes for document types that are associated with journey
tasks.
• You must not enable Approvals for document types that are associated with journey tasks.
Exclude Roles from Restriction
You can select specific roles that you want to exclude in the Roles Excluded from Restriction field even if the following
restrict options are enabled for the document type:
• Restrict Create
• Restrict Update
• Restrict Delete
For example, you might need to exclude certain roles for business reasons while restricting all other roles in the
organization.
These examples explain how the role exclusion works:
• You've enabled the Restrict Create option for a document type and have excluded certain roles from the
restriction. In this case, users having these excluded roles can still create a document record when they select
the document type in the Add Document Record page.
304

Oracle Fusion Cloud Human Resources
Implementing Global Human Resources
Chapter 13
Document Records
• You've enabled the Restrict Update option for a document type and have excluded certain roles from the
restriction. In this case, the Edit button will still be enabled for users having these excluded roles when they
view the document record.
• You've enabled the Restrict Delete option for a document type and have excluded certain roles from the
restriction. In this case, the Delete button will still be enabled for users having these excluded roles when they
view the document record.
• You've enabled the Restrict Delete, Create, and Update options for a Document Type and excluded certain roles
from the Delete and Update restrictions. In this case, the user role with most access will take precedence. Here's
an example to understand this better:
◦
Sandra has only the employee role. You've enabled the Restrict Update option to Yes for the Visa
document type and have excluded the HR specialist role for the same option. With this configuration,
Sandra can’t edit the Visa document record.
◦
John has two roles, employee and HR specialist. With the Restrict Update option enabled to Yes for the
Visa document type, John can edit the Visa document record for Sandra, since he has the HR specialist
role which is excluded from the Restrict Update option. Also, since John has both HR specialist and
Employee roles, the role with the most access takes precedence which means that John is permitted to
update his own Visa document record, as long as he has the appropriate data security privileges.
Here are some points to consider while excluding roles using the Roles Excluded from Restriction field:
• The field has a character limit of 4000 characters (including commas).
• By default, the value for the field is null.
• The field will be enabled only when the restrict setting is set to Yes.
• You can select one or more role names from a list of values in the field. If there's more than one role, they'll be
automatically separated by commas.
• If a role is deleted after it’s added to the exclusion list, it'll not be displayed in the dropdown list of the Roles
Excluded from Restriction field and will not be available for future selection in the list of values.
• A document type LOV displays document types based on your document type security profile:
◦
When Restrict Create option is enabled but no roles are specified in the Roles Excluded from
Restriction list, you’ll not receive an error message, and the LOV won’t display the document types.
◦
When Restrict Create option is enabled but roles are specified in the Roles Excluded from Restriction
list, you’ll receive an error message if your role isn't included in the Roles Excluded from Restriction list.
• You can export and import the document type exclusion configuration by using Functional Setup Manager
(FSM). The configuration supports HCM Data Loader and HCM Spreadsheet Data Loader.
• If you've changed the add, edit, and delete buttons using page composer, it's recommended that you evaluate
the changes and use the role exclusion configuration option wherever applicable.
Configure Labels for Standard Document Type Attributes
You can configure new labels for the standard document record attributes based on the document type by using the
translation editor on the Document Type Setup page. For example, you can configure these new labels for the passport
document type:
305

Oracle Fusion Cloud Human Resources
Implementing Global Human Resources
Chapter 13
Document Records
Existing Attribute Label New Attribute Label
Name Passport Name
Number Passport Number
Issuing Comments Passport Issuing Comments
Start Date Passport Start Date
End Date Passport End Date
Issued Date Passport Issued Date
Issuing Authority Passport Issuing Authority
Issuing Country Passport Issuing Country
Issuing Location Passport Issuing Location
These steps show how you can configure new labels for the passport document type:
1. Navigate to the Setup and Maintenance work area.
2. In the Tasks panel drawer, click Search.
3. Search and click the Document Types task name.
4. Search for the passport document type.
5. Click the passport link in the Search Results area.
6. In the Edit Document Type page, click the Translation Editor icon (globe icon).
7. In the Edit Translations dialog box, for the US source language, enter the new labels for name, number, issuing
comments, from date, to date, issued date, issuing authority, issuing country, and issuing location. Click OK.
8. Click Submit.
9. Click Yes, and then click OK.
Here are some points to consider when you configure new labels for document record attributes:
• You can configure the labels only by using the translation editor available on the Document Type Setup page.
• By default, the new labels have a null value and therefore, the seeded labels are used.
• The character limit for each new label field is 200 characters.
• You can export and import the label configuration by using Functional Setup Manager (FSM).
• You can create and update the labels by using HCM Data Loader and HCM Spreadsheet Data Loader.
• If you have changed the labels by using page composer, it is recommended that you evaluate your changes and
use the translation editor configuration option wherever applicable.
When you’re configuring labels for standard attributes in the Redwood user interface, use the New Label field in the
Basic details section. These labels are displayed when you view, add, or edit a document record for the document type.
The translation support in the Redwood UI is available by logging in with the specific language and modifying the labels
in the required language.
306

Oracle Fusion Cloud Human Resources
Implementing Global Human Resources
Chapter 13
Document Records
Document Type Lookups
This topic identifies lookups related to document records. Review these lookups, and update them as appropriate to suit
enterprise requirements. You review these lookups in the Setup and Maintenance work area.
Document Types Lookups
Here's a list of the document types lookups that are available:
Lookup type Description Configuration Level
DOCUMENT_CATEGORY
Categorizes a document.
Extensible
DOCUMENT_STATUS
Status of a document record.
User
ORA_PER_DOC_TYPE_TAGS Tags for Grouping Document Types. User
Note: DOCUMENT_STATUS isn't available for use.
Document Records Profile Options
Use the Manage Administrator Profile Values task in the Setup and Maintenance work area to manage profile options.
You can configure these document record-related profile options as required, to meet your enterprise requirements:
Profile Option Code Profile Display Name Default Profile Value Description
ORA_HCM_SENSITIVE_DATA_
VIEW_AUDIT_ENABLED
Mobile-Responsive Sensitive Data
View Audit Enabled
N If this is set to Y, you can monitor
users who have accessed data on
the Document Records and Mass
Download of Document Records
pages by using the Sensitive Data
Access Audit page.
ORA_PER_DOR_ASG_LVL_
DELETE_ON_CANCEL_WR
Cancel of Non-Global Transfer
Work Relationship
No
If this is set to Yes, then this is what
happens in this process:
• If there are multiple
assignments in the work
relationship and the
assignments have document
records, then the document
records associated with the
assignments are deleted.
307

Oracle Fusion Cloud Human Resources
Implementing Global Human Resources
Chapter 13
Document Records
Profile Option Code Profile Display Name Default Profile Value Description
• When document records are
being deleted, the document
records pending transactions
are discarded from the
approval process.
ORA_PER_DOR_ASG_LVL_
DELETE_ON_DELETE_ASG
Delete Assignment Level
Document Records During Delete
Assignment Enabled
No
If this is set to Yes, then this is what
happens in this process:
• All document records
associated with the
assignment are deleted.
• Document records pending
approval are discarded from
the approval process.
ORA_PER_DOR_ASG_LVL_MOVE_
ON_CHANGE_LE
Move Assignment Level Document
Records During Change Legal
Employer Enabled
N
If this is set to Yes, then this is what
happens in these processes:
• Global Transfer
◦
When document records
are moved from source to
destination assignment,
document records pending
approval aren't moved.
However, users can move the
document records manually
using HDL, HSDL or REST,
post approval.
◦
Only document records from
the source assignment are
moved.
◦
If there are multiple
assignments in the source
work relationship and the
assignments have document
records, then the document
records associated with a
non-source assignment
continue to be associated
with the original assignment
• Cancellation of Global
Transfer Work Relationship
◦
When document records are
moved from destination to
source assignment, document
records pending approval
aren't moved. The pending
transactions are discarded
from the approval process.
◦
If there are multiple
assignments in the
destination work relationship
and the assignments have
document records, then the
document records associated
with a non-destination
assignment are deleted.
308

Oracle Fusion Cloud Human Resources
Implementing Global Human Resources
Chapter 13
Document Records
Profile Option Code Profile Display Name Default Profile Value Description
◦
If there are multiple
assignments in the
destination work relationship
and the assignments have
document records, then the
document records associated
with a non-destination
assignment are deleted.
ORA_PER_DOR_ATTACHMENT_
SCAN
Document Record Attachment
Scan Enabled
Yes If this is set to Yes, the Add (Add
from Attachment) action is enabled
on the Document Records page. To
disable the action, you must set the
profile option to No.
ORA_PER_DOR_FILE_
DOWNLOAD_MAX_SIZE
Document Records File Download
Maximum Size
5 MB
You can increase the profile value
to enable larger files to be included
in the download of document
records.
ORA_PER_DOR_SOA_WAIT_IN_
MINS
Document Records Post Approval
Commit Wait Time
0
This is what you can specify:
• Specify the time to wait in
minutes to commit document
record transaction data after
it's approved. Value can be
between 1 and 59.
Document Type Descriptive Flexfields
You use the Document Type Descriptive Flexfields task in the Setup and Maintenance work area to create and manage
the flexfields. Review these flexfields and use them as appropriate to suit enterprise requirements.
Here's the list of document type descriptive flexfields
Application Table Name Descriptive Flexfield Code Name Used Availability
HR_DOCUMENT_TYPES
PER_DOCUMENT_TYPE_
DFF
Document Type Descriptive
Flexfield
For capturing organization
specific information for
document types.
Available for use.
HR_DOCUMENT_TYPES
PER_DOCUMENT_TYPE_
LEG_DDF
Document Type Developer
(legislative) Flexfield
For capturing legislation
specific information for
document types.
Available for Oracle
Localization use.
309

Oracle Fusion Cloud Human Resources
Implementing Global Human Resources
Chapter 13
Document Records
Parameters for Document Type Descriptive and Developer Flexfields
This table shows the parameters that you can use in the document type DFF (PER_DOCUMENT_TYPE_DFF) and
document type DDF (PER_DOCUMENT_TYPE_LEG_DDF):
Parameter Name Parameter Description Data Type Supported in DFF Supported in DDF
CATEGORY_CODE
Document type category
code
Varchar2
Yes
Yes
LEGISLATION_CODE
Document type legislation
code
Varchar2
Yes
Yes
SYSTEM_DOCUMENT_
TYPE
System document type
Varchar2
Yes
Yes
Related Topics
•
Overview of Descriptive Flexfields
Document Record Descriptive Flexfields
You use the Document Records Descriptive Flexfields task in the Setup and Maintenance work area to create and
manage the flexfields. Review these flexfields and use them as appropriate to suit enterprise requirements.
Document Records Descriptive Flexfields
Here's the list of document records descriptive flexfields in the application:
Application Table Name Descriptive Flexfield Code Name Used Availability
HR_DOCUMENTS_OF_
RECORD
PER_DOC_OF_RECORD_
LEG_DDF
Documents of Record
Legislative Information
For capturing legislation
specific information for
document records.
Available only for Oracle
Localization use.
HR_DOCUMENTS_OF_
RECORD
PER_DOCUMENTS_OF_
RECORD_DFF
Documents of Record
Attributes
For capturing organization
specific information for
document records.
Available for use.
Parameters for Document Records Descriptive and Developer Flexfields
This table shows the parameters that you can use for the document record DFF (PER_DOCUMENTS_OF_RECORD_DFF)
and document record DDF (PER_DOC_OF_RECORD_LEG_DDF):
310

Oracle Fusion Cloud Human Resources
Implementing Global Human Resources
Chapter 13
Document Records
Parameter Name Parameter Description Data Type Supported in DFF Supported in DDF
PERSONID
Person identifier for whom
the document record is
created.
Number
Yes
Yes
ASSIGNMENTID
Assignment identifier of the
worker.
Number
Yes
Yes
SYSDOCTYPEDFF
Document type context
Varchar2
Yes
No
SYSDOCTYPE
Document type context
Varchar2
No
Yes
Related Topics
•
Overview of Descriptive Flexfields
Configure Flexfield Parameters in Value Sets for
Document Records
You want to use the person ID as an input parameter when creating a value set for a document record flexfield segment.
Business Requirement: Meg is an employee at Vision Corporation. She needs to create some document records for her
contacts, for example, her spouse and mother. She should be able to easily select the name of the contact for whom she
is creating the document record.
Summary of Tasks
1. Define a segment for the PER_DOCUMENTS_OF_RECORD_DFF Document Records Descriptive Flexfield (DFF).
2. Define a value set that will display the contact values based on the person ID of the employee (Meg).
Defining a Segment for the DFF
1. In the Setup and Maintenance work area, go to the following:
◦
Functional Area: Workforce Information
◦
Task: Document Records Descriptive Flexfields
2. On the Document Records Descriptive Flexfields page, select the Documents of Record Attributes row and click
Edit on the Actions menu.
3. Click the Create (+) icon in the Global Segments area and create a segment by entering these values:
◦
Name: Contact
◦
Description: Displays the list of contacts for an employee.
◦
Data Type: Number
311

Oracle Fusion Cloud Human Resources
Implementing Global Human Resources
Chapter 13
Document Records
Note: You need to create the segment under the GLB_BIRTH context code.
Defining a Value Set for the DFF
1. Click Create Value Set.
2. In the Create Value Set page, enter these values:
◦
Value Set Code: EMP_CONTACT
◦
Description: Value set containing the contacts of the employee.
◦
Module: Search and select Global Human Resources
◦
Validation Type: Table
◦
Value Data Type: Character
3. In the FROM Clause field, enter the following syntax:
PER_CONTACT_RELSHIPS_F CR, per_person_names_f_v ppnf
4. In the Value Column Name field, enter ppnf.display_name.
5. In the ID Column Name field, enter ppnf.person_id.
6. In the Start Date Column Name field, enter to_date(null).
7. In the End Date Column Name field, enter to_date(null).
8. In the WHERE Clause field, enter the following syntax:
CR.PERSON_ID = :{PARAMETER.PERSONID}
and CR.CONTACT_PERSON_ID = ppnf.person_id
and trunc(sysdate) between CR.effective_start_date and CR.effective_end_date
and trunc(sysdate) between ppnf.effective_start_date and
ppnf.effective_end_date
9. Click Save and Close three times to return to the Document Records Descriptive Flexfields page.
10. Click Deploy Flexfield.
11. Click OK, and then click Done.
Log in as Meg and create a document record of type Birth. The contacts for Meg appear in the flexfield
segment LOV. She can then select the contact for whom she wants to create the document record.
Defaulting a Value in a Flexfield Segment
When you use a value set, the display will always be a LOV, even if there is only one value in the value set. For scenarios
where you want to default a single value in the specific flexfield segment, you need to select SQL as the default type
value for the initial default.
This is a sample SQL to default a person number:
1. To default the selected worker's person number:
select person_number
from per_all_people_f
where sysdate between effective_start_date and effective_end_date
and person_id = :{PARAMETER.PERSONID}
2. To default the logged in user's person number:
select person_number
from per_all_people_f
where sysdate between effective_start_date and effective_end_date
312

Oracle Fusion Cloud Human Resources
Implementing Global Human Resources
Chapter 13
Document Records
and person_id = HRC_SESSION_UTIL.GET_USER_PERSONID
Create and Default Context for Descriptive Flexfield
Based on Document Type
When you create a document record, the flexfield segments are displayed based on the context selected for the
document type. You can configure the flexfield context for a document type such that it's automatically selected when
you create a document record.
This example shows how you can do so.
To automatically populate the context, you must enter a context code for the document flexfield that exactly matches
the internal document type.
The internal document type is generated as follows:
• Document type is valid for a specific country: The internal document type is derived as country code_document
type name, all in uppercase. The spaces and hyphens in the document type name are replaced with
underscores. For example, if the document type name is Loan Request and the document type is valid for India
only, the internal document type takes the value IN_LOAN_REQUEST.
• Document type is global: The internal document type is derived as GLB_document type name. For example,
if the document type name is Loan Request and the document type is valid for all countries, the internal
document type takes the value GLB_LOAN_REQUEST.
Consider the following example where you want to default a flexfield context based on the document type.
Business Requirement
You want to configure a custom loan request form using the Document Records functionality. You want to configure the
following attributes as part of this custom loan request form:
1. Loan Start Date
2. Loan Type
3. Loan Reason
4. Loan Value
5. Employee Guarantee 1
6. Employee Guarantee 2
Summary of Tasks
1. Configure a document type.
2. Define the descriptive flexfield (DFF) for document records.
3. Define six segments for the PER_DOCUMENTS_OF_RECORD_DFF Document Records DFF.
4. Verify that the context value is automatically defaulted and all segments configured for the context are
automatically displayed.
Configure a Document Type
Configure a document type with Type = Loan Request. To do this, follow these steps:
1. In the Setup and Maintenance work area, go to the following:
313

Oracle Fusion Cloud Human Resources
Implementing Global Human Resources
Chapter 13
Document Records
◦
Functional Area: Workforce Information
◦
Task: Document Types
2. In the Search Results area, click the Create icon.
3. In the Document Type Information page, enter these values:
◦
Type: Loan Request
◦
Description: Loan request for employees.
◦
Country: Search and select India
◦
Category: Benefits
4. Click Submit, and then click Yes.
5. Click OK, and then click Done.
Define the DFF for Document Records
Define the PER_DOCUMENTS_OF_RECORD_DFF descriptive flexfield. To do this follow, these steps:
1. In the Setup and Maintenance work area, go to the following:
◦
Functional Area: Workforce Information
◦
Task: Document Records Descriptive Flexfields
2. On the Document Records Descriptive Flexfields page, click Edit on the Actions menu.
3. Verify that the Derivation Value field in the Context Segment area is configured with the SYSDOCTYPEDFF
value.
4. Click Manage Contexts.
5. In the Search Results area, click the Create icon.
6. In the Create Context page, enter these values:
◦
Display Name: Loan Request
◦
Context Code: IN_LOAN_REQUEST
7. Click Save and Close.
Important: Ensure that the context code is the same as the System Document Type.
Note: System Document Type is an internal code. Its value is derived by the application using the following
logic:
◦
If document type is for a specific country then the document type will be CountryCode + '_'
+ Document Type Name converted to upper case, where spaces ( ) and hyphens (-) in the
Document Type Name are replaced with underscores (_)
◦
If document type is for all countries (global) then the document type will be 'GLB' + '_' +
Document Type Name converted to upper case, where spaces ( ) and hyphens (-) in the
Document Type Name are replaced with underscores (_)
For example, in this case since document type (Loan Request) is specific for the country India, the document
type will be IN_LOAN_REQUEST
If this document type was defined for all countries (global), then the document type would be
GLB_LOAN_REQUEST.
314

Oracle Fusion Cloud Human Resources
Implementing Global Human Resources
Chapter 13
Document Records
8. Search the IN_LOAN_REQUEST context code in the Manage Contexts page.
9. In the Search Results area, select the Loan Request row, and click Edit on the Actions menu.
Define Segments for the Document Records DFF
Create the following segments as per the business requirement for the context you created:
1. Loan Start Date
2. Loan Type
3. Loan Reason
4. Loan Value
5. Employee Guarantee 1
6. Employee Guarantee 2
To do this, follow these steps:
1. In the Context Sensitive Segments area, click the Create (+) icon.
2. In the Create Segment page, enter these values:
◦
Name: Loan Start Date
◦
Data Type: Date
◦
Display Type: Date/Time
3. Click Create Value Set.
4. In the Create Value Set page, enter these values:
◦
Value Set Code: CZ_DATE
◦
Module: Search and select Global Human Resources
◦
Value Data Type: Date
5. Click Save and Close.
6. Repeat steps 1 through 5 by using values from this table for the remaining segments:
Name Data Type Display Type Value Set Code Value Data Type
Loan Type
Character
List of Values
Loan_Type
Character
Loan Reason
Character
List of Values
Loan_Reason
Character
Loan Value
Number
Text Box
15 Number
Number
Employee Guarantee 1
Character
Text Box
10 Characters
Character
Employee Guarantee 2
Character
Text Box
10 Characters
Character
7. Click Save and Close three times to return to the Document Records Descriptive Flexfields page.
8. Click Deploy Flexfield. During the deployment process, validate the messages for any errors or warnings.
9. Click OK, and then click Done.
315

Oracle Fusion Cloud Human Resources
Implementing Global Human Resources
Chapter 13
Document Records
Verifying Automatic Default of Flexfield Context Based on Document Type
1. Log in as an employee and create a document record of type Loan Request. Notice that the context value will be
automatically defaulted and all segments configured for the context will be automatically displayed.
2. If you change the document type, the appropriate context value will again be defaulted and all segments for the
corresponding context code will be displayed automatically.
Generate Letter from Document Record for a Specific
Document Type
You're creating a document type that employees can use to create a document record for generating a letter to submit
for their visa processing. You create the document type and additionally specify a BI publisher report path to generate
the letter.
Create a document descriptive flexfield context that includes the fields required in the letter. You then associate this
context with the document type you created.
You can generate a letter when you create a document record using any of these methods:
• Document Records flow
• HCM Data Loader (HDL)
• HCM Spreadsheet Data Loader (HSDL)
• REST API
• Plugin sections in responsive Employment and Salary flows
Before You Start
1. Use the seeded DocumentReport.xdm data model to create your own BI template for the letter that needs to be
generated. Only one template can be used per document type. The draft and approved letters are based on this
template.
2. Create an RTF template and associate this template to the data model. Note down the report path and specify
the path when you create the document type.
3. Ensure users have access to the report, if necessary add or modify permissions.
Creating the Document Descriptive Flexfield for Visa Application
Document Type
1. In the Setup and Maintenance work area, go to the Document Records Descriptive Flexfields task.
2. On the Document Records Descriptive Flexfields page, select PER_DOCUMENTS_OF_RECORD_DFF and click
Edit.
3. Click Manage Contexts.
4. In the Create Context section, enter values as shown in the table. For others use the default values:
Field Value
Display Name Letter for Visa Application
316

Oracle Fusion Cloud Human Resources
Implementing Global Human Resources
Chapter 13
Document Records
Field Value
Description
Letter for visa application
Context Code
Auto-populated but can be modified
API Name
Auto-populated but can be modified
Enabled
Checked
5. Click Save.
6. In the Context Sensitive Segment section, create the required segments and fields that you want to include in
the visa application letter.
7. Click on Save and Close till you return to the Document Records Descriptive Flexfields page.
8. Click OK and then Done.
Deploying the Flexfield
1. On the Document Descriptive Flexfield page, click Deploy Flexfield.
2. In the Confirmation dialog box, click OK, and click Done.
You must sign out and sign in to see the changes you deployed at run time. The context is available when
workers select the visa application document type.
Configuring the Visa Application Document Type
1. In the Setup and Maintenance work area, go to the Document Types task.
2. On the Document Types page, click Create.
3. In the Create Document Type page, enter values as shown in the table. For others use the default values:
This two-column table with twelve data rows lists the fields and the corresponding values that you need
to enter.
Field Value
Type Visa Application
Description The passport details entered should be valid for a period of 6 months from the date of travel.
Country All Countries
Category Employment
Subcategory Blank
Status Active
317

Oracle Fusion Cloud Human Resources
Implementing Global Human Resources
Chapter 13
Document Records
Field Value
Expiration Notification Period Blank
Approval Required Yes
Allow Multiple Occurrences Yes
Minimum Attachments 0
Publish Required No
Report Path /Custom/Human Capital Management/Document Records/VisaApplication.xdo
Note: When you seed the data model and report, the following roles must be added to the
report, data model, and the folders containing the data model and report along with roles
and users:
◦
Web Services Application Identity for HCM
◦
Batch Loader Enterprise Scheduler Job Application Identity for HCM
4. In the Attributes section, specify if each attribute is relevant or required.
318

Oracle Fusion Cloud Human Resources
Implementing Global Human Resources
Chapter 13
Document Records
5. Click Submit.
Note: When a report path is configured for a Document Type, by default Restrict Update and Restrict
Delete are set to Yes and can't be edited in the Document Record Preferences section.When workers enter
the document record details and click View Document, this is what happens, it will get the associated BIP
template, merge the data entered by the worker and display the draft letter. After review, they can submit it
for approval. After the request is approved, the final letter is generated. This final version in PDF format is
stored in the worker's document records for this document type. After the letter is approved and generated,
View Document won't be available in the Document Records page.
Note:
◦
Workers need to enter all mandatory values and the minimum number of attachments
required, before clicking View Document. Otherwise, a validation error displays.
◦
If the report path isn't specified, View Document won't be visible to workers.
◦
Only PDF format is supported.
◦
Even if approval isn't enabled for the document type, clicking View Document still
displays the letter with a watermark. The letter is available without the watermark after
the document record is added to the worker's record.
◦
Even if the worker doesn't click View Document but submits the document record, it
goes through approval (if approvals are enabled) and the final letter is generated.
◦
After the letter is approved and generated, View Document won't be available in the
Document Records page for this document record.
Generate Letter Based on Document Record Source
You can enable letter generation for the document record sources by configuring appropriate values in the Letter
Generation Configuration Based on Document Record Source EFF context. To do this, follow these steps:
1. Navigate to the Setup and Maintenance work area.
2. Search for and click the Manage Enterprise HCM Information task.
3. For the Letter Generation Configuration Based on Document Record Source EFF context, select the
document record source.
Note: Values in the Document Record Source column will be populated from the ORA_PER_DOR_SOURCE
lookup. Only supported values are displayed in the list.
4. In the Generate Letter column, select the Yes or No value.
5. Click Done.
319

Oracle Fusion Cloud Human Resources
Implementing Global Human Resources
Chapter 13
Document Records
Note: If the report path is configured for the document type, then the letter is generated by default. Additionally, the
letter is stored as an attachment in the person's document record. In case of the Document Record plugin section, the
letter generation and storage happens when the parent transaction is approved and committed.
For more information on generating letters from document records, see the document Document Records -
Generate Letter from Document Record for Specific Doc Type (https://community.oracle.com/customerconnect/
discussion/630980) on Customer Connect.
For more information on OTBI reports, see the Oracle Human Capital Management Cloud Creating and Administering
Analytics and Reports for HCM guide on the Oracle Help Center (https://docs.oracle.com/en/cloud/saas/index.html).
Move Deleted Document Records to Archive Table
You can configure settings to archive the deleted document records instead of permanently deleting them when you
create or edit a document type. When the archive setting is enabled, the deleted document records for the document
type are moved to the HR_DOCUMENTS_OF_RECORD_ARCHIVE table.
Archive Settings
These are the fields used to archive the deleted document records:
• Archive Criteria Basis: By default this LoV is blank. You can select either the Creation Date, From Date, To Date,
or Issued On.
• Archive After Days: By default this field is blank. It’s a mandatory field where you enter a number that’s greater
than 0 and less than or equal to 18000. For example, if you enter 2, the document records will be archived 2
days after the date selected for Archive Criteria Basis.
Enable Archive Settings for the Document Type
1. Navigate to the Setup and Maintenance work area.
2. In the Tasks panel drawer, click Search.
3. Search and click the Document Types task name.
4. Click the Create icon in the Search Results area.
5. Enter the document type and select the category.
6. Under the Document Record Preferences tab, select the value for Archive Criteria Basis.
Note: Ensure that you have selected the relevant attributes in the Attributes area to match the selected
value for the Archive Criteria Basis.
7. Enter the value for Archive After Days.
8. Click Submit.
Run the Archive Document Records Process
1. Click Navigator > Tools > Scheduled Processes.
2. Click Schedule New Process.
320

Oracle Fusion Cloud Human Resources
Implementing Global Human Resources
Chapter 13
Document Records
3. In the Name drop-down list, search and select the Archive Document Records process.
4. In the Process Details dialog box, search and select the document type parameter for whose document records
you want to archive.
5. Click Submit, and click OK in the Confirmation dialog box. Note the process ID.
Points to Consider
• By default, the Archive Criteria Basis isn’t selected in the Document Type setup page, and therefore the deleted
document records aren’t moved to the HR_DOCUMENTS_OF_RECORD_ARCHIVE table.
• To select the Archive Criteria Basis (Creation Date, From Date, Issued On, and To Date), you need to select the
matching attributes from the Attributes area under the Document Record Preferences tab. If the matching
attributes aren’t selected, you will receive a validation error.
• When you enable the archive setting, the document records are deleted from the
HR_DOCUMENTS_OF_RECORD table and moved to the HR_DOCUMENTS_OF_RECORD_ARCHIVE table. The
attachments for the document records, if any, will continue to be stored in the FND_ATTACHMENTS table and
not moved or deleted.
• The archive settings work for document records that are deleted using the Document Records page, HCM Data
Loader, HCM Spreadsheet Data Loader, and REST API.
• The archived document records in the HR_DOCUMENTS_OF_RECORD_ARCHIVE table will be marked with the
archive date.
Related Topics
•
How You Configure Archiving and Purging for Document Records
•
Archive and Purge Document Records
How You Configure Archiving and Purging for Document
Records
You can archive and purge the document records for a document type by enabling the archive and purge settings for
the document type and running the Archive Document Records process.
When you run the process, all document records that match the archive criteria will be archived. The archiving
process involves moving the document records from the HR_DOCUMENTS_OF_RECORD table to the
HR_DOCUMENTS_OF_RECORD_ARCHIVE table. After the document records are archived, they will be removed from the
HR_DOCUMENTS_OF_RECORD_ARCHIVE table based on the purge settings enabled for the document type.
Archive and Purge Settings
These are the fields used to archive and purge the deleted document records:
• Archive Criteria Basis: By default this LoV is blank. You can select either the Creation Date, From Date, To Date,
or Issued On.
• Archive After Days: By default this field is blank. It’s a mandatory field where you enter a number that’s greater
than 0 and less than or equal to 18000. For example, if you enter 2, the document records will be archived 2
days after the date selected for Archive Criteria Basis.
321

Oracle Fusion Cloud Human Resources
Implementing Global Human Resources
Chapter 13
Document Records
• Purge After Days: By default this field is blank. It’s a mandatory field where you enter a number that’s greater
than 0 and less than or equal to 18000. For example, if you enter 2, the document records will be purged 2 days
after the archive date.
Enable Archive and Purge Settings for the Document Type
1. Navigate to the Setup and Maintenance work area.
2. In the Tasks panel drawer, click Search.
3. Search and click the Document Types task name.
4. Click the Create icon in the Search Results area.
5. Enter the document type and select the category.
6. Under the Document Record Preferences tab, select the value for Archive Criteria Basis.
Note: Ensure that you have selected the relevant attributes in the Attributes area to match the selected
value for the Archive Criteria Basis.
7. Enter the values for Archive After Days and Purge After Days.
8. Click Submit.
Run the Archive Document Records Process
1. Click Navigator > Tools > Scheduled Processes.
2. Click Schedule New Process.
3. In the Name drop-down list, search and select the Archive Document Records process.
4. In the Process Details dialog box, search and select the document type parameter for whose document records
you want to archive.
5. Click Submit, and click OK in the Confirmation dialog box. Note the process ID.
Points to Consider
• To select the Archive Criteria Basis (Creation Date, From Date, To Date, and Issued On), you need to select the
matching attributes from the Attributes area under the Document Record Preferences tab. If the matching
attributes aren’t selected, you will receive a validation error.
• You can only purge document records that are archived.
• The document record ID in the HR_DOCUMENTS_OF_RECORD_ARCHIVE table will be the same as the
document record ID in the HR_DOCUMENTS_OF_RECORD table. This ensures that the attachments continue to
be available for the archived document records as well.
• The archived document records in the HR_DOCUMENTS_OF_RECORD_ARCHIVE table will be marked with the
archive date.
• The archive setting fields are available in HCM Data Loader and HCM Spreadsheet Data Loader.
• The archive setting fields and the HR_DOCUMENTS_OF_RECORD_ARCHIVE table will be made available in OTBI
for reporting purposes in a future update.
• When the Remove Person Information process is run, it removes document records from the
HR_DOCUMENTS_OF_RECORD and HR_DOCUMENTS_OF_RECORD_ARCHIVE tables. The archive settings for
document records don’t apply to the Remove Person Information process.
322

Oracle Fusion Cloud Human Resources
Implementing Global Human Resources
Chapter 13
Document Records
Related Topics
•
Move Deleted Document Records to Archive Table
•
Archive and Purge Document Records
Set Document Record Availability
You can view document records using the Document Records task from Quick Actions, person spotlight, My Team work
area, or person smart navigation. Additionally, you can specify a date from when the document records for a document
type can be viewed.
To do this, follow these steps:
Creating the Document Type
1. In the Setup and Maintenance work area, go to the Document Types task.
2. In the Search Results area, click the Create icon. The Create Document Type page is displayed.
3. In the Document Type Information area, click Yes for the Publish Required option when you enter the details.
This displays Publish Date as a required field for workers on the Add Document Record page.
4. Select the restrict options for the document record and attachment preferences, and click Submit.
5. Click Yes, and then click OK.
Note:
• You can change the Publish Required option to Yes. To make the change, you need to ensure that all document
records of the document type have the publish date populated.
Creating Document Records using HDL
Enter the attribute values as shown in the following table when you create the document records using HCM Data
Loader.
Attribute Value
Publish
Y
Publish Date
Date you want to publish the document records. For example, 2017/12/01.
Note:
• You can update the attribute values through HSDL and REST.
• You need to populate the publish date using HCM Data Loader before you change the publish date to Yes.
For more information about loading document records using HCM Data Loader, see the HCM Business Objects guide.
323

Oracle Fusion Cloud Human Resources
Implementing Global Human Resources
Chapter 13
Document Records
Related Topics
•
Restrict Management of Document Records
•
Guidelines for Loading Document Records
Document Type Attributes You Can Change
After you create document records for a worker, you can change the values for the document type attributes. This table
describes the update values and the conditions for updating the values:
Attribute Update Value Condition for Update
Allow Multiple Occurrences Yes to No There should be no existing document records corresponding to
the document type.
Expiration Period Null to Not Null To Date must be Not Relevant or Required.
Note: If To Date is updated to Not Relevant, the Expiration
Period must be Null.
Publish Required No to Yes There should be no existing document records corresponding to
the document type.
• Document Name
• Document Number
• From Date
• To Date
• Issuing Country
• Issuing Location
• Issuing Authority
• Issued On
• Issuing Comments
• Not Relevant (N) to Required (R)
• Required (R) to Not Relevant (N)
There should be no existing document records corresponding to
the document type.
• Document Name
• Document Number
• From Date
• To Date
• Issuing Country
• Issuing Location
• Issuing Authority
• Issued On
• Issuing Comments
• Relevant (Y) to Not Relevant (N)
There should be no existing document records corresponding to
the document type. If any such records exist, the corresponding
attribute value must not be null for all those records.
324

Oracle Fusion Cloud Human Resources
Implementing Global Human Resources
Chapter 13
Document Records
Attribute Update Value Condition for Update
• Document Name
• Document Number
• From Date
• To Date
• Issuing Country
• Issuing Location
• Issuing Authority
• Issued On
• Issuing Comments
• Relevant (Y) to Required (R)
There should be no existing document records corresponding to
the document type. If any such records exist, the corresponding
attribute value must be null for all those records.
Document Type Delete There should be no existing document records corresponding to
the document type.
Note: If a seeded document type is deleted, it will appear in
the next environment update.
Category Edit This option is available on the Redwood page only.
Sub-category Edit This option is available on the Redwood page only.
Control Access to Document Records
You can control a worker's access to document records by giving the appropriate access. You can grant either the view
or manage access to document records based on the document type.
You can restrict access to selected document types by granting view access only for those document types. On the
Document Records page, workers can view all document records for which they have view and manage access. They
can edit and delete those document records for which they have manage access.
Example
Let's say you want a worker to view all document records but manage documents of type adoption and birth. Here's
how you do it:
1. Create a document security profile by including the document types (adoption and birth) that require manage
access.
2. Create a custom role for the worker with the View Person Documentation aggregate privilege.
3. Assign the document security profile created in step 1 to the delivered employee role (that contains Manage
Person Documentation by Worker aggregate privilege).
4. Assign the delivered and custom employee roles to the user.
For more information about controlling access to document records, see the Oracle Human Capital Management Cloud
Securing HCM guide on the Oracle Help Center (https://docs.oracle.com/en/cloud/saas/index.html).
325

Oracle Fusion Cloud Human Resources
Implementing Global Human Resources
Chapter 13
Document Records
For more information on controlling security of document records, see the document Document Records - Controlling
Security of Document Records (https://community.oracle.com/customerconnect/discussion/630973) on Customer
Connect.
Methods of Creating Document Records
You can identify the method used to create a document record from the HR_DOCUMENTS_OF_RECORD table. The table
contains an attribute which stores the method used.
The attribute isn’t displayed on the Document Records page. Additionally, the attribute is auto-populated and can't be
updated using HCM Data Loader or REST API.
This table describes the attribute values:
Attribute Description
Deep link Document records created by using a deep link.
Document records Document records created from the Document Records page.
HCM data loader Document records created by using HCM Data Loader (HDL).
HCM spreadsheet data loader Document records created by using HCM Spreadsheet Data Loader (HSDL).
Note: Currently, the document records will store the method similar to HDL.
HCM Extract Document records created by using HCM Extract.
REST API Document records created by using REST API.
Attachment scan Document records created by scanning an attachment.
Document records API Document records created by using document records API.
Document Records Available in Other HCM Flows
You have two options to upload attachments to responsive employment flows:
• Comments and Attachments section: In this section, the attachments are associated with the approval
workflow. The attachments have a lifecycle of archive and purge after which the attachments are no longer
accessible.
• Document Records section: In this section, the attachments are stored in the worker's document records. The
attachments are not automatically archived or purged.
You can enable both the sections to be used together or independently. If you don't want to permanently store the
attachments, you must use the Comments and Attachments section. However, if you want to store the attachments in
326

Oracle Fusion Cloud Human Resources
Implementing Global Human Resources
Chapter 13
Document Records
the employee's document records, you must enable and use the Document Records section. You can add document
records specific to a responsive employment business process by enabling the Document Records plug-in section.
However, if you don't want the employee to upload any attachment during a transaction, you must disable both the
sections using HCM Experience Design Studio.
Here are a few scenarios where you may enable the Document Records plug-in section:
• When hiring a new person, the HR specialist may want to add document records such as offer or contract letter,
birth certificate, educational certificates, and previous work experience letters.
• When a person is being terminated, the HR specialist may want to add the resignation letter and clearance
emails by different teams such as finance, security, and IT assets.
• When promoting an employee, the line manager or HR specialist may want to add a justification letter or a
recommendation letter.
HCM Employment Flows
You can enable the Document Records plug-in section in these HCM employment flows:
• Add Assignment
• Add Contingent Worker
• Add Pending Worker
• Add a Nonworker
• Change Assignment
• Change Location
• Change Manager
• Change Working Hours
• Create Work Relationship
• Direct Reports
• Edit Pending Worker
• Hire an Employee
• Local and Global Transfer
• Promote
• Resignation
• Termination
• Transfer
• Work Relationship
The Document Records plug-in section is hidden out-of-the-box. To enable this section in the responsive employment
flow, you must use HCM Experience Design Studio.
When you create a document record by using the Document Records section of the employment flow, these values are
populated:
Document Record Attribute Populated Value
PERSON_ID Person ID of the worker.
327
Oracle Fusion Cloud Human Resources
Implementing Global Human Resources
Chapter 13
Document Records
Document Record Attribute Populated Value
ASSIGNMENT_ID Assignment ID of the worker.
Note:
• The ID is populated only if the document type is assignment-based.
• In case of employment transactions, such as global transfer and add assignment, the
assignment ID is that of the target assignment.
RELATED_OBJECT_NAME PER_ACTION_OCCURRENCES
RELATED_OBJECT_ID_COL ACTION_OCCURRENCE_ID
RELATED_OBJECT_ID Value of the action occurrence ID
LAST_UPDATE_DATE Date when the employment transaction was committed.
LAST_UPDATED_BY User who submitted the employment transaction.
CREATED_BY User who submitted the employment transaction.
CREATION_DATE Date when the employment transaction was committed.
CREATION_SOURCE ORA_DOR
PUBLISH Y
PUBLISH_DATE Effective date of the employment transaction.
For setup information about HCM Responsive User Experience, see the following white paper on My Oracle Support
(https://support.oracle.com): HCM Responsive User Experience Setup Information (Doc ID 2399671.1)
HCM Flow - Document Type Mapping
By default, all document types that are part of the user's document type security profile appear in the Document Type
list of values when creating a document record in an employment flow.
Note: For flows, such as Add Contingent Worker, Add a Nonworker, Add Pending Worker, and Hire an Employee, if the
signed-in user has manage access to a document type, then the list of values displays those document types.
If you want to permit only specific document types for an employment flow, you need to configure the mapping of
the employment flow with the document type using the HCM Flow and Document Type Mapping section on the HCM
Enterprise Information page. To do this, follow these steps:
1. In the Setup and Maintenance work area, search and select the Manage Enterprise HCM Information task.
2. Click Edit, and then click Update.
3. In the Update Enterprise dialog box, select the effective start date and the action reason, and then click OK.
4. Navigate to HCM Flow and Document Type Mapping section.
5. Click the Add Row (+) icon.
328

Oracle Fusion Cloud Human Resources
Implementing Global Human Resources
Chapter 13
Document Records
6. Select the HCM flow and the document type.
7. Repeat steps 5 and 6 to configure additional mappings.
8. Click on Submit, and then click Yes in the warning dialog box.
9. Click OK in the confirmation dialog box, and then click Done.
Note:
• There's no date-effective mapping of the Document Type and HCM Flow. The mapping as of the date of the
transaction is used.
• The mapping only applies to update flows. When you correct an existing employment transaction (for example,
Correct Employment Details), the Document Type LoV displays all the values irrespective of the mapping
configuration.
Points to Consider
• You can attach new document records when adding a pending worker. However, these document records won't
be displayed when you edit or convert the pending worker. Nonetheless, you can add more document records
as part of the Edit Pending Worker and Convert Pending Worker flows.
• You can attach new document records when using Resignation and Termination flows. However, these
document records won't be displayed when you view or correct the termination.
• You can't have different document types mapped for different variations of the Local and Global Transfer flow.
For example, Transfer, Global Transfer, and Global Temporary Assignment support the same document types.
• When the employment transaction is deleted (for example, Transfer is deleted), the document records created
as part of the transaction are retained. They won't be deleted automatically.
• Existing document records for the person won't be displayed in the Document Records section on the
Employment flow pages.
• The Document Records section won't be available in the read-only Employment Info page. You must use the
Document Records quick action to view all existing document records for the worker.
• The approval process of the employment flow apply when document records are added as part of the
employment flow. When the employment flow is approved, the document records are moved to the worker's
document records.
• The document records approval flow won't be applicable for the Document Records plug-in section.
• The document records attributes can't be added to the approval payload of the employment flow when
configuring the approval rule for the employment flow.
• The BIP data models for the employment flow approval notifications include the document records data set.
However, the BIP templates for employment flow approval notifications don't include the Document Records
section out-of-the-box. You need to modify the RTF templates to include the document records information by
using the newly defined data set in the corresponding data model.
• Attachments in notifications only display the name and can't be downloaded. An approver can click Edit to view
and download the attachments.
• The effective date of the employment transaction works as the publish date for the document records created
as part of the employment transaction.
• If the document type configuration is modified such that it makes the pending document records data invalid,
then the employment transaction which is pending approval and contains such document records, fails.
329

Oracle Fusion Cloud Human Resources
Implementing Global Human Resources
Chapter 13
Document Records
Restrict Document Types During Mass Download of
Document Records
By default, all document types that are part of the user's document type security profile will appear in the Document
Type list of values when the user submits a request to mass download document records.
You can restrict the list of document types that can be mass downloaded from the employment flow by configuring the
HCM Flow and Document Type Mapping on the Manage Enterprise HCM Information setup page. This mapping applies
only to the Mass Download of Document Records page.
To configure the document type mapping for the Mass Download of Document Records flow, follow these steps:
1. In the Setup and Maintenance work area, search and select the Manage Enterprise HCM Information task.
2. Click Edit, and then click Correct.
3. Navigate to the HCM Flow and Document Type Mapping section.
4. Click the Add Row (+) icon.
5. Search and select the Mass download document records flow and the document type.
6. Repeat steps 4 and 5 to configure any additional mapping.
7. Click Submit and then click Yes in the warning dialog box.
8. Click OK in the confirmation dialog box, and then click Done.
Deep Links for Document Records
You can use deep links to open responsive pages for document records without navigating through the menu structure.
When you add deep links to a business intelligence report or a company website, users can simply click those links to
go directly to the application pages they need to use, without any additional clicks or navigation. You can find all of the
available deep links in the Deep Links work area. Some deep links, such as those assigned the NONE action, are ready
to use as is. Other deep links, such as those assigned the VIEW action, require you to edit the link details before you can
use them.
You can use these parameters in the document records deep links:
• Category
• Documents of Record ID
• Document Type ID
• Document Type Read Only - should be passed if you pass pMode as CREATE. It can either be Y or N.
• Mode - mode of the document records page, this can be either Create, View, or List
• Person ID
• Person Number
• System Document Type
330

Oracle Fusion Cloud Human Resources
Implementing Global Human Resources
Chapter 13
Document Records
Note:
• You must not click deep links that require parameters directly on the deep links page.
• If you try to access a document type in a deep link for which you don’t have access or the document type is
inactive, you will receive an exception.
• If the Document Records (DOCUMENT_RECORDS_ANY,NONE) deep link is used without the Person ID or
Person Number parameter, then the person ID of the logged in user will be defaulted.
• If the logged in user doesn’t have an associated person record, then a blank page is displayed when the user
clicks the deep link.
• If the document type is passed in the deep link during Create mode and the Allow Multiple Occurrence Flag for
the document type is true, then the deep link will open the create page with the passed document type.
• If the document type is passed in the deep link during Create mode and the Allow Multiple Occurrence Flag for
the document type is false, then the following conditions are true:
◦
If a document record exists, the deep link will open the record in Edit mode.
◦
If no document record exists, the deep link will open the create page with the document type populated.
This table lists Document Records deep links that are available in the Deep links work area.
Deep Link Purpose ObjKey Needed? (Y/N) Name and Description of
ObjKey Parameter
ObjKey Parameter Values
Document Records
(DOCUMENT_RECORDS_
ANY,NONE)
Opens the Document
Records page of a person
without person search
Note:
This is same for both
HR specialists and
managers.
Y
pPersonId: unique identifier
of the person.
pPersonNumber: number
that uniquely identifies the
person.
Note:
Either pPersonId or
pPersonNumber is
required.
pDocumentTypeId: unique
identifier of the document
type of a specific document
record.
pPersonId: PERSON_ID
column in PER_PERSONS
or PER_ALL_PEOPLE_F
tables
pPersonNumber: PERSON_
NUMBER PER_ALL_
PEOPLE_F tables
pDocumentTypeId:
DOCUMENT_TYPE_
ID column in HR_
DOCUMENT_TYPES_VL
pSystemDocType:
SYSTEM_DOCUMENT_
TYPE column in HR_
DOCUMENT_TYPES_VL
331

Oracle Fusion Cloud Human Resources
Implementing Global Human Resources
Chapter 13
Document Records
Deep Link Purpose ObjKey Needed? (Y/N) Name and Description of
ObjKey Parameter
ObjKey Parameter Values
pSystemDocType: unique
identifier of system
document type of a specific
document record
Note:
You can pass the
pDocumentTypeId
or pSystemDocType
parameter. If you don’t
pass either parameter,
all document types
will be displayed on the
Document Records page.
pMode: mode of document
records page
It can have three values.
CREATE: To open Add
Document Records page
VIEW: To open the
document record of the
specified type, if it exists.
Else, opens the list view.
LIST: To open the
Document Records list
page.
Note:
If you don't pass pMode,
then LIST is passed as
Default mode.
pDocTypeReadOnly: should
be passed if you pass
pMode as CREATE. It can
have two values Y or N and
N is the default value.
If it's Y then the document
type field is read-only on
the Add Document Records
page, else it's editable.
pCategory: unique
identifier code, and not
meaning of the document
category of a specific
document record.
pCategory: CATEGORY_
CODE column in HR_
DOCUMENT_TYPES_VL
table
pDocumentsOfRecordId:
DOCUMENTS_OF_
RECORD_ID column in HR_
DOCUMENTS_OF_RECORD
table
332

Oracle Fusion Cloud Human Resources
Implementing Global Human Resources
Chapter 13
Document Records
Deep Link Purpose ObjKey Needed? (Y/N) Name and Description of
ObjKey Parameter
ObjKey Parameter Values
Note: This parameter is
applicable only for the
LIST mode.
pDocumentsOfRecordId:
unique identifier of the
document record.
Note: This parameter
is applicable only for
the VIEW mode. When
you pass this parameter
value, the person related
or document type related
parameter won’t be
used. This is because the
pDocumentsOfRecordId
parameter is already
based on the person and
document type.
Document Records
(MANAGER_DOCUMENT_
RECORDS,NONE)
This deep link is for
managers. It displays the
person search page where
managers can search for
their directs and open the
Document Records page.
Y
pDocumentTypeId: unique
identifier of the document
type of a specific document
record.
pSystemDocType: unique
identifier of system
document type of a specific
document record
Note:
You can pass the
pDocumentTypeId
or pSystemDocType
parameter. If you don’t
pass either parameter,
all document types
will be displayed on the
Document Records page.
pMode: Mode of Document
Records page.
It can have three values:
CREATE: To open Add
Document Records page
VIEW: To open the
document record of the
specified type, if it exists.
Else, open the list view
LIST: To open the
Document Records list page
pDocumentTypeId:
DOCUMENT_TYPE_
ID column in HR_
DOCUMENT_TYPES_VL
pSystemDocType :SYSTEM_
DOCUMENT_TYPE column
in HR_DOCUMENT_TYPES_
VL
pCategory: CATEGORY_
CODE column in HR_
DOCUMENT_TYPES_VL
table
333

Oracle Fusion Cloud Human Resources
Implementing Global Human Resources
Chapter 13
Document Records
Deep Link Purpose ObjKey Needed? (Y/N) Name and Description of
ObjKey Parameter
ObjKey Parameter Values
Note:
If you don't pass pMode,
then LIST is passed as
Default mode.
pDocTypeReadOnly: should
be passed if you pass
pMode as CREATE. It can
have two values Y or N and
N is the default value.
If it's Y then the document
type field is read-only on
the Add Document Records
page, else it's editable.
pCategory: unique
identifier code, and not
meaning of the document
category of a specific
document record.
Note: This parameter is
applicable only for the
LIST mode.
Document Records (HR_
DOCUMENT_RECORDS,
NONE)
This deep link is for HR
specialists. It displays the
person search page where
the HR specialist can search
his organization and open
the Document Records
page.
Y
pDocumentTypeId: unique
identifier of the document
type of a specific document
record.
pSystemDocType: unique
identifier of system
document type of a specific
document record
Note:
You can pass the
pDocumentTypeId
or pSystemDocType
parameter. If you don’t
pass either parameter,
all document types
will be displayed on the
Document Records page.
pMode: mode of Document
Records page.
It can have three values:
CREATE: To open Add
Document Records page
VIEW: To open the
document record of the
pDocumentTypeId:
DOCUMENT_TYPE_
ID column in HR_
DOCUMENT_TYPES_VL
pSystemDocType :SYSTEM_
DOCUMENT_TYPE column
in HR_DOCUMENT_TYPES_
VL
pCategory: CATEGORY_
CODE column in HR_
DOCUMENT_TYPES_VL
table
334

Oracle Fusion Cloud Human Resources
Implementing Global Human Resources
Chapter 13
Document Records
Deep Link Purpose ObjKey Needed? (Y/N) Name and Description of
ObjKey Parameter
ObjKey Parameter Values
specified type, if it exists.
Else, open the list view
LIST: To open the
Document Records list page
Note:
If you don't pass pMode,
then LIST is passed as
Default mode.
pDocTypeReadOnly: should
be passed if you pass
pMode as CREATE. It can
have two values Y or N and
N is the default value.
If it's Y then the document
type field is read-only on
the Add Document Records
page, else it's editable.
pCategory: unique
identifier code, and not
meaning of the document
category of a specific
document record.
Note: This parameter is
applicable only for the
LIST mode.
Document Records
(DOCUMENT_RECORDS,
NONE)
Note: It’s recommended
that you don't use this
deep link because it will
be obsoleted in future.
It is currently retained
because of backward
compatibility.
Opens the Document
Records page of the
signed-in user.
Y
NA
NA
Create Document
Record (EMP_CREATE_
DOCUMENT_RECORDS,
NONE)
Displays the Create
Document Records page of
the signed-in user.
N
NA
NA
335

Oracle Fusion Cloud Human Resources
Implementing Global Human Resources
Chapter 13
Document Records
Deep Link Purpose ObjKey Needed? (Y/N) Name and Description of
ObjKey Parameter
ObjKey Parameter Values
Note: It’s recommended
that you don't use this
deep link because it will
be obsoleted in future.
It is currently retained
because of backward
compatibility.
Document Delivery
Preferences (EMP_DOC_
DELIVERY_PREF,NONE)
Opens the Document
Records page of the
signed-in user.
N
NA
NA
Document Delivery
Preferences (MGR_DOC_
DELIVERY_PREF,NONE)
This deep link is for
managers. It displays the
person search page where
the manager can search
for their directs and open
the Document Delivery
Preferences page.
N
NA
NA
Document Delivery
Preferences (HR_DOC_
DELIVERY_PREF,NONE)
This is for HR specialists.
It displays the person
search page where the HR
specialist can search for
their organization and open
the Document Delivery
Preferences page.
N
NA
NA
Mass Download of
Document Records (MASS_
DOWNLOAD_DOCUMENT_
RECORDS,NONE)
This is for HR specialists
and HR analysts and opens
the Mass Download of
Document Records page.
N NA NA
This table lists the target audience and security requirements for different Document Records deep links.
Note:
• Replace instances of pod.oraclecloud.com with your pod name.
• Replace the PersonNumber and PersonID with the actual person number and ID. In the examples these are
indicated with sample values.
Deep Link Audience Security Requirements Examples
Document Records (DOCUMENT_
RECORDS_ANY,NONE)
Employee, Manager, HR
Functional Security:
• Manage Person
Documentation by Worker
• Manage Person
Documentation by Manager
List mode with person number
https://
pod.oraclecloud.com/
fscmUI/faces/deeplink?
objType=DOCUMENT_RECORDS_
ANY&action=NONE&objKey=pPersonNumber=955160008184689
1. List mode with person ID
336
Oracle Fusion Cloud Human Resources
Implementing Global Human Resources
Chapter 13
Document Records
Deep Link Audience Security Requirements Examples
• Manage Person
Documentation
• View Person Documentation
Data Security:
• Manage Person
Documentation
• View Person Documentation
https://
pod.oraclecloud.com/
fscmUI/faces/deeplink?
objType=DOCUMENT_
RECORDS_
ANY&action=NONE&objKey=pPersonId=300100077923877
2. List mode with person
number and document type
ID
https://
pod.oraclecloud.com/
fscmUI/faces/deeplink?
objType=DOCUMENT_
RECORDS_
ANY&action=NONE&objKey=pPersonNumber=955160008184689;pDocumentTypeId=100100001749404
3. List mode with person
number and system
document type
https://
pod.oraclecloud.com/
fscmUI/faces/deeplink?
objType=DOCUMENT_
RECORDS_
ANY&action=NONE&objKey=pPersonNumber=955160008184689;pSystemDocType=GLB_
BIRTH
4. List mode with person ID and
system document type
https://
pod.oraclecloud.com/
fscmUI/faces/deeplink?
objType=DOCUMENT_
RECORDS_
ANY&action=NONE&objKey=pPersonId=300100077923877;pSystemDocType=GLB_
ADOPTION
5. List mode with person ID and
category
https://
pod.oraclecloud.com/
fscmUI/faces/deeplink?
objType=DOCUMENT_
RECORDS_
ANY&action=NONE&objKey=pPersonId=100000008153756;pCategory=LEGAL_
DOC
Document Records (MANAGER_
DOCUMENT_RECORDS,NONE)
Manager
Functional Security:
• Manage Person
Documentation by Worker
• Manage Person
Documentation by Manager
• Manage Person
Documentation
• View Person Documentation
Data Security:
Without Parameters
https://
pod.oraclecloud.com/
fscmUI/faces/deeplink?
objType=MANAGER_DOCUMENT_
RECORDS&action=NONE
With Parameters
337

Oracle Fusion Cloud Human Resources
Implementing Global Human Resources
Chapter 13
Document Records
Deep Link Audience Security Requirements Examples
• Manage Person
Documentation
• View Person Documentation
1. List mode with system
document type
(pSystemDocType)
https://
pod.oraclecloud.com/
fscmUI/faces/deeplink?
objType=MANAGER_
DOCUMENT_
RECORDS&action=NONE&objKey=pSystemDocType=GLB_
BIRTH
2. View mode with
system document type
(pSystemDocType)
https://
pod.oraclecloud.com/
fscmUI/faces/deeplink?
objType=MANAGER_
DOCUMENT_
RECORDS&action=NONE&objKey=pSystemDocType=GLB_
BIRTH;pMode=VIEW
3. View mode with
system document type
(pSystemDocType)
https://
pod.oraclecloud.com/
fscmUI/faces/deeplink?
objType=MANAGER_
DOCUMENT_
RECORDS&action=NONE&objKey=pSystemDocType=GLB_
PASSPORT;pMode=VIEW
4. Create mode pMode (equal to
CREATE) system document
type (pSystemDocType)
https://
pod.oraclecloud.com/
fscmUI/faces/deeplink?
objType=MANAGER_
DOCUMENT_
RECORDS&action=NONE&objKey=pMode=CREATE
5. Create mode pMode (equal
to CREATE) with system
document type
https://
pod.oraclecloud.com/
fscmUI/faces/deeplink?
objType=MANAGER_
DOCUMENT_
RECORDS&action=NONE&bjKey=pSystemDocType=GLB_
BIRTH;pMode=CREATE
6. Create mode pMode
(equal to CREATE) with
system document type
(pSystemDocType)
338

Oracle Fusion Cloud Human Resources
Implementing Global Human Resources
Chapter 13
Document Records
Deep Link Audience Security Requirements Examples
and pDocTypeReadOnly
parameter
https://
pod.oraclecloud.com/
fscmUI/faces/deeplink?
objType=MANAGER_
DOCUMENT_
RECORDS&action=NONE&objKey=pSystemDocType=GLB_
BIRTH;pMode=CREATE;pDocTypeReadOnly=Y
7. List mode with category
(pCategory)
https://
pod.oraclecloud.com/
fscmUI/faces/deeplink?
objType=DOCUMENT_
RECORDS_
ANY&action=NONE&objKey=pCategory=LEGAL_
DOC
Document Records (HR_
DOCUMENT_RECORDS,NONE)
HR
Functional Security:
• Manage Person
Documentation by Worker
• Manage Person
Documentation by Manager
• Manage Person
Documentation
• View Person Documentation
Data Security:
• Manage Person
Documentation
• View Person Documentation
Without Parameters
https://
pod.oraclecloud.com/
fscmUI/faces/deeplink?
objType=HR_DOCUMENT_
RECORDS&action=NONE
With Parameters
1. List mode with system
document type
(pSystemDocType)
https://
pod.oraclecloud.com/
fscmUI/faces/deeplink?
objType=HR_DOCUMENT_
RECORDS&action=NONE&objKey=pSystemDocType=GLB_
BIRTH
2. View mode with
system document type
(pSystemDocType)
https://
pod.oraclecloud.com/
fscmUI/faces/deeplink?
objType=HR_DOCUMENT_
RECORDS&action=NONE&objKey=pSystemDocType=GLB_
BIRTH;pMODE=VIEW
3. View mode with
system document type
(pSystemDocType)
https://
pod.oraclecloud.com/
fscmUI/faces/deeplink?
objType=HR_DOCUMENT_
RECORDS&action=NONE&objKey=pSystemDocType=GLB_
PASSPORT;pMode=VIEW
339

Oracle Fusion Cloud Human Resources
Implementing Global Human Resources
Chapter 13
Document Records
Deep Link Audience Security Requirements Examples
4. Create mode pMode equal to
(CREATE)
https://
pod.oraclecloud.com/
fscmUI/faces/deeplink?
objType=HR_DOCUMENT_
RECORDS&action=NONE;pMode=CREATE
5. Create mode pMode
equal to (CREATE) with
system document type
(pSystemDocType)
https://
pod.oraclecloud.com/
fscmUI/faces/deeplink?
objType=HR_DOCUMENT_
RECORDS&action=NONE&objKey=pSystemDocType=GLB_
BIRTH;pMode=CREATE
6. Create mode pMode
equal to (CREATE) with
system document type
(pSystemDocType)
and (Doc Type Read
Only)pDocTypeReadOnly
parameter
https://
pod.oraclecloud.com/
fscmUI/faces/deeplink?
objType=HR_DOCUMENT_
RECORDS&action=NONE&objkey=pSystemDocType=GLB_
BIRTH;pMode=CREATE;pDocTypeReadOnly=Y
7. List mode with category
(pCategory)
https://
pod.oraclecloud.com/
fscmUI/faces/deeplink?
objType=DOCUMENT_
RECORDS_
ANY&action=NONE&objKey=pCategory=LEGAL_
DOC
Document Records (DOCUMENT_
RECORDS,NONE)
Employee, Manager, HR
Functional Security:
• Manage Person
Documentation by Worker
• Manage Person
Documentation by Manager
• Manage Person
Documentation
• View Person Documentation
Data Security:
• Manage Person
Documentation
• View Person Documentation
https://
pod.oraclecloud.com/
fscmUI/faces/deeplink?
objType=DOCUMENT_
RECORDS&action=NONE
340

Oracle Fusion Cloud Human Resources
Implementing Global Human Resources
Chapter 13
Document Records
Deep Link Audience Security Requirements Examples
Create Document Record (EMP_
CREATE_DOCUMENT_RECORDS,
NONE)
Employee, Manager, HR
Functional Security:
• Manage Person
Documentation by Worker
• Manage Person
Documentation by Manager
• Manage Person
Documentation
• View Person Documentation
Data Security:
• Manage Person
Documentation
• View Person Documentation
https://
pod.oraclecloud.com/
fscmUI/faces/
deeplink? objType=EMP_
CREATE_DOCUMENT_
RECORDS&action=NONE
Document Delivery Preferences
(EMP_DOC_DELIVERY_PREF,
NONE)
Employee, Manager, HR
Functional Security:
• Manage Person Document
Delivery Preferences
• View Person Document
Delivery Preferences
Data Security:
• Manage Person Document
Delivery Preferences
• View Person Document
Delivery Preferences
https://
pod.oraclecloud.com/
fscmUI/faces/deeplink?
objType=EMP_DOC_DELIVERY_
PREF&action=NONE
Document Delivery Preferences
(MGR_DOC_DELIVERY_PREF,
NONE)
Manager, HR
Functional Security:
• Manage Person Document
Delivery Preferences
• View Person Document
Delivery Preferences
Data Security:
• Manage Person Document
Delivery Preferences
• View Person Document
Delivery Preferences
https://
pod.oraclecloud.com/
fscmUI/faces/deeplink?
objType=MGR_DOC_DELIVERY_
PREF&action=NONE
Document Delivery Preferences
(HR_DOC_DELIVERY_PREF,NONE)
Employee, Manager, HR
Functional Security:
• Manage Person Document
Delivery Preferences
• View Person Document
Delivery Preferences
Data Security:
• Manage Person Document
Delivery Preferences
https://
pod.oraclecloud.com/
fscmUI/faces/deeplink?
objType=HR_DOC_DELIVERY_
PREF&action=NONE
341

Oracle Fusion Cloud Human Resources
Implementing Global Human Resources
Chapter 13
Document Records
Deep Link Audience Security Requirements Examples
• View Person Document
Delivery Preferences
Mass Download of Document
Records
(MASS_DOWNLOAD_DOCUMENT_
RECORDS,NONE)
HR Functional Security:
• Mass Download Document
Records
Data Security:
• Manage Person
Documentation
• View Person Documentation
https://
pod.oraclecloud.com/
fscmUI/faces/deeplink?
objType=MASS_
DOWNLOAD_DOCUMENT_
RECORDS&action=NONE
Related Topics
•
Deep Links
How You Set Preferences for Document Delivery
You typically define delivery preferences for documents that are delivered periodically from employers to workers, for
example, payslips, or year end tax statements. You can select default delivery methods for a document type, including
online and paper, and specify other delivery related preferences.
You set these preferences using the Document Types task in the Setup and Maintenance work area.
These are the key attributes required for setting document delivery preferences:
Attribute Description
Delivery Method
Select default delivery methods for a document type, including online and paper, and specify other
delivery related preferences.
Online Delivery Consent Required
Specify whether worker consent is required for delivering documents online-only. If you set the Online
Delivery Consent Required option to Yes and Initial Consent Granted to No, then the Delivery Method
is automatically selected as Paper and the option is disabled for edit; the option is automatically
deselected (while still disabled) when you set Initial Consent Granted to No again.
Allow Person Level Overrides
Enable workers to override the delivery preferences for their document records.
Note:
If this isn't enabled, delivery preferences for the document type is displayed in read-only mode in
the Document Delivery Preferences page.
Document Delivery Default Overrides
Set default delivery preferences on the document type and override the preferences on associated
work structures. Delivery preference is derived based on the preference set at these levels:
• Document Type (lowest precedence)
342

Oracle Fusion Cloud Human Resources
Implementing Global Human Resources
Chapter 13
Document Records
Attribute Description
• Payroll Statutory Unit or Legal Employer
• Department
• Location
• Person (highest precedence)
FAQs for Document Records
Can I change the Document Type setting from Person to
Assignment?
Yes, you can. But, you must populate the assignment ID for all document records for that document type. Otherwise,
such document records will be at the person level.
You can update the document record and add the assignment ID only using HSDL, HDL, or REST.
Can I create an approval rule for document records using
flexfields?
Yes, you can using descriptive flexfields (DFF) and developer descriptive flexfields (DDF) in the Approval Setup tab in
Transaction Console.
Note: The flexfield segments won't display the user configured segment names. You have to use the appropriate
segment based on your flexfield configuration.
Can I configure different approval rules while adding, updating, or
deleting document records?
Yes, the transaction type can be identified using the ATTRIBUTE3 property of the TRANSACTIONAPPROVALREQUEST
payload.
For example:
• TRANSACTIONAPPROVALREQUEST.ATTRIBUTE3 == "ADD"
• TRANSACTIONAPPROVALREQUEST.ATTRIBUTE3 == "EDIT"
• TRANSACTIONAPPROVALREQUEST.ATTRIBUTE3 == "DELETE"
343

Oracle Fusion Cloud Human Resources
Implementing Global Human Resources
Chapter 13
Document Records
How can I restrict certain file formats from being uploaded?
You can use the Manage Attachment File Formats setup task in the Setup and Maintenance work area. Using this task,
you can configure the file formats that you want to restrict from being attached.
How to resolve the REST error I see when I access the Redwood
Document Records page?
If the Redwood Document Records landing page doesn't load, run the scheduled processes in this table to regenerate
the security profiles and grants. If you're using custom roles, make sure that the Use REST Service - Worker
Assignments List of Values privilege is available and regenerate the grants.
Scheduled Process Parameters
Regenerate Data Security Profiles In the Security Profile Type field, select Document type
security profiles.
Regenerate Data Security Grants In the Mode field, select All roles.
344

Oracle Fusion Cloud Human Resources
Implementing Global Human Resources
Chapter 14
Workforce Records
14 Workforce Records
Overview of Workforce Records
In the Setup and Maintenance work area, most of the setup tasks for workforce details are in the Workforce Information
functional area. If you create an implementation project, these tasks are in the Define Workforce Records task list.
You define a person's name format, name style, availability, employment values, and document types as a part of the
Workforce Information functional area.You define other workforce related tasks such as person number generation
methods using the Manage Enterprise HCM Information task.
The Workforce Information functional area and the Define Workforce Records task list cover tasks in the following areas:
Area Includes
Availability
Calendar events, work schedules and assignment, work shifts and workday patterns
Person Record Values
Person lookups, flexfields, profile options, person name formats and style, and person types
Employment Record Values
Employment lookups, flexfields, profile options, and assignment statuses
Documents
Document lookups, flexfields, and document types
Processes for Person Search
Settings for person search processes
Related Topics
•
Person Number Generation Methods
Directory and Organization Chart Lookups
This topic identifies common lookups that are Directory and My Team-related and have user configuration levels.
Review these lookups, and update them as appropriate to suit enterprise requirements.
You review lookups using the Manage Common Lookups task in the Setup and Maintenance work area.
Directory and Organization Chart Lookups
Lookup Type Description Configuration Level
ORA_HRL_DIR_ADV_SEARCH_SORT Sort options displayed for sorting workers in
the Directory Advanced Search page.
User
345

Oracle Fusion Cloud Human Resources
Implementing Global Human Resources
Chapter 14
Workforce Records
Lookup Type Description Configuration Level
ORA_HRL_DIR_ORG_CHART_SORT Sort options for displayed sorting workers in
the Organization Chart page.
User
ORA_HRL_ORG_PRINT_ATTR_GEN Attributes that can be selected by a general
user when printing the organization chart.
User
ORA_HRL_ORG_PRINT_ATTR_ADMIN Attributes that can be selected by an
administrator when printing the organization
chart.
User
ORA_HRL_ORG_PRINT_FORMAT_ADMIN File formats that can be selected by an
administrator when printing the organization
chart.
User
My Team Lookups
Lookup Type Description Configuration Level
ORA_HRL_MYTEAM_OVERVIEW_SORT Sort options displayed for sorting workers in
the My Team Overview page.
User
ORA_HRL_MYTEAM_POS_SORT Sort options displayed for sorting positions in
the My Team page.
User
Overview of Work Schedules
Overview of Scheduling Options for Your Workforce
You can define schedules for workers using a base scheduling solution. Or you can dynamically schedule workers based
on workload or staffing needs and let workers self-schedule and trade shifts.
The base solution is part of Oracle Fusion Cloud Human Capital Management and uses enterprise shifts and work
patterns. The advanced solution is Oracle Fusion Cloud Workforce Management and was developed entirely in the
Redwood user experience. It also uses these shifts and work patterns, and schedule generation profiles, workload
management, and worker self-scheduling.
If the basic and advance solutions don’t support your scheduling needs, you can also define work schedules and
exceptions. This scheduling approach is covered in the remaining topics of this Work Schedules section.
How You Configure and Assign Work Schedules
To define worker schedules, you configure calendar events and work schedules using these tasks in the Setup and
Maintenance work area. They're part of the Workforce Deployment offering, Workforce Information functional area.
346

Oracle Fusion Cloud Human Resources
Implementing Global Human Resources
Chapter 14
Workforce Records
Task Description
Manage Availability Lookups Use lookup codes to define geographical locations for area 1 through area 4, such as United Kingdom
(area1), England (area2), and London (area3). Add the codes to the ORA_PER_GEOGRAPHIC_TREE_
NODES lookup to create these location lookups.
Use the PER_CAL_EVENT_CATEGORY lookup type to define calendar event categories beyond the
delivered Public holiday category.
Manage Geography Trees Create the geographic tree and tree versions. Add the geographic tree nodes to the tree versions. Also,
audit, activate, and flatten the tree versions.
Manage Calendar Events Create calendar events, such as May Day, Thanksgiving, and Boxing Day, to include and exclude at
various levels of the organizational or geographical hierarchy.
Manage Locations Update locations, as appropriate, to override calendar events for default geographic hierarchies. For
example, a team in Bangalore is working with a team in France. During the project, you want the
Bangalore team to also observe the French public holidays.
This task is part of the Workforce Structures functional area.
Work Shifts Create work shifts, such as Day Office and Night Home.
Work Workday Patterns Create workday patterns using the work shifts. For example, create a weekly work pattern with the Day
Office shift starting on Monday and ending on Wednesday. The Night Home shift starts on Thursday
and ends on Friday.
Eligibility Profiles Create profiles that automatically identify who's eligible for a particular work schedule. For example,
you want to identify people in the Support department.
Work Schedules Create work schedules made up of work patterns, calendar events, exceptions, if any, and eligibility
profiles.
Work Schedule Assignment Administration Assign the work schedules to the appropriate workforce structures, such as assignment, position, job,
department, or location.
Work Schedule Assignment Change the work schedule assignment for a specific person.
This task is in the Person Management work area, on the Tasks panel tab after you find the specific
person.
Related Topics
•
How an Individual's Schedule Is Identified
How an Individual's Schedule Is Identified
You can set up an individual's work time in different ways. So, the process that identifies a person's official schedule for
a selected time period uses the individual's current schedule or work hours. It also considers applicable calendar events,
work schedule resource exceptions, and absence entries.
Search Order
This flow chart shows you the order that the process searches for someone's schedule, before applying it to the
assignment.
347
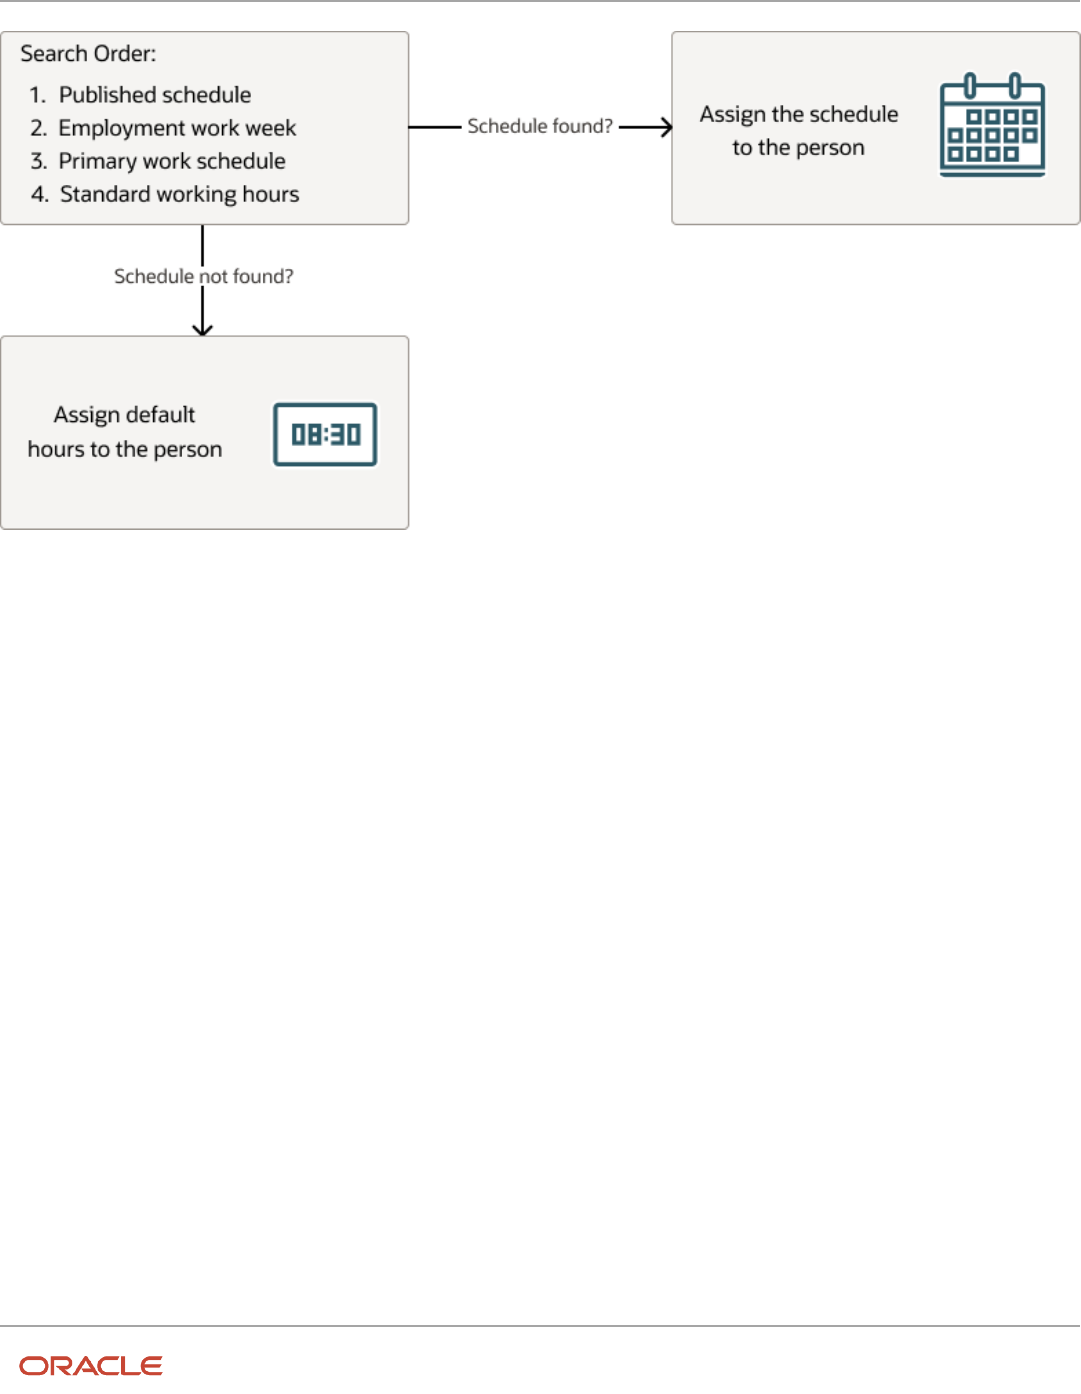
Oracle Fusion Cloud Human Resources
Implementing Global Human Resources
Chapter 14
Workforce Records
Published Schedule (Workforce Management)
The process builds the published schedule using the employment work week, primary work schedule, or standard
working hours for each person. It can also build it using published schedules from other scheduling applications. The
published schedule shows applicable calendar events and absences.
Employment Work Week
The person's employment record can include the setup for their employment work week. Schedules that the process
builds from the work week also show applicable calendar events and absences.
Primary Work Schedule
The primary work schedule links to one of these levels. Schedules that the process builds from the work schedule also
show assigned calendar events and resource exceptions, and applicable absences.
1. Primary assignment of the person
2. Position
3. Job
4. Department
5. Location
6. Legal Employer
348

Oracle Fusion Cloud Human Resources
Implementing Global Human Resources
Chapter 14
Workforce Records
7. Enterprise
The process moves through the schedule hierarchy in the specified order and stops as soon as it finds a primary
schedule. This example hierarchy shows primary work schedules associated with three levels.
Departments 1 and 3 don't have primary schedules. So, the primary schedule at the enterprise level applies to everyone,
with one exception. A person in department 3 has a schedule for their primary assignment. That primary assignment
schedule applies instead of the enterprise-level schedule. Department 2 has a primary schedule, and it applies to
everyone in that department.
The calendar events and resource exceptions that exist in the primary work schedule affect everyone's schedules,
regardless of level. Any absences they report during the selected time period also affect the individual's schedule.
Standard Working Hours
The person's primary assignment includes their standard working hours. Schedules built with these hours also show
applicable calendar events and absences.
Default Hours
If the process doesn't find a schedule, it uses the default hours 8:30a to 5:00p.
349

Oracle Fusion Cloud Human Resources
Implementing Global Human Resources
Chapter 14
Workforce Records
Calendar Events and Geographic Hierarchy
People Covered by a Calendar Event
You specify whether the people covered by a calendar event get identified using an organization or a geographic
hierarchy.
For example, the calendar event covers everyone in an enterprise or a specific department. Or, the calendar event
covers everyone in a specific country, state or province, or city.
By default, a calendar event covers everyone in the hierarchy nodes you include in the coverage. But, the event covers
people assigned work schedules only if you add the event or calendar event category as an exception in the work
schedule.
Related Topics
•
Geographic Hierarchy Decides Calendar Event Coverage
•
Organization Hierarchy Decides Calendar Event Coverage
Geographic Hierarchy Decides Calendar Event Coverage
A calendar event applies to people's work assignments according to their geographic location when the event uses the
geographic hierarchy.
For example, in the UK you want to identify January 2 as a holiday in Scotland but not in England, Wales, or Northern
Ireland.
You create geographic hierarchies using the Manage Geography Trees task in the Setup and Maintenance work area. It's
part of the Workforce Deployment offering, Workforce Information functional area. You link the geography hierarchy to
calendar events when you set the calendar event Hierarchy Type to Geographic.
Related Topics
•
People Covered by a Calendar Event
Organization Hierarchy Decides Calendar Event Coverage
A calendar event applies to people's work assignments according to their position in an organization when the event
uses the organizational hierarchy.
For example, you want the Annual Sales Team Outing calendar event to apply to everyone in and below the Sales
department in the organization hierarchy. You don't want it to apply to people in the Research department.
You create the organization hierarchy using the Manage Organization Trees task in the Setup and Maintenance work
area. It's part of the Workforce Deployment offering, Workforce Structures functional area. You link the organization
hierarchy to calendar events when you set the calendar event Hierarchy Type to Organization.
350

Oracle Fusion Cloud Human Resources
Implementing Global Human Resources
Chapter 14
Workforce Records
Related Topics
•
People Covered by a Calendar Event
Basic Process to Create a Calendar Event Using a Geographic Tree
Here's the basis process to create calendar events using a geographic tree:
1. Add the country, state, and city level nodes in the Geographic Tree Nodes lookup.
Note: You add this lookup only when you want to create calendar events for states and cities.
2. Create a geography tree based on the delivered tree structure HCM Geography Tree Structure and add a tree version.
3. Add geographic tree state and city nodes.
4. Audit, activate, and row-flatten the tree version.
5. Create calendar events for the country, state, and city level nodes.
6. Optionally, override the default geography hierarchy, as appropriate.
7. Sign in as a covered individual to confirm that the calendar events are part of their schedule.
Related Topics
•
People Covered by a Calendar Event
•
Geographic Hierarchy Decides Calendar Event Coverage
•
How do I create a calendar event category?
Add India and UK Nodes to the Geographic Tree Nodes Lookup
You're adding the IN and UK country nodes to the ORA_PER_GEOGRAPHIC_TREE_NODES lookup so that you can use
them to create calendar events.
The IN node includes the Telangana and Karnataka state nodes and the Hyderabad and Bangalore city nodes. The
UK node includes the England and Scotland state nodes and the London and Edinburgh city nodes. Use the Manage
Availability Lookups task in the Setup and Maintenance work area. It's part of the Workforce Deployment offering,
Workforce Information functional area.
1. On the Manage Availability Lookups page, click ORA_PER_GEOGRAPHIC_TREE_NODES.
2. In the ORA_PER_GEOGRAPHIC_TREE_NODES: Lookup Codes section, add the India and UK lookup codes, as shown
in this table. The lookup code should be a unique short code for the country, state or province, or city.
Lookup Code Meaning
GL Global
IN India
IN_TELA Telangana, India
351

Oracle Fusion Cloud Human Resources
Implementing Global Human Resources
Chapter 14
Workforce Records
Lookup Code Meaning
TELA_HYD Hyderabad, Telangana
IN_KARN Karnataka, India
KARN_BAN Bangalore, Karnataka
UK United Kingdom
UK_ENG England, United Kingdom
ENG_LON London, England
UK_SCOT Scotland, United Kingdom
SCOT_EDIN Edinburgh, Scotland
3. Click Save and Close.
4. On the Manage Availability Lookups page, click Done.
Related Topics
•
Create a Geographic Tree and Tree Version for India and UK
Create a Geographic Tree and Tree Version for India and UK
You're creating a geographic tree version for India and UK that you can use when you create calendar events.
Before you start
Make sure all of the geographic nodes that you need are in the ORA_PER_GEOGRAPHIC_TREE_NODES lookup type.
Use the Manage Geography Trees task in the Setup and Maintenance work area. It's part of the Workforce Deployment
offering, Workforce Information functional area.
Here's what to do
1. Create a geographic tree.
a. On the Manage Trees and Tree Versions page, Actions menu, select Create Tree.
b. On the Create Tree: Specify Definition page, in the Name field, enter Enterprise Locations.
c. In the Code field, enter ENT_LOC.
d. Click Next.
e. On the Create Tee: Specify Labels page, click Next.
f. On the Create Tree: Specify Access Rules page, click Submit.
352

Oracle Fusion Cloud Human Resources
Implementing Global Human Resources
Chapter 14
Workforce Records
2. Create a geographic tree version.
a. On the Manage Trees and Tree Version page, select the tree that you just created, Enterprise Locations.
b. On the Create icon menu, select Create Tree Version.
c. On the Create Tree Version: Specify Definition page, in the Name field, enter Enterprise Locations Version
1.
d. In the Effective Start Date field, select January 1 of this year.
e. Click Next.
f. On the Confirmation dialog box, click OK.
3. Add the root node.
a. On the Create Tree Version: Specify Nodes page, click the Create icon.
b. On the Add Tree Node dialog box, in the Data Source field, select Geographic Tree Calendar Top Scopes
Data Source.
c. In the Available Nodes field, select Global and move it to the Selected Nodes field. You select Global
because the first node in a geographic tree must be the root node.
d. Click OK.
4. Add the country-level nodes.
a. On the Create Tree Version: Specify Nodes page, select Global.
b. Click the Create icon.
c. On the Add Tree Node dialog box, in the Data Source field, select Geographic Tree Territory Code Data
Source.
d. In the Available Nodes field, select the GB United Kingdom and IN India country level nodes and move
them to the Selected Nodes field.
e. Click OK.
5. Add the state-level nodes.
a. On the Create Tree Version: Specify Nodes page, expand the Global node.
b. Select a country node, such as GB United Kingdom.
c. Click the Create icon.
d. On the Add Tree Node dialog box, in the Data Source field, select Geographic Tree Calendar Events Data
Source. Now you can define the state-level nodes.
e. In the Available Nodes field, select England, United Kingdom and Scotland, United Kingdom, and move
them to the Selected Nodes field.
f. Click OK.
g. Repeat steps b through f to add the Telangana and Karnataka state-level nodes for India.
6. Add the city-level nodes.
a. On the Create Tree Version: Specify Nodes page, expand the GB United Kingdom node.
b. Select England, United Kingdom.
c. Click the Create icon.
d. On the Add Tree Node dialog box, in the Data Source field, select Geographic Tree Calendar Events Data
Source.
e. In the Available Nodes field, select London, England and move it to the Selected Nodes field.
f. Click OK.
g. On the Crate Tree Version: Specify Nodes page, click Submit.
h. On the Confirmation dialog box, click OK.
i. Repeat steps a through h to add the Hyderabad city-level node to the Telangana, India node. Repeat them
again to add the Bangalore city-level node to the Karnataka, India node.
353

Oracle Fusion Cloud Human Resources
Implementing Global Human Resources
Chapter 14
Workforce Records
Related Topics
•
Add India and UK Nodes to the Geographic Tree Nodes Lookup
•
Audit, Activate, and Row-Flatten the India and UK Geographic Tree Version
Audit, Activate, and Row-Flatten the India and UK Geographic Tree
Version
You're auditing, activating, and row-flattening the India and UK geographic tree version you want to use to create
calendar events.
Before you start
Make sure that the Enterprise Locations geographic tree exists and has the Enterprise Locations Version 1 tree version.
Use the Manage Geography Trees task to confirm it exists or to create it.
Use the Manage Geography Trees task in the Setup and Maintenance work area. It's part of the Workforce Deployment
offering, Workforce Information functional area.
Here's what to do
1. Audit the tree version.
a. On the Manage Trees and Tree Versions page, expand the geographic tree that you created.
b. Select the Enterprise Locations Version 1 tree version.
c. On the Actions menu, select Audit.
d. On the Trees Audit Result page, click Online Audit.
e. On the Confirmation dialog box, click OK.
f. On the Tree Audit Result page, click Done.
2. Activate the tree version.
a. On the Manage Trees and Tree Versions page, ensure that the tree version that you created, Enterprise
Locations Version 1, is still selected.
b. On the Actions menu, select Set Status Active.
c. On the Confirmation dialog box, click OK.
3. Row-flatten the tree version.
a. On the Manage Trees and Tree Versions page, ensure that the tree version that you created, Enterprise
Locations Version 1, is still selected.
b. On the Actions menu, select Flatten > Row Flattening. Flattening the tree version makes tree retrieval and
display faster.
c. On the Row Flattening page, click Online Flattening.
d. On the Confirmation dialog box, click OK.
e. On the Row Flattening page, click Done.
f. On the Manage Trees and Tree Versions page, click Done.
Related Topics
•
Create a Geographic Tree and Tree Version for India and UK
354

Oracle Fusion Cloud Human Resources
Implementing Global Human Resources
Chapter 14
Workforce Records
Create the May Day Calendar Event for India
You're creating the May Day calendar event for India.
Before you start
Make sure that the Enterprise Locations geographic tree exists. Use the Manage Geography Trees task to confirm it
exists or to create it.
Use the Manage Calendar Events task in the Setup and Maintenance work area. It's part of the Workforce Deployment
offering, Workforce Information functional area.
Here's what to do
1. On the Manage Calendar Events page, click the Create icon.
2. On the Create Calendar Event page, complete the fields, as shown here.
Field Value
Name May Day
Short Code MD_HYD
Category Public Holiday
Start Date 5/1/18 12:00 AM
End Date 5/2/18 12:00 AM
3. In the Coverage section, Hierarchy Type field, select Geographic.
4. In the Hierarchy field, select Enterprise Locations.
5. In the Coverage Source section, expand the hierarchy and select the India nodes.
6. Click Include.
7. Click Submit.
8. On the Confirmation dialog box, click OK. On the Manage Calendar Events page, you can see that the May Day
calendar event got created.
9. On the Manage Calendar Events page, click Done.
Related Topics
•
People Covered by a Calendar Event
•
How an Individual's Schedule Is Identified
•
Create a Geographic Tree and Tree Version for India and UK
•
Audit, Activate, and Row-Flatten the India and UK Geographic Tree Version
•
How You View WFM Team Schedules
355

Oracle Fusion Cloud Human Resources
Implementing Global Human Resources
Chapter 14
Workforce Records
Override the Default Edinburgh Geography Hierarchy with
Hyderabad
You're overriding the default geographic hierarchy for a team of project managers in Edinburgh, Scotland working with
developers in Hyderabad.
During the project, you want the Edinburgh team members to observe the same public holidays as their Hyderabad
teammates. Use the Manage Locations task in the Setup and Maintenance work area. It's part of the Workforce
Deployment offering, Workforce Structures functional area.
1. On the Manage Locations page, search for the person's location, for example, using the name Edinburgh.
2. In the Results in Table section, select Edinburgh.
3. On the Edit menu, select Update.
a. On the Update Location dialog box, select the action reason, such as Seasonal Closure.
b. Click OK.
4. Click OK.
5. Click Save.
6. On the Confirmation dialog box, click OK.
7. Click Submit.
8. On the Warning dialog box, click Yes.
9. On the Manage Locations page, click Done.
Related Topics
•
People Covered by a Calendar Event
•
Create the May Day Calendar Event for India
Calendar Events FAQs
What's a half day calendar event?
An event that divides the duration shift on the specified day in half. It shows the person's availability to work for only the
first half of the day. You can add half-day events to elapsed work schedules.
Related Topics
•
Work Schedule Types Supported by Oracle HCM Cloud Applications
What's a calendar event message?
A message that appears on the calendars of people covered by a calendar event.
For example, a message about a Spanish public holiday could appear on the calendars of people working in Spain. It
lets people working in other countries know why people in Spain are unavailable on that date. You create calendar event
messages using the Planned Schedule task in the Time Management work area.
356

Oracle Fusion Cloud Human Resources
Implementing Global Human Resources
Chapter 14
Workforce Records
Why didn't a calendar event message appear on the calendars of everyone in an
organization or location?
If you use work schedules and a calendar event covers a person, you need to include the calendar event as a schedule
exception.
Otherwise, even though the person belongs to the organization or location covered by the calendar event, no calendar
event message appears on their calendar. You add the calendar event exception to their primary work schedule or
schedule assignment.
How do I create a calendar event category?
Add lookup codes to the PER_CAL_EVENT_CATEGORY lookup.
Use the Manage Availability Lookups task in the Setup and Maintenance work area. It's part of the Workforce
Deployment offering, Workforce Information functional area.
How can I view calendar events I created?
Sign in with credentials for someone who would have the calendar event. Then, open their calendar in the Time and
Absences work area and go to the appropriate month, week, or day.
Calendar Event Setup Examples
Example of Including and Excluding Calendar Event Coverage in a
Hierarchy
You want to apply the New Phone System Training calendar event to everyone in your enterprise except those people
working in the Support department.
When an event applies to most of a hierarchy, it's most efficient to include the whole hierarchy in the coverage.
Then, you can exclude the exceptions. So you include your enterprise, which also includes the departments in that
organization hierarchy, such as Sales and Finance. Then, you exclude the departments that the calendar event doesn't
apply to, such as the Support department.
You can also include and exclude geographic hierarchy levels the same way.
357

Oracle Fusion Cloud Human Resources
Implementing Global Human Resources
Chapter 14
Workforce Records
Examples of Overriding Calendar Event Coverage for Specific
Geographic Locations, Levels, and Individuals
You set up public holidays and other calendar event for people at your India and France locations using a geographic
hierarchy. You also set up regional holiday events for Hyderabad and Bangalore.
You override geographic coverage for locations and levels using the Manage Locations task in the Setup and
Maintenance work area. It's part of the Workforce Deployment offering, Workforce Structures functional area. You
override geographic coverage for individuals on their Employment page.
Specific Geographic Locations
For 6 months, your people in Bangalore work closely with their counterparts in Paris on a critical project. During this
time, you want the people in Bangalore to follow the calendar events you set up for France. On the Manage Locations
page, edit the location information for Bangalore, and set the geographic hierarchy to France, as shown here.
Specific Geographic Levels
You're providing training on a new phone system to people in your India offices. People in Hyderabad have a regional
holiday at that time, so you schedule their training for the next week. On the Manage Locations page, edit the location
information for each person, setting the geographic hierarchy to Hyderabad instead of India. This edit links each person
with calendar events defined exclusively for their Hyderabad location, as shown here.
358

Oracle Fusion Cloud Human Resources
Implementing Global Human Resources
Chapter 14
Workforce Records
Specific Individuals
Some individuals in Bangalore are working closely on a project with their French counterparts for a year. During
the project, you want these individuals in Bangalore to follow the calendar events for the France location. For each
individual, open their Employment page and set the geographic hierarchy to France.
Related Topics
•
Geographic Hierarchy Decides Calendar Event Coverage
Examples of Overriding the Calendar Event Name or Category in a
Hierarchy
You can create a calendar event using the name or category that makes sense to the most people in the organization or
geography. You can then override the name or category at lower levels of the hierarchy, as appropriate.
Calendar Event Name
You set up the May Day calendar event for all locations in your enterprise. But, you want people in France to see the
event as Labor Day.
1. On the Calendar Event page, select the France location node on your geographical hierarchy.
2. To enter a new name for the event, click the Override icon.
Calendar Event Category
You linked the Good Friday calendar event with the Public Holiday event category and applied the coverage to all
departments in your enterprise. But for your finance department, you want to change the event category to a voluntary
holiday.
1. On your organization hierarchy, select the Finance node.
2. To select a different category, click the Override icon.
359

Oracle Fusion Cloud Human Resources
Implementing Global Human Resources
Chapter 14
Workforce Records
Related Topics
•
People Covered by a Calendar Event
•
Organization Hierarchy Decides Calendar Event Coverage
Workforce Scheduling
Overview of Workforce Scheduling
Schedule the appropriate quantity of qualified workers where you need them.
• Implementation consultants and schedule administrators can create a library of shifts, work pattern types,
and work pattern templates. They can also create rules to assign the work pattern templates as work patterns
to worker assignments. They create schedule generation profiles that link schedule managers to staffing
departments and schedule periods. And they can import workload plans.
• Line managers link worker assignments to departments or locations so that they can be assigned work patterns
and schedule managers can generate appropriate workforce schedules. The line managers can also manually
add work patterns to worker assignments.
• Schedule managers generate and publish workforce schedules, and manage schedule shifts to optimize worker
resources.
• Workers can use their calendars to view their published schedules, claim open shifts, and submit requests to
cover, and drop shifts.
360

Oracle Fusion Cloud Human Resources
Implementing Global Human Resources
Chapter 14
Workforce Records
Here’s the workforce scheduling cycle:
1. Import your workload.
2. Generate draft and planned schedules.
3. Self-schedule shifts.
4. Balance the schedules.
5. Create more shift opportunities.
6. Publish the final schedules.
7. Fill opportunities and shift swaps.
8. Approve or deny submitted shift requests, such as cover, drop, and withdraw claim.
361

Oracle Fusion Cloud Human Resources
Implementing Global Human Resources
Chapter 14
Workforce Records
Shifts in Workforce Scheduling
A shift is a defined block of work used to create work patterns. You also use them to identify operating shifts for
schedule generation profiles, and when managing workforce schedules.
Create shifts using the Shifts quick action for My Client Groups > Workforce Scheduling. You can also use the
Enterprise Shifts task in the Setup and Maintenance work area. The task is in the Workforce Deployment offering,
Workforce Scheduling functional area.
A shift includes a name, work duration, and start time. It can include a total break duration. The work and break
durations decide the total duration. For example, you create the Union Day shift with these settings:
• The start time is 8:00 am.
• The work duration is 8 hours.
• The total break duration is 60 minutes.
• The calculated total duration is 9 hours.
362

Oracle Fusion Cloud Human Resources
Implementing Global Human Resources
Chapter 14
Workforce Records
Work patterns that use this shift could include two 15-minute paid coffee breaks and one 30-minute unpaid meal break.
CAUTION: Be sure to enter times and durations that are in 15-minute intervals, such as 15, 30, and 45.
When appropriate you can let workers exceed their FTE without any validation warnings for the worker or scheduler by
configuring shifts that allow overtime. Exceeding FTE without validation warnings happens when workers accept open
shifts or requests to cover shifts that allow overtime. It also applies when they claim shifts that allow overtime during
self-scheduling.
You can encourage workers to work certain shifts by including an incentive amount when configuring or assigning the
shift. And to help people more quickly find appropriate shifts, include a category, such as Day, Evening, or Night.
Tip: Any reports that you create that include shift start times, end times, and work durations will show the values
in only minutes because that's how they're stored. Only the applicable pages include calculations to convert stored
minutes over 59 into hours and minutes.
Related Topics
•
Add Shift Types for Workforce Scheduling
•
Configure Key Lookups for Workforce Scheduling
Work Pattern Types in Workforce Scheduling
You can use duration, start and end times, flexible days, and flexible days and times work pattern types to identify the
shift period type to use in work patterns.
You create these work pattern types using the Work Pattern Type task in the Setup and Maintenance work area. The task
is in the Workforce Deployment offering, Workforce Scheduling functional area.
Type Description Typical Use
Duration These patterns define the work period using a
duration, such as 8 hours on fixed workdays.
Hourly administrative and support workers
where the duration and days are required, but
the time is flexible
Start and end times These patterns define the work period using
start and end times, such as 8:00 am and 5:00
pm on fixed workdays.
Workers in fixed department roles that don't
correspond to patient volume variability, such
as management roles
Flexible days These patterns define the work period using
start and end times, such as 8:00 am and 5:00
pm and support flexible working days over a
multiweek cycle.
Workers using only self-scheduling periods or
open shifts
Flexible days and times These patterns define the work period using a
duration, such as a maximum daily duration of
8 hours, and support flexible working days over
a multiweek cycle.
Workers using only self-scheduling periods or
open shifts
363
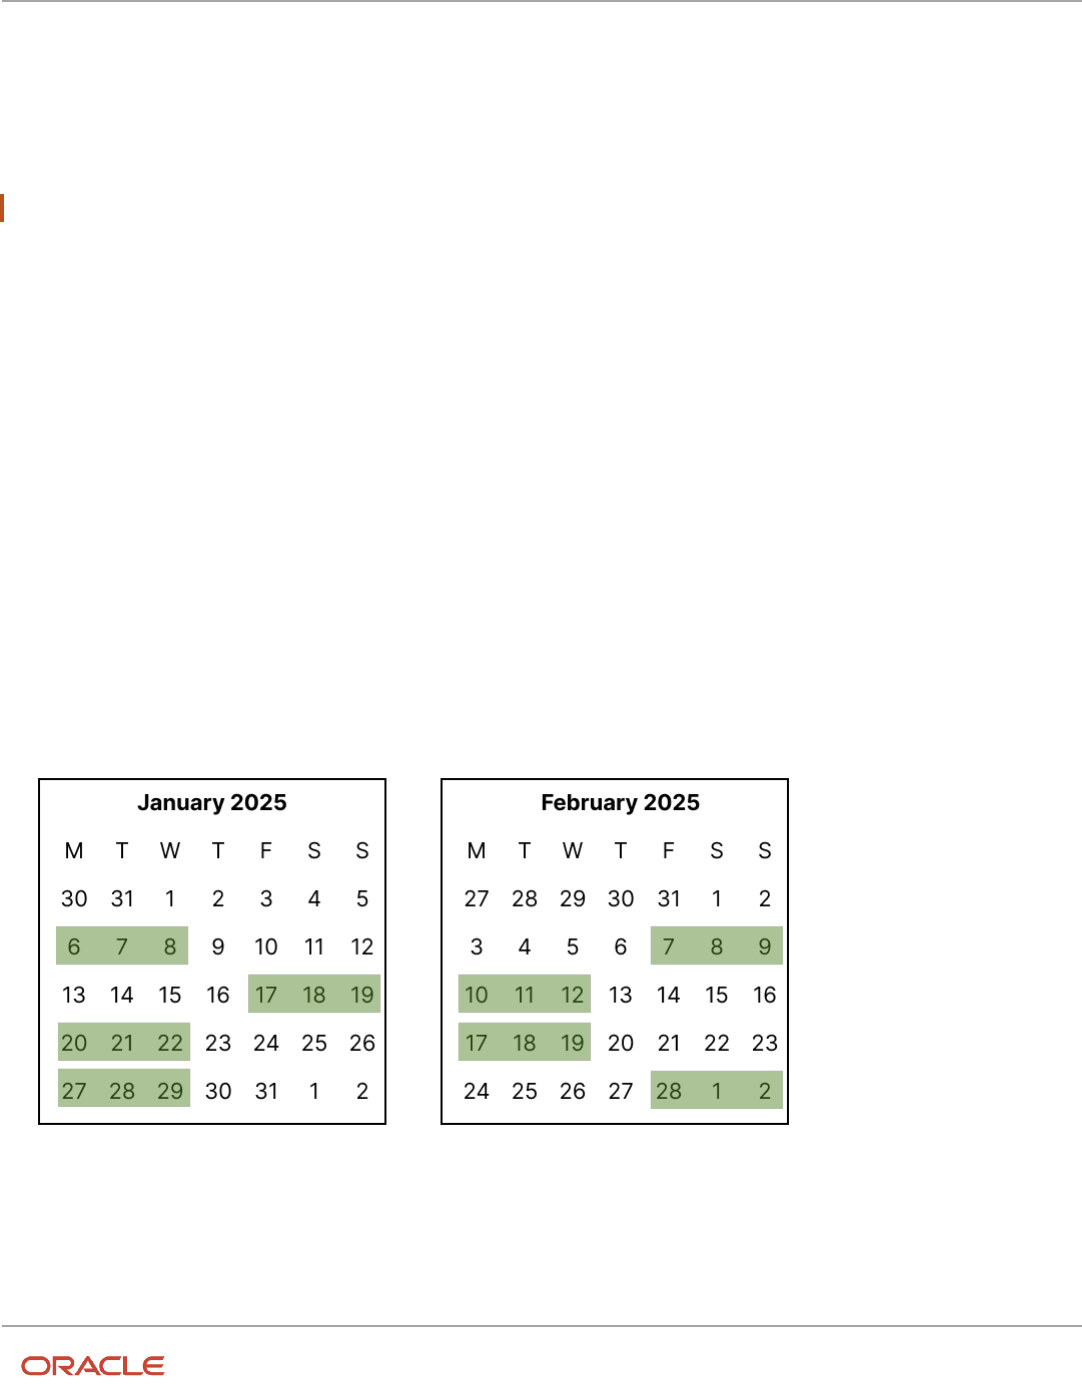
Oracle Fusion Cloud Human Resources
Implementing Global Human Resources
Chapter 14
Workforce Records
Flexible working days are the days when the worker needs to be available to work. To derive time totals and absence
information, you need to use duration and start and end time shifts and work patterns. That information can't be
derived from flexible shifts and patterns.
Work pattern types also identify the type and nature of any included breaks. For example, breaks can occur at a fixed
time, any time during a specified range, or any time during the shift. And they can be paid or unpaid.
CAUTION: Be sure to break durations are in 15-minute intervals, such as 15, 30, 45, or 60 minutes.
Work Pattern Templates in Workforce Scheduling
To identify the shifts framework for groups of workers during a specific cycle, create work pattern templates. The shifts
can have specific start and end times or durations for specific days. Or they can be flexible.
You can use work pattern templates to create work patterns for individual users, or assign them to workers who meet
specific criteria. Create work pattern templates using the Work Pattern Templates quick action for My Client Groups >
Workforce Scheduling. You can also use the Work Pattern Templates task in the Setup and Maintenance work area. The
task is in the Workforce Deployment offering, Workforce Scheduling functional area.
You can configure a cycle for work pattern templates that use a duration or start and end times work type. You need to
consider the schedule period when setting the template cycle. For example, you have a schedule period of 6 weeks. For
the templates that correspond to those schedules, it would seem that you can set up templates with a 2, 3, or 6 week
cycle depending on the pattern. But a set of workers needs to work Friday through Sunday of their middle week, in a
3-week cycle. You can achieve this pattern in your 6-week schedule period by entering a template cycle of either 3 or 6
weeks as shown in the first calendar set, but not 2 weeks, as shown in the second calendar set.
3-week or 6-week cycle
2-week cycle
364

Oracle Fusion Cloud Human Resources
Implementing Global Human Resources
Chapter 14
Workforce Records
For multiweek templates, you can also set a shift to be a nonworking week. This framework is used to decide the
workers' default contractual schedules.
Assigned work pattern templates don't show on worker Work Patterns pages. After assigning a template, you need to
generate the workforce schedule that should include the assignees and confirm they're included appropriately.
Related Topics
•
Work Patterns in Workforce Scheduling
Work Patterns in Workforce Scheduling
To identify the shifts framework for a worker during a specific cycle, create a work pattern for their work assignment.
The shifts can have specific start and end times or durations for specific days. Or they can be flexible.
For multiweek patterns, you can also set a shift to be a nonworking week. This framework is used to decide the worker's
default contractual schedule. Here's an example of how the same assignment might vary depending on the work
pattern type.
Cycle Start and End Times Flexible Days and Times
Week 1 Work Monday, Wednesday, and Friday from 8:00 am to
noon
Work Tuesday, Thursday, and Saturday from noon to 4:00
pm
All the shifts include a 15-minute paid break that can be
taken any time during the shift
Can work Monday, Wednesday, and Friday for a maximum of 4
hours
Can also work Tuesday, Thursday, and Saturday for a maximum of
6 hours
All the shifts include a 15-minute paid break that can be taken any
time during the shift
Week 2 Work Tuesday, Wednesday, and Thursday from 2:00 pm to
8:00 pm.
Includes a 15-minute paid coffee break at 4:00 pm, and a
30-minute unpaid meal break at 6:00 pm
Can work on Tuesday, Wednesday, and Thursday for a maximum of
6 hours
Can take a 15-minute paid coffee break between noon and 3:00 pm
and a 30-minute unpaid meal break between 5:00 pm and 7:00 pm
365

Oracle Fusion Cloud Human Resources
Implementing Global Human Resources
Chapter 14
Workforce Records
Cycle Start and End Times Flexible Days and Times
Nonflexible work patterns are validated to ensure the weekly hours total to the standard working hours defined for the
worker assignment. For example, if a worker has an assignment-level FTE of 40 hours, then their work pattern needs to
total to 40 hours for any week. Flexible work patterns aren’t validated.
To create a work pattern, use the Work Patterns quick action for My Client Groups > Workforce Scheduling. On the
Work Patterns page, search for and select a specific work assignment to see the existing inactive and active work
patterns. You can also add other work patterns here. Or you can load work patterns for worker assignments using HCM
Data Loader.
Tips
As a line manager or HR specialist, you can assign work patterns to only the workers you've permissions to access.
A worker’s work assignment can have only one work pattern active at a time and work pattern dates can’t overlap. The
work assignment can have gaps between when one work pattern ends and another pattern starts.
The fields that you see when adding shifts depend on the selected work pattern type. For example, start and end
times types include time fields while duration types don’t. You can add existing shifts to the work pattern or create the
appropriate shift while you’re creating the work pattern.
For flexible work patterns, the days or days and times are when the person needs to be available to work that
assignment. You don’t need to schedule them to work on all the specified days and at all the specified times. For
example, Kris's manager schedules Kris to work the week 1 pattern on Mondays and Fridays from 9:00 am to noon.
They don’t schedule Kris to work at all on Wednesdays.
Notify Workers and Managers About New, Updated, and Deleted
Work Patterns
Workforce scheduling provides three alerts that you can configure using the Alerts Composer tool. By default, they
notify a worker when they've a new, update, or deleted work pattern. You can change them to also notify the worker's
manager.
Alert Template Description
HTS Work Pattern Created Notification to worker that they've a new work pattern assigned.
HTS Work Pattern Updated Notification to worker that their work pattern was updated.
HTS Work Pattern Deleted Notification to worker that their work pattern was deleted.
366

Oracle Fusion Cloud Human Resources
Implementing Global Human Resources
Chapter 14
Workforce Records
Work Schedules
Work Schedule Types Supported by Oracle HCM Cloud
Applications
You define availability details for a period using work schedules. Oracle Fusion Cloud HCM applications support only
time and elapsed work schedules.
You create these schedules using the Work Schedules task in the Setup and Maintenance work area. It's part of the
Workforce Deployment offering, Workforce Information functional area.
Note: For people with multiple assignments, assign work schedules of the same type to their assignments so that
absence durations calculate correctly.
Time
A time work schedule has a fixed work day pattern and anyone assigned the schedule is available for specific hours each
day. For example, you want an 8-hour schedule for 5 days of the week. You create a time work schedule that starts at
8:00a and ends at 5:00p, Monday through Friday.
Elapsed
An elapsed work schedule doesn't have fixed start or end times for anyone assigned the schedule. Instead, they're
available for a specific number of hours each day--a specific duration. For example, everyone works 8 hours a day,
Monday through Friday. Some people might start work at 9:00a and others at 11:00a. Some people might work in 2-
hour bands with an hour or more of nonwork time between. And some people might work during the night. It doesn't
matter as long as they work their assigned duration.
Related Topics
•
Exception Options in Work Schedules
•
Basic Process to Create a Work Schedule
Exception Options in Work Schedules
When you create a work schedule, you can include exceptions, such as public holidays or training sessions. You then use
these exceptions to identify people's availability to work.
Calendar Event
A calendar event is an exception for a single event on 1 or more consecutive days, such as a public holiday or training
event.
367

Oracle Fusion Cloud Human Resources
Implementing Global Human Resources
Chapter 14
Workforce Records
Calendar Event Category
A calendar event category is an exception for all calendar events that make up the event category. For example, the
events New Year's Day, Good Friday, and Easter Monday make up the category UK Public Holidays.
Resource Exception
A resource exception is an exception for everyone assigned the work schedule. For example, everyone assigned the
Night Shift schedule get scheduled to attend a training event, so they aren't available to do their regular work.
People can see the Work period exceptions for themselves and their team on the Time and Absences work area
calendar. They need to select either or both of the Employment schedule and My schedule display options. They can't
see any off period, or nonwork, exceptions.
Related Topics
•
How do I change exceptions in individuals' work schedules?
Basic Process to Create a Work Schedule
Here's the basic process to create a work schedule.
1. Create calendar events.
2. Create shifts.
3. Create a weekly work pattern made up of one or more shifts.
4. Create a work schedule made up of a weekly work pattern and calendar event, or calendar event category
exceptions.
Related Topics
•
Work Schedule Types Supported by Oracle HCM Cloud Applications
•
Exception Options in Work Schedules
•
Basic Process to Create a Calendar Event Using a Geographic Tree
•
Assign the Weekly Day Office, Night Home Work Schedule
•
Change the Weekly Day Office, Night Home Work Schedule of an Individual
Create the Day Office and Night Home Time Shifts
You're creating two shifts for a support department in India. The day shift is Monday through Wednesday from 9:00a to
5:00p. The night shift is Thursday and Friday from 5:00p to 1:00a.
Use the Work Shifts task in the Setup and Maintenance work area. It's part of the Workforce Deployment offering,
Workforce Information functional area.
1. On the Work Shifts page, Create icon menu, select Create Time Shift.
368

Oracle Fusion Cloud Human Resources
Implementing Global Human Resources
Chapter 14
Workforce Records
2. On the Create Time Shift dialog box, complete the fields for one of the shifts, as shown here:
Field Day Value Night Value
Name Day Office Night Home
Start Time 9:00a 5:00p
Category Work from office Work from home
Duration 8 Hours 8 Hours
Shift Detail Type None None
3. Click Save and Close. After you complete the second shift, skip to step 5.
4. Repeat steps 1 through 3 to create the second shift.
5. On the Work Shifts page, click Done.
What to do next
Create the Weekly Day Office, Night Home Work Pattern, Create the Weekly Day Office, Night Home Work Schedule, and
Assign the Weekly Day Office, Night Home Work Schedule
Related Topics
•
Basic Process to Create a Work Schedule
Create the Weekly Day Office, Night Home Work Pattern
You're creating a weekly work pattern that uses the Day Office and Night Home shifts for a support department in India.
Before you start
Create the Day Office and Night Home Time Shifts
Use the Work Workday Patterns task in the Setup and Maintenance work area. It's part of the Workforce Deployment
offering, Workforce Information functional area.
Here's what to do
1. On the Work Workday Patterns page, Create icon menu, select Create Time Workday Pattern.
2. On the Create Time Workday Pattern dialog box, in the Name field, enter Weekly Day Office, Night Home.
3. In the Length of Days field, enter 7.
4. Add the two workday pattern details by completing these steps twice.
a. In the Workday Pattern Details section, click the Add Row icon.
b. Complete the fields for one of the patterns, as shown here:
Field Day Office Value Night Home Value
Start Day 1 4
End Day 3 5
369

Oracle Fusion Cloud Human Resources
Implementing Global Human Resources
Chapter 14
Workforce Records
Field Day Office Value Night Home Value
Shift Name Day Office Night Home
5. Click Save and Close.
6. On the Work Workday Patterns page, click Done.
What to do next
Create the Weekly Day Office, Night Home Work Schedule and Assign the Weekly Day Office, Night Home Work Schedule
Related Topics
•
Basic Process to Create a Work Schedule
Create the Weekly Day Office, Night Home Work Schedule
You're creating the work schedule that uses the Weekly Day Office, Night Home workday pattern for a support
department in India. The work schedule includes public holiday exceptions.
Before you start
Create the Day Office and Night Home Time Shifts and Create the Weekly Day Office, Night Home Work Pattern. Also
create the India_Support_Team eligibility profile to identify everyone in the India support department. Use the Eligibility
Profiles task.
Use the Work Schedules task in the Setup and Maintenance work area. It's part of the Workforce Deployment offering,
Workforce Information functional area.
Here's what to do
1. On the Work Schedules page, click Create.
2. On the Create Work Schedule page, complete the general fields, as shown here.
Field Value
Name Weekly Day Office, Night Home
Category Work
Type Time
Effective From Date January 1 of the current year
Effective To Date December 31 of the current year
3. Add the pattern by completing the fields, as shown here.
Field Value
Sequence 1
Name Weekly Work Pattern
370

Oracle Fusion Cloud Human Resources
Implementing Global Human Resources
Chapter 14
Workforce Records
4. Add the exception by completing the fields, as shown here.
Field Value
Type Calendar event category
Name Public holiday
5. Add the India_Support_Team eligibility profile.
6. Click Submit.
7. On the Work Schedules page, click Done.
What to do next
Assign the Weekly Day Office, Night Home Work Schedule
Related Topics
•
Basic Process to Create a Work Schedule
Assign the Weekly Day Office, Night Home Work Schedule
You're assigning the Weekly Day Office, Night Home work schedule to everyone who works in a support department in
India.
Before you start
Create the Day Office and Night Home Time Shifts, Create the Weekly Day Office, Night Home Work Pattern, and Create
the Weekly Day Office, Night Home Work Schedule.
Use the Work Schedule Assignment Administration task in the Setup and Maintenance work area. It's part of the
Workforce Deployment offering, Workforce Information functional area.
Here's what to do
1. On the Work Schedule Assignment Administration page, search for and click Weekly Day Office, Night Home.
2. On the Edit Work Schedule Assignment Administration: Weekly Day Office, Night Home page, in the Resource
Assignments section, click the Add Row icon.
3. Complete the fields, as shown here:
Field Value
Resource Type Department
Name Support IN
Start Date January 1 of the current year
End Date December 31 of the current year
Primary Yes
4. Click Submit.
5. On the Confirmation dialog box, click OK.
371
Oracle Fusion Cloud Human Resources
Implementing Global Human Resources
Chapter 14
Workforce Records
6. On the Work Schedule Assignment Administration page, click Done.
Related Topics
•
Work Schedule Types Supported by Oracle HCM Cloud Applications
•
Exception Options in Work Schedules
•
How do I change exceptions in individuals' work schedules?
•
Basic Process to Create a Work Schedule
•
Change the Weekly Day Office, Night Home Work Schedule of an Individual
Change the Weekly Day Office, Night Home Work Schedule of an
Individual
You need to modify the work schedule for Vijay Singh because he's scheduled to attend the Advance Communication
Skills training on February 8. His schedule needs to indicate that he's unavailable on that day.
1. Click Navigator > Person Management.
2. On the Person Management: Search page, search for and click Vijay Singh.
3. On the Tasks panel tab, click Work Schedule Assignment.
4. On the Work Schedule Assignment page, click the Add Row icon.
5. In the Schedules section, complete the fields, as shown here:
Field Value
Name Weekly Day Office, Night Home
Start Date January 1 of the current year
End Date December 31 of the current year
Primary Yes
6. In the Exceptions section, click the Add Row icon.
7. Complete the fields, as shown here:
Field Value
Type Resource Exception
Name In the choice list, click Create. Then, create a resource exception called Advanced Communication
Skills that starts and ends on February 8.
Availability Off Period
8. Click Submit.
372

Oracle Fusion Cloud Human Resources
Implementing Global Human Resources
Chapter 14
Workforce Records
Related Topics
•
Work Schedule Types Supported by Oracle HCM Cloud Applications
•
Exception Options in Work Schedules
•
How do I change exceptions in individuals' work schedules?
•
Basic Process to Create a Work Schedule
•
Assign the Weekly Day Office, Night Home Work Schedule
Work Schedules FAQs
What's a primary work schedule?
The schedule used to identify an individual's work availability.
For example, you assign two schedules for different time periods to someone's primary work assignment. So that those
schedules identify the person's work availability for those time periods, you need to set both schedules to Primary. If
you assign only a single work schedule, that schedule automatically identifies the person's work availability.
You manage work schedules using the Work Schedule Assignment task in the Person Management work area.
How do I change exceptions in individuals' work schedules?
You can change how the exceptions affect that person's work availability when you assign a schedule to someone using
the Work Schedule Assignment page.
For example, you added a calendar event as an exception that affects everyone. But, a designated person needs to
remain available to handle critical customer queries. So, you change the person's work availability for that exception.
373

Oracle Fusion Cloud Human Resources
Implementing Global Human Resources
Chapter 14
Workforce Records
374
Oracle Fusion Cloud Human Resources
Implementing Global Human Resources
Chapter 15
Set Up Connections
15 Set Up Connections
Set Up Connections
Before you start setting up Connections, here’s what you need to do:
• Enable the Workforce Deployment offering to view the profile options for Connections. For more information,
see Overview of Global Human Resources.
• Review your existing profile option settings and check if any of them might impact the Connections search. For
more information, see Profile Options Considerations for Connections Search.
To set up Connections, you need to enable the profile options for Connections and configure Oracle Search.
Profile Options for Connections
Go to the Setup and Maintenance area, Manage Administrator Profile Values task and enable these profile options:
Profile Option Code Profile Display Name Application Module Profile Level Profile Value
HCM_RESPONSIVE_
PAGES_ENABLED
Mobile-Responsive
HCM Pages Enabled
Global Human
Resources
Global Human
Resources
Site Y
HCM_CONNECTIONS_
ENABLED
HCM_CONNECTIONS_
ENABLED
Global Human
Resources
Global Human
Resources
Site Y
Configure Oracle Search
1. Go to the Setup and Maintenance area, Manage Administrator Profile Values task and enable these profile
options:
Profile Option Code Profile Display
Name
Application Module Profile Level Profile Value
ORA_FND_SEARCH_
EXT_ENABLED
Enable/Disable
Search Ext
Framework
Oracle Middleware
Extensions for
Applications
Oracle Middleware
Extensions for
Applications
Site Yes
HRC_ELASTIC_
SEARCH_ENABLED
HRC: Enable Elastic
Search
HCM Common
Architecture
Search Framework Site Y
2. In the Tools > Scheduled Processes work area, run this ESS process for each of the listed indices.
Job Name Parameter Name Parameter Value
ESS job to create index definition and
perform initial ingest to OSCS
Index Name to Reingest fa-hcm-person
375

Oracle Fusion Cloud Human Resources
Implementing Global Human Resources
Chapter 15
Set Up Connections
Job Name Parameter Name Parameter Value
fa-hcm-profile-tag
Note: Run the initial data ingestion process after each release version upgrade and after each P2T
(production to test) process.
Profile Options Considerations for Connections Search
These profile options might impact the Connections search. Review these profile settings before you set up
Connections.
Profile Option Name Purpose Default Value
PER_WORKER_SEARCHES_PERSON_NUMBER_
SEARCH_ENABLED
Enables search by person number. N
PER_PERSON_INDEX_FUZZY_SEARCH_
ENABLED
Enables fuzzy search on person names and
allowing up to 2 spelling differences.
Y
PER_WORKER_SEARCHES_LEADING_EMAIL_
SEARCH_ENABLED
Enables a focused search on the work email
if the search terms entered appears to be an
email address.
Y
PER_WORKER_SEARCHES_LEADING_EMAIL_
LOCAL_PART_SEARCH_ENABLED
Enables a focused search on the work email
local part (before the @) if the search terms
entered are alphabetic characters separated by
a period.
Y
Roles Required for Connections
To use Connections, you need a custom employee or contingent role that has:
• HCM Connections REST Services privilege
• ORA_HRT_REST_SERVICE_ACCESS_TALENT_PERSON_PROFILES aggregate privilege You need this role to use
the About Me panel. It’s included in these duty roles, by default.
◦
ORA_HRC_HUMAN_CAPITAL_MANAGEMENT_INTEGRATION_SPECIALIST_JOB
◦
ORA_HRT_ACCESS_SKILLS_CENTER
◦
ORA_PER_CONNECTIONS_DUTY
This role is included in these abstract roles, by default:
- ORA_PER_CONTINGENT_WORKER_ABSTRACT
- ORA_PER_EMPLOYEE_ABSTRACT
• Manage Scheduled Job Definition privilege, FND_MANAGE_SCHEDULED_JOB_DEFINITION_PRIV
376

Oracle Fusion Cloud Human Resources
Implementing Global Human Resources
Chapter 15
Set Up Connections
You need this privilege for running the Oracle Search initial data ingestion process. It’s available in these job
roles, by default.
◦
ORA_FND_APPLICATION_ADMINISTRATOR_JOB
◦
ORA_FND_APPLICATION_DEVELOPER_JOB
After adding the privileges, you must regenerate the grants for the data role.
377

Oracle Fusion Cloud Human Resources
Implementing Global Human Resources
Chapter 15
Set Up Connections
378

Oracle Fusion Cloud Human Resources
Implementing Global Human Resources
Chapter 16
HR Help Desk Classic Configuration
16 HR Help Desk Classic Configuration
HR Help Desk Classic Documentation
The classic HR Help Desk application is used to create and submit HR Help Desk service requests (HRHD SRs). Oracle
introduced Redwood Help Desk in release R13.22.07 (21C).
If you are implementing or using the classic version of HR Help Desk, the documentation is located in the appendixes of
the new Redwood Help Desk guides.
Related Topics
•
Implementing Redwood Help Desk
•
Using Redwood Help Desk
379

Oracle Fusion Cloud Human Resources
Implementing Global Human Resources
Chapter 16
HR Help Desk Classic Configuration
380
