
Oracle Fusion
Cloud HCM
Using Common Features for HCM
24B
Oracle Fusion Cloud HCM
Using Common Features for HCM
24B
F92796-01
Copyright © 2024, Oracle and/or its affiliates.
Author: Lakshmi Sweta Polepalli

Oracle Fusion Cloud HCM
Using Common Features for HCM
Contents
Get Help ................................................................................................................................ i
1
HCM Common Features Overview
1
Overview of Using HCM Common Features ............................................................................................................................. 1
Diagnose and Synchronize Application Data ........................................................................................................................... 5
2
Date Effectivity
7
Date Effectivity ................................................................................................................................................................................ 7
Examples of Correcting Date-Effective Objects ...................................................................................................................... 8
Examples of Updating Date-Effective Objects ....................................................................................................................... 10
Examples of Effective Sequencing ............................................................................................................................................ 11
How You Delete Physical Records from Date-Effective Objects ......................................................................................... 12
How You Make Multiple Updates to Date-Effective Objects in One Day .......................................................................... 13
FAQs for Date Effectivity ............................................................................................................................................................. 14
3
Responsive User Experience Setup
17
HCM Experience Design Studio ................................................................................................................................................. 17
Transaction Design Studio .......................................................................................................................................................... 18
Use Transaction Design Studio to Configure Field Displays ............................................................................................... 18
How You Configure Rules in the Transaction Design Studio .............................................................................................. 19
Create Rule to Configure Promote Action ............................................................................................................................... 21
Displayed, Conditionally Displayed, and Hidden Fields in Global Human Resources .................................................... 22
How You Personalize the Save and Save and Close Actions in the Toolbar .................................................................... 22
Configuration Report ................................................................................................................................................................... 23
Guided Journeys in HCM Flows ............................................................................................................................................... 24
Deep Links ..................................................................................................................................................................................... 24
Quick Actions ................................................................................................................................................................................ 25
Search Logic Profile Options for Client List of Values in Global Human Resources ...................................................... 25
How You Configure List of Values (LOVs) .............................................................................................................................. 27
FAQs for Responsive User Experience Setup ......................................................................................................................... 32

Oracle Fusion Cloud HCM
Using Common Features for HCM
4
Oracle Search Cloud Service Setup
35
Set Up Oracle Search for HCM .................................................................................................................................................. 35
Set Up Oracle Search for List of Values .................................................................................................................................. 36
Set Up Data Security for Oracle Search .................................................................................................................................. 39
Enable Global Search .................................................................................................................................................................. 40
Using Oracle Search Cloud Service Features ......................................................................................................................... 41
5
Filtered Lists
43
Overview of Filtered Lists .......................................................................................................................................................... 43
Enable Filtered Lists .................................................................................................................................................................... 43
Create Filtered Lists ..................................................................................................................................................................... 43
6
Geographies for HCM
45
Overview of Geographies ........................................................................................................................................................... 45
What are the best practices for managing Geography mismatches? .............................................................................. 69
Overview of Zone Types and Zones ......................................................................................................................................... 71
Import Geographies and Zones ................................................................................................................................................ 72
Set Up Geocoding ........................................................................................................................................................................ 95
How You Set up Address Cleansing ........................................................................................................................................ 99
FAQs for Loqate Support ......................................................................................................................................................... 100
FAQs for Define Geographies .................................................................................................................................................. 102
7
Currencies and Currency Rates
111
Manage Currencies ...................................................................................................................................................................... 111
FAQs for Manage Currencies .................................................................................................................................................... 112
Manage Conversion Rate Types ............................................................................................................................................... 113
FAQs for Manage Conversion Rate Types ............................................................................................................................. 116
Manage Daily Rates .................................................................................................................................................................... 116
8
Enterprise Structures
119
Overview of Enterprise Structures .......................................................................................................................................... 119
Model Your Enterprise Management Structure ................................................................................................................... 122
Guidelines for Configuring Global Enterprises ..................................................................................................................... 125
Design an Enterprise Configuration ....................................................................................................................................... 126
Enterprise Information for Non-HCM Users ......................................................................................................................... 127

Oracle Fusion Cloud HCM
Using Common Features for HCM
9
Legal Entities, Business Units, and Reference Data Sets
129
Overview of Legal Entities, Business Units, and Divisions ................................................................................................ 129
Overview ....................................................................................................................................................................................... 129
Model Legal Entities .................................................................................................................................................................. 130
Overview of Legal Jurisdiction and Authorities ................................................................................................................... 133
Jurisdictions ................................................................................................................................................................................. 133
Legal Authorities ......................................................................................................................................................................... 134
Create Legal Jurisdictions, Addresses and Authorities ...................................................................................................... 134
Create Legal Entities, Registrations, and Reporting Units ................................................................................................. 136
Legislative Data Groups ............................................................................................................................................................ 138
How Legal Employers Work with Payroll Statutory Units and Tax Reporting Units ..................................................... 138
Examples of HCM Organization Models ............................................................................................................................... 139
Examples of Creating Calculation Cards for Deductions at Different Levels ................................................................ 145
Business Units ............................................................................................................................................................................. 146
How Business Units Work with Reference Data Sets ......................................................................................................... 147
Associate Business Unit with Legal Employer ..................................................................................................................... 150
FAQs for Legal Entities, Business Units, and Reference Data Set .................................................................................... 151
10
Enterprise Structures Configurator (ESC)
157
How You Establish Enterprise Structures Using the Enterprise Structures Configurator ............................................ 157
Configuration Workbench ......................................................................................................................................................... 159
How You Create Legal Entities in the Enterprise Structures Configurator ..................................................................... 159
Considerations for Creating Business Units in the Enterprise Structures Configurator .............................................. 161
How You Create Reference Data Sets in the Enterprise Structures Configurator ......................................................... 164
How You Roll Back an Enterprise Structure Configuration ............................................................................................... 164
FAQs for Enterprise Structures Configurator ....................................................................................................................... 165
11
Divisions, Departments, Worker Unions, Locations, and Trees
167
Guidelines for Using Single or Multiple Classifications for an Organization ................................................................. 167
How You Configure Your Enterprise Structure After an Acquisition ............................................................................... 167
Divisions ........................................................................................................................................................................................ 172
Example of Adding a New Division After Acquiring a Company ..................................................................................... 173
Departments ................................................................................................................................................................................ 175
How You Create a Chart of Account to Create a Department .......................................................................................... 177
Cost Centers and Departments ............................................................................................................................................... 183
Department Classifications ...................................................................................................................................................... 184
How You Configure the Department Title ............................................................................................................................ 186

Oracle Fusion Cloud HCM
Using Common Features for HCM
Disability Organizations ............................................................................................................................................................ 186
Worker Union Management ..................................................................................................................................................... 187
Collective Agreement Flexfields .............................................................................................................................................. 193
Locations ...................................................................................................................................................................................... 194
Associate Legal Employers with Locations ........................................................................................................................... 196
HCM Trees .................................................................................................................................................................................... 197
FAQs for Divisions, Departments, Worker Unions, Locations, and Trees ...................................................................... 202
12
Jobs and Positions
205
Jobs ............................................................................................................................................................................................... 205
Examples of Jobs ....................................................................................................................................................................... 205
Examples of Positions .............................................................................................................................................................. 206
Considerations for Using Jobs and Positions ..................................................................................................................... 208
Job and Position Structures ..................................................................................................................................................... 210
Workforce Structures Code Generation Methods ................................................................................................................ 212
Evaluation Criteria for Jobs and Positions ............................................................................................................................ 213
How FTE is Calculated in Positions ........................................................................................................................................ 215
Work Hours and Duration ......................................................................................................................................................... 215
Workday Information Defaults ................................................................................................................................................. 216
How You Match Position Valid Grades with Job Grades .................................................................................................... 218
Position Synchronization .......................................................................................................................................................... 218
Set Up Position Synchronization ............................................................................................................................................ 220
How Assignment Values Are Inherited from Position ........................................................................................................ 221
HCM Position Hierarchy ............................................................................................................................................................ 223
Graphical Position Hierarchy .................................................................................................................................................... 223
How You Create a Graphical Position Hierarchy ................................................................................................................. 224
Considerations for Using Position or Position Hierarchy for Synchronizing Assignment Manager ......................... 228
Synchronize Assignment Action Reason From Position ................................................................................................... 229
Example of Action Reason Synchronization in Assignments .......................................................................................... 230
Synchronize Assignment Flexfields From Position Flexfields .......................................................................................... 232
Considerations for Flexfield Mapping in Position Synchronization ................................................................................ 233
Synchronize Person Assignment from Position Process .................................................................................................. 234
Create a Position Profile ........................................................................................................................................................... 236
Associate Action Reasons in Position with Role ................................................................................................................. 236
Upload Workforce Structures Using a Spreadsheet ........................................................................................................... 237
FAQs for Jobs and Positions ................................................................................................................................................... 238

Oracle Fusion Cloud HCM
Using Common Features for HCM
13
Grades, Grade Rates, and Grade Ladders
241
Grades ........................................................................................................................................................................................... 241
Grade Rates ................................................................................................................................................................................. 243
Grade Ladders ............................................................................................................................................................................ 244
Lookup Types for Grades ......................................................................................................................................................... 245
Grade Ladder on Worker Assignment ................................................................................................................................... 245
How Grades, Grade Rates, and Sets Work with Legislative Data Groups ...................................................................... 246
How Grades and Grade Rates Work with Jobs, Positions, Assignments, Compensation, and Payroll ..................... 248
Examples of Grades, Grade Rates, and Grade Ladders .................................................................................................... 249
How You Set Up Grade Ladders for Pay Scale Requirements .......................................................................................... 252
Example of Setting Up Grade Ladders for Spine Point Requirements ........................................................................... 256
FAQs for Grades, Grade Rates, and Grade Ladders ........................................................................................................... 259
14
Workforce Structures - Configuration Options
261
Workforce Structures Enterprise-Level Configuration ........................................................................................................ 261
Workforce Structures Profile Options .................................................................................................................................... 264
Workforce Structures Lookups ............................................................................................................................................... 266
Workforce Structures Flexfields .............................................................................................................................................. 266
Parameters for Work Structure Extensible and Descriptive Flexfields ........................................................................... 268
15
Workforce Profiles
275
Overview of Profile Management ........................................................................................................................................... 275
Enhanced Talent Profiles .......................................................................................................................................................... 276
Oracle Fusion Profile Management Components: How They Work Together .............................................................. 276
Rating Models ............................................................................................................................................................................. 279
Content Types and Content Items ......................................................................................................................................... 282
Talent Profiles ............................................................................................................................................................................. 298
Content Sections ........................................................................................................................................................................ 303
Lookups ........................................................................................................................................................................................ 310
Writing Assistant ......................................................................................................................................................................... 314
Questionnaires ............................................................................................................................................................................ 316
Anytime Feedback ..................................................................................................................................................................... 338
FAQs for Workforce Profiles .................................................................................................................................................... 345
16
Workflow Notifications and Approvals
349
Overview of Notifications and Approvals ............................................................................................................................. 349

Oracle Fusion Cloud HCM
Using Common Features for HCM
Roles That Give Workflow Administrators Access .............................................................................................................. 349
Search for Workflow Tasks to Configure ............................................................................................................................... 351
Disable or Enable Workflow Notifications ............................................................................................................................. 351
Synchronize Notifications in the Global Header and Home Page with Workflow Tasks ............................................. 353
How You Define Approvals for Human Capital Management ......................................................................................... 354
How You Manage HCM Approval Transactions .................................................................................................................. 355
How You Simulate Approval Rules ......................................................................................................................................... 357
Simulate Approval Rules .......................................................................................................................................................... 358
Export and Import Rules Using SOA Composer ................................................................................................................. 358
Run Diagnostics Test for a Failed Transaction .................................................................................................................... 359
Resubmitting Approval Transactions .................................................................................................................................... 360
Archiving Completed Approval Transactions ....................................................................................................................... 361
Assignments and Routing ........................................................................................................................................................ 363
Define the Due Date and Expiration Policies for Workflow Tasks ................................................................................... 387
Predefined Approval Rules for Oracle Fusion Global Human Resources Tasks ........................................................... 390
Approval Management Configuration Options for Oracle Fusion Human Capital Management ............................. 393
Guidelines for Managing Approval Rules ............................................................................................................................. 394
Approver Types .......................................................................................................................................................................... 396
HCM Approval Rules ................................................................................................................................................................. 397
Configure HCM Approval Rules Using Advanced Mode ................................................................................................... 398
Edit an Approval Rule to Include a Null Condition ............................................................................................................. 399
Management Hierarchy Approval-Rule Attributes ............................................................................................................. 399
Position Hierarchy Approval-Rule Attributes ....................................................................................................................... 402
How You Define an HCM Approval Policy ........................................................................................................................... 403
Delegate Approvals ................................................................................................................................................................... 407
How You Modify Approval Notifications Using Page Composer .................................................................................... 409
Example of Modifying an Approval Notification Using Page Composer ....................................................................... 410
FAQs for Approvals .................................................................................................................................................................... 412
Workflow Notifications Setup .................................................................................................................................................. 416
Configurable Workflow Notifications ..................................................................................................................................... 426
Workflow Task Life Cycle Setup ............................................................................................................................................. 483
Monitor and Troubleshoot ....................................................................................................................................................... 488
17
HCM Nudges
501
Overview of Nudges .................................................................................................................................................................. 501
Configure Nudges ...................................................................................................................................................................... 501
How You Use Nudges to Assign Journeys for Employment Events ............................................................................... 502

Oracle Fusion Cloud HCM
Using Common Features for HCM
18
Application Toolkit Configuration
505
Set Watchlist Options ............................................................................................................................................................... 505
19
Help Configuration
509
Set Up Help ................................................................................................................................................................................. 509
Hide or Show Help Icons ......................................................................................................................................................... 509
Give People Access to Create and Edit Help ........................................................................................................................ 510
Create Groups to Limit Access to Added Help .................................................................................................................... 510
20
Common Reference Objects
513
Why can't I edit setup data? .................................................................................................................................................... 513
Set General Preferences for All Users .................................................................................................................................... 513
Set Value Formats for Regional Preferences for All Users ................................................................................................ 514
Set a Banner Message in the Global Header ....................................................................................................................... 515
How can I determine which languages appear in the Translation Editor? ..................................................................... 516
How do I define whether the user image, name, or initials display in the global header? ......................................... 516
Set CSV as the Default Option for Exporting Table Data .................................................................................................. 517
Define Application Taxonomy .................................................................................................................................................. 517
Define Reference Data Sharing ............................................................................................................................................... 519
Define ISO Reference Data ...................................................................................................................................................... 524
FAQs for Define ISO Reference Data ..................................................................................................................................... 527
Search Extension Framework .................................................................................................................................................. 529
Define Global Search ................................................................................................................................................................. 532
21
Enterprise Scheduler Job Definitions and Job Sets
533
Overview of Managing Job Definitions and Job Sets ........................................................................................................ 533
Manage List of Values Sources .............................................................................................................................................. 534
Manage Job Definitions ........................................................................................................................................................... 536
Manage Job Sets ....................................................................................................................................................................... 545
Assign Roles for Access to Manage Scheduled Processes ............................................................................................... 549
Allow Updates to Scheduled Process Priority ...................................................................................................................... 551
Where to Find Information About HCM Scheduled Processes ......................................................................................... 551
FAQs ............................................................................................................................................................................................... 561
22
Audit Policies
563
Audit Policies ............................................................................................................................................................................... 563

Oracle Fusion Cloud HCM
Using Common Features for HCM
Audit Configuration for Business Object Attributes ........................................................................................................... 563
Overview of Audit Configuration ........................................................................................................................................... 565
Impersonation Audit ................................................................................................................................................................. 565
How You Audit Talent Management Business Objects ..................................................................................................... 566
Audit Payroll Business Objects ............................................................................................................................................... 567
23
Applications Core Configuration
571
Import Flexfields, Lookups, or Profile Values Using Web Services .................................................................................. 571
Define Lookups .......................................................................................................................................................................... 576
FAQs for Define Lookups ......................................................................................................................................................... 588
Manage Messages ..................................................................................................................................................................... 590
Define Document Sequences .................................................................................................................................................. 597
Define Profile Options .............................................................................................................................................................. 600
Define Attachments .................................................................................................................................................................. 606
FAQs for Define Attachments ................................................................................................................................................. 609
24
Trees Setup
611
Overview of Trees ....................................................................................................................................................................... 611
Manage Tree Structures ............................................................................................................................................................ 612
Manage Tree Labels .................................................................................................................................................................. 622
Manage Trees and Tree Versions ........................................................................................................................................... 622
25
HCM Flexfields Setup
629
Overview of Flexfields .............................................................................................................................................................. 629
Flexfield Components ............................................................................................................................................................... 630
Overview of Flexfield Configuration ....................................................................................................................................... 631
Flexfields at Runtime ................................................................................................................................................................ 633
Flexfield Modification Using Page Composer ..................................................................................................................... 634
How Flexfields Work with Oracle Application Cloud Architecture ................................................................................... 635
Flexfield Management .............................................................................................................................................................. 637
FAQs for Flexfield Management ............................................................................................................................................. 654
Flexfield Deployment ................................................................................................................................................................ 656
Manage Value Sets .................................................................................................................................................................... 661
FAQs for Manage Value Sets .................................................................................................................................................. 685
26
HCM Flexfields Maintenance
687
Manage Descriptive Flexfields ................................................................................................................................................ 687

Oracle Fusion Cloud HCM
Using Common Features for HCM
Manage Extensible Flexfields .................................................................................................................................................. 707
FAQs for Manage Extensible Flexfields ................................................................................................................................. 723
Manage Key Flexfields .............................................................................................................................................................. 723
27
HCM Cloud Mobile App
745
Oracle Fusion Applications Mobile App ................................................................................................................................ 745
Configure the Oracle Fusion Applications Mobile App ..................................................................................................... 745
FAQs for HCM Cloud Mobile ................................................................................................................................................... 746
28
Alerts Composer
747
Overview ...................................................................................................................................................................................... 747
Define Alert Notifications ........................................................................................................................................................ 754
Process Alert Notifications ....................................................................................................................................................... 757
Configure Resource Alerts ....................................................................................................................................................... 759
Configure Event Alerts .............................................................................................................................................................. 762
Resolve Alert Run Errors .......................................................................................................................................................... 763
Purge Alerts ................................................................................................................................................................................. 763
29
HCM Events
765
Overview ...................................................................................................................................................................................... 765
Define HCM Event Conditions ................................................................................................................................................ 765
30
HR Help Desk Classic Configuration
767
HR Help Desk Classic Documentation .................................................................................................................................. 767
31
Eligibility Profiles
769
How Eligibility Works With Other Objects ............................................................................................................................ 769
Derived Factors .......................................................................................................................................................................... 770
Examples of Derived Factors ................................................................................................................................................... 771
Options for Using Age to Determine Eligibility ................................................................................................................... 775
User-Defined Criteria ................................................................................................................................................................ 776
Examples of User-Defined Criteria ........................................................................................................................................ 777
Example of Using Range of Scheduled Hours .................................................................................................................... 779
Eligibility Profiles ....................................................................................................................................................................... 780
Single or Multiple Eligibility Profiles ...................................................................................................................................... 785
Examples of Eligibility Profiles ............................................................................................................................................... 786

Oracle Fusion Cloud HCM
Using Common Features for HCM
Create a Participant Eligibility Profile .................................................................................................................................... 788
32
Predictive Models for HCM
793
Guidelines for Managing Predictive Models ........................................................................................................................ 793
33
Process Configuration
795
Payroll Process Configuration Groups .................................................................................................................................. 795
Payroll Process Configuration Parameters ........................................................................................................................... 795
Parallel Processing Parameters ............................................................................................................................................... 801
Logging Processing Parameters ............................................................................................................................................. 802
34
Country Extensions and Address Rules
807
Change Address Style and Address Validation Settings .................................................................................................. 807
Select Country Extensions ...................................................................................................................................................... 809
35
Elements, Balances, and Formulas Task List
811
Define Elements, Balances, and Formulas ............................................................................................................................ 811
Overview of Implementing Payroll Relationship ................................................................................................................. 814
Overview of Payroll Employment Model ............................................................................................................................... 814
Payroll Legislative Data ............................................................................................................................................................. 816
Configure Legislations ............................................................................................................................................................... 817
How Legislations are Edited .................................................................................................................................................... 819
Overview of Object Groups ...................................................................................................................................................... 819
FAQs for Elements, Balances, and Formulas Task List ....................................................................................................... 821
36
Organization Payment Methods
823
How Bank, Branch, and Account Components Work Together ....................................................................................... 823
Bank Info for Personal Payment Methods ........................................................................................................................... 824
Organization Payment Methods Overview .......................................................................................................................... 826
Prenotifications .......................................................................................................................................................................... 830
Payment Sources in Organization Payment Methods Setup Examples ......................................................................... 831
37
Payroll Definitions
837
Payroll Definitions ...................................................................................................................................................................... 837
Overview of Payroll Definitions .............................................................................................................................................. 837

Oracle Fusion Cloud HCM
Using Common Features for HCM
Create Payroll Definitions ........................................................................................................................................................ 840
FAQs for Manage Payroll Definitions .................................................................................................................................... 843
38
Payroll Elements
845
How Payroll Elements Hold Information for Multiple Features ....................................................................................... 845
Payroll Elements ........................................................................................................................................................................ 846
Payroll Element Input Values .................................................................................................................................................. 848
Employment Level Options for Payroll Elements ................................................................................................................ 851
How You Maintain Payroll Elements ...................................................................................................................................... 852
Element Eligibility ...................................................................................................................................................................... 855
Using Element Templates ........................................................................................................................................................ 859
FAQs for Manage Payroll Elements ........................................................................................................................................ 881
39
Fast Formulas
883
Overview of Using Formulas ................................................................................................................................................... 883
Example of Writing a Fast Formula Using Formula Text .................................................................................................. 884
Example of Writing a Fast Formula Using Expression Editor .......................................................................................... 886
Formula Compilation Errors .................................................................................................................................................... 887
Formula Execution Errors ........................................................................................................................................................ 888
FAQs for Fast Formulas ........................................................................................................................................................... 890
40
Rate Definitions
891
Overview of Rate Definitions ................................................................................................................................................... 891
Options to Configure Rate Definitions .................................................................................................................................. 893
Rate Contributors for Derived Rates ..................................................................................................................................... 897
Configure Elements Used by Rate Definitions .................................................................................................................... 899
Create Rate Definitions for Leave .......................................................................................................................................... 903
Create a Rate Definition for Basic Salary ............................................................................................................................. 905
Create Rate Definitions for Overall Salary ........................................................................................................................... 906
Generate HCM Rates ................................................................................................................................................................ 909
Rates Defined by Formula ........................................................................................................................................................ 914
Rates Used to Calculate Absences in Payroll ....................................................................................................................... 916
FAQs for Rate Definitions ......................................................................................................................................................... 917
41
Values Defined by Criteria
919
Calculate Values Defined by Criteria ...................................................................................................................................... 919

Oracle Fusion Cloud HCM
Using Common Features for HCM
Overview of Values Defined by Criteria ................................................................................................................................ 920
Pay Bonuses at Different Rates .............................................................................................................................................. 925
Limit Pension Contributions .................................................................................................................................................... 928
FAQ for Values Defined by Criteria ........................................................................................................................................ 932
42
Base Pay
933
Overview of Base Pay Configuration ..................................................................................................................................... 933
Salary Basis Options for Determining Salary Amount ...................................................................................................... 934
Rounding Rules, Salary Amounts, and Decimal Places to Display ................................................................................. 934
Salary Range Violation Behavior for Proposed Salaries .................................................................................................... 935
How You Store the Salary Amount and Pass It to Payroll for Processing ...................................................................... 936
How You Enable Salary Itemization Using Incremental Components ............................................................................ 938
Basic Process to Default Salary Amounts from Grade Ladder Rates ............................................................................. 939
How You Validate Salary Changes with the Grade Range ................................................................................................ 939
How Salary Metrics Are Calculated ....................................................................................................................................... 940
How Many Salary Bases to Create ........................................................................................................................................ 940
Periodicity Conversion ............................................................................................................................................................... 941
Examples of Annual Salary and Annualized Full-Time Salary Calculations ................................................................. 945
FAQs .............................................................................................................................................................................................. 948
Using Base Pay .......................................................................................................................................................................... 949
43
Individual Compensation Plans
961
Overview of Individual Compensation .................................................................................................................................. 961
Plan Access Restrictions ........................................................................................................................................................... 961
Individual Compensation Plan and Option Visibility ......................................................................................................... 962
Spot Bonus and Stock Grant Plan Configuration ............................................................................................................... 963
Car Allowance Plan Configuration ......................................................................................................................................... 963
Charity or Savings Contribution Plan Configuration ......................................................................................................... 964
How You Let People Submit Personal Contributions When Earlier Contributions Are Pending Approval .............. 964
How You Let Managers Track Off-Cycle and On-Cycle Compensation Against a Budget ......................................... 965
FAQs .............................................................................................................................................................................................. 965
Using Individual Compensation ............................................................................................................................................. 965
44
Personal Contributions
969
Overview of Personal Compensation Information and Contribution Management ................................................... 969
View My Compensation Information .................................................................................................................................... 969

Oracle Fusion Cloud HCM
Using Common Features for HCM
45
Compensation History
971
Compensation History Categories .......................................................................................................................................... 971
How You Set Up the Other Compensation and Recurring Payments Summary Data for Compensation History ... 972
Manage Stock Grants in the Integrated Workbook ............................................................................................................ 972
Set Up Desktop Integration for Excel .................................................................................................................................... 973
Guidelines for Using Desktop Integrated Excel Workbooks ............................................................................................. 974
Troubleshoot Desktop Integration for Excel ........................................................................................................................ 975
FAQs .............................................................................................................................................................................................. 976
46
Other Setup and Maintenance Tasks
977
Set Up the Mapping Service for Contextual Addresses .................................................................................................... 977
Home Page Setup ...................................................................................................................................................................... 977
Set Privacy Statement URL ..................................................................................................................................................... 982
Set Up Sender Policy Framework (SPF) ................................................................................................................................ 983
Guidelines for Setting Up General Troubleshooting .......................................................................................................... 983
Set Up the Worklist Region on My Dashboard ................................................................................................................... 984
Deep Links ................................................................................................................................................................................... 985
47
Moving Common Reference Objects
987
Overview of Moving Common Reference Objects ............................................................................................................. 987
Business Objects for Moving Common Reference Objects .............................................................................................. 987
Guidelines for Moving Related Common Reference Objects ........................................................................................... 993
Guidelines for Moving Common Reference Objects Using the Seed Data Framework .............................................. 994

Oracle Fusion Cloud HCM
Using Common Features for HCM

Oracle Fusion Cloud HCM
Using Common Features for HCM
Get Help
Get Help
There are a number of ways to learn more about your product and interact with Oracle and other users.
Get Help in the Applications
Use help icons to access help in the application. If you don't see any help icons on your page, click your user image
or name in the global header and select Show Help Icons.
Get Support
You can get support at My Oracle Support. For accessible support, visit Oracle Accessibility Learning and Support.
Get Training
Increase your knowledge of Oracle Cloud by taking courses at Oracle University.
Join Our Community
Use Cloud Customer Connect to get information from industry experts at Oracle and in the partner community. You
can join forums to connect with other customers, post questions, suggest ideas for product enhancements, and watch
events.
Learn About Accessibility
For information about Oracle's commitment to accessibility, visit the Oracle Accessibility Program. Videos included in
this guide are provided as a media alternative for text-based topics also available in this guide.
Share Your Feedback
We welcome your feedback about Oracle Applications user assistance. If you need clarification, find an error, or just
want to tell us what you found helpful, we'd like to hear from you.
You can email your feedback to oracle_fusion_applications_help_ww_grp@oracle.com.
Thanks for helping us improve our user assistance!
i

Oracle Fusion Cloud HCM
Using Common Features for HCM
Get Help
ii

Oracle Fusion Cloud HCM
Using Common Features for HCM
Chapter 1
HCM Common Features Overview
1 HCM Common Features Overview
Overview of Using HCM Common Features
This guide is for anyone who's using HCM, which means you! Use it to learn how to do general tasks that apply to some
or all product families. If you're looking for product-specific information, refer to the product-specific guides.
Some setup tasks are common and available within multiple offerings. The Application Extensions and other functional
areas comprise these common setup and implementation tasks.
The following table lists the task lists within Workforce Deployment that are covered in other guides:
Task List Guide
Define Batch Data Loads
Define Extracts
Oracle Fusion Cloud HCM HCM Data Loading Business Objects
Note:
This guide also covers Oracle Taleo Recruiting Cloud Service Integration.
Oracle Fusion Cloud HCM HCM Extracts
Define Security for Human Capital
Management
Oracle Fusion Cloud HCM Securing HCM
Define Payroll
Define Payroll Legislations
Oracle Fusion Cloud Human Resources Implementing Global Payroll
Define Absences
Oracle Fusion Cloud Human Resources Implementing Absence Management
Define Transactional Business Intelligence
Configuration
Oracle Fusion Cloud HCM Administering Analytics and Reports for HCM
Introduction
Title Contents
HCM Common Features Overview
An introduction to the common features in HCM.
1

Oracle Fusion Cloud HCM
Using Common Features for HCM
Chapter 1
HCM Common Features Overview
Date Effectivity
Title Contents
Date Effectivity
Describes how date-effectivity is used in HCM transactions and you can correct date-effective objects.
Responsive User Experience
Title Contents
Responsive User Experience Setup
Using the HCM Design Studio and its components to tailor your user experience with responsive HCM
pages.
Oracle Search Cloud Service Setup Setup Oracle Search Global Search.
Geographies and Currencies
Title Contents
Geographies for HCM
Managing geography structures, hierarchies, and validation, setting up geocoding, and importing
geographies.
Currencies and Currency Rates
Managing currencies, conversion rate types, and daily rates.
Enterprise and Workforce Structures
Title Contents
Enterprise Structures
An overview of the enterprise structures, modeling an enterprise structure in Oracle Fusion.
Legal Entities, Business Units, and
Reference Data Sets
Managing reference data sets, legal jurisdictions and authorities, and legal entities for HCM.
Enterprise Structures Configurator (ESC) Using the ESC workbench to create and manage an enterprise structure.
Divisions, Departments, Worker Unions,
Locations, and Trees
Setting up divisions, disability organizations, cost centers, departments, locations, worker unions, and
trees.
Jobs and Positions
Defining jobs, positions, andsetting up position synchronization.
Grades, Grade Rates, and Grade Ladders Defining grades and grades ladders.
2

Oracle Fusion Cloud HCM
Using Common Features for HCM
Chapter 1
HCM Common Features Overview
Title Contents
Workforce Structures - Configuration
Options
Profile options, flexfields, and lookups related to workforce structures.
Workforce Profiles
Using Profile Management to define rating models, content types and content items, talent profiles,
content sections, and questionnaires.
Common Applications Configuration
Title Contents
Workflow Notifications and Approvals
Defining approvals for HCM, managing approval rules, and understanding approver types and
approval-rule attributes.
Application Toolkit Configuration
Configuring and securing HCM Cloud mobile features.
Help configuration
Understanding help features choices and help options, and creating help security groups.
Common Reference Objects
Defining application taxonomy and reference data sharing. Managing menu configurations, security
and audit policies, Oracle social network objects, and messages.
Enterprise Scheduler Job Definitions and
Job Sets
Managing scheduled processes, job definitions, and job sets
Audit Policies
Audit policies for HCM business objects.
Applications Core Configuration
Defining lookups, messages, document sequences, profile options, and attachments.
Trees Setup
Managing tree structures, tree labels, trees, and tree versions.
HCM Flexfields Setup
Configuring flexfields, managing and deploying flexfields, and managing value sets.
HCM Flexfields Maintenance
Managing descriptive flexfields, extensible flexfields, and key flexfields.
Common HCM Configuration
Title Contents
HCM Cloud Mobile App
Configure the HCM mobile application.
Alerts Composer Setting up alerts and notifications.
HCM Events Define HCM event conditions.
HR Help Desk Configuration Describes the tasks to set up and configure the HR Help Desk application.
3

Oracle Fusion Cloud HCM
Using Common Features for HCM
Chapter 1
HCM Common Features Overview
Title Contents
Eligibility Profiles
Defining derived factors, user-defined criteria, and eligibility profiles.
Predictive Models for HCM
Running predictive models for HCM, creating and editing predictive attributes, and removing
predictive models.
Payroll
Title Contents
Process Configuration
Defining sets of processing parameters, primarily related to logging and performance, for flows such as
a new hire flow, termination, or an extract or report.
Country Extensions and Address Rules
Defining the country extension, address style, and address validation settings for each country or
territory in the enterprise.
Elements, Balances, and Formulas Task
List
An overview of payroll relationships, the payroll employment model, payroll legislative groups, and
object groups.
Organization Payment Methods
Creating accounts, setting up payment methods, and creating third parties and third-party payment
methods.
Payroll Definitions
Creating and managing payroll definitions.
Payroll Elements
Maintaining elements and element eligibility, using element templates, and calculating gross earnings.
Fast Formulas
An overview of formulas, formula compilation errors and execution errors.
Rate Definitions
Creating and managing rate definitions.
Values Defined by Criteria
Managing and using values defined by criteria.
Compensation
Title Contents
Base Pay
Understanding salary basis and how it works with salary information.
Individual Compensation Plans
Defining individual compensation plans, understanding plan access and actions, and tracking
compensation against a budget.
4
Oracle Fusion Cloud HCM
Using Common Features for HCM
Chapter 1
HCM Common Features Overview
Title Contents
Compensation History
Understanding compensation history categories, configuring summary table, and managing stock
grants.
Others
Title Contents
Other Setup and Maintenance Task
An overview of transactional business intelligence configuration and contextual addresses.
Moving Common Reference Objects
Understanding creating configuration packages and moving common reference objects.
Diagnose and Synchronize Application Data
Sometimes, inconsistency errors might occur in the application data. To resolve these errors, you can run the Diagnose
and Synchronize Application Data scheduled process. Oracle Support might request you to run this process, or you can
proactively run the process as needed.
Using this process, you can do these tasks.
• Delete orphan rows in the base and translation tables
• Reconcile GUID and clear the data security cache
• Update the value set of empty flexfield segments
Run the Diagnose and Synchronize Application Data process from the Scheduled Processes work area.
• From the Operation Type list, select the task.
Note: Make sure to select an operation type, because if you leave it blank, the process might run into errors.
• From the Action Type list, select the required option. You can choose to just view any inconsistency errors, or
to view and fix the errors.
After the process is completed, you can check the log file of the process to see the details of any inconsistency errors.
Related Topics
•
Submit Scheduled Processes and Process Sets
5

Oracle Fusion Cloud HCM
Using Common Features for HCM
Chapter 1
HCM Common Features Overview
6
Oracle Fusion Cloud HCM
Using Common Features for HCM
Chapter 2
Date Effectivity
2 Date Effectivity
Date Effectivity
Date effectivity preserves a history of changes made to the attributes of some objects. As a Professional user, you can
retrieve and edit past and future versions of an object.
Many Human Capital Management (HCM) objects, including person names, assignments, benefits plans, grades, jobs,
locations, payrolls, and positions are date-effective.
Logical and Physical Records
Date-effective objects include one or more physical records. Each record has effective start and end dates. One record is
current and available to transactions. Others are past or take effect in the future. Together, these records constitute the
logical record or object instance. For a date-effective logical row, which is a collection on contiguous temporal physical
rows, each physical row CreatedBy (CREATED_BY) and CreationDate (CREATION_DATE) are the same.
This table shows changes to the department manager attribute in a department business object. Each row represents a
single physical record.
Physical Record Effective Start Date Effective End Date Department Manager
4
18 January, 2022
C. Woods
3
15 October, 2021
17 January, 2022
A. Chan
2
13 June, 2020
14 October, 2021
T. Romero
1
22 March, 2019
12 June, 2020
G. Martin
Note: The physical record number doesn't appear in the record.
Effective End Dates in Physical Records
Every physical record except the last has an effective end date. The update process adds this date, which is the day
before the effective start date of the next record, whenever you update the object.
Object End Dates
You can enter a final effective end date for some date-effective objects. For example, terminating an assignment adds
a final effective end date to the assignment. Alternatively, the End Date action may be available. If you end date a date-
effective object, then it isn't available to transactions after that date. But the object's history is retrievable.
7

Oracle Fusion Cloud HCM
Using Common Features for HCM
Chapter 2
Date Effectivity
Status Values in Date-Effective Objects
Some date-effective objects, such as grades and jobs, have both effective dates and status values. When the object
status is Inactive, the object isn't available to transactions, regardless of its effective dates. Setting the status to
Inactive makes objects unavailable to transactions. If you can't enter an effective end date for an object, then changing
its status has the same effect.
Future-Dated Changes
For date-effective objects, you can enter future changes. For example, you enter the worker promotion shown in this
table on 25 July, 2022 to take effect on 18 October, 2022.
Physical Record Effective Start Date Effective End Date Grade
2
18 October, 2022
IC2
1
14 December, 2020
17 October, 2022
IC1
Physical record two becomes current on 18 October, 2022. From 14 December, 2020 until 17 October, 2022 physical
record one is current and available to transactions. If you can access the object history, you can see physical record two
before it takes effect.
When future-dated changes exist, other actions may be limited. For example, to end this worker's assignment before
the promotion takes effect, you must first delete the promotion.
Date-Enabled Objects
Some objects, such as work relationships, are date-enabled rather than date-effective. They have start and end dates
that define when they're available, but they have no history of changes. New attribute values overwrite existing attribute
values.
Related Topics
•
Examples of Updating Date-Effective Objects
•
Examples of Correcting Date-Effective Objects
•
How You Make Multiple Updates to Date-Effective Objects in One Day
•
How You Delete Physical Records from Date-Effective Objects
Examples of Correcting Date-Effective Objects
You can correct most attributes of date-effective objects, regardless of whether they occur in current, past, or future
physical records.
If you correct the effective start date of an object's first physical record, then the revised date must be before the current
effective start date. For the second and subsequent records, the revised date must be between the record's current
effective start and end dates.
8

Oracle Fusion Cloud HCM
Using Common Features for HCM
Chapter 2
Date Effectivity
Correcting a Current Error
On 11 December, 2022 you create a location definition but enter the wrong phone. On 21 December, 2022, you search for
the definition and select the Correct action. Before correction, the object history is as shown in this table.
Physical Record Effective Start Date Effective End Date Location Phone
1
11 December, 2022
650.555.0175
After correction, the object history is as shown in this table.
Physical Record Effective Start Date Effective End Date Location Phone
1
11 December, 2022
650.555.0176
Because you corrected the object, no change history exists.
Correcting a Past Error
A worker's assignment history is as shown in this table.
Physical Record Effective Start Date Effective End Date Job Working at Home
4
20 October, 2022
Line Manager
No
3
18 August, 2022
19 October, 2022
Senior Administrator
No
2
10 May, 2022
17 August, 2022
Senior Administrator
Yes
1
25 July, 2021
9 May, 2022
Administrator
Yes
You learn that the worker's job was actually Project Leader from 10 May to 19 October, 2022. As this period spans
physical records 2 and 3, you must correct both.
To retrieve physical record 2, you set the effective as-of date in the person search to any date between 10 May and 17
August, 2022. You select the assignment from the search results and make the correction.
You then retrieve physical record 3 and make the same correction.
9

Oracle Fusion Cloud HCM
Using Common Features for HCM
Chapter 2
Date Effectivity
Examples of Updating Date-Effective Objects
When you update a date-effective object, you insert a physical record in the object's history. Typically, the inserted
record follows the current record and the effective start date is today. However, you can also enter future-dated changes
and update past records.
Entering Future-Dated Changes
The grade EC3 exists from 17 June, 2019. Its ceiling step changes from 1 January, 2023. On 30 November, 2022, you
change the grade's ceiling step and enter an effective start date of 1 January, 2023. This change creates a physical
record in the grade definition, as shown in this table.
Physical Record Effective Start Date Effective End Date Ceiling Step
2
1 January, 2023
4
1
17 June, 2019
31 December, 2022
3
From 1 January, 2023 physical record 2 is in effect. Until then, physical record 1 is in effect.
Applying Historical Updates to Later Records
Jennifer Watts has one assignment, as shown in this table.
Physical Record Effective Start Date Effective End Date Grade Location
2
18 September, 2022
A1
Area Office
1
10 April, 2022
17 September, 2022
A1
HQ
You promote Jennifer to grade A2 from 1 July, 2022. You update her assignment with an effective start date of 1 July,
2022 and enter grade A2. This update:
• Inserts a physical record between existing records 1 and 2
• Sets the effective end dates of physical record 1 to 30 June, 2022 and of the inserted record to 17 September,
2022
You also correct existing physical record 2 to change the grade from A1 to A2.
Jennifer's assignment history is now as shown in this table.
10

Oracle Fusion Cloud HCM
Using Common Features for HCM
Chapter 2
Date Effectivity
Physical Record Effective Start Date Effective End Date Grade Location
3
18 September, 2022
A2
Area Office
2
1 July, 2022
17 September, 2022
A2
HQ
1
10 April, 2022
30 June, 2022
A1
HQ
Examples of Effective Sequencing
Some date-effective objects, such as assignments, create a physical record for each update on one day. Physical
records with the same effective start date have effective sequence numbers. This topic provides examples of effective
sequencing in assignment histories.
Changing the Assignment Working Hours
You create an assignment for a worker. Later the same day, you update the assignment working hours. This change isn't
a correction, but an update. The assignment history is as shown in this table.
Physical Record Effective Sequence
Number
Effective Start Date Effective End Date Working Hours
2
2
28 Decmber, 2022
42
1
1
28 Decmber, 2022
40
Changing the Assignment Manager
You update a worker's assignment twice on 14 November, 2022. You change the:
1. Assignment manager from S. Taylor to J. Miles.
2. Assignment manager from J. Miles to M. Scott and the grade from C14 to C15.
Effective sequencing doesn't apply to assignment manager and work measures. Because effective sequencing applies
to grades but not assignment managers, the assignment history is as shown in this table after you make both updates.
Physical Record Effective Sequence
Number
Effective Start Date Effective End Date Grade Assignment Manager
3
2
14 November, 2022
C15
M. Scott
2
1
14 November, 2022
C14
M. Scott
1 1 30 December, 2021 13 November, 2022 C13 S. Taylor
11

Oracle Fusion Cloud HCM
Using Common Features for HCM
Chapter 2
Date Effectivity
Physical Record Effective Sequence
Number
Effective Start Date Effective End Date Grade Assignment Manager
Changes to assignment managers and work measures are corrections rather than updates. Only the last change made
on any day remains in the object history. The change of manager to M. Scott overwrites the first change from S. Taylor
to J. Miles.
How You Delete Physical Records from Date-Effective
Objects
The effect of deleting a physical record from a date-effective object depends on the record's position in the object's
history.
Consider the date-effective object, which has three physical records, shown in this table.
Physical Record Effective Start Date Effective End Date Attribute Value
3
15 August, 2022
C
2
30 October, 2021
14 August, 2022
B
1
10 June, 2020
29 October, 2021
A
Intermediate Records
If you delete physical record two, where the attribute value is B, then the object is as shown in this table after the
deletion.
Physical Record Effective Start Date Effective End Date Attribute Value
2
15 August, 2022
C
1
10 June, 2020
14 August, 2022
A
If physical records exist both before and after the deleted record, then the deletion adjusts the dates of the surrounding
records automatically. The effective end date of the previous record is now the day before the effective start date of this
record. This change closes the gap in the object's effective dates.
First or Only Records
In most cases, you can't delete the first or only physical record.
12

Oracle Fusion Cloud HCM
Using Common Features for HCM
Chapter 2
Date Effectivity
If you can delete the first physical record, then the object exists from the effective start date of the next physical record
(30 October, 2010 in this example). If only one physical record exists, then deleting that record is the same as deleting
the object.
Final Records
If you delete the final physical record, then the deletion removes the effective end date automatically from the previous
physical record (14 August, 2011, in this example).
How You Make Multiple Updates to Date-Effective
Objects in One Day
For most date-effective objects, only one physical record exists per day. Therefore, the object history shows only the
latest update to each attribute in any one day. For example, if you update a location phone three times in one day, then
only
For some objects, such as assignments, the update process creates a physical record for each update in a day.
Such objects include an effective sequence number in each physical record to show the update order. Changes are
cumulative, and the physical record with the highest effective sequence number is available to transactions for that
date.
For example, this table shows multiple updates to a person's assignment working hours and job on 14 October, 2020
and 30 April, 2022.
Physical Record Effective Sequence
Number
Effective Start Date Working Hours Job
6
2
30 April, 2022
40
Lead Technician
5
1
30 April, 2022
42.5
Lead Technician
4
3
14 October, 2020
42.5
Senior Technician
3
2
14 October, 2020
42.5
Technician
2
1
14 October, 2020
40
Technician
1
1
17 June, 2020
40
Junior Technician
Object Correction
Effective sequence numbers apply only when you update an object. If you correct an object, then the new value
overwrites the previous value. The correction process doesn't create a separate physical record for each change.
13

Oracle Fusion Cloud HCM
Using Common Features for HCM
Chapter 2
Date Effectivity
This table shows the person's assignment record when you correct rather than update the working hours and job
attributes multiple time in one day.
Physical Record Effective Start Date Working Hours Job
3
30 November, 2022
40
Lead Technician
2
14 October, 2020
42.5
Senior Technician
1
17 June, 2020
40
Junior Technician
FAQs for Date Effectivity
What's the difference between updating and correcting a date-
effective object?
When you update an object, you insert a physical record in the object's history. Typically, the inserted record follows the
current physical record, and the effective start date is today's date. However, you can edit the object history or create a
future-dated change by
When you correct a date-effective object, you edit the information in an existing physical record. You don't create a
physical record.
What's the effective as-of date?
A date value that filters search results. For any date-effective object that matches the other search criteria, the search
results include the physical record for the specified effective as-of date. The effective as-of date is one of the search
criteria. Therefore, objects with effective dates that
How can I see future-dated or past records for a date-effective
object?
When searching for a date-effective object, you can enter an effective as-of date. The search returns the physical record
from the object with an effective date range that includes the specified effective as-of date.
While viewing or editing an object, you can see its history, which includes all current, past, and future physical records.
You can select any of these records from the object history.
14

Oracle Fusion Cloud HCM
Using Common Features for HCM
Chapter 2
Date Effectivity
Can I delete a date-effective object?
In most cases, yes. If the Delete icon appears in the search results table when you search for the object, then you can
delete it. Deletion purges all of the object's physical records and isn't reversible.
After deletion, the object's history is no longer available.
Alternatively, enter an effective end date for the object or change its status to make it unavailable to transactions. With
these approaches, the object's history remains available.
What happens when I end date an object?
The date that you enter becomes the final effective end date for the object. If physical records exist for the object
beyond the effective end date, either they're deleted automatically or you delete them.
The object's history remains available. For example, the object may appear in search results if the search criteria include
an effective as-of date that's within the object's effective dates.
What's an effective sequence number?
A number that's added automatically to physical records with the same effective start date in a single date-effective
object, such as an assignment. The number differentiates the physical records and identifies the update order. The
physical record with the highest effective sequence number
15

Oracle Fusion Cloud HCM
Using Common Features for HCM
Chapter 2
Date Effectivity
16

Oracle Fusion Cloud HCM
Using Common Features for HCM
Chapter 3
Responsive User Experience Setup
3 Responsive User Experience Setup
HCM Experience Design Studio
You can do these actions in the HCM Experience Design Studio:
• Configure HCM actions
• Configure person spotlight
• Add background images for landing pages for redesigned HCM actions
Watch video
How to Configure HCM Actions
You can do these actions in the Transaction Design Studio:
• Create rules to configure pages to include sections and fields applicable to your business.
• Change the required status of optional attributes.
• Control the availability of the questionnaire page for actions that use the guided process design.
• Enable flexfields and the segments that you want to make visible.
You can specify these common criteria for a rule:
• Legal Employers: Select the legal employers covered by the rule.
• Business Unit: Select the business unit covered by the rule.
• Roles: Select the applicable roles. This is the role of the user that's performing the action.
You can hide unused or optional sections and fields on the redesigned actions and pages. For example, for the promote
action for the India legal employer, you can show the salary section if a worker's salary is adjusted during promotion.
You can choose to hide the position section and the position fields if you don't use position management.
You can create multiple rules for an action. The criteria help determine which rule applies to which employees. If an
employee meets multiple criteria for a page or action, then the rules are applied in the order displayed in the transaction
design studio. You can set a rule to be active or inactive. You can have only one active rule for any action at any time.
Note: You can configure the Convert Pending Worker flow using the Create Work Relationship action.
How is it Different from the Page Composer
The Transaction Design Studio doesn't replace the ADF Page Composer completely. It reduces the need to create EL
expression to vary pages for different roles or legal employers. You can use either of the tools depending on your
requirement. Use the ADF Page Composer advanced configuration options to configure changes not supported by the
Transaction Design Studio.
17

Oracle Fusion Cloud HCM
Using Common Features for HCM
Chapter 3
Responsive User Experience Setup
How to Configure the Person Spotlight
Watch video
You configure the person spotlight using the person spotlight page in the HCM Experience Design Studio. You can
change the sequence in which they appear on a person's spotlight. In addition, you can hide a tab completely or use an
EL expression to make the tab available to a select group of employees.
Transaction Design Studio
The Transaction Design Studio (TDS) is available within the HCM Experience Design Studio. The TDS enables you to
create rules to configure transactions and pages in the responsive user pages.
You can change how sections and fields are displayed, based on the user's role and the employee's business unit or
legal employer. You can do these actions in the TDS.
• Control the visibility of regions and sections on the page
• Control the visibility for attributes within a page, region, or a section
• Change the required status of optional attributes
• Control the availability of the questionnaire page for actions that use the guided process design
• Specify whether a user must visit a specific region for actions that use the guided process design
• Enable Save and Save and Close action buttons for actions where the feature is available
You can create one or more rules for any page available in the TDS to manage your business needs. For example:
• Make different fields visible and required in the new hire flow for employees in the US and employees in other
countries.
• If employees in the US don’t get salary increases as part of a promotion, hide the Salary and Compensation
regions for US employees only, while making these regions available for employees in other countries when
being promoted.
• Hide the Ethnicity and Religion fields from the Personal Details page for countries or legal employers that you
don’t want to store that information.
Use Transaction Design Studio to Configure Field
Displays
Use the Transaction Design Studio (TDS) to configure transactions and pages for responsive applications. TDS is
available within the HCM Experience Design Studio.
You can control the visibility of attributes that are displayed either as Delivered or Enabled, and the availability of fields
and sections of a transaction based on the user's role, person's business unit, or legal employer.
By default, the responsive pages display the often used attributes and hide the less often used attributes. Use Page
Composer to personalize the responsive pages and display the attributes and tabs delivered within the feature.
18

Oracle Fusion Cloud HCM
Using Common Features for HCM
Chapter 3
Responsive User Experience Setup
Here's how you start HCM Experience Design Studio:
1. Sign in to the application as Human Capital Management Application Administrator with Access HCM Page
Configurator (HRC_ACCESS_HCM_TRANSACTION_CONFIGURATOR_PRIV) privilege. This privilege provides
you access to TDS in HCM Experience Design Studio.
2. Enable a sandbox to compose data for configuring business objects. On the Home page, click the HCM
Experience Design Studio quick action under the My Client Groups tab.
3. Under Settings and Actions, click Edit Pages.
4. Select the site layer and click OK.
Related Topics
•
Overview of Page Modification
How You Configure Rules in the Transaction Design
Studio
Let’s look at how you configure a rule for responsive pages in the Transaction Design Studio (TDS).
To get started, select the action and enter these basic rule details:
• Name
• Description
• Parameters that determine when and for whom the rule is applied
Configuration Parameters
Parameters vary according to the selected action. You can set all, some, or none of the parameters. When evaluating the
rule at runtime, the application ignores the criteria for parameters that you haven't set. You can select multiple values
for some parameters. Here is a list of parameters that you can use to configure a rule.
• Role: User security roles assigned for performing the action or viewing the page. This LOV shows all delivered
and custom security roles.
• Legal Employer: Legal employers being acted on.
• Country: Used when the legal employer doesn’t fully support the requirement to create rules by country.
• Legislative Data Group: Used when the legal employer doesn’t fully support the requirement to create rules by
country.
• Business Unit: Used when the legal employer doesn’t fully support the requirement to create rules by country.
• Worker Type: Worker types being acted on such as contingent worker, employee, nonworker, offer, and
pending worker.
• When is the rule applied? View other’s info or Viewing own info is used when the page you're configuring is
available to both workers and other users, such as HR specialist.
• Action (HCM): Available for transactions that use actions such as Create and Edit Job Offers.
• Recruiting Type: Recruiting types of the job requisition or the job requisition related to the object being acted
on.
19

Oracle Fusion Cloud HCM
Using Common Features for HCM
Chapter 3
Responsive User Experience Setup
• Site Name: Name of the external candidate experience site that external candidates use to search and apply
jobs.
• Application Flow Name: Name of an application flow that is used for external candidate's job application,
requesting additional information or talent community sign-up.
• Performance Document: Name of the performance document as defined in the performance template.
Show or Hide Regions
This section applies to actions that include different sections. For example, Promote, Transfer, and Hire an Employee
actions use the guided process design, which includes various sections of specific information. The Show questionnaire
page field is set to Yes for actions that use the guided process. This allows users to mandate and show or hide the
regions that they want to manage during the transaction.
TDS configuration rules take precedence over any other setting. If you enable the profile option Questionnaire
Displayed in Guided Processes (HCM_TASK_CONFIGURATOR_RESPONSIVE_ENABLED) to show the questionnaire, it will
display in the transaction page. Later, if you create a rule to hide the questionnaire it will be hidden even if the profile
option is enabled. If you hide the questionnaire page, you navigate directly into the transaction details page to complete
the transaction.
This section is shown even for actions that don’t use the guided process design but have different sections of
information. You can rename a section, hide sections that aren’t delivered as required, and make optional sections
required.
Required Sections
You can improve the quality of your data by ensuring that your users complete the required fields before submitting the
transaction. For example, the Payroll Details and Salary sections are required in the Hire an Employee flow. When you
initiate the process, Payroll Details and Salary aren’t displayed as options on the questionnaire because they are already
part of the guided process. You need to complete these required sections before submitting the transaction. You can
change the severity of the message from a warning to an error for some actions, to ensure that the required information
is provided.
You set up required sections from the Reference Info Regions in the Page Attributes section in the TDS. Click the Show
error message for mandatory sections that haven’t been viewed option to show an error message when the required
sections aren’t visited. You can see a warning message if you configure sections as required in the TDS but don’t visit
the mandatory sections in employment flows.
Page Attributes
When an action or page includes regions, you select the region to see a list of available attributes on the Page by
Region. When attributes are read-only, there’s no option to change the required setting. You can’t add new attributes
to a page, but you can hide fields not delivered as required, make delivered optional fields as required, and enable
descriptive flexfields segments.
Flexfields
A flexfield attribute is identified by a pencil icon. A point to note is that when a flexfield is defined as a check box,
making the attribute mandatory will not force the user to select the check box. There’s always a value stored for each
state of the attribute, whether selected or not. To enable a flexfield that’s already been compiled, click the pencil
icon. For Employment or Contract pages, you can also decide which segments under a specific context are hidden or
displayed. This doesn’t apply for Person pages.
20

Oracle Fusion Cloud HCM
Using Common Features for HCM
Chapter 3
Responsive User Experience Setup
Create Rule to Configure Promote Action
In this example, you create a rule to configure the Promote action. You must hide the Compensation region in the
Promote flow for all UK legal employers. This rule is applicable for line manager performed promotions only.
Prerequisites
1. You must activate a sandbox before defining a rule.
2. Enable page-level configuration at the Site level.
Select the Action
1. On your Home page, select My Client Groups > Employment > HCM Experience Design Studio.
2. Select the Transaction Design Studio tab.
3. Select Promote from the Action list.
Add Rule
1. Click Add to add a new rule.
2. Enter these rule details:
Field Value
Name
UK Promotion
Description
Hide Compensation region for UK LE only
Legal Employers
Vision Corporation UK
Action
Promotion
Business Unit
Vision Operations
Worker Type
Employee, Contingent worker
Roles
Line Manager (ORA_PER_LINE_MANAGER_ABSTRACT)
Active
Yes
21

Oracle Fusion Cloud HCM
Using Common Features for HCM
Chapter 3
Responsive User Experience Setup
Configure Rule
1. In the Show or Hide Regions section, scroll down to the Compensation row and select Not visible.
2. Scroll down to the Page Attributes region and select Promotion from the Region list.
3. In the Grade attribute row, select Not visible from the list.
4. Click Save.
Displayed, Conditionally Displayed, and Hidden Fields in
Global Human Resources
Responsive user experience pages, by default display the frequently used fields and hide the less frequently used
fields. This topic helps you to identify which fields are displayed, conditionally displayed, or hidden in Global Human
Resources.
If there are hidden fields your company wants to display, you can personalize the responsive pages using Page
Composer. Visibility of fields displayed either as delivered or enabled using Page Composer can then be controlled using
the Transaction Design Studio. Use the Transaction Design Studio to control the availability of fields and sections of a
transaction for new redesigned transactions by legal employer and role.
Related Topics
•
Responsive User Experience- Global Human Resources - Displayed, Conditionally Displayed, and Hidden Fields
(Doc ID 2709404.1)
How You Personalize the Save and Save and Close
Actions in the Toolbar
You can personalize the toolbar to add the save actions in the toolbar. You can save your transaction at any point of
time.
For example, you’re adding a new contractor and you have already provided half of the required info. If you need to
switch to another task, you can save your work and resume later where you left off.
Here's a list of actions for which you can configure Save and Save and Close buttons.
• Add Assignment
• Add Contingent Worker
• Add Pending Worker
• Add a Nonworker
• Administer Compensation
• Change Assignment
• Change Location
• Change Manager
22

Oracle Fusion Cloud HCM
Using Common Features for HCM
Chapter 3
Responsive User Experience Setup
• Change Salary
• Change Working Hours
• Create Job
• Create Location
• Create Work Relationship
• Direct Reports
• Edit Pending Worker
• Eligible Jobs
• Employment Contracts
• Employment Start Dates
• Hire an Employee
• Individual Compensation
• Job Details
• Local and Global Transfer
• Location Details
• Manage Personal Contributions
• Position Details
• Promote
• Request a New Position
• Request a Position Change
• Resignation
• Salary History
• Termination
• Transfer
• Work Relationship
The Save and Save and Close buttons are hidden, out-of-the-box. You can enable these buttons from the Reference
Info Regions region in the Page Attributes section in the TDS.
A point to note is that rules are evaluated for each attribute for active rules in the TDS. If the same attribute is defined in
multiple rule definitions, only the first in order of active rule attribute conditions is applied.
For example, if you define 2 rules where rule 1 is a generic rule and states that the Save and Close is available
unconditionally, but not Save and a rule 2 where Save is available only for a specific legal employer. As a result, rule 1 is
evaluated as the first rule in order of active rules and so the Save button isn’t displayed for all legal employers selected
in rule 2.
Configuration Report
You can check the Configuration Report to understand why a page acts in a certain way. The report provides a
comprehensive list of configurations done in the TDS or Page Composer, or both, across various pages.
23

Oracle Fusion Cloud HCM
Using Common Features for HCM
Chapter 3
Responsive User Experience Setup
You access the View Configuration Report from the Transaction Design Studio home page. Select the action and then
the page that you want to analyze. Select All to analyze all pages of the selected action. You can access information on
which tool was used to show or hide the attributes on pages, either the TDS or Page Composer.
Properties
• Page
• Attribute
• Attribute ID
• Required Property Configured From: Tools from where the required property was configured: Values can be
Transaction Design Studio, Page Composer, or both.
• Rendered Property Configured From: Tools from where the rendered property was configured: Values can be
Transaction Design Studio, Page Composer, or both.
• Visible Property Configured From: Tools from where the visible property was configured: Values can be
Transaction Design Studio, Page Composer, or both.
The configuration report is useful in understanding if a field on a page is customized or not and the tool used to
customize a field. You can download and export the information in the configuration report into a .csv file. Oracle can
use this file for troubleshooting UI issues instead of the earlier method of downloading customizations from MDS and
providing sandbox details.
Guided Journeys in HCM Flows
You can provide guidance such as tutorials, company policies, and best practices, in the context of an HCM flow, using
guided journey tasks.
For example, tasks to help a line manager transfer an employee. You need to first configure a guided journey in
Checklist Templates, and then create a rule for the action in the TDS.
There are some of the best practices to follow when implementing guided journeys.
• A recommended best practice when creating multiple guided journeys and adding in TDS is to follow a naming
convention to help identify the guided journey. Something like this: actionName_ruleConfigParams_pageLevel
or actionName_ruleConfigParams_sectionName. For example, Transfer_Employee_Page or
Transfer_USManager_AssignmentDetails.
• It’s recommended to use only one guided journey per TDS action.
Related Topics
•
Overview of Guided Journeys
Deep Links
You can use deep links to provide easy navigation directly to a page in the HCM Cloud application.
24

Oracle Fusion Cloud HCM
Using Common Features for HCM
Chapter 3
Responsive User Experience Setup
You can also use deep links for mobile responsive pages on your intranet, custom and third-party applications, or in a
document. This helps people run transactions in the HCM cloud and provides quick access to their HR information.
To access deep links:
1. Open the main menu.
2. Go to Tools > Deep Links.
3. Copy the URL for a deep link.
4. Paste the URL in the appropriate location.
When you open Deep Links, you find a list of all available deep links.
Quick Actions
Quick actions are links on the Home page that enable you to initiate actions quickly on yourself, your team, or your
client groups. You can view the quick actions grouped under the following tabs:
• Me - This tab lists actions to manage your own information.
• My Team - This tab lists actions to manage your team.
• My Client Groups - This tab lists actions to manage people within your area of responsibility.
Click the Show More link to view all the available actions grouped under a specific head.
The set of actions that you see are displayed based on your security privileges. The people that you can act on differ
based on the tab you're on. Consider that you're both a line manager and an HR Specialist. You can access the Promote
action from both the tabs: My Team and My Client Groups. Also, you will see a different set of employees on each tab
whom you can promote. You can promote only your direct reports using the Promote task in the My Team tab. You can
promote only those employees that you have access to as an HR Specialist, using the Promote task in the My Client
Groups tab.
Related Topics
•
Configure Quick Actions
Search Logic Profile Options for Client List of Values in
Global Human Resources
You can use the logic CONTAINS to create the client list of values. This returns results containing the characters you
enter.
Optionally, for individual list of values, you can change this logic to STARTS WITH, to return results that start with the
search characters you enter.
For example, when you search for a person with the name John Smith while using the logic CONTAINS, you can search by
'jo' or 'sm' or 'th'. When you use the logic STARTS WITH, your search must start with 'j'.
Use the logic STARTS WITH when your list contains thousands of values (more than 15,000 records) to improve the search
performance. Or, if you don't partition your data by set ID.
25

Oracle Fusion Cloud HCM
Using Common Features for HCM
Chapter 3
Responsive User Experience Setup
Note: If you change the search logic for a client list of values, the logic changes in all pages where the list of values is
used.
You can use these profile options to change the search logic for a client LOV in Global Human Resources.
Object Profile Option Code
Address Attributes
PER_LOV_SEARCH_ADDRESSES_STARTSWITH (Site level value is delivered as Y)
Bargaining Unit
PER_LOV_SEARCH_BARGAININGUNITS_STARTSWITH
Business Unit
PER_LOV_SEARCH_BUSINESSUNITS_STARTSWITH
Collective Agreement
PER_LOV_SEARCH_COLLECTIVEAGREEMENTS_STARTSWITH
Country (including Phone Country Code)
PER_LOV_SEARCH_HCMCOUNTRIES_STARTSWITH
Department
PER_LOV_SEARCH_DEPARTMENTS_STARTSWITH
Department Trees PER_LOV_SEARCH_DEPARTMENTTREENODES_STARTSWITH
Document Type
PER_LOV_SEARCH_HRDOCUMENTTYPES_STARTSWITH
Cost Center
PER_LOV_SEARCH_HCM_COSTCENTER_STARTSWITH
Grade
PER_LOV_SEARCH_GRADES_STARTSWITH
Grade Ladder
PER_LOV_SEARCH_GRADELADDERS_STARTSWITH
HCM Trees PER_LOV_SEARCH_HCMTREES_STARTSWITH
Job
PER_LOV_SEARCH_JOBS_STARTSWITH
Job Families PER_LOV_SEARCH_JOBFAMILIES_STARTSWITH
Legal Employer
PER_LOV_SEARCH_LEGALEMPLOYERS_STARTSWITH
Location
PER_LOV_SEARCH_LOCATIONS_STARTSWITH
Organization Trees PER_LOV_SEARCH_ORGANIZATIONTREENODES_STARTSWITH
Person (Worker, Manager, Employee)
PER_LOV_SEARCH_WORKERS_STARTSWITH
Position
PER_LOV_SEARCH_POSITIONS_STARTSWITH
Position Trees PER_LOV_SEARCH_POSITIONTREENODES_STARTSWITH
26

Oracle Fusion Cloud HCM
Using Common Features for HCM
Chapter 3
Responsive User Experience Setup
Object Profile Option Code
Roles
PER_LOV_SEARCH_ROLES_STARTSWITH
Sets ORA_PER_LOV_SEARCH_HCM_SETS_STARTSWITH
Union
PER_LOV_SEARCH_UNIONS_STARTSWITH
User Accounts
PER_LOV_SEARCH_USERACCOUNTS_STARTSWITH
User Roles
PER_LOV_SEARCH_USERROLES_STARTSWITH
Related Topics
•
Set Profile Option Values
How You Configure List of Values (LOVs)
You can centrally configure list of values (LOV) used in HCM so that the same search and display fields appear on all
pages that use this LOV. You can independently configure the search and display fields.
The configuration controls what your users will see in results; display or search-and-display fields, and what fields user
will be able to search against - search-only or search-and-display fields. For example, if you configure Name, Work
Email, and Person Number as searchable fields for the Workers LOV, these fields will appear on all pages that have the
Workers LOV and you can use them in searching for values.
You can do these actions, based on the particular LOV capabilities and your requirements.
• Hide fields that aren't relevant for your organization
• Add more fields to enhance the search results and easily identify an individual record
• Reorder fields to reflect their relevance in your organization
You can configure these LOVs on the Search Configuration page in the HCM Experience Design Studio.
• Countries
• Departments
• Jobs
• Locations
• Phone Countries
• Positions
• Workers
These are some key points to note:
• If Oracle Search or database implementations of the same LOVs are available, then only the enabled one will be
listed.
27
Oracle Fusion Cloud HCM
Using Common Features for HCM
Chapter 3
Responsive User Experience Setup
• The LOV configuration is a replacement for any personalization implemented through Page Composer. Any
personalization done using Page Composer may be overwritten on upgrade. It's recommended to revert any
personalization and use the LOV Configuration instead.
• The user must have the Access HCM Page Configurator
(HRC_ACCESS_HCM_TRANSACTION_CONFIGURATOR_PRIV) privilege to your user to access the LOV
configuration UI.
LOV Configuration Options
You can configure these options on the individual LOV configuration pages.
Section What You Can Do
Search and Display Fields
• Choose the fields to display in the search results. Use the Add and Delete actions to add or
remove fields respectively.
• Choose the display order of the fields. Use the Up and Down arrow icons to reorder the list of
fields as required.
• Choose the searchable (Search and display option) or not-searchable fields (Display only option)
Search Only Fields
Choose the fields that you can use for search, but these fields may not appear in the search results. Use
Add and Delete actions to add or remove such fields respectively
Preview
Test your configuration
Flows That Display the Configured LOVs
Product LOV Flow
Global Human Resources
Countries
• Add a Contingent Worker
• Add a Nonworker
• Add a Pending Worker
• Add Document Record
• Contact Info
• Create Work Relationship
• Edit Document Record
• Edit Pending Worker
• Family and Emergency Contacts
• Hire an Employee
• Identification Info
• Local and Global Transfer
• Location Details
• Personal Details
28

Oracle Fusion Cloud HCM
Using Common Features for HCM
Chapter 3
Responsive User Experience Setup
Product LOV Flow
Global Human Resources
Departments
• Add Assignment
• Add a Contingent Worker
• Add a Nonworker
• Add a Pending Worker
• Change Assignment
• Create Work Relationship
• Edit Pending Worker
• Employment Details
• Hire an Employee
• Local and Global Transfer
• Manage Job Offers
• Mass Legal Employer Change
• Pending Workers
• Position Details
• Promote
• Request a New Position
• Request a Position Change
• Transfer
• Vacancy
Global Human Resources
Jobs
• Add Assignment
• Add a Contingent Worker
• Add a Nonworker
• Add a Pending Worker
• Change Assignment
• Create Work Relationship
• Edit Pending Worker
• Employment Details
• Hire an Employee
• Job Details
• Local and Global Transfer
• Manage Job Offers
• My Team
• Pending Workers
• Position Details
• Promote
• Request a New Position
• Request a Position Change
• Transfer
29

Oracle Fusion Cloud HCM
Using Common Features for HCM
Chapter 3
Responsive User Experience Setup
Product LOV Flow
• Vacancy
Global Human Resources
Locations
• Add Assignment
• Add a Contingent Worker
• Add a Nonworker
• Add a Pending Worker
• Change Assignment
• Change Location
• Create Work Relationship
• Edit Pending Worker
• Employment Details
• Hire an Employee
• Local and Global Transfer
• Location Details
• Manage Job Offers
• Mass Legal Employer Change
• Pending Workers
• Position Details
• Promote
• Request a New Position
• Request a Position Change
• Transfer
• Vacancy
Global Human Resources
Phone Countries
• Add a Contingent Worker
• Add a Nonworker
• Add a Pending Worker
• Contact Info
• Create Work Relationship
• Edit Pending Worker
• Family and Emergency Contacts
• Hire an Employee
• Local and Global Transfer
• Location Details
Global Human Resources
Positions
• Add Assignment
• Add a Contingent Worker
• Add a Nonworker
• Add a Pending Worker
• Change Assignment
30

Oracle Fusion Cloud HCM
Using Common Features for HCM
Chapter 3
Responsive User Experience Setup
Product LOV Flow
• Create Work Relationship
• Edit Pending Worker
• Employment Details
• Hire an Employee
• Local and Global Transfer
• Manage Job Offers
• My Team
• Position Details
• Promote
• Request a New Position
• Request a Position Change
• Transfer
• Vacancy
Global Human Resources
Workers
• Add a Contingent Worker
• Add a Nonworker
• Add a Pending Worker
• Add Assignment
• Change Assignment
• Change Location
• Create Work Relationship
• Edit Pending Worker
• Employment Details
• Hire an Employee
• Local and Global Transfer
• Location Details
• Mass Download of Document Records
Mass Legal Employer Change
• Position Details
Promote
• Request a New Position
• Request a Position Change
• Responsive Quick Action Person Search
• Share Info (Grantee)
• Termination
• Transfer
Talent Management
• Career Development
• Goal Management
31

Oracle Fusion Cloud HCM
Using Common Features for HCM
Chapter 3
Responsive User Experience Setup
Product LOV Flow
• Performance Management
• Profile Management
• Requested Feedback
• Succession Management
• Talent Review
Workers LOV
You need to enter a search term to display the search results. No workers are displayed when you don't enter any search
terms in the LOV. This is to prevent showing random workers initially, even before you search for a worker as most times
randomly listed people may not be the people that you're searching. This helps in improving both, user experience and
performance.
You can't search by business title; it's disabled by default. You can enable it on the Manage Administrator Profile
Values page by setting the PER_LOV_SEARCH_WORKERS_EXCLUDE_BUSINESS_TITLE profile option to N. You need
to then change the property of the Business Title field from Display only to Search and display in the Search and
Display Fields section.
Note: The Workers LOV attributes vary depending on whether Oracle Search is enabled for people.
FAQs for Responsive User Experience Setup
Why can't I see some quick actions on landing pages after an
upgrade?
These responsive landing pages are redesigned:
• Absences
• Career Development
• Compensation
• Data Exchange
• Goals
• Mass Updates
• New Person
• Performance
• Profiles
• Workforce Structures
32

Oracle Fusion Cloud HCM
Using Common Features for HCM
Chapter 3
Responsive User Experience Setup
Quick action tasks available on the My Client Groups tab are also available from the new landing pages as well. If you
don't see a task in the list of quick actions, you won't see it on the landing page and vice-versa. You need to enable the
quick actions to see these tasks in the landing pages. Here are the steps to enable the quick actions.
1. Navigate to Configuration > Sandboxes.
2. Click Create Sandbox.
3. Enter a name and description for the sandbox.
4. Add Structure and any other tools you require.
5. Click Create and Enter.
6. Navigate to Configuration > Structure.
7. Click My Client Groups and then click the Quick Actions tab.
8. Select the quick action you want to configure.
9. Change the Visible or other settings as needed.
10. Click Save and Close.
Does the Transaction Design Studio replace the Page Composer?
No. The Transaction Design Studio doesn't replace the Page Composer completely but reduces the need to create EL
(Expression Language) expression to vary pages for different roles or legal employers. You can use either of the tools
depending on your requirement.
Why isn't the Create Primary Work Relationship field visible for a
global transfer even though it's set to Visible in the Transaction
Design Studio?
When you set the Create Primary Work Relationship field in the Local and Global Transfer flow to Visible, this is what
happens:
• The field is visible when you create a global temporary assignment by selecting the transfer type as Temporary
in the Local and Global Transfer flow.
• The field isn't visible when you do a global transfer by selecting the transfer type as Permanent in the Local
and Global Transfer flow. This is because the work relationship is set to Primary by default in a global transfer.
There's no choice of whether to create a primary work relationship or not.
Why can't I see the roles I selected earlier in a rule for the
Additional Person Info action in the Transaction Design Studio?
In cases where you can select multiple roles for a rule in the Transaction Design Studio, the roles have to belong to any
of these categories to be visible in the Roles menu.
• HCM_Job
• HCM_Abstract
• HCM_Data
33

Oracle Fusion Cloud HCM
Using Common Features for HCM
Chapter 3
Responsive User Experience Setup
If the role belongs to any other category, then the role won't be visible in the Transaction Design Studio.
Related Topics
•
Role Types
Why can't I see the direct reports action and action reason fields
in the When and Why section of the Resignation flow even though
they're enabled in the Transaction Design Studio?
You can't see the action and action reason fields for the direct reports in the Resignation page because the person
resigning can't reassign their own direct reports. The fields are visible to the approver of the resignation when the
resignation transaction goes for approval.
What's the difference between Autocomplete Rules and
Transaction Design Studio
The Transaction Design Studio enables you to configure the display of fields and sections in the responsive pages based
on a fixed set of parameters. Autocomplete Rules is a data model layer-driven application that enables you to default
values or validate fields irrespective of whether the fields actually appear in the user interface or not.
Watch video
Though there are many differences between the Transaction Design Studio and Autocomplete Rules, there is one
overlapping functional feature. Transaction Design Studio enables you to specify if a field is required unconditionally
or conditionally based on parameters such as business unit, legal entity, and so on. However, Autocomplete Rules can’t
determine when to show or hide a field like the Transaction Design Studio, it can simulate the field requirement by
enforcing a validation rule with an error message.
This table summarizes the differences between Autocomplete Rules and the Transaction Design Studio.
Autocomplete Rules Transaction Design Studio
Autocomplete Rules is a data model-
driven application.
Transaction Design Studio is based on the UI components.
Autocomplete rules are written based on
the underlying business object
Transaction Design Studio is used to configure fields and sections based on an action.
A single rule applies for all actions that
use that business object. For example, the
When and Why business object applies to
Transfer, Hire, Promote, and so on.
You can write a rule only for one action at a time.
There are over a hundred different criteria
that you can define in a rule.
There are about 8-10 predefined criteria that apply for each action.
34
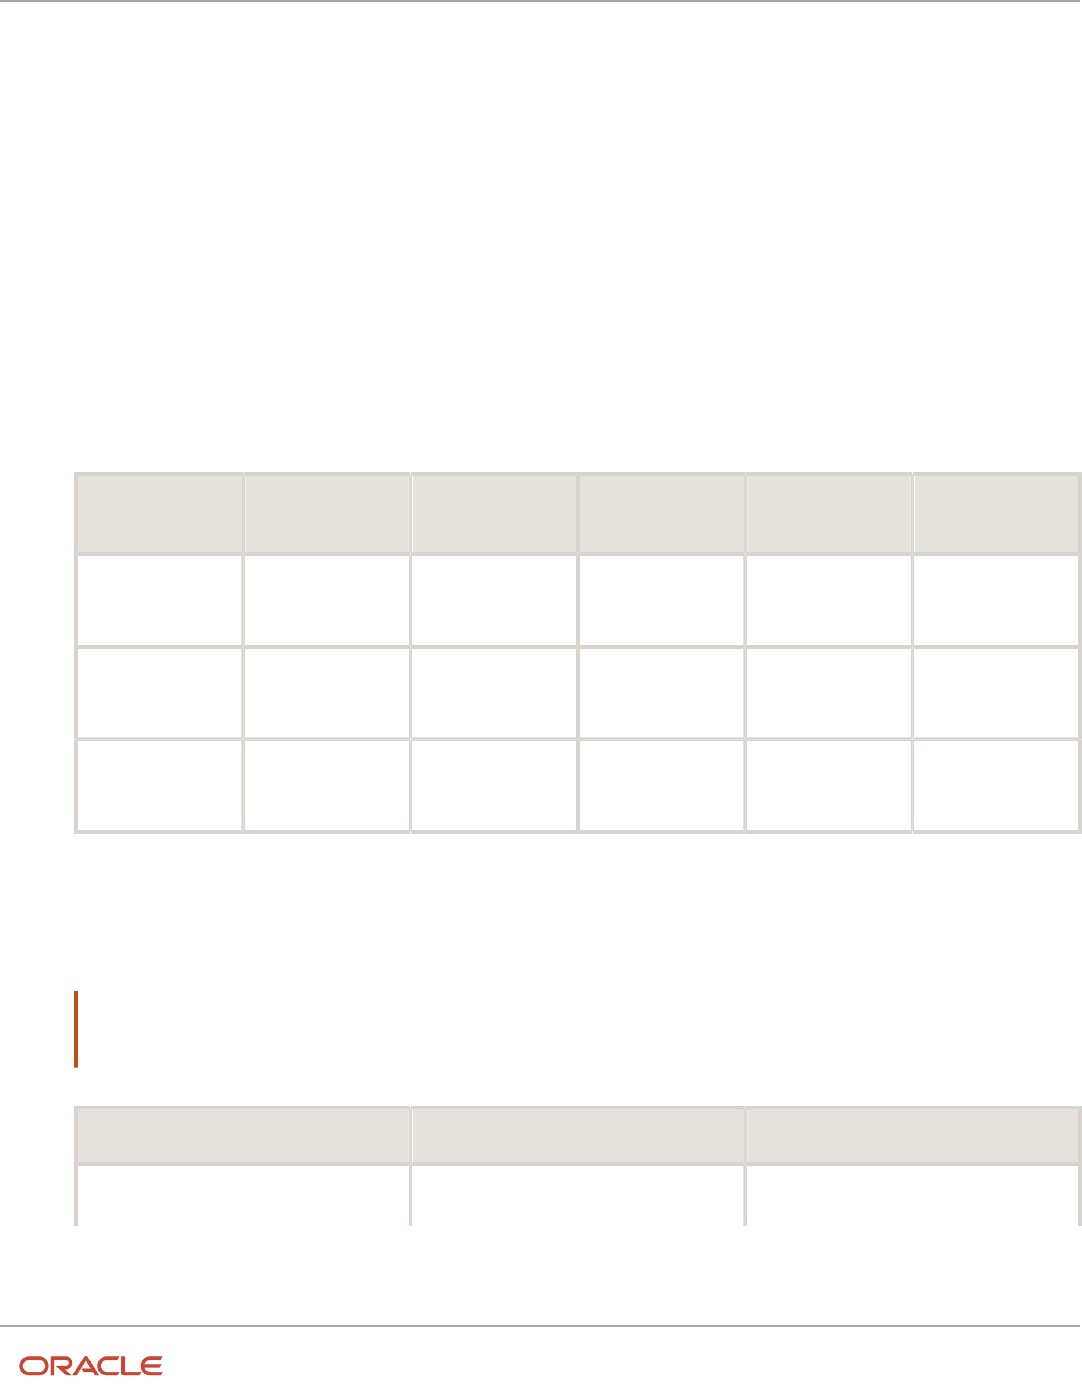
Oracle Fusion Cloud HCM
Using Common Features for HCM
Chapter 4
Oracle Search Cloud Service Setup
4 Oracle Search Cloud Service Setup
Set Up Oracle Search for HCM
You need to configure profile options and run the initial data ingestion process to set up Oracle Search index, which is
the foundation of Oracle Search based Global Search.
Set Oracle Search Profile Options
1. Navigate to Home > Setup and Maintenance > Manage Administrator Profile Values.
2. Search for and review the following profile options. Set the values with the corresponding level if not set
already.
Profile Option Code Profile Display
Name
Application Module Profile Level Profile Value
ORA_FND_SEARCH_
EXT_ENABLED
Enable/Disable
Search Ext
Framework
Oracle Middleware
Extensions for
Applications
Oracle Middleware
Extensions for
Applications
Site Yes
HRC_ELASTIC_
SEARCH_ENABLED
HRC: Enable Elastic
Search
HCM Common
Architecture
Search Framework
Site Y
PER_SEARCH_
LOGIN_EVENT_PUB
PER: User Login
Event Publication for
Search
Global Human
Resources
Security Site ATOM
Run Initial Data Ingestion
1. Navigate to Tools > Scheduled Processes.
2. Run the ESS job described in this table.
Note: If you need to set up the index for a feature, select the relevant parameter value. For example, fa-hcm-
person for person search or fa-hcm-position for positions search. If you’re setting up multiple indices, then
you need to run multiple processes with different index name parameters.
Job Name Parameter Name Parameter Value
ESS job to create index definition and
perform initial ingest to OSCS
Index Name to Reingest <index_name>
35

Oracle Fusion Cloud HCM
Using Common Features for HCM
Chapter 4
Oracle Search Cloud Service Setup
Job Name Parameter Name Parameter Value
For example: fa-hcm-person
This process is secured with FND_MANAGE_SCHEDULED_JOB_DEFINITION_PRIV function
privilege. The privilege is available in the ORA_FND_APPLICATION_ADMINISTRATOR_JOB or
ORA_FND_APPLICATION_DEVELOPER_JOB job roles.
Refresh Indexes after Upgrade
You must run the initial data ingestion process for every created index after upgrading to a new release.
Refresh Indexes after P2T
You must run the initial data ingestion process for every created index after P2T (production-to-test) process.
Related Topics
•
Enable Global Search
•
Set Up Connections
Set Up Oracle Search for List of Values
You can set up Oracle Search for these List Of Values (LOVs).
• Workers
• Positions
• Departments
• Locations
• Jobs
Oracle Search for Workers List Of Values
Here are the steps to enable Oracle Search for workers list of values:
1. Create the person index, fa-hcm-person and set up Oracle Search. For details, see Set Up Oracle Search for
HCM.
2. Set up data security for Oracle Search. For details, see Set Up Data Security for Oracle Search.
36

Oracle Fusion Cloud HCM
Using Common Features for HCM
Chapter 4
Oracle Search Cloud Service Setup
3. Enable Oracle Search for workers LOV:
a. Navigate to Home > Setup and Maintenance > Manage Administrator Profile Values.
b. Search and set these profile options.
Profile Option
Code
Profile Display
Name
Application Module Profile Level Profile Value
ORA_PER_
ORACLE_SEARCH_
WORKERSLOV_
ENABLED
Enable Oracle
Search Workers Lov
Global Human
Resources
Personal
Information
Site Yes
4. Optionally, use the HCM Experience Design Studio to configure other properties and customize your LOV. You
can independently configure the search and display fields. For details, see How You Configure List of Values
(LOVs).
Note: Oracle Search based public person search doesn’t implement the public person security profile, it
always returns all results. Private Person security profile is fully implemented with Oracle Search.
Oracle Search for Positions List of Values
Here are the steps to enable Oracle Search for positions list of values:
1. Create the position index, fa-hcm-position and set up Oracle Search. For details, see Set Up Oracle Search for
HCM.
2. Set up data security for Oracle Search. For details, see Set Up Data Security for Oracle Search.
3. Enable Oracle Search for positions LOV using these steps:
a. Navigate to Home > Setup and Maintenance > Manage Administrator Profile Values.
b. Search and set these profile options.
Profile Option
Code
Profile Display
Name
Application Module Profile Level Profile Value
ORA_PER_
ORACLE_SEARCH_
POSITIONSLOV_
ENABLED
Enable Oracle
Search for Positions
Lov
Global Human
Resources
Personal
Information
Site Yes
4. Optionally, use the HCM Experience Design Studio to configure other properties and customize your LOV. You
can independently configure the search and display fields. For details, see How You Configure List of Values
(LOVs).
Oracle Search for Departments List of Values
Here are the steps to enable Oracle Search for departments list of values:
1. Create the departments index, fa-hcm-organization and set up Oracle Search. For details, see Set Up Oracle
Search for HCM.
2. Set up data security for Oracle Search. For details, see Set Up Data Security for Oracle Search.
3. Enable Oracle Search for departments LOV using these steps:
37

Oracle Fusion Cloud HCM
Using Common Features for HCM
Chapter 4
Oracle Search Cloud Service Setup
a. Navigate to Home > Setup and Maintenance > Manage Administrator Profile Values.
b. Search and set these profile options.
Profile Option
Code
Profile Display
Name
Application Module Profile Level Profile Value
ORA_PER_
ORACLE_SEARCH_
DEPARTMENTSLOV_
ENABLED
Enable Oracle
Search for
Departments Lov
Global Human
Resources
Personal
Information
Site Yes
4. Optionally, use the HCM Experience Design Studio to configure other properties and customize your LOV. You
can independently configure the search and display fields. For details, see How You Configure List of Values
(LOVs).
Oracle Search for Locations List of Values
1. Create the locations index, fa-hcm-location and set up Oracle Search. For details, see Set Up Oracle Search for
HCM.
2. Set up data security for Oracle Search. For details, see Set Up Data Security for Oracle Search.
3. Enable Oracle Search for locations LOV using these steps:
a. Navigate to Home > Setup and Maintenance > Manage Administrator Profile Values.
b. Search and set these profile options.
Profile Option
Code
Profile Display
Name
Application Module Profile Level Profile Value
ORA_PER_
ORACLE_SEARCH_
LOCATIONSLOV_
ENABLED
Enable Oracle
Search for
Locations Lov
Global Human
Resources
Personal
Information
Site Yes
4. Optionally, use the HCM Experience Design Studio to configure other properties and customize your LOV. You
can independently configure the search and display fields. For details, see How You Configure List of Values
(LOVs).
Oracle Search for Jobs List of Values
1. Create the jobs index, fa-hcm-job and set up Oracle Search. For details, see Set Up Oracle Search for HCM.
2. Set up data security for Oracle Search. For details, see Set Up Data Security for Oracle Search.
38

Oracle Fusion Cloud HCM
Using Common Features for HCM
Chapter 4
Oracle Search Cloud Service Setup
3. Enable Oracle Search for jobs LOV using these steps:
a. Navigate to Home > Setup and Maintenance > Manage Administrator Profile Values.
b. Search and set these profile options.
Profile Option
Code
Profile Display
Name
Application Module Profile Level Profile Value
ORA_PER_
ORACLE_SEARCH_
JOBSLOV_
ENABLED
Enable Oracle
Search for Jobs Lov
Global Human
Resources
Personal
Information
Site Yes
4. Optionally, use the HCM Experience Design Studio to configure other properties and customize your LOV. You
can independently configure the search and display fields. For details, see How You Configure List of Values
(LOVs).
Set Up Data Security for Oracle Search
Set up Oracle Search data security with dynamically computed access control lists (ACLs).
Set Logging Profile Options
You need to run ACL processes with some minimum logging capabilities. Set these profile options:
1. Navigate to Home > Setup and Maintenance > Manage Administrator Profile Values.
2. Search and set these profile options.
Profile Option Code Profile Display
Name
Application Module Profile Level Profile Value
AFLOG_ENABLED FND: Log Enabled Oracle Middleware
Extensions for
Applications
Application Logging Site or User level for
the user running
ACL processes
Yes
AFLOG_LEVEL FND: Log Level HCM Common
Architecture
Application Logging Site or User level for
the user running
ACL processes
Severe
AFLOG_MODULE FND: Log Module
Filter
Global Human
Resources
Application Logging Site or User level for
the user running
ACL processes
%
Initiate ACL Ingestion
Run a process to erase any existing existing ACL index, create the required ACL index, and populate it with access
control lists for all users.
1. Navigate to Tools > Scheduled Processes.
39

Oracle Fusion Cloud HCM
Using Common Features for HCM
Chapter 4
Oracle Search Cloud Service Setup
2. Run the process that's described in this table.
Job Name Description
HCM Access Control List Initial
Ingestion
Creates HCM access control list and performs the initial ingestion.
Schedule ACL Processes
Schedule these ACL processes, if they're not yet scheduled.
1. Navigate to Tools > Scheduled Processes.
2. Schedule these processes.
Job Name Frequency
Compute Users ACL by Event Every 15-60 minutes
Job Name Parameter Name Parameter Value Frequency
Compute Users ACL User Population Logged in users Every 30-120 minutes
Action ComputeCompute Users with Large ACL
User Population All users with Large ACL
Daily
Enable Global Search
You need to configure the Global Search profile option and review the configuration for HCM to enable Global Search.
After that, you need to create the person index.
1. Create Person Index
This feature requires an Oracle search index. Ensure that the required index, fa-hcm-person is created and data is
ingested. Follow the steps listed in Set Up Oracle Search for HCM
Note: Oracle Search based public person search doesn’t implement the public person security profile, it always
returns all results. Private Person security profile is fully implemented with Oracle Search.
2. Set Global Search Profile Option
1. Navigate to Home > Setup and Maintenance > Manage Global Search Profile Options.
40

Oracle Fusion Cloud HCM
Using Common Features for HCM
Chapter 4
Oracle Search Cloud Service Setup
2. Search and set this profile option.
Profile Option Code Profile Display
Name
Application Module Profile Level Profile Value
FUSION_APPS_
SEARCH_ENABLED
Global Search
Enabled
Oracle Middleware
Extensions for
Applications
Oracle Middleware
Extensions for
Applications
Site Yes
3. Review Global Search Configuration for HCM
1. Navigate to Home > Setup and Maintenance > Manage Global Search Configurations.
2. Ensure that Global Search is configured and enabled for HCM.
3. Ensure that the following Suggestion Group is enabled in the Global Search Configuration for HCM.
Short Name Display Name Description
HCM_PERSON_SEARCH Oracle HCM Cloud Global Search for Person
Action
This is the Global Search for HCM Person.
Using Oracle Search Cloud Service Features
Global Search
Use Oracle Search-based Global Search to quickly find all active employees, contingent workers, and nonworkers as of
today’s date.
Global search involves a complete search of people and displays matching results irrespective of the public person
security profile of the logged in user. Oracle Search-based global search provides a faster search experience. Here’s a list
of the new person search capabilities.
• Improved relevancy of results - Only the relevant person records are displayed so you don't have to scan
through multiple records to find the one you were searching for.
• Fuzzy person name search - Search allows for simple mistakes and typos up to two spelling differences.
• Name synonyms search - Synonyms are defined for many English sounding names. You can search by
different forms of the name. For example, when you are searching for ‘Bill’, people named ‘William’ will also be
displayed in the results.
• Field Weight - Primary search is by person name and person name matches are of highest relevancy.
• Ability to search by other person attributes - Although person name search is of highest relevancy, you can
also search using these person attributes - person display name, person number, work email address, and
business title.
• Improved search results - Search results display direct reports at the top followed by others.
41

Oracle Fusion Cloud HCM
Using Common Features for HCM
Chapter 4
Oracle Search Cloud Service Setup
42

Oracle Fusion Cloud HCM
Using Common Features for HCM
Chapter 5
Filtered Lists
5 Filtered Lists
Overview of Filtered Lists
Filtered Lists are lists created with custom-defined criteria containing attributes, operators, and other filters. You
associate a list with a business object, a subscriber, and conditions that form your criteria of the list. You can run lists
within a business process to easily identify the object records that qualify your criteria and use the lists for specific tasks.
Filtered Lists are dynamic in nature and the list results are based on current data. For example, if you create a list of
workers with criteria to return information about contingent workers, the results of the list now can be different from the
results of the list a month later. This is because the number of contingent workers might be different a month later.
You can create and access lists from the My Client Groups tab, Data Exchange work area, Filtered Lists quick action.
Related Topics
•
Create a Predefined Audience Using Filtered Lists
•
Suggested Skills to Set as Oracle Learning Related and Outcome Skills and Qualifications
•
Mass Download Document Records
Enable Filtered Lists
To enable Filtered Lists, you need to set up Oracle Search with specific indexes existing for all objects. For details, see
Set Up Oracle Search for HCM.
To manage lists, you need the HRC_MANAGE_HCM_LISTS_PRIV functional privilege.
To create system lists that are available across the organization, you need the
HRC_MANAGE_HCM_SYSTEM_LISTS_PRIV functional privilege.
Create Filtered Lists
After you enable Filtered Lists for your application, here’s how you can create a list:
1. On the home page, click the My Client Groups tab.
2. Search for and click the Filtered Lists quick action.
3. On the Filtered Lists page, click Add.
4. On the New List page, enter these details:
◦
Name: A name for the list.
◦
Object: Select the category of elements that the list returns. For example, Workers or Learning Items.
43

Oracle Fusion Cloud HCM
Using Common Features for HCM
Chapter 5
Filtered Lists
◦
Subscriber: Select the application that the list is used in. For example, use a list to return learning items
within the Skills Advisor application. You can create multiple lists with the same subscriber.
◦
Conditions: Define the criteria that the list uses to return results. You can build a list that uses a criteria
set with multiple conditions and operators to suit your business needs.
Examples of Filtered Lists
You need to send a monthly newsletter to the top workforce. Here’s a sample list:
• Filtered List Object: Worker
• Subscriber: HCM Communicate
• Criteria: GradeCode = IC5, IC6, IC7
You want a list of all the contingent workers from the Finance department. Here’s a sample list:
• Filtered List Object: Worker
• Subscriber: Mass Download DoR
• Criteria:
◦
Worker Type = Contingent Worker
◦
Department = Finance
44

Oracle Fusion Cloud HCM
Using Common Features for HCM
Chapter 6
Geographies for HCM
6 Geographies for HCM
Overview of Geographies
Overview of Geographies, Geographic Entities, and Locations
Geography is a physical space on Earth, such as a location or region, that's defined by a boundary. For example, it
maybe existing geopolitical locations such as San Jose or Peru.
These geographical locations are used in applications to manage business requirements such as sales territories,
transportation deliveries, taxation, logistics, and so on.
Geography Type
A divisional grouping of geographies is named as Geography Types. It could be a geopolitical division such as Country,
First Order Administrative Divisions (example: State, Province, District, and so on), City, Town, Village, or Non-
Administrative Divisions (example: Southwest China, Northern California, and so on) or physical geographic divisions
such as Island, Continent, Mountain, and so on.
Geography Use
Specifying the purpose and use of these geographies is known as Geography Use. Data could be classified for use by
processes such as Taxation, Sales, Transportation, Marketing and so on.
Master Reference Geography Use
Master Reference Geography Use is data that's classified as being the source of truth. This data is used as a reference
for creating User-defined Geography Uses and as the source when working with geographical data such as validating
addresses or importing data. This data can be obtained from a third party or manually entered. It is defined by widely
recognized administrative or political boundaries such as States, Provinces, Counties, Cities, and so on.
Master Reference Geographies
Master Reference Geographies are geographical boundary names and physical boundaries that are classified as being
part of the Master Reference Geography Use. Examples include the State of California, the Province of Alberta, The
Country of India, and so on.
Master Reference Geography Type
Master Reference Geography Type is a layer of Master Reference Geographies. Examples of Master Reference
Geography Types would include States, Cities, Provinces, Countries, and so on.
How Geography Structure, Hierarchy, and Validation Fit Together
This topic presents the components of geographies.
45

Oracle Fusion Cloud HCM
Using Common Features for HCM
Chapter 6
Geographies for HCM
The following three components are dependent on each other when defining a country:
1. Geography structure
2. Geography hierarchy
3. Geography validation
Every country must have the geography structure defined first before the hierarchy can be defined, and the geography
hierarchy has to be defined before the validation can be defined.
Geography Structures
The first step for defining a country is to create a geography structure in which geography types are part of the country
structure, and then define how the geography types are hierarchically related within the country structure. For example,
you can create geography types called State, City, and Postal Code. Then you can rank the State geography type as the
highest level within the country, the City as the second level, and the Postal Code as the lowest level within the country
structure. Geography structure can be defined using the Manage Geographies task, or can be imported using tasks in
the Define Geographies activity.
Note: During import of geography data from any provider if one or more geography levels aren’t available, n/a
is substituted for those geography levels. For example, the list of values in the address UIs of accounts, contacts,
suppliers, persons, and so on are displayed as n/a for such geography levels.
A geography structure is a hierarchical grouping of geography types for a country. The following table describes the
geography structure for the United States.
Level Geography Type
1
State
2
County
3
City
4
Postal Code
You can use the geography structure to relate geography types for a country and define geography types for a country.
Relate Geography Types for a Country
You can determine how a country's geographies are hierarchically related by creating the hierarchy of the geography
types in the geography structure. When you define a country's structure, the geography type Country is implicitly at the
highest level of the geography structure with level as 1. The subsequent geography types that you add after country are
numbered in sequence.
You must add a geography type as a level in the country structure before you can define a geography for that geography
type in a country. For example, before defining the state of California, the State geography type must be added to the
46

Oracle Fusion Cloud HCM
Using Common Features for HCM
Chapter 6
Geographies for HCM
United States country structure. To quickly create country structure, you can copy a structure from another country and
modify the geography types for the country.
Define Geography Types for a Country
You can use any of the master reference geography types to create your geography structure. If required, you can create
a geography type, before adding it to the country structure. Each geography type is added at a lower level to the current
lowest level.
Note: You can't delete geography types that have associated geography data. You can only delete the lowest level
geography type of the country structure.
You can use a geography type that you create within the country structure for other country structures as well.
Geography Hierarchy
Once the geography structure is defined, the geographies for each geography type can be added to the hierarchy. For
example, in the hierarchy of United States you can create a geography called California using a State geography type.
As part of managing the geography hierarchy you can view, create, edit, and delete the geographies for each geography
type in the country structure. You can also add a primary and alternate name and code for each geography. A
geography hierarchy can be created using the Manage Geographies task, or can be imported using tasks in the Define
Geographies activity.
Geography hierarchy is a data model that creates conceptual parent-child relationships between geographies.
The application uses geography hierarchy information to facilitate business processes that rely on geography
information, such as, tax calculation, order sourcing rules, and sales territory definition. The geography hierarchy
information is centrally located and shared among other application offerings.
The geography hierarchy includes geography, geography type, geography usage, master reference geography hierarchy
and user defined zones.
If you delete a geography level, all the children in that geography hierarchy are also deleted. For example, under a state
you have defined zones using a range of postal codes. Later, you delete the state because you no longer support that
state in your business. All the zones defined within that state are also deleted.
How do I manage geography validation?
After defining the geography hierarchy, you need to specify the structure for the country.
You can choose which address style format you would like to use for the country, and for each selected address style
format you can map geography types to address attributes. You can also select which geography types to include in
address validation or tax validation, and which geography types will display in a list of values during address entry in
other user interfaces. The geography validation level for the country, such as error or warning, can also be selected.
Geography validation determines the geography mapping and validation for a country's address styles, and the overall
address validation control for a country.
47

Oracle Fusion Cloud HCM
Using Common Features for HCM
Chapter 6
Geographies for HCM
The No Styles Format address style format is the default address style format for a country. By defining the mapping
and validation for this format you will ensure that validations can be performed for any address in the country. After the
No Styles Format is defined you can set up additional mapping for specific address styles.
For each address style format, you can define the following:
• Map to attribute
• Enable list of values
• Tax validation
• Address validation
• Address validation control
Attribute Mapping
For every address style format, you can map each geography type to an address attribute. For example, you can
map the State geography type to the State address attribute for the United States, or map the State geography type
to the County address attribute for the United Kingdom. The geography types that appear are based on how the
country structure is defined. The list of address attributes that appear are based on address formats delivered with the
application, or your customer defined address formats.
Note: You only need to map geography types that you want to use for address or tax validation purposes.
Enable List of Values
Once a geography type is mapped to an attribute, then you can specify whether the geography type will appear in a
list of values during address entry in user interfaces. It is very important to review carefully if you want to enable a list
of values. You should only enable a list of values if you have sufficient geography data imported or created for that
geography. If the setup for master geography data is incomplete, then the geography data is either not imported or
created. As a result, the list of values for the address attribute doesn't list any geography data.
Once you have enabled a list of values for an address attribute, you can only select the geography data available for the
geography type. This means that if a specific geography value isn't available in the geography hierarchy, you can't create
an address with a different geography value.
Note: Enable List of Values applies to the UI only. It doesn't apply to import, web services, nor REST APIs. For these,
all of the required geography types must have a value in the request when creating or updating an address.
Tax Validation
You can also specify whether a geography type will be included in tax validation. For example, for the United States
North America address style format you specify that County, State, and City are used for tax validation. This will mean
that when a transaction involves an address with the North America address style, the address must have the correct
county, state, and city combination based on the geography hierarchy data, to be considered valid for tax calculation.
Address Validation
You must set up address validation for those geography elements that you plan to use in your application. Address
validation checks whether geography elements of an address such as state, city, postal code, and soon are valid as per
master geography data. Setting up validation also helps ensure that the addresses are correct and deliverable during
entry. You can select states or other address elements from lists to ensure accuracy during entry. For example, when
you enter a postal code, the application can validate if the postal code exists. Note that address validation isn’t the same
48

Oracle Fusion Cloud HCM
Using Common Features for HCM
Chapter 6
Geographies for HCM
as address verification. Address Verification updates and enhances your address. Address verification depends upon
Oracle or any third-party address verification services to perform verification.
You can specify whether a geography type will be included in address validation. For example, when the user enters a
United States address using the North American address style format, the address must have the correct country, state,
and postal code combination based on geography hierarchy data to be considered geographically valid.
If an address element is mapped to a geography type, but not selected for geography validation usage, then during
address entry suggested values are provided for the address element, but the address element isn't validated.
You need to verify that the default mapping between Geography Type and Map to Attribute is valid in the Geography
Mapping and Validation region and update it if required when you define geography validation.
After setting geography validation, all features that directly and indirectly depend upon geographies are impacted. For
example, multiple applications such as ERP, CX, and SCM that use geographies are impacted.
Oracle recommends that you use the following valid mapping for the countries that Loqate supports:
Country Name Country Code Geography Type Map to Attribute
Andorra
AD
• Country
• Parroqia
• Settlement
• Postal Code
• Country
• State
• City
• Postal code
Angola
AO
• Country
• Provincia
• Municipio
• Comuna
• Localidad
• Country
• Province
• County
• City
• Additional address
attribute 2
Argentina
AR
• Country
• Province
• Department
• Municipality
• Postal Code
• Country
• Province
• County
• City
• Postal code
Australia
AU
• Country
• State
• City
• Postal Code
• Country
• State
• City
• Postal code
Austria
AT
• Country
• Bundensland
• Bezirk
• Gemeinde
• Postal Code
• Country
• State
• County
• City
• Postal code
49

Oracle Fusion Cloud HCM
Using Common Features for HCM
Chapter 6
Geographies for HCM
Country Name Country Code Geography Type Map to Attribute
Belgium
BE
• Country
• Gewest
• Provincie
• Gemeente
• Postal Code
• Country
• Additional address
attribute 1
• Province
• City
• Postal code
Bolivia
BO
• Country
• Departmento
• Provincia
• Canton
• Country
• Additional address
attribute 1
• Province
• City
Bosnia and Herzegovina
BA
• Country
• District
• Kanton
• Opcine
• Nasalje
• Postal Code
• Country
• Additional address
attribute 1
• Province
• County
• City
• Postal code
Brazil
BR
• Country
• State
• City
• Postal Code
• Country
• State
• City
• Postal code
Bulgaria
BG
• Country
• Oblast
• Obshhina
• Settlement
• Postal Code
• Country
• Additional address
attribute 1
• Province
• City
• Postal code
Canada
CA
• Country
• Province
• City
• Postal Code
• Country
• Province
• City
• Postal code
Cayman Islands
KY
• Country
• Island
• District
• Postal Code
• Country
• State
• City
• Postal code
50

Oracle Fusion Cloud HCM
Using Common Features for HCM
Chapter 6
Geographies for HCM
Country Name Country Code Geography Type Map to Attribute
Chile
CL
• Country
• Region
• Provincia
• Kommune
• Postal Code
• Country
• State
• County
• City
• Postal code
China
Note:
China geography structure is
supported but geocoding isn't
supported.
CN
• Country
• Province
• City
• Postal Code
• Country
• Province
• City
• Postal code
Croatia
HR
• Country
• Zupanije
• Grad
• Postal Code
• Country
• Province
• City
• Postal code
Cuba
CU
• Country
• Provincia
• Municipio
• City
• Postal Code
• Country
• Province
• County
• City
• Postal code
Cyprus
CY
• Country
• Periochi
• Dimos
• Postal Code
• Country
• Province
• City
• Postal code
Czech Republic
CZ
• Country
• Kraj
• Okres
• Obec
• Postal Code
• Country
• State
• County
• City
• Postal code
Denmark
DK
• Country
• Amt
• Settlement
• Postal Code
• Country
• Province
• City
• Postal code
Dominican Republic
DO
• Country
• Provincia
• Country
• Province
51

Oracle Fusion Cloud HCM
Using Common Features for HCM
Chapter 6
Geographies for HCM
Country Name Country Code Geography Type Map to Attribute
• Municipio
• Town
• Postal Code
• County
• City
• Postal code
Ecuador
EC
• Country
• Province
• Canton
• City
• Postal Code
• Country
• Province
• County
• City
• Postal code
Estonia
EE
• Country
• Maakond
• Vald
• Postal Code
• Country
• State
• City
• Postal code
Finland
FI
• Country
• Laani
• Kunta
• Postal Code
• Country
• State
• City
• Postal code
France
FR
• Country
• Region
• Department
• Commune
• Postal Code
• Country
• Additional address
attribute 1
• State
• City
• Postal code
Germany
DE
• Country
• Bundesland
• Gemeinde
• Postal Code
• Country
• State
• City
• Postal code
Great Britain
GB
• Country
• County
• Township
• Postal Code
• Country
• State
• City
• Postal code
Greece
GR
• Country
• Periferia
• Nomi
• Dimotika
• Postal Code
• Country
• State
• County
• City
• Postal code
52

Oracle Fusion Cloud HCM
Using Common Features for HCM
Chapter 6
Geographies for HCM
Country Name Country Code Geography Type Map to Attribute
Guadalupe
GP
• Country
• Commune
• Postal Code
• Country
• City
• Postal code
Guam
GU
• Country
• State
• County
• Municipality
• Village
• Postal Code
• Country
• State
• County
• City
• Additional address
attribute 2
• Postal code
Guernsey
GG
• Country
• City
• Parishes
• Villages
• Postal Code
• Country
• City
• Additional address
attribute 2
• Additional address
attribute 3
• Postal Code
Hungary
HU
• Country
• Megye
• Jaras
• Telepules
• Settlement
• Postal Code
• Country
• Additional address
attribute 1
• Province
• County
• City
• Postal code
Iceland
IS
• Country
• Jaras
• Telepules
• Settlement
• Postal Code
• Country
• Province
• County
• City
• Postal code
India
IN
• Country
• State
• City
• Postal Code
• Country
• State
• City
• Postal code
Indonesia
ID
• Country
• Province
• Regency
• City
• Country
• Province
• County
• City
53

Oracle Fusion Cloud HCM
Using Common Features for HCM
Chapter 6
Geographies for HCM
Country Name Country Code Geography Type Map to Attribute
• Postal Code • Postal code
Ireland
IE
• Country
• Province
• Post County
• Postal_Code
• Country
• State
• City
• Postal Code
Isles of Man
IM
• Country
• Locality
• Settlement
• Postal Code
• Country
• City
• Additional address
attribute 2
• Postal code
Israel
IL
• Country
• District
• Subdistrict
• City
• Postal Code
• Country
• State
• County
• City
• Postal code
Italy
IT
• Country
• Regione
• Provincia
• Comune
• Postal code
• Country
• Additional address
attribute 1
• Province
• City
• Postal code
Jamaica
JM
• Country
• Parish
• Settlement
• Country
• State
• City
Japan
JP
• Country
• Prefecture
• City
• Postal Code
• Country
• State
• City
• Postal code
Jordan
JO
• Country
• Muhafazat
• Liwa
• Tajma
• Postal Code
• Country
• State
• County
• City
• Postal code
Kenya
KE
• Country
• County
• Country
• State
54

Oracle Fusion Cloud HCM
Using Common Features for HCM
Chapter 6
Geographies for HCM
Country Name Country Code Geography Type Map to Attribute
• Division
• Settlement
• City
• Additional address
attribute 2
Latvia
LV
• Country
• Rajons
• Pilseta
• Postal Code
• Country
• State
• City
• Postal code
Liechtenstein
LI
• Country
• Wahlkreis
• Gemeinde
• District
• Postal Code
• Country
• Additional address
attribute 1
• State
• City
• Postal code
Lithuania
LT
• Country
• County
• Municipality
• Ward
• Postal Code
• Country
• State
• County
• City
• Postal code
Luxembourg
LU
• Country
• Canton
• Commune
• Settlement
• Postal Code
• Country
• State
• County
• City
• Postal code
Malaysia
MY
• Country
• State
• District
• Subdistrict
• Postal Code
• Country
• State
• County
• City
• Postal code
Malta
MT
• Country
• Region
• Local Council
• Postal Code
• Country
• State
• City
• Postal code
Martinique
MQ
• Country
• Department
• Arrondisement
• Commune
• Country
• State
• County
• City
55

Oracle Fusion Cloud HCM
Using Common Features for HCM
Chapter 6
Geographies for HCM
Country Name Country Code Geography Type Map to Attribute
• Postal Code • Postal code
Mexico
MX
• Country
• State
• Municipality
• Locality
• Postal Code
• Country
• State
• County
• Additional address
attribute 2
• Postal code
Netherlands
NL
• Country
• Province
• Municipality
• Town
• Postal Code
• Country
• Province
• County
• City
• Postal code
New Zealand
NZ
• Country
• Region
• Town
• Postal Code
• Country
• State
• City
• Postal code
Norway
NO
• Country
• Fylke
• Kommune
• Postal Code
• Country
• Province
• City
• Postal code
Oman
OM
• Country
• Muhafazah
• District
• City
• Country
• State
• County
• City
Peru
PE
• Country
• Region
• Provincia
• Distrito
• Postal Code
• Country
• Province
• County
• City
• Postal code
Poland
PL
• Country
• Wojewodztwo
• Powiat
• Gmina
• Postal Code
• Country
• Province
• County
• City
• Postal code
Portugal
PT
• Country • Country
56

Oracle Fusion Cloud HCM
Using Common Features for HCM
Chapter 6
Geographies for HCM
Country Name Country Code Geography Type Map to Attribute
• Distrito
• Concelho
• Settlement
• Postal Code
• Province
• County
• City
• Postal code
Puerto Rico
PR
• Country
• Commonwealth
• Municipio
• Barrio
• Postal Code
• Country
• State
• County
• City
• Postal code
Qatar
QA
• Country
• Municipality
• Zone
• Country
• State
• City
Reunion Island
RE
• Country
• Region
• Department
• Commune
• Postal Code
• Country
• State
• County
• City
• Postal code
Romania
RO
• Country
• Regiune
• Judet
• Settlement
• Comuna
• Postal Code
• Country
• Additional address
attribute 1
• Province
• County
• City
• Postal code
Russia
RU
• Country
• Federal_District
• Federal_Subject
• Oblast
• Postal Code
• Country
• Additional address
attribute 1
• State
• City
• Postal code
San Marino
SM
• Country
• Comune
• Postal Code
• Country
• State
• Postal code
Singapore
SG
• Country
• Region
• District
• Country
• State
• City
57

Oracle Fusion Cloud HCM
Using Common Features for HCM
Chapter 6
Geographies for HCM
Country Name Country Code Geography Type Map to Attribute
• Postal Code • Postal code
Slovakia
SK
• Country
• Kraj
• Okres
• Obec
• Postal Code
• Country
• Province
• County
• City
• Postal code
Slovenia
SI
• Country
• Regija
• Upravna Enota
• Obcina
• Settlement
• Postal Code
• Country
• Additional address
attribute 1
• Province
• County
• City
• Postal code
South Africa
ZA
• Country
• Province
• District Municipality
• Local Municipality
• Postal Code
• Country
• Province
• County
• City
• Postal code
South Korea
KR
• Country
• Jibang
• Siti
• Postal Code
• Country
• State
• City
• Postal code
Spain
ES
• Country
• Autonomous Community
• Province
• City
• Postal Code
• Country
• Additional address
attribute 1
• Province
• City
• Postal code
Sri Lanka
LK
• Country
• Province
• District
• Divisional Secretariat
• Postal Code
• Country
• Province
• County
• City
• Postal code
Swaziland
SZ
• Country
• District
• Country
• Province
58

Oracle Fusion Cloud HCM
Using Common Features for HCM
Chapter 6
Geographies for HCM
Country Name Country Code Geography Type Map to Attribute
Note:
This country maybe labeled
Eswatini in Manage Territories.
• Inkhundla
• Town
• Postal Code
• County
• City
• Postal code
Sweden
SE
• Country
• Lan
• Settlement
• Postal Code
• Country
• Province
• City
• Postal code
Switzerland
CH
• Country
• Kanton
• Bezirk
• Gemeinde
• Postal Code
• Country
• State
• County
• City
• Postal code
Taiwan
TW
• Country
• County
• Town
• Postal Code
• Country
• State
• City
• Postal code
Thailand
TH
• Country
• Region
• Changwat
• Amphoe
• Postal Code
• Country
• Additional address
attribute 1
• State
• City
• Postal code
Tunisia
TN
• Country
• Governorate
• Delegation
• Postal Code
• Country
• State
• City
• Postal Code
Turkey
TR
• Country
• Sehir
• Ilce
• Kasaba
• Postal Code
• Country
• Province
• County
• City
• Postal code
United Arab Emirates
AE
• Country
• Emirate
• City
• Area
• Country
• State
• City
59

Oracle Fusion Cloud HCM
Using Common Features for HCM
Chapter 6
Geographies for HCM
Country Name Country Code Geography Type Map to Attribute
• Additional address
attribute 2
United States
US
• Country
• State
• County
• City
• Postal Code
• Country
• State
• County
• City
• Postal code
Uruguay
UY
• Country
• Departamento
• City
• Postal Code
• Country
• State
• City
• Postal code
Vatican City
VA
• Country
• Municipal
• Settlement
• Postal Code
• Country
• Province
• City
• Postal code
Vietnam
VN
• Country
• Region
• Tihn
• Quan
• Thank Pho
• Postal Code
• Country
• Additional address
attribute 1
• Province
• County
• City
• Postal code
Note: For either the tax or address validation, don't skip any level unless you're certain that the selected geography
types can uniquely identify geographies. For example, the United States country structure is: State, County, City,
and Postal Code, and you want to select just State and Postal Code for address or tax validation. However, for the
combination of California and 94065, the city can be either Redwood Shores or Redwood City. In this case, you should
also select at least the City geography type for address or tax validation.
Address Validation Control
You can select the address validation level for a country. Validation will check if the entered address maps to the
geography hierarchy data available for the country, and the address validation control determines whether you can save
an address that didn't pass validation during address entry. For example, if the validation level is Error, then an address
can't be saved if the values don't match the geography hierarchy data.
These are the address validation levels you can choose:
• Error - only completely valid addresses can be saved, with all mandatory address elements entered.
• No Validation - all addresses can be saved including incomplete and invalid addresses.
60

Oracle Fusion Cloud HCM
Using Common Features for HCM
Chapter 6
Geographies for HCM
Regardless of the result of validation, the validation process will try to map any address attribute to a geography of
the country, and store any mapping it could establish based on the available data. This is called Geography Name
Referencing and it's executed as part of validation. The result of this referencing is used in several business processes
in the application to map an address to a specific geography or zone. Therefore, Geography Name Referencing is
the process of validating and mapping address elements of existing location table records against master reference
geographies. For example, CA value in the STATE column of the HZ_LOCATIONS table is mapped to the master
reference geography of CA (California).
The Geography Dimension value in territories is derived from sell-to addresses of sales accounts. To use geography
dimensions in territories, you must validate the geography elements in the addresses, such as state, city, and postal
code. You can validate the address by enabling geography validation for each country using the Manage Geographies
task. Perform the following in the Manage Geographies task:
• Enable at least one level in the geography hierarchy for geography validation.
• Enable geography validation for all geography levels that you intend to use for territory definition for each
country.
• If needed, enable a list of values containing specific geography elements. This will help users search and select
appropriate geography values during addresses entry and eliminate all possibilities of wrong address entry.
You can set geography validation control to Error in the Manage Geography Validation page. This ensures that users can
only use valid geography elements in addresses.
Note: If you have already created addresses before setting up address validation for a country, you must enable
geography validation and then execute the Validate Geographies of Addresses Against Master Geographies task for
that country. This validates all your geography elements.
Related Topics
•
How can I save an address that didn't pass geography validation?
•
Setting Up Geography Validation
•
How do I validate geographies of addresses against master geographies and generate naming references?
Setting Up Geography Validation
You must set up geography validation to enable geography setup, help users fill in missing address information, and
validate address information. For example, if you enter the postal code you can retrieve the rest of the address, such as,
city and state.
For example, an organization named Vision Corp., wants its salespeople to use a list of values to enter the states in their
addresses. Also, it plans to set up territories at the state level. So validation must be set up at the state level.
To define geography validation for Vision Corp.:
1. Click Navigator > My Enterprise > Setup and Maintenance work area.
2. Click the Tasks menu and click Search. Search for Manage Geographies.
3. Search for a country. For example, you can search by entering either the country name United States or the two
letter ISO code US, and clicking Search. Search for a country. For example, you can search by entering either the
country name United States or the two letter ISO code US, and clicking Search.
4. Select the country, such as United States, in the Search Results area.
61
Oracle Fusion Cloud HCM
Using Common Features for HCM
Chapter 6
Geographies for HCM
5. Click the Go to Task button in the Validation Defined column.
The Manage Geography Validation page appears. The geography types available for the country are shown in
the Geography Mapping and Validation region.
6. Ensure that the No Styles Format address style is selected. You define validation for the No Styles Format
address style so that the validations are performed for all addresses in the country.
7. Select Enable List of Values in the Geography Mapping and Validation region to display the geography type as
list of values during address entry in user interfaces. For example, for Vision Corp, select Enable List of Values
for State.
This ensures correct values are entered for states, so that territory assignments work.
Note: You should only enable a list of values if you have sufficient geography data for that geography type.
8. Select Geography Validation for a geography type to include it in geography validation. For example, for Vision
Corp, select Geography Validation for State.
You must enable geography validation for all geography levels that you intend to use for territory definition.
The territory assignments may fail if the geography data used isn't validated. If Vision Corp. decided to set up
territories at the postal code level, it would have to set up validation for state, city, county, and postal code.
Note: If an address element isn't selected for geography validation usage, then during address entry
suggested values will be provided for the address element, but the address element isn't validated.
9. Select the appropriate geography validation control level to determine whether you can save an address that
fails validation during address entry. For example, Vision Corp. wants to save all addresses including incomplete
and invalid addresses, so select No validation in the Geography Validation Level for Country list.
Note: If Vision Corp. decided to save only valid addresses, it would have to set the geography validation
control level to Error in the Geography Validation Level for Country list.
10. Click Save and Close.
62

Oracle Fusion Cloud HCM
Using Common Features for HCM
Chapter 6
Geographies for HCM
Best Practices for Geography Validation
After geography data setup, you must configure geography validations.
Here are some best practices to configure geography validation:
• The configuration of geography validation rules depends upon your application needs. If you want to ensure
that only valid addresses must are allowed:
a. Navigate to Manage Geographies, search for a country, and click Validation Defined.
b. Set Geography Validation based on the application requirements.
Note: For either the tax or geography validation, don't skip more than one consecutive level unless
you're certain that the selected geography types can uniquely identify geographies. For example, the
United States country structure is: State, County, City, and Postal Code, and you want to select just
State and Postal Code for geography or tax validation. However, for the combination of California and
94065, the city can be either Redwood Shores or Redwood City. In this case, you should also select at
least the City geography type for geography or tax validation.
c. Set the Geography Validation Level for Country in the Geography Validation Control section to Error.
• If you require validated addresses for your downstream applications:
a. Go to Manage Geographies, search for a country, and click Validation Defined.
b. The best practice is Enable List of Values and setup validation for all geography levels and geography
types.
c. Run the Validate Geographies of Addresses Against Master Geographies scheduled process to review
address validation results.
• To ensure that the addresses are validated and there are no downstream impacts:
a. Go to Manage Administrator Profile Values and set the Number of workers for a given Geography Name
Referencing request (HZ_GNR_NUM_OF_WORKERS) profile option to 5.
b. Run the Validate Geographies of Addresses Against Master Geographies scheduled process with
Parameters: Location Table Name: HZ_LOCATIONS, Run Type: ALL, Country Code: [Country code for
which Geography Name Referencing (GNR) needs to be generated].
c. Run the Validate Geographies of Addresses Against Master Geographies scheduled process with
Parameters: Location Table Name: PER_ADDRESSES_F, Run Type: ALL, Country Code: [Country code for
which GNR needs to be generated].
d. You can then use the report: to identify if the existing addresses are incorrect. Correct these addresses as
a onetime activity.
How do I manage Geography Structures, Hierarchies, and
Validation?
You can add geography structure by first defining the geography types using the Manage Geographies task. You can
then create geography hierarchy and geography validations also using the Manage Geographies task.
63

Oracle Fusion Cloud HCM
Using Common Features for HCM
Chapter 6
Geographies for HCM
This example shows how you can configure the geography structure, geography types within the structure, geography
hierarchy, and geography validation for a country geography, using the United Kingdom country geography as an
illustration.
The following table summarizes the key decisions for this scenario.
Decisions to Consider In This Example
Copy an existing country structure?
No, create a new country structure.
What is the structure of the geography
types?
Create geography types with the following ranking structure:
1. County
2. Post Town
What is the geography hierarchy?
Create the following hierarchy:
1. Country of United Kingdom
2. County of Berkshire
3. Post Town of Reading
Which address style format will you use
when mapping geography validations?
The default address style format called the No Styles Format.
Are you using Oracle Fusion Tax for tax
purposes?
No, don't select Tax Validation for the geography types.
Define the Geography Structure
You can add the County and Post Town geography types to the United Kingdom geography structure.
1. On the Manage Geographies page, enter GB in the Code field. Click Search.
2. On the Manage Geographies page, click Structure Defined.
3. On the Manage Geography Structure page, click the Create button next to the Copy Country Structure From
field.
4. In the Geography Structure section, select the County list item in the Add Geography Type field.
5. Click Add.
6. Select the Post Town list item in the Create and Add Geography Type field.
7. Click Add.
8. Click Save and Close.
Note: You can't modify or delete a geography type.
Define the Geography Hierarchy
You can add the geographies for the County and Post Town geography types using the geography hierarchy user
interfaces to create the geography hierarchy for United Kingdom. You can also use Import Management to import
geography hierarchies using a CSV or XML file.
1. On the Manage Geographies page, enter GB in the Code field. Click Search.
2. On the Manage Geographies page, click Hierarchy Defined.
64

Oracle Fusion Cloud HCM
Using Common Features for HCM
Chapter 6
Geographies for HCM
Note: If there are many child geographies for the selected parent geography, a message asking you to
refine the search criteria is displayed. The child geographies are displayed after you refine the search
criteria. If there are many search results, you may have to further refine the search criteria. The maximum
number of child geographies that can be displayed is controlled by the ORA_HZ_GEO_HIERARCHY_LIMIT
profile option. You can change the value of this profile option by navigating to the Setup and Maintenance
work area, click the Tasks menu, and search for Manage Administrative Profile Values task. Search for the
ORA_HZ_GEO_HIERARCHY_LIMIT profile option and change the value.
3. In the Geography Hierarchy section, click United Kingdom to highlight the table row, and click Create.
4. In the Create County page, Primary and Alternate Names section, enter Berkshire in the Name field.
5. Click Save and Close.
6. In the Geography Hierarchy section, click Berkshire to highlight the table row, and click Create.
7. In the Create Post Town page, Primary and Alternate Names section, enter Reading in the Name field.
8. Click Save and Close.
Define the Geography Validations
You can define the geography mapping and validation for the United Kingdom default address style format to specify
the geography validations for the geography types you added to United Kingdom. You can then map the geography
types to attributes, enable the geography types for Lists of Values and Geography Validation, and set the geography
validation level.
1. On the Manage Geographies page, click Validation Defined.
2. In the Address Style section, click No Styles Format to highlight the table row.
3. For the County geography type, click the County list item in the Map to Attribute field.
4. Select the Enable List of Values and Geography Validation options.
5. For the Post Town geography type, click the City list item in the Map to Attribute field.
6. Select the Geography Validation option.
7. In the Geography Validation Control section, select Error in the Geography Validation Level for Country list.
8. Click Save and Close.
Considerations While Working With Master Geographies
Considerations for working with master geographies:
• You can update master geographies using the Manage Geographies page, but you can't update master
geographies using Import Management.
• Countries are predefined so you can’t delete them. You can delete the geography levels of a country in the
geography hierarchy, such as state, city, and so on using the Manage Geographies page.
• If you delete the geography levels of a country in the geography hierarchy, such as state, city, and so on, you
must manage the impact of these changes in the downstream applications, such as SCM, ERP, HCM, and so on.
• If you delete a geography level, all the children in that geography hierarchy are also deleted. For example, if you
define city and postal codes under a state, and you later delete the state, all the cities and postal codes under
this state are also deleted.
65

Oracle Fusion Cloud HCM
Using Common Features for HCM
Chapter 6
Geographies for HCM
Manage Geography Lookups
You can manage geography lookups using the Manage Geography Lookups.
Perform these steps:
1. Click Navigator > My Enterprise > Setup and Maintenance work area and go to the following:
◦
Offering: Sales
◦
Functional Area: Sales Foundation
◦
Task: Manage Geography Lookups
2. On the Manage Geography Lookups page, click any of the following lookups:
Lookup Type Meaning Description
HZ_GEOGRAPHY_USAGE
Geography Validation Purpose
Purpose of geography validation, for
example, tax. This lookup type can't be
edited.
HZ_GEO_DISPLAY_ONLY
Zone Definition
Interface elements used to define zones.
This lookup type can't be edited.
HZ_GEO_GNR_RUN_TYPE
Geography Name Referencing Program Run
Type
You can specify the type of records that
must be processed using the geography
name referencing (Validate Geographies
of Addresses Against Master Geographies)
scheduled process. This lookup type can't
be edited.
HZ_GEO_IDENTIFIER_TYPE
Geography Identifier Type
Identifier type for geography, for example,
name or code. This lookup type can't be
edited.
HZ_GEO_POSTAL_CODE_RANGE_FLAG
Postal Code Range Provided
Values indicate whether a postal code range
was used to define a set of postal codes.
This lookup type can't be edited.
HZ_GEO_DATA_PROVIDER
Geography Information Provider
Names of the source of geography
information. You can add new geography
providers.
HZ_GEO_IDENTIFIER_SUBTYPE
Geography Identifier Subtype
Identifier sub type for geography, for
example, primary. You can specify the
66
Oracle Fusion Cloud HCM
Using Common Features for HCM
Chapter 6
Geographies for HCM
Lookup Type Meaning Description
primary and secondary names and codes
for geographies.
3. View or edit the values as applicable.
4. Click Save and Close to return to the list of lookups.
5. Click Done to exit the page.
Manage Territory Geography Splits
You must group territory geographies into group zones to manage territory geography level splits. Grouping the
territory geographies involves two steps, selecting the geography level based on which you need grouping and initiating
the grouping.
Select the Geography Level for Grouping
You can perform these steps to select the geography level based on which you want to create the group zones:
1. Sign in as a set up user such as Application Implementation Consultant.
2. In the Setup and Maintenance work area, go to the following:
◦
Offering: Customer Data Management
◦
Functional Area: Enterprise Profile
◦
Task: Manage Geographies
3. Search for the country for which you want to enable territory geography level grouping.
4. Click Structure Defined. Manage Geography Structure page appears.
5. Select the Subject to Grouping check box corresponding to the geography type level for which you want to
enable grouping.
You must select the geography level that suits your business requirements. For example, if your product
delivery is based on postal code, and your territory geographies don't have higher levels of master geographies
such as counties and cities, then you may have postal code splits. In this case you must select postal code as
the geography type level for grouping.
Note: You can enable grouping for only one level at a time.
6. Click Save and Close.
Initiate Grouping
Here are the steps to initiate grouping:
1. In the Setup and Maintenance work area, go to the following:
◦
Offering: Sales
◦
Functional Area: Territories
◦
Task: Manage Territory Geographies
67

Oracle Fusion Cloud HCM
Using Common Features for HCM
Chapter 6
Geographies for HCM
The Manage Territory Geographies page opens.
2. Click Initiate Grouping.
3. Click OK in response to the warning message and confirm the process.
Note: You can't automatically un-group the grouped territory geographies. You can manually undo the
grouping process by recreating territory geography hierarchy either through the UI or import process.
The geography level that you selected for grouping appears as an expandable Group Zone when the grouping
is complete is shown in the following figure.
4. Click Save and Close.
How Territory Geographies are Grouped
This topic describes how we can overcome the problem of territory geography splits by grouping them into group
zones.
Note: The information in this topic is obsolete. Use the Address dimension for geographical territories.
You do a territory geography grouping when any of your territory geography levels has multiple splits. A territory
geography splits occur when the lower level master geographies are added to territory geography hierarchy, while
skipping the higher level master geographies. This may cause multiple occurrences of the lower geography level
members in a territory geography hierarchy.
For example, postal code split happens when a postal code overlaps across many master geography levels such as cities
and counties. Suppose that the business firm Vision Corp. delivers its product according to the postal codes. If counties
and cities aren't included in the territory geography hierarchy of Vision Corp., then the end user can see the multiple
occurrences of the postal code 97229.
When there is a territory geography level split, and if you want to group the split geographies, first you must specify
the master geography level for which you want the grouping to be performed, then initiate grouping. When grouping
is performed, all the splits of the selected master geography level get grouped under a new group zone. In the previous
example, if you select postal code in the master geographies as the level for grouping and initiate the grouping process,
then the 12 postal code splits for the postal code 97229 gets grouped together under one group zone named 97229. So,
the Territory Manager user can define territories on a clean list of postal codes or their ranges, although some of those
postal codes would in fact be the groupings of the postal code splits. The grouped splits are hidden for the Territory
Manager user.
68

Oracle Fusion Cloud HCM
Using Common Features for HCM
Chapter 6
Geographies for HCM
What are the best practices for managing Geography
mismatches?
This topic employs a couple of use cases to illustrate the best practices for setting up Master Reference Geographies
for sales customers using the Oracle Account and Contact Enrichment by Dun & Bradstreet (D&B) for Sales for data
enrichment and the Oracle Address, Email, and Phone Verification for address, email, and phone number verification.
When you perform the real-time enrichment of accounts or contacts using the Oracle Account and Contact Enrichment
by Dun & Bradstreet (D&B), if there's a geography data mismatch between the predefined master geography data
and the Dun and Bradstreet (D&B) data, then the Service enriches the accounts and contacts data but you can't edit
or save the enriched data unless the master geography data mismatches are resolved. In addition, you can verify the
enriched address using the Oracle Address, Email, and Phone Verification, however, in case of mismatches between
Oracle Account and Contact Enrichment by Dun & Bradstreet (D&B) (Loqate) and predefined master geography data
you can't save the verified address.
The second use case describes the setup required to enable address verification and to avoid data conflicts between the
Oracle Address, Email, and Phone Verification and master reference geography data.
Use Case 1
You're a sales customer using master reference geographies for territory assignments or tax calculation and have
purchased Oracle Account and Contact Enrichment by Dun & Bradstreet (D&B) for data enrichment and Oracle
Address, Email, and Phone Verification. In this case, while the Loqate geography reference data is configured as master
geography, Tax calculation is being done using Vertex master geography data. Also, address validation is enabled based
on the customer's requirement.
Best Practice: Review geography mapping for the countries where you do business. If the geography mapping for
a specific country isn't mapped according to the country-specific address attributes, update the mapping. Oracle
recommends performing enrichment before verifying address.
Suppose that you're doing real time enrichment of account or contact. If there's a geography data mismatch between
the predefined master geography and the D&B data, the Oracle Account and Contact Enrichment by Dun & Bradstreet
(D&B) still enriches the accounts and contacts data but can't edit or save the enriched account or contact unless the
master geography data mismatches are resolved. However, you can verify the enriched address using the Oracle
Address, Email, and Phone Verification.
To save a verified address that has master geography data mismatch, you must add alternative names for the
mismatched hierarchy elements in master geography. The following are the steps to add alternative name for the
mismatched hierarchy element:
1. In the Setup and Maintenance work area, go to the following:
◦
Offering: Customer Data Management
◦
Functional Area: Enterprise Profile
◦
Task: Manage Geographies
2. On the Manage Geographies page, search for the country by the name or country code, for example US.
69

Oracle Fusion Cloud HCM
Using Common Features for HCM
Chapter 6
Geographies for HCM
3. Click the Go to Task button in the Hierarchy Defined column. The Manage Geographies Hierarchy page for the
particular country appears.
Note: If there are many child geographies for the selected parent geography, a message asking you to
refine the search criteria is displayed. The child geographies are displayed after you refine the search
criteria. If there are many search results, you may have to further refine the search criteria. The maximum
number of child geographies that can be displayed is controlled by the ORA_HZ_GEO_HIERARCHY_LIMIT
profile option. You can change the value of this profile option by navigating to the Setup and Maintenance
work area, click the Tasks menu, and search for Manage Administrative Profile Values task. Search for the
ORA_HZ_GEO_HIERARCHY_LIMIT profile option and change the value.
4. Highlight the mismatched hierarchy element, for example California State, and click the Edit icon.
5. Click the Add icon on the Edit page.
6. Add an alternative name CA for the California state geography element.
7. Click Save and Close
Once the alternative name is added for the mismatched hierarchy element in master geography, you can save the
enriched address.
Use Case 2
You're a sales customer who doesn't use geographies for territory assignment or tax calculation and has purchased
Oracle Account and Contact Enrichment by Dun & Bradstreet (D&B) for data enrichment and the Oracle Address, Email,
and Phone Verification for address verification. To enable address verification and to avoid data conflicts between the
Oracle Address, Email, and Phone Verification and master reference geography data you must do the following setups:
• Deselect the Geography Validation option in the Geography Mapping and Validation region to avoid Oracle
Address, Email, and Phone Verification data conflicts with master reference geography data. By deselecting this
option you can avoid any UI level validation against master geographies while adding address.
• Select Geography Validation Level for Country as No validation to verify address data by Oracle Address, Email,
and Phone Verification.
Perform the following steps on the Manage Geography Validation page to enable address verification and to avoid data
conflicts between the Oracle Address, Email, and Phone Verification and master reference geography data:
1. In the Setup and Maintenance work area, go to the following:
◦
Offering: Customer Data Management
◦
Functional Area: Enterprise Profile
◦
Task: Manage Geographies
2. On the Manage Geographies page, search for the country by the name or country code, for example US.
3. Click the Go to Task button in the Validation Defined column. The Manage Geography Validation page appears.
4. Deselect the Geography Validation check boxes for all the geography attributes to avoid any UI level validation
against master geographies while entering the addresses. If the Enable List of Values check boxes are selected
then, in case of data conflicts, Geography Naming References records aren't created.
Note: If any of the Geography Types listed isn't applicable to the selected country's territory structure, then you must
deselect the geography validation for that type.
If you're planning to create territories based on a particular Geography Type, such as County, then you must deselect all
the Geography Validation levels under that Geography Type (in this case City and Postal Code) based on which you want
to create the territory.
70

Oracle Fusion Cloud HCM
Using Common Features for HCM
Chapter 6
Geographies for HCM
Tip: Review the Address Style Formats that are selected on the Manage Geography Validation page. The review is
required because on the Account or Contact Simplified UI page, address attributes are displayed based on the address
formats and verified or enriched addresses are saved in Oracle Applications Cloud based on the selected address
formats.
Related Topics
•
Overview of Zone Types and Zones
Geography hierarchy is a data model that creates conceptual parent-child relationships between geographies.
Geography hierarchies can be classified as follows:
• Master Reference Geography Hierarchy: This refers to the predefined geography hierarchy and is considered
as the source of truth. It is defined by widely recognized administrative or political boundaries such as States,
Provinces, Counties, Cities, and so on. This hierarchy can be obtained from a supplier or manually entered.
This geography hierarchy is the source when validating addresses or importing data. Examples are the State of
California, the Province of Alberta, The Country of India, and so on.
• User Defined Geography Hierarchy: This refers to geography hierarchy defined by the user. This geography
hierarchy may be created using the Master Reference Geography, obtained from a supplier, or entered
manually. A user-defined geography hierarchy can have:
◦
Zone Types
◦
Zones
Zone Types
Zone types categorize and group zones together, for example, the zone types of Income Tax and Shipping Regions.
Zone types need to be created before you define a zone for the geographical boundary. You can create a zone type
which will contain geographical boundaries from anywhere in the world, or you can create a zone type that will only
contain geographies from within a specified country. When you create a zone type that's bounded by a country you can
define which geography types or geographies you will be able to choose when you create a zone.
Zones
Zones are geographical boundaries for a zone type, for example, the San Jose Tax zone. Zones are based on the master
reference geography hierarchy data.
Zones are created within a zone type, and you can associate geographies to define the zone. For example, for
the Shipping Regions zone type you can create a West Coast zone which has the state of California as one of its
geographies. Within a geography you can specify a postal range. So, for the state of California, for example, you can
specify that the zone spans from postal code 90001 to 90011.
Zones Created in Master Geographies
Here is the list of zones created using master geographies in each product offering and the tasks to load them:
71

Oracle Fusion Cloud HCM
Using Common Features for HCM
Chapter 6
Geographies for HCM
Product Offering Task Name
Territory Geographies
Manage Territory Geographies
Tax
Manage Tax Zone Types
Shipping
Manage Shipping Zones
Compensation
Compensation Zones
Note: There are no bulk loaders for loading these zones.
For more information about creating zone types and zones, see the Related Topics section.
Related Topics
•
Manage Zone Types and Zones for Shipping and Tax
•
Configure Compensation Zone Types and Zones
Import Geographies and Zones
How do I import geographies?
A geography, such as Tokyo or Peru, describes a boundary on the surface of the earth.
You can use the following options when importing geographies:
• Oracle-licensed geography reference data
• Import Management
Note: The processing time for importing geography data can vary based on several variables, such as, the volume of
data to be loaded and it could take several hours to complete.
Oracle-Licensed Geography Reference Data
You can import Oracle-licensed data from Loqate, for those countries where the data is available. For more information
about the supported countries, see the List of Available Countries with Loqate Geography Reference Data topic. You
can import geography data using the Manage Geographies task. Search for the country, and select Import Geography
Data from the Actions menu. If the licensed data isn't available or already set up for a particular country, then the
Import Geography Data action is disabled.
72

Oracle Fusion Cloud HCM
Using Common Features for HCM
Chapter 6
Geographies for HCM
Note:
• If you are licensed to use HCM Cloud Payroll for the United States, you must import your geography data from
Vertex. For more information, see the United States Payroll implementation and administering guides.
• If you are licensed to use HCM Cloud Payroll for Canada, you can import your geography data from either
Loqate, or your own geography data vendor. Loqate is the Oracle-licensed geography vendor across all Oracle
applications, but it isn’t mandatory. You may use any other geography vendor, but it must be comparable in
structure by using a 2-character province code. For more information, see the Canada Payroll implementation
and administering guides.
• By exporting this "Geography" data from the Oracle environment to Your environment, You agree that (a)
Oracle is granting You only a restricted right to download the exported data specifically for Your use with the
Oracle Fusion services, (b) this data may not be used, transferred, or uploaded for any other purposes; and (c)
except for the restricted right granted in (a), all provisions of the Oracle Cloud Services Agreement (CSA) or
Schedule C, as applicable to You, remain in full force and effect, including specifically section 3.4 thereof.
• Geography Round-Trip Export Import is currently not supported.
Import Management
The Import Management process reads the data included in your XML or text file and imports the data into the
application.
To access Import Management functionality, go to Navigator > Tools > Import Management
For more information, see the Import Your Geography Data topic.
Import Geography Data is disabled for a country if the geography data for that country isn't available from Loqate or if
the geography structure or hierarchy is already defined for that country. The existing master geography hierarchy can
be from Loqate or non-Loqate. For example, Pakistan isn't supported currently in the supported list of 82 countries. If
you try to import geography data for Pakistan after defining geography structure or geography hierarchy for it, Pakistan
would be greyed out in the import list.
Related Topics
•
Create Legal Jurisdictions, Addresses and Authorities
•
Overview of Implementing Customer Data Management
•
Setup Data Import and Export for Oracle Accounting Hub Cloud
73

Oracle Fusion Cloud HCM
Using Common Features for HCM
Chapter 6
Geographies for HCM
List of Available Countries with Loqate Geography Reference Data
Oracle Applications Cloud provides third-party Loqate geography data for import. Here's the list of countries for which
the Loqate geography data is available for import.
Country Name Country Code
Andorra
AD
Angola
AO
Argentina
AR
Australia
AU
Austria
AT
Belgium
BE
Bolivia
BO
Bosnia and Herzegovina
BA
Brazil
BR
Bulgaria
BG
Canada
CA
Cayman Islands
KY
Chile
CL
China
CN
Croatia
HR
Cuba
CU
Cyprus
CY
74

Oracle Fusion Cloud HCM
Using Common Features for HCM
Chapter 6
Geographies for HCM
Country Name Country Code
Czech Republic
CZ
Denmark
DK
Dominican Republic
DO
Ecuador
EC
Estonia
EE
Finland
FI
France
FR
Germany
DE
Great Britain
GB
Greece
GR
Guadalupe
GP
Guam
GU
Guernsey
GG
Hungary
HU
Iceland
IS
India
IN
Indonesia
ID
Ireland
IE
Isles of Man
IM
Israel
IL
Italy
IT
75

Oracle Fusion Cloud HCM
Using Common Features for HCM
Chapter 6
Geographies for HCM
Country Name Country Code
Jamaica
JM
Japan
JP
Jordan
JO
Kenya
KE
Latvia
LV
Liechtenstein
LI
Lithuania
LT
Luxembourg
LU
Malaysia
MY
Malta
MT
Martinique
MQ
Mexico
MX
Netherlands
NL
New Zealand
NZ
Norway
NO
Oman
OM
Peru
PE
Poland
PL
Portugal
PT
Puerto Rico
PR
Qatar
QA
76

Oracle Fusion Cloud HCM
Using Common Features for HCM
Chapter 6
Geographies for HCM
Country Name Country Code
Reunion Island
RE
Romania
RO
Russia
RU
San Marino
SM
Singapore
SG
Slovakia
SK
Slovenia
SI
South Africa
ZA
South Korea
KR
Spain
ES
Sri Lanka
LK
Swaziland
SZ
Sweden
SE
Switzerland
CH
Taiwan
TW
Thailand
TH
Tunisia
TN
Turkey
TR
United Arab Emirates
AE
United States
US
Uruguay
UY
77

Oracle Fusion Cloud HCM
Using Common Features for HCM
Chapter 6
Geographies for HCM
Country Name Country Code
Vatican City
VA
Vietnam
VN
How do I replace the existing master geography data with revised
Oracle-Licensed geography data?
You must import and set up reference geography data for the countries where you do business.
Using the Oracle-licensed geography reference data, you no longer have to source geography data from a third party.
You can import Oracle-licensed data from Loqate, including the country structure and hierarchy information, either to
create a new geography setup or replace your existing geography data.
All customers with the exception of United States HCM Payroll customers, can use the information in this section to
replace existing geography data with Loqate geography data. You can follow these steps if you're using Nokia or any
other geography data and now want to move to Loqate geography data.
Before you begin, perform the following steps:
• Backup existing geography data including customizations, if any.
• Backup territory geographies.
• Perform impact analysis by contacting the support team to identify the use of geography IDs downstream.
Note: Before deleting the geography data, make sure that GEOGRAPHY_ID isn't referenced in any downstream
applications such as TAX, FIN, Legal, and so on. Geography data is used across Oracle Cloud applications such as
Human Capital Management, TAX, and Legal. Global Single Instance POD users share the same geography data and
before deleting geography data, the geography usage POD analysis is required. The Oracle Support team can help you
identify the downstream impact.
Create an Export File of All Territories
In case you have implemented Customer Data Management along with the sales functionality, you must export all
territories before deleting the master geography data because removing the master geography data invalidates the
territory definitions that are based on the Geography dimension. You can either export the definitions of all territories to
a file or make manual corrections. If there are a large number of territories, export the territories definition to a file for
the territories import process. However, if there are very few affected territories, then you can choose to either export
the territories definition to a file or make corrections manually.
This procedure is applicable only if there are territories defined using the Geography dimension.
Perform the following steps to create an export file of all territories.
1. From the Territories and Quotas work area, click View Active Territories in the Tasks pane.
2. In the View Active Territories page, select the territory at the highest level.
3. Click the Actions list, and select Export, and then Export Selected Territory Hierarchy.
4. In the Warning dialog box, click OK.
78

Oracle Fusion Cloud HCM
Using Common Features for HCM
Chapter 6
Geographies for HCM
5. Click the Actions list and select Export, and then View Export Status.
6. Review the status of the export job and verify if it has completed successfully.
7. In the Exported Data File column, click the .zip file against your export job, and click Save. All the territories are
exported to a compressed file on your system.
8. Click OK.
9. Click Done in the View Active Territories page.
Delete the Territory Geography Data
A territory definition has references to the territory geography data and master geography data. Territory geography
data is based on the master geography data, in case you have implemented Customer Data Management along with the
sales functionality, you must delete the territory geography data prior to deleting the master geography data. When you
delete the territory geography data, all territories that are defined using geography dimension become invalid.
This procedure is applicable only if territory geographies are defined.
Perform the following steps to delete the territory geography data.
1. In the Setup and Maintenance work area, go to the following:
◦
Offering: Sales
◦
Functional Area: Territories
◦
Task: Manage Territory Geographies
2. On the Manage Territory Geographies page, click View All Hierarchies.
3. Select the highest level node for the country for which you want to replace the master geography data and click
the Delete icon.
4. In the Warning dialog box, click OK.
5. In the Confirmation dialog box, click OK. The parent node of the territory geography data and its children are
deleted.
6. Repeat steps 3 to 5 to delete all the higher nodes in the territory geography data.
7. Click Save and Close.
The Territory Management application retains a copy of the dimension members referenced in the territory definitions.
This copy is updated when you trigger the Load and Activate process from the Enable Dimensions and Metrics task.
Therefore, although the territory geography data is deleted, the territory definitions may appear to remain valid.
Delete the Master Geography Data
Delete the existing geography data one country at a time. We recommend that you raise a service request for assistance
in deleting the geography data.
Delete Geography Structure
If you have created a geography structure, it prevents the geography imports from working or working as desired. For
example, if the geography structure exists, the Import Geography option may not be enabled for a country in Manage
Geographies even if Loqate predefined geography data is available for that country and the geography hierarchy doesn't
exist yet.
Note: If any geography hierarchy was created manually, it must be deleted first.
If the geography structure was created manually, you can follow these steps to delete it. However, we recommend that
you raise a service request for assistance in deleting the geography structure.
1. In the Setup and Maintenance work area, go to the following:
79

Oracle Fusion Cloud HCM
Using Common Features for HCM
Chapter 6
Geographies for HCM
◦
Offering: Customer Data Management
◦
Functional Area: Enterprise Profile
◦
Task: Manage Geographies
2. On the Manage Geographies page, enter either the country name or the two-letter ISO code (for example, US),
and click Search.
3. Select the country in the search results and click Actions > Manage Geography Structure.
4. In the Manage Geography Structure page, delete each level of the structure.
5. Click Save and Close.
You can now proceed to importing geography data.
Note: If other setup or transaction data exists that's based on the geography data, replacement procedures for that
setup must also be followed.
Import Oracle-Licensed Geography Reference Data
Use this procedure to import Loqate geography data in Manage Geographies one country at a time. If the country data
you want isn't supported by Loqate geography seed data and point the Loqate supported country list here, then the
Import Geography Data action is disabled.
The geography data is provided by Loqate and is third-party content. As per Oracle policy, this software and
documentation may provide access to or information about content and services from third parties. Oracle and its
affiliates aren't responsible for and expressly disclaim all warranties of any kind with respect to third-party content and
services. Oracle and its affiliates aren't responsible for any loss, costs, or damages incurred due to your access to or use
of third-party content, products, or services.
Perform the following steps to import Oracle-licensed geography reference data.
1. In the Setup and Maintenance work area, go to the following:
◦
Offering: Customer Data Management
◦
Functional Area: Enterprise Profile
◦
Task: Manage Geographies
2. On the Manage Geographies page, enter either the country name or the two-letter ISO code (for example, US),
and click Search.
3. Select the country in the search results.
4. Click the Actions list, and select Import Geography Data.
Note: Import Geography Data is disabled for a country if the geography data for that country isn't available
from Loqate or if the geography structure or hierarchy is already defined for that country. The existing master
geography hierarchy can be from Loqate or non-Loqate.
5. In the Warning dialog box, click OK.
6. In the Confirmation dialog box, click OK.
The import of larger countries may require several hours to complete.
You can track the progress of the import process by selecting Scheduled Processes from the Navigator.
Note: To access the Scheduled Processes work area, you must be signed in as a user with the Employee abstract role.
The initial user doesn't have this role assigned, but the other users you created do.
80

Oracle Fusion Cloud HCM
Using Common Features for HCM
Chapter 6
Geographies for HCM
After the import is complete, you can search for the country again in the Manage Geographies page. Check marks now
appear in the Structure Defined and Hierarchy Defined columns indicating the import completed successfully.
Next, click the Validation Defined icon to define the validations, enable List of Values, and choose address style format
for a country as set up before. For more information, see the Geography Validation topic.
The Geocoding Defined and Address Cleansing Defined columns are used for additional features which you must
license from Oracle and set up separately.
• Geocoding makes it possible to display customers in the vicinity of a mobile address. You set up Geocoding
Enabled for those countries where you're using Around Me functionality in CX Sales Cloud Mobile.
• Cleansing makes it possible to validate addresses down to the street level.
Add any geography customizations.
Run the Geography Name Referencing Process
The Geography Name Referencing (GNR) process validates address elements in location tables, such as
HZ_LOCATIONS, against the master geography data.
Run the GNR process in the following situations:
• When you are using geography based address validation (not third party address validation services).
• GNR data is needed for your business processes (such as ERP Tax).
Note: Note: You can't update existing data, such as effective start date, in the GNR process tables for the locations.
Perform the following steps to run the GNR process.
1. Navigate to Tools > Scheduled Processes work area.
2. On the Overview page, click Actions > Schedule New Process.
3. Click the Name list and search for Validate Geographies of Addresses Against Master Geographies, and
then click OK.
4. Click OK in the Schedule New Process dialog box.
5. In the Process Details dialog box, enter the following details:
◦
Location Table Name: HZ_LOCATIONS
◦
Run Type: ALL
◦
Usage Code: GEOGRAPHY
6. Enter the country code in the Country Code field.
7. Click Submit.
8. In the Confirmation dialog box, click OK.
9. Click Close.
10. In the Scheduled Processes page, click the Refresh icon.
11. Verify if the status of the process has completed successfully.
Find the locations failing in Geography Name References using: https://cloudcustomerconnect.oracle.com/posts/
b1e16b06ae. Fix Geography Name References failures by updating addresses with the latest geography data.
81

Oracle Fusion Cloud HCM
Using Common Features for HCM
Chapter 6
Geographies for HCM
Recreate and Load the Territory Geography Data
In case you have implemented Customer Data Management along with the sales functionality, you can recreate the
territory geography data, after the master geography data is imported, using either of the following methods:
• Import process: If you created the original territory geography data using the import process, then use the
same import file to recreate the territory geography structure. For more information about importing the
territory geography data using Import Management, see Import Your Sales Territory Data in the Oracle CX
Understanding Import and Export Management for CX Sales and Fusion Service guide.
• Manual creation process: You can manually recreate the territory geography data structures, as they existed
before their deletion, using the Manage Territory Geographies task. For more information about creating zones
and adding geographies to a zone, see Managing Territory Geographies in the Related Topics section.
After you have recreated the territory geography data, perform the following steps to load the data.
1. In the Setup and Maintenance work area, go to the following:
◦
Offering: Sales
◦
Functional Area: Territories
◦
Task: Enable Dimensions and Metrics
2. On the Enable Dimensions and Metrics page, click the Actions list, and select Load and Activate. The
process loads the territory geography data to make dimension members available for selection when defining
territories.
3. In the Confirmation dialog box, click OK.
4. Click Done.
Restore the Invalid Territory Definitions
After recreating the territory geography hierarchies and running the Load and Activate option from the Enable
Dimensions and Metrics task, the geography dimensions are populated with the new geography members. The
geography members in the territory appear as invalid because your territories still reference the old copies of the
dimension members that were deleted. The new members aren't referenced automatically by the territories. You must
re-reference the territory definitions from the old geography dimension members to the new ones.
You can restore the invalid territory definitions by either importing the previously created export file or making manual
corrections to the territories.
To restore valid territory definitions using territories import:
1. Open the export file you saved in the Creating an Export File of All Territories step. The compressed file
contains four CSV files.
2. Open TERR_HEADER.CSV file.
3. Enter REPLACE in the Action column for all territories that are based on geography dimension.
4. Save the file in CSV format and compress it together with three other CSV files.
5. From the Territories and Quotas work area, click View Active Territories in the Tasks pane.
6. Click the Actions list, and select Import to Proposal, and then Import Territories.
7. Select the newly created compressed file and click OK.
8. Click the Actions list and select Import to Proposal, and then View Import Status.
9. Review the status of the export job and verify if it has completed successfully.
10. Click OK.
11. From the Tasks pane, click Manage Territory Proposals.
82

Oracle Fusion Cloud HCM
Using Common Features for HCM
Chapter 6
Geographies for HCM
12. In the Manage Territory Proposals page, on the Current Territory Proposals table, search for the proposal with
your import file name.
13. Click the import file name to open the territory proposal.
14. Click Edit Coverage to verify that the territory definitions are valid.
15. Verify that there are no values listed as invalid in the Selected Dimension Members section.
16. Click Save and Close.
17. Click Activate. The territory proposal of your import file is activated.
To restore valid territory definitions through manual corrections:
1. From the Territories and Quotas work area, click Manage Territory Proposals in the Tasks pane.
2. In the Manage Territory Proposals page, click the Create icon.
3. In the Create Territory Proposals dialog box, enter a name and click Save and View.
4. In the Territory Proposals page, add all the territories with the Geography dimension value other than the value
Any to the proposal.
5. Select a territory and click Edit Coverage.
6. In the Edit Coverage page, select Geography from the Dimensions list. The invalid dimension members are
displayed in the Selected Dimension Members pane.
7. Expand the values in the Available Dimension Members section or search for the member that has the same
name as the one marked invalid in the Selected Dimension Members pane.
8. Select one or more new geography dimension members from Available Dimension Members pane and click
Add icon to the Selected Dimension Members pane.
9. Click the Remove icon to remove the invalid members from the Selected Dimension Members pane.
10. Click Save and Close.
11. Repeat steps 4 to 10 for all territories that were based on Geography dimension.
12. Click Activate. After the activation process is complete, your territory definitions are valid again and are
referencing to the new geography data.
Although this method is always applicable, it's most appropriate when you have to restore territory definitions for a
smaller number of territories.
To run the batch assignment process for opportunities:
1. From Navigator, click Scheduled Processes.
2. In the Schedule Processes page, click Schedule New Process.
3. In the Schedule New Process dialog box, search for the Request Revenue Territory Assignment process and
select it.
4. Click OK.
5. In the Process Details dialog box, enter OpenOpportunitiesByCreationDate in the View Criteria Name field.
This selects all revenue lines belonging to open opportunities that were created in the last 'X' days.
6. Enter BindOptyCreationDateFrom= followed by the date.
For example, if BindOptyCreationDateFrom=2014-01-01, then all open opportunities which were created
between 1st January 2014 till the current date, are processed.
7. Click Submit to schedule the process.
8. In the Confirmation dialog box, make a note of the process identifier for monitoring the process, and click OK.
9. Click Close.
10. In the Schedule Processes page, click the Refresh icon.
11. Review the status of the process job and verify if it has completed successfully.
Note: Review a small subset of the open opportunities to confirm that the territory assignment is as
expected.
83

Oracle Fusion Cloud HCM
Using Common Features for HCM
Chapter 6
Geographies for HCM
To run the batch assignment process for sales accounts:
1. Ensure that the ZCA_SA_AUTO_ASSIGN_ON_CREATE and ZCA_SA_AUTO_ASSIGN_ON_UPDATE profile
options are set to Yes in the Manage Customer Center Profile Options task.
2. From Navigator, click Customers.
3. In the Customers page, click Create Account.
4. In the Create Account page, enter a name and address of the sales account, and select the Address is sell to
check box.
5. Click Save and Close.
6. From Navigator, click Customers.
7. In the Search pane, search for the name of the sales account you created and select it.
8. In the section Customer Information, select Sales Account Team. The details of the sales account and
territories associated with the sales account are displayed.
This indicates that the sales account was created successfully and the batch assignment was run automatically
to assign the matching territories to the sales account.
To run the batch assignment process manually from the Scheduled Processes page, perform the following steps.
1. From Navigator, click Scheduled Processes.
2. In the Schedule Processes page, click Schedule New Process.
3. In the Schedule New Process dialog box, search for the Request Account Assignment process and select it.
4. Click OK.
5. Enter SalesAccount_Work_Object in the Work Object Code field and
SalesAccountTerritory_Candidate_Object in the Candidate Object Code field.
6. Select Territory in the Assignment Mode list.
7. Enter AllSalesAccountsVC in the View Criteria Name field. This selects all sales accounts.
8. Click Submit to schedule the process.
9. In the Confirmation dialog box, make a note of the process identifier for monitoring the process, and click OK.
10. Click Close.
11. In the Schedule Processes page, click the Refresh icon.
12. Review the status of the process job and verify if it has completed successfully.
Note: Review a small subset of the accounts to confirm that the territory assignment is as expected.
Verify that the downstream applications using geography data is working fine.
Create Countries
This procedure lists the steps to create countries in the application.
The countries are seeded in the application. If you're unable to find a specific country in the Manage Geographies page,
then you can add it to the application.
Note: The application provides support for Loqate geography data for countries. For countries where Loqate
geography data isn't available, you can purchase the geography data from a third-party data provider and load it into
the application using Import Management. For more information, see the Import Your Data chapter in the Oracle CX
Understanding Import and Export Management for CX Sales and Service guide. If countries aren't available in the
application, then use the procedure outlined in this topic to create them.
84
Oracle Fusion Cloud HCM
Using Common Features for HCM
Chapter 6
Geographies for HCM
Perform the following steps to create a new country.
1. In the Setup and Maintenance work area, go to the following:
◦
Offering: Customer Data Management
◦
Functional Area: Application Extensions
◦
Task: Manage Territories
2. On the Manage Territories page, click the New icon.
3. Enter the following details:
◦
Territory Code: Enter a unique code for the territory.
◦
Territory Name: Enter a unique name for the territory.
◦
Description: Enter a description for the territory.
4. Click Save and Close.
Note: After you have added a new country in the application, if you want to import the geography data for
that country, then you must perform Step 5 to 10.
5. In the Setup and Maintenance work area, go to the following:
◦
Offering: Customer Data Management
◦
Functional Area: Enterprise Profile
◦
Task: Manage Geographies
6. On the Manage Geographies page, click Actions > Create Country.
7. In the Create Country dialog box, select the name of the country and click Save.
8. Click Done.
Note: You can now import the geography data for the newly created country using Loqate geography data available
in the application. In case geography data for your country isn't available from Loqate, you can purchase the
geography data from a third-party data provider and import it using Import Management.
Related Topics
•
How do I replace the existing master geography data with revised Oracle-Licensed geography data?
How do I import Non-Oracle Licensed geography data?
You can use Import Management to create Geography data. It's recommended to use import management if you're
importing Non-Oracle Licensed geography data or while loading your own geography from other vendors. You can
also add alternate name or code to existing geographies with import. For more information see Example of Importing
Geography Data.
To import Geography data, perform the following tasks:
1. Map your source data to Oracle Applications Cloud object attributes.
2. Create source Comma Separated Values (CSV) file for import.
3. Create the import activity.
85

Oracle Fusion Cloud HCM
Using Common Features for HCM
Chapter 6
Geographies for HCM
4. Review the import results.
How You Map Your Source Data to Object Attributes
To import your Geography data into Oracle Applications Cloud, you must populate a .csv file with your source data and
map that source data to target object attributes in Oracle Applications Cloud.
You need to do the following before creating the CSV file for data import:
• Identify how your source data attributes map to the target object attributes in Oracle Applications Cloud.
• Create Country Structure before importing Geography data. For information on how to create Country
Structure, see Import Your Country Structure and Example of Importing Country Structure in Related Topics
Section.
• Identify the target object attributes that are required in the CSV file for a successful import as mentioned in the
table Required Attributes and Validations for the Geography Object below.
Before You Start
You must do some basic checks before starting your import. For example, make sure that:
• You have completed all the prerequisites for importing each attribute in your source data such as creating a
country structure.
Required Attributes and Validations for the Geography Object
To import data successfully into Oracle Applications Cloud, your CSV file must include the required attributes. Ensure
that you provide values for the attributes. The following table lists the required attributes for importing new Geography
records, prerequisite setup tasks for the attributes, and specific validations, if any, for Geography import:
Attribute Description Prerequisite Setup Task/ Import
Validations
Creating a Geography Record
CountryCode
The code of the country to which
the geography belongs.
This is validated against the
country structure to check if
the structure is defined for this
country.
Required
PrimaryGeographyName
The primary name of the
geography.
This is validated against the name
of country if geography type is
'Country' or LevelNumber is 1.
Required
RecordTypeCode
The record type code that
represents the intent of the import
data. The values are:
• 0 - indicates the geography
that already exists in the base
table.
• 1 - indicates the intent to
create a new geography.
• 2 - indicates the intent to
add an alternate identifying
name or code to an existing
geography.
No Validation
Required
86

Oracle Fusion Cloud HCM
Using Common Features for HCM
Chapter 6
Geographies for HCM
Attribute Description Prerequisite Setup Task/ Import
Validations
Creating a Geography Record
LevelNumber
The level number of the geography
in the hierarchy. For example,
Country is at Level 1 and State
(California) is at Level 2.
The level should exist in the
country structure.
Required
SourceID
The source ID for the geography,
along with the parent source ID
is used to identify the geography
parent and child relationship
within the source file data and the
interface table data.
None
Required
ParentSourceID
The parent source ID for the
geography, along with the
source ID is used to identify the
geography's parent and child
relationship with records within the
source file data. This should be null
for the country record, as Country
is at the top of the hierarchy.
None
Required
You can view the Geography object and attributes in the Manage Import Objects page of the Import Management flow.
You can find attribute information like type, length, description, and so on, on this Manage Import Objects page.
Note: Keep a note of the following:
• You can't update geographies via import.
• You can't add alternate names or alternate code of country via import. You can do so only via UI.
• Before adding a new alternate name, make sure that the alternate name does not exist with the same value
for any other geography name.
• You can enable high-volume import for the Geography import object in the Manage Import Objects page.
• PrimaryGeographyCodeType and PrimaryGeographyCode can't be added after PrimaryGeographyName is
created via import. You must create them together. Alternatively, you can add primaryGeographyCodeType
and PrimaryGeographyCode from the UI after the import is complete.
• The attributes ProviderGeoId, ParentProviderGeoId, and ParentGeographyId are currently Not Supported.
Create the Source CSV File
You include the data that you want to import into CX Sales and Fusion Service in a source CSV file.
You can use the templates available in the Import Objects UI page to create the source CSV file. To download a template:
1. Go to Navigator > Tools > Import Management > Import Objects.
2. Select the Geography object in the table and click Download.
You can now edit the downloaded file and provide valid values for the required attributes.
87

Oracle Fusion Cloud HCM
Using Common Features for HCM
Chapter 6
Geographies for HCM
Note: For help in populating the CSV file and to avoid any issues in entering values, see the topic Potential Issues
When Opening CSV Files With Excel in Related Topics section.
Create the Import Activity
After you have the CSV file ready, create an import activity to import the information. To create an import activity:
1. Go to Navigator > Tools > Import Management > Import Queue.
2. Click Create Import Activity in the Manage Imports page.
3. In the Enter Import Options page, provide a name for the import activity, and select Geography from the
Object drop-down list.
4. Select the CSV file in the File Name field, and click Next.
5. The source and target attributes are automatically mapped in the Map Fields page. Review and edit the
mappings if required.
6. Check the file for unmapped columns or data format issues by clicking Validate Data. Click Next.
7. Review the import details on the Review and Submit page, and click Submit when you're ready.
Review the Import Results
Check if your import succeeded on the Manage Imports page. This page shows the status of all active, completed, and
unsuccessful imports. To check the status of the import activity:
1. Go to Navigator > Tools > Import Management > Import Queue.
2. Click All Imports and search for the import activity that you created earlier.
3. Check the Status column for the import activity. The import is successful if the status displays as Completed.
You can drill down on the import activity to go to the Import Status page which provides the status details of
the import activity.
Note: Geography names aren't translatable and are always displayed in the same language in which they were loaded
irrespective of the language of the signed in user. If you need different options of display, you can use the alternative
names option.
Related Topics
•
Potential Issues When Opening CSV Files in Excel
•
Import Your Country Structure Data
•
Example of Importing Country Structure Data
•
How do I import data?
•
Example of Importing Geography Data
Example of Importing Geography Data
This example demonstrates how to import data using Import Management.
In this example, you have a source file containing geography data that you want to import into the application to
make the geography data available for real time address validation and tax purposes. A geography is any region with a
boundary around it, regardless of its size. It might be a state, a country, a city, a county, or a ward.
88

Oracle Fusion Cloud HCM
Using Common Features for HCM
Chapter 6
Geographies for HCM
Summary of the Tasks
You perform the following steps to create an import activity and activate the import:
1. Determine what information is in the source file.
2. Create and schedule the import activity.
Before You Start
1. You use the country structure of a country to define which geography types are part of the country. For more
information about an example of importing a country structure, see the topic "Example of Importing Country
Structure Data".
2. Ensure that Source ID values are unique for each row of data within a single import.
3. Ensure that all the parents of a child geography are included in your data file so that the child geography can be
added. For example, if you originally imported US, CA, and San Francisco, and now you want to import the city
of San Jose in CA, then your data file must include US, CA, and San Jose.
4. Check that your source data file has the correct values for the geography data that you have already loaded. For
example, if your initial import included the value US for country and CA as state, and in a subsequent import
you have California as a state, then your geography import creates two state records (CA and California) in the
application data, with the US as the country parent.
Determine the Information in the Source File
The source geography data files must include a unique Source ID value for each row of data and Parent Source ID value
for the parent of that row of data. You include the data that you want to import into CX Sales and Fusion Service in a
source CSV file. A sample input CSV file for country as US is shown in this table.
RecordTypeCode PrimaryGeographyNameCountryCode LevelNumber SourceId ParentSourceId LanguageCode
0
United States
US
1
1
<blank>
US
1
California
US
2
11
1
US
1
San Mateo
US
3
111
11
US
1
Redwood City
US
4
1111
111
US
1
94065
US
5
11111
1111
US
Here is a sample CSV file to import geographies with alternate name and code for country India:
RecordType PrimaryGeographyNameCountryCode LevelNumber SourceId ParentSOurceIdIdentifierType IdentifierSubTypeIdentifierValue
0
India
IN
1
1
1
Karnataka
IN
2
2
1
1
Bengaluru
IN
3
3
2
89

Oracle Fusion Cloud HCM
Using Common Features for HCM
Chapter 6
Geographies for HCM
RecordType PrimaryGeographyNameCountryCode LevelNumber SourceId ParentSOurceIdIdentifierType IdentifierSubTypeIdentifierValue
2
Bengaluru
IN
3
3
2
NAME
Standard_
Name
Bangalore
1
Whitefield
IN
4
4
3
1
560066
IN
5
5
4
2
560066
IN
5
5
4
CODE
ISO_
COUNTRY_
CODE
91
Note: Keep a note of the following:
• The hierarchy is modeled in the CSV file using the SourceId and ParentSourceId. The ParentSourceId for the
Country Record (level Number 1) is always null.
• If defining an alternate name (RecordTypeCode = 2) for any level below the country (LevelNumber >1), ensure that
the SourceId and ParentSourceId columns match the values for the original record respectively.
• You can't update geographies via import.
• You can't add alternate names or alternate code of country via import. You can do so only via UI.
• Before adding a new alternate name, make sure that the alternate name doesn't exist with the same value
for any other geography name. You can check the existing values for alternate names in the Manage
Geographies task page under Hierarchy Defined.
• You can find the list of IdentifierSubTypes in Manage Geography Lookups page in the UI.
• PrimaryGeographyCodeType and PrimaryGeographyCode can't be added after PrimaryGeographyName is
created via import. You must create them together. Alternatively, you can add PrimaryGeographyCodeType
and PrimaryGeographyCode from the UI after the import is complete.
You must create a source file (CSV) file with the attributes and import it using import management as shown in this
table.
Attribute Name Value Description
RecordTypeCode
1
The record type code that represents the intent
of the import data. The values are:
• 0 - indicates the geography that already
exists in the base table.
• 1 - indicates the intent to create a new
geography.
• 2 - indicates the intent to add an alternate
identifying name or code to an existing
geography.
90

Oracle Fusion Cloud HCM
Using Common Features for HCM
Chapter 6
Geographies for HCM
Attribute Name Value Description
PrimaryGeographyName
India
This is the primary geography name. This
will be marked as the primary name for the
Geography and also displayed in the Manage
Geographies Page.
CountryCode
IN
This indicates the Country Code for the country
for which you're importing data.
LevelNumber
2
The level number of the geography in the
hierarchy. For example, Country is at Level 1 and
State (California) is at Level 2.
SourceId
2
The source ID for the geography, along with
the parent source ID is used to identify the
geography parent and child relationship within
the source file data and the interface table data.
ParentSourceId
1
The parent source ID for the geography, along
with the source ID is used to identify the
geography's parent and child relationship with
records within the source file data. This should
be null for the country record, as Country is at
the top of the hierarchy.
IdentifierType
Name
The type of the identifier. It can be either Name
or Code.
IdentifierSubtype
Standard_Name or Standard_Code
The IdentifierSubtype can be Standard_Name
or Secondary_Name. The default value is
Standard_Name.
The valid Sub Types for Type "CODE" are FIPS_
CODE, GEO_CODE, ISO_COUNTRY_CODE,
PRIMARY_CITY, or UNKNOWN
IdentifierValue
Bangalore
The value of the identifier.
You can create an import activity, enter the import details, and schedule the import.
1. Go to Navigator > Tools > Import Management > Import Queue.
2. Click Create Import Activity in the Manage Imports page.
3. In the Enter Import Options page, provide a name for the import activity, and select Geography from the
Object drop-down list.
Note: In the Advanced Options section, the option Enable High-Volume Import is selected by default. This
mode is designed to import millions of records at once.
4. Select the CSV file in the File Name field, and click Next.
5. The source and target attributes are automatically mapped in the Map Fields page. Review and edit the
mappings if required.
6. Check the file for unmapped columns or data format issues by clicking Validate Data. Click Next.
91

Oracle Fusion Cloud HCM
Using Common Features for HCM
Chapter 6
Geographies for HCM
7. Review the import details on the Review and Submit page, and click Submit.
Example of Importing Country Structure Data
You use the country structure of a country to define which geography types are part of the country and how the
geography types are hierarchically related within the country.
For example, you can create geography types called State, City, and Postal Code. Then you can rank the State
geography type as the highest level within the country, the City as the second level, and the Postal Code as the lowest
level within the country structure.
To add a country structure using import management, your source file must contain information about the country to
which the country structure belongs. You can view the list of valid values for country codes in the UI by navigating to
the Manage Geographies task and searching with % as the Country Code value. You also need to specify the level at
which the geography types need to be placed. By default, all countries are at Level 1. You create the country structure
by increasing the level number as you go down the country structure. You place the geography types such as states,
provinces, and so on at Level 2, districts or counties at Level 3, and so on. To add a country structure, your source file
must include the values that let the import process identify the existing records.
Sample Input CSV File
You include the data that you want to import into CX Sales and Fusion Service in a source CSV file. Here is a sample
input CSV file for country as US.
CountryCode LevelNumber GeographyType
US
1
COUNTRY
US
2
STATE
US
3
COUNTY
US
4
CITY
US
5
POSTAL CODE
Here is another input CSV file for importing the country structure for India.
CountryCode LevelNumber GeographyType
IN
1
COUNTRY
IN
2
STATE
IN
3
DISTRICT
92

Oracle Fusion Cloud HCM
Using Common Features for HCM
Chapter 6
Geographies for HCM
CountryCode LevelNumber GeographyType
IN
4
CITY
IN
5
POSTAL CODE
In case you want to import the country structure for Mexico, your input CSV file would look like this:
CountryCode LevelNumber GeographyType
MX
1
COUNTRY
MX
2
STATE
MX
3
MUNICIPALITY
MX
4
LOCALITY
MX
5
POSTAL CODE
In this example, we are importing the Country Structure for US. You must create a source file (CSV) file with the
attributes as shown in this table and import it using Import Management.
Attribute Name Value Description
CountryCode
US
The code for the country for which the country
structure is applicable.
LevelNumber
1
The level number of the geography in the
hierarchy. For example, Country is at Level 1
(Top level) and State (California) is at Level
2. You need these to create parent-child
relationships between geography types for your
country.
GeographyType
COUNTRY
Geopolitical divisions such as Country, State,
City, and so on. For example, for US the
different geography types would be State,
County, City, and Postal Code. For India, the
different geography types would be State,
District, City, and Postal Code. For Mexico,
it would be State, Municipality, Locality, and
Postal Code.
Create an import activity to import the information. To create an import activity:
1. Go to Navigator > Tools > Import Management > Import Queue.
93

Oracle Fusion Cloud HCM
Using Common Features for HCM
Chapter 6
Geographies for HCM
2. Click Create Import Activity in the Manage Imports page.
3. In the Enter Import Options page, provide a name for the import activity, and select Country Structure from
the Object drop-down list.
Note: In the Advanced Options section, the option Enable High-Volume Import is selected by default. This
mode is designed to import millions of records at once.
4. Select the CSV file in the File Name field, and click Next.
5. The source and target attributes are automatically mapped in the Map Fields page. Review and edit the
mappings if required.
6. Check the file for unmapped columns or data format issues by clicking Validate Data. Click Next.
7. Review the import details on the Review and Submit page, and click Submit.
How You Import and Export Territory Geography Zones
Territory geography zones are geographical boundaries that you can set up to replicate your organization's regions,
such as a Pacific Northwest sales region.
You can set up territory geography zones in one application instance, and then after the territory geography zones are
defined you can export the territory zones and import them into another application instance.
To define your territory geography zones and then import your territory zones into another application instance, you
must complete the following steps:
1. Import the master reference geography data into the application.
2. Define your territory geography zones using the Manage Territory Geographies task.
3. Export the territory geography zones.
4. Import the territory geography zones into another application instance.
Import the Master Reference Geography Data
Firstly, you must import the master reference geography data. Master reference geography data includes geography
elements, such as country, state, and city, and is required for any geographical information that you store in the
application, such as address information used in customer and sales records. For more information, see the topic
Geography Hierarchy. Master reference geography data can be imported into the application using the Import
Management.
Define Your Territory Geography Zones
After the master reference geography data has been imported, you can then create your territory geography zones in
the application using the Manage Territory Geographies task in Setup and Maintenance. For more information, see the
Manage Territory Geographies topic in the Related Topics section.
Export the Territory Geography Zones
After you have completed importing the master reference geography data and defining your territory geography zone
tasks, you can create a configuration package to export the territory zone data. For more information, refer to the
Exporting Setup Data demo listed in the related topics section.
Import the Territory Geography Zones
After you have downloaded your configuration package for your territory geography zone setup, you can import the
territory zones into another application instance.
94

Oracle Fusion Cloud HCM
Using Common Features for HCM
Chapter 6
Geographies for HCM
Note: Ensure that you import your master reference geography data into the new application instance before you
import the configuration package.
Related Topics
•
Geography Hierarchy
•
Import Your Territory Geographies Data
•
Example of Importing Territory Geography Data
Set Up Geocoding
Geocoding
This topic explains geocoding and how to enable this option in the application.
Geocoding is the process of finding latitude and longitude coordinates from geographic data such as street addresses
or postal codes. Once these coordinates are available, you can use the spatial services feature to identify points of
interest, such as customer and contact addresses, in the vicinity. The application integrates the Geocoding feature with
eLocation (http://elocation.oracle.com/maps_oracle_dot_com_main.html), which is a Geocoding service provided by
Oracle.
Note: Geocoding for Hong Kong isn't supported.
By default, the Geocoding option is turned off in the application. You can enable the Geocoding option by going to the
Setup and Maintenance work area and performing the following:
• Offering: Customer Data Management
• Functional Area: Enterprise Profile
• Task: Manage Geographies
If the Geocoding feature is enabled, the feature can be scheduled to run at regular time intervals. This ensures that
newly created or updated locations are picked up and geocoded whenever you create or update an address using the
user interface, web services, bulk import, or using import management.
Related Topics
•
What are Spatial Services?
•
Set Up Geocoding
Set Up Geocoding
This procedure lists the steps to set up geocoding in Oracle Cloud applications.
95

Oracle Fusion Cloud HCM
Using Common Features for HCM
Chapter 6
Geographies for HCM
Geocoding is a process that determines the latitude and longitude coordinates for a location. By default, geocoding is
turned off in the application. You can use geocoding to display customers in the vicinity of a mobile address.
Enable Geocoding for a Country
To enable geocoding for a country, complete these steps:
1. In the Setup and Maintenance work area, go to the following:
◦
Offering: Customer Data Management
◦
Functional Area: Enterprise Profile
◦
Task: Manage Geographies
2. On the Manage Geographies page, search for the country for which you want to enable geocoding. You can
either search by the country name or country code.
3. Click Search. The search results for the matching country names are displayed.
4. Select the country for which you want to enable the geocoding option.
5. Select Geocoding Defined for the country.
Populate Location Latitude and Longitude Information
Once geocoding is enabled, you can schedule this feature to run at regular time intervals so that newly created or
updated locations are picked up and geocoded. To schedule the geocoding feature to run at regular intervals, complete
these steps:
1. Navigate to Tools > Scheduled Processes work area.
2. On the Overview page, click Actions > Schedule New Process.
3. Click the Name list and search for Populate Location Latitude and Longitude Information, and then click OK.
4. Enter the parameters such as Start Date and End Date, and click Submit.
Related Topics
•
Geocoding
•
Populate Location Latitude and Longitude Information
Use Web Services to Populate Location Attributes for the Around
Me Feature
Use this procedure to populate location attributes using Web services for the Around Me feature in countries that aren't
supported by the eLocation service. The Around Me feature enables you to quickly locate information about your
surroundings.
This feature uses your current location to run a proximity search on objects with location information, such as contacts,
opportunities, and customers.
96

Oracle Fusion Cloud HCM
Using Common Features for HCM
Chapter 6
Geographies for HCM
Create an Address with the Location Attributes Using the LocationService Web
Service
Perform the following steps to create an address with location attributes, such as latitude and longitude, using the
createLocation operation.
1. Extract the Web Services URL
a. Sign in to the Oracle Enterprise Manager Applications Control using the WebLogic Server credentials.
b. Select Oracle Fusion Customer Relationship Management from the navigation tree, and then select
Fusion Applications.
c. From the tree, select CrmCommonApp, and then select CrmCommonApp (CRMCommonServer_1).
d. In the Web Services pane, click Test for the LocationServiceSoapHttpPort port.
e. In the Test Web Service pane, copy the URL of a WSDL that appears in the WSDL field until "?wsdl", and
then paste to a notepad.
2. Derive the Payload
a. Launch the WSDL URL in a Web browser to open the LocationService endpoint page.
b. In the LocationServiceSoapHttpPort pane, select createLocation from the Operation list.
c. In the Location pane, complete the fields, as shown in the following table.
Field Value
Country
CN
Address1
Chaoyang District
City
Shanghai
Postal Code
200233
State
China
CreatedByModule
AMS
Latitude
20.36789
Longitude
-39.34444
Note: Deselect all the other parameters in this Location pane. Also, deselect LocationProfile,
OriginalSystemReference, and LocationInformation options.
97

Oracle Fusion Cloud HCM
Using Common Features for HCM
Chapter 6
Geographies for HCM
d. Click the XML Source option.
Note: This option appears next to the Operation list.
e. Copy the XML source and paste to a notepad.
3. Call the Web Service
a. Open the Oracle Fusion Service Tester page.
b. In the WebService URL field, paste the WSDL URL that you derived from Step 5 of the Extracting the Web
Services URL section.
c. Enter the user name and password credentials.
d. In the Payload pane, paste the XML source that you derived from Step 5 of the Deriving the Payload
section.
e. Click Invoke. The Output Payload pane displays the output payload.
4. Test the Web Service
a. Sign in to the Oracle Fusion Applications Home Page.
b. Navigate to the Customer Center work area.
c. Search the address that you added.
d. Click the Addresses section.
e. From the Actions list, select the View Geography Information option.
f. Verify the latitude and longitude details.
Update the Location Attributes of an Address Using the LocationService Web Service
Perform the following steps to update the location attributes of an address, such as latitude and longitude, using the
updateLocation operation.
1. Extract the Web Services URL
a. Sign in to the Oracle Enterprise Manager Applications Control using the WebLogic Server credentials.
b. Select Oracle Fusion Customer Relationship Management from the navigation tree, and then select
Oracle Fusion Applications.
c. From the tree, select CrmCommonApp, and then select CrmCommonApp (CRMCommonServer_1)
d. In the Web Services pane, click Test for the LocationServiceSoapHttpPort port.
e. In the Test Web Service pane, copy the URL of a WSDL that appears in the WSDL field until "?wsdl", and
then paste to a notepad.
2. Derive the Payload
a. Launch the WSDL URL in a Web browser to open the LocationService endpoint page.
b. In the LocationServiceSoapHttpPort pane, select updateLocation from the Operation list.
c. In the Location pane, complete the fields, as shown in the following table.
Field Value
LocationId
300100078489616
98

Oracle Fusion Cloud HCM
Using Common Features for HCM
Chapter 6
Geographies for HCM
Field Value
Note:
Enter the location ID that was generated in Step 1 of the Testing the Results section.
Latitude
30.36789
Longitude
-40.34444
Note: Deselect all the other parameters in this Location pane. Also, deselect LocationProfile,
OriginalSystemReference, and LocationInformation options.
d. Click the XML Source option.
Note: This option appears next to the Operation list.
e. Copy the XML source and paste to a notepad.
3. Call the Web Service
a. Open the Oracle Fusion Service Tester page.
b. In the WebService URL field, paste the WSDL URL that you derived from Step 5 of the Extracting the Web
Services URL section.
c. Enter the user name and password credentials.
d. In the Payload pane, paste the XML source that you derived from Step 5 of the Deriving the Payload
section.
e. Click Invoke. The Output Payload pane displays the output payload.
4. Test the Web Service
a. Sign in to the Oracle Fusion Applications Home Page.
b. Navigate to the Customer Center work area.
c. Search the address that you updated.
d. Click the Addresses section.
e. From the Actions list, select the View Geography Information option.
f. Verify the latitude and longitude details.
How You Set up Address Cleansing
Address cleansing validates, corrects, and standardizes address information that you enter in the application. Address
cleansing, unlike geography validation, validates both the geography attributes and the address line attributes.
To use the address cleansing functionality, you need to have license for the customer data quality application, because
the feature is delivered using data quality integration.
99

Oracle Fusion Cloud HCM
Using Common Features for HCM
Chapter 6
Geographies for HCM
You can specify the real-time address cleansing level for each country by choosing either of these options:
• None: Specifies no real time address cleansing.
• Optional: Provides option to cleanse addresses.
Once you have enabled address cleansing for a country, a Verify Address icon appears at address entry points in the
application. Click the icon to perform address cleansing and receive a corrected, standardized address. If the application
doesn't find a matching address, then an alert message is displayed.
FAQs for Loqate Support
How to Import Nokia Geography Data
We recommend that you use Loqate geography data. However, if you need to use Nokia data for one or more countries
for business reasons you can do so.
By default, Import Geography Data task invokes Loqate geography data.
Note: Oracle doesn't support any Nokia geography data fixes.
Perform these steps to import Nokia geography data:
1. Set the profile value of the ORA_HZ_ENABLE_DAAS_LOQATE profile option to No in the Setup and
Maintenance work area by going to the following:
◦
Offering: Sales
◦
Functional Area: Sales Foundation
◦
Task: Manage Administrator Profile Values
2. Import the Nokia geography data for a country as follows:
a. Navigate to the Manage Geographies task in the Setup and Maintenance work area by going to the
following:
- Offering: Sales
- Functional Area: Sales Foundation
- Task: Manage Geographies
b. On the Actions menu, Click Import Geography Data for a country.
Note: The Import Geography Data action is disabled for a country if the geography data for that country isn't
available from Loqate or if the country data is already imported using either Loqate, Nokia, or any third party
geography data.
After the geography data is loaded, the data provider name (Loqate or Nokia) is displayed in the Hierarchy
Defined section in Manage Geographies.
100

Oracle Fusion Cloud HCM
Using Common Features for HCM
Chapter 6
Geographies for HCM
How many countries does Loqate support? How do I get support
for any additional country?
Loqate supports 82 countries. Any additional country support beyond the 82 must be logged as an enhancement
request.
To log the enhancement request, go to Idea Lab.
Related Topics
•
How to submit an enhancement request on Idea Lab
Will I be charged for Loqate data?
There's no charge or licensing requirement for Loqate geography data.
I am an existing customer, how will I be impacted? Can I import
both Loqate and Nokia geography data?
No. You can import either Loqate or Nokia geography data, but you can't import from both providers for a single
country. We recommend that you use Loqate geography data because Loqate supports 82 countries including existing
62 Nokia supported countries.
If you're already using Nokia geography data, you can select one of these two options:
• Option 1: You need not do anything and continue to use Nokia geography data. Oracle doesn't support any
Nokia geography data fixes.
• Option 2: You can replace Nokia geography data with Loqate geography data. This is a manual process today.
You must follow manual steps and work closely with the support team to import new Loqate geography data.
For more information about this process, see Replace Existing Master Geography Data with Revised Oracle-
Licensed Geography Data section in this chapter.
How frequent are updates to Oracle licensed geography reference
data available?
The geography reference data is updated on a quarterly basis but the update of the latest geography reference data
refresh isn't automated. You will be informed about the geography reference data refresh using release readiness
documents.
101

Oracle Fusion Cloud HCM
Using Common Features for HCM
Chapter 6
Geographies for HCM
How is geography data updated? Are updates available for all
countries at the same time?
When you import the geography data for a country for the first time you would get the latest Loqate geography data.
But if your Loqate geography data is more than three months old, you have to uptake the latest Loqate geography data
by following the steps in the Replace Existing Master Geography Data with Revised Oracle-Licensed Geography Data
topic.
Related Topics
•
How do I replace the existing master geography data with revised Oracle-Licensed geography data?
Can I import Vertex or other third-party geography data in
Manage Geographies?
Yes, you can continue to import geography data of your choice. Oracle provides support for Loqate geography data out
of the box.
Can I import geography data for multiple countries in one import
job?
No. You can submit only one import job for a country. After submitting the import job, you can search for a different
country and submit another import job for that country. Currently, you can only search and import Loqate data for one
country at a time using the Manage Geographies task in Setup and Maintenance menu.
FAQs for Define Geographies
How You Search Geographies in the Language You Prefer
You can search geographical data using the language that you prefer.
For example, when you load geography data for Canada in English and French. When you search this data using say
Postal Code H4A 0A1, the following is the search result:
When you search this data using say Postal Code H4A 0A1, the following is the search result:
• H4A 0A1, Montreal, QC
• H4A 0A1, Montreal, Quebec
102

Oracle Fusion Cloud HCM
Using Common Features for HCM
Chapter 6
Geographies for HCM
• H4A 0A1, Montréal, QC
• H4A 0A1, Montréal, Quebec
You may want the search results to be displayed in the language you prefer. So, if you set the language as English, the
following must be displayed:
• H4A 0A1, Montreal, QC
• H4A 0A1, Montreal, Quebec
And if you set the language as French, the following must be displayed:
• H4A 0A1, Montréal, QC
• H4A 0A1, Montréal, Quebec
This can be done after setting up the profile option Filter Geographies Using User Language
(HZ_GEO_FILTER_BY_USER_LANG). You must first define the profile option HZ_GEO_FILTER_BY_USER_LANG and
specify the language you want to use.
1. Create the profile option as follows:
a. Click Navigator > My Enterprise > Setup and Maintenance > Search and search for Manage Profile
Options.
b. Click Create new profile option icon and enter the following:
- Profile Option Code: HZ_GEO_FILTER_BY_USER_LANG
- Profile Display Name: Filter Geographies Using User Language
- Application: Trading Community Model
- Module: Trading Community Model
- Description: provide the description
- Start Date: specify a date
c. Click Save and close.
d. In Profile Option Levels table, select Enabled and Updateable for the site level.
e. Click Save and Close.
2. Set the default value for the profile option as follows:
a. Click Navigator > My Enterprise > Setup and Maintenance > Search and search for Manage
Administrator Profile Values.
b. Search HZ_GEO_FILTER_BY_USER_LANG as the profile option code.
c. Add new Site level profile value.
d. Specify the new profile in the following format:
<COUNTRY_CODE1>:<GEOGRPHY_LEVEL1>,
<GEOGRAPHY_LEVEL2>;<COUNTRY_CODE2>:<GEOGRAPHY_LEVEL1>
Where Geography Level values start with value 1 for country and increment for each level that's defined in
the country's geography structure setup.
For example, the following are the geography levels for Canada:
Country - 1, State - 2, Province - 3, City - 4, Postal Code - 5
Similarly, the following are the geography levels for United States:
Country - 1, State - 2, County - 3, City - 4, Postal Code - 5
103

Oracle Fusion Cloud HCM
Using Common Features for HCM
Chapter 6
Geographies for HCM
Example 1: If you want to filter data for Canadian Cities, then the profile value is CA:3 where CA is the
country code for Canada and 3 is geography level value for City.
Example 2: If you want to filter data for both State and Cities for United States, then value should be
US:2,4
Example 3: If you want to filter data for multiple countries as given in both example 1 and example 2, then
use semi colon as delimiter, like CA:3;US:2,4
e. Click Save and Close.
When do I define address cleansing?
When address data entered into the application must conform to a particular format, to achieve consistency in the
representation of addresses. For example, making sure that the incoming data is stored following the correct postal
address format.
Why can't I update a geography structure by copying an existing
country structure?
You can only update a geography structure by adding existing geography types, or by creating new geography types
and then adding them to the geography structure.
You can only copy an existing country structure when you're defining a new country structure.
How many levels in a geography structure can I define?
We recommend that you add up to six levels, starting with country at level 1, while defining geography structures. If
you add more than six levels containing list of values or validations, then the sixth level and above may not work as
expected in the Address UI of accounts, contacts, suppliers, persons, and so on.
Why can't I delete a level of the country geography structure?
If a geography exists for a country geography structure level then you can't delete the level.
For example, if a state geography has been created for the United States country geography structure, then the State
level can't be deleted in the country geography structure.
104

Oracle Fusion Cloud HCM
Using Common Features for HCM
Chapter 6
Geographies for HCM
How do I add a geography to the geography hierarchy?
You can add a new geography to the geography hierarchy. The new geography can be added under any level of the
hierarchy for an existing geography type in the country geography structure.
For example, we can add a new postal code 94065 under United State, California, San Mateo, Redwood City.
1. Click Navigator > My Enterprise > Setup and Maintenance work area.
2. Click the Tasks menu and click Search. Search for Manage Geographies.
3. On the Manage Geographies page, enter US in the Code field. Click Search.
4. Click Hierarchy Defined for United States.
Note: If there are many child geographies for the selected parent geography, a message asking you to
refine the search criteria is displayed. The child geographies are displayed after you refine the search
criteria. If there are many search results, you may have to further refine the search criteria. The maximum
number of child geographies that can be displayed is controlled by the ORA_HZ_GEO_HIERARCHY_LIMIT
profile option. You can change the value of this profile option by navigating to the Setup and Maintenance
work area, click the Tasks menu, and search for Manage Administrative Profile Values task. Search for the
ORA_HZ_GEO_HIERARCHY_LIMIT profile option and change the value.
5. Search using State as the Geography Type and CA as the Code.
6. Drill down to San Mateo and select Redwood City.
7. Click Actions > Create.
8. Type 94065 for Name in the Primary Name and Alternative Names section.
9. Click Save and Close.
10. Click Save and Close.
11. Click Done.
Edit a Specific Geography in the Geography Hierarchy
You can edit the following details of a geography hierarchy using the Manage Geography Hierarchy page:
• geography's date range
• primary and alternate names
• primary and alternate codes
• creating geographies within the hierarchy such as adding a postal code for a city.
1. Click Navigator > My Enterprise > Setup and Maintenance work area.
2. Click the Tasks menu and click Search. Search for Manage Geographies.
3. On the Manage Geographies page, enter US in the Code field. Click Search.
105

Oracle Fusion Cloud HCM
Using Common Features for HCM
Chapter 6
Geographies for HCM
4. Click Hierarchy Defined for United States.
Note: If there are many child geographies for the selected parent geography, a message asking you to
refine the search criteria is displayed. The child geographies are displayed after you refine the search
criteria. If there are many search results, you may have to further refine the search criteria. The maximum
number of child geographies that can be displayed is controlled by the ORA_HZ_GEO_HIERARCHY_LIMIT
profile option. You can change the value of this profile option by navigating to the Setup and Maintenance
work area, click the Tasks menu, and search for Manage Administrative Profile Values task. Search for the
ORA_HZ_GEO_HIERARCHY_LIMIT profile option and change the value.
5. Search using State as the Geography Type and CA as the Code.
6. Select CA and click Actions > Edit.
7. (Optional) Select the row that you want to specify as the primary name under the Primary and Alternative
Names section and click Actions > Set Primary.
8. (Optional) Select the row that you want to specify as the primary code under the Primary and Alternative
Codes section and click Actions > Set Primary.
9. Click Save and Close.
10. Click Save and Close.
11. Click Done.
Edit Alternative Names and Codes for an Existing Country
You can add or edit alternative names and codes for an existing geography in the geography hierarchy.
For example, you can add a FIPS code of 06 for the state of California.
1. Click Navigator > My Enterprise > Setup and Maintenance work area.
2. Click the Tasks menu and click Search. Search for Manage Geographies.
3. On the Manage Geographies page, enter US in the Code field. Click Search.
4. Click Hierarchy Defined for United States.
Note: If there are many child geographies for the selected parent geography, a message asking you to
refine the search criteria is displayed. The child geographies are displayed after you refine the search
criteria. If there are many search results, you may have to further refine the search criteria. The maximum
number of child geographies that can be displayed is controlled by the ORA_HZ_GEO_HIERARCHY_LIMIT
profile option. You can change the value of this profile option by navigating to the Setup and Maintenance
work area, click the Tasks menu, and search for Manage Administrative Profile Values task. Search for the
ORA_HZ_GEO_HIERARCHY_LIMIT profile option and change the value.
5. Search using State as the Geography Type and CA as the Code.
6. Select CA and click Actions > Edit.
7. In the Primary and Alternative Codes section, click Actions > Add.
8. Type 06 under Code and select FIPS code as the Code Type.
9. Click Save and Close.
10. Click Save and Close.
11. Click Done.
106

Oracle Fusion Cloud HCM
Using Common Features for HCM
Chapter 6
Geographies for HCM
How can I add a geography that's at a lower level to any geography
in a geography hierarchy?
Select the geography that you want to create a geography at lower level, and then click the Create icon. This lets you
create a geography for a geography type that's one level lower to the geography type you selected. The structure of the
country's geography types are defined in the Manage Geography Structure page.
How can I verify whether the third-party geography structure and
hierarchy I imported are available in the application?
You can track the progress of the geography structure and hierarchy import process by navigating to the Scheduled
Processes page and viewing the status of the third-party geography data import process.
Once the process completes, the status changes to Succeeded. You can then verify the newly imported geography
structure and hierarchy in the Setup and Maintenance work area by navigating to the following: offering: Customer Data
Management; functional area: Enterprise Profile; task: Manage Geographies, where you first loaded the third-party
geography data.
Note: Before you load geography data for a country from a third party provider, ensure that no geography structure
or hierarchy is saved for that country. If geography structure or hierarchy data is already available, the load process
fails.
How can I enable geocoding?
You can enable geocoding for a country by turning the Geocoding option for that country in the Setup and Maintenance
work area.
Navigate to the following:
• offering: Customer Data Management
• functional area: Enterprise Profile
• task: Manage Geographies
Search for the country for which you want to enable geocoding and click the Geocoding Defined icon. If geocoding is
enabled for a country, the Geocoding Defined icon displays a check mark.
Once you have enabled geocoding for a country, you must run the Run Geocode Generation scheduled process on the
Run Geocode Generation task. Before you run the job, however, ensure that you have specified the country code of the
country for which you want to generate the geocodes.
107

Oracle Fusion Cloud HCM
Using Common Features for HCM
Chapter 6
Geographies for HCM
Where can I view the geocode values of a location?
You can search for and view the geocode values of a party's location in the Party Center and the Customer Center
pages.
Navigate to the Addresses section of the party's profile and click either View, Columns, Latitude and View, Columns,
Longitude, or View, Columns, Manage Columns, Latitude and Longitude. This displays the latitude and longitude, or
geocode values, associated with the location of the party.
Note: Geocode information display is available only when geocoding is enabled for the country to which the address
belongs.
Related Topics
•
Geocoding
What are Spatial Services?
Spatial services allow users to find points of interest such as customers, contacts, and so on using the latitude and
longitude coordinates of an address.
The Oracle Fusion Mobile Sales application provides these services for sales representatives to discover accounts and
contacts around their location.
Where can I update and view the geography name reference
information for parties?
To view the geography name reference information associated with parties, you need to ensure that you have created
an address for the party. You can create or update party addresses in the Organizations, Persons, and Groups work
areas.
Once you have updated an address, you must either wait for the Run Geocode Generation scheduled process to run
automatically as scheduled or start geocode generation manually from the Setup and Maintenance work area by
navigating as follows:
• offering: Customer Data Management
• functional area: Enterprise Profile
• task: Run Geocode Generation
Once the Run Geocode Generation job has updated the geography information for the country associated with the
party you updated, you can search for and view the geography name reference information associated with the party
in the Organizations, Persons, and Groups work areas. Navigate to the person, organization, or group whose address
108

Oracle Fusion Cloud HCM
Using Common Features for HCM
Chapter 6
Geographies for HCM
you want to verify and click Actions, View Geography Information. This displays a dialog box that displays the updated
geography information, complete with address values enhanced using geography name reference.
Note: Geography name reference enriched geography information display is available only when geography
validation is enabled for the country to which the address belongs.
How can I save an address that didn't pass geography validation?
Search and select for the country name in the Manage Geographies page, and then click the Validation Defined option.
In the Manage Geography Validation page, select No Validation in the Geography Validation Level for Country drop-
down list. This option saves addresses that don't pass the geography validation, including incomplete and invalid
addresses.
Why is Import Geography Data Disabled in Manage Geographies?
Import Geography Data is disabled for a country if the geography data for that country isn't available from Loqate or
if the geography structure or hierarchy is already defined for that country. The existing master geography hierarchy
can be from Loqate or non-Loqate geography data providers. For example, Pakistan isn't supported currently in the
supported list of 82 countries. If you try to import geography data for Pakistan after defining geography structure or
geography hierarchy for it, Pakistan would be greyed out in the import list.
Note: If the hierarchy is defined, delete the geography hierarchy data first and then the geography structure.
109

Oracle Fusion Cloud HCM
Using Common Features for HCM
Chapter 6
Geographies for HCM
110

Oracle Fusion Cloud HCM
Using Common Features for HCM
Chapter 7
Currencies and Currency Rates
7 Currencies and Currency Rates
Manage Currencies
Considerations for Defining Currencies
Consider these points about entering the currency code, date range, or symbol for the currency, when you create or edit
currencies.
Currency Codes
You can't change a currency code after you enable the currency, even if you later disable that currency.
Date Ranges
You can enter transactions denominated in the currency only for the dates within the specified range. If you don't enter
a start date, then the currency is valid immediately. If you don't enter an end date, then the currency is valid indefinitely.
Symbols
Some applications support displaying currency symbols. You may enter the symbol associated with a currency so that it
appears along with the amount.
Related Topics
•
What's the difference between precision, extended precision, and minimum accountable unit for a currency?
•
What's a statistical unit currency type?
•
Euro Currency Derivation
Euro Currency Derivation
Use the Derivation Type, Derivation Factor, and Derivation Effective Date fields to define the relationship between the
official currency (Euro) of the European Monetary Union (EMU) and the national currencies of EMU member states.
For each EMU currency, you define its Euro-to-EMU fixed conversion rate and the effective starting date. If you have to
use a different currency for Euro, you can disable the predefined currency and create a new one.
Derivation Type
The Euro currency derivation type is used only for the Euro, and the Euro derived derivation type identifies national
currencies of EMU member states. All other currencies don't have derivation types.
Derivation Factor
The derivation factor is the fixed conversion rate by which you multiply one Euro to derive the equivalent EMU currency
amount. The Euro currency itself must not have a derivation factor.
111

Oracle Fusion Cloud HCM
Using Common Features for HCM
Chapter 7
Currencies and Currency Rates
Derivation Effective Date
The derivation effective date is the date on which the relationship between the EMU currency and the Euro begins.
FAQs for Manage Currencies
When do I create or enable currencies?
Create or enable any currency for displaying monetary amounts, assigning currency to ledgers, entering transactions,
recording balances, or for any reporting purpose. All currencies listed in the International Organization for
Standardization (ISO) 4217 standard are supported.
The default currency is set to United States Dollar (USD).
Related Topics
•
Considerations for Defining Currencies
What's the difference between precision, extended precision, and
minimum accountable unit for a currency?
Precision refers to the number of digits placed after the decimal point used in regular currency transactions. For
example, USD would have 2 as the precision value for transactional amounts, such as $1.00.
Extended precision is the number of digits placed after the decimal point and must be greater than or equal to the
precision value. For calculations requiring greater precision, you can enter an extended precision value such as 3 or 4.
That would result in the currency appearing as $1.279 or $1.2793.
Minimum accountable unit is the smallest denomination for the currency. For example, for USD that would be .01 for a
cent.
You can set these values for a currency using the Manage Currencies task in the Application Extensions functional area
in the Setup and Maintenance work area.
Note: When setting up currencies, make sure you use the correct precision. Some currencies, for example, the
Chilean peso, don’t support precision at all.
What's a statistical unit currency type?
The statistical unit currency type denotes the Statistical (STAT) currency used to record financial statistics in the
financial reports, allocation formulas, and other calculations.
112

Oracle Fusion Cloud HCM
Using Common Features for HCM
Chapter 7
Currencies and Currency Rates
Manage Conversion Rate Types
Guidelines for Creating Conversion Rate Types
Maintain different conversion rates between currencies for the same period using conversion rate types.
The following conversion rate types are predefined:
• Spot
• Corporate
• User
• Fixed
You can use different rate types for different business needs. During journal entry, the conversion rate is provided
automatically based on the selected conversion rate type and currency, unless the rate type is User. For User rate types,
you must enter a conversion rate. You can define additional rate types as needed. Set your most frequently used rate
type as the default. Conversion rate types can't be deleted.
Assign conversion rate types to automatically populate the associated rate for your period average and period end
rates for the ledger. For example, you can assign the conversion rate type of Spot to populate period average rates, and
the conversion rate type of Corporate to populate period end rates. Period average and period end rates are used in
translation of account balances.
Conversion rate types are used to automatically assign a rate when you perform the following accounting functions:
• Convert foreign currency journal amounts to ledger currency equivalents.
• Convert journal amounts from source ledgers to reporting currencies or secondary ledgers.
• Run revaluation or translation processes.
When creating conversion rates, decide whether to:
• Enforce inverse relationships
• Select pivot currencies
• Select contra currencies
• Enable cross rates and allow cross-rate overrides
• Maintain cross-rate rules
Enforce Inverse Relationships
The Enforce Inverse Relationship option indicates whether to enforce the automatic calculation of inverse conversion
rates when defining daily rates. The following table describes the impact of selecting or not selecting the option.
Action Results
Selected
When you enter a daily rate to convert currency A to currency B, the inverse rate of currency B to
currency A is automatically calculated and entered in the adjacent column. If either rate is changed, the
application automatically recalculates the other rate.
113

Oracle Fusion Cloud HCM
Using Common Features for HCM
Chapter 7
Currencies and Currency Rates
Action Results
You can update the application calculated inverse rate, but once you do, the related rate is updated.
The option enforces the inverse relationship is maintained but doesn't prevent you from updating the
rates.
Not Selected
The inverse rate is calculated, but you can change the rate and update the daily rates table without the
corresponding rate being updated.
Select Pivot Currencies
Select a pivot currency that's commonly used in your currency conversions. A pivot currency is the central currency that
interacts with contra currencies. For example, you set up a daily rate between the US dollar (USD) and the Euro currency
(EUR) and another between the USD and the Canadian dollar (CAD). USD is the pivot currency in creating a rate between
EUR and CAD. EUR and CAD are the contra currencies. Select the pivot currency from the list of values which contains
those currencies that are enabled, effective, and not a statistical (STAT) currency. The description of the pivot currency is
populated automatically based on the currency definition.
If you want the application to create cross rates against a base currency, define the base currency as the pivot currency.
Selected pivot currencies can be changed in the Rate Types page.
Select Contra Currencies
Select currencies available on the list of values as contra currencies. The available currencies are those currencies which
are enabled, effective, not STAT currency, and not the pivot currency selected earlier. The description of the contra
currency is populated automatically based on the currency definition. Add or delete contra currencies in the Contra
Currencies region of the Rate Types page.
Enable Cross Rates and Allow Cross Rate Overrides
Check the Enable Cross Rates check box to calculate conversion rates based on defined currency rate relationships.
General Ledger calculates cross rates based on your defined cross rate rules. Associate your cross rate rules with
a conversion rate type, pivot currency, and contra currencies. Cross rates facilitate the creation of daily rates by
automatically creating the rates between contra currencies based on their relationship to a pivot currency. If the Enable
Cross Rates option is deselected after entering contra currencies, the application stops calculating cross rates going
forward for that particular rate type. All the earlier calculated cross rates for that rate type remain in the database unless
you manually delete them.
For example, if you have daily rates defined for the pivot currency, USD to the contra currency, EUR, and USD to another
contra currency, CAD, the application automatically creates the rates between EUR to CAD and CAD to EUR. You don't
have to manually define the EUR to CAD and CAD to EUR rates.
Select the Allow Cross Rates Override check box to permit your users to override application generated cross rates. If
you accept the default of not selected, the application generated cross rates can't be overridden.
Maintain Cross Rate Rules
Define or update your cross rate rules at any time by adding or removing contra currency assignments. Add a contra
currency to a cross rate rule and run the Daily Rates Import and Calculation process to generate the new rates. If you
remove a cross rate rule or a contra currency from a rule, any cross rates generated previously for that contra currency
remain unless you manually delete them. Changes to the rule aren't retroactive and don't affect previously stored cross
114

Oracle Fusion Cloud HCM
Using Common Features for HCM
Chapter 7
Currencies and Currency Rates
rates. The Cross Rate process generates as many rates as possible and skips currencies where one component of the set
is missing.
Note: With a defined web service that extracts daily currency conversion rates from external services, for example
Reuters, currency conversion rates are automatically updated for the daily rates and all cross currency relationships.
Related Topics
•
Examples of Using Conversion Rate Types in a Journal
•
What's the difference between calendar and fiscal period naming?
Examples of Using Conversion Rate Types in a Journal
The following conversion rate types are predefined: Spot, Corporate, User, Fixed.
Scenario
You are the general ledger accountant for Vision US Inc. You are entering a journal entry to capture three transactions
that were transacted in three different foreign currencies.
• Canadian Dollar CAD: A stable currency
• Mexican Peso MXP: A fluctuating currency
• Hong Kong Dollar HKD: An infrequently used currency
You enter two journal lines with accounts and amounts for each foreign currency transaction. Based on your company
procedures, you select the rate type to populate the rate for Corporate and Spot rate types from your daily rates table.
You manually enter the current rate for the User rate type.
The following table lists the currency, the rate type that you select, and the reasons for the rate type selection.
Selected Currency Selected Rate Type Reason
CAD
Corporate
Entered a periodic type of transaction. Your
company has established a daily rate to use
for the entire month across divisions for all
transactions in Canadian dollars, a stable
currency that fluctuates only slightly over the
month.
MXP
Spot
Entered a periodic type of transaction. Your
company enters daily rates each day for the
Mexican peso because the currency is unstable
and fluctuates.
HKD
User
Entered a one time transaction. Your company
doesn't maintain daily rates for Hong Kong
dollars.
115

Oracle Fusion Cloud HCM
Using Common Features for HCM
Chapter 7
Currencies and Currency Rates
Your company doesn't currently use the Fixed rate type. From January 1, 1999, the conversion rate of the French franc
FRF against the Euro EUR was a fixed rate of 1 EUR to 6.55957 FRF. Your French operations were started in 2007, so you
maintain all your French business records in the Euro.
FAQs for Manage Conversion Rate Types
What's the difference between spot, corporate, user, and fixed rate
types?
Spot, corporate, user, and fixed conversion rate types differ based on fluctuations of the entered foreign currency and
your company procedures for maintaining daily rates.
• Spot: For currencies with fluctuating conversion rates, or when exact currency conversion is needed.
• Corporate: For setting a standard rate across your organization for a stable currency.
• User: For infrequent entries where daily rates for the entered foreign currency aren't set up.
• Fixed: For rates where the conversion is constant between two currencies.
If you have infrequent foreign currency transactions, the User rate type can simplify currency maintenance. The User
rate type can also provide an accurate conversion rate on the date of the transaction.
Manage Daily Rates
Enter Daily Rates Using the Daily Rates Spreadsheet
You are required to enter the daily rates for currency conversion from Great Britain pounds sterling (GBP) to United
States dollars (USD) for 5 days.
To load rates using the Create Daily Rates Spreadsheet, you must first install Oracle ADF Desktop Integration client
software. Oracle ADF Desktop Integration is an Excel add-in that enables desktop integration with Microsoft Excel
workbooks. You can download the installation files from the Tools work area by selecting Download Desktop Integration
Installer.
Entering Daily Rates
1. From the General Accounting work area, select the Period Close link.
2. From the Tasks panel, click the Manage Currency Rates link.
Use the Currency Rates Manager page to create, edit, and review currency rate types, daily rates, and historical
rates.
3. Click the Daily Rates tab.
Use the Daily Rates tab to review and enter currency rates.
116

Oracle Fusion Cloud HCM
Using Common Features for HCM
Chapter 7
Currencies and Currency Rates
4. Click the Create in Spreadsheet button.
Use the Create Daily Rates spreadsheet to enter daily rates in a template that you can save and reuse.
5. Click in the From Currency field. Select the GBP - Pound Sterling list item.
6. Click in the To Currency field. Select the USD - US Dollar list item.
7. Click in the Conversion Rate field. Select the Spot list item.
8. Click in the From Conversion field. Enter a valid value: 10/2/2017.
9. Click in the To Conversion Date field. Enter a valid value: 10/6/2017.
10. Click in the Conversion Rate field. Enter a valid value: 1.6.
11. Click Submit and click OK twice.
12. Review the Record Status column to verify that all rows were inserted successfully.
13. Save the template to use to enter daily rates frequently. You can save the spreadsheet to a local drive or a
shared network drive.
14. Optionally, edit the rates from the Daily Rates user interface or resubmit the spreadsheet.
Related Topics
•
Examples of Using Conversion Rate Types in a Journal
•
Guidelines for Using Desktop Integrated Excel Workbooks
•
Update Currency Rates
Update Currency Rates
You're required to change today's daily rates that were already entered. The rates you're changing are for currency
conversion from Great Britain pounds sterling (GBP) to United States dollars (USD) for your company InFusion America.
Currency conversion rates were entered by an automatic load to the Daily Rates table. They can also be entered through
a spreadsheet.
Updating Currency Rates
1. Navigate to the Period Close work area.
Use the Period Close work area to link to close processes and currency process.
2. Click the Manage Currency Rates link.
Use the Currency Rates Manager page to create, edit, and review currency rate types, daily rates, and historical
rates.
3. Click the Daily Rates tab.
Use the Daily Rates tab to review and enter currency rates.
4. Click the From Currency list. Select the GBP - Pound Sterling list item.
5. Click the To Currency list. Select the USD - US Dollar list item.
6. Enter the dates for the daily rates that you are changing. Enter today's date.
7. Click the Rate Type list. Select the Spot list item.
8. Click the Search button.
9. Click in the Rate field. Enter the new rate of 1.7 in the Rate field.
10. Click in the Inverse Rate field. Enter the new inverse rate of 0.58822 in the Inverse Rate field.
117


Oracle Fusion Cloud HCM
Using Common Features for HCM
Chapter 8
Enterprise Structures
8 Enterprise Structures
Overview of Enterprise Structures
Oracle Fusion Applications have been designed to ensure your enterprise can be modeled to meet legal and
management objectives.
The decisions about your implementation of Oracle Fusion Applications are affected by your:
• Industry
• Business unit requirements for autonomy
• Business and accounting policies
• Business functions performed by business units and optionally, centralized in shared service centers
• Locations of facilities
Every enterprise has three fundamental structures that describe its operations and provide a basis for reporting.
• Legal
• Managerial
• Functional
In Oracle Fusion, these structures are implemented using the chart of accounts and organization hierarchies. Many
alternative hierarchies can be implemented and used for reporting. You are likely to have one primary structure that
organizes your business into:
• Divisions
• Business Units
• Departments
Align these structures with your strategic objectives.
This figure illustrates a grid with Business Axis, representing the enterprise division, Legal Axis representing the
companies, and the Functional Axis representing the business functions.
119

Oracle Fusion Cloud HCM
Using Common Features for HCM
Chapter 8
Enterprise Structures
Legal Structure
The figure illustrates a typical group of legal entities, operating various business and functional organizations. Your
ability to buy and sell, own, and employ comes from your charter in the legal system. A corporation is:
• A distinct legal entity from its owners and managers.
• Owned by its shareholders, who may be individuals or other corporations.
Many other kinds of legal entities exist, such as sole proprietorships, partnerships, and government agencies.
120

Oracle Fusion Cloud HCM
Using Common Features for HCM
Chapter 8
Enterprise Structures
A legally recognized entity can own and trade assets and employ people in the jurisdiction in which the entity is
registered. When granted these privileges, legal entities are also assigned responsibilities to:
• Account for themselves to the public through statutory and external reporting.
• Comply with legislation and regulations.
• Pay income and transaction taxes.
• Process value added tax (VAT) collection on behalf of the taxing authority.
Many large enterprises isolate risk and optimize taxes by incorporating subsidiaries. They create legal entities to
facilitate legal compliance, segregate operations, optimize taxes, complete contractual relationships, and isolate risk.
Enterprises use legal entities to establish their enterprise's identity within the laws of each country in which their
enterprise operates.
The figure illustrates:
• A separate card represents a series of registered companies.
• Each company, including the public holding company, InFusion America, must be registered in the countries
where they do business.
• Each company contributes to various divisions created for purposes of management reporting. These are
shown as vertical columns on each card.
For example, a group might have a separate company for each business in the United States (US), but have its United
Kingdom (UK) legal entity represent all businesses in that country.
The divisions are linked across the cards so that a business can appear on some or all of the cards. For example, the
air quality monitoring systems business might be operated by the US, UK, and France companies. The list of business
divisions is on the Business Axis.
Each company's card is also horizontally striped by functional groups, such as the sales team and the finance team.
This functional list is called the Functional Axis. The overall image suggests that information might, at a minimum, be
tracked by company, business, division, and function in a group environment. In Oracle Fusion Applications, the legal
structure is implemented using legal entities.
Management Structure
Successfully managing multiple businesses requires that you segregate them by their strategic objectives, and measure
their results. Although related to your legal structure, the business organizational hierarchies don't have to be reflected
directly in the legal structure of the enterprise. The management structure can include divisions, subdivisions, lines
of business, strategic business units, profit, and cost centers. In the figure, the management structure is shown on the
Business Axis. In Oracle Fusion Applications, the management structure is implemented using divisions and business
units as well as being reflected in the chart of accounts.
Functional Structure
Straddling the legal and business organizations is a functional organization structured around people and their
competencies. For example, sales, manufacturing, and service teams are functional organizations. This functional
structure is represented by the Functional Axis in the figure. You reflect the efforts and expenses of your functional
organizations directly on the income statement. Organizations must manage and report revenues, cost of sales, and
functional expenses such as research and development and selling, general, and administrative expenses. In Oracle
Fusion Applications, the functional structure is implemented using departments and organizations, including sales,
marketing, project, cost, and inventory organizations.
121

Oracle Fusion Cloud HCM
Using Common Features for HCM
Chapter 8
Enterprise Structures
Model Your Enterprise Management Structure
This example uses a fictitious global company to demonstrate the analysis that can occur during the enterprise
structure configuration planning process.
Scenario
Your company, InFusion Corporation, is a multinational conglomerate that operates in the United States (US) and the
United Kingdom (UK). InFusion has purchased an Oracle Fusion Cloud Enterprise Resource Planning (ERP) solution
including Oracle General Ledger and all of the Oracle Fusion Cloud Applications subledgers. You are chairing a
committee to discuss creation of a model for your global enterprise structure including both your US and UK operations.
InFusion Corporation
InFusion Corporation has 400 plus employees and revenue of 120 million US dollars. Your product line includes all
the components to build and maintain air quality monitoring applications for homes and businesses. You have two
distribution centers and three warehouses that share a common item master in the US and UK. Your financial services
organization provides funding to your customers for the initial costs of these applications.
The following are elements you must consider in creating your model for your global enterprise structure.
• Your company is required to report using US Generally Accepted Accounting Principles (GAAP) standards and
UK Statements of Standard Accounting Practice and Financial Reporting Standards. How many ledgers do you
want to achieve proper statutory reporting?
• Your managers need reports that show profit and loss (revenue and expenses) for their lines of business. Do
you use business units and balancing segments to represent your divisions and businesses? Do you secure data
by two segments in your chart of accounts which represents each department and legal entity? Or do you use
one segment that represents both to produce useful, but confidential management reports?
• Your corporate management requires reports showing total organizational performance with drill-down
capability to the supporting details. Do you need multiple balancing segment hierarchies to achieve proper
rollup of balances for reporting requirements?
• Your company has all administrative, account payables, procurement, and Human Resources functions
performed at their corporate headquarters. Do you need one or more business units in which to perform all
these functions? How is your shared service center configured?
Global Enterprise Structure Model
The following figure and table summarize the model that your committee has designed and uses numeric values to
provide a sample representation of your structure. The model includes the following recommendations:
• Creation of three separate ledgers representing your separate legal entities:
◦
InFusion America Inc.
◦
InFusion Financial Services Inc.
◦
InFusion UK Services Ltd.
122

Oracle Fusion Cloud HCM
Using Common Features for HCM
Chapter 8
Enterprise Structures
• Consolidation of results for application components, installations, and maintenance product lines across the
enterprise
• All UK general and administrative costs processed at the UK headquarters
• US Systems' general and administrative costs processed at US Corporate headquarters
• US Financial Services maintains its own payables and receivables departments
123

Oracle Fusion Cloud HCM
Using Common Features for HCM
Chapter 8
Enterprise Structures
In this chart, the green globe stands for required and gold globe stands for optional setup. The following statements
expand on the data in the chart.
• The enterprise is required because it serves as an umbrella for the entire implementation. All organizations are
created within an enterprise.
• Legal entities are also required. They can be optionally mapped to balancing segment values or represented
by ledgers. Mapping balancing segment values to legal entities is required if you plan to use the intercompany
functionality. The InFusion Corporation is a legal entity but isn't discussed in this example.
• At least one ledger is required in an implementation in which you record your accounting transactions.
• Business units are also required because financial transactions are processed in business units.
• A shared service center is optional, but if used, must be a business unit.
• Divisions are optional and can be represented with a hierarchy of cost centers or by a second balancing
segment value.
• Departments are required because they track your employees.
• Optionally, add an item master organization and inventory organizations if you're tracking your inventory
transactions in Oracle Fusion Applications.
124

Oracle Fusion Cloud HCM
Using Common Features for HCM
Chapter 8
Enterprise Structures
Note: Some Oracle Fusion Cloud Human Capital Management implementations don't require recording accounting
transactions and therefore, don't require a ledger.
Guidelines for Configuring Global Enterprises
Start your global enterprise structure configuration by discussing what your organization's reporting needs are and how
to represent those needs in the Oracle Fusion Cloud Applications.
The following are some questions and points to consider as you design your global enterprise structure in Oracle Fusion
Applications.
• Enterprise Configuration
• Business Unit Management
• Security Structure
• Compliance Requirements
Enterprise Configuration
• What is the level of configuration needed to achieve the reporting and accounting requirements?
• What components of your enterprise do you need to report on separately?
• Which components can be represented by building a hierarchy of values to provide reporting at both detail and
summary levels?
• Where are you on the spectrum of centralization versus decentralization?
Business Unit Management
• What reporting do I need by business unit?
• How can you set up your departments or business unit accounts to achieve departmental hierarchies that
report accurately on your lines of business?
• What reporting do you need to support the managers of your business units, and the executives who measure
them?
• How often are business unit results aggregated?
• What level of reporting detail is required across business units?
Security Structure
• What level of security and access is allowed?
• Are business unit managers and the people that report to them secured to transactions within their own
business unit?
• Are the transactions for their business unit largely performed by a corporate department or shared service
center?
125

Oracle Fusion Cloud HCM
Using Common Features for HCM
Chapter 8
Enterprise Structures
Compliance Requirements
• How do you comply with your corporate external reporting requirements and local statutory reporting
requirements?
• Do you tend to prefer a corporate first or an autonomous local approach?
• Where are you on a spectrum of centralization, very centralized or decentralized?
Design an Enterprise Configuration
This example illustrates how to set up an enterprise based on a global company operating mainly in the US and the UK
with a single primary industry.
Scenario
InFusion Corporation is a multinational enterprise in the high technology industry with product lines that include all
the components that are required to build and maintain air quality monitoring systems for homes and businesses.
Its primary locations are in the US and the UK, but it has smaller outlets in France, Saudi Arabia, and the United Arab
Emirates (UAE).
Enterprise Details
In the US, InFusion employs 400 people and has company revenue of 120 million US dollars. Outside the US, InFusion
employs 200 people and has revenue of 60 million US dollars.
InFusion requires three divisions.
• The US division covers the US locations.
• The Europe division covers UK and France.
• Saudi Arabia and the UAE are covered by the Middle East division.
InFusion requires legal entities with legal employers, payroll statutory units, tax reporting units, and legislative data
groups for the US, UK, France, Saudi Arabia, and UAE, to employ and pay its workers in those countries.
InFusion requires a number of departments across the enterprise for each area of business, such as sales and
marketing, and a number of cost centers to track and report on the costs of those departments.
InFusion has general managers responsible for business units within each country. Those business units may share
reference data. Some reference data can be defined within a reference data set that multiple business units may
subscribe to. Business units are also required for financial purposes. Financial transactions are always processed within
a business unit.
Resulting Enterprise Configuration
Based on this analysis, InFusion requires an enterprise with multiple divisions, ledgers, legal employers, payroll statutory
units, tax reporting units, legislative data groups, departments, cost centers, and business units.
This figure illustrates the enterprise configuration that results from the analysis of InFusion Corporation.
126

Oracle Fusion Cloud HCM
Using Common Features for HCM
Chapter 8
Enterprise Structures
Enterprise Information for Non-HCM Users
The Manage Enterprise HCM Information task includes default settings for your enterprise such as the employment
model, worker number generation, and so on.
If you're not implementing Oracle Fusion Human Capital Management (HCM), then the only action you may need to
perform using this task is to change the enterprise name, if necessary. The other settings are HCM-specific and aren't
relevant outside of Oracle Fusion HCM.
127

Oracle Fusion Cloud HCM
Using Common Features for HCM
Chapter 8
Enterprise Structures
128

Oracle Fusion Cloud HCM
Using Common Features for HCM
Chapter 9
Legal Entities, Business Units, and Reference Data Sets
9 Legal Entities, Business Units, and
Reference Data Sets
Overview of Legal Entities, Business Units, and Divisions
The setup tasks for legal entities, divisions, business units and other organizations are in different functional areas in
the Setup and Maintenance work area.
The Legal Structures functional area covers tasks related to legal entity setup, the Organization Structures functional
area includes tasks related to business unit setup, and the Workforce Structures functional area includes tasks related to
department, division, trees, jobs, positions, and other organizations setup.
Overview
A legal entity is a recognized party with rights and responsibilities given by legislation.
Legal entities have the following rights and responsibilities to:
• Own property
• Trade
• Repay debt
• Account for themselves to regulators, taxation authorities, and owners according to rules specified in the
relevant legislation
Their rights and responsibilities may be enforced through the judicial system. Define a legal entity for each registered
company or other entity recognized in law for which you want to record assets, liabilities, expenses and income, pay
transaction taxes, or perform intercompany trading.
A legal entity has responsibility for elements of your enterprise for the following reasons:
• Facilitating local compliance
• Minimizing the enterprise's tax liability
• Preparing for acquisitions or disposals of parts of the enterprise
• Isolating one area of the business from risks in another area. For example, your enterprise develops property
and also leases properties. You could operate the property development business as a separate legal entity to
limit risk to your leasing business.
129

Oracle Fusion Cloud HCM
Using Common Features for HCM
Chapter 9
Legal Entities, Business Units, and Reference Data Sets
The Role of Your Legal Entities
In configuring your enterprise structure in Oracle Fusion Cloud Applications, the contracting party on any transaction is
always the legal entity. Individual legal entities:
• Own the assets of the enterprise
• Record sales and pay taxes on those sales
• Make purchases and incur expenses
• Perform other transactions
Legal entities must comply with the regulations of jurisdictions, in which they register. Europe now allows for companies
to register in one member country and do business in all member countries, and the US allows for companies to register
in one state and do business in all states. To support local reporting requirements, legal reporting units are created and
registered.
You are required to publish specific and periodic disclosures of your legal entities' operations based on different
jurisdictions' requirements. Certain annual or more frequent accounting reports are referred to as statutory or external
reporting. These reports must be filed with specified national and regulatory authorities. For example, in the United
States (US), your publicly owned entities (corporations) are required to file quarterly and annual reports, as well as other
periodic reports, with the Securities and Exchange Commission (SEC), which enforces statutory reporting requirements
for public corporations.
Individual entities privately held or held by public companies don't have to file separately. In other countries, your
individual entities do have to file in their own name, as well as at the public group level. Disclosure requirements are
diverse. For example, your local entities may have to file locally to comply with local regulations in a local currency, as
well as being included in your enterprise's reporting requirements in different currency.
A legal entity can represent all or part of your enterprise's management framework. For example, if you operate in a
large country such as the United Kingdom or Germany, you might incorporate each division in the country as a separate
legal entity. In a smaller country, for example Austria, you might use a single legal entity to host all of your business
operations across divisions.
Model Legal Entities
Oracle Fusion Cloud Applications support the modeling of your legal entities. If you make purchases from or sell to
other legal entities, define these other legal entities in your customer and supplier registers.
These registers are part of the Oracle Trading Community Architecture.
When your legal entities are trading with each other, represent them as legal entities and as customers and suppliers in
your customer and supplier registers. Use legal entity relationships to determine which transactions are intercompany
and require intercompany accounting. Your legal entities can be identified as legal employers and therefore, are
available for use in Human Capital Management (HCM) applications.
Several decisions you should consider when you create legal entities.
• The importance of using legal entity on transactions
• Legal entity and its relationship to business units
• Legal entity and its relationship to divisions
• Legal entity and its relationship to ledgers
130

Oracle Fusion Cloud HCM
Using Common Features for HCM
Chapter 9
Legal Entities, Business Units, and Reference Data Sets
• Legal entity and its relationship to balancing segments
• Legal entity and its relationship to consolidation rules
• Legal entity and its relationship to intercompany transactions
• Legal entity and its relationship to worker assignments and legal employer
• Legal entity and payroll reporting
• Legal reporting units
The Importance of Using Legal Entities on Transactions
All of the assets of the enterprise are owned by individual legal entities. Oracle Fusion Cloud Financials allow your users
to enter legal entities on transactions that represent a movement in value or obligation.
For example, a sales order creates an obligation on the legal entity that books the order and promises to deliver the
goods on the acknowledged date. The creation also creates an obligation on the purchaser to receive and pay for those
goods. Contract law in most countries contains statutes that state damages can be sought for both:
• Actual losses, putting the injured party in the same state as if they had not entered into the contract.
• What is called loss of bargain, or the profit that would have made on a transaction.
In another example, if you revalued your inventory in a warehouse to account for raw material price increases,
the revaluation and revaluation reserves must be reflected in your legal entity's accounts. In Oracle Fusion Cloud
Applications, your inventory within an inventory organization is managed by a single business unit and belongs to one
legal entity.
Legal Entity and Its Relationship to Business Units
A business unit can process transactions on behalf of many legal entities. Frequently, a business unit is part of a single
legal entity. In most cases, the legal entity is explicit on your transactions. For example, a payables invoice has an explicit
legal entity field. Your accounts payables department can process supplier invoices on behalf of one or many business
units.
In some cases, your legal entity is inferred from your business unit that's processing the transaction. For example,
Business Unit ACM UK has a default legal entity of InFusion UK Ltd. When a purchase order is placed in ACM UK,
the legal entity InFusion UK Ltd is legally obligated to the supplier. Oracle Procurement, Oracle Fusion Cloud Project
Management, and Oracle Fusion Cloud Supply Chain and Manufacturing applications rely on deriving the legal entity
information from the business unit.
Legal Entity and Its Relationship to Divisions
The division is an area of management responsibility that can correspond to a collection of legal entities. If wanted, you
can aggregate the results for your divisions by legal entity or by combining parts of other legal entities. Define date-
effective hierarchies for your cost center or legal entity segment in your chart of accounts to facilitate the aggregation
and reporting by division. Divisions and legal entities are independent concepts.
Legal Entity and Its Relationship to Ledgers
One of your major responsibilities is to file financial statements for your legal entities. Map legal entities to specific
ledgers using the Oracle General Ledger Accounting Configuration Manager. Within a ledger, you can optionally map a
legal entity to one or more balancing segment values.
131

Oracle Fusion Cloud HCM
Using Common Features for HCM
Chapter 9
Legal Entities, Business Units, and Reference Data Sets
Legal Entity and Its Relationship to Balancing Segments
General Ledger supports up to three balancing segments. Best practices recommend one segment represents your legal
entity to ease your requirement to account for your operations to regulatory agencies, tax authorities, and investors.
Accounting for your operations means you must produce a balanced trial balance sheet by legal entity. If you account
for many legal entities in a single ledger, you must:
1. Identify the legal entities within the ledger.
2. Balance transactions that cross legal entity boundaries through intercompany transactions.
3. Decide which balancing segments correspond to each legal entity and assign them in General Ledger
Accounting Configuration Manager. Once you assign one balancing segment value in a ledger, then all your
balancing segment values must be assigned. This recommended best practice facilitates reporting on assets,
liabilities, and income by legal entity.
Represent your legal entities by at least one balancing segment value. You may represent it by two or three balancing
segment values if more granular reporting is required. For example, if your legal entity operates in multiple jurisdictions
in Europe, you might define balancing segment values and map them to legal reporting units. You can represent a legal
entity with more than one balancing segment value. Do not use a single balancing segment value to represent more
than one legal entity.
In General Ledger, there are three balancing segments. You can use separate balancing segments to represent your
divisions or strategic business units to enable management reporting at the balance sheet level for each. This solution
is used to empower your business unit and divisional managers to track and assume responsibility for their asset
utilization or return on investment. Using multiple balancing segments is also useful when you know at the time of
implementation that you're disposing of a part of a legal entity and want to isolate the assets and liabilities for that
entity.
Implementing multiple balancing segments requires every journal entry that isn't balanced by division or business unit,
to generate balancing lines. You can't change to multiple balancing segments after you begin using the ledger because
your historical data isn't balanced by the new balancing segments. Restating historical data must be done at that point.
If your enterprise regularly spins off businesses or holds managers accountable for utilization of assets, identify the
business with a balancing segment value. If you account for each legal entity in a separate ledger, no requirement exists
to identify the legal entity with a balancing segment value.
While transactions that cross balancing segments don't necessarily cross legal entity boundaries, all transactions that
cross legal entity boundaries must cross balancing segments. If you make an acquisition or are preparing to dispose of
a portion of your enterprise, you may want to account for that part of the enterprise in its own balancing segment even
if the portion isn't a separate legal entity. If you don't map legal entities sharing the same ledger to balancing segments,
you can't distinguish them using intercompany functionality or track individual equity.
Legal Entity and Its Relationship to Consolidation Rules
In Oracle Fusion Applications you can map legal entities to balancing segments and then define consolidation rules
using your balancing segments. You are creating a relationship between the definition of your legal entities and their
role in your consolidation.
Legal Entity and Its Relationship to Intercompany Transactions
Use Oracle Intercompany features to create intercompany entries automatically across your balancing segments.
Intercompany processing updates legal ownership within the enterprise's groups of legal entities. Invoices or journals
are created as needed. To limit the number of trading pairs for your enterprise, set up intercompany organizations
and assign then to your authorized legal entities. Define processing options and intercompany accounts to use when
creating intercompany transactions and to assist in consolidation elimination entries. These accounts are derived
132

Oracle Fusion Cloud HCM
Using Common Features for HCM
Chapter 9
Legal Entities, Business Units, and Reference Data Sets
and automatically entered on your intercompany transactions based on legal entities assigned to your intercompany
organizations.
Intracompany trading, in which legal ownership isn't changed but other organizational responsibilities are, is also
supported. For example, you can track assets and liabilities that move between your departments within your legal
entities by creating departmental level intercompany organizations.
Tip: In the Oracle Fusion Supply Chain and Manufacturing applications, you can model intercompany relationships
using business units, from which legal entities are derived.
Legal Entity and Its Relationship to Worker Assignments and Legal
Employer
Legal entities that employ people are called legal employers in the Legal Entity Configurator. You must enter legal
employers on worker assignments in Oracle Fusion Cloud HCM.
Legal Entity and Payroll Reporting
Your legal entities are required to pay payroll tax and social insurance such as social security on your payroll. In Oracle
Fusion Applications, you can register payroll statutory units to pay and report on payroll tax and social insurance for
your legal entities. As the legal employer, you might be required to pay payroll tax, not only at the national level, but
also at the local level. You meet this obligation by establishing your legal entity as a place of work within the jurisdiction
of a local authority. Set up legal reporting units to represent the part of your enterprise with a specific legal reporting
obligation. You can also mark these legal reporting units as tax reporting units, if the legal entity must pay taxes as a
result of establishing a place of business within the jurisdiction.
Overview of Legal Jurisdiction and Authorities
You are required to register your legal entities with legal authorities in the jurisdictions where you conduct business.
Register your legal entities as required by local business requirements or other relevant laws.
For example, register your legal entities for tax reporting to report sales taxes or value added taxes.
Define jurisdictions and related legal authorities to support multiple legal entity registrations, which are used by Oracle
Fusion Tax and Oracle Fusion Payroll. When you create a legal entity, the Oracle Fusion Legal Entity Configurator
automatically creates one legal reporting unit for that legal entity with a registration.
Jurisdictions
Jurisdiction is a physical territory such as a group of countries, country, state, county, or parish where a particular piece
of legislation applies.
French Labor Law, Singapore Transactions Tax Law, and US Income Tax Laws are examples of particular legislation
that apply to legal entities operating in different countries' jurisdictions. Judicial authority may be exercised within a
jurisdiction.
133

Oracle Fusion Cloud HCM
Using Common Features for HCM
Chapter 9
Legal Entities, Business Units, and Reference Data Sets
Types of jurisdictions are:
• Identifying Jurisdiction
• Income Tax Jurisdiction
• Transaction Tax Jurisdiction
Identifying Jurisdiction
For each legal entity, select an identifying jurisdiction. An identifying jurisdiction is your first jurisdiction you must
register with to be allowed to do business in a country. If there's more than one jurisdiction that a legal entity must
register with to commence business, select one as the identifying jurisdiction. Typically the identifying jurisdiction is the
one you use to uniquely identify your legal entity.
Income tax jurisdictions and transaction tax jurisdictions don't represent the same jurisdiction. Although in some
countries, the two jurisdictions are defined at the same geopolitical level, such as a country, and share the same legal
authority, they're two distinct jurisdictions.
Income Tax Jurisdiction
Create income tax jurisdictions to properly report and remit income taxes to the legal authority. Income tax jurisdictions
by law impose taxes on your financial income generated by all your entities within their jurisdiction. Income tax is a key
source of funding that the government uses to fund its activities and serve the public.
Transaction Tax Jurisdiction
Create transaction tax jurisdictions through Oracle Tax in a separate business flow, because of the specific needs and
complexities of various taxes. Tax jurisdictions and their respective rates are provided by suppliers and require periodic
maintenance. Use transaction tax jurisdiction for legal reporting of sales and value added taxes.
Legal Authorities
A legal authority is a government or legal body that's charged with powers to make laws, levy and collect fees and taxes,
and remit financial appropriations for a given jurisdiction.
For example, the Internal Revenue Service is the authority for enforcing income tax laws in United States. In some
countries, such as India and Brazil, you're required to print legal authority information on your tax reports. Legal
authorities are defined in the Oracle Legal Entity Configurator. Tax authorities are a subset of legal authorities and are
defined using the same setup flow.
Legal authorities aren't mandatory in Oracle Fusion Cloud Human Capital Management (HCM), but are recommended
and are generally referenced on statutory reports.
Create Legal Jurisdictions, Addresses and Authorities
Define legal jurisdictions and related legal authorities to support multiple legal entity registrations, which are used by
Oracle Fusion Tax and Oracle Fusion Payroll.
134

Oracle Fusion Cloud HCM
Using Common Features for HCM
Chapter 9
Legal Entities, Business Units, and Reference Data Sets
Legal Jurisdictions
Create a legal jurisdiction by following these steps:
1. In the Setup and Maintenance work area, go to the Manage Legal Jurisdictions task.
2. Select Create.
3. Enter a unique Name, United States Income Tax.
4. Select a Territory, United States.
5. Select a Legislative Category, Income tax.
6. Select Identifying, Yes. Identifying indicates the first jurisdiction a legal entity must register with to do business
in a country.
7. Enter a Start Date if desired. You can also add an End Date to indicate a date that the jurisdiction may no
longer be used.
8. Select a Legal Entity Registration Code, EIN or TIN.
9. Select a Legal Reporting Unit Registration Code, Legal Reporting Unit Registration Number.
10. Optionally enter one or more Legal Functions.
11. Save and Close.
Legal Addresses for Legal Entities and Reporting Units
Create a legal address for legal entities and reporting units by following these steps:
1. In the Setup and Maintenance work area, go to the Manage Legal Address task.
2. Select Create.
3. Select Country.
4. Enter Address Line 1, Oracle Parkway.
5. Optionally enter Address Line 2, and Address Line 3.
6. Enter or Select the postal code, 94065.
7. Select Geography 94065 and Parent Geography Redwood Shores, San Mateo, CA.
8. Optionally enter a Time Zone, US Pacific Time.
9. OK.
10. Save and Close.
Legal Authorities
Create a legal authority by following these steps:
1. In the Setup and Maintenance work area, go to the Manage Legal Authorities task.
2. Enter the Name, California Franchise Tax Board.
3. Enter the Tax Authority Type, Reporting.
Note: Create an address for the legal authority.
4. Select Create.
5. The Site Number is automatically assigned.
6. Optionally enter a Mail Stop.
7. Select Country, United States
8. Enter Address Line 1, 121 Spear Street, Suite 400.
135

Oracle Fusion Cloud HCM
Using Common Features for HCM
Chapter 9
Legal Entities, Business Units, and Reference Data Sets
9. Optionally enter Address Line 2, and Address Line 3.
10. Enter or Select the postal code, 94105.
11. Select Geography 94105 and Parent Geography San Francisco, San Francisco, CA.
12. OK.
13. Optionally enter a Time Zone, US Pacific Time.
14. Optionally click the One-Time Address check box.
15. The From Date displays today's date. Update if necessary.
16. Optionally enter a To Date to indicate the last day the address can be used.
Note: You can optionally enter Address Purpose details.
17. Select Add Row.
18. Select Purpose.
19. The Purpose from Date will default to today's date.
20. Optionally enter a Purpose to Date.
21. OK.
22. Save and Close.
Related Topics
•
Legal Authorities
•
Overview of Legal Jurisdiction and Authorities
•
How do I update existing setup data?
Create Legal Entities, Registrations, and Reporting Units
Define a legal entity for each registered company or other entity recognized in law for which you want to record assets,
liabilities, and income, pay transaction taxes, or perform intercompany trading.
Legal Entity
Create a legal entity by following these steps:
1. In the Setup and Maintenance work area, go to the Manage Legal Entity task.
2. Accept the default Country, United States.
3. Enter Name, InFusion USA West.
4. Enter Legal Entity Identifier, US0033.
5. Optionally enter Start Date. When the start date is blank the legal entity is effective from the creation date.
6. Optionally enter an End Date.
7. Optionally, if your legal entity should be registered to report payroll tax and social insurance, select the Payroll
statutory unit check box.
8. Optionally, if your legal entity has employees, select the Legal employer check box.
9. Optionally, if this legal entity isn't a payroll statutory unit, select an existing payroll statutory unit to report
payroll tax and social instance on behalf of this legal entity.
10. Enter the Registration Information
11. Accept the default Identifying Jurisdiction, United States Income Tax.
136

Oracle Fusion Cloud HCM
Using Common Features for HCM
Chapter 9
Legal Entities, Business Units, and Reference Data Sets
12. Search for and select a Legal Address, 500 Oracle Parkway, Redwood Shores, CA 94065.
The legal address must have been entered previously using the Manage Legal Address task.
13. OK.
14. Optionally enter a Place of Registration.
15. Enter the EIN or TIN.
16. Enter the Legal Reporting Unit Registration Number.
17. Save and Close.
18. In the Setup and Maintenance work area, go to the Manage Legal Entity page and Select to set scope.
19. Select the Manage Legal Entity.
20. In the *Legal Entity list, select Select and Add.
21. Click Apply and Go to Task.
22. Select your legal entity.
23. Save and Close.
This sets the scope for your task list to the selected legal entity.
24. Save and Close.
Legal Entity Registrations
A legal entity registration with the same name as that of the legal entity is created by default. To verify this, locate the
Manage Legal Entity Registrations task and then select Go to Task. To create another registration for the legal entity
follow these steps:
1. In the Setup and Maintenance work area, go to the Manage Legal Entity Registrations task. Verify that the
Legal Entity scope value is set correctly.
2. Go to Task.
3. Select Create.
4. Enter Jurisdiction.
5. Enter Registered Address.
6. Enter Registered Name.
7. Optionally enter Alternate Name, Registration Number, Place of Registration, Issuing Legal Authority, and
Issuing Legal Authority Address, Start Date, and End Date.
8. Save and Close.
Legal Reporting Unit
When a legal entity is created, a legal reporting unit with the same name as that of the entity is also automatically
created. To create more legal reporting units or modify the settings follow these steps:
1. In the Setup and Maintenance work area, go to the Manage Legal Reporting Unit task. Verify that the Legal
Entity scope value is set correctly.
2. Go to Task
3. Select Create.
4. Enter Territory, United States.
5. Enter Name.
6. Optionally enter a Start Date.
7. Enter Registration Information.
8. Search for and select Jurisdiction.
9. Enter Main Legal Reporting Unit information.
137

Oracle Fusion Cloud HCM
Using Common Features for HCM
Chapter 9
Legal Entities, Business Units, and Reference Data Sets
10. Select the value Yes or No for the Main Legal Reporting Unit. Set value to yes only if you're creating a new
main (primary) legal reporting unit.
11. Enter the Main Effective Start Date, 1/1/11.
12. Save and Close.
Related Topics
•
Overview
•
Model Legal Entities
•
Plan Legal Reporting Units
•
How do I update existing setup data?
Legislative Data Groups
Legislative data groups are a means of partitioning payroll and related data. At least one legislative data group is
required for each country where the enterprise operates.
Each legislative data group is associated with one or more payroll statutory units. Each payroll statutory unit can belong
to only one legislative data group.
Payroll-related information, such as elements, is organized by legislative data group. Each legislative data group:
• Marks a legislation in which payroll is processed.
• Is associated with a legislative code, currency, and its own cost allocation key flexfield structure.
• Is a boundary that can share the same set up and still comply with the local laws.
• Can span many jurisdictions as long as they're within one country.
• Can contain many legal entities that act as payroll statutory units.
How Legal Employers Work with Payroll Statutory Units
and Tax Reporting Units
You can designate legal entities as legal employers and payroll statutory units, which makes them available for use in
Oracle Fusion Human Capital Management (HCM).
You can have only one legal entity that's also a payroll statutory unit and legal employer, or multiple legal entities,
payroll statutory units and legal employers. Payroll statutory units and tax reporting units share a parent child
relationship with the payroll statutory unit being a parent of a tax reporting unit
Legal Employers and Payroll Statutory Units
You can designate payroll statutory units to group legal employers to do statutory calculations at a higher level. For
example, you can use payroll statutory units for court orders, or to calculate the United Kingdom (UK) statutory sick pay.
A legal employer can exist independently of an enterprise or be a part of a payroll statutory unit. There can be many
legal employers belonging to a payroll statutory unit, but a legal employer can belong only to one payroll statutory unit.
138

Oracle Fusion Cloud HCM
Using Common Features for HCM
Chapter 9
Legal Entities, Business Units, and Reference Data Sets
Legal Employers and Tax Reporting Units
Tax reporting units are indirectly associated with a legal employer through the payroll statutory unit. One or more
tax reporting units can be used by a single legal employer, and a tax reporting unit can be used by one or more legal
employers.
For example, if a single tax reporting unit is linked to a payroll statutory unit and two legal employers are associated with
this payroll statutory unit, then both legal employers are associated with the tax reporting unit. Use the Manage Legal
Reporting Unit HCM Information task to designate an existing legal reporting unit as a tax reporting unit. You need to
select a parent payroll statutory unit when you create a legal reporting unit belonging to a legal employer (that isn't a
payroll statutory unit as well). Next, you need to designate the legal reporting unit as a tax reporting unit and select the
legal employer.
Related Topics
•
Examples of HCM Organization Models
•
Overview
•
What's a legal employer?
•
What's a payroll statutory unit?
•
What's a tax reporting unit?
Examples of HCM Organization Models
You can use any of these HCM organization models.
• Simple Configuration
• Multiple Legal Employers and Tax Reporting Units
• One Payroll Statutory Unit and Two Tax Reporting Units
• One Payroll Statutory Unit with Several Tax Reporting Units
• Multiple Payroll Statutory Units with Several Tax Reporting Units
These models include a legislative data group (LDG) that isn't an organization classification and show how you can
partition payroll data by associating them with a payroll statutory unit
Simple Configuration
This is an example of a simple configuration without any tax reporting units. The enterprise has only one legal entity,
which is both a payroll statutory unit and a legal employer, and shares the same boundaries. In this type reporting can
be done only at a single level. Countries such as Saudi Arabia and the United Arab Emirates (UAE) might use this type of
model, as these countries report at the legal entity level.
139

Oracle Fusion Cloud HCM
Using Common Features for HCM
Chapter 9
Legal Entities, Business Units, and Reference Data Sets
This figure illustrates a simple configuration where the enterprise has only one legal entity, which is both a payroll
statutory unit and a legal employer.
Multiple Legal Employers and Tax Reporting Units
In this configuration, you define one legal entity, InFusion US as a payroll statutory unit with two separate legal entities,
which are also legal employers. This model shows multiple legal employers that are associated with a single payroll
statutory unit. Tax reporting units are always associated with a specific legal employer (or employers) through the
payroll statutory unit.
The implication is that payroll statutory reporting boundaries vary from human resources (HR) management, and you
can categorize the balances separately as either a payroll statutory unit, legal employer, or a tax reporting unit.
This configuration is based on tax filing requirements, as some tax-related payments and reports are associated with a
higher level than employers. An example of a country that might use this model is the US
140

Oracle Fusion Cloud HCM
Using Common Features for HCM
Chapter 9
Legal Entities, Business Units, and Reference Data Sets
This figure illustrates an enterprise that has one payroll statutory unit and multiple legal employers and tax reporting
units.
One Payroll Statutory Unit and Two Tax Reporting Units
This model makes no distinction between a legal employer and a payroll statutory unit. You define tax reporting units as
subsidiaries to the legal entity.
In this enterprise, legal entity is the highest level of aggregation for payroll calculations and reporting. Statutory
reporting boundaries are the same for both payroll and HR management. An example of a country that might use this
model is France.
141

Oracle Fusion Cloud HCM
Using Common Features for HCM
Chapter 9
Legal Entities, Business Units, and Reference Data Sets
This figure illustrates an example of an organization with one legal entity. The legal entity
is both a legal employer and a payroll statutory unit and that has two tax reporting units.
One Payroll Statutory Unit with Several Tax Reporting Units
In this model, the enterprise has one legal entity. Legal employers and tax reporting units are independent from each
other within a payroll statutory unit, because there is no relationship from a legal perspective. Therefore, you can report
separately on both entities
Using this model, you can't report on tax reporting unit balances within a legal employer, and categorize balances by
either or both organizations, as required. An example of a country that might use this model is India.
142

Oracle Fusion Cloud HCM
Using Common Features for HCM
Chapter 9
Legal Entities, Business Units, and Reference Data Sets
This figure illustrates an enterprise with one legal entity that's a payroll statutory unit
and a legal employer. The tax reporting units are independent from the legal employer.
Multiple Payroll Statutory Units with Several Tax Reporting Units
In this model, the enterprise has two legal entities. The legal employers and tax reporting units are independent from
each other within a payroll statutory unit, because there is no relationship from a legal perspective. Therefore, you can
report separately on both entities.
Using this model, you can't report on tax reporting unit balances within a legal employer, and categorize balances by
either or both organizations, as required. An example of a country that might use this model is the United Kingdom
(UK).
143

Oracle Fusion Cloud HCM
Using Common Features for HCM
Chapter 9
Legal Entities, Business Units, and Reference Data Sets
This figure illustrates an enterprise with two legal entities, and legal employers and tax reporting units are independent
from each other.
Related Topics
•
How Legal Employers Work with Payroll Statutory Units and Tax Reporting Units
•
Legislative Data Groups
•
Overview
144

Oracle Fusion Cloud HCM
Using Common Features for HCM
Chapter 9
Legal Entities, Business Units, and Reference Data Sets
Examples of Creating Calculation Cards for Deductions
at Different Levels
You can create and manage calculation cards at several different levels, from an individual person to a payroll statutory
unit.
Use the cards to capture information specific to a person or organization, such as an employee's tax filing status or
an employer's tax identification number. Calculation card entries override default values defined at other levels. The
priority of information, from highest to lowest, is as follows:
1. Personal calculation card (payroll relationship level)
2. Tax reporting unit calculation card
3. Payroll statutory unit calculation card
4. Calculation value definitions (legislative data group level)
Note: Not all countries or territories support creating calculation cards for payroll statutory units and tax reporting
units. The enterable values at each level also vary by country or territory. The basic steps to create and manage
calculation cards are the same at all levels.
Use these examples to understand when you might define calculation cards at each level.
Personal Calculation Card
Scenario: An employee qualifies for a special reduced tax rate.
Task: Calculation Cards task in the Payroll section under My Client Groups.
Tax Reporting Unit Card
Scenario: The income tax exemption amount is 2000 at the legislative data group level, but a tax reporting unit in a
particular state or province uses an exemption amount of 2500. Enter this default value for the tax reporting unit, which
can be overridden on personal calculation cards.
Task: Manage Legal Reporting Unit Calculation Cards task in the Setup and Maintenance section.
Payroll Statutory Unit Card
Scenario: During application setup, the implementation team defines default contribution rates for the payroll statutory
unit.
Task: Manage Legal Entity Calculation Cards task in the Setup and Maintenance section.
Calculation Value Definition
Scenario: You can view the predefined income tax rates for your country, but you can't edit them.
Task: Calculation Value Definitions task in the Payroll section.
If an employer qualifies for a special tax rate, enter these values on a calculation card at the appropriate level.
145

Oracle Fusion Cloud HCM
Using Common Features for HCM
Chapter 9
Legal Entities, Business Units, and Reference Data Sets
Business Units
A business unit is a unit of an enterprise that performs one or many business functions that can be rolled up in a
management hierarchy. A business unit can process transactions on behalf of many legal entities.
Normally, it has a manager, strategic objectives, a level of autonomy, and responsibility for its profit and loss. Roll
business units up into divisions if you structure your chart of accounts with this type of hierarchy.
Though there’s no direct relationship between business units and legal employers, it’s recommended that you either
maintain a 1:1 relationship between the two or have many business units within a legal employer. Typically, a business
unit is used to roll up financial transactions within a legal entity. So, if you set up business units at a higher level than
legal entities, your financial transactions may fail.
In Oracle Fusion Cloud Applications you do the following:
• Assign your business units to one primary ledger. For example, if a business unit is processing payables
invoices, then it must post to a particular ledger. This assignment is required for your business units with
business functions that produce financial transactions.
• Use a business unit as a securing mechanism for transactions. For example, if you run your export business
separately from your domestic sales business, then secure the export business data to prevent access by the
domestic sales employees. To accomplish this security, set up the export business and domestic sales business
as two separate business units.
The Oracle Fusion Applications business unit model provides the following advantages:
• Enables flexible implementation
• Provides consistent entity that controls and reports on transactions
• Shares sets of reference data across applications
Business units process transactions using reference data sets that reflect your business rules and policies and can differ
from country to country. With Oracle Fusion Application functionality, you can share reference data, such as payment
terms and transaction types, across business units, or you can have each business unit manage its own set depending
on the level at which you want to enforce common policies.
In summary, use business units for:
• Management reporting
• Transaction processing
• Transactional data security
• Reference data sharing and definition
Brief Overview of Business Unit Security
A number of Oracle Fusion Applications use business units to implement data security. You assign roles like Accounts
Payable Manager to users to permit them to perform specific functions, and you assign business units for each role to
users to give them access to data in those business units. For example, users who have been assigned a Payables role
for a particular business unit, can perform the function of payables invoicing on the data in that business unit. Roles can
be assigned to users manually using the Security Console, or automatically using provisioning rules. Business Units can
be assigned to users using the Manage Data Access for Users task found in Setup and Maintenance.
146

Oracle Fusion Cloud HCM
Using Common Features for HCM
Chapter 9
Legal Entities, Business Units, and Reference Data Sets
Related Topics
•
Reference Data Sets and Sharing Methods
How Business Units Work with Reference Data Sets
Reference data sharing enables you to group set-enabled reference data such as jobs or grades to share the data across
different parts of the organization.
Sets also enable you to filter reference data at the transaction level so that only data assigned to certain sets is available
to be selected. To filter reference data, Oracle Fusion Human Capital Management (HCM), applications use the business
unit on the transaction. To set up reference data sharing in Oracle Fusion HCM, you create business units and sets, and
then assign the sets to the business units.
Common Set Versus Specific Sets
Some reference data in your organization may be considered global, and should therefore be made available for use
within the entire enterprise. You can assign this type of data to the Common Set, which is a predefined set. Regardless
of the business unit on a transaction, reference data assigned to the Common Set is always available, in addition to the
reference data assigned to the set that corresponds to the business unit on the transaction.
Other types of reference data can be specific to certain business units, so you can restrict the use of the data to those
business units. In this case, you can create sets specifically for this type of data, and assign the sets to the business
units.
Business Unit Set Assignment
When you assign reference data sets to business units, you assign a default reference data set to use for all reference
data types for that business unit. You can override the set assignment for one or more data types.
Example: Assigning Sets to Business Units
InFusion Corporation has two divisions: Lighting and Security, and the divisions each have two locations. Each location
has one or more business functions.
147
Oracle Fusion Cloud HCM
Using Common Features for HCM
Chapter 9
Legal Entities, Business Units, and Reference Data Sets
The following figure illustrates the structure of InFusion Corporation.
When deciding how to create business units, InFusion decides to create them using the country and business function
level. Therefore, they created the following business units:
• Sales_Japan
• Marketing_Japan
• Sales_US
• Sales_UK
• Marketing_India
• Sales_India
Because locations, departments, and grades are specific to each business unit, InFusion does not want to share these
types of reference data across business units. They create a reference data set for each business unit so that data
of those types can be set up separately. Because the jobs in the Sales business function are the same across many
locations, InFusion decides to create one additional set called Jobs. They override the set assignment for the Jobs
reference data group and assign it to the Jobs set. Based on these requirements, they create the following sets:
• Sales_Japan_Set
• Mktg_Japan_Set
• Sales_US_Set
• Sales_UK_Set
• Mktg_India_Set
• Sales_India_Set
• Grades_Set
The following table describes the default set assignment and the set assignment overrides for each business unit in
InFusion:
148

Oracle Fusion Cloud HCM
Using Common Features for HCM
Chapter 9
Legal Entities, Business Units, and Reference Data Sets
Business Unit Default Set Assignment Set Assignment Overrides
Sales_Japan
Sales_Japan_Set for grades, departments, and
locations
Jobs set for jobs
Marketing_Japan
Mktg_Japan_Set for grades, departments, and
locations
None
Sales_US
Sales_US_Set for grades, departments, and
locations
Jobs set for jobs
Sales_UK
Sales_UK_Set for grades, departments, and
locations
Jobs set for jobs
Marketing_India
Mktg_India_Set for grades, departments, and
locations
None
Sales_India
Sales_India_Set for grades, departments, and
locations
Jobs set for jobs
When setting up grades, departments, and locations for the business units, InFusion assigns the data to the default set
for each business unit. When setting up jobs, they assign the Jobs set and assign the Common Set to any jobs that may
be used throughout the entire organization.
When using grades, departments, and locations at the transaction level, users can select data from the set that
corresponds to the business unit they enter on the transaction, and any data assigned to the Common Set. For example,
for transactions for the Marketing_Japan business unit, grades, locations, and departments from the Mktg_Japan_Set is
available to select, as well as from the Common Set.
When using jobs at the transaction level, users can select jobs from the Jobs set and from the Common Set when they
enter a sales business unit on the transaction. For example, when a manager hires an employee for the Sales_India
business unit, the list of jobs is filtered to show jobs from the Jobs and Common sets.
The following figure illustrates what sets of jobs can be accessed when a manager creates an assignment for a worker.
149

Oracle Fusion Cloud HCM
Using Common Features for HCM
Chapter 9
Legal Entities, Business Units, and Reference Data Sets
Associate Business Unit with Legal Employer
You can associate multiple business units with a legal employer. This enables filtering business units by legal employer,
on responsive pages that have implemented this feature.You use the Associated Business Units extensible flexfield (EFF)
context for the business unit - legal entity association.
These are some key points to note:
• By default, the Associated Business Units context isn't associated with any page. You need to configure the
mapping on the Manage Extensible Flexfields page. Thereafter, you can associate multiple business units with
the legal employer. Once the context is associated, it appears for all legal employers.
• A legal employer must have at least one associated business unit to filter the business unit by legal employer.
• You can associate multiple business units with a legal employer, but can't associate the same business unit
twice with a legal employer.
• You can associate the same business unit with multiple legal employers.
• You can delete the legal employer - business unit association.
• You can associate business units when updating or correcting a legal employer.
• The business unit list of values displays all active and inactive business units configured. There isn't any
filtering for only active business units.
• Business units are listed in the ascending order of business unit name.
In this example, Vision Enterprise has 3 legal employers in India - Vision India, Vision Corp India, and Vision India
Financial Services. Each legal employer has 5 business units defined. You want to filter the business units according
to the Vision India legal employer. So, you associate the business units with the legal employer using the Associated
Business Units extensible flexfield context.
Let's look at the steps to update the key values for this association. For other fields, you can use the default values.
Add Context to Manage Legal Entity HCM Information Page
1. Go to My Enterprise > Setup and Maintenance.
2. Search and select the Manage Extensible Flexfields task.
3. Search for Organization Information EFF on the Manage Extensible Flexfields page.
4. Click Edit.
5. Expand the Organization category and select Legal Employer.
6. In the Legal Employer: Details section, select the Associated Business Units delivered context and click the
Pages tab.
7. In the Legal Employer: Associated Contexts Details section, click the Select and Add icon.
8. In the Select and Add: Contexts window, enter Associated Business Units in the Name field and click Search.
9. Select the context.
10. Click Apply.
11. Click Save and Close.
12. Select the Organization Information EFF context on the Manage Extensible Flexfields page and click the
Deploy Flexfield button.
Associate Business Units to Vision India
1. Go to My Client Groups > Quick Actions > Workforce Structures.
150

Oracle Fusion Cloud HCM
Using Common Features for HCM
Chapter 9
Legal Entities, Business Units, and Reference Data Sets
2. Search and click the Manage Legal Entity HCM Information task.
3. Search and click the Vision India legal entity to associate the business units.
4. Click Edit > Update or Correct.
5. Click the Add Row icon in the Associated Business Units section.
6. Search and select these business units.
Number Business Unit
1
Legal
2
Human Resources
3
Facilities
4
Administration
5
Operations
Note: As a prerequisite, these business units should already exist.
Repeat step 5 to add more business units.
7. Click Submit.
Related Topics
•
Filter Business Units Based on Legal Employers
FAQs for Legal Entities, Business Units, and Reference
Data Set
What's a legal employer?
A legal employer is a legal entity that employs workers. You define a legal entity as a legal employer in the Oracle Fusion
Legal Entity Configurator.
The legal employer is captured at the work relationship level, and all assignments within that relationship are
automatically with that legal employer. Legal employer information for worker assignments is also used for reporting
purposes.
151

Oracle Fusion Cloud HCM
Using Common Features for HCM
Chapter 9
Legal Entities, Business Units, and Reference Data Sets
What's a legal address?
A legal address is the mailing address of a legal entity or legal authority. A legal address is also the address a legal entity
uses to register with a legal authority.
You can use legal addresses to send correspondence, such as invoices, bills, reports, and so on, to a legal entity or
authority.
Note:
• You must create legal addresses before creating legal entities
• You can create legal addresses for legal authorities when creating legal authorities
What's a payroll statutory unit?
Payroll statutory units are legal entities that are responsible for paying workers, including the payment of payroll tax and
social insurance.
A payroll statutory unit can pay and report on payroll tax and social insurance on behalf of one or many legal entities,
depending on the structure of your enterprise. For example, if you're a multinational, multiple company enterprise,
then you register a payroll statutory unit in each country where you employ and pay people. You can optionally register
a consolidated payroll statutory unit to pay and report on workers across multiple legal employers within the same
country. You associate a legislative data group with a payroll statutory unit to provide the correct payroll information for
workers.
What's a tax reporting unit?
Use a tax reporting unit to group workers for the purpose of tax and social insurance reporting. A tax reporting unit is
the Oracle Fusion Human Capital Management (HCM) version of the legal reporting unit in Oracle Fusion Applications.
To create a tax reporting unit, you use the Oracle Fusion Legal Entity Configurator to define a legal entity as a payroll
statutory unit. When you identify a legal entity as a payroll statutory unit, the application transfers the legal reporting
units that are associated with that legal entity to Oracle Fusion HCM as tax reporting units. You can then access the tax
reporting unit using the Manage Legal Reporting Unit HCM Information task.
If you identify a legal entity as a legal employer, and not as a payroll statutory unit, you must enter a parent payroll
statutory unit. The resulting legal reporting units are transferred to Oracle Fusion HCM as tax reporting units, but as
children of the parent payroll statutory unit that you entered, and not the legal entity that you identified as a legal
employer.
152

Oracle Fusion Cloud HCM
Using Common Features for HCM
Chapter 9
Legal Entities, Business Units, and Reference Data Sets
What's an ultimate holding company?
The legal entity that represents the top level in your organization hierarchy, as defined by the legal name entered for the
enterprise. This designation is used only to create an organization tree, with these levels:
• Ultimate holding company as the top level
• Divisions and country holding companies as the second level
• Legal employers as the third level
What reference data objects can be shared across business units?
The following table contains the reference data objects for the Oracle Fusion Applications that can be shared across
business units and the method in which the reference data for each is shared.
Application Name Reference Data Object Method of Sharing
Trading Community Model
Customer Account Relationship
Assignment to one set only, no common values
allowed
Trading Community Model
Customer Account Site
Assignment to one set only, no common values
allowed
Trading Community Model
Salesperson
Assignment to one set only, no common values
allowed
Opportunity Management
Sales Method Group
Assignment to one set only, with common
values
Work Management
Assessment Templates
Assignment to one set only, with common
values
Enterprise Contracts
Contract Types
Assignment to one set only, with common
values
Sales
Sales Method
Assignment to one set only, with common
values
Common Components
Activity Templates
Assignment to one set only, with common
values
Payables
Payment Terms
Assignment to multiple sets, no common values
allowed
153

Oracle Fusion Cloud HCM
Using Common Features for HCM
Chapter 9
Legal Entities, Business Units, and Reference Data Sets
Application Name Reference Data Object Method of Sharing
Receivables
Accounting Rules
Assignment to one set only, with common
values
Receivables
Aging Buckets
Assignment to one set only, with common
values
Receivables
Auto Cash Rules
Assignment to one set only, with common
values
Receivables
Collectors
Assignment to one set only, with common
values
Receivables
Lockbox
Assignment to one set only, with common
values
Receivables
Memo Lines
Assignment to one set only, with common
values
Receivables
Payment Terms
Assignment to one set only, with common
values
Receivables
Remit To Address
Assignment to one set only, with common
values
Receivables
Revenue Contingencies
Assignment to one set only, with common
values
Receivables
Transaction Source
Assignment to one set only, with common
values
Receivables
Transaction Type
Assignment to one set only, with common
values
Advanced Collections
Collections Setups
Assignment to one set only, with common
values
Advanced Collections
Dunning Plans
Assignment to one set only, with common
values
Tax
Tax Classification Codes
Assignment to multiple sets, no common values
allowed
Human Resources
Departments
Assignment to one set only, with common
values
Human Resources
Jobs
Assignment to one set only, with common
values
154

Oracle Fusion Cloud HCM
Using Common Features for HCM
Chapter 9
Legal Entities, Business Units, and Reference Data Sets
Application Name Reference Data Object Method of Sharing
Human Resources
Locations
Assignment to one set only, with common
values
Human Resources
Grades
Assignment to one set only, with common
values
Project Billing
Project and Contract Billing
Assignment to multiple sets, no common values
allowed
Project Foundation
Project Accounting Definition
Assignment to one set only, no common values
allowed
Project Foundation
Project Rates
Assignment to one set only, with common
values
Order Management
Hold Codes
Assignment to one set only, with common
values
Order Management
Orchestration Process
Assignment to one set only, with common
values
What happens if I override the set assignment?
For the selected business unit, you can override the default reference data set for one or more reference data groups.
For example, assume you have three reference data groups: Vision 1 SET, Vision 2 SET, and Vision 3 SET, where Vision
SET 1 is the default set for business unit United Kingdom Vision 1 BU. You can override the default so that:
• Grades are assigned to Vision 2 SET.
• Departments are assigned to Vision 3 SET.
• Jobs are assigned to the default set, Vision 3 SET.
155

Oracle Fusion Cloud HCM
Using Common Features for HCM
Chapter 9
Legal Entities, Business Units, and Reference Data Sets
156

Oracle Fusion Cloud HCM
Using Common Features for HCM
Chapter 10
Enterprise Structures Configurator (ESC)
10 Enterprise Structures Configurator (ESC)
How You Establish Enterprise Structures Using the
Enterprise Structures Configurator
The Enterprise Structures Configurator is an interview-based tool that guides you through the process of setting up a
basic enterprise structure.
By answering questions about your enterprise, the tool creates a structure of divisions, legal entities, business units,
and reference data sets that reflects your enterprise structure. After you create your enterprise structure, you also
follow a guided process to determine whether to use positions, and whether to set up additional attributes for jobs and
positions. After you define your enterprise structure and your job and position structures, you can review them, make
any necessary changes, and then load the final configuration.
This figure illustrates the process to configure your enterprise using the Enterprise Structures Configurator.
To be able to use the Enterprise Structures Configurator, you must select the Enterprise Structures Guided Flow feature
for your offerings on the Configure Offerings page in the Setup and Maintenance work area. If you don't select this
157

Oracle Fusion Cloud HCM
Using Common Features for HCM
Chapter 10
Enterprise Structures Configurator (ESC)
feature, then you must set up your enterprise structure using individual tasks provided elsewhere in the offerings, and
you can't create multiple configurations to compare different scenarios.
Establish Enterprise Structures
To define your enterprise structures, use the guided flow within the Establish Enterprise Structures task to enter basic
information about your enterprise, such as the primary industry. You then create divisions, legal entities, business
units, and reference data sets. The Establish Enterprise Structures task enables you to create multiple enterprise
configurations so that you can compare different scenarios. Until you load a configuration, you can continue to create
and edit multiple configurations until you arrive at one that best suits your enterprise.
Establish Job and Position Structures
You also use a guided process to determine whether you want to use jobs only, or jobs and positions. The primary
industry that you select in the Establish Enterprise Structures task provides the application with enough information to
make an initial recommendation. You can either accept the recommendation, or you can answer additional questions
about how you manage people in your enterprise, and then make a selection. After you select whether to use jobs or
positions, you're prompted to set up a descriptive flexfield structure for jobs, and for positions if applicable. Descriptive
flexfields enable you to get more information when you create jobs and positions.
Review Configuration
You can view a result of the interview process prior to loading the configuration. The review results, show the divisions,
legal entities, business units, reference data sets, and the management reporting structure that the application will
create when you load the configuration.
Load Configuration
You can load only one configuration. When you load a configuration, the application creates the divisions, legal entities,
business units, and so on. After you load the configuration, you then use individual tasks to edit, add, and delete
enterprise structures.
This table lists the order of creation of business objects by the Enterprise Structures Configurator
Business Object Task
Location Location Details
Division Manage Divisions
Business Unit Manage Business Units
Set Assignment Override Manage Set Assignments
Legislative Data Group Manage Legislative Data Groups
Enterprise Manage Enterprise HCM Information
Job and Position Flexfield
Definitions
Manage Descriptive Flexfields
Legal Entity
• Manage Legal Entities
• Manage Legal Entity HCM Information
158

Oracle Fusion Cloud HCM
Using Common Features for HCM
Chapter 10
Enterprise Structures Configurator (ESC)
Business Object Task
• Manage Legal Reporting Unit HCM Information
Organization Tree Manage Organization Trees
Configuration Workbench
The Oracle Fusion Enterprise Structures Configurator is an interview based tool to help you analyze how to represent
your business in the Oracle Fusion Applications.
The interview process poses questions about the name of your enterprise, legal structure, management reporting
structure, and primary organizing principle for your business. Based on your answers, the applications suggest the best
practices to use to implement business units in your enterprise. You can use or modify these answers to ensure that
both your reporting and administrative goals are met in your Oracle Fusion deployment.
How You Create Legal Entities in the Enterprise
Structures Configurator
Use the Enterprise Structures Configurator, to create legal entities for your enterprise automatically, based on the
countries in which divisions of your business operate, or you can upload a list of legal entities from a spreadsheet.
Automatically Creating Legal Entities
If you are not certain of the number of legal entities that you need, you can create them automatically. To use this
option, you first identify all of the countries in which your enterprise operates. The application opens the Map Divisions
by Country page, which contains a matrix of the countries that you identified, your enterprise, and the divisions that you
created. You select the check boxes where your enterprise and divisions intersect with the countries to identify the legal
entities that you want the application to create. The enterprise is included for situations where your enterprise operates
in a country, acts on behalf of several divisions within the enterprise, and is a legal employer in a country. If you select
the enterprise for a country, the application creates a country holding company.
The application automatically creates the legal entities that you select, and identifies them as payroll statutory units
and legal employers. For each country that you indicated that your enterprise operates in, and for each country that you
created a location for, the application also automatically creates a legislative data group.
Any legal entities that you create automatically cannot be deleted from the Create Legal Entities page within the
Enterprise Structures Configurator. You must return to the Map Divisions by Country page and deselect the legal
entities that you no longer want.
Example: Creating Legal Entities Automatically
InFusion Corporation is using the ESC to set up its enterprise structure. The corporation has identified two divisions,
one for Lighting, and one for Security. The Lighting division operates in Japan and the US, and the Security division
operates in the UK and India.
159
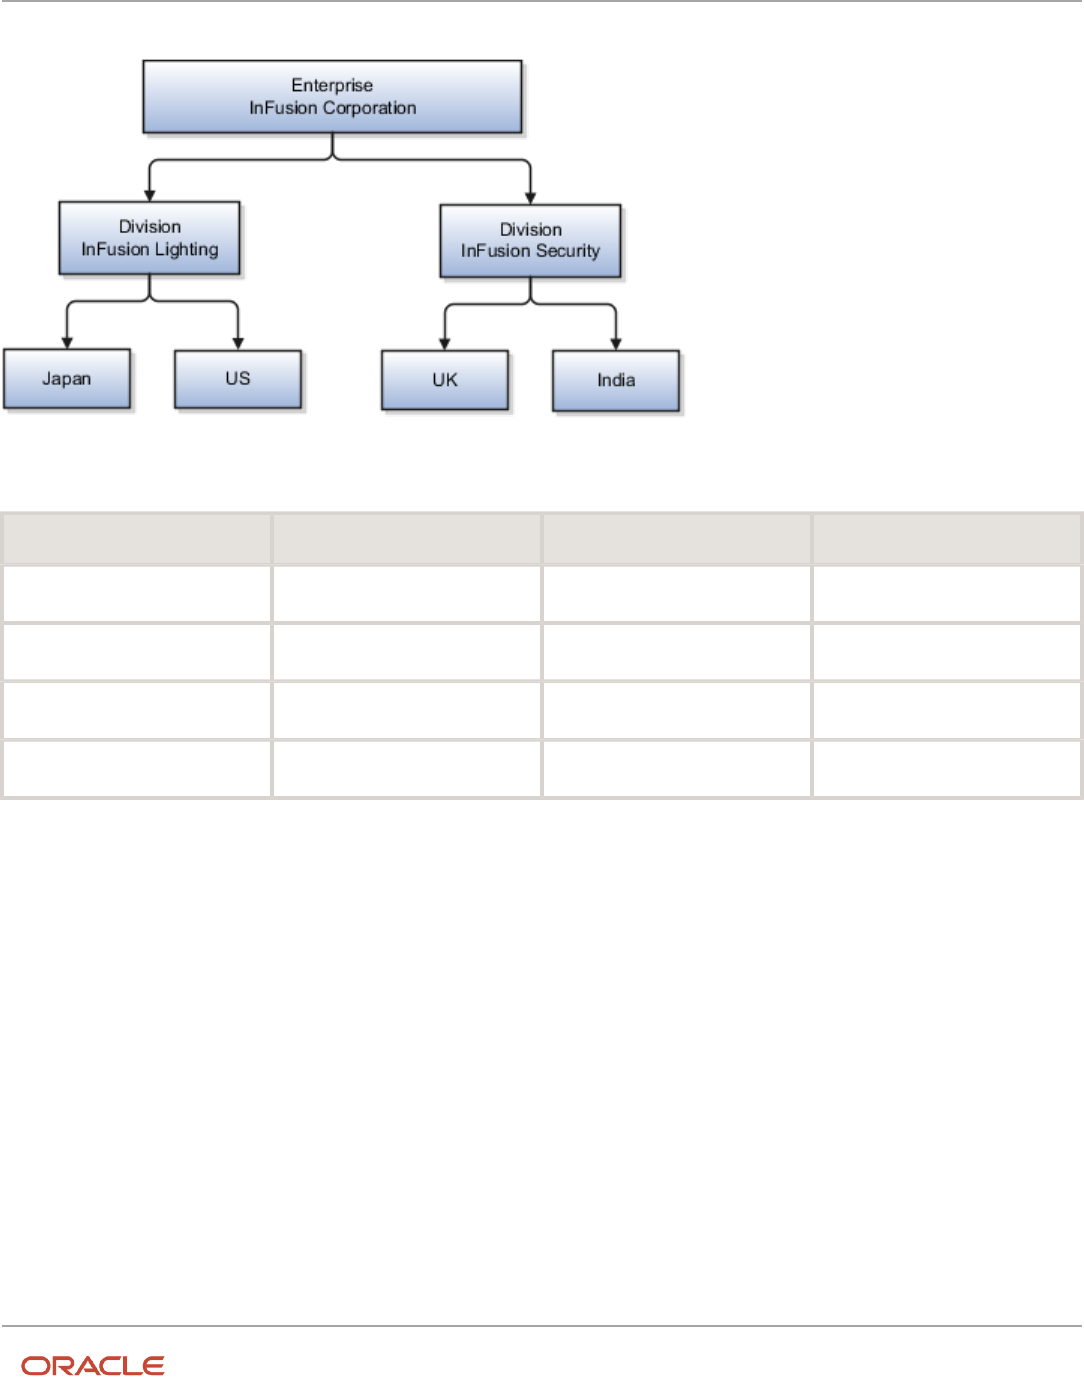
Oracle Fusion Cloud HCM
Using Common Features for HCM
Chapter 10
Enterprise Structures Configurator (ESC)
This figure illustrates InFusion Corporation's enterprise structure.
This table represents the selections that InFusion Corporation makes when specifying which legal entities to create on
the Map Divisions by Country page.
Country Enterprise InFusion Lighting InFusion Security
Japan
No
Yes
No
US
No
Yes
No
UK
No
No
Yes
India
No
No
Yes
Based on the selections made in the preceding table, the ESC creates the following four legal entities:
• InFusion Lighting Japan LE
• InFusion Lighting US LE
• InFusion Security UK LE
• InFusion Security India LE
Creating Legal Entities Using a Spreadsheet
If you have a list of legal entities already defined for your enterprise, you can upload them from a spreadsheet. To use
this option, you first download a spreadsheet template, then add your legal entity information to the spreadsheet, and
then upload directly to your enterprise configuration. You can export and import the spreadsheet multiple times to
accommodate revisions.
160

Oracle Fusion Cloud HCM
Using Common Features for HCM
Chapter 10
Enterprise Structures Configurator (ESC)
Related Topics
•
Examples of HCM Organization Models
•
What's an ultimate holding company?
•
Guidelines for Using Desktop Integrated Excel Workbooks
•
How Legal Employers Work with Payroll Statutory Units and Tax Reporting Units
Considerations for Creating Business Units in the
Enterprise Structures Configurator
Business units are used within Oracle Fusion applications for management reporting, processing of transactions,
and security of transactional data. Using the Enterprise Structures Configurator, you create business units for your
enterprise either automatically or manually.
Automatically Creating Business Units
To create business units automatically, you must specify the level at which to create business units. Business units
within your enterprise may be represented at one of two levels:
• Business function level, such as Sales, Consulting, Product Development, and so on.
• A more detailed level, where a business unit exists for each combination of countries in which you operate and
the functions in those countries.
You can automatically create business units at the following levels:
• Country
• Country and Division
• Country and business function
• Division
• Division and legal entity
• Division and business function
• Business function
• Legal entity
• Business function and legal entity
Select the option that best meets your business requirements, but consider the following:
• If you use Oracle Fusion Financials, the legal entity option is recommended because of the manner in which
financial transactions are processed.
• The business unit level that you select determines how the application automatically creates reference data
sets.
After you select a business unit level, the application generates a list of business units, and you select the ones you
want the application to create. If you select a level that has two components, such as country and division, then
161

Oracle Fusion Cloud HCM
Using Common Features for HCM
Chapter 10
Enterprise Structures Configurator (ESC)
the application displays a table listing both components. You select the check boxes at the intersections of the two
components.
The business units listed by the application are suggestions only, and are meant to simplify the process to create
business units. You aren't required to select all of the business units suggested. When you navigate to the next page in
the ESC guided flow, the Manage Business Units page, you can't delete any of the business units created automatically.
You must return to the Create Business Units page and deselect any business units that you no longer want.
Example: Selecting Business Unit Levels
InFusion Corporation is using the Enterprise Structures Configurator to set up its enterprise structure. InFusion has
identified two divisions, one for Lighting, and one for Security. They operate in four countries: US, UK, Japan, and India,
and they have created a legal entity for each of the countries. The sales and marketing functions are based in both India
and Japan, while the US and the UK have only the sales function.
This figure illustrates InFusion Corporation's enterprise structure.
The following table lists the options for business unit levels and the resulting business units that the application
suggests for InFusion Corporation.
Business Unit Level Suggested Business Units
Country
• US
• UK
• Japan
• India
Country and Division
• InFusion Lighting: Japan
• InFusion Lighting: US
• Infusion Security: UK
• Infusion Security: India
162

Oracle Fusion Cloud HCM
Using Common Features for HCM
Chapter 10
Enterprise Structures Configurator (ESC)
Business Unit Level Suggested Business Units
Country and business function
• Sales: Japan
• Marketing: Japan
• Sales: US
• Sales: UK
• Marketing: India
• Sales: India
Division
• InFusion Lighting
• InFusion Security
Division and Legal Entity
• InFusion Lighting: Japan
• InFusion Lighting: US
• Infusion Security: UK
• Infusion Security: India
Division and Business Function
• InFusion Lighting, Sales
• InFusion Lighting, Marketing
• InFusion Security, Sales
• InFusion Security, Marketing
Business Function
• Sales
• Marketing
Legal Entity
• Legal Entity: Japan
• Legal Entity: US
• Legal Entity: UK
• Legal Entity India
Legal Entity and Business Function
• Legal Entity: Japan, Sales
• Legal Entity: Japan, Marketing
• Legal Entity: US, Sales
• Legal Entity: UK, Sales
• Legal Entity India, Marketing
• Legal Entity India, Sales
Manually Creating Business Units
If none of the levels for creating business units meets your business needs, you can create business units manually, and
you create them on the Manage Business Units page. If you create business units manually, then no reference data sets
are created automatically. You must create them manually as well.
163

Oracle Fusion Cloud HCM
Using Common Features for HCM
Chapter 10
Enterprise Structures Configurator (ESC)
Related Topics
•
Business Units
•
Reference Data Sets and Sharing Methods
•
What reference data objects can be shared across asset books?
How You Create Reference Data Sets in the Enterprise
Structures Configurator
If you created business units automatically, then the Enterprise Structures Configurator automatically creates reference
data sets for you. The Enterprise Structures Configurator creates one reference data set for each business unit.
You can add additional sets, but you cannot delete any of the sets that were created automatically. The Enterprise
Structures Configurator creates one reference data set for each business unit. You can add additional sets, but you
cannot delete any of the sets that were created automatically. A standard set called the Enterprise set is predefined.
Common Set
The Common set is a predefined set that enables you to share reference data across business units. When you select
set-enabled data at the transaction level, the list of values includes data in the:
• Common set
• Set associated with the data type for the business unit on the transaction
For example, when you create an assignment, the list of values for grades includes grade in the:
• Common set
• Set that is assigned to grades for the business unit in which you creating the assignment
How You Roll Back an Enterprise Structure Configuration
The Enterprise Structures Configurator provides the ability to roll back an enterprise configuration.
Roll Back a Configuration Manually
You can manually roll back an enterprise configuration after loading it, for example, because you decide you don't
want to use it. Clicking the Roll Back Configuration button on the Manage Enterprise Configuration page rolls back any
enterprise structures that were created as a part of loading the configuration.
164

Oracle Fusion Cloud HCM
Using Common Features for HCM
Chapter 10
Enterprise Structures Configurator (ESC)
Roll Back a Configuration Automatically
If an error occurs during the process of loading the configuration, then the application automatically rolls back any
enterprise structures that were created before the error was encountered.
FAQs for Enterprise Structures Configurator
What happens if I don't use the Enterprise Structures Configurator
to set up my enterprise structures?
The Enterprise Structures Configurator is an interview-based tool that guides you through setting up divisions, legal
entities, business units, and reference data sets.
If you don't use the Enterprise Structures Configurator, then you must set up your enterprise structure using the
individual tasks that correspond to each enterprise component. In addition, you can't set up multiple configurations and
compare different scenarios. Using the Enterprise Structures Configurator is the recommended process for setting up
your enterprise structures.
165

Oracle Fusion Cloud HCM
Using Common Features for HCM
Chapter 10
Enterprise Structures Configurator (ESC)
166

Oracle Fusion Cloud HCM
Using Common Features for HCM
Chapter 11
Divisions, Departments, Worker Unions, Locations, and
Trees
11 Divisions, Departments, Worker Unions,
Locations, and Trees
Guidelines for Using Single or Multiple Classifications for
an Organization
Organization classifications define the purpose of the organization, whether it's a department, a division, or a legal
entity. In some enterprises, organization classifications overlap, which means that the same organization can be
assigned multiple classifications.
For example, one organization within an enterprise might be both a project organization and a department. The
classifications of organizations vary according to business objectives, legal structure, industry, company culture, size
and type of growth. You can create organizations in Oracle Fusion with one or more classifications to reflect your
enterprise structure.
Defining an Organization with One Classification
Define each organization in your enterprise as a separate organization with a single classification to reflect your
enterprise structure and provide flexibility for expansion. The advantage of setting up separate organizations is the
ability to add further organizations to expand the enterprise easily. For example, if your enterprise acquires another
company which has a different line of business in a country in which you employ people, you can create a division, a
legal entity, and additional departments. Classify the new legal entity as a legal employer and payroll statutory unit for
the company's payroll tax and social insurance.
Defining an Organization with Multiple Classifications
Define an organization with multiple classifications if the organization has multiple purposes. For example, use an
organization within the sales applications as a department that employs salespeople and classify it as a department and
a sales organization. Or, if your enterprise operates and employs people in multiple countries, create a legal entity for
each country using the Manage Legal Entity task. Then use the Manage Departments task to classify the legal entity as
a department.
Related Topics
•
Model Your Financial Reporting Structure
How You Configure Your Enterprise Structure After an
Acquisition
The InFusion Corporation is a global company with organizations in the United States (US), the United Kingdom (UK),
France, China, Saudi Arabia, and the United Arab Emirates (UAE).
167

Oracle Fusion Cloud HCM
Using Common Features for HCM
Chapter 11
Divisions, Departments, Worker Unions, Locations, and
Trees
Its main area of business is in the high tech industry, but it recently acquired a financial services business, based in
Germany. InFusion wants to retain the financial services company as a separate business with all the costs and reporting
managed by the Financial Services division.
You need to set up organizations to reflect the newly acquired company and its organizations.
The following figure illustrates how to set up the new division for Germany, and how the new division fits into the
enterprise.
The following table summarizes the key decisions for setting up the new division:
Decisions to Consider In This Example
Create a separate division?
Yes, as you want to keep the Financial Services company as a separate line of business. By creating a
separate division, you can manage the costs and reporting separately from the InFusion Corporation.
Additionally, you don't have to modify any existing organizations in your enterprise setup.
How many departments?
The Financial Services company currently has three departments for sales, accounting, and marketing.
As InFusion has no plans to downsize or change the company, you can create the three departments to
retain the structure.
How many cost centers? Three, to track the costs of each department.
168

Oracle Fusion Cloud HCM
Using Common Features for HCM
Chapter 11
Divisions, Departments, Worker Unions, Locations, and
Trees
Decisions to Consider In This Example
How many legal entities?
You need one legal entity defined as a legal employer and payroll statutory unit. As the new division
operates only from Germany, you can configure the legal entity to suit Germany's legal and statutory
requirements.
Create legislative data group?
Yes, you need a legislative data group as you currently don't employ or pay people in Germany. Create
one legislative data group to run payroll for your workers in Germany.
Create location?
Create a new location address for each organization located differently. The financial services company
is based in Frankfurt, and the headquarters and departments are all in the same location.
You can use the following tasks to set up the enterprise structures that you need to include in the new Financial Services
company:
• Creating a Location
• Creating a Division
• Creating Departments
• Creating a Legislative Data Group
• Creating Legal Entities
• Defining Legal Employer and Payroll Statutory Unit Information
Creating a Location
1. In the Workforce Structures work area, click the Manage Locations tab to open the Manage Locations page.
2. On the Manage Locations page, click Create, and complete the fields shown in the following table. Use the
default values except where indicated.
Field Value
Name
Germany
Code
DE
Country
Germany
Address Line 1
Hauptstrasse 85
Postal Code
6000
City
Frankfurt
169

Oracle Fusion Cloud HCM
Using Common Features for HCM
Chapter 11
Divisions, Departments, Worker Unions, Locations, and
Trees
3. Click Submit.
Creating a Division
1. In the Workforce Structures work area, click Manage Divisions to open the Manage Divisions page.
2. On the Manage Divisions page, click Create.
3. On the Create Division: Division Description page, select the Create New option to create a division with a
single classification.
4. In the Division Description region, complete the fields shown in the following table. Use the default values
except where indicated.
Field Value
Name
Germany Financial Services
Location
Germany
5. Click Next.
6. On the Create Division: Division Details page, complete the fields shown in the following table. Use the
default values except where indicated.
7. Click Next.
8. On the Create Division: Review page, review the division details, and click Submit.
9. Click Yes.
10. Click OK.
Creating Departments
1. In the Workforce Structures work area, click the Manage Departments tab to open the Manage Department
page.
2. On the Manage Departments page, click Create.
3. On the Create Department: Description page, select the Create New option to create a department with a
single classification.
4. Enter the details of the accounting department by completing the fields shown in the following table. Use the
default values except where indicated.
Field Value
Department Name
Accounting
Location
Germany
5. Click Next.
6. Associate a cost center in the Create Department: Department Details page.
7. Click Next.
8. On the Create Department: Review page, review the details of the department, and click Submit.
170

Oracle Fusion Cloud HCM
Using Common Features for HCM
Chapter 11
Divisions, Departments, Worker Unions, Locations, and
Trees
9. Repeat steps 2 through 8 to create the sales and marketing departments.
Creating a Legislative Data Group
1. In the Setup and Maintenance work area, locate the Manage Legislative Data Groups task. Click Go to Task
to open the Manage Legislative Data Group page.
2. On the Manage Legislative Data Groups page, click Create.
3. On the Create Legislative Data Groups page, complete the fields shown in the following table. Use default
values except where indicated.
Field Value
Name
Germany Financial Services
Country
Germany
Currency
Eur
4. Click Submit.
Creating Legal Entities
1. In the Setup and Maintenance work area, locate the Manage Legal Entity task. Click Go to Task to open the
Manage Legal Entity page.
2. On the Manage Legal Entity page, click Create.
3. On the page, complete the fields shown in the following table. Use default values except where indicated.
Field Value
Name
Legal Entity
Legal Entity Identifier
123456
Payroll Statutory Unit
Selected
Legal Employer
Selected
Legal Address
123
EIN or TIN
123
Registration Number
123
171

Oracle Fusion Cloud HCM
Using Common Features for HCM
Chapter 11
Divisions, Departments, Worker Unions, Locations, and
Trees
4. Click Save and Close.
Defining Legal Employer and Payroll Statutory Unit Information
1. In the Setup and Maintenance work area, locate the Manage Legal Entity HCM Information task. Click Go to
Task to open the Manage Legal Entity page.
2. Search for the new legal entity that you created in the "Creating Legal Entities" task.
3. Enter the payroll statutory unit and legal employer details.
4. Associate the legislative data group with the payroll statutory unit.
5. Click Save.
Divisions
Managing multiple businesses requires that you segregate them by their strategic objectives and measure their results.
Responsibility to reach objectives can be delegated along the management structure. Although related to your legal
structure, the business organizational hierarchies don't reflect directly the legal structure of the enterprise. The
management entities and structure can include:
• Divisions and subdivisions
• Lines of business
• Other strategic business units
• Their own revenue and cost centers
These organizations can be included in many alternative hierarchies and used for reporting, as long as they have
representation in the chart of accounts.
Divisions
A division refers to a business-oriented subdivision within an enterprise, in which each division organizes itself
differently to deliver products and services or address different markets. A division can operate in one or more
countries, and can be many companies or parts of different companies that are represented by business units.
A division is a profit center or grouping of profit and cost centers, where the division manager is responsible for
achieving business goals including profits. A division can be responsible for a share of the company's existing product
lines or for a separate business. Managers of divisions may also have return on investment goals requiring tracking of
the assets and liabilities of the division. The division manager generally reports to a corporate executive.
By definition a division can be represented in the chart of accounts. Companies can use product lines, brands, or
geographies as their divisions: their choice represents the primary organizing principle of the enterprise.
Historically, divisions were implemented as a node in a hierarchy of segment values. For example, Oracle E-Business
Suite has only one balancing segment, and often the division and legal entity are combined into a single segment where
each value stands for both division and legal entity.
172

Oracle Fusion Cloud HCM
Using Common Features for HCM
Chapter 11
Divisions, Departments, Worker Unions, Locations, and
Trees
Use of Divisions in Oracle Fusion Cloud Human Capital Management
(HCM)
Divisions are used in HCM to define the management organization hierarchy, using the generic organization hierarchy.
This hierarchy can be used to create organization-based security profiles.
Example of Adding a New Division After Acquiring a
Company
This example describes how you can restructure your enterprise after acquiring a new division.
Scenario
You are part of a senior management team at InFusion Corporation. InFusion is a global company with organizations in
the following countries:
• United States (US)
• United Kingdom (UK)
• France
• China
• Saudi Arabia
• United Arab Emirates (UAE)
The company's main area of business is in the high tech industry, and it recently acquired a new company. You must
analyze the company's current enterprise structure and determine the new organizations to create in the new company.
Details of the Acquired Company
The acquired company is a Financial Services business based in Germany. The Financial Services business differs
significantly from the high tech business. Therefore, you want to keep the Financial Services company as a separate
business with all the costs and reporting managed by the Financial Services division.
The following table summarizes the key decisions that you must consider when determining what new organizations to
set up and how to structure the enterprise.
Decision to Consider In This Example
Create location?
The Financial Services company and its departments are based in Frankfurt. Therefore, you only have
to create one location.
Create separate division?
Yes. Although the new division will exist in the current enterprise structure, you want to keep the
Financial Services company as a separate line of business. By creating a separate division, you can
manage the costs and reporting separately from the InFusion Corporation. Additionally, you don't have
to modify any organizations in the enterprise setup.
173
Oracle Fusion Cloud HCM
Using Common Features for HCM
Chapter 11
Divisions, Departments, Worker Unions, Locations, and
Trees
Decision to Consider In This Example
Create business unit?
Yes. The Financial Services business requires you to create several jobs that don't exist in your high
tech business. You can segregate the jobs that are specific to financial services in a new business unit.
How many departments?
The Financial Services company currently has departments for sales, accounting, and marketing. As
you have no plans to downsize or change the company, you can create three departments to retain the
structure.
How many cost centers?
Although you can have multiple cost centers to track the department costs, you decide to create one
cost center for each department.
How many legal entities?
Define a legal entity for each registered company or some other entity recognized by law. Using the
legal entity, you can:
• Record assets
• Record liabilities
• Record income
• Pay transaction taxes
• Perform intercompany trading
In this case, you only need one legal entity.
You must define the legal entity as a legal employer and payroll statutory unit. As the new division
operates only from Germany, you can configure the legal entity to suit Germany's legal and statutory
requirements.
Note:
You can identify the legal entity as a payroll statutory unit. When you do so, the application transfers
the legal reporting unit associated with the legal entity to Oracle Fusion HCM as a tax reporting unit.
Create legislative data group?
Yes. Because you currently don't employ or pay people in Germany, you must create one legislative
data group to run payroll for the workers in Germany.
Resulting InFusion Enterprise Structure
Based on the analysis, you must create the following:
• One new division
• One new location
• Three new departments
• Three new cost centers
• One new legal entity
• One new legislative data group
174

Oracle Fusion Cloud HCM
Using Common Features for HCM
Chapter 11
Divisions, Departments, Worker Unions, Locations, and
Trees
The following figure illustrates the structure of InFusion Corporation after adding the new division and the other
organizations.
Departments
A department is an organization to which you assign workers. It is an organization with one or more operational
objectives or responsibilities that exist independently of its manager.
You track the department's financial performance through one or more cost centers. For example, sales, research and
development, and human resources. You can report and keep track of headcount by creating a department hierarchy
using Oracle Fusion Trees.
Departments and cost centers example:
175
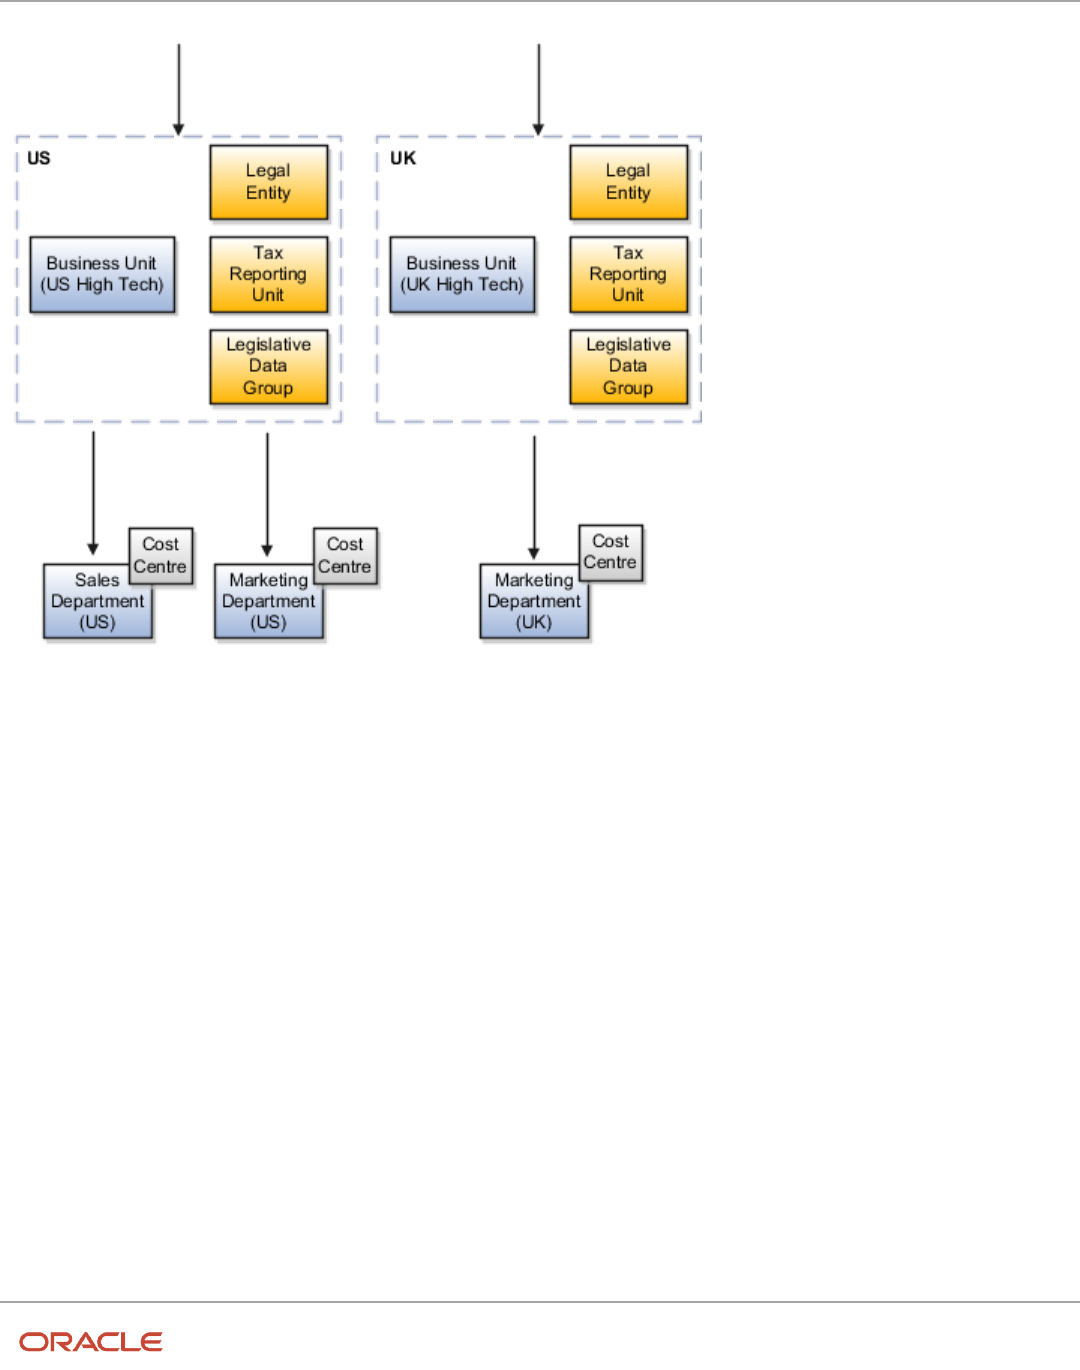
Oracle Fusion Cloud HCM
Using Common Features for HCM
Chapter 11
Divisions, Departments, Worker Unions, Locations, and
Trees
This figure illustrates how departments belong to legal entities within the enterprise structure.
Departments and Cost Centers
A cost center represents the smallest segment of an organization for which you allocate and report on costs. The
manager of a department is typically responsible for cost control by meeting a budget and may be responsible for the
assets used by the department. You can track the financial performance of a department through one or more cost
centers.
Uploading Departments Using a Spreadsheet
If you have a list of departments already defined for your enterprise, you can upload them from a spreadsheet. To use
this option, you first download a spreadsheet template, add your department information to the spreadsheet, and
then upload directly to your enterprise configuration. You can upload the spreadsheet multiple times to accommodate
revisions.
Related Topics
•
Upload Workforce Structures Using a Spreadsheet
176

Oracle Fusion Cloud HCM
Using Common Features for HCM
Chapter 11
Divisions, Departments, Worker Unions, Locations, and
Trees
How You Create a Chart of Account to Create a
Department
In this example you can see how to create a chart of account for HCM implementations. You must set up a minimal
chart of account to associate a company and cost center with departments.
This topic describes a simple scenario primarily intended for use within HCM. For more detailed information on setting
up a chart of account, refer to the Financials product documentation.
Vision Corporation US is a US-based legal entity with cost centers in Arizona and California. In this example, we will
create a Arizona cost center and associate it with the Sales Department.
The following table summarizes key decisions that you must consider when creating a chart of .
Decisions to Consider In this Example
What should be the validation type for the
value set?
Independent. Only this type is supported for creating General Ledger (GL) cost center information for
departments in HCM.
What should be the segment labels for the
chart of account?
The first segment is Primary Balancing Segment and the second segment is Cost Center Segment.
Selecting these labels in this order is crucial in specifying the General Ledger cost center information
for a department.
Summary of Tasks
In the Setup and Maintenance work area, create a chart of account and cost center value sets to create a chart of
account structure and instance, and then associate it with the department.
1. Create the chart of account value set for the Vision Corporation US enterprise.
2. Specify Arizona and California as the values for the chart of account value set
3. Create the cost center value set for the Vision Corporation US enterprise.
4. Specify Arizona and California as the values for the cost center value set.
5. Create the chart of account structure by associating it with the chart of account and cost center value sets you
created earlier.
6. Create the chart of account structure instance by associating it with the structure.
7. Specify the General Ledger cost center information by associating it with the chart of account and the cost
center you created earlier, for creating the sales department.
Create a Chart of Account Value Set
1. In the Setup and Maintenance work area, go to the following:.
◦
Offering: Workforce Deployment
◦
Functional Area: Financial Reporting Structures
◦
Task: Manage Chart of Accounts Value Sets
2. Click Create.
177

Oracle Fusion Cloud HCM
Using Common Features for HCM
Chapter 11
Divisions, Departments, Worker Unions, Locations, and
Trees
3. Complete the fields as shown in this table.
Field Value
Value Set Code
Vision Corporation US Value Set 1
Description
Vision Corporation US Value Set 1
Module
Common Shared Setups
Validation Type
Independent
Value Data Type
Character
Value Subtype
Text
Maximum Length
5
4. Click Save and Close.
Specify Values for the Chart of Account Value Set
1. On the Manage Chart of Accounts Value Sets page, search and select Vision Corporation US Value Set 1 from
the search results.
2. Click Manage Values.
3. Click Create.
4. Complete the fields as shown in this table.
Field Value
Value
AZ
Description
Arizona
Enabled
Select the check box
5. Click Save and Close.
178

Oracle Fusion Cloud HCM
Using Common Features for HCM
Chapter 11
Divisions, Departments, Worker Unions, Locations, and
Trees
6. Create additional values for the Vision Corporation US Value Set 1 as shown in this table.
Field Value
Value
CA
Description
California
Enabled
Select the check box
7. On the Manage Values page, click Save and Close.
Create a Cost Center Value Set
1. In the Setup and Maintenance work area, go to the following:
◦
Offering: Workforce Deployment
◦
Functional Area: Financial Reporting Structures
◦
Task: Manage Chart of Accounts Value Sets
2. Click Create.
3. Complete the fields as shown in this table.
Field Value
Value Set Code
Vision Corporation US Cost Center Value Set 1
Description
Vision Corporation US Cost Center Value Set 1
Module
Common Shared Setups
Validation Type
Independent
Value Data Type
Character
Value Subtype
Text
Maximum Length
5
4. Click Save and Close.
179

Oracle Fusion Cloud HCM
Using Common Features for HCM
Chapter 11
Divisions, Departments, Worker Unions, Locations, and
Trees
Create a Chart of Account Structure
1. In the Setup and Maintenance work area, go to the following:.
◦
Offering: Workforce Deployment
◦
Functional Area: Financial Reporting Structures
◦
Task: Manage Chart of Accounts Structures
2. Search and select the GL# key flexfield code.
3. Click Manage Structures.
4. Click Create.
5. Complete the fields as shown in this table.
Field Value
Structure Code
Vision Corp CoA Cost Center
Name
Vision Corp CoA Cost Center
Description
Vision Corporation Chart of Account Cost Center
Delimiter
Select any value
6. Click Save.
7. In the Segments section, click Create.
8. Complete the fields as shown in this table.
Field Value
Segment Code
Vision_Corp_COA
API Name
visionCorpCoa
Name
Vision Corporation COA
Sequence Number
1
Prompt
Vision Corporation COA
Short Prompt
Vision
Enabled Select the check box
180

Oracle Fusion Cloud HCM
Using Common Features for HCM
Chapter 11
Divisions, Departments, Worker Unions, Locations, and
Trees
Field Value
Display Width
1
Range Type
Low
Column Name
SEGMENT1
Default Value Set Code
Vision Corporation US Value Set 1
Selected Labels
Primary Balancing Segment
9. Click Save and Close.
10. Create another segment with the following values
Field Value
Segment Code
Vision_Corp_CostCenter_COA
API Name
visionCorpCostcenterCoa
Name
Vision Corporation Cost Center COA
Sequence Number
2
Prompt
Vision Corporation Cost Center COA
Short Prompt
Vision1
Enabled
Select the check box
Display Width
1
Range Type
Low
Column Name
SEGMENT2
181

Oracle Fusion Cloud HCM
Using Common Features for HCM
Chapter 11
Divisions, Departments, Worker Unions, Locations, and
Trees
Field Value
Default Value Set Code
Vision Corporation US Cost Center Value Set 1
Selected Labels
Cost Center Segment
11. Click Save and Close.
12. On the Create Key Flexfield Structure page, click Save and Close.
Create a Chart of Accounts Structure Instance
1. In the Setup and Maintenance work area, go to the following:
◦
Offering: Workforce Deployment
◦
Functional Area: Financial Reporting Structures
◦
Task: Manage Chart of Accounts Structure Instances
2. Search and select the GL# key flexfield code.
3. Click Manage Structure Instances.
4. Click Create.
5. Complete the fields as shown in this table.
Field Value
Structure Instance Code
Vision COA Structure Instance
API name
VisionCoaStructureInstance
Name
Vision Corporation COA Structure Instance
Structure Name
Vision Corp CoA Cost Center
6. Click Save and Close.
Specify the General Ledger Cost Center Information for Creating a
Department
1. In the Workforce Structures work area, click the Manage Departments tab.
2. Click Create.
3. Select the Create new option.
4. Enter Sales Department in the Name field.
5. Click Next.
182

Oracle Fusion Cloud HCM
Using Common Features for HCM
Chapter 11
Divisions, Departments, Worker Unions, Locations, and
Trees
6. In the GL Cost Center Information section, complete the fields as shown in this table.
Field Value
Record Identifier
10
Company Value Set
Vision Corporation US Value Set 1
Company
AZ
Cost Center Value Set
Vision Corporation US Cost Center Value Set 1
Cost Center
AZ
7. Click Next to review the specified information.
8. Click Submit.
Cost Centers and Departments
The two important components to be considered in designing your enterprise structure are cost centers and
departments.
A cost center represents the smallest segment of an organization for which you collect and report costs. A department
is an organization with one or more operational objectives or responsibilities that exist independently of its manager
and has one or more workers assigned to it.
Cost Centers
A cost center represents the destination or function of an expense rather than the nature of the expense which is
represented by the natural account. For example, a sales cost center indicates that the expense goes to the sales
department.
A cost center is generally attached to a single legal entity. To identify the cost centers within a chart of accounts
structure use one of these two methods:
• Assign a cost center value in the value set for each cost center. For example, assign cost center values of
PL04 and G3J1 to your manufacturing teams in the US and India. These unique cost center values allow easy
aggregation of cost centers in hierarchies (trees) even if the cost centers are in different ledgers. However, this
approach requires defining more cost center values.
• Assign a balancing segment value with a standardized cost center value to create a combination of segment
values to represent the cost center. For example, assign the balancing segment values of 001 and 013 with
cost center PL04 to represent your manufacturing teams in the US and India. This creates 001-PL04 and 013-
PL04 as the cost center reporting values. The cost center value of PL04 has a consistent meaning. This method
requires fewer cost center values to be defined. However, it prevents construction of cost center hierarchies
183

Oracle Fusion Cloud HCM
Using Common Features for HCM
Chapter 11
Divisions, Departments, Worker Unions, Locations, and
Trees
using trees where only cost center values are used to report results for a single legal entity. You must specify a
balancing segment value in combination with the cost center values to report on a single legal entity.
Departments
A department is an organization with one or more operational objectives or responsibilities that exist independently of
its manager. For example, although the manager may change, the objectives don't change. Departments have one or
more workers assigned to them.
A manager of a department is typically responsible for:
• Controlling costs within their budget
• Tracking assets used by their department
• Managing employees, their assignments, and compensation
The manager of a sales department may also be responsible for meeting the revenue targets.
The financial performance of departments is generally tracked through one or more cost centers. In Oracle Fusion Cloud
Applications, departments are defined and classified as Department organizations. Oracle Fusion Cloud Human Capital
Management (HCM) assigns workers to departments, and tracks the headcount at the departmental level.
The granularity of cost centers and their relationship to departments varies across implementations. Cost center
and department configuration may be unrelated, identical, or consist of many cost centers tracking the costs of one
department.
Department Classifications
A department can be classified as a project organization, sales and marketing organization, or cost organization.
A point to note is that a department name must be unique. This rule applies even when the department is classified as
a project organization or an inventory organization. For example, if you create a department with name Vision Corp.
Sales, you can't create another department with the same name. Also, if you classify this department as a project
organization, you can't create another project organization as well with the same name.
Or, if you create a division with the name Vision Corp. Marketing that is classified as a department, which in turn is
classified as a project organization, you can't create another division, department or project organization with the same
name.
Oracle Fusion Cloud Human Capital Management (HCM) uses trees to model organization hierarchies. It provides
predefined tree structures for department and other organizational hierarchies that can include organizations with any
classification.
Project Organization
Classify departments as a project owning organization to enable associating them with projects or tasks. The project
association is one of the key drivers for project access security.
In addition, you must classify departments as project expenditure organizations to enable associating them to project
expenditure items. Both project owning organizations and project expenditure organizations can be used by Oracle
Subledger Accounting to derive accounts for posting Oracle Fusion Cloud Project Management accounting entries to
Oracle General Ledger.
184

Oracle Fusion Cloud HCM
Using Common Features for HCM
Chapter 11
Divisions, Departments, Worker Unions, Locations, and
Trees
Sales and Marketing Organization
In sales applications, you can define sales and marketing organizations. Sales organization hierarchies are used to
report and forecast sales results. Salespeople are defined as resources assigned to these organizations.
In some enterprises, the HCM departments and hierarchies correspond to sales organizations and hierarchies.
Examining the decision on how to model sales hierarchies in relationship to department hierarchies when implementing
Customer Relationship Management to eliminate any possible redundancy in the definition of the organizations is
important.
The following figure illustrates a management hierarchy, in which the System Components Division tracks its
expenses in two cost centers, Air Compressors and Air Transmission. At the department level, two organizations with a
classification of Department are defined, the Marketing Department and Sales Department. These two departments can
be also identified as a Resource Organizations, which enable assigning resources, such as salespeople, and other sales
specific information to them. Each department is represented in the chart of accounts by more than one cost center,
enabling granular as well as hierarchical reporting.
Cost Organization
Oracle Project Costing uses a cost organization to represent a single physical inventory facility or group of inventory
storage centers, for example, inventory organizations. This cost organization can roll up to a manager with responsibility
for the cost center in the financial reports.
A cost organization can represent a costing department. Consider this relationship when determining the setup of
departments in HCM. No system dependencies are required for these two entities, cost organization and costing
department, to be set up in the same way.
185

Oracle Fusion Cloud HCM
Using Common Features for HCM
Chapter 11
Divisions, Departments, Worker Unions, Locations, and
Trees
How You Configure the Department Title
The Title field for a department is hidden and optional, by default. You need to do these 2 steps to enable the field and
make it mandatory.
Enable Title Field
These are the steps to set the value of the profile option ORA_PER_ENABLE_DEPARTMENT_TITLE to Y.
1. Navigate to the Setup and Maintenance work area.
2. Search for and click the Manage Administrator Profile Values task.
3. Search for the ORA_PER_ENABLE_DEPARTMENT_TITLE profile option code and select the profile option in
the search results.
4. In the Profile Values section, enter Y in the Profile Value field.
5. Click Save and Close.
Once you set the profile option value to Y, you can see the Title field in all the department pages, including Create,
Update, Correct, and Review pages. Currently, the Title field appears in the Department LOV only on the responsive
position pages.
Make Title Field Mandatory
Prerequisite Tasks:
1. Create a sandbox and add the Page Composer tool.
2. Create a department from the Workforce Structures work area on the My Client Groups tab.
Do these steps to make the title field mandatory:
1. Click Edit Pages from the Settings and Actions menu.
2. Click Structure and place your cursor in the Title field.
3. Click Edit in the Confirm Shared Component Edit window.
4. Search for InputText:Title in the component list and click the Edit icon.
5. Scroll down to the Required field in the Edit Properties window and click the down arrow.
6. Select Expression Builder.
7. Add the #{pageFlowScope.makeTitleMandatory eq 'Y'} condition in the expression editor.
8. Click OK.
9. Scroll down to the Show Required field in the Edit Properties window and click the down arrow.
10. Select Expression Builder.
11. Add the #{pageFlowScope.makeTitleMandatory eq 'Y'} condition in the expression editor.
12. Click OK.
Disability Organizations
You can set up disability organizations to identify the external organizations with which disabled employees are
registered, and assess the degree of disability in the employee.
186

Oracle Fusion Cloud HCM
Using Common Features for HCM
Chapter 11
Divisions, Departments, Worker Unions, Locations, and
Trees
You set up disability organizations using the Manage Disability Organizations task in the Workforce Structures work area
under My Client Groups.
Purpose of Disability Organizations
Disability organizations provide information and support to people with disabilities, for example, the Royal National
Institute of Blind People. You can create a disability organization as a Trading Community Architecture party using the
Manage Integration of Additional Applications task in the Setup and Maintenance work area. You can then select a
disability organization party usage code.
For employees with disability, you can select the disability organization in their person records, identify the registration
and expiration dates, and enter any other descriptive or legislative information about the disability.
Related Topics
•
Person Records
•
Third Parties Overview
Worker Union Management
These three components manage worker union information in Human Capital Management (HCM) Cloud:
• Worker Unions
• Bargaining Units
• Collective Agreements
Worker Unions
The worker union is a HCM organization. You can create a new worker union or select an existing organization to define
a worker union. The details of a worker union are country-specific and the country value is mandatory for a worker
union. You can optionally attach any supporting documents for the worker union. A worker union holds date-effective
attributes. Therefore, you can track the changes to the worker union over a period of time. You can also inactivate
the worker union. You can configure additional attributes specific to any legislation or customer using the available
descriptive flexfields and extensible flexfields.
You can optionally associate worker unions with their affiliated bargaining units. The values in the Bargaining Unit and
Location fields are filtered to match the country you selected. You can add more than one work union contact and enter
the contact details, such as contact name, union title, work phone, and work Email.
This figure illustrates the association between worker union, bargaining unit, and collective agreement:
187

Oracle Fusion Cloud HCM
Using Common Features for HCM
Chapter 11
Divisions, Departments, Worker Unions, Locations, and
Trees
A worker union can be associated with multiple bargaining units. However, a bargaining unit can be associated with only
one worker union. A collective agreement can be associated with only one worker union and bargaining unit. A worker
union or bargaining unit can be associated with multiple collective agreements.
This figure illustrates the association between position or assignment and worker union, bargaining unit, and collective
agreement:
188
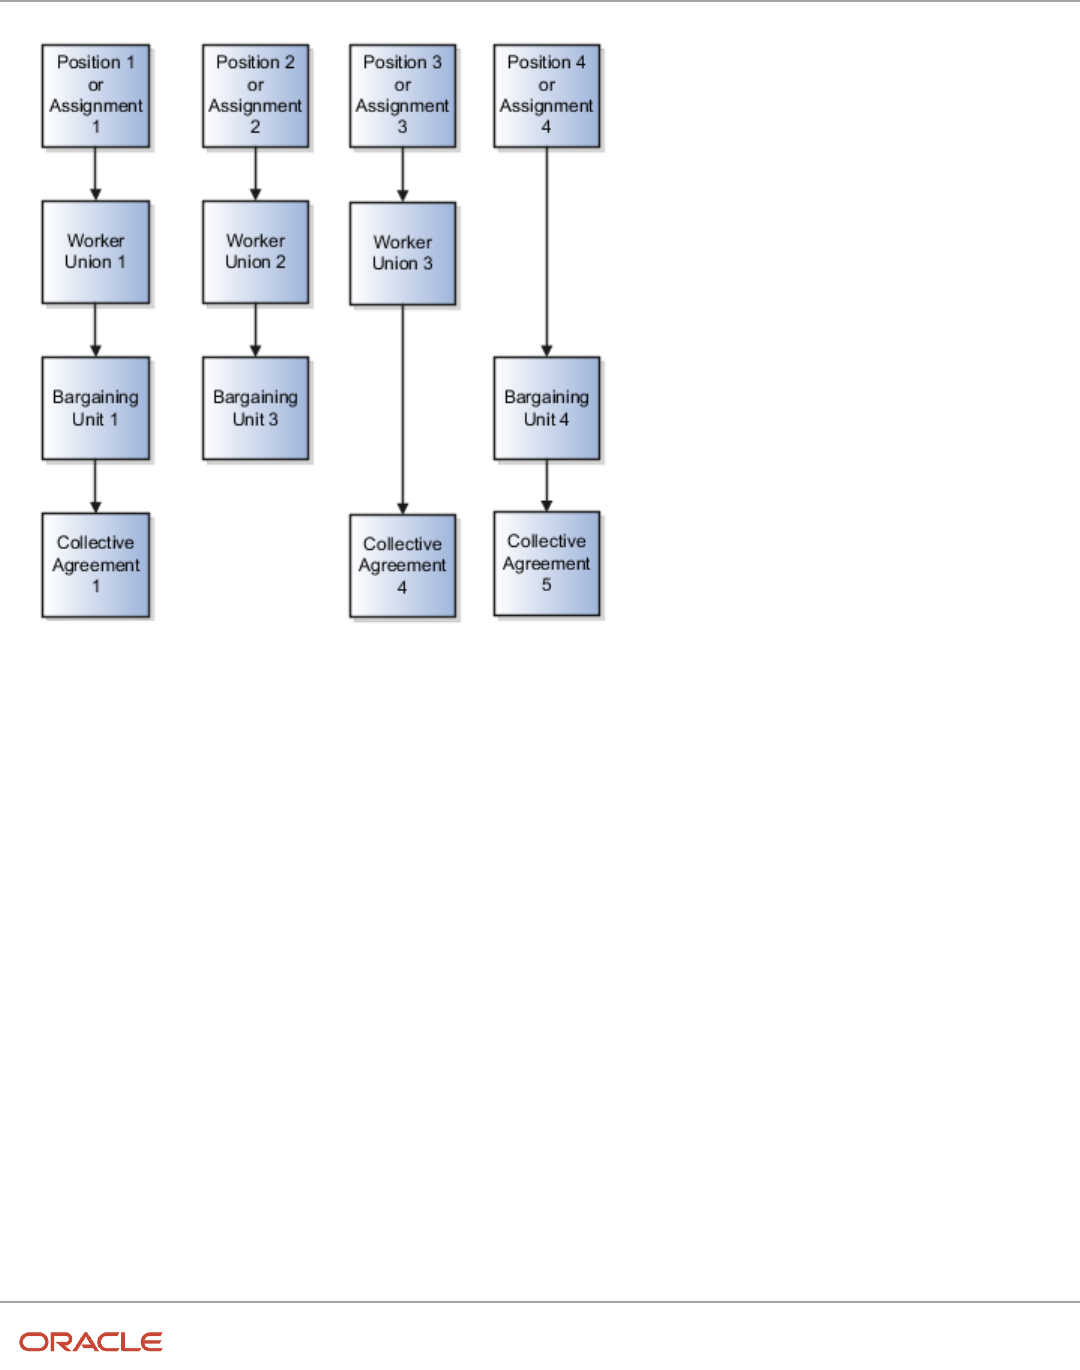
Oracle Fusion Cloud HCM
Using Common Features for HCM
Chapter 11
Divisions, Departments, Worker Unions, Locations, and
Trees
A position or worker assignment can be associated with only one collective agreement, bargaining unit, and worker
union. However, a bargaining unit, worker union, or collective agreement can be associated with multiple positions or
worker assignments.
Bargaining Units
A bargaining unit is a specific group of employees who are represented by one authorized union or association for
purposes of collective bargaining. A bargaining unit is defined as a lookup type.
Collective Agreements
A collective agreement is a special type of commercial agreement that's negotiated collectively between the
management (on behalf of the company) and trade unions (on behalf of employees). The agreement regulates the
terms and conditions of employees in their workplace, their duties, and the duties of the employer.
Let's take a look at the collective agreement details:
A collective agreement is country-specific. You may enter the bargaining unit, legal employer, and union values
depending on the country. For example, you can create a collective agreement without the bargaining unit and legal
employer, or only with the legal employer. When you select the value in the Country field, the values in the Bargaining
Unit, Legal Employer, and Union fields are filtered to match the country selected. You can optionally associate collective
agreements with worker unions and attach documents to the collective agreement.
189

Oracle Fusion Cloud HCM
Using Common Features for HCM
Chapter 11
Divisions, Departments, Worker Unions, Locations, and
Trees
You can provide details of the parties negotiating the collective agreement, such as the employee and employer
organizations. The employee organization can be the trade union or bargaining unit representing the employee while
the employer organization is represented by the company management.
A collective agreement is date-effective, therefore, you can track changes to a collective agreement over time.
You can also inactivate the collective agreement. You can configure additional attributes specific to a legislation or
customer using the available descriptive flexfields and extensible flexfields. If you specify a Valid To date for a collective
agreement, it lapses after that date and you can't link it to an employee.
Note: If the collective agreement is linked to an assignment, you can't edit the Identification Code, Country,
Bargaining Unit, Union, and Legal Employer fields. Additionally, you can't delete the collective agreement.
Here's how you can link collective agreements:
You can link a collective agreement to an assignment provided the bargaining unit, country, and legal employer of the
collective agreement are consistent with the assignment. If you created a collective agreement without associating
it with a legal employer or bargaining unit, you can link the collective agreement to any assignment within the same
country.
You can link a union, bargaining unit, or collective agreement with a worker assignment provided that its country and
legal employer is consistent with the assignment.
The union, bargaining unit, and collective agreement list of values (LOV) that you can select for linking with an
assignment or position are filtered as described in this table:
Attribute Linking Object Filter Conditions
Union
Assignment
The LOV is filtered to show unions that are
active as of the start date and whose country
matches the country of the legal employer on
the worker assignment.
Union
Position
The LOV is filtered to show unions that are
active as of the position start date. As there is
no legislation context available for a position,
the LOV isn't filtered based on the union
country. All unions configured in the application
are listed in the LOV.
Bargaining Unit
Assignment
• If you don't select a union, the LOV is
filtered to show bargaining units that are
active as of the start date, and whose
country matches the legal employer
country or have no country tag itself.
• If you select a union, the LOV is filtered to
show bargaining units that are active as of
the start date and are associated with the
selected union.
Bargaining Unit
Position
As there is no legislation context available for a
position, the LOV isn't filtered based on country
tags configured for the bargaining unit lookup
codes.
190

Oracle Fusion Cloud HCM
Using Common Features for HCM
Chapter 11
Divisions, Departments, Worker Unions, Locations, and
Trees
Attribute Linking Object Filter Conditions
• If you don't select a union, the LOV is
filtered to show bargaining units that are
active as of the position start date.
• If you select a union, the LOV is filtered to
show bargaining units that are active as of
the position start date and are associated
with the selected union.
Collective Agreement
Assignment
Note:
The LOV is filtered to show only those values
that match the country of the legal employer
on the worker assignment.
If you don't select a union or bargaining unit,
the LOV is filtered to show all active collective
agreements as of the start date.
If you select a union without selecting a
bargaining unit, the LOV is filtered this way:
• Shows collective agreements that are
active and match the selected union, but
don't have an associated bargaining unit
(union-specific values).
• Shows collective agreements that are
active and don't have an associated union
or bargaining unit value (global values).
If you select a bargaining unit without selecting
a union, the LOV is filtered this way:
• Shows collective agreements that are
active and match the selected bargaining
unit, but don't have an associated union
(bargaining unit-specific values).
• Shows collective agreements that are
active and don't have an associated union
or bargaining unit value (global values).
If you select a union and a bargaining unit, the
LOV is filtered this way:
• Shows collective agreements that are
active and match the selected union and
bargaining unit (union and bargaining
unit-specific values).
• Shows collective agreements that are
active and don't have an associated union
or bargaining unit value (global values).
Collective Agreement
Position
As there is no legislation context available on
for a position, the LOV isn't filtered based on
the collective agreement country.
If you don't select a union or bargaining unit,
the collective agreement LOV is filtered to
191

Oracle Fusion Cloud HCM
Using Common Features for HCM
Chapter 11
Divisions, Departments, Worker Unions, Locations, and
Trees
Attribute Linking Object Filter Conditions
show all active collective agreements as of the
position start date.
If you select a union without selecting a
bargaining unit, the LOV is filtered this way:
• Shows collective agreements that are
active and match the selected union, but
don't have an associated bargaining unit
(union-specific values).
• Shows collective agreements that are
active and don't have an associated union
or bargaining unit value (global values).
If you select a bargaining unit without selecting
a union, the LOV is filtered this way:
• Shows collective agreements that are
active and match the selected bargaining
unit, but don't have an associated union
(bargaining unit-specific values).
• Shows collective agreements that are
active and don't have an associated union
or bargaining unit value (global values).
If you select a union and a bargaining unit, the
LOV is filtered this way:
• Shows collective agreements that are
active and match the selected union and
bargaining unit (union and bargaining
unit-specific values).
• Shows collective agreements that are
active and don't have an associated union
or bargaining unit value (global values).
192
Oracle Fusion Cloud HCM
Using Common Features for HCM
Chapter 11
Divisions, Departments, Worker Unions, Locations, and
Trees
Attribute Linking Object Filter Conditions
Note:
• The global collective agreement values
can be used on a position by configuring
the following profile option:
◦
Code: ORA_PER_ALLOW_GLOBAL_
CAGR_ON_POSITIONS
◦
Display Name: Allow Global Collective
Agreements on Position
• By default, the profile value is set to
N. In this case, the global collective
agreement values can't be used on a
position even though the values are
available for selection in the LOV. If you
select a global collective agreement
value, the application will display an
error message when you submit the
position change or creation.
• If you set the profile value to Y, the
global collective agreement values can
be used on a position.
Collective Agreement Flexfields
Use the Manage Descriptive Flexfields and Manage Extensible Flexfields tasks in the Setup and Maintenance work
area to manage flexfields. You can configure these collective agreement-related flexfields as required, to meet your
enterprise requirements:
Application Table Name Descriptive Flexfield Code Name Used Availability
PER_COL_AGREEMENTS_F
PER_COL_AGREEMENTS_
DDF
Collective Agreements
Legislative Information
For storing additional
legislative information
regarding collective
agreements.
Available only for Oracle
localization use.
PER_COL_AGREEMENTS_F
PER_COL_AGREEMENTS_
DFF
Collective Agreements
Attributes
For storing additional
information regarding
collective agreements.
Available for use.
193

Oracle Fusion Cloud HCM
Using Common Features for HCM
Chapter 11
Divisions, Departments, Worker Unions, Locations, and
Trees
Application Table Name Descriptive Flexfield Code Name Used Availability
PER_COL_AGRS_EXTRA_
INFO_F
PER_COL_AGREEMENTS_
EFF
Collective Agreements EIT
Information EFF
For storing additional
collective agreement
information as single and
multiple row extensible
flexfield contexts.
Available for use.
Locations
A location identifies physical addresses of a workforce structure, such as a department or a job. You create and manage
locations using the Location Details quick action in the Workforce Structures area on the My Client Groups tab.
You can also create locations to enter the addresses of external organizations that you want to maintain, such as
employment agencies, tax authorities, and insurance or benefits carriers.
When specifying the location address, you can default the country in the location responsive pages. You configure the
default location country on the Manage Enterprise HCM Information page. If you don't configure any default country,
then the country is automatically defaulted to United States in the location address.
The locations that you create exist as separate structures that you can use for reporting purposes, and in rules that
determine employee eligibility for various types of compensation and benefits. You enter information about a location
only once. Subsequently, when you set up other workforce structures you select the location from a list.
A point to note is that the Ship-to Site, Receiving Site, Bill-to Site, Office Site, and Designated Receiver fields in the
Shipping Details section of a location setup are for information purpose only and can be used to report upon. They
aren’t currently used by any feature or process within HCM.
Location Sets
When you create a location, you must associate it with a set. Only those users who have access to the set's business unit
can access the location set and other associated workforce structure sets, such as those that contain departments and
jobs.
Note the following:
• You can also associate the location to the common set so that users across your enterprise can access the
location irrespective of their business unit.
• You can also configure a location as an employee location on the Location Details page.
• When users search for locations, they can see the locations that they have access to along with the locations in
the common set.
194
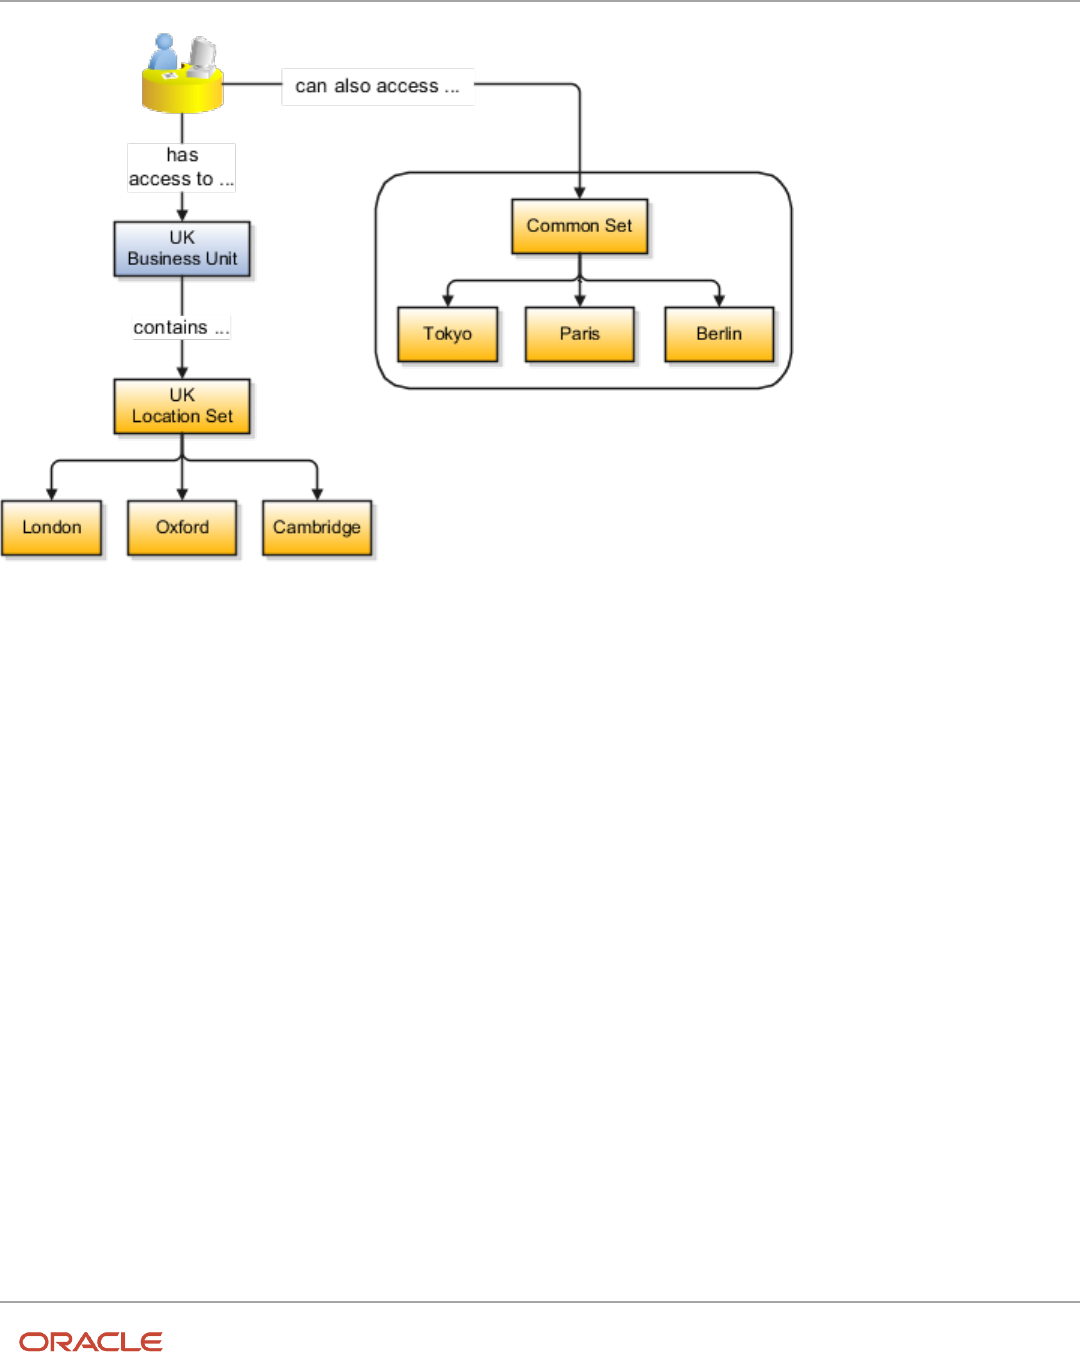
Oracle Fusion Cloud HCM
Using Common Features for HCM
Chapter 11
Divisions, Departments, Worker Unions, Locations, and
Trees
The following figure shows how locations sets restrict access to users.
Upload Locations Using a Spreadsheet
If you have a list of locations already defined for your enterprise, you can upload them from a spreadsheet.
To use this option:
• Download a spreadsheet template
• Add your location information to the spreadsheet
• Upload directly to your enterprise configuration
You can upload the spreadsheet multiple times to accommodate revisions.
Update Location Details
If you need to update or correct the details of a location, here's how you can do that:
1. Go to My Client Groups > Location Details.
2. On the page, click Show Filters.
3. Search for the location you need to correct or update using the filters and select it.
4. On the location's details page, click Actions and select Update or Correct.
5. Update the details as required and click Submit.
Related Topics
•
Why can't I see my location in the search results?
•
What happens if I inactivate a location?
•
Upload Workforce Structures Using a Spreadsheet
195

Oracle Fusion Cloud HCM
Using Common Features for HCM
Chapter 11
Divisions, Departments, Worker Unions, Locations, and
Trees
Associate Legal Employers with Locations
You can associate multiple legal employers with a location. This enables filtering locations by legal employer on pages
that have implemented this feature. You use the Legal Employers Operating At This Location extensible flexfield (EFF)
context for the legal employer - location association.
These are some key points to note:
• A location must have at least one associated legal employer to filter the location by legal employer.
• You can associate multiple legal employers operating at a location, but can't associate the same legal employer
twice with a location.
• You can associate the same legal employer with different locations.
• You can delete the legal employer - location association.
• The legal employer - location mapping is copied when you duplicate a location.
• You can associate legal employers when creating, updating, or correcting a location.
• The legal employer list of values displays all active and inactive legal employers configured. There isn't any
filtering for only active legal employers. Similarly, there is no filtering of legal employers by matching the legal
employer country with the location address country.
• Legal employers are listed in the ascending order of legal employer name.
• Locations are first filtered based on the set. And thereafter, if an association exists, they're filtered based on the
legal employers.
In this example, Vision Enterprise has 3 legal employers Vision Corporation, Vision US, and Vision Consulting operating
at multiple locations in the US. You want to filter locations from where Vision Corporation is operating.
Let's look at the steps to update this association.
Associate Vision Corporation with the Pleasanton Location
1. Go to My Client Groups > Quick Actions > Workforce Structures.
2. Click the Location Details task.
3. Click Add.
4. Select the Additional Info option on the questionnaire page and click Continue.
5. Enter these required details to create a location.
Section Field Value
When and Why
When does this location start?
8/25/21
Location Details
Name
Pleasanton
Code
PLS
Main Address Address Line 1 603
196

Oracle Fusion Cloud HCM
Using Common Features for HCM
Chapter 11
Divisions, Departments, Worker Unions, Locations, and
Trees
Section Field Value
ZIP Code
94588
City
Pleasanton
State
CA
County
Alameda
6. In the Additional Info section, click Add in the Legal Employers Operating At this Location section to associate
the Vision Corporation legal employer to this location.
7. Select Vision Corporation from the Legal Employer list.
Note: As a prerequisite, the legal employer should already exist.
8. Click OK.
9. Click Submit.
Related Topics
•
Filter Locations Based on Legal Employers
HCM Trees
Trees graphically represent the hierarchical structures of your organization. You manage trees in the Workforce
Structures work area under My Client Groups.
These tree structures are supported - department, organization, position, and geography. What nodes can be added
to the tree is controlled by each structure type. With the exception of geography trees, you can create multiple trees for
each HCM tree type, and multiple versions of each tree. However, only one version of a tree is active at any time.
Each tree version contains a root node that's at the highest level in the hierarchy. The lines connecting the elements in
a tree structure are branches and the elements are referred to as nodes. These relationships are explained as follows: a
node is a parent of another node if it's one step higher in the hierarchy. Child nodes share the same parent node.
For example, in the Department Tree figure, Operations is the parent of Human Resources, Legal, and Finance, which
are its child nodes.
Department Trees
A department tree is a hierarchical representation of your departments. You can create versions of department trees but
only one tree version is active at a time. A department can’t be added more than once in the same tree version.
197

Oracle Fusion Cloud HCM
Using Common Features for HCM
Chapter 11
Divisions, Departments, Worker Unions, Locations, and
Trees
Department Tree Uses
• Maintain a hierarchy of all departments under one or multiple trees.
• Select the department hierarchy tree structure in the Secure by Organization Hierarchy setup of the
organization security profiles to secure access to departments within that tree.
• Secure Areas of Responsibility (AOR) data using the Hierarchy Type list. The areas of responsibility defined
for a hierarchy type can be used in securing by areas of responsibility while creating person security profiles to
secure person records.
• Use the responsibility types defined in the AOR setup to define approval rules so that representatives defined
using department tree can be approvers.
• Use the department hierarchy in your analysis to build roll-up analysis reports.
• Default the line manager from the department manager in a worker assignment using the department tree. You
can use the PER_DEPARTMENT_TREE_FOR_MANAGER profile option to configure this setting.
Example of a Department Tree
The following figure illustrates a department hierarchy that you can establish using a department tree.
Organization Trees
An organization tree is a hierarchical representation of your various organizational entities. You can select any
organization including divisions, legal employers, business units, departments, and so on to create your organization
tree. You can create versions of organization trees but only one tree version is active at a time. An organization can’t be
added more than once in the same tree version.
198

Oracle Fusion Cloud HCM
Using Common Features for HCM
Chapter 11
Divisions, Departments, Worker Unions, Locations, and
Trees
Organization Tree Uses
• Maintain a hierarchy of different organizational structures.
• Select the Generic organization hierarchy tree structure option in the Secure by Organization Hierarchy setup
of organization security profiles to secure access to organizations within that tree.
• Secure Areas of Responsibility (AOR) data using the Hierarchy Type list. The areas of responsibility defined
for a hierarchy type can be used in securing by areas of responsibility while creating person security profiles to
secure person records.
• Use the responsibility types defined in the AOR setup to define approval rules so that representatives defined
using organization tree can be approvers.
• Use the organization hierarchy in your analysis to build roll-up analysis reports, if departments are at the lowest
level of the hierarchy.
Example of an Organization Tree
The following figure illustrates an organization hierarchy that you can establish using an organization tree.
199

Oracle Fusion Cloud HCM
Using Common Features for HCM
Chapter 11
Divisions, Departments, Worker Unions, Locations, and
Trees
Position Trees
You can create multiple position trees using the predefined position tree structure in the Workforce Structures work
area. You can then create multiple versions to establish reporting relationships among positions. Position trees can have
only one top node.
Position Tree Uses
• Use position hierarchies for budgeting and organizational planning.
• Secure access to positions by identifying a position hierarchy in a position security profile. For example, you
can create a position security profile that includes all positions in a position hierarchy under a specified first
position. You can also include the position security profile in a person security profile to secure access to person
records. In this case, the person security profile includes the person records of the people who occupy the
positions in the position security profile.
Example of a Position Tree
The following figure illustrates a position hierarchy that you can establish using a position tree.
Geography Trees
You can create versions of the predefined geography tree structure to represent countries in which your enterprise
operates. For each country, you can define lower-level nodes such as states and cities. For example, United Kingdom -
England - London. You manage trees in the Workforce Structures work area.
Although you can create multiple versions, you can create only one tree in the hierarchy. Geography trees also have only
one first node.
Calendar Events
You use the geography tree to specify the locations to which calendar events apply. You can create the tree using these
conditions.
• If an event applies to your entire enterprise, you can attach it to the first node in the tree, for example, Global.
200

Oracle Fusion Cloud HCM
Using Common Features for HCM
Chapter 11
Divisions, Departments, Worker Unions, Locations, and
Trees
• If an event applies only to specific countries in your enterprise, you can attach it to the nodes for those specific
countries, for example, United Kingdom.
• If an event applies only to specific states or cities in a country, you can attach it to the state or city level nodes.
For example, England, London.
Example of a Geography Tree
This figure illustrates the geographical hierarchy that you can establish using a geography tree.
Related Topics
•
Guidelines for Managing Trees and Tree Versions
•
Employment Profile Options
201

Oracle Fusion Cloud HCM
Using Common Features for HCM
Chapter 11
Divisions, Departments, Worker Unions, Locations, and
Trees
FAQs for Divisions, Departments, Worker Unions,
Locations, and Trees
What's a reporting establishment?
A reporting establishment is an organization that's used for statutory reporting other than tax and social insurance
reporting. In some countries, such as France, a reporting establishment can also be a tax reporting unit.
A reporting establishment and a legal employer share a parent-child relationship with the legal employer being the
parent organization. A legal employer can be the parent of multiple reporting establishments. You create reporting
establishments using the Manage Legal Reporting Unit HCM Information task in the Setup and Maintenance work area.
Can I delete an organization?
No you can't. However, you can disable an organization if it's no longer required. For example, if the enterprise is
downsizing, then you can set the status of the organization to inactive.
Changing the status of the organization disables the organization and the organization is no longer available to select.
How do I create a disability organization?
Use the Manage Integration of Additional Applications task in the Setup and Maintenance work area. Disability
organizations are one of the choices when creating third-party organizations.
How can I identify my organization in a report?
Use the organization manager information in the Create and Edit Department pages to enter a reporting name to
identify the organization in a report. You use organization hierarchies for statutory, legal and management reporting.
You can see all employees in the Manager list.
What's the purpose of the legislative action attributes?
When you create transfer or termination related actions using the Configure Actions task in the Workforce Structures
work area, you can also enter legislative attributes for the actions. You can use the attributes to:
• Indicate whether an action is transfer-related.
• Specify the termination type for termination-related actions.
202

Oracle Fusion Cloud HCM
Using Common Features for HCM
Chapter 11
Divisions, Departments, Worker Unions, Locations, and
Trees
For example, the termination-related action Resignation can have the termination type as voluntary and the action
Reduction in Force can have the termination type as involuntary. Typically you enter this information to meet specific
legislative requirements or for reporting purposes.
What's the difference between department name and title?
A department name is unique but the department title is non-unique and can be the same across departments. You
can't have 2 or more departments with the same name, but you can have multiple departments with the same title.
For example, you can have a Human Resources department (title) that can be common across the enterprise but there
can only be one unique US Human Resources department (name) in the enterprise. A department name is mandatory
but the title is hidden and optional, by default. You can enable the Title field and make it mandatory.
Why can't I see my location in the search results?
You can search for approved locations only. Also, if you created a location in Oracle Fusion Trading Community Model,
then you can't access that location from Oracle Fusion Global Human Resources.
For use in Oracle Fusion HCM, you must recreate the location from the Manage Locations page.
How can I associate a location with an inventory organization?
From the Oracle Fusion Global Human Resources, go to the Manage Locations page. Use the Manage Locations task in
the Workforce Structures work area.
To appear on the Create or Edit Location pages, your inventory organization must be effective as of the current date and
must exist in the location set that you selected.
What happens if I select an inventory organization when I am
creating or editing a location?
The location is available for selection in purchase documents of that inventory organization in Oracle Fusion Inventory
Management. If you don't select an inventory organization, then the location is available in purchase documents across
all inventory organizations.
What happens if I select a geographic hierarchy node when I
create or edit a location?
The calendar events that you created for the geographic node start to apply for the location and may impact the
availability of worker assignments at that location.
203

Oracle Fusion Cloud HCM
Using Common Features for HCM
Chapter 11
Divisions, Departments, Worker Unions, Locations, and
Trees
You manage locations using the Manage Locations task in the Workforce Structures work area.
The geographical hierarchy nodes available for selection on the Locations page display from a predefined geographic
hierarchy.
Related Topics
•
How an Individual's Schedule Is Identified
What happens if I inactivate a location?
Starting from the effective date that you entered, you can no longer associate the location with other workforce
structures, assignments, or applications.
If the location is already in use, it will continue to be available to the components that currently use it.
204

Oracle Fusion Cloud HCM
Using Common Features for HCM
Chapter 12
Jobs and Positions
12 Jobs and Positions
Jobs
Jobs are typically used without positions by service industries where flexibility and organizational change are key
features. As part of your initial implementation, you specify whether to use jobs and positions, or only jobs.
Basic Details
Basic details for a job include an effective start date, a job set, a name, and a code.
A job code must be unique within a set. Therefore, you can create a job with the code DEV01 in the US set and another
job with the same code in the UK set. However, if you create a job with the code DEV01 in the Common set, then you
can't create a job with the same code in any other set.
Benchmark Information
You can identify a job as being a benchmark job. A benchmark job represents other jobs in reports and salary surveys.
You can also select the benchmark for jobs. Benchmark details are for informational purposes only.
Progression Information
A progression job is the next job in a career ladder. Progression jobs enable you to create a hierarchy of jobs and are
used to provide the list of values for the Job field in the Promote Worker and Transfer Worker tasks.
The list of values includes the next job in the progression job hierarchy. For example, assume that you create a job called
Junior Developer and select Developer as the progression job. Progression jobs show as suggested jobs; so when you
promote a junior developer, the Suggested Jobs list of values for the new job will show Developer. You can select this
value, or select another one.
Jobs and Grades
You can assign grades that are valid for each job. If you're using positions, then the grades that you specify for the job
become the default grades for the position.
Related Topics
•
Guidelines for Using Desktop Integrated Excel Workbooks
•
Considerations for Enforcing Grades at Assignment Level
Examples of Jobs
Jobs are typically used without positions by service industries where flexibility and organizational change are key
features.
205

Oracle Fusion Cloud HCM
Using Common Features for HCM
Chapter 12
Jobs and Positions
Software Industry
For example, XYZ Corporation has a director over the departments for developers, quality assurance, and technical
writers.
• Recently, three developers have resigned from the company.
• The director decides to redirect the headcount to other areas.
• Instead of hiring all three back into development, one person is hired to each department, quality assurance,
and technical writing.
In software industries, the organization is fluid. Using jobs gives an enterprise the flexibility to determine where to use
headcount, because the job only exists through the person performing it. In this example, when the three developers
leave XYZ Corporation, their jobs no longer exist, therefore the corporation has the flexibility to move the headcount to
other areas.
This figure illustrates the software industry job setup.
Examples of Positions
Positions are typically used by industries that use detailed approval rules, which perform detailed budgeting and
maintain headcounts, or have high turnover rates.
Retail Industry
ABC Corporation has high turnovers. It loses approximately 5% of its cashiers monthly. The job of the cashier includes
three positions: front line cashier, service desk cashier, and layaway cashier. Each job is cross-trained to take over
another cashier's position. When one cashier leaves from any of the positions, another existing cashier from the
front line, service desk or layaway can assist where needed. But to ensure short lines and customer satisfaction, ABC
Corporation must replace each cashier lost to turnover. Since turnover is high in retail it's better for this industry to use
positions.
206

Oracle Fusion Cloud HCM
Using Common Features for HCM
Chapter 12
Jobs and Positions
Note the following:
• You have to create a vacancy manually when position synchronization is used and an employee terminates
employment (when an incumbent moves out of the position).
• The position exists even when there are no holders. Having the position continue to exist is important if the
person who leaves the company is a manager or supervisor with direct reports.
• All direct reports continue reporting to the position even if the position is empty.
• You don't have to reassign these employees to another manager or supervisor. The replacement manager is
assigned to the existing position.
Also, an added advantage to using Positions is when you hire somebody new, many of the attributes are inherited from
the position. This speeds up the hiring process.
This figure illustrates the retail position setup.
Health Care Industry
Health care is an industry that must regulate employment, roles, and compensation according to strict policies and
procedures. Fixed roles tend to endure over time, surviving multiple incumbents. Industries that manage roles rather
than individuals, where roles continue to exist after individuals leave, typically model the workforce using positions.
The hospital has a structured headcount and detailed budgeting. For example, a specific number of surgeons, nurses,
and interns of various types are needed. These positions must be filled in order for the hospital to run smoothly. Use
jobs and positions when you apply detailed headcount rules.
207

Oracle Fusion Cloud HCM
Using Common Features for HCM
Chapter 12
Jobs and Positions
This figure illustrates the hospital position setup.
Considerations for Using Jobs and Positions
Jobs and positions represent roles that enable you to distinguish between tasks and the individuals who perform those
tasks.
Note the following:
• The key to using jobs or positions depends on how each is used.
• Positions offer a well-defined space independent of the person performing the job.
• Jobs are a space defined by the person.
• A job can be defined globally in the Common Set, whereas a position is defined within one business unit.
• You can update the job and department of a position at any time. For example, if you hire someone into a new
role and want to transfer the position to another department.
During implementation, one of the earliest decisions is whether to use jobs or a combination of jobs and positions. The
determinants for this decision are:
• The primary industry of your enterprise
• How you manage your people
Primary Industry of Your Enterprise
The following table outlines information about Primary industries and how they set up their workforce.
Primary Industry Workforce Setup
Mining
Positions
Utilities Positions
208

Oracle Fusion Cloud HCM
Using Common Features for HCM
Chapter 12
Jobs and Positions
Primary Industry Workforce Setup
Manufacturing
Positions
Retail Trade
Positions
Transportation and Warehousing
Positions
Educational Services
Positions
Public Transportation
Positions
Agriculture, Forestry, Fishing, and Hunting
Jobs
Construction
Jobs
Wholesale Trade
Jobs
Information
Jobs
Finance and Insurance
Jobs
Professional, Scientific, and Technical
Services
Jobs
Management of Companies and
Enterprises
Jobs
Administrative and Support and Waste
Management and Remediation Services
Jobs
Arts, Entertainment, and Recreation
Jobs
Accommodation and Food Services
Jobs
Other Services (Except Public
Administration)
Jobs
Management of People
Consider the following scenarios how industries manage their employee turnover:
• Scenario 1: Replace employees by rehiring to the same role.
• Scenario 2: Replace headcount but the manager uses the headcount in a different job.
209

Oracle Fusion Cloud HCM
Using Common Features for HCM
Chapter 12
Jobs and Positions
• Scenario 3: Rehire employees to the same position, but the manager requests reallocation of budget to a
different post.
The following table displays suggestions of what the industry should use, either jobs or positions, in these three
scenarios:
Industry Scenario 1 Scenario 2 Scenario 3
Project (An industry that
supports project-based forms of
organization in which teams of
specialists from both inside and
outside the company report to
project managers.)
Positions
Jobs
Jobs
Controlled (An industry that's
highly structured in which all
aspects of work and remuneration
are well organized and regulated.)
Positions
Positions
Positions
Manufacturing
Positions
Jobs
Positions
Retail
Positions
Jobs
Positions
Education
Positions
Jobs
Positions
Other
Positions
Jobs
Jobs
Related Topics
•
How Grades and Grade Rates Work with Jobs, Positions, Assignments, Compensation, and Payroll
Job and Position Structures
Job and position structures identify the descriptive flexfield structure that enables you to specify additional attributes
that you want to capture when you define jobs and positions.
Job and position attributes provide further detail to make jobs and positions more specific. You also use attributes to
define the structure of your jobs and positions. You can specify attributes at the enterprise level for jobs and positions,
at the business unit level for positions, and at the reference data set level for jobs. Job and position structures are
optional.
Enterprise-Level Job Attributes
When you define a job, you enter a value for the name of the job. To make job names more specific, set up attributes
to identify additional details about the job. This includes the nature of the work that is performed or the relative skill
210

Oracle Fusion Cloud HCM
Using Common Features for HCM
Chapter 12
Jobs and Positions
level required. If these attributes apply to all jobs within your enterprise, set up enterprise-level job attributes. Standard
capabilities mean that you can use the different segments of the name to:
• Identify common jobs or job holders for analysis or compensation.
• Group records in reports, such as to find all jobs of a specific job type.
Don't use attributes with values that change regularly, for example, salary ranges or expense approval levels that change
every year.
This figure illustrates how job type and job level provide further details for the HR Application Specialist job.
Enterprise-Level Position Attributes
Position attributes at the enterprise level are similar to those for jobs. Each position that you define identifies a specific
role in the enterprise, which you can manage independently of the person in the position. A position belongs to one
specific department or organization. The name of each position must be unique. To simplify the process of managing
unique names for positions, set up enterprise-level attributes to identify separate components of the position name.
For example, you can set up an attribute for position title and one for position number. When defining the attributes
that make up the structure of a position name, consider whether any of your attributes are part of the definition of
a common job type. Using job types for a position can help you manage common information that applies to many
different positions.
For example, you can:
1. Define a job type of Manager.Level 1.
2. Use it for comparison of positions across departments or lines of business or for setting common job
requirements.
3. Define multiple manager-type positions in your HR department, each of which has responsibility for a different
management function or group.
211

Oracle Fusion Cloud HCM
Using Common Features for HCM
Chapter 12
Jobs and Positions
This figure illustrates how title and position number provide further details for the manager position.
Business Unit-Level Attributes for Positions
If you have information that you want to capture for positions that are specific to each business unit, then you can
define attributes at the business unit level for positions. When you create positions, these attributes appear in addition
to any enterprise-level attributes. For example, you might want to identify the sales region for all positions in the sales
business unit. You can set up a text attribute called Sales Region and use it to enter the necessary information when
creating positions for the sales business unit.
Reference Data Set-Level Attributes for Jobs
If you have information for jobs that applies to specific reference data sets, set up attributes for jobs at the reference
data set level. When you create jobs, these attributes appear in addition to any enterprise-level attributes. For example,
you might want to identify all information technology (IT) jobs within a specific set. You can set up a text attribute called
Function and use it to enter IT in jobs that you create that perform an IT function within a specific set.
Workforce Structures Code Generation Methods
A code uniquely identifies either a position or a job. Currently, you can generate a code for position and job workforce
structures. Use the Manage Enterprise HCM Information task in the Workforce Structures work area to configure the
code generation method for positions and jobs.
You can generate the position code or the job code in one of these 3 ways:
• Manually
• Automatically prior to submission
• Automatically upon final save
Manual: Use this method to manually enter the code when creating a position or a job. You can update the code in the
Details page. This is the default method for generating the position and job code.
212

Oracle Fusion Cloud HCM
Using Common Features for HCM
Chapter 12
Jobs and Positions
Automatic prior to submission: Use this method to automatically create and display the code when you create a
position or job. This method may create gaps in the code sequence if the transaction is canceled after the position or
job code is generated.
Automatic upon final save: Use this method to create position or job codes only after the create transaction is
approved. You can't see the position or job code when you're creating the respective workforce structure, but can see it
on the Details page after the transaction is approved. This method has less possibility of creating gaps in the generated
codes.
The Automatic prior to submission and Automatic upon final save methods use an enterprise number sequence. All
workforce structures' codes that are generated using the automatic methods are numeric only. By default, the sequence
starts from 1; however, you can change the starting number. The code increments by one for each new position or job
created.
You can change the position or job code generation method from Automatic prior to submission method to the
Automatic upon final save method and the other way around. You can also change from the automatic method to the
manual method and the other way around but you must be careful which method you choose if you have existing data.
You can't edit an automatically generated position or job code.
Initial Position and Job Code
You can specify the initial position or job code for your enterprise when you generate the code automatically. The
application uses this number for the first record that you create using the automatic position and job code setting and
increments the number by one for subsequent records. By default, the initial code is 1. The validation on the initial
position and job code helps you identify the starting code in automatic code generation when the method is changed
from manual to automatic.
Using the initial position and job code, you can retain the legacy codes for existing positions and jobs respectively.
Additionally, you can automate the number generation for new positions and jobs, starting from the last legacy person
number plus one. You can change the initial code.
Note: To avoid duplicate codes being generated, follow these recommendations.
• If you have been using the manual method of position or job code generation for sometime and now moving
to the automatic method, we recommend setting an initial code to a value higher than the old position or job
codes that were specified manually.
• When using HDL to load positions or jobs, the position and job code can be automatically generated, hence we
recommend you leave the code blank in the dat file.
Evaluation Criteria for Jobs and Positions
You can define evaluation criteria such as evaluation system, date, unit of measure, for for jobs and positions
By default, 2 evaluation systems are available. The Hay system is a predefined evaluation system. Another custom
evaluation system is available for which you need to define your own criteria and values..
213

Oracle Fusion Cloud HCM
Using Common Features for HCM
Chapter 12
Jobs and Positions
Enable Evaluation Criteria Section
The Evaluation Criteria section is hidden by default, you need to enable it in the Transaction Design Studio. For example,
here's how you can enable it in the Position Details page
1. Click My Client Groups > HCM Experience Design Studio.
2. Select the Position Details action.
3. Click Add to add a rule.
4. Enter a name and description for the rule.
5. In the Page Attributes section, select the Configure Save Options and Regions option.
6. For the Evaluation Criteria region, select Visible.
7. Select Evaluation Criteria from the Region list to ensure that the Evaluation System field is enabled in the
section.
8. Click Save and Close.
You can enable for the Job Details page similarly by selecting the Job Details action in Transaction Design StudioIn the
Request a New Position and Request a Position Change flow, the Evaluation Criteria section is available in the Show or
Hide Regions section.
Points to Consider
• The evaluation criteria data associated to a job or position isn't copied when a job or position is duplicated.
• You can see only the Evaluation Date and the Evaluation System fields in the read-only job or position pages, if
there isn't any evaluation data.
• The Evaluation Date doesn't default to the start date of the job or position unlike the classic job and position
pages.
• The Evaluation Date can't be earlier than the start date of the job or position.
• Any updates to evaluation data are retained in the cache until you submit the data. Only the data submitted or
committed to the database is displayed on the page, irrespective of the earlier data updates.
• If you want to remove the evaluation data for a job or position, you need to remove the Evaluation System
value. However, if the Evaluation System is defaulted and the field is hidden, you have to first unhide the field
and then remove the Evaluation System to delete the evaluation data.
Default Evaluation System
You can specify a default evaluation system for job and position flows on the Manage Enterprise HCM Information
page. If you specify a default evaluation system it applies to both jobs and positions. However, you can change it in the
respective flows.
Here are some key points to note about the evaluation system defaulting.
• The Evaluation System is defaulted when you specify an evaluation date in the Evaluation Criteria section.
• The Default Evaluation System configuration isn’t date effective on the Manage Enterprise HCM Information
page.
Related Topics
•
Workforce Structures Flexfields
•
Workforce Structures Lookups
214

Oracle Fusion Cloud HCM
Using Common Features for HCM
Chapter 12
Jobs and Positions
How FTE is Calculated in Positions
The full-time equivalent (FTE) value is the result of multiplying the working hours with the headcount and dividing by
the standard working hours.
For example, if the working hours are 30, the headcount is 2 and the standard working hours are 40, then the FTE value
is 1.5.
Ways to Calculate the FTE
You can either enter the FTE manually or calculate it automatically.
• Manually: Use the FTE field in the Budget Details section to enter a FTE value manually. If an FTE value is
already provided, you can update it based on the ratio of the working hours to standard working hours.
• Automatically: Select the Calculate FTE option in the Budget Details section to automatically calculate the FTE.
This check box is shown only when the Enable FTE Calculation in Positions profile option is set to Yes. Earlier,
the FTE value was automatically calculated only when a position was created. However, when this check box is
deselected automatic FTE calculation is disabled even when a position is created.
When the Calculate FTE option is selected and you edit the working hours or the headcount in the position
pages, the FTE is automatically calculated and the FTE field becomes read-only. However, you can override the
automatic calculation of FTE by deselecting the Calculate FTE option on the position pages.
This check box is available in these flows - Request a New Position, Request a Position Change, Update or
Correct Position, and Duplicate Position flows.
The Calculate FTE Option
Here are some points to note about Calculate FTE option.
• The Calculate FTE option is disabled for positions created before enabling automatic FTE calculation.
• The Calculate FTE setting is copied when a position is duplicated.
• If FTE is configured as hidden in the Transaction Design Studio (TDS), then the Calculate FTE option is also
hidden even though the profile option is enabled.
Work Hours and Duration
Full-time equivalent (FTE) is the number of hours worked by an employee on a full-time basis.
It’s calculated by dividing the working hours by standard working hours. For example, if the working hours are 20 and
the standard working hours are 40, the FTE is 0.5.
Organizations use FTE to determine their employees’ workload; specifically the number of part-time employees
required and the hours they work to add up to the same number of hours worked by full-time employees. Hence, the
general assumption is that an employee works 2,080 hours annually. This value is derived by calculating the number of
215

Oracle Fusion Cloud HCM
Using Common Features for HCM
Chapter 12
Jobs and Positions
hours worked by a full-time worker in a week multiplied by the number of weeks in a year - 8 hours per day x 5 days per
week x 52 weeks per year = 2,080 hours.
However, the working hours duration might vary across industries. For example, in the manufacturing sector, an annual
number of working hours contract may be in place due to seasonal fluctuations, with only premium pay applicable when
the prorated annual hours exceed the specified annual hours. In the education sector, the duration may be linked to the
academic teaching timetable.
In such cases, the FTE calculation needs to be adjusted for such employees. These work hours attributes defined in a
position help in determining the adjusted FTE.
Standard Working Hours - Standard working hours are usually those of a full-time worker. You define them for the
enterprise, legal employer, department, location, job, or position.
If you define standard working hours for more than one work structure, the application uses this hierarchy to derive
standard working hours for the position: Job > Location > Department > Enterprise. The application uses this hierarchy
to derive standard working hours for the worker assignment: Position > Job > Location > Department > Legal Employer
> Enterprise.
Working Hours - Working hours are the same as standard working hours, by default.
Working hours and standard working hours may remain the same. For example, if an employee is working the
department's standard working hours, standard working hours and working hours are the same. For part-time workers,
there is usually a difference between standard working hours and working hours. Where there is a difference, you
update the working hours for the position and the assignment.
Standard Annual Working Duration – You define the standard annual working duration for the enterprise, legal
employer, department, location, job, or position.
If you define the standard annual working duration for more than one work structure, the hierarchy to derive the
standard annual working duration is same as standard working hours.
Annual Working Duration – Annual working duration is same as the standard annual working duration. The value may
differ but the duration is the same as the duration defined for the standard annual working duration.
Workday Information Defaults
The Full-Time Equivalent (FTE) is the number of hours worked by a worker on a full-time basis and is typically used to
determine the workload.
You can either specify your own values or default the standard working hours, standard annual working duration, and
the unit of measure (UOM) values. The workday information is used to calculate the full-time equivalent (FTE) of a
worker.
You can default the workday information attributes from these entities in this order.
1. Job
2. Location
3. Department
4. Enterprise
Let’s look at how this works with the help of a diagram.
216
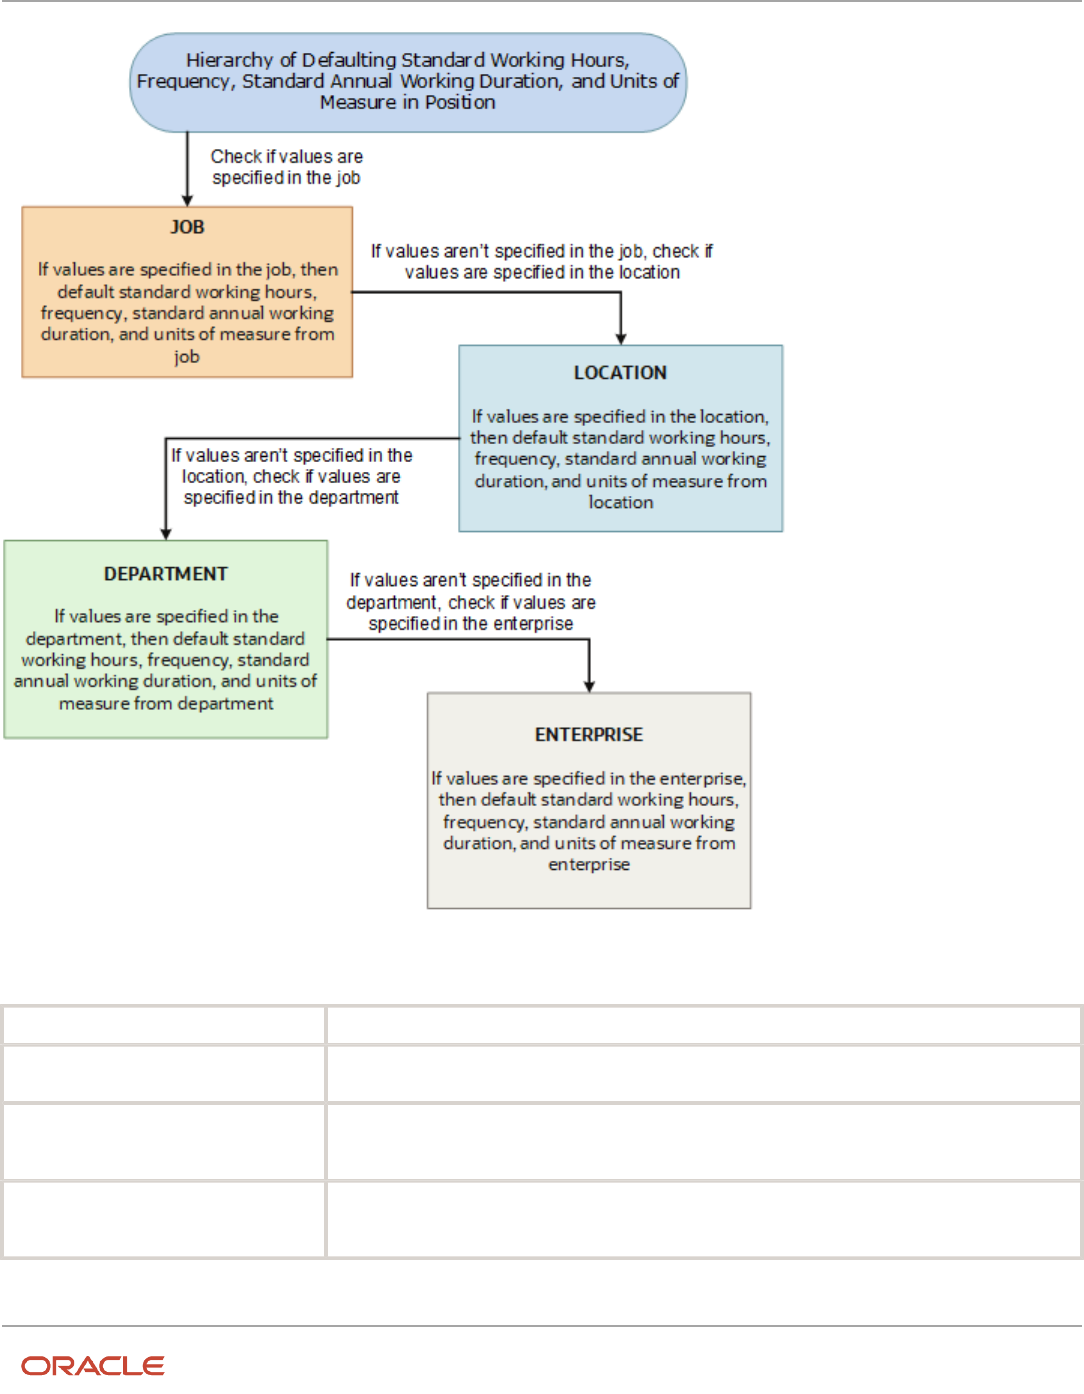
Oracle Fusion Cloud HCM
Using Common Features for HCM
Chapter 12
Jobs and Positions
The defaulting logic for the standard working hours, frequency, standard annual working duration, and units of
measure is given below.
Entity How it Works
Job The first check is on the job specified in the position. If values for any of these attributes are available
in the job, then these values are defaulted on the position.
Location If any of the attribute values aren't specified on the job, then the check is done on the location
specified in the position. If these values are specified in the location, then these values are defaulted on
the position.
Department If any of the attribute values aren't specified on the location, then the check is done on the department
specified in the position. If these values are specified in the department, then these values are
defaulted on the position.
217

Oracle Fusion Cloud HCM
Using Common Features for HCM
Chapter 12
Jobs and Positions
Enterprise If any of the attribute values aren't specified on the department, then the check is done on the
enterprise. If these values are specified in the enterprise, then these values are defaulted on the
position.
If you change the business unit, department, location, or job in the position, then the existing defaulted workday
information is also removed, if they are defaulted from any of these objects. However, this doesn't apply when you
duplicate a position.
In addition, the defaulting hierarchy gets recalibrated when you provide a value in any of the entities. For example, if
the standard annual working duration was earlier defaulted from the enterprise and you have specified a value for the
standard annual working duration for a department now. The latest standard annual working duration value will now be
defaulted from the department.
How You Match Position Valid Grades with Job Grades
You can enforce that valid grades of the position match with valid grades of the associated job by setting this profile
option value to yes: Validation to Match Position's Valid Grades With Job Valid Grades Enabled.
When the profile option is enabled, only valid grades specified in the selected job can be added in the position. An error
is shown when you add grades that aren’t specified for the job.
A new position inherits the valid grades defined in the selected job. Valid grades for the position are those that are
active and associated with the common set or the set associated with the business unit. Valid grades are used in
assignments that use the position and subsequently in payroll calculation.
Position Synchronization
If position synchronization is enabled, assignments inherit specified values from the associated position.
Synchronized Attributes
You can select any of the following attributes for synchronization when position synchronization is enabled:
• Department
• Job
• Location
• Grade
• Grade Ladder
• Manager
• Full Time or Part Time
• Regular or Temporary
• Assignment Category
• FTE and Working Hours
218

Oracle Fusion Cloud HCM
Using Common Features for HCM
Chapter 12
Jobs and Positions
• Start Time and End Time
• Probation Period
• Union, Bargaining Unit and Collective Agreement
• Synchronize Mapped Flexfields
Position Changes
All active assignments that are synchronized from position automatically inherit changes from the position. Assignment
attributes synchronized from position automatically inherit changes from the position. For those attributes not
synchronized from position, you can either retain the existing values or update values from the position.
The Review page in the Edit Position page displays the list of impacted assignments with a status for each assignment.
The status indicates if there are any issues due to the position change. You must correct all errors before submitting the
position changes.
Assignment Changes
When you change the position in existing assignments you have a choice whether to inherit the values for those
attributes which aren't synchronized from the position. If you choose not to inherit, then the previous values remain
unchanged.
Position Synchronization Configuration Changes
If the position synchronization configuration is changed after person and assignments are created, then the
Synchronize Person Assignment from Position process must be run to apply the changes in assignments.
Position Hierarchy Configuration Changes
When the manager is synchronized from the HCM position hierarchy and you change the parent position, all
assignments inherit the new manager from the current parent position. When you remove a position from the hierarchy,
all child positions move one level up in the hierarchy. Hence, the grandparent position is the new parent position.
The incremental flattening process is triggered when you add or change a parent position. The flattening process will
update the changes in the position hierarchy.
When you change the position in an existing assignment, the manager value is updated based on the parent position of
the changed position. If the parent position doesn't have an incumbent, the incumbent in the position in the next level
up in the hierarchy is the new manager.
Uploading Changes Using HCM Data Loader and Workers REST API
When you create or update assignments using HCM Data Loader or Workers REST API, you can synchronize them from
positions. In this case, you must:
• Enable position synchronization before you load the assignments. If you enable it after the assignments are
loaded, then you can synchronize from positions for current and future dates only.
• Set the Synchronize from Position (Position Override) attribute on the employment terms or assignment
object to Y.
After loading the assignments using HCM Data Loader or Workers REST API, you must run the Synchronize Person
Assignments from Position process to synchronize the assignments.When you run the process, set the Past Period
to Be Considered in Days parameter to an appropriate value. For example, if you set this parameter to 60 days, then
219

Oracle Fusion Cloud HCM
Using Common Features for HCM
Chapter 12
Jobs and Positions
any assignment records with start dates during the previous 60 days are synchronized from positions. By default, Past
Period to Be Considered in Days is set to 30 days.
Note: If you're using the Compensation Workbench to promote your workers and have enabled position
synchronization, then after running the Transfer Workforce Compensation Data to HR process, you need to also
run the Synchronize Person Assignments from Position process. This will update the other synchronized position
attributes in the assignment.
Related Topics
•
How Assignment Values Are Inherited from Position
•
Synchronize Person Assignment from Position Process
Set Up Position Synchronization
Position synchronization is inheritance of values in an assignment from the values specified in the associated position.
You can enable position synchronization at the enterprise and legal entity levels using the Manage Enterprise HCM
Information and Manage Legal Entity HCM Information tasks (in the Setup and Maintenance work area) respectively.
Enterprise Level Setup
You can enable position synchronization either at the enterprise or the legal employer levels. Select the Enable Position
Synchronization attribute in the Edit Enterprise page to enable position synchronization for the enterprise. By default,
this attribute is deselected. You can also specify whether the inherited values can be overridden at the assignment level.
If you enable position synchronization at the legal entity and the enterprise levels, then the settings specified at the
legal employer level takes precedence over the settings specified at the enterprise level.
Legal Employer Level Setup
Set the Enable Position Synchronization attribute to Yes in the Position Synchronization page to specify the attributes to
be configured with the position for the legal employer.
Select No for the Enable Position Synchronization attribute, to exclude a specific legal employer.
You can also use the same settings as defined for the enterprise. In this case, you must select the Use Enterprise
option, which is the default value. If position synchronization is configured at the enterprise level, then the assignment
inherits the attribute values from the position selected. You can also override these values at the assignment level.
Enabling Position Synchronization Post Setup
Here are the steps to enable position synchronization for the enterprise or legal entity post setup..
1. On the Home page, under My Client Groups tab, click the Show More link to access more quick actions.
2. Navigate to Workforce Structures > Manage Enterprise HCM Information page or Manage Legal Entity
HCM Information page.
3. Under Position Synchronization Configuration section, select the attributes that you want to synchronize.
4. Select the Allow Override at the Assignment option if you want to exclude an assignment from
synchronization.
220

Oracle Fusion Cloud HCM
Using Common Features for HCM
Chapter 12
Jobs and Positions
5. Using HCM Data Loader, you need to update all assignments that you want to must be synchronized from the
position (as of the date you want to enable position synchronization).
6. Set the Synchronize from Position (position override check in HCM Data Loader) attribute on these
assignments to Y. This enables position synchronization even if you don't want to allow override at the
assignment.
7. Run the Synchronize Person Assignments from Position process to synchronize the assignments.
Related Topics
•
Synchronize Person Assignment from Position Process
How Assignment Values Are Inherited from Position
If you enable position synchronization, assignments inherit specified values from the associated position. You can also
specify whether the inherited values can be overridden in the assignment.
You can specify this at the enterprise and legal entity levels using the Manage Enterprise HCM Information and Manage
Legal Entity HCM Information tasks respectively.
Overriding of Assignment Values
When you enable position synchronization, you specify which attributes the assignment inherits from the position
due to synchronization. Assignment attributes synchronized from position inherit their values from the position and
aren't editable. The restriction on editing values in the assignment applies only to the information that's entered in the
position. For example, if the Bargaining Unit isn't entered in the position, you can edit this value in the assignment even
though it's one of the attributes inherited from the position. If override is allowed at the assignment level, then you can
specify at the assignment level whether you want to synchronize from position or not. By default, the Synchronize from
Position attribute on the Edit Assignments page is set to Yes. If you prevent override at the assignment level, users can't
update the specified attributes that the assignment has inherited from the position. You can use personalization to
enable managers to specify a value for the Synchronize from Position field.
You can choose to either retain the existing values in the assignment or update the values from the position for any
attributes that aren't synchronized. So, if you don't select the grade attribute for synchronization and update the grade
value in the position, you can either retain the existing grade value in the assignment or update it from the position.
If a synchronized attribute is empty at the position, then this attribute won't be synchronized in the assignment. You can
enter any value for this attribute in the assignment. If a value already exists for this attribute, it will be retained and you
can change it to any other value.
Let’s see how assignments are impacted when position and position synchronization details are modified using
different applications.
Parameters Responsive
Employment Flows
HDL or HSDL REST Request a Position
Change - Impacted
Assignments
Synchronize Person
Assignment from
Position Process
Position Attributes Yes Yes Yes Yes Yes
Position Flexfields Yes N/A N/A N/A Yes
221

Oracle Fusion Cloud HCM
Using Common Features for HCM
Chapter 12
Jobs and Positions
Parameters Responsive
Employment Flows
HDL or HSDL REST Request a Position
Change - Impacted
Assignments
Synchronize Person
Assignment from
Position Process
Note: Only if the
mapping is defined
for the assignment
flexfield.
Manager from
Position Hierarchy
Yes N/A N/A N/A Yes
Manager from
Position
Yes N/A N/A Yes Yes
Synchronize Reports
from Position
Hierarchy
N/A N/A N/A N/A Yes
Calculate FTE as per
Position Working
Hours
Yes N/A N/A N/A Yes
For example, if position synchronization is enabled and you change the position in the responsive employment flows,
all position parameters are synchronized except direct reports. If you load the position parameters changes using HCM
Data Loader (HDL), HCM Spreadsheet Data Loader (HSDL), or REST, then only the position attributes are synchronized.
The Synchronize Person Assignment from Position process updates all assignments irrespective of the application used.
These are some key points to note.
• Position attributes are synchronized irrespective of the application used for the update.
• Position flexfields are synchronized in responsive employment flows and when you run the Synchronize Person
Assignment from Position process. Flexfield data can also be updated in responsive employment flows.
• Line manager is defaulted from the position hierarchy in responsive employment flows, and when you run the
Synchronize Person Assignment from Position process.
• Line manager is defaulted from the position in responsive employment flows, when there is change in the
position, and when you run the Synchronize Person Assignment from Position process.
• Direct reports can be synchronized only when you run the Synchronize Person Assignment from Position
process.
• FTE is calculated based on the position working hours in responsive employment flows and when you run the
Synchronize Person Assignment from Position process.
For more information on the attributes that can be synchronized, refer to the topic Position Synchronization.
Note: If you choose to specify your own values for an assignment, then that assignment won't be synchronized with
any future position changes.
222

Oracle Fusion Cloud HCM
Using Common Features for HCM
Chapter 12
Jobs and Positions
HCM Position Hierarchy
Position hierarchy defines positions' relationships. The HCM position hierarchy is built based on these relationships.
You enable the HCM position hierarchy on the Manage Enterprise HCM Information page in the Setup and Maintenance
work area.
When you enable HCM position hierarchy:
• You can specify the parent position for a position on the Create and Edit Position pages in the Workforce
Structures work area. When you search for positions based on a parent position, it will show all child positions
for the specific parent position.
• You can also use the hierarchy to synchronize the line manager in the assignment from the line manager value
in the parent position.
• You can view the positions that are part of the HCM position hierarchy on the My Team page and view the
incumbents for a position.
• You can inactivate a position only if an incumbent with an inactive assignment exists.
Updating the Position Hierarchy
You can only correct the HCM position hierarchy. You can enable or disable the position hierarchy configuration by
flattening the existing hierarchy. You must run the Synchronize Person Assignments from Position process to flatten the
position hierarchy.
When the position hierarchy is flattened, then schedule to run the Synchronize Person Assignments from Position
process. This will apply the manager changes in assignments if the position hierarchy is changed after person and
assignments are created. The assignment changes can exist on the current date, date in the future, or in the past.
You can't change the position hierarchy configuration if the line manager is synchronized based on the HCM position
hierarchy. However, if line manager synchronization was configured as of a date in the past, then you can correct the
position hierarchy configuration.
Graphical Position Hierarchy
The HCM position hierarchy shows the relationship between positions and their parent positions. You can view and edit
the hierarchy on the HCM Position Hierarchy page, if your data security profile allows you.
You can identify a position's parent on the Manage Positions page if the Use HCM Position Hierarchy option is enabled
for the enterprise.
The nodes of the position hierarchy represent positions and parent positions. You can:
• Add child positions under a position either by creating a new position or by selecting an existing position as the
child.
• Create a copy of an existing position by specifying a new name and code. The rest of the information is copied
from the original position to the copy. You can change any information that you want.
• Edit the position.
223

Oracle Fusion Cloud HCM
Using Common Features for HCM
Chapter 12
Jobs and Positions
• View the incumbent details including name, person type, person number, position entry and exit dates, and
their status as of the current date.
• Delete any position that doesn't have any incumbents or child positions.
In each position node, you can view:
• Position name and code.
• Business unit, job, department, and location.
• Number of incumbents for the position.
• Open Full Time Equivalent (FTE)
• Current incumbents in the position.
How You Create a Graphical Position Hierarchy
Vision Corporation is reorganizing its workforce and defining the hierarchy for all positions. You must create a position
hierarchy as shown here.
224

Oracle Fusion Cloud HCM
Using Common Features for HCM
Chapter 12
Jobs and Positions
The following table summarizes the key decisions for this scenario.
Decisions to Consider In this Example
Which business unit do these positions
belong?
Vision Corp. US
What is the method for position code
generation?
Manual
You must do the following before creating the position hierarchy:
1. On the Manage Enterprise HCM Information page, enable HCM Position Hierarchy.
225

Oracle Fusion Cloud HCM
Using Common Features for HCM
Chapter 12
Jobs and Positions
2. Ensure you have the Manage HCM Position Hierarchy privilege, which enables you to update the hierarchy.
3. Create the following positions -Executive Vice President, Vice President, Senior Sales Manager, and Senior
Operations Manager.
4. Display additional fields on the Create and Edit Position pages using personalization, if required.
Add a Parent Position to an Existing Position
1. On the My Client Groups tab, click Workforce Structures.
2. On the Manage Positions page, search and select the Vice President position.
3. On the Position: Vice President page, click Edit and select Update.
4. Select Reorganization.
5. Click OK.
6. Search and select the Executive Vice President position as the parent position.
7. Click Review.
8. Click Submit.
9. Click Yes.
10. Click OK.
Create a New Child Position
1. On the HCM Position Hierarchy page, click the orange arrow icon in the Vice President node and select Create
Child Position.
2. On the Create Child Position page, enter the following details:
Field Value
Name
Sales Director
Code
SALES_DIR
Job
Director
Type
Single Incumbent
FTE
1
Headcount
1
3. Click Save and Close.
4. For the Vice President node, repeat steps 1 and 2 using the following details:
Field Value
Name
Operations Director
226

Oracle Fusion Cloud HCM
Using Common Features for HCM
Chapter 12
Jobs and Positions
Field Value
Code
OPS_DIR
Job
Director
Type
Single Incumbent
FTE
1
Headcount
1
5. Click Save and Close.
Add an Existing Position as a Child Position
1. In the Sales Director node, click the orange arrow icon and select Add Existing Position as a Child.
2. Search and select the Senior Sales Manager position.
3. Click OK.
4. On the Edit Position: Senior Sales Manager page, click Save and Close.
5. In the Operations Director node, click the orange arrow icon and select the Add Existing Position as Child
option.
6. In the Select Position window, search and select the Senior Operations Manager position.
7. Click OK.
8. On the Edit Position: Senior Operations Manager page, click Save and Close.
Create Duplicate Positions
1. In the Senior Sales Manager node, click the orange arrow icon. and select Duplicate Position.
2. On the Create Duplicate Position page, enter the following details:
Field Value
Name
Sales Manager
Code
SALES_MGR
Type
Single Incumbent
FTE
1
Headcount
1
227

Oracle Fusion Cloud HCM
Using Common Features for HCM
Chapter 12
Jobs and Positions
3. Click Save and Close.
4. In the Senior Operations Manager node, click the orange arrow icon. and select Duplicate Position.
5. On the Create Duplicate Position page, enter the following details:
Field Value
Name
Operations Manager
Code
OPS_MGR
Type
Single Incumbent
FTE
1
Headcount
1
6. Click Save and Close.
Move the Sales Manager Node
You added the Sales Manager node under the Sales Director node instead of under the Senior Sales Manager node. You
can drag the node and drop it on the Senior Sales Manager node.
1. Select the Sales Manager node and drop it on the Senior Sales Manager node. The Sales Manager position
automatically becomes a child of the Senior Sales Manager position.
If you created a node in a wrong place, you can just drag and drop the node to the correct place. The hierarchy
automatically adjusts itself when you do so.
Review and Submit the Position Hierarchy Changes
1. On the HCM Position Hierarchy page, click Review. This page shows the positions that you added to the
hierarchy or the changes made to existing positions.
2. Click Submit.
3. Click Yes.
4. Click OK. If approval rules are set up, you'll be able to see the hierarchy changes after they are approved/
Considerations for Using Position or Position Hierarchy
for Synchronizing Assignment Manager
To select a line manager synchronization option for the enterprise or for individual legal entities, use the Manage HCM
Enterprise Information and Manage HCM Legal Entity Information in the Setup and Maintenance work area respectively.
This topic discusses the line manager synchronization options available.
228

Oracle Fusion Cloud HCM
Using Common Features for HCM
Chapter 12
Jobs and Positions
HCM Position Hierarchy
Use the HCM Position Hierarchy to synchronize the line manager on the assignment with the incumbent of the parent
position in the position hierarchy.
When there is a change in the position hierarchy, you need to run the Synchronize Person Assignments from Position
process to update the affected assignments. Alternately, when you update a position using the HCM Data Loader also
you must run the Synchronize Person Assignments from Position process for the assignments to inherit the position
changes. For example, if a position is moved under a different parent position, if there are any direct reports they're
automatically reassigned to the incumbent in the new parent position. If there is no manager in the parent position, the
application checks for the incumbent in the grandparent position, or until it finds an incumbent. If there are multiple
incumbents in a parent position, the incumbent with the longest tenure in the position is assigned as the new manager,
You can change the manager to the other incumbent on the Employment page.
If you move a position or remove it from the hierarchy, the grandparent position becomes the new parent position for
all the child positions. For example, if you have a hierarchy as follows: Manager (grandparent), Team lead (parent), and
Developer (child), and you move the Team Lead position to a different branch. The Manager position is the new parent
position for the Developer position.
Note: If you're using HCM position hierarchy, remove the function privilege for the Manage Position Trees task in the
Setup and Maintenance work area for your users. You can also hide the Manager field on the Create Position and Edit
Position pages using personalization if you synchronize the line manager using position hierarchy.
Position Manager
Use the position manager to synchronize the line manager on the assignment with the line manager defined for the
position. You can use this option if you're not using the HCM Position Hierarchy and want to manually maintain the
manager at the position. .
Related Topics
•
Guidelines for Loading Positions
Synchronize Assignment Action Reason From Position
You can synchronize the action reason in assignments with the action reason specified when a position is updated using
these flows and process.
• Update Position (from Position Details)
• Request a Position Change
• Synchronize Person Assignments from Position ESS process
The action reason is synchronized in the assignment if these conditions are satisfied.
• Position synchronization is enabled at the legal entity level.
• Action reason attribute is selected for synchronization in the position synchronization setup.
• Action reason is specified in the selected position.
• Synchronization from Position action has associated reasons configured.
229

Oracle Fusion Cloud HCM
Using Common Features for HCM
Chapter 12
Jobs and Positions
• Action reason specified in the position is one of the reasons associated with Synchronization from Position
(ORA_POS_SYNC) action and to action of type Update Position (PER_POS_UPD)
• At least one of the synchronized attributes is updated in the position apart from action reason.
A point to note is that the action reason is synchronized only when the first position synchronization record is created in
the assignment. If there’s a correction in the position, then all changed attributes from position will be synchronized in
the assignment apart from the action reason.
How You Enable Action Reason Synchronization
You need to enable position synchronization at the enterprise or legal entity level. These are the steps to enable position
synchronization at the enterprise-level.
1. On the Home page, click My Client Groups > Workforce Structures.
2. Click the Manage Enterprise HCM Information task.
3. Click Edit > Update.
4. Click OK.
5. In the Position Synchronization Configuration section, select Enable Position Synchronization and Action
Reason check boxes. Select any other attributes for synchronization.
6. Click Review to check your changes.
7. Click Submit.
8. Click OK.
After position synchronization is enabled, let's add action reasons to the Synchronization from Position and Update
position actions.
1. On the Home page, click My Client Groups > Workforce Structures.
2. Click the Configure Actions task.
3. Search for Synchronization from Position (ORA_POS_SYNC) action.
4. Click Continue.
5. In the Action Reasons section, Click Associate to associate the action reasons with the action.
6. Click Ok.
7. Click Submit.
8. Click Configure Actions task
9. Search for and click Update (PER_POS_UPD) action.
10. Click Continue in the Action section.
11. Click Associate and add the same action reason you added to the Synchronization from Position action, for
example, Promotion.
12. Click Ok.
13. Click Submit.
Example of Action Reason Synchronization in
Assignments
You can synchronize the action reason in the position with the action reason in the assignment. Let's understand how
this works with an example.
Position synchronization is enabled at the Global Business Institute enterprise level and department, job, full time or
part time, and action reason attributes are enabled for synchronization.
230

Oracle Fusion Cloud HCM
Using Common Features for HCM
Chapter 12
Jobs and Positions
There are 3 positions - Architect, Sales Manager, and Director with these action reasons and jobs respectively.
Position Info
Position Name Action Reason Job
Architect Promotion Software Development
Sales Manager Organization Change Sales Manager - SAAS
Director Assignment Change Director - Operations
The Synchronization from Position action is associated with only promotion and Organization Change action reasons
and the Update Position action is associated with Assignment Change and Organization Change action reasons.
Action Reason Info
Action Associated Action Reason
Synchronization from Position
• Promotion
• Organization Change
Update Position
• Assignment Change
• Organization Change
Assignment Info
Person Position Job Action Reason Updated Job Updated Action
Reason
John Doe Architect Software Development NA NA (no update in the
assignment action
reason)
Bonnie Vickers Sales Manager Sales Manager - SAAS NA Software Development Organization Change
David Steward Director Director - Operations NA Software Development (no update in the
assignment action
reason)
Action Reason Synchronization in Assignment
• John Doe - There is no update in the assignment action reason because none of the attributes were updated in
the Architect position.
• Bonnie Vickers - The Sales Manager position was updated with a new job and the action reason specified
in the position is Organization Change. The Organization Change action reason is associated with both -
Synchronization from Position and Update position actions. Since all conditions are met, the assignment is
updated with the Organization Change action reason.
• David Steward - Though the Director position was updated with a new job, but the action reason (Assignment
Change) wasn't updated in the assignment because the action reason is associated only with Update Position
action type and not the Synchronization from Position action.
231

Oracle Fusion Cloud HCM
Using Common Features for HCM
Chapter 12
Jobs and Positions
Synchronize Assignment Flexfields From Position
Flexfields
You map position flexfields with assignment flexfields using the Manage Assignment Flexfields Mapping task in the
Functional Setup Manager.
Use the task to map assignment descriptive flexfield segments to position descriptive flexfield segments. Synchronizing
mapped flexfields includes the following steps:
1. Define flexfield mapping
2. Enabling flexfield synchronization
3. Synchronizing assignment flexfields from position flexfields
Define Flexfield Mapping
To map flexfields, follow these steps.
1. In the Functional Setup Manager, click the Manage Assignment Flexfields Mapping task.
2. Specify the following information.
Field Description
Source Context
The context for the position descriptive flexfield. If you want to map a global position flexfield
segment, leave the source context blank
Source Segment
The position descriptive flexfield segment of the selected context or the global segment if the
context was left blank
Destination Context
The context for the assignment descriptive flexfield you want to map the position flexfield to.
If you want to map it to a global assignment flexfield segment, leave the destination context
blank.
Destination Segment
The assignment descriptive flexfield segment of the selected assignment context or the global
segment if the context was left blank.
Enterprise Configuration: Enable
Position Synchronization
Specify whether you want to use this flexfield mapping for position synchronization for the
enterprise. Leave this field blank if the flexfield mapping applies to a specific legal employer.
Legal Employer Configuration: Legal
Employer
Use this option if the flexfield mapping doesn't apply to the enterprise. You can select multiple
legal employers. Select the legal employer.
Legal Employer Configuration: Enable
Position Synchronization
Specify whether you want to use this flexfield mapping for position synchronization for the
selected legal employer.
232

Oracle Fusion Cloud HCM
Using Common Features for HCM
Chapter 12
Jobs and Positions
Field Description
3. Add more mappings as required and specify information described in step 2 for each row.
4. Save the mapping.
Enabling Flexfield Synchronization
To enable flexfield synchronization, follow these steps.
1. In the Setup and Maintenance work area, click the Manage Enterprise HCM Informationtask to enable the
setting for the enterprise, or click the Manage Legal Entity HCM Information task to enable the setting for a
specific legal entity.
2. Click Edit and select Update.
3. Select the Enable Position Synchronization and Synchronize Mapped Flexfields check boxes in the Position
Synchronization Configuration section.
4. Click Submit.
Synchronizing Assignment Flexfields from Position Flexfields
To synchronize assignment flexfields from position flexfields, follow these steps.
1. In the Navigator, click Scheduled Processes.
2. Click Schedule New Process.
3. Run the Synchronize Person Assignments from Positions process.
Related Topics
•
Position Synchronization
•
Considerations for Flexfield Mapping in Position Synchronization
•
Synchronize Person Assignment from Position Process
Considerations for Flexfield Mapping in Position
Synchronization
You map position descriptive flexfields to assignment descriptive flexfields using the Manage Assignment Flexfield
Mapping task in Oracle Fusion Functional Setup Manager.
Use this mapping to automatically populate values for those assignment flexfields mapped to the position flexfields,
when position synchronization is enabled. This topic describes what to consider when you're mapping flexfields.
Enterprise or Legal Entity Levels
Before you map flexfields, you must decide whether you want the mapping to be available for the enterprise or for
specific legal entities only. You can reuse a mapping across different legal entities. Settings at the legal employer level
takes precedence over enterprise settings, if both are specified.
233

Oracle Fusion Cloud HCM
Using Common Features for HCM
Chapter 12
Jobs and Positions
You need to define the enterprise or legal employer mapping for each position flexfield segment by selecting each row
corresponding to the flexfield segment.
Note: If you have defined position synchronization at the legal employer level and haven’t defined flexfield mapping
for a legal employer, the position flexfields won’t be synchronized at the assignment for that legal employer.
Context Specific or Global
You must decide whether to map context specific or global flexfield segments because you can't map a context specific
flexfield segment to a global flexfield segment. You can't map two or more segments of different contexts or multiple
position segments to the same assignment segment.
When you change the position value in an assignment, all synchronized global segments inherit the value from the new
position. You can manually update those segments that have a blank value in the position.
When you change the position value in an assignment, all context specific segments inherit the value from the new
position. If the new position has similar values to the old position and additional contexts defined, the assignments
retain the same values and inherit the additional values from the new position.
Selecting and removing a position in an assignment makes the context and segments editable but the current values
aren't removed if they're synchronized from the position.
Numeric or Character
You can map flexfields of the same type (for example, numeric-to-numeric or character-to-character only), same
precision, and the same value set (same value set ID).
Related Topics
•
Position Synchronization
•
Considerations for Managing Descriptive Flexfields
Synchronize Person Assignment from Position Process
To synchronize the position changes with the affected assignments, run the Synchronize Person Assignments
from Position process. The Initialize Position Synchronization process to load position synchronization changes is
incorporated into the Synchronize Person Assignments from Position process.
The Synchronize Person Assignments from Position process is triggered in these scenarios.
Assignment
• Assignment update causing a date-effective split.
• Direct report assignment change because of change in assignment. This might be due to either position
change or termination of the manager.
Position
• Position update causing a date-effective split.
• Parent position change.
234

Oracle Fusion Cloud HCM
Using Common Features for HCM
Chapter 12
Jobs and Positions
Position Synchronization Configuration
• Position synchronization configuration update either at the enterprise or the legal entity level.
Run the Synchronize Person Assignment from Position to:
• Update affected assignments in the enterprise or legal entity if position synchronization is enabled (either
initially or later, as a change).
• Prevent data corruption
• Synchronize the line manager based on the HCM position hierarchy.
• Synchronize action reason based on the position action reason and the available action reasons under
Synchronization from Position action.
• Update assignments affected by the position changes, uploaded using HCM Data Loader.
Note: You must schedule this process to run on a regular basis. If you’re synchronizing the manager, then it's
recommended to run this process daily.
Use the Schedule New Process page in the Scheduled Processes work area to run the Synchronize Person Assignment
from Position process.
Before you run the process, you must enable position synchronization on the Manage Enterprise HCM Information or
Manage Legal Entity HCM Information tasks in the Setup and Maintenance work area
Process Parameters
Past Period to Be Considered in Days
Number of days in the past to be considered for updating the attribute in the assignments. The default value is 30
days. Note that even if position synchronization was enabled in the past and you loaded position data with an effective
date of 6 months back, you don’t need to specify 180 days as the number of days. This is because the process detects
the effective date and the last updated date of the position data. You can enter 2 days as the parameter value though
changes are effective 6 months back.
Run at Enterprise Level
Select Yes to run the process for the enterprise, or No to run it for a specific legal entity.
Legal Entity
Legal entity for which you want to run the process.
Process Results
This process updates all affected assignments with the changes from the position. This includes:
• Changes due to position synchronization.
• Past or future-dated changes to the position hierarchy.
• Rollback of line manager changes in assignments for reverse termination.
• Line manager hierarchy changes
• Flexfield-mapping changes.
• Changes in position loaded using HCM Data Loader
235

Oracle Fusion Cloud HCM
Using Common Features for HCM
Chapter 12
Jobs and Positions
Create a Position Profile
Profiles help you in identifying the requirements and competencies for a position. You can associate an existing profile.
You can also create a new profile and associate it with the position by updating or correcting the position.
You can associate a profile to a position using any of these pages - Position Details, Position Change, and Request a
New Position. Here's how you create a position profile.
1. On the Home page, click My Client Groups.
2. Navigate to the quick actions and click the Show More link.
3. Under Workforce Structures, click Position Details.
4. Search for and click the position for which you want to associate the profile.
5. On the Position Details page, click Create Profile under the Actions menu.
6. On the Create Position Profile page, enter these details.
Field Description
Position Responsibility
Responsibilities that are required for the position.
Position Qualifications
Qualifications that are required of the people in the position.
7. Click Save.
Associate Action Reasons in Position with Role
You can make the action and action reason role-specific on these position pages by selecting the applicable roles when
you configure the action and action reason.
• Request a New Position
• Request a Position Change
• Update Position (from Position Details)
• Correct Position (from Position Details)
• Duplicate Position (from Position Details)
After the configuration, the position pages will display the action and action reason that are specific to the worker's
logged in user role. You need to associate the action reasons on the Configure Actions page. In these steps, we will
create a new action reason and associate the role.
1. On the Home page, click My Client Groups > Workforce Structures > Action Reasons.
2. Click Add.
3. Enter a name, code, and description for the action.
4. Click Submit.
236
Oracle Fusion Cloud HCM
Using Common Features for HCM
Chapter 12
Jobs and Positions
5. On the Home page, click My Client Groups > Workforce Structures > Configure Actions.
6. Search and click the action with which you want to associate the specific action reason, for example, Update.
This table lists the flows associated with the action.
Action Code Applies to
Create PER_POS_NEW
◦
Request a New Position
◦
Duplicate Position
Update PER_POS_UPD
◦
Update Position
◦
Correct Position
◦
Request a Position Change
7. On the Edit Action page, click Continue in the Action section.
8. Click Associate.
9. Select the action reason you created.
10. Enter a start date for the association.
11. Select the roles you want to associate.
12. Click Submit.
In addition to the action reasons associated with the role, you can also see the action reasons that are available for all
users and not associated with any role in the Action Reasons LOV.
Upload Workforce Structures Using a Spreadsheet
Using a spreadsheet, you can upload multiple objects at a time, for the following workforce structures:
• Jobs
• Locations
• Departments
For example, to upload multiple jobs at a time:
• Select Manage Jobs in the Workforce Structures work area
• Display the Create menu
• Select Create in Spreadsheet
Uploading Using a Spreadsheet
For each workforce structure, you can do the following:
• Download a predefined spreadsheet template from the application
• Work on the spreadsheet offline, and upload the spreadsheet to the application when your changes are
complete
• Upload the spreadsheet multiple times to accommodate revisions
237

Oracle Fusion Cloud HCM
Using Common Features for HCM
Chapter 12
Jobs and Positions
Effective Start Date
Ensure that the effective start date of the workforce structure is same as or earlier than the hire date of persons
associated with the workforce structure; for example, enter a job start date earlier than the hire date of persons
associated with the job. You may want to consider creating all objects as of a common early date, for example, create all
locations with the start date 1-1-1950.
Entering Descriptive Flexfield Values
Use the Attribute columns in the main sheet to enter values for the descriptive flexfields that are already defined for the
object. Use the DFF Reference sheet to understand which attribute columns map to which descriptive flexfields, since
this information isn't displayed in the main sheet.
Note: You can't enter values in the DFF Reference sheet, you can only view details of the descriptive flexfields.
Uploading Jobs Using a Spreadsheet
When uploading jobs using a spreadsheet, you:
• Can't create a new job profile
• Can only associate an existing job profile
• Must enter the name of an existing job profile in the spreadsheet
Related Topics
•
Guidelines for Using Desktop Integrated Excel Workbooks
FAQs for Jobs and Positions
What's the difference between a job set and a job family?
A job family is a group of jobs that have different but related functions, qualifications, and titles. They are beneficial for
reporting. You can define competencies for job families by associating them with model profiles.
A job set is an organizational partition of jobs. For example, a job set can include global jobs for use in all business units,
or jobs for a specific country or line of business. When you select a job for a position or an assignment, you can view the
available jobs in your business unit set and the common set.
Related Topics
•
What's a job set?
238

Oracle Fusion Cloud HCM
Using Common Features for HCM
Chapter 12
Jobs and Positions
Why can't I see the position code for the new position?
Based on your enterprise settings, the position code is generated after the Create Position transaction is approved. For
example, once the transaction is approved, you can see the position code on the Position Details page.
When can I enable position synchronization?
You can enable position synchronization at any time but if there are existing assignments in an enterprise or legal
employer, you can enable it only as of the current or future date.
If you update an assignment as of a past date the values from the new position won't be updated in the assignment.
For example, if you create a transfer as of a past date before enabling position synchronization, the values from the new
position won't be updated in the assignment.
What happens if I specify a parent position?
You can specify a parent position when you enable HCM position hierarchy using the Manage Enterprise HCM
Information task in the Setup and Maintenance work area. A parent position is one, which is the next position up in the
position hierarchy.
On the Manage Positions page, click the parent position link to view the position details and click the icon next to the
parent position to refresh the search with the parent position.
As a prerequisite, you specify a parent position to synchronize the line manager from the parent position. When you
select to synchronize the line manager using the position hierarchy the incumbent in the parent position is populated as
the new manager.
Related Topics
•
Position Synchronization
What happens if I specify the standard working hours in a
position?
In an assignment, the standard working hours are inherited from the position. The working hours and the standard
working hours provided in the position are used to calculate the FTE (Full Time Equivalent) in the assignment.
If there is a FTE value already existing in the position, you can choose to update it based on the ratio of the working
hours to standard working hours.
When position synchronization is enabled, even if FTE value exists for the position, it is not copied to the assignment
during synchronization. Instead, the assignment FTE value is calculated as a ratio of working hours to standard working
hours, if specified.
239

Oracle Fusion Cloud HCM
Using Common Features for HCM
Chapter 12
Jobs and Positions
What happens when grades are synchronized?
The profile options to default or enforce valid grades are ignored when grades are synchronized.
If multiple valid grades exist at the position, then you can select an appropriate grade in the assignment. If you hire a
person into the position, which has an entry grade specified, then the entry grade will be the default value in case of
multiple valid grades.
If the assignment has both position and job, then synchronization from the position always takes precedence and the
values at the job will be ignored. Let's say you haven't defined any valid grades for the position. However, valid grades
are defined for the job and the assignment has a position. Then any valid grades for the job are ignored.
How can I exclude some assignments from position
synchronization?
If you want to use position synchronization only for a section of workers, you need to enable position synchronization at
the legal employer level.
To exclude some assignments from synchronization, select Allow Override at the Assignment in the Position
Synchronization Configuration section on the Manage Enterprise HCM Information page.
To exclude a specific assignment from synchronization, select No in the Synchronize from Position field in the
assignment (even if override is allowed). All read-only fields become editable but the assignment won't be synchronized
and will no longer inherit any changes made at the position level. However, it isn't possible to exclude only some
synchronized attributes.
How do I override position synchronization at the attribute level?
If you want to capture a different value for one attribute only, leave that attribute blank at the position
Let's say the location attribute is synchronized from the position but except in a few cases it doesn't matter into which
location the person is hired, then you can leave the location field blank at the position. Since blank values aren't
synchronized, the location will be editable in the assignment enabling you to select a value manually.
What happens if I select Synchronize Mapped Flexfields?
When you select this option, assignment flexfields are synchronized with the mapped position flexfields.
You must first map position flexfields to assignment flexfields using the Manage Assignment Flexfield Mapping task
in the Functional Setup Manager, and then select this option in the Manage Enterprise HCM Information task. When
position synchronization is enabled, the position flexfields are inherited in the assignments.
240

Oracle Fusion Cloud HCM
Using Common Features for HCM
Chapter 13
Grades, Grade Rates, and Grade Ladders
13 Grades, Grade Rates, and Grade Ladders
Grades
From the Manage Grades page, create grades to record the level of compensation for workers.
You can do these actions.
• Create grades for multiple pay components, such as salary, bonus, and overtime rates
• Define one or more grades that are applicable for jobs and positions
This list of valid grades, combined with the settings for two profile options, enables you to restrict the grades that can
be selected when you set up assignments for a worker.
Grades and Sets
You assign each grade to a set. If you assign a grade to the common set, then the grade is available for use in all
business units. To limit a grade to a single business unit, you can assign it to a set that's specific to that business unit.
Grade Steps
Grade steps are distinct increments of progression within a grade. You can set up grades with or without grade steps.
241

Oracle Fusion Cloud HCM
Using Common Features for HCM
Chapter 13
Grades, Grade Rates, and Grade Ladders
The following figure illustrates the difference between grades with and without steps.
Grade Rates
Grade rate values are the compensation amounts associated with each grade. You can set up rates at the same time that
you create grades, or set them up independently from grades.
For grades with steps, you set up the step rates when you include them in a grade ladder. Grade rates are optional.
Grade Ladders
You can combine grades into grade ladders to group your grades or grades with steps in the sequence in which your
workers typically progress. For example, you might create three grade ladders for your enterprise: one for technical
grades, another for management grades, and a third for administrative grades.
Related Topics
•
Grade Rates
•
Grade Ladders
•
How Grades and Grade Rates Work with Jobs, Positions, Assignments, Compensation, and Payroll
•
Examples of Grades, Grade Rates, and Grade Ladders
242

Oracle Fusion Cloud HCM
Using Common Features for HCM
Chapter 13
Grades, Grade Rates, and Grade Ladders
Grade Rates
Grade rates contain the pay values that are related to each grade.
Grade rate values can be either a fixed amount or a range of values, and you can set up rates for different types of pay
such as salary, overtime, and bonuses.
Note the following:
• Grade rates for some jobs or positions might include an hourly salary rate and an overtime rate.
• Grade rates for other jobs or positions might contain a salary rate type with a range of amounts and a bonus
rate type with a fixed amount.
• Grade rates typically serve only as a guideline to validate that the salary you propose during the compensation
process for a worker on a certain grade is appropriate for that grade.
This figure illustrates a grade that has two rate types associated with it: Salary rate type that has a range of valuesBonus
rate type with a fixed amount
This figure illustrates a different grade that has two rate types associated with it:Salary rate type that has a fixed
amountOvertime rate type that also has a fixed amount
243

Oracle Fusion Cloud HCM
Using Common Features for HCM
Chapter 13
Grades, Grade Rates, and Grade Ladders
Rate Types
The types of rates that you can set up depend on the values for lookup type GRADE_PAY_RATE_TYPE. Examples of rate
types are salary, bonus, and overtime pay.
Grade Rates and Legislative Data Groups
You assign a legislative data group to each grade rate. Depending on how your enterprise is configured, you may have
several legislative data groups. You can set up grades that are shared across different areas of your business, and enter
rates that are specific to each legislative data group.
Grade Rates and Grades
You can do the following:
• Set up grade rates when you set up grades
• Set up grade rates independently from grades
For grades with steps, you enter rates when you attach the grades to a grade ladder.
Related Topics
•
How Grades, Grade Rates, and Sets Work with Legislative Data Groups
•
How Grades and Grade Rates Work with Jobs, Positions, Assignments, Compensation, and Payroll
•
Examples of Grades, Grade Rates, and Grade Ladders
Grade Ladders
Grade ladders group grades and grades with steps in the sequence in which your workers typically progress.
You create grade ladders either from the Manage Progression Grade Ladders page (in the Compensation work area) or
from the Manage Grade Ladders page (in the Workforce Structures work area).
Grade ladders describe the grades and steps to which a worker is eligible to progress and compensation value
associated with that grade and step. You may create different grade ladders for your enterprise: one for technical grades,
another for management grades, and a third for administrative grades.
Ladders with Grades
You create ladders with grades by building a hierarchy of grades that were created without steps. When you set up
this type of ladder, only grades without steps are available to add to the ladder. You can't create a grade ladder with a
combination of both grades and grades with steps.
You don't define any grade rates when you set up a ladder with grades; the rates for the grades within the ladder are
inherited from the rates that were added when you set up the grades. To add or edit rates for grades, you must use the
Manage Grade Rates task.
244

Oracle Fusion Cloud HCM
Using Common Features for HCM
Chapter 13
Grades, Grade Rates, and Grade Ladders
Ladders with Grade Steps
You create ladders with grade steps using grades that were created with steps. When you set up this type of ladder, only
grades with steps are available to add to the ladder.
You define step rates when you set up the ladder, and the rates are unique to each ladder. You can't share step rates
between grade ladders.
Related Topics
•
Grade Rates
•
Grades
•
Examples of Grades, Grade Rates, and Grade Ladders
•
How You Set Up Grade Ladders for Pay Scale Requirements
Lookup Types for Grades
The Lookup type for Grades task identifies the lookup type for managing grades that has an extensible configuration
level.
The GRADE_PAY_RATE_TYPE lookup type identifies compensation components you want to set up for grade rates. The
predefined values are salary, bonus, and overtime. Review these lookup values, and update them as appropriate to suit
enterprise requirements.
Grade Ladder on Worker Assignment
You can use the grade ladder in the worker assignment to ensure that workers are compensated according to the grade
structure defined in the job or position.
Selecting Grade Ladder for Worker Assignment
Transactions, such as New Hire, Add Assignment, and Create Work Relationship involve creating a new assignment.
During assignment creation, the grade ladder is automatically populated based on the selected job or position. This isn't
true for transactions that involve an assignment update (for example, promotion, transfer). You must manually select
the grade ladder when you update the assignment.
Note: The Grade Ladder field isn't displayed if a grade ladder isn't defined for the worker organization.
You must select from the grades populated for the grade ladder. If the selected grade includes steps, you can view
the steps and the associated salary rates by clicking the Grade Details icon. The step rate is displayed based on the
legislative data group associated with the assignment business unit.
The grade step progression process evaluates a worker's eligibility to progress to a new grade or step based on the
defined rules and updates the salary rate. The process can be run for workers associated with a particular grade ladder
to move them to a new grade or step and update their salary rate.
245

Oracle Fusion Cloud HCM
Using Common Features for HCM
Chapter 13
Grades, Grade Rates, and Grade Ladders
If the grade ladder selected in the assignment is associated with an automatic grade step progression process, you can
exclude the worker from the process. To exclude the worker, deselect the Include in grade step progression check box.
Note: The Include in grade step progression check box isn't displayed if a grade ladder isn't defined for the worker
organization.
Related Topics
•
Grade Ladders
•
Grades
•
Grade Rates
How Grades, Grade Rates, and Sets Work with Legislative
Data Groups
You assign grades to sets, and grade rates to legislative data groups from the Workforce Structures > Manage Grade
Rates page.
If you have grades that are common across multiple business units, you can:
• Assign them to the set that's associated with business units.
• Set up grade rates that are specific to each legislative data group.
246

Oracle Fusion Cloud HCM
Using Common Features for HCM
Chapter 13
Grades, Grade Rates, and Grade Ladders
The following figure illustrates how you can use sets to share grades across multiple business units and change the
grade rates for each legislative data group.
Grades and Sets
Sets enable you to share grades that are common across business units in your enterprise. You can assign grades to
either a specific set or to the common set to each grade. If you assign the grade to the common set, then the grade is
available for use in all business units.
Grade Rates and Legislative Data Groups
Grade rate values are associated with each component of compensation for your workers. While grades may be
common across different areas of your enterprise, grade rates vary among the countries in which you employ people.
For example, if your enterprise has engineer jobs in the United States, the United Kingdom, and Australia, you can
set up grades for a set that's shared between the countries, but set up different grade rates for each country in the
applicable currency.
247

Oracle Fusion Cloud HCM
Using Common Features for HCM
Chapter 13
Grades, Grade Rates, and Grade Ladders
Related Topics
How Grades and Grade Rates Work with Jobs, Positions,
Assignments, Compensation, and Payroll
You use grades and grade rates in the following components of Oracle Fusion HCM to ensure that workers are
compensated according to the grade structure that you create.
• Jobs
• Positions
• Assignments
• Compensation
• Payroll
How Grades Work with Jobs and Positions
You can define one or more grades that are applicable for each job and position. Using this list of valid grades,
combined with the settings for two profile options you restrict the grades that can be selected when you set up
assignments for a worker.
Note the following:
• If you use positions, then the grades that you assign to jobs are the default grades for the positions that you
associate with each job.
• You can use the default grades for the position, remove ones that don't apply, or add new ones.
How Grades Work with Assignments
When you set up assignments, you can select the applicable grade for the job or position.
Two profile options determine the grades that are available for selection:
Profile Option Description
PER_ENFORCE_VALID_GRADES
If you set this site-level profile option to Yes:
• Users can select a grade only from the list that you defined for the job or position.
◦
If users select both job and position for the assignment, they can select grades that are valid for
the position only.
◦
If valid grades are defined for neither job nor position, then users can select from all grades.
If you set this site-level profile option to No:
• User can select from all the grades
• This is also the default value
248
Oracle Fusion Cloud HCM
Using Common Features for HCM
Chapter 13
Grades, Grade Rates, and Grade Ladders
Profile Option Description
PER_DEFAULT_GRADE_FROM_JOB_
POSITION
If you set this site-level profile option to Yes and there is only one valid grade for a job or position:
• The grade is used by default in the assignment.
◦
If an entry grade is defined for a position, then that grade is used by default when the user creates
a new assignment.
If you set this site-level profile option to No:
• User can select from all the grades
• This is also the default value
How Grades and Grade Rates Work with Compensation and Payroll
Depending on the configuration of the legal employer to which workers belong, their salary can be stored at the
assignment level. The grade rate can be linked to the salary basis within the salary record, in which case their salaries
are validated using the grade rates.
For example, assume an assignment record for a worker indicates they're in Grade A1 with the salary of USD 40000.00:
• The grade rate range that's attached to Grade A1 is 30,000.00 USD to 50,000.00 USD. Therefore, the salary is
within the grade rate range and no warnings are issued.
• If their manager or a human resource (HR) specialist changes their salary to 55,000.00 USD, a warning is issued
that the new salary is outside their salary range.
In addition, compa-ratios and salary range positions for workers are calculated using the minimum and maximum
amounts that are defined in the grade rates for their grades.
Payroll elements reference grades in the eligibility criteria. For example, assume you want to process a bonus for all
workers who are at grade level A2. To accomplish this, you would create an earnings element for the bonus and specify
A2 for the grade in the eligibility criteria. The result of this setup, when combined with additional eligibility criteria that
may be applied by the bonus plan, is that when payroll is processed, workers who are at grade level A2 and who meet
the additional eligibility criteria would receive the bonus.
Related Topics
•
How Many Salary Bases to Create
Examples of Grades, Grade Rates, and Grade Ladders
The following examples illustrate how InFusion Corporation might set up different types of grades, rates, and ladders
for the different types of jobs within the company. The examples include grade structures for administrative workers,
managers, senior executives, and line workers.
Note: All amounts in the examples are US dollars.
249

Oracle Fusion Cloud HCM
Using Common Features for HCM
Chapter 13
Grades, Grade Rates, and Grade Ladders
Grades with Steps
The grade structure for annual salary amounts for administrative workers in InFusion Corporation includes five grades,
and each grade includes five steps.
• When workers move from one grade to another in this ladder, they don't always start at step 1 of a grade.
• The next step is based on their previous salary plus two steps.
For example, a worker could move from Step 5 in Grade 1 to Step 3 in Grade 2.
The following table lists the five grades, steps, and the rates associated with them for administrative workers at InFusion
Corporation.
Grade Step 1 Step 2 Step 3 Step 4 Step 5
1
17, 803
18, 398
18, 990
19, 579
20, 171
2
20, 017
20, 493
21, 155
21, 717
21, 961
3
21, 840
22, 568
23, 296
24, 024
24, 752
4
24, 518
25, 335
26, 152
26, 969
27, 786
5
27, 431
28, 345
29, 259
30, 173
31, 087
To set up your grade structure to reflect this table, perform the following tasks:
• Set up five different grades and add five steps for each grade.
• Set up a grade ladder using the Grades with Steps type, and select all five grades.
• Set up step rates for annual salary amounts using the rates in the preceding table.
Grades Without Steps
The grade structure for annual salary amounts for level 3 managers at InFusion Corporation includes grades without
steps. The grade rates are fixed amounts.
The following table lists the grades and associated rates for level 3 managers at InFusion Corporation.
Grade Annual Salary Amount
1
103, 900
2
111, 800
3
119, 900
250

Oracle Fusion Cloud HCM
Using Common Features for HCM
Chapter 13
Grades, Grade Rates, and Grade Ladders
Grade Annual Salary Amount
4
127, 800
5
135, 900
6
143, 700
7
151, 800
8
155, 500
To set up your grade structure to reflect this table, perform the following tasks:
• Set up eight separate grades.
• For each grade, enter the rates from the preceding table.
• Set up a grade ladder with the Grades type and add all eight grades to the ladder.
Grades with Grade Rate Ranges
The grade structure for annual salary amounts for senior executives at InFusion Corporation includes grades with no
steps, and the rates are set up using ranges.
The following table lists the rate range for senior executives at InFusion Corporation.
Grade Minimum Annual Salary Amount Maximum Annual Salary Amount
SNREXEC
154, 300
243, 900
To set up a grade structure to reflect this table, perform the following tasks:
• Create a single grade.
• Create a grade rate and enter the minimum and maximum amounts from the preceding table for the grade rate
range.
Grade Rates with Hourly Amounts
The grade structure for line workers at InFusion Corporation includes grades with steps, and the rates are hourly
amounts.
The following table lists the hourly rates for line workers at InFusion Corporation.
Grade Step 1 Step 2 Step 3 Step 4 Step 5
1
10.64
11.07
11.49
11.96
12.40
251

Oracle Fusion Cloud HCM
Using Common Features for HCM
Chapter 13
Grades, Grade Rates, and Grade Ladders
Grade Step 1 Step 2 Step 3 Step 4 Step 5
2
11.77
12.27
12.76
13.24
13.72
3
12.92
13.46
13.98
14.55
15.07
4
14.03
14.63
15.21
15.80
16.39
5
15.20
15.83
16.46
17.12
17.75
To set up your grade structure to reflect this table, perform the following tasks:
• Create five grades, each with five steps.
• Set up a grade ladder using the Grades with Steps type, and select all five grades.
• Set up step rates for hourly amounts using the rates in the table.
How You Set Up Grade Ladders for Pay Scale
Requirements
This example illustrates how to use a grade ladder to create a pay scale that's typical of technicians in the metal industry
in Germany. The ladder includes four grades, and each grade includes four steps.
The following table summarizes key decisions for the grades, rates, and grade ladder in this scenario.
Decision to Consider In This Example
Are steps required for the grades?
Yes.
Which step in each grade should be the
ceiling step?
The last step in each grade.
What type of rates are necessary?
Salary rates only.
Will the ladder be created using grades or
grades with steps?
Grades with steps.
Summary of the Tasks
To set up the pay scale, complete these tasks:
• Create grades
• Create a grade ladder
252

Oracle Fusion Cloud HCM
Using Common Features for HCM
Chapter 13
Grades, Grade Rates, and Grade Ladders
Create Grades
1. Under My Client Groups, In the Workforce Structures work area, click Manage Grades to open the Manage
Grades page.
2. On the Manage Grades page, click Create to open the Create Grade: Grade Details page.
3. In the Grade Details region of the Create Grade: Grade Details page, complete the fields as shown in this table,
using the default values unless otherwise indicated.
Field Value
Grade Set
Common
Name
Technicians 03
Code
Tech03
4. Click Next to access the Create Grade: Grade Steps page.
5. In the Grade Steps region of the Create Grade: Grade Steps page, click Add Row.
6. Add four steps for the grade by completing the fields as shown in this table. You must click Add Row after
adding each step.
Field Value
Step Name
Year 1
Step Name
Year 2
Step Name
Year 3
Step Name
Year 4
7. Verify that Year 4 is the ceiling step.
8. Click Submit. You will add the grade rates when you create the grade ladder.
9. In the Warning dialog, click Yes.
10. In the Confirmation dialog, click OK.
11. Repeat steps 2 through 9 to add three more grades with steps. Complete the information for each grade using
the information in these tables. The ceiling step in each grade is Year 4.
Field Grade 2 Grade 3 Grade 4
Grade Set
Common
Common
Common
253

Oracle Fusion Cloud HCM
Using Common Features for HCM
Chapter 13
Grades, Grade Rates, and Grade Ladders
Field Grade 2 Grade 3 Grade 4
Name
Technicians 04
Technicians 05
Technicians 06
Code
Tech04
Tech05
Tech06
Field Value
Step Name
Year 1
Step Name
Year 2
Step Name
Year 3
Step Name
Year 4
Create a Grade Ladder
1. In the Workforce Structures work area, click Manage Grade Ladders to open the Manage Grade Ladders page.
2. On the Manage Grade Ladders page, click Create to access the Create Grade Ladder: Grade Ladder Details
page.
3. In the Grade Ladder Details region of the Create Grade Ladder: Grade Ladder Details page, complete the fields
as shown in this table, using default values unless otherwise indicated.
Field Value
Grade Set
Common
Name
Metal Technicians
Grade Type
Grade with steps
4. Click Next to access the Create Grade Ladder: Grades page.
5. In the Search Grades region of the Create Grade Ladder: Grades page, enter TECH in the Code field and click
Search.
6. Select Tech03 and click Add to Grade Ladder.
7. Select Tech04 and click Add to Grade Ladder.
8. In the Add to Grade Ladder Hierarchy dialog, select At the top and click OK.
9. Select Tech05 and click Add to Grade Ladder.
10. In the Add to Grade Ladder Hierarchy dialog, select At the top and click OK.
254

Oracle Fusion Cloud HCM
Using Common Features for HCM
Chapter 13
Grades, Grade Rates, and Grade Ladders
11. Select Tech06 and click Add to Grade Ladder.
12. In the Add to Grade Ladder Hierarchy dialog, select At the top and click OK.
13. Verify that the grades appear in numerical order, with Tech06 at the beginning of the ladder and Tech03 at the
end of the ladder.
14. Click Next to access the Create Grade Ladder: Rate Values page.
15. On the Create Grade Ladder: Rate Values page, select the legislative data group for Germany.
16. In the Grade Step Rates region, click Add Row.
17. Complete the following fields as shown in this table.
Field Value
Name
Technician Ladder Rates
Rate Type
Salary
Frequency
Monthly
Annualization Factor
12
Currency
EUR
18. In the Step Rate Values region, enter rates for the four steps in each grade by completing the fields as shown in
this table.
Grade Name Step Name Value
Technicians 03
Step 1
1,750.73
Technicians 03
Step 2
1,878.90
Technicians 03
Step 3
2,009.79
Technicians 03
Step 4
2,143.92
Technicians 04
Step 1
2,238.57
Technicians 04
Step 2
2,408.39
Technicians 04
Step 3
2,577.68
Technicians 04 Step 4 2,744.81
255
Oracle Fusion Cloud HCM
Using Common Features for HCM
Chapter 13
Grades, Grade Rates, and Grade Ladders
Grade Name Step Name Value
Technicians 05
Step 1
2,831.87
Technicians 05
Step 2
3,047.14
Technicians 05
Step 3
3,257.52
Technicians 05
Step 4
3,469.00
Technicians 06
Step 1
3,586.36
Technicians 06
Step 2
3,851.38
Technicians 06
Step 3
4,122.34
Technicians 06
Step 4
2,143.92
19. Click Next.
20. On the Create Grade Ladder: Review page, review the grade ladder hierarchy and the rates, and click Submit.
21. In the Warning dialog, click Yes.
22. In the Confirmation dialog, click OK.
Related Topics
•
Example of Setting Up Grade Ladders for Spine Point Requirements
•
Examples of Grades, Grade Rates, and Grade Ladders
Example of Setting Up Grade Ladders for Spine Point
Requirements
This example illustrates how you can use grades, rates, and a grade ladder to represent spine points. You manage grade
ladders using the Manage Grade Ladders task in the Workforce Structures work area.
Spine Points
Some public sector organizations in the United Kingdom (UK) use spine points to structure their grades. Each spine
point corresponds to one or more steps within a grade, as grades often overlap each other.
256
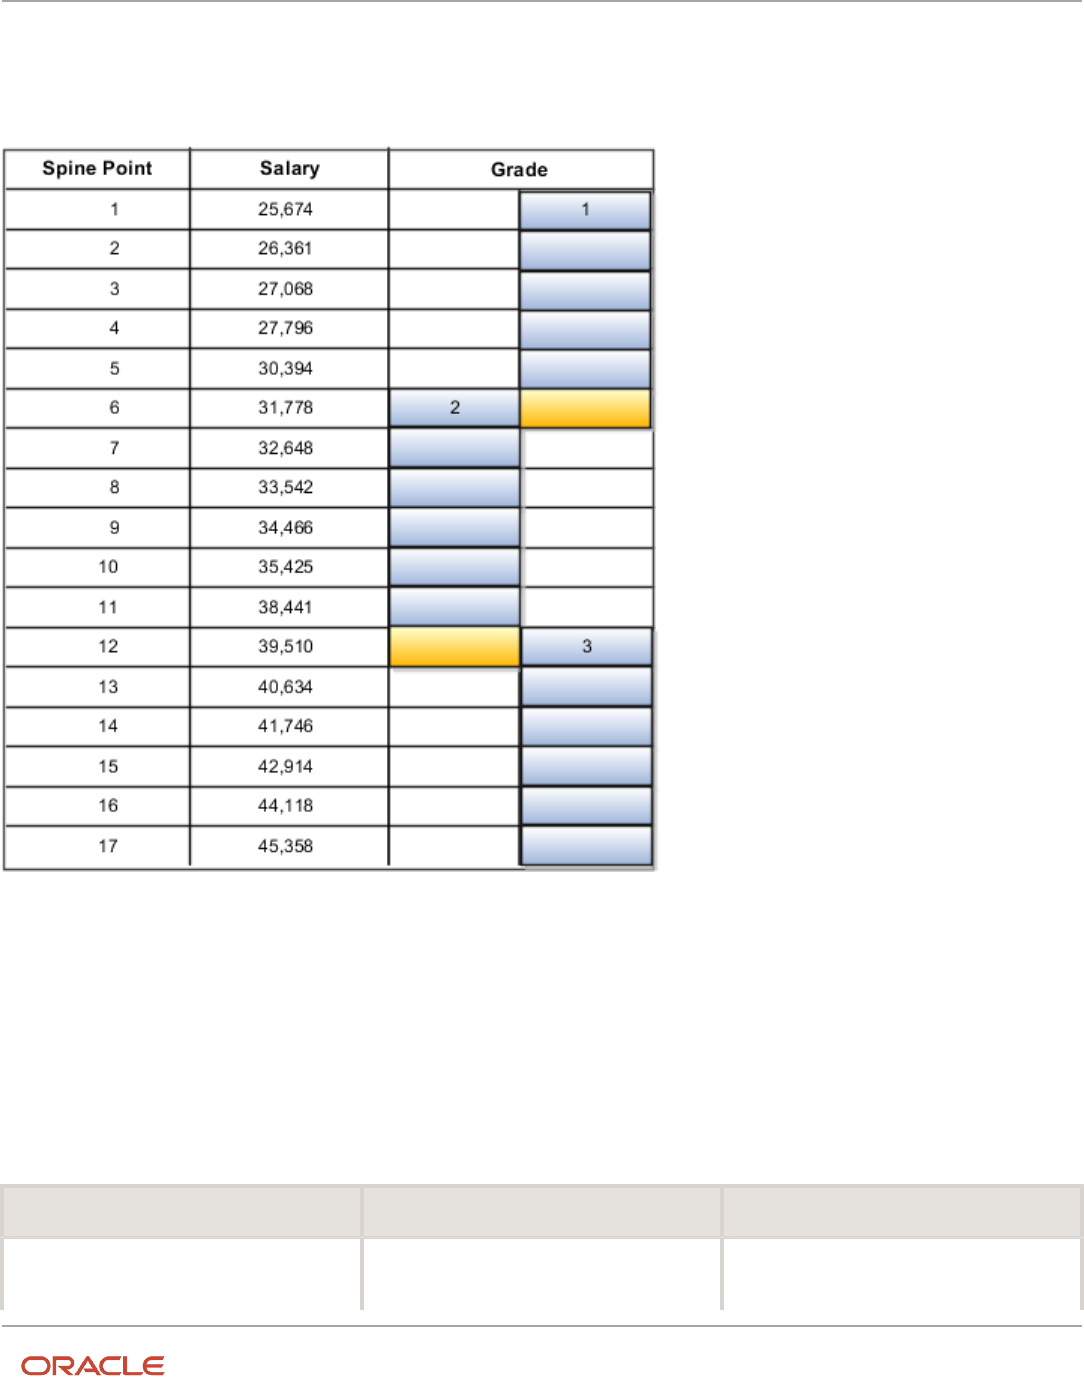
Oracle Fusion Cloud HCM
Using Common Features for HCM
Chapter 13
Grades, Grade Rates, and Grade Ladders
Grade Structure
You can use grade ladders to meet the requirements of a grade structure with spine points. The following table
illustrates a grade structure with spine points that's similar to the one used for university workers in the UK.
To set up grades for the spine point structure, you must:
• Create three grades with steps and name each step using the spine point number.
• Create a grade ladder with all three grades.
• Create step rates with annual salary amounts.
Resulting Grades, Rates, and Grade Ladder
The following table lists the grades and steps needed to meet the requirements of the grade structure with spine points.
Grade Name Steps Ceiling Step
Grade 1
• Spine Point 1
• Spine Point 2
Spine Point 5
257

Oracle Fusion Cloud HCM
Using Common Features for HCM
Chapter 13
Grades, Grade Rates, and Grade Ladders
Grade Name Steps Ceiling Step
• Spine Point 3
• Spine Point 4
• Spine Point 5
• Spine Point 6
Grade 2
• Spine Point 6
• Spine Point 7
• Spine Point 8
• Spine Point 9
• Spine Point 10
• Spine Point 11
• Spine Point 12
Spine Point 11
Grade 3
• Spine Point 12
• Spine Point 13
• Spine Point 14
• Spine Point 15
• Spine Point 16
• Spine Point 17
Spine Point 17
The following table lists the grades, steps, and rates to add to the ladder.
Grade Name Steps Rates
Grade 1
• Spine Point 1
• Spine Point 2
• Spine Point 3
• Spine Point 4
• Spine Point 5
• Spine Point 6
• 25, 674
• 26, 631
• 27, 068
• 27, 796
• 30, 394
• 31, 778
Grade 2
• Spine Point 6
• Spine Point 7
• Spine Point 8
• Spine Point 9
• Spine Point 10
• Spine Point 11
• Spine Point 12
• 31, 778
• 32, 648
• 33, 542
• 34, 466
• 35, 425
• 38, 441
• 39, 510
Grade 3
• Spine Point 12
• Spine Point 13
• 39, 510
• 40, 634
258

Oracle Fusion Cloud HCM
Using Common Features for HCM
Chapter 13
Grades, Grade Rates, and Grade Ladders
Grade Name Steps Rates
• Spine Point 14
• Spine Point 15
• Spine Point 16
• Spine Point 17
• 41, 746
• 42, 914
• 44, 118
• 45, 358
Related Topics
•
Examples of Grades, Grade Rates, and Grade Ladders
•
How You Set Up Grade Ladders for Pay Scale Requirements
FAQs for Grades, Grade Rates, and Grade Ladders
Can I edit the legislative data group for a grade rate?
No. If you need to change the legislative data group for a grade rate, you must change the grade rate to inactive and
create a new grade rate with the correct legislative data group.
How can I add rates to grade steps?
Rates can be added to a grade with steps, when you add the grade to a grade ladder.
What's the difference between grade ladders and progression
grade ladders?
Grade ladders group grades and grades with steps in the sequence in which your workers typically progress.
Progression grade ladders are hierarchies used to group grades and steps and define their sequence.
They include the associated progression rules and rates for each grade and step within the ladders. Oracle Fusion
Human Capital Management has both a Grade Ladder and a Progression Grade Ladder For a specific grade ladder
definition; you should use one of these, but not both.
The differences between them are:
Progression Grade Ladders Grade Ladder
• Viewed in Manage Progression Grade
Ladders page in Compensation work
area
• Viewed in Manage Grade Ladders page in Workforce Structures work area
259

Oracle Fusion Cloud HCM
Using Common Features for HCM
Chapter 13
Grades, Grade Rates, and Grade Ladders
Progression Grade Ladders Grade Ladder
• Required if you're using grade step
progression or rate synchronization
processes
• Enables population of worker salary
record from grade or step rates
during employment transactions
• Only one rate (grade rate or step rate)
allowed per progression grade ladder
• Associated with a single legislative
data group
How can I edit rates for a grade?
You can edit rates using the Manage Grade Rates task. However, you can't edit rates within the Manage Grades task,
because grades and rates have separate effective dates.
What's a grade ladder hierarchy?
The grade ladder hierarchy consists of grades. You can move the grades up and down within the hierarchy, and add or
remove grades. You can click any grade to view the details.
What's a ceiling step?
A ceiling step is typically the highest step within a grade to which a worker may progress. When a worker reaches the
ceiling step within a grade, typically any further progress must be made by moving the worker to another grade.
You can override the ceiling for individual assignments. In most cases, the ceiling step is the last step in the sequence.
For example, if the grade has steps 1 through 5, step 5 is the ceiling step. However, you may have situations where you
want another step to be the ceiling. For example, in a grade with steps 1 through 5, you might indicate that step 4 is the
ceiling step, and workers can progress from step 1 to step 4, and then on to the next grade. You can use step 5 when
a worker isn't entitled to move to the next grade, perhaps because he doesn't yet have the required qualifications or
certificates, but you still want to increase his pay to reward him for many years of experience and good performance.
You can provide the pay increase by moving him to step 5.
260

Oracle Fusion Cloud HCM
Using Common Features for HCM
Chapter 14
Workforce Structures - Configuration Options
14 Workforce Structures - Configuration
Options
Workforce Structures Enterprise-Level Configuration
Let's look at the different configuration options for workforce structures and the minimum search characters
configuration for each workforce structure at the enterprise-level.
Workforce Structure Configuration Options
You can configure workforce structure-related options at the enterprise level using the Manage Enterprise HCM
Information task in the Setup and Maintenance work area. This table provides the description and default value for each
option.
Option Description Default Value
Default Effective Start Date You can default the effective start date when
creating workforce structure objects such as
position, job, location and so on in responsive
and classic pages.
None
Default Location Country You can default a country for the location at
the enterprise level. This defaults the selected
country under the country field (Main Address)
from Location Details (Add) Quick Actions.
If the country value is not defaulted at
Enterprise setup then the default country is
United States
None
Default Evaluation System You can set a default evaluation system at
the enterprise level which would default the
specified evaluation system for both job and
position
None
Guided Flows: Future-Dated Records Validation You can use this option to control whether
users can update work structures with future-
dated records using the self-service work
structure related pages. You can select from
these values:
• None: No validation is displayed.
• Error: An error message is displayed
indicating that the work structure has
a future-dated record, and the user
is prevented from updating the work
structure.
• Warning: A warning message is displayed
indicating that the work structure has a
future-dated record. The user can choose
None
261

Oracle Fusion Cloud HCM
Using Common Features for HCM
Chapter 14
Workforce Structures - Configuration Options
Option Description Default Value
to ignore the message and continue with
the transaction.
Initial Position Code You can specify the initial position for your
enterprise when you generate the code
automatically.
The application uses this number for the first
record that you create using the automatic
position code setting and increments the
number by one for subsequent records. By
default, the initial code is 1.
1
Initial Job Code You can specify the initial job for your
enterprise when you generate the code
automatically.
The application uses this number for the first
record that you create using the automatic job
code setting and increments the number by one
for subsequent records. By default, the initial
code is 1.
1
Job Code Generation Method You can generate a code for job workforce
structure. Use the Manage Enterprise HCM
Information task in the Workforce Structures
work area to configure the code generation
method for jobs for your enterprise.
You can generate the job code in one of these 3
ways:
• Manually
• Automatically prior to submission
• Automatically upon final save
None
Position Code Generation Method You can generate a code for position workforce
structure. Use the Manage Enterprise HCM
Information task in the Workforce Structures
work area to configure the code generation
method for positions for your enterprise.
You can generate the position code in one of
these 3 ways:
• Manually
• Automatically prior to submission
• Automatically upon final save
None
Minimum Search Characters
You can define the minimum number of characters to search for workforce structure objects using the Manage
Enterprise HCM Information task in the Setup and Maintenance work area.
262

Oracle Fusion Cloud HCM
Using Common Features for HCM
Chapter 14
Workforce Structures - Configuration Options
The minimum search characters are used to search for the name and code for each search page depending on the
number of objects. For performance reasons, the minimum value is 1.
Note: If your organization has a detailed department structure with a large number of departments, it's
recommended that you use 3 characters to search for departments. But, if you have a few departments, then you can
set the value to 1 character to make the search easier.
Workforce Structure Minimum Search Suggested Characters Default Value
Grade 1 None
Grade Ladder 1 None
Grade Rate 1 None
Job 2 None
Job Family 1 None
Location 1 None
Organization 3 None
Position 2 None
Effective Start Date Defaults
You can set the default effective start date for workforce structure objects in responsive and classic pages using the
Manage Enterprise HCM Information task in the Setup and Maintenance work area.
This table lists the behavior of the effective date on responsive and classic pages in certain scenarios.
Scenario Behavior in Responsive Pages Behavior in Classic Pages
Default Effective Start Date field is blank on
the Manage Enterprise HCM Informtion page
and an effective date isn't specified on the
search pages.
Current date is defaulted when creating a new
workforce structure.
1-Jan-1951 is defaulted when creating a new
workforce structure.
Default Effective Start Date field is blank on
the Manage Enterprise HCM Informtion page
and an effective date is selected on the search
pages.
Current date is defaulted when creating a new
workforce structure.
When you search for a workforce structure
using an effective date, then this date is
defaulted when creating a new workforce
structure from the search page .
Default Effective Start Date isn't blank on
the Manage Enterprise HCM Informtion page
and an effective date is selected on the search
pages.
Configured default date specified for the
enterprise is defaulted when creating a new
workforce structure.
When you search for a workforce structure
using an effective date, then this date is
defaulted when creating a new workforce
structure from the search page ..
Default Effective Start Date field on the
Manage Enterprise HCM Information page isn't
blank and an effective date isn't specified on
the search pages.
Configured default date specified for the
enterprise is defaulted when creating a new
workforce structure.
Configured default date specified for the
enterprise is defaulted when creating a new
workforce structure.
263

Oracle Fusion Cloud HCM
Using Common Features for HCM
Chapter 14
Workforce Structures - Configuration Options
Workforce Structures Profile Options
Use the Manage Administrator Profile Values task in the Setup and Maintenance work area to manage profile options.
You can configure these workforce structure-related profile options as required, to meet your enterprise requirements:
Profile Option Code Profile Display Name Default Value Description
ORA_PER_ALLOW_GLOBAL_
CAGR_ON_POSITIONS
Allow global Collective Agreements
on Position
No Allow global Collective Agreements
to be associated to a Position.
ORA_PER_DEPARTMENT_LOV_
STARTSWITH_NUMROWS
Search LOV Departments Starts
With Row Count Threshold
10000 Enable department search to start
with characters entered when row
count is high. Row count is across
organization units, organization
unit classifications, location details
and sets
ORA_PER_DEPTTREE_LOV_
STARTSWITH_NUMROWS
Search LOV Department Tree
Nodes Starts With Row Count
Threshold
10000 Enable department tree node
search to start with characters
entered when row count is high.
Row count is across department
tree nodes, organization units/
classifications
ORA_PER_ENABLE_
DEPARTMENT_TITLE
Title Attribute in Departments
Enabled
N Enable the Title attribute in
Departments.
ORA_PER_GRADESTEP_LOV_
STARTSWITH_NUMROWS
Search LOV Grade Steps Starts
With Row Count Threshold
10000 Enable grade step search to start
with characters entered when row
count is high. Row count includes
rows across tables for grade steps
ORA_PER_GRADE_LOV_
STARTSWITH_NUMROWS
Search LOV Grades Starts With
Row Count Threshold
10000 Enable grade search to start with
characters entered when row count
is high. Row count includes rows
across tables for grades and sets
ORA_PER_JOB_LOV_
STARTSWITH_NUMROWS
Search LOV Jobs Starts With Row
Count Threshold
10000 Enable job search to start with
characters entered when row count
is high. Row count includes rows
across tables for jobs, job families
and sets
ORA_PER_LOCATION_LOV_
STARTSWITH_NUMROWS
Search LOV Locations Starts With
Row Count Threshold
10000 Enable location search to start
with characters entered when row
count is high. Row count includes
rows across tables for locations,
territories and sets
ORA_PER_LOV_COMPACT_
DEPARTMENT_SEARCH
Department LOV Compact Search
Enabled
No Enable compact search to use only
department name when searching
for departments
ORA_PER_LOV_COMPACT_JOB_
SEARCH
Job LOV Compact Search Enabled No Enable compact search to use only
job name and code when searching
for jobs
264

Oracle Fusion Cloud HCM
Using Common Features for HCM
Chapter 14
Workforce Structures - Configuration Options
Profile Option Code Profile Display Name Default Value Description
ORA_PER_LOV_COMPACT_
LOCATION_SEARCH
Location LOV Compact Search
Enabled
No Enable compact search to use only
location name and code when
searching for locations
ORA_PER_LOV_COMPACT_
POSITION_SEARCH
Position LOV Compact Search
Enabled
No Enable compact search to use only
position name and code when
searching for positions
ORA_PER_ORGTREE_LOV_
STARTSWITH_NUMROWS
Search LOV Departments Starts
With Row Count Threshold
10000 Enable organization tree node
search to start with characters
entered when row count is high.
Row count is across organization
tree nodes, organization units/
classifications
ORA_PER_POSITIONTREE_LOV_
STARTSWITH_NUMROWS
Search LOV Position Tree Nodes
Starts With Row Count Threshold
10000 Enable position tree node search
to start with characters entered
when row count is high. Row count
is across position tree nodes,
positions, organization units/
classifications
ORA_PER_POSITION_LOV_
STARTSWITH_NUMROWS
Search LOV Positions Starts With
Row Count Threshold
10000 Enable position search to start with
characters entered when row count
is high. Row count includes rows
across tables for positions, jobs
and departments
ORA_POS_HIRING_STATUS_FILTER ORA_POS_HIRING_STATUS_FILTER N Enable Position List of Values
filtering based on Hiring Status.
In pending worker pages, the
position LOV isn't filtered, but
instead an error message is shown
if the user selects a position that
isn't approved for hiring. The same
validation also applies when using
HCM Data Loader (HDL). The
position filtering doesn't apply for
nonworkers.
ORA_PER_POS_NUM_VALID_
GRADES_ALLWD
Number of Valid Grades Allowed
on a Position
0 Specify a number between 1 and
5 to restrict the number of valid
grades allowed on a position.
Select 0 to specify any number of
valid grades.
ORA_PER_MATCH_POS_GRADES_
WITH_JOB_GRADES_ENABLED
Validation to Match Position's Valid
Grades With Job Valid Grades
N Enable validation to match valid
grades on the position with valid
grades of the job.
Note: Compact Search/NUMROWS Profile Options – For all the above listed Compact Search Profiles a scheduled
process, "Optimize Workforce Structures LOV to Use Starts With" runs automatically on a daily basis. The process
switches the search from 'contains' to 'starts with' for all large workforce structures LOVs when the row threshold is
exceeded. The default for the threshold for the number of rows is 10,000. You can change the default value as per
your requirements. You can set it to 0 if you don't want the application to change the LOV search. This is because the
scheduled process won’t consider the profile option if the value is <= 0, or if it contains a non-numeric character.
265

Oracle Fusion Cloud HCM
Using Common Features for HCM
Chapter 14
Workforce Structures - Configuration Options
Workforce Structures Lookups
This topic identifies common lookups that are work structure-related and have user or extensible configuration levels.
Review these lookups and update them as appropriate to suit enterprise requirements. You review lookups using the
Manage Common Lookups task in the Setup and Maintenance work area.
Lookup Type Description Configuration Level
BARGAINING_UNIT_CODE Identifies a legally organized group of people
which has the right to negotiate on all aspects
of terms and conditions with employers or
employer federations. This is applicable for
positions.
User
EVAL_SYSTEM Identifies the evaluation system used for the job
or position.
Extensible
EVAL_SYSTEM_MEAS Measurement unit for evaluation criteria on job
or position
Extensible
GRADE_PAY_RATE_TYPE Shows rate types like salary, bonus, and over
time.
Extensible
JOB_FUNCTION_CODE Description of the primary function of a job.
Used for grouping and reporting jobs of like
function.
User
MANAGER_LEVEL Description of the seniority of a manager on the
job
User
PROBATION_PERIOD Specifies the unit of measurement for the
Probation Period of a Position. For example,
365 "Day", 52 "Week", 12 "Month", 1 "Year", and
so on.
Extensible
SECURITY_CLEARANCE Classifies if security clearance is needed. Extensible
Workforce Structures Flexfields
Use the Manage Descriptive Flexfields and Manage Extensible Flexfields tasks in the Setup and Maintenance work area
to manage flexfields. You can configure these workforce structure-related flexfields as required, to meet your enterprise
requirements:
Application Table Name Descriptive Flexfield Code Name Used Availability
Organizations
HR_ALL_ORGANIZATION_
UNITS_F
PER_ORGANIZATION_
UNIT_DFF
Organization Attributes For storing additional
information on
organizations
Available for use.
266

Oracle Fusion Cloud HCM
Using Common Features for HCM
Chapter 14
Workforce Structures - Configuration Options
Application Table Name Descriptive Flexfield Code Name Used Availability
HR_ORGANIZATION_
INFORMATION_F
PER_ORGANIZATION_
INFORMATION_EFF
Organization Information
EFF
For storing additional
organization information
as single and multiple
row extensible flexfield
contexts.
Available for use.
Grade and Grade Rates
PER_GRADES_F PER_GRADES_DF Grade Additional Details For storing additional grade
information.
Available for use.
PER_GRADE_LEG_F PER_GRADES_LEG_EFF Grade Legislative
Information
For storing additional
legislative information
for grades as single and
multiple row extensible
flexfield contexts
Available only for Oracle
localization use.
PER_GRADE_LADDERS_F PER_GRADE_LADDERS_DF Grade Ladder Additional
Details
For storing additional
information related to
grade ladder.
Available for use.
PER_RATES_F PER_RATES_DF Rate Additional Details For storing additional grade
rate details.
Available for use.
Jobs
PER_JOB_EVALUATIONS PER_EVALUATION_
CRITERIA_DFF
Evaluation Criteria
Attributes
For storing additional job
evaluation information.
Available for use.
PER_JOBS_F PER_JOBS_DFF Job Attributes For storing additional job
information.
Available for use.
PER_JOB_EXTRA_INFO_F PER_JOBS_EIT_EFF Job EIT Information For storing additional job
information as single and
multiple row extensible
flexfield contexts.
Available for use.
PER_JOB_LEG_F PER_JOBS_LEG_EFF Job Legislative Information For storing additional
legislative information
related to job as single and
multiple row extensible
flexfield contexts
Available only for Oracle
localization use.
PER_JOB_FAMILY_F PER_JOB_FAMILY_DFF Job Family Attributes For storing additional job
family information.
Available for use.
Locations
PER_LOCATION_DETAILS_F PER_LOCATIONS_DF Location Attributes For storing additional
location information.
Available for use.
PER_LOCATION_EXTRA_
INFO_F
PER_LOCATION_
INFORMATION_EFF
Location Information EFF For storing additional
location information
as single and multiple
row extensible flexfield
contexts.
Available for use.
PER_LOCATION_LEG_F PER_LOCATION_LEG_EFF Location Legislative EFF For storing additional
location legislative
information as single and
multiple row extensible
flexfield contexts.
Available only for Oracle
localization use.
267

Oracle Fusion Cloud HCM
Using Common Features for HCM
Chapter 14
Workforce Structures - Configuration Options
Application Table Name Descriptive Flexfield Code Name Used Availability
Positions
PER_POSITION_EXTRA_
INFO_F
PER_POSITIONS_EIT_EFF Position EIT Information For storing additional
position legislative
information as single and
multiple row extensible
flexfield contexts.
Available for use.
PER_POSITION_LEG_F PER_POSITIONS_LEG_EFF Position Legislative
Information
For storing additional
position legislative
information as single and
multiple row extensible
flexfield contexts.
Available only for Oracle
localization use.
HR_ALL_POSITIONS_F PER_POSITIONS_DFF Position Attributes For storing additional
position information.
Available for use.
Parameters for Work Structure Extensible and
Descriptive Flexfields
Flexfield segments have list of values that are dependent on standard attributes. Workforce structure attributes can be
used as these objects:
• Flexfield parameters for workforce structure descriptive flexfields.
• Input parameters when creating a value set for a flexfield segment.
You can use workforce structure attributes and descriptive flexfields as parameters when you configure workforce
structure extensible flexfields (EFF) and workforce structure descriptive flexfields (DFF).
Note: If you have configured the value set or default conditions using parameters for the EFF, these values will be
reinitialized only when you navigate to the EFF field.
Grades
This table shows the parameters that you can use for these grade workforce structures EFF.
• PER_GRADES_LEG_EFF
Flexfield Code Parameter Code Data Type Parameter Description
PER_GRADES_LEG_EFF EFFECTIVE_START_DATE DATE Effective Start Date
268
Oracle Fusion Cloud HCM
Using Common Features for HCM
Chapter 14
Workforce Structures - Configuration Options
Jobs
This table shows the parameters that you can use for these job workforce structures DFF and EFF.
• PER_JOBS_DFF
• PER_JOBS_EIT_EFF
• PER_JOBS_LEG_EFF
Flexfield Code Parameter Code Data Type Parameter Description
PER_JOBS_DFF EFFECTIVE_START_DATE DATE Effective Start Date
PER_JOBS_DFF SET_ID NUMBER Set ID
PER_JOBS_EIT_EFF EFFECTIVE_START_DATE DATE Effective Start Date
PER_JOBS_EIT_EFF SET_ID NUMBER Set ID
PER_JOBS_LEG_EFF EFFECTIVE_START_DATE DATE Effective Start Date
Locations
This table shows the parameters that you can use for these location workforce structures DFF and EFF.
• PER_LOCATIONS_DF
• PER_LOCATION_INFORMATION_EFF
• PER_LOCATION_LEG_EFF
Flexfield Code Parameter Code Data Type Parameter Description
PER_LOCATIONS_DF EFFECTIVE_START_DATE DATE Effective Start Date
PER_LOCATIONS_DF SET_ID NUMBER Set ID
PER_LOCATION_INFORMATION_
EFF
ACTION_REASON_CODE VARCHAR2 Action Reason Code
PER_LOCATION_INFORMATION_
EFF
ACTIVE_STATUS_CODE VARCHAR2 Active Status Code
PER_LOCATION_INFORMATION_
EFF
ADDRESS_LINE_1 VARCHAR2 ADDRESS_LINE_1
PER_LOCATION_INFORMATION_
EFF
ADDRESS_LINE_2 VARCHAR2 ADDRESS_LINE_2
PER_LOCATION_INFORMATION_
EFF
ADDRESS_LINE_3 VARCHAR2 ADDRESS_LINE_3
PER_LOCATION_INFORMATION_
EFF
ADDRESS_LINE_4 VARCHAR2 ADDRESS_LINE_4
PER_LOCATION_INFORMATION_
EFF
BILL_TO_SITE VARCHAR2 Bill-to Site Flag
269

Oracle Fusion Cloud HCM
Using Common Features for HCM
Chapter 14
Workforce Structures - Configuration Options
Flexfield Code Parameter Code Data Type Parameter Description
PER_LOCATION_INFORMATION_
EFF
BUILDING VARCHAR2 BUILDING
PER_LOCATION_INFORMATION_
EFF
COUNTRY VARCHAR2 COUNTRY
PER_LOCATION_INFORMATION_
EFF
DESIGNATED_RECEIVER_ID NUMBER Designated Receiver ID
PER_LOCATION_INFORMATION_
EFF
DESIGNATED_RECEIVER_LIST_
NAME
VARCHAR2 Designated Receiver List Name
PER_LOCATION_INFORMATION_
EFF
EFFECTIVE_END_DATE DATE Effective End Date
PER_LOCATION_INFORMATION_
EFF
EFFECTIVE_START_DATE DATE Effective Start Date
PER_LOCATION_INFORMATION_
EFF
FLOOR_NUMBER VARCHAR2 FLOOR_NUMBER
PER_LOCATION_INFORMATION_
EFF
GEOGRAPHIC_HIEARCHY_CODE VARCHAR2 Geographic Hierarchy Code
PER_LOCATION_INFORMATION_
EFF
INTERNAL_LOCATION_CODE VARCHAR2 Location Code
PER_LOCATION_INFORMATION_
EFF
INVENTORY_ORGANIZATION_
CODE
VARCHAR2 Inventory Organization Code
PER_LOCATION_INFORMATION_
EFF
LEGISLATION_CODE VARCHAR2 Legislation Code
PER_LOCATION_INFORMATION_
EFF
LOCATION_ID NUMBER Location ID
PER_LOCATION_INFORMATION_
EFF
OFFICE_SITE VARCHAR2 Office Site Flag
PER_LOCATION_INFORMATION_
EFF
POSTAL_CODE VARCHAR2 POSTAL_CODE
PER_LOCATION_INFORMATION_
EFF
RECEIVING_SITE VARCHAR2 Receiving Site Flag
PER_LOCATION_INFORMATION_
EFF
REGION_1 VARCHAR2 REGION_1
PER_LOCATION_INFORMATION_
EFF
REGION_2 VARCHAR2 REGION_2
PER_LOCATION_INFORMATION_
EFF
REGION_3 VARCHAR2 REGION_3
PER_LOCATION_INFORMATION_
EFF
SET_CODE VARCHAR2 Set Code
PER_LOCATION_INFORMATION_
EFF
SET_ID NUMBER Set ID
PER_LOCATION_INFORMATION_
EFF
SHIP_TO_LOCATION_CODE VARCHAR2 Ship-to Location Code
270

Oracle Fusion Cloud HCM
Using Common Features for HCM
Chapter 14
Workforce Structures - Configuration Options
Flexfield Code Parameter Code Data Type Parameter Description
PER_LOCATION_INFORMATION_
EFF
SHIP_TO_LOCATION_SET_ID NUMBER Ship-to Location Set ID
PER_LOCATION_INFORMATION_
EFF
SHIP_TO_SITE_FLAG VARCHAR2 Ship-to Site Flag
PER_LOCATION_INFORMATION_
EFF
TOWN_OR_CITY VARCHAR2 TOWN_OR_CITY
PER_LOCATION_LEG_EFF ACTION_REASON_CODE VARCHAR2 Action Reason Code
PER_LOCATION_LEG_EFF ACTIVE_STATUS_CODE VARCHAR2 Active Status Code
PER_LOCATION_LEG_EFF ADDRESS_LINE_1 VARCHAR2 ADDRESS_LINE_1
PER_LOCATION_LEG_EFF ADDRESS_LINE_2 VARCHAR2 ADDRESS_LINE_2
PER_LOCATION_LEG_EFF ADDRESS_LINE_3 VARCHAR2 ADDRESS_LINE_3
PER_LOCATION_LEG_EFF ADDRESS_LINE_4 VARCHAR2 ADDRESS_LINE_4
PER_LOCATION_LEG_EFF BILL_TO_SITE VARCHAR2 Bill-to Site Flag
PER_LOCATION_LEG_EFF BUILDING VARCHAR2 BUILDING
PER_LOCATION_LEG_EFF COUNTRY VARCHAR2 COUNTRY
PER_LOCATION_LEG_EFF DESIGNATED_RECEIVER_ID NUMBER Designated Receiver ID
PER_LOCATION_LEG_EFF DESIGNATED_RECEIVER_LIST_
NAME
VARCHAR2 Designated Receiver List Name
PER_LOCATION_LEG_EFF EFFECTIVE_END_DATE DATE Effective End Date
PER_LOCATION_LEG_EFF EFFECTIVE_START_DATE DATE Effective Start Date
PER_LOCATION_LEG_EFF FLOOR_NUMBER VARCHAR2 FLOOR_NUMBER
PER_LOCATION_LEG_EFF GEOGRAPHIC_HIEARCHY_CODE VARCHAR2 Geographic Hierarchy Code
PER_LOCATION_LEG_EFF INTERNAL_LOCATION_CODE VARCHAR2 Location Code
PER_LOCATION_LEG_EFF INVENTORY_ORGANIZATION_
CODE
VARCHAR2 Inventory Organization Code
PER_LOCATION_LEG_EFF LEGISLATION_CODE VARCHAR2 Legislation Code
PER_LOCATION_LEG_EFF LOCATION_ID NUMBER Location ID
PER_LOCATION_LEG_EFF OFFICE_SITE VARCHAR2 Office Site Flag
PER_LOCATION_LEG_EFF POSTAL_CODE VARCHAR2 POSTAL_CODE
PER_LOCATION_LEG_EFF RECEIVING_SITE VARCHAR2 Receiving Site Flag
PER_LOCATION_LEG_EFF REGION_1 VARCHAR2 REGION_1
PER_LOCATION_LEG_EFF REGION_2 VARCHAR2 REGION_2
PER_LOCATION_LEG_EFF REGION_3 VARCHAR2 REGION_3
271

Oracle Fusion Cloud HCM
Using Common Features for HCM
Chapter 14
Workforce Structures - Configuration Options
Flexfield Code Parameter Code Data Type Parameter Description
PER_LOCATION_LEG_EFF SET_CODE VARCHAR2 Set Code
PER_LOCATION_LEG_EFF SHIP_TO_LOCATION_CODE VARCHAR2 Ship-to Location Code
PER_LOCATION_LEG_EFF SHIP_TO_LOCATION_SET_ID NUMBER Ship-to Location Set ID
PER_LOCATION_LEG_EFF SHIP_TO_SITE_FLAG VARCHAR2 Ship-to Site Flag
PER_LOCATION_LEG_EFF TOWN_OR_CITY VARCHAR2 TOWN_OR_CITY
Organizations
This table shows the parameters that you can use for these organization workforce structures DFF and EFF.
• PER_ORGANIZATION_UNIT_DFF
• PER_ORGANIZATION_INFORMATION_EFF
Flexfield Code Parameter Code Data Type Parameter Description
PER_ORGANIZATION_UNIT_DFF EFFECTIVE_START_DATE DATE Effective Start Date
PER_ORGANIZATION_UNIT_DFF ORGANIZATION_ID NUMBER Organization Id
PER_ORGANIZATION_UNIT_DFF SET_ID NUMBER Set ID
PER_ORGANIZATION_
INFORMATION_EFF
EFFECTIVE_START_DATE DATE Effective Start Date
PER_ORGANIZATION_
INFORMATION_EFF
ORGANIZATION_ID NUMBER Organization Id
PER_ORGANIZATION_
INFORMATION_EFF
SET_ID NUMBER Set Id
Positions
This table shows the parameters that you can use for these position workforce structures DFF and EFF.
• PER_POSITIONS_DFF
• PER_POSITIONS_EIT_EFF
• PER_POSITIONS_LEG_EFF
Flexfield Code Parameter Code Data Type Parameter Description
PER_POSITIONS_DFF ASSIGNMENT_CATEGORY VARCHAR2 Assignment Category
PER_POSITIONS_DFF BARGAINING_UNIT_CD VARCHAR2 Bargaining Unit Code
PER_POSITIONS_DFF BUSINESS_UNIT_ID NUMBER Business Unit Id
PER_POSITIONS_DFF COLLECTIVE_AGREEMENT_ID NUMBER Collective Agreement Id
272

Oracle Fusion Cloud HCM
Using Common Features for HCM
Chapter 14
Workforce Structures - Configuration Options
Flexfield Code Parameter Code Data Type Parameter Description
PER_POSITIONS_DFF EFFECTIVE_END_DATE DATE Effective End Date
PER_POSITIONS_DFF EFFECTIVE_START_DATE DATE Effective Start Date
PER_POSITIONS_DFF ENTRY_GRADE_ID NUMBER Entry Grade Id
PER_POSITIONS_DFF ENTRY_STEP_ID NUMBER Entry Step Id
PER_POSITIONS_DFF GRADE_LADDER_ID NUMBER Grade Ladder Id
PER_POSITIONS_DFF JOB_ID NUMBER Job Id
PER_POSITIONS_DFF LOCATION_ID NUMBER Location Id
PER_POSITIONS_DFF ORGANIZATION_ID NUMBER Organization Id
PER_POSITIONS_DFF UNION_ID NUMBER Union Id
PER_POSITIONS_EIT_EFF ASSIGNMENT_CATEGORY VARCHAR2 Assignment Category
PER_POSITIONS_EIT_EFF BARGAINING_UNIT_CD VARCHAR2 Bargaining Unit Code
PER_POSITIONS_EIT_EFF BUSINESS_UNIT_ID NUMBER Business Unit
PER_POSITIONS_EIT_EFF COLLECTIVE_AGREEMENT_ID NUMBER Collective Agreement
PER_POSITIONS_EIT_EFF EFFECTIVE_END_DATE DATE Effective End Date
PER_POSITIONS_EIT_EFF EFFECTIVE_START_DATE DATE Effective Start Date
PER_POSITIONS_EIT_EFF ENTRY_GRADE_ID NUMBER Entry Grade Id
PER_POSITIONS_EIT_EFF ENTRY_STEP_ID NUMBER Entry Step Id
PER_POSITIONS_EIT_EFF JOB_ID NUMBER Job Id
PER_POSITIONS_EIT_EFF LOCATION_ID NUMBER Location Id
PER_POSITIONS_EIT_EFF POSITION_TYPE VARCHAR2 Position Type
PER_POSITIONS_EIT_EFF UNION_ID NUMBER Union Id
PER_POSITIONS_LEG_EFF EFFECTIVE_START_DATE DATE Effective Start Date
273

Oracle Fusion Cloud HCM
Using Common Features for HCM
Chapter 14
Workforce Structures - Configuration Options
274

Oracle Fusion Cloud HCM
Using Common Features for HCM
Chapter 15
Workforce Profiles
15 Workforce Profiles
Overview of Profile Management
Profile management provides a framework for developing and managing talent profiles that meet your industry or
organizational requirements. Profiles summarize the qualifications and skills of a person or a workforce structure such
as a job or position.
Profiles are valuable for tracking workers' skills, competencies, and accomplishments, and for various talent
management activities, such as career planning, identifying training needs, performance management, and in the
recruitment process for identifying job requirements and suitable applicants.
Note:
If you are still using Classic Talent Profiles, you should upgrade to Enhanced Talent Profiles before release 21A.
In the Enhanced Talent Profiles feature, the display of the person profile and talent ratings has a more engaging and
responsive interface design. The new user experience enables features to be presented on both mobile and web pages.
The interfaces are simple, intuitive and are written in a more conversational language.
The administration enhancements provide increased product performance and extensibility. The enhanced solution
introduces content templates that represent the talent content (for example, Competencies, Certificates, Skills, and
Awards) required to support the Oracle Talent Management Suite. Each content template includes unique attributes.
These content templates can be used and reused to create the content sections necessary to capture talent data. The
templates can be used to design both person and model talent profiles.
Any relevant topics from this chapter have been updated and moved to My Oracle Support: Upgrading Oracle Cloud
HCM Profile Management (Doc ID 2421964.1).
This topic discusses:
• Profile search
• Profile comparison
• Best-fit analysis
Profile Search
You can search for worker, job, and position profiles based on certain criteria. For example, a Human Resource (HR)
Specialist in London requiring to fill an Applications Developer position internally, can search for profiles of all workers
who are based in London and have experience with Java and PL/SQL.
Profile Comparison
Use the Compare option in the Organization Chart tab on the person gallery to compare profiles You can compare
profiles to determine next career moves or training needs for workers, and identify suitable candidates for jobs. For
example, John is looking for his next career move He can compare his profile to that of a job to determine whether his
competency ratings match the targeted competency ratings in a job profile. If his Teamwork rating is 3 and the rating
275

Oracle Fusion Cloud HCM
Using Common Features for HCM
Chapter 15
Workforce Profiles
requirement for the job is 4, he has a deficiency of -1. John and his manager can use this gap to drive development
plans and other talent management-related functions.
Best-Fit Analysis
Use the best-fit analysis to determine the person profile that most closely matches a job profile and vice versa. For
example, if you want to fill a Developer vacancy, and the job profile requires a B.S. degree in Computer Science, level 4
expertise in Java, and a rating of at least 3 in Teamwork, you can review an automatically-generated list of workers who
most closely match this set of requirements. You can also use the best-fit analysis to find workers who are similar to a
selected worker, or jobs that are similar to a selected job.
For more information about Best Fit, see My Oracle Support: Oracle Profile Management: Best Fit Analyses (Doc ID
2043543.1).
Related Topics
•
Oracle Fusion Profile Management Components: How They Work Together
•
Talent Profile Summary
•
Comparing Items
•
How Best-Fit is Calculated
Enhanced Talent Profiles
Enhanced Talent Profiles provides a framework for developing and managing talent profiles that meet your industry or
organizational requirements. Profiles summarize the qualifications and skills of a person or a workforce structure such
as a job or position.
For more information, see Oracle Cloud HCM Profile Management
Oracle Fusion Profile Management Components: How
They Work Together
You can configure Oracle Fusion Profile Management to meet your business requirements using these components: the
content library, profiles and profile types, content subscribers, educational establishments, instance qualifier sets, and
rating models.
276

Oracle Fusion Cloud HCM
Using Common Features for HCM
Chapter 15
Workforce Profiles
Note: If you are still using Classic Talent Profiles, you should upgrade to Enhanced Talent Profiles before release
21A. In the Enhanced Talent Profiles feature, the display of the person profile and talent ratings has a more engaging
and responsive interface design. The new user experience enables features to be presented on both mobile and web
pages. The interfaces are simple, intuitive and are written in a more conversational language. The administration
enhancements provide increased product performance and extensibility. The enhanced solution introduces content
templates that represent the talent content (for example, Competencies, Certificates, Skills, and Awards) required
to support the Oracle Talent Management Suite. Each content template includes unique attributes. These content
templates can be used and reused to create the content sections necessary to capture talent data. The templates can
be used to design both person and model talent profiles. Any relevant topics from this chapter have been updated
and moved to My Oracle Support: Upgrading Oracle Cloud HCM Profile Management (Doc ID 2421964.1).
This figure illustrates how the components of Profile Management fit together.
Content Library
The content library provides the foundation for profiles as it stores both content types and content items.
277

Oracle Fusion Cloud HCM
Using Common Features for HCM
Chapter 15
Workforce Profiles
Profile Types
Profile types are templates that you use to create profiles. Profile types determine:
• Whether the profile is for a person or for a workforce structure such as a job or a position.
• The content of the profile.
You select content types from the content library to create content sections for the profile type.
Profiles
You create person profiles for individual workers and model profiles for workforce structures, such as jobs or positions.
The profile type that you select for the model profile determines the information that you complete for the profile.
For example, a person profile might contain information about a person's education, language skills, competencies,
and activities and interests. A job profile might contain information about the requirements for the job, such as
competencies, language skills, degrees, or certifications.
Content Subscribers
Content subscribers are applications external to Profile Management that use content types.
Educational Establishments
You can define educational establishments to enable workers to add education information, such as degrees, to their
profile.
Instance Qualifier Sets
You assign instance qualifiers to content types. Instance qualifier sets uniquely identify multiple instances of a content
item on a profile. For example, if multiple people update a performance rating for a competency on a worker's profile,
instance qualifiers provide a unique identifier to each instance of the competency. The unique identifier enables you to
determine who provided each rating.
Rating Models
When you create content types in the content library, you can attach rating models to determine the scale for measuring
performance and proficiency. You can also use rating models to measure the risk and impact of loss for workers, and to
measure their potential.
Related Topics
•
Profile Types
•
Content Types
•
Rating Models
•
Instance Qualifier Sets
278

Oracle Fusion Cloud HCM
Using Common Features for HCM
Chapter 15
Workforce Profiles
Rating Models
Rating Models
Use rating models to rate workers on their performance and level of proficiency in the skills and qualities that are set up
on the person profile.
You can also use rating models to specify target proficiency levels for items on a model profile, so that the model profile
can be compared to workers' profiles. Use the Manage Profile Rating Models task in the Profiles work area to create a
rating model.
To rate workers on their performance and proficiency, attach rating models to the content types included in the
person profile. Then you can rate workers on the items within the type. For example, you can rate workers on the
Communication content item within the Competencies content type.
For model profiles, you can specify target proficiency levels for items on the profile, to compare model profiles with
worker profiles. Using the ratings:
• Managers can compare a model profile to workers' profiles with and determine the best person suited to fill a
position.
• Workers can compare their profile to model profiles to identify:
◦
Suitable positions within the organization.
◦
Skill gaps and fill the gaps before applying for other positions.
Rating models that measure workers' potential and the impact and risk of loss are also available.
Rating models can include some or all of the following components, depending on the use for the model:
• Rating levels
• Review points
• Rating categories
• Distributions
Rating Levels
Rating levels identify the qualitative values, such as 1, 2, 3, or 4, that you use to rate a worker.
For rating models that are used by Oracle Fusion Performance Management, you must:
• Define numeric ratings, particularly for rating models in performance documents that use calculated ratings.
• Define rating levels using whole numbers, with the highest number indicating the best rating. Rating levels
determine high and low ratings in the analytics.
Review Points
Define review points for rating models in performance documents that use the average, sum, or band calculation
method. The review points and point ranges that you define for the rating model are used to calculate ratings.
279

Oracle Fusion Cloud HCM
Using Common Features for HCM
Chapter 15
Workforce Profiles
Rating Categories
Using rating categories you can group rating levels together for analysis tools used in the talent review process, such as
the box chart that is used in the talent review process. You can group rating levels into categories such as low, medium,
and high, and those categories then become the labels for the analytic. You should not change rating categories after
setting them up, as the changes could affect the analytic.
Distributions
Oracle Fusion Compensation Management and Oracle Fusion Performance Management both use rating model
distributions to determine the targeted minimum and maximum percentage of workers that should be given each rating
level. Compensation Management uses the distribution values that you set up directly on rating models. However,
you can set up distributions using the Manage Target Ratings Distribution task for rating models that are used in
Performance Management.
Related Topics
•
How You Update Talent Ratings
•
Box Chart Matrix Options
How You Update Talent Ratings
Talent ratings are used to evaluate a worker, including performance, potential, proficiency, readiness, and impact.
Ratings are used in multiple products within the HCM product family such as Oracle Fusion Profile Management, Oracle
Fusion Performance Management, and Oracle Fusion Talent Review.
Talent Rating Types
Depending on application settings and roles assigned, you can view, add, and update these talent ratings across
multiple products within the HCM product family.
Talent Ratings Description
Talent score
Evaluate a person's overall value to the organization using a rating model your organization defines.
Performance rating
Evaluate the overall performance document.
Potential level
Evaluate a person based on the execution of their work.
Potential score
Evaluate a person's attainable level of excellence or ability to achieve success.
N box cell assignment
Evaluate a person's current contribution and potential contribution to the organization on a box chart
matrix with N boxes. N represents the number of boxes in the grid.
Advancement readiness
Evaluate a person's readiness for the next position in their career development.
Risk of loss Evaluate the likelihood of a person leaving the company.
280

Oracle Fusion Cloud HCM
Using Common Features for HCM
Chapter 15
Workforce Profiles
Talent Ratings Description
Impact of loss
Evaluate the real or perceived effects on an organization when the person leaves.
Proficiency
Evaluate a person's skill level for a competency.
Behavior ratings
Evaluate a person's actions for a behavior associated with a competency.
Updating Talent Ratings
You can update talent ratings depending on application settings and roles assigned to you. The following table shows
where you can update talent ratings.
Talent Ratings Can I Update This
Rating on the Talent
Ratings page?
Can I Update This
Rating in Talent
Review?
Can I Update
This Rating in
Performance
Management?
Can I Update This
Rating in Succession
Management?
Can I Update This
Rating in Talent
Pools?
Talent score
Yes
Yes
No
No
No
Performance rating
Yes
Yes
Yes
No
No
Potential level
Yes
Yes
No
No
No
Potential score
No
Yes
No
No
No
N box cell assignment
No
Yes
No
No
No
Advancement
readiness
Yes
No
No
No
No
Risk of loss
Yes
Yes
No
Yes
Yes
Impact of loss
Yes
Yes
No
Yes
Yes
Proficiency
No
No
Yes
No
No
Note: You can update Behavior ratings under Competencies on the Edit Skills and Qualifications page for a person.
When you update talent ratings:
• The performance rating from the worker's performance document overall section is displayed on the worker's
profile when configured to do so in the performance template.
281

Oracle Fusion Cloud HCM
Using Common Features for HCM
Chapter 15
Workforce Profiles
• The talent review process uses talent ratings on the worker's profile to build talent review information. When
a talent review meeting concludes, a worker's profile is automatically updated with the calibrated ratings.
Therefore, the performance rating displayed in a worker's performance document might be different from the
one displayed in the worker's profile.
Related Topics
•
Rating Models
Content Types and Content Items
Content Types
Content types are the skills, qualities, and qualifications that you want to track in talent profiles. The content library
contains predefined content types such as competencies, languages, and degrees, but you can create custom content
types as needed. You can also create free-form
Depending on your business requirements, you can use predefined content types or create custom content types. A
predefined or custom content type, can be a free-form content type or not.
Content Types Other than Free-Form
In addition to a code, name, and description, content types that aren't free-form contain the following details:
• Properties: Represents the information that you want to capture for the content type. You define properties for
a content type on the Field Properties tab on the Edit Content Type page.
Note: On the Field Properties tab, the values of the following fields are automatically generated and can't be
edited:
◦
Content Type ID
◦
Content Item ID
◦
Name
◦
From Date
◦
Content Supplier
• Relationships: Associations between content types, where one content type is a parent of another, or where
one content type supports another. You define relationships for a content type on the Relationships tab on the
Edit Content Type page. On the Relationships tab, the Proficiency Calculation Rule field is applicable for the
Behaviors content type only. The value of this field is set to Average by default and can't be edited.
You can specify whether one content type is a parent of another, or whether one content type supports
another. Content items inherit the relationship of associated content types. After you create a relationship, you
282

Oracle Fusion Cloud HCM
Using Common Features for HCM
Chapter 15
Workforce Profiles
can't delete it. You can only specify an end date for it so that the relationship is no longer applicable from the
end date.
You can't create:
◦
Two kinds of relationships between two content types. For example, the content type A can't be both the
parent and child of the content type B.
◦
A relationship between a content type and itself. For example, a content type can't be related to itself.
• Subscribers: Codes that represent other Oracle Cloud products or applications that use content types. To use
a content type in an Oracle Cloud application, you must add the predefined subscriber code associated with
the application to the content type. Custom subscriber codes aren't supported. You add subscriber codes to a
content type on the Subscribers tab on the Edit Content Type page.
Examples of predefined content types that aren't free-form are:
• Categories
• Competencies
• Components
• Degree
• Education Levels
• Goals
• Honors and Awards
• Languages
• Licenses and Certifications
• Memberships
• N Box Cell Assignment
• Platforms
• Platform codes
• Product problem codes
• Technical Post Details
Free-Form Content Types
A free-form content type contains only a code, name, and a description, and does not have any properties defined for it
until you add it to a profile type. Free-form content types do not include any content items.
Note: Free-form content types don't contain relationships or properties. You add properties for free-form content
types when you add them to a profile type.
You can use free-form content types when you don't need a content item because the attribute captured for the content
section is free-formed or less-structured. For example, you cant set up a free-form content type to store information for
career-related information.
Examples of predefined free-form content types are:
• Accomplishments
• Advancement Readiness
283

Oracle Fusion Cloud HCM
Using Common Features for HCM
Chapter 15
Workforce Profiles
• Areas of Study
• Career Preferences
• Career Potential
• Career Statement
• Criticality
• Enrollments
• Highest Education Level
• Learning
• Performance Rating
• Previous Employment
• Risk of Loss
• Special Projects
• Talent Score
• Work Requirements
Related Topics
•
Content Type Properties
•
Content Items
•
Considerations for Associating Behaviors with Competencies
•
Examples of Content Type Relationships
•
Content Subscribers
Content Type Properties
Content type properties represent the information that you want to capture for a content type. Content items inherit
the fields and field properties that you define for the content type to which the item belongs. Use the Manage Content
Types task in the
You define properties for content types that aren't free-form. For free-form content types, the properties are defined
when you add them as a content section to a profile type.
The values of the following content type properties for content types that aren't free-form content types are
automatically generated for a profile item and should not be modified:
• CONTENT_ITEM_ID
• CONTENT_SUPPLIER_CODE
• CONTENT_TYPE_ID
• DATE_FROM
• NAME
Note: The DATE_FROM property stores the start date information of a content item within the content type. This
field is used for maintaining the history of content items and isn't recommend to be displayed on the UI
284

Oracle Fusion Cloud HCM
Using Common Features for HCM
Chapter 15
Workforce Profiles
Attributes of Content Type Properties
Each content type property has a field for which you set attributes. You determine attributes for each content type
property that will be used for defining the relevant content items. The attributes that you can set for each content type
property that you include for a content type are displayed in the following table.
Attribute Description
Default Value
Value that appears by default for the property on the UI
Display
Determines if the property is editable, hidden, or display only for a content item
Label
Label for the property displayed on UI when the property is included within a content type
Required
Determines if the user is required to populate the field
Source
Name of the lookup type that provides values for the property. This attribute is specified for properties
ITEM_TEXT_1 to ITEM_TEXT_10
Content Type Properties List
The following table describes a list of content type properties you can define for a content type that isn't free-form.
These properties appear on the Field Properties tab on the Edit Content Type page.
Content Type Property Specifies
COUNTRY_ID
The country ID associated with the content item within the content type
ITEM_DATE_1 to ITEM_DATE_10
Any date. Use these fields to enter dates for profile items
ITEM_NUMBER_1 to ITEM_NUMBER_7
Any numeric data
ITEM_TEXT_1 to ITEM_TEXT_10
Data that requires selecting values from a list. Each field can store up to 30 characters of data. You
provide values for ITEM_TEXT_1 to ITEM_TEXT_10 properties by specifying a lookup type for their
Source attribute
ITEM_TEXT_11 to ITEM_TEXT_30
Nontranslatable data, such as a code or serial ID. Each field can store up to 30 characters of data
ITEM_TEXT_TL_1 to ITEM_TEXT_TL_5
Translatable data. Each field can store up to 240 characters of data
ITEM_TEXT_TL_6 to ITEM_TEXT_TL_10
Translatable data. Each field can store up to 2000 characters of data
ITEM_TEXT_TL_11 to ITEM_TEXT_TL_15
Translatable data. Each field can store up to 4000 characters of data
285

Oracle Fusion Cloud HCM
Using Common Features for HCM
Chapter 15
Workforce Profiles
Content Type Property Specifies
RATING_MODEL_ID
The rating model. The rating model you specify for a content type is also applicable for content items
associated with the content type. However, for the content items added to the Competencies content
type, the rating model selected for the Competencies content section takes precedence
STATE_PROVINCE_ID
The state ID associated with the content item within the content type
Related Topics
•
Content Types
•
Content Items
•
Content Section Properties
•
Create Custom Content Types and Content Items
•
Create Free-Form Custom Content Types
Content Subscribers
Content subscribers are codes that represent functional areas that use content types. You manage subscriber codes
using the Manage Content Subscribers task in the Profiles work area.
Note: If you are still using Classic Talent Profiles, you should upgrade to Enhanced Talent Profiles before release
21A. In the enhanced Enhanced Talent Profiles feature, the display of the person profile and talent ratings has a
more engaging and responsive interface design. The new user experience enables features to be presented on both
mobile and web pages. The interfaces are simple, intuitive and are written in a more conversational language. The
administration enhancements provide increased product performance and extensibility. The enhanced solution
introduces content templates that represent the talent content (for example, Competencies, Certificates, Skills, and
Awards) required to support the Oracle Talent Management Suite. Each content template includes unique attributes.
These content templates can be used and reused to create the content sections necessary to capture talent data.
The templates can be used to design both person and model talent profiles. Any relevant topics from this chapter
have been updated and moved to My Oracle Support: Upgrading Oracle Cloud HCM Profile Management (Doc ID
2421964.1).
To use a content type in a functional area, you must add the associated predefined subscriber code to the content type.
Example: You add a new custom content type Corporate Citizenship to the Person profile type. To view the content
section for Corporate Citizenship in the Skills and Qualifications work area, you must add the HRMS content subscriber
code to the new content type.
Note: Custom subscriber codes aren't supported.
286

Oracle Fusion Cloud HCM
Using Common Features for HCM
Chapter 15
Workforce Profiles
By default, the application provides predefined subscriber codes for:
• Oracle Fusion applications such as:
◦
Talent Review
◦
Succession Management
◦
Performance Management
◦
Network at Work
◦
Resource Management
• Work areas within Oracle Fusion applications such as:
◦
Person Management
◦
Profiles
Note: Different subscriber codes are used to make content types available for job profiles and person
profiles in the Profiles work area.
◦
Skills and Qualifications
◦
Team Talent
• Other Oracle Cloud applications such as Oracle Taleo Recruiting Cloud Service
Predefined Subscriber Codes for Oracle Fusion Applications
To make a content type available within an Oracle Fusion application, you must add the associated predefined
subscriber code to the content type.
The following table displays the predefined subscriber codes and the corresponding Oracle Fusion application where the
subscribed content types are displayed.
Subscriber Code Oracle Fusion Application
HRTR
Talent Review
SM
Succession Management
HRA
Performance Management
HRS
Network at Work
RM
Resource Management
Predefined Subscriber Codes for Work Areas
To make a content type available in a work area within the application, you must add the associated predefined
subscriber code to the content type.
287

Oracle Fusion Cloud HCM
Using Common Features for HCM
Chapter 15
Workforce Profiles
Note: If you are still using Classic Talent Profiles, you should upgrade to Enhanced Talent Profiles before release 21A.
Any relevant topics from this chapter have been updated and moved to My Oracle Support: Upgrading Oracle Cloud
HCM Profile Management (Doc ID 2421964.1).
The following table displays the predefined subscriber codes, the corresponding work area where the subscribed
content types are displayed, and the navigation to the work area.
Subscriber Code Work Area Navigation
HRMSSPC
Person Management
Select My Workforce then Person
Management on the Home page.
HRMSSPC
Profiles (For person profiles)
1. Select My Workforce then Profiles on the
Home page.
2. Select the Person Profiles tab, search for a
person, and in the Search Results section,
click the person name to view the person's
profile on the Skills and Qualifications
page.
TM
Profiles (For job profiles)
1. Select My Workforce then Profiles on the
Home page.
2. Select the Model Profiles tab, search for a
job, and in the Search Results section, click
the job name to view the job profile.
HRMS
Skills and Qualifications
Select About Me > Skills and Qualifications to
open the Skills and Qualifications work area.
HRMS
Team Talent
Select My Team then Team Talent on the
Home page.
Predefined Subscriber Codes for Other Cloud Applications
To make a content type available in Oracle Taleo Recruiting Cloud Service, you must add the predefined subscriber code
TALEO to the content type.
Related Topics
•
Content Types
•
Content Type Properties
•
Content Section Properties
•
Profile Types
Examples of Content Type Relationships
You can associate content items of related content types with each other using content relationships. Use the
Relationships tab on the Edit Content Type page to define content type relationships. The following scenarios illustrate
the use of content type relationships.
288

Oracle Fusion Cloud HCM
Using Common Features for HCM
Chapter 15
Workforce Profiles
Tracking Product Expertise
The Resource Manager component of Oracle Fusion Trading Community Model uses content type relationships to track
the areas of expertise of workers. Using the predefined content type relationship where the Categories content type
is a parent of Products, and Products is a parent of Components; resource managers can keep track of the categories,
products, and components that they consider as areas of expertise for their resources.
Note: Because these content types and relationships apply only to the Resource Manager component of Oracle
Fusion Trading Community Model, this product is the only predefined content subscriber to these content types.
Specifying Target Outcomes for Goals
Workers can manage their goals by associating their goals with target outcomes, which are content types such as
Competencies and Memberships. You can set up a relationship on the Competencies content type where Competencies
is supported by Goals. Workers can then set up goals that have a specific competency as a target outcome.
Related Topics
•
Content Types
•
How can I define a relationship between the Goals content type and other content types?
Content Items
Content items are the individual skills, qualities, and qualifications within the content types in the content library. For
example, within the Competencies content type, communication is a content item. Use the Manage Content Items task
in the Profiles work area to create content items
This topic discusses:
• Item properties
• Related content items
• Proficiency descriptions
Item Properties
Content items inherit the fields and field properties that you define for the content type to which the item belongs. For
example, one of the fields defined for the Memberships content type is ITEM_DESCRIPTION field. The attributes of this
field are set up so that the label is Description, the field is editable, and the field doesn't require an entry. When you set
up a content item for the Memberships content type, the application displays a field labeled Description, in which you
can enter text to describe the agency, but the field isn't required.
Related Content Items
If the content type for which you are creating an item has related content types, then you can enter the related content
items for the item. For example, if you have a content type relationship where the Goals content type supports the
Competencies content type, then on the content items for competencies, you can enter the related goals.
289

Oracle Fusion Cloud HCM
Using Common Features for HCM
Chapter 15
Workforce Profiles
Proficiency Descriptions
If the content item belongs to a content type that has a rating model defined for it, then you can either use the existing
descriptions for the ratings within the model, or define descriptions for the ratings that are specific to the content item.
When ratings exist for the content item, the descriptions defined for the item are used instead of those on the rating
model.
Related Topics
•
Oracle Fusion Profile Management Components: How They Work Together
•
Why can't I change the relationship type of a content item?
•
Content Types
How You Enable Approvals for Content Types
By default, any changes to a talent profile aren't subject to approval. When you edit a talent profile, all changes are
visible immediately on the talent profile. HR specialists and implementors can enable approvals for each content type so
that worker edits on
Content types are defined as content sections in profile types. You can enable approvals for a content section when you
edit or create a profile type by using the Manage Profile Types task. You can open the task:
• In the Setup and Maintenance work area. To open the Setup and Maintenance work area, select Navigator >
Setup and Maintenance.
• In the Profiles work area. To open the Profiles work area, select Navigator > My Workforce > Profiles.
As an HR specialist or implementor, follow these steps to enable approval for a content section when you create or edit
the person profile type on the Manage Profile Types page:
1. On the Content Sections tab, click the link to the content section.
2. Click the content section link in the Content Sections region to open the Content Section page.
3. Select the Approval Required check box to enable approval for that content section.
4. Click OK to save your changes.
Note: You can enable approval for a content section added to only the Person profile type.
Related Topics
•
Guidelines for Managing Approval Rules
•
What happens if I enable custom approval rules for the person profile type?
•
Profile Types
Create Custom Content Types and Content Items
This example demonstrates how to set up a new custom content type and content items to track the corporate
citizenship activities of your workers so that you can rate them on their involvement in the organization. This example
also demonstrates how to set
290
Oracle Fusion Cloud HCM
Using Common Features for HCM
Chapter 15
Workforce Profiles
The following table summarizes key decisions for this scenario.
Decisions to Consider In This Example
Can a predefined rating model be used to
rate corporate citizenship?
No. The predefined rating models don't have relevant rating descriptions.
Should the content type be a free-form
content type?
No. Content items are needed, and the content should be stored in the content library.
What field and properties should the
content type contain?
Add two fields to the content type:
• ITEM_TEXT_20
• RATING_MODEL_ID
The ITEM_TEXT_20 field uses a label Comments to enter comments about the workers' corporate
involvement. The RATING_MODEL_ID field uses a label Company Contribution to attach the rating
model for corporate citizenship to the content type.
Both fields should require entry and should be editable.
Does the content type need any content
subscribers?
Yes. In order to be visible on the person profile, the new content type must be added to the HRMS
content subscriber code.
What content items are needed to track
the required information?
• Corporate social responsibility
• Corporate environmental responsibility
• Corporate industrial citizenship
• Corporate state citizenship
• Corporate borough, council, or municipal citizenship
When the content type is added to the
person profile as a content section, what
properties should the fields contain?
Both the Comments and the Company Contribution fields:
• Display in the detail view of the content section
• Are required
• Must be included in search results
To track corporate citizenship for your workers, complete the following tasks:
• Create a rating model.
• Create a content type.
• Create content items.
• Add the content type to the person profile type.
Creating a Rating Model
1. In the Setup and Maintenance work area, search for the Manage Profile Rating Models task and click Go to
Task.
2. On the Manage Rating Models page, click Create.
291

Oracle Fusion Cloud HCM
Using Common Features for HCM
Chapter 15
Workforce Profiles
3. On the Create Rating Model page, complete the following fields, as shown in this table. Use the default values
except where indicated.
Field Value
Code
Citizenship
Rating Name
Corporate Citizenship
Description
Rating model for corporate citizenship
4. On the Rating Levels tab, complete the following fields, as shown in this table.
Rating Level Name Short Description
1
Demonstrates limited or unused influence.
Limited
2
Demonstrates clear evidence of influence.
Clear Evidence
3
Provides a successful image of the
company as socially responsible in limited
environments.
Successful Image
4
Actively called upon to use influence as
a corporate representative in selected
environments.
Influential in Selected Environments
5
Demonstrates high level of influence and
can operate effectively in all environments.
High Level of Influence
5. Click Save and Close.
Creating a Content Type
1. In the Setup and Maintenance work area, search for the Manage Profile Content Types task and click Go to
Task.
2. On the Manage Content Types page, click Create.
3. On the Create Content Type page, add a content type by completing the following fields, as shown in this table.
Use the default values except where indicated.
Field Value
Code Citizenship
292

Oracle Fusion Cloud HCM
Using Common Features for HCM
Chapter 15
Workforce Profiles
Field Value
Name
Corporate Citizenship
Description
Ratings for corporate citizenship behaviors for workers.
4. Set up the following field properties, as shown in this table. Use the default values except where indicated.
Field Name Field Label Required Display Option
ITEM_TEXT_20
Comments
Selected
Editable
RATING_MODEL_ID
Company Contribution
Selected
Editable
5. Click Save and Close.
6. On the Manage Content Types page, select the Corporate Citizenship content type and click Edit.
7. On the Edit Content Type page, select the Subscribers tab.
8. On the Subscribers tab, click Add.
9. In the Subscriber Code field, select HRMS.
10. Click Save and Close.
Creating Content Items
1. In the Setup and Maintenance work area, search for the Manage Profile Content Items task and click Go to
Task.
2. On the Manage Content Items page, click Create.
3. In the Create Content Item dialog box, complete the following fields, as shown in this table.
Field Value
Content Type
Corporate Citizenship
Content Item
Corporate Social Responsibility
4. On the Create Content Item: Corporate Social Responsibility page, select the Corporate Citizenship rating
model in the Rating field.
5. Click Save and Close.
6. Repeat steps 2 through 5 to add content items for Corporate Environmental Responsibility, Corporate Industrial
Citizenship, Corporate State Citizenship, and Corporate Borough, Council, or Municipal Citizenship.
Adding the Corporate Citizenship Content Type to the Person Profile Type
1. In the Setup and Maintenance work area, search for the Manage Profile Types task and click Go to Task.
293

Oracle Fusion Cloud HCM
Using Common Features for HCM
Chapter 15
Workforce Profiles
2. On the Manage Profile Types page, locate the Person profile type and click Edit.
3. On the Edit Profile Type: Person page, select the Content Sections tab.
4. In the Content Sections region, click Add Content Section.
5. In the Content Types dialog box, select Citizenship.
6. In the Content Sections region, click Citizenship.
7. On the Content Section page, set up the following field properties, as shown in this table. Use the default values
except where indicated.
Column Name Display Required Searchable
ITEM_TEXT240_1
Detail
Selected
Selected
RATING_LEVEL_ID1
Detail
Selected
Selected
8. On the Edit Profile Type: Person page, click Save and Close.
9. In the Content Access Section region, click Add.
10. In the Role field, select Employee.
11. Select the Update check box.
12. Click Add.
13. In the Role field, select Manager.
14. Click OK.
15. Click Add.
16. In the Role field, select HR Specialist.
17. Click OK.
18. On the Edit Profile Type: Person page, click Save and Close.
Related Topics
•
Rating Models
•
Content Types
•
Content Subscribers
•
Create Free-Form Custom Content Types
Create Free-Form Custom Content Types
This example demonstrates how to set up a free-form custom content type, add it to the HRMS content subscriber code,
and then add the content type to the person profile type.
Your company wants to track the previous employment information for workers, including employer name, dates of
employment, and job description. However, you don't want to set up and maintain content items for each employer,
and this information applies only to person profiles. You decide to use a free-form content type for this information.
You can set up the free-form content type with minimal information. Then when you add it to the person profile as a
content section, you can define properties for employer name, dates of employment, and job description. Workers can
complete their employment information on their profile based on how you set up the content section. The following
table summarizes key decisions for this scenario.
294

Oracle Fusion Cloud HCM
Using Common Features for HCM
Chapter 15
Workforce Profiles
Decisions to Consider In This Example
Must the content type be a free-form
content type?
Yes. Content items aren't needed, and the content must not be stored in the content library.
Does the content type need any content
subscribers?
Yes. In order to be visible on the person profile, the new content type must be added to the HRMS
content subscriber code.
When the content type is added to the
person profile as a content section, what
fields are needed?
To capture the previous employer, a text field is needed. To capture employment dates, two date fields
are needed. To capture job description, another text field is needed. Therefore, the following fields
must be added:
• ITEM_TEXT30_1
• ITEM_DATE_1
• ITEM_DATE_2
• ITEM_TEXT240_1
What properties are needed for the ITEM_
TEXT30_1 field?
The field isn't required and the information isn't available as search criteria, so you must only set up
these field properties as follows:
• Label: Previous Employer
• Display: Detail (section must appear in detail view of profile)
What properties are needed for the ITEM_
DATE_1 field?
The field isn't required and the information isn't available as search criteria, so you must only set up
these field properties as follows:
• Label: From Date
• Display: Detail
What properties are needed for the ITEM_
DATE_2 field?
The field isn't required and the information isn't available as search criteria, so you must only set up
these field properties as follows:
• Label: To Date
• Display: Detail
What properties are needed for the ITEM_
TEXT240_1 field?
The field isn't required and the information isn't available as search criteria, so you must only set up
these field properties as follows:
• Label: Job Description
• Display: Detail
What role access must be granted for the
content section?
Employees, managers, and HR specialists must all have access to update the section.
To set up a free-form content type to track previous employment information for workers, you must:
• Set up a free-form content type
• Add the free-form content type to the person profile type
295

Oracle Fusion Cloud HCM
Using Common Features for HCM
Chapter 15
Workforce Profiles
Setting Up a Free-Form Content Type
1. In the Setup and Maintenance work area, search for the Manage Profile Content Types task and click Go to
Task.
2. On the Manage Content Types page, click Create.
3. On the Create Content Type page, complete the following fields, as shown in this table.
Field Value
Code
PREVEMP
Name
Previous Employment
Description
Track previous employment information for workers.
4. Select the Free-Form Type check box.
5. Click Save and Close.
6. On the Manage Content Types page, select the Previous Employment content type and click Edit.
7. On the Edit Content Type page, select the Subscribers tab.
8. On the Subscribers tab, select HRMS in the Subscriber Code field.
9. Click Save and Close.
Adding the Free-Form Content Type to the Person Profile Type
1. In the Setup and Maintenance work area, search for the Manage Profile Types task and click Go to Task.
2. On the Manage Profile Types page, select the Person profile type, and click Edit.
3. On the Edit Profile Type: Person page, select the Content Sections tab and click Add Content Section.
4. In the Content Types dialog box, select the Previous Employment content type.
5. In the Content Sections region, click the Previous Employment content type and enter the following properties
on the Content Section page, as shown in this table.
Column Name Label Display
ITEM_TEXT30_1
Previous Employer
Detail
ITEM_DATE_1
From Date
Detail
ITEM_DATE_2
To Date
Detail
ITEM_TEXT240_1
Job Description
Detail
6. In the Content Access Section region, click Add.
7. In the Role field, select Employee.
8. Select the Update check box.
296

Oracle Fusion Cloud HCM
Using Common Features for HCM
Chapter 15
Workforce Profiles
9. Click Add.
10. In the Role field, select Manager.
11. Click OK.
12. Click Add.
13. In the Role field, select HR Specialist.
14. Click OK.
15. On the Edit Profile Type: Person page, click Save and Close.
Related Topics
•
Content Types
•
What's a free-form content type?
Considerations for Associating Behaviors with Competencies
Behaviors are subcomponents of a competency. You must create a relationship between the Competencies and
Behaviors content types so that you can associate their content items. You associate behaviors with competencies using
the Relationships tab on the Edit Content Type page of the Behaviors
• Manage Content Types task in the Profiles work area .
• Manage Profile Content Types task in the Setup and Maintenance work area.
The following features aren't available for the Behaviors content type:
• Print behaviors in the Talent Profile Summary report
• Search for persons or competencies based on behaviors using the advanced search
• Upload behaviors content such as from a third-party supplier or HCM Data Loader
• Support for using behaviors in other Oracle Fusion products
When associating behaviors with competencies, you must decide:
• The type of relationship between the Behaviors and Competencies content types
• The duration of each relationship
• Related content items
Deciding the Relationship
You can define the following relationships between the behavior and competencies content types:
• Parent and child relationship: You can define Behaviors as a child of the Competencies content type. Using
this relationship, you define a hierarchy where Behavior content items are added to the Competencies content
item. For example, when Behaviors is a child of Competencies, you can add the Behaviors content items to
one or more Competencies content items. In this relationship, you must associate the same rating model with
Competencies and associated Behaviors.
• Supports or supported by relationship: You can enable Behaviors to support the Competencies content type,
and vice versa. The supported or supporting content items are not in a hierarchical relationship with one
another. That is, each content item associated with a content type is independent of the content items of the
other content type. Therefore, you can associate different rating models with each content type, and then add
their content items to a profile and review them together.
297

Oracle Fusion Cloud HCM
Using Common Features for HCM
Chapter 15
Workforce Profiles
Note: The proficiency calculation rule is applicable for the Behaviors content type only. The value of the Proficiency
Calculation Rule field on the Relationships tab on the Edit Content Type page for Behaviors is set to Average by
default and can't be edited. Using this rule, the application calculates the proficiency rating for the competency as the
average of the behavior ratings. The rating provided at the competency level is ignored by the application.
Deciding the Relationship Duration
You can define a duration for the relationship between the Behaviors and Competencies content types. There can be
multiple relationships provided their dates don't overlap. You can delete a relationship only when the content type or
its related content type is not added to any profiles (model or person). Once the content type or its related content type
is added to a profile, you cannot delete the relationship. However, you can enter a To Date for the relationship to end
it. You can also relate the content items of Competencies and Behaviors content types, and define the duration of the
relationship between content items. Further, you can delete or end the relationship between content items.
Deciding the Related Content Items
After you establish the relationship between the Behaviors and Competencies content types; you must:
1. Create the content items for each content type.
2. Relate the content items between each content type. You relate a content item of a content type with content
items of another content type using the Related Content Items tab. The tab is available on the Edit Content Item
page. You open the Edit Content Item page by using the Manage Content Items task in the Profiles work area
or Setup and Maintenance work area. On the Related Content Items tab, you can view the relationship type
between the two content types. You can also decide the duration until when the content items are related with
each other.
Related Topics
•
Content Types
•
How You Update Talent Ratings
•
Examples of Content Type Relationships
Talent Profiles
Profile Types
Profile types include person profile types and model profile types. Use the Manage Profile Types task in the Profiles or
Setup and Maintenance work area to create a profile type.
Note: If you are still using Classic Talent Profiles, you should upgrade to Enhanced Talent Profiles before release 21A.
Any relevant topics from this chapter have been updated and moved to My Oracle Support: Upgrading Oracle Cloud
HCM Profile Management (Doc ID 2421964.1).
298

Oracle Fusion Cloud HCM
Using Common Features for HCM
Chapter 15
Workforce Profiles
Person Profile Types
The person profile type:
• Is the template that you use to create profiles of your workers or nonworkers.
• Contains the skills, qualities, and qualifications that you want to track for your workers.
Model Profile Types
The model profile type:
• Is a template for workforce structures such as jobs and positions. You can set up multiple model profile types.
Note: You must use the Job profile type to create profiles for jobs or positions.
• Identifies the targeted and required skills and qualifications for a job or position.
• Identifies work requirements, such as work schedule and travel frequency.
About Defining Profile Types
To define profile types, you first specify whether the profile type is a person or model profile. For model profiles, you
also specify the workforce structures for which the model profile can be used. However, to create a position profile you
must use the Job profile type as the template. To define the structure of the profile type, you add one or more content
sections using content types from the content library and free-form content types. Define the following for each content
section:
• Instance qualifier sets
• Section properties
• Role access
Note: You access the Behaviors content section only after you select the Competencies content section on the Edit
Profile Type page.
Instance Qualifier Sets
If you have defined instance qualifier sets for the content type, you select the instance qualifier set to use for the
sections. You can't define instance qualifiers for the Behaviors content type.
Section Properties
The properties determine the fields and how they are displayed when you create profiles based on the type. For
example, properties determine the label for the field, whether the field is required, and whether the field should be
included in profile searches.
You define all of the properties for free-form content types.
Role Access
You can specify user roles such as Employee or Manager, which define who can view the content section, and who can
update the section.
299

Oracle Fusion Cloud HCM
Using Common Features for HCM
Chapter 15
Workforce Profiles
Effective Dates of Profiles
You can associate multiple profiles with a workforce structure. However, only one profile can be in effect at a time for
the workforce structure. Therefore, the effective start and end dates of multiple profiles associated with a workforce
structure must not overlap.
Related Topics
•
Content Types
•
Content Section Properties
•
Profile Management
How You Create Person Profiles
The person profile is a profile type you create for individual workers. Person profile data, such as the skills,
qualifications, accomplishments, and career preferences of a person, is displayed on Skills and Qualifications and Career
Planning pages on a worker's person profile.
HR specialists or implementors can create person profiles from the application, or implementors can upload them using
tools such as HCM Data Loader.
The application provides the functionality to automatically create person profiles for person records. You can enable or
disable this functionality using the Autocreate Person Profiles check box. By default, this check box is already selected.
The Autocreate Person Profiles check box is available on the Edit Profile Type page of the person profile type. Use the
Manage Profile Types task in the Profiles or Setup and Maintenance work area to edit the person profile type.
When the Autocreate Person Profiles check box is selected:
• The application automatically creates the person profile for that person when someone accesses the Skills and
Qualifications page for a person.
• The person profile added for a pending worker is activated on the effective hire date for an employee or the
effective placement date for a contingent worker.
If you choose to deselect the Autocreate Person Profiles check box for the person profile type and no profile exists
for a person, the application displays an error message to create or upload profile when you access that person's Skills
and Qualifications page. However, when uploading talent profile data from external sources, you must deselect the
Autocreate Person Profiles check box to avoid duplication of person profiles.
Related Topics
•
Person Records
How You Upload Talent Profile Data
Talent profile data is the person and job profiles data displayed on Skills and Qualifications and Career Planning pages.
You access these pages for a worker in the worker's person spotlight.
Examples of talent profile data include ratingsand corresponding rating models, content items, and educational
establishments. You can upload talent profile data for initial migration or mass data entry.
300

Oracle Fusion Cloud HCM
Using Common Features for HCM
Chapter 15
Workforce Profiles
The following tools support upload of talent profile data:
• Oracle ADF Desktop Integration (ADFdi) workbook (only for Classic Talent Profiles).
• Oracle Fusion HCM Data Loader (for Classic Talent Profiles and Enhanced Talent Profiles).
• Oracle Fusion HCM Spreadsheet Data Loader (for Classic Talent Profiles and Enhanced Talent Profiles).
Note: The tools available to you for uploading talent profile data depend on the setting of the HCM Data Loader
Scope parameter. The ADFdi workbook isn't affected by the HCM Data Loader Scope parameter. You can continue
to upload competencies using the ADFdi workbook regardless of the parameter setting. The ADFdi workbook is only
available for classic Talent Profiles. To load content items in Enhanced Talent Profiles, use HCM Data Loader or the
HCM Spreadsheet Data Loader.
For more information about:
• Uploading content items using an ADFdi workbook, see Uploading Competencies and Content Items into Oracle
Fusion Profile Management (1453118.1) on My Oracle Support at https://support.oracle.com.
• All data loaders mentioned earlier, see Oracle Human Capital Management Cloud Integrating with Oracle HCM
Cloud Guide.
Uploading Actions
The following table displays the type of talent profile data you typically upload and the actions you perform to load that
data.
Note: Use the Open Competency Excel Template option to generate the ADFdi workbook for uploading
competencies. The option is available on the Manage Content Items page in the Profiles work area.
Uploading Tool Talent Profile Data Type Actions
ADFdi workbook
• Content item (only Competency) • Create
• Update
HCM Data Loader
• Educational establishment
• Talent profile rating model
• Talent profile type (only Person and Job)
• Talent profile content item
• Talent profile content item relationship
• Create
• Update
• Delete
HCM Spreadsheet Data Loader
• Educational establishment
• Talent profile rating model
• Talent profile type (only Person and Job)
• Talent profile content item
• Talent profile content item relationship
• Create
• Update
Related Topics
•
Guidelines for Using Desktop Integrated Excel Workbooks
301

Oracle Fusion Cloud HCM
Using Common Features for HCM
Chapter 15
Workforce Profiles
Add Content to a Worker's Profile
Depending on the content section access settings for HR specialists and managers, they can edit content or add it to a
worker's profile.
To view, add, or edit content of a worker's profile, they must use the worker's Skills and Qualifications page.
Note: If you are still using Classic Talent Profiles, you should upgrade to Enhanced Talent Profiles before release 21A.
Any relevant topics from this chapter have been updated and moved to My Oracle Support: Upgrading Oracle Cloud
HCM Profile Management (Doc ID 2421964.1).
As an HR specialist, follow these steps to either edit the content or add it to the worker's profile:
1. Click My Client Groups > Profiles to open the Search: Profiles page.
2. Click the name of the worker in the Results section to open the Skills and Qualifications page of that worker.
Tip: Alternatively, use the Manage Talent Profile task in the Person Management work area to open a
person's Skills and Qualifications page.
3. Click Edit on the Skills and Qualifications page to either edit the content, or add it to the worker's profile.
As a manager, follow these steps to either edit the content or add it to a report's profile:
1. Click My Team > Team Talent.
2. Click a report's person card to open the Skills and Qualifications page for the report.
3. Click Edit on the Skills and Qualifications page to either edit the content, or add it to the report's profile.
Talent Profile Summary
The Talent Profile report provides talent-related information for a worker. This topic describes options that you can
select when printing the report.
To print the report, select the Manage Talent Profile task in the Person Management work area. On the Edit Profile page,
select Actions - Print Profile. Talent review meeting participants can also print the report for one or more workers from
the Talent Review dashboard.
Note: If you are still using Classic Talent Profiles, you should upgrade to Enhanced Talent Profiles before release 21A.
Any relevant topics from this chapter have been updated and moved to My Oracle Support: Upgrading Oracle Cloud
HCM Profile Management (Doc ID 2421964.1).
Report Sections
The Talent Profile report can contain a person summary and five configurable sections. This table describes the
contents of each section.
Report Section Contents
Experience
Current and previous assignments.
302

Oracle Fusion Cloud HCM
Using Common Features for HCM
Chapter 15
Workforce Profiles
Report Section Contents
Talent Overview
Performance evaluation information for up three years. The section includes the evaluation period,
overall rating, overall comments, and a bar graph comparing the performance ratings. You can also
include talent ratings.
Education and Qualifications
Competency ratings and evaluation types, degrees, licenses and certifications, honors and awards, and
memberships.
Career Options and Interests
Career preference and advancement readiness information, including willingness to travel, relocate,
consider part-time employment, or adopt flexible work schedules. You can also include preferred
career moves and any jobs in a worker's interest list.
Goals
Development and performance goal information, such as goal names, completion dates, statuses, and
descriptions. This section includes a graph of goal achievements for the worker.
Print Formats
You can print the Talent Profile Summary in the following formats:
Print Format Description
PDF
Includes a photograph of the worker and all selected graphs.
RTF
Includes a photograph of the worker and all selected graphs.
Microsoft Excel
Includes all selected workers in an Excel workbook, with one profile per worksheet and the worker's
name as the tab label. This format doesn't include the photograph, performance history, or goals
graphs.
HTML
Includes selected graphs but doesn't include the photograph.
Content Sections
Content Sections
Content sections are sections in a profile, person or model, containing profile items. The properties for the content
sections are configured under the profile type. You define properties for each content section. However, the accessibility
of a content section for person profiles is dependent
Content Section Properties
Content section properties or content properties are attributes that are used to define data included in a profile. A free-
form content type doesn't have any properties defined for it until you add it to the profile type as a content section.
303

Oracle Fusion Cloud HCM
Using Common Features for HCM
Chapter 15
Workforce Profiles
Therefore, you define all properties for free-form content types. You can change content section properties inherited
from the content library and free-form content types or add new properties, as needed. Use the Manage Profile Types
task in the Profiles or Setup and Maintenance work area to select and edit a content section associated with a profile
and define its properties. You must have the HR specialist or implementor role or privileges to perform this task.
Content Section Approval
For a content section in a profile type, you can specify whether the approval is required when a worker adds the content
section that the worker can access to a profile. Use the Approval Required check box on the Content Section page to
enable or disable approval for a content section. You open the Content Section page, when you add or edit a content
section for the person or job profile type on the Manage Profile Types page in the Profiles or Setup and Maintenance
work area. You must have the HR specialist or implementor role or privileges to perform this task.
Content Section Access
For accessing the content for person profiles, you must give the required access for the content section to a role. You
can specify the level of access as view, edit, or report for each role. For example, users in the line manager role can be
given edit access to add and edit the Competencies content and view access to only read the Degrees content for their
workers. You can include content-type data in Oracle Business Intelligence Publisher reports. Use the Manage Profile
Content Section Access task in the Setup and Maintenance work area to secure access to content sections in person
profiles. You must have the IT Security Manager role or privileges to perform this task.
If you search for person profiles, the search results display profiles that match the search criteria. However, you can view
content sections details of a person profile based on the access level given to your role. You search for person profiles
on the Search: Profiles page in the Profiles work area.
Content sections in person profiles are unsecured when person profiles are included in:
• Best-fit analyses
• Profile comparisons
• Oracle Transactional Business Intelligence reports
No access is required for content sections added to model profiles as their content aren't secured.
Related Topics
•
Content Section Properties
•
Examples of Person Profile Content Access for Roles
•
What's a free-form content type?
•
How You Secure Content Sections in Person Profiles
Content Section Properties
Content sections are sections in a profile, person or model, containing profile items. The properties for the content
sections are configured under the profile type. Content section properties are attributes that are used to define data
included in a profile. Use the Manage Profile
304

Oracle Fusion Cloud HCM
Using Common Features for HCM
Chapter 15
Workforce Profiles
Attributes of Content Section Properties
The following table displays a list of attributes that you can set for each content section property that you included for a
content section.
Attribute Description
Default Value
Value that appears by default for the content section property on the profile
Display
Determines if the content section property is displayed on the profile. If yes, then whether the property
is displayed on the content section summary, content section details area, or both
Label
Label for the content section property displayed on the profile when the property is included within a
content section
Required
Determines if the user is required to enter a value for the property
Searchable
Determines if the content section property name must be included in profile searches
Value Set Name
Name of the lookup type or a predefined value set that provides values for the content section
property. You specify a lookup type for properties ITEM_TEXT30_6 to ITEM_TEXT30_15. The value set
is already defined for a predefined content section property, if applicable. For custom content types,
you can specify only a lookup type as the value for this attribute
View Attribute
Specifies the attribute in the predefined value set that provides the list of values for a content section
property. You enter a value for this attribute only for predefined content section properties and when
you mention a predefined value set in the Value Set Name attribute. The view attribute is already
defined for a predefined content section property, if applicable. You can't use this attribute for custom
content types
Note: The functionality associated with the Searchable attribute isn't available for use in the application.
Content Section Properties List
The following table describes a list of content section properties that appear on the pages with a profile item that
belongs to the content section.
Content Section Property Specifies
COUNTRY_ID
The country ID associated with the profile item. Ensure that the value of the Value Set Name attribute
is CountryPVO and View Attribute attribute is GeographyName, where CountryPVO is the name of the
value set and GeographyName is the attribute in the CountryPVO value set that provides a list of values
for the COUNTRY_ID property
DATE_FROM
The start date information of a content section. This property is used for maintaining the history of
profile items and isn't recommend to be displayed on the UI
305

Oracle Fusion Cloud HCM
Using Common Features for HCM
Chapter 15
Workforce Profiles
Content Section Property Specifies
DATE_TO
The end date information of a content section. This property is used for maintaining the history of
profile items and isn't recommend to be displayed on the UI
ITEM_DATE_1 to ITEM_DATE_10
Any date. Use these properties to enter dates for profile items
ITEM_DECIMAL_1 to ITEM_DECIMAL_5
Numeric data that includes decimals. For example, price USD 2.99
ITEM_NUMBER_1 to ITEM_NUMBER_10
Numeric data that doesn't include decimals. For example, age 29 years
ITEM_TEXT30_1 to ITEM_TEXT30_5
Data that requires selecting values from a check box
ITEM_TEXT30_6 to ITEM_TEXT30_15
Data that requires selecting values from a list. Ensure that the value of the Value Set Name attribute is
a lookup type. For example, HRT_RISK_REASON is a lookup type for selecting risk of loss reasons
ITEM_TEXT_240_1 to ITEM_TEXT_240_15
A simple text string, such as a name. Each property can store up to 240 characters of data. If the ITEM_
TEXT_240_1 property is used in:
• A predefined free-form content type, you can't enter duplicate data for this property for a profile
item
• A custom free-form content type, you can enter duplicate data for this property for a profile item
• A predefined or custom content type that aren't free-form, you can't enter duplicate data for this
property for a content item
ITEM_TEXT2000_1 to ITEM_TEXT2000_5
Long text data, such as a comment. Each property can store up to 2000 characters of data
IMPORTANCE
The priority of the content section. The value of this property is used in the best-fit algorithm
INTEREST_LEVEL
The level of interest. This property is added to the Competency content section. The value of this
property is based on the Interest Rating Model and is automatically generated for a profile item
MANDATORY
Whether the item in a content type is required or not. This property is used by content types that are
added to the Job profile type. Ensure that the value of the Value Set Name attribute is YES_NO. If
added to a content type, the label for this property, is displayed as a check box column for content
items within the content type for a job profile. The default label for this property is Required
QUALIFIER_ID1 to QUALIFIER_ID2
The instance qualifier information assigned to the profile content section. To uniquely identify different
instances of competencies, you must not modify the predefined value of the QUALIFIER_ID1 and
QUALIFIER_ID2 properties for the Competency content section included in the Person profile type
LAST_UPDATE_DATE
The last updated date of the content section. The value of this property is automatically generated for
a profile item
RATING_LEVEL_ID1 to RATING_LEVEL_
ID3
The rating level information of a profile content section
306

Oracle Fusion Cloud HCM
Using Common Features for HCM
Chapter 15
Workforce Profiles
Content Section Property Specifies
RATING_MODEL_ID1 to RATING_MODEL_
ID3
The rating model information of a profile content section. The RATING_MODEL_ID1 property is used
for storing the rating model information for the Competencies content section associated with a job or
person profile type. The default value for this property is Proficiency Rating Model
STATE_PROVINCE_ID
The state ID associated with the profile item. This property is used in conjunction with the COUNTRY_
ID property. Ensure that the value of the Value Set Name attribute is StateProvincePVO and
View Attribute is GeographyName, where StateProvincePVO is the name of the value set and
GeographyName is the attribute in the StateProvincePVO value set that provides a list of values for the
STATE_PROVINCE_ID property
Note:
• For content sections associated with free-form content types, the values of the properties CONTENT_TYPE_ID
and DATE_FROM are automatically generated for a profile and should not be modified.
• For content sections associated with content types that aren't free-form, the values of the properties
CONTENT_TYPE_ID, CONTENT_ITEM_ID, and DATE_FROM are automatically generated for a profile and
should not be modified.
• The SOURCE_ID property isn't used by the application and can be ignored.
Related Topics
•
Content Sections
•
How You Add Common Lookup Types to a Content Section Property
•
Content Type Properties
•
What's a free-form content type?
•
What happens if I don't add a label for a content section property?
Examples of Person Profile Content Access for Roles
You must identify which job roles and abstract roles need access to content sections and the level of access each role
needs. This topic provides examples of content-section access for some roles and identifies tasks that users with those
roles can perform.
Scenario
The First Software organization associates the following content sections with the person profile type. These content
sections are available as searchable profile content.
• Competencies
• Degree
307

Oracle Fusion Cloud HCM
Using Common Features for HCM
Chapter 15
Workforce Profiles
• Languages
• Licenses and Certifications
The organization has employee, line manager, and license manager roles. An appropriate person security profile is
assigned to each role. According to the person security profile:
• Users with the employee role can search for workers according to their access privileges for person records in
the directory and manage their own records.
• Users with the line manager role can manage the person records of their reports.
• Users with the license manager role can manage the person records of workers in their department.
The access level for each content section for a role is defined as shown in the following table.
Content Section Access Level for the Employee
Role
Access Level for the Line
Manager Role
Access Level for the License
Manager Role
Competencies
Edit
Edit
None
Degree
Edit
Edit
None
Languages
Edit
Edit
None
Licenses and Certifications
View
Edit
Edit
Content Access for Employees
As the employee role has the edit access level for all content sections in the organization, all users associated with the
role can do the following tasks:
• Search for all workers in the directory and view the publicly accessible content of a person profile
• Search for their own person profile using the searchable profile content
• View their own person profile content for which they have edit or view access. In the example, all employees can
view their competencies, degree, languages, and licenses and certifications content on their profile
• Edit their own person profile content for which they have edit access. In the example, all employees can edit
their competencies, degree, and languages content on their person profile
• View, add, and remove attachments for their person profile content
Content Access for Line Managers
As the line manager role has the edit access level for all content sections in the organization, all users associated with
the role can do the following tasks:
• Search for direct reports within their own person security profile on the Team Talent page
• View secured content of person profiles of their direct reports within their own person security profile. In this
example, all line managers can view competencies, degree, languages, and licenses and certifications content
on their reports' person profile
308

Oracle Fusion Cloud HCM
Using Common Features for HCM
Chapter 15
Workforce Profiles
• Edit secured content of person profiles of their direct reports within their own person security profile. In this
example, all line managers can edit competencies, degree, languages, and licenses and certifications content
on their reports' person profile
• View, add, and remove attachments for person profile content of their direct reports within their own person
security profile
Content Access for License Managers
As the license manager role has the edit access level for only the Licenses and Certifications content section in the
organization, all users associated with the role can do the following tasks:
• Search for workers within their own person security profile in the directory using the searchable profile content
• View Licenses and Certifications content for person profiles of workers within their own person security profile
• Edit Licenses and Certifications content of person profiles of workers within their own person security profile
Related Topics
•
Content Sections
•
How You Secure Content Sections in Person Profiles
Instance Qualifier Sets
An instance qualifier set is a group of codes that uniquely identify different occurrences of the same profile item such as
competency content section or a performance rating. Use the Manage Instance Qualifiers task in the Profiles work area
to view and edit
Purpose
Instance qualifiers identify the role of a person or the application that updated a content type. For example, if a worker,
the worker's peer, and the worker's manager all enter a rating for a competency on the worker's profile, instance
qualifier sets uniquely identify each instance, or the rating given by each different role. Uniquely identifying different
instances of competencies enables you to specify which instance is used when you view or compare profiles. Instance
qualifiers also affect data entered for content types. For example, if configured, a worker with an employee profile can
enter a competency with the Evaluation Type instance qualifier as Self only.
Properties
Each instance qualifier contains a code and a description, which indicate the role or the application that updated the
content type.
The following examples list the instance qualifiers displayed on the UI or BI reports when the content type is updated by:
• An application: If an employee's potential rating is updated in a talent review meeting, the instance qualifier of
the rating appears as TRPOTENTIAL in BI reports. Similarly, if the rating is updated on the employee's Career
Planning page, the instance qualifier appears as PROFILEPOTENTIAL in BI reports.
• A role: If a competency is updated by an employee, the value of the Evaluation Type instance qualifier appears
as Self on the employee's Edit Skills and Qualifications page and BI reports. Similarly, if the competency is
updated by a manager, the value of the Evaluation Type qualifier appears as Supervisor.
309

Oracle Fusion Cloud HCM
Using Common Features for HCM
Chapter 15
Workforce Profiles
Each instance qualifier has the following properties:
• Priority
• Employee and manager views
• Search ability
• Default instance qualifier for employee and manager
Priority
Priority determines:
• The order in which different instances of a competency are displayed.
• Which instance to use when searching and comparing profiles. The lowest number indicates the highest
priority. The lowest number is displayed on the competency gap chart, comparison results for profiles, and
best-fit results for a profile.
Employee and Manager Views
If the security privileges associated with employee and manager roles enables them to view or edit a content section,
then you can use employee and manager views to determine which instances are visible to employees and to managers.
Search Ability
You can specify whether items that have been assigned the instance qualifier code should be included in profile
searches. For example, you might not want the ratings for competencies given by peers to display when other workers
are searching person profiles.
Default Instance Qualifier
You can specify the default instance qualifier to use when managers and employees update a competency. Each time an
employee or manager updates a competency, the record is assigned the instance qualifier code that is identified as the
employee or manager default code.
Related Topics
•
Content Section Properties
Lookups
Profile Management Lookups
This topic identifies common lookups that are profile management-related and have user or extensible configuration
levels. Review these lookups, and update them as appropriate to suit enterprise requirements.
Profile Management Lookups
Profile management lookups are described in the following table.
310

Oracle Fusion Cloud HCM
Using Common Features for HCM
Chapter 15
Workforce Profiles
Lookup Type Description Configuration Level
HRT_CONTENT_SUPP_CODE
Codes to identify where the content type
originated, such as from the customer or from
a third party. Human Resource (HR) Specialists
assign supplier codes when setting up new
content types.
Extensible
HRT_COMPETENCY_EVAL_TYPE
Types of competency ratings, such as self,
supervisor, and peer. Evaluation types are used
in instance qualifier sets to identify the role of
the person who provided a competency rating
for a worker.
User
HRT_DEGREE_LEVEL
Required levels of education for a job or
position profile, such as a Bachelor's Degree or
Masters degree.
User
HRT_DURATION
Time periods for when a worker would like to
make a career move. Workers select a duration
for their career move in the career preferences
information on the career planning card.
User
HRT_EDUCATION_LEVEL
Types of education that a degree provides, such
as a Bachelor's degree or one year college. HR
Specialists use education levels when creating
content items in the Degrees content type.
User
HRT_IMPORTANCE
Values for the importance level of each content
type. Importance values are used in the best-fit
analysis calculation.
User
HRT_NOTES_TYPE
Values for categories of notes, such as external
and internal.
User
HRT_PAY_FREQUENCY
Frequencies at which a worker is paid. Workers
specify a preferred pay frequency when they
edit their work requirements on the experience
and qualifications card.
User
HRT_READINESS
Time periods in which a worker is ready for
advancement to a specified job or position
profile. Managers and HR Specialists use
readiness levels when editing the talent ratings
information on workers' career planning cards.
User
HRT_RISK_REASON
Reasons for why a worker is at risk for leaving
the company. Managers and HR Specialists use
risk reasons when editing the talent ratings
information on workers' career planning cards.
User
HRT_SATISFACTION_METHOD
Methods by which an item such as a
competency is verified, such as assessment or
demonstration. Managers and HR Specialists
User
311

Oracle Fusion Cloud HCM
Using Common Features for HCM
Chapter 15
Workforce Profiles
Lookup Type Description Configuration Level
use these values to identify the method that
was used to evaluate the proficiency of a worker
in a particular skill or quality.
HRT_TASK_PRIORITY
Codes for the priority of a task, such as High
and Medium. Talent review facilitators specify
a priority when assigning tasks during a talent
review.
Extensible
HRT_TASK_TYPE
Categories of tasks, such as Preparation and
Presentation. Talent review facilitators specify a
task type when assigning tasks during a talent
review.
Extensible
HRT_TRAVEL_FREQUENCY
Percentages of time a worker is expected
to travel for a job or position, for example,
25 percent or 50 percent. Managers and HR
specialists specify the required travel frequency
on job and position profiles. Workers also
specify a travel frequency when they edit their
work requirements on the experience and
qualifications car
User
HRT_VALIDITY_PERIOD
Periods of time for which content items such as
licenses and certifications are valid. Managers
and human resource (HR) specialists select
validity periods when setting up content items
for the Licenses and Certifications content type.
User
HRT_WORK_DAYS
Work days for a job or position, such as Monday
through Friday. Managers and HR specialists
specify the expected work days on job and
position profiles.
User
HRT_WORK_HOURS
Work hours for a job or position, such as 9:00
a.m. to 5:00 p.m. Managers and HR specialists
specify the expected work hours on job and
position profiles.
User
How You Add Common Lookup Types to a Content Section
Property
Associate common lookup types with a content section property when defining content sections for a profile type.
You can then provide a list of values for the content section property. For example, you can add a list of industries to a
content section
312

Oracle Fusion Cloud HCM
Using Common Features for HCM
Chapter 15
Workforce Profiles
Note: This functionality doesn't apply to these content section properties when they are associated with the following
content sections: Career Preferences, Potential, Risk, Advancement Readiness, Career Statement, Talent Score,
Performance Rating, and Work Requirements.
Related Topics
•
Overview of Lookups
•
Add Common Lookups to a Content Section Property
Add Common Lookups to a Content Section Property
This example illustrates how to use common lookup types to create a list of values for a content section property.
Development Readiness
The Human Resource (HR) department at InFusion Corporation wants to track development readiness for employees
using the person profile. They would also like to indicate whether a worker is a candidate for serving as a mentor to
another worker.
Values for Development Readiness
The HR department has decided on three possible levels for a worker's development readiness:
• 1 to 2 years
• 3 to 5 years
• Ready Now
To indicate whether a worker is a candidate for being a mentor, they want three choices:
• Yes
• No
• Maybe
InFusion analyzes the existing content types in the content library, and decides that none of the content types works.
They must create a free-form content type called Development Readiness. The content type is free-form because
content items aren't needed, and the information needn't be stored in the content library.
Next, they analyze the existing common lookups, and determine that they can use an existing lookup type,
HRT_READINESS but add lookup codes and meanings to suit their needs. For the indicator for mentorship, they must
create a common lookup.
After creating the content type and lookup and changing the lookup codes for HRT_READINESS, they must add the
content type as a content section to the person profile. Adding the content section to the person profile enables HR
Specialists and managers to add the section to workers' profiles. they can then rate workers on their readiness level and
ability to be a mentor.
Note: You can attach lookup values to only these content section properties: ITEM_TEXT30_6 through
ITEM_TEXT30_15.
313

Oracle Fusion Cloud HCM
Using Common Features for HCM
Chapter 15
Workforce Profiles
Resulting Setup
To track development readiness for workers, InFusion must complete the following setup:
1. Using the Manage Common Lookups task in the Setup and Maintenance work area, locate the
HRT_READINESS lookup type.
2. Add codes for 1 to 2 years, 3 to 4 years, and Ready Now.
3. Using the Manage Common Lookups task, create a common lookup called HRT_MENTOR, and add the three
values of Yes, No, and Maybe.
4. Using the Manage Content Types task in the Setup and Maintenance work area, create a free-form content type
called Development Readiness. Add HRMS and TM as the content subscribers.
5. Using the Manage Profile Types task in the Setup and Maintenance work area, select the Person profile type
and add Development Readiness to it.
6. Using the Manage Profile Types task, select the Development Readiness content section to access the Content
Section page.
Set up the content section by adding two properties as described in this table.
Property Label Display Value Set Name
ITEM_TEXT30_6
Development Readiness
Summary
HRT_READINESS
ITEM_TEXT30_7
Potential Mentor
Summary
HRT_MENTOR
7. In the Content Section Access region on the Content Section page, add the HR Specialist and Manager roles.
Select the option for each role to be able to edit the content section.
Note: Don't add the Employee role.
HR specialists and managers can then access worker profiles and add the Development Readiness content section to
the profiles.
Related Topics
•
Overview of Lookups
Writing Assistant
How You Upload Writing Assistant Data Using Spreadsheets
Human resource (HR) specialists can upload and associate new Writing Assistant data for competencies using an
application-generated spreadsheet.
Use the Export option on the Manage Content Items page in the Profiles work area to generate the spreadsheet for
uploading writing assistant data. The uploaded data is associated with each separate competency.
314

Oracle Fusion Cloud HCM
Using Common Features for HCM
Chapter 15
Workforce Profiles
The application-generated spreadsheet for uploading Writing Assistant data contains the following two worksheets:
• Feedback Suggestions - Upload feedback suggestions for each proficiency level for each competency.
• Development Tips - Upload development tips associated for each competency.
Generate the Spreadsheet
Here's how you generate the spreadsheet to upload and associate data for Writing Assistant with competencies:
1. Navigate to the Profiles work area.
2. Search for and select the Items Catalog task.
3. In the Search Results region, click Actions > Open Writing Assistant Excel Template. A File Download dialog
box appears.
4. Click Save. Select a destination on your local hard disk to save the CompetencyFeedbackSuggestion.xlsx
spreadsheet.
Upload and Update Feedback Suggestions
To upload feedback suggestions, specify all the required columns in the Feedback Suggestions worksheet and click
Upload. After you click Upload, click Save to commit the feedback suggestions for proficiency levels for associated
competencies into the application database.
To update an existing feedback suggestion, click Download to download all feedback suggestions for competencies into
the spreadsheet. You can then update the suggested text and click Upload. After you click Upload, click Save to commit
the feedback suggestions for proficiency levels for associated competencies into the application database.
Note: You can enter the same suggestion text for multiple competencies and for multiple proficiency levels.
Upload and Update Development Tips
To upload development tips, specify all the required columns in the Development Tips worksheet and click Upload.
After you click Upload, click Save to commit the development tips for associated competencies into the application
database.
To update an existing development tip, click Download to download all development tips for competencies into the
spreadsheet. You can then update the suggested text and click Upload. After you click Upload, click Save to commit the
updated development tips for associated competencies into the application database.
Note: You can enter the same suggestion text for multiple competencies.
Related Topics
•
Writing Assistant
•
Guidelines for Using Desktop Integrated Excel Workbooks
•
How Writing Assistant Works with Performance Documents
•
How You Set up Writing Assistant for Performance Documents
315

Oracle Fusion Cloud HCM
Using Common Features for HCM
Chapter 15
Workforce Profiles
Writing Assistant
Writing Assistant is a tool that provides suggestions for a manager when writing comments or feedback for a worker's
competency or rating level during performance evaluation.
Writing Assistant suggests statements associated with competencies and proficiency levels within those competencies,
to help describe a worker's observed and wanted actions. The Writing Assistant data is displayed in the form of
feedback suggestions and development tips. Use Actions > Open Writing Assistant Excel Template on the Item
Catalogs page in the Profiles work area to generate the spreadsheet for uploading writing assistant data.
Requirements for Using Writing Assistant Data
Here's how you use the Writing Assistant tool:
• HR specialists upload data associated with a competency using an application-generated spreadsheet
• Managers select a proficiency level for a competency
• Managers view suggested comments for the selected proficiency level or for the competency as a whole
• Managers can copy and edit the suggested comments
Did you know that the application enables suggestions only for competencies that have a rating?
Related Topics
•
How You Upload Writing Assistant Data Using Spreadsheets
•
How Writing Assistant Works with Performance Documents
•
Guidelines for Setting Up Performance Templates
Questionnaires
Questionnaires
You can create questionnaires to gather information in applications that support them. For example, you can use
questionnaires to collect feedback in a performance evaluation.
A questionnaire consists of several questions, and you create questionnaires based on questionnaire templates. You can
create questions using the question library and then add the questions to questionnaire templates and questionnaires.
This topic describes aspects of questionnaire creation and maintenance.
You create and update questions, questionnaire templates, and questionnaires from the Setup and Maintenance work
area.
To access this work area, click the arrow next to your photo on the global header, open the Settings and Actions menu,
and select Setup and Maintenance.
Next, select Workforce Development from the Setup list, and select Questionnaires from the Functional Areas list.
316

Oracle Fusion Cloud HCM
Using Common Features for HCM
Chapter 15
Workforce Profiles
Using these tasks, you can configure each of these sections:
• Question Library
• Questionnaire Templates
• Questionnaires
Subscriber Applications
Applications which are eligible to use questionnaires are called subscriber applications. In addition to Oracle
Performance Management, other subscriber applications include Oracle Learning, Oracle Time and Labor, Oracle
Recruiting, and many more. You must select the subscriber application for each questionnaire. When you select the
subscriber on the Questionnaires page, you can create questionnaires for the selected subscriber only. In addition, the
subscriber filters your search results to display only questionnaires created for that subscriber.
Note: Some subscriber applications use Setup and Maintenance tasks to manage questionnaire components
while others provide their own tasks or don't allow modification of questionnaires. See the documentation for the
subscriber applications for more information.
Folders
You maintain folders to store questionnaires. For each subscriber application, you can create as many folders as
required to differentiate or identify the questionnaires.
Questionnaire Templates
All questionnaires are based on templates, which promote consistency. When creating a questionnaire, you must
select a template on which to base the questionnaire. The template can provide default settings or enforce mandatory
requirements such as specific sections and questions that must be in all questionnaires created using the template. You
can configure templates for:
• Specific applications
• General audiences, such as an entire organization or all internal customers
• Targeted audiences, such as particular roles (managers, for example)
• Specific purposes, such as providing feedback for performance evaluation periods or rate worker potential in an
assessment for a talent review
You can create questionnaires only from templates that were created for the same subscriber as the questionnaire.
Questionnaire Presentation
You can specify how the questionnaire appears in the subscriber application. For example, you can:
• Add sections to group questions by type or other classification.
• Define the question order to appear in the sequence defined or in random order in a section.
• Mark questions as required.
When a section is defined for Random question order, you can specify the sample size that isn't less than the required
number of questions and more than the number of questions in the section.
Note: Conditional questions aren't included in the random sample questions.
317

Oracle Fusion Cloud HCM
Using Common Features for HCM
Chapter 15
Workforce Profiles
Questionnaire and Question Scoring
For subscriber applications that support scoring, you can configure questions that score the responses provided by
respondents. You can configure questionnaires to calculate the cumulative total of responses (Sum), the average score,
or the percentage based on the maximum available score.
Tip: You can define a high score for a question that can be more than 3 digits. This facilitates to have higher number
of questions with each of these questions having higher scores in a questionnaire. Thus, the high score can result into
an overall high score too.
You can define the score for question answers directly in each questionnaire. For questions that are reused across
multiple questionnaires, you can define a different score for the question in each questionnaire. If you don't change the
question score in the questionnaire, the default score from the question is used.
Questionnaire and Template Access
You can control access to questionnaires and templates by setting privacy options. If you set the Privacy option to
Private, only the named owner can edit the questionnaire or template. Otherwise, anyone with access can edit the
questionnaire or template.
How You Create Questions
When creating a question, you specify the question type, additional instructions about the question, images and
attachments, if any, response type for the question, scoring options, and more.
You create questions in the question library. To create, review, or edit questions, select these in the Setup and
Maintenance work area:
• Setup: Workforce Development
• Functional Area: Questionnaires
• Task: Question Library
Follow these steps to create a question, for example:
1. After selecting the options mentioned above, select the subscriber from the Questions page.
2. Click the Create icon. The Create Questions page appears.
3. Select the folder, status, and privacy options, as required. The Question Code and Question Version Number are
generated automatically.
4. In the Question Text field, type the question that you want to ask. For example, “How many states are there in
the US?”
5. In the Image field, click the Manage Attachments icon to add an accompanying image to the question. For
example, if your question reads, "What does this sign mean?", add the image of a sign in this field.
6. In the Instructions text box, include additional information or provide additional context about the question.
You can format the information that you add by using the toolbar. You can also add an URL using the Add Link
icon on the toolbar.
Note: The URL that you add here will open in the same window as the questionnaire. You may want to add a
note in the Instructions text box to let the respondents know that they must open the URL in a new window
to avoid losing any unsaved changes.
7. Select the question type. Options are Text, Single Choice, Multiple Choice, and No Response.
318

Oracle Fusion Cloud HCM
Using Common Features for HCM
Chapter 15
Workforce Profiles
8. Select the Display the question conditionally check box if you want to display the question based on a specific
response that’s provided to another question called the controlling question. For example, if respondents
answer “No” to a controlling question such as, “Are you happy with the learning module?”, you can configure a
text question to appear conditionally, asking them to provide more details. For more information, refer to the
Conditional Questions section in this topic.
9. For Single-Choice and Multiple-Choice question types, you can provide scoring options by selecting the Score
Question check box.
For more information, refer to the Response Scoring section in this topic.
10. Select the type of response that a respondent must provide to the question. Each question type has a list of
response types that you can choose from.
11. To allow respondents to upload attachments with their responses, select the Allow Attachments check box.
For example, you have the question, "Provide proof of the right to work in this country". The respondent can
upload an attachment to show proof of the right to work.
Note: Respondents can add attachments for all types of questions, including No Response questions.
12. Select the Allow Additional Comments check box, if you’d like respondents to provide additional comments or
reasons for their responses. This option is available only for Date responses of the Text question type and for
all responses of the Single Choice and Multiple Choice question types.
Note: When you create a new version of a question or copy a question that has additional comments
enabled, this option is available in the new question as well. However, it’s not available for existing questions
that are already published. This option may not be available in certain run-time and setup pages in Oracle
Recruiting, Oracle Health and Safety Incidents, Wellness, and Journeys.
13. In the Minimum Length and Maximum Length fields, specify the length of text responses, or the start and
end dates of date responses.
14. Click Save and Close.
Question Types
Four types of questions are available in the Question Type list:
• Text
• Single choice
• Multiple choice
• No response
For each question type, you also configure responses and select a presentation method. For example, for single-choice
questions, you can specify that the possible responses appear either in a list or as radio buttons.
This table describes the types of questions and their response types.
Type Description Sample Question Response Type Sample Response Notes
Text
Respondents can
either enter free-form
text as the answer to
the question, or they
can enter a date using
a date picker.
How can we improve
this class?
• Date
• Plain Text Box
• Rich Text Box
The class is too long
and should be broken
into 2 half-day classes.
For text responses,
you can specify
the minimum and
maximum number of
characters. You can
also allow rich text that
uses formatting, such
as bold and underline.
319

Oracle Fusion Cloud HCM
Using Common Features for HCM
Chapter 15
Workforce Profiles
Type Description Sample Question Response Type Sample Response Notes
For date responses,
you can set the
minimum or
maximum dates, or
both. Respondents
must choose a date
on or before the
maximum date and on
or after the minimum
date. For example,
if respondents have
to enter their date
of joining between
12/01/2021 and
12/31/2021, set these
as the minimum and
maximum dates.
Single Choice
Respondent chooses
only one correct
answer.
Is Performance
Management a
subscriber application
for questionnaires?
• Single Choice
from List
• Radio Button List
• Radio Button
with Image
• Single Choice
– Horizontal
Buttons
(applicable only
for Touchpoints
and Journeys
Surveys
subscribers)
Yes
Multiple Choice
Respondent can
choose more than one
answer.
Which applications are
subscriber applications
for questionnaires?
• Check Multiple
Choices
• Check Box with
Image
• Multiple Choices
from List
• Multiple Choice
– Horizontal
Buttons
(applicable only
for Touchpoints
and Journeys
Surveys
subscribers)
Oracle Performance
Management, Oracle
Learning, Oracle
Health and Safety,
Oracle Recruiting
No Response
Instructional text
only; no response is
allowed.
Attach any supporting
documentation that
relates to this person's
performance for this
period.
320

Oracle Fusion Cloud HCM
Using Common Features for HCM
Chapter 15
Workforce Profiles
Subscriber Applications
Subscriber applications are applications that can use questionnaires, for example, Oracle Performance Management.
When creating a question, you must select a subscriber application for the question and a folder in which to include
it. You can create folders for each subscriber application to store questions for the subscriber. For example, folders for
Oracle Recruiting might be named for locations, where the organization has offices, such as San Francisco, Austin, Los
Angeles, Tokyo, Bangalore, and Shanghai. A question is only available to questionnaires with the same subscriber.
Conditional Questions
When you select the Display the question conditionally check box, you need to specify the controlling question code
and response. When the respondent answers the controlling question with the controlling response, the conditional
question appears.
For example, for a controlling question such as, Did you receive assistance with this form?, if the controlling response
is Yes, then you can display the conditional question, Which type of assistance did you receive?
Note: Add both the conditional question and the controlling question to the same section of the questionnaire.
You can also add response feedback visible to respondents to display a targeted message to their response, if the
subscribing application uses response feedback.
Tip: You can assign your own response codes to the responses that you create in choice-based questions. The
application provides the response code by default. But you can remove the response code and enter a code of your
choice so that it's meaningful and helpful in organizing your setup. If you enter a response code, please note the code
must be unique for the entire set of responses across all questions and not just for a specific question. For example,
you can only have one response code, “Yes” across all your questions.
Single-Choice and Multiple-Choice Questions
For single-choice questions, respondents select one response from several. You specify whether the responses appear
in a list or as radio buttons. An example of a single-choice question is, "Have you completed a similar class?" Only one
response for the options is expected, Yes or No.
You can select a rating model to quickly provide consistent responses. When you select a rating model, the rating levels
appear as responses. For example, you create the questions "How do you rate your performance in this performance
period?" and you associate the Performance Rating Model, which has 5 rating levels defined as Outstanding, Exceeds
Expectations, Meets Expectations, Inconsistent, and Unsatisfactory. These 5 rating levels are automatically added as
the response choices for the questions. You can add, remove, or edit the responses. If you change the rating model, for
example, to the Language Rating Model, which has 3 ratings (High, Moderate, Low), the response choices will change,
but the text for the question stays the same unless you edit it.
You can add feedback to display messages to users reviewing a completed questionnaire if the subscribing application
has enabled this feature. The response feedback appears when the respondent submits the questionnaire.
When you configure a single-choice question as a radio button and specify that it isn't required, the No opinion
response appears automatically as a response. This option allows respondents to change their responses to no opinion
if they already selected a response that they can't deselect.
For multiple-choice questions, respondents can provide one or more answers. Specify whether the responses are
presented as check boxes or a choice list. You can set both a minimum and maximum number of required responses.
As with single-choice questions, you can associate a rating model with the response type. You can add responses
to multiple-choice questions, as with single-choice questions. An example of a multiple-choice question is "Indicate
321

Oracle Fusion Cloud HCM
Using Common Features for HCM
Chapter 15
Workforce Profiles
which of the following grades you have taught. Select all that apply." A respondent can check grade levels, such as
Kindergarten, first, second, third and so on.
Tip: You can assign your own response codes to the responses that you create in choice-based questions, single-
choice or multiple-choice. You can assign meaningful identifiers to the questions by using your own question codes. If
you don't want to, you can use the application-generated codes.
For choice-based question responses, you can add images when defining the response. To do this, enable one of these
options in the Allow Response Types section of the questionnaire template:
• Check box with image
• Radio button with image
Outside the questionnaire, when defining an independent question, you can add an image to any type of question. For
responses to choice-based questions, ensure that you select one of these options for Response Type.
• Check box with image
• Radio button with image
Response Scoring
You can configure single- and multiple-choice questions to be scored. To score the responses, you can either set them
up to use user-defined scoring or select a rating model to use the predefined numeric rating. Responses using rating
models are only scored when the question is configured for scoring. The application uses the score from the responses
to calculate the score of questionnaires that are configured to be scored. With the rating models, you can edit the short
description and the score.
Note: For the Touchpoints subscriber, scoring is enabled by default as pulse scores can be computed and displayed
as graphs in Oracle Touchpoints only if it's enabled.
Editing a Question
When you edit a question, you can either create a new version or update it. You can see the version number when you
edit a question. However, the version number is incremented only when you create a new version of the question and
not when you update an existing version.
When you create a new version of the question, it won't be automatically included in a questionnaire that's in use
and referencing an older version of the question. To include the new version, you need to create a new version of the
questionnaire and add the question.
Randomized Questions and Answers
Just as questions can be randomized in a questionnaire section, the answer choices can be randomized. Randomized
questions and answers help prevent users from copying answers from others or memorizing questions and answers to
share with others.
You can have two kinds of randomization:
• Position Randomization - This refers to the sequence of response choices for a given question. If 5 choices are
available (a, b, c, d, e), the order in which these are shown to the respondent is randomized. For example, the
choices can appear in the order e, d, c, b, a for one respondent. For another respondent, the choices can appear
in the order a, c, b, e, d.
322

Oracle Fusion Cloud HCM
Using Common Features for HCM
Chapter 15
Workforce Profiles
• Selection Randomization - This refers to randomizing the response choices shown to the respondent from an
available list of choices. For example, you set up a question that has a sample of 10 answer choices. You can
show 5 random choices from the list of 10. The correct answer or answers are always included in the selection
shown to the respondent.
You can set up single- and multiple-choice responses in random response order.
In addition to randomization in questions and answers, you can randomize the order of sections in a questionnaire.
Put Your Sections, Questions, and Answers in Random Order (Position
Randomization)
This shows how to put sections and questions in random order. Optionally you can also put answers in random order.
1. Go to the Settings and Actions menu.
2. In the Administration area, select Setup and Maintenance.
3. From Setup, select Workforce Development > Questionnaires.
4. Search for or create a questionnaire. Note that you can't edit a questionnaire if it's in Active status.
5. Select the Subscriber, for example, Performance 360.
6. If needed, edit the Basic information and click Next.
7. For the Section Order, select Random.
8. In the Sections area, under the Question Order column, select Random.
Note: You can achieve position randomization for answers when you select Random for the Response Order in the
Sections area.
Put Your Answers in Random Order (Position Randomization)
This shows how to make the answers for a single question appear in random order.
1. Go to the Settings and Actions menu.
2. In the Administration area, select Setup and Maintenance.
3. From Setup, select Workforce Development > Questionnaires.
4. On the right side of the page, click Question Library.
5. Select the Subscriber, for example, Performance 360. If you have multiple libraries, select a specific library.
6. Search for or create a question. Note that you can't edit a question if it's in Active status.
7. In the Response area, select Random for the Response Order .
8. Enter a Sample Size that matches the number of answer choices that you define for the question. Sample size
determines the number of answer choices shown to the respondent.
9. Enter the possible answers in the table by clicking the Add icon. Make sure that you enter the correct answers in
the table and indicate they're correct by selecting Yes in the Correct Response column.
When the sample size matches, position randomization is enabled.
Create a Question with Randomized Answers (Selection Randomization)
This shows how to enable a higher level of randomization by randomizing the answer choices shown for a question.
1. Go to the Settings and Actions menu.
2. In the Administration area, select Setup and Maintenance.
3. From Setup, select Workforce Development > Questionnaires.
323

Oracle Fusion Cloud HCM
Using Common Features for HCM
Chapter 15
Workforce Profiles
4. On the right size of the page, click Question Library.
5. Select the Subscriber, for example, Performance 360. If you have multiple libraries, select the library.
6. Search for or create a question. Note that you can't edit a question if it's in Active status.
7. For the Question Type, select Multiple Choice or Single Choice.
8. For the Response order, select Random.
9. Enter the Sample Size for the answers. Sample size determines the number of answer choices shown to the
respondent.
10. Enter a number in the Minimum Number of Selections, for example, 1. The minimum number of selections
determines how many choices the respondent must select at the minimum.
11. Enter a number in the Maximum Number of Selections, for example, 2. The maximum number of selections
determines the number of correct responses that will be shown to the respondent in the choices presented.
12. Enter the possible answers in the table by clicking the Add icon. Make sure that you enter the correct answers in
the table and indicate they're correct by selecting Yes in the Correct Response column.
Example of a Question with Randomized Answers
Question Details Notes Sample Information
Question text
Which of these countries is in Asia?
Question type
Multiple Choice
Response order
Random
Sample size
Number of choices shown to the respondent
6
Minimum number of selections
Number of choices the respondent must select
1
Maximum number of selections
Number of correct responses that will be shown
to the respondent
2
Number of correct answers
2
In the answer table, you enter the responses and indicate which are the correct ones.
Short Description Correct Response
India
Yes
South Korea
Yes
France
No
Columbia
No
Zimbabwe No
324

Oracle Fusion Cloud HCM
Using Common Features for HCM
Chapter 15
Workforce Profiles
Short Description Correct Response
Lebanon
No
Canada
No
New Zealand
No
Ethiopia
No
Greenland
No
Because you set the sample size as 6, the respondent will see 6 possible answers.
Which of these countries is in Asia?
1. France
2. South Korea
3. Zimbabwe
4. India
5. Greenland
6. Ethiopia
Because you set up selection randomization, another respondent might see the question with different responses, such
as:
Which of these countries is in Asia?
1. Lebanon
2. India
3. New Zealand
4. France
5. Columbia
6. South Korea
How You Configure Questionnaire Templates
This topic describes how questionnaire template options determine the features of questionnaires. After creating a
questionnaire from a template, you can override or change some of these options in the questionnaire.
To create a questionnaire, go to the Setup and Maintenance work area, and select these options:
• Setup: Workforce Development
• Functional Area: Questionnaires
• Task: Questionnaire Templates
Click Create in the Questionnaire Templates page that appears.
325

Oracle Fusion Cloud HCM
Using Common Features for HCM
Chapter 15
Workforce Profiles
Questionnaire Scoring and Calculation Rules
You can select Score Questionnaire to configure the questionnaire to calculate scores based on responses.
Questionnaires made from the template can then be scored. However, it's not always necessary that a questionnaire
created from a scored template has to be scored. To score a questionnaire, you must also select the overall score
calculation rule that specifies the formula used to calculate scores.
Note: Scoring only applies to subscriber applications that allow scoring. For the Touchpoints subscriber, scoring is
enabled by default as pulse scores need to be computed and displayed as graphs in Oracle Touchpoints.
If you edit the template and deselect Score Questionnaire, existing questionnaires created from the template aren't
affected. Only questionnaires created in the future from the template aren't scored.
Section Presentation and Order
A questionnaire has at least one section. You can use sections to group questions by type or category, for example.
The Section Presentation option controls how the questionnaire uses sections. This table describes the Section
Presentation values.
Value Description
No Sections
One section appears that contains all questions.
Stack Regions
Multiple sections appear as specified on the Section Order option.
The Section Order option controls section order. This table describes the Section Order values.
Value Description
Sequential
One section appears that contains all questions.
Random
Each respondent views the sections in a different order. Reviewers view the sections in sequential
order to provide consistency when reviewing responses.
You can specify whether questionnaires based on this template can override these values.
Allowed Response Types
The Allowed Response Types controls the types of questions that are included in a questionnaire template. However,
this doesn't limit users from adding questions with other response types to a questionnaire created from this template.
Sections
The Allow Additional Questions option controls whether authorized users can add questions in the subscriber
application. For example, for performance documents, that could be managers or workers.
If you select the Required option, then respondents must answer all questions in the section.
326

Oracle Fusion Cloud HCM
Using Common Features for HCM
Chapter 15
Workforce Profiles
Question and Response Order
The Question Order and Response Order values control the order that questions and possible responses appear
to a respondent. Response order only applies to single-choice and multiple-choice questions, which contain a list of
responses.
This table describes the Question Order and Response Order values.
Value Description
Vertical
Questions appear in the specified order.
Random
Each respondent views the questions in a different order. Reviewers view the questions in sequential
order to provide consistency when reviewing responses.
You can override the default values of these options for individual sections. You can also specify whether questionnaires
based on this template can override these values.
Questions and Responses in Sections
In the Questions section, you manage questions for a selected section. You can:
• Add questions from the question library. You can change the response type for these questions after adding
them to the template.
• Create questions, either those that are scored, or aren't. Questions you create become part of the question
library. You must also add the question to the section after creating it from the section.
• Edit questions. Your edits are also reflected in the question library.
• Remove questions.
• Change question order by dragging them in the section. Questions appear in this order in the questionnaire if
question order is Vertical for the section
If the section itself isn't required, then you can mark individual questions as required. Otherwise, respondents must
answer all questions.
Note: You can't change the response type to Plain Text or Rich Text for questions that were originally created to
accept date responses. Similarly, you can't change the response type to Date for questions that were originally created
to accept text responses.
Review
As the final step, you can review the sections, questions, responses, response feedback, and test scoring, before saving
the questionnaire template.
Note: Once a questionnaire is created from a template, you can’t delete the template. But you can inactivate the
template.
327

Oracle Fusion Cloud HCM
Using Common Features for HCM
Chapter 15
Workforce Profiles
How You Create a Questionnaire
This topic explains how to create a questionnaire for incidents by selecting a questionnaire template and specifying
relevant information in the questionnaire. It also lists the points to consider while editing a questionnaire. Note that for
inspections, you can also create a basic questionnaire from the Inspection Items page. For more information, see the
Manage Inspection Items topic.
Select the Questionnaire Template
In the Setup and Maintenance work area, select these options:
• Setup: Workforce Development
• Functional Area: Questionnaires
• Task: Questionnaires
If you use Performance Management, you can also go to My Client Groups > Performance > Questionnaires.
1. In the Folders section of the Questionnaires page, select the subscriber application for the questionnaire, for
example Performance 360, Recruiting, or Learning Assessments.
2. In the Search Results section, click Create.
3. Enter Questionnaire Template ID or Name values, if available. Alternatively, click Search to list all available
templates.
4. In the Search Results section, select a template and click OK.
Enter Questionnaire Basic Information
1. A unique numeric questionnaire ID appears automatically. You can change this value.
2. If this is a scored questionnaire, an overall score calculation rule appears. You can select a different rule.
3. Enter a Name and select a Folder. Use folders to organize questionnaires by type or purpose.
4. Leave the Owner field blank and the Privacy value set to Public if anyone who can access the questionnaire
can edit it. Otherwise, select an owner and set Privacy to Private.
5. Leave the Status value set to Draft until the questionnaire is ready.
6. For the Touchpoints and Journey Surveys subscribers, select a pagination option from the Display Format list.
Note: When you display one section per page, section instructions, if any, appear below the section title.
When you display all questions on a single page, questionnaire instructions and section instructions appear
below the respective titles.
7. In the Instructions and Help Materials section, enter and format any instructions for questionnaire users. This
text appears at the top of page one of the questionnaire.
8. Add file or URL attachments, if appropriate. Links appear at the top of the questionnaire and beneath any
instruction text.
9. Click Next.
Enter Questionnaire Contents
The Section Order and Section Presentation values are as specified in the questionnaire template, for example,
Sequential as the Section Order and Stack Regions as the Section Presentation. Depending on template settings,
328

Oracle Fusion Cloud HCM
Using Common Features for HCM
Chapter 15
Workforce Profiles
you may be able to change these values. Depending on template settings, you can edit some or all section settings. You
can also delete predefined sections and create additional sections.
1. Select the first section to view its questions in the Questions section. You can delete a question or change its
response type and Required setting.
2. If you create additional sections, you add questions to them. In the Questions section, click Add. Search for
a question, select it, and click OK. The question is added below the question that appears highlighted in the
Questions section. You can reorder the questions by dragging them by the expandable arrow that appears in
the first column and dropping them in another row.
Note: You can view the version number of the question in the Search Results section. If this column doesn't
appear, click the View menu and select Columns > Question Version Number.
3. You can also create questions for a section. Select a section, and in the Questions section, click Create.
4. Select the Folder, and enter question and response details, and click Save and Close. The question becomes
available in the question library as well. Add the question to the section using the instruction in step 2.
5. Edit questions as required. Select a question and click Edit. Enter question and response details, and click Save
and Close. The question is updated in the questionnaire and the question library.
Note: Although you can override the response types for questions while defining a questionnaire, you can't
change the response type to text for questions that accept date responses or change the response type to
date for questions that accept text responses.
6. When all sections and questions are complete, click Next.
7. Click Preview to preview the questionnaire. For scored questionnaires, click Test to verify the scoring.
Note:
◦
When you click Reset after testing, the previously filled responses are retained in the
questionnaire. This allows you to modify specific responses as per your needs and test the
behaviour of the questionnaire again.
◦
The questions in a section are displayed in the order specified in the Section Order field.
◦
Questionnaire surveys that are created for both Touchpoints and Journey Surveys subscribers
are distributed to respondents using the Journeys application. So, when you preview the
questionnaire survey in ADF-based pages, the response options appear in a drop-down list.
However, when you view the survey in the Journeys application, you can see the horizontal
button responses and the question display format that you’ve chosen.
8. Click OK and then click Save.
Note: If a questionnaire isn't in use, you can still add new questions that accept date response types, or create a new
version of the questionnaire to add such questions. When you edit the response type for a question in a questionnaire
that isn't in use, the updated response type is reflected in the questionnaire definition.
Editing a Questionnaire
To edit a questionnaire, go to the Questionnaires setup page, and select a questionnaire from the Search Results
section and click Edit.
329

Oracle Fusion Cloud HCM
Using Common Features for HCM
Chapter 15
Workforce Profiles
A few points about editing a questionnaire:
Set the questionnaire Status value to Active when the questionnaire is ready for use.
If a questionnaire isn't in use, you can still add new questions that accept date response types, or create a new version
of the questionnaire to add such questions. When you edit the response type for a question in a questionnaire that isn't
in use, the updated response type is reflected in the questionnaire definition.
You no longer need to go into the edit mode to preview a questionnaire. You can preview it from the Search Results
section of the Questionnaires setup page. You can preview draft, active, and inactive questionnaires.
Related Topics
•
What happens if I edit a questionnaire that's in use?
How You Use Questionnaires to Create General Surveys
Use questionnaires to create stand-alone, generic surveys that aren’t linked to specific HCM product flows such as
performance or recruiting. For example, you can create an organization-wide annual survey to gather employee
feedback on specific organization functions or create an end-of-project survey to understand customer satisfaction
levels.
To create a general survey questionnaire, define a questionnaire template with the subscriber as General Surveys, and
then create the questionnaire based on the template. While creating the template and the questionnaire, select the
folder as General Surveys.
When creating general surveys, you can use all the features of questionnaires such as conditional questions, questions
with images, or questions with text or date type of responses. After creating the questionnaire, you use REST APIs for
accessing it and publishing it to specific participants.
Using REST APIs to Manage General Surveys and Responses
Use the existing questionnaire REST API resource to read and manage questionnaires, questions, and answers for
general surveys. In addition, use these REST API resources to manage the responses to general surveys:
• questionnaireParticipants
• questionnaireResponses (child resource of questionnaireParticipants)
• questionResponses (child resource of questionnaireParticipants)
Using the API resources, you can do these:
• Create a questionnaire for the General Survey subscriber.
• Access the questionnaire to review the questionnaire setup.
• Post responses to the questionnaire and update them.
• Retrieve responses from the questionnaire and view them.
Note: While these APIs allow for setting up questionnaires and posting responses to store them in HCM Cloud,
publishing the survey to specific employees is not within their scope. The user interface to publish the survey and
collect individual inputs from employees is also external to HCM Cloud.
330

Oracle Fusion Cloud HCM
Using Common Features for HCM
Chapter 15
Workforce Profiles
Secure responses posted to general surveys using a person security profile. You can only access responses from
participants that you have access to, through their person security profile.
You must have these security privileges to perform specific operations on the questionnaire Participants REST API:
Security Privilege Supported Operations
HRQ_REST_SERVICE_ACCESS_
QUESTIONNAIRE_PARTICIPANTS_RO_
PRIV
• GET
HRQ_REST_SERVICE_ACCESS_
QUESTIONNAIRE_PARTICIPANTS_PRIV
• GET
• DESCRIBE
• POST
• PATCH
• DELETE
Question Scoring Setup Options
For eligible subscriber applications, you can configure questions to calculate a score based on responses. This topic
describes aspects of creating questions that can be used to score questionnaires.
Use the Question Library task in the Setup and Maintenance work area for this task.
Eligible Question Types
Two question types are eligible for scoring:
• Single choice
• Multiple choice
If you select single choice, the question score is the value of the selected response. For multiple-choice questions, the
total value of all selected responses is the question score.
Score Question
To score the question, select Score Question. Scored questionnaires use scored questions to determine the
questionnaire score. You set the default calculation rule in the template, but this can be overridden in the questionnaire.
If a question is in use, you can't change whether it's scored or not. To create a scored question, create a new question or
copy an existing question.
You can add scored questions to questionnaires that aren't scored. In questionnaires that aren't scored, response scores
aren't available.
Tip: Use the Preview feature to ensure that the scoring works as you anticipated.
331

Oracle Fusion Cloud HCM
Using Common Features for HCM
Chapter 15
Workforce Profiles
Minimum and Maximum Calculated Scores
For multiple-choice questions you can define either, or both, minimum and maximum calculated scores. These are the
maximum and minimum scores the question can attain, regardless of how many responses the respondent selects, or
the score of the responses.
You can define the maximum and minimum calculated scores to keep them within a range that aligns with your
business process. For example, you can set maximum and minimum scores to ensure that:
• Questions in a questionnaire have consistent maximum and minimum values
• Questions aren't weighted too heavily with either too high a positive or too low a negative score
If you don't define the maximum calculated score or maximum number of responses, the maximum possible score is
the sum of all responses. When you update the score of a question, the maximum possible score of the questionnaires
that include this question are automatically updated, provided they aren't in use. However, if you have the scores
overridden for these questions at the questionnaire level or if the questionnaire is in use, then these scores will remain
unaffected by your updates to the question score.
Response Configuration
To provide responses for users to select, you must add responses. You can then specify additional configuration for the
responses.
Minimum and Maximum Number of Selections
For multiple-choice questions, you can optionally define the minimum and maximum number of selections that
respondents make to the question. If respondents don't select the specified number of responses, an error message
appears.
Short Description
When you add responses, you can define the score for the response. You must enter a short description, which appears
to respondents. You can enter any score for the response and as many responses as your business process requires.
The scores can be the same or varied. For example, you can have five responses with 5 as the score for each. Or, you
can have five responses with values of 1, 2, 3, 4, and 5.
Tip: After adding responses, use the Preview feature in the questionnaire to ensure that the list of responses isn't to
long for respondents to view effectively.
Rating Model
You can select a rating model to provide a predefined short description and score. However, you can edit both the short
descriptions and scores.
Response Feedback
You can add feedback to display messages associated with the responses selected by the respondent. This feedback
may appear to the respondent or to a reviewer depending upon configuration in the subscribing application.
332

Oracle Fusion Cloud HCM
Using Common Features for HCM
Chapter 15
Workforce Profiles
Preview
Use the Preview feature in the Questionnaire to review the questions and responses in the questionnaire. Select
answers and click Test to see the resulting score and any response feedback. Click Reset to clear the scores and test
again.
Related Topics
•
How You Configure Questionnaires for Questionnaire Scoring
How You Use Translation Editor with Questionnaires and
Questions
You can translate questionnaire templates, questionnaires, and questions using the translation editor. With the
translation editor, you can review and translate text for more than one language at a time without signing out of your
current session.
For each translatable field, the translation editor helps to ensure your data is translated the way you intend. The
translations appear wherever the questionnaire templates, questionnaires and questions appear.
Eligible Languages
The languages that you can translate are those that are that are installed and active in the application. The translated
text appears in the application for the respective language a user selects when signing in.
Text that Can Be Translated
Using the translation editor, you can translate any text fields that you can edit in questionnaire templates,
questionnaires, or questions. For questionnaires and templates, you can translate:
• Name, description, and introduction
• Section title, description, and introduction
For questions, you can translate:
• Question text
• Question response short description
• Question response feedback
Translation Editor Usage
Click the Translation Editor icon to edit the translatable text in a questionnaire, questionnaire template, or question.
The icon appears on the pages and sections where the fields you can appear. In the Edit Translation dialog box that
appears, you can enter text for any available language for each field. The translated text appears in the application
for the respective language a user selects when signing in. For example, if you translate a question from English to
Spanish, a Spanish-speaking user sees the Spanish translation. If the translated text is in a language that's the same as
the language of your current session, you can see the translation apply to the UI immediately.
333

Oracle Fusion Cloud HCM
Using Common Features for HCM
Chapter 15
Workforce Profiles
When you create a new questionnaire, template, or question, you must first save it before using the translation editor.
Once the object is saved to the database, the translation editor becomes available.
Translation Inheritance
Questionnaires inherit translations from the template. You can edit the translations to change them. Question
translations that you configure are also inherited by that question if it's used later in another questionnaire or template.
You can edit the translation either in the Question Library, or in the questionnaire or template in which it's used.
How You Configure Questionnaires for Questionnaire Scoring
You can configure questionnaires to calculate a score based on responses to questions in the questionnaire. This topic
describes aspects of creating questionnaires that are scored.
You must create a questionnaire template from which to create a questionnaire. Use the Questionnaire Templates and
Questionnaires tasks in the Setup and Maintenance work area.
Subscriber Applications
Only eligible subscriber applications can use scored questionnaires. Recruiting is an eligible subscriber to use scored
questionnaires.
Questionnaire Scoring Setup
To score a questionnaire, in the questionnaire template, select Score Questionnaire. All questionnaires made from the
template can then be scored. If you edit the template and deselect Score Questionnaire, existing questionnaires made
from the template aren't affected. Only questionnaires made in the future from the template aren't scored.
Scored Questions
To create a questionnaire that can be scored, you must add questions that have responses configured for scoring to the
section. You can either add questions from the question library or create scored questions in the section itself.
You can add questions that aren't configured for scoring to a scored questionnaire. These questions aren't included in
the overall score calculation.
Overall Score Calculation Rule
The calculation rule determines the method used to calculate the overall questionnaire score from the question scores
of scored questions. The table shows the calculation rules and the formula each uses to calculate the questionnaire
score.
Overall Score Calculation Rule Formula to Calculate Questionnaire Score
Sum
Sum of question scores
Percentage
(Sum of question scores / Sum of maximum possible question scores) * 100
Average
Sum of question scores / Number of scored questions
334

Oracle Fusion Cloud HCM
Using Common Features for HCM
Chapter 15
Workforce Profiles
When calculating the score, questions that are configured for scoring, if no score is provided, the application considers
such questions as no value.
Questionnaire Score Calculation Example
As an example for calculating the score, consider a questionnaire with the attributes shown in the table.
Attribute Value
Calculation rule
Average
Total number of questions
10
Number of questions configured for
scoring
9
Number of questions that can't be scored
1
Maximum value of each response
5
For this questionnaire, the maximum possible score is 45 (9 x 5). The maximum average score is 5 (45/9).
A respondent responds to the questionnaire and selects the maximum value of 5 for eight of the nine scored questions,
leaving one blank. The respondent also selects a response for the question that isn't scored. The application calculates
the questionnaire score in the following manner:
• The sum of the responses is 40 (8 x 5). The question that isn't scored doesn't affect the score.
• Using the Average calculation rule, the final questionnaire score is 4.44 (40/9).
Preview
Click Preview to review the questionnaire questions and scoring. Select answers and click Test to see the resulting
questionnaire score and any response feedback. Click Reset to clear the scores and test again.
Related Topics
•
Question Scoring Setup Options
Export and Import of Questionnaire Data
Streamline the mass upload of Questions, Questionnaire Templates, and Questionnaires by using HCM Data Loader and
HCM Spreadsheet Data Loader. Import any type of questions within the questionnaire, including the response choices
in choice-based questions.
Note: You can import images for questions and responses and import attachments for questionnaire information
using HCM Data Loader.
335

Oracle Fusion Cloud HCM
Using Common Features for HCM
Chapter 15
Workforce Profiles
You can create questionnaire objects or manage the existing ones. You can load data for Questions and Question
Answer Responses by using the Question data file. You can create questionnaire templates and questionnaires
including the sections, questions, and answers that are a part of the questionnaire.
You can load the translation data of these business objects by using the translation data files. To use HCM Spreadsheet
Data Loader in the Data Exchange work area, you need to first create a spreadsheet template, then upload it using the
Load Spreadsheet Data task.
Related Topics
•
Overview of Loading Questions, Questionnaire Templates, and Questionnaires
•
Guidelines for Loading Questions, Questionnaire Templates, and Questionnaires
•
Examples of Loading Questionnaires
•
Examples of Loading Questionnaire Templates
•
Examples of Loading Questions
What happens if I edit a questionnaire that's in use?
When you edit a questionnaire that's in use, you're prompted to either create a new version of the questionnaire or
update the existing version.
When you update the questionnaire, the existing responses could become invalid. So it might be better to create a new
version of the questionnaire.
Here's what happens when you update an existing questionnaire:
• If respondents answered questions and saved the questionnaire before the update, their saved responses
continue to appear when they reopen the questionnaire after the update.
• The status remains Active.
• The questionnaire version remains the same.
• The In Use status is Yes.
Note: You can edit the questionnaire as needed, but it's best to limit the edits to those that have a minimal impact,
such as changing text. Adding questions, marking questions as required, or changing responses to choice-based
questions can result in issues for questionnaires that are already completed. This applies to questionnaires used in
performance documents, anytime performance documents, requested feedback, and check-ins.
You can update these attributes in a questionnaire that's In Use:
• Name of the questionnaire
• Folder (category) of the questionnaire
• Owner
• Status
• Privacy
• Description
• Instructions
• Attachment for questionnaire
336

Oracle Fusion Cloud HCM
Using Common Features for HCM
Chapter 15
Workforce Profiles
• Section order (if allowed from base questionnaire template)
• Section presentation (if allowed from base questionnaire template)
• Response order (positional randomization for answers)
• Name, description, and instruction text of section (if allowed from base questionnaire template)
• Position of questions (drag and drop feature is allowed)
The changes take effect as soon as you save the questionnaire. Respondents see the changed version in these
scenarios:
• Creating a new performance document that includes a questionnaire
• Editing a questionnaire in a performance document that's in progress
• Reopening a previously completed performance document to edit the questionnaire
• Check-in documents always refer to the latest version of the questionnaire referenced in the check-in template.
If you need a new version of a questionnaire for new check-in documents, it's recommended you create a
new check-in template that includes a new questionnaire, instead of creating a new version of the existing
questionnaire. This helps you preserve the questionnaire responses in existing check-in documents.
Here's what happens when you create a new version of a questionnaire:
• The previous version isn't affected.
• The status of the new version is set to Draft.
• The questionnaire version number increases by one.
• The In Use status is set to Prior Version.
When a questionnaire is completed using this version, the In Use status changes to Yes. The changes take effect when
you set the status to Active and save the questionnaire. Respondents see the new version in these scenarios:
• Creating a new performance document that includes a questionnaire
• Editing a questionnaire in a performance document that's in progress:
◦
If respondents answered questions and saved the questionnaire prior to the new version, their saved
responses don't appear when they reopen the new version. Instead, they see the new version of the
questionnaire.
• Reopening a previously completed performance document to edit the questionnaire.
◦
The questionnaire version you see for completed performance documents before reopening is the
version in which it was completed.
• Creating a new check-in document
• Opening an existing check-in document to edit the questionnaire
• Creating a new requested feedback
• Editing a questionnaire in requested feedback that's in progress:
◦
If respondents answered questions and saved the questionnaire prior to the new version, their saved
responses don't appear when they reopen the new version. Instead, they see the new version of the
questionnaire.
What happens if I edit a question that's in use?
Editing questions when responses already exist can invalidate responses. It's recommended that you copy the question
over to a new questionnaire and then make the changes you want.
337

Oracle Fusion Cloud HCM
Using Common Features for HCM
Chapter 15
Workforce Profiles
Anytime Feedback
Overview of Anytime Feedback
Anytime feedback is unsolicited feedback you give to anyone in your organization. You may also receive anytime
feedback from anyone in the organization. This feedback is independent of the participant feedback process in
performance documents.
You can create feedback for yourself or any other person, and also edit and delete the feedback that you create. All
feedback have visibility rules set for them, which determines who can see them. The person who provides the feedback
decides the visibility rules.
Related Topics
•
Considerations for Configuring Anytime Feedback Visibility Options
•
Anytime Feedback Notifications
•
Add and Hide Components Using Page Composer
View Anytime Feedback Given to You
There are many ways to view anytime feedback that you received.
Here are some ways to do it:
• Go to Me > My Public Info. Click Show More on the left navigation pane and select Feedback
• Go to Me > Career and Performance > Feedback
• Go to Me > Quick Actions > Show More > Career and Performance > Feedback
The Feedback Given to Me section on the Feedback page lists the feedback you received. You can filter the list based on
the author of the feedback or period of feedback (for example, past six months).
For each feedback, you can view these details:
• Name of the employee who gave the feedback
• Date of the feedback
• Visibility of the feedback
• Contents of the feedback
Note: If the feedback is set to Visible to Everyone or Visible to Managers, Peers, and [Employee], you can hide it
by clicking the Hide link. The person who receives feedback and the HR specialist who has administrative oversight of
the person can hide the feedback, if the content isn't appropriate. Only the person who hides the feedback can unhide
it. The author can view the feedback and see that it's hidden.
You can thank the feedback provider by selecting Send Thank You from the Actions menu. You can thank the feedback
provider multiple times for the same feedback. Any others (including HR specialists) who can view the feedback can also
338

Oracle Fusion Cloud HCM
Using Common Features for HCM
Chapter 15
Workforce Profiles
thank the feedback provider multiple times for the same feedback. When you send the thank you note, the feedback
provider receives an email notification about it. They can also view the thank you note from their worklist.
Note:
• The thank you feature is available only if the notification template Worker Thanks Anytime Feedback Provider,
which is a part of the Anytime Feedback Provided alert, is enabled in Alerts Composer. Even if the feedback
notification in Talent Notifications is disabled, you can still use this feature as long as the Anytime Feedback
Provided alert is enabled.
• The thank you note is not saved in the application. Therefore, it’s visible only in feedback provider’s email
notification or worklist.
Related Topics
•
Overview
•
Anytime Feedback Notifications
View Anytime Feedback Given to Others
There are many ways you can view anytime feedback that you gave to others.
Here are some ways to do it:
• Go to Me > My Public Info. Click Show More on the left navigation pane and select Feedback.
• Go to Me > Career and Performance > Feedback
• Go to Me > Quick Actions > Show More > Career and Performance > Feedback
On the Feedback page that's displayed, you can filter the feedback list based on the recipient's name or feedback
period.
For each feedback, you can view these details:
• Recipient's name
• Date of the feedback
• Visibility of the feedback
• Contents of the feedback
View Anytime Feedback Received for Your Employees
As a manager or HR specialist, there are many ways you can view anytime feedback received for your direct and indirect
reports, or the employees in your organization.
However, you can view this feedback only if the feedback visibility is set to Everyone, Managers Only, Managers,
peers, and [Employee], or Manager and [Employee].
As a manager, you can view anytime feedback in some of these ways, for example:
• Go to My Team > My Team. Click the Actions menu (shown by three dots) next to the employee's name, and
select Feedback.
339

Oracle Fusion Cloud HCM
Using Common Features for HCM
Chapter 15
Workforce Profiles
• Go to My Team > Quick Actions > Career and Performance > Feedback, and search for, or select the name of
the employee.
As an HR specialist, you can use some of these navigation paths, for example:
• Go to My Client Groups > Quick Actions > Show More > Talent > Feedback. Select an employee.
• Search for an employee using the Search bar on the global header and click their name from search results.
Click Show More from the left navigation pane and select Feedback.
The Feedback Given to [Employee Name] section on the Feedback page lists the anytime feedback that the employee
has received. You can filter the list based on the author's name or period of feedback.
For each feedback, you can view these details:
• Name of the person who gave the feedback
• Date of the feedback
• Visibility of the feedback
• Contents of the feedback
You can thank the feedback provider by selecting Send Thank You from the Actions menu. You can thank the feedback
provider multiple times for the same feedback. Any others who can view the feedback can also thank the feedback
provider multiple times for the same feedback. When you send the thank you note, the feedback provider receives an
email notification about it. They can also view the thank you note from their worklist.
Note:
• The thank you feature is available only if the notification template Manager/HR Thanks Anytime Feedback
Provider, which is part of the Anytime Feedback Provided alert, is enabled in Alerts Composer. Even if the
feedback notification in Talent Notifications is disabled, you can still use this feature as long as the Anytime
Feedback Provided alert is enabled.
• The thank you note is not saved in the application. Therefore, it’s visible only in feedback provider’s email
notification or worklist.
Related Topics
•
Overview
•
Anytime Feedback Notifications
Provide Anytime Feedback as a Manager or HR Specialist
As a manager or HR specialist, you can provide anytime feedback to your report, team member, or others in your
organization.
1. You can access the Feedback page in many ways. Here are some options:
◦
Go to My Team > My Team, and select an employee's name. Click Show More on the left navigation pane,
and select Feedback.
◦
Go to My Client Groups > Quick Actions > Show More > Talent > Feedback.
2. In the Feedback Given to [Employee Name] section, click Add.
3. Select who can view your feedback and enter the feedback comments.
4. Click Save.
340

Oracle Fusion Cloud HCM
Using Common Features for HCM
Chapter 15
Workforce Profiles
Provide Anytime Feedback as a Worker
Workers can provide anytime feedback for other workers in several ways. For example, using Person Spotlight or Quick
Actions.
Provide Feedback Using Person Spotlight
1. Search for an employee using the Search bar on the global header, and click their name from search results.
2. Click the More Information menu (shown by three dots) on the person’s image, and select Feedback. The
Feedback page appears.
3. Click Add in the Feedback Given to [Employee Name] section.
4. Select who can view your feedback and enter the feedback comments.
5. Click Save.
Providing Feedback Using Quick Actions
1. Go to Me > Quick Actions > Show More > Career and Performance > Provide Feedback.
2. Enter the feedback recipient's full or partial name. A list of matching names appears in the list.
3. Select the person you want to provide feedback for.
Note: If you want to provide feedback for another recipient instead of the current one, click the Remove
[Recipient Name] icon, and select another.
4. Select who can view your feedback and enter the feedback comments.
5. Click Submit.
You can also add anytime feedback for yourself by navigating to Me > Career and Performance > Feedback >
Feedback Given to Me.
Edit or Delete Anytime Feedback
Your role determines whether you can edit or delete anytime feedback and change its visibility settings. The different
permissions depending on the role are described here.
Author of the feedback
If you created an anytime feedback for yourself or for others, you can revise, delete, or change the visibility settings of
the feedback.
Manager
As a manager, you can't edit or change the visibility settings for anytime feedback that others have given to your
reports. You can delete that feedback only if you’re the author of the feedback, or if you also have the HR specialist role.
If you need edit permissions, contact your administrator for the required privileges.
HR Specialist
HR specialists can delete anytime feedback received by the employees in the organization, when the feedback visibility
is set to Everyone, Managers Only, Managers, peers, and [Employee], or Managers and [Employee]. They can
delete any feedback that they create, regardless of the visibility setting.
341

Oracle Fusion Cloud HCM
Using Common Features for HCM
Chapter 15
Workforce Profiles
They can hide public feedback that they haven't authored, if the feedback visibility is set to Everyone or Managers,
Peers, and [Employee].
HR specialists must have the Hide HCM Person Note and Delete HCM Person Note aggregate privileges in order to
delete or hide the anytime feedback.
Note: When others provide anytime feedback for you, you can hide the feedback, if the visibility is set to Everyone.
You can't delete or edit the feedback.
To edit or delete anytime feedback, follow these steps:
1. Go to the Feedback page.
2. In the Feedback Given to [Employee Name] section, you can optionally filter the list by the recipient's name or
feedback period.
3. Click Edit next to the feedback that you want to revise or delete.
4. Change the visibility or edit comments, as required, and click Save. To delete the feedback, click Delete.
To edit or delete the anytime feedback you added for yourself, go to Me > Career and Performance > Feedback >
Feedback Given to Me and follow the same procedure as above.
Note: Using HCM Data Loader, HR specialists can delete anytime feedback responses for multiple employees at once.
Anytime Feedback Notifications
You can notify workers and their managers when they receive anytime feedback in their Feedback spotlight page and in
Connections.
You can enable or disable notifications sent to the manager or worker using the Talent Notifications task. You can
access the task in one of these ways:
• Go to the Setup and Maintenance work area, select Workforce Deployment from Setup, and select Workforce
Profiles in Functional Area. Select the Talent Notifications task and click the Profile Management tab.
• Go to My Client Groups > Performance > Talent Notifications and click the Profile Management tab.
Enable or disable these options as per your business needs:
• Feedback Notification to Manager
• Feedback Notification to Worker
The settings affect all workers and managers throughout the application.
Considerations for Configuring Anytime Feedback Visibility
Options
You can configure feedback visibility options and default options to specify who can see feedback.
Use the Manage Feedback Visibility task in the Setup and Maintenance work area, Workforce Deployment (or
Workforce Development) offering, Workforce Profiles functional area.
342

Oracle Fusion Cloud HCM
Using Common Features for HCM
Chapter 15
Workforce Profiles
Note: You must have the Manage Feedback Visibility functional privilege to access this configuration task.
Feedback Context
You can set feedback for the following contexts:
• ORA_NO_CONTEXT: Used for feedback notes for a person in the person spotlight, person smart navigation,
and elsewhere throughout Oracle Fusion applications.
• ORA_TALENT_REVIEW_TYPE: Used for feedback notes only for talent review meetings. Notes created in
a talent review are visible as Feedback elsewhere in Oracle Fusion applications, but no Feedback created
elsewhere appears in talent review meetings.
• ORA_CELEBRATION_TYPE: Used for configuring visibility settings for the Celebrations feature in Oracle Fusion
Cloud Touchpoints. When an employee or manager sends a celebration card to others using Touchpoints, they
can choose from one of the visibility settings available for this context type: Managers and worker, and Only
worker and me.
Visibility Options and Defaults
Select roles to make them eligible to view feedback. Users can select the roles when they create feedback so that the
roles can view it. All settings are available unless you deselect them.
The options and descriptions for each visibility option are shown in the table.
Visibility Option Description
Everyone
A public note visible to any person in the organization.
Managers only
Visible to only the managers in the hierarchy of the worker for whom the feedback is created. Visible to
HR specialists as well.
Managers and worker
Visible to managers in the hierarchy of the worker, and the worker who receives the feedback. Visible to
HR specialists as well.
Managers, peers, and worker Visible to managers in the hierarchy of the worker, and the worker who receives the feedback. Also
visible to peers of the worker who report to the same manager as the feedback recipient in one or more
active or suspended assignments. Visible to HR specialists as well.
Only me
A private note created by an author about themselves or about another person and is visible only to
the author.
Only worker and me
A private note created by an author about the worker and is visible only to the worker and the author.
Note: For peers to view notes that have the Managers, peers, and worker feedback visibility option, they need to
have the View HCM Person Note Shared with Peers data privilege.
HR specialists can view all feedback except those with these visibility settings:
• Only me
343

Oracle Fusion Cloud HCM
Using Common Features for HCM
Chapter 15
Workforce Profiles
• Only worker and me
Note: Feedback visibility is also determined by data security; you can only create or see notes for people whom you
have authorization to view.
Defaults
You can edit the default value that appears in the Visibility choice list when a person creates feedback. If you select the
No default option, no predefined option appears in the field. Users can select the available options whether a default is
set or not. Default settings for the contexts are as follows:
• ORA_NO_CONTEXT: No default
• ORA_TALENT_REVIEW_TYPE: Managers only
• ORA_CELEBRATION_TYPE: Managers and worker
If you don't edit the visibility options or defaults, the default settings apply.
Deleted Context Settings
If you delete context settings, users can still add and view feedback, but you can no longer edit the context settings.
When you delete feedback context settings, the following rules apply:
• If you delete only ORA_NO_CONTEXT, the predefined default values for ORA_NO_CONTEXT applies for the
person feedback. All visibility options are available, and the default setting is No default.
• If you delete only ORA_TALENT_REVIEW_TYPE, the ORA_NO_CONTEXT settings apply for both the person
feedback and talent review feedback.
• If you delete both ORA_NO_CONTEXT and ORA_TALENT_REVIEW_TYPE, the predefined default values for
ORA_NO_CONTEXT apply for both the person feedback and talent review feedback.
How to Enable the Rich Text Editor Toolbar in Feedback or Notes
Using the Rich Text Editor (RTE) toolbar, users can provide their feedback or notes with formatted text, images, and
URLs.
When you enable the RTE toolbar, it appears in all pages that use feedback or notes across Talent Review, Goals,
Performance Management, and so on. The exception to this behavior is the Provide Feedback page (from Quick
Actions). When you enable it on the Provide Feedback page, the changes aren’t carried over to other feedback pages
and vice versa.
Note: You can’t enable the toolbar in feedback pages that are a part of VBCS-based applications such as Connections
or Touchpoints.
Before you start
Create a sandbox with the Structure and Page Composer tools in it, and activate the sandbox.
Here's what to do
1. Open a feedback page. For example, go to My Team > Quick Actions > Show More > Feedback.
344

Oracle Fusion Cloud HCM
Using Common Features for HCM
Chapter 15
Workforce Profiles
2. Select an employee, and click Add in the Feedback Given to <Employee Name> section.
3. Click your user name or image in the global header, and select Edit Pages.
4. Click the Structure tab. A component panel appears at the end of the page. Drag it to the middle of the page to view
the list of page components.
5. Click the What do you want to say? section heading on the Feedback page. If a dialog box appears, prompting you
to confirm editing of the component, click Edit.
6. In the component panel, you will find that the corresponding component, panelLabelAndMessage: What do you
want to say?, is highlighted. Select the Text component displayed below this component.
7. On the component panel’s toolbar, click the Show the properties of Text icon.
8. In the dialog box that appears, change the value of Toolbox Layout field from none to one or more toolbar icons that
you want displayed on the toolbar. For example, enter this text:
font history mode color formatAll justify list indent link
9. Click Apply, and then click OK.
10.Click Close on the top right of the page to exit the Edit Pages mode.
Results:
The What do you want to say? section now has the toolbar icons enabled.
Related Topics
•
Create and Activate Sandboxes
FAQs for Workforce Profiles
What's a rating category?
A label for a grouping of rating levels. Rating categories are used in talent management processes such as performance
management and talent reviews to group ratings for analysis tools (performance and potential box chart, for example.)
Why are some content type relationships not editable?
Predefined content type relationships aren't editable. You can only edit content type relationships that you define.
How can I define a relationship between the Goals content type
and other content types?
Set up the relationship on the content type that you want to relate to goals using the relationship type: Is supported by.
For example, to define a relationship between the Goals and the Competencies content types, set up the relationship on
the Competencies content
345

Oracle Fusion Cloud HCM
Using Common Features for HCM
Chapter 15
Workforce Profiles
What's a free-form content type?
Free-form content types enable you to capture information in a profile that you needn't store in the content library. For
example, you can set up a free-form content type to store information about the previous employment information for
your workers. Use the Manage Content
A free-form content type contains only a code, name, and a description, and doesn't have any properties until you add
it to a profile type. Free-form content types don't include any content items. You can use free-form content types when
you don't need a content item because the attribute captured for the content section is free-formed or less-structured.
For example, you can set up a free-form content type to store information for accomplishments, career statements, and
honors and awards.
Why can't I change the relationship type of a content item?
You can't change a content item's relationship type because it is derived from its content type. You can only change
relationships at the content type level from the Edit Content Type page in the Profiles work area. You can't change
predefined relationships.
How can I delete an attribute from the person profile?
You must have the HR specialist role to delete an attribute from the person profile.
Note: You can hide predefined attributes, but you can't delete them.
To delete an attribute that isn't a predefined attribute from the person profile:
1. Click Manage Profile Types on the Tasks tab in the Profiles work area.
2. Search for the Person profile type and select the row for the profile type in the Search Results section.
3. Click Edit in the Search Results section to open the Edit Profile Type page.
4. On the Content Sections tab, select the content section that includes the attribute you want to delete.
5. In the Content Sections region, click the selected content section link to open the Content Section page.
6. In the Content Properties section, select the row for the attribute and click Delete.
What happens if I enable custom approval rules for the person
profile type?
HR specialists and implementors can enable custom approval rules for the person profile type:
• They can define approval rules for each content section related to the person profile type.
• When a worker submits changes for all approval-enabled content through the Edit Skills and Qualifications
page of the worker's talent profile, notification is sent to approvers based on the default approval rules.
346

Oracle Fusion Cloud HCM
Using Common Features for HCM
Chapter 15
Workforce Profiles
To enable the custom approval rules for the person profile type, select the Person profile type on the Manage Profile
Types page and click Edit. You then select the Enable Custom Approval Rules check box on the Edit Profile Type page.
For configuring approval rules for person profiles, use the Manage Approval Rules interface.
Related Topics
•
Guidelines for Managing Approval Rules
•
How You Enable Approvals for Content Types
•
How You Create Person Profiles
Can I edit skills and qualification data of a person's profile?
Yes. Depending on the content section access settings for your role, you can view and edit any of the predefined or
custom content of a worker's profile.
How can I add content to my profile?
Select Me > Skills and Qualifications on the Home page. Click Edit on the Skills and Qualifications page to edit or add
the content to your profile.
Depending on the content section access settings for your role, you can view and edit any of the predefined or custom
content on your profile.
What happens if I don't add a label for a content section property?
If you don't enter a value in the Label field for a content section property, the application uses the value in the Column
Name field as the default value. To open the Content Section page, click the Manage Profile Types task in the
How can I diagnose issues with Oracle Fusion Profile Management
data?
After populating the Oracle Fusion Profile Management data tables, you can run the Profile Management Integrity
Validations test if you have access to the Diagnostic Dashboard. Select Run Diagnostic Tests from the Setting and
Actions menu in the global area. The validations test
For Profile Management, the test validates four categories of data integrity:
• Business Group Validation: Checks the business group is valid and exists in the Oracle Fusion Global Human
Resources business group table.
• Foreign Key Validation: Foreign key attributes must not be null.
347

Oracle Fusion Cloud HCM
Using Common Features for HCM
Chapter 15
Workforce Profiles
• Field Level Validation: Field level attributes must match the business rules set up in Profile Management
• Row Count Validation: The row count on the setup tables must be greater than 0.
348

Oracle Fusion Cloud HCM
Using Common Features for HCM
Chapter 16
Workflow Notifications and Approvals
16 Workflow Notifications and Approvals
Overview of Notifications and Approvals
Approval management uses human workflow to automate tasks that are passed from a user or an application to
another user or group for consideration or action. Workflows are routed in a predefined sequence to achieve an end
result.
Examples of tasks include approving a time card or completing an employee performance appraisal.
Approval management enables administrators to do these tasks:
• Control workflows for business processes such as hiring an employee or managing promotions.
• Define task routing policies that can be as simple or as complex as needed.
• Derive approvers based on the supervisory hierarchy, areas of responsibility (such as HR or Benefit
Representatives) and other criteria, such as job levels because approval management is fully integrated with
HCM.
For workflows, Oracle Fusion Applications uses the approval management extensions of the human workflow services
from Oracle Service-Oriented Architecture (SOA) Suite as well as the Oracle Business Process Management (BPM)
Worklist application.
Here are the main features of Oracle SOA Suite:
• It's a comprehensive software suite used to build, deploy, and manage service-oriented architectures.
• Provides a human workflow service that handles all interactions with users or groups in business processes.
For more information about using human workflow in SOA Suite, see Developing SOA Applications with Oracle SOA
Suite.
Oracle BPM Worklist provides an interface for:
• Users to access tasks assigned to them and perform actions based on their roles in the workflow.
• Implementors to perform approval management setup, to define who should act on which types of transactions
under what conditions.
For more information about working on tasks, see Managing and Monitoring Processes with Oracle Business Process
Management.
Roles That Give Workflow Administrators Access
Workflow administrators for a specific product family need a predefined, family-specific workflow role to access tasks
and manage submitted tasks for that family. To configure workflow tasks, they also need BPM Workflow System Admin
Role (BPMWorkflowAdmin).
For example, administrators with the family-specific roles can do things like reassign submitted tasks, but they also
need BPM Workflow System Admin Role to define approval rules. Other than the family-specific workflow roles, there's
349

Oracle Fusion Cloud HCM
Using Common Features for HCM
Chapter 16
Workflow Notifications and Approvals
also BPM Workflow All Domains Administrator Role (BPMWorkflowAllDomainsAdmin). This gives administrators access
to all product families. Assign to the administrators a role that contains the workflow roles appropriate for their needs.
Workflow Roles
Here are the roles that give access to workflow administration.
Product Family Role Name Role Code
All
BPM Workflow All Domains Administrator Role
BPMWorkflowAllDomainsAdmin
All
BPM Workflow System Admin Role
BPMWorkflowAdmin
Financials
BPM Workflow Financials Administrator
BPMWorkflowFINAdmin
Higher Education
BPM Workflow Higher Education Administrator
BPMWorkflowHEDAdmin
Human Capital Management
BPM Workflow Human Capital Management
BPMWorkflowHCMAdmin
Incentive Compensation
BPM Workflow Incentive Compensation
Administrator
BPMWorkflowOICAdmin
Procurement
BPM Workflow Procurement Administrator
BPMWorkflowPRCAdmin
Project Management
BPM Workflow Project Administrator
BPMWorkflowPRJAdmin
Sales
BPM Workflow Customer Relationship
Management Administrator
BPMWorkflowCRMAdmin
Supply Chain Management
BPM Workflow Supply Chain Administrator
BPMWorkflowSCMAdmin
Things to Know About the Roles
Here are some things to know about how these workflow roles should be used and what the roles let administrators do.
• If your administrators manage workflow for multiple product families, you should give those users a custom
role with the appropriate family-specific workflow roles added.
• If your administrators manage workflow for all product families, give them a custom role with BPM Workflow All
Domains Administrator Role.
CAUTION: Assign BPM Workflow All Domains Administrator Role only if your administrators really do need
access to workflow tasks from all product families. For access in multiple product families, but not all, use the
workflow roles for the corresponding families instead.
• All administrators can see to-do tasks, no matter which role they have for workflow administration.
350

Oracle Fusion Cloud HCM
Using Common Features for HCM
Chapter 16
Workflow Notifications and Approvals
• Only administrators with either BPM Workflow All Domains Administrator Role or BPM Workflow System Admin
Role would have Skip Current Assignment as an action to take on workflow tasks.
Related Topics
•
Assign Roles to an Existing User
•
Edit Job Role and Abstract Role
•
Role Copying or Editing
•
Actions and Statuses for Workflow Tasks
•
Create Roles in the Security Console
Search for Workflow Tasks to Configure
Some workflow setup applies to all tasks, but most of the time you configure specific tasks. To work on a specific
workflow task in BPM Worklist, you first run a search and then select the task from the search results.
1. In the Setup and Maintenance work area, go to the Manage Task Configurations task in the Application
Extensions functional area. Or, depending on your offering, you might use a different functional area or
another approval setup task.
2. In BPM Worklist, on the Task Configuration tab, run a search in the Tasks to be configured pane.
3. If you don't get any results, or the ones you want, change your search term and try again.
Here are some things to know about the search:
• This searches against various attributes, for example the task title (the one on the General subtab that appears
on the Task Configuration tab after you select a task from the search results), application name, and category.
But, the search doesn't match against the task name you see in the search results.
• The search is case-sensitive.
• Search by * if you want all tasks in the search results.
• Only default tasks are included in the search results. You can click Show and select the Active Versions check
box to get both default and active tasks.
Related Topics
•
How do I update existing setup data?
Disable or Enable Workflow Notifications
If you have BPM Workflow System Admin Role (BPMWorkflowAdmin), you can disable or enable email and in-
app notifications for all users. For example, disable when testing changes to approval rules, to avoid sending test
notifications. When done testing, reenable notifications.
When workflow tasks are assigned to users, they can get email notifications, as well as in-app notifications from a few
places:
• The Things to Finish section on the home page.
• The notifications list in the global header.
351

Oracle Fusion Cloud HCM
Using Common Features for HCM
Chapter 16
Workflow Notifications and Approvals
• The Notifications page, which users can open from either of the first two places to see all their in-app
notifications.
Here are things to know about disabling workflow notifications:
• You disable only email notifications that are sent as part of workflow tasks, not all emails in general.
• Users can still find their workflow tasks in the Worklist: Notifications and Approvals work area.
Note: If the Approvals work area is enabled, it replaces the Worklist: Notifications and Approvals work area.
Set the Notification Mode
Here's how you disable or enable workflow notifications:
1. Click the Notifications icon in the global header.
2. Click Show All.
3. On the Notifications page, click the Worklist button.
4. In BPM Worklist, click your user name and select Administration.
5. On the Administration tab, open the Application Preferences page and go to the Notification section.
6. Select a value from the Notification Mode list:
◦
All: This is the default value.
- Email notifications are enabled.
- Workflow notifications are included in the global header, home page, and Notifications page.
◦
None:
- Email notifications are disabled.
- Workflow notifications aren't included in the global header, home page, and Notifications page.
◦
Email:
- Email notifications are enabled.
- New workflow notifications won't appear in the global header, home page, and Notifications page.
◦
In-app:
- Email notifications are no longer sent.
- Workflow notifications in the global header, home page, and Notifications page are enabled.
7. Click Save.
Related Topics
•
More Setup for Workflow Email Notifications
•
Send Test Workflow Email Notifications to One Address
•
View and Act On Notifications
352

Oracle Fusion Cloud HCM
Using Common Features for HCM
Chapter 16
Workflow Notifications and Approvals
Synchronize Notifications in the Global Header and
Home Page with Workflow Tasks
Users can get in-app notifications for the same workflow task in various UIs, as well as email notifications. The
Synchronize Notifications in Global Header scheduled process ensures that all the in-app notification UIs reflect the
latest task status.
When workflow tasks are assigned to users, they can get an email as well as a notification in the global header and
in the Things to Finish section on the home page. Updates they make to tasks from the global header, for example
approving them, are automatically reflected in the Things to Finish section. Same goes the other way around, too.
But, the notifications don't immediately reflect changes to the task status if users take action through email, the
Worklist: Notifications and Approvals work area, or BPM Worklist. For example, after you approve a task from email, you
can still see the notification in the global header and home page asking for approval. Another case like that's when a
task is assigned to an approval group, and everyone in the group gets a notification. Say you approve that task from the
Things to Finish section. Your notification is removed from that section and the notifications list in the global header,
but the same notification is still there for everyone else in the approval group.
Note: If the Approvals work area is enabled, it replaces the Worklist: Notifications and Approvals work area.
So, use the Synchronize Notifications in Global Header scheduled process to synchronize notifications with the latest
task status for all users:
• This affects the notifications list in the global header, the Things to Finish section, and the Notifications page
that shows all notifications, not just what's pending for the user.
• The process includes notifications not just for tasks that require action, but also ones that are just FYI.
• The process doesn't update the title of notifications in the global header, home page, or Notifications page. Like
email subjects, the notification titles are static.
Note: No matter what the task status is, the scheduled process also removes notifications that are older than 30 days
from the notifications list, Things to Finish section, and Notifications page.
Even when notifications aren't in sync with the latest workflow task status, users can still find the latest task status in the
Worklist: Notifications and Approvals work area.
Note: If the Approvals work area is enabled, it replaces the Worklist: Notifications and Approvals work area.
Schedule the Process
In the Scheduled Processes work area, submit the Synchronize Notifications in Global Header process to run on a
schedule. It's recommended that you schedule the process to run every two hours. How often you should run the
process depends on the volume of approvals. For example, there might be more during month-end or year-end
activities. But if you do need to run the process more frequently, don't schedule it to run more often than every 30
minutes.
353

Oracle Fusion Cloud HCM
Using Common Features for HCM
Chapter 16
Workflow Notifications and Approvals
How long the process takes to run also depends on the volume of approvals. If you're running the process for the first
time, or it hasn't run in a very long time, then the process might take hours to finish.
You need to have the Manage Scheduled Job Definition (FND_MANAGE_SCHEDULED_JOB_DEFINITION_PRIV) privilege
to run this process. Your security administrator can assign a custom job role with this privilege.
What Happens After Synchronization
One key thing that affects what users see in the notifications list, Things to Finish section, or Notifications page is
whether the workflow task is pending for the user. Here's an example of what happens before and after the scheduled
process runs:
1. A notification is pending a user's approval.
2. The user approves the task from email. The task status changes, but the notification requesting approval is still
in the global header and Things to Finish section.
3. After synchronization, because the task status is Completed and the task is no longer pending for the user,
here's what happens to the notification:
◦
It's removed from the list in the global header.
◦
It's no longer a card in the Things to Finish section.
◦
On the Notifications page, it moves from the Assigned to Me tab to the All tab.
Related Topics
•
Submit Scheduled Processes and Process Sets
How You Define Approvals for Human Capital
Management
You can manage approval policies using the tasks Manage Approval Transactions for Human Capital Management and
Manage Task Configurations for Human Capital Management.
Managing Approval Transactions
Using the Manage Approval Transactions page, you can configure approval policies for many HCM tasks, including, but
not limited to, the following:
• Hire
• Promote
• Transfer
• Terminate
You can select approvers for a task, arrange approvers in the required sequence, define approval rules for each
approver, and configure conditions for each rule.
354

Oracle Fusion Cloud HCM
Using Common Features for HCM
Chapter 16
Workflow Notifications and Approvals
Managing Task Configurations
The Manage Task Configurations for Human Capital Management task navigates to the BPM Worklist. You can use
the BPM Worklist to review and configure approval policies for HCM tasks; however, we recommend that you use the
Manage Approval Transactions for Human Capital Management task. Using either UI, you can configure the following
approval details:
• When to issue approval notifications
• Who can access task contents
• What actions are available to approvers
• What to do when errors occur during approval routing
• When tasks expire or when should tasks be escalated
• When approvers can add additional approvers
Note: The HCM Simplified UI does not allow you to modify rules that were created using Advanced Mode in the BPM
Worklist. If you originally created your rule conditions using Advanced Mode in the BPM Worklist, you must continue
to use the BPM Worklist to make changes.
Approval Flow
Approval Management configuration options for Oracle Fusion Human Capital Management determine most of the
actions that are available to the participants in the approval process. For example:
• Either approver can reject the transaction. By default, the approval process stops when the transaction is
rejected.
• The second-level manager can push the transaction back to the first-level manager, who then has a second
opportunity to review the transaction and either approve or reject it, as appropriate.
• Insertion of approvers in the approval list is permitted.
• Approvers can delegate their approval responsibilities to other approvers.
If you change the default settings of the Approval Management configuration options for a task, then different actions
or action outcomes become available to this approval flow.
Related Topics
•
How You Manage HCM Approval Transactions
How You Manage HCM Approval Transactions
Use the Transaction Console to easily monitor daily tasks related to HCM approvals.
In the Navigator menu, select Tools and then Transaction Console.
The Transaction Console provides diagnostic information and search capabilities that enable HCM Administrators to:
• See the current status of all of the approval tasks in the application.
355

Oracle Fusion Cloud HCM
Using Common Features for HCM
Chapter 16
Workflow Notifications and Approvals
• Monitor tasks that have failed and take appropriate actions like withdraw or reassign to resolve stuck
transactions.
• Search approval tasks based on user defined criteria.
• Save search criteria.
• Export the queried results to a spreadsheet.
• Set up approval rules and routing policies.
• Set up transaction flows to bypass approvals.
Approval Rules Tab
To view or configure the approval rules for a transaction, search for the transaction and click the Configure button in the
Rules column in the search results. This opens the Rules configuration page where you can edit and save approval rules.
For more information, see the Basics of Approval Rules document on Oracle HCM Cloud Common Features Release 13
Transaction Console (2430452.1) on My Oracle Support at https://support.oracle.com.
Transaction Summary Tab
You can monitor all the tasks in the application and can search and filter the results based on various criteria. The
Transaction Summary tab provides information on whether a process has failed or is pending, and how many instances
of the process have failed or are pending. An approval process may fail due to various reasons, for example, if there is a
network or database outage or an issue in the approval rules setup. An approval process may also remain in a pending
state waiting for approval. For failed processes, you can view the error message generated in the application, and for
pending processes, you can view the list of approvers. You can also view the current status of the approval which shows
who the transaction is with or who might have already approved it. You can either withdraw a failed process or configure
the approval rules and resubmit the process. If you withdraw the process, then the process is canceled and you can
either start or submit a new transaction.
You can select a transaction and drill-down to the details page to download a diagnostic log that gives you more
information on the transaction. In addition, if there are any attachments in the transaction, you can view those details as
well in the log.
Archived Transaction Summary Tab
The Archived Transaction Summary tab of the Transaction Console lists transactions that have been archived by the
Archive Transaction Console Completed Transactions scheduled process. You need to have the Review Archived
Approval Transactions privilege to view this tab. This tab lists the details of the archived transactions and the time the
Archive Transaction Console Completed Transactions scheduled process was last run. You can filter the transactions
on this tab by these attributes:
• Transaction ID
• Object name
• Process name
Click the object name to view its details such as approval history, comments and attachments, issue comments, and
timeline. You can download the details of the archived transactions.
356

Oracle Fusion Cloud HCM
Using Common Features for HCM
Chapter 16
Workflow Notifications and Approvals
Bypassing Approvals
The application automatically initiates the approval process upon submitting a transaction, if the transaction has
approvals configured. You can override this behavior by enabling the Bypass Approvals option for the transaction. If you
bypass approval for a transaction, the transaction is committed immediately upon submit and is not routed for approval.
Note: When you submit a termination transaction, you can select the Deferred processing option to postpone
processing the transaction until the termination date. This option is typically used in future-dated terminations.
However, if you enable Bypass Approvals for the termination transaction, the Deferred processing option will not be
available for selection.
For more information, see The Basics of Approval Rules in Oracle HCM Cloud Common Features Release 13 Transaction
Console (2430452.1) on My Oracle Support at https://support.oracle.com.
Diagnostic Log
You can select a transaction and drill-down to the details page to download a diagnostic log that gives you more
information on the transaction. In addition, if there are any attachments in the transaction, you can view those details in
the log too.
If you download the diagnostic log for a pending or error transaction, you can see the details in the Task Level
Configuration and Transaction History sections.
Note: The display of the Task Level Configuration and Transaction History sections is controlled through a profile
option which you need to create and set to False.
How You Simulate Approval Rules
You can simulate approval rules to test the approval routing of a pending, in-progress, or failed transaction.
You use Test Rules > Simulate when you drill-down to the Approval Rules page for a process. By simulating a rule, you
can test a specific transaction according to the rule configuration. This way you don’t have to recreate or submit the
transactions again later.
Not all processes support testing rules. If testing of rules is available for a process, you'll see Test Rules on the
Approvals Tab.
On using Test Rules, you’re taken to the Transaction Manager: Rules page, where you can search for a transaction based
on the transaction name or the user name of the person who submitted the transaction. You can also use the statuses
to filter the transaction and choose the one for which you want to simulate the approval rule.
When you use Simulate, if the configuration passes the test, you can use the rule. If the configuration has issues, an
error message displays. You then need to correct the configuration, commit and test the rules again to verify if the
errors are removed.
Note: Testing of rules is applicable only to supported processes or responsive actions in Employment flows.
357

Oracle Fusion Cloud HCM
Using Common Features for HCM
Chapter 16
Workflow Notifications and Approvals
Related Topics
•
Simulate Approval Rules
Simulate Approval Rules
You can configure and test approval rules to correct any errors instead of recreating and submitting the rules again.
Before you begin, do the following:
• Create a new profile option HCM_TEST_APPROVAL_RULES_ENABLED and enable it. Make it updateable at the
site level. Set it to true.
• Ensure that you have the Review HCM Approval Transactions as Administrator
(ORA_PER_REVIEW_HCM_APPROVAL_TRANSACTIONS) duty role which includes the Test Approval Rules
(PER_TEST_APPROVAL_RULES_PRIV) function privilege.
Watch video
1. Navigate to the Transaction Console, click the Approvals tab.
2. Search for the rule you want to test either by specifying the transaction name, user name, or the status of the
submitted transaction.
If testing is available for the process, the Test Rules icon is displayed.
3. Click the Test Rules icon to go to the Approval Rules configuration page.
4. In the Test Approvals Rules page, click Simulate.
Review the processing message and check for errors.
5. In case of errors, navigate back to Configure Rules, make changes, commit the changes and then test the rules again.
Related Topics
•
How You Simulate Approval Rules
Export and Import Rules Using SOA Composer
You can export and then import approval rules from one environment to another.
Before you start
• Ensure you have the BPM Admin Role (BPMProcessAdmin) to be able to import or export rules.
• Ensure the source and target environments must be at the same patch level as well as the same release version
of the composites or the import process will fail.
• Export SOA runtime changes, that is modified tasks and rules only.
• Modify the exported file to include only specific composites for import in case there are saved or uncommitted
approval rule changes unwanted in the target instance.
358

Oracle Fusion Cloud HCM
Using Common Features for HCM
Chapter 16
Workflow Notifications and Approvals
Watch video
Here's what to do
1. Open SOA Composer in the source environment using the URL: https://host:port/soa/composer.
2. Go to the Export/Import menu and click Export SOA Changes.
Wait for the processing to complete. The process creates an archive file.
3. When complete, click Download and save the archive onto your local drive.
4. Use the appropriate application such to open the archive.
5. From the archive, extract the CS_SOA_ExportList.txt file and then do these steps:
a. Edit to include only the composites you want to import.
b. Save, then drag and drop this file back to the archive.
c. Click Yes to confirm. The jar is ready for import.
6. In SOA Composer in the target environment, go to the Export/Import menu and click Import SOA Changes.
7. Click Choose File and select the modified archive to import, then click Import.
8. When the import is complete, check the rule configurations in the Transaction Manager: Rules page to verify if the
migrated rule appears.
Run Diagnostics Test for a Failed Transaction
You can run a diagnostic test to identify the cause of a failed transaction. The diagnostic test generates a report of the
transaction, which can then be used to further analyze the problem.
Watch video
1. In the Transaction Console, filter by failed transactions. Enter a keyword to find the failed transaction in a specific
process. For example, search using 'Person' to find the failed transactions in the Change Personal Information
process.
2. Click on the transaction to drill-down for the transaction details. Copy the transaction ID from this page. You'll use
the ID to complete the details to run the report.
3. Navigate to your user image or name in the global header, and from the Settings and Actions menu, select Run
Diagnostic Tests.
4. In the Diagnostic Dashboard, enter Fetch transaction in the Test Name field.
5. In the search results, select the Fetch Transaction Details check box. Then click Add to Run.
6. In the Run Tests section, click the Required Input Values Missing warning icon.
7. In the Input Parameters dialog box, paste the Transaction ID in the New Value column. Click OK.
8. Enter a name in the Run Name field and click Run.
9. Click OK in the confirmation message.
10.In the Run Status section, click Refresh to update the status of the diagnostic test.
11. When the test run is completed, expand the folder and click the View Test Results icon in the Report Column.
12. On the details page, click Transaction Details Report.
13. Download this diagnostic report.
You can now include this report in your SR for further analysis.
359

Oracle Fusion Cloud HCM
Using Common Features for HCM
Chapter 16
Workflow Notifications and Approvals
Resubmitting Approval Transactions
How You Enable Resubmitting Approval Transactions
As administrators, you need to enable resubmitting of approval transactions so that this action is available on the
Transaction Console.
You need to create and set the profile options listed in this table to TRUE. Refer to this table to understand how these
profile options control the Resubmit action for approval transactions.
Profile Option Effect of Enabling Effect of Disabling
HCM_TAC_RESUBMIT_ACTION The Resubmit action is available. The Resubmit action isn't available.
HCM_TAC_RESUBMIT_FOR_ALL_NON_
APPROVED
If the HCM_TAC_RESUBMIT_ACTION
profile option is also enabled, then the
Resubmit action is available for all unapproved
transactions that aren't bypassed and that are
either in Withdrawn or Rejected state.
If the HCM_TAC_RESUBMIT_ACTION profile
option is also enabled, then the Resubmit
action is available only for terminated and stuck
transactions.
Related Topics
•
Create and Edit Profile Options
•
Set Profile Option Values
How You Configure Resubmission Alert Notification
When a transaction is resubmitted for approval, the initiator receives an alert notification. You can configure this
notification.
Search for and select the TAC_RESUBMIT_ALERT alert in Alerts Composer. Edit the template and configure the
notification according to your organization’s requirements.
You can use the functions listed in this table to configure the alert notification.
Function Description
recipient_list List of recipients
initiator_UserName User name of the initiator of the approval transaction
process_name Name of the approval process
object_name Name of the object submitted for approval. For example, goal plan name.
360

Oracle Fusion Cloud HCM
Using Common Features for HCM
Chapter 16
Workflow Notifications and Approvals
Related Topics
•
Define Alert Notifications
•
Functions and Groovy Expressions
How You Resubmit Approval Transactions
You can resubmit approval transactions that are stuck due to a server-related issue or transactions that have unfixable
errors.
If transactions have unfixable errors, then you need to terminate such transactions and resubmit them after correcting
the underlying issue.
First your administrator needs to enable resubmitting approval transactions.
You can resubmit approval transactions that are in any of these states:
• Stuck
• Aborted
• Withdrawn
• Rejected
Select the transactions in the Transaction Summary tab and then select the Resubmit action. Note that this action may
not be visible if any existing approval transaction can potentially contradict with any of the transactions selected for
resubmission.
Related Topics
•
How You Manage HCM Approval Transactions
Archiving Completed Approval Transactions
Configure Approval Transactions for Archiving
Archiving completed approval transactions can improve the performance of the Transaction Console.
You need to specify the archive period so that the Archive Transaction Console Completed Transactions scheduled
process archives completed approval transactions.
1. Go to the Approval Rules tab of the Transaction Console.
2. For each approval process, specify the archive period in the Archive Transactions column.
You can select one of these archive periods: 3 months, 6 months, 9 months, or Don't archive. The default archive
period is 3 months.
Results:
361

Oracle Fusion Cloud HCM
Using Common Features for HCM
Chapter 16
Workflow Notifications and Approvals
When the Archive Transaction Console Completed Transactions scheduled process runs, it archives the completed
approval transactions according to the period selected. For example, If you selected 6 months for the Approve
Performance Goal process, then the Archive Transaction Console Completed Transactions scheduled process
archives all completed approval transactions of Oracle Fusion Cloud Goal Management that are older than 6 months
from the current date. You can view the details of the archived transactions on the Archived Transaction Summary tab
of the Transaction Console. Note that you can no longer see the archived transactions on the Transaction Summary tab.
Note: When you click Last Archive in the Archived Transaction Summary page, a log file is available for download.
This is only meant for troubleshooting purposes. The text in this log isn’t translated and won’t display in translated
languages.
Related Topics
•
How You Manage HCM Approval Transactions
Archive Transaction Console Completed Transactions Process
Archiving completed approval transactions can improve the performance of the Transaction Console.
Run the Archive Transaction Console Completed Transactions scheduled process to archive completed approval
transactions. You need to have the Run Approval Transactions Archive Process privilege to run this process.
Criteria for Execution
The Archive Transaction Console Completed Transactions scheduled process uses these criteria to determine the
approval transactions to archive:
• Archive period: The completion date of a transaction needs to be greater than the archive period specified for
that transaction specified on the Approval Rules tab of the Transaction Console.
• Tasks purged: All the tasks of a transaction must have been purged.
• Status: The transaction needs to be in Completed state.
Parameters
You can provide values for these 2 parameters for the Archive Transaction Console Completed Transactions
scheduled process:
• Days: Specify the archive period in days. The value you enter will override the archive period value of the
processes. This field is disabled by default. Set the value of the HRC_ARCHIVE_DAYS_SHOW profile option to
true to enable entering values into this field.
• Processes: A list of values to select processes for archiving.
If you don’t specify values for these parameters, then the Archive Transaction Console Completed Transactions
scheduled process uses these default values:
• Days: The archive period specified for transactions on the Approval Rules tab of the Transaction Console.
• Processes: All processes on the Approval Rules tab for which the archive period selected isn’t Don't Archive.
362

Oracle Fusion Cloud HCM
Using Common Features for HCM
Chapter 16
Workflow Notifications and Approvals
Related Topics
•
Submit Scheduled Processes and Process Sets
Purge Archived Transactions
You can set up purge policies to purge archived transactions in the Transaction Console based on your organization’s
data retention policies.
Grant the PER_DEFINE_APPROVAL_TRANSACTION_PURGE_RULES_PRIV privilege to the role performing this task.
1. In the Transaction Console, go to the Approval Rules tab.
2. Find the process for which you want to set up a purge policy.
3. In the Purge Transactions column, select a time when the archived transaction for that process should be purged.
By default, each process has been setup to not purge the archived transactions. Select one of the predefined purge
periods.
4. Repeat the steps for all business processes for which you want to setup a purge policy.
5. You then need to submit the Purge Archived Transactions scheduled process to purge all the transactions that were
archived prior to the time selected in the purge policy.
Note: You can also add user-defined purge periods by adding new lookup codes under the extensible lookup type
ORA_HRC_TXN_PURGE_PERIOD_TYPES. Use the following format while defining the lookup code:
◦
HRC_TXN_<nn>_MONTH, to add a 1-month period, define the lookup code as HRC_TXN_1_MONTH
◦
HRC_TXN_<nn>_MONTHS, to add a 6-month period, define the lookup code as
HRC_TXN_6_MONTHS
◦
HRC_TXN_<nn>_YEAR, to add a 1-year period, define the lookup code as HRC_TXN_1_YEAR
◦
HRC_TXN_<nn>_YEARS, to add a 10-year period, define the lookup code as HRC_TXN_10_YEARS
Assignments and Routing
How Workflow Task Routing Is Mapped Out
To determine how to route and assign a workflow task, the task configuration has at least one stage and participant. In
BPM Worklist, the Assignees subtab in the Task Configuration tab has a diagram that maps out stages and participants.
A participant represents a single user or group of users to assign the task to, and a stage is a way to organize those
participants to map out the routing flow. You can have one or more stages in sequence or in parallel. And within each
stage, you can have one or more participants in sequence or in parallel:
• Parallel: The task gets assigned and notifications are sent to all of the participants in the stage at once.
• Sequential: The task gets assigned and notifications are sent to one participant and then another, in a specific
order. All assignees need to approve sequentially to get the task approved.
363

Oracle Fusion Cloud HCM
Using Common Features for HCM
Chapter 16
Workflow Notifications and Approvals
Each participant has at least one rule set defined, and each rule set has at least one rule. Rules contain the conditions
that must be met for the task to be assigned to a participant, and rules also determine whom to assign the task to.
Example
Let's take a look at a diagram mapping out a workflow task. The flow and placement of the boxes show what's in parallel
or in sequence.
Callout Number What It Is In This Example
1
Stage
The outermost boxes in the diagram are stages.
We see four of the stages in this task, and two
of them are in parallel at the second step of the
sequence for the task.
2
Participant
Each box within a stage is a participant. Three
of the stages have one participant, and one
stage has three participants, two of which are in
parallel at the beginning of the sequence for the
stage.
3
Go to rule icon
Each participant has an icon that you can
click to open the rule sets and rules for that
participant.
Types of Participants
There are four types of participants for workflow tasks. In the diagram on the Assignees subtab, each participant has an
icon that tells you what type it is. If an icon is grayed out, that means the participant is disabled.
364

Oracle Fusion Cloud HCM
Using Common Features for HCM
Chapter 16
Workflow Notifications and Approvals
Single
The assignee is a single user or an application role. (Even though LDAP group is also a possibility, it's recommended that
they're not used.) For example, the task is assigned to a user's manager, and the manager's approval is all that's needed
for the request to go through. With application role, the task is routed to all users with the role, and someone can claim
the task to work on it.
Parallel
A set of assignees must work in parallel, usually by voting. For example, the task is assigned to people who must vote to
decide whether to hire someone or not.
Serial
A set of assignees must work in sequence, and the set is usually dynamic. For example, the task is routed up a
supervisory chain for approval.
FYI
This is like the Single participant type, except that the assignees just get a notification and don't need to act on the task.
In some cases, they can add comments or attachments, but they can't affect the outcome of the task.
Set Up Parallel Approvals in Transaction Console
You can use parallel approvals when more than one approver needs to approve the transaction.
Watch video
There are 2 ways to set up parallel approvals:
• First Responder Wins: The response of the approver who responds first serves as the response for all
approvers for the transaction. After the first response is received, pending approval notifications are
immediately removed from the worklist of other approvers.
365

Oracle Fusion Cloud HCM
Using Common Features for HCM
Chapter 16
Workflow Notifications and Approvals
• Vote Outcome: Here you specify the approval percentage and rejection percentage. For example, if you specify
the approval percentage as 75 and if there are 4 approvers, then the transaction is approved if 3 approvers
approve the transaction.
1. Go to Tools > Transaction Console. Or use the Manage Approval Transactions for Human Capital Management
task in the Setup and Maintenance work area.
2. Click the Approval Rules tab.
3. Search for and select the rule for which you want to set up parallel approvals.
4. Ensure that Bypass Approvals is disabled for the rule.
5. Click the Configure Rules icon for the rule.
6. Click Edit Approval Participants.
7. On the next page, open the rule.
8. Select the Approvers icon.
9. Scroll down the page and select the approval type as PARALLEL.
10.Configure the approval method:
◦
To allow the response of the first responder to determine the outcome of the approval request, select the
First Responder Wins check box.
◦
To specify the percentage of approvers who need to approve the request:
i. Clear the First Responder Wins check box.
ii. Specify percentage of approvers who need to approve in the Vote Outcome Approve field.
iii. Specify percentage of approvers who need to reject in the Vote Outcome Reject field.
iv. Select the default outcome for the transaction when both the vote outcome conditions aren’t met.
11. Click Submit.
Disable Stages or Participants
If a stage or participant doesn't apply based on your business requirements, you can disable it.
1. In the Setup and Maintenance work area, go to the Manage Task Configurations task in the Application
Extensions functional area. Or, depending on your offering, you might use a different functional area or
another approval setup task.
2. In BPM Worklist, on the Task Configuration tab, search for the workflow task in the Tasks to be configured
pane.
3. Select the task from the search results and click the Edit task icon in the toolbar.
4. Click the Assignees subtab.
5. If the diagram mapping out the workflow task is big, click the Switch to Vertical Layout link.
6. In the diagram, select the stage or participant you want to disable.
◦
Stage: Click anywhere in the stage except inside the boxes representing participants.
◦
Participant: Click in the box representing the participant.
7. In the pane after the diagram, click the Advanced subtab.
8. Select the Ignore Stage or Ignore Participant check box, depending on what you selected in the diagram.
9. In the Tasks to be configured toolbar, click the Commit task icon when you're ready to roll out your changes.
366

Oracle Fusion Cloud HCM
Using Common Features for HCM
Chapter 16
Workflow Notifications and Approvals
Related Topics
•
Search for Workflow Tasks to Configure
Create Approval Groups
An approval group is a set of specific users that can act on workflow tasks. You can set up approval rules so that tasks
can get routed to an approval group. An approval group can contain other approval groups.
• When a task is assigned to an approval group in a parallel participant, someone in the group can claim the task
and act on it. When the task is claimed, no one else in the group can act on it. But if the person who claimed the
task releases it, then someone else from the group can claim it.
• If it's a serial participant instead, the task is routed to each member of the approval group in sequence, so
everyone must act on it.
• There are two types of groups in workflow. One is the approval groups we are talking about here that you can
use in task configurations to define routing. The other is LDAP groups that are available for users to select when
they delegate or reassign tasks, but it's not recommended for them to use LDAP groups.
There aren't any predefined approval groups, so it's up to you if you want to create any. Here's how you go about it:
1. In the Setup and Maintenance work area, go to the Manage Approval Groups task in the Application
Extensions functional area.
2. In BPM Worklist, on the Approval Groups tab, click the Create Approval Group icon in the Groups toolbar.
3. On the Details page, enter the group name.
4. In the Members section, click the Add Member icon.
5. In the Add to Group dialog box, select User or Approval Group, depending on what you want to add to your
group.
6. Find and select the specific user or group, and click OK.
7. Add more members, and edit or delete any if you need to.
Note: For approval groups that you plan to use in serial participants, add members in the order that you want
tasks to get assigned. If you add User 1, User 2, and then User 3, the task is first assigned to User 1, then User
2, and finally User 3.
8. Click Save.
CAUTION: Don't delete your approval group if it's used in at least one approval rule. You can still edit the group.
Configure Approval Rule Sets and Rules
Rule sets and rules control how a workflow task is routed, assigned, and completed, based on specific conditions. For
example, a rule can say that transactions over a certain amount must have approvals up three levels in the management
chain.
A workflow task has one or more rule sets, and a rule set has one or more rules. At run time, if a rule set has multiple
rules, all the rules are evaluated at the same time. A rule has two parts, an If section that has the conditions, or tests,
and a Then section that has the actions to take when the conditions are met.
367

Oracle Fusion Cloud HCM
Using Common Features for HCM
Chapter 16
Workflow Notifications and Approvals
Configure Rule Sets
First, create or find the rule set you want to work on:
1. In the Setup and Maintenance work area, go to the Manage Task Configurations task in the Application
Extensions functional area. Or, depending on your offering, you might use a different functional area or
another approval setup task.
2. In BPM Worklist, on the Task Configuration tab, search for the workflow task in the Tasks to be configured
pane.
3. Select the task from the search results and click the Edit task icon in the toolbar.
Note: You may see a message saying that flexfields have been modified. This means someone used
Application Composer to create new fields, which creates flexfields on the back end. Click the Start
Synchronization button to get the latest set of flexfields that you can use for the rules in this task.
4. Click the Assignees subtab.
5. If the diagram mapping out the workflow task is big, click the Switch to Vertical Layout link.
6. In the diagram, find the participant you want to work on. Click the Go to rule icon and select Go to rule. Or,
select the participant and, in the pane after the diagram, click the link in the Business rule field.
7. Go on to work on the rule set that's displayed on the Rules tab. Or, from the drop-down list with rule set names,
select another rule set to edit, or select Add New Rule Set.
8. Click the View Properties link after the rule set name to see the Effective Date setting and Active check box.
The rule set needs to be effective and active to apply when people create workflow tasks. It's a good idea to
leave the effective date set to Always.
CAUTION: From here, you can also click the Delete Rule Set link. Before you delete any predefined rule
sets, make sure you’re really not using it and never will. Don’t delete the predefined Modification Rules and
Substitution Rules rule sets.
9. In the Rules pane, you can add, edit, or delete rules in the rule set. Expand the rule if it's not already. As with the
rule set, you can click the Show Advanced Settings icon for a rule to make sure that the rule is effective and
active.
◦
Create: Click the Advanced Add or Modify Options icon and select General Rule.
◦
Edit: Select the rule if it's not already.
◦
Delete: Select the rule and click the Delete icon in the toolbar in the Rules pane.
For the rule you’re creating or editing, you can click the Properties link after the rule name to rename the rule
and make sure that the rule is effective and active.
Here's a screenshot to help us understand what we see in the Rules subtab on the Assignees tab:
368

Oracle Fusion Cloud HCM
Using Common Features for HCM
Chapter 16
Workflow Notifications and Approvals
Callout Number What It Is
1
The rule set drop-down list, where you can select a rule set to work on or create a new rule set.
2
The link to open properties for the rule set.
3
The Rules pane, which lists the rules within the rules set and has a toolbar for working on those rules,
for example to add or delete them.
4
The names of the rule that’s selected in the Rules pane, followed by a link to open properties for that
rule.
5 The If section of the rule, where the conditions are defined and there’s a toolbar for working on those
conditions.
6 The Then section of the rule, which defines what happens when the conditions are met. There’s also a
toolbar specific to this section.
Configure the If Section in Rules
In the If section of the rule, define conditions for the rule. Each line in this section is called a test.
1. For existing conditions, click on the line that you want to edit, making it active and selected. To add a new line,
click the Advanced Add or Modify Options icon and select a type to add, for example simple test.
2. Click the Left Value icon to select an attribute in the Condition Browser dialog box.
3. Select an operator.
4. Click the Right Value icon to select something from the Condition Browser dialog box, or enter a value in the
corresponding field.
369

Oracle Fusion Cloud HCM
Using Common Features for HCM
Chapter 16
Workflow Notifications and Approvals
5. If you’re not working on the last line, you can click the and or or link at the end of the line to toggle between the
two.
CAUTION: If the attribute you're evaluating in the condition is optional, users might not have entered a value
for that attribute in the UI. For your rule to work properly, it's highly recommended that you first have a line
in the condition that checks if the attribute isn't blank. So that means you select the attribute, select isn't as
the operator, amd enter null. Then add another line with the condition that you're evaluating the attribute for,
and make sure you have an and between the two lines.
To delete a line, put your cursor in any field in the line, and click the Delete icon.
Configure the Then Section in Rules
In the Then section of the rule, define what happens when the conditions in the If section are met.
1. Edit any existing actions. Or, click the Insert Action icon, and you usually select Add Approver and then a list
builder, which controls how to route the task.
2. Fill in the rest of the section. The fields you get depends on the list builder, but here are some that you might
use.
Field What This Is
Response Type
Required: The assignee needs to take action, for example to approve or reject.
FYI: The assignee doesn't need to take action.
Number of Levels
Number of levels required for the task to be completely approved, from the starting participant
to the top participant.
Starting Participant
The first assignee in the approval chain.
Top Participant
The last assignee in the approval chain if the chain goes up that high. Approvals don't go
beyond this participant, for example in the supervisory hierarchy.
Auto Action Enabled
If set to True, there's an automatic action that is taken on the task when the rule conditions are
met.
Auto Action
"APPROVE": The task is automatically approved.
"REJECT": The task is automatically rejected.
Rule Name
The name of the rule with the Then section that you want to use.
◦
Leave the field with the name of the rule you're working on, to indicate that this rule will
use the Then section defined here for this rule.
◦
Or, you can enter the name of an existing rule from any task, enclosed with quotation
marks, and leave all the other fields in this Then section blank. The Then section in the
370

Oracle Fusion Cloud HCM
Using Common Features for HCM
Chapter 16
Workflow Notifications and Approvals
Field What This Is
rule you entered would apply to this rule you're working on. So basically, you're reusing the
Then section from another rule.
To select the starting or top participant:
a. Click the Starting Participant or Top Participant icon.
b. In the Add Hierarchy Participant dialog box, select the Get User option for a particular user, or Get
Manager for an attribute, such as the task creator.
c. For the Get Manager option only, select the list builder that's used for the rule.
d. For the Get User option, enter in the Reference User field the user ID that the user signs in with, enclosed
in quotation marks, for example "KLEE".
For the Get Manager option, here's what you do for the Reference User field:
i. Click the Expression Builder icon.
i. In the Variables tab of the Expression Builder, select the attribute you want in the hierarchy. For
example, expand Task > payload and find your attribute there.
ii. Click the Insert Into Expression button.
iii. Click OK.
e. Leave the Effective Date field blank to use the latest hierarchy, for example supervisory hierarchy.
f. Click OK.
What shows up in the Starting Participant or Top Participant field reflects what you have in the Add Hierarchy
Participant dialog box. Here are a couple of examples.
◦
HierarchyBuilder.getManager("supervisory",Task.payload.Owner User Name,-1,"","")
Part of the Participant Value What This Means
getManager
You selected the Get Manager option.
"supervisory"
You selected the Supervisory list builder.
Task.payload.Owner User Name
For the Reference User field, you went to Task > payload > Owner User Name in the
Variables tab to select the Owner User Name attribute.
-1
This is the default value, which corresponds to the primary employment assignment. That
supervisory hierarchy will be used to find assignees for the task.
"",""
You left the Hierarchy Type and Effective Date fields blank, so there's nothing between
the quotation marks.
371

Oracle Fusion Cloud HCM
Using Common Features for HCM
Chapter 16
Workflow Notifications and Approvals
◦
HierarchyBuilder.getPrincipal("KLEE","","")
Part of the Participant Value What This Means
getPrincipal
You selected the Get User option.
"KLEE"
For the Reference User field, you entered "KLEE".
"",""
You left the Hierarchy Type and Effective Date fields blank, so there's nothing between
the quotation marks.
Example of a Rule
Let's take a look at an example of a rule. In the If section, we have two tests, the first checking if an attribute is a specific
value, the second checking if an attribute is more than a certain amount. The attribute names reflect where the attribute
is in the hierarchy you get in the Condition Browser dialog box. The and connecting the two tests means that both
conditions must be met.
In the Then section, there's the action that applies if the conditions are met, and it's defined based on a Supervisory list
builder. Assignees must take action, and only one approval is needed.
372

Oracle Fusion Cloud HCM
Using Common Features for HCM
Chapter 16
Workflow Notifications and Approvals
Test and Apply Your Rule Set
1. Click the Validate button in the Assignees tab to see if there’s anything wrong with the rules that needs to be
fixed. Results appear in the Business Rule Validation – Log subtab after the Rules subtab.
2. In the Tasks to be configured toolbar, click the Commit task icon when you're ready to roll out your changes.
Related Topics
•
Search for Workflow Tasks to Configure
•
Overview of Flexfields
•
Define Fields
•
Assignments
373

Oracle Fusion Cloud HCM
Using Common Features for HCM
Chapter 16
Workflow Notifications and Approvals
List Builders
A list builder is the method to use for routing a workflow task, for example, by going up the supervisory hierarchy or
sending to an approval group.
When the conditions in a rule are met, the task is assigned based on the action in the Then section of the rule. To define
an action, you select a list builder and then provide settings for that list builder to determine whom to assign the task to.
Here are the recommended list builders:
• Approval Group
• Job Level
• Position
• Resource
• Supervisory
Approval Group
An approval group is a specific set of users that can act on a task. Depending on the participant type, tasks are routed to
an approval group in serial or parallel.
• Parallel: Someone in the approval group can claim the task and act on it. When the task is claimed, no one else
in the group can act on it. But if the person who claimed the task releases it, then someone else from the group
can claim it.
• Serial: The task is routed to each member of the approval group in sequence, so everyone must act on it.
After you select Approval Group as the list builder, you select the approval group to assign the task to when the rule's
conditions are met. If you select True for the Allow empty groups list, there won't be any errors if the group you select
doesn't have any members when the rule is evaluated. In most cases, the task is then rejected or routed back to the
previous assignee, with the same status that the task was in when it was first routed to that assignee.
Job Level
This routing is based on the supervisor hierarchy in Oracle Fusion Cloud HCM. Employees must be set up in HCM with
job levels and supervisors. The approval chain goes up the hierarchy and includes assignees based on what you define.
For the number of levels, enter a positive number in the At most or At least fields, or both. And select a value from the
relative to list.
• At least: Let's call the corresponding job level X1.
◦
Users in the hierarchy are included in the list of assignees if their job level is less than X1. As soon as we
get to a user whose job level is the same as or more than X1, the list of assignees includes that user but
goes no further.
374

Oracle Fusion Cloud HCM
Using Common Features for HCM
Chapter 16
Workflow Notifications and Approvals
◦
The at least condition takes precedence, so after it's met first, then the at most condition is applied from
where the at least condition left off.
• At most: Let's call the corresponding job level X2.
◦
We start with the last assignee from the at least condition. If their manager's job level is less than or
the same as X2, then their manager is added to the assignees list and becomes the last assignee. The
manager of this new last assignee is then evaluated the same way, and so on up the hierarchy.
◦
When we reach a job level that's more than X2, the list of assignees ends, and that user isn't included.
The job levels that X1 and X2 represent depend on what you select from the relative to list. Here are examples of what
X1 and X2 would be if you enter 3 in the At most and At least fields.
Relative To What That Means What X1 and X2 Would Be
Absolute
The first job level, job level 1
Job level 3
Creator
The user who did something to create a
workflow task
Job level 5, if the user at job level 2 created the
task
Starting Point
What you define in the Starting Participant
field
Job level 6, if the starting participant
corresponds to the user at job level 3
Also, there are a couple of optional settings you can use for the job level list builder:
• Utilized Participants: Include the entire assignee list or just a part of it.
◦
All approvers: Everyone in the list.
◦
Final approver only: Just the very last assignee in the list.
◦
Manager and final approver: The first assignee in the list and the very last assignee.
• Include all managers at last level: Include all users with a job level that's the same as the last level needed for
approval.
Let's take a look at some examples of what the assignee list would be from this reporting hierarchy:
• Clerk (job level 1)
• Manager (job level 2)
• Director (job level 3)
• Vice president (job level 5)
• Senior vice president (job level 6)
• Chief executive officer (job level 6)
For all the examples, the clerk at job level 1 created the task, and the rule has these settings:
• Relative to: Absolute
• Starting Participant: Manager at job level 2
• Top Participant: Job level 6
375

Oracle Fusion Cloud HCM
Using Common Features for HCM
Chapter 16
Workflow Notifications and Approvals
• Utilized Participants: All approvers
At Least (X1) At Most (X2) Include All Managers at Last
Level
Assignees
3
3
No
The assignees are the manager
(job level 2) and director (job level
3).
• Starting participant: Manager
at job level 2 is included no
matter what.
• At least condition: Director at
job level 3, the last and only
assignee for this condition
because he has the first job
level that's the same as or
more than X1.
• At most condition: No match
because the director's
manager, the vice president,
has a job level (5) that's more
than X2.
2
5
No
The assignees are the manager
(job level 2), director (job level 3),
and vice president (job level 5).
• Starting participant: Manager
at job level 2 is included no
matter what.
• At least condition: Director at
job level 3, the last and only
assignee for this condition
because he has the first job
level that's the same as or
more than X1.
• At most condition: Vice
president at level 5, because
she is the director's manager
and has a job level that's
the same as X2. But, her
own manager isn't included
because the senior vice
president's job level (6) is
more than X2.
4
6
No
The assignees are the manager
(job level 2), director (job level 3),
vice president (job level 5), and
senior vice president (job level 6).
• Starting participant: Manager
at job level 2 is included no
matter what.
• At least condition: Director,
whose job level (3) is less than
X1, and the vice president,
who is the last assignee for
376
Oracle Fusion Cloud HCM
Using Common Features for HCM
Chapter 16
Workflow Notifications and Approvals
At Least (X1) At Most (X2) Include All Managers at Last
Level
Assignees
this condition because her job
level (5) is the first that's the
same as or more than X1.
• At most condition: Senior vice
president at level 6, because
he is the vice president's
manager and has a job level
that is the same as X2.
4
6
Yes
The assignees are the manager
(job level 2), director (job level 3),
vice president (job level 5), senior
vice president (job level 6), and
chief executive officer (job level 6).
This example is the same as the
previous one, except that the
Include all managers at last level
check box is selected. So in this
case, the CEO is also an assignee
because she has the same job level
as the senior VP, who is the last
assignee based on what's defined
for the rule.
1
1
No
The only assignee is the manager
(job level 2).
• Starting participant: Manager
at job level 2 is included no
matter what.
• At least condition: The
manager is already the first
assignee with a job level that's
the same as or more than X1,
so the condition is already
met.
• At most condition: No match
because the manager's
manager, the director, has a
job level (3) that's more than
X2.
Position
Create approval rules based on the position hierarchy in Oracle Human Capital Management Cloud. The approval
process will ascend the position hierarchy, starting at the position level specified in the approval rule and continuing
until a sufficient position is found, based on other conditions in the rule.
377

Oracle Fusion Cloud HCM
Using Common Features for HCM
Chapter 16
Workflow Notifications and Approvals
For the number of levels, enter a positive number in the At most or At least fields, or both. And select a value from the
relative to list.
• Number of levels defines the number of levels the approval request should proceed to. It has two values, x1 (at
least) and x2 (at most). It can be relative to Starting Point, Creator, or Absolute.
◦
Starting Point: Here the values x1 or x2 are relative to the Starting Participant defined in the Rule. Again,
x1 and x2 are relative to the position level of this user.
◦
Creator: Here the values x1 or x2 are relative to the creator of the task.
◦
Absolute: Here the values x1 or x2 (at least and at most) will be absolute values starting from the first
position level.
• Starting Participant is the first participant in a list, usually a manager. This isn't affected by any other condition
like at-least, at-most, or Top Participant. Substitution can happen after all the rules are executed.
• Top Participant is the last participant in the approval. If this participant is assigned in the approval flow and not
skipped, then the request doesn't go beyond this participant.
• Utilized Participant: From the calculated list of participants, only participants specified in this option are used.
Choose Everyone, First and Last manager, or Last manager.
• Auto Action Enabled: The list builder automatically acts on task based on the next option.
• Auto Action: Specifies the outcome to be set. This can be null if auto action is not enabled.
Let's take a look at an example of what the assignee list would be from this position hierarchy:
User with position level PL1 reports to PL2 and so on to level PL6. The task creator has PL1, and the Starting Participant
is set as one higher than the creator, or PL2.
At least (relative to) At most (relative to) Utilized Participants Approval Chain
3 (Absolute) 3 (Absolute)
All Approvers
• Starting participant: PL2
• At least = PL3
• At most = PL5
PL2 > PL3 > > PL4 > PL5.
3 (Starting Participant) 3 (Starting Participant)
All Approvers
• Starting participant: PL2
• At least = PL3
• At most = PL5
PL2 > PL3 > PL4 > PL5
3 (Starting Participant) 3 (Starting Participant)
Final Approver Only
• Starting participant: PL2
• At least = PL3
• At most = PL5
PL5
3 (Starting Participant) 3 (Starting Participant)
Manager and Final Approver
PL2 > PL5
378

Oracle Fusion Cloud HCM
Using Common Features for HCM
Chapter 16
Workflow Notifications and Approvals
At least (relative to) At most (relative to) Utilized Participants Approval Chain
• Starting participant: PL2
• At least = PL3
• At most = PL5
1 (Absolute) 1 (Absolute)
All Approvers
• Starting participant: PL2
• At least = no match
• At most = no match
PL2
Resource
You can assign the task to a specific user or application role. (Even though LDAP group is also a possibility, it's
recommended that you don't use them.) Select the assignee in the Users or Application Role field, and leave the other
fields for participants with null.
Supervisory
This routing is based on the supervisory hierarchy in Oracle Fusion Cloud HCM. Employees must be set up in HCM with
jobs and supervisors. For example, the clerk reports to the manager, who reports to the director, who reports to the vice
president. The list of assignees begins with the starting participant in the rule, then goes up the supervisory hierarchy.
The list ends when it has gone through the specified number of levels or reached the top participant, whichever comes
first.
Here's an example of an action in the Then section of the rule, based on the supervisory list builder.
Field Example of a Value What This Means
Number of Levels
3
Three approvals are needed
Starting Participant
HierarchyBuilder.getPrincipal(Task.Workflow
Submitter,-1,"","")
The user who created the task
Top Participant
HierarchyBuilder.getPrincipal("KLEE",-1,"","")
The person with the user ID KLEE, in this case,
the vice president
So with the reporting structure from the clerk to the vice president, say the clerk submits a transaction that creates a
workflow task. The starting participant is the clerk, so the task would go first to the clerk, the manager, and then the
director. Because only three levels of approvals are needed, the task is completely approved without going up to the vice
president, who would be the final assignee no matter how many levels are needed.
379

Oracle Fusion Cloud HCM
Using Common Features for HCM
Chapter 16
Workflow Notifications and Approvals
Define Rules to Automatically Approve or Reject Workflow Tasks
You can configure a rule so that the workflow task is automatically approved or rejected without having to send it to any
approver. These are the main things to do for your rule in the Then section:
• Set up the routing so that the task gets assigned to the application (workflowsystem) or the submitter
(Task.Workflow Submitter).
• Select True for the Auto Action Enabled list.
• Enter "APPROVE" or "REJECT" in the Auto Action field.
Here's an example of the Then section for a rule that's set up to automatically approve.
Field Value
List Builder
Supervisory
Response Type
Required
Number of Levels
1
Starting Participant
HierarchyBuilder.getPrincipal("workflowsystem",-1,"","")
or
HierarchyBuilder.getPrincipal(Task.creator,-1,"","")
Auto Action Enabled
True
Auto Action
"APPROVE"
Rule Name
Example Approval
Dimension ID
null
For a rule that's set up to automatically reject, the only difference is that the Auto Action field has "REJECT" instead.
Create Rules in Advanced Mode
Configure rules in advanced mode to optimize how rules perform when they are applied. Usually you use advanced
mode when the rule conditions involve business objects that have hierarchical attributes and collections.
A collection is a grouping of transactional data. For example, an expense report is a business object that has child
attributes, such as expense items. Because each item can have a different cost center, the expense items are a collection
380

Oracle Fusion Cloud HCM
Using Common Features for HCM
Chapter 16
Workflow Notifications and Approvals
of data that the rule needs to evaluate across cost centers. So, the advanced rule can have a condition that looks at all
expense items but matches only for specific cost centers.
Here’s how you generally go about creating a new rule in advanced mode:
1. Click the Properties link after the rule name and select the Advanced Mode check box.
2. Click the Insert Pattern link in the If section to get a pattern with the is a operator. A pattern is a way to organize sets
of lines, or tests, in the If section.
◦
In the field before the operator, enter any term you want that represents the business object. This term is a
variable that’s used later in the rule.
◦
After the operator, select the attribute for the business object, for example Expense Report.
3. Click the Advanced Add or Modify Options icon in the toolbar after the pattern, and select simple test.
4. Define a condition that the rule would match on for the business object. Select an attribute under the folder named
after the variable you entered earlier.
5. Add more conditions if you need to.
6. In the toolbar for the business object pattern, click the Add Pattern icon.
◦
In the field before the operator, enter Lists_collection.
◦
After the operator, select Lists.
This pattern is needed because the rule involves collections.
7. In the toolbar for the lists pattern, click the Add Pattern icon.
◦
In the field before the operator, enter a variable.
◦
After the operator, select the attribute that the collection is based on, for example Expense Item.
This pattern defines what the collection contains.
8. In the toolbar for the collection pattern, click the Surround selected tests with parenthesis icon, and select
Surround.
The surround option puts the pattern you just added and other conditions you define later within parentheses,
to group them all together. Conditions within parentheses are evaluated in their entirety, in this case, against the
collection.
9. In the drop-down list before the collection pattern, select how you want the rule to match against the collection.
◦
Each: There’s a match every time something in the collection meets the conditions. Notifications are sent
for each match.
◦
At least one: As soon as the first match is found in the collection, a notification is sent and the rest of the
collection isn’t evaluated.
◦
None: The entire collection is evaluated, and a notification is sent when nothing matches.
◦
Aggregate: Use this option if you need operations like sum or average on attributes in the collection.
10.In the toolbar after the collection pattern, click the Advanced Add or Modify Options icon, and select simple test.
11. Define a condition that the rule would match on within the collection, selecting attributes under the folder named
after the variable.
12. Add more conditions if you need to.
13. Configure the Then section as you would any rule.
Here’s an example of the If section for a rule in advanced mode. The rule is looking for expense reports that total
1000 or more, where at least one of the expense items is categorized under Travel. ER and item are the two variables
381

Oracle Fusion Cloud HCM
Using Common Features for HCM
Chapter 16
Workflow Notifications and Approvals
that were entered, and the paths ER.Expense Report Total and item.Expense Source show that the attributes were
selected from folders named after the variables.
Prevent Assigning Approvals to Specific Users
In rare cases, workflow tasks get routed to the person who created the task or someone who should not approve due to
conflicts of interest. To prevent this, you can configure tasks to skip certain users in the approval chain.
Note: The skipped users can still get FYI notifications about the tasks, but not notifications they can act on.
1. In the Setup and Maintenance work area, go to the Manage Task Configurations task or another approval
setup task in the Application Extensions functional area or another functional area.
2. In BPM Worklist, on the Task Configuration tab, search for the workflow task in the Tasks to be configured
pane.
3. Select the task from the search results and click the Edit task icon in the toolbar.
4. Click the Configuration subtab.
5. In the Prohibit User Self-Approval section, select the Prohibit self-approval by users named in these payload
attributes check box.
382

Oracle Fusion Cloud HCM
Using Common Features for HCM
Chapter 16
Workflow Notifications and Approvals
6. In the Payload Attributes subsection, add one or more attributes:
a. Click the Add icon.
b. Click the Expression Builder icon.
c. In the Expression Builder, expand Variables > Task > task:task.
d. Select an attribute that represents the users to skip, for example task:creator for the task creator. Or,
open the task:payload node and select an attribute from there instead.
Note: Make sure you select an attribute that gives you user IDs at runtime, the IDs that users enter to
sign in to the application.
e. Click Insert into Expression and then OK.
7. Select the Reassign approvals to those users' managers check box if you want to reroute tasks to the
manager of the skipped user. Otherwise, the task goes to the next assignee in the approval chain.
8. In the Tasks to be configured toolbar, click the Commit task icon when you're ready to roll out your changes.
You can also do this setup for specific participants in the task, if it's not an FYI task. In the Assignees subtab, select the
participant, click Advanced, and find the same Prohibit User Self-Approval section.
• If you have settings at both the participant and task level, both would apply.
• If there's any conflict, for example with the setting of the Reassign approvals to those users' managers check
box, the participant level setting takes precedence.
Related Topics
•
Search for Workflow Tasks to Configure
When Tasks Are Automatically Released to Approval Groups
When a workflow task is assigned to an approval group, anyone in the group can claim it. But if they don’t act on the
task after a certain amount of time, the task is automatically released to the group.
While a task is claimed, no one else in the approval group can act on it. But when the task is released, anyone in the
group can claim and act on it. The time that a user has before the task is automatically released can depend on multiple
factors. The factors that you can control are the task priority and expiration policy.
No Expiration Is Set
If the task has no expiration, it’s automatically released based only on the task’s priority.
Duration Based on Priority
Task Priority Duration in Days
1 1
2 2
3 3
4 4
5 5
383

Oracle Fusion Cloud HCM
Using Common Features for HCM
Chapter 16
Workflow Notifications and Approvals
So, if a task has a priority of 3, the user who claimed the task has 3 days to act before it’s automatically released.
Expiration Is Set
If the task is configured to expire, it’s automatically released based on the task’s priority and the expiration policy. The
priority determines the expiration percentage, which is used in this formula to calculate how much time there is before
the task is automatically released:
(Expiration Date - Calendar Date) * Expiration %
Percentage Based on Priority
Task Priority Expiration Percentage
1 30
2 40
3 50
4 60
5 76
For example, a task has a priority of 3, and its expiration policy is set to 10 days. Whether the policy is set at the task or
assignee level, it doesn’t affect the calculation. Let’s say someone claimed the task on May 5, and today is May 10. The
expiration date is May 15 because the expiration is set to 10 days. The calculation based on the formula would then be:
(15 – 10) * .50 = 2.5
So, the user has two and a half more days from today to act on the task before it’s automatically released.
Related Topics
•
Define the Due Date and Expiration Policies for Workflow Tasks
Change the Workflow Task Priority
Workflow tasks can have a priority from 1 to 5, and they are most likely predefined with 3. You can change the priority to
affect when the task is automatically released after someone claims but doesn’t act on it.
Here's how you check what the priority is and change it:
1. In the Setup and Maintenance work area, go to the Manage Task Configurations task in the Application Extensions
functional area. Or, depending on your offering, you might use a different functional area or another approval setup
task.
2. In BPM Worklist, on the Task Configuration tab, search for the workflow task in the Tasks to be configured pane.
3. Select the task from the search results and click the Edit task icon in the toolbar.
4. On the General subtab, select a new value for the Priority list, with 1 as the highest and 5 as the lowest.
5. Click the Commit task icon in the Tasks to be configured toolbar when you're ready to roll out your changes,
384

Oracle Fusion Cloud HCM
Using Common Features for HCM
Chapter 16
Workflow Notifications and Approvals
Related Topics
•
Search for Workflow Tasks to Configure
Limit Whom to Reassign or Delegate Workflow Tasks To
When users reassign or delegate workflow tasks, by default they can select any user. You can create and set a profile
option so that users can select only someone with the same legal employer, or only from specific legal employers.
Note: Here's when the data restriction you set up applies or doesn't apply:
• Applies even when users are defining vacation rules that control what happens to tasks that are assigned to
them while they're out of office.
• Applies only to users defined as employees in Oracle Fusion Cloud HCM.
• Doesn't apply to UIs where users request more information about a specific workflow task, or where you select
users as part of workflow configuration, for example when creating an approval group.
Before You Start
Make sure your security administrator has already restricted the availability of employee data in general, by defining a
security profile and assigning it to a custom job role.
Create the Profile Option
Here's what you do:
1. In the Setup and Maintenance work area, go to the Manage Applications Core Profile Options task in the
Application Extensions functional area for your offering.
2. On the Manage Applications Core Profile Options page, click the New icon.
3. On the Create Profile Option page, enter BPM_RESTRICT_WORKFLOW_USERS_BY_SECURITY_POLICY as the
profile option code.
4. Enter a display name that you can easily remember to help you find the profile option later.
5. From the Application list, select Common Work Setup.
6. From the Module list, select Application Common.
7. Specify a start date.
8. Click Save and Close.
9. On the Manage Applications Core Profile Options page, make sure your new profile option is selected in the
Search Results: Profile Options subsection.
10. In the <Profile Option>: Profile Option Levels subsection, select the Enabled and Updatable check boxes for
the Site level.
11. Save your work.
385

Oracle Fusion Cloud HCM
Using Common Features for HCM
Chapter 16
Workflow Notifications and Approvals
Set the Profile Option
In the Setup and Maintenance work area, go to the Manage Applications Core Administrator Profile Values task in
the Application Extensions functional area. Set your profile option at the Site level with true as the profile value. This
setting will take effect after about an hour.
Related Topics
•
Set Profile Option Values
•
Configure Employee List of Values
Define People to Support Workflow Tasks
Generally, workflow tasks involve the person who creates the task and the approvers who act on the task. But for any
given task, you can also define others who might get involved:
• Task Owner: The task owner is an administrator for the business process that the workflow task is related to.
Task owners can see the tasks for their business processes and act on behalf of anyone assigned to the task.
They can also reassign, withdraw, or escalate tasks.
• Reviewers: Reviewers can add comments and attachments to a task without having the task directly assigned
to them. They can do this only if you or someone else set them up as reviewers for the task.
• Error Assignees: Sometimes workflow tasks run into problems when trying to figure out the next assignee, for
example when trying to carry out the escalation policy. You can define whom to automatically assign the task to
so that the issue gets fixed. You can have different error assignees for different tasks. Error assignees can route
or reassign the task to the appropriate people, or indicate that the issue can't be fixed (in which case, the task is
set to the Error status).
Set Up Task Owner, Reviewers, or Error Assignees
This screenshot shows where you define supporting people on the Task Configuration tab in BPM Worklist.
1. In the Setup and Maintenance work area, go to the Manage Task Configurations task or another approval setup
task in the Application Extensions functional area or another functional area.
2. In BPM Worklist, on the Task Configuration tab, search for the workflow task in the Tasks to be configured
pane.
3. Select the task from the search results and click the Edit task icon in the toolbar.
4. Open the Assignees subtab.
386

Oracle Fusion Cloud HCM
Using Common Features for HCM
Chapter 16
Workflow Notifications and Approvals
5. Click one of the icons after the Task Owner, Reviewers, or Error assignees field.
◦
First icon: Use the expression builder to define who gets assigned, and click OK.
◦
Second icon: Find the person you want, and click OK.
6. Click the Commit task icon in the Tasks to be configured toolbar when you're ready to roll out your setup.
Related Topics
•
Search for Workflow Tasks to Configure
•
Define When to Send Workflow Notifications
Define the Due Date and Expiration Policies for Workflow
Tasks
If you want workflow to finish within a general time frame, you can set a due date, expiration policies, or both.
• Before the due date, the current assignee will be reminded to take action. Even after the due date passes, the
task doesn't expire. The assignee, and any approvers after them, can still act on the task.
• But if you set expiration policies, the task can expire based on your settings. Expired tasks are in a final state
and no one can make any more updates to them.
Overall Process
Here's how you set the due date, expiration policies, or both for a specific workflow task:
1. In the Setup and Maintenance work area, go to Manage Task Configurations or another approval setup task in
Application Extensions or another functional area.
2. In BPM Worklist, on the Task Configuration tab, search for the workflow task in the Tasks to be configured
pane.
3. Select the task from the search results and click the Edit task icon in the toolbar.
4. Open the Deadlines subtab and make your changes.
5. Click the Commit task icon in the Tasks to be configured toolbar when you're ready to roll out your changes.
Let's take a look at the Deadlines subtab and what you can set up there.
387

Oracle Fusion Cloud HCM
Using Common Features for HCM
Chapter 16
Workflow Notifications and Approvals
Specify a Due Date
On the Deadlines subtab, specify how much time you want to give to approvers. For example, if you enter 14 days for
the Due Date fields, that means the task is due 14 days after it's created. All approvals should be done by then.
Indicate How Tasks Would Expire
If you want to set expiration policies, do this first:
1. On the Deadlines subtab, expand the Expiration Settings section.
2. Indicate how the task would expire:
◦
Task Level: If all approvals aren't done within a certain time frame
◦
Assignee Level: If the assignee doesn't act on the task within a certain time frame
3. Now let's move on with the rest of the setup, which depends on the level you selected.
There's no expiration policy if you leave it at Do Nothing. The task is automatically withdrawn if it's still open after
the number of days (180) you see in the Open Tasks Withdrawn After Number of Days field. That field is on the
Application Preferences page, which you can get to by opening the Administration tab in BPM Worklist.
388

Oracle Fusion Cloud HCM
Using Common Features for HCM
Chapter 16
Workflow Notifications and Approvals
Define Expiration Policies at the Assignee Level
If you selected Assignee Level, here's how you set expiration policies, including any escalations or renewals:
1. In the Expiration Settings section of the Deadlines subtab, enter a duration and optionally select the Exclude
Saturday and Sunday check box. Let's say you enter 30 days and select the check box:
◦
With sequential routing, the task expires if the last assignee doesn't act on the task within 30 weekdays
after the task is routed to them. If the first assignee doesn't act within 30 weekdays, the task is passed to
the next assignee, who gets another 30 weekdays. This goes on until the last assignee.
◦
With parallel routing, the task expires if the current assignees don't act on the task within 30 weekdays
after the task is assigned.
2. If you want to escalate or renew tasks after they expire, select the Escalate or Renew option. If not, leave the
Expire only option selected.
3. To escalate, indicate how many times to go up the management chain. Suppose you enter 2 in the Maximum
Escalation Levels field. Here's what happens when the task expires:
◦
With sequential routing, the task goes to the manager (User 2) of the last assignee (User 1).
◦
With parallel routing, the task goes to the managers (User 2) of all current assignees (User 1).
When User 2 doesn't act within 30 weekdays, the task is escalated to the manager of User 2, who has another
30 weekdays before the task goes to a final Expired status.
4. To renew, indicate how many times the task can get renewed. For example, you enter 2 in the Maximum
Renewals field. Here's what happens when the task expires:
◦
With sequential routing, the last assignee gets another 30 weekdays.
◦
With parallel routing, the current assignees get another 30 weekdays.
If they still don't act within those 30 weekdays, they get another 30 weekdays before the task goes to a final
Expired status.
Define Expiration Policies at the Task Level
If you selected Task Level, here's how you set expiration policies, including any escalations or renewals:
1. In the Expiration Settings section of the Deadlines subtab, enter a duration and optionally select the Exclude
Saturday and Sunday check box. Let's say you enter 30 days and select the check box:
◦
The task expires if all approvals aren't done 30 weekdays after the task is routed to the first assignee.
◦
If there are three assignees and the first two take 25 weekdays to act, then the last assignee gets only five
weekdays.
2. If you want to escalate or renew tasks after they expire, select the Escalate or Renew option. If not, leave the
Expire only option selected.
3. To escalate, indicate how many times to go up the management chain. Suppose you enter 2 in the Maximum
Escalation Levels field:
◦
When the task expires, it's routed to the manager (User 2) of the current assignee (User 1).
◦
When User 2 doesn't act within 30 weekdays, the task is escalated to the manager of User 2, who has
another 30 weekdays before the task goes to a final Expired status.
Don't select anything for the Highest Approver Title list. This setting won't apply to your expiration policy.
389

Oracle Fusion Cloud HCM
Using Common Features for HCM
Chapter 16
Workflow Notifications and Approvals
4. To renew, indicate how many times the task can get renewed. For example, you enter 2 in the Maximum
Renewals field:
◦
When the task expires, all pending assignees get another collective 30 weekdays to act.
◦
If they all don't act within that period, they get another 30 weekdays before the task goes to a final
Expired status.
Related Topics
•
Search for Workflow Tasks to Configure
Predefined Approval Rules for Oracle Fusion Global
Human Resources Tasks
Predefined approval rules exist for many Oracle Fusion Global Human Resources tasks. Usually, approval by the first-
level and second-level managers of the person who submits the transaction is required; however, you can create
different approval rules for any task.
Predefined rules are delivered in both the Transaction Console and the BPM Worklist application. Use the Transaction
Console to search for a transaction, and click that transaction to see the default rules. In the Transaction Console, on the
Approval Rules tab, Transaction Manager: Rules page, use Find to search for a Process Name, and click Configure Rules
to see the predefined approval rules.
For more information, see Oracle HCM Cloud Common Features Release 13 Transaction Console 2430452.1 on My Oracle
Support at https://support.oracle.com.
Approval by First-Level and Second-Level Managers
For the following tasks, the predefined approval rules require approval by the transaction submitter's first-level and
second-level managers. The attributes shown in the following table are enabled for use in customer-defined approval
rules; the predefined approval rules don't use them.
Task Enabled Attributes
Transfer (Line Manager)
Action, Action Reason, Assignment Category, Business Unit, Department, Grade, Destination Legal
Employer, Hourly Paid or Salaried, Job, Location, Position, Salary Amount, Salary Components, Worker
Category, Working at Home
Promotion (Line Manager)
Action, Action Reason, Assignment Category, Business Unit, Department, Grade, Hourly Paid or
Salaried, Job, Location, Position, Salary Amount, Salary Components, Worker Category, Working at
Home
Change Manager
Action, Action Reason
Change Location
Action, Action Reason, Location
Change Working Hours
Action, Action Reason, Assignment Category, Hourly Paid or Salaried, Worker Category
390

Oracle Fusion Cloud HCM
Using Common Features for HCM
Chapter 16
Workflow Notifications and Approvals
Task Enabled Attributes
Terminate Work Relationship
Termination Action, Termination Reason, Notification Date, Recommended for Rehire, Rehire
Recommendation Reason, Termination Date
Hire an Employee
Hire Action, Hire Reason, Assignment Category, Business Unit, Citizenship Nationality, Citizenship To
Date, Citizenship Status, Contract Type, Contract Duration, Department, Grade, Grade Ceiling Step,
Grade Ladder, Grade Rate Value, Grade Step, Hourly Paid or Salaried, Job, Legislative Information (all
attributes), Location, National ID Country, National ID Type, Notice Period, Passport Country, Passport
Expiration Date, Passport Type, Payroll, Person Type, Position, Probation Period, Role Name, Salary
Amount, Salary Basis, Salary Components, Visa or Permit Country, Visa or Permit Expiration Date,
Visa or Permit Status, Visa or Permit Type, Worker Category, Working as a Manager, Working at Home,
Working Hours, Working Hours Frequency
Add a Nonworker
Action, Action Reason, Assignment Category, Business Unit, Citizenship Nationality, Citizenship To
Date, Citizenship Status, Contract Type, Contract Duration, Department, Grade, Grade Ceiling Step,
Grade Ladder, Grade Rate Value, Grade Step, Hourly Paid or Salaried, Job, Legislative Information (all
attributes), Location, National ID Country, National ID Type, Passport Country, Passport Expiration
Date, Passport Type, Payroll, Person Type, Position, Role Name, Salary Amount, Salary Basis, Salary
Components, Visa or Permit Country, Visa or Permit Expiration Date, Visa or Permit Status, Visa or
Permit Type, Worker Category, Working as a Manager, Working at Home, Working Hours, Working
Hours Frequency
Add a Contingent Worker
Placement Action, Placement Reason, Assignment Category, Business Unit, Citizenship Nationality,
Citizenship To Date, Citizenship Status, Contract Type, Contract Duration, Department, Grade, Grade
Ceiling Step, Grade Ladder, Grade Rate Value, Grade Step, Hourly Paid or Salaried, Job, Legislative
Information (all attributes), Location, National ID Country, National ID Type, Passport Country, Passport
Expiration Date, Passport Type, Payroll, Person Type, Position, Role Name, Salary Amount, Salary Basis,
Salary Components, Visa or Permit Country, Visa or Permit Expiration Date, Visa or Permit Status, Visa
or Permit Type, Worker Category, Working as a Manager, Working at Home, Working Hours, Working
Hours Frequency
Add a Pending Worker
Action, Action Reason, Assignment Category, Business Unit, Citizenship Nationality, Citizenship To
Date, Citizenship Status, Contract Type, Contract Duration, Department, Grade, Grade Ceiling Step,
Grade Ladder, Grade Rate Value, Grade Step, Hourly Paid or Salaried, Job, Legislative Information (all
attributes), Location, National ID Country, National ID Type, Notice Period, Passport Country, Passport
Expiration Date, Passport Status, Passport Type, Person Type, Position, Probation Period, Role Name,
Visa or Permit Country, Visa or Permit Expiration Date, Visa or Permit Status, Visa or Permit Type,
Worker Category, Working as a Manager, Working at Home, Working Hours, Working Hours Frequency,
Worker Type
Create Work Relationship (if redirected
from an Add Person task)
Action, Action Reason, Assignment Category, Business Unit, Citizenship Nationality, Citizenship To
Date, Citizenship Status, Contract Type, Contract Duration, Department, Grade, Grade Ceiling Step,
Grade Ladder, Grade Rate Value, Grade Step, Hourly Paid or Salaried, Job, Legislative Information (all
attributes), Location, National ID Country, National ID Type, Notice Period, Passport Country, Passport
Expiration Date, Passport Status, Passport Type, Payroll, Person Type, Position, Probation Period,
Role Name, Salary Amount, Salary Basis, Salary Components, Visa or Permit Country, Visa or Permit
Expiration Date, Visa or Permit Status, Visa or Permit Type, Worker Category, Worker Type, Working as
a Manager, Working at Home, Working Hours, Working Hours Frequency
Manage Work Schedule Assignment
None
391

Oracle Fusion Cloud HCM
Using Common Features for HCM
Chapter 16
Workflow Notifications and Approvals
Approval by First-Level Manager
For the following task, which includes creation, deletion, and editing of the relevant objects, approval by the transaction
submitter's first-level manager is required. The attributes shown in the following table are enabled for use in customer-
defined approval rules; the predefined approval rules do not use them.
Task Enabled Attributes
Manage Document Record
Document Category, Document Country, Document Type
Approval by Worker
For the Share Data Access and Share Personal Info tasks, approval by the worker whose information is shared is
required if the task is performed by a manager or Human Resource Specialist.
No Predefined Approval Rules
For the following tasks, no predefined approval rules exist. However, the attributes shown in the following table are
enabled for use in customer-defined approval rules.
Task Enabled Attributes
Change Address
Address (all attributes), Phone Number (all attributes)
Change Marital Status
Address (all attributes), Marital Status, Phone Number (all attributes)
Create Employment Terms
Action, Action Reason, Assignment Category, Business Unit, Contract Type, Contract Duration,
Department, Grade, Grade Ceiling Step, Grade Ladder, Grade Rate Value, Grade Step, Hourly Paid or
Salaried, Job, Location, Notice Period, Payroll, Position, Probation Period, Salary Amount, Salary Basis,
Salary Components, Person Type, Worker Category, Working as a Manager, Working at Home, Working
Hours, Working Hours Frequency
Employment
Action, Action Reason, Assignment Category, Business Unit, Contract Type, Contract Duration,
Department, Grade, Grade Ceiling Step, Grade Ladder, Grade Rate Value, Grade Step, Hourly Paid or
Salaried, Job, Location, Notice Period, Payroll, Position, Probation Period, Salary Amount, Salary Basis,
Salary Components, Person Type, Worker Category, Working as a Manager, Working at Home, Working
Hours, Working Hours Frequency
Manage Grades
Grade Code, Grade Name, Grade Status, Grade Step Name
Manage Grade Ladders
Grade Ladder Status, Grade Name, Step Rate Name, Step Rate Value
Manage Grade Rates
Grade Rate Name, Grade Rate Status, Grade Rate Type, Maximum Value, Midpoint Value, Minimum
Value
Manage Jobs
Approval Level, Full Time or Part Time, Job Family, Job Function, Job Name, Management Level,
Regular or Temporary, Status, Valid Grade
392

Oracle Fusion Cloud HCM
Using Common Features for HCM
Chapter 16
Workflow Notifications and Approvals
Task Enabled Attributes
Manage Locations
Address (all attributes), Designated Receiver, Fax Number, Main Phone Number, Location Status, Ship-
to-Site
Manage Organizations
Classification Code
Manage Person
All attributes of: Address, Citizenship, Communication Methods, Contact Relationship, Email, Ethnicity,
Legislative Information, National ID, Passport, Person Name, Phone Number, Religion, Visa, Work
Permit
Manage Positions
Bargaining Unit, Business Unit, Department, Entry Grade, Hiring Status, Job, Location, Regular or
Temporary, Seasonal, Security Clearance, Valid Grades
Manage Work Schedule Assignment TransactionId (Primary Key), requestor (user id of the person initiating the transaction),
identificationKey (transaction id), Attribute1 (Work Schedule Name), Attribute2 (Name of the person
whose work schedule assignment is being updated), Attribute3 (person number), Attribute4 (Person
user id), AttributeDate1 (Work Schedule Assignment Start Date), AttributeDate2 (Work Schedule
Assignment End Date)
For other Global Human Resources tasks such as Checklist Templates, no predefined approval rules exist and no
attributes are enabled for customer-defined approval rules. Transactions without approval rules or for which no
approval task flows exist are approved automatically when approvals are enabled.
Approval Management Configuration Options for Oracle
Fusion Human Capital Management
Approval Management has the following default configuration options for all applications in the Oracle Fusion Human
Capital Management family.
Configuration Option Default Value Effect of Default Value
Ad hoc insertion of approvers
True
Ad hoc insertion of approvers in the approval
list is allowed. Users who add approvers may
also modify or remove the approvers that they
add.
Allow delegate
True
Approvers can delegate their approval
responsibilities to other users. One approver
replaces another, but the approver list is
otherwise unaltered.
Allow push back
True
An approver can push the transaction back
to the previous approver, who thereby has a
second opportunity to review the transaction.
393

Oracle Fusion Cloud HCM
Using Common Features for HCM
Chapter 16
Workflow Notifications and Approvals
Configuration Option Default Value Effect of Default Value
Allow reassign
True
Any approver can reassign the approval
to a different approver. The approval list is
recalculated based on the new approver.
Allow request information
True
Approvers can request more information from
another approver or the person who submitted
the transaction.
Allow self-approval
False
The person who submits the transaction can't
approve it.
Allow withdraw
True
The requester or an administrator can withdraw
a transaction while the approval process is
incomplete. Approvers who have already
approved are notified of the withdrawal. The
transaction is removed from the worklists of
approvers who haven't yet approved.
On error notify
Human Resources Application Administrator
A Human Resources Application Administrator
is notified automatically when an error occurs.
Period before task expires
None
Approval tasks don't expire.
Period before task escalates
None
Approval tasks aren't escalated to other
approvers.
Escalated approver
None
Approval tasks aren't escalated to other
approvers.
Repeated approver frequency
Once per approval
An approver receives one notification per
transaction, even when the approver appears
multiple times in the approver list.
Re-evaluate approver list
True
The approver list is regenerated after every
response.
Rejection outcome
Stop all
When an approver rejects a transaction, the
approval process stops and the transaction is
canceled.
Guidelines for Managing Approval Rules
Use the Manage Approval Transactions for Human Capital Management task to configure approval policies for HCM
tasks such as Hire or Promote.
394

Oracle Fusion Cloud HCM
Using Common Features for HCM
Chapter 16
Workflow Notifications and Approvals
This interface works in conjunction with the BPM Worklist, but enables users to identify approvers and configure
approval rules easily for some frequently performed HCM tasks.
Configuring Approval Policies
For a selected task, you can configure the approval policy by arranging approvers in the required order, defining
approval rules for each approver, and submitting the approval policy. The approval policy takes effect immediately and
supersedes the current approval policy for the selected task; however, in-progress approvals complete as expected and
do not switch to the new policy.
Approvers
You can add the following types of approvers:
• Management Hierarchy or Supervisory Hierarchy
• Users
• Approval groups, which you define in BPM Worklist
• Position hierarchy
• Representatives, who are workers with assigned responsibilities, for example Benefits Representative
• Application role
• Job-level based line manager hierarchy
• Self auto approve
When to Use the BPM Worklist
Use the BPM Worklist to:
• Configure notifications, including when notifications are issued
• Configure process details, such as expiration and escalation policies
• Define approval groups
• Define approval rules in advanced mode
You should use the BPM Worklist instead of the HCM Simplified UI if you are configuring complex rules. The simplified
UI does not display more than 25 rules and does not allow more than 10 approvers in a single rule.
For any HCM tasks that are not available in the Manage Approval Transactions interface, you can use the BPM Worklist
to configure all aspects of approvals. To configure in the BPM Worklist, use the Manage Task Configurations for Human
Capital Management task.
Note: The HCM Simplified UI does not allow you to modify rules that were created using Advanced Mode in the BPM
Worklist. If you originally created your rule conditions using Advanced Mode in the BPM Worklist, you must continue
to use the BPM Worklist to make changes.
Related Topics
•
How You Manage HCM Approval Transactions
395

Oracle Fusion Cloud HCM
Using Common Features for HCM
Chapter 16
Workflow Notifications and Approvals
Approver Types
You can include any number of approvers of various types in your approval sequence by dragging and dropping them
into the approval flow. This topic explains each of the approver types.
Management Hierarchy or Supervisory Hierarchy
You can include the following predefined types of managers in your approval sequence:
• Line manager
• Resource manager
• Project manager
• Regional manager
If your enterprise defines additional types of managers, then they appear automatically in the Approvers section of the
Manage Approval Rules page. You can include them in the approval sequence.
Users
You can include one or more Oracle Fusion Applications users in the approval sequence.
Approval Groups
You create approval groups using the BPM Worklist. When defining your approval sequence, you can enter the names of
one or more existing approval groups.
Position Hierarchy
If you include a position hierarchy in your approval sequence, then position holders are invited to approve the
transaction. For positions with more than one position holder, the transaction is approved by the first position holder to
approve.
Responsibility Holders
You can include holders of the following predefined responsibilities in your approval sequence:
• Human Resources Representative
• Benefits Representative
• Union Representative
• Payroll Representative
If your enterprise defines additional responsibility types, then they appear automatically in the Approvers section of the
Manage Approval Rules page. You can include them in the approval sequence.
Human Resource (HR) Specialists assign responsibilities to workers using the Manage Areas of Responsibility task.
A worker becomes an approver for a transaction if he or she has that responsibility for the transaction subject. For
396

Oracle Fusion Cloud HCM
Using Common Features for HCM
Chapter 16
Workflow Notifications and Approvals
example, if you specify the Benefits Representative as an approver for a promotion, then the Benefits Representative of
the worker who is being promoted is invited to approve the promotion.
The application routes approval notifications to representatives by first checking if the configured Representative Type
has an active assignment on the current date. If no representative has an active assignment on the current date, the
notification is routed to the representative who is active as of the effective start date of the transaction.
Note: If you use a responsibility holder, then ensure that responsibility holders are already defined in the application.
For example, if you include a HR representative as an approver for an employee process, then all employees must
have HR representatives assigned to them.
Application Roles
You can use any of the existing duty roles to include in your approval sequence. If your enterprise defines duty roles for
security purposes, then you can enter the duty role to include them in the approval sequence. Users with job or data
roles that inherit the duty role become transaction approvers.
Job Level
You can include a job level in your approval sequence.
Job level routings are based on the manager hierarchy defined in Oracle Fusion Human Capital Management. The
approval list is generated based on the starting level specified in a rule and continues until an approver with a sufficient
job level is found. The approval flow uses the job level defined in the Manage Jobs interface.
Related Topics
•
How You Assign Areas of Responsibility
HCM Approval Rules
Using the Manage Approval Transactions for Human Capital Management task, you can specify one or more
approval rules for each task. To create more than one approval rule, you either add a rule or duplicate a selected rule and
edit it as appropriate.
When you create multiple approval rules for a task, they are evaluated in the order of the rule's priorities. When the
priorities are the same for different rules, they are executed in an undefined order, sequentially.
Approval rules comprise one or more IF statements and one or more THEN statements.
IF Statements (Conditions)
IF statements are tests that determine when an approval rule takes effect. For example, you could specify that an
approval rule for a promotion takes effect when the worker's department is Sales or the worker's job is Area Manager.
You can specify multiple IF statements. If you join multiple statements with "AND" operators, then all statements must
be true before the approval rule takes effect. If you join multiple statements with "OR" operators, then at least one of the
statements must be true before the approval rule takes effect.
397

Oracle Fusion Cloud HCM
Using Common Features for HCM
Chapter 16
Workflow Notifications and Approvals
THEN Statements (Actions)
THEN statements specify:
• Who the approvers are
• What actions approvers can take
The following table summarizes the approval actions.
Approval Action Description
Approval required
Notifications are issued to the identified approvers and their response is required.
Automatic approval
No notifications are issued to the identified approvers. The transaction is either approved or rejected
automatically, and the approvers are recorded as having approved or rejected the transaction. The
value of the Set Outcome To attribute for manager hierarchies determines whether the transaction is
approved or rejected.
FYI only
Notifications are issued to the identified approvers, but no response is expected.
For more information about creating approval rules, see the Oracle Fusion Middleware User's Guide for Oracle Business
Rules.
Related Topics
•
Management Hierarchy Approval-Rule Attributes
•
Position Hierarchy Approval-Rule Attributes
Configure HCM Approval Rules Using Advanced Mode
This topic describes how to configure approval rules using the advanced mode.
You use the advanced mode when you have different rules and each condition in the approval rule needs to be
evaluated. For example, say you need to configure a change assignment approval rule that's based on a requestor’s
role. The requestor could have more than one role, such as a line manager and an HR specialist, and you want to use
different rules when the requestor is only a line manager (not a HR specialist), only an HR specialist (not a line manager),
or both a line manager and an HR specialist.
Watch video
1. Sign into the BPM Worklist page, in the Tasks to be configured panel search for and select an approval rule. If the
task isn’t in an editable mode, click the Edit icon.
2. Click the Assignees tab, and then click Go to rule.
3. Click the Advanced Add or Modify Options drop-down menu, and select General Rule.
4. Select the new rule that displays and click Properties.
5. Enter details for the new rule and and select the Advanced Mode. Click OK.
398
Oracle Fusion Cloud HCM
Using Common Features for HCM
Chapter 16
Workflow Notifications and Approvals
6. Add patterns, each representing an object in the condition.
7. After the collection pattern, click the Advanced Add or Modify Options icon, and select simple test.
8. Define a condition that the rule would match on within the collection, selecting attributes under the folder named
after the variable. Add more conditions if you need to.
9. In the toolbar for the collection pattern, click the Surround selected tests with parenthesis icon, and select
Surround.
The surround option puts the pattern you just added and other conditions you define later within parentheses, to
group them all together. Conditions within parentheses are evaluated in their entirety.
10.In the drop-down list before the collection pattern, select how you want the rule to match against the collection. The
options are Each, At least one, None, and Aggregate.
11. Configure the Then section.
12. Review the rules and then click Commit to save your changes.
Related Topics
•
Create Rules in Advanced Mode
Edit an Approval Rule to Include a Null Condition
You can edit an approval rule to include conditions to handle null scenarios in both the payload object and attributes. It’s
essential for null values to be addressed otherwise transactions can fail.
Watch video
1. In the Transaction Console, click the Approval Rules tab.
2. Find the process for which you want to edit the rule. Note that you can only edit the Change Personal Information
task at this point.
3. Click on Configure Rules for that process.
4. Select the condition to which you want to add the null value check.
5. In the Condition Details window, select Automatically build a null condition.
6. Select the condition and click Edit Selection.
7. Click OK in the Edit Condition Expression window. Then click Yes when prompted to confirm in the warning
message.
8. Close the condition details and save the rule.
Management Hierarchy Approval-Rule Attributes
When you define approval policies using the Manage Approval Transactions for Human Capital Management task,
you can create one or more approval rules for manager hierarchies of predefined and locally defined types.
This topic describes the values that you can specify in the THEN statements of approval rules for manager hierarchies.
399

Oracle Fusion Cloud HCM
Using Common Features for HCM
Chapter 16
Workflow Notifications and Approvals
Attributes
The following table summarizes the attributes of the manager-hierarchy approval rules and their default values.
Attribute Name Description Values Default Value
Action Type
Allows users to choose from
Approval required (participants
need to act on the transaction),
Information only (participants get
FYI notifications), and Automatic
approval (participants do not
need to act, transaction is auto
approved).
• Approval required
• Information only
• Automatic approval
Approval required
Route Using
Allows users to choose which
manager to route through.
• Resource manager
• Line manager
• Project manager
• Regional manager
• Customer—Defined Manager
Types
Line Manager
Approval Chain of
Allows users to choose which
approval chain to use.
• Requester
• User
• Worker
• Worker's Current Line
Manager
• Worker's Proposed Line
Manager
Requester
Start With
• Identifies both the first
approver and the manager
hierarchy. By default,
approval requests are
sent to the requester's
first-level manager, and
the manager hierarchy is
the one associated with
the requester's primary
assignment. The requester is
the worker who submits the
transaction.
• If you select a user in
Approval Chain of, then the
manager hierarchy is the one
associated with that user's
primary assignment. For
example, when promoting
one of your direct reports
you could select as initial
approver a human resource
(HR) specialist who is outside
your manager hierarchy;
approval requests from this
rule would be directed to
• Manager
• Employee
• Second Level Manager
Manager
400

Oracle Fusion Cloud HCM
Using Common Features for HCM
Chapter 16
Workflow Notifications and Approvals
Attribute Name Description Values Default Value
the manager hierarchy of
the HR specialist's primary
assignment.
• If you select a user who is not
a manager, then the rule fails.
Number of Levels
• Controls how far up the
selected manager hierarchy
approval requests are sent.
The first level is based on the
Start With value.
• Approval routing stops when
either the number of levels
or the topmost approver is
reached, whichever occurs
first.
• Worker's Current Line
Manager
• 1 or higher
1
Top Approver
• Specifies an approver above
whom approvals are not
routed.
• Approval routing stops when
either the number of levels
or the topmost approver is
reached, whichever occurs
first.
For the top approver value, you can
select:
• A different manager (first-
level or second-level, as
appropriate).
• A user who is a manager from
the same manager hierarchy
as the initial approver.
If you select a user who is
not a manager or is from a
different manager hierarchy
from the initial approver, then
the topmost approver is not
found. In this case, routing
of approvals stops when the
number-of-levels value is
reached.
• Worker
• Worker's Proposed Line
Manager
• Requester
• User
• Manager
• Second Level Manager
• Manager
Set Outcome To
Specifies the outcome for
automatic approvals. If you set
this value to Approve, then
all identified approvers are
recorded as having approved
the transaction, even though the
approval is automatic. Similarly,
if you set this value to Reject,
then all identified approvers are
recorded as having rejected the
transaction.
• Approve
• Reject
None
401

Oracle Fusion Cloud HCM
Using Common Features for HCM
Chapter 16
Workflow Notifications and Approvals
Position Hierarchy Approval-Rule Attributes
When you define approval policies using the Manage Approval Transactions for Human Capital Management task,
you can create one or more approval rules for a specified position hierarchy.
Attributes
The following table summarizes the attributes of the position-hierarchy approval rules and their default values.
Attribute Name Description Values Default Value
Action Type
Allows users to choose from
Approval required (participants
need to act on the transaction),
Information only (participants get
FYI notifications), and Automatic
approval (participants do not
need to act, transaction is auto
approved).
• Approval required
• Information only
• Automatic approval
Approval required
Job Level
• The number of job levels.
Approvals are routed to
approvers between the initial
and topmost approvers in the
position hierarchy based on
this value.
• You can specify the job
levels as absolute values
(for example, a minimum
of 2 and a maximum of 4).
Alternatively, you can specify
the values relative to either
the initial approver or the
requester. The requester is
the person who submits the
transaction.
• Approval routing stops
when either the number of
job levels or the topmost
approver is reached,
whichever is sooner.
Minimum and maximum values
relative to:
• Initial approver
• Requester
Absolute minimum and maximum
values
At most 1 relative to initial approver
At least 1 relative to initial approver
Position Hierarchy
• The name of the position
hierarchy
• You can select from all
position hierarchies in the
enterprise
All position hierarchies in the
enterprise
None
Starting Position
• The position of the first
approver
• The approval notification
is sent to all workers who
have the position, and the
All positions in the selected
position hierarchy
None
402

Oracle Fusion Cloud HCM
Using Common Features for HCM
Chapter 16
Workflow Notifications and Approvals
Attribute Name Description Values Default Value
transaction is approved by the
first worker to approve
Job Level
• The number of job levels.
Approvals are routed to
approvers between the initial
and topmost approvers in the
position hierarchy based on
this value.
• You can specify the job
levels as absolute values
(for example, a minimum
of 2 and a maximum of 4).
Alternatively, you can specify
the values relative to either
the initial approver or the
requester. The requester is
the person who submits the
transaction.
• Approval routing stops
when either the number of
job levels or the topmost
approver is reached,
whichever is sooner.
Minimum and maximum values
relative to:
• Initial approver
• Requester
Absolute minimum and maximum
values
At most 1 relative to initial approver
At least 1 relative to initial approver
Top Position
• The position of the topmost
approver
• The approval notification
is sent to all workers who
have the position, and the
transaction is approved by the
first worker to approve
• Approval routing stops when
either the number of levels
or the topmost approver is
reached, whichever is sooner
All positions in the selected
position hierarchy
None
Include
Allows users to choose which
approvers to include.
• All Approvers
• First and last approvers
• Last approver only
All approvers
How You Define an HCM Approval Policy
This example shows how to define an approval policy for employee hires in the Sales department using the Manage
Approval Transactions for Human Capital Management task.
If the Department of the new hire is Sales, approvals should route to the first level line manager of the requester and FYI
only to the HR Representative of the worker.
403

Oracle Fusion Cloud HCM
Using Common Features for HCM
Chapter 16
Workflow Notifications and Approvals
If the Department of the new hire is Finance, approvals should route to the second level line manager of the requester
and FYI only to the HR Representative of the worker.
The following table summarizes key decisions for this scenario.
Decisions to Consider This Example
Who will approve employee hire requests?
• Managers in the Sales department.
• The human resources representative of any new hire doesn't need to approve but is informed of
the hire after the relevant manager has approved.
Which approval actions must approvers
take?
• Managers must approve the hire.
• The human resources representative receives an approval notification for all hires, but no
response is needed.
Can the required level of management
approval vary?
The required level of approval varies with the grade of the new hire.
The requester's:
• First-level manager approves the trainee grades 1 through 3
• Second-level manager approves the professional grades 4 and above
Summary of the Tasks
To define the approval policy in this example, you:
1. Navigate to the Manage Approval Rules: Hire an Employee page.
2. Assemble the approval sequence.
3. Define the approval rule for trainee grades.
4. Define the approval rule for professional grades.
5. Define the approval rule for all grades.
Navigating to the Manage Approval Rules: Hire an Employee Page
1. In the Setup and Maintenance work area, click the Search button and search for the task Manage Approval
Transactions for Human Capital Management.
2. In the Search Results region, click the task name.
3. On the Manage Approval Transactions page, enter the search term Hire in the Name field.
4. Click Search.
5. In the Search Results region, click the Configure button in the Rules column for the transaction Hire an
Employee.
Assembling the Approval Sequence
1. On the Manage Approval Rules: Hire an Employee page, confirm that an entry for Line Manager appears in the
Approval Sequence region.
2. In the Approvers region, click the Add icon on the Human Resources Representative entry to add it to the right
of the Line Manager entry in the Approval Sequence region.
404

Oracle Fusion Cloud HCM
Using Common Features for HCM
Chapter 16
Workflow Notifications and Approvals
Defining the Approval Rule for Trainee Grades
1. In the Approval Sequence region, select the Line Manager entry.
2. Click the Edit icon to edit the rule settings.
3. In the Name field of the Edit Rule Settings window, enter the rule name SalesHiresTraineeGrades. (The name
can't contain spaces.)
4. In the IF statement for the SalesHiresTraineeGrades rule, click the Add icon to the right of the first condition to
create an additional condition.
5. Complete the fields of the two condition statements as shown in this table.
Attribute Name Operator Attribute Value And or Or
Department
==
Sales
and
Grade
<=
3
6. In the THEN statement for the SalesHiresTraineeGrades rule, complete the fields as shown in this table.
Field Value
Action
Approval required
Route Using
Line Manager
Approval Chain of
Requester
Start with
Manager
Number of Levels
1
Top Approver
Manager
Defining the Approval Rule for Professional Grades
1. Click Add Rule.
2. Click the Edit icon to edit the rule settings.
3. In the Name field of the Edit Rule Settings window, enter the rule name SalesHiresProfessionalGrades.
4. In the IF statement for the SalesHiresProfessionalGrades rule, click the Add icon to the right of the first
condition twice to create two additional conditions.
405

Oracle Fusion Cloud HCM
Using Common Features for HCM
Chapter 16
Workflow Notifications and Approvals
5. Complete the fields of the three condition statements as shown in this table.
Attribute Name Operator Attribute Value And or Or
Department
==
Sales
and
Grade
>
3
and
Grade
<=
6
6. In the THEN statement for the SalesHiresProfessionalGrades rule, complete the fields as shown in this table.
Field Value
Action
Approval required
Route Using
Line manager
Approval Chain of
Requester
Start with
Second Level Manager
Number of Levels
1
Top Approver
Second Level Manager
Defining the Approval Rule for All Grades
1. In the Approval Sequence region, select the Human Resources Representative entry.
2. In the Rules region for the new rule, click the Edit icon to edit the rule settings.
3. In the Name field of the Edit Rule Settings window, enter the rule name SalesHiresAll Grades.
4. In the IF statement for the SalesHiresAllGrades rule, complete the fields of the condition statement as shown in
this table.
Attribute Name Operator Attribute Value
Department
==
Sales
406

Oracle Fusion Cloud HCM
Using Common Features for HCM
Chapter 16
Workflow Notifications and Approvals
5. In the THEN statement of the SalesHiresAllGrades rule, complete the fields as shown in this table.
Field Value
Action
Information Only
Representative Type
Human Resource Representative
Representative of
Worker's Proposed Representative
6. Click Submit.
Related Topics
•
How You Manage HCM Approval Transactions
Delegate Approvals
How You Delegate Approvals
You can delegate approvals that you need to perform to others for a specific duration. As administrators, you can also
delegate approvals of a manager to another person.
You delegate approvals by creating approval delegation rules. You manage approval delegation rules on the Account
Management page. You need to select an approval category when creating an approval delegation rule. You can create
multiple approval delegation rules for the same duration.
The approval delegation categories correspond to the category values configured on the Task Configuration tab of the
BPM worklist. Categories help to group tasks. For example, the ProfileCoreHumanTask and ApprovePerformanceGoal
tasks belong to the Talent category.
You can edit approval delegation rules that you created.
You can delete existing approval delegation rules that you have created. To delete an approval delegation rule, edit it
and then click Delete. After you delete the delegation rule, the delegation is no longer valid, and approvals won’t be
routed to the delegated person.
If enabled, the delegated person gets a notification when you create, edit, or delete approval delegation rules. If the
delegation rule is for others, then the person for whom the delegation rule is created also gets a notification.
Related Topics
•
How can I enable notifications for approval delegations?
407

Oracle Fusion Cloud HCM
Using Common Features for HCM
Chapter 16
Workflow Notifications and Approvals
Delegate Your Approvals
As managers, you can delegate the approvals you need to do to others in your organization.
Assume that you are a manager and you need to go on a vacation for 3 weeks. But your direct reports might submit
leaves during this time or they might perform other tasks that need your approval. You can delegate these approval
tasks to another manager in your organization for the duration of your absence.
You manage approval delegation rules on the Account Management page.
Add an Approval Delegation Rule
1. Go to Me > Roles and Delegation.
2. On the Account Management page, go to the Approval Delegations section.
3. Click Add.
4. Enter values as indicated in these fields:
◦
Rule Name: Enter a unique name.
◦
Category: Select an approval category. Note that only approval rules that belong to this category will be
delegated.
◦
Start Date: The date from when the delegation is effective. You can also specify the time when you want
the delegation to start.
◦
Delegate To: Select the person who you want to delegate approvals to.
5. Optionally, enter an end date to indicate until when the delegation is effective. You can also specify the time
when you want the delegation to end.
6. Select the Allow this user to approve their own transaction check box if you want to allow the delegated
person to approve their transactions also.
7. Save your changes.
Results:
If enabled, the person who is delegated the approvals receives notification that you’ve created an approval delegation
rule.
Approvals are delegated to the selected person during the period that the rule is effective. The delegated person can
approve or reject the approval requests on your behalf during the effective period.
Delegate Approvals for Others
As administrators, you can delegate approvals of a manager to another person.
Assume that a manager in your organization had to suddenly go on a sick leave. To ensure continuity in the approval
process, as administrators you need to delegate the approvals of this manager to another manager.
1. Go to My Client Groups > Person Management.
2. Search for the person whose approvals you want to delegate.
3. Click Actions > Personal and Employment > User Account.
4. On the Account Management page, go to the Approval Delegations section.
408

Oracle Fusion Cloud HCM
Using Common Features for HCM
Chapter 16
Workflow Notifications and Approvals
5. Click Add.
6. Enter values as indicated in these fields:
◦
Rule Name: Enter a unique name.
◦
Category: Select an approval category. Note that only approval rules that belong to this category will be
delegated.
◦
Start Date: The date from when the delegation is effective. You can also specify the time when you want
the delegation to start.
◦
Delegate To: Select the person who you want to delegate approvals to.
7. Optionally, enter an end date to indicate until when the delegation is effective. You can also specify the time when
you want the delegation to end.
8. Select the Allow this user to approve their own transaction check box if you want to allow the delegated person to
approve their transactions also.
9. Save your changes.
Results:
If enabled, both the person for whom you created the approval delegation rule and the person who is delegated
approvals receive notification about the approval delegation rule.
Approvals are delegated to the selected person during the period that the rule is effective. The delegated person can
approve or reject the approval requests on behalf of the original approver during the effective period.
How You Modify Approval Notifications Using Page
Composer
Using the Oracle Page Composer, you can selectively show and hide various components of a notification, including
fields, labels, and regions. You can edit labels, color, and page layout.
Users with this role: Human Capital Management Application Administrator role or any other role that has this privilege
PER_CUSTOMIZE_APPROVAL_NOTIFICATION_PRIV can modify notifications.
Note: Any modifications made to a notification will affect all notifications of the same transaction type.
Modifying Notifications
To modify a notification using the Page Composer, click the Edit button on the top right corner of the notification. You
can edit the notification using either the design view or the source view. The design view:
• Is the basic or default view.
• Supports region changes, such as changing the page layout, showing or hiding regions, and adding customer-
defined content in regions.
• Can be easily used by functional users who are not familiar with the Oracle Application Development
Framework (ADF).
409

Oracle Fusion Cloud HCM
Using Common Features for HCM
Chapter 16
Workflow Notifications and Approvals
The source view:
• Supports component changes, such as changing the task flow, editing individual component properties, and
showing or hiding individual components.
• Is targeted to technical users and requires an understanding of ADF components.
You can preview the changes before submitting them by clicking the Apply button. The Reset Page option removes
all past edits (regardless of when they were made) and restores the page to its default state. Modifications made in a
Worklist notification are also visible in an email notification.
Making Changes in Design View
The Design view supports:
• Changing the display, including changing the header font, hiding the region header, hiding the complete
region, and enabling or disabling the ability to re-size or remove regions.
• Changing the page style, including specifying a different style sheet for the page.
• Modifying the content style such as font, background, and margins; specifying a different style sheet for the
content.
• Adding the following customer-defined content in the notification:
◦
A box with content
◦
HTML markup tags
◦
A link to a page or website
◦
A box with content, including options to move and re-size the box
◦
Formatted text
◦
A web page within the notification
Making Changes in Source View
The Source view supports:
• Defining a header for the notification
• Defining text for the notification body
Related Topics
•
Example of Modifying an Approval Notification Using Page Composer
•
Overview of Page Modification
Example of Modifying an Approval Notification Using
Page Composer
You may sometimes want to modify an approval notification.
410

Oracle Fusion Cloud HCM
Using Common Features for HCM
Chapter 16
Workflow Notifications and Approvals
This example demonstrates how to do this. You received a notification in your worklist to approve a transaction
involving creation of a grade. You can add a comment for the subsequent approvers and attach a document to the
notification, listing the existing grades and their descriptions. You also want to make changes to certain notification
components.
The following table summarizes key decisions for this scenario.
Decisions to Consider In this Example
Display the Edit Grade Details link?
No, hide the region containing the link.
Display a screenshot of the Grade Creation
page?
Yes, add a link to the screenshot in the Details region
Change the notification header?
Yes, change from "Create Grade <Grade Name>, <Grade Code>, <Effective Date>" to "Created New
Grade"
Change the Effective Start Date label?
Yes, change to Grade Effective Date
Highlight the Grade Effective Date?
Yes, display the date in bold
Making Changes Using the Design View
1. Click the Edit button on the top right corner of the notification page.
2. The Design view appears by default. Click the Edit icon in the Related Links region.
3. In the Display Options tab, deselect Show Component and click Apply. You can see that the Related Links
region disappears. Click OK to confirm.
4. Click the Add Content button below the page header.
5. Click the Open link in the ADF Faces Components row.
6. Click the Add link in the Image row. An Image region is added in the notification.
7. Click the Edit icon in the Image region and provide the URL of the screenshot in the Destination field. The
image now includes a link to the screenshot. Move the image region to the end of the Details region.
Making Changes Using the Source View
1. Click the View dropdown button on the top of the page and select Source to change from Design to Source
view.
2. Click the page header to select the panelHeader component. Click Edit to open the Component Properties
window.
3. In the Text field, click Select Text Resource. Create a text resource and enter the Display Value Created New
Grade. Select this text resource and click OK. The page header is now changed.
4. Select the Effective Start Date field in the Transaction Details region. A warning message appears indicating
that the changes will be applied to all instances wherever the task flow is used. Click Edit and follow the same
steps as in the previous step to change the label to Grade Effective Date.
5. Click the Content Style tab in the Component Properties window.
6. Select the Font Style as bold. The date now displays in bold.
7. Click Save to apply all the changes.
411

Oracle Fusion Cloud HCM
Using Common Features for HCM
Chapter 16
Workflow Notifications and Approvals
Related Topics
•
Overview of Page Modification
FAQs for Approvals
What happens if I assign an approval task that requires additional
information?
If a task requires additional information, you can't reassign it. When users ask for more information, they also select one
of two options, Return back to me or Reinitiate the approval process.
After the additional information is submitted, the task goes back to the initiator or to the user who asked for more
information. The initiator or the user who asked for more information can then reassign the task.
How do I define the approval policy for a task?
Use the Manage Approval Transactions for Human Capital Management task to define the approval policy.
On the Manage Approval Rules page for a supported task, such as Hire an Employee, begin by deciding who will
approve transactions. Using either drag and drop or the Add action, move those approvers from the Approvers section
to the approval sequence and arrange them in the required order. By default, an approver is added to the sequence
immediately following the currently selected approver, but you can use drag and drop to change the approver order.
When you have defined the approval sequence, select the first approver in the approval sequence to display any
predefined approval rule for that approver type. You can edit the displayed approval rule and create additional approval
rules, as appropriate. Edit the rule settings to specify a name for each rule. Define approval rules for the remaining
approvers in the approval sequence. When you have defined the approval rules for all approvers, submit the approval
policy.
What happens if I edit or delete an approval rule?
If you edit or delete an approval rule on the Manage Approval Rules page, then approvals currently in progress complete
as if the rule had not been edited or deleted.
New approvals follow the latest version of the rule.
Note: For more information about approvals, see Frequently Asked Questions About Approvals (Doc ID 1987850.1) on
My Oracle Support at https://support.oracle.com.
412

Oracle Fusion Cloud HCM
Using Common Features for HCM
Chapter 16
Workflow Notifications and Approvals
Can I refresh the status of Transactions in Transaction Console?
Yes, you can immediately refresh the status of approval transactions in Transaction Console.
You no longer need to wait for the Refresh Transaction Administrator Console Transaction Status scheduled process
to complete to view the updated status of transactions.
On the Transaction Summary tab of the Transaction Manager, click the refresh icon in each row to refresh the status of
individual transactions. Click the refresh icon in the header row to refresh all transactions shown on the page.
How can I hide the refresh column on the Transaction Summary
tab of the Transaction Console?
To hide the refresh column on the Transaction Summary tab, create the HCM_TAC_ROW_REFRESH_HIDE profile option
and set it to true.
Create the HCM_TAC_ROW_REFRESH_HIDE Profile Option
1. Navigate to the Setup and Maintenance work area.
2. Search for and select the Manage Profile Options task.
3. In the Search Results section, click New.
4. On the Create Profile Option page, specify the values indicated in this table for the new profile option.
Field Value
Profile Option Code HCM_TAC_ROW_REFRESH_HIDE
Profile Display Name Approval Rules Row Refresh Hide Enabled
Application Global Human Resources
Module Global Human Resources
Description A suitable description such as Enable hiding approval rules row refresh.
Start Date 1/1/2000
5. Click Save and Close.
6. On the Manage Profile Options page, select the Enabled and Updateable check boxes for the Site level.
7. Click Save and Close.
Set the HCM_TAC_ROW_REFRESH_HIDE Profile Option to true
1. Navigate to the Setup and Maintenance work area.
2. Search for and select the Manage Administrator Profile Values task.
3. Search for the HCM_TAC_ROW_REFRESH_HIDE profile option.
4. Set the Profile Value field to true.
5. Click Save and Close.
413

Oracle Fusion Cloud HCM
Using Common Features for HCM
Chapter 16
Workflow Notifications and Approvals
Why do I see a placeholder like "attribute16" in a list of values in
my product?
If you see a placeholder like "attribute16" in a list of values in your product, it is because a flexfield that should be used
for the value was not registered and deployed yet or the attribute was not configured.
For more information about flexfields, see Flexfields Setup in this guide.
Why can't I find my HR Checklist transactions in the Transaction
Console?
HR Checklist transactions have the Initiator set to FUSION_APPS_HCM_SOA_APPID, so they are not displayed in the
Transaction Console.
Use the BPM Worklist to view HR Checklist transactions.
Related Topics
•
Use Your Worklist to Manage Workflow Tasks
•
Transaction Security Profiles
Why can't I configure the Add Contact task in Approvals?
The Add Contact approval rule is used for the task when an employee is adding a coworker as a contact, not when an
employee is creating a contact.
This approval rule ensures that the person, who's being added as a contact, can approve or reject the request. This gives
the control to the person being added so that employees don't randomly add a person as a contact.
How does the approval rule determine the worker's current and
proposed, and the requester's representative?
The approval rule determines the representative based on some rules.
This table lists the rules that determine the representative.
Option How Representative Is Determined
Worker's Current Representative
• Worker's start date is today or in the past - The current application date is considered
• Worker's start date is in the future - The worker's future start date is considered to determine the
current representative. If the person record already exists in the application as a contact of an
414

Oracle Fusion Cloud HCM
Using Common Features for HCM
Chapter 16
Workflow Notifications and Approvals
Option How Representative Is Determined
existing worker, then the current application start date is used to determine the worker's current
representative,
Worker's Proposed Representative
• Worker's start date is today or in the past - The current application date is considered
• Worker's start date is in the future - The worker's future start date is considered to determine the
current representative.
Requester's Representative
The current application date is always considered for workers irrespective of the transaction start date.
Why are approvals routed to the old manager of an employee
instead of the current manager?
The approval workflow considers the system date of the server that's based on Coordinated Universal Time (UTC).
Manager changes become effective at the UTC time of the server and not the local time, which can be ahead of the
server time. So, you may see transactions routed to the old manager until the manager change becomes effective at the
server time.
How can I enable notifications for approval delegations?
As administrators you can enable notifications for approval delegation rules. This helps the person who is delegated to
take appropriate action.
To enable notifications for approval delegations, you need to create the
HCM_APPROVAL_DELEGATION_SEND_NOTIFICATION profile option and set it to true.
Related Topics
•
Create and Edit Profile Options
•
Set Profile Option Values
Can the Change Personal Information approval rule evaluate only
the primary phone, email, address, or national identifier?
No. The rule evaluates based on the setting in the ORA_PER_PERSONAL_INFO_EVALUATE_PRIMARY profile option. The
profile values are N, Y, and null. If you select N, the rule evaluates based on the record currently being modified. This is
the default value.
If you select either Y or leave it null, the rule evaluates based on the primary record.
415

Oracle Fusion Cloud HCM
Using Common Features for HCM
Chapter 16
Workflow Notifications and Approvals
Workflow Notifications Setup
Define When to Send Workflow Notifications
When notifications are enabled, each workflow task sends notifications as part of the approval process. For any
workflow task, you can change the setup to control when notifications are sent and whom they're sent to.
Note: This setup applies to email or in-app notifications, or both, depending on what's enabled.
Set Up Notification Scenarios
Here's how you define the scenarios for when to send notifications and whom to send to:
1. In the Setup and Maintenance work area, go to the Manage Task Configurations task in the Application
Extensions functional area. Or, depending on your offering, you might use a different functional area or
another approval setup task.
2. In BPM Worklist, on the Task Configuration tab, search for the workflow task in the Tasks to be configured
pane.
3. Select the task from the search results and click the Edit task icon in the toolbar.
4. Click the Notifications subtab.
5. Click the Add Notification icon if you want more scenarios, or edit what's already there.
a. In the Task Status column, select when to send the notification, for example when the task has expired.
Other than the actions or statuses available to end users, you can also select any of these:
- Alerted: Usually, when there's an error that can be fixed. The task is assigned to the error assignee,
or someone else if the task doesn't have error assignees.
- Update: Whenever the task is updated without affecting the approval status or routing. For
example, when users add a comment or attachment.
- Update Outcome: Whenever the outcome of the task is updated, for example approved or
rejected.
- All other actions: Any action that's not already in the list of values.
b. In the Recipient column, select whom to notify.
- Assignees: The users or groups that the task is currently assigned to.
- Initiator: The user who created the task.
- Approvers: The users who already approved the task as part of a sequential approval chain.
- Owner: The task owner, who's responsible for the business process that the task is related to.
- Reviewers: The user who can only add comments and attachments to a task.
- Additional Assignees: Additional users who the task is currently assigned to; this is used when
you want to specify an email address instead of selecting an existing assignee. You can specify the
user as an XPATH from the task payload using the expression builder, or enter an email address
directly.
For the Additional Assignees option, here's what you do for the Recipient field:
a. Select Additional Assignees.
416
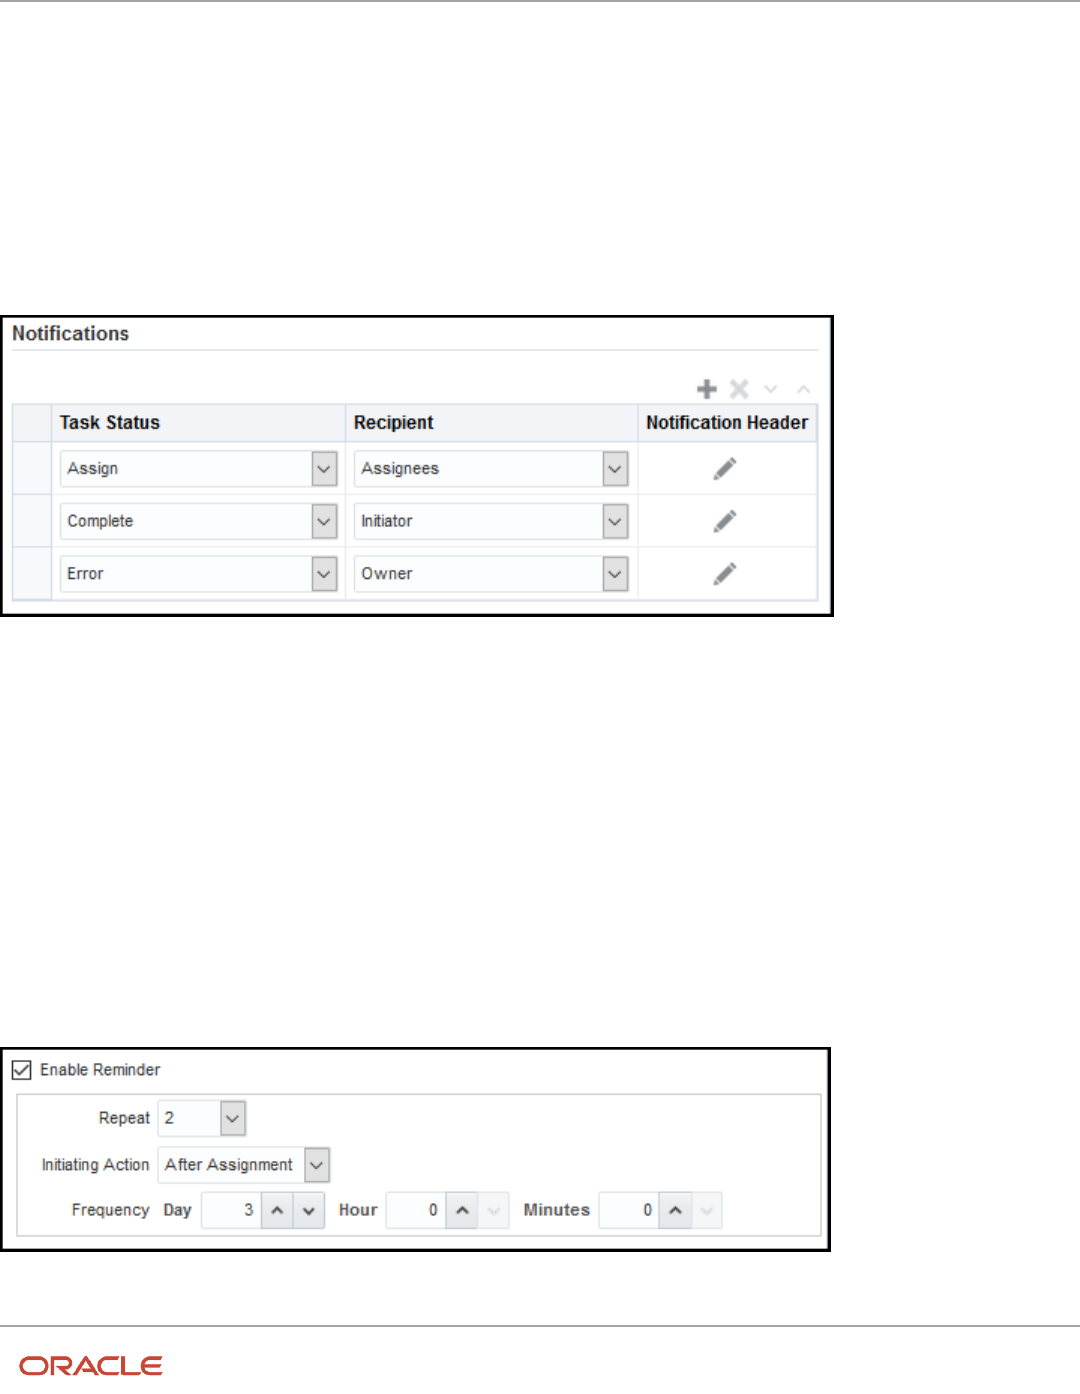
Oracle Fusion Cloud HCM
Using Common Features for HCM
Chapter 16
Workflow Notifications and Approvals
b. Click the Additional Assignees icon.
a. In the Variables tab of the Expression Builder, select the attribute you want in the hierarchy.
For example, expand Task > payload and find the XPATH attribute there.
b. Click the Insert Into Expression button.
c. Click OK.
6. To remove any notification scenario, select a row and click the Delete Notification icon.
7. In the Tasks to be configured toolbar, click the Commit task icon when you're ready to roll out your changes.
This screenshot shows three scenarios on the Notifications subtab. In this example, notifications are sent to assignees
whenever the task is assigned to them. The task initiator also gets a notification when the task is complete, and
administrators are notified if the task ends up in error.
Set Up Reminders
Other than what's sent based on the notification scenarios, you can also set up the task to send reminders.
1. On the Notifications subtab, select the Enable Reminder check box.
2. From the Repeat list, select the number of reminders to send.
3. From the Initiating Action list, select an option for when to send a reminder to the assignee:
◦
After Assignment: After the task is assigned to the assignee
◦
Before Expiration: Before the task expires on the assignee
4. Define a frequency for when to send the first reminder and the time between reminders.
5. In the Tasks to be configured toolbar, click the Commit task icon when you're ready to roll out your changes.
Let's take a look at an example. Based on the setup we see in this screenshot, a reminder is sent three days after the
user is assigned the task. Just one more reminder is sent three days after that, if the user still hasn't acted on the
assigned task.
417

Oracle Fusion Cloud HCM
Using Common Features for HCM
Chapter 16
Workflow Notifications and Approvals
Note: By default, the word Reminder appears at the beginning of the title for reminder notifications. If you don't want
that word there, set the Add Reminder Prefix to Notification Title (BPM_REMINDER_PREFIX) profile option to false.
In the Setup and Maintenance work area, use the Manage Applications Core Administrator Profile Values task in the
Application Extensions functional area. What you set for this profile option applies to all workflow tasks. This setting
will take effect after about an hour.
Related Topics
•
Search for Workflow Tasks to Configure
•
Define People to Support Workflow Tasks
•
Set Profile Option Values
•
Actions and Statuses for Workflow Tasks
Aggregate Tasks to Minimize the Number of Notifications to Send
Depending on the approval rules, a task can be assigned to the same user more than once. You can aggregate the task
so that a separate notification isn't sent to the assignee every time they're assigned the same task.
For example, the rules in a stage results in assigning a task to your manager. But then, a later stage in the same task
also results in assigning the task to them. Here's how you can set things up so they would get only one notification in
this scenario:
1. In the Setup and Maintenance work area, go to the Manage Task Configurations task in the Application
Extensions functional area. Or, depending on your offering, you might use a different functional area or
another approval setup task.
2. In BPM Worklist, on the Task Configuration tab, search for the workflow task in the Tasks to be configured
pane.
3. Select the task from the search results and click the Edit task icon in the toolbar.
4. Click the Configuration subtab.
5. In the Miscellaneous section, select a value from the Task Aggregation list:
◦
None: Send separate notifications every time the task is assigned to the same assignee.
◦
Once per task: Send a single notification to the assignee no matter how many times they're assigned the
same task.
◦
Once per stage: Send a single notification to the assignee if they're assigned the same task more than
once within a stage. If they're assigned the same task again because of another stage, they would get
another notification for that stage.
6. In the Tasks to be configured toolbar, click the Commit task icon when you're ready to roll out your changes.
Note: When users select the Request Information action for an aggregated task, it doesn’t matter what they select as
the return option. When the requested information is submitted, the task is always assigned back to the requester.
Related Topics
•
Search for Workflow Tasks to Configure
•
Actions and Statuses for Workflow Tasks
418

Oracle Fusion Cloud HCM
Using Common Features for HCM
Chapter 16
Workflow Notifications and Approvals
Remove Prefix from Subject Lines and Titles in Workflow
Notifications
By default, email and in-app workflow notifications have a prefix in the subject line or title, such as Action Required.
Remove the prefix only if you have a specific requirement, for example to grab readers’ attention about special offers.
For example, Action Required: Early Payment Offer - Accelerate Payments for up to USD 1000 becomes Early
Payment Offer - Accelerate Payments without the prefix. You can remove the prefix for any scenario in the
Notifications subtab for a particular task. For example, you can exclude the prefix when the task status is Assigned and
notifications are sent to the assignees. Your setup won't apply to FYI notifications, which will always show the prefix.
1. In the Setup and Maintenance work area, go to the Manage Task Configurations task in the Application Extensions
functional area. Or, depending on your offering, you might use a different functional area or another approval setup
task.
2. In BPM Worklist, on the Task Configuration tab, search for the workflow task in the Tasks to be configured pane.
3. Select the task from the search results and click the Edit task icon in the toolbar.
4. Click the Notifications subtab.
5. For any of the notification scenarios in the subtab, select the Exclude Notification Prefix check box.
6. In the Tasks to be configured toolbar, click the Commit task icon when you're ready to roll out your changes.
Related Topics
•
Search for Workflow Tasks to Configure
Show Approve and Reject Options in Notifications
Users can approve or reject workflow tasks from email notifications or in-app notifications, for example the notifications
list in the global header. Here's how you make sure that the Approve and Reject options appear in notifications for
certain tasks.
1. In the Setup and Maintenance work area, go to the Manage Task Configurations task in the Application
Extensions functional area. Or, depending on your offering, you might use a different functional area or
another approval setup task.
2. In BPM Worklist, on the Task Configuration tab, search for the workflow task in the Tasks to be configured
pane.
3. Select the task from the search results and click the Edit task icon in the toolbar.
4. Click the Access subtab.
5. In the Actions section, select No Signature Required for the Signature Policy list, if it's not set that way already.
6. Click the Configuration subtab.
7. In the Approval Pre-conditions section, select Optional for the Approve and Reject lists.
8. Make sure that the Perform update outcome only from task form check box isn't selected.
9. Click the Commit task icon in the Tasks to be configured toolbar when you're ready to roll out your changes.
Related Topics
•
Search for Workflow Tasks to Configure
419

Oracle Fusion Cloud HCM
Using Common Features for HCM
Chapter 16
Workflow Notifications and Approvals
Email Notifications
Add Header Content to Workflow Email Notifications
Each workflow task is configured with scenarios for sending email notifications as part of the approval process. For
each scenario in the Notifications subtab, the Notification Header column determines what's in the email header, which
appears before the email body.
• By default, all predefined notification scenarios have emails with blank headers.
• Any notification scenarios you add in the Notifications subtab would have the following header value:
concat(string('Task '), /task:task/task:title, string(' requires your attention.')). It is recommended to
change that value to null.
For some workflow tasks, you can enable configurable email notifications based on report layouts to be used instead of
the standard email notifications. The Notification Header setting doesn't apply to those configurable email notifications.
Adding Company Name or Logo
If you do want to add, for example, your company name or logo to the email header:
1. In the Setup and Maintenance work area, go to the Manage Task Configurations task or another approval setup
task in the Application Extensions functional area or another functional area.
2. In BPM Worklist, on the Task Configuration tab, search for the workflow task in the Tasks to be configured
pane.
3. Select the task from the search results and click the Edit task icon in the toolbar.
4. Open the Notifications subtab.
5. For the specific notification scenario on the Notifications subtab, click the icon in the Notification Header
column.
6. In the Edit Notification Message dialog box, delete any existing content and enter the following in the
Notification Message field.
◦
For company name: Enter text in single quotes, for example 'Oracle'. You can also use HTML
formatting, for example '<h2>Oracle</h2>'.
◦
For company logo: Enter the URL to your logo, following this syntax: '<img src="https://
cloud.oracle.com/res/images/header/oracle-cloud-logo.png" width="230" height="69" alt="Oracle
Logo">'. Replace the URL and alternative text with your own.
7. Click the Save icon in the Tasks to be configured toolbar.
Related Topics
•
Search for Workflow Tasks to Configure
•
Define When to Send Workflow Notifications
•
Add a Branding Logo and Change Other Shared Components in Workflow Notifications
Set Up the From Field in Workflow Email Notifications
By default, the From field in workflow email notifications shows <your pod>[email protected].<your data
center>.cloud.oracle.com. You can change the email address, add a sender name, or do both.
420

Oracle Fusion Cloud HCM
Using Common Features for HCM
Chapter 16
Workflow Notifications and Approvals
For example, you indicate that Your Company is the sender name to display, and the from address should be
[email protected]. The From field in emails would show: Your Company <[email protected]>. Your setting
for the from address also applies to the reply-to address.
Note: Make sure that the sender name and email address make sense together in the From field. For example, if you
set up the From field to show the task submitter’s email address, you should set up the sender name to be the task
submitter’s name.
Your users might get other types of email notifications, for example for things not related to workflow. Your setup here
doesn't affect those emails, and you might not be able to specify the sender name for those emails.
Change the From and Reply-To Address
Before you define the address for the From and Reply-To fields, set a profile option to make that change possible. If
you’re not using the default email address, you must do additional setup steps.
Here’s how you change the from and reply-to address for a specific workflow task:
1. If you plan to use any address other than the default, you need to do these steps to avoid email delivery issues:
◦
Make sure that Sender Policy Framework (SPF) is set up.
◦
Verify that whichever email address you want to use is valid.
2. In the Setup and Maintenance work area, go to the Manage Applications Core Administrator Profile Values task in
the Application Extensions functional area.
3. Set the From and Reply To Email Address Configuration Enabled
(ORA_FND_BPM_FROM_EMAIL_ADDRESS_ENABLED) profile option to Yes at the Site level. This setting will take
effect after about an hour.
4. In the Setup and Maintenance work area, go to the Manage Task Configurations task in the Application Extensions
functional area. Or, depending on your offering, you might use a different functional area or another approval setup
task.
5. In BPM Worklist, on the Task Configuration tab, search for the workflow task in the Tasks to be configured pane.
6. Select the task from the search results and click the Edit task icon in the toolbar.
7. Open the Notifications subtab.
8. On the Notifications subtab, click the Expand More icon.
9. Select one of the Email: From and Reply To address options.
◦
Select Default email address to use the default from and reply-to address. The address that you see for
this option is the default from address. The default reply-to address is separate and could be a different
predefined value.
◦
Select Submitter to show the task submitter’s email address. If that address can't be determined for a
specific notification, the default email address is used.
◦
Select the last option to show a specific email address. Enter the address in quotes, for example
"your.company@oracle.com".
10.Click the Save icon in the Tasks to be configured toolbar.
Tip: If you later want to revert to the default email address for all workflow tasks, just set the profile option back to No
at the Site level.
421

Oracle Fusion Cloud HCM
Using Common Features for HCM
Chapter 16
Workflow Notifications and Approvals
Related Topics
•
Set Up Sender Policy Framework (SPF)
•
Set Profile Option Values
•
Search for Workflow Tasks to Configure
Add Sender Name to the From Field
You can set up the sender name in application preferences for all workflow tasks, or have different setup for specific
workflow tasks. If not specified at the task level, the sender name setting defaults from the preferences.
All Workflow Tasks
Here's how you define the sender name for all workflow tasks that have no other applicable setup. This setting applies
to tasks that require action as well as FYI-only tasks.
1. If you're not in BPM Worklist:
a. Click the Notifications icon in the global header.
b. Click Show All.
c. On the Notifications page, click the Worklist button.
d. In BPM Worklist, click your user name and select Administration.
If you’re already in BPM Worklist, just open the Administration tab.
2. On the Application Preferences page that's on the Administration tab, select one of the Email "From:" Display
Name options.
◦
Select to specify the text to display. Enter your value or leave blank if you want nothing to appear in the
From field.
◦
Select Submitter to show the person who created the task.
◦
Select Previous Approver to show the previous assignee in the approval chain. When the notification is
sent to the first assignee in the approval chain, the From field shows the person who created the task.
422

Oracle Fusion Cloud HCM
Using Common Features for HCM
Chapter 16
Workflow Notifications and Approvals
3. Click Save.
Specific Workflow Task
To specify the sender name for a specific actionable or FYI task:
1. In the Setup and Maintenance work area, go to the Manage Task Configurations task or another approval setup
task in the Application Extensions functional area or another functional area.
2. In BPM Worklist, on the Task Configuration tab, search for the workflow task in the Tasks to be configured
pane.
3. Select the task from the search results and click the Edit task icon in the toolbar.
4. Open the Notifications subtab.
5. On the Notifications subtab, click the Expand More icon.
6. Select one of the Email "From:" Display Name options.
◦
Select Not Applicable so that what appears in the From field depends on the application preferences that
apply to all workflow tasks.
◦
Select the second option and do one of the following:
- Enter the text to display, surrounded by quotes, for example "Oracle".
- Leave this field blank if you want nothing to appear in the From field.
- Follow these steps to display the task submitter's user name, which is what they enter to sign in to
the application:
a. Click the Sender Name icon after the field.
b. In the Expression Builder, select task:creator.
c. Click the Insert into Expression button, then OK.
◦
Select Previous Approver to show the previous assignee in the approval chain. When the notification is
sent to the first assignee in the approval chain, the From field shows the person who created the task.
7. Click the Save icon in the Tasks to be configured toolbar.
Related Topics
•
Search for Workflow Tasks to Configure
423

Oracle Fusion Cloud HCM
Using Common Features for HCM
Chapter 16
Workflow Notifications and Approvals
Set Up Attachments in Workflow Email Notifications
Workflow email notifications can have attachments. Many workflow tasks have this already set up by default. You can
enable or disable email attachments, as well as set the maximum number and size of attachments.
Here's an example of attachments in workflow. When you request information from someone as part of the approval
process, they might respond with a message and a file attachment. The email notification you get when they respond
would include their attachment.
Enable or Disable Email Attachments
You can turn on or off email attachments for specific workflow tasks.
1. In the Setup and Maintenance work area, go to the Manage Task Configurations task in the Application
Extensions functional area. Or, depending on your offering, you might use a different functional area or
another approval setup task.
2. In BPM Worklist, on the Task Configuration tab, search for the workflow task in the Tasks to be configured
pane.
3. Select the task from the search results and click the Edit task icon in the toolbar.
4. Click the Notifications subtab.
5. Expand the More section.
6. Select or deselect the Send task attachments with email notifications check box.
7. In the Tasks to be configured toolbar, click the Commit task icon when you're ready to roll out your changes.
Set Maximum Number and Size of Attachments
These settings apply to all workflow tasks that have email attachments enabled.
1. Click the Notifications icon in the global header.
2. Click Show All.
3. On the Notifications page, click the Worklist button.
4. In BPM Worklist, click your user name and select Administration.
5. On the Application Preferences page, go to the Notification section.
6. In the Maximum Number of Email Attachments field, enter a whole number to limit the number of
attachments in a single email.
7. In the Maximum Size of Email Attachments (in MB) field, enter a whole number up to 10 to limit the size
of individual attachments in the email. No matter what you enter here, the total size of an email, including all
attachments, can't be more than 15 MB.
Tip: If you want the emails to have links to files instead of having the files attached to the email, enter 0 in at
least one of these two fields.
8. Click Save.
Related Topics
•
Search for Workflow Tasks to Configure
Send Test Workflow Email Notifications to One Address
While testing workflow setup, you can send all email notifications to a single address so that your users don't receive
any test emails. The test emails are still sent based on the notification scenarios defined for the particular workflow task.
424

Oracle Fusion Cloud HCM
Using Common Features for HCM
Chapter 16
Workflow Notifications and Approvals
Specifying the Email Address
To enter the email address to send test emails to:
1. Click the Notifications icon in the global header.
2. Click Show All.
3. On the Notifications page, click the Worklist button.
4. In BPM Worklist, click your user name and select Administration.
5. On the Application Preferences page that's on the Administration tab, click the Test Notification Email
Address icon.
6. In the dialog box, enter an email address in the Test Notification Email Address field.
7. Click OK and then Save.
After you're done testing, go back and delete the email address that you entered.
Related Topics
•
More Setup for Workflow Email Notifications
•
Define When to Send Workflow Notifications
•
Disable or Enable Workflow Notifications
More Setup for Workflow Email Notifications
The More section on the Notifications subtab has other setup options for email notifications. In general, you would
leave the default settings in this section for every workflow task, but here are some setup options you should know
about.
1. In the Setup and Maintenance work area, go to the Manage Task Configurations task in the Application
Extensions functional area. Or, depending on your offering, you might use a different functional area or
another approval setup task.
2. In BPM Worklist, on the Task Configuration tab, search for the workflow task in the Tasks to be configured
pane.
3. Select the task from the search results and click the Edit task icon in the toolbar.
4. Click the Notifications subtab.
5. Expand the More section.
Here's what happens if these check boxes in the More section are selected:
◦
Make notification secure (exclude details): Exclude business transaction details in email notifications.
◦
Hide End User Web URL in notifications: Remove the default first line in the email body, which is:
Access this task in the Workspace Application or take direct action using the links in this email. This
line includes a link that opens BPM Worklist. It's recommended to select this check box.
◦
Make notification actionable: Include links in email notifications that users can click to directly take
action, for example to approve or reject.
◦
Send task attachments with email notifications: Include files attached to the task as attachments in
the email notifications.
6. If you do make any changes, click the Commit task icon in the Tasks to be configured toolbar when you're
ready to roll out your changes.
425

Oracle Fusion Cloud HCM
Using Common Features for HCM
Chapter 16
Workflow Notifications and Approvals
Configurable Workflow Notifications
Overview of HCM Configurable Workflow Notifications
As part of workflow tasks, the workflow automatically sends notifications to your users. For example, when a user
submits a performance goal for approval, the approvers receive a notification with the approval request.
For some flows, Oracle Business Intelligence (BI) Publisher reports determine the notification content and format,
and you can edit the report to configure the email and in-app notifications. These report-based notifications are
configurable, and optimized for viewing on mobile devices. In addition to getting notifications in email, users can also
view in-app notifications, for example by
• Clicking the Notifications icon in the global header and opening a notification
• Going to the Worklist: Notifications and Approvals work area and opening a notification
• Clicking the In-App Notification link at the end of an email notification
Such business flows include the following HCM workflow tasks:
• Absence recording approvals
• Add contact
• Add contingent worker
• Add nonworker
• Add pending worker
• Add terms
• Additional Assignment Info
• Approve time cards
• Cancel work relationship
• Career development
• Change assignment
• Change location
• Change manager
• Change work schedule
• Change working hours
• Delete assignment
• Discretionary disbursement approvals
• Donation approvals
• Employment start dates
• Feedback
• Goal approvals
• Goal management
• Local and global transfer
426

Oracle Fusion Cloud HCM
Using Common Features for HCM
Chapter 16
Workflow Notifications and Approvals
• Manage areas of responsibility
• Manage allocated checklists
• Manage contracts
• Manage directs
• Manage document records
• Manage eligible jobs
• Manage employment
• Manage grades
• Manage grade ladders
• Manage grade rates
• Manage jobs
• Manage locations
• Manage organizations
• Manage positions
• Manage work relationship
• New assignment
• New hire
• New work relationship
• Performance document approvals
• Performance management
• Person external identifiers
• Person notes
• Personal information
• Promote
• Share information
• Talent review
• Termination
• Transfer
Process Overview
The process to generate email and in-app notifications is the same as generating other types of report output. The
process involves various types of objects in the business intelligence catalog, including data models, subtemplates, style
templates, and reports.
427

Oracle Fusion Cloud HCM
Using Common Features for HCM
Chapter 16
Workflow Notifications and Approvals
This figure shows how these BI objects work together to generate the notification content.
• Data Sources: Store the attributes and attribute values for business objects and transactions in the application
(example of data sources being transaction tables)
• Data Model: Determines which attributes from data sources are available to be included in the notification and
how that data is retrieved
• Subtemplate: Provides common components, for example a branding logo and buttons, that can be reused in
multiple reports
• Style Template: Provides styles such as the type of lines and fonts to use in tables, or the font type, size, and
color to use for headings
• Report: Contains a layout template that determines:
◦
Which attributes appear in the notification, from the data model used for the report
◦
What the notification looks like, leveraging components from the subtemplate and styles from the style
template used for the report
• HTML: Is the output generated from the report
• Email Notification: Has the HTML output embedded in the email body
• In-App Notification: Has the HTML output embedded in the application UI
Each workflow task with configurable notifications has a corresponding predefined report in
the BI catalog. For example, the goal management approval notifications report contains the
PerformanceGoalApprovalNotificationsReport layout template and uses the PerformanceGoalApprovalNotificationsDM
data model. The generated output is included in emails that are sent to users for goal approval.
Notification Modifications
After you enable configurable email and in-app notifications, the predefined reports and related objects in the BI
catalog work by default. The report-based notifications provide the same information as the standard notifications, but
in a format optimized for mobile devices. If you must modify the notifications, you can edit copies of the predefined
428

Oracle Fusion Cloud HCM
Using Common Features for HCM
Chapter 16
Workflow Notifications and Approvals
reports and data models, but not the style template. You proceed as you would to edit any report or data model in the
catalog, for example:
1. Find a predefined report for goal approvals in the business intelligence catalog.
2. Use the Customize option to create a copy of the report that's linked to the original.
3. Edit the copied report layout template.
For more information about configuring reports, see Oracle Human Capital Management Cloud Creating and
Administering Analytics and Reports. You should get familiar with reports and BI Publisher in general before configuring
workflow email and in-app notifications. Aspects specific to email and in-app notifications include:
• You use only the Template Builder for Word add-in to configure the .rtf template in Microsoft Word. You don't
use the layout editor or other tools available for configuring report layout.
• You usually edit a copy of predefined layout templates, rather than create reports or layout templates.
Security
To configure reports and data models for email and in-app notifications, you must have one of these duty roles or
privilege:
• BI Platform Administrator duty role
• Publisher Data Model Developer duty role
• Manage BI Publisher Template privilege
Related Topics
•
Best Practices for Content and Layout in Workflow Notifications
•
Set Up for RTF and Excel Report Layout Templates
•
Templates and Data Models Used for HCM Notifications Based on Reports
Set Up Profile Options for Configurable Workflow Notifications
You configure profile options to specify the HCM applications that use the BI Publisher reports rather than the default
FYI and approval notifications. To use BI Publisher reports rather than the default workflow and approval notifications,
you need to:
• Configure profile options for email and in-app notifications to specify the HCM applications that use the BI
Publisher reports.
• Download and install the Template Builder for Word add-in.
You configure profile options using the Manage Administrator Profile Values task in the Setup and Maintenance work
area. The application will always first check individual product profile values and only then the family-level profile
option. If both are specified then the product-level profile option takes precedence over the family-level profile option.
Let's look how to configure these profile options
1. In the Setup and Maintenance work area, go to the Manage Administrator Profile Values task.
2. Search and select the profile option.
3. Click New to add a new profile value.
4. Select profile level as Site.
5. Enter True in the Profile Value field
6. Click Save and Close.
429

Oracle Fusion Cloud HCM
Using Common Features for HCM
Chapter 16
Workflow Notifications and Approvals
This table shows the profile option codes that determine which business processes use BI Publisher templates for email
notifications. It also describes the effect of each code.
Business Processes Profile Option Code Profile Display Name Effect
All Absence Management
BIP_EMAIL_NOTIFICATION_HCM_
ANC
BI Publisher Notifications Enabled
for Absence Management
The application first checks this
setting. If set to true, all Absence
Management business processes
that can use BI Publisher reports
for workflow notifications use
them.
All Compensation
BIP_EMAIL_NOTIFICATION_HCM_
COMPENSATION
BI Publisher Notifications Enabled
for Compensation
The application first checks
this setting. If set to true, all
Compensation business processes
that can use BI Publisher reports
for workflow notifications use
them.
All Global Human Resources
BIP_EMAIL_NOTIFICATION_HCM_
PER
BI Publisher Notifications Enabled
for Global Human Resources
The application first checks this
setting. If set to true, all Global
Human Resources business
processes that can use BI Publisher
reports for workflow notifications
use them.
All Recruiting
BIP_EMAIL_NOTIFICATION_HCM_
IRC
BIP_EMAIL_NOTIFICATION_IRC_
PRODUCT_LEVEL
The application first checks this
setting. If set to true, all Recruiting
business processes that can use
BI Publisher reports for workflow
notifications use them.
All Talent Management
BIP_EMAIL_NOTIFICATION_HCM_
TALENT
BI Publisher Notifications Enabled
for Talent Management
The application first checks this
setting. If set to true, all Talent
Management business processes
that can use BI Publisher reports
for workflow notifications use
them.
All Time and Labor
BIP_EMAIL_NOTIFICATION_HCM_
HXT
BIP_EMAIL_NOTIFICATION_HCM_
HXT
The application first checks this
setting. If set to true, all Time and
Labor business processes that
can use BI Publisher reports for
workflow notifications use them.
All Work Life
BIP_EMAIL_NOTIFICATION_HCM_
WLF
BI Publisher Notifications Enabled
for Work Life
The application first checks this
setting. If set to true, all Work Life
business processes that can use
BI Publisher reports for workflow
notifications use them.
All HCM
BIP_EMAIL_NOTIFICATION_HCM
BIP EMAIL NOTIFICATION PER
FAMILY LEVEL
The application checks this
setting next. If set to true, all HCM
business processes that can use
BI Publisher reports for workflow
notifications use them.
430

Oracle Fusion Cloud HCM
Using Common Features for HCM
Chapter 16
Workflow Notifications and Approvals
Business Processes Profile Option Code Profile Display Name Effect
This table shows the profile option codes that determine which business processes use BI Publisher templates for in-
app notifications. It also describes the effect of each code.
Business Processes Profile Option Code Profile Display Name Effect
All Absence Management
BIP_ONLINE_NOTIFICATION_
HCM_ANC
BIP_ONLINE_NOTIFICATION_
HCM_ANC
The application first checks this
setting. If set to true, all Absence
Management business processes
that can use BI Publisher reports
for in-app notifications use them.
All Compensation
BIP_ONLINE_NOTIFICATION_
HCM_COMPENSATION
BI Publisher Worklist Notifications
Enabled for Compensation
The application first checks
this setting. If set to true, all
Compensation business processes
that can use BI Publisher reports
for in-app notifications use them.
All Global Human Resources
BIP_ONLINE_NOTIFICATION_
HCM_PER
BI Publisher Worklist Notifications
Enabled for Global Human
Resources
The application first checks this
setting. If set to true, all Global
Human Resources business
processes that can use BI Publisher
reports for in-app notifications use
them.
All Goal Management
BIP_ONLINE_NOTIFICATION_
HCM_GOALS
BI Publisher Worklist Notifications
Enabled for Goals and Career
Management
The application first checks this
setting. If set to true, all Goal and
Career Management business
processes that can use BI Publisher
reports for in-app notifications use
them.
All Recruiting
BIP_ONLINE_NOTIFICATION_
HCM_IRC
BIP_ONLINE_NOTIFICATION_IRC_
PRODUCT_LEVEL
The application first checks this
setting. If set to true, all Recruiting
business processes that can use
BI Publisher reports for in-app
notifications use them.
All Talent Management
BIP_ONLINE_NOTIFICATION_
HCM_TALENT
BI Publisher Worklist Notifications
Enabled for Talent Management
The application first checks this
setting. If set to true, all Talent
Management business processes
that can use BI Publisher reports
for in-app notifications use them.
All Time and Labor
All Time and Labor
BI Publisher Worklist Notifications
Enabled for Time and Labor
The application first checks this
setting. If set to true, all Time and
Labor business processes that can
use BI Publisher reports for in-app
notifications use them.
All Work Life
BIP_ONLINE_NOTIFICATION_
HCM_WLF
BI Publisher Worklist Notifications
Enabled for Work Life
The application first checks this
setting. If set to true, all Work Life
431

Oracle Fusion Cloud HCM
Using Common Features for HCM
Chapter 16
Workflow Notifications and Approvals
Business Processes Profile Option Code Profile Display Name Effect
business processes that can use
BI Publisher reports for in-app
notifications use them.
All HCM
BIP_ONLINE_NOTIFICATION_HCM
BI Publisher Worklist Notifications
Enabled for Human Capital
Management
The application checks this
setting next. If set to true, all HCM
business processes that can use
BI Publisher reports for workflow
notifications use them.
For configurable email notifications, make sure that the email domain setup is correct in BI Publisher so that the emails
get sent.
Change the Subject Line for a Notification
You can change the subject line of a notification by adding or replacing attributes. This will help make the notification
unique and enable users to distinguish the notification when they receive it.
Watch video
1. Sign in to the BPM Worklist using https://host:port/integration/worklistapp.
2. From the Username drop-down list, select Administration and then select the Task Configuration tab.
3. Search for the task. This displays the default title for the notification.
4. Click Edit. On the General tab, click Title for the Translation dialog box.
5. Under the English locale, click Add. Enter the key as per the project naming convention. Enter a new Title.
6. Choose Edit to open the Edit Arguments dialog box.
7. Click Edit in the first argument.
8. In the expression builder new window, expand the Variables for task:payload. Find the desired variable. For example,
DisplayName for person’s display name, select and click Preview.
9. Click Insert into Expression.
10.Click Edit in the second argument.
11. In the expression builder new window, expand the Variables for task:payload. Find the desired variable and click
Preview.
12. Click Insert into Expression, then OK to close.
13. Click OK and then click OK to close all dialog boxes.
14.Click Save and OK. Then click Commit Task and OK.
15. Verify the results.
Reflect Changes from Edited Reports Sooner
When you use the Customize option to edit a predefined report, your changes won't be reflected until a refresh that
happens every 24 hours. For changes to take effect sooner, use profile options to change the refresh interval.
432

Oracle Fusion Cloud HCM
Using Common Features for HCM
Chapter 16
Workflow Notifications and Approvals
The refresh applies your changes to Oracle Fusion Cloud Applications, but you can immediately see your changes in
Microsoft Word and Oracle Analytics Publisher. For example, you download a predefined .rtf layout template and edit
the file in Word. You can see the modified output using the preview in Word. After you upload the .rtf file to the catalog,
you can open the report in Analytics Publisher and see your changes. But, if you're accessing the report from Fusion
Applications, you see the updated output only after the refresh.
When you're done configuring and testing reports, use the same profile options to turn the refresh back to every 24
hours. But even if you don't, the refresh automatically resets to 24 hours when it's been more than 8 hours since you set
the profile options. The 24-hour refresh interval helps optimize performance.
Create Profile Options to Control the Refresh
Your profile options can apply to all workflow tasks, a product family, or a product. Based on the scope you want, your
profile option must have a profile option code that follows a certain format.
Scope Profile Option Code Examples
Global
BIP_CLIENT_REFRESH_TIME
BIP_CLIENT_REFRESH_TIME
Product Family
BIP_CLIENT_REFRESH_TIME_<FAMILY>
• BIP_CLIENT_REFRESH_TIME_FIN
• BIP_CLIENT_REFRESH_TIME_HCM
• BIP_CLIENT_REFRESH_TIME_PRC
• BIP_CLIENT_REFRESH_TIME_PRJ
• BIP_CLIENT_REFRESH_TIME_SCM
Product
BIP_CLIENT_REFRESH_TIME_<FAMILY>_
<PRODUCT>
• BIP_CLIENT_REFRESH_TIME_FIN_AP
• BIP_CLIENT_REFRESH_TIME_HCM_PER
• BIP_CLIENT_REFRESH_TIME_PRC_PON
• BIP_CLIENT_REFRESH_TIME_PRJ_PJE
• BIP_CLIENT_REFRESH_TIME_SCM_EGO
The profile options with a smaller scope take precedence. For example, you have profile option A with a global scope
and profile option B with a product scope. If you're currently configuring notifications for a particular product, use
profile option B to adjust the refresh time just for that product. But based on profile option A, the refresh is still at 24
hours for all other configurable notifications in all other products. Profile option B takes precedence over profile option
A only for that one product.
Tip: To find the product family or product code, go to the Setup and Maintenance work area. Use the Manage
Taxonomy Hierarchy task in the Application Extensions functional area for any offering. In the hierarchy, expand
the root node and then the Oracle Fusion node. Find the row for the family or product and look in the Module Key
column for the code.
Now you're ready to create your profile options!
1. In the Setup and Maintenance work area, go to the Manage Applications Core Profile Options task in the
Application Extensions functional area for your offering.
2. On the Manage Applications Core Profile Options page, click the New icon.
433

Oracle Fusion Cloud HCM
Using Common Features for HCM
Chapter 16
Workflow Notifications and Approvals
3. On the Create Profile Option page, enter the profile option code in the format that corresponds to the scope
you want.
4. Enter a display name that you can easily remember to help you find the profile option later.
5. From the Application list, select Oracle Middleware Extensions for Applications.
6. From the Module list, select Application Core.
7. Specify a start date.
8. Click Save and Close.
9. On the Manage Applications Core Profile Options page, make sure that your new profile option is selected in
the Search Results: Profile Options subsection.
10. In the <Profile Option>: Profile Option Levels subsection, select the Enabled and Updatable check boxes for
the Site level.
11. Save your work.
Set the Refresh Interval
In the Setup and Maintenance work area, go to the Manage Applications Core Administrator Profile Values task in
the Application Extensions functional area. Set your profile option at the Site level and enter 15 or higher for the refresh
interval in minutes. If you enter 15, your changes are reflected in Fusion Applications 15 minutes after they're saved
in the BI catalog. For example, 15 minutes after you upload an edited .rtf layout template to the catalog, or after you
update report properties in Analytics Publisher.
CAUTION: Make sure to enter a whole number.
When you're done making and testing your changes, set the profile option back to 1440, which is 24 hours in minutes. If
you forget and leave your profile option as is for longer than 8 hours, don't worry! At that point, the profile option resets
itself back to 1440 minutes.
Related Topics
•
Set Profile Option Values
•
Modules in Application Taxonomy
•
How do I update existing setup data?
Templates and Data Models Used for HCM Notifications Based on
Reports
You can configure Oracle Business Intelligence (BI) Publisher reports to send notifications (email and in-app) for some
HCM workflow tasks. Each business process uses different BI Publisher templates and data models for the email and in-
app notifications.
Templates and Associated Data Models
This table shows the BI Publisher templates and the associated data models that are available for each business process.
Business Process Template (Data Model)
Career Development
CareerDevelopmentApprovalFYIReport (CareerDevelopmentApprovalNotificationDM)
CareerDevelopmentApprovalReport (CareerDevelopmentApprovalNotificationDM)
434

Oracle Fusion Cloud HCM
Using Common Features for HCM
Chapter 16
Workflow Notifications and Approvals
Business Process Template (Data Model)
CareerDevelopmentFYINotification (CareerDevelopmentFyiDM)
Journeys ChecklistWelcomeReport (ChecklistWelcomeDataModel)
ChecklistTaskCombinedNotificationReport (ChecklistTaskCombinedNotificationDataModel)
ChecklistTaskPerformerFYIReport (TaskNotificationDataModel)
TaskActionRequiredReport (TaskNotificationDataModel)
TaskFYIReport (TaskNotificationDataModel)
Feedback
NoteSentToManagerReport (PersonNotes)
NoteSentToWorkerReport (PersonNotes)
Goal Management
PerformanceGoalApprovalNotificationsReport (PerformanceGoalApprovalNotificationsDM)
PerformanceGoalNotificationsReport (PerformanceGoalNotificationsDM)
Performance Management
PerformanceApprovalNotificationsReport (PerformanceApprovalDM)
PerformanceFyiNotificationsReport (PerformanceFYIDM)
Profile Management
ProfilesApprovalNotificationFYIReport (ProfilesApprovalNotificationDM)
ProfilesApprovalNotificationReport (ProfilesApprovalNotificationDM)
ProfileChangeNotificationReport (ProfileChangeNotification)
Talent Review
TalentCalibFYIReport (TalentCalibFYIDM)
Time and Labor
ApprovalEmailNotification (ApprovalEmailNotification)
Workforce Deployment
AddAssignmentReport (EmploymentCreateProcesses)
AddContactReport (AddContact)
AddCWKReport (EmploymentCreateProcesses)
AddNWKReport (EmploymentCreateProcesses)
AddPWKReport (EmploymentCreateProcesses)
AddTermsReport (EmploymentCreateProcesses)
AddWorkRelationshipReport (EmploymentCreateProcesses)
AssignmentChangeReport (EmploymentUpdateProcesses)
CancelWorkRelationshipReport (EmploymentWRProcesses)
ChangeLegalEmployerReport (EmploymentCreateProcesses)
435

Oracle Fusion Cloud HCM
Using Common Features for HCM
Chapter 16
Workflow Notifications and Approvals
Business Process Template (Data Model)
ChangeLocationReport (EmploymentUpdateProcesses)
ChangeManagerReport (EmploymentUpdateProcesses)
ChangeSalaryReport (ChangeSalary)
ChangeWorkHoursReport (EmploymentUpdateProcesses)
CreateGradeLadderReport (ManageGradeLadders)
CreateGradeRateReport (ManageGradeRates)
CreateGradeReport (ManageGrades)
CreateJobReport (ManageJobs)
CreateLocationReport (ManageLocations)
CreateOrganizationReport (ManageOrganizations)
CreatePositionReport (ManagePositions)
DeleteGradeLadderReport (ManageGradeLadders)
DeleteGradeRateReport (ManageGradeRates)
DeleteGradeReport (ManageGrades)
DeletePositionReport (ManagePositions)
DTDeleteJobReport (ManageJobs)
DTDeleteLocationReport (ManageLocations)
DTDeleteOrganizationReport (ManageOrganizations)
EligibleJobsReport (EmploymentUpdateProcesses)
EmploymentStartDatesReport(EmploymentStartDates)
ExternalIdentifierReport (ExternalIdentifier)
LocalAndGlobalTransferReport(LocalAndGlobalTransfer)
ManageAssignmentEFFReport(AdditionalAssignmentInfo)
ManageContractsReport(ManageContracts)
ManageEmploymentReport(EmploymentUpdateProcesses)
ManageDirectsReport (EmploymentUpdateProcesses)
ManageDorReport (ManageDOR)
ManageEmploymentReport (EmploymentUpdateProcesses)
ManageWorkRelationshipReport (EmploymentWRProcesses)
NewHireReport (EmploymentCreateProcesses)
NoteSentToManagerReport (PersonNotes)
NoteSentToWorkerReport (PersonNotes)
436

Oracle Fusion Cloud HCM
Using Common Features for HCM
Chapter 16
Workflow Notifications and Approvals
Business Process Template (Data Model)
NotifyCopyConflictReport (EmploymentWRProcesses)
NotifyDeleteConflictReport (EmploymentWRProcesses)
NotifyMultipleConflictReport (EmploymentWRProcesses)
NotifyWithdrawConflictReport (EmploymentWRProcesses)
PersonalInformationReport (PersonalInformation)
PersonalInformation_AddressReport (PersonalInformation)
PersonalInformation_BiographicalReport (PersonalInformation)
PersonalInformation_CitizenshipReport (PersonalInformation)
PersonalInformation_CommunicationReport (PersonalInformation)
PersonalInformation_ContactRelationshipReport (PersonalInformation)
PersonalInformation_DemographicReport (PersonalInformation)
PersonalInformation_DisabilityReport (PersonalInformation)
PersonalInformation_DriversLicenseReport (PersonalInformation)
PersonalInformation_NameReport (PersonalInformation)
PersonalInformation_PassportReport (PersonalInformation)
PersonalInformation_VisaPermitReport (PersonalInformation)
PromotionReport (EmploymentUpdateProcesses)
ResponsibilityInfoFYIReport (ManageAOR)
ResponsibilityInfoReport (ManageAOR)
ShareInfoApprovalFYIReport (ShareInformation)
ShareInfoApprovalReport (ShareInformation)
ShareInfoFYIReport (ShareInformation)
ShareInfoRejectFYIReport (ShareInformation)
TerminationReport (EmploymentWRProcesses)
TransferReport (EmploymentUpdateProcesses)
UpdateGradeLadderReport (ManageGradeLadders)
UpdateGradeRateReport (ManageGradeRates)
UpdateGradeReport ((ManageGrades))
UpdateJobReport (ManageJobs)
UpdateLocationReport (ManageLocations)
UpdateOrganizationReport (ManageOrganizations)
437

Oracle Fusion Cloud HCM
Using Common Features for HCM
Chapter 16
Workflow Notifications and Approvals
Business Process Template (Data Model)
UpdatePositionReport (ManagePositions)
Best Practices for Content and Layout in Workflow Notifications
Here are some recommendations, tips, and reminders regarding the content and format of your configurable workflow
notifications. Keep these in mind while you work on layout templates.
Follow the General Structure
In general, the workflow notifications contain a set of components that are displayed in a certain order. When you
modify notifications, try to keep to this general structure and don't remove essential elements such as the action
buttons.
The callouts in this figure identify the email notification components listed in the following table.
438

Oracle Fusion Cloud HCM
Using Common Features for HCM
Chapter 16
Workflow Notifications and Approvals
The callouts in this figure identify the in-app notification components listed in the following table. In addition to
describing each component, the table also indicates if the component appears in the email notification, in-app
notification, or both.
439
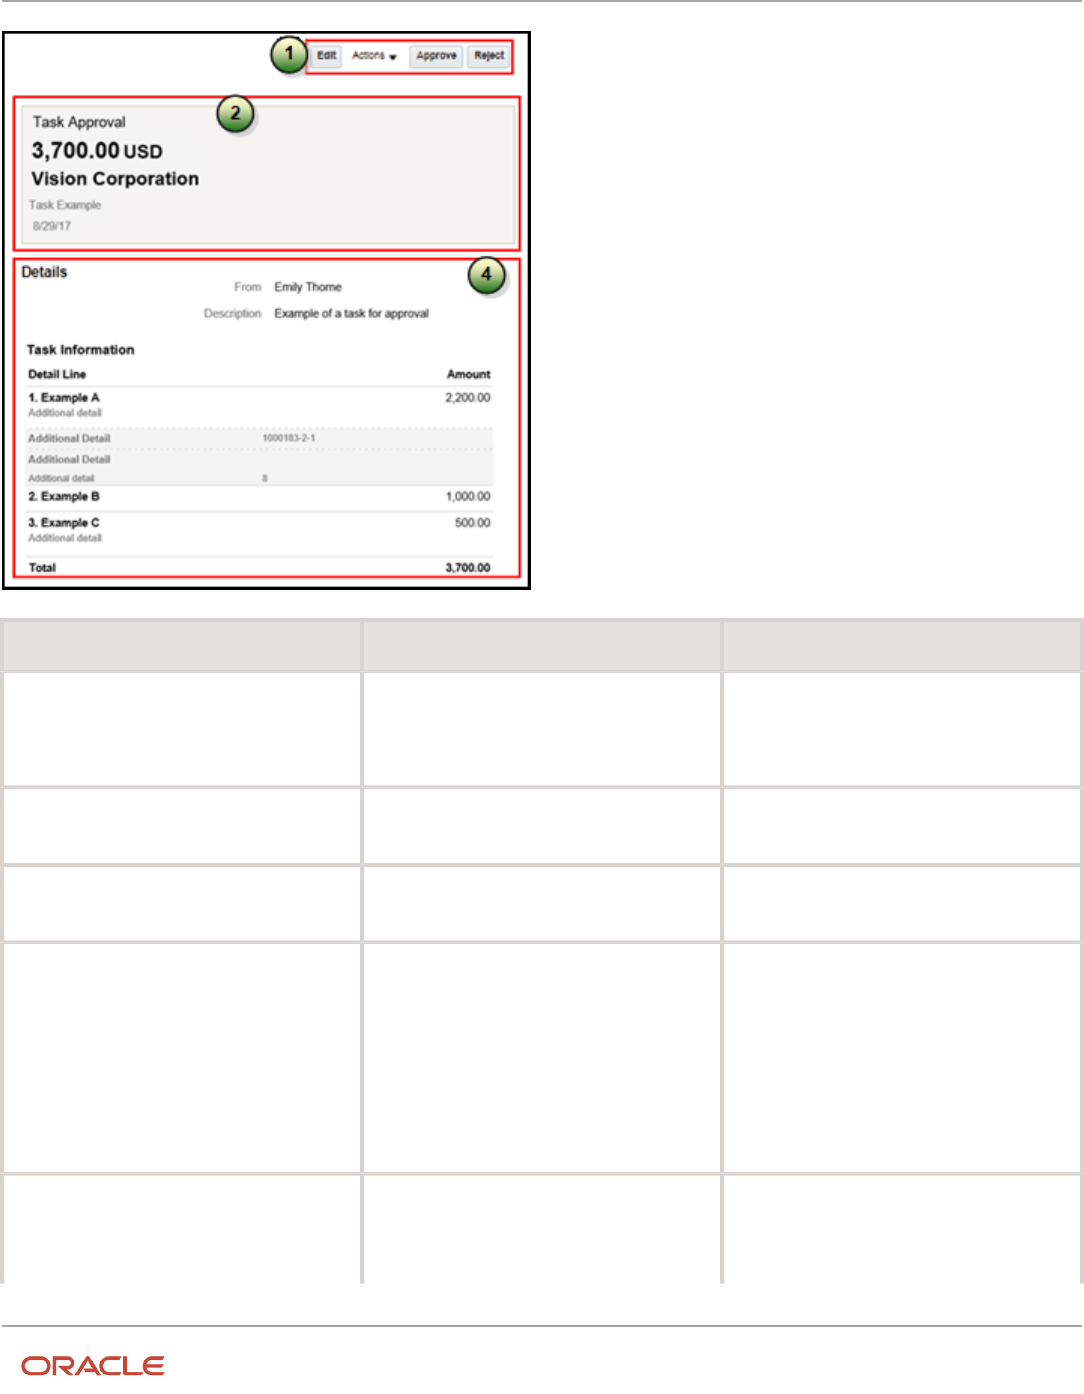
Oracle Fusion Cloud HCM
Using Common Features for HCM
Chapter 16
Workflow Notifications and Approvals
Callout Component Notification Type
1
Buttons with the primary actions to take on
the task, such as Approve and Reject. These
buttons aren't part of the configurable, report-
based notification content.
In-app
2
Notification header listing key attributes of the
workflow task and the associated transaction.
Both
3
Buttons for the primary actions to take on the
task, such as Approve and Reject.
Email
4
Notification body that usually includes
transaction and line level details, displayed in
tables or sets of attributes with corresponding
values. The data model for the report restricts
the total number of rows displayed in some
of the tables. If the limit is exceeded, the table
footer provides a link to the transaction details
page, where users can view all the rows. To
change this limit, you can edit a copy of the
data model.
Both
5
Approval history, including any attachments
that users in the history uploaded for the task.
You can't edit the approval history component,
which usually appears in the body of only email
notifications. For in-app notifications, you can
Email (or both, in rare cases)
440

Oracle Fusion Cloud HCM
Using Common Features for HCM
Chapter 16
Workflow Notifications and Approvals
Callout Component Notification Type
usually view the history by clicking the Actions
button and selecting History.
6
Buttons for the primary actions again.
Email
7
A link to the corresponding transaction page,
and another link to the in-app notification.
Email
Keep Mobile in Mind
Because users can view the workflow notifications on mobile devices, always consider mobile first and keep the
notifications as simple as possible. For example:
• Don't put too much content horizontally, such as too many columns in tables.
• Keep all text, including attributes and column headings, as short as possible.
• Center align lists of attributes and their values, if they appear outside tables.
Note: For workflow tasks with configurable notifications, make sure that the Hide End User Web URL in
notifications check box is selected in BPM Worklist. If not, a default first line will appear in the emails, in addition to
what comes from the report layout template. It’s best to hide this additional content because it might cause emails to
not render well, especially when viewed from mobile devices.
Make sure to test your email notifications on mobile devices. As part of your testing, confirm that the default line about
accessing the task in the Workspace Application isn’t showing up.
Related Topics
•
More Setup for Workflow Email Notifications
•
Create RTF Templates Using the Template Builder for Word
Add a Branding Logo and Change Other Shared Components in
Workflow Notifications
A predefined subtemplate has common components for all workflow notifications based on predefined report layouts.
You can edit these shared components so that the same changes apply to your notifications.
Here are some of the shared components in the subtemplate:
• Branding logo, if you add one to the subtemplate, which would appear as the first component in the email body.
The logo appears in email notifications only.
• Action buttons in email notifications.
• Links at the end of the email notification, one to the corresponding transaction page, and another to the in-app
notification.
441

Oracle Fusion Cloud HCM
Using Common Features for HCM
Chapter 16
Workflow Notifications and Approvals
For example, you can add a branding logo in the designated place in the subtemplate, or change the text on the buttons
and links.
Note:
• When you make a copy of a predefined layout template to edit, the copy automatically inherits the same
predefined subtemplate.
• Other than this central subtemplate for all notifications, you might also find predefined subtemplates specific
to a product family. We talk about the central one here, but you would generally follow the same steps for other
subtemplates.
• You must edit a copy of the subtemplate in the Custom folder of the BI catalog. Don't directly update the
predefined subtemplate, including renaming it.
• When you work on your copy of the subtemplate, add your own content or edit what's already there, but don't
remove anything.
• The exact steps can vary depending on your version of Microsoft Word.
Modify Shared Components in the Subtemplate
Here's how you edit a copy of the predefined subtemplate that has the shared components:
1. Click Navigator > Tools > Reports and Analytics.
2. Click the Browse Catalog icon.
3. In the catalog (the Folders pane), expand Shared Folders > Common Content > Templates.
4. For Workflow Notification Subtemplate, click More and select Customize.
If you're not using the Customize option, even though it's recommended:
a. Click Copy in the toolbar with Workflow Notification Subtemplate selected.
b. In the catalog, expand Shared Folders > Custom > Common Content > Templates. Create a Templates
folder in this location if it doesn't exist.
c. Click Paste in the toolbar.
5. In the catalog, with the Templates folder open under the Custom folder, click More for the subtemplate and
select Rename to give it a new name.
6. Click the Edit link for the renamed subtemplate.
7. In the Templates section, click the link in the Locale column.
8. Save the subtemplate .rtf file to your computer.
9. Open the .rtf file with Microsoft Word.
◦
To add a logo, insert your own image in the subtemplate.
◦
To change button or link text, edit the text accordingly. Make the same edits wherever that button or link
text appears in the subtemplate.
442

Oracle Fusion Cloud HCM
Using Common Features for HCM
Chapter 16
Workflow Notifications and Approvals
CAUTION: To make sure that your layout templates reflect these changes without more rework, don't
edit any other text in the subtemplate .rtf file.
10. Update Word options so that existing links remain intact in the subtemplate.
a. Click File > Options > Advanced.
b. In the Word Options dialog box, click Web Options in the General section.
c. In the Web Options dialog box, open the Files tab.
d. Deselect the Update links on save check box.
11. Save your changes in Word.
Upload the Modified Subtemplate
Now you upload your subtemplate to the BI catalog:
1. In the catalog, expand Shared Folders > Custom > Common Content > Templates.
2. Click Edit for your subtemplate.
3. In the Templates section, click the Upload icon.
4. Select your modified .rtf subtemplate and a locale, and click OK to replace the original subtemplate.
Point Layout Templates to Your Subtemplate
Update all the report layout templates that you want to apply your subtemplate to:
1. In Microsoft Word, open the .rtf file for the layout template, as you would to make any other changes to the
notification.
2. At the beginning of the document, change the subtemplate reference. For example, change <?
import:xdoxsl:///Common Content/Templates/Workflow Notification Subtemplate.xsb?> to <?import:xdoxsl:///
Custom/Common Content/Templates/My Workflow Notification Subtemplate.xsb?>.
3. Save your work.
4. Test things out to make sure you see your subtemplate changes in the notification output.
Related Topics
•
What is a subtemplate?
•
Customize Pixel-Perfect Reports
Use Quick Parts for Workflow Notifications
Use the Quick Parts feature in Microsoft Word to insert reusable pieces of formatted content. When you edit copies of
predefined report layout templates for workflow notifications in Word, you can add predefined Quick Parts content to
your .rtf file.
Quick Parts are helpful when you do more advanced work on layout templates. For example, from the Quick Parts
gallery, you can select and add a table in a format that's consistent with predefined tables already on your notifications.
The predefined Quick Parts content is available in a style template .dotx file on My Oracle Support.
Note: The exact steps can vary depending on your version of Microsoft Word.
443

Oracle Fusion Cloud HCM
Using Common Features for HCM
Chapter 16
Workflow Notifications and Approvals
Prerequisites
To get the predefined Quick Parts content into your Quick Parts gallery:
1. Open Quick Parts for Configurable Workflow Notifications (2215570.1) on My Oracle Support at https://
support.oracle.com.
2. Download the .dotx file and save it to your Microsoft Word template folder, for example C:\Users\<user name>
\AppData\Roaming\Microsoft\Templates. You need to save the .dotx file where the Normal.dotm Microsoft
Word template is stored.
Also, to preview your layout template changes before uploading the .rtf file back to the BI catalog:
• Generate sample report data from the data model for the report that you're editing.
• Download a local copy of the subtemplate that applies to the layout template.
Adding Quick Parts Content to Workflow Notifications
To insert content from the Quick Parts gallery into a layout template:
1. In the BI catalog, find the predefined report with the layout template that you want to modify.
2. For the report, click More and select Customize.
If you're not using the Customize option:
a. Copy the predefined report and paste it in an appropriate subfolder within the Custom folder.
b. Click the Edit link for the copied report.
3. Click Edit for the layout template to insert Quick Parts content into, and save the .rtf file to your computer with
a new file name.
4. Open the .rtf file with Microsoft Word.
5. Put your cursor where you want to insert new content.
6. From the Insert tab on the ribbon, click Quick Parts within the Text group, and select the component to insert.
7. Edit the inserted component as needed and add any other components.
8. Save your changes in Word.
Previewing the Layout Template Changes
To preview your edits before uploading your layout template to the BI catalog:
1. On the ribbon, open the Analytics Publisher tab and click Sample XML within the Load Data group to import
sample data from the data model. Skip this step if you already loaded sample data.
2. At the beginning of the document, replace the path with the location of the downloaded subtemplate file on
your computer. For example, change <?import:xdoxsl:///Common Content/Templates/Workflow Notification
Subtemplate.xsb?> to <?import:file:///C:/Template_Directory/FinFunWorkflowNotificationSub.rtf?>.
3. From the Analytics Publisher tab on the ribbon, click HTML in the Preview group.
4. If the preview reflects your changes as expected, then change the path back to the original location.
5. Save your changes in Word.
Uploading the Modified Layout Template
To upload your layout template to the BI catalog after previewing the changes:
1. Back in the catalog, click Edit for the report within the Custom folder, if that page isn't still open.
2. Click the View a list link.
3. Click the Create icon on the table toolbar.
444

Oracle Fusion Cloud HCM
Using Common Features for HCM
Chapter 16
Workflow Notifications and Approvals
4. In the Upload or Generate Layout section, click Upload.
5. Upload your edited .rtf file with a unique layout name.
6. Back on the page for editing the report, click Delete for the layout template that you downloaded earlier.
7. Click the Save Report icon.
Related Topics
•
Quick Parts for Configurable Workflow Notifications
•
Understand Style Templates
•
Test Data Models and Generate Sample Data
•
Customize Pixel-Perfect Reports
Set Up Content to Appear in Only Email or In-App Workflow
Notifications
The same .rtf report layout template is used for both email and in-app notifications. When you edit a copy of
predefined templates, you can make content conditional. For example, add an attribute and have it appear only in email
notifications.
The logo, action buttons, and links at the end of email notifications are predefined to appear only in emails, based on
the subtemplate. The approval history is usually predefined to also appear in the body of only email notifications. Any
conditional setting you apply to these components in the .rtf template won't override the predefined setup.
Prerequisites
Generate sample report data from the data model used for the report, and save the .xml file to your computer.
Defining Conditional Regions
To define a conditional region of content that appears only in email or in-app notifications:
1. Open your .rtf report layout template in Microsoft Word.
2. On the ribbon, open the Analytics Publisher tab and click Sample XML within the Load Data group.
3. Select the .xml file you downloaded to import sample data from the data model.
4. In your .rtf document, select the content you want to make conditional.
5. On the ribbon, click Conditional Region within the Insert group.
6. In the Conditional Region dialog box, on the Properties tab, select BINDISONLINENOTIF from the Data field list in
the General section. The values in this list come from the sample data you imported from the data model.
7. Select Date/Text from the next list.
8. In the Condition 1 section, select Equal to from the Data field list.
9. In the corresponding text field, enter true for content to appear only in in-app notifications, or false for content
to appear only in emails.
10. Make sure that form fields containing the conditional logic are inserted around your selected content. The
beginning form field, C, should be immediately before the conditional content, and the closing form field, EC,
should be immediately after. Move the form fields as needed.
Tip: To make sure you're looking at the correct form fields, double-click the C form field to open the
Conditional Region dialog box and see the BINDISONLINENOTIF setting.
11. Save your changes in Word.
445

Oracle Fusion Cloud HCM
Using Common Features for HCM
Chapter 16
Workflow Notifications and Approvals
Entering Conditional Code
If the data model for your report doesn't have the BINDISONLINENOTIF attribute, then:
1. In your .rtf report layout template, put your cursor immediately before the content you want to make
conditional.
2. Enter the following code, which functions the same as the C form field:
◦
<?if:BINDISONLINENOTIF='true'?> for in-app only
◦
<?if:BINDISONLINENOTIF='false'?> for email only
3. Put your cursor immediately after your conditional content.
4. Enter <?end if?>, which functions the same as the EC form field.
5. Save your changes in Word.
Related Topics
•
Best Practices for Content and Layout in Workflow Notifications
•
Add a Branding Logo and Change Other Shared Components in Workflow Notifications
•
Test Data Models and Generate Sample Data
Securing In-App Notifications
In-app notifications are secured using data privileges so that only approvers with appropriate privileges can view or edit
transactions.
You can secure approval notifications in these responsive employment flows using data privileges:
• Edit Pending Worker
• Work Relationship
• Cancel Work Relationship
• Employment Details
• Employment Contract
• Eligible Jobs
• Additional Assignment Info
• Manage Directs
• Delete Assignment
• Termination
• Resignation
• Reverse Termination
• Withdraw Resignation
• Correct Termination
Example of Securing In-App Notifications
Here's what approvers can access in the Work Relationship flow based on the privileges and functions assigned to them:
446

Oracle Fusion Cloud HCM
Using Common Features for HCM
Chapter 16
Workflow Notifications and Approvals
Approver Access View Access Edit Access
A1
A1 has only view access -
PER_VIEW_WORK_RELATIONSHIP_DATA
A1 can view the current and
proposed work relationship
changes in the notification.
A1 can't edit the transaction.
A2
A2 is an HR Analyst and can view
a worker's data, but has edit
work relationship access only for
department 1. A2 doesn't have
access to the worker's department
2 assignment information.
A2 can view the current and
proposed work relationship
changes in the notification.
When A2 clicks Edit in the
notification, an error message is
displayed in the transaction page
indicating A2 doesn't have access
to the worker's assignment info.
A3
A3 is a line manager and has edit
access but doesn't have access to a
worker's assignment information.
A3 can't view the current and
proposed work relationship change
section in the in-app notification.
An error message is displayed in
the notification page indicating A3
doesn't have access to the worker's
assignment info.
When A3 clicks Edit in the
notification, an error message is
displayed in the transaction page
indicating A3 doesn't have access
to the worker's assignment info.
A4
A4 has functional privilege
and edit access to a worker's
assignment information.
Functional Privilege: PER_EDIT_
WORK_RELATIONSHIP
Data Privilege :PER_VIEW_WORK_
RELATIONSHIP_DATA, PER_
EDIT_WORK_RELATIONSHIP_
DATA, PER_MANAGE_WORK_
RELATIONSHIP_DATA
A4 can view the current and
proposed work relationship
changes in the notification
A4 can edit the transaction.
Related Topics
•
Regenerate Roles
•
Guidelines for Copying HCM Roles
Configure Notifications in Career Development Using Reports
You can configure workflow email and in-app notifications for the career development business process using Oracle
Business Intelligence (BI) Publisher reports.
You use Microsoft Word to edit the .rtf template used for notifications. You can modify the BI Publisher templates only if
you have the BI Administrator role.
The following table summarizes key decisions for this scenario.
Decisions to Consider This Example
Which template do I update? CareerDevelopmentFYINotification, for changes to worker development goal content
447

Oracle Fusion Cloud HCM
Using Common Features for HCM
Chapter 16
Workflow Notifications and Approvals
Decisions to Consider This Example
Do I add prompts and headers to the
template?
Yes
Do I add data model attributes to the
template?
Goal ID
Which language do I use for the .rtf
template?
English (United States)
Summary of the Tasks
Configure a career development notification by:
1. Exporting the data model XML file.
2. Downloading the report layout template.
3. Editing prompts and headers in the template.
4. Previewing the document.
5. Adding data model attributes to the template.
6. Uploading the modified report layout to the BI Publisher catalog.
If you only want to add or edit prompts and headers in the template, use tasks 1, 2, 3, 4, and 6. To only add data model
attributes to the template, use tasks 1, 2, 4, 5, and 6.
Prerequisites
1. Download and install the Oracle BI Publisher Desktop: http://www.oracle.com/technetwork/middleware/bi-
publisher/downloads/index.html.
2. Download and install the Template Builder for Word to use Microsoft Word to edit the layout templates. To
download, install, and set up Template Builder for Word, see Creating RTF Templates by Using BI Publisher
11g Template Builder for Word: http://www.oracle.com/webfolder/technetwork/tutorials/obe/fmw/bi/bip/
tb4word/tbwordbip.htm.
3. To preview the configured templates, download a local copy of the subtemplate that applies to your custom
own report layout template:
◦
Sign in to the Oracle Business Intelligence Publisher server with the BI Administrator Role to open the
Oracle Business Intelligence Home page.
◦
Click Catalog.
◦
In the BI catalog, go to Shared Folders > Common Content > Templates for the predefined
subtemplate.
◦
Click Edit for Workflow Notification Subtemplate.
◦
In the Templates section, click the link in the Locale column.
◦
Save the subtemplate .rtf file to your computer.
4. Click Catalog to open the Catalog page.
448

Oracle Fusion Cloud HCM
Using Common Features for HCM
Chapter 16
Workflow Notifications and Approvals
Exporting the Data Model XML File
In this task, you export the XML file that includes the data model attributes predefined for the notifications. Perform this
task to enable previewing your modified template. This task is also required if you intend to add data model attributes to
the template.
1. Sign in to the Oracle Business Intelligence Publisher server with the BI Administrator Role to open the Oracle
Business Intelligence Home page.
2. Click Catalog to open the Catalog page.
3. In the Folders section, expand Shared Folders > Human Capital Management > Workflow Notifications and
select Data Models to display the data models in the right pane.
4. Under CareerDevelopmentFyiDM, click Edit to open the Diagram tab on the CareerDevelopmentFyiDM Data
Model page.
Note: To ensure that all data sets include requested elements with null values in the output XML data, do the
following:
◦
In the Data Model section, select Properties.
◦
In the Properties section, select Include Empty Tags for Null Elements.
◦
In the Data Model section, select Data Sets.
Note: To add data model attributes to the template, perform steps 5 and 6. Otherwise, skip to step 7.
5. Click the Data tab.
6. Enter the following attributes for an existing goal that are key attributes and enable you to pull in all the goal
attributes:
◦
GoalID
◦
NotificationType
7. Click View to see the sample data in the report, and all the available attributes.
8. Click Export to open the Opening CareerDevelopmentFyiDM dialog box.
9. Select Save File and click OK.
10. Save the CareerDevelopmentFyiDM_.xml file to a local drive.
Downloading the Report Layout Template
In this task, you create a copy of the report layout template in the Custom folder, and download a copy of the template
to your local hard drive to modify it.
1. Sign in to the Oracle Business Intelligence Publisher server with the BI Administrator role to open the Oracle
Business Intelligence Home page.
2. Click Catalog to open the Catalog page.
3. In the Folders section, expand Shared Folders > Human Capital Management and select Workflow
Notifications to display the templates in the right pane.
4. Under CareerDevelopmentFYINotification, click More, and then select Customize. A copy of the
CareerDevelopmentFYINotification is created automatically in the Custom folder.
5. On the CareerDevelopmentFYINotification page, under CareerDevelopmentFYINotification, click Edit.
6. Save the template to your local drive with the name UpdatedCareerDevelopmentFYINotificationLayoutrtf to
distinguish it from the original template.
449

Oracle Fusion Cloud HCM
Using Common Features for HCM
Chapter 16
Workflow Notifications and Approvals
Editing Prompts and Headers in the Template
To modify workflow email and in-app notifications, you edit a local copy of the .rtf report layout templates in Microsoft
Word.
Note: The exact steps can vary depending on your version of Microsoft Word.
1. Open the UpdatedCareerDevelopmentFYINotificationLayout.rtf template in Microsoft Word with the Template
Builder installed, if not already open. The document contains all notifications for the career development
business process except approval notifications.
2. Scroll to the notification with the header Development Goal Added.
3. Place your curser at the end of the Development Goal Added header.
4. Enter to Your Development Plan. The text now reads: Development Goal Added to Your Development Plan.
5. Place the cursor at the end of the text PPERFORMERNAME added development goal GOAL_NAME for you..
6. Enter a new sentence: You can access the goal to track your development.
7. Save the document.
8. Proceed to the task Previewing the Document.
Previewing the Document
Before uploading the .rtf files to the business intelligence (BI) catalog, you should preview the output with the changes
you made. You can avoid uploading a broken report that displays an error in the emails sent to users.
1. In the Ribbon, open the BI Publisher tab and click Sample XML within the Load Data group.
2. Browse to and select the CareerDevelopmentFyiDM)_.xml file you downloaded to import sample data from the
data model.
3. In the Data Loaded Successfully dialog box, click OK.
4. At the top of the document, replace the path with the location of the downloaded subtemplate file on your
computer. For example, change <? import:xdoxsl:///Common Content/Templates/Workflow Notification
Subtemplate.xsb?> to <?import:file:C:///Template_Directory/Workflow Notification Subtemplate.rtf?>.
5. From the BI Publisher tab in the Ribbon, click HTML in the Preview group.
6. If the preview reflects your changes as expected, then change the path back to the original location.
7. From the BI Publisher tab in the Ribbon, click Validate Template in the Tools group.
8. Also in the Tools group, click Check Accessibility.
9. Save your changes in Word.
Adding Data Model Attributes to the Template
In this task, you add to the report template attributes that exist in the predefined data model. You will add the Goal ID
and Category Meaning data model attributes to the template.
1. Open the UpdatedCareerDevelopmentFYINotificationLayout.rtf template in Microsoft Word with the Template
Builder installed, if not already open.
2. Select the BI Publisher tab.
3. In the Load Data section, click Sample XML.
4. In the dialog box to select XML data that appears, browse to open the CareerDevelopmentFyiDM_.xml file you
saved in the Exporting the Data Model XML File task and click Open.
5. In the Data loaded successfully dialog box, click OK.
6. Scroll to the Development Goal Added notification.
7. Place the cursor after the sentence: PPERFORMERNAME added development goal GOAL_NAME for you.
and press the Enter key.
8. On the new line, enter Goal ID:.
9. Enter a space after Goal ID:
10. On the BI Publisher tab, in the Insert section, click the 123 Field button to open the Field dialog box.
450

Oracle Fusion Cloud HCM
Using Common Features for HCM
Chapter 16
Workflow Notifications and Approvals
11. In the DATA_DS folder, select PGOALID and click Insert. The field appears in the document.
12. Click Close to return to the UpdatedCareerDevelopmentFYINotificationLayout.rtf template.
13. Preview the template using the steps in the Previewing the Document task.
14. Save and close the document.
15. Proceed to the task Uploading the Modified Report Layout to the Oracle BI Publisher Catalog.
Uploading the Modified Report Layout to the Oracle BI Publisher Catalog
You must perform this task to use the modified report layout for notifications.
1. Sign in to the Oracle Business Intelligence Publisher server with the BI Administrator Role to open the Oracle
Business Intelligence Home page.
2. Click Catalog to open the Catalog page.
3. In the Folders section, expand Shared Folders > Custom > Human Capital Management and select Workflow
Notifications.
4. Under CareerDevelopmentFYINotification, click Edit.
5. On the CareerDevelopmentFYINotification Data Model page, on the right side of the page, click Add New
Layout to open the page with the Create Layout and Upload or Generate Layout sections.
6. In the Upload or Generate Layout section, click the Upload icon.
7. In the Upload Template File dialog box, in the Layout Name field, enter Updated Career Development
Notifications Template.
8. In the Template File field, browse for the modified UpdatedCareerDevelopmentFYINotificationLayout.rtf
template on your local drive, select the template, and click Open.
9. On the Upload Template File dialog box, from the Type list, select RTF Template.
10. From the Locale list, select English (United States).
11. Click Upload to open the Processing dialog box.
12. On the CareerDevelopmentFYINotification Data Model page, on the right side, click View a list to open the
Layout page.
13. In the row for the Updated Career Development Notifications Template, select the Default Layout check
box.
14. On the right side of the page, click the Save Report icon.
Related Topics
•
Set Up for RTF and Excel Report Layout Templates
•
How You Modify Copies of Predefined Reports
Configure Notifications in Goal Management Using Reports
You can configure workflow email and in-app notifications for the goal management business process using Oracle
Business Intelligence (BI) Publisher reports.
You use Microsoft Word to edit the .rtf template used for notifications. You can modify the BI Publisher templates only if
you have the BI Administrator role.
The following table summarizes key decisions for this scenario.
Decisions to Consider This Example
Which template do I update?
PerformanceGoalNotificationsReport, for updates to notifications about goal content
451

Oracle Fusion Cloud HCM
Using Common Features for HCM
Chapter 16
Workflow Notifications and Approvals
Decisions to Consider This Example
Do I add prompts and headers to the
template?
Yes
Do I add data model attributes to the
template?
Yes, for Goal ID and Goal Plan ID
Which language do I use for the .rtf
template?
English (United States)
Summary of the Tasks
Configure a goal management notification by:
1. Exporting the data model XML file.
2. Downloading the report layout template.
3. Editing prompts and headers in the template.
4. Previewing the document.
5. Adding data model attributes to the template.
6. Uploading the modified report layout to the BI Publisher catalog.
If you only want to add or edit prompts and headers in the template, use tasks 1, 2, 3, 4, and 6. To only add data model
attributes to the template, use tasks 1, 2, 4, 5, and 6.
Prerequisites
1. Download and install the Oracle BI Publisher Desktop: http://www.oracle.com/technetwork/middleware/bi-
publisher/downloads/index.html.
2. Download and install the Template Builder for Word to use Microsoft Word to edit the layout templates. To
download, install, and set up Template Builder for Word, see Creating RTF Templates by Using BI Publisher
11g Template Builder for Word: http://www.oracle.com/webfolder/technetwork/tutorials/obe/fmw/bi/bip/
tb4word/tbwordbip.htm.
3. To preview the configured templates, download a local copy of the subtemplate that applies to your own report
layout template:
◦
Sign in to the Oracle Business Intelligence Publisher server with the BI Administrator Role to open the
Oracle Business Intelligence Home page.
◦
Click Catalog.
◦
In the BI catalog, go to Shared Folders > Common Content > Templates for the predefined
subtemplate.
◦
Click Edit for Workflow Notification Subtemplate.
◦
In the Templates section, click the link in the Locale column.
◦
Save the subtemplate .rtf file to your computer.
452

Oracle Fusion Cloud HCM
Using Common Features for HCM
Chapter 16
Workflow Notifications and Approvals
Exporting the Data Model XML File
In this task, you export the XML file that includes the data model attributes predefined for the notifications. Perform this
task to enable previewing your modified template. This task is also required if you intend to add data model attributes to
the template.
1. Sign in to the Oracle Business Intelligence Publisher server with the BI Administrator Role to open the Oracle
Business Intelligence Home page.
2. Click Catalog.
3. On the Catalog page, in the Folders section, expand Shared Folders > Human Capital Management >
Workflow Notifications and select Data Models to display the data models in the right pane.
4. Under Performance Goal Notifications Data Model, click Edit to open the Diagram tab on the Performance Goal
Notifications Data Model page.
Note: To ensure that all data sets include requested elements with null values in the output XML data, do the
following:
◦
In the Data Model section, select Properties.
◦
In the Properties section, select Include Empty Tags for Null Elements.
◦
In the Data Model section, select Data Sets.
Note: To add data model attributes to the template, perform steps 5 and 6. Otherwise, skip to step 7.
5. Click the Data tab.
6. Enter the following attributes for an existing goal that are key attributes and enable you to pull in all the goal
attributes:
◦
GoalID
◦
NotificationType
7. Click View to see the sample data in the report, and all the available attributes.
8. Click Export.
9. In the Opening PerformanceGoalNotificationsDM dialog box, select Save File and click OK.
10. Save the PerformanceGoalNotificationsDM_.xml file to a local drive.
Downloading the Report Layout Template
In this task, you create a copy of the report layout template in the Custom folder, and download a copy of the template
to your local hard drive to modify it.
1. Sign in to the Oracle Business Intelligence Publisher server with the BI Administrator role to open the Oracle
Business Intelligence Home page.
2. Click Catalog.
3. On the Catalog page, in the Folders section, expand Shared Folders > Human Capital Management and select
Workflow Notifications to display the templates in the right pane.
4. Under PerformanceGoalNotificationsReport, click More, and then select Customize. A copy of the
PerformanceGoalNotificationsReport is created automatically in the Custom folder.
5. On the PerformanceGoalNotificationsReport page, under PerformanceGoalNotificationsTemplate, click Edit.
6. On the Opening PerformanceGoalNotifications.rtf dialog box, select Save File and click OK to save the
document to your local hard drive. Save the template with the name UpdatedPerformanceGoalNotifications.rtf
to distinguish it from the original template.
453

Oracle Fusion Cloud HCM
Using Common Features for HCM
Chapter 16
Workflow Notifications and Approvals
Editing Prompts and Headers in the Template
To modify workflow email and in-app notifications, you edit a local copy of the .rtf report layout templates in Microsoft
Word.
Note: The exact steps can vary depending on your version of Microsoft Word.
1. Open the UpdatedPerformanceGoalNotifications.rtf template in Microsoft Word with the Template Builder
installed, if not already open. The document contains all notifications for the goal management business
process.
2. Scroll to the notification with the header Realign the Goal ALIGNED_GOAL_NAME Because the Goal
GOAL_NAME was Canceled.
3. Place the cursor in front of the Description header text.
4. Enter Goal. The text now reads Goal Description.
5. In the header Realign the Goal ALIGNED_GOAL_NAME Because the Goal GOAL_NAME was Canceled,
place your cursor after Realign, enter Your, and delete the. The text now reads Realign Your Goal
ALIGNED_GOAL_NAME Because the Goal GOAL_NAME was Canceled.
6. Save the document.
7. Proceed to the task Previewing the Document.
Previewing the Document
Before uploading the .rtf files to the business intelligence (BI) catalog, you should preview the output with the changes
you made. You can avoid uploading a broken report that displays an error in the emails sent to users.
1. In the Ribbon, open the BI Publisher tab and click Sample XML within the Load Data group.
2. Browse to and select the PerformanceGoalNotificationsDM_.xml file you downloaded to import sample data
from the data model.
3. In the Data Loaded Successfully dialog box, click OK.
4. At the top of the document, replace the path with the location of the downloaded subtemplate file on your
computer. For example, change <? import:xdoxsl:///Common Content/Templates/Workflow Notification
Subtemplate.xsb?> to <?import:file:C:///Template_Directory/Workflow Notification Subtemplate.rtf?>.
5. From the BI Publisher tab in the Ribbon, click HTML in the Preview group.
6. If the preview reflects your changes as expected, then change the path back to the original location.
7. From the BI Publisher tab in the Ribbon, click Validate Template in the Tools group.
8. Also in the Tools group, click Check Accessibility.
9. Save your changes in Word.
Adding Data Model Attributes to the Template
In this task, you add to the report template attributes that exist in the predefined data model. You will add the Goal ID
and Category Meaning data model attributes to the template.
1. Open the UpdatedPerformanceGoalNotifications.rtf template in Microsoft Word with the Template Builder
installed, if not already open.
2. Select the BI Publisher tab.
3. In the Load Data section, click Sample XML.
4. In the dialog box to select XML data that appears, browse to open the PerformanceGoalNotificationsDM_.xml
file you saved in the Exporting the Data Model XML File task and click Open.
5. In the Data loaded successfully dialog box, click OK.
6. Scroll to the Aligned Goal Canceled notification.
7. Place the cursor after Goal Name and press the Enter key.
454

Oracle Fusion Cloud HCM
Using Common Features for HCM
Chapter 16
Workflow Notifications and Approvals
8. On the new line, enter Goal ID.
9. Place the cursor after the data code GOAL_NAME and press the Enter key to enter a new line.
10. On the BI Publisher tab, in the Insert section, click the 123 Field button to open the Field dialog box.
11. In the GOALDETAILS folder, select GOAL_ID and click Insert. The field appears in the document.
12. Place the cursor after the data code Goal Description and press the Enter key.
13. On the new line, enter Goal Category.
14. Place the cursor after the data code DESCRIPTION and press the Enter key to enter a new line.
15. On the Field dialog box, in the GOALDETAILS folder, select CATEGORY_MEANING and click Insert. The field
appears in the document.
16. Click Close to return to the PerformanceGoalNotifications.rtf template.
17. Preview the template using the steps in the Previewing the Document task.
18. Save and close the document.
19. Proceed to the task Uploading the Modified Report Layout to the Oracle BI Publisher Catalog.
Uploading the Modified Report Layout to the Oracle BI Publisher Catalog
You must perform this task to use the modified report layout for notifications.
1. Sign in to the Oracle Business Intelligence Publisher server with the BI Administrator Role to open the Oracle
Business Intelligence Home page.
2. Click Catalog
3. On the Catalog page, in the Folders section, expand Shared Folders > Custom > Human Capital Management
and select Workflow Notifications.
4. Under the PerformanceGoalNotificationsReport, click Edit.
5. On the Performance Goal Notifications Data Model page, on the right side of the page, click Add New Layout
to open the page with the Create Layout and Upload or Generate Layout sections.
6. In the Upload or Generate Layout section, click the Upload icon.
7. In the Upload Template File dialog box, in the Layout Name field, enter Updated Performance Goal
Notifications Template.
8. In the Template File field, browse for the modified UpdatedPerformanceGoalNotificationsTemplate.rtf
template on your local drive, select the template, and click Open.
9. In the Upload Template File dialog box, from the Type list, select RTF Template.
10. From the Locale list, select English (United States).
11. Click Upload to open the Processing dialog box and return to the Performance Goal Notifications Data Model
page.
12. On the right side of the page, click View a list to open the Layout page.
13. In the row for the Updated Performance Goal Notifications Template, select the Default Layout check box.
14. On the right side of the page, click the Save Report icon.
Related Topics
•
Set Up for RTF and Excel Report Layout Templates
•
How You Modify Copies of Predefined Reports
Configure Performance Management Notifications Using Reports
This example shows how to configure workflow email and in-app notifications for the performance management
business process using Oracle Business Intelligence (BI) Publisher reports.
455

Oracle Fusion Cloud HCM
Using Common Features for HCM
Chapter 16
Workflow Notifications and Approvals
You use Microsoft Word to edit the .rtf template used for notifications. You can modify the BI Publisher templates only if
you have the BI Administrator role.
The following table summarizes key decisions for this scenario.
Decisions to Consider This Example
Which template do I update?
PerformanceFyiNotificationsReport
Do I add prompts and headers to the
template?
Yes
Do I add predefined data model attributes
to the template?
Yes, for Evaluation ID
Which language do I use for the .rtf
template?
English
Summary of the Tasks
Configure a performance management notification by:
1. Exporting the data model XML file.
2. Downloading the report layout template.
3. Editing prompts and headers in the template.
4. Previewing the document.
5. Adding data model attributes to the template.
6. Uploading the modified report layout to the BI Publisher catalog.
If you only want to add or edit prompts and headers in the template, use tasks 1, 2, 3, 4, and 6. To only add data model
attributes to the template, use tasks 1, 2, 4, 5, and 6.
Prerequisites
1. Download and install the Oracle BI Publisher Desktop: http://www.oracle.com/technetwork/middleware/bi-
publisher/downloads/index.html.
2. Download and install the Template Builder for Word to use Microsoft Word to edit the layout templates. To
download, install, and set up Template Builder for Word, see Creating RTF Templates by Using BI Publisher
11g Template Builder for Word: http://www.oracle.com/webfolder/technetwork/tutorials/obe/fmw/bi/bip/
tb4word/tbwordbip.htm.
3. To preview the configured templates, download a local copy of the subtemplate that applies to your report
layout template:
◦
Sign in to the Oracle Business Intelligence Publisher server with the BI Administrator Role to open the
Oracle Business Intelligence Home page.
◦
Click Catalog.
◦
In the BI catalog, go to Shared Folders > Common Content > Templates for the predefined
subtemplate.
◦
Click Edit for Workflow Notification Subtemplate.
456

Oracle Fusion Cloud HCM
Using Common Features for HCM
Chapter 16
Workflow Notifications and Approvals
◦
In the Templates section, click the link in the Locale column.
◦
Save the subtemplate .rtf file to your computer.
Exporting the Data Model XML File
In this task, you export the XML file that includes the data model attributes predefined for the notifications. Perform this
task to enable previewing your modified template. This task is also required if you intend to add data model attributes to
the template.
1. Sign in to the Oracle Business Intelligence Publisher server with the BI Administrator Role to open the Oracle
Business Intelligence Home page.
2. Click Catalog
3. On the Catalog page, in the Folders section, expand Shared Folders > Human Capital Management >
Workflow Notifications and select Data Models to display the data models in the right pane.
4. Under PerformanceFyiNotificationsReport Data Model, click Edit to open the Diagram tab on the Performance
Fyi NotificationsReport Data Model page.
Note: To ensure that all data sets include requested elements with null values in the output XML data, do the
following:
◦
In the Data Model section, select Properties.
◦
In the Properties section, select Include Empty Tags for Null Elements.
◦
In the Data Model section, select Data Sets.
Note: To add data model attributes to the template, perform steps 5 and 6. Otherwise, skip to step 7.
5. Click the Data tab.
6. Enter the Evaluation ID of an actual performance evaluation in the EvaluationID field to pull in all the
performance document attributes. The Evaluation ID is a key attribute that enables you to see all available data
attributes. Leave any existing sample data in these fields for any other fields.
7. Click View to see the sample data in the report, and all the available attributes.
8. Click Export.
9. In the Opening PerformanceFYIDM dialog box, select Save File and click OK.
10. Save the PerformanceFYIDM.xml file to a local drive.
Downloading the Report Layout Template
In this task, you create a copy of the report layout template in the Custom folder, and download a copy of the template
to your local hard drive to modify it.
1. Sign in to the Oracle Business Intelligence Publisher server with the BI Administrator role to open the Oracle
Business Intelligence Home page.
2. Click Catalog.
3. On the Catalog page, in the Folders section, expand Shared Folders > Human Capital Management and select
Workflow Notifications to display the templates in the right pane.
4. Under PerformanceFyiNotificationsReport, click More, and then select Customize. A copy of the
PerformanceFyiNotificationsReport is created automatically in the Custom folder.
5. On the PerformanceFYINotificationsReport page, under PerformanceFyiNotificationsReport, click Edit.
6. On the Opening PerformanceFyiNotificationsReport .rtf dialog box, select Save File and
click OK to save the document to your local hard drive. Save the template with the name
UpdatedPerformanceFyiNotificationsReport.rtf to distinguish it from the original template.
457

Oracle Fusion Cloud HCM
Using Common Features for HCM
Chapter 16
Workflow Notifications and Approvals
Editing Prompts and Headers in the Template
To modify workflow email and in-app notifications, you edit a local copy of the .rtf report layout templates in Microsoft
Word.
Note: The exact steps can vary depending on your version of Microsoft Word.
1. Open the UpdatedPerformanceFYINotifications.rtf template in Microsoft Word with the Template Builder
installed, if not already open. The document contains all notifications for the performance management
business process.
2. Scroll to the Performance Document Reopened notification.
3. Select the Performance Document Reopened header text.
4. Change the text to Your Manager Reopened Your Performance Document.
5. Scroll to the body text MGR_NAME reopened your performance document CUSTOMARY_NAME and place
your cursor after the period.
6. Enter You can continue your evaluation.
7. Scroll to the Review Period text.
8. Place the cursor right before Review Period. Enter Performance Document. The text now reads Performance
Document Review Period. (For TR, using Meeting Date - Enter Talent Review. The text now reads Talent Review
Meeting Date.)
9. Save the document.
10. Proceed to the task Previewing the Document.
Previewing the Document
Before uploading the .rtf files to the business intelligence (BI) catalog, you should preview the output with the changes
you made. You can avoid uploading a broken report that displays an error in the emails sent to users.
1. In the Ribbon, open the BI Publisher tab and click Sample XML within the Load Data group.
2. Browse to and select the PerformanceFYIDM_.xml file you downloaded to import sample data from the data
model.
3. In the Data Loaded Successfully dialog box, click OK.
4. From the BI Publisher tab in the Ribbon, click HTML in the Preview group.
5. From the BI Publisher tab in the Ribbon, click Validate Template in the Tools group.
6. Also in the Tools group, click Check Accessibility.
7. Save your changes in Word.
Adding Data Model Attributes to the Template
In this task, you add to the report template attributes that exist in the predefined data model.
1. Open the UpdatedPerformanceFYINotifications.rtf template in Microsoft Word with the Template Builder
installed, if not already open.
2. Select the BI Publisher tab.
3. In the Load Data section, click Sample XML.
4. In the dialog box to select XML data that appears, browse to open the PerformanceFYIDM_.xml file you saved
in the Exporting the Data Model XML File task and click Open.
5. In the Data loaded successfully dialog box, click OK.
6. Scroll to the Performance Document Reopened notification.
7. Place the cursor after Review Period and press the Enter key.
8. On the new line, enter Person ID.
9. Place the cursor after the data code REVIEW_PERIOD_NAME and press the Enter key to create a new line.
10. On the BI Publisher menu bar, in the Insert section, click the 123 Field button to open the Field dialog box.
11. In the PERSON_DETAILS folder, select PERSON_ID and click Insert. The field appears in the document.
12. Place the cursor after the Person ID text you entered in step 8 and press the Enter key.
458

Oracle Fusion Cloud HCM
Using Common Features for HCM
Chapter 16
Workflow Notifications and Approvals
13. On the new line, enter Current Date.
14. Place the cursor after the data code PERSON_ID you added in step 11 and press the Enter key to add a new line.
15. In the DATA_DS folder, select PCURRENTDATE and click Insert. The field appears in the document.
16. Click Close to return to the PerformanceFYINotifications.rtf template.
17. Preview the template using the steps in the Previewing the Document task.
18. Save and close the document.
19. Proceed to the task Uploading the Modified Report Layout to the Oracle BI Publisher Catalog.
Uploading the Modified Report to the Oracle BI Publisher Server
You must perform this task to use the customized template for notifications.
1. Sign in to the Oracle Business Intelligence Publisher server with the BI Administrator Role to open the Oracle
Business Intelligence Home page.
2. Click Catalog
3. On the Catalog page, in the Folders section, expand Shared Folders > Custom > Human Capital Management
and select Workflow Notifications.
4. Under the PerformanceFYIDM, click Edit.
5. On the PerformanceFyiNotificationsReport page, on the right side of the page, click Add New Layout to open
the page with the Create Layout and Upload or Generate Layout sections.
6. In the Upload or Generate Layout section, click the Upload icon.
7. In the Upload Template File dialog box, in the Layout Name field, enter Updated Performance FYI
Notifications Report Template.
8. In the Template File field, browse for the modified UpdatedPerformanceFyiNotificationsReport.rtf template
on your local drive, select the template, and click Open.
9. In the Upload Template File dialog box, from the Type list, select RTF Template.
10. From the Locale list, select English (United States).
11. Click Upload to open the Processing dialog box and return to the Performance FYI Notifications Data Model
page.
12. On the right side of the page, click View a list to open the Layout page.
13. In the row for the Updated Performance FYI Notifications Template, select the Default Layout check box.
14. On the right side of the page, click the Save Report icon.
Related Topics
•
Set Up for RTF and Excel Report Layout Templates
•
How You Modify Copies of Predefined Reports
Configure Profile Management Notifications Using Reports
This example shows how to configure workflow email and in-app notifications for the profile management business
process using Oracle Business Intelligence (BI) Publisher reports. You use Microsoft Word to edit the .rtf template used
for notifications. You can modify the BI Publisher templates only
The following table summarizes key decisions for this scenario.
Decisions to Consider This Example
Which template do I update?
ProfileChangeNotificationReport, for changes to worker profile content
459

Oracle Fusion Cloud HCM
Using Common Features for HCM
Chapter 16
Workflow Notifications and Approvals
Decisions to Consider This Example
Do I add prompts and headers to the
template?
Yes
Do I add data model attributes to the
template?
Yes, for Content Type Name
Which language do I use for the .rtf
template?
English (United States)
Summary of the Tasks
Configure a profile management notification by:
1. Exporting the data model XML file.
2. Downloading the report layout template.
3. Editing prompts and headers in the template.
4. Previewing the document.
5. Adding data model attributes to the template.
6. Uploading the modified report layout to the BI Publisher catalog.
If you only want to add or edit prompts and headers in the template, use tasks 1, 2, 3, 4, and 6. To only add data model
attributes to the template, use tasks 1, 2, 4, 5, and 6.
Prerequisites
1. Download and install the Oracle BI Publisher Desktop: http://www.oracle.com/technetwork/middleware/bi-
publisher/downloads/index.html.
2. Download and install the Template Builder for Word to use Microsoft Word to edit the layout templates. To
download, install, and set up Template Builder for Word, see Creating RTF Templates by Using BI Publisher
11g Template Builder for Word: http://www.oracle.com/webfolder/technetwork/tutorials/obe/fmw/bi/bip/
tb4word/tbwordbip.htm.
3. To preview the configured templates, download a local copy of the subtemplate that applies to your custom
own report layout template:
◦
Sign in to the Oracle Business Intelligence Publisher server with the BI Administrator Role to open the
Oracle Business Intelligence Home page.
◦
Click Catalog.
◦
In the BI catalog, go to Shared Folders > Common Content > Templates for the predefined
subtemplate.
◦
Click Edit for Workflow Notification Subtemplate.
◦
In the Templates section, click the link in the Locale column.
◦
Save the subtemplate .rtf file to your computer.
4. Click Catalog to open the Catalog page.
460

Oracle Fusion Cloud HCM
Using Common Features for HCM
Chapter 16
Workflow Notifications and Approvals
Exporting the Data Model XML File
In this task, you export the XML file that includes the data model attributes predefined for the notifications. Perform this
task to enable previewing your modified template. This task is also required if you intend to add data model attributes to
the template.
1. Sign in to the Oracle Business Intelligence Publisher server with the BI Administrator Role to open the Oracle
Business Intelligence Home page.
2. Click Catalog to open the Catalog page.
3. In the Folders section, expand Shared Folders > Human Capital Management > Workflow Notifications and
select Data Models to display the data models in the right pane.
4. Under ProfileChangeNotification, click Edit to open the Diagram tab on the Profile Change Data Model page.
Note: To ensure that all data sets include requested elements with null values in the output XML data, do the
following:
◦
In the Data Model section, select Properties.
◦
In the Properties section, select Include Empty Tags for Null Elements.
◦
In the Data Model section, select Data Sets.
Note: To add data model attributes to the template, perform steps 5 and 6. Otherwise, skip to step 7.
5. Click the Data tab.
461

Oracle Fusion Cloud HCM
Using Common Features for HCM
Chapter 16
Workflow Notifications and Approvals
6. Enter the following attributes for an existing worker profile that are key attributes and enable you to pull in all
the available profile attributes for changes to worker profile content data:
◦
Context Name
◦
Profile Item Id
◦
Content Item Name
◦
Profile Name
◦
Content Item Id
◦
Content Type Id
◦
Notification Name
Leave any existing sample data in these fields for any other fields.
Note: To configure a template for worker job profile interest, use the following key attributes:
◦
Image Person Id
◦
Person Id
◦
Job Profile Id
◦
Profile Interest Id
◦
Notification Name
7. Click View to see the sample data in the report, and all the available attributes.
8. Click Export.
9. Save the ProfileChangeNotification_.xml file to a local drive.
Downloading the Report Layout Template
In this task, you create a copy of the report layout template in the Custom folder, and download a copy of the template
to your local hard drive to modify it.
1. Sign in to the Oracle Business Intelligence Publisher server with the BI Administrator role to open the Oracle
Business Intelligence Home page.
2. Click Catalog.
3. On the Catalog page, in the Folders section, expand Shared Folders > Human Capital Management and select
Workflow Notifications to display the templates in the right pane.
4. Under ProfileChangeNotificationReport, click More, and then select Customize. A copy of the
ProfileChangeNotificationReport is created automatically in the Custom folder.
5. On the ProfileChangeNotificationReport page, under ProfileChangeNotificationReport, click Edit.
6. On the Opening ProfileChangeNotificationReport.rtf dialog box, select Save File and click OK to save the
document to your local hard drive. Save the template with the name UpdatedProfileReport.rtf to distinguish it
from the original template.
Editing Prompts and Headers in the Template
To modify workflow email and in-app notifications, you edit a local copy of the .rtf report layout templates in Microsoft
Word.
462

Oracle Fusion Cloud HCM
Using Common Features for HCM
Chapter 16
Workflow Notifications and Approvals
Note: The exact steps can vary depending on your version of Microsoft Word.
1. Open the UpdatedProfileReport.rtf template in Microsoft Word with the Template Builder installed, if not
already open. The document contains all notifications for the profile management business process that
involve changes to worker profile content or job profile interest data. It doesn't include approval notifications.
2. Scroll to the notification with the header CONTENT_TYPE_NAME Added.
3. Place the cursor at the end of the text A competency was added to PPROFILENAME talent profile by
PLOGGEDINPERSONNAME.
4. Enter to fulfill update job requirements..
5. Place your cursor in front of the label Competency, and enter New.
6. Save the document.
7. Proceed to the task Previewing the Document.
Previewing the Document
Before uploading the .rtf files to the business intelligence (BI) catalog, you should preview the output with the changes
you made. You can avoid uploading a broken report that displays an error in the emails sent to users.
1. In the Ribbon, open the BI Publisher tab and click Sample XML within the Load Data group.
2. Browse to and select the ProfileChangeNotification_.xml file you downloaded to import sample data from the
data model.
3. In the Data Loaded Successfully dialog box, click OK.
4. At the top of the document, replace the path with the location of the downloaded subtemplate file on your
computer. For example, change <? import:xdoxsl:///Common Content/Templates/Workflow Notification
Subtemplate.xsb?> to <?import:file:C:///Template_Directory/Workflow Notification Subtemplate.rtf?>.
5. From the BI Publisher tab in the Ribbon, click HTML in the Preview group.
6. If the preview reflects your changes as expected, then change the path back to the original location.
7. From the BI Publisher tab in the Ribbon, click Validate Template in the Tools group.
8. Also in the Tools group, click Check Accessibility.
9. Save your changes in Word.
Adding Data Model Attributes to the Template
In this task, you add to the report template attributes that exist in the predefined data model. You will add the Content
Type Name data model attribute to the template.
1. Open the UpdatedProfileReport.rtf template in Microsoft Word with the Template Builder installed, if not
already open.
2. Select the BI Publisher tab.
3. In the Load Data section, click Sample XML.
4. In the dialog box to select XML data that appears, browse to open the ProfileChangeNotification_.xml file you
saved in the Exporting the Data Model XML File task and click Open.
5. In the Data loaded successfully dialog box, click OK.
6. Scroll to the CONTENT_TYPE_NAME Added notification.
7. Place the cursor after Description and press the Enter key.
8. On the new line, enter Content Type.
9. Place the cursor after the data code DESCRIPTION_COMP and press the Enter key to create a new line.
10. On the BI Publisher tab, in the Insert section, click the 123 Field button to open the Field dialog box.
11. In the CONTENT_TYPES folder, select CONTENT_TYPE_NAME and click Insert. The field appears in the
document.
12. Click Close to return to the UpdatedProfileReport.rtf template.
13. Preview the template using the steps in the Previewing the Document task.
463

Oracle Fusion Cloud HCM
Using Common Features for HCM
Chapter 16
Workflow Notifications and Approvals
14. Save and close the document.
15. Proceed to the task Uploading the Modified Report Layout to the Oracle BI Publisher Catalog.
Uploading the Modified Report Layout to the Oracle BI Publisher Catalog
You must perform this task to use the modified report layout for notifications.
1. Sign in to the Oracle Business Intelligence Publisher server with the BI Administrator Role to open the Oracle
Business Intelligence Home page.
2. Click Catalog to open the Catalog page.
3. In the Folders section, expand Shared Folders > Custom > Human Capital Management and select Workflow
Notifications.
4. Under the ProfileChangeNotificationReport, click Edit.
5. On the ProfileChangeNotification Data Model page, on the right side of the page, click Add New Layout to
open the page with the Create Layout and Upload or Generate Layout sections.
6. In the Upload or Generate Layout section, click the Upload icon to open the Upload Template File dialog box.
7. In the Layout Name field, enter Updated Profile Notifications Template.
8. In the Template File field, browse for the modified UpdatedProfileReport.rtf template on your local drive,
select the template, and click Open.
9. In the Upload Template File dialog box, from the Type list, select RTF Template.
10. From the Locale list, select English (United States).
11. Click Upload to open the Processing dialog box.
12. On the ProfileChangeNotification Data Model page, on the right side, click View a list to open the Layout page.
13. In the row for the Updated Profile Notifications Template, select the Default Layout check box.
14. On the right side of the page, click the Save Report icon.
Related Topics
•
Set Up for RTF and Excel Report Layout Templates
•
How You Modify Copies of Predefined Reports
Configure Notifications in Talent Review Using Reports
This example shows how to configure workflow email and in-app notifications for the talent review business process
using Oracle Business Intelligence (BI) Publisher reports. You use Microsoft Word to edit the .rtf template used for
notifications.
You can modify the BI Publisher templates only if you have the BI Administrator role.
The following table summarizes key decisions for this scenario.
Decisions to Consider This Example
Which template do I update?
TalentCalibFYIReport, for updates to notifications about talent review meetings
Do I add prompts and headers to the
template?
Yes
Do I add data model attributes to the
template?
Yes, for meeting date and meeting ID
464

Oracle Fusion Cloud HCM
Using Common Features for HCM
Chapter 16
Workflow Notifications and Approvals
Decisions to Consider This Example
Which language do I use for the .rtf
template?
English (United States)
Summary of the Tasks
Configure a talent review notification by:
1. Exporting the data model XML file.
2. Downloading the report layout template.
3. Editing prompts and headers in the template.
4. Previewing the document.
5. Adding data model attributes to the template.
6. Uploading the modified report layout to the BI Publisher catalog.
If you only want to add or edit prompts and headers in the template, use tasks 1, 2, 3, 4, and 6. To only add data model
attributes to the template, use tasks 1, 2, 4, 5, and 6.
Prerequisites
1. Download and install the Oracle BI Publisher Desktop: http://www.oracle.com/technetwork/middleware/bi-
publisher/downloads/index.html.
2. Download and install the Template Builder for Word to use Microsoft Word to edit the layout templates. To
download, install, and set up Template Builder for Word, see Creating RTF Templates by Using BI Publisher
11g Template Builder for Word: http://www.oracle.com/webfolder/technetwork/tutorials/obe/fmw/bi/bip/
tb4word/tbwordbip.htm.
3. To preview the configured templates, download a local copy of the subtemplate that applies to your custom
own report layout template:
◦
Sign in to the Oracle Business Intelligence Publisher server with the BI Administrator Role to open the
Oracle Business Intelligence Home page.
◦
Click Catalog.
◦
In the BI catalog, go to Shared Folders > Common Content > Templates for the predefined
subtemplate.
◦
Click Edit for Workflow Notification Subtemplate.
◦
In the Templates section, click the link in the Locale column.
◦
Save the subtemplate .rtf file to your computer.
Exporting the Data Model XML File
In this task, you export the XML file that includes the data model attributes predefined for the notifications. Perform this
task to enable previewing your modified template. This task is also required if you intend to add data model attributes to
the template.
1. Sign in to the Oracle Business Intelligence Publisher server with the BI Administrator Role to open the Oracle
Business Intelligence Home page.
2. Click Catalog.
3. On the Catalog page, in the Folders section, expand Shared Folders > Human Capital Management >
Workflow Notifications and select Data Models to display the data models in the right pane.
465

Oracle Fusion Cloud HCM
Using Common Features for HCM
Chapter 16
Workflow Notifications and Approvals
4. Under TalentCalibFYIDM, click Edit to open the Diagram tab on the Talent Calib FYI Data Model page.
Note: To ensure that all data sets include requested elements with null values in the output XML data, do the
following:
◦
In the Data Model section, select Properties.
◦
In the Properties section, select Include Empty Tags for Null Elements.
◦
In the Data Model section, select Data Sets.
Note: To add data model attributes to the template, perform steps 5 and 6. Otherwise, skip to step 7.
5. Click the Data tab.
6. Enter the following attributes for an existing meeting that are key attributes and enable you to pull in all the
meeting attributes:
◦
MeetingId
◦
ParticipantId
◦
FYINotificationName
7. Click View to see the sample data in the report, and all the available attributes.
8. Click Export.
9. In the Opening TalentCalibFYIDM dialog box, select Save File and click OK.
10. Save the TalentCalibFYIDM_.xml file to a local drive.
Downloading the Report Layout Template
In this task, you create a copy of the report layout template in the Custom folder, and download a copy of the template
to your local hard drive to modify it.
1. Sign in to the Oracle Business Intelligence Publisher server with the BI Administrator role to open the Oracle
Business Intelligence Home page.
2. Click Catalog.
3. On the Catalog page, in the Folders section, expand Shared Folders > Human Capital Management and select
Workflow Notifications to display the templates in the right pane.
4. Under TalentCalibFYIReport, click More, and then select Customize. A copy of the TalentCalibFYIReport is
created automatically in the Custom folder.
5. On the TalentCalibFYIReport page, under TalentCalibFYIReport, click Edit.
6. On the TalentCalibFYIReport dialog box, select Save File and click OK to save the document to your local
hard drive. Save the template with the name UpdatedTalentCalibReport.rtf to distinguish it from the original
template.
Editing Prompts and Headers in the Template
To modify workflow email and in-app notifications, you edit a local copy of the .rtf report layout templates in Microsoft
Word.
Note: The exact steps can vary depending on your version of Microsoft Word.
1. Open the UpdatedTalentCalibReport.rtf report template using MS-Word. The document contains all
notifications for the talent review business process.
466

Oracle Fusion Cloud HCM
Using Common Features for HCM
Chapter 16
Workflow Notifications and Approvals
2. Scroll to the first notification with the header Talent Review Meeting Scheduled.
3. Place the cursor after the You are invited to the talent review meeting MEETING_TITLE. Meeting details
are listed in this notification. body text.
4. Enter Ensure that you update content for your reports before the meeting.
5. Place the cursor right in front of Meeting Date. Enter Talent Review. The text now reads Talent Review
Meeting Date.
6. Save the document.
7. Proceed to the task Previewing the Document.
Previewing the Document
Before uploading the .rtf files to the business intelligence (BI) catalog, you should preview the output with the changes
you made. You can avoid uploading a broken report that displays an error in the emails sent to users.
1. In the Ribbon, open the BI Publisher tab and click Sample XML within the Load Data group.
2. Browse to and select the TalentCalibFYIDM_.xml file you downloaded to import sample data from the data
model.
3. In the Data Loaded Successfully dialog box, click OK.
4. From the BI Publisher tab in the Ribbon, click HTML in the Preview group.
5. From the BI Publisher tab in the Ribbon, click Validate Template in the Tools group.
6. Also in the Tools group, click Check Accessibility.
7. Save your changes in Word.
Adding Data Model Attributes to the Template
In this task, you add to the report template attributes that exist in the predefined data model. You will add the Meeting
Date and Meeting ID data model attributes to the template.
1. Open the UpdatedTalentCalibReport.rtf template in Microsoft Word with the Template Builder installed, if not
already open.
2. Select the BI Publisher tab.
3. In the Load Data section, click Sample XML.
4. In the dialog box to select XML data that appears, browse to open the TalentCalibFYIDM_.xml file you saved in
the Exporting the Data Model XML File task and click Open.
5. In the Data loaded successfully dialog box, click OK.
6. Scroll to the first notification with the header Talent Review Meeting Scheduled.
7. Place the cursor after Meeting Date and press the Enter key.
8. On the new line, enter Meeting ID.
9. Place the cursor after the data code MEETING_DATE and press the Enter key to create a new line.
10. On the BI Publisher tab, in the Insert section, click the 123 Field button to open the Field dialog box.
11. In the G_1 folder, select MEETING_ID and click Insert. The field appears in the document.
12. Click Close to return to the UpdatedTalentCalibReport.rtf template.
13. Preview the template using the steps in the Previewing the Document task.
14. Save and close the document.
15. Proceed to the task Uploading the Modified Report Layout to the Oracle BI Publisher Catalog.
Uploading the Modified Report Layout to the Oracle BI Publisher Catalog
You must perform this task to use the modified report layout for notifications.
1. Sign in to the Oracle Business Intelligence Publisher server with the BI Administrator Role to open the Oracle
Business Intelligence Home page.
2. Click Catalog to open the Catalog page.
3. In the Folders section, expand Shared Folders > Custom > Human Capital Management and select Workflow
Notifications.
467

Oracle Fusion Cloud HCM
Using Common Features for HCM
Chapter 16
Workflow Notifications and Approvals
4. Under TalentCalibFYIReport, click Edit.
5. On the TalentCalibFYIReport page, click Add New Layout to open the page with the Create Layout and Upload
or Generate Layout sections.
6. In the Upload or Generate Layout section, click the Upload icon.
7. In the Upload Template File dialog box, in the Layout Name field, enter Updated Talent Review Notifications
Template.
8. In the Template File field, browse for the modified UpdatedTalentCalibReport.rtf template on your local
drive, select the template, and click Open.
9. In the Upload Template File dialog box, from the Type list, select RTF Template.
10. From the Locale list, select English (United States).
11. Click Upload to open the Processing dialog box and return to the TalentCalibFYIDM Data Model page.
12. On the right side of the page, click View a list to open the Layout page.
13. In the row for the Updated Talent Review Notifications Template, select the Default Layout check box.
14. On the right side of the page, click the Save Report icon.
Related Topics
•
Set Up for RTF and Excel Report Layout Templates
•
How You Modify Copies of Predefined Reports
Configure Workforce Deployment Notifications Using Reports
This example shows how to configure the promotion workflow email and in-app notification for the workforce
deployment business process using Oracle Business Intelligence (BI) Publisher reports.
You use Microsoft Word to edit the .rtf template used for notifications. You can modify the BI Publisher templates only if
you have the BI Administrator role.
The following table summarizes key decisions for this scenario.
Decisions to Consider This Example
Which template do I update?
PromotionReport, for updates to notifications about a worker's promotion
Do I add prompts and headers to the
template?
Yes
Do I add data model attributes to the
template?
Yes, for Person Type and Annual Salary
Which language do I use for the .rtf
template?
English (United States)
Summary of the Tasks
Configure a promotion notification by:
1. Exporting the data model XML file.
468

Oracle Fusion Cloud HCM
Using Common Features for HCM
Chapter 16
Workflow Notifications and Approvals
2. Downloading the report layout template.
3. Editing prompts and headers in the template.
4. Previewing the document.
5. Adding data model attributes to the template.
6. Uploading the modified report layout to the BI Publisher catalog.
If you only want to add or edit prompts and headers in the template, use tasks 1, 2, 3, 4, and 6. To only add data model
attributes to the template, use tasks 1, 2, 4, 5, and 6.
Prerequisites
1. Download and install the Oracle BI Publisher Desktop: http://www.oracle.com/technetwork/middleware/bi-
publisher/downloads/index.html.
2. Download and install the Template Builder for Word to use Microsoft Word to edit the layout templates. To
download, install, and set up Template Builder for Word, see Creating RTF Templates by Using BI Publisher
11g Template Builder for Word: http://www.oracle.com/webfolder/technetwork/tutorials/obe/fmw/bi/bip/
tb4word/tbwordbip.htm.
3. To preview the configured templates, download a local copy of the subtemplate that applies to your own report
layout template:
◦
Sign in to the Oracle Business Intelligence Publisher server with the BI Administrator Role to open the
Oracle Business Intelligence Home page.
◦
Click Catalog.
◦
In the BI catalog, go to Shared Folders > Common Content > Templates for the predefined
subtemplate.
◦
Click Edit for Workflow Notification Subtemplate.
◦
In the Templates section, click the link in the Locale column.
◦
Save the subtemplate .rtf file to your computer.
Exporting the Data Model XML File
In this task, you export the XML file that includes the data model attributes predefined for the notifications. Perform this
task to enable previewing your modified template. This task is also required if you intend to add data model attributes to
the template.
1. Sign in to the Oracle Business Intelligence Publisher server with the BI Administrator Role to open the Oracle
Business Intelligence Home page.
2. Click Catalog.
3. On the Catalog page, in the Folders section, expand Shared Folders > Human Capital Management >
Workflow Notifications and select Data Models to display the data models in the right pane.
4. Under Promotion data model, click Edit to open the Diagram tab on the Promotion data model page.
Note: To ensure that all data sets include requested elements with null values in the output XML data, do the
following:
◦
In the Data Model section, select Properties.
◦
In the Properties section, select Include Empty Tags for Null Elements.
◦
In the Data Model section, select Data Sets.
469

Oracle Fusion Cloud HCM
Using Common Features for HCM
Chapter 16
Workflow Notifications and Approvals
Note: To add data model attributes to the template, perform steps 5 and 6. Otherwise, skip to step 7.
5. Click the Data tab.
6. Enter the following attributes for the promotion that are key attributes and enable you to pull in all the goal
attributes:
◦
TransactionID
7. Click View to see the sample data in the report, and all the available attributes.
8. Click Export.
9. In the Opening Promotion_.xml dialog box, select Save File and click OK.
10. Save the Promotion_.xml file to a local drive.
Downloading the Report Layout Template
In this task, you create a copy of the report layout template in the Custom folder, and download a copy of the template
to your local hard drive to modify it.
1. Sign in to the Oracle Business Intelligence Publisher server with the BI Administrator role to open the Oracle
Business Intelligence Home page.
2. Click Catalog.
3. On the Catalog page, in the Folders section, expand Shared Folders > Human Capital Management and select
Workflow Notifications to display the templates in the right pane.
4. Under PromotionReport, click More, and then select Customize. A copy of the PromotionReport is created
automatically in the Custom folder.
5. On the PromotionReport page, under PromotionReport, click Edit.
6. On the Opening PromotionReportR11.rtf dialog box, select Save File and click OK to save the document to
your local hard drive. Save the template with the name UpdatedPPromotionReport.rtf to distinguish it from the
original template.
Editing Prompts and Headers in the Template
To modify email and in-app notifications, you edit a local copy of the .rtf report layout templates in Microsoft Word.
Note: The exact steps can vary depending on your version of Microsoft Word.
1. Open the UpdatedPromotionReportR11.rtf.rtf template in Microsoft Word with the Template Builder installed, if
not already open. The document contains all notifications for the workforce deployment business process.
2. Scroll to the notification with the header Promotion Details.
3. Place the cursor in front of the Description header text.
4. Enter Your. The text now reads Your Promotion Details.
5. Scroll to the prompt Mail Stop. Replace Mail Stop with Post Office Box.
6. Save the document.
7. Proceed to the task Previewing the Document.
Previewing the Document
Before uploading the .rtf files to the business intelligence (BI) catalog, you should preview the output with the changes
you made. You can avoid uploading a broken report that displays an error in the emails and in-app notification sent to
users.
1. In the Ribbon, open the BI Publisher tab and click Sample XML within the Load Data group.
2. Browse to and select the PromotionReportDM_.xml file you downloaded to import sample data from the data
model.
3. In the Data Loaded Successfully dialog box, click OK.
470

Oracle Fusion Cloud HCM
Using Common Features for HCM
Chapter 16
Workflow Notifications and Approvals
4. At the top of the document, replace the path with the location of the downloaded subtemplate file on your
computer. For example, change <? import:xdoxsl:///Common Content/Templates/Workflow Notification
Subtemplate.xsb?> to <?import:file:C:///Template_Directory/Workflow Notification Subtemplate.rtf?>.
5. From the BI Publisher tab in the Ribbon, click HTML in the Preview group.
6. If the preview reflects your changes as expected, then change the path back to the original location.
7. From the BI Publisher tab in the Ribbon, click Validate Template in the Tools group.
8. Also in the Tools group, click Check Accessibility.
9. Save your changes in Word.
Adding Data Model Attributes to the Template
In this task, you add to the report template attributes to data model. You will add the Person Type and Annual Salary
data model attributes to the template.
1. Open the UpdatedPerformanceGoalNotifications.rtf template in Microsoft Word with the Template Builder
installed, if not already open.
2. Select the BI Publisher tab.
3. In the Load Data section, click Sample XML.
4. In the dialog box to select XML data that appears, browse to open the Promotion_.xml file you saved in the
Exporting the Data Model XML File task and click Open.
5. In the Data loaded successfully dialog box, click OK.
6. Scroll to the Employee Details notification.
7. Place the cursor after Name and press the Enter key.
8. On the new line, enter Person Type.
9. Place the cursor after the data code ParentEntityName and press the Enter key to enter a new line.
10. On the BI Publisher tab, in the Insert section, click the 123 Field button to open the Field dialog box.
11. In the EMPLOYEEDETAILS folder, select PERSON_TYPE and click Insert. The field appears in the document.
12. Place the cursor after the data code Department and press the Enter key.
13. On the new line, enter Annual Salary.
14. Place the cursor after the data code Department and press the Enter key to enter a new line.
15. On the Field dialog box, in the EMPLOYEEDETAILS folder, select ANNUAL_SALARY and click Insert. The field
appears in the document.
16. Click Close to return to the PromotionReportR11.rtf template.
17. Preview the template using the steps in the Previewing the Document task.
18. Save and close the document.
19. Proceed to the task Uploading the Modified Report Layout to the Oracle BI Publisher Catalog.
Uploading the Modified Report Layout to the Oracle BI Publisher Catalog
You must perform this task to use the modified report layout for notifications.
1. Sign in to the Oracle Business Intelligence Publisher server with the BI Administrator Role to open the Oracle
Business Intelligence Home page.
2. Click Catalog
3. On the Catalog page, in the Folders section, expand Shared Folders > Custom > Human Capital Management
and select Workflow Notifications.
4. Under the PromotionReport, click Edit.
5. On the PromotionReport Data Model page, on the right side of the page, click Add New Layout to open the
page with the Create Layout and Upload or Generate Layout sections.
6. In the Upload or Generate Layout section, click the Upload icon.
7. In the Upload Template File dialog box, in the Layout Name field, enter Updated Promotion Template.
8. In the Template File field, browse for the modified Updated PromotionReportR11.rtf template on your local
drive, select the template, and click Open.
471

Oracle Fusion Cloud HCM
Using Common Features for HCM
Chapter 16
Workflow Notifications and Approvals
9. In the Upload Template File dialog box, from the Type list, select RTF Template.
10. From the Locale list, select English (United States).
11. Click Upload to open the Processing dialog box and return to the PromotionReport page.
12. On the right side of the page, click View a list to open the Layout page.
13. In the row for the Updated Promotion Report Template, select the Default Layout check box.
14. On the right side of the page, click the Save Report icon.
Related Topics
•
Set Up for RTF and Excel Report Layout Templates
•
How You Modify Copies of Predefined Reports
Configure Document Records Notifications Using Reports
This example shows how to configure the document records workflow email and in-app notification for the document
records business process using Oracle Business Intelligence (BI) Publisher reports. You use Microsoft Word to edit
the .rtf template used for notifications.
You can modify the BI Publisher templates only if you have the BI Administrator role.
The following table summarizes key decisions for this scenario.
Decisions to Consider This Example
Which template do I update?
ManageDorReport, for updates to notifications about a worker's document records
Do I add prompts and headers to the
template?
Yes
Do I add data model attributes to the
template?
Yes, for Person Name and Person Number
Which language do I use for the .rtf
template?
English (United States)
Summary of the Tasks
Configure a document record notification by:
1. Exporting the data model XML file.
2. Downloading the report layout template.
3. Editing prompts and headers in the template.
4. Previewing the document.
5. Adding data model attributes to the template.
6. Uploading the modified report layout to the BI Publisher catalog.
If you only want to add or edit prompts and headers in the template, use tasks 1, 2, 3, 4, and 6. To only add data model
attributes to the template, use tasks 1, 2, 4, 5, and 6.
472

Oracle Fusion Cloud HCM
Using Common Features for HCM
Chapter 16
Workflow Notifications and Approvals
Prerequisites
1. Download and install the Oracle BI Publisher Desktop: http://www.oracle.com/technetwork/middleware/bi-
publisher/downloads/index.html.
2. Download and install the Template Builder for Word to use Microsoft Word to edit the layout templates. To
download, install, and set up Template Builder for Word, see Creating RTF Templates by Using BI Publisher
11g Template Builder for Word: http://www.oracle.com/webfolder/technetwork/tutorials/obe/fmw/bi/bip/
tb4word/tbwordbip.htm.
3. To preview the configured templates, download a local copy of the subtemplate that applies to your own report
layout template:
◦
Sign in to the Oracle Business Intelligence Publisher server with the BI Administrator Role to open the
Oracle Business Intelligence Home page.
◦
Click Catalog.
◦
In the BI catalog, go to Shared Folders > Common Content> Templates for the predefined subtemplate.
◦
Click Edit for Workflow Notification Subtemplate.
◦
In the Templates section, click the link in the Locale column.
◦
Save the subtemplate .rtf file to your computer.
Exporting the Data Model XML File
In this task, you export the XML file that includes the data model attributes predefined for the notifications. Perform this
task to enable previewing your modified template. This task is also required if you intend to add data model attributes to
the template.
1. Sign in to the Oracle Business Intelligence Publisher server with the BI Administrator Role to open the Oracle
Business Intelligence Home page.
2. Click Catalog.
3. On the Catalog page, in the Folders section, expand Shared Folders > Human Capital Management >
Workflow Notifications and select Data Models to display the data models in the right pane.
4. Under ManageDOR data model, click Edit to open the Diagram tab on the ManageDOR data model page.
Note: To ensure that all data sets include requested elements with null values in the output XML data, do the
following:
◦
In the Data Model section, select Properties.
◦
In the Properties section, select Include Empty Tags for Null Elements.
◦
In the Data Model section, select Data Sets.
Note: To add data model attributes to the template, perform steps 5 and 6. Otherwise, skip to step 7.
5. Click the Data tab.
6. Enter the following attributes for the document record that are key attributes and enable you to pull in all the
attributes:
◦
TransactionID
7. Click View to see the sample data in the report, and all the available attributes.
473

Oracle Fusion Cloud HCM
Using Common Features for HCM
Chapter 16
Workflow Notifications and Approvals
8. Click Export.
9. In the Opening ManageDOR_.xml dialog box, select Save File and click OK.
10. Save the ManageDOR_.xml file to a local drive.
Downloading the Report Layout Template
In this task, you create a copy of the report layout template in the Custom folder, and download a copy of the template
to your local hard drive to modify it.
1. Sign in to the Oracle Business Intelligence Publisher server with the BI Administrator role to open the Oracle
Business Intelligence Home page.
2. Click Catalog.
3. On the Catalog page, in the Folders section, expand Shared Folders > Human Capital Management and select
Workflow Notifications to display the templates in the right pane.
4. Under ManageDorReport, click More, and then select Customize. A copy of the ManageDorReport is created
automatically in the Custom folder.
5. On the ManageDorReport page, under ManageDorReport, click Edit.
6. On the Opening ManageDorReportR13.rtf dialog box, select Save File and click OK to save the document to
your local hard drive. Save the template with the name ManageDorReport.rtf to distinguish it from the original
template.
Editing Prompts and Headers in the Template
To modify email and in-app notifications, you edit a local copy of the .rtf report layout templates in Microsoft Word.
Note: The exact steps can vary depending on your version of Microsoft Word.
1. Open the ManageDorReportR13.rtf template in Microsoft Word with the Template Builder installed, if not
already open. The document contains all notifications for the workforce deployment business process.
2. Scroll to the notification with the header New Document Record.
3. Place the cursor in front of the Description header text.
4. Enter Your. The text now reads Your New Document Record.
5. Scroll to the prompt Issuing Authority. Replace Issuing Authority with Issuing Agency.
6. Save the document.
7. Proceed to the task Previewing the Document.
Previewing the Document
Before uploading the .rtf files to the business intelligence (BI) catalog, you should preview the output with the changes
you made. You can avoid uploading a broken report that displays an error in the emails and in-app notification sent to
users.
1. In the Ribbon, open the BI Publisher tab and click Sample XML within the Load Data group.
2. Browse to and select the ManageDorDM_.xml file you downloaded to import sample data from the data model.
3. In the Data Loaded Successfully dialog box, click OK.
4. At the top of the document, replace the path with the location of the downloaded subtemplate file on your
computer. For example, change <? import:xdoxsl:///Common Content/Templates/Workflow Notification
Subtemplate.xsb?> to <?import:file:C:///Template_Directory/Workflow Notification Subtemplate.rtf?>.
5. From the BI Publisher tab in the Ribbon, click HTML in the Preview group.
6. If the preview reflects your changes as expected, then change the path back to the original location.
7. From the BI Publisher tab in the Ribbon, click Validate Template in the Tools group.
8. Also in the Tools group, click Check Accessibility.
474

Oracle Fusion Cloud HCM
Using Common Features for HCM
Chapter 16
Workflow Notifications and Approvals
9. Save your changes in Word.
Adding Data Model Attributes to the Template
In this task, you add to the report template attributes to data model. You will add the Person Name and Person Number
attributes to the template.
1. Open the ManageDorReport.rtf template in Microsoft Word with the Template Builder installed, if not already
open.
2. Select the BI Publisher tab.
3. In the Load Data section, click Sample XML.
4. In the dialog box to select XML data that appears, browse to open the ManageDOR_.xml file you saved in the
Exporting the Data Model XML File task and click Open.
5. In the Data loaded successfully dialog box, click OK.
6. Place the cursor after the data code ParentEntityName and press the Enter key to enter a new line.
7. On the BI Publisher tab, in the Insert section, click the 123 Field button to open the Field dialog box.
8. In the PersonHeader folder, select PERSON_NAME and click Insert. The field appears in the document.
9. Place the cursor after the data code PERSON_NAME and press the Enter key to enter a new line.
10. In the PersonHeader folder, select PERSON_NUMBER and click Insert. The field appears in the document
11. Click Close to return to the ManageDorReportR13.rtf template.
12. Preview the template using the steps in the Previewing the Document task.
13. Save and close the document.
14. Proceed to the task Uploading the Modified Report Layout to the Oracle BI Publisher Catalog.
Uploading the Modified Report Layout to the Oracle BI Publisher Catalog
You must perform this task to use the modified report layout for notifications.
1. Sign in to the Oracle Business Intelligence Publisher server with the BI Administrator Role to open the Oracle
Business Intelligence Home page.
2. Click Catalog.
3. On the Catalog page, in the Folders section, expand Shared Folders > Custom > Human Capital Management
and select Workflow Notifications.
4. Under the ManageDorReport, click Edit.
5. On the ManageDorReport Data Model page, on the right side of the page, click Add New Layout to open the
page with the Create Layout and Upload or Generate Layout sections.
6. In the Upload or Generate Layout section, click the Upload icon.
7. In the Upload Template File dialog box, in the Layout Name field, enter Updated ManageDor Template.
8. In the Template File field, browse for the modified Updated ManageDorReportR13.rtf template on your local
drive, select the template, and click Open.
9. In the Upload Template File dialog box, from the Type list, select RTF Template.
10. From the Locale list, select English (United States).
11. Click Upload to open the Processing dialog box and return to the ManageDorReport page.
12. On the right side of the page, click View a list to open the Layout page.
13. In the row for the Updated ManageDor Report Template, select the Default Layout check box.
14. On the right side of the page, click the Save Report icon.
Related Topics
•
Set Up for RTF and Excel Report Layout Templates
•
How You Modify Copies of Predefined Reports
475

Oracle Fusion Cloud HCM
Using Common Features for HCM
Chapter 16
Workflow Notifications and Approvals
Configure Checklist Notifications Using Reports
This example shows how to configure the checklist task workflow email and in-app notification for the workforce
deployment business process using Oracle Business Intelligence (BI) Publisher reports. You use Microsoft Word to edit
the .rtf template used for notifications.
You can modify the BI Publisher templates only if you have the BI Administrator role.
The following table summarizes key decisions for this scenario.
Decisions to Consider This Example
Which template do I update?
TaskFYIReport, for updates about a worker's checklist task
Do I add prompts and headers to the
template?
Yes
Do I add data model attributes to the
template?
Yes, for Task Contact Details
Which language do I use for the .rtf
template?
English (United States)
Summary of the Tasks
Configure a checklist notification by:
1. Exporting the data model XML file.
2. Downloading the report layout template.
3. Editing prompts and headers in the template.
4. Previewing the document.
5. Adding data model attributes to the template.
6. Uploading the modified report layout to the BI Publisher catalog.
If you only want to add or edit prompts and headers in the template, use tasks 1, 2, 3, 4, and 6. To only add data model
attributes to the template, use tasks 1, 2, 4, 5, and 6.
Prerequisites
1. Download and install the Oracle BI Publisher Desktop: http://www.oracle.com/technetwork/middleware/bi-
publisher/downloads/index.html.
2. Download and install the Template Builder for Word to use Microsoft Word to edit the layout templates. To
download, install, and set up Template Builder for Word, see Creating RTF Templates by Using BI Publisher
11g Template Builder for Word: http://www.oracle.com/webfolder/technetwork/tutorials/obe/fmw/bi/bip/
tb4word/tbwordbip.htm.
476

Oracle Fusion Cloud HCM
Using Common Features for HCM
Chapter 16
Workflow Notifications and Approvals
3. To preview the configured templates, download a local copy of the subtemplate that applies to your own report
layout template:
◦
Sign in to the Oracle Business Intelligence Publisher server with the BI Administrator Role to open the
Oracle Business Intelligence Home page.
◦
Click Catalog.
◦
In the BI catalog, go to Shared Folders > Common Content > Templates for the predefined subtemplate.
◦
Click Edit for Workflow Notification Subtemplate.
◦
In the Templates section, click the link in the Locale column.
◦
Save the subtemplate.rtf file to your computer.
Exporting the Data Model XML File
In this task, you export the XML file that includes the data model attributes predefined for the notifications. Perform this
task to enable previewing your modified template. This task is also required if you intend to add data model attributes to
the template.
1. Sign in to the Oracle Business Intelligence Publisher server with the BI Administrator Role to open the Oracle
Business Intelligence Home page.
2. Click Catalog.
3. On the Catalog page, in the Folders section, expand Shared Folders > Human Capital Management > Workflow
Notifications and select Data Models to display the data models in the right pane.
4. Under TaskNotification data model, click Edit to open the Diagram tab on the TaskNotification data model page.
Note: To ensure that all data sets include requested elements with null values in the output XML data, do the
following:
◦
In the Data Model section, select Properties.
◦
In the Properties section, select Include Empty Tags for Null Elements.
◦
In the Data Model section, select Data Sets.
Note: To add data model attributes to the template, perform steps 5 and 6. Otherwise, skip to step 7.
5. Click the Data tab.
6. Enter the following attributes for the checklist that are key attributes and enable you to pull in all the attributes:
◦
TransactionID
7. Click View to see the sample data in the report, and all the available attributes.
8. Click Export.
9. In the Opening TaskNotification_.xml dialog box, select Save File and click OK.
10. Save the TaskNotification_.xml file to a local drive.
Downloading the Report Layout Template
In this task, you create a copy of the report layout template in the Custom folder and download a copy of the template to
your local hard drive to modify it.
1. Sign in to the Oracle Business Intelligence Publisher server with the BI Administrator role to open the Oracle
Business Intelligence Home page.
477

Oracle Fusion Cloud HCM
Using Common Features for HCM
Chapter 16
Workflow Notifications and Approvals
2. Click Catalog.
3. On the Catalog page, in the Folders section, expand Shared Folders > Human Capital Management and select
Workflow Notifications to display the templates in the right pane.
4. Under TaskFYIReport, click More, and then select Customize. A copy of the TaskFYIReport is created
automatically in the Custom folder.
5. On the TaskFYIReport page, under TaskFYIReport, click Edit.
6. On the Opening TaskFYIReport.rtf dialog box, select Save File and click OK to save the document to your local
hard drive. Save the template with the name UpdatedTaskFYIReport.rtf to distinguish it from the original
template.
Editing Prompts and Headers in the Template
To modify email and in-app notifications, you edit a local copy of the .rtf report layout templates in Microsoft Word.
Note: The exact steps can vary depending on your version of Microsoft Word.
1. Open the UpdatedTaskFYIReport.rtf.rtf template in Microsoft Word with the Template Builder installed, if not
already open. The document contains all notifications for the workforce deployment business process.
2. Scroll to the notification with the header FYI: Task.
3. Place the cursor in front of the FYI: header text.
4. Enter Checklist. The text now reads FYI: Checklist Task.
5. Save the document.
6. Proceed to the task Previewing the Document.
Previewing the Document
Before uploading the .rtf files to the business intelligence (BI) catalog, you should preview the output with the changes
you made. You can avoid uploading a broken report that displays an error in the emails and in-app notification sent to
users.
1. In the Ribbon, open the BI Publisher tab and click Sample XML within the Load Data group.
2. Browse to and select the TaskNotification_.xml file you downloaded to import sample data from the data
model.
3. In the Data Loaded Successfully dialog box, click OK.
4. At the top of the document, replace the path with the location of the downloaded subtemplate file on your
computer. For example, change <?import:xdoxsl:///Common Content/Templates/Workflow Notification
Subtemplate.xsb?> to<?import:file:C:///Template_Directory/Workflow Notification Subtemplate.rtf?> .
5. From the BI Publisher tab in the Ribbon, click HTML in the Preview group.
6. If the preview reflects your changes as expected, then change the path back to the original location.
7. From the BI Publisher tab in the Ribbon, click Validate Template in the Tools group.
8. Also in the Tools group, click Check Accessibility.
9. Save your changes in Word.
Adding Data Model Attributes to the Template
In this task, you add to the report template attributes to data model. You will add the Task Contact Details data model
attributes to the template.
1. Open the UpdatedTaskFYIReport.rtf template in Microsoft Word with the Template Builder installed, if not
already open.
2. Select the BI Publisher tab.
3. In the Load Data section, click Sample XML.
4. In the dialog box to select XML data that appears, browse to open the TaskNotification_.xml file you saved in
the Exporting the Data Model XML File task and click Open.
5. In the Data loaded successfully dialog box, click OK.
478

Oracle Fusion Cloud HCM
Using Common Features for HCM
Chapter 16
Workflow Notifications and Approvals
6. Scroll to the Task Details notification.
7. Place the cursor after Status and press the Enter key.
8. On the new line, enter Task Contact Details.
9. Place the cursor after the data code MEANING and press the Enter key to enter a new line.
10. On the BI Publisher tab, in the Insert section, click the 123 Field button to open the Field dialog box.
11. In the AllocatedTaskDetails folder, select CONTACT_DETAILS and click Insert. The field appears in the
document.
12. Click Close to return to the TaskFYIReport.rtf template.
13. Preview the template using the steps in the Previewing the Document task.
14. Save and close the document.
15. Proceed to the task Uploading the Modified Report Layout to the Oracle BI Publisher Catalog.
Uploading the Modified Report Layout to the Oracle BI Publisher Catalog
You must perform this task to use the modified report layout for notifications.
1. Sign in to the Oracle Business Intelligence Publisher server with the BI Administrator Role to open the Oracle
Business Intelligence Home page.
2. Click Catalog
3. On the Catalog page, in the Folders section, expand Shared Folders > Custom > Human Capital Management
and select Workflow Notifications.
4. Under the ChecklistReport, click Edit.
5. On the TaskNotification Data Model page, on the right side of the page, click Add New Layout to open the page
with the Create Layout and Upload or Generate Layout sections.
6. In the Upload or Generate Layout section, click the Upload icon.
7. In the Upload Template File dialog box, in the Layout Name field, enter Updated TaskFYIReport Template.
8. In the Template File field, browse for the modified Updated TaskFYIReport.rtf template on your local drive,
select the template, and click Open.
9. In the Upload Template File dialog box, from the Type list, select RTF Template.
10. From the Locale list, select English (United States).
11. Click Upload to open the Processing dialog box and return to the TaskFYIReport page.
12. On the right side of the page, click View a list to open the Layout page.
13. In the row for the Updated TaskFYI Report Template, select the Default Layout check box.
14. On the right side of the page, click the Save Report icon.
Configure Feedback Notifications Using Reports
This example shows how to configure workflow email and in-app notifications for feedback using Oracle Business
Intelligence (BI) Publisher reports. You use Microsoft Word to edit the .rtf template used for notifications. You can
modify the BI Publisher templates only if you have the
The following table summarizes key decisions for this scenario.
Decisions to Consider This Example
Which template do I update?
NoteSentToManager, for updates to notifications about feedback sent to managers
Do I add prompts and headers to the
template?
Yes
479

Oracle Fusion Cloud HCM
Using Common Features for HCM
Chapter 16
Workflow Notifications and Approvals
Decisions to Consider This Example
Do I add data model attributes to the
template?
Yes, for DISPLAY_NAME and WORKER_DISPLAY_NAME
Which language do I use for the .rtf
template?
English (United States)
Summary of the Tasks
Configure a goal management notification by:
1. Exporting the data model XML file.
2. Downloading the report layout template.
3. Editing prompts and headers in the template.
4. Previewing the document.
5. Adding data model attributes to the template.
6. Uploading the modified report layout to the BI Publisher catalog.
If you only want to add or edit prompts and headers in the template, use tasks 1, 2, 3, 4, and 6. To only add data model
attributes to the template, use tasks 1, 2, 4, 5, and 6.
Prerequisites
1. Download and install the Oracle BI Publisher Desktop: http://www.oracle.com/technetwork/middleware/bi-
publisher/downloads/index.html.
2. Download and install the Template Builder for Word to use Microsoft Word to edit the layout templates. To
download, install, and set up Template Builder for Word, see Creating RTF Templates by Using BI Publisher
11g Template Builder for Word: http://www.oracle.com/webfolder/technetwork/tutorials/obe/fmw/bi/bip/
tb4word/tbwordbip.htm.
3. To preview the configured templates, download a local copy of the subtemplate that applies to your own report
layout template:
◦
Sign in to the Oracle Business Intelligence Publisher server with the BI Administrator Role to open the
Oracle Business Intelligence Home page.
◦
Click Catalog.
◦
In the BI catalog, go to Shared Folders > Common Content > Templates for the predefined
subtemplate.
◦
Click Edit for Workflow Notification Subtemplate.
◦
In the Templates section, click the link in the Locale column.
◦
Save the subtemplate .rtf file to your computer.
Exporting the Data Model XML File
In this task, you export the XML file that includes the data model attributes predefined for the notifications. Perform this
task to enable previewing your modified template. This task is also required if you intend to add data model attributes to
the template.
1. Sign in to the Oracle Business Intelligence Publisher server with the BI Administrator Role to open the Oracle
Business Intelligence Home page.
2. Click Catalog.
480

Oracle Fusion Cloud HCM
Using Common Features for HCM
Chapter 16
Workflow Notifications and Approvals
3. On the Catalog page, in the Folders section, expand Shared Folders > Human Capital Management >
Workflow Notifications and select Data Models to display the data models in the right pane.
4. Under Person Notes, click Edit to open the Diagram tab on the PersonNotes page.
Note: To ensure that all data sets include requested elements with null values in the output XML data, do the
following:
◦
In the Data Model section, select Properties.
◦
In the Properties section, select Include Empty Tags for Null Elements.
◦
In the Data Model section, select Data Sets.
Note: To add data model attributes to the template, perform steps 5 and 6. Otherwise, skip to step 7.
5. Click the Data tab.
6. In the empty text field, enter the Note_ID for an existing feedback note to pull in all the feedback attributes.
7. Click View to see the sample data in the report, and all the available attributes.
8. Click Export.
9. In the Opening PersonNotes dialog box, select Save File and click OK.
10. Save the PersonNotes_.xml file to a local drive.
Downloading the Report Layout Template
In this task, you create a copy of the report layout template in the Custom folder, and download a copy of the template
to your local hard drive to modify it.
1. Sign in to the Oracle Business Intelligence Publisher server with the BI Administrator role to open the Oracle
Business Intelligence Home page.
2. Click Catalog.
3. On the Catalog page, in the Folders section, expand Shared Folders > Human Capital Management and select
Workflow Notifications to display the templates in the right pane.
4. Under NoteSentToManagerReport, click More, and then select Customize. A copy of the
NoteSentToManagerReport is created automatically in the Custom folder.
5. On the NoteSentToManagerReport page, under NoteSentToManagerReport, click Edit.
6. On the Opening NoteSentToManagerReport.rtf dialog box, select Save File and click OK to save the
document to your local hard drive. Save the template with the name UpdatedNoteSentToManagerReport.rtf to
distinguish it from the original template.
Editing the Template
To modify workflow email and in-app notifications, you edit a local copy of the .rtf report layout templates in Microsoft
Word.
Note: The exact steps can vary depending on your version of Microsoft Word.
1. Open the UpdatedNoteSentToManagerReport.rtf template in Microsoft Word with the Template Builder
installed, if not already open.
2. Place the cursor at the end of the text AUTHOR_DISPLAY_NAME added feedback about
WORKER_DISPLAY_NAME.
3. Enter recently.. The text now reads AUTHOR_DISPLAY_NAME added feedback about
WORKER_DISPLAY_NAME recently.
481

Oracle Fusion Cloud HCM
Using Common Features for HCM
Chapter 16
Workflow Notifications and Approvals
4. Place the cursor in front of the feedback code that includes <html2fo: NOTE_TEXT> and press the Enter key to
add a line.
5. Enter Check out this feedback:. When you preview the document, the feedback note appears below the text
that you entered.
6. Save the document.
7. Proceed to the task Previewing the Document.
Previewing the Document
Before uploading the .rtf files to the business intelligence (BI) catalog, you should preview the output with the changes
you made. You can avoid uploading a broken report that displays an error in the emails sent to users.
1. In the Ribbon, open the BI Publisher tab and click Sample XML within the Load Data group.
2. Browse to and select the PerformanceGoalNotificationsDM_.xml file you downloaded to import sample data
from the data model.
3. In the Data Loaded Successfully dialog box, click OK.
4. From the BI Publisher tab in the Ribbon, click HTML in the Preview group.
5. From the BI Publisher tab in the Ribbon, click Validate Template in the Tools group.
6. Also in the Tools group, click Check Accessibility.
7. Save your changes in Word.
Adding Data Model Attributes to the Template
In this task, you add to the report template attributes that exist in the predefined data model. You will add the
DISPLAY_NAME and WORKER_DISPLAY_NAME data model attributes to the template.
1. Open the UpdatedNoteSentToManagerReport.rtf template in Microsoft Word with the Template Builder
installed, if not already open.
2. Select the BI Publisher tab.
3. In the Load Data section, click Sample XML.
4. In the dialog box to select XML data that appears, browse to open the PersonNotes_.xml file you saved in the
Exporting the Data Model XML File task and click Open.
5. In the Data loaded successfully dialog box, click OK.
6. Place the cursor after the code containing <html2fo: NOTE_TEXT> and press the Enter key twice to add two
new lines.
7. On the new line, enter Author Name:.
8. On the BI Publisher tab, in the Insert section, click the 123 Field button to open the Field dialog box.
9. In the AUTHORNAME folder, select DISPLAY_NAME and click Insert. The field appears in the document.
10. Place the cursor after the data code DISPLAY_NAME and press the Enter key.
11. On the new line, enter Worker Name:.
12. On the Field dialog box, in the WORKERNAME folder, select WORKER_DISPLAY_NAME and click Insert. The
field appears in the document.
Note: Ensure that you don't alter or remove the code WORKER_DISPLAY_NAME or Online Notification that
appear at the bottom of the template.
13. Click Close to return to the UpdatedNoteSentToManagerReport.rtf template.
14. Preview the template using the steps in the Previewing the Document task.
15. Save and close the document.
16. Proceed to the task Uploading the Modified Report Layout to the Oracle BI Publisher Catalog.
Uploading the Modified Report Layout to the Oracle BI Publisher Catalog
You must perform this task to use the modified report layout for notifications.
1. Sign in to the Oracle Business Intelligence Publisher server with the BI Administrator Role to open the Oracle
Business Intelligence Home page.
482

Oracle Fusion Cloud HCM
Using Common Features for HCM
Chapter 16
Workflow Notifications and Approvals
2. Click Catalog
3. On the Catalog page, in the Folders section, expand Shared Folders > Custom > Human Capital Management
and select Workflow Notifications.
4. Under NoteSentToManagerReport, click Edit.
5. On the NoteSentToManagerReport Data Model page, on the right side of the page, click Add New Layout to
open the page with the Create Layout and Upload or Generate Layout sections.
6. In the Upload or Generate Layout section, click the Upload icon.
7. In the Upload Template File dialog box, in the Layout Name field, enter Updated Feedback Notifications
Template.
8. In the Template File field, browse for the modified UpdatedNoteSentToManagerReport.rtf template on your
local drive, select the template, and click Open.
9. In the Upload Template File dialog box, from the Type list, select RTF Template.
10. From the Locale list, select English (United States).
11. Click Upload to open the Processing dialog box and return to the NoteSentToManagerReport Data Model page.
12. On the right side of the page, click View a list to open the Layout page.
13. In the row for the Updated Feedback Notifications Template, select the Default Layout check box.
14. On the right side of the page, click the Save Report icon.
How You View Archived Transaction Details
You can view these details of archived transactions on the Archive Console page.
• Basic Details, including status, process name, object name with transaction ID, submitted on and submitted by.
• Approval History, you can see the hierarchy of approvers including initiator details, and also when the
transaction is configured to bypass approvals.
• Comments and Attachments, along with the comments, you can see any documents attached by the
approvers and the initiator.
• Issue Comments, which are attached with a failed transaction.
• Timeline, you can see all the transitions of a transaction through its lifetime.
Workflow Task Life Cycle Setup
Define Where and How Users Can Act On Workflow Tasks
For any workflow task, you can prevent users from acting on tasks through email. Or, require them to verify their
identity before updating the task outcome. You can also make comments required, optional, or not allowed.
By default, users can act on workflow tasks from email notifications, their worklist, and anywhere else they get to the
task. Also, users can add comments while updating the task outcome, for example to explain why they're rejecting
something.
Here's more detail about what you can configure for a workflow task:
• Set it up so that users can act on tasks only when they're in the application, not from emails.
483

Oracle Fusion Cloud HCM
Using Common Features for HCM
Chapter 16
Workflow Notifications and Approvals
• Make it required, optional, or not allowed to enter comments when approving or rejecting tasks. For example,
you might require comments for auditing or regulatory purposes.
• Require users to verify their identity before updating the task outcome from the application.
Here's how you go about it:
1. In the Setup and Maintenance work area, go to Manage Task Configurations in the Application Extensions
functional area. Or, depending on your offering, you might use a different functional area or another approval
setup task.
2. In BPM Worklist, on the Task Configuration tab, search for the workflow task in the Tasks to be configured
pane.
3. Select the task from the search results and click the Edit task icon in the toolbar.
4. Open the Configuration subtab.
5. If you want users to update tasks only from the application, not from email, select the Perform update
outcome only from task form check box in the Approval Pre-conditions section.
6. To make comments required, optional, or not allowed when users approve or reject tasks, select an option for
the Approve and Reject lists. For example, select the Required option for both Approve and Reject lists to
make comments required.
Note:
◦
These settings apply only to new tasks that users submit after you finish these steps, not to
tasks that are already in progress.
◦
For in-app UIs, the validation applies right before the user approves or rejects. For example, let's
say comments aren't allowed for approval. The user adds a comment and then does something
else immediately to the task, like save, if such actions are available. When they then click
Approve, they won't get an error. If they add a comment and then immediately click Approve,
they would get an error.
7. Click the Access tab.
8. Select a value for the Signature Policy list to determine what users need to do or not before updating the task
outcome.
◦
No Signature Required: Users don't need to verify their identity.
◦
Password Required: Users need to enter a password or more, depending on the task.
9. Click the Commit task icon on the Tasks to be configured toolbar when you're ready to roll out your changes.
Related Topics
•
Search for Workflow Tasks to Configure
Define When to Automatically Dismiss or Withdraw Workflow
Tasks
For a workflow task to be purged and removed from users' worklists, it must have a final status, like Completed or
Withdrawn. FYI tasks must be dismissed. You can control when FYI tasks are eligible to be automatically dismissed.
Tasks go from the Assigned status to the Completed status when the final assignee approves or rejects the tasks. For
your information (FYI) tasks get a final status when assignees explicitly dismiss the tasks. If assignees don't do anything
484

Oracle Fusion Cloud HCM
Using Common Features for HCM
Chapter 16
Workflow Notifications and Approvals
within a certain period of time that result in a final task status, the tasks are automatically dismissed (FYI tasks) or
withdrawn (all other tasks).
When FYI Tasks Are Eligible to Be Automatically Dismissed
The FYI Notifications Expiration Period (FND_NOTIFICATION_EXP_PERIOD) profile option controls when FYI tasks are
eligible to be automatically dismissed.
1. In the Setup and Maintenance work area, go to the Manage Applications Core Administrator Profile Values
task in the Application Extensions functional area.
2. On the Manage Applications Core Administrator Profile Values page, leave the profile option with the default
value of 7 at the Site level, or replace it with a different number.
The profile value represents the number of days after the FYI task is created. When assignees don't read or dismiss an
FYI task within this many days after the task was created, the task is then eligible to get automatically dismissed.
When All Other Tasks Are Eligible to Be Automatically Withdrawn
All other tasks (the ones that aren't FYI) are eligible to be automatically withdrawn if both of these things happen:
• The expiration settings for the particular task is set to Do Nothing on the Deadlines subtab, within the Task
Configuration tab in BPM Worklist.
• Assignees don't take action to send the task to a final status within 180 days after the task was created. This
number is reflected in the Open Tasks Withdrawn After Number of Days field on the Application Preferences
page, which you can open by clicking the Administration tab in BPM Worklist.
When Eligible Tasks Are Automatically Dismissed or Withdrawn
Now we know when tasks are eligible, but when are they actually dismissed or withdrawn automatically?
• FYI tasks: A process runs every three days, starting the first day of each month. For example, it runs on May 1,
4, 7, and so on, and again on June 1 and every three days after. So, if you leave the FYI Notifications Expiration
Period profile value at 7, depending on when the process runs, an FYI task can be automatically dismissed
within seven to ten days after it's created. The process changes the task status from Assigned to Completed.
• All other tasks: A process runs every three days, starting the second day of each month. For example, it runs on
May 2, 5, 8, and so on, and again on June 2 and every three days after. The process changes the task status to
Withdrawn.
Related Topics
•
Set Profile Option Values
•
Define the Due Date and Expiration Policies for Workflow Tasks
•
How do I update existing setup data?
How Workflow Tasks Are Archived and Purged
Workflow tasks with a final status of Completed, Errored, Expired, or Withdrawn can be archived and purged. In progress
tasks with statuses like Assigned, Information Requested, or Suspended aren't eligible.
• Archiving keeps a copy of the task data for audit, data retention or analysis, and other purposes. Archived
data includes task details, approval history, comments, and attachments. How you view or use the archived
485

Oracle Fusion Cloud HCM
Using Common Features for HCM
Chapter 16
Workflow Notifications and Approvals
data depends on the products you're using. For example, the data might be displayed in a table on a page, or
available through a business intelligence subject area that you can select to create an analysis.
These are the database tables that store the archived data:
◦
FND_BPM_TASK_B
◦
FND_BPM_TASK_TL
◦
FND_BPM_TASK_HISTORY_B
◦
FND_BPM_TASK_HISTORY_TL
◦
FND_BPM_TASK_ASSIGNEE
◦
FND_BPM_TASK_COMMENT
◦
FND_BPM_TASK_ATTACHMENT
• Purging removes the completed tasks from users' worklists and permanently deletes the original data.
Archive
Tasks are automatically archived once a day without you having to set anything up. You can't change or stop this
automatic archive, which includes all eligible tasks that aren't archived yet. These scheduled processes run in this order
to get the daily archive done:
• Extract Workflow Tasks for Archive
• Process Translations for Workflow Tasks Archive
• Upload Workflow Task Attachments for Archive
All three scheduled processes must complete for tasks to get archived. But, as soon as Extract Workflow Tasks for
Archive is done, the tasks are available for purge. It usually takes around two hours for each automatic process to finish.
Though unlikely, if you ever need to archive more frequently, you can use the Scheduled Processes work area to
manually run these processes. But it's best not to unless it's really necessary. In which case, keep these in mind:
• Run the processes in the same order that they're run for the automatic archive.
• Don't run these processes when any of the three processes are still running, including the automatic runs.
• Run the processes during off hours, but not at midnight when the purge is running.
• Optionally set parameters for the Extract Workflow Tasks for Archive process. Let's say you select 50000 for
the Number of Tasks in Batch parameter and 120 for the Maximum Runtime in Minutes parameter. That means
the process will archive in batches of 50000 workflow tasks. If it's still running after two hours, the process
finishes archiving the current batch and then stops. You can check the log file of the process to see how many
tasks are included in the archive.
If the automatic archive isn't working, don't manually run the processes to compensate. Instead, contact your help desk
to ensure that the automatic archive works again.
Purge
Archived tasks that were last updated over 30 days ago are purged without you doing any setup. The purge runs daily at
midnight. You can't change or stop this automatic purge.
After a task is purged, users can no longer find it in BPM Worklist or the Worklist: Notifications and Approvals work area.
The task's approval history won't be available either. But, the tasks are still in the archive tables and available in analytics
or anything else that reflects the archived data.
486

Oracle Fusion Cloud HCM
Using Common Features for HCM
Chapter 16
Workflow Notifications and Approvals
Note: If the Approvals work area is enabled, it replaces the Worklist: Notifications and Approvals work area.
Related Topics
•
Submit Scheduled Processes and Process Sets
•
View Status and Other Details for Scheduled Processes
•
Oracle Fusion Cloud Applications Tables and Views for Common Features
Set Up the Worklist Region on My Dashboard
The Worklist: Notifications and Approvals region displays the workflow tasks assigned to the user. You can
add this region to My Dashboard for all users, and set the Welcome Dashboard Worklist Timeout Interval
(ATK_HOME_PAGE_WORKLIST_TIMEOUT) profile option.
Adding the Region
To add the Worklist: Notifications and Approvals region to My Dashboard:
1. Click Navigator > Others > My Dashboard.
2. If the Page Composer isn't active, click the Activate a sandbox link in the warning dialog box to activate a
sandbox with that tool.
3. Click your initials in the global header, and select Edit Pages in the Administration menu group.
4. Click the Add Content button where you want to place the region.
5. Open the Application Content folder in the Add Content dialog box.
6. Click Add for the Worklist: Notifications and Approvals item.
7. Click Close.
8. Save your work, and then click the Close button.
Defining the Timeout Interval
When users open My Dashboard and it contains the Worklist: Notifications and Approvals region, data for the region is
retrieved. The Welcome Dashboard Worklist Timeout Interval profile option determines how long to continue retrieving
before timing out and displaying no data. In the Setup and Maintenance work area, use the following:
• Functional Area: Application Extensions
• Task: Manage Application Toolkit Administrator Profile Values
Note: If you don't see this task, then make sure that the Application Toolkit Component Maintenance feature is
enabled at the offering level in the Offerings work area.
On the Manage Application Toolkit Administrator Profile Values page, set the Welcome Dashboard Worklist Timeout
Interval profile option.
• If you don't set a value for this profile option, which is blank by default, then the region doesn't time out.
• Retrieving data for the Worklist region affects the performance of My Dashboard as a whole. So, select a value
for this profile option if your users have the Worklist region on My Dashboard and notice performance issues.
After the timeout, users can refresh the region to try retrieving the data again.
487

Oracle Fusion Cloud HCM
Using Common Features for HCM
Chapter 16
Workflow Notifications and Approvals
Related Topics
•
Set Profile Option Values
•
Create and Activate Sandboxes
•
Configure Offerings
•
How do I update existing setup data?
Monitor and Troubleshoot
Audit the Changes Made to Task Configurations
To help you troubleshoot or manage workflow setup, you can get audit information about changes to task
configurations. For example, which task was updated, who made the change and when. Use the Audit Reports work area
to get audit results.
Here’s what you search on:
• Product: Oracle SOA Suite (SOA)
• Event Type: SOA DT@RT Change
Setup
Workflow tasks are audited as long as the audit level is set to Low, Medium, or High for Oracle SOA Suite on the Manage
Audit Policies page. You get the same audit results for workflow tasks no matter which of these levels is selected. To
check the setup, in the Setup and Maintenance work area, use the Manage Audit Policies task in the Application
Extensions functional area. If you don’t see this setup task, make sure the Maintain Common Reference Objects feature
is enabled at the offering level.
Related Topics
•
Audit Policies
•
Audit Reports
•
How do I update existing setup data?
•
Configure Offerings
Things to Check If There Are Issues with Workflow Tasks
After you configure workflow tasks, it's possible to have some issues when they're actually in use. Let's take a look at
some issues that might come up and how you can proceed when they do.
488

Oracle Fusion Cloud HCM
Using Common Features for HCM
Chapter 16
Workflow Notifications and Approvals
Task Isn't Getting Assigned to Approvers
One main way to tell this is happening is that when users open a workflow task, they see a message saying that the
approval history can't be displayed. That usually means something about the related approval rule is not quite right, so
approvers can't be found. Here are some things to check to make sure the rules are working correctly:
• Click the Show Advanced Settings icon for the rule set and rules to make sure that both are active and
effective.
• If the rule is routing to an approval group, make sure that the group actually exists and has members.
• If the list builder is using the supervisory hierarchy, check for these things:
◦
Are there enough manager positions to fulfill the number of levels needed for approval?
◦
Does the supervisor hierarchy go up that far from the task creator or the person the task is created for,
depending on which is the starting participant?
◦
Is there a top participant defined in the rule?
◦
Is the rule configured to always route to an implementation user instead of managers in the hierarchy?
• Review the rules in general to make sure the conditions have enough information to be true.
• If the rule is defined to automatically approve or reject, ask the task creator to try and submit their transaction
again.
Assignees Don't Get a Notification
In the Transaction Console work area, look for the transaction, which would have an error. If available as an option,
withdraw the transaction. Otherwise, review the error and logs, if any, and address the issue.
To confirm that something went wrong with the notification, the task creator or the current assignee can also check for
tasks with errors, for example in the notifications list in the global header or the Worklist: Approvals and Notifications
work area.
Assignees Can't Approve By Email
Here are some things to check:
• Is this an email-only issue? Can the assignee can approve from somewhere else, for example the notifications
list in the global header or the Worklist: Approvals and Notifications work area?
• Does the email have links that the assignee can click to take action? If not, open the task configuration and
make sure that the Make notification actionable check box is selected in the More section of the Notifications
subtab.
• Did the assignee already take action on the task elsewhere, outside email?
Pending Task Prevents Further Update
If there's no movement on a task for a while, future approvers can't act on the task and move things along.
• It could be that there's nothing wrong. The task is just pending action from the current assignee. In which case,
remind them to act on the task.
• Find out who created the task and check if there's an error with the task.
◦
If you recently had an upgrade and the error wasn't already there before the upgrade, make sure to
resolve the issue.
489

Oracle Fusion Cloud HCM
Using Common Features for HCM
Chapter 16
Workflow Notifications and Approvals
◦
If the creator wants to withdraw the task, whether there's an error or not, they can do that themselves or
have you withdraw for them from the Transaction Console work area.
Approvals Are Complete But Result Isn't Reflected
Even though a workflow task has a Completed status, it could be that what you expect to happen next due to the
approval hasn't happened yet. In which case, check on these things:
• Did all approvers act on the task? Did any approver reject?
• Has the task expired? Check the task configuration to see if expiration policies are set on the Deadlines subtab.
Also, the task creator should have received a notification if it expired.
• Did the task creator get any notifications about errors with the task? In the Worklist: Notifications and Approvals
work area, they should select Any for the Status filter to make sure they review all notifications.
Note: If the Approvals work area is enabled, it replaces the Worklist: Notifications and Approvals work area.
Transaction Console
Manage Workflow Transactions
After workflow tasks are created, it's helpful to keep track of them and jump in when needed, especially when
something goes wrong. If you have the appropriate access, you can monitor and troubleshoot workflow tasks for others
and for yourself.
Use the Transaction Manager: Transactions page in the Transaction Console work area to manage transactions. A
transaction is a business process that involves a workflow task. Here are some of the things you can do:
• Track transaction statuses and download spreadsheets with information about transactions.
• Download and review diagnostic logs for transactions. For example, you can see the conditions in the approval
rules that might have caused an error.
• Depending on what's going on with the transaction and what access you have, you might be able to, for
example, reassign or recover the transaction.
Find Transactions
Follow these steps:
1. Click Navigator > Tools > Transaction Console.
2. If you see tabs, make sure you're on the Transaction Summary tab.
3. On the Transaction Manager: Transactions page, check the Last Refresh time stamp after the page title to see
when the transaction statuses were last updated. Click the Refresh icon if needed. You can refresh any time as
long as someone else didn't already start a refresh.
◦
You can also click the Refresh icon for a specific row in the table to refresh individual transactions.
◦
Also, the Refresh Transaction Administrator Console Transaction Status scheduled process
automatically runs to refresh the statuses.
◦
If you open the details for a specific transaction (step 5), its status also refreshes and you see the latest
on the details page.
490

Oracle Fusion Cloud HCM
Using Common Features for HCM
Chapter 16
Workflow Notifications and Approvals
4. View the transactions with a status that matches the default Status filter, for example Failed. You can remove
this filter to get results for all statuses. Or, use the search and filters to apply your own criteria, for example, to
find transactions that are priority 1 or submitted by a specific person.
◦
You can use the search to find results based on keywords in the Name or Process Name column, or
specifically use the Name or Process Name filters. Name is the person or object the workflow task applies
to, and the process reflects the type of workflow task.
◦
You can personalize filters to add or hide filters, and create saved searches for future use.
5. Select and act on the transactions right there from the results table, or click the transaction in the Name
column to see details, such as diagnostic information for failed transactions, and go from there.
Act On Transactions Without Opening Details
Here's what you do:
1. Select one or more transactions from the results table.
2. Optionally use the Priority menu to set an issue priority, so that you can later filter on the priority to find these
transactions.
3. Open the Actions menu and select an action. If you selected more than one transaction, you see only the
actions that can apply to all of them.
Use Transaction Details
What you can see and do in the transaction details depends on the transaction status and what access you have. For
example, for transactions that are in progress or completed, you might see the approval history, which shows who
already approved and who the current assignee is, if any.
For failed transactions, you can get information about the issues and, if you're an administrator, usually take some
action:
1. Select an issue from the Issues list, if the transaction has more than one issue.
2. Review the information in the Instructions and Details sections, including any description and resolution for the
issue, as well as the related workflow task and approval rule.
3. Click the Download link to get the diagnostic log.
4. Use the Issue Priority list to set an issue priority, if you want to later filter on the priority to find this transaction.
5. From the Assigned To list, select the person who should fix the issue, for tracking and filtering purposes.
6. Add comments, for example to track what you're doing to address the issue, or note down any service request
IDs. You and others can see these comments only in the Transaction Console, not with the workflow task in the
worklist.
7. If you can, take action to address the issue. Here are some examples of how you might go about it:
◦
Open the Actions menu and select an action to manage the transaction.
◦
Follow up with the person you assigned the issue to or your help desk. Give them the diagnostic log and
other information from the transaction details.
◦
Reconfigure the approval rule that the transaction is based on, and have the workflow task resubmitted.
8. Select another issue from the Issues list, if any, and go through the same process.
9. Click Save and Close.
Download a Spreadsheet of Transactions
This is all you need to do:
1. In the results table, select the transactions you want to include in the spreadsheet. To get all transactions, either
select all of them or none at all.
491

Oracle Fusion Cloud HCM
Using Common Features for HCM
Chapter 16
Workflow Notifications and Approvals
2. On the Actions menu, click Download.
Related Topics
•
Statuses for Filtering Transactions
•
Automatically Refresh Transaction Statuses
•
Actions for Managing Transactions
•
Use Filters with Keyword Searches
•
Save Keyword Searches with Filters
Statuses for Filtering Transactions
Use the Transaction Manager: Transactions page in the Transaction Console work area to track the status of
transactions. For example, you can filter the transactions by status to see just the transactions that are in progress or
stuck.
Note: These statuses aren't the actual workflow task statuses that you see in the worklist or in notifications.
Status Description
Auto Recovery
The transaction ran into some issues, but the application is trying to fix them without any action on
your end.
Completed
All approvals are done and the transaction successfully went through all processes.
Draft
The transaction is saved but not submitted yet. This status doesn't apply to all product families.
Failed
The transaction has one or more errors, for example, due to a network or database outage, or an issue
in the approval rules setup.
In Progress
At least one approval is still pending for the transaction before it's all done.
Stuck
The transaction was submitted, but ran into issues so the workflow task doesn't exist yet.
Submitted
The transaction was just created and hasn't moved on yet to another status. This status doesn't apply
to all product families.
Related Topics
•
Manage Workflow Transactions
•
Actions and Statuses for Workflow Tasks
Automatically Refresh Transaction Statuses
The Refresh Transaction Administrator Console Transaction Status scheduled process automatically runs every
hour. It refreshes the statuses on the Transaction Manager: Transactions page in the Transaction Console work area.
492

Oracle Fusion Cloud HCM
Using Common Features for HCM
Chapter 16
Workflow Notifications and Approvals
Hourly is the recommended frequency, and it should be enough, especially since you can just refresh using the Refresh
icons on the page. But if you really need to, say due to an extraordinary volume of transactions, you can submit the
process to run on a more frequent schedule.
• Be careful if you do this, because you are adding load to the queue of all scheduled processes. Consider if that
potential performance impact is really warranted.
• If your manually submitted process has any scheduled runs that overlap with the automatic hourly ones, your
process would run instead of the automatic one.
• The automatic process still runs whenever there’s no overlap with your process.
• The time it takes for the process to finish depends on the volume of transactions, but it usually ends in minutes.
So if it’s taking hours or longer, something is most likely wrong.
To run this scheduled process, you need a custom job role that has the Perform HCM Approval Transaction Actions
(PER_PERFORM_APPROVAL_TRANSACTION_ACTIONS_PRIV) privilege. If you can access transactions on the
Transaction Manager: Transactions page, you already have this privilege.
Related Topics
•
Submit Scheduled Processes and Process Sets
Actions for Managing Transactions
Use the Transaction Manager: Transactions page in the Transaction Console work area to manage and troubleshoot
transactions. There are many actions you can take. For example, you can withdraw a transaction even if you're not the
one who submitted it.
What you can do depends on the transaction status and the custom roles you have. Some actions, such as approve and
reassign, are the same as the ones you can take on the workflow tasks from the worklist or from notifications.
Action Description
Add Comment
Add your notes for the transaction, for example to track what you're doing to address the issue, or
to jot down any service request IDs. You and others can see these comments only in the Transaction
Console.
Alert Initiator on Error
Notify the submitter if the transaction ends up in error.
Approve
Approve the transaction if the workflow task is currently assigned to you to approve or reject.
Download
Get a spreadsheet with information about the selected transactions.
Reassign
Reassign the workflow task to an approver, the submitter, or someone else. This action isn't available if
the workflow task is based on a Position list builder.
Recover
Restart the process after the transaction stopped due to errors. After you address the issue, use this
action to pick up where the process had stopped and try what had ended up in error again.
Reject
Reject the transaction if the workflow task is currently assigned to you to approve or reject.
493

Oracle Fusion Cloud HCM
Using Common Features for HCM
Chapter 16
Workflow Notifications and Approvals
Action Description
Resend Email Notification Send an email notification to the current assignee of the workflow task, for example, if they can’t find
the original email. This action is available only if the transaction is in progress and involves a workflow
task that’s currently assigned.
• In some cases, the in-app notification is sent as well.
• If someone from a group of approvers has claimed the task but hasn't acted on it, the notification
is still sent to the entire group.
Terminate Process
Completely end the transaction so that no one can see or act on the workflow task again.
Withdraw
Remove the workflow task from the workflow. You can ask the submitter to submit again, for example,
after an issue is resolved.
Related Topics
•
Manage Workflow Transactions
•
Statuses for Filtering Transactions
•
Actions and Statuses for Workflow Tasks
Archive and Purge Transactions
To optimize the performance of the Transaction Manager: Transactions page in the Transaction Console work area,
archive and purge completed transactions. Run the Archive Transaction Console Completed Transactions scheduled
process to remove transactions from the page.
A transaction must meet these criteria to be eligible for archive and purge:
• The transaction has the Completed status for at least a certain amount of time. The default is three months.
If you have access to the Approval Rules tab in the Transaction Console work area, you can change the duration
for all transactions of specific business processes. Here are the options you can select:
◦
3 months
◦
6 months
◦
9 months
◦
Don't archive
• All workflow tasks in the transaction are already archived and purged.
If you have access to the Approval Rules tab, you can also click the Archive icon to run the scheduled process
immediately.
Before You Start
You need a custom job role that has the Run Approval Transactions Archive Process
(PER_RUN_APPROVAL_TRANSACTIONS_ARCHIVE_PROCESS_PRIV) privilege.
Review this before you submit the process:
• You’re strongly advised to schedule the process to run once a day, during off hours.
494

Oracle Fusion Cloud HCM
Using Common Features for HCM
Chapter 16
Workflow Notifications and Approvals
• Make sure that the process doesn’t try to start while another run of the same process is still going. This process
is self-incompatible and only one instance of the process can run at any given time.
• The time it takes for the process to finish depends on the volume of transactions, but it usually ends in minutes.
If you're running the process for the first time, or it hasn't run in a very long time, the process might take much
longer to finish. So it’s best to run it daily, as recommended.
Parameters
If you have access to the Approval Rules tab, most likely you don’t need to worry about these parameters. You can just
define and use the settings on that tab. But if you don’t have access, you can use these parameters to override those
settings. Another reason you might use these parameters is if you have a need to archive immediately at any given
time, for one or more business processes.
• Days: Enter the number of days that a transaction must already have the Completed status to be eligible for
archive and purge.
◦
Enter 0 if you want all transactions with the Completed status to be eligible immediately.
◦
This parameter isn’t available by default, but requires setup.
◦
This parameter applies to transactions in all business processes.
◦
If you leave this parameter blank, or the parameter isn’t available, the setting for each business process
on the Approval Rules tab takes effect. For example, the 3 months default, or Don’t archive.
• Process Name: Select all or specific business processes.
◦
The scheduled process includes transactions for the selected business process names.
◦
If you leave this parameter blank, the scheduled process considers all business processes except the
business processes set to Don’t archive on the Approval Rules tab, if any.
Let’s say you enter 30 for the Days parameter and leave the Process Name parameter blank. Business processes set to
Don’t archive on the Approval Rules tab are excluded. The 30 days would still apply to all other business processes on
the tab.
Purge Archived Transactions
You can set up purge policies to archive transactions in the Transaction Console based on your organization’s data
retention policies.
Related Topics
•
How Workflow Tasks Are Archived and Purged
•
Submit Scheduled Processes and Process Sets
Make the Days Parameter Available for Archiving Transactions
Create and set a profile option to make the Days parameter available for the Archive Transaction Console Completed
Transactions scheduled process. The process includes only transactions that have the Completed status for at least the
specified number of days.
For example, if the user enters 30 for the parameter, the scheduled process includes transactions that have the
Completed status for 30 days or longer. If the Days parameter isn’t available, the process would use the settings on
the Account Rules tab of the Transaction Console work area. There, for all transactions of specific business processes,
the default duration is three months. If you have access to that tab, you can change the setting for individual business
processes to another duration, or to not archive at all. The Days parameters let the user decide if they want to override
or use those settings when they submit the scheduled process.
495

Oracle Fusion Cloud HCM
Using Common Features for HCM
Chapter 16
Workflow Notifications and Approvals
If your users have access to the Approval Rules tab, most likely you don’t need to make the Days parameter available.
But, say that your company has a need to archive immediately at any given time, for one or more business processes. In
that case, you need the Days parameter, because the shortest duration for the setting on the Approval Rules tab is three
months.
Create the Profile Option
Here's what you do:
1. In the Setup and Maintenance work area, go to the Manage Applications Core Profile Options task in the
Application Extensions functional area for your offering.
2. On the Manage Applications Core Profile Options page, click the New icon.
3. On the Create Profile Option page, enter HRC_ARCHIVE_DAYS_SHOW as the profile option code.
4. Enter a display name that you can easily remember to help you find the profile option later.
5. From the Application list, select Common Work Setup.
6. From the Module list, select Application Common.
7. Specify a start date.
8. Click Save and Close.
9. On the Manage Applications Core Profile Options page, make sure that your new profile option is selected in
the Search Results: Profile Options subsection.
10. In the <Profile Option>: Profile Option Levels subsection, select the Enabled and Updatable check boxes for
the Site level.
11. Save your work.
Set the Profile Option
In the Setup and Maintenance work area, go to the Manage Applications Core Administrator Profile Values task in
the Application Extensions functional area. Set your profile option at the Site level with True as the profile value.
Related Topics
•
Set Profile Option Values
How You Use Data Cache Corrector
You can use Edit Data Cache in the Transaction Summary page to edit errors in the data cache of a stuck transaction.
In the Transaction Summary page, you can select either a single transaction or select multiple transactions that are in
the stuck status and use Actions > Edit Data Cache. You can edit multiple transactions together only if the transactions
belong to the same process. If they belong to different processes, the Edit Data Cache option isn’t available.
On the Corrector page, you can enter an XML path to the node that you want to correct or add. You can select only one
of these actions at a time. In case, you want to restore the transaction to its original status, you can use Revert Data
Cache Changes. Again, you can revert the transaction only if you’ve made changes. If you haven't made changes, the
Revert Data Cache option isn’t available.
Points to Note
1. By default, the Edit Data Cache action is hidden. Create the HCM_EDIT_DATA_CACHE_ENABLE profile option
and set it to True.
2. If you enter an invalid path, an error message displays.
3. A record of the edit data cache action is stored and displayed in the Transaction History page for audit
purposes.
496

Oracle Fusion Cloud HCM
Using Common Features for HCM
Chapter 16
Workflow Notifications and Approvals
Related Topics
•
Edit Data Cache
Edit Data Cache
If you have transactions that have been stuck due to corrupted data cache, you can use Edit Data Cache to fix those
transactions.
Here’s how you use edit data cache for a stuck transaction:
1. In the Transaction Manager: Transactions page, locate and select the stuck transaction for which you want to edit the
data cache.
2. In the Actions menu, click Edit Data Cache and then click Yes in the warning message.
3. On the Correct Data Cache page, enter the path to the node that needs editing.
The path is validated and the current value displays.
4. Enter the new value and specify the appropriate data type.
5. Click Edit Node to submit your changes.
6. Click Yes to confirm.
Add a Node
If you want to add a new node, follow these steps:
1. Enter the path to the node that needs to be added. The system detects that the node entered in the path is a new
node.
2. Enter the new value and specify the appropriate data type. If there’s a mismatch in the data type selected and the
value entered, an error message displays.
3. Click Add Node to submit your changes.
Revert Changes
If you want to discard changes to the data cache and restore the transaction to its original state, follow these steps:
1. Locate and select the row of the transaction for which you previously modified the data cache.
2. In the Actions menu, click Edit Data Cache.
3. Click Revert Data Cache Changes.
4. Confirm the discard and restore the transaction back to its original state.
Related Topics
•
How You Use Data Cache Corrector
Review Employee Vacation and Delegation Rules
Use the Employee Vacation and Delegation Rules Report to get details about the rules that users defined to reassign or
delegate the workflow tasks assigned to them. This report is available as a scheduled process.
497

Oracle Fusion Cloud HCM
Using Common Features for HCM
Chapter 16
Workflow Notifications and Approvals
For example, your employee is on vacation, and you need to know what happens to tasks assigned to them during that
time. The report tells you if they have set up a rule to reassign or delegate to someone else to approve. You can also see
who the designated person is.
Before You Start
Review this before you run the report:
• You can run the report as a scheduled process from the Scheduled Processes work area if you have a custom
role that contains the following:
◦
Run BPM Workflow Reports (FUN_RUN_BPM_WORKFLOW_REPORTS_PRIV)
◦
Run BPM Workflow Reports (FUN_RUN_BPM_WORKFLOW_REPORTS_PRIV_OBI)
• Run the report on an as needed basis, whenever you need information about users' vacation or other
delegation rules. Don't submit this report to run on a recurring schedule.
Report Parameters
The report includes rules that are active, inactive, or both on the day that you run the report. Let’s say you run the report
on November 10, and select October 1 for the From Date parameter and October 30 for the To Date parameter.
And for example, there are three rules with these active dates:
1. September 25 to October 10
2. October 5 to October 15
3. October 30 to November 30
The report can potentially include any of these rules, which have active dates within the period you set in the From Date
and To Date parameters. What you select for the Rule Status parameter determines which of the three rules are actually
included in the report:
• Active: Only the third rule is included because only that rule is still active on November 10.
• Inactive: Only the first two rules are included because those are inactive on November 10.
• All: All three rules are included.
Note: If you leave the From Date and To Date parameters blank, the report runs as if you had entered the first and last
date of the current month.
Report Output
You don’t need to define the output when you submit the report. You will get a spreadsheet with these sections:
• Originator Employee Details: Information about the user who defined the rule.
• Rule Details: Information about the rule, including when the rule is effective and any conditions that a workflow
task must meet for the rule to apply. There are two types of rules:
◦
Vacation: A rule for when the user is out of office.
◦
Delegation: Any other rule that the user defined for tasks assigned to them, for example to delegate or
reassign tasks based on certain conditions.
• Destination Employee Details: Information about the person whom tasks are delegated or reassigned to.
498

Oracle Fusion Cloud HCM
Using Common Features for HCM
Chapter 16
Workflow Notifications and Approvals
If you don't get a spreadsheet, or the spreadsheet is blank, one thing you can do is to contact your security
administrator. Confirm if you do in fact have the privileges listed earlier.
Related Topics
•
Submit Scheduled Processes and Process Sets
•
View Output from Scheduled Processes
How You Can Regularly Reassign Pending Approvals for Workers
That Become Inactive
A manager assignment can become inactive due to the end of an assignment or work term, termination, or global
transfer. If the manager has any pending approval notifications, you must reassign them.
Run this process: Run Reassign Pending Approvals for Terminations and Correct Invalid Supervisor Assignments
Process in the Scheduled Processes work area. You can set a schedule to run it at least once a day. You can run it more
frequently if you want things updated faster.
Here's what the process does:
• It reassigns the direct reports of a terminated manager to that person's line manager and also assigns any
pending notifications to the line manager. Only actionable notifications will be reassigned.
• It reassigns pending approval notifications based on the number of days you specify using the Past Period in
Days Considered for Reassigning Pending Approvals parameter.
Related Topics
•
Submit Scheduled Processes and Process Sets
499

Oracle Fusion Cloud HCM
Using Common Features for HCM
Chapter 16
Workflow Notifications and Approvals
500

Oracle Fusion Cloud HCM
Using Common Features for HCM
Chapter 17
HCM Nudges
17 HCM Nudges
Overview of Nudges
A nudge is a reminder sent to a worker to take a specific action on a certain event.
Managers and employees receive nudges for any overdue or pending tasks pertaining to events such as upcoming
check-ins, assigned goals, pending feedback, or celebrating accomplishments, so that they can take appropriate actions
on them.
They receive these reminders through one or more of these channels:
• As nudge cards that appear on the employee’s Touchpoints page
• As recommended insights topics that appear when they create or edit a check-in
• As email notifications
Currently, nudges are available for these product areas:
• Core HR
• Feedback
• Check-ins
• Goals
• Touchpoints Surveys
Note: Nudges pertaining to Feedback, Check-ins, and Goals can be configured only for the Touchpoints product.
Key points to consider when configuring a nudge:
• Identify the reason for nudging a worker. For example, you can send a reminder to employees about an
upcoming check-in discussion, or send a reminder to a manager to provide feedback for their employees.
• Specify the evaluation criteria for each of these nudges. For example, a reminder for a check-in can be sent to
employees ‘n’ number of days prior to the scheduled check-in, where ‘n’ is a configurable parameter.
• Specify the message template for each of these nudges. You can use existing templates or define new
templates.
Configure Nudges
Configure nudges to remind your workers to take a specific action on their upcoming or overdue tasks. This example
describes how you can configure a nudge to remind a manager to schedule a check-in with an employee.
1. Go to My Client Groups > Nudge Configuration.
2. On the Nudge Configurations page, click Add.
3. On the Nudge page, Nudge Type section, select these values:
a. In the Module field, select the type of nudge. For example, to nudge a manager about an overdue check-
in with an employee, select Check-in.
501

Oracle Fusion Cloud HCM
Using Common Features for HCM
Chapter 17
HCM Nudges
b. In the Reason field, select a reason for scheduling the nudge. For example, select Check-in between
manager and employee hasn't been scheduled for a period of time.
c. Optionally, edit the value in the Configuration Name field as required.
d. In the Status field, select Active.
e. In the Number of Days Since Last Check-In Discussion field, enter a value.
4. In the Channels section, click Add.
5. In the Channel Type field, select one of these values. The channel types you see here depend on the module
you select. For the check-in module, these are the channel types:
◦
Email: The recipient receives the nudge in an email.
◦
Touchpoints Card: The receipent receives the nudge as a touchpoint.
◦
Transaction Card: The receipent receives the nudge as a card with a link to the Check-ins page.
6. In the Receipent Type field, select the role of receipent.
7. In the Content Source field, select a value. You can use the default template content or customize the content.
8. If you select a user-defined content source, you can edit the content in the Title and Content fields.
9. Select the Active check box.
10. In the Priority field, select a value.
11. In the Channels section, select OK.
You can add more than one channel for a nudge.
12. Click Save and Close.
How You Use Nudges to Assign Journeys for
Employment Events
You can configure a nudge that automatically assigns a journey for specific employment events.
You configure nudges for the Human Resources module in the Nudge Configuration work area. The following table lists
the nudges that you can configure:
Reason to Nudge Purpose of Nudge
Employee's contract end date is
approaching
Assign a journey to the recipient when the employee’s contract end date is approaching
Employee's probation period end date is
approaching
Assign a journey to the recipient when the employee’s probation end date is approaching
Employee's retirement date is approaching Assign a journey to the recipient when the employee’s retirement date is approaching.
After you configure a nudge, the Process HCM Nudges ESS job evaluates active nudges and identifies the population to
whom the journey needs to be assigned.
502

Oracle Fusion Cloud HCM
Using Common Features for HCM
Chapter 17
HCM Nudges
Points to Note
A few points to remember when configuring nudges:
• Nudges for the predefined employment actions are evaluated only for the primary assignment of a worker.
• When a nudge is processed, the effective date in the system is considered. It’s not based on the ESS job run
date. The following dates are considered for the events:
◦
Contract end date
◦
Probation end date
◦
Retirement date
• After a journey is assigned for an event and there’s a change in the contract, probation, or retirement date,
the journey assignment is reevaluated and reassigned again. The already assigned journey isn’t automatically
removed.
Related Topics
•
How Journeys are Assigned
503

Oracle Fusion Cloud HCM
Using Common Features for HCM
Chapter 17
HCM Nudges
504

Oracle Fusion Cloud HCM
Using Common Features for HCM
Chapter 18
Application Toolkit Configuration
18 Application Toolkit Configuration
Set Watchlist Options
Disable or Enable Watchlist Categories and Items
To disable or enable predefined Watchlist categories and items for all users, use the following in the Setup and
Maintenance work area.
• Functional Area: Application Extensions
• Task: Set Watchlist Options
Ultimately, what users see in their own Watchlist would be the categories and predefined items that you enable in the
Set Watchlist Options page:
• Plus any saved searches that the user is using as Watchlist items
• Minus any categories or items that the user decides to hide using Watchlist preferences
• Minus any items with no results found, if the user decides to hide such items using Watchlist preferences
Any Category or Item
When you disable any category or item, you also disable the processes that calculate the Watchlist item counts. These
processes include creating data caches, performing security checks, calling services across domains, running queries,
and so on.
Predefined Watchlist Items
An item with the Predefined type represents the actual predefined Watchlist item that appears in the Watchlist. If you
disable this type of Watchlist item, then:
• The item isn't available for users to display in their Watchlist.
• The item is removed from any Watchlist where it's currently displayed.
If you disable a Watchlist category, then the category isn't available for users to include in their Watchlist. All Watchlist
items within the category are also disabled.
User-Created Saved Search Watchlist Items
A Watchlist item with the User-Created Saved Search type doesn't appear in the Watchlist. It controls the display of the
Manage Watchlist button on pages with saved searches. If you disable this type of Watchlist item, then:
• The Manage Watchlist option isn't available on the corresponding page, so users can't use their own saved
searches as Watchlist items.
• Any user-defined saved searches (from that page) already used as Watchlist items are removed from the users'
Watchlist. The saved searches are still available for searching, but not for the Watchlist.
505

Oracle Fusion Cloud HCM
Using Common Features for HCM
Chapter 18
Application Toolkit Configuration
Watchlist Category
If you disable a Watchlist category, then:
• The category isn't available for users to include in their Watchlist.
• All Watchlist items within the category are also disabled.
Note: You can see the Watchlist icon in the global header only if your default home page layout is Panel or Banner.
Related Topics
•
Refresh Intervals for Watchlist Items
•
How can I change predefined Watchlist category and item names?
•
Create Watchlist Items
•
Set Watchlist Preferences
•
Why can't I see icons in the global header?
Refresh Intervals for Watchlist Items
All Watchlist items have a predefined refresh interval, which controls how often the query that calculates the count for a
Watchlist item can run. You can use the Set Watchlist Options page to edit the interval values.
In the Setup and Maintenance work area, use the following:
• Functional Area: Application Extensions
• Task: Set Watchlist Options
How the Refresh Works
The count for any Watchlist item gets refreshed as follows.
• When users open the Watchlist in the global header for the first time after signing in, the item is refreshed if five
minutes have passed since its last refresh in an earlier session.
• When users open the Watchlist again, the item is refreshed only if the time since its last refresh is equal to or
greater than the refresh interval.
User-Created Saved Search Watchlist Items
What you enter as the refresh interval for a Watchlist item of type User-Created Saved Search applies to all Watchlist
items based on saved searches that users create for that item. For example, you set the refresh interval for the
Corporate Card Transactions item to five minutes. Multiple users create saved searches for corporate card transactions
and use those saved searches as Watchlist items in their own Watchlist. All of these Watchlist items would have a refresh
interval of five minutes.
506

Oracle Fusion Cloud HCM
Using Common Features for HCM
Chapter 18
Application Toolkit Configuration
Related Topics
•
Disable or Enable Watchlist Categories and Items
•
How can I change predefined Watchlist category and item names?
•
Create Watchlist Items
FAQs for Set Watchlist Options
How can I change predefined Watchlist category and item names?
Edit the standard lookup type that stores the predefined Watchlist category and item names.
1. In the Setup and Maintenance work area, go to the Manage Standard Lookups task in the Application
Extensions or a product-specific functional area.
2. On the Manage Standard Lookups page, find the lookup type for the Watchlist category you want to edit. The
lookup types for predefined categories end with WATCHLIST, for example EXM_EXPENSES_WATCHLIST.
3. Edit the lookup type meaning to change the category name.
4. To change item names, edit lookup code meanings.
5. Save your work.
Related Topics
•
Overview of Lookups
•
How do I update existing setup data?
507

Oracle Fusion Cloud HCM
Using Common Features for HCM
Chapter 18
Application Toolkit Configuration
508

Oracle Fusion Cloud HCM
Using Common Features for HCM
Chapter 19
Help Configuration
19 Help Configuration
Set Up Help
You don't have to set anything up for help to work. But you can do optional setup, for example to give people access to
add help content. First enable help features, then perform tasks in the Application Extensions functional area.
Enable Features
In the Offerings work area, review these features at the offering level.
• Local Installation of Help: Make sure to leave this enabled.
• Access to Internet-Based Help Features: This feature isn't used, so it doesn't matter if you enable it or not.
• Help Content Management: Enable this feature if you want some people to be able to add company-specific
help to help windows or the Getting Started work area.
• Security for Added Help: Enable this feature if you want certain help to be available only to a restricted set of
user roles.
CAUTION: Enable this feature only if you have this requirement, because the feature can affect performance.
Related Topics
•
Hide or Show Help Icons
•
Give People Access to Create and Edit Help
•
Configure Offerings
•
How You Manage Different Types of Help
•
Create Groups to Limit Access to Added Help
Hide or Show Help Icons
By default, help icons that open help windows are visible. You can control whether users see the icons every time they
sign in, on any page with help icons. You can disable or enable help icons by default, for everyone.
1. In the Setup and Maintenance work area, go to the Set Help Options task in the Application Extensions
functional area.
2. On the Set Help Options page, deselect or select the Show help icons by default check box. You just need to
do this for one offering, and the setting applies to everyone.
3. Sign out and sign back in to see your change take effect. The same goes for any user next time they sign in.
To show or hide the icons in a specific user session, people can still click their user image or name in the global header
and select Show Help Icons or Hide Help Icons.
509

Oracle Fusion Cloud HCM
Using Common Features for HCM
Chapter 19
Help Configuration
Note: What we are talking about here affects only help windows, not help text that appears when you hover over or
click certain UI elements on the page. To edit or delete UI element help text, use Page Composer or other tools.
Related Topics
•
How do I update existing setup data?
•
Manage Help for Fields and Other UI Elements
Give People Access to Create and Edit Help
If you enabled the Help Content Management feature, check who has the Manage Help Content
(ATK_CUSTOMIZE_HELP_TOPICS_PRIV) privilege. Here's what these users can do:
• Add help in any help window, and also edit and manage the help that anyone added.
• Edit existing pages in the Getting Started work area and also add new pages.
Your security administrator can assign custom job roles with this privilege to users. The Assign Help Text
Administration Duty task is a reminder for you to follow up with your security administrator. Make sure that people
who want to create and edit help have the access to do so.
Related Topics
•
How You Manage Different Types of Help
Create Groups to Limit Access to Added Help
In this example, you want to add company policies as help in a help window. But only human resources (HR) specialists
should be able to see those policies. You can use a help security group to limit access like this.
Let's look at the steps to create a help security group that includes only a custom job role for HR specialists. You can
then secure your company policies with this help security group so that only people with that job role can see the help.
Before You Start
In the Offerings work area, make sure that these features are enabled at the offering level:
• Local Installation of Help
• Help Content Management
• Security for Added Help
Ask your security administrator for the name of the custom job role granted to HR specialists in your company.
Create the Help Security Group
1. In the Setup and Maintenance work area, go to the Manage Help Security Groups task in the Application
Extensions functional area.
510

Oracle Fusion Cloud HCM
Using Common Features for HCM
Chapter 19
Help Configuration
2. On the Manage Help Security Groups page, add a new row.
3. Enter these values, but leave the start and end dates blank.
Field Value
Help Security Group
HR
Display Name
HR Only
Description
Viewing by HR specialists only
4. Click Save.
5. With your new help security group selected, go to the Associated Roles section and add a new row.
6. Select the custom job role for HR specialists as the role name.
7. Click Save and Close.
Related Topics
•
Set Up Help
•
Configure Offerings
•
How do I update existing setup data?
•
Add Your Content to a Help Window
•
Create and Edit Added Help
511

Oracle Fusion Cloud HCM
Using Common Features for HCM
Chapter 19
Help Configuration
512

Oracle Fusion Cloud HCM
Using Common Features for HCM
Chapter 20
Common Reference Objects
20 Common Reference Objects
Why can't I edit setup data?
The configuration of your setup data may be protected. Application developers mark some configurations as protected,
indicating that you can't edit them.
Some examples of configurations that may be protected are:
• Descriptive flexfields
• Extensible flexfield contexts
• Extensible flexfield pages
• Value sets
• Tree structures
Set General Preferences for All Users
Use the Global Admin Preferences page to set general preferences, such as language, currency, and time zone for all
users.
Use the Set User General Preferences task only if you want to update preferences for all users. Your users can still set
preferences for themselves using the settings in the General Preferences section on the Preferences page. Once you
set the general preferences for all users, if specific users don't change their preferences, the choices you have set for all
users will apply to them. You can also set the default value formats for date, time, and number in regional preferences
for all users.
To set general preferences, do these steps:
1. Click Navigator > My Enterprise > Setup and Maintenance.
2. In the Setup and Maintenance work area, go to the Set User General Preferences task in the Application
Extensions functional area.
3. Set the required general preferences for your users.
Note: You can also set the value formats for regional preferences, such as date, time, and number for your
users using profile options.
4. If you only want to set the preferences for new users whose preferences haven't been set by them yet, select the
Reset preferences for new users only check box. Selecting this option excludes all users whose preferences
were set at some point in time.
5. Click Save.
Related Topics
•
Set Value Formats for Regional Preferences for All Users
•
Set Your General Preferences
513

Oracle Fusion Cloud HCM
Using Common Features for HCM
Chapter 20
Common Reference Objects
Set Value Formats for Regional Preferences for All Users
Use profile options to set the default formats of values for regional preferences, such as date, time, number, currency,
and time zone for all users.
You can set the values of specific profile options at the site layer using the Manage Administrator Profile Values page.
The formats you set here are displayed for all users in the fields for regional settings on the General Preferences:
Regional page. Your users can still set the value formats for themselves using the settings in the General Preferences:
Regional page. Once you set the value formats for all users, if specific users don't change their value formats, the
choices you have set for all users will apply to them.
To set value formats for profile options, do these steps:
1. Click Navigator > My Enterprise > Setup and Maintenance.
2. In the Setup and Maintenance work area, go to the Manage Administrator Profile Values task in the
Application Extensions functional area.
514

Oracle Fusion Cloud HCM
Using Common Features for HCM
Chapter 20
Common Reference Objects
3. Set the value formats for the profile options, as required:
Note: Check if the profile option already has a value set for the Site profile level. If so, just edit that value.
Otherwise, create a new row and select a value for the Site profile level so that your settings apply to all users.
◦
To set the date format:
i. Search for the Default Date Format (FND_DATE_FORMAT) profile option.
ii. In the FND_DATE_FORMAT: Profile Values section, click the New icon.
iii. From the Profile Level list, select Site.
iv. From the Profile Value list, select the required date format. For example, 31-1-1999.
◦
To set the time format:
i. Search for the Default Time Format (FND_TIME_FORMAT) profile option.
ii. In the FND_TIME_FORMAT: Profile Values section, click the New icon.
iii. From the Profile Level list, select Site.
iv. From the Profile Value list, select the required time format. For example, 1:30 PM.
◦
To set the number format:
i. Search for the Default Number Format (FND_NUMBER_FORMAT) profile option.
ii. In the FND_NUMBER_FORMAT: Profile Values section, click the New icon.
iii. From the Profile Level list, select Site.
iv. From the Profile Value list, select the required time format. For example, -1,234.567.
◦
To set the default currency:
i. Search for the Default Currency (FND_CURRENCY) profile option.
ii. In the FND_CURRENCY: Profile Values section, click the New icon.
iii. From the Profile Level list, select Site.
iv. From the Profile Value list, select the required currency. For example, US Dollar.
◦
To set the default time zone:
i. Search for the Default User Time Zone (FND_TIMEZONE) profile option.
ii. In the FND_TIMEZONE: Profile Values section, click the New icon.
iii. From the Profile Level list, select Site.
iv. From the Profile Value list, select the required time zone. For example, US Pacific Time.
4. Click Save and Close.
Related Topics
•
Set General Preferences for All Users
•
How do I update existing setup data?
Set a Banner Message in the Global Header
Let's say you want to communicate some important information to your users. You can set a banner message to display
such information in the global header. But here are a few things to keep in mind.
• The banner message doesn't support translation. It will be only in English.
515

Oracle Fusion Cloud HCM
Using Common Features for HCM
Chapter 20
Common Reference Objects
• Oracle may override your banner message if required.
To set a banner message, do these tasks:
1. In the Setup and Maintenance work area, go to the Manage Administrator Profile Values task in the
Application Extensions functional area.
2. Search for the Banner Message (FND_BANNER_MESSAGE) profile option.
3. In the FND_BANNER_MESSAGE: Profile Values section, click the New icon.
4. From the Profile Level list, select Site.
5. In the Profile Value field, enter the message that you want to show in the global header.
Note: The length of your message must not exceed 1000 characters. If your message has more than 77
characters, only the first 77 characters are displayed on the global header, and the complete message
appears when you hover over the banner.
6. Click Save and Close.
7. Sign out and sign back in to see the banner message.
Related Topics
•
Set Profile Option Values
•
How do I update existing setup data?
How can I determine which languages appear in the
Translation Editor?
Use the Translation Editor Languages profile option to specify the languages as the profile values, so that they're
available as options for the user on the Translation Editor dialog box.
1. In the Setup and Maintenance work area, go to the Manage Administrator Profile Values task.
2. Search for the Translation Editor Languages profile option.
3. In the Profile Values section, specify the required languages as its profile values, separated by comma. You can
either list the complete names of the languages or just the language codes specified on the Manage Languages
page, for example, F for French, KO for Korean.
Note: You can specify only those languages that are available in the supported language pack. If you don't
specify any value, all available language packs are supported.
4. Click Save and Close. The language entries will take effect for the user in the next sign in.
Related Topics
•
Enter or Edit Translated Text
How do I define whether the user image, name, or initials
display in the global header?
Set the User Image Display Enabled (FND_USER_PHOTO_ENABLED) profile option.
516

Oracle Fusion Cloud HCM
Using Common Features for HCM
Chapter 20
Common Reference Objects
If you select:
• Yes, then the user image is displayed in the global header only if the user uploaded a photo. Otherwise, the
user's initials are displayed. By default, this profile option is set to Yes.
• No, then only the user name is displayed in the global header.
Related Topics
•
Change Your Photo
Set CSV as the Default Option for Exporting Table Data
You can specify Comma Separated Values (CSV) as the default file format for exporting most table data to excel. To
specify this setting, use the File Format for Export to Excel profile option.
Note: For tables that contain rows with detail facets, the table data doesn't get exported to the CSV format.
Follow these steps:
1. In the Setup and Maintenance work area, go to the Manage Administrator Profile Values task in the
Application Extensions functional area.
2. Search for the File Format for Export to Excel (ORACLE.ADF.VIEW.EXPORT_DEFAULT_TYPE) profile option.
3. In the ORACLE.ADF.VIEW.EXPORT_DEFAULT_TYPE: Profile Values section, click the New icon.
4. From the Profile Level list, select Site.
5. From the Profile Value field, select Export to CSV.
6. Click Save and Close.
Related Topics
•
Set Profile Option Values
•
How do I update existing setup data?
•
What's the difference between Export to Excel and desktop integration for Excel?
Define Application Taxonomy
Overview of Application Taxonomy
Oracle application components and functions are organized in a hierarchy, ranging from product lines to logical
business areas. The hierarchy represents a breakdown of products into units based on how applications are installed
and supported.
In the Application Extensions functional area within your offering, search for the Manage Taxonomy Hierarchy task and
view the hierarchy on the Manage Taxonomy Hierarchy page.
517

Oracle Fusion Cloud HCM
Using Common Features for HCM
Chapter 20
Common Reference Objects
Hierarchy
• The application taxonomy hierarchy contains various levels and types of nodes, or modules.
Usage
• Use application taxonomy to understand relationships among applications and between an application and its
files. This information is helpful in managing various phases of the product life cycle.
Modules in Application Taxonomy
The application modules are organized in a hierarchy, the highest level being the product line, followed by the product
family, application, and logical business area.
There can be multiple levels of logical business areas, with one or more nested within a parent logical business area. A
module is a node at any of these levels. Each level is briefly described here.
• Product Line: A collection of products associated with a single brand name, for example, Oracle Fusion.
• Product Family: A collection of products associated with a functional area that may or may not be licensed
together as a single unit, for example Oracle Fusion Financials.
• Application: A single product within a product family, containing closely related features for a specific business
solution, for example General Ledger.
• Logical Business Area: A collection of business object definitions organized into a logical grouping. It contains
the model objects, services, and UI components for those business objects. Logical business areas have their
own hierarchy levels and in some cases can be up to two or three levels deep.
Related Topics
•
Guidelines for Managing Modules in Application Taxonomy
Guidelines for Managing Modules in Application Taxonomy
In the application taxonomy hierarchy, when you create a module, it becomes a child of the currently selected node.
Once created, you can't delete the module or move it elsewhere in the hierarchy.
From the Manage Taxonomy Hierarchy page, navigate to the Create Child Module or Edit Module page to manage the
modules. As you create or edit modules, consider the following points regarding specific fields.
Identifiers
Module ID is the unique primary key for nodes in the taxonomy table. When you create a module, a unique read-only ID
is automatically generated. The module contains two other identifiers: Module key and alternative ID. The module key
is a string identifier, for example AP for the Oracle Fusion Payables application. The alternative ID is a numeric identifier,
for example 1 for the Oracle Fusion product line. These additional identifiers are provided for the product line, product
family, and application modules. However, you can optionally add them for logical business areas and new modules.
Note: Don't change the module key or alternative ID for predefined modules.
518

Oracle Fusion Cloud HCM
Using Common Features for HCM
Chapter 20
Common Reference Objects
The product code is relevant only to application and logical business area modules. You can leave the field blank for
other module types. The product code for applications is the short name that can be displayed in lists of application
values. For example, FND for Oracle Fusion Middleware Extensions for Oracle Application.
Names
Module name is the logical name for the module. The name must be unique among nodes within the hierarchy level
with the same parent, but Oracle recommends keeping it unique in the entire hierarchy. The user name and description
can appear to users in other parts of Oracle Applications Cloud.
Usage Types
Though you can update the usage type to reflect the current state of the module, just doing so doesn't affect the actual
state. For example, setting a module as installed doesn't mean the module is actually installed if the installation itself
didn't take place. Installation refers to operations related to laying down all the components required to create an Oracle
Applications Cloud environment. Deployment is the process that starts the managed servers and clusters and facilitates
the actual use of product offerings. A licensed module is available for installation and deployment, and a deployed
module is considered actively used when actually used by users.
Seed Data
If seed data is allowed, then data residing in flexfields and lookups can be extracted for the module using seed data
loaders. By default, extract is allowed for all predefined modules of type application and logical business area.
Associations
You can associate a logical domain to modules of the type Product Family, as well as one or more enterprise applications
to modules of type Application. This association represents the relationship between the taxonomy modules and the
corresponding domain and enterprise applications stored in the Oracle Applications Cloud Functional Core (ASK) tables.
Related Topics
•
Modules in Application Taxonomy
Define Reference Data Sharing
Reference Data Sharing
Reference data sharing facilitates sharing of configuration data such as jobs and payment terms, across organizational
divisions or business units.
You define reference data sets and determine how common data is shared or partitioned across business entities to
avoid duplication and reduce maintenance effort. Depending on the requirement (specific or common), each business
unit can maintain its data at a central location, using a set of values either specific to it or shared by other business
units.
A common reference data set is available as the default set, which can be assigned to several business units sharing
the same reference data. For commonly used data such as currencies, you can use the common reference data set and
assign it to multiple business units in various countries that use the same currency. In cases where the default set can't
519

Oracle Fusion Cloud HCM
Using Common Features for HCM
Chapter 20
Common Reference Objects
be assigned to an entity, you can create specific sets. The data set visible on the transactional page depends on the
sharing method used to share reference data.
For example, XYZ Corporation uses the same grades throughout the entire organization. Instead of different business
units setting up and using the same grades, XYZ Corporation decides to create a set called Grades, which contains the
grades. All business units in the organization have the Grades set so that the grades can be shared and used.
Note: For specific information about configuring reference data sharing for a particular object or product, refer to the
relevant product documentation.
Related Topics
•
Reference Data Sets
•
Reference Data Sets and Sharing Methods
•
Assignment of Reference Data Sets to Reference Objects
Reference Data Sets
Reference data sets are logical groups of reference data that various transactional entities can use depending on the
business context. You can get started using either the common reference data set or the enterprise set depending on
your implementation requirement.
You can also create and maintain additional reference data sets, while continuing to use the common reference data set.
Consider the following scenario. Your enterprise can decide that only some aspects of corporate policy should affect all
business units. The remaining aspects are at the discretion of the business unit manager to implement. This enables
your enterprise to balance autonomy and control for each business unit.
For example, your enterprise holds business unit managers accountable for their profit and loss, but manages working
capital requirements at a corporate level. Then, you can let managers define their own sales methods, but define
payment terms centrally. As a result, each business unit has its own reference data set for sales methods and one central
reference data set for payment terms assigned to all business units.
Partitioning
Partitioning reference data and creating data sets provide you the flexibility to handle the reference data to fulfill your
business requirements. You can share modular information and data processing options among business units with
ease. You can create separate sets and subsets for each business unit. Alternatively, you can create common sets or
subsets to enable sharing reference data between several business units, without duplicating the reference data.
520

Oracle Fusion Cloud HCM
Using Common Features for HCM
Chapter 20
Common Reference Objects
The following figure illustrates the reference data sharing method. The user can access the data assigned
to a specific set in a particular business unit, as well as access the data assigned to the common set.
Related Topics
•
Reference Data Sets and Sharing Methods
•
Assignment of Reference Data Sets to Reference Objects
Reference Data Sets and Sharing Methods
Oracle Fusion Cloud Applications reference data sharing feature is also known as SetID. The reference data sharing
functionality supports operations in multiple ledgers, business units, and warehouses.
As a result, there is a reduction in the administrative burden and the time to implement new business units. For
example, you can share sales methods, or transaction types across business units. You may also share certain other
data across asset books, cost organizations, or project units.
The reference data sharing features use reference data sets to which reference data is assigned. The reference data sets
group assigned reference data. The sets can be understood as buckets of reference data assigned to multiple business
units or other application components.
Reference Data Sets
You begin this part of your implementation by creating and assigning reference data to sets. Make changes carefully as
changes to a particular set affect all business units or application components using that set. You can assign a separate
set to each business unit for the type of object that's being shared. For example, assign separate sets for payment
terms, transaction types, and sales methods to your business units.
Your enterprise can determine that certain aspects of your corporate policy can affect all business units. The remaining
aspects are at the discretion of the business unit manager to implement. This allows your enterprise to balance
521

Oracle Fusion Cloud HCM
Using Common Features for HCM
Chapter 20
Common Reference Objects
autonomy and control for each business unit. For example, your enterprise holds business unit managers accountable
for their profit and loss, but manages working capital requirements at a corporate level. In such a case, you can let
managers define their own sales methods, but define payment terms centrally. In this example:
• Each business unit has its own reference data set for sales methods.
• One central reference data set for payment terms is assigned to all business units.
The reference data sharing is especially valuable for lowering the cost of setting up new business units. For example,
your enterprise operates in the hospitality industry. You are adding a new business unit to track your new spa services.
The hospitality divisional reference data set can be assigned to the new business unit to quickly set up data for this
entity component. You can establish other business unit reference data in a business unit-specific reference data set as
needed.
Reference Data Sharing Methods
Variations exist in the methods used to share data in reference data sets across different types of objects. The following
list identifies the methods:
• Assignment to one set only, no common values allowed. This method is the simplest form of sharing reference
data that allows assigning a reference data object instance to one and only one set. For example, Asset Prorate
Conventions are defined and assigned to only one reference data set. This set can be shared across multiple
asset books, but all the values are contained only in this one set.
• Assignment to one set only, with common values. This method is the most commonly used method of sharing
reference data that allows defining reference data object instance across all sets. For example, Receivables
Transaction Types are assigned to a common set that's available to all the business units. You need not
explicitly assign the transaction types to each business unit. In addition, you can assign a business unit-specific
set of transaction types. At transaction entry, the list of values for transaction types includes the following:
◦
Transaction types from the set assigned to the business unit.
◦
Transaction types assigned to the common set that's shared across all business units.
• Assignment to multiple sets, no common values allowed. The method of sharing reference data that allows
a reference data object instance to be assigned to multiple sets. For instance, Payables Payment Terms use
this method. It means that each payment term can be assigned to one or more than one set. For example,
you assign the payment term Net 30 to several sets, but assign Net 15 to a set specific only to your business
unit. At transaction entry, the list of values for payment terms consists of only the set that's assigned to the
transaction's business unit.
Note: Oracle Fusion Applications contains a reference data set called Enterprise. Define any reference data that
affects your entire enterprise in this set. Also update the data set going forward as you create new reference data
items.
Related Topics
•
What reference data objects can be shared across business units?
•
Items and Supplier Site Reference Data Sharing
•
What reference data objects can be shared across cost organizations?
•
What reference data objects can be shared across project units?
•
What reference data objects can be shared across asset books?
522

Oracle Fusion Cloud HCM
Using Common Features for HCM
Chapter 20
Common Reference Objects
Assignment of Reference Data Sets to Reference Objects
You can assign the reference data sets to reference objects using the Manage Reference Data Set Assignments page.
For multiple assignments, you can classify different types of reference data sets into groups and assign them to the
reference entity objects.
The assignment takes into consideration the determinant type, determinant, and reference group, if any.
Determinant Types
The partitioned reference data is shared using a business context setting called the determinant type. A determinant
type is the point of reference used in the data assignment process. The following table lists the determinant types used
in the reference data assignment.
Determinant Type Description
Asset Book
Information about the acquisition, depreciation, and retirement of an asset that belongs to a ledger or
a business unit.
Business Unit
The departments or organizations within an enterprise.
Cost Organization
The organization used for cost accounting and reporting on various inventory and cost centers within
an enterprise.
Project Unit
A logical organization within an enterprise that's responsible for enforcing consistent project
management practices.
Reference Data Set
References to other shared reference data sets.
Determinant
The determinant (also called determinant value) is a value that corresponds to the selected determinant type. The
determinant is one of the criteria for selecting the appropriate reference data set.
Reference Groups
A transactional entity may have multiple reference entities (generally considered to be setup data). However, all
reference entities are treated alike because of similarity in implementing business policies and legal rules. Such
reference entities in your application are grouped into logical units called reference groups. For example, all tables
and views that define Sales Order Type details might be a part of the same reference group. Reference groups are
predefined in the reference groups table.
523

Oracle Fusion Cloud HCM
Using Common Features for HCM
Chapter 20
Common Reference Objects
Define ISO Reference Data
Considerations for Defining Currencies
Consider these points about entering the currency code, date range, or symbol for the currency, when you create or edit
currencies.
Currency Codes
You can't change a currency code after you enable the currency, even if you later disable that currency.
Date Ranges
You can enter transactions denominated in the currency only for the dates within the specified range. If you don't enter
a start date, then the currency is valid immediately. If you don't enter an end date, then the currency is valid indefinitely.
Symbols
Some applications support displaying currency symbols. You may enter the symbol associated with a currency so that it
appears along with the amount.
Related Topics
•
What's the difference between precision, extended precision, and minimum accountable unit for a currency?
•
What's a statistical unit currency type?
•
Euro Currency Derivation
Euro Currency Derivation
Use the Derivation Type, Derivation Factor, and Derivation Effective Date fields to define the relationship between the
official currency (Euro) of the European Monetary Union (EMU) and the national currencies of EMU member states.
For each EMU currency, you define its Euro-to-EMU fixed conversion rate and the effective starting date. If you have to
use a different currency for Euro, you can disable the predefined currency and create a new one.
Derivation Type
The Euro currency derivation type is used only for the Euro, and the Euro derived derivation type identifies national
currencies of EMU member states. All other currencies don't have derivation types.
Derivation Factor
The derivation factor is the fixed conversion rate by which you multiply one Euro to derive the equivalent EMU currency
amount. The Euro currency itself must not have a derivation factor.
524

Oracle Fusion Cloud HCM
Using Common Features for HCM
Chapter 20
Common Reference Objects
Derivation Effective Date
The derivation effective date is the date on which the relationship between the EMU currency and the Euro begins.
Language Packs on Your Application
A language pack contains artifacts that are translated to a specific language. Translated artifacts include UI text,
predefined data, messages, BI catalog data, and so on.
Here are the supported languages other than American English:
• Arabic
• Chinese (Simplified)
• Chinese (Traditional)
• Croatian
• Czech
• Danish
• Dutch
• Finnish
• French (Canadian)
• French (European)
• German
• Greek
• Hebrew
• Hungarian
• Italian
• Japanese
• Korean
• Norwegian
• Portuguese (Brazilian)
• Polish
• Romanian
• Russian
• Slovak
• Spanish
• Swedish
• Thai
• Turkish
• Ukrainian
• Vietnamese
525

Oracle Fusion Cloud HCM
Using Common Features for HCM
Chapter 20
Common Reference Objects
How to Install Language Packs
To install language packs on all your environments, contact your help desk. For more information about language
packs, see Oracle Applications Cloud Service Definition - Language Packs (2073202.1) on My Oracle Support at https://
support.oracle.com. There's no limit to the number of language packs you can ask for in one service request. But you
must only install the language packs you need to conduct your day-to-day business because of these reasons:
• Once you request a language pack, the installation will be scheduled for all your environments, including
production, staging, and test environments, so that they're all in sync.
• It takes time and resources to install language packs. So you might get extended outages during updates,
especially if you have four or more language packs installed in your environments.
• Once you install any language, you can't uninstall it later.
You can view all available languages, whether they're already installed or available for installation and translation. In the
Setup and Maintenance work area, use the Manage Languages task in the Application Extensions functional area. Each
dialect is treated as a separate language. Generally, you don't need to edit any of the fields on the Manage Languages
page, unless absolutely necessary.
Related Topics
•
How do I update existing setup data?
Considerations for Natural Languages
Natural languages are all the languages that humans use, written and spoken. If a language is enabled, then users can
associate it with entities, for example as languages spoken by sales representatives.
When managing natural languages, consider tasks to perform and best practices for entering particular values.
Tasks
Once you add a language, it can't be deleted, but just disabled. You can optionally associate natural languages with
International Organization for Standardization (ISO) languages and territories, just for reference.
Values
When you create a natural language, use the alpha-2 ISO code as the language code, or, if not available, then alpha-3. If
the language isn't an ISO language, then use x- as a prefix for the code, for example x-ja for a Japanese dialect. Use the
sgn code of ISO-639-2 for sign languages, followed by territory code, for example sgn-US for American Sign Language.
You can also use Internet Assigned Numbers Authority (IANA) language tags.
The natural language description must be the language name with territory name in parenthesis where needed, for
example English (Australia) and English (Canada).
526

Oracle Fusion Cloud HCM
Using Common Features for HCM
Chapter 20
Common Reference Objects
FAQs for Define ISO Reference Data
When do I create or edit territories?
The predefined territories are countries from the International Organization for Standardization (ISO) 3166 standard.
Edit territory descriptions to determine how they're displayed in lists of country values in an application.
You don't have to edit territory names or codes unless there is a specific requirement. Create territories if new countries
emerge and the application isn't yet patched with the latest ISO country values.
Note: The National Language Support (NLS) territory codes are territory identifiers used in the application. Don't edit
the codes unless you must change the association between ISO and the application territory.
When do I create or edit industries?
To meet a specific business need, you may edit industry names or descriptions of industries except for those belonging
to the North American Industry Classification System (NAICS). Edit the industry descriptions also to determine how they
appear in an application.
You may also create industries with specifications not included in the NAICS standards.
When do I associate industries with territories?
To meet specific business needs, you can associate industries with territories. For example, administrators can configure
a page in different ways for different sets of users of the same industry, but residing in different countries.
When do I create or enable currencies?
Create or enable any currency for displaying monetary amounts, assigning currency to ledgers, entering transactions,
recording balances, or for any reporting purpose. All currencies listed in the International Organization for
Standardization (ISO) 4217 standard are supported.
The default currency is set to United States Dollar (USD).
Related Topics
•
Considerations for Defining Currencies
527

Oracle Fusion Cloud HCM
Using Common Features for HCM
Chapter 20
Common Reference Objects
What do I do if a currency code I am still using in my existing
transactions is desupported?
Temporarily remove the end dates of these currencies and close the transactions or wait for the transaction life cycle to
complete. Then add the end dates for the currencies again so that you use new codes for any new transactions.
Note: In General Ledger, you can't change the currency for existing ledgers. So if you're using any desupported
currency codes as ledger currencies in primary, secondary, or reporting currency ledgers, then remove the end dates
of these currencies to continue using them.
Here's how you update the end date for a currency code:
1. In the Setup and Maintenance work area, go to the Manage Currencies task in the Application Extensions
functional area.
Note: If you don't see this task, make sure the Maintain Common Reference Objects feature is enabled at the
offering level in the Offerings work area.
2. Search for the obsolete currency code, for example STD.
3. Remove the end date of the currency code.
4. Save your changes.
Related Topics
•
How do I update existing setup data?
•
Configure Offerings
What's the difference between precision, extended precision, and
minimum accountable unit for a currency?
Precision refers to the number of digits placed after the decimal point used in regular currency transactions. For
example, USD would have 2 as the precision value for transactional amounts, such as $1.00.
Extended precision is the number of digits placed after the decimal point and must be greater than or equal to the
precision value. For calculations requiring greater precision, you can enter an extended precision value such as 3 or 4.
That would result in the currency appearing as $1.279 or $1.2793.
Minimum accountable unit is the smallest denomination for the currency. For example, for USD that would be .01 for a
cent.
You can set these values for a currency using the Manage Currencies task in the Application Extensions functional area
in the Setup and Maintenance work area.
Note: When setting up currencies, make sure you use the correct precision. Some currencies, for example, the
Chilean peso, don’t support precision at all.
528

Oracle Fusion Cloud HCM
Using Common Features for HCM
Chapter 20
Common Reference Objects
What's a statistical unit currency type?
The statistical unit currency type denotes the Statistical (STAT) currency used to record financial statistics in the
financial reports, allocation formulas, and other calculations.
When do I create or edit ISO languages?
Edit the names and descriptions of International Organization for Standardization (ISO) languages to determine how
they appear in the application. The ISO languages are a part of the ISO 639 standard.
If any change to the ISO standard doesn't reflect in the application, you can update the ISO alpha-2 code or add
languages to provide up-to-date information.
Can I add or edit time zones?
You usually don't add or edit time zones because all standard time zones are provided. However, you may create time
zones if new zones become standard and the application isn't yet updated with the latest values.
You can rename existing time zones and enable them. Only the enabled time zones are available for all users to select
while setting their regional general preferences.
To add or edit time zones, use the following in the Setup Maintenance work area:
• Functional Area: Application Extensions
• Task: Manage Time Zones
Search Extension Framework
Overview of Search
Users can search for product-specific business objects, such as documents, records, and purchase orders. They can use
highly responsive, index-based, and full-text search capabilities. The search platform has these components.
• The search engine, which provides primary search capabilities, such as indexing and querying, as well as
supports search functions such as keyword and attribute search.
• The search extension framework, which serves as an integration layer between search engine and Oracle
Applications Cloud.
Search Extension Framework
You can use the search extension framework to define product-specific searchable business objects and provide real
time, index-based, and full-text search capabilities using REST and Java APIs.
529

Oracle Fusion Cloud HCM
Using Common Features for HCM
Chapter 20
Common Reference Objects
This metadata-based framework supports search features, such as functional and data security and Natural Language
Support. You can manage and configure the indexes after they're created, such as manage bulk uploads or provide
production-to-test support.
Here are some of the things you can view in the search results using this framework.
• List of attributes and their associated set of available values. The attribute search results are based on the
attributes of the business objects. After selecting a value for each attribute in the search result, you get more
filtered results.
• Action links associated with the searchable objects. From the search results, you can either go straight to the
related page or open a specific task.
• Recent searches for all the business objects enabled in the search.
• Basic search results based on the keywords used.
• Configured attachments related to transactional objects and record in your application.
Note: The search extension framework is available only for certain product families. Refer to the product-specific
documentation to determine if your product uses this framework.
Enable Search Extension Framework
Enable the search extension framework to create indexes, ingest predefined indexes, perform bulk ingest, and manage
search capabilities.
• Make sure the Enable/Disable Search Ext Framework (ORA_FND_SEARCH_EXT_ENABLED) profile option is
set to Yes. By default, this functionality is enabled and can't be edited.
• Make sure that you have the Manage Scheduled Job Definition
(FND_MANAGE_SCHEDULED_JOB_DEFINITION_PRIV) privilege to run scheduled processes.
• Submit the ESS job to create index definition and perform initial ingest to OSCS process for creating
indexes and ingesting predefined indexes.
Note: This job shouldn't be performed on a regular or scheduled basis.
• Submit the ESS job to run Bulk ingest to OSCS process for ingesting bulk data to Oracle Search indexes.
Note: If you don't specify any index names while submitting the process, the process will run for all predefined
indexes. We recommend you to create indexes related to your product family only. Refer to the product-specific
documentation to determine the index names for your product family.
Related Topics
•
Set Profile Option Values
•
Submit Scheduled Processes and Process Sets
530

Oracle Fusion Cloud HCM
Using Common Features for HCM
Chapter 20
Common Reference Objects
FAQs for Search Extension Framework
What do I do if the process for creating indexes keeps failing?
It might be because of one or more of these reasons.
• You entered incorrect index names while submitting the process. Make sure that your ESS job parameters have
the correct index names. If the problem persists, contact your help desk.
• You might not have enabled the search extension framework. Make sure you enable it.
• Your search cloud service isn't reachable. To check its availability, submit the ESS process to check Search
Cloud Service availability process.
What do I do if I get errors about enabling the search extension framework?
Follow these steps.
1. Make sure the Enable/Disable Search Ext Framework (ORA_FND_SEARCH_EXT_ENABLED) profile option is
set to Yes.
2. Create indexes and ingest predefined indexes. To do so, submit the ESS job to create index definition and
perform initial ingest to OSCS process.
Note: This job shouldn't be performed on a regular or scheduled basis.
Related Topics
•
Set Profile Option Values
What do I do if I get errors stating that the Oracle Search Cloud Service or OSCS isn't
reachable?
Follow these steps.
1. Check the availability of search cloud service. To do so, submit the ESS process to check Search Cloud Service
availability process.
2. Create indexes and ingest predefined indexes. To do so, submit the ESS job to create index definition and
perform initial ingest to OSCS process.
Note: This job shouldn't be performed on a regular or scheduled basis.
Related Topics
•
Submit Scheduled Processes and Process Sets
531

Oracle Fusion Cloud HCM
Using Common Features for HCM
Chapter 20
Common Reference Objects
Define Global Search
Overview of Global Search Setup
You have many options for setting up the global search, from enabling or disabling it completely to controlling what
appears in the autosuggest. For most of the steps, use setup tasks in the Setup and Maintenance work area.
Enable Global Search
A predefined set of business objects, for example files related to purchase order, are available for global search. These
objects are grouped into categories. The search gives you results from indexed data that matches your search term.
1. Check with your help desk to make sure that objects and categories are already set up.
2. Set the Global Search Enabled (FUSION_APPS_SEARCH_ENABLED) profile option to Yes at the Site level.
◦
Otherwise, the Search field isn't available in the global header for any user.
◦
After you set the profile option, users must sign out and sign back in to see the global search.
Note: Enabling global search is the only mandatory setup. You can skip the following setup steps, and just use the
default configuration for the global search.
Define Global Search
Use the following tasks in the Application Extensions functional area to control how the global search works:
• Manage Applications Core Global Search Configurations: Define configurations that capture a collection of
settings, and determine which configurations are enabled or used as default. Each configuration applies to the
global search on all or specific applications or pages.
• Manage Applications Core Global Search Suggestion Groups: Define suggestion groups, which represent
categories of suggestions in the autosuggest.
Retain Recent Items
You can set the Recent Items Retention (FND_PURGE_RECENT_ITEMS) profile option to determine how long to retain
recent items for the global search autosuggest. A page that the user opened can appear in the user's autosuggest until
the specified number of days passes. Aside from the autosuggest, this profile option also applies to the recent items
tracked in Favorites and Recent Items in the global header. The Favorites and Recent Items icon is available in the
global header only if your default home page layout is panel or banner.
Related Topics
•
Set Profile Option Values
•
Examples of Global Search Configurations Set as Enabled or Default
•
Create Global Search Configurations
•
Suggestion Groups for Global Search
532

Oracle Fusion Cloud HCM
Using Common Features for HCM
Chapter 21
Enterprise Scheduler Job Definitions and Job Sets
21 Enterprise Scheduler Job Definitions and
Job Sets
Overview of Managing Job Definitions and Job Sets
Users run scheduled processes based on jobs to process data and, in some cases, to provide report output.
Each job has a job definition which, for example, determines the parameters that users can set. Jobs are based on
Oracle Enterprise Scheduler Services. Using Enterprise Scheduler Jobs tasks, you can define job definitions, list of
values sources, and job sets.
• Job Definitions: Contain the metadata about the job and the options available to users. A job definition is
defined by a job type, such as Oracle Analytics Publisher or PL/SQL Job type or others.
• List of Values Sources: Determine where a list of values for the parameters in a job definition comes from and
what the specific values are.
• Job Sets: Collections of several jobs in a single process set that the users submit instead of running separate
jobs.
The various Enterprise Scheduler Jobs tasks are:
• Manage Enterprise Scheduler Job Definitions and Job Sets for Financial, Supply Chain Management, and
Related Applications
• Manage Enterprise Scheduler Job Definitions and Job Sets for Human Capital Management and Related
Applications
• Manage Enterprise Scheduler Job Definitions and Job Sets for Customer Relationship Management and
Related Applications
In the Setup and Maintenance work area, you can find these tasks in the Application Extensions functional area, or,
depending on your offering, another functional area. If you don't see the task, make sure that the Enterprise Scheduler
Job Definitions and Job Sets feature is enabled at the offering level in the Offerings work area.
Related Topics
•
Job Definitions
•
Manage List of Values Sources
•
Job Sets
•
What are scheduled processes?
•
Configure Offerings
•
Best Practices for Scheduled Processes in Fusion Applications
533

Oracle Fusion Cloud HCM
Using Common Features for HCM
Chapter 21
Enterprise Scheduler Job Definitions and Job Sets
Manage List of Values Sources
A list of values source for job definitions determines where a list of values comes from and what the specific values are.
Users can select from the list when they set parameters.
For example, the list of values for a Country parameter gives users a list of countries to choose from. You can create list
of values sources to use in job definitions that you or someone else created. Parameters in predefined job definitions
can have lists of values too, but not from list of values sources that you can manage. But if you duplicate a predefined
job definition, list of values sources might be automatically created for your new job definition. You can manage those
sources as you would a source that you created yourself.
Here's how you get started to create, edit, or delete list of values sources:
1. In the Setup and Maintenance work area, go to the Manage Enterprise Scheduler Job Definitions and Job
Sets task in the Application Extensions functional area. Or, depending on your offering, you might use a
different functional area.
Note: If you don't see the task, make sure that the Enterprise Scheduler Job Definitions and Job Sets feature
is enabled at the offering level.
2. Click the Manage List of Values Sources tab. If you don’t see anything here, that just means you haven’t created
any sources or duplicated any predefined job definitions that would result in automatically creating list of
values sources.
3. Go on to create or edit list of values sources.
Create List of Values Source
Create a source based on predefined view objects or your own SQL query.
• For predefined view objects, contact your help desk to find out if there are any that meet your needs. And to
get the view object's full path, which you enter when creating the list of values source.
• For your own SQL query, you can see the Tables and Views guides for more information, if you want to base the
list of values source on a specific table or view.
Your list of values source might behave differently from similar sources used in predefined jobs. There are some
limitations to creating custom sources. For example, you can’t add new filtering criteria or configure the search.
1. On the Manage List of Values Sources tab, click the Create icon.
2. In the Create List of Values Source dialog box, select something from the Application Name list that's related
to your list of values. If you don't know what to select or can't find anything that applies, just select Application
Toolkit.
3. In the User List of Values Source Name field, enter a name that helps you identify your list of values source.
4. From the LOVType list, select Predefined to use a view object or User Defined to use a SQL query.
534

Oracle Fusion Cloud HCM
Using Common Features for HCM
Chapter 21
Enterprise Scheduler Job Definitions and Job Sets
5. If you selected Predefined, then in the List of Values Source Definition Name field, enter the full path of the
view object that your help desk provided.
If you selected User Defined, enter your own SQL in the Query field.
◦
Your query can't have any aggregate function like DISTINCT, SUM, MAX, or AVG in the direct select
clause. It can't have UNION, UNION ALL, INTERSECT, or MINUS either.
◦
If you absolutely need to use any of those functions, you need to wrap the query in another select clause.
Here are a couple examples:
Don't Use This Use This Instead
SELECT DISTINCT
CHANNEL.MEANING MEANING FROM
FND_LOOKUP_VALUES_TL
SELECT MEANING FROM (SELECT DISTINCT MEANING MEANING FROM FND_
LOOKUP_VALUES_TL);
select lookup_code as
LookupCode from fnd_lookup_
values_b where lookup_
type='EXM_REPORT_STATUS'
UNION select 'NULL' as
LookupCode from dual
SELECT LOOKUPCODE FROM (select lookup_code as LookupCode from fnd_
lookup_values_b where lookup_type='EXM_REPORT_STATUS' UNION select
'NULL' as LookupCode from dual)
6. Make sure everything looks fine and then click Save and Close. You can't change most of the things about your
source after you create it.
Edit or Delete List of Values Source
Here are some things to know about editing and deleting list of values sources, which you can do on the Manage List of
Values Sources tab.
• You can edit only the application name and description.
• When you delete a list of values source, you can't find it and manage it any more, but it's not really gone. Any
job definitions using that source can continue using it. So after you delete a source, you can't create another
one later with the same name, even though you won't be able to find the deleted one. To avoid confusion, it's
recommended that you don't ever delete any list of values source. Just create new ones as needed, with unique
names.
Related Topics
•
How do I update existing setup data?
•
Configure Offerings
535

Oracle Fusion Cloud HCM
Using Common Features for HCM
Chapter 21
Enterprise Scheduler Job Definitions and Job Sets
Manage Job Definitions
Job Definitions
Scheduled processes are based on jobs that process data and, in some cases, provide output. Each job requires a job
definition. A job definition can also include parameters and user properties that the user defines while submitting the
scheduled process.
You are encouraged to use predefined scheduled processes as is, so usually you don't need to do anything with job
definitions. But if you do need something specific to your needs, you can create Oracle Analytics Publisher reports
as the basis for custom jobs, and create job definitions for those custom jobs. You can also duplicate predefined job
definitions and edit your copy, mainly to update the parameters. But, usually you wouldn't duplicate predefined job
definitions. Some of them can't be duplicated anyway, and there are many limitations to consider with the duplicate.
To view, create, edit, or duplicate job definitions, use the Manage Job Definitions tab on the Manage Enterprise
Scheduler Job Definitions and Job Sets page. In the Setup and Maintenance work area, here's where you go to open that
page:
• Functional Area: Application Extensions a product-specific functional area
• Task: Manage Enterprise Scheduler Job Definitions and Job Sets
Viewing Job Definitions
Use the table on the Manage Job Definitions tab to view the job definitions created for the application. An asterisk in the
name column indicates a predefined job definition. Not all job definitions are shown. You always see only the ones you
have access to, and only the first 100 are shown when you open the tab.
Tip: Use Query by Example to find the job definition you're looking for, even those not shown in the table by default.
This table describes the columns in the table on the Manage Job Definitions tab.
Column Name Description
Name
Name of the job definition.
Display Name
Name of the job definition as available to users while submitting scheduled processes.
Description
Description for the job definition.
Path
The full directory path where the job definition is saved.
Execution Type
The type of job request for the given job definition, such as a Java, C, PL/SQL, Perl, or hosted script
job.
Job Type The name of the job type that the job definition is based on.
536

Oracle Fusion Cloud HCM
Using Common Features for HCM
Chapter 21
Enterprise Scheduler Job Definitions and Job Sets
Column Name Description
• BIPJobType: Jobs that run as Oracle Analytics Publisher reports
• CJobType: Jobs that are implemented in C and run in the container
• HostJobType: Jobs that run as as host scripts executed from the command line
• JavaJobType: Jobs that are implemented in Java and run in the container
• PerlJobType: Jobs that are implemented in Perl and run in the container
• PlsqlJobType: Jobs that run as PL/SQL procedures stored in a database server
• SqlLdrJobType: Jobs that are implemented in SQL*Loader and run in the container
• SqlPlusJobType: Jobs that are implemented in SQL*Plus and run in the container
Note: If you create a brand new job definition (not by duplicating an existing one), the only job type
you can use is BIPJobType.
Parameters
A parameter controls which records are included or how they are affected when the job runs. Parameters are available to
users when they submit scheduled processes based on your job definitions. For example, a job updates only the records
that are effective after the date that users enter in a Start Date parameter. You can create, edit and delete parameters for
job definitions that are not predefined.
User Property
A user property is set in the job definition to attain some specific results.
Related Topics
•
Create Job Definitions to Run Reports as Scheduled Processes
•
Edit Job Definitions
•
What are scheduled processes?
•
Use Query By Example
Create Job Definitions to Run Reports as Scheduled Processes
Every job definition has a job type that reflects the executable for the job, such as Java or Oracle Analytics Publisher
reports. You can only create job definitions that are based on Analytics Publisher reports.
When there's a job definition for an Analytics Publisher report, users can run the report as a scheduled process in the
Scheduled Processes work area. Otherwise, they can open reports (which are set up to be run online) elsewhere, for
example in the Reports and Analytics work area.
CAUTION: Make sure your user name doesn’t contain any spaces. If you create a custom job definition using a user
name that contains spaces, other users might get errors when they submit this custom job definition.
537

Oracle Fusion Cloud HCM
Using Common Features for HCM
Chapter 21
Enterprise Scheduler Job Definitions and Job Sets
Create Job Definitions
Here's how you create a job definition for an Analytics Publisher report:
1. In the Setup and Maintenance work area, go to the Manage Enterprise Scheduler Job Definitions and Job
Sets task in the Application Extensions functional area. Or, depending on your offering, you might use a
different functional area.
Note: If you don't see the task, make sure that the Enterprise Scheduler Job Definitions and Job Sets feature
is enabled at the offering level.
2. On the Manage Enterprise Scheduler Job Definitions and Job Sets page, click the Manage Job Definitions tab.
3. Click the Create icon.
4. Fill in the Job Definition section.
Field or Check Box What You Do
Display Name
Enter the name that users see and select to submit the scheduled process.
Name
Enter a name with only alphanumeric characters, for example, AtkEssPrograms1. It can't have
spaces or any special characters.
Job Application Name
Select the application to associate the job definition with. What you select depends on the task
you're using.
◦
Manage Enterprise Scheduler Job Definitions and Job Sets for Customer Relationship
Management and Related Applications: Select CrmEss.
◦
Manage Enterprise Scheduler Job Definitions and Job Sets for Financial, Supply Chain
Management, and Related Applications: Select FscmEss.
◦
Manage Enterprise Scheduler Job Definitions and Job Sets for Human Capital
Management and Related Applications task: Select EarHcmEss.
Enable submission from Enterprise
Manager
Make sure you don't select this check box.
Job Type
Select BIPJobType. Don't select any other type.
Default Output Format
Select the output format users get by default when they submit the scheduled process.
Report ID
Enter the path to the report in the BI catalog, starting with the folder within Shared Folders, for
example: Custom/<Family Name>/<Product Name>/<Report File Name>.xdo.
Make sure to include the .xdo file extension for the report definition.
Enable submission from Scheduled
Processes
Leave the check box selected.
538
Oracle Fusion Cloud HCM
Using Common Features for HCM
Chapter 21
Enterprise Scheduler Job Definitions and Job Sets
5. In the Parameters subtab, you can define parameters that are available to users when they submit the
scheduled process based on your job definition.
6. In the User Properties subtab, don't create or edit a user property unless you have the accurate information
that's required to create or edit one. The EXT_PortletContainerWebModule user property is automatically created.
7. Click Save and Close.
When you create a job definition, a privilege with the same name as the job definition is automatically created with a
Run prefix. For example, for a job definition named MyProcess1, with display name My Process, the privilege code is
RUN_MYPROCESS1, with Run My Process as the name. Make sure to use the Security Console to assign this privilege to
roles so that users who need to run the process can do so.
Related Topics
•
Define Parameters for Job Definitions
•
Manage List of Values Sources
•
Edit Job Definitions
•
How do I update existing setup data?
•
Configure Offerings
Duplicate Job Definitions
A parameter controls which records are included or how they are affected when a job runs. Job definitions can have one
or more parameters or none at all.
1. However, usually you wouldn't duplicate predefined job definitions. Some of them can't be duplicated anyway,
and there are many limitations to consider with the duplicate. If you're duplicating a predefined job definition,
make sure you test the duplicate carefully because it might not work exactly like the original.
1. In the Setup and Maintenance work area, go to the Manage Enterprise Scheduler Job Definitions and Job Sets
task in the Application Extensions functional area. Or, depending on your offering, you might use a different
functional area.
Note: If you don't see the task, make sure that the Enterprise Scheduler Job Definitions and Job Sets feature is
enabled at the offering level.
2. On the Manage Enterprise Scheduler Job Definitions and Job Sets page, click the Manage Job Definitions tab.
3. On the Manage Job Definitions tab, select a job definition with any job type.
4. Click Duplicate to get another row in the table with the duplicate job definition.
5. Select the duplicate job definition and click Edit.
6. Enter the name and path.
7. Update the parameters if you need to. Make sure that all mandatory parameters are populated properly.
8. Click Save and Close.
Results:
When you create a job definition by duplicating, a privilege with the same name as the duplicate job definition is
automatically created with a Run prefix. For example, for a job definition named MyProcess1, with display name My
Process, the privilege code is RUN_MYPROCESS1, with Run My Process as the name. Make sure to use the Security
Console to assign this privilege to roles so that users who need to run the process can do so.
539

Oracle Fusion Cloud HCM
Using Common Features for HCM
Chapter 21
Enterprise Scheduler Job Definitions and Job Sets
You also automatically create a view object with the same name in the list of values sources. Validations for the
attributes in the parameters view object aren't copied over.
Related Topics
•
Define Parameters for Job Definitions
•
How do I update existing setup data?
•
Configure Offerings
Duplicate Job Definitions
A parameter controls which records are included or how they are affected when a job runs. Job definitions can have one
or more parameters or none at all.
1. However, usually you wouldn't duplicate predefined job definitions. Some of them can't be duplicated anyway,
and there are many limitations to consider with the duplicate. If you're duplicating a predefined job definition,
make sure you test the duplicate carefully because it might not work exactly like the original.
1. In the Setup and Maintenance work area, go to the Manage Enterprise Scheduler Job Definitions and Job Sets
task in the Application Extensions functional area. Or, depending on your offering, you might use a different
functional area.
Note: If you don't see the task, make sure that the Enterprise Scheduler Job Definitions and Job Sets feature is
enabled at the offering level.
2. On the Manage Enterprise Scheduler Job Definitions and Job Sets page, click the Manage Job Definitions tab.
3. On the Manage Job Definitions tab, select a job definition with any job type.
4. Click Duplicate to get another row in the table with the duplicate job definition.
5. Select the duplicate job definition and click Edit.
6. Enter the name and path.
7. Update the parameters if you need to. Make sure that all mandatory parameters are populated properly.
8. Click Save and Close.
Results:
When you create a job definition by duplicating, a privilege with the same name as the duplicate job definition is
automatically created with a Run prefix. For example, for a job definition named MyProcess1, with display name My
Process, the privilege code is RUN_MYPROCESS1, with Run My Process as the name. Make sure to use the Security
Console to assign this privilege to roles so that users who need to run the process can do so.
You also automatically create a view object with the same name in the list of values sources. Validations for the
attributes in the parameters view object aren't copied over.
Related Topics
•
Define Parameters for Job Definitions
•
How do I update existing setup data?
•
Configure Offerings
540
Oracle Fusion Cloud HCM
Using Common Features for HCM
Chapter 21
Enterprise Scheduler Job Definitions and Job Sets
Edit Job Definitions
You can only edit certain fields in predefined job definitions, as some of the fields are read only. However, you can edit
all aspects of job definitions that are not predefined.
Editing Job Definitions
Follow these steps:
1. In the Setup and Maintenance work area, go to the Manage Enterprise Scheduler Job Definitions and Job
Sets task in the Application Extensions functional area. Or, depending on your offering, you might use a
different functional area.
Note: If you don't see the task, make sure that the Enterprise Scheduler Job Definitions and Job Sets feature
is enabled at the offering level.
2. On the Manage Enterprise Scheduler Job Definitions and Job Sets page, open the Manage Job Definitions tab.
3. Select the job definition you want to edit.
4. Click Edit.
5. Make the changes that you want, for example:
◦
You can edit the display name of the job definition to use terms that are more familiar to your users.
◦
You can use the Prompt field to edit parameter display names.
6. Click Save and Close.
Predefined Job Definitions
You cannot update parameters in predefined job definitions, but this table lists some of the other fields that you can
edit.
Field Description
Retries
The number of times to automatically run this job again if the scheduled process fails.
Job Category
Specific to the application of the job definition, it's used to group definitions according to your
requirements.
Timeout Period
The amount of time before stopping a scheduled process that couldn't complete.
Priority
Priority of scheduled processes submitted, with 0 as lowest. If other processes, based on the same or
another job, are scheduled to run at the same time, then priority determines the run order.
541

Oracle Fusion Cloud HCM
Using Common Features for HCM
Chapter 21
Enterprise Scheduler Job Definitions and Job Sets
Related Topics
•
Job Definitions
•
Create Job Definitions to Run Reports as Scheduled Processes
•
How do I update existing setup data?
•
Configure Offerings
Define Parameters for Job Definitions
A parameter controls which records are included or how they are affected when a job runs. Job definitions can have one
or more parameters or none at all.
You define parameters while creating or editing job definitions using the Manage Enterprise Scheduler Job Definitions
and Job Sets page. In the Setup and Maintenance work area, use the following:
• Functional Area: Application Extensions or a product-specific functional area
• Task: Manage Enterprise Scheduler Job Definitions and Job Sets
When users run the scheduled process for job definitions of type BIPJobType, the values they enter for the parameters
determine the data to be included in the report. Also, the values are passed to the data model that the report is using.
The parameters that you define must be in the same order as parameters in the data model for the report. For example,
the data model has parameters in this order:
• P_START_DATE
• P_END_DATE
• P_CURRENCY
You create parameters as follows:
• Start Date
• End Date
• Currency
Defining Parameters: Job Definitions
To define parameters while creating or editing job definitions:
1. On the Manage Job Definitions page, open the Parameters sub tab.
2. Click Create.
3. Enter the parameter prompt that users see when they submit the scheduled process.
4. Select a data type and configure how the parameter and the data entered are displayed, as described in this
table.
Data Type Fields
Boolean
Select this if you want the parameter to be a check box.
Select True or False to determine if the check box is selected or not.
542

Oracle Fusion Cloud HCM
Using Common Features for HCM
Chapter 21
Enterprise Scheduler Job Definitions and Job Sets
Data Type Fields
Date or time
Select Date and time or Date only option.
Select a value from the Default Date Format.
Note: Make sure the format you select here is the same as the format used for the job. If the
job definition type is BIPJobType, select yyyy-MM-dd, and make sure the data model for the
corresponding Oracle Analytics Publisher report is using the same date format.
Number
Select a Number Format.
Select Left or Right for data alignment.
String
Select a Page Element.
Select Text box if you want the user to provide a text.
Select Choice list if you want a list with limited options (maximum 10). If there are more than
500 values, users will get an error when they try to set the parameter as part of submitting the
scheduled process.
Select List of values if you want a list with unlimited options with a search facility.
5. Select the Read Only check box if you don't want to enable users to set this parameter. When a parameter is set
as read only, the user is required to provide a default value to be passed to the job definition.
6. If you select list of values or choice list page element, select a List of Values Source and an Attribute. Use the
list of values sources from the Manage List of Values Sources tab. Don't define lists of values in the data model
that the report is using.
7. From the list of available attributes, select the attributes you want to appear in the list and move them to the
selected attributes section. These attributes determine the values that the user can see.
8. Define a Default Value for the parameter.
9. In the Tooltip Text field, provide additional information for the user to follow.
10. Select the Required check box if users must set this parameter to submit the scheduled process.
11. Select the Do not Display check box if users should not see this parameter while submitting the process.
12. Click Save and Create Another or Save and Close.
Dependent Parameters
The attributes of some parameters depend on the attributes or values of certain other parameters. The attributes of a
parameter would change if the value of its dependent parameter changes.
For example, you have three parameters, namely Country, State and, City. In this case, the value of the Country
parameter would determine the values available in the State parameter. The values in the State parameter would
determine the values available in the City parameter.
543

Oracle Fusion Cloud HCM
Using Common Features for HCM
Chapter 21
Enterprise Scheduler Job Definitions and Job Sets
Related Topics
•
Create Job Definitions to Run Reports as Scheduled Processes
•
Define Dependent Parameters in Job Definitions
Define Dependent Parameters in Job Definitions
This example demonstrates how to define dependent parameters.
This table summarizes key decisions for this scenario.
Decisions to Consider In this Example
Which parameters do I want to make
dependent?
Region, Country and City.
Region list of values includes the names of the regions like North America, EMEA, JAPAC and so on.
The Country list of values includes the names of countries like USA, Canada, France, England, India,
Japan and so on. Similarly City list of values includes the names of different cities like New York,
Washington, London, Paris, Mumbai, Tokyo and so on. The Country parameter list of values includes
only the countries like USA, Canada and so on, if user selects North America. The City parameter list of
values includes the names of the cities in the country that the user has selected.
What are view criteria?
The view criteria determine the values that appear in the dependent parameter list of values for the
users to see. The view criteria are used to filter the list and pass the required bind variables based on
the user's selection.
To filter countries based on the selected region, you must select getCountriesByRegion and pass
Region as a bind variable.
Prerequisites
Create the parameters Region, Country and City. The values available to the users in the Country parameter list of
values depends on the value selected for the Region parameter. City parameter list of values depends on the value that
the user selects for the Country parameter.
Defining Dependent Parameters
To define parameters with dependent lists of values:
1. On the Manage Job Definitions tab, open the Parameters sub tab.
2. Select the Region parameter.
3. Click the Manage Dependencies button located next to the Delete button.
4. From Available View Criteria, select getCountriesByRegion and move it to Selected View Criteria using the
move icons.
The selected view criteria appears in the Bind Variables section.
5. In the Bind Variables section, for the getCountriesByRegion view criteria, select Country from the mapped
parameters list of values.
The Country parameter list of values is now dependent on the value selected for the Region parameter.
6. Click OK.
544

Oracle Fusion Cloud HCM
Using Common Features for HCM
Chapter 21
Enterprise Scheduler Job Definitions and Job Sets
7. Repeat the steps with Country parameter. Select getCitiesByCountries from the available view criteria and pass
City as a bind variable.
Related Topics
•
Define Parameters for Job Definitions
•
Create Job Definitions to Run Reports as Scheduled Processes
•
Create Job Sets
•
Manage List of Values Sources
Manage Job Sets
Job Sets
A job set is a collection of several jobs in a single process set that the users can submit instead of running individual
jobs separately.
The job set definition also determines if the jobs run in serial or parallel, or based on some other predetermined logic. In
the Setup and Maintenance work area, go to the following:
• Functional Area: Application Extensions or a product-specific functional area
• Task: Manage Enterprise Scheduler Job Definitions and Job Sets
Use the Manage Enterprise Scheduler Job Definitions and Job Sets page to open the Manage Job Sets tab.
• On this tab, you can view and define job sets, and use Query By Example to find a specific job set.
• You can't edit or delete the predefined job sets which are indicated by an asterisk. You can create job sets, and
also edit and delete job sets that are not predefined.
Job Set Steps
A job set can contain any number of individual jobs as well as other job sets. There can also be multiple levels of nested
job sets within a single job set. For example, a job set can include three jobs and two job sets, one of which contains
another job set. Each individual job or job set that's included within a job set is called a job set step. A job set and each
of its job set steps can have additional parameters. Users provide the values for these parameters when they submit the
process set.
Application Defined Properties
Some Job Sets require the user to enter certain additional properties before submitting a job request. Application
Defined Properties are the additional properties that the user has to enter during runtime. For example, when
enableDuplicateJobWithParamTaskflow property is set to True, it can be used to run a single job multiple times with
different parameter values, within a job set.
System Properties
System Properties are the additional settings that determine how a job set runs. For example, you can use a system
property to determine the number of retries for a job set that fails to execute. On this tab, you can view and define job
sets, and use Query By Example to find a specific job set.
545

Oracle Fusion Cloud HCM
Using Common Features for HCM
Chapter 21
Enterprise Scheduler Job Definitions and Job Sets
Related Topics
•
Create Job Sets
•
System Properties for Job Sets
•
Overview of Managing Job Definitions and Job Sets
Create Job Sets
Create a job set so that users can run multiple jobs with a single submission.
Before you create the job set, plan the sequence and hierarchy of the job steps within the job set. You can create job sets
using the Manage Job sets tab. You can also edit and delete job sets that are not predefined.
Steps to Create Job Sets
Follow these steps:
1. In the Setup and Maintenance work area, go to the Manage Enterprise Scheduler Job Definitions and Job
Sets task in the Application Extensions functional area. Or, depending on your offering, you might use a
different functional area.
Note: If you don't see the task, make sure that the Enterprise Scheduler Job Definitions and Job Sets feature
is enabled at the offering level.
2. On the Manage Enterprise Scheduler Job Definitions and Job Sets page, open the Manage Job Sets tab.
3. Click Create.
4. Complete the fields as shown in this table.
Field Description
Name
Provide a name with only alphanumeric characters, for example, ExportMetadataTables1.
Note:
A job set name can't have space or any special character.
Display Name
Provide a name that the users see while submitting the scheduled process.
Description
Provide more information about what the job set does.
Package
Specify the path where you want to save the job set.
5. In the Job Set Steps section, select Serial or Parallel to define the sequence of the job set.
6. Click Add Job Set Step to open the Add Step dialog box.
7. In the Step tab:
546

Oracle Fusion Cloud HCM
Using Common Features for HCM
Chapter 21
Enterprise Scheduler Job Definitions and Job Sets
a. Enter a Step ID to easily identify the steps.
b. Search for and select a job or job set to include in your job set.
c. Select Job definition or Job set.
d. Type a valid name or package, or both of the Job or Job Set you are looking for and click search.
e. Select the required job definition or job set and click OK.
f. If you selected Parallel in step 4:
- Select Insert into main diagram if you want the step to be executed independently.
- Select Add to list of available steps if you want the step to be one of the outcomes in the available
steps.
- If you choose to add the step to the list of available steps, select an option for the possible job
outcomes. For example, you can determine whether the process must stop or another step must
be executed if the step fails to run successfully.
8. In the Application Defined Properties tab:
a. Click Add Application Defined Property icon and select a data type.
b. Enter a name and an initial value.
c. Select the Read Only check box if you don't want users to update this property when they submit the
process set.
d. Click OK.
9. In the System Properties tab:
a. Click Add System Property.
b. From the name list, select a system property.
c. Enter a value in the Initial Value field.
d. Select Read Only check box if you don't want users to update this property when they submit the process
set.
e. Click OK.
Note: You can also add and edit the Application Defined Properties and System Properties in the respective
sections on the Create Job Set page.
10. Click OK to add the Job Set Step.
11. Add jobs and job sets as required. You can select job steps in the Job Set Steps section and edit, remove, or
reorder (for Serial only). You can also switch between Serial and Parallel.
12. Click Save and Close.
Note: When you create a job set, a privilege with the same name as the job set is automatically created with a Run
prefix. For example, for a job set named ExportAppsData, with display name Export Application Data, the privilege
code is RUN_EXPORTAPPSDATA, with Run Export Application Data as the name. Make sure to use the Security
Console to assign this privilege to roles so that users who need to run the process set can do so.
547

Oracle Fusion Cloud HCM
Using Common Features for HCM
Chapter 21
Enterprise Scheduler Job Definitions and Job Sets
Related Topics
•
Job Sets
•
System Properties for Job Sets
•
Overview of Managing Job Definitions and Job Sets
•
How do I update existing setup data?
•
Configure Offerings
System Properties for Job Sets
System Properties are the additional settings that determine how a job set runs. For example, you can use a system
property to determine the number of retries for a job set that fails to execute.
You can open the Manage Job Sets tab using the Manage Enterprise Scheduler Job Definitions and Job Sets page. In
the Setup and Maintenance work area, use the following:
• Functional Area: Application Extensions or a product-specific functional area
• Task: Manage Enterprise Scheduler Job Definitions and Job Sets
System Properties
This table lists some system properties with description.
System Property Name Description
SYS_allowMultPending
Specifies if the same job definition can have multiple pending requests.
SYS_application
Specifies the logical name of the Scheduling Services folder application used for request processing.
Oracle Enterprise Scheduler automatically sets this property during request submission.
SYS_effectiveApplication
Specifies the logical name of the Scheduling Services folder application that is the effective application
used to process the request. You can associate a job definition, job type, or a job set step with a
different application by defining the EFFECTIVE_APPLICATION system property. This property can
only be specified through metadata and cannot be specified as a submission parameter.
SYS_priority
Specifies the request processing priority. The priority interval is 0 to 9, where 0 is the lowest priority
and 9 is the highest. If this property is not specified, the default value used is 4.
SYS_product
Specifies the product used for submitting the request.
SYS_request_timeout
Enables the job request to time out.
SYS_requestExpiration
Specifies the expiration time for a request. This represents the time (in minutes) that a request will
expire after its scheduled execution time. An expiration value of zero (0) means that the request never
expires. If this property is not specified, the default value used is 0.
548

Oracle Fusion Cloud HCM
Using Common Features for HCM
Chapter 21
Enterprise Scheduler Job Definitions and Job Sets
System Property Name Description
Request expiration only applies to requests that are waiting to run. If a request waits longer than the
specified expiration period, it does not run. After a request starts running, the request expiration no
longer applies.
SYS_retries
Specifies the retry limit for a failed request. If request execution fails, the request is retried up to the
number of times specified by this property until the request succeeds. If the retry limit is zero (0), a
failed request is not retried. If this property is not specified, the default value used is 0.
Related Topics
•
Job Sets
•
Create Job Sets
Assign Roles for Access to Manage Scheduled Processes
Users can view and manage the scheduled processes that they submit, for example, to cancel the process or see the
output. But, if they need to do that for processes other people submitted, they need certain roles.
Here are the roles and what they let users do with scheduled processes that anyone submitted.
Role Name Role Code View Update Cancel See Output Republish Output
ESS Operator Role
ESSOperator
Yes
No
No
No
No
ESS Monitor Role
ESSMonitor
Yes
No
No
No
No
ESS Administrator
Role
ESSAdmin
Yes
Yes
Yes
No
No
BI Administrator
Role
BIAdministrator
No
No
No
Yes
Yes
You can use the Security Console to create a custom role that has the needed roles, and assign the custom role to the
user. Usually it's best to give access just by giving users the needed roles.
• But, in some cases you might need to give additional access to specific tasks. For example, someone with ESS
Monitor Role can see scheduled processes from others, but they also need to put processes on hold. And you
don't want to give them the ESS Administrator Role because that would be too much access.
• Another case is that a user should not have access to all processes, but they still need to do certain tasks for
some processes.
549

Oracle Fusion Cloud HCM
Using Common Features for HCM
Chapter 21
Enterprise Scheduler Job Definitions and Job Sets
In these cases, the custom role you assign to users should have a data security policy, which gives users access to
certain tasks. Here are the actions you should choose from for the policy, for the specific tasks you want to give users
access to.
Action Description
ESS_REQUEST_CANCEL
Cancel processes.
ESS_REQUEST_HOLD
Put processes on hold.
ESS_REQUEST_OUTPUT_READ
See the output from processes.
ESS_REQUEST_OUTPUT_UPDATE
Update the output from processes, for example to change what output you want if the process hasn't
started running yet.
ESS_REQUEST_READ
Access processes and view details.
ESS_REQUEST_RELEASE
Release processes that were put on hold.
Access for All Scheduled Processes
Here's how you give someone access to manage all processes:
1. On the Roles page in the Security Console, click Create Role.
2. On the Create Role: Data Security Policies page, create a data security policy only if you need to give access to
specific tasks.
a. For the Data Resource field, select ESS_REQUEST_HISTORY.
b. For the Data Set list, select All Values.
c. For the Actions list, select any of the tasks that you want to give access to.
3. On the Create Role: Role Hierarchy page, add any of the needed roles.
4. On the Create Role: Users page, enter the users you want to assign this custom role to.
Access to Do Certain Tasks for Specific Processes
Say you don't want to give users access to all scheduled processes. When you create the custom role, instead of
selecting a role like ESS Monitor Role, you enter a condition that controls what processes are included. You first create
the condition in a data resource:
1. On the Administration page in the Security Console, click Manage Database Resources on the General tab.
2. On the Manage Database Resources and Policies page, search with ESS_REQUEST_HISTORY in the Object
Name field.
3. In the Search Results table, select the ESS_REQUEST_HISTORY database resource and click Edit.
4. On the Edit Data Security page, click the Condition tab.
5. On the Condition tab, click the Create icon.
6. In the Create Database Resource Condition dialog box, select SQL predicate for the Condition Type option.
7. In the SQL Predicate field, enter SQL that determines what processes to give access to, for example:
EXISTS
550

Oracle Fusion Cloud HCM
Using Common Features for HCM
Chapter 21
Enterprise Scheduler Job Definitions and Job Sets
(select 1 from dual)
and DEFINITION in (
'JobDefinition://oracle/apps/ess/hcm/users/SyncRolesJob'
)
8. Save your work.
Now you're ready to create your custom role and assign it to users:
1. On the Roles page in the Security Console, click Create Role.
2. On the Create Role: Data Security Policies page, create a data security policy.
a. For the Data Resource field, select ESS_REQUEST_HISTORY.
b. For the Data Set list, select Select by instance set.
c. For the Condition Name list, select the condition you created.
d. For the Actions list, select ESS_REQUEST_READ so users can access the process in the first place.
Include any other action that you want to give access to. For example, if the user needs to see output,
select ESS_REQUEST_OUTPUT_READ too.
3. On the Create Role: Users page, enter the users you want to assign this custom role to.
Related Topics
•
Create Roles in the Security Console
Allow Updates to Scheduled Process Priority
Every scheduled process has a default priority, from 0 to 9. When many scheduled processes are submitted, those with
a lower number, for example 2, would usually run before those with a higher number, for example 7.
1. You can set the Scheduled process priority change allowed (ESS_ALLOW_CHANGE_PROCESS_PRIORITY)
profile option so that administrators can change the priority for specific submissions.
1. In the Setup and Maintenance work area, use the Manage Applications Core Administrator Profile Values task in
the Application Extensions functional area. Set the Scheduled process priority change allowed profile option to
Yes at the Site level.
2. In the Security Console, create a custom role that has the ESS Administrator Role (EssAdmin), and assign it to
administrators who should have access to change priorities. Or, ask your security administrator to do this.
Related Topics
•
Set Profile Option Values
•
Assign Roles for Access to Manage Scheduled Processes
Where to Find Information About HCM Scheduled
Processes
Here are some of the scheduled processes that are available as part of Oracle Global Human Resources Cloud.
551

Oracle Fusion Cloud HCM
Using Common Features for HCM
Chapter 21
Enterprise Scheduler Job Definitions and Job Sets
Absences
• Evaluate Absences
See: Options for the Evaluate Absences Process
• Evaluate Certification Updates
See: Options for the Evaluate Certification Updates Process
• Update Accrual Plan Enrollments
See: Options for the Update Accrual Plan Enrollments Process
• Calculate Accruals and Balances
See: Options for the Calculate Accruals and Balances Process
• Withdraw Accruals and Balances
See: Options for the Withdraw Accruals and Balances Process
• Generate Daily Breakdown of Absence Details
See: Generate Daily Breakdown of Absence Details Process
• Migrate Previous Versions of Absence Data
• Process Events
Approvals
• Refresh Transaction Administrator Console Transaction Status
• Archive Transaction Console Completed Transactions
• Run Reassign Pending Approvals for Terminations and Correct Invalid Supervisor Assignments Process
See: How You Can Regularly Reassign Pending Approvals for Workers That Become Inactive
Benefits
• Life Event Processes
◦
Back Out Life Events
See: Monitor Processes and Resolve Errors
◦
Evaluate Life Event Participation
◦
Back Out Unrestricted Life Events
◦
Evaluate Unrestricted Event Participation
◦
Evaluate Scheduled Event Participation
See: Scheduled Event Participation Process Options
◦
Evaluate Temporal Event Participation
See: Identify and Resolve In-Progress Life Events Before Open Enrollment
◦
Assign Corrective Potential Life Event
◦
Collapse Life Events
See: Collapsing Life Events
552

Oracle Fusion Cloud HCM
Using Common Features for HCM
Chapter 21
Enterprise Scheduler Job Definitions and Job Sets
• Election Processes
◦
Close Enrollment
See: Benefits Process Parameters
◦
Enroll in Default Benefits
◦
Manage Action Items
◦
Adjust Open Enrollment Window
◦
Reopen Life Events
◦
Upload Benefit Enrollments
See: Upload Benefit Enrollments Batch to Database Tables
• Recalculate Processes
◦
Reevaluate Designee Eligibility
◦
Recalculate Unrestricted Participation Rates
• Restart Processes
◦
Restart Default Benefits Enrollment
◦
Restart Participation Evaluation
◦
Restart Life Events Backout All Modes
◦
Restart Enrollment Closure
◦
Restart Action Item Closure
• Maintenance Processes
◦
Purge Participation Evaluation Audit Data
See: Collapsing Life Events
◦
Purge Backed-Out or Voided Life Event Data
◦
Assign and Update Benefits Relationships
◦
Purge Stage Data
See: How You Purge Benefits Staging Data
• Billing Processes
◦
Allocate and Reconcile Payments
◦
Generate Benefit Coverage Charges
◦
Prepare Benefit Coverage Charge Data
Career Development
• Manage Goal Scheduled Process
See: Options for Mass Assignment of Development Goals
553

Oracle Fusion Cloud HCM
Using Common Features for HCM
Chapter 21
Enterprise Scheduler Job Definitions and Job Sets
Compensation
• Base Pay
◦
Generate Compensation Zone and Address Mapping
See: Generate Compensation Zone and Address Mapping
◦
Grade Step Progression
- Run Grade Step Progression
See: Global Compensation Settings for Defaulting Salary from Grade Ladder Rates
See: Batch Settings for Grade Step Progression Processing
See: Batch Error Conditions for Assignment Date in Grade Step Progression Processing
See: Batch Error Conditions for Salary Date in Grade Step Progression Processing
See: Overview of Grade Step Progression Processing
See: Run Grade Step Progression Process
See: How You Include Multiple Progression Grade Ladders in a Process
See: Assignment and Salary Actions in Grade Step Progression Processing
See: Frequency in Grade Step Progression Processing Results
See: Effective and Transaction Dates in Grade Step Progression Processing
See: Propose Progression and Salary Update According to Eligibility
See: Overview of Proposed Progression and Salary Updates
See: Statuses for Grade Step Processes
See:Actions for Manual Progression and Synchronization Processes
See: How You Can Handle Progression Processing Errors
See: Overview of Parameters That Affect Salary Amounts for Proposed Progression and Salary
Updates
See: How Rounding Rules Affect Salary Amounts for Proposed Progression and Salary Updates
See: How the Salary Adjustment Type Affects Salary Amounts for Proposed Progression and Salary
Updates
554

Oracle Fusion Cloud HCM
Using Common Features for HCM
Chapter 21
Enterprise Scheduler Job Definitions and Job Sets
• Grade Step Progression
◦
Synchronize Grade Step Rate
See: Global Compensation Settings for Defaulting Salary from Grade Ladder Rates
See: Batch Error Conditions for Salary Date in Grade Step Progression Processing
See: Overview of Grade Step Progression Processing
See: Synchronize Grade Step Rate Process
See: How You Include Multiple Progression Grade Ladders in a Process
See: Assignment and Salary Actions in Grade Step Progression Processing
See: Effective and Transaction Dates in Grade Step Progression Processing
See: Update Salary According to New Progression Grade Ladder Rates
See: Overview of Proposed Progression and Salary Updates
See: Statuses for Grade Step Processes
See: Actions for Manual Progression and Synchronization Processes
See: How You Can Handle Progression Processing Errors
• Workforce Compensation
◦
Start Workforce Compensation Cycle
See: Overview of Plan Validation and Starting the Workforce Compensation Cycle
See: Start Workforce Compensation Cycle and Synchronize Hierarchy Processes
See: Plan Not in the Choice List of the Start Workforce Compensation Cycle Process
See: Formula Type Is Compensation Person Selection
◦
Refresh Workforce Compensation Data
See: Refresh Workforce Compensation Data Process
See: Refresh Options for the Refresh Workforce Compensation Data Process
See: Formula Type Is Compensation Person Selection
◦
Notify Managers of Approaching Due Date
See: Notify Managers About Workforce Compensation Plan Due Dates and Cycle Status Change Processes
◦
Notify Managers That Cycle Is Open Or Closed
See: Notify Managers About Workforce Compensation Plan Due Dates and Cycle Status Change Processes
555

Oracle Fusion Cloud HCM
Using Common Features for HCM
Chapter 21
Enterprise Scheduler Job Definitions and Job Sets
Document Records
• Archive Document Records
See: How You Configure Archiving and Purging for Document Records
Employment
• Correct Employment Data Integrity Issues
See: Check and Correct Employment-Related Data Issues
• HCM Data Loader Worker Postprocessing
• Migrate Employment Data
See: Process to Migrate to Version 3 Termination
See: Process to Link Source and Destination Assignments for Global Transfer
See: Process to Migrate Contract Data
• Refresh Manager Hierarchy
See:The Manager Hierarchy: How It's Maintained
• Run Convert Pending Workers Automatically Process
See: Automatic Conversion of Pending Workers
• Run Reassign Pending Approvals for Terminations and Correct Invalid Supervisor Assignments Process
See: How You Reassign Pending Approvals and Invalid Supervisor Assignments
• Synchronize Person Assignments from Position
See: Synchronize Person Assignment from Position Process
Goal Management
• Check Goal Data Integrity
See: https://docs.oracle.com/pls/topic/lookup?ctx=fa-latest&id=u30240440
• Mass assign goals
◦
Manage Goal Scheduled Process
See: Overview of Performance Goals Scheduled Processes
See: Mass Assignment of Performance Goals
• Assign goal plans
◦
Manage Goal Scheduled Process
See: Overview of Performance Goals Scheduled Processes
See: How You Assign Goal Plans
• Assign goal plan sets
◦
Manage Goal Scheduled Process
See: Overview of Performance Goals Scheduled Processes
556

Oracle Fusion Cloud HCM
Using Common Features for HCM
Chapter 21
Enterprise Scheduler Job Definitions and Job Sets
See: Guidelines for Creating Goal Plan Sets
◦
Purge Goal Temporary Records
See: Overview of Performance Goals Scheduled Processes
◦
Upgrade Goals
◦
Extract Goals Transaction Data from Cache
See: Extract Performance Goals Transaction Data from Approvals Cache
Journeys and Checklists
• Archive and Purge Journey Data
See: How You Archive and Purge Assigned Journeys
• Update Assigned Journey Attributes Based on Modified Journey Template
See: Overview of Synchronizing Assigned Journey Attributes
Learning
• Processes Scheduled by Oracle
◦
Rebuild Learning Item Stop Word Index
◦
Optimize Learning Text Indexes
◦
Process eLearning Package
◦
Process Learning Cover Art Image
◦
Video Transcoding and Processing
◦
Learn Migration
See: Background Processing in Oracle Learning
• Processes People Schedule Manually
◦
Evaluate Person IDs for Assignment Rule
◦
Reconcile Access Groups
◦
Reconcile Dynamic Assignments
◦
Process User Access
◦
Process Learning Recommendations
◦
Process Unfinished Attempts
◦
Load and Synchronize External Course Data
◦
Process Learning Alerts
◦
Reconcile Learning Assignment Status
◦
Update Assignment Status on Date-Driven Activities
◦
Virtual Classroom External Provider Synchronization
See: Background Processing in Oracle Learning
557

Oracle Fusion Cloud HCM
Using Common Features for HCM
Chapter 21
Enterprise Scheduler Job Definitions and Job Sets
Performance Management
• Perform Mass UpdateEvaluate Temporal Event Participation
See: Process Mass Actions for Performance Documents
• Eligibility Batch Process
See: Eligibility Batch Process for Performance Documents and Check-In Templates
• Send Performance Document Alert Notifications
See: Performance Document Task Alert Notifications
• Reassign Performance Documents with Terminated Managers
See: Reassign Performance Documents for Terminated Managers
Person
• Update Person Search Keywords
See: How You Update Person Search Keywords
• Synchronize Person Records
See: How You Communicate Person and Assignment Changes to Consumer Applications
See: Guidelines for Synchronizing Person Records
See: Guidelines for Batch Loading Workers
• Apply Name Formats to Person Names, Keywords, and LDAP
See: Apply Name Formats to Person Names, Keywords, and LDAP
• Optimize Person Search Keywords Index
See: How You Optimize Person Search Keywords
• Person-Record Keyword Searches
See: Person-Record Keyword Searches
Recruiting
• Load and Index Candidates
• Load and Index Job Requisitions
• Load and Index TCA Geographies
• Load Workers into the Candidate Table
• Maintain Candidates and Job Requisitions for Search
• Manage Expired Interview Feedback Requests
• Manage Recruiting Job Offer Letters (previously called Restore Recruiting Job Offer Letter Layouts)
• Perform Batch Recruiting Actions
• Perform Recruiting Candidate Selection Process Actions
558

Oracle Fusion Cloud HCM
Using Common Features for HCM
Chapter 21
Enterprise Scheduler Job Definitions and Job Sets
• Perform Recruiting Candidate Selection Process Offer Actions (previously called Complete the Candidate Move
to HR)
• Prepare Campaign Email
• Publish Job Requisitions
• Purge Processed Internal Recruiting Data
• Recruiting Job Offer Expiration Date Alert
• Send Campaign Email
• Send Candidate Screening Requests to Partners (previously called Send Candidate Assessment Requests to
Partners)
• Send Interview Feedback Respondent Request Expiring Notification
• Send Interview Reminder Notification
• Send Job Application Notification
• Send Notifications to Draft Applications
• Send Requisition Posting Expiration Date Notification
• Synchronize LinkedIn Recruiter System Connect
• Synchronize Recruiting Data for Candidate Recommendations
• Track Campaign Email Delivery
• Update Date When Last Retrieved
• Update Job Application Questionnaire
See: Scheduled Processes in Oracle Recruiting Cloud
• Import User and Role Application Security Data
See: Run Scheduled Processes for Agency Hiring
• Retrieve Latest LDAP Changes
See: Run Scheduled Processes for Agency Hiring
Seniority Dates
• Migrate to Version 3 of Seniority Dates
See: Process to Migrate Seniority Dates
• Populate Seniority Dates
• Calculate Seniority Dates
See: Process to Calculate Seniority Dates
Succession Management
• Succession Plan Incumbents
See: How Inferred Incumbents of Succession Plans Decide Plan Access
Talent Review
• Send Notification for Talent Review Tasks
559

Oracle Fusion Cloud HCM
Using Common Features for HCM
Chapter 21
Enterprise Scheduler Job Definitions and Job Sets
See: Notify Owners and Assignees about Talent Review Meeting Tasks
• Send Reminder for Talent Review Tasks That Are Due
See: Remind Assignees When Talent Review Tasks Are Due
Time and Labor
• Generate Time Cards
See: Options for Time and Labor Managers to Manage Time Cards
See:Generate and Approve Monthly Time Cards in the Time Management Work Area
• Diagnose and Correct Time Issues
See: Diagnose and Correct Time Issues Process
• Generate Time Cards from Time Collection Device
See: Generate Time Cards from Time Collection Device Process
• Generate Time Exceptions from Compliance Rules
See: Generate Time Exceptions from Compliance Rules
• Mass Submit and Approve Time Cards
See: Mass Submit and Approve Time Cards Process
• Resubmit Time Cards
See: Resubmit Time Cards Process
• Submit Queued Time Cards
See: Submit Queued Time Cards Process
• Export Data to Time Collection Devices
See: Export Data to Time Collection Devices Process
• Process Imported Time Entries
See: Load Time Record Events in the Time Repository
• Prepare Unapproved Time Entries for Payroll Transfer
See: Prepare Unapproved Time Entries for Payroll Transfer Process
• Process Imported Shifts
See: Process Imported Shifts Process
• Update Extracted Time Cards from Ready to Transfer to Transferred
See: Update Extracted Time Cards from Ready to Transfer to Transferred Process
Workforce Reputation Management
• Generate Notifications for Work Life Cloud Application
See: How You Generate Notifications for Work Life Cloud Service Applications
560

Oracle Fusion Cloud HCM
Using Common Features for HCM
Chapter 21
Enterprise Scheduler Job Definitions and Job Sets
Workforce Structures
• Flatten HCM Position Hierarchy
• Run HCM Data Loader Postprocessing for Positions
• Optimize Workforce Structures LOV to Use Starts With
Related Topics
•
Best Practices for Scheduled Processes in Fusion Applications
FAQs
Why can't I see certain job definitions, and how do I find them?
In the table on the Manage Job Definitions tab, not all job definitions are shown. You always see only the ones you have
access to, and only the first 100 are shown when you open the tab.
Use Query by Example to find what you're looking for, even the job definitions that aren't shown in the table by default.
Related Topics
•
Use Query By Example
Why can't I see all the parameters in a predefined job definition?
When you view, edit, or duplicate a predefined job definition, it's possible that you won't see all the parameters that
users see when they submit the scheduled process.
There are two types of parameters, based on task flows and view objects. Only the parameters based on view objects
are available on the Manage Job Definitions tab. The ones based on task flows are not visible. Any parameters you
create would also be based on view objects.
What do I select for job application name when I create a job
definition?
What you select from the Job Application Name list depends on the setup task you're using.
• Manage Enterprise Scheduler Job Definitions and Job Sets for Customer Relationship Management and
Related Applications: Select CrmEss.
• Manage Enterprise Scheduler Job Definitions and Job Sets for Financial, Supply Chain Management, and
Related Applications: Select FscmEss.
• Manage Enterprise Scheduler Job Definitions and Job Sets for Human Capital Management and Related
Applications task: Select EarHcmEss.
561

Oracle Fusion Cloud HCM
Using Common Features for HCM
Chapter 21
Enterprise Scheduler Job Definitions and Job Sets
Can I use a table value set as the list of values for a parameter?
No, you should create a list of values source instead to provide the same values for the parameter.
How can I restrict user access so that they can run only custom
scheduled processes?
You can try creating a custom role with the Manage Scheduled Processes
(FND_MANAGE_SCHEDULED_PROCESSES_PRIV) privilege to give access to the Scheduled Processes work area, along
with the privileges that are automatically created when you create a job definition or job set.
Note: You need to test the custom role to make sure it doesn't have any roles or privileges that give access to
predefined processes.
562

Oracle Fusion Cloud HCM
Using Common Features for HCM
Chapter 22
Audit Policies
22 Audit Policies
Audit Policies
Auditing is used to monitor user activity and all configuration, security, and data changes that have been made to an
application. Auditing involves recording and retrieving information pertaining to the creation, modification, and removal
of business objects.
All actions performed on the business objects and the modified values are also recorded. The audit information is
stored without any intervention of the user or any explicit user action.
Use audit policies to select specific business objects and attributes to be audited. The decision to create policies usually
depends on the type of information to be audited and to the level of detail required for reporting.
Enabling Audit Functionality
For Oracle Applications Cloud, you must configure the business objects and select the attributes before enabling audit.
If you enable audit without configuring the business objects, auditing remains inactive. By default, auditing is disabled
for all applications. To enable and manage audit, ensure that you have a role with the assigned privilege Manage Audit
Policies (FND_MANAGE_AUDIT_POLICIES_PRIV). For appropriate assignment of roles and privileges, check with your
security administrator.
To enable auditing for Oracle Fusion Middleware products, select one of the levels at which auditing is required for that
product. The audit levels are predefined and contain the metadata and events to be audited. For more information, see
Audit Events for Oracle Applications Cloud Middleware (Doc ID 2114143.1) on My Oracle Support.
If you don't want an application to be audited, you can stop the audit process by setting the Audit Level option to None.
Also, note that there's no specified retention period for the audited data or the logs. Follow your company policy for
retaining or removing such data.
Note: You won't be able to enable audit if you're working in a sandbox. If you try to set up audit while you're in
a sandbox, you will see the message "Audit setup is disabled in a sandbox". You'll also notice that the buttons
associated with the audit functionality are disabled.
Related Topics
•
Audit Configuration for Business Object Attributes
•
Overview of Audit Configuration
Audit Configuration for Business Object Attributes
Audit enables tracking the change history of particular attributes of a business object. However, those objects and their
attributes must be selected for audit and auditing must be enabled for that application.
The configuration settings determine which attributes to audit for a given object, and when the audit starts and ends.
Auditing takes into account all the operations performed on an object and its attributes, such as create, update, and
563

Oracle Fusion Cloud HCM
Using Common Features for HCM
Chapter 22
Audit Policies
delete. To configure audit business object attributes, use the Manage Audit Policies task in the Setup and Maintenance
work area.
Selecting an Application
To set up auditing, you must select a web application that contains the required business objects that can be audited.
From the list of business objects, select those business objects that you want to audit. Selecting a business object also
displays its attributes that are enabled for auditing.
Selecting Attributes
For each selected business object to be audited, select the corresponding attributes to include in the audit. All attributes
that belong to that object are by default selected for audit and appear on the user interface. However, you can add or
remove attributes from the list. When you remove an attribute from the list, you stop auditing it even when the parent
object is selected for audit. So, if you want an attribute to be audited, you must add it to the list. If the object selected in
an audit hierarchy is also a part of several other audit hierarchies, the attribute configuration for that object is applicable
to all the hierarchies in that application.
For business objects based on flexfields, select the Flexfields (Additional Attributes) check box to view, add, or remove
flexfield attributes. The selected objects are audited.
Note: You can't audit LOB (BLOB, CLOB, and NCLOB), rich text, and long text attributes.
Starting and Stopping Audit
The business object is ready for audit after you select its attributes and save the configuration changes. However, to
start auditing, the audit level for Oracle Applications Cloud must be set to Auditing on the Manage Audit Policies page.
To stop auditing an object, you can deselect the entire object and save the configuration. As a result, all its selected
attributes are automatically deselected and aren't audited. To continue to audit the business object with select
attributes, deselect those attributes that aren't to be audited. When users view the audit history for an application, they
can specify the period for which they want the results. Therefore, make a note of when you start and stop auditing an
application.
For example, users intend to view the audit history of an object for the previous week, but auditing for that object was
stopped last month. They wouldn't get any audit results for that week, because during the entire month that object
wasn't audited. Even if you enable audit for that object today, users can't get the wanted results because audit data until
today isn't available.
Note: When users export the report summary to a Microsoft Excel file, there's a limit on the number of rows that are
displayed in the file.
• For Oracle Fusion Middleware products, the maximum limit is 25000. By default, the limit is set as 10000. You
can change this limit using the FND_AUDIT_FMW_EVENT_LIMIT profile option.
• For Oracle Fusion Application Business Objects, the maximum limit is 10000 per table. This is
set as the default value. Sometimes, the actual rows returned might be more than the limit set,
because a single transaction can update multiple tables. To decrease this limit, you can create the
FND_AUDIT_EXPORT_ENTITY_LIMIT profile option and set a lesser value for it.
See Why is it taking so long to get search results when exporting audit summary of Fusion Application
Business Objects?
564

Oracle Fusion Cloud HCM
Using Common Features for HCM
Chapter 22
Audit Policies
Overview of Audit Configuration
To set up auditing for Oracle Applications Cloud, select the Manage Audit Policies task from the Setup and Maintenance
work area within your offering.
To set up auditing for Oracle Fusion Middleware products, select the level of auditing mapped to a predefined set of
metadata and the events that have to be audited. Information about configuring audit for Oracle Fusion Middleware
products is provided in Oracle Fusion Middleware guides.
You can also create a configuration file and deploy it to audit a specific Oracle Fusion Middleware product. The
configuration details for Oracle Fusion Middleware products are available as audit-specific assets that you can use to
create the config.xml configuration file. To get a list of audit-specific assets, see Audit Events for Oracle Applications
Cloud Middleware (Doc ID 2114143.1) on My Oracle Support.
Oracle Fusion Middleware Products
• Configure business objects to enable auditing in Oracle Fusion Middleware products. Refer to Oracle
Applications Cloud Common Features Reference.
See: Auditing Web Services
Oracle Fusion Security Products
• Configure business objects to enable auditing in Oracle Fusion security products. Refer to Oracle Applications
Cloud Common Features Reference.
See: Introduction to Oracle Fusion Middleware Audit Framework
See: Managing Audit
Impersonation Audit
Users can temporarily designate other users to impersonate their profiles and perform application tasks on their behalf.
Let’s understand how the tasks that an impersonator does in the application, are audited.
Here are a few things to know about impersonation auditing:
• Impersonation auditing is controlled using the Audit Impersonation Transaction Enabled profile option. By
default, it’s enabled and the profile value is set to Yes. To disable it, set the profile value to No.
• Even when auditing is disabled for an application, impersonation auditing remains active.
• At runtime, the audit setup tracks and stores information about attributes, even when auditing isn't enabled for
the attributes.
• While viewing audit history, users can retrieve the audited information, filtered by an impersonated user.
Impersonation auditing is limited in scope and applies only to the business objects in the Manage Audit Policies task.
565

Oracle Fusion Cloud HCM
Using Common Features for HCM
Chapter 22
Audit Policies
Updates that an impersonator can do, based on the value of Audit Impersonation Transaction Enabled profile
option
Impersonation Auditing Enabled? What an Impersonator can do
Yes Impersonator can update only the business objects in the Manage Audit Policies task. This is because,
impersonation auditing information can be fully captured only for these business objects.
No Impersonator can update business objects that aren't part of the Manage Audit Policies tasks also.
CAUTION: Even if impersonation auditing is disabled, impersonation information is still captured in
the audit tables. But, if there's no corresponding audit table for the base table, then the activities are
audited as if the actual user performed them.
Related Topics
•
Designate Proxies
•
Work as a Proxy
How You Audit Talent Management Business Objects
Set up auditing policies to maintain a history of changes to your important data: what changed, who changed it, and
when. The audit tracks changes to attributes of Oracle Fusion Talent Management business objects made using the
application pages, web services, or talent management
You can view the audit history to determine how a business object obtained its current value and to compare old and
new values. To set up auditing, you must have the Application Implementation Consultant job role to access the Manage
Audit Policies task. To view audit data, you must have the Internal Auditor job role.
Talent Management Business Objects
When you set up auditing for business objects in talent management, you configure Oracle Fusion Applications
business objects on the Manage Audit Policies page in the Setup and Maintenance work area:
1. Select the HCM Talent application on the Configure Business Object Attributes page.
2. Specify the attributes to audit for the objects. For example, you may audit the rating level and numeric rating
attributes for rating levels.
The following table lists the talent management business objects to audit.
Talent Management Business Object Audited Attributes
Talent content library, including rating
models, rating levels, and content items
• From and to dates, code, name, distribution threshold, and description for rating models
• From and to points, maximum and minimum distributions, numeric and star ratings, name, rating
level, short description, review points, and description details for rating levels
566

Oracle Fusion Cloud HCM
Using Common Features for HCM
Chapter 22
Audit Policies
Talent Management Business Object Audited Attributes
• Item code, from and to dates, item description, name, rating model details for content items
Talent pools
Status details of talent pool members
Talent profiles, including person and
model profiles
Keywords and from and to dates for person and model profiles
Talent profiles setup, including content
section properties
Label, column name, default value, display, source, required, searchable, value set name, and view
attribute for profile type section properties (also called content section properties)
Performance evaluations, including
evaluation sections, evaluation section
ratings, evaluation items, evaluation
item ratings, participant details, and
performance task.
• Manager ID, status, start and end dates, performance document name, and evaluation context
(descriptive flexfields for additional attributes) for performance evaluations
• Comments and performance rating for evaluation section ratings
• Item name, minimum weight, and weight for evaluation item
• Comments, performance rating, and proficiency level for evaluation item ratings
• Participant ID and role, status of the task, optional overall comments, and notified by data to
indicate which person requested the participant to participate in the evaluation
• Status of performance task, and action performed by data to indicate which person performed
the task
Check-ins Check-in meeting details and discussion topics.
Succession plans
Status details of succession plan candidates.
Audit Reports
Talent management enables users with the Internal Auditor job role to view audit reports for audit-enabled talent
management business objects. You can view the changes that the application data underwent. The report provides you
with details of the talent management business objects that were created, updated, and deleted. You can select among
several search parameters to decide the type of audit history report that you require. To access the Audit Reports work
area, select Navigator > Tools > Audit Reports.
Related Topics
•
Audit Policies
•
Audit Configuration for Business Object Attributes
•
Audit Reports
Audit Payroll Business Objects
Set up auditing policies to maintain a history of changes to your important data: what changed, who changed it, and
when.
The audit tracks changes to attributes of payroll business objects made using the application pages, web services, or
payroll processes, which use Oracle Enterprise Scheduler.
567

Oracle Fusion Cloud HCM
Using Common Features for HCM
Chapter 22
Audit Policies
You can view the audit history to determine how a business object obtained its current value and to compare old
and new values. To view the history or to create an audit report from the Audit History work area, you require
appropriate duty roles and privileges. Enterprises typically assign the following two audit duty roles to the application
implementation consultant and master data management application roles:
• Audit trail management, which determines the objects audited
• Audit trail report viewing to view the audit history
Payroll Business Objects
When you set up auditing for payroll, you configure Oracle Fusion Applications business objects on the Manage Audit
Policies page in the Setup and Maintenance area:
1. Select the HCM Payroll application on the Configure Business Object Attributes page.
2. Specify the attributes to audit for the objects.
For example, you might audit the start and end date attributes for the calculation card component details.
This table lists the payroll business objects you can set up for auditing payroll. You track changes to attributes specified
for these objects.
Payroll Business Object Description
Assigned Payroll
Holds date-effective attributes about payrolls assigned to a worker.
Assigned Payroll More Details
Holds details that aren't date-effective about the payroll assigned to a worker.
Calculation Card
Holds values required for calculating payroll components.
Calculation Card Component
Holds the definition of a component that represents one or more logically related payroll components.
Calculation Card Component Detail
Holds the input values of a person's calculation card.
Calculation Reporting Card
Defines the tax reporting units that report the calculation.
Calculation Reporting Card Usage
Attaches a reporting card to a person record.
Element Entry
Holds earning and deductions details for a person.
Element Entry Value
Holds the values of the compensation and benefits granted to a person.
Payroll Calculation Range Value
Defines the values or sets of values used in the calculation of a value definition.
Payroll Calculation Value Definition
Defines how a value is calculated in payroll processing.
Personal Payment Method Holds the payment method details for a person.
568


Oracle Fusion Cloud HCM
Using Common Features for HCM
Chapter 22
Audit Policies
570

Oracle Fusion Cloud HCM
Using Common Features for HCM
Chapter 23
Applications Core Configuration
23 Applications Core Configuration
Import Flexfields, Lookups, or Profile Values Using Web
Services
You can import lookups, profile option values, and extensible flexfields into an application using the import function on
the application page. Or, you can use the web service FndManageImportExportFilesService for the import task. The web
service uses the following methods:
Loader Name Asynchronous Method Synchronous Methods Supported methods for backward
compatibility (without UUID)
Flex data uploader
processFlexDataAsync(List<String>
inputFileIdTypeList,
String UUID)
processFlexData(LIst<String>inputFileIdTypeList,
String UUID)
processFlexDataFiles(List<Strig>
inputFileIdTypeList)
Lookups data uploader
processLookupsDataAsync(long
lookupTypesFileID, long
lookupCodesFileID, long
viewApplicationID, String
UUID)
processLookupsData (long
lookupTypesFileID, long
lookupCodesFileID, long
viewApplicationID, String
UUID)
processLookupsUploadFiles
(long lookupTypesFileID,
long lookupCodesFileID,
long viewApplicationID)
User profile values
uploader
processUserProfileValuesAsync(long
userProfilesFileID, String
UUID)
processUserProfileValues(long
userProfilesFileID, String
UUID)
processUserProfileValuesFile(long
userProfilesFileID)
Valueset Values data
uploader
processValueSetValuesAsync(Long
fileIdAtRepository, String
UUID)
processValueSetValues(Long
fileIdAtRepository, String
UUID)
valueSetValuesDataLoader(Long
fileIdAtRepository)
Generic method
NA
downloadProcessLogFile(String
UUID)
NA
Example
The following example is about importing the profile values using the web service. To import lookups or extensible
flexfields, initiate the web service in the same way as shown here, after replacing the methods and other relevant values
in the code.
571

Oracle Fusion Cloud HCM
Using Common Features for HCM
Chapter 23
Applications Core Configuration
To import profile values:
1. Perform the following substeps to generate keystore for the security policy "oracle/
wss11_saml_or_username_token_with_message_protection_service_policy":
a. Generate keystore using the command keytool -genkeypair -keyalg RSA -alias mycompkey -keypass
password -keystore mycompclient-keystore.jks -storepass password -validity 3600.
b. Open the WSDL using the URL http://<host>:<port>/fndAppCoreServices/
FndManageImportExportFilesService?wsdl through a web browser, and get the public key <wsdl:service>/
<wsdl:port>/<wsa:EndpointReference>/<wsid:Identity>/<dsig:keyInfo>/<dsig:X509Data>/
<dsig:X509Certificate>. Then, enclose it with ---- BEGIN CERTIFICATE ---- and ---- END CERTIFICATE
---- and save it to a file by name cdrmpk.cer.
c. Store the key information in the truststore using the command keytool -importcert -alias cdrmkey -
file cdrmpk.cer -keystore mycompclient-keystore.jks -storepass password.
2. Open the WSDL page using the browser of your choice.
3. Export and save the associated security certificates Verisign Class 3 Public Primary Certification Authority -
G5 and Verisign Secure Server CA - G3.
4. Use the following command to import the saved certificates into the trust store of the client computer.
keytool -importcert -keystore <truststore> -storepass <truststorepassword> -file <file location where
the mentioned certificate is stored> -alias <alias for certificate>
5. Run the following command to generate the JAX-WS proxy for the FndManageImportExportFilesService web
service.
C:\Program Files\Java\jdk1.7.0_04\bin>wsimport -s "d:\wsimport\FndManageImportExport" -d "d:\wsimport
\FndManageImportExport" http://<host>:<port>/fndAppCoreServices/FndManageImportExportFilesService?wsdl
6. Save the generated code as a JAR file and name it FndManageImportExportProxy.jar.
7. Use the following code to create another JAR file to initiate the web service:
package com.oracle.xmlns.oracle.apps.fnd.applcore.webservices;
import com.sun.xml.ws.developer.WSBindingProvider;
import java.io.File;
import java.io.IOException;
import java.util.List;
import java.util.Map;
import javax.xml.ws.BindingProvider;
import javax.xml.ws.WebServiceRef;
import javax.xml.ws.handler.Handler;
import oracle.webservices.ClientConstants;
import weblogic.wsee.jws.jaxws.owsm.SecurityPoliciesFeature;
// !THE CHANGES MADE TO THIS FILE WILL BE DESTROYED IF REGENERATED!
// This source file is generated by Oracle tools
// Contents may be subject to change
// For reporting problems, use the following
// Version = Oracle WebServices (11.1.1.0.0, build 130224.1947.04102)
public class FndManageImportExportFilesServiceSoapHttpPortClient
{
@WebServiceRef
private static FndManageImportExportFilesService_Service fndManageImportExportFilesService_Service;
572

Oracle Fusion Cloud HCM
Using Common Features for HCM
Chapter 23
Applications Core Configuration
public static void main(String [] args)
{
System.setProperty("javax.net.ssl.trustStore","<location of truststore which is used in II) to import
the certificates>");
System.setProperty("javax.net.ssl.trustStorePassword", "<truststore password>");
fndManageImportExportFilesService_Service = new FndManageImportExportFilesService_Service();
SecurityPoliciesFeature securityFeatures =
new SecurityPoliciesFeature(new String[] { "oracle/
wss11_username_token_with_message_protection_client_policy",
});
FndManageImportExportFilesService
fndManageImportExportFilesService =
fndManageImportExportFilesService_Service.getFndManageImportExportFilesServiceSoapHttpPort
(securityFeatures);
// Add your code to call the required methods.
WSBindingProvider wsbp = (WSBindingProvider) fndManageImportExportFilesService;
Map<String, Object> requestContext = wsbp.getRequestContext();
requestContext.put(ClientConstants.WSSEC_KEYSTORE_TYPE,"jks");
// Provide location of 'mycompclient-keystore.jks' which was created during Step I)
requestContext.put(ClientConstants.WSSEC_KEYSTORE_LOCATION,"/home/user1/mycompclient-keystore.jks");
requestContext.put(ClientConstants.WSSEC_KEYSTORE_PASSWORD,"password");
requestContext.put(ClientConstants.WSSEC_RECIPIENT_KEY_ALIAS,"cdrmkey");
//Provide user who is having permission to initiate the service
requestContext.put(WSBindingProvider.USERNAME_PROPERTY,"<username>");
requestContext.put(WSBindingProvider.PASSWORD_PROPERTY, "<password>");
String id = invokeUploadFiletoUCMMethod(fndManageImportExportFilesService);
if (id != null) {
invokeUserProfileValuesDataLoader(fndManageImportExportFilesService, new Long(id));
}
}
static String invokeUploadFiletoUCMMethod(FndManageImportExportFilesService
fndManageImportExportFilesService) {
String response = null;
DocumentDetails document = new DocumentDetails();
ObjectFactory objfactory = new ObjectFactory();
document.setFileName(objfactory.createDocumentDetailsFileName("import_data.txt"));
// Provide UCM repository - if repository is fin/tax/import then suffix each value with $ as mentioned
here
document.setDocumentAccount(objfactory.createDocumentDetailsDocumentAccount("fin$/tax$/import$"));
document.setDocumentTitle(objfactory.createDocumentDetailsDocumentTitle("VS"));
document.setContentType(objfactory.createDocumentDetailsContentType("plain/text"));
try {
// Provide location of bulk import data file in prescribed format
byte[] content =
org.apache.commons.io.FileUtils.readFileToByteArray(new File("/home/user1/import_data.txt"));
//System.out.println("File content:" + new String(content, "UTF-8"));
document.setContent(objfactory.createDocumentDetailsContent(content));
} catch (IOException e) {
System.out.println(e.getMessage());
573

Oracle Fusion Cloud HCM
Using Common Features for HCM
Chapter 23
Applications Core Configuration
}
catch(Exception e) {
System.out.println("Exception: "+e.getMessage());
}
try {
response = fndManageImportExportFilesService.uploadFiletoUCM(document);
System.out.println("Response: " + response);
} catch (ServiceException e) {
System.out.println(e.getMessage());
}
return response;
}
static void invokeUserProfileValuesDataLoader(FndManageImportExportFilesService
fndManageImportExportFilesService,
Long id) {
String response;
try {
response = fndManageImportExportFilesService.processUserProfileValuesFile(id);
System.out.println("Response: " + response);
} catch (ServiceException e) {
System.out.println(e.getMessage());
}
}
}
Note: Wherever applicable, replace the values referring to the profile values with those of the lookups or
flexfields value sets.
8. Save the generated output as a JAVA file and name it
FndManageImportExportFilesServiceSoapHttpPortClient.java.
9. Use the JAVA file to build a JAR file, and name it FndManageImportExportClient.jar.
10. Use the following command to run the web service:
java -cp ./FndManageImportExportProxy.jar:./ws.api_1.1.0.0.jar:./FndManageImportExportClient.jar
FndManageImportExportFilesServiceSoapHttpPortClient
Here's a sample program that's a web service client for the asynchronous method deployFlexAsync(). This client
program starts callback client and does the asynchronous call. The required callback web service starts at the line no 58.
Endpoint e = Endpoint.publish(callbackServiceAddress, new ApplicationsCoreSetupServiceResponseImpl());
The callback web service will still be in Running state after the client program execution completes and you need to
close it manually. Or, you can also comment the previous line here and run it in a separate client program.
package com.ws.client;
import com.sun.xml.ws.api.addressing.AddressingVersion;
import com.sun.xml.ws.api.addressing.WSEndpointReference;
import com.sun.xml.ws.developer.WSBindingProvider;
import com.sun.xml.ws.message.StringHeader;
import com.ws.client.callback.ApplicationsCoreSetupServiceResponseImpl;
import com.ws.client.types.DeployFlexAsyncResponse;
import java.util.Map;
import java.util.UUID;
import javax.xml.ws.Endpoint;
import javax.xml.ws.Response;
574

Oracle Fusion Cloud HCM
Using Common Features for HCM
Chapter 23
Applications Core Configuration
import javax.xml.ws.WebServiceRef;
import oracle.webservices.ClientConstants;
import weblogic.wsee.jws.jaxws.owsm.SecurityPolicyFeature;
// !THE CHANGES MADE TO THIS FILE WILL BE DESTROYED IF REGENERATED!
// This source file is generated by Oracle tools
// Contents may be subject to change
// For reporting problems, use the following
// Version = Oracle WebServices (11.1.1.0.0, build 150302.2135.1.30348)
public class ApplicationsCoreSetupServiceSoapHttpPortClient
{
@WebServiceRef
private static ApplicationsCoreSetupService_Service applicationsCoreSetupService_Service;
private static final AddressingVersion WS_ADDR_VER = AddressingVersion.W3C;
public static void main(String [] args) throws InterruptedException {
applicationsCoreSetupService_Service = new ApplicationsCoreSetupService_Service();
SecurityPolicyFeature[] features = new SecurityPolicyFeature[]
{ new SecurityPolicyFeature("policy:oracle/wss_username_token_client_policy") };
ApplicationsCoreSetupService applicationsCoreSetupService =
applicationsCoreSetupService_Service.getApplicationsCoreSetupServiceSoapHttpPort(features);
// Get the request context to set the outgoing addressing properties
WSBindingProvider wsbp = (WSBindingProvider)applicationsCoreSetupService;
Map<String, Object> requestContext = wsbp.getRequestContext();
requestContext.put(ClientConstants.WSSEC_KEYSTORE_TYPE, "jks");
requestContext.put(ClientConstants.WSSEC_KEYSTORE_LOCATION,
"/scratch/vgarikip/view_storage/work/keys/mycompclient-keystore.jks");
requestContext.put(ClientConstants.WSSEC_KEYSTORE_PASSWORD,
"mypassword1");
requestContext.put(ClientConstants.WSSEC_RECIPIENT_KEY_ALIAS,
"cdrmkey");
requestContext.put(WSBindingProvider.USERNAME_PROPERTY,
"app_impl_consultant");
requestContext.put(WSBindingProvider.PASSWORD_PROPERTY, "mypassword1");
String callbackServiceAddress = "http://<server>:<port>/TestAsyncMani-Project1-context-root/
ApplicationsCoreSetupServiceResponseImplPort";
Endpoint e = Endpoint.publish(callbackServiceAddress, new ApplicationsCoreSetupServiceResponseImpl());
WSEndpointReference replyTo = new WSEndpointReference(callbackServiceAddress, WS_ADDR_VER);
String uuid = "uuid:" + UUID.randomUUID();
wsbp.setOutboundHeaders( new StringHeader(WS_ADDR_VER.messageIDTag, uuid),
replyTo.createHeader(WS_ADDR_VER.replyToTag));
applicationsCoreSetupService.deployFlexAsync("PER_CITIZENSHIPS_DFF", "DFF",
false); //.deployPatchedFlexAsync(mode, pCustomizationId, pCustomizationSetLoc);
System.out.println("####END OF WS CALL");
Thread.sleep(10000);
// Add your code to call the desired methods.
}
575

Oracle Fusion Cloud HCM
Using Common Features for HCM
Chapter 23
Applications Core Configuration
}
Example callback web service start utility if you comment line no 58 in the previous program:
package com.ws.client;
import com.ws.client.callback.ApplicationsCoreSetupServiceResponseImpl;
import javax.xml.ws.Endpoint;
public class RunCallbackServtest {
public RunCallbackServtest() {
super();
}
public static void main(String[] args) throws InterruptedException {
RunCallbackServtest runCallbackServtest = new RunCallbackServtest();
runCallbackServtest.runServ();
}
private void runServ() throws InterruptedException {
System.out.println("$$$$$ BEFORE Server Start ###################");
String callbackServiceAddress = "http://<server>:<port>/TestAsyncMani-Project1-context-root/
ApplicationsCoreSetupServiceResponseImplPort";
Endpoint e = Endpoint.publish(callbackServiceAddress, new ApplicationsCoreSetupServiceResponseImpl());
System.out.println("$$$$$ AFTER Server Start ###################");
}
}
Define Lookups
Overview of Lookups
Lookups are lists of values in applications. You define a list of values as a lookup type comprising a set of lookup codes,
each code's translated meaning, and optionally a tag.
On the UI, users see the list of translated meanings as the values available for selection. Lookups provide a means of
validation and lists of values where valid values appear on a list with no duplicate values. For example, an application
might store the values Y and N in a column in a table, but when displaying those values in the user interface, Yes or No
(or their translated equivalents) should be available for users to select. For example, the two lookup codes Y and N are
defined in the REQUIRED_INDICATOR lookup type.
Note: Don't include spaces in lookup codes. Use the underscore character (_) to separate the words if needed. For
example, instead of creating the lookup code as DEV PROGRAM, create it as DEV_PROGRAM.
The following table contains an example of a lookup type for marital status (MAR_STATUS) that has lookup codes for
users to specify married, single, or available legal partnerships.
576

Oracle Fusion Cloud HCM
Using Common Features for HCM
Chapter 23
Applications Core Configuration
Lookup Code Meaning Tag
M
Married
Not applicable
S
Single
Not applicable
R
Registered Partner
+NL
DP
Domestic Partner
-FR, AU
In this case, tags are used for localizing the codes. All legislations list Married and Single. Only the Dutch legislation lists
Registered Partner. And all legislations except France and Australia also list Domestic Partner.
When managing lookups, you need to understand the following.
• Using lookups in applications
• Configuration levels
• Accessing lookups
• Enabling lookups
• The three kinds of lookups: standard, common, and set-enabled
Using Lookups in Applications
Use lookups to provide validation or a list of values for a user input field in a user interface.
An example of a lookup used for validation is a flexfield segment using a table-validated value set with values from a
lookup type. An example of a lookup in a list of values is a profile option's available values from which users select one
to set the profile option. Invoice Approval Status gives the option of including payables invoices of different approval
statuses in a report. The lookup code values include All, so that users can report by all statuses: Approved, Resubmitted
for approval, Pending or rejected, and Rejected.
Configuration Level
The configuration level of a lookup type determines whether the lookups in that lookup type can be edited. This applies
data security to lookups.
Some lookup types are locked so no new codes and other changes can be added during implementation or later, as
needed. Depending on the configuration level of a lookup type, you may be able to change the codes or their meanings.
Some lookups are designated as extensible, so new lookup codes can be created during implementation, but the
predefined lookup codes can't be modified. Some predefined lookup codes can be changed during implementation or
later, as needed.
The configuration levels are user, extensible, and system. The following table shows the lookup management tasks
permitted at each configuration level.
Permitted Task User Extensible System
Deleting a lookup type
Yes
No
No
Inserting new codes Yes Yes No
577

Oracle Fusion Cloud HCM
Using Common Features for HCM
Chapter 23
Applications Core Configuration
Permitted Task User Extensible System
Updating start date, end date, and
enabling the lookup code
Yes
Yes, only if the code isn't
predefined data
No
Deleting codes
Yes
Yes, only if the code isn't
predefined data
No
Updating tags
Yes
No
No
Updating module
Yes
No
No
Predefined data means LAST_UPDATED_BY = SEED_DATA_FROM_APPLICATION.
If a product depends on a lookup, the configuration level must be system or extensible to prevent deletion.
Once the configuration level is set for a lookup type, it can't be modified. The configuration level for newly created
lookup types is by default set at the User level.
Access to the REST Resources
Users can retrieve information about lookups using the following REST resources:
• standardLookupsLOV
• commonLookupsLOV
• setEnabledLookupsLOV
• genericLookupsLOV
However, you can control whether a lookup is a part of the LOV or not. On the UI, for each lookup you can specify the
REST Access Secured value that in turn determines whether it's included in the response or not. These values are:
• Anonymous: Lookup is available to a user having anonymous role or authenticated role.
• Authenticated: Lookup is available to a user having only the authenticated role.
• Secure: Lookups aren't available to users as part of generic REST Resources (Standard, Common, or Set-
Enabled). To make it available, your security administrator must assign a specific function security policy for
each lookup type to a role and assign that role to the selected users.
Note: The function security policy is provided only for predefined lookup types.
For all lookups, the default value is set to Secure. So, if you want to make the lookup available to users through any of
those resources, you must change the value to Authenticated or Anonymous, depending on who needs to access that
information.
Standard, Common, and Set-Enabled Lookups
The following table shows the available types of lookups.
578

Oracle Fusion Cloud HCM
Using Common Features for HCM
Chapter 23
Applications Core Configuration
Lookup Type Description
Standard
Lists the available codes and translated meanings.
Set-enabled
Associates a reference data set with the lookup codes.
Common
Legacy lookups or lookups that have attributes.
Standard lookups are the simplest form of lookup types consisting only of codes and their translated meaning. They
differ from common lookups only in being defined in the standard lookup view. Common lookups exist for reasons
of backward compatibility and differ from standard lookups only in being defined in the common lookup view. These
can also be lookups having attribute columns. Set-enabled lookup types store lookup codes that are enabled for
reference data sharing. At runtime, a set-enabled lookup code is visible because the value of the determinant identifies
a reference data set in which the lookup code is present.
Accessing Lookups
Standard, set-enabled, and common lookups are defined in the Standard, Set-enabled, and Common views,
respectively. Applications development might define lookups in an application view to restrict the UI pages where they
might appear.
In lookups management tasks, lookups might be associated with a module in the application taxonomy to provide
criteria for narrowing a search or limiting the number of lookups accessed by a product specific task such as Manage
Purchasing Lookups.
Enabling Lookups
A lookup type is reusable for attributes stored in multiple tables.
Enable lookups based on the following.
• Selecting an Enabled check box
• Specifying an enabled start date, end date, or both
• Specifying a reference data set determinant
If you make changes to a lookup, users must sign out and back in before the changes take effect. When defining a list of
values for display rather than validation, limit the number of enabled lookup codes to a usable length.
To view the predefined lookups and their lookup codes, use the following tasks in the Setup and Maintenance work
area:
• Manage Standard Lookups
• Manage Common Lookups
• Manage Set-Enabled Lookups
Translating Lookups
You can translate the lookups that you defined to the preferred language(s) without changing the language session
of the application. Use the translation option available on the lookup code table. By default, for each lookup, all the
permitted language rows in the translator dialog box appear in the source language (the current session language).
When you edit a particular language entry, you can modify the translated meaning and description to the language in
579

Oracle Fusion Cloud HCM
Using Common Features for HCM
Chapter 23
Applications Core Configuration
which you want the lookup to appear. Once the updates are made, the end-users can view the lookup in the translated
text.
Note: You can add the translation for only as many languages as are permitted by the administrator. The functionality
to limit the number of languages displayed on the dialog box is controlled through the Translation Editor Languages
profile option. It can be set at the SITE or USER level. If nothing is specified, all active languages are displayed.
Deleting Lookup Types and Lookup Codes
You can delete lookup types and lookup codes from the lookups management tasks in the Setup and Maintenance
work area. For example, you can delete lookups that are part of the Purchasing module, from the Manage Purchasing
Lookups task in the Setup and Maintenance work area. Select the required lookup type to see the lookup codes
associated with it. To delete a lookup code, select the required code and click the Delete icon. To delete a lookup type,
similarly, select the required lookup type and click the Delete icon.
You can also use REST resources to delete lookup types and lookup codes.
• For more information about deleting a lookup type using REST resources, see the Delete a standard lookup
section in the REST API for Common Features in Oracle Fusion Cloud Applications guide.
• For more information about deleting a lookup type, see the Delete a lookup code section in the REST API for
Common Features in Oracle Fusion Cloud Applications guide.
Here are a few things to know about deleting lookup types and codes:
• Certain lookup types and codes can’t be deleted, for example, predefined lookup types and codes can’t be
deleted.
• You can’t delete lookup codes in bulk. Instead, you can delete an entire lookup type.
Related Topics
•
Example of a Set-Enabled Lookup
•
What's the difference between a lookup type and a value set?
•
Example of a Standard Lookup
•
How can I access predefined lookups?
•
Enter or Edit Translated Text
•
Create Roles in the Security Console
Example of a Standard Lookup
Creating a new standard lookup involves creating or selecting a lookup type containing the lookup code. The task also
involves determining appropriate values for the lookup codes and their meanings.
You can create or edit lookup codes only if the configuration level for that lookup type supports it.
580
Oracle Fusion Cloud HCM
Using Common Features for HCM
Chapter 23
Applications Core Configuration
Creating a Lookup Type Called COLORS
Your enterprise needs a list of values to be used as different statuses on a process. Each status is indicated using a
color. Therefore, you create a lookup type called COLORS. The following table lists a mapping between the lookup type
parameters and the actual values assigned to those parameters to create the required list of values.
Lookup type parameters Value
Lookup type name
COLORS
Meaning
Status
Description
Status by color
Module
Oracle Fusion Middleware Extensions for Oracle Application
After you define the lookup type, you need to define the lookup codes and their related details. The following table lists
the lookup codes you define for the COLORS lookup type.
Lookup Code Meaning Enabled Display Sequence
BLUE
Urgent
No
4
RED
Stop
Yes
1
GREEN
Proceed
Yes
3
YELLOW
Check
Yes
2
The Resulting Data Entry List of Values
Only the enabled lookup codes appear in the list of values for the COLORS lookup type. You must select one of them to
complete the activity.
The following table lists the meanings and the codes that were enabled. They appear in the order of the defined display
sequence.
Meaning Lookup Code
Stop
RED
Check
YELLOW
Proceed
GREEN
581

Oracle Fusion Cloud HCM
Using Common Features for HCM
Chapter 23
Applications Core Configuration
The BLUE lookup code wasn't enabled and doesn't appear in the list of values. The display sequence of values in the list
of values is alphabetic, unless you enter a number manually to determine the order of appearance. Number 1 indicates
the first value that appears in the list. Only lookups that are enabled and active between start and end dates are visible.
The Transaction Table
When users enter one of the values from the list of values for the lookup type COLORS, the transaction table records
the lookup code. The following table contains an example, where the lookup code is stored in the Status column of the
transaction table.
Transaction number User name Status
1
Jane
RED
2
Bob
YELLOW
3
Alice
BLUE
The status for one user is BLUE because at the time they entered a value, BLUE was enabled. Disabling a lookup code
doesn't affect transaction records in which that code is stored. Data querying and reporting have access to disabled
lookup codes in transaction tables.
Related Topics
•
What's a lookup tag used for?
•
What's the difference between a lookup type and a value set?
•
Why can't I see my lookup types?
•
How can I edit lookups?
Example of a Set-Enabled Lookup
Creating a new set-enabled lookup is similar to creating a standard lookup with the addition of specifying a reference
data set determinant for the lookup codes.
The reference data set for a set-enabled lookup code is part of its foreign key. This is unlike other set-enabled entities.
Use the Manage Set Assignments task to define and manage reference data set assignments. Note that you can create
or edit lookup codes only if the configuration level for that lookup type supports it.
Selecting a Reference Group for a Set-Enabled Lookup Type
Specify a reference group for a set-enabled lookup type to indicate which reference data set assignments are available
for its lookup codes. For example a COLORS lookup type might be set-enabled for a Countries reference group that
includes the US and EU reference data set assignments.
582

Oracle Fusion Cloud HCM
Using Common Features for HCM
Chapter 23
Applications Core Configuration
Selecting a Reference Data Set for a Set-Enabled Lookup
The reference data set determines which lookup code is included in the list of values. For example, there are two
references data sets - one for the US and the other for EU. If a COLORS lookup type contains RED, YELLOW, ORANGE,
and GREEN lookup codes, you can enable one RED lookup code from the US reference data set and another RED lookup
from the EU reference data, each lookup code having different meanings.
The following table elaborates the example, how these two reference data sets (US and EU) contain one lookup code
that's common, but each differing in its lookup meaning.
Reference Data Set Lookup Code Lookup Meaning
US
RED
Red
US
YELLOW
Yellow
US
GREEN
Green
EU
RED
Rouge
EU
ORANGE
Orange
Some lookup codes may be unique to one or another reference data set as the ORANGE lookup is to the EU reference
data set in the example.
In another example in the following table, a lookup type called HOLD_REASON provides a list of reasons for putting a
contract renewal on hold. Reference data sets determine which codes are included in the Hold Reason list of values.
Reference Data Set Lookup Code Lookup Meaning
US
SEC
SEC Compliance Review
US
DIR
Needs Director's Approval
US
VP
Needs Vice President's Approval
CHINA
CSRC
Pending China Securities Regulatory
Commission Review
CHINA
PR
Needs President's Approval
COMMON
REQUESTED
Customer Request
583

Oracle Fusion Cloud HCM
Using Common Features for HCM
Chapter 23
Applications Core Configuration
Referring to the example in the table, when end-users place a contract on hold in the US business unit, the three reason
codes in the US set are available. When placing a contract on hold in the China business unit, the two codes in the China
set are available.
Related Topics
•
Example of a Standard Lookup
Import Lookups
On each page pertaining to the tasks of managing the Standard, Common, and Set Enabled lookups, use the Import
option to import the lookup type and lookup code information.
Prerequisite
The separate files containing the lookup types and lookup codes are already available in the document repository of
Oracle WebCenter Content.
Importing Lookups
To import lookups:
1. In the Setup and Maintenance work area, go to the Manage Standard Lookups task. Depending on the lookup
you want to import, you may select the other lookup tasks.
2. In Search Results, from the Actions menu, select Import.
The Import Lookups dialog box appears.
3. Select the WebCenter Content account to which the files were uploaded.
4. Enter the names of the separate files containing the lookup type and lookup code information. The names here
must match with the names of the files uploaded to the selected account.
5. Click Upload. The lookup details are imported.
Note: If the import fails, click the link to the log file on the confirmation dialog box and examine the cause of
failure.
Related Topics
•
File Format for Importing Lookups
•
Import Flexfields, Lookups, or Profile Values Using Web Services
File Format for Importing Lookups
You can import lookups to your application by creating separate text files containing lookup types and lookup codes.
You can then upload these files to the Oracle WebCenter Content document repository.
Here are a few things that you need to keep in mind while creating these files:
• Use a vertical bar or pipe ( | ) as a delimiter between fields for both the header and the value rows.
584

Oracle Fusion Cloud HCM
Using Common Features for HCM
Chapter 23
Applications Core Configuration
• According to the Oracle WebCenter Content specification, set the file encoding to UTF-8 without the Byte Order
Mark (BOM).
• The first line in the file must be a header line, and the files must look exactly the same as shown in the sample
file.
The following sections contain details about the specific lookup types and codes.
Prerequisite
You must have worked with lookups in Oracle Fusion Cloud applications.
Standard and Common Lookups
The lookup types and codes are similar for standard and common lookups. To create a file containing the lookup types,
include the following headers:
Header Description Required or Optional
LookupType This value displays the lookup type. Required
Meaning This value displays the name of the lookup type. Required
Description This value displays the description of the lookup
type.
Optional
ModuleType This value displays the module associated with
the lookup type.
Required
ModuleKey This value displays the module code. Required
Here's a sample file with the header values at the beginning of the file, followed by line entries of the two lookup types.
For importing several lookup types, add more line entries in a similar format.
LookupType|Meaning|Description|ModuleType|ModuleKey
AFLOG_22APR_1|Log1|AFLOG_desc_1|APPLICATION|FND
PROD_22APR_2|Product1|PROD_desc_2|APPLICATION|FND
To create a file containing the lookup codes, include the headers specified in this table:
Header Description Required or Optional
LookupType This value displays the lookup type. Required
LookupCode This value displays the lookup code associated
with the lookup type.
Required
DisplaySequence This value displays the sequence in which the
lookup code appears in the list of values.
Required
EnabledFlag This value lets you enable or disable the display
status of the lookup code:
• Y: Enable the display status of the lookup
code
• N: Disable the display status of the lookup
code
Required
585
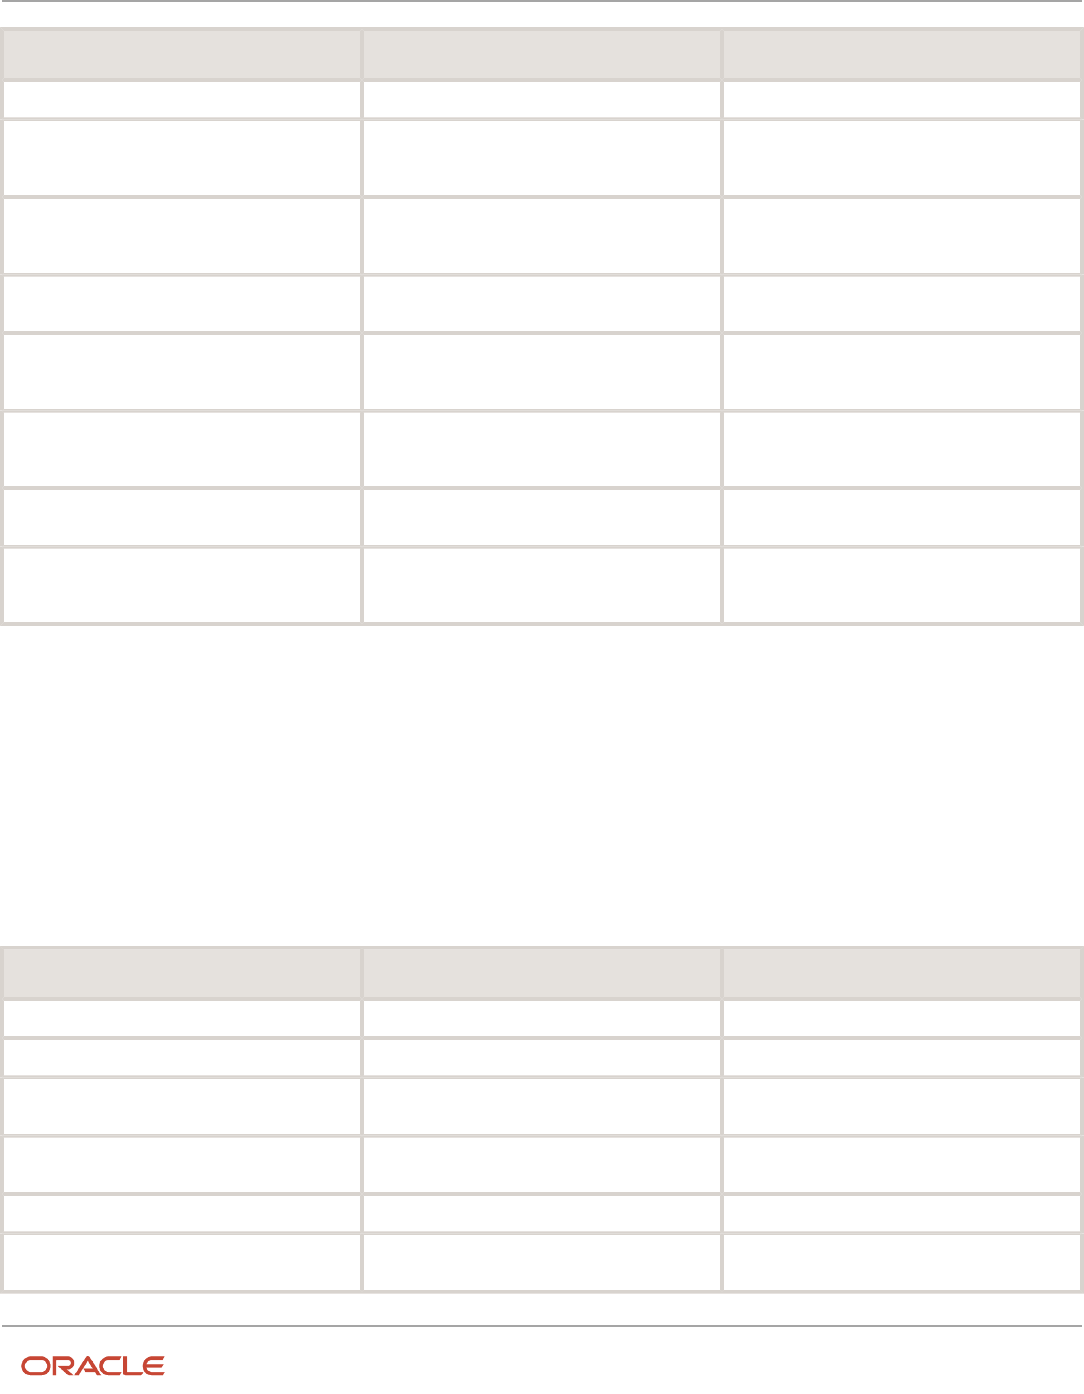
Oracle Fusion Cloud HCM
Using Common Features for HCM
Chapter 23
Applications Core Configuration
Header Description Required or Optional
Meaning This value displays the name of the lookup code. Required
StartDateActive This value displays the beginning of the date
range during which the lookup code is active and
visible on the page. The format is dd/MM/yyyy.
Optional
EndDateActive This value displays the end of the date range
during which the lookup code is active and
visible on the page. The format is dd/MM/yyyy.
Optional
Description This value displays the description of the lookup
code.
Optional
Tag This value indicates any tag associated with
the lookup code that you can use for a quick
reference or retrieval of information.
Optional
Seg This value displays the API name used for a
global segment that you can define for the
descriptive flexfield associated with the lookup.
Optional
CONTEXT_ATTRIBUTE This value displays the context value specified in
the CSV file for a particular descriptive flexfield.
Optional
ctxSeg This value displays the name of the API for a
context-sensitive segment defined for a context
attribute.
Optional
Here's a sample file that contains two lookup codes:
LookupType|LookupCode|DisplaySequence|EnabledFlag|StartDateActive|EndDateActive|Meaning|Description|Tag|Seg|
CONTEXT_ATTRIBUTE|ctxSeg
TASK_22APR_1|Code1_1|1|Y|25/12/2014|25/5/2015|TASK_22apr_1|Task_desc_1|Tag1_1|testSeg1|TEST_CTX1|ctx1Seg1
TASK_22APR_1|Code1_2|2|N|25/1/2014|25/11/2015|TASK_22apr_2|Task_desc_2|Tag1_2|testSeg1TEST_CTX1|ctx1Seg1
TASK_22APR_2|code2_1|3|N|25/12/2012|25/7/2015|TASK_22qpr_2_1|Task_desc_2|tag2_1|testSeg2|TEST_CTX2|ctx2Seg2
TASK_22APR_2|code2_2|3|Y|25/12/2012|25/7/2015|TASK_22qpr_2_2|Task_desc_2_2|tag2_2|testSeg2|TEST_CTX2|
ctx2Seg2
Set Enabled Lookups
To create a file containing the set enabled lookup types, include the headers specified in this table:
Header Description Required or Optional
LookupType This value displays the lookup type. Required
Meaning This value displays the name of the lookup type. Required
Description This value displays the description of the lookup
type.
Optional
ModuleType This value displays the module associated with
the lookup type.
Required
ModuleKey This value displays the module code. Required
ReferenceGroupName This value displays the name of the reference
group that contains the reference data set.
Required
586

Oracle Fusion Cloud HCM
Using Common Features for HCM
Chapter 23
Applications Core Configuration
Here's a sample that contains two set enabled lookup types:
LookupType|Meaning|Description|ModuleType|ModuleKey|ReferenceGroupName
CODE_22APR_1|CODE_22apr_1|Code_desc_1|APPLICATION|FND|BU_APAC
CODE_22APR_2|CODE_22qpr_2|Code_desc_2|APPLICATION|FND|BU_APAC
To create a file containing the set enabled lookup codes, include the headers specified in this table:
Header Description Required or Optional
LookupType This value displays the lookup type. Required
LookupCode This value displays the lookup code associated
with the lookup type.
Required
DisplaySequence This value displays the sequence position at
which the lookup code appears in the list of
values.
Required
EnabledFlag This value lets you enable or disable the option
to view the display:
• Y: Enable the option to view the display
• N: Disable the option to not view the display
Required
Meaning This value displays the name of the lookup code. Required
SetName This value displays the name of the reference
data set.
Required
StartDateActive This value displays the beginning of the date
range during which the lookup code is active and
visible on the page. The format is dd/MM/yyyy.
Optional
EndDateActive This value displays the end of the date range
during which the lookup code is active and
visible on the page. The format is dd/MM/yyyy.
Optional
Description This value displays the description of the lookup
code.
Optional
Tag This value indicates any tag associated with
the lookup code that you can use for a quick
reference or retrieval of information.
Optional
Here's a sample file with the header values at the beginning and lists four set enabled lookup codes. For importing
several lookup codes, add more entries in the same format.
LookupType|LookupCode|DisplaySequence|EnabledFlag|StartDateActive|EndDateActive|Meaning|Description|Tag|
SetName
DATA_22APR_1|Code1_1|1|Y|25/12/2014|25/5/2015|DATA_22apr_1|Data_desc_1|Tag1_1|TEST SET CODE 2
DATA_22APR_1|Code1_2|2|N|25/1/2014|25/11/2015|DATA_22apr_2|Data_desc_2|Tag1_2|TEST SET CODE 3
DATA_22APR_2|code2_1|3|N|25/12/2012|25/7/2015|DATA_22qpr_2_1|Data_desc_2|tag2_1|TEST SET CODE 2
DATA_22APR_2|code2_2|3|Y|25/12/2012|25/7/2015|DATA_22qpr_2_2|Data_desc_2_2|tag2_2|TEST SET_ERR_CODE_Z
587

Oracle Fusion Cloud HCM
Using Common Features for HCM
Chapter 23
Applications Core Configuration
Related Topics
•
Overview of Lookups
•
Import Lookups
•
Overview of Files for Import and Export
•
Guidelines for File Import and Export
FAQs for Define Lookups
How can I edit lookups?
On any of the Manage Lookups pages, you can edit the existing lookup codes of a lookup type or add new lookup
codes. You can edit lookups using the following tasks in the Setup and Maintenance work area:
• Manage Standard Lookups
• Manage Common Lookups
• Manage Set Enabled Lookups
Each task contains a predefined set of lookup types that are classified and stored. Open a task to search and edit the
required lookup. However, you may not be able to edit a lookup if its configuration level doesn't support editing.
Why can't I see my lookup types?
Lookup types are classified using tasks that involve a group of related lookups, such as Manage Geography Lookups.
Each task gives you access only to certain lookup types.
However, the generic tasks provide access to all lookups types of a kind, such as common lookups associated with the
Manage Common Lookups task. If the lookup types in an application are available in the standard, common, or set-
enabled lookups view, they're central to an application. However, lookup types defined for a specific application are
managed using the task for that application.
What's the difference between a lookup type and a value set?
A lookup type consists of lookups that are static values in a list of values. Lookup code validation is a one to one match.
A table-validated value set may consist of values that are validated through a SQL statement, which allows the list of
values to be dynamic. The following table brings out the differences between a lookup type and a value set.
Tip: You can define a table-validated value set on any table, including the lookups table. Thus, you can change a
lookup type into a table-validated value set that can be used in flexfields.
588

Oracle Fusion Cloud HCM
Using Common Features for HCM
Chapter 23
Applications Core Configuration
Area of Difference Lookup Type Value Set
List of values
Static
Dynamic if the list is table-validated
Validation of values
One to one match of meaning to code included
in a lookup view, or through the determinant of
a reference data set
Validation by format or inclusion in a table
Format type of values
char
varchar2, number, and so on
Length of value
Text string up to 30 characters
Any type of variable length from 1 to 4000
Duplication of values
Never. Values are unique.
Duplicate values allowed
Management
Both administrators and end-users manage
these, except system lookups or predefined
lookups at the system configuration level, which
can't be modified.
Usually administrators maintain these, except
some product flexfield codes, such as GL for
Oracle Fusion General Ledger that the end-
users maintain.
Both lookup types and value sets are used to create lists of values from which users select values.
A lookup type can't use a value from a value set. However, value sets can use standard, common, or set-enabled
lookups.
What's a lookup tag used for?
A tag is an additional label attached to the lookup. Tags are user-defined and can be grouped depending on the user's
requirement to make search convenient and effective.
The same tag may be used across lookup categories. In such cases, tags are used as a refined search criterion to filter
information across several groups and get the search results.
Note: Lookup tags are optional descriptions of attribute values. These descriptions aren’t validated. In some
product-specific implementations, tags are used for specific purposes. For more information, see product-specific
documentation.
Related Topics
•
Overview of Lookups
•
Considerations for Deleting Tags from Lookup Codes
How can I search for a specific lookup code?
Use the Query By Example functionality to sort through hundreds of lookup codes for a lookup type, and display a
specific lookup code.
589

Oracle Fusion Cloud HCM
Using Common Features for HCM
Chapter 23
Applications Core Configuration
Enter the first few characters of the lookup code value in any of the relevant fields to filter the records.
Note: The search functionality is case sensitive.
Related Topics
•
How do I update existing setup data?
•
Use Query By Example
Manage Messages
Messages
Messages provide users with information about business or application errors or warnings.
Typically, messages inform the users about the following:
• Missing or incorrect data
• Status of an application, page, or a business object
• Status of an ongoing process
• Result of a user action
Besides notifying users about the problem, messages provide guidance to users on taking corrective action. Messages
also warn users about the consequences of a certain action.
Oracle provides a set of predefined messages that are stored in a message dictionary. You can create additional
messages or modify the existing ones using the Manage Messages task in the Setup and Maintenance work area.
Note: Don't delete predefined messages unless you're sure that they aren't used anywhere.
Message Dictionary
The message dictionary stores messages that the application requires at run time. Messages are predefined for specific
applications and modules, but a few are common messages that can be used in any application or module.
When you create messages, use the message text and the following components to cover additional details addressing
users and help desk personnel:
• User Details: A detailed explanation of the message short text meant for users.
• Administrator Details: Details of the identified problem meant for the help desk personnel. The end users don't
see this text.
• Cause: An end-user version of the cause of error.
• User Action: Instructions to users for addressing the identified problem. Where there is no guidance for end
users, they must approach the help desk.
• Administrator Action: Corrective action that help desk personnel must take to correct the problem. This
information isn't available to the end users.
590

Oracle Fusion Cloud HCM
Using Common Features for HCM
Chapter 23
Applications Core Configuration
Related Topics
•
Message Types
•
Create and Edit Messages
Message Types
All messages must be associated with a message type. You can select the message type based on the message severity.
The available message types are:
• Error
• Warning
• Information
• UI String
Error Messages
Use the Error message to inform users about, for example, entering incorrect data or performing actions that trigger
validation. Error messages also inform users how to correct the situation so that they can continue with their task.
For example: You can't specify a task without specifying the project.
Error messages also tell users about any serious problem with the application or process, and when they must seek
assistance from the help desk. Some error messages trigger incidents or logs and have a mechanism to notify the help
desk automatically.
Warning Messages
Use the Warning message type to inform users about an application condition or a situation that might require their
decision before they can continue.
Warning messages:
• Describe the reason for the warning and potential consequence of the selected or intended user action.
• Can be either a question or a statement.
For example: You delete the primary user. Do you want to continue?
The message is usually followed by Yes and No buttons.
Information Messages
The Information message type tells users about changes in the application, a page, or a business object. These
messages aren't triggered by users, and they don't have to take any immediate action in response.
For example: No events have been started or processed for this employee.
Use the Information message type to communicate information that's neither an error nor a warning.
591

Oracle Fusion Cloud HCM
Using Common Features for HCM
Chapter 23
Applications Core Configuration
UI String Messages
Use the UI string message type to store shorter messages such as UI prompts, titles, or translated text, in the message
dictionary.
Related Topics
•
Message Groups
Message Groups
You can group messages by severity to internally define logging and classifying incident policies. You can group by
category based on the functionality or program.
Category and severity values don't appear in logging entries, incidents, or on the UI.
Note: The values in both options are predefined lookups but you can modify them. However, the maximum size of
this field is 30 characters.
To group the messages, in the Setup and Maintenance work area, use the Manage Messages task.
Group by Category
Use this option to group messages that relate to one functionality, such as a scheduled process, together into one
category. Select one of the predefined categories to enable automatic incident creation when the error message
activates. By default, the following categories are available:
• Product: Issues related to product functionality, setup, and maintenance. Such messages are typically intended
for functional administrators or product super users.
• System: Issues concerning the application, database, technology stack, and so on. Such messages are typically
intended for technical users such as application administrators or database administrators.
• Security: Issues concerning permissions, access, compliance, passwords, and so on. Such messages are
typically intended for security administrators.
Group by Severity
This grouping attribute is very specific and indicates the severity of the message. You must set the severity to High
to enable automatic incident creation for the message. The following are predefined values, but you can add more if
required.
• High: Used for serious messages that completely stop the progress of an important business process or affect
a large user community, and require help desk's attention. Use this option to enable implicit incident creation
for the message.
• Medium: Used for less severe and more isolated messages.
• Low: Used when you can't determine whether the message has a negative impact on end users or business
processes.
592

Oracle Fusion Cloud HCM
Using Common Features for HCM
Chapter 23
Applications Core Configuration
Logging and Incidents
Select the Logging Enabled check box to include the UI message in the stored log file. To enable automatic incident
creation when the error message appears on the UI, set the severity to High.
Incidents collect information about the application errors for which users may require assistance from help desk. An
incident contains information about the state of the application at the time the problem occurred. Help desk can use the
information in the incidents to resolve the problems.
Related Topics
•
Overview of Lookups
•
What's an incident?
•
Run Diagnostic Tests
•
Run Diagnostic Tests to Verify, Troubleshoot, and Analyze
Create and Edit Messages
You can create messages or edit the predefined messages stored in the message dictionary.
Creating a Message
To create a message, perform the following steps:
1. In the Setup and Maintenance work area, go to the Manage Messages task.
2. On the Manage Messages page, click the New icon.
3. On the Create Message page, enter details in each section.
4. In the Message Properties section, do these.
a. Enter a unique message name that helps you find the messages you create and avoid name conflicts
with predefined messages. Use underscore as a separator if the name contains multiple parts.
b. Select the application and module to associate the message with.
c. Enter a unique number that can be used as an identifier for the message. Users can quote this number
when they contact the help desk for assistance.
Note: You can use any number between 10,000,000 and 10,999,999. This number range is allocated
for the messages you create. At runtime, this number appears along with the application code after the
message text, for example FND-2774.
d. In the Translation Notes field, enter a description of the message indicating its use.
e. Select the relevant message type, category, and severity.
f. Select the Logging Enabled check box to create incidents or logs when messages appear on the UI.
593

Oracle Fusion Cloud HCM
Using Common Features for HCM
Chapter 23
Applications Core Configuration
5. In the Message Text section, do these.
a. In the Short Text field, provide the actual message text that appears on the page at runtime.
The short text can include tokens that are placeholders for displaying dynamic values at runtime.
However, to support easy translation, keep the message length (including values of tokens) within 160
characters in American English.
b. In the User Details field, enter information for the users to know why the message appeared. You can also
include information for the users to resolve the issue themselves.
If your Short Text component has tokens that expand the text beyond the 160-character limit, move that
portion of text here.
c. In the Administrator Details field, provide a detailed technical explanation of the message. This field is
only visible to the help desk.
d. In the Cause field, provide a concise explanation of why the message appears. This text is visible to the
users.
This information is optional and is only applicable to messages of type Error and Warning. However, if
you mention the cause, you must mention in the User Action field the action that users must take.
e. In the User Action field, enter the user action to guide the users with steps to respond to the message
and complete the task.
f. In the Administrator Action field, provide information that the help desk can use to resolve the problem.
6. In the Message Tokens section, define tokens that you want to use in this message.
7. Click Save and Close.
Editing a Message
You can edit a predefined message or a message that you created.
To edit a message, search for a message on the Manage Messages page and perform the following steps:
1. Select the existing message and click the Edit icon.
2. On the Edit Message page, modify the existing details according to the instructions provided in the Creating a
Message procedure.
Note: Don't edit the message number for predefined messages.
3. Click Save and Close.
While creating and editing messages, you can translate the message details to the preferred languages without
changing the language session of the application. To specify the translations in all the enabled language rows, use the
Translation Editor option. Once the updates are made, users can view the translated text for the specific details.
Related Topics
•
Message Types
•
Message Groups
•
Use of Tokens in Messages
•
How can I make message components visible only to specific users?
•
Enter or Edit Translated Text
594

Oracle Fusion Cloud HCM
Using Common Features for HCM
Chapter 23
Applications Core Configuration
Use of Tokens in Messages
Certain messages must display variable information at run time to help users clearly relate to the actual data and
perform the required action.
Instead of writing a unique message for every possible situation, you can use tokens to display the variable values at run
time.
Tokens are programmatic parts of message text that are placed within curly brackets when creating the message.
Tokens serve as placeholders for the actual data. At run time, tokens dynamically display the actual text or value in the
message, making a message specific to the situation. For example, the message "Enter an effective date that's the same
as or later than {MATURITY_DATE}" contains the token {MATURITY_DATE}. At run time, instead of the token, the represented
value (the actual date) appears. Thus, users see the message "Enter an effective date that's the same as or later than 25-
APR-2015".
Use the Manage Messages task in the Setup and Maintenance work area to create and manage tokens. You must edit
a message to define tokens for it. You can create tokens for a message and also delete them. However, you can't edit or
delete the predefined tokens.
Token Definition
To define a token, you must provide the following information:
• A unique name for the token.
• The type of data that the token replaces at run time. Available types are Date, Number, or Text.
• A description about what the token represents at run time.
Guidelines
Follow these general guidelines while defining tokens:
• Use curly brackets and all uppercase letters for the token names.
• Use underscore as a separator for a name containing two words or more.
• Don't use a space between words.
The following table contains specific guidelines for each token data type.
Data Type Guideline
Text
Use tokens for substituting any variable text element that qualifies as a noun.
Number
Plan carefully while using tokens for numbers especially, where a token could refer to either a singular
or a plural number. You can use tokens for numbers representing an order, customer, or any other
business object bearing a numeric value.
Date
Clearly define the context of the date, such as the start date, or end date, or a date range.
595

Oracle Fusion Cloud HCM
Using Common Features for HCM
Chapter 23
Applications Core Configuration
Common Messages
Message names that begin with FND_CMN are common messages. Each common message can appear in multiple
places in any product family across Oracle Applications Cloud.
For example, the FND_CMN_NEW_SRCH message can be used for any search to indicate that no results were found.
Common messages of type error or warning are part of the message dictionary.
Creating and Editing Common Messages
You can create common messages for use in multiple places. However, ensure that you follow the predefined naming
convention and numbering series associated with the application or module.
Note: Don't use FND_CMN as the prefix for the messages you create because all the predefined common messages
begin with it.
Common messages can be used in any application. Therefore, consider the ramifications if you edit any aspect of the
message, including incident and logging settings. Changes would be reflected in all instances where the message is
used. For example, if you change the message text, ensure that the text is generic and applies to the entire site of Oracle
Applications Cloud implementation.
How can I make message components visible only to specific
users?
Use the Manage Administrator Profile Values task to determine the visibility of the message components. For the
Message Mode profile option, set the profile value to either User or Administrator.
Based on the set value, the administrator or user actions and details appear for the intended audience.
However, the message components are visible to the audience based on their predefined access rights. Anyone having
a user level access can't view the Administrator message components. If you set the profile value to the administrators
of a specific product, the message components are visible only to that specific audience.
Note: If you don't set any value to the profile option, the visibility of the message component is determined by the
default profile option settings.
Related Topics
•
Set Profile Option Values
596

Oracle Fusion Cloud HCM
Using Common Features for HCM
Chapter 23
Applications Core Configuration
Define Document Sequences
Document Sequences
You can assign a document sequence number to each business document or business event to uniquely identify it. For
example, you can assign a document sequence number to an invoice that gets generated in response to a purchase
order.
However, you must enable the document sequencing option for that business document or event to start assigning the
number. A document sequence number is useful in tracking completed or failed transactions.
You can set up document sequencing in three different modes:
• Automatic
• Manual
• Gapless
Note: Plan your document sequencing carefully before you start applying sequence numbers. Avoid switching to a
different mode after you saved your work on the Manage Document Sequences and Manage Document Sequence
Categories pages.
Automatic Sequencing
Automatic document sequencing assigns a unique number to each document automatically when the document is
generated. That unique number is stored in the database. You can set an initial value for the numbering sequence.
Thereafter, the numbering is sequential by date and time of creation. If you don't provide an initial value, the application
sets the default initial value as 1.
However, you might notice gaps in the numbering sequence because automatic sequencing isn’t gapless.
Manual Sequencing
Use the manual sequencing mode to assign a unique number to each document before the document is generated. In
manual sequencing, the numeric ordering and completeness of a transaction isn't automatically enforced. As a result,
users can skip or omit numbers when entering the sequence value. However, each time a user assigns a number, the
application validates its uniqueness.
Gapless Sequencing
Gapless sequencing is similar to automatic sequencing. It automatically generates a unique number for each document,
but does that only for successfully generated documents. Sequence numbers aren't assigned to incomplete or failed
documents. As a result, the sequence is maintained for all the successfully generated documents.
Additionally, you can control the gapless document sequencing by enforcing the Transaction Date Validation option.
When enabled, this option checks for the transaction date of a particular document and assigns the sequence number
accordingly, to chronologically maintain the documents. The sequence numbers and the transaction dates are
chronologically correlated to prevent any mismatch of a new document sequence assigned to an older document or an
older document sequence assigned to a new document.
597

Oracle Fusion Cloud HCM
Using Common Features for HCM
Chapter 23
Applications Core Configuration
Note: Use this type of sequencing only if necessary because it may affect the performance of the application and
slow down transaction processing.
Related Topics
•
Modules in Application Taxonomy
•
Guidelines for Managing Document Sequences
Document Sequence Categories
A document sequence category is a set of documents that share similar characteristics and that are formed into a
logical group. Document sequence categories simplify the task of assigning number sequences to specific documents.
Instead of assigning a number to each document, you assign a document sequence to one or more document sequence
categories. The document sequence category automatically takes care of numbering the documents.
A document sequence category identifies the database table that stores documents resulting from transactions that
your users enter. When you assign a sequence to a category, the sequence numbers the documents that are stored in a
particular table. You must create document sequence categories to be able to manage the task of assigning document
sequences.
Note: Once a document sequence category is created, you can't change the application, the category code, or the
table name. Therefore, carefully consider these details and plan your document sequencing requirement before you
begin working with the application.
Once you create a document sequence category, it's available for use in the Document Sequences: Assignments
section on the Manage Document Sequences page. The Category field contains the name of the document sequence
category. After you create a document sequence, you can assign it to a document sequence category.
Guidelines for Managing Document Sequences
Sequencing documents is an important business and legal requirement. Therefore, you must first decide the
appropriate document sequence to use for a set of documents. Before you begin, here are a few prerequisites:
• Determine beforehand the mode of document sequencing, because you can't switch to other types once a
sequence is in use.
• Note details such as the document sequence and document sequence category, for later reference.
• Identify if there are any restrictions or configuration prerequisites.
Note: Products that implement document sequencing have specifications about its usage. See the corresponding
product documentation for specific details and also to identify if there are any restrictions or configuration
prerequisites.
598

Oracle Fusion Cloud HCM
Using Common Features for HCM
Chapter 23
Applications Core Configuration
Creating and Editing Document Sequences
You can create document sequences that are automatic, manual, or gapless, depending on the business or legal
requirement. By default, the current date is considered as the start date. The sequence definition never expires if you
don't provide an end date. Among the several options used in creating and editing document sequences, the following
options are functionally more important and therefore must be carefully identified:
• Determinant Type: Select to limit the document sequencing activity to certain documents that belong to a
specific business entity, such as Ledger, Tax Registration, and so on.
• Initial Value: Enter a value for the first document in your sequence. This field applies only to sequences with
automatic or gapless numbering types. Sequence numbers must not be more than 11 digits. If you leave this
field blank, the first document is automatically assigned a value of 1. Once a document sequence is defined, you
can't change this initial value.
Creating and Editing Document Sequence Categories
Document sequence categories are defined to make it easy to assign document sequence definitions to a group of
documents instead of to individual documents. Each document sequence category is mapped to a specific table, where
the documents belonging to that category are stored. When specifying the table, you must consider the following
points:
• When the sequential numbering feature checks for completeness or generates a report, it finds the category's
documents in the table.
• Select only those tables that belong to the application associated with the category.
• Once a category is defined, you can't switch to another table.
Assigning Document Sequences
Identify the documents to be numbered before assigning them a document sequence. For each document sequence,
there can be only one active assignment to a document sequence category, and a determinant value (if applicable). As
part of the assignment, specify whether the document is created automatically (for example, due to a batch process, or
manually through a form). If you don't specify an end date, the assignment continues to remain active throughout the
process cycle. If a determinant type was specified for the document sequence, then enter a specific determinant value
related to the determinant type.
At runtime, when users create documents, the document sequence to be assigned is decided based on the following:
• An active assignment that matches the correct combination of category
• The numbering method
• The date range containing the transaction date
Auditing Document Sequences
You can audit document sequences, if required, to provide an audit trail of the document sequences used in a specific
product. However, before enabling the audit functionality for a document sequence, you must have created an audit
table for the specific document sequence, using appropriate details. Enabling the audit functionality is allowed only for
newly created document sequences. You can't audit document sequences that are already in use by a specific product.
Related Topics
•
Guidelines for Managing Modules in Application Taxonomy
599

Oracle Fusion Cloud HCM
Using Common Features for HCM
Chapter 23
Applications Core Configuration
Define Profile Options
Overview of Profile Options
Profile options are a set of preferences that you use to centrally manage the user interface settings and application
behavior.
You can use the profile options to manage, for example:
• User preferences to specify language or currency.
• Configuration choices to change the user interface skin or appearance of fonts.
• Processing options to determine how much of an activity needs to be logged and at which level.
In the Setup and Maintenance work area, go to these tasks:
• Manage Profile Options
• Manage Profile Categories
• Manage Administrator Profile Values
This table explains what each task is used for.
Task Purpose
Manage Profile Options
Create new profile options or modify existing profile options, except some which are predefined and
restricted to prevent any modifications.
Manage Profile Categories
Group the profile options based on their functional similarities.
Manage Administrator Profile Values
Set the profile values for the enabled profile options to control application behavior.
Related Topics
•
Create and Edit Profile Options
•
Set Profile Option Values
•
Profile Categories
•
How can I access predefined profile options?
Hierarchy in Profile Levels
The hierarchy in profile levels determines the context for making a profile option effective.
600

Oracle Fusion Cloud HCM
Using Common Features for HCM
Chapter 23
Applications Core Configuration
You can enable a profile option at the following levels:
• Site level (lowest): The entire site of deployment
• User level (highest): A specific user
After you create or edit a profile option on the Manage Profile Options page, you must enable it. You can enable it at
multiple levels. The setting at the highest enabled level takes precedence over the lower levels. User level is the highest
in the hierarchy and always takes precedence over the settings at the site level.
On the Manage Administrative Profile Values page, set the profile value at any of the enabled levels of the profile option.
Example of Profile Option Hierarchy
The following table shows an example of setting the currency profile option at different levels.
Profile Level Hierarchy Currency
Site
Lowest
Euro
User
Highest
US Dollar
For this example, there are two users, John and Lisa. For John, the user-level profile value currency is set to US Dollar. If
the Currency profile option is enabled only at the site level, both John and Lisa would see Euro as the default currency. If
the profile option is enabled at the user level, users having a different currency set as their currency profile value would
see only that currency. In this case, John would see US Dollar as the default currency. If the Currency profile option is
enabled at the user level and there is no user level currency defined, the site level setting takes effect. When both site
and user levels are enabled, the value for the user level takes precedence over the site level value.
Set Profile Option Values
Each profile option contains specific values that determine how it affects the application. You can add or modify the
values for each profile option.
Select or enter the value for one or more of the available levels (site, product, and user) so that each setting takes effect
at the intended level.
Setting the Profile Value
1. In the Setup and Maintenance work area, go to the profile option task that correlates to the product or
functionality of the profile option you want to set. If needed, use the Manage Administrator Profile Values
task, which provides access to all profile options.
2. Search for and select the profile option.
3. In the Profile Values section, select or enter a value in the Profile Value column for any default row with a
predefined Site level.
601

Oracle Fusion Cloud HCM
Using Common Features for HCM
Chapter 23
Applications Core Configuration
4. If there isn't any row, or if you need more rows, click the New icon.
◦
Profile Level: Specify the level at which the profile value is to be set. If the profile value applies to the
entire site, select Site. Otherwise, select User.
Note:
- Don't select Site if a row for the Site level already exists. There can only be one row
for the Site level, but you can have multiple rows for the User level.
- The Product level is deprecated and can no longer be used. However, it might be
visible in the list to support legacy profile values.
◦
User Name: If you select User as the profile level, select the user name and specify the associated profile
value.
◦
Profile Value: Select or enter the value corresponding to the selected profile level. For an existing entry,
you can modify only the profile value.
5. Click Save and Close. Changes in the profile values affect users the next time they sign in.
Import Profile Values
Use the Import option on the Manage Administrator Profile Values page to import profile values in bulk and associate
them with a profile option.
Before you begin, make sure that the file containing the profile values is available in the document repository of Oracle
WebCenter Content.
1. In the Setup and Maintenance work area, go to the Manage Administrator Profile Values task.
2. In the Search: Profile Options section, search for the profile option for which you want to import the values.
3. In the Search Results: Profile Options section, select the profile option.
4. In the <Profile Option>: Profile Values section, click Actions > Import.
5. On the Import User Profile Values window, select the WebCenter Content account to which the file was
uploaded.
6. Enter the name of the file containing the profile values. The name here must match with the name of the file
uploaded to the selected account.
7. Click Upload. The profile values are imported.
Note: If the import fails, click the link to the log file on the confirmation dialog box and examine the cause of
failure.
Related Topics
•
File Format for Importing Profile Values
•
Import Flexfields, Lookups, or Profile Values Using Web Services
•
How can I bulk update user preferences?
•
Overview of Files for Import and Export
602

Oracle Fusion Cloud HCM
Using Common Features for HCM
Chapter 23
Applications Core Configuration
File Format for Importing Profile Values
You can import profile option values to your application by creating separate text files containing values. You can then
upload these files to the Oracle WebCenter Content document repository.
Here are a few things that you need to keep in mind while creating these files:
• Use a vertical bar or pipe ( | ) as a delimiter between fields for both the header and the value rows.
• According to the Oracle WebCenter Content specification, set the file encoding to UTF-8 without the Byte Order
Mark (BOM).
• The first line in the file must be a header line, and the files must look exactly the same as shown in the sample
file.
To create a file containing the profile values, include the headers specified in this table:
Header Description
ProfileOptionCode This value displays the profile option code.
LevelName This value displays the level name of the profile. It must be one of these level names:
• Site
• Product
• User
UserName This value must correspond to the registered user name in the application. Don't provide any other
shortened or coded name of the user.
ProfileOptionValue This value displays the profile value that you can import.
Here's a sample file with the header values at the beginning of the file, followed by line entries of the two profile values.
For importing several profile values, add more line entries in a similar format.
ProfileOptionCode|LevelName|UserName|ProfileOptionValue
AFLOG_BUFFER_MODE|USER|APP_IMPL_CONSULTANT|TEST
AFLOG_LEVEL|USER|APPLICATION_DEVELOPER|FINEST
Related Topics
•
Overview of Profile Options
•
Import Profile Values
•
Overview of Files for Import and Export
•
Guidelines for File Import and Export
Create and Edit Profile Options
Use profile options to manage user preferences and control the general function of applications. For example, you can
control user preferences involving language, date, time, currency, and other similar general settings.
603

Oracle Fusion Cloud HCM
Using Common Features for HCM
Chapter 23
Applications Core Configuration
You can create a profile option and also determine the level at which that profile option takes effect. You can also define
the profile values for the profile option. The profile values appear on the Manage Administrator Profile Values page
when you select the profile option.
Creating a Profile Option
1. In the Setup and Maintenance work area, go to the Manage Profile Options task.
2. On the page, click Actions > New.
3. On the Create Profile Option page, fill all the fields with relevant details with specific attention to the following:
◦
Use the SQL Validation field to provide an SQL statement that displays the permissible profile values to
be used. Using an SQL statement, you can select the values from another table and display them as a list
of values.
For example, to display the values Yes and No from a lookup table, you can use the following SQL
statement:
select MEANING, LOOKUP_CODE from FND_LOOKUPS where LOOKUP_TYPE='YES_NO'
As a result, on the Manage Administrator Profile Values page, the profile values Yes and No are
available for selection for that profile option.
◦
You can specify a date range to keep the profile option active during that period. Beyond the specified
duration, the profile option automatically becomes inactive. If you no longer require the profile option,
you must manually delete it from the Manage Profile Options page.
4. Click Save and Close.
5. On the Manage Profile Options page, search for the newly created profile option and from the results, select it.
6. In the Profile Option Levels section, do the following:
a. In Enabled, select the levels at which you want to enable the profile option.
Note: You can enable a profile option at multiple levels, but a higher-level profile value overrides a
lower-level value. Therefore, enable them only at the required levels.
b. In Updatable, select the profile level at which you want implementors to have update privileges. Leave
the check box deselected if you don't want the implementors to modify the profile values (they appear in
read-only mode).
7. Click Save and Close.
To edit a profile option that you created, search for it and edit the necessary details.
Note:
• While creating and editing profile options and profile categories, you can translate the details to the preferred
languages without changing the language session of the application. To specify the translations in all the
enabled language rows, use the Translation Editor option. Once the updates are made, users can view the
translated text for the specific details.
• If you want to access the profile option using REST API, you must add it to the Authenticated User Profile
Option Values (ORA_FND_AUTH_REST_ACCESS) profile category.
604
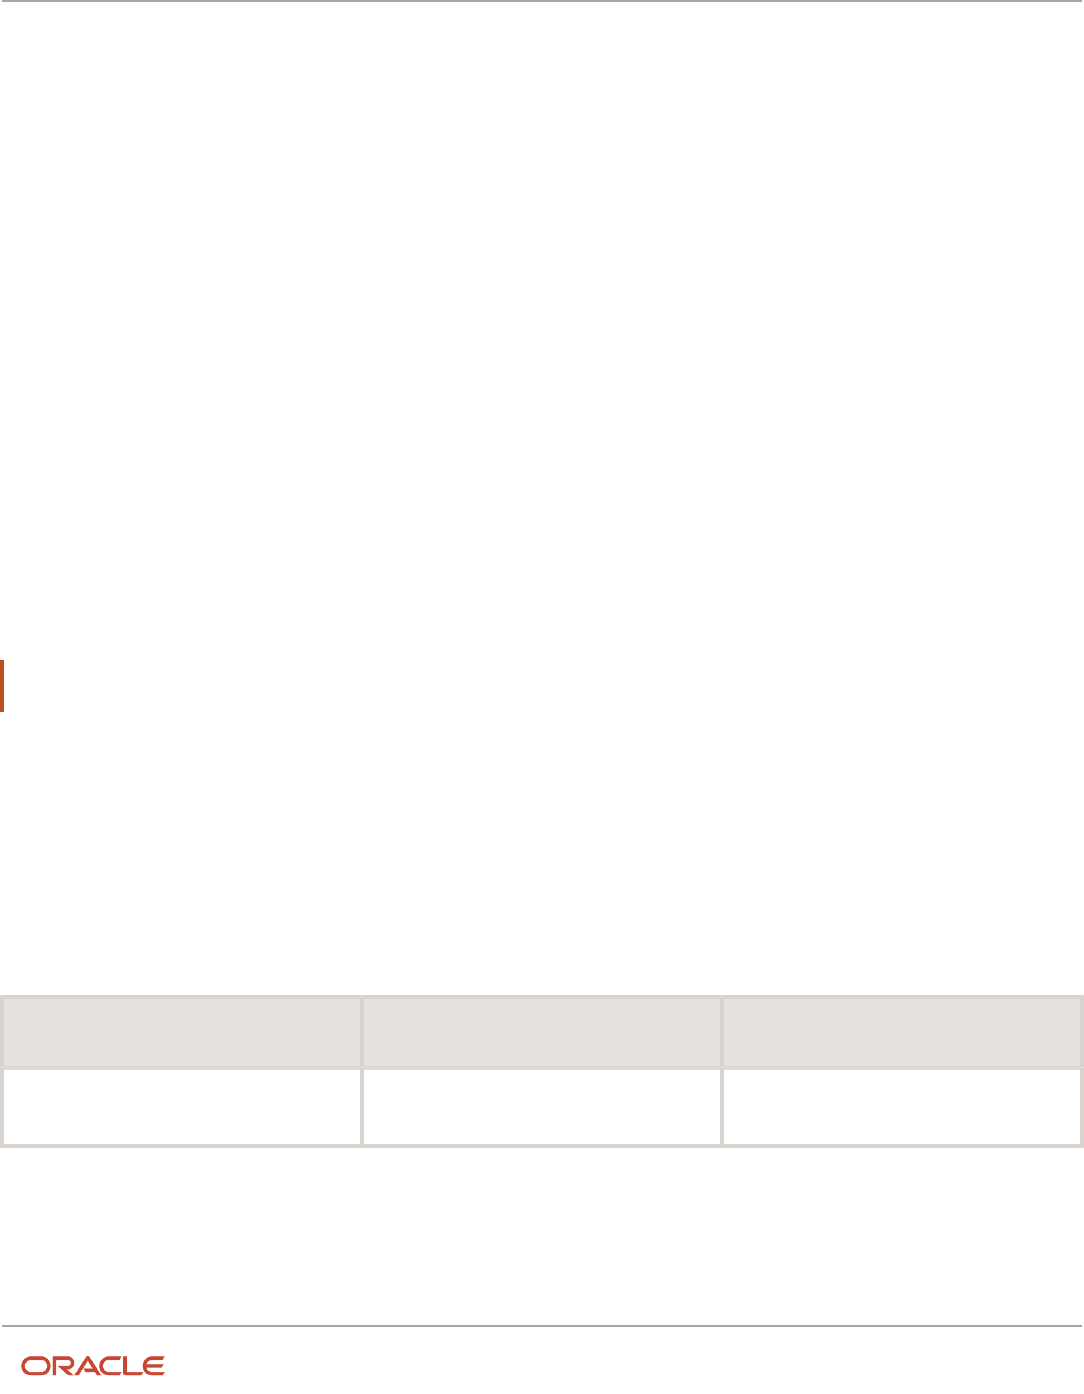
Oracle Fusion Cloud HCM
Using Common Features for HCM
Chapter 23
Applications Core Configuration
Related Topics
•
Hierarchy in Profile Levels
•
Set Profile Option Values
•
Profile Categories
•
Enter or Edit Translated Text
Profile Categories
You can create profile categories to group profile options based on their functional similarities and their use. In the
Setup and Maintenance work area, use the Manage Profile Categories task.
Profile categories help administrators or implementors in retrieving profile options using a search criterion on the
Manage Administrator Profile Values page.
Managing Profile Categories
Consider the following options while managing profile categories:
• Create profile categories and add existing profile options to them
• Add newly created profile options to existing user-defined profile categories
Note: While you can add a profile option to more than one category, some profile categories are predefined and
restricted from any modifications. So, you can't edit them or add profile options to them.
Setting Display Sequence for the Profile Options
You must set the display sequence for each profile option that you add to a profile category. Display sequence
determines the order in which the profile options appear in a search result, based on the profile category. You can set
the sequence beginning with zero or one for the first profile option to display, and proceed sequentially to assign the
values to the remaining profile options.
The following table demonstrates the effect of the display sequence on the profile options when they're retrieved as
search results.
Profile Category Included Profile Option - Assigned Display
Sequence
Display Sequence of Profile Options in the
Search Results
Attachments
• Attachment File Directory - 2
• Indicate Attachments - 1
1. Indicate Attachments
2. Attachment File Directory
Related Topics
•
Set Profile Option Values
605

Oracle Fusion Cloud HCM
Using Common Features for HCM
Chapter 23
Applications Core Configuration
Define Attachments
Attachments
You can use attachments to provide supplementary information to specific business objects. Attachments can be URLs,
desktop files, text, or repository folders.
For a business object you may view, create, delete, or edit attachments, depending on your role and granted privileges.
Repository
Attachments are stored in a content management repository provided by Oracle WebCenter Content Server. Users
managing attachments can't interact with the repository unless the repository mode is enabled. When enabled, users
can share attachments among objects, update attachments, and perform other tasks. Access to the attachment files is
controlled by a digital signing mechanism.
All attachments are scanned for viruses before they're stored on the content management repository. If a virus is
detected at the time of upload, the attachment request fails and the user is notified about it.
Security
Data security applicable to a specific business object also applies to its attachments For example, if a user has no access
to a specific expense report, then that user can't access its attachments. You can also use attachment categories to
control access and actions on attachments, based on roles associated with that category.
Related Topics
•
Attachment Entities
•
What's an attachment category?
Attachment Entities
An attachment entity is usually a database entity, for example a table or view, that represents a business object with
which attachments are associated. Each attachment UI must be defined with a corresponding attachment entity.
Attachment entities are used only in the context of attachments and exist separately from the database entities that
they're based on.
In the Setup and Maintenance work area, use the Manage Attachment Entities task to edit and create attachment
entities. You can either use the predefined attachment entities with attachment UIs or create entities, for example when
developing your own UIs.
The entity name should match the name of the table or view that represents the business object used for attachment.
The name is also used in the repository folder that's automatically created to store attachments for the entity.
The data security policies associated with the database resource defined for the attachment entity apply to attachments
for that entity. However, the security setting must be enabled for that entity. The database resource value must match
the value in the OBJ_NAME column in the FND_OBJECTS table for the business object that the entity represents.
606

Oracle Fusion Cloud HCM
Using Common Features for HCM
Chapter 23
Applications Core Configuration
Related Topics
•
How Attachment Entities and Attachment Categories Work Together
•
Modules in Application Taxonomy
•
How Data Resources and Data Security Policies Work Together
How Attachment Entities and Attachment Categories Work
Together
The association between attachment entities and categories determines the use of categories for an entity. For
example, categories associated with the expense report attachment entity are available in the attachment UIs for
expense reports.
You can configure the associations when managing either entities or categories. Between the Manage Attachment
Entities and Manage Attachment Categories pages, any change in association on one page automatically reflects on the
other page.
Managing Entities
In the Setup and Maintenance work area, go to the Manage Attachment Entities task. Determine the attachment
categories that are relevant to a particular entity and assign it to those categories. Each entity must have at least one
category. For a particular expense report page with attachments functionality, you can specify which category to use for
the attachment. Accordingly, the data security defined for each category is applied to the attachments on that page if
security is enabled.
Managing Categories
In the Setup and Maintenance work area, go to the Manage Attachment Categories task. If a category must be
associated with multiple attachment entities, you can complete that association using this task. The association you
define here reflects on the Manage Attachment Entities page for the respective entities.
Related Topics
•
What's an attachment category?
•
Attachment Entities
Attachments Troubleshooting
Attachments UIs are very user-friendly and easy to work with. You may encounter issues in certain cases such as you
modify the attachments, for example create additional attachment categories, or implement data security on them.
Issue: Can't View, Add, Update, or Delete Attachments
You may encounter the following issues when trying to view attachments or perform actions such as adding
attachments.
• You can no longer see specific attachments that were earlier visible.
607

Oracle Fusion Cloud HCM
Using Common Features for HCM
Chapter 23
Applications Core Configuration
• You can no longer update or delete attachments.
• You get an error stating that you don't have permission to add attachments.
Resolution
Use the Manage Attachment Entities page to ensure that attachment categories are associated to the relevant
attachment entity. You might need to check with your system administrator or help desk to determine the exact entity
used on the page with the expenses attachments or what categories to assign.
If data security is implemented on the categories for the attachment entity, verify that the Enable Security check box
is selected in the Manage Attachment Entities page for that entity. Also, make sure that users have a role that has the
necessary privileges. The following table lists the privileges required to view, add, update, or delete attachments with a
specific attachment category.
Action Privilege
View
Read Application Attachment (FND_READ_APPLICATION_ATTACHMENT_DATA)
Add or Update
Update Application Attachment (FND_UPDATE_APPLICATION_ATTACHMENT_DATA)
Delete
Delete Application Attachment (FND_DELETE_APPLICATION_ATTACHMENT_DATA)
For example, if users have the Read Application Attachment privilege for all categories associated with the expense
report attachment entity, except the Receipts attachment category, then they can view all expense report attachments
except those created with the Receipts category. Likewise, if users don't have the Update Application Attachment
privilege for any attachment categories tied to the expense report attachment entity, then they can't create any
attachments for the expense reports.
Certain attachments UI have predefined restrictions for users on categories. Your developers can also introduce
additional filters to determine which document categories are available for a specific page. Check with your developers
or help desk.
Issue: Missing Attachment Category
You can view existing attachments but the attachments no longer have an attachment category associated with them.
Resolution
When the attachment was added, at least one category existed for the corresponding attachment entity. Since then, the
entity was edited so that it no longer has any assigned categories, so the user can't see the category associated with
that attachment.
Use the Manage Attachment Entities page to reassign attachment categories to the relevant attachment entity. For
example, if users can no longer see the Receipts attachment category for an attachment to an expense report, then
search for the expense report attachment entity and assign to it the Receipts category. You may need to check with your
system administrator or help desk to determine the exact entity used on the page with the expenses attachments or any
additional categories to assign.
Certain attachments UI have predefined restrictions for users on categories. Your developers can also introduce
additional filters to determine which document categories are available for a specific page. Check with your developers
or help desk.
608

Oracle Fusion Cloud HCM
Using Common Features for HCM
Chapter 23
Applications Core Configuration
Related Topics
•
Attachment Entities
•
How Attachment Entities and Attachment Categories Work Together
•
What's an attachment category?
FAQs for Define Attachments
What's an attachment category?
You must use an attachment category to classify and secure an attachment. While adding attachments, you can view
the available attachment categories and add the attachment to one of them.
For example, attachments for an expense report can be categorized as receipts, scanned invoice images, and so on.
In the Setup and Maintenance work area, use the Manage Attachment Categories task. You can associate roles with
categories to restrict user access and actions for an attachment entity. You can also create and manage categories for
your own purpose, involving specific attachments with specific security requirements.
Related Topics
•
How Attachment Entities and Attachment Categories Work Together
•
Modules in Application Taxonomy
609

Oracle Fusion Cloud HCM
Using Common Features for HCM
Chapter 23
Applications Core Configuration
610

Oracle Fusion Cloud HCM
Using Common Features for HCM
Chapter 24
Trees Setup
24 Trees Setup
Overview of Trees
Trees are hierarchical data models that you can use to organize data, apply business rules, control data access, and
improve performance while querying.
For example, an application maintains data of an organization called Vision Corporation that has two departments:
Marketing and Finance. The Finance department has two functional divisions: Receivables and Payables. You can define
a tree for Vision Corporation to establish a hierarchy across its departments, and their respective functional divisions.
You can use the hierarchy to manage data at various levels of the organization.
To work with trees, in the Setup and Maintenance work area, use any of the following tasks:
• Manage Tree Structures: To create and update tree structures. You must first define a tree structure to create a
tree.
• Manage Trees and Tree Versions: To create and update trees and their versions.
• Manage Tree Labels: To create and update tree labels.
Tree Structures
As the name suggests, tree structures provide you the framework to organize data such that you can establish a
hierarchy for use by the tree. So, similar to a template, a tree structure guides the creation of a tree.
Tree
A tree is an instance of the tree structure. The root node is the highest nodal point of a tree. Child nodes branch off from
the root node. Child nodes at the same level, branching off from a common parent node, are called siblings. Leaves are
details branching off from a node but not extending further down the tree hierarchy. You can create trees for multiple
data sources and share them across applications.
Tree Versions
A tree by default has only one version. If required, you can create and maintain more than one editable tree version. At
any point, only one tree version must be active. If you edit an existing version, it changes from active to draft. To use it
again, you must set it to active. Similar to any other version control system, versions of trees are maintained to track all
the changes that a tree undergoes in its life cycle.
Tree Labels
Tree labels are short names given to trees and tree structures. You can label the tree versions for better accessibility and
information retrieval. When nodes are created in a tree, the existing tree labels are automatically assigned to the new
tree nodes. You can use any table to store the labels and register the label data source with the tree structure.
Related Topics
•
Tree Structures
•
Tree Labels
611

Oracle Fusion Cloud HCM
Using Common Features for HCM
Chapter 24
Trees Setup
Manage Tree Structures
Tree Structures
A tree structure defines the hierarchy for creating trees and prescribes rules based on which trees are created,
versioned, and accessed. You can associate multiple data sources with a tree structure.
A tree is an instance of this hierarchy and each tree structure can contain one or more trees. You can create tree
structures specific to an application but you can share tree structures across applications. If you apply version control
to the tree structure, it's carried over to the trees that are based on the tree structure. Each tree version contains at least
one root node. Occasionally, a tree version may have more than one root node.
An administrator controls the access to tree structures through a set of rules that are periodically audited for validity.
Related Topics
•
Guidelines for Managing Tree Structures
•
Tree Structure Audit Results
Guidelines for Defining the Tree Structure
You may create a tree structure from scratch or use any predefined tree structure. To complete the tree structure
definition, specify the required details on the Create Tree Structure: Specify Definition page.
Tree Node Selection
The data in Tree Node table maps to the data in nodes of the tree structure. You must select the correct and most
appropriate tree node table to define the tree structure, based on which you establish the tree hierarchy. This selection
also affects the level of security that's set on a tree node and its child entities.
Tree Sharing Mode
Use the following options to determine the mode of sharing a tree structure across the applications.
• Open: Indicates that the tree is associated with all reference data sets.
• Set ID: Indicates that the tree is associated with a specific reference data set.
Modification
You can modify the predefined tree structures as well as those you create. However, modifying a predefined tree
structure is restricted and permitted through additional privileges. Modification is limited to specific tree nodes and
lower in the tree hierarchy.
612

Oracle Fusion Cloud HCM
Using Common Features for HCM
Chapter 24
Trees Setup
Multiple Tree Versions
Although multiple tree versions can exist together, Oracle recommends that only one version be active at any given
time. However, if required, you can have more tree versions to be in the active state for the same date range. You can
use this flexibility to select the tree version you want to implement.
Guidelines for Managing Tree Structures
You can create, edit, and delete tree structures. You can also change the status of a tree structure and audit the changes.
Creating and Editing Tree Structures
When you edit an active tree structure, the status of the tree structure and all associated trees and their versions
changes to draft. To reuse a tree structure, create a copy of the tree without copying the associated trees and tree
versions. After making changes, set the status again to active. If you delete a tree structure, all the associated trees and
tree versions are automatically deleted.
For information about working with the offering-specific predefined tree structures, refer to the relevant product
documentation.
Status
When you change the status of a tree structure, the status of the trees and tree versions associated with that tree
structure also changes.
The following table lists the different statuses of a tree structure.
Status Meaning
Draft
In a modified state, or not yet in use.
Active
In use, indicating that one or more trees or tree versions are created from the tree structure.
Inactive
Not in use.
Related Topics
•
Guidelines for Defining the Tree Structure
•
How Trees and Data Sources Work Together
•
Tree Structure Audit Results
613

Oracle Fusion Cloud HCM
Using Common Features for HCM
Chapter 24
Trees Setup
Tree Structure Audit Results
Use the tree structure audit results to verify the tree structure's correctness and data integrity. The audit results include
the following details:
• The name of the validator, which is a specific validation check
• The result of the validation, including a detailed message
• Corrective actions to take if there are any validation errors
Running an Audit
Setting the status of a tree structure to active automatically triggers an audit of that tree structure. To manually trigger
an audit, select Audit from the Actions menu on the Manage Tree Structures page. The Tree Structure Audit Result table
shows a list of validations that ran against the selected tree structure.
Audit Validators
The following table lists the validators used in the audit process and describes what each validator checks for. It also lists
possible causes for validation errors and suggests corrective actions.
Validator Page Description (what's
validated)
Possible Cause for
Validation Failure
Suggested Corrective
Action
Restrict By Set ID
Manage Tree Structures:
Specify Data Sources
If you select the Reference
Data Set check box for the
Restrict Tree Node List of
Values Based on option,
each of its data source
view objects must have a
reference data set attribute.
Even when the check box is
selected, one or more data
source view objects doesn't
contain a reference data set
attribute.
If reference data set
restriction is required for
this tree structure, include a
reference data set attribute
on all data sources.
Otherwise, deselect the
check box.
Available Label Data
Sources
Manage Tree Structures:
Specify Data Sources
If you select a list item
from Labeling Scheme to
specify a labeling scheme,
the label data source
view object specified for
each data source must
be accessible. Also, the
primary keys must be valid.
This restriction doesn't
apply if you select None
from the list.
• Any of the specified
label data source view
objects doesn't exist.
• Any of the specified
label data source view
objects doesn't have
primary keys.
• When a label data
source view object is
initially defined, the
database registers
the primary keys for
the view object. If the
view object is later
modified such that
its primary keys no
longer match the
primary keys that
were registered earlier,
this validation fails.
• Correct the specified
label data source view
object.
• Correct the primary
keys of the specified
label data source view
object.
• Do one of the
following:
◦
Correct the primary
keys in the label data
source view object to
match the primary
keys that were earlier
registered in FND_TS_
DATA_SOURCE.
◦
Correct the primary
keys registered in
that table to match
the new view object
definition.
614

Oracle Fusion Cloud HCM
Using Common Features for HCM
Chapter 24
Trees Setup
Validator Page Description (what's
validated)
Possible Cause for
Validation Failure
Suggested Corrective
Action
Row Flattened Table Name
Manage Tree Structures:
Specify Performance
Options
You must specify a valid
row flattened table for
the tree structure. It can
either be the standard row
flattened table FND_TREE_
NODE_RF or another table.
• The specified table
doesn't exist in the
database.
• The specified table
doesn't contain the
same columns as the
FND_TREE_NODE_RF
table.
Correct the row flattened
table definition.
Available Data Sources
Add Data Source
Each data source view
object specified for the
tree structure must be
accessible, and all its
primary key attributes must
be valid.
• Any of the specified
data source view
objects doesn't exist.
• When you define
a data source view
object, keep the
Use non-defined
primary key columns
check box deselected.
The database
automatically registers
the primary keys
for the view object.
Select this check
box if you want the
database to register
the primary keys you
specify. However,
if the registered
primary keys contain
any duplicates, this
validation fails.
• The Use non-defined
primary key columns
check box is selected
in a data source, but
the list of specified
primary key columns
doesn't match the
primary keys defined
in the corresponding
data source view
object.
• Any common attribute
that exists in both
the data source view
object and the tree
node view object isn't
of the same data type
in both view objects.
• Correct the specified
data source view
object.
• Correct the duplicate
column in the
registered primary
keys.
• Correct the primary
keys of the specified
data source view
object.
• Correct any mismatch
in data types.
Column Flattened Table
Name
Manage Tree Structures:
Specify Performance
Options
You must specify a valid
column flattened table for
the tree structure. It can
either be the standard row
flattened table FND_TREE_
NODE_CF or another table.
• The specified table
doesn't exist in the
database.
• The specified table
doesn't contain the
same columns as the
Correct the column
flattened table definition.
615

Oracle Fusion Cloud HCM
Using Common Features for HCM
Chapter 24
Trees Setup
Validator Page Description (what's
validated)
Possible Cause for
Validation Failure
Suggested Corrective
Action
FND_TREE_NODE_CF
table.
Restrict by Date
Manage Tree Structures:
Specify Data Sources
If you select the Date
Range check box for the
Restrict Tree Node List of
Values Based on option
for a tree structure, each
of its data source view
objects must have effective
start date and end date
attributes. This validation
doesn't take place when the
check box isn't selected.
Even when the check box
is selected, one or more of
its data source view objects
doesn't contain effective
start date and end date
attributes.
If the date restriction
is required for this tree
structure, include the
effective start date
and effective end date
attributes on all data
sources. Otherwise,
deselect the check box.
Tree Node Table Name
Manage Tree Structures:
Specify Definition
You must specify a valid
tree node table for the tree
structure. It can either be
the standard row flattened
table FND_TREE_NODE or
another table.
• No table is specified in
the Tree Node Table
field.
• The specified table
doesn't exist in the
database.
• The specified table
doesn't contain the
same columns as the
FND_TREE_NODE
table.
Correct the tree node table
definition.
Tree Nodes
Tree nodes are points of data convergence where a tree branches into levels. Nodes are the building blocks of a tree
structure and are attached to tree versions.
Whenever you create or edit a tree version, you need to specify its tree node. To manage tree nodes, in the Setup and
Maintenance work area, go to the Manage Trees and Tree Versions task.
Managing Tree Nodes
You can create, modify, or delete tree nodes on the Tree Version: Specify Nodes page. To add a tree node, ensure that
the tree structure with which the tree version is associated is mapped to a valid data source. You can also duplicate a
tree node if the multiple root node feature is enabled.
Node Levels
Usually, the nodes at a particular level represent similar information. For example, in a tree that reflects the
organizational hierarchy, all nodes representing divisions appear at one level and all the department nodes on another.
Similarly, in a tree that organizes a user's product catalog, the nodes representing individual products might appear at
one level and the nodes representing product lines on the immediate higher level.
The following node levels are in use:
• Root node: The highest node in the tree structure
616

Oracle Fusion Cloud HCM
Using Common Features for HCM
Chapter 24
Trees Setup
• Parent node: The node that branches off into other nodes
• Child node: The node that's connected to a node higher in hierarchy (parent node)
• Sibling node: Nodes that are at the same level and belong to the same parent node
• Leaf node: Entities branching off from a node but not extending further down the tree hierarchy
Node Types
A tree node has the following node types.
• Single: Indicates that the node is a value by itself.
• Range: Indicates that the node represents a range of values and possibly could have many children. For
example, a tree node representing account numbers 10000 to 99999.
• Referenced Tree: Indicates that the tree node is actually another version for the tree based on the same tree
structure, which isn't physically stored in the same tree. For example, a geographic hierarchy for the United
States can be referenced in a World geographic hierarchy.
File Format for Importing Data Loaders of Tree Hierarchies
You can import tree hierarchies to your application by creating separate text files containing values and value set codes.
You can then upload these files to the Oracle WebCenter Content document repository.
Here are a few things that you need to keep in mind while creating these files:
• Use a vertical bar or pipe ( | ) as a delimiter between fields for both the header and the value rows.
• According to the Oracle WebCenter Content specification, set the file encoding to UTF-8 without the Byte Order
Mark (BOM).
• The first line in the file must be a header line, and the files must look exactly the same as shown in the sample
file.
Note: This requirement is specific for a tree with structure code "GL_ACCT_FLEX".
Flat File
To create a file containing tree data loaders, include the headers specified in this table:
Header Data Type Data Size Description Required or Optional
ValueSetCode String 30 This value determines the
value used as a parameter
for the tree.
Required
TreeCode String 30 This value displays the code
for the tree.
Required
TreeVersionName String 30 This value displays the
name for the tree version.
Required
617

Oracle Fusion Cloud HCM
Using Common Features for HCM
Chapter 24
Trees Setup
Header Data Type Data Size Description Required or Optional
TreeVersionStartDate Date - This value displays the
beginning of the date range
during which the tree is
active and visible on the
page. The format is (DD/
MM/YYYY).
Required
TreeVersionEndDate Date - This value displays the end
date for the tree version.
The application inserts the
default date. The format is
(DD/MM/YYYY).
Optional
Parent 30....Parent1 String 30 This value displays the value
set values of the value set
code field and represents
the internal nodes.
Optional
Value String 30 This value displays the value
set values of the value set
code field and represents
the leaf nodes.
Optional
IsChild String 1 Set this option to enable or
disable the option to add the
node as a parent:
• Y: Enable node as
parent or detail value
of the hierarchy.
• N: Disable as parent
or detail value of the
hierarchy.
Optional
Here's a sample file with the header values at the beginning of the file, followed by the line entries of the hierarchies
(tree) data loader. For importing several data loaders, add more line entries in a similar format.
ValueSetCode|TreeCode|TreeVersionName|TreeVersionStartDate|TreeVersionEndDate|Parent30|Parent29|Parent28|
Parent27|Parent26|Parent25|Parent24|Parent23|Parent22|Parent21|Parent20|Parent19|Parent18|Parent17|Parent16|
Parent15|Parent14|Parent13|Parent12|Parent11|Parent10|Parent9|Parent8|Parent7|Parent6|Parent5|Parent4|
Parent3|Parent2|Parent1|Value|IsChild
Operations Company|OC COA_Company|OC COA_Company|01/1/2019|||||||||||||||||||||||||||||PARENT3366941||||N
Operations Company|OC COA_Company|OC COA_Company|01/1/2019|||||||||||||||||||||||||||||PARENT3366941|
PARENT3366942|||N
Operations Company|OC COA_Company|OC COA_Company|01/1/2019|||||||||||||||||||||||||||||PARENT3366941|
PARENT3366943|||N
Operations Company|OC COA_Company|OC COA_Company|01/1/2019|||||||||||||||||||||||||||||PARENT3366941|
PARENT3366942|PARENT3366944||N
Operations Company|OC COA_Company|OC COA_Company|01/1/2019|||||||||||||||||||||||||||||PARENT3366941|
PARENT3366942|PARENT3366944|3366128|Y
Operations Company|OC COA_Company|OC COA_Company|01/1/2019|||||||||||||||||||||||||||||PARENT3366941|
PARENT3366943|PARENT3366945||N
Operations Company|OC COA_Company|OC COA_Company|01/1/2019|||||||||||||||||||||||||||||PARENT3366941|
PARENT3366943|PARENT3366946|3366126|Y
618

Oracle Fusion Cloud HCM
Using Common Features for HCM
Chapter 24
Trees Setup
Operations Company|OC COA_Company|OC COA_Company|01/1/2019||||||||||||||||||||||||||||PARENT3366941|
PARENT3366943|PARENT3366947|PARENT3366948|3366127|Y
Related Topics
•
Overview of Trees
•
Tree Structures
•
Guidelines for Defining the Tree Structure
•
Guidelines for Managing Tree Structures
•
Tree Labels
•
How Trees and Data Sources Work Together
•
Overview of Files for Import and Export
How Trees and Data Sources Work Together
Data sources are the foundation of tree management. Tree structures, trees, and tree versions establish direct and real-
time connectivity with the data sources.
Changes to the data sources immediately reflect on the Manage Trees and Tree Versions page and wherever the trees
are in use.
Metadata and Data Storage
Tree structures contain the metadata of the actual data and the core business rules that manifest in trees and tree
versions. You can select and enable a subset of trees to fulfill a specific purpose in that application.
Access Control
Source data is mapped to tree nodes at different levels in the database. Therefore, the changes you make to the tree
nodes affect the source data. Access control set on trees prevents unwanted data modifications in the database. Access
control can be applied to the tree nodes or anywhere in the tree hierarchy.
Related Topics
•
Guidelines for Specifying Data Sources for Tree Structures
Guidelines for Specifying Data Sources for Tree Structures
The data sources provide the items for establishing hierarchy in a tree structure. In the tree management infrastructure,
these data sources are Oracle ADF business components view objects, which are defined by application development.
Labeling Schemes
Selecting a labeling scheme determines how the tree nodes are labeled. You may select a labeling scheme to assign at
the data source level, at the parent node level, or keep it open for customers assignment. You may also choose not to
619

Oracle Fusion Cloud HCM
Using Common Features for HCM
Chapter 24
Trees Setup
have any labeling scheme. However, if you decide to use any of the labeling schemes, select the following additional
options, to restrict the list of values that appear in the selected tree node.
• Allow Ragged Nodes: To include nodes that have no child nodes, and are shorter than the remaining nodes in
the entire hierarchy.
• Allow Skip Level Nodes: To include nodes that are at the same level but have parent nodes at different levels.
Restriction of Tree Node Values
You can decide the depth of the tree structure by selecting an appropriate value from the list. Keeping the depth limit
open renders an infinite list of values.
Using the following options, you can restrict the list of values that appear for selection in a specific tree node.
• Date Range: Specifies whether a selection of nodes should be restricted to the same date range as the tree
version.
• Allow Multiple Root Nodes: Allows you to add multiple root nodes when creating a tree version.
• Reference Data Set: Specifies whether a selection of nodes should be restricted to the same set as the tree.
Data Source Values and Parameters
Tree data sources have optional data source parameters with defined view criteria and associated bind variables. You
can specify view criteria as a data source parameter when creating a tree structure, and edit the parameters when
creating a tree. Multiple data sources can be associated with a tree structure and can have well-defined relationships
among them.
Note: Parameter values modified at the tree level override the default values specified at the tree-structure level.
The data source parameters are applied to any tree version belonging to that data source, when performing node
operations on the tree nodes. Data source parameters also provide an additional level of filtering for different tree
structures. The tree structure definition supports three data source parameter types.
• Bound Value: Captures any fixed value, which is used as part of the view criteria condition.
• Variable: Captures and binds a dynamic value that's being used by the data source view object. This value is
used by the WHERE condition of the data flow.
• View Criteria: Captures the view criteria name, which is applied to the data source view object.
You can also specify which of the data source parameters are mandatory while creating or editing the tree structure.
View objects from the Oracle ADF business components are used as data sources. To associate the view object with the
tree structure, you can pick the code from Oracle ADF business component view objects and provide the fully qualified
name of the view object, for example, oracle.apps.fnd.applcore.trees.model.view.FndLabelVO.
Guidelines for Improving the Performance of a Tree Structure
Tree structures are heavily loaded with data. As a tree management guideline, use the following settings to improve
performance of data rendering and retrieval.
• Row Flattening
620

Oracle Fusion Cloud HCM
Using Common Features for HCM
Chapter 24
Trees Setup
• Column Flattening
• Column Flattened Entity Objects
• BI View Objects
CAUTION: Force flattening handles both row and column flattening. This is applicable for all modes of force
flattening, such as, Schedule Force Flattening, Online Force Flattening, and Offline Force Flattening. You must
not run row flattening and column flattening separately using force flattening. Running two flattening processes in
parallel for the same tree will lead to inconsistent results.
Row Flattening
Row flattening optimizes parent-child information for run-time performance by storing additional rows in a table for
instantly finding all descendants of a parent without initiating a CONNECT BY query. Row flattening eliminates recursive
queries, which allows operations to perform across an entire subtree more efficiently.
To store row flattened data for the specific tree structure, users can either use the central FND_TREE_NODE_RF table or
they can register their own row flattened table. For example, in a table, if Corporation is the parent of Sales Division
(Corporation-Sales Division), and Sales Division is the parent of Region (Sales Division-Region), a row-flattened table
contains an additional row with Corporation directly being the parent of Region (Corporation-Region).
Column Flattening
Column flattening optimizes parent-child information for runtime performance by storing an additional column in a
table for all parents of a child.
To store column flattened data for the specific tree structure, users can either use the central FND_TREE_NODE_CF table or
they can register their own column flattened table. For example, in a table, if Corporation is the parent of Sales Division
(Corporation-Sales Division), and Sales Division is the parent of Region (Sales Division-Region), a flattened table in
addition to these columns, contains three new columns: Region, Sales Division, and Corporation. Although positioned
next to each other, the column Region functions at the lower level and Corporation at the higher level, retaining the data
hierarchy.
Column Flattened Entity Object
In the absence of a column-flattened table, if you need to generate the business component view objects for your tree
structure for the flattened table, use the tree management infrastructure to correctly provide the fully qualified name of
the entity object for the column flattened table.
BI View Object
View objects from Business Intelligence can be used as data sources, eliminating the need to create new types of data
sources. This field is to store the fully qualified name for the BI view object generated by the tree management for
business intelligence reporting and usage The BI view object is a combination of the tree data source and column
flattened entity. Using this option prevents data redundancy and promotes greater reuse of existing data, thereby
improving the performance of the tree structure.
Search View Object
Specify the full name of the view object for the tree node to ensure that search operations performed on the tree node
are efficient.
621
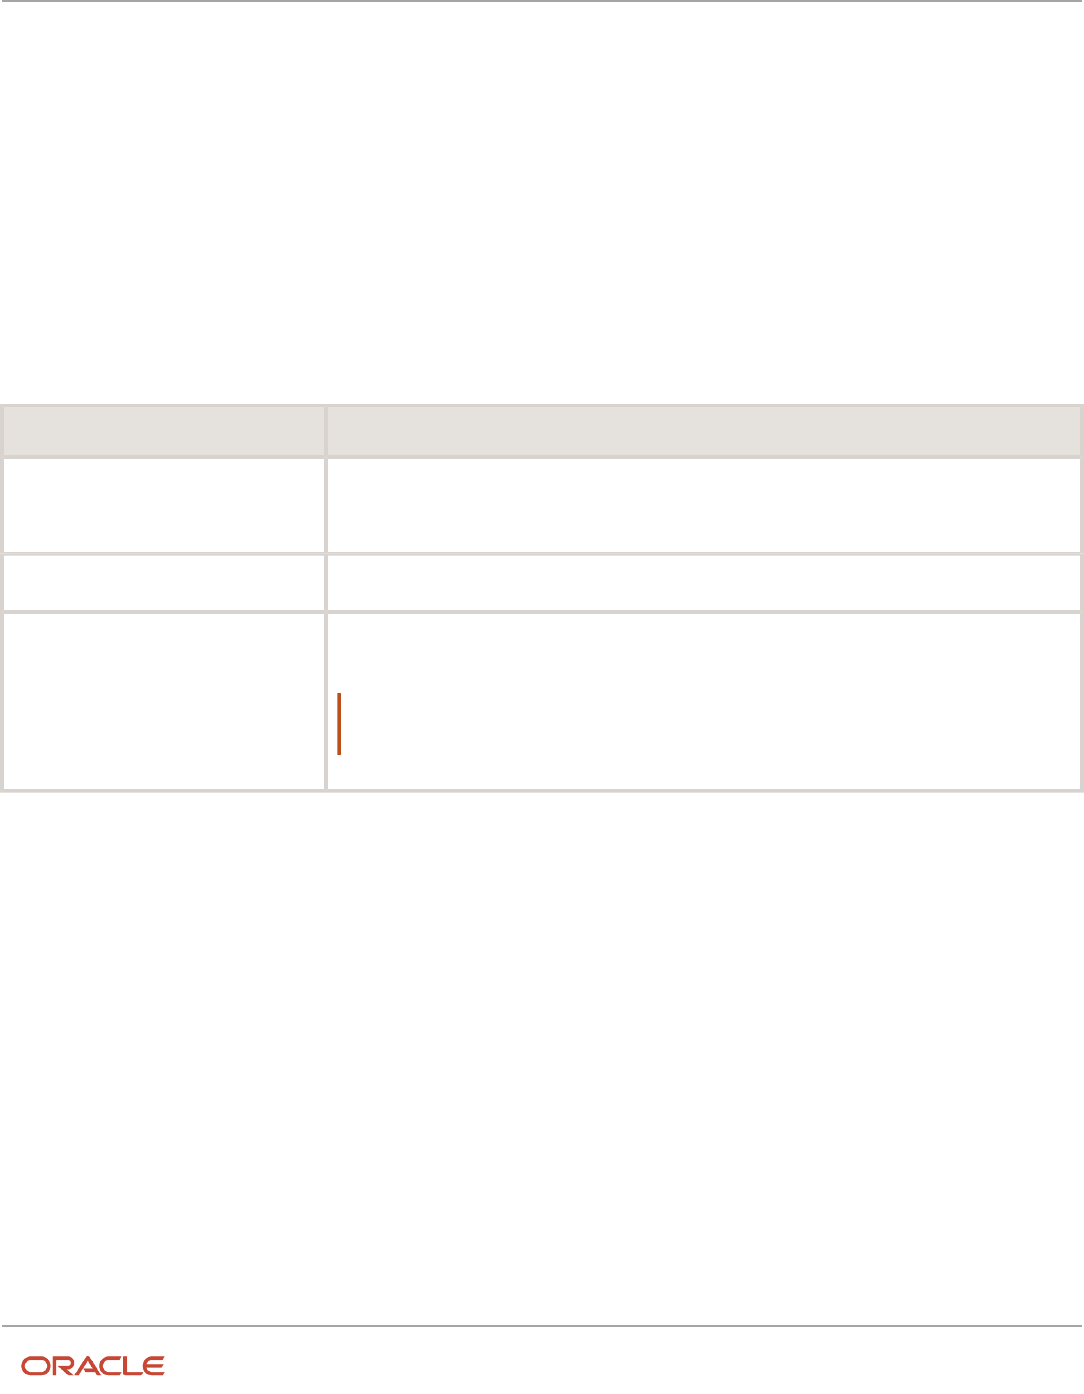
Oracle Fusion Cloud HCM
Using Common Features for HCM
Chapter 24
Trees Setup
Manage Tree Labels
Tree Labels
Tree labels are tags that are stored on tree nodes. You can store labels in any table and register the label data source
with the tree structure.
When a labeling scheme is used for trees, the selected labels are stored in the tree label entity, and each tree node
contains a reference to a tree label in the labeling scheme. The following table lists the three ways in which tree labels
are assigned to the tree nodes.
Labeling Scheme Description
Level
Labels that are automatically assigned based on the data source to which the tree node belongs.
A level label points to a specific data source. For example, in a tree that reflects the organizational
hierarchy of an enterprise, all division nodes appear on one level and all department nodes on another.
Group
Labels that you can arbitrarily assign to tree nodes.
Depth
Labels that are automatically assigned based on the depth of the tree node within the tree. No manual
assignment is performed.
Note:
In an unbalanced hierarchy, a level may not be equal to depth.
Manage Trees and Tree Versions
Guidelines for Managing Trees and Tree Versions
You can create and edit trees and tree versions depending upon the requirement. A tree can have one or more tree
versions. When changes are made to an existing tree, a new version is created and published.
Creating and Editing Trees
Trees are created based on the structure defined in the tree structure. You can create trees, modify existing trees, and
delete trees. If you want to copy an existing tree, you can duplicate it. You can also select and copy the associated tree
versions.
Creating a tree involves specifying the tree definition and specifying the labels that are used on its nodes. You can even
select an icon of your choice to represent the tree in the search results. If the selected tree structure has data sources
and parameters defined for it, they appear on the page allowing you to edit the parameter values at the tree node level.
622

Oracle Fusion Cloud HCM
Using Common Features for HCM
Chapter 24
Trees Setup
Note: Parameter values modified at the tree level will override the default values specified at the tree-structure level.
Creating and Editing Tree Versions
Tree versions are created at the time of creating trees. Each tree must contain a version.
Editing an existing tree provides you with the option of updating the existing version. You can also edit the existing
version that lies nested in the tree in the search results.
When you edit a tree version bearing Active status, the status changes to Draft until the modifications are saved or
canceled. To edit a tree version while keeping the status active select the Update tree nodes while keeping the tree
version active check box.
Related Topics
•
Tree Nodes
•
Tree Version Audit Results
Tree Version Audit Results
Use the tree version audit results to verify the tree version's correctness and data integrity. The audit results include the
following details:
• The name of the validator, which is a specific validation check
• The result of the validation, including a detailed message
• Corrective actions to take if there are any validation errors
Running an Audit
An audit automatically runs whenever a tree version is set to active. You can also manually trigger an audit on the
Manage Trees and Tree Versions page, using Actions > Audit. If you run an audit on a tree version, which is in Draft
status, and want to change the status to Active after the audit is complete then select the Set tree version status to
active after audit is successfully complete Check Box.
The Tree Version Audit Result table shows a list of validations that ran against the selected tree version.
Validation Details
The following table lists the validators used in the audit process and describes what each validator checks for. It also lists
possible causes for validation errors and suggests corrective actions.
Validator Description (what's checked) Possible Cause for Validation
Failure
Suggested Corrective Action
Effective Date
The effective start and end dates
of the tree version must be valid.
The effective end date is set to a
value that isn't greater than the
effective start date.
Modify the effective start and end
dates such that the effective start
date is earlier than the effective
end date.
623

Oracle Fusion Cloud HCM
Using Common Features for HCM
Chapter 24
Trees Setup
Validator Description (what's checked) Possible Cause for Validation
Failure
Suggested Corrective Action
Root Node
On the Manage Tree Structures:
Specify Data Sources page, if the
Allow Multiple Root Nodes check
box for the Restrict Tree Node List
of Values Based on option isn't
selected, and if the tree structure
isn't empty, the tree version must
contain exactly one root node. This
validation doesn't take place if the
check box is selected.
Even if the check box is deselected,
the tree version has multiple root
nodes.
Modify the tree version such that
there is exactly one root node.
Data Source Maximum Depth
For each data source in the tree
structure, on the Data Source
dialog box, if the data source is
depth-limited, the data in the
tree version must adhere to
the specified depth limit. This
validation doesn't apply to data
sources for which the Maximum
Depth field is set to Unlimited.
The tree version has data at a
depth greater than the specified
depth limit on one or more data
sources.
Modify the tree version such
that all nodes are at a depth that
complies with the data source
depth limit.
Duplicate Node
On the Data Source dialog box, if
the Allow Duplicates check box
isn't selected, the tree version must
not contain more than one node
with the same primary key from
the data source. If the check box
is selected, duplicate nodes are
permitted.
Even when the check box is
deselected, the tree version
contains duplicate nodes.
Remove any duplicate nodes from
the tree version.
Available Node
All nodes in the tree version
must be valid and available in the
underlying data source.
• A node in the tree version
doesn't exist in the data
source. Deleting data items
from the data source without
removing the corresponding
nodes from the tree version
can result in orphaned
nodes in the tree version. For
example, if you added node
A into your tree version, and
subsequently deleted node A
from the data source without
removing it from the tree
version, the validation fails.
• The tree version contains a
tree reference node, which
references another tree
version that doesn't exist.
Remove any orphaned nodes
from the tree version. Update
tree reference nodes so that they
reference existing tree versions.
Node Relationship
All nodes must adhere to the
relationships mandated by the
data sources registered in the tree
structure.
The tree structure has data
sources arranged in a parent-
child relationship, but the nodes
in the tree don't adhere to the
same parent-child relationship.
For example, if the tree structure
has a Project data source with
a Task data source as its child,
Modify the tree version such that
the nodes adhere to the same
parent-child relationships as the
data sources.
624

Oracle Fusion Cloud HCM
Using Common Features for HCM
Chapter 24
Trees Setup
Validator Description (what's checked) Possible Cause for Validation
Failure
Suggested Corrective Action
Task nodes must always be within
Project nodes in the tree version.
This validation fails if there are
instances where a Project node is
added as the child of a Task node.
SetID Restricted Node
On the Manage Tree Structures:
Specify Data sources page, if the
Set ID check box is selected to
enable the Restrict Tree Node
List of Values Based on option
for each tree node, the underlying
node in the data source must
belong to the same reference data
set as the tree itself. This restriction
doesn't apply when the check box
isn't selected.
Even when the check box is
selected, the tree version has
nodes whose data source values
belong to a different reference data
set than the tree.
Modify the tree version such that
all nodes in the tree have data
sources with reference data set
matching that of the tree.
Label Enabled Node
On the Manage Tree Structures:
Specify Data Sources page, if a
labeling scheme is specified for
the tree structure by selecting a list
item from the Labeling Scheme
list, all nodes must have labels.
This restriction doesn't apply when
you select None from the Labeling
Scheme list.
The tree structure has a labeling
scheme but the tree version has
nodes without labels.
Assign a label to any node that
doesn't have a label.
Date Restricted Node
On the Manage Tree Structures:
Specify Data Sources page, if the
Date Range check box is selected
to enable the Restrict Tree Node
List of Values Based on option
for a tree structure, each node in
the underlying data source must
have an effective date range same
as the effective date range of
the tree version. This restriction
doesn't apply if the check box isn't
selected.
Even when the check box is
selected, there are data source
nodes that have a date range
beyond the tree version's effective
date range. For example, if the
tree version is effective from
Jan-01-2012 to Dec-31-2012, all
nodes in the tree version must
be effective from Jan-01-2012 to
Dec-31-2012 at a minimum. It is
acceptable for the nodes to be
effective for a date range that
extends partly beyond the tree
version's effective date range (for
example, the node data source
value is effective from Dec-01-2011
to Mar-31-2013). It isn't acceptable
if the nodes are effective for none
or only a part of the tree version's
effective date range (for example,
the node data source value are
effective only from Jan-01-2012 to
June-30-2012).
Ensure that all nodes in the tree
version have effective date range
for the effective date range for the
tree version.
Multiple Active Tree Version
On the Manage Tree Structures:
Specify Definition page, if the
Allow Multiple Active Tree
Versions check box isn't selected
for the tree structure, there must
not be more than one active tree
Even when the check box isn't
selected, there is more than one
active tree version in the tree for
the same date range.
Set no more than one tree version
to Active within the same date
range and set the others to inactive
or draft status.
625

Oracle Fusion Cloud HCM
Using Common Features for HCM
Chapter 24
Trees Setup
Validator Description (what's checked) Possible Cause for Validation
Failure
Suggested Corrective Action
version for a tree at any time. This
restriction doesn't apply if the
check box is selected.
Range Based Node
On the Data Source dialog box,
if the Allow Range Children
check box isn't selected, range-
based nodes aren't permitted from
that data source. This restriction
doesn't apply if the check box is
selected.
Even when the check box isn't
selected, there are range-based
nodes from a data source.
Ensure that any range nodes in
your tree version are from a data
source that allows range children.
Terminal Node
On the Data Source dialog box, if
the Allow Use as Leaves check
box isn't selected, values from
that data source can't be added as
leaves (terminal nodes) to the tree
version. This restriction doesn't
apply if the check box is selected.
Even when the check box isn't
selected, values from a data source
are added as leaf nodes (terminal
nodes).
Modify the tree version such that
all terminal nodes are from data
sources for which this check box is
selected.
Usage Limit
On the Data Source dialog box,
if the Use All Values option is
selected to set the Usage Limit for
the data source, every value in the
data source must appear as a node
in the tree. This restriction doesn't
apply if None option is selected.
Even if the Use All Values option
is selected, there are values in the
data source that aren't in the tree
version.
For each data source value that
isn't yet available, add nodes to the
tree version.
Copy, Audit, and Flatten Tree Versions Using a Scheduled Process
You can run the Manage All Trees Operations Centrally scheduled process to do these tasks.
• Copy tree version – Duplicate from an existing tree version.
• Audit and activate tree version – Audit the tree version, and mark the tree version as active, if audited
successfully.
• Flatten tree version – Incrementally flatten both rows and columns, and force flatten the tree version.
Run the Manage All Trees Operations Centrally process from the Scheduled Processes work area.
Related Topics
•
Submit Scheduled Processes and Process Sets
Why is it taking so long to duplicate my tree version?
For a faster response, duplicate your tree version using the Manage All Trees Operations Centrally scheduled process.
626


Oracle Fusion Cloud HCM
Using Common Features for HCM
Chapter 24
Trees Setup
628

Oracle Fusion Cloud HCM
Using Common Features for HCM
Chapter 25
HCM Flexfields Setup
25 HCM Flexfields Setup
Overview of Flexfields
A flexfield is a set of placeholder fields associated with business objects and placed on the application pages to contain
additional data.
You can use flexfields to modify the business objects and meet enterprise data management requirements without
changing the data model or performing any database programming. Using flexfields, you can capture different data on
the same database table and modify the application features. For example, airline manufacturers may require specific
attributes for orders that aren't predefined. Using a flexfield for the order business object, they can create and configure
the required attribute.
When you first define your flexfields, you choose how many segments you want to use and what order you want them
to appear in. You also choose how you want to validate each of your segments. The decisions you make affect how you
define your value sets. When your user enters a value, your value sets validate that value. The value sets can be one of
these types:
• List of valid values that aren't stored in any application table.
• Table-validated value sets that use a predefined list of values stored in an application table.
• Format only value sets that use any value as long as it conforms to your specified formatting rules. For
example, the value must not exceed the maximum length you define for your value set.
You can assign a value set to a flexfield segment to define the valid values in that segment. While defining valid values
in a segment, either reuse an existing value set or define a new value set. You can reuse a value set as often as you want
across multiple flexfields or different segments within the same flexfield.
Flexfield Types
Here are the types of flexfields:
• Descriptive flexfields
• Extensible Flexfields
• Key Flexfields
Both extensible and descriptive flexfields provide an expansion space that you can use to configure additional attributes
without additional programming. Descriptive flexfields are stored in additional columns on the same table as that of the
object, whereas extensible flexfields are stored in a separate extension table.
Key flexfields consist of one or more segments, where each segment can have a meaning. You can use key flexfields
to enter multipart values, such as a part number, a job code, or an account code. Users see the flexfields as fields or
attributes on UI pages. To manage the flexfields, use any of these tasks in the Setup and Maintenance work area:
• Manage Descriptive Flexfields: To configure descriptive flexfield segments if you have enabled descriptive
flexfields on a page.
• Manage Extensible Flexfields: To configure extensible flexfield segments if you have enabled extensible
flexfields on a page.
• Manage Key Flexfields: To configure key flexfields, which is a configurable multipart key.
629

Oracle Fusion Cloud HCM
Using Common Features for HCM
Chapter 25
HCM Flexfields Setup
• Manage Value Sets: To create reusable value sets to validate values in flexfield segments.
Note: You can manage value sets within the Manage Descriptive Flexfields or Manage Extensible
Flexfields tasks.
Related Topics
•
How can I access predefined flexfields?
•
Overview of Descriptive Flexfields
•
Overview of Extensible Flexfields
•
Overview of Key Flexfields
•
Overview of Value Sets
Flexfield Components
A flexfield is made up of several data entities that store and render information pertaining to flexfield configuration.
Flexfields are made up of the following components:
• Segments
• Value Sets
• Contexts
• Structures
Segments
A segment is a field within a flexfield and represents a single table column of your database. When configuring a
flexfield, define the appearance and meaning of individual segments. Segments represent attributes of information.
Segments can appear globally wherever the flexfield is implemented, or based on a structure or context. Each segment
captures a single atomic value and represents an attribute of information.
The characteristics of a segment vary based on the type of flexfield in which it's used.
• In key flexfields, a segment describes a characteristic of the entity. For example, a part number that contains
details about the type, color, and size of an item.
• In a descriptive or extensible flexfield, a segment represents an information attribute on the application page.
For example, details about a device containing components, some of which are global while the remaining are
contextually dependent on the category of the device.
Value Sets
Users enter values into segments while using an application. A value set is a named group of values that validate the
content of a flexfield segment. You configure a flexfield segment with a value set to enforce entries of only valid values
for that segment.
630

Oracle Fusion Cloud HCM
Using Common Features for HCM
Chapter 25
HCM Flexfields Setup
The configuration involves the following tasks:
• Defining the values in a value set, including characteristics such as the length and format of the values.
• Specifying formatting rules or values from an application table or predefined list.
Multiple segments within a flexfield, or multiple flexfields, can share a single value set.
Contexts
Context-sensitive flexfield segments are available to an application based on a context value. You define contexts as
part of configuring a flexfield. Users see global segments as well as any context-sensitive segments that apply to the
selected context value.
In descriptive flexfields and extensible flexfields, you can reuse the context-sensitive segments that are based on the
database columns, in multiple contexts.
Structures
Key flexfields have structures. Each key flexfield structure is a specific configuration of segments. Adding or removing
segments, or rearranging their order, produces a different structure. You can reuse the segments that are based on the
database columns, in multiple structures.
Note: You can translate all these flexfield components to the preferred languages without changing the language
session of the application. To specify the translations in all the enabled language rows, use the Translation Editor
option on the respective edit pages. Once the updates are made, users can view the translated text for the specific
flexfield components.
Related Topics
•
How Flexfields Work with Oracle Application Cloud Architecture
•
Overview of Value Sets
•
Enter or Edit Translated Text
Overview of Flexfield Configuration
Configuring a flexfield involves identifying the need for enhancing a business object with user-defined attributes
and then integrating the attributes into deployment. In the case of key flexfields, configuring the flexfield involves
identifying value set assignments and determining segment structures.
Overall Process for Configuring User-Defined Attributes
Before using flexfields to create attributes, familiarize yourself with the context layers and the configuration life cycle of
the application. You can add attributes to a business object using a flexfield, if developers have registered that object to
a flexfield. For descriptive and extensible flexfields, the overall configuration process involves the following:
1. Use the Highlight Flexfields feature from the Administration menu to find flexfields on pages associated with
business objects.
2. Plan the flexfield configuration.
631

Oracle Fusion Cloud HCM
Using Common Features for HCM
Chapter 25
HCM Flexfields Setup
3. Plan flexfield validation.
4. Define the attributes by configuring the flexfield segments.
a. Use the Manage Extensible Flexfields or Manage Descriptive Flexfields tasks, or use the Configure
Flexfield icon button directly on the page where the flexfield is highlighted. For simple configurations,
use the Add Segment, Add Context Value, and Edit Segment icon buttons directly on the page where
the flexfield is highlighted.
b. Optionally, validate the flexfield configuration.
c. Optionally, deploy the flexfield to a sandbox for initial testing.
5. Deploy the extensible flexfields changes to the mainline metadata, to display the attributes on the application
pages and to make them available for integration with other tools such as Oracle Transactional Business
Intelligence. But for descriptive flexfields, you must deploy your changes to a sandbox and test the changes
before publishing your sandbox. To deploy your descriptive flexfield to a sandbox:
a. Create or activate a sandbox, and select Flexfields from the list of tools.
b. In the Setup and Maintenance work area, go to the Manage Descriptive Flexfields task.
c. Open the flexfield you want to edit, and make your changes.
d. On the Actions menu, select Deploy Flexfield to Sandbox.
e. Click Yes to continue with the deployment.
6. Perform the necessary steps to integrate the attributes into the technology stack.
A simple configuration is limited to such actions as adding a format-only field or adding a field with a basic list of values.
Overall Process for Configuring User-Defined Keys
Using key flexfields, you can configure intelligent key codes containing meaningful parts according to your business
practices. You configure the key flexfield to have one segment for each part that makes up your key code.
For key flexfields, the overall configuration process involves the following:
1. Use the Highlight Flexfields feature from the Administration menu to find flexfields on pages associated with
business objects.
2. Plan the flexfield configuration.
3. Plan the flexfield validation.
4. Define the value sets before configuring the key flexfield segments by going to the Manage Value Sets task.
5. Define the key flexfield structures and their segments, and define structure instances for each structure.
a. Use the Manage Key Flexfields task or the Configure Flexfield icon button directly on the page where
the flexfield is highlighted.
b. Optionally, validate the flexfield configuration.
c. Optionally, deploy the flexfield to a sandbox for initial testing.
6. Deploy the key flexfield changes to the mainline metadata to display it on the application pages and to make it
available for integration with other tools such as Oracle Transactional Business Intelligence.
Note: You can't deploy your changes in value sets, key flexfields, and extensible flexfields to your sandbox.
You must deploy them directly to the mainline environment. However, if you're making changes to any
descriptive flexfields, you must deploy your flexfield to the sandbox and test your changes before publishing
your sandbox.
7. Perform the necessary steps to integrate the flexfield into the technology stack.
632

Oracle Fusion Cloud HCM
Using Common Features for HCM
Chapter 25
HCM Flexfields Setup
Related Topics
•
Overview of Extensible Flexfields
•
Overview of Key Flexfields
•
Considerations for Managing Flexfields
•
Overview of Context Layers
•
Configuration Life Cycle
Flexfields at Runtime
Business objects have an associated descriptive or extensible flexfield. Using these, you can create attributes for the
business object at run time. Some business objects have an associated key flexfield for configuring flexible multiple part
keys.
Finding Flexfields on a Page
At run time, the attributes you define as flexfield segments appear in the application page just like any other attribute.
However, each type of flexfield appears in a different way.
The following characteristics help you determine the type of flexfield on the application page:
• Descriptive flexfield segments appear as label and field pairs or as a table of fields that correspond to the
column headers. The fields represent the flexfield segments and accept values that derive from the segment's
assigned value set.
• Extensible flexfield segments appear grouped within labeled regions, where each grouping is a context and the
region labels are the context names.
• Key flexfields appear in the application page as a field with a key flexfield icon, where the field's value is a
collection of segments.
You can locate flexfields on a page using the Settings and Actions menu. Click your user image or name in the global
header to open this menu, and select Highlight Flexfields to locate flexfields on a page. The page renders in a special
mode, displaying the location of flexfields, if any, on the page. Do the following:
• Hover over the Basic Info icon to view flexfield details.
• Click the Configure Flexfield icon to manage the flexfield using the Manage Flexfields task.
• Click the Add Context Value, Add Segment, or Edit Segment icons to add a context value or edit a global or
context-sensitive flexfield segment. This applies to both descriptive and extensible flexfields.
Note: You can't create attributes on all flexfields. For example, some flexfields are protected, and you either can't edit
their configurations at all, or can do only limited changes to them. Consult the product-specific documentation to
verify whether there are any restrictions on using the flexfield.
All segments of a single flexfield are grouped together by default. The layout and positions of the flexfield segments
depend on where the application developer places the flexfield on the page. Flexfields may also be presented in a
separate section of the page, in a table, or on their own page or a dialog box. You can use the Application Composer tool
to edit the layout, position, or other display features of the flexfield segments.
633

Oracle Fusion Cloud HCM
Using Common Features for HCM
Chapter 25
HCM Flexfields Setup
When you no longer want to view the flexfields on a page, select Unhighlight Flexfields from the Administration menu.
Related Topics
•
Flexfield Modification Using Page Composer
Flexfield Modification Using Page Composer
You can use Page Composer to modify flexfields specific to a page.
Extensible Flexfield Modification
In Page Composer, open the page with the flexfield you want to modify. By default, you get the Design view to modify
pages. But for this page, you must use the Source view. Set the Source View for Page Composer Enabled profile
option (FND_PAGE_COMPOSER_SOURCE_VIEW) to Yes so that the View menu is available for you to switch between
the two views. You can find the profile option in the Manage Administrator Profile Values task In the Setup and
Maintenance work area.
After you switch to Source view, look for a region that's bound to an EffContextsPageContainer task flow. You can find all
attributes and contexts of the extensible flexfield in this task flow. To view the flexfield code and identifying information,
open the properties panel for the region. To modify any component within the region, select the desired tag and click
Edit.
Descriptive Flexfield Modification
In Page Composer, open the page with the flexfield you want to modify. Set the Source View for Page Composer
Enabled profile option (FND_PAGE_COMPOSER_SOURCE_VIEW) to Yes so that the View menu is available for you to
switch between the two views. You can find the profile option in the Manage Administrator Profile Values task In the
Setup and Maintenance work area.
After you switch to Source view, look for the <descriptiveFlexfield> element of that flexfield. Open the properties panel
for this element to view the flexfield code and to identify the information. Within the properties panel, you might modify
properties for the global, context, and context-sensitive segments or re-order the global segments on the page.
Property Description
Read-only
Indicates whether the flexfield is rendered as read-only. You can set the value to True or False or an EL
expression.
Auto Submit
Indicates whether the component submits automatically when users change the segment's value. You
can set the value to True or False or an EL expression.
Rendered
Indicates whether the flexfield is rendered on the page. You can set the value to True or False or an EL
expression. If a value for this property is explicitly set within the descriptive flexfields metadata, it's
shown as read-only. Users can't override the metadata settings using Page Composer.
Required
Indicates whether users must enter some data for the component before saving the page. You can
set the value to True or False or EL expression. If a value for this property is explicitly set within the
634

Oracle Fusion Cloud HCM
Using Common Features for HCM
Chapter 25
HCM Flexfields Setup
Property Description
descriptive flexfields metadata, it's shown as read-only. Users can't override the metadata settings
using Page Composer.
Inline Style
The inline style of the component. You can use the inline style property to set individual properties,
such as background color, font style, or padding.
Style Class
The style class of the flexfield. You can use style class to group a set of inline styles.
Mode
The UI mode of the descriptive flexfield component. You can use this property to render all the
segments or just some of them. You can select any one of these values:
• No value: Renders all descriptive flexfield segments. By default, all descriptive flexfield segments
are rendered.
• global: Renders only the global segments of the flexfield. You can use this value for a descriptive
flexfield inside a table column to generate sub-columns for the global segments.
• contextSensitive: Renders only the context-sensitive segments of the flexfield (including the
context segment). You can use this value for a descriptive flexfield inside a table detail region to
render the context values.
ShortDesc
A text that appears when a user hovers over an element.
Label
The display text for the component. For example, the field prompt or the single prompt for a group of
check boxes.
Columns
The width of the control in terms of the default font size of the browser. You can set this property with
a literal value or an EL expression.
Note: Flexfield segments can't be edited using their individual component elements. They can only be edited from
the properties panel of the <descriptiveFlexfield> element they belong to. To find these components, open the
properties panel of the descriptive flexfield, switch to the relevant tab, and search using the unique identifying
information. For example, to find a context sensitive segment, open the properties panel for the flexfield and go to the
Flexfield Context Segments tab. Search for the segment using its Context Value and Segment Code.
Related Topics
•
Flexfields at Runtime
•
Set Profile Option Values
How Flexfields Work with Oracle Application Cloud
Architecture
To capture additional data, administrators or implementors configure flexfield segments that represent attributes of
business objects. Business objects are enabled for both descriptive flexfields and extensible flexfields.
635

Oracle Fusion Cloud HCM
Using Common Features for HCM
Chapter 25
HCM Flexfields Setup
Application developers create a flexfield and register it so that it's available for configuration. Administrators and
implementation consultants configure segments and other properties of the available flexfields. This information is
stored as additional flexfield metadata in the database. Deploying the flexfield generates ADF business components
based on the flexfield metadata in the database.
The following aspects are important in understanding how flexfields and Oracle Fusion Cloud Applications architecture
work together:
• Integration
• Deployment
• Import and export
• Runtime
• Patching
636

Oracle Fusion Cloud HCM
Using Common Features for HCM
Chapter 25
HCM Flexfields Setup
Integration
The attributes that you add by configuring flexfields are available throughout the Oracle Middleware technology stack.
You can use the flexfield segment's Application Programming Interface (API) to identify segments and integrate the
flexfields in the following:
• User interface pages
• Service-oriented Architecture (SOA) infrastructure
• Oracle Transactional Business Intelligence
• Extended Spread Sheet Database (ESSbase)
Flexfield configurations are preserved across application updates.
Deployment
The metadata for the flexfield is stored in the application database as soon as you save your configuration changes.
Deploying the flexfield generates the ADF business components so that the user interface reflects the latest flexfield
definition in the metadata.
Importing and Exporting
Using the Setup and Maintenance work area, you can import and export flexfields across the implementation site. The
deployment status must be either Deployed or Deployed to sandbox. Therefore, before you attempt migration, verify
and ensure that a flexfield is successfully deployed.
Runtime
The latest definitions of a flexfield reflect on the user interface only if the flexfield is deployed. When the user interface
accesses a business object, the deployed flexfield definition identifies the attributes associated with the captured values.
On a page, if you add display configurations for a flexfield using the Application Composer tool, the same flexfield
segments can appear differently on different pages.
Patching
Flexfield configurations are preserved during patching and upgrading.
Related Topics
•
How Flexfield Deployment Status is Calculated
Flexfield Management
Considerations for Managing Extensible Flexfields
Configuring extensible flexfields involves managing the available flexfields registered with your application database.
637

Oracle Fusion Cloud HCM
Using Common Features for HCM
Chapter 25
HCM Flexfields Setup
The following sequence describes how to configure extensible flexfields:
1. Configuring contexts by creating each context segment and the context-sensitive segments for each context
segment, and providing the following for each segments:
a. Identifying information
b. Column assignment
c. Initial default value
d. Display properties
2. Configuring context usages and usage security by selecting actions to which users should have access:
◦
View
◦
Edit
◦
None, if no special privileges should be enforced.
3. Configuring categories and category details.
4. Associating contexts with a category.
5. Creating logical pages for a category.
The following aspects are important in understanding extensible flexfield management:
• Contexts and pages
• Categories
• Initial values
• Adding segments to highlighted extensible flexfields
• Indexed segments
• Security
• Deployment
Contexts and Pages
Each context is displayed to end users as a region containing its context-sensitive segments. You can specify instruction
help text to display instructions that explain how to use the region and its attributes to end users. Instruction help text
is displayed at the beginning of the context region. A context can be defined as single row or multi-row. Single row
contexts are the same as descriptive flexfields contexts. A single row context has only one set of context-sensitive
segments. A multi-row context enables you to associate multiple sets of values with the same object instance.
For example, for a BOOK table, you could create a multi-row context named chapters that contains a segment for
chapter and a segment for number of pages. Multiple chapters can then be associated with each book in the BOOK
table.
For contexts that store multiple rows, you can uniquely identify each row by having the values in each row form a
unique key.
If flexfield has a category hierarchy, then you can leverage the hierarchy to reuse contexts for similar entities, such as
similar items in a product catalog.
Set the context to translatable so that free-form text entered by end users is stored in the language of the user's locale,
and different translations of that text can be stored in other languages. Segments in the translated contexts should use
format-only value sets for storing free-form, user-entered text.
Set the context security to give an end user view or edit access to a context. The context's task flow and region appear
in the user interface only for users with view access. With edit access, an end user can edit the context's attribute values.
With no action specified for a usage, no special privileges are enforced through the context's configuration.
638

Oracle Fusion Cloud HCM
Using Common Features for HCM
Chapter 25
HCM Flexfields Setup
Define logical pages to group contexts together in the user interface. For a given category, you may create one or more
logical pages. You may add one or more of the category's associated contexts to each of the category's logical pages.
You can specify:
• The sequence of the contexts within each page.
• The sequence in which the logical pages appear.
• Instruction help text to display instructions that explain how to use the page to end users. Instruction help text
is displayed at the beginning of the logical page, preceding all of its context regions.
Categories
A category is a grouping of related data items that can be considered to belong together. You can associate any
combination of contexts with a given category. Extensible flexfields with more than 30 categories must be deployed as a
background process.
A category hierarchy logically organizes a set of categories. For example, the Electronics and Computers category
hierarchy might include a Computer category and a Home Entertainment category, which in turn might include an
Audio category and a TV category, and so on.
A category can be a child or sibling of an existing category. The hierarchy can be as simple or as complex as desired,
with any combination of zero or more sibling categories and zero or more child categories. If no category is defined, the
data items are grouped in a single predefined default category.
Each category has associated contexts that store relevant information about a data item in that category. For example, a
Home Entertainment product has contexts that specify Voltage, Dimensions, Inputs and Outputs. Contexts are reusable
within a given extensible flexfield. Then, the Dimensions context could be assigned to any category that needs to
include dimensional information.
If a hierarchy includes child categories, each child category inherits the contexts from its parent category; for example,
the Home Entertainment category inherits Voltage and Dimensions from the Electronics and Computers category.
Each extensible flexfield is associated with a particular category hierarchy. Consider category hierarchies to be defining
framework for extensible flexfields and their contexts. A category hierarchy specifies which contexts are valid for each
category.
An extensible flexfield can include multiple contexts which you define to support a given category. These contexts can
be suitable for various purposes, but within a particular category, some contexts might be considered to be related to,
or dependent on, each other. You can combine these contexts into groups known as logical pages, and determine the
sequence in which the pages appear. This serves to connect the contexts so they will always be presented together and
in a particular order in the application user interface.
For example, the Home Entertainment category might have an Electrical Specifications page that contains the Voltage,
Inputs and Outputs contexts, and a Physical Specifications page that contains the Dimensions and Form Factor
contexts.
Initial Values
The SQL statement defining an initial value must be a valid statement that returns only one row and a value of the
correct type.
You can use two types of SQL statements:
• SQL statement with no binding. For example, select MIN(SALARY) from EMPLOYEES.
• SQL statement with bind variables. You can use these bind variables in the WHERE clause of the SQL statement.
639

Oracle Fusion Cloud HCM
Using Common Features for HCM
Chapter 25
HCM Flexfields Setup
◦
:{SEGMENT.<segment_code>}: Identifies a segment in the same context.
◦
:{PARAMETER.<parameter_code>}: Identifies a parameter.
◦
:{CONTEXT.<context_code>;SEGMENT.<segment_code>}: Identifies a segment in a different context. The
context must be in the same category or in an ancestor category, and it can't be a multiple-row context.
◦
:{VALUESET.<value_set_code>}: Identifies the closest prior segment in the same context that's assigned to
the specified value set.
◦
:{FLEXFIELD.<internal_code>}: Identifies a flexfield.
Adding Segments to Highlighted Extensible Flexfields
When you highlight flexfields on a run time page and use an Add Segment icon button to create a segment, the
segment code, name, description, table column, and sequence number are set automatically. If you use an Add
Segment icon button to configure extensible flexfield segments, you can't use an existing value set. Value sets are
created automatically when you add segments. You can enter the valid values, their descriptions, and the default value
or specify the formatting constraints for the value set, such as minimum and maximum values.
Depending on display type, the value set you create with the Add Segment icon button is either an independent value
set or a format-only value set. The following table shows which type of value set is created depending on the segment
display component you select.
Display Component Value Set Created Using Add Segment
Check Box
Independent
Drop-down List
Independent
List of Values
Independent
Radio Button Group
Independent
Text Field With Search
Independent
Text box
Format Only
Text area
Format Only
Rich Text Editor
Format Only
Date/Time
Format Only
Tip: After you add a context value, refresh the page to see the new value.
640

Oracle Fusion Cloud HCM
Using Common Features for HCM
Chapter 25
HCM Flexfields Setup
Indexed Segments
You can designate an extensible flexfield segment as indexed so that it's one of the selectively required attributes a
user can use in an attribute search. If you indicate in the Manage Extensible Flexfield UI page that a segment should
be indexed, the column representing the segment must be added to the database index. Commonly, a database
administrator (DBA) adds columns to the database index.
When an extensible flexfield with indexed segments is deployed, search task flows are generated along with the other
flexfield artifacts and specify the indexed attributes as selectively required. In the deployed extensible flexfield's search
task flow, an end user must specify at least one of the indexed attributes in the search criteria. This prevents non-
selective searches, which could cause performance issues.
For example, if you index the memory and processor attributes and ensure that the corresponding columns in the
database are indexed, a user can search an item catalog for computers by entering processor or memory or both as a
search criteria. No search is performed if an end user enters an attribute that isn't indexed as a search criterion.
Security
An extensible flexfield's base data security resource typically has a name with an _B suffix. The translation data security
resource is a view of a translation table that typically has a name with an _VL suffix.
If a flexfield supports the translatable option and has a translation data security resource, make sure that you create the
action for the appropriate data security resource.
• If you create a context-specific action for a nontranslatable context, add it to the base data security resource.
• If you create a context-specific action for a translatable context, add it to the translation data security resource.
Deployment
You can only deploy extensible flexfields using the Manage Extensible Flexfields task. You can deploy extensible
flexfields offline as a background process and continue working in the session without having to wait for the
deployment to complete. You can queue up several extensible flexfields and deploy as a background process. The
flexfields are deployed, one at a time, in the order that you deploy them to the queue. You must deploy extensible
flexfields with more than 30 categories as a background process.
You can remove an extensible flexfield from the deployment queue with the Cancel Background Deployment command.
When an extensible flexfield is deployed in a background process, its offline status indicates that the flexfield is in a
background deployment process. A flexfield's offline status is cleared and it's deployment status updated when the
background deployment process has completed.
Note: The Offline Status column refreshes when you perform a new search in the Manage Extensible Flexfields task.
Related Topics
•
Why did my flexfield changes not appear in the UI?
•
Flexfield Usages
•
Why can't I edit my flexfield or value set configuration?
641

Oracle Fusion Cloud HCM
Using Common Features for HCM
Chapter 25
HCM Flexfields Setup
Flexfield Segment Properties
Independent of the value set assigned to a segment, segments may have properties that affect how they're displayed
and how they function.
The following aspects are important in understanding
• Display properties
• Properties related to segment values
• Properties related to search
• Range validation segments
• Rule validation of segment values
• Naming conventions
Display Properties
The following table summarizes display properties.
Property Description
Enabled
Whether the segment can be used.
Sequence
The order the segment appears in relation to the other configured segments.
Prompt
The string to be used for the segment's label in the user interface.
Display type
The type of field in which to display the segment.
Selected and deselected values
If the display type is check box, the actual values to save. For example, Y and N or 0 and 1.
Display size
The character width of the field.
Display height
The height of the field as measured in visible number of lines when the display type is a text area.
Read only
Whether the field should display as read-only, not editable text.
Description help text
The field-level description help text to display for the field. Use description help text to display a field-
level description that expands on or clarifies the prompt provided for the field.
If description help text is specified, a Help icon button is displayed next to the field in the application.
The description help text is displayed when the user hovers over the Help icon button.
Instruction help text
The field-level instruction help text to display for the field.
Use instruction help text to provide directions on using the field. If instruction help text is specified, it's
appears in an in-field help note window when users move the cursor over the field.
642

Oracle Fusion Cloud HCM
Using Common Features for HCM
Chapter 25
HCM Flexfields Setup
Property Description
Properties Related to Search
Extensible flexfield segments can be marked as selectively required in search using the indexed property. The indexed
property requires users to enter a value before conducting a search on the attribute represented by the indexed
segment. A database administrator must create an index on the segment column representing the indexed attribute.
Range Validation of Segments
Range validation enables you to enforce an arithmetic inequality between two segments of a flexfield. For example, a
product must be ordered before it can be shipped. Therefore, the order date must be on or before the ship date. Also,
the order date segment value must be less than or equal to the ship date segment value. You can use range validation to
ensure this relationship.
The conditions for range validation are as follows:
• Segments must be configured for range validation in pairs, one with the low value and one with the high value.
• Both segments must be of the same data type.
• Both segments must be parts of the same structure in a key flexfield or parts of the same context in a
descriptive flexfield or extensible flexfield.
• The low value segment must have a sequence number that's lesser than that of the high value segment.
• Non-range validated segments can exist between a range validated pair, but range validated pairs can't overlap
or be nested.
You can configure as many range validated pairs as you want within the same flexfield. Your application automatically
detects and applies range validation to the segment pairs that you define, in sequence order. It must detect a low value
segment first, and the next range validated segment that it detects must be a high value segment. These two segments
are assumed to be a matching pair. The low value and the high value can be equal.
Rule Validation of Segment Values
Validation rules on descriptive and extensible flexfield segments determine how an attribute is validated. The value
entered for an attribute on a business object must match a specified format or be restricted to a list of values. You can
use a value set or a Groovy validator to specify the validation rules.
Value set validation is required for global segments and context-sensitive segments, and optional for context segments.
In the case of context segments, the application may validate a value instead of the value set validating the value
against the context segment. However the application entered values must match exactly the valid context segment
values. If the context segment values are a superset or subset of the input values, you must assign a table-validated
value set or independent value set to validate context values.
You can also use Groovy validation to set additional restrictions or requirements for what values are allowed for certain
attributes of business objects. This is useful when you need to use the same value set to validate multiple segments, but
the exact validation requirement changes with each case. These validators can be defined at the global segment level,
or at the context level, based on your business needs. They have a validator code, validation expression, error message,
and description. After adding a new validator, click the Groovy Expression Builder icon to open the expression builder
window where you define your validation expression. Groovy validation is done when a user tries to save their values to
an attribute that has a Groovy validator. If the value for this attribute fails validation against the Groovy expression, the
text defined in the Error Message column is displayed as an error message.
643

Oracle Fusion Cloud HCM
Using Common Features for HCM
Chapter 25
HCM Flexfields Setup
When you configure a descriptive flexfield segment, you can specify a constant to use for setting the initial value. The
initial value can be an available parameter. For every planned segment, list the constant value or parameter, if any, to
use for the initial value.
Naming Conventions
Enter a unique code, name, and description for the segment. These properties are for internal use and not displayed to
end users. You can't change the code after the segment is created.
The Application Programming Interface (API) name is a name for the segment that isn't exposed to users. The API name
is used to identify the segment in various integration points including web services, rules, and business intelligence. Use
alphanumeric characters only with a leading character. For example, enter a code consisting of the characters A-Z, a-z,
0-9 with a non-numeric leading character. The use of spaces, underscores, multi-byte characters, and leading numeric
characters isn't permitted. You can't change the API name after the segment has been created.
Related Topics
•
Considerations for Managing Extensible Flexfields
Naming Conventions for Flexfield APIs
Application Programming Interface (API) name is a name for your flexfield component, which isn't exposed to users.
These names are used to identify flexfield components in various integration points, including web services, rules, and
business intelligence.
How to Frame API Names
You must use only alphanumeric characters for API names. For example, enter a name with the characters A-Z, a-z, or
0-9, with a non-numeric leading character. Don't use spaces, underscores, multi-byte characters, or leading numeric
characters in your API names.
CAUTION: Do not change API names after they're created. Doing so could break integration points.
Words You Can't Use for API Names
You can't use certain words for API names when configuring flexfields because they're reserved words in ADF, SQL, PL/
SQL, Java, Groovy, and so on.
This table lists some of the reserved words that can't be used as API names. This list isn't exhaustive.
Letter Reserved Words
A
ABORT, ABSTRACT, ACCEPT, ACCESS, ACTIONENABLED, ADD, ALL, ALLROWSINRANGE, ALTER,
AND, ANY, ARRAY, ARRAYLEN, AS, ASC, ASSERT, ASSIGN, AT, ATTRIBUTEDEF, ATTRIBUTEDEFS,
ATTRIBUTEVALUE, ATTRIBUTEVALUES, AUDIT, AUTHORIZATION, AVG
B
BEGIN, BETWEEN, BINDINGS, BODY, BOOLEAN, BREAK, BY, BYTE, BYVALUE
644

Oracle Fusion Cloud HCM
Using Common Features for HCM
Chapter 25
HCM Flexfields Setup
Letter Reserved Words
C
CASCADE, CASE, CAST, CATCH, CATEGORY, CHAR, CHECK, CHILDREN, CLASS, CLONE, CLOSE,
CLUSTER, CLUSTERS, COALESCE, COLAUTH, COLUMN, COLUMNS, COMMENT, COMMIT, COMPRESS,
CONNECT, CONST, CONSTANT, CONSTRIANT, CONTAINS, CONTINUE, COUNT, CRASH, CREATE,
CURRENT, CURRENTROW, CURRVAL, CURSOR
D
DATABASE, DATACONTROL, DATE, DBA, DEBUGOFF, DEBUGON, DECIMAL, DECLARE, DEFAULT,
DEFINITION, DELAY, DELETE, DELTA, DESC, DESCRIPTION, DIGITS, DISPLAY, DISPLAYDATA,
DISPLAYHINT, DISPLAYHINTS, DISPOSE, DISTINCT, DIV, DO, DOUBLE, DROP
E
ELSE, ELSIF, EMPTY, ENABLED, ENABLEDSTRING, END, ENTRY, EQ, EQUALS, ERROR,
ESTIMATEDROWCOUNT, EXCEPTION, EXCLUSIVE, EXISTS, EXIT, EXTENDS
F
FALSE, FETCH, FILE, FINAL, FINALIZE, FINALLY, FINDMODE, FLOAT, FOR, FORM, FROM, FULLNAME,
FUNCTION, FUTURE
G
GE, GENERIC, GETCLASS, GOTO, GRANT, GROUP, GROUPBY, GT
H
HASHCODE, HAVING, HINTS
I
IDENTIFIED, IF, IMMEDIATE, IMPLEMENTS, IMPORT, IN, INCREMENT, INDEX, INDEXES, INDICATOR,
INITIAL, INNER, INPUTVALUE, INSERT, INSTANCEOF, INT, INTEGER, INTERFACE, INTERSECT, INTO, IS,
ITERATORBINDING
J
JAVA
K
KEY
L
LABEL, LABELS, LABELSET, LE, LEVEL, LIKE, LIMITED, LOCK, LONG, LOOP, LT
M
MANDATORY, MAX, MAXEXTENTS, MIN, MINUS, MLSLABEL, MOD, MODE, MODIFY
N
NAME, NATIVE, NATURAL, NE, NEW, NEXTVAL, NOAUDIT, NOCOMPRESS, NOT, NOTFOUND, NOTIFY,
NOTIFYALL, NOWAIT, NULL, NULLIF, NUMBER
O
OF, OFFLINE, ON, ONLINE, OPEN, OPERATIONENABLED, OPERATOR, OPTION, OR, ORDER, ORDERBY,
OTHERS, OUT, OUTER, OVERLAPS
P
PACKAGE, PARTITION, PCTFREE, POSITIVE, PRAGMA, PRIMARY, PRIOR, PRIVATE, PRIVILEGES,
PROCEDURE, PROTECTED, PUBLIC
R
RAISE, RANGE, RANGESET, RANGESIZE, RANGESTART, RAW, REAL, RECORD, REFERENCES,
RELEASE, REMR, RENAME, RESOURCE, REST, RESULT, RETURN, REVERSE, REVOKE, ROLLBACK,
ROOTNODEBINDING, ROW, ROWID, ROWLABEL, ROWNUM, ROWS, ROWTYPE, RUN
S
SAVEPOINT, SCHEMA, SELECT, SELECTEDVALUE, SEPARATE, SESSION, SET, SHARE, SHORT, SIZE,
SMALLINT, SPACE, SQL, SQLBUF, SQLCODE, SQLERRM, START, STATEMENT, STATIC, STDDEV,
SUBTYPE, SUCCESSFUL, SUM, SUPER, SWITCH, SYNCHRONIZED, SYNONYM, SYSDATE
645

Oracle Fusion Cloud HCM
Using Common Features for HCM
Chapter 25
HCM Flexfields Setup
Letter Reserved Words
T
TABAUTH, TABLE, TABLES, TASK, TERMINATE, THEN, THIS, THROW, THROWS, TO, TOOLTIP,
TOSTRING, TRANSIENT, TRIGGER, TRUE, TRY, TYPE
U
UID, UNION, UNIQUE, UPDATE, UPDATEABLE, USE, USER
V
VALIDATE, VALUES, VAR, VARCHAR, VARCHAR2, VARIANCE, VIEW, VIEWS, VOID, VOLATILE
W
WAIT, WHEN, WHENEVER, WHERE, WHILE, WITH, WORK
X
XOR
Related Topics
•
Flexfield Segment Properties
•
Considerations for Managing Flexfields
How Flexfield Segments are Rendered on Pages
Flexfield segments appear on pages as attributes of business objects. When you create or edit flexfield segments, the
value you enter for the display type determines how the segment appears on a page.
How Display Type Values Appear
The series of figures (A to L) represent how the display types render on the UI. Each display type screenshot is assigned
an alphabetic character that maps to the display type and its description in the table.
646

Oracle Fusion Cloud HCM
Using Common Features for HCM
Chapter 25
HCM Flexfields Setup
647

Oracle Fusion Cloud HCM
Using Common Features for HCM
Chapter 25
HCM Flexfields Setup
648

Oracle Fusion Cloud HCM
Using Common Features for HCM
Chapter 25
HCM Flexfields Setup
The table describes each display type:
Figure Reference Display Type Description
A
Check Box
The field appears as a check box. If you select
the check box, the checked value is used.
Otherwise, the deselected value is used.
B
Drop-down List
The field appears as a list of values from which
you can select. It supports a smaller number of
values.
C
List of Values
The field appears as a list of values from which
you can select.
649

Oracle Fusion Cloud HCM
Using Common Features for HCM
Chapter 25
HCM Flexfields Setup
Figure Reference Display Type Description
D
Pop-up List of Values
The field appears as a list of values from which
you can select. It supports large volumes of
values.
E
Search Enabled List of Values
The field appears as a text field with a Search
icon. You can type a value in the text field.
You can also click the Search icon that opens
another window for searching.
F
Radio Button Group
The field appears as a set of radio buttons. You
can click a button to select an option. When you
select an option, previously selected option is
automatically deselected.
G
Text Area
The field appears as a text area where you
can enter multiple lines of text. The display
width and height specify the visible width and
number of lines in the text area.
H
Text Box
The field appears as a text field where you can
enter a single line of text. The display width
controls the width of the text box.
I
Date Time
The field enables you to enter a date if the data
type is Date. You can enter a date and time
if the data type is Date Time. You can select
the date in a calendar. If the data type is Date
Time, you can also specify the hour, minutes,
seconds, AM or PM, and the time zone.
J
Rich Text Editor
The field appears as a text area where you
can enter and edit multiple lines of formatted
text. The display width and height specify the
visible width and number of lines in the rich text
editor.
Note:
This display type is available for extensible
flexfields only.
K
Color
The field displays a color palette. You can select
a color and assign it to the segment. You can
select the display type only if the value set
for the segment is set to ORA_FND_COLOR_
#RRGGBB.
L
Static URL
The field appears as a text field where you can
enter a fixed URL that opens the web page
when clicked.
650

Oracle Fusion Cloud HCM
Using Common Features for HCM
Chapter 25
HCM Flexfields Setup
Figure Reference Display Type Description
Note:
The length of the URL must not exceed 255
characters.
Note: If you select the display type as Hidden, the field isn't displayed.
How Flexfields and Value Sets Work Together
Value sets are specific to your enterprise. When gathering information using flexfields, your enterprise's value sets
validate the values that your users enter based on how you defined the value set.
You can assign a value set to any number of flexfield segments in the same or different flexfields. Value set usage
information indicates which flexfields use the value set.
The following aspects are important in understanding how flexfields and value sets work together:
• Defining value sets
• Shared value sets
• Deployment
Defining Value Sets
As a key flexfield guideline, define value sets before configuring the flexfield, because you assign value sets to each
segment as you configure a flexfield. With descriptive and extensible flexfields, you can define value sets when adding
or editing a segment.
Note: Ensure that changes to a shared value set are compatible with all flexfield segments that use the value set.
Shared Value Sets
When you change a value in a shared value set, the change affects the value set for all flexfields that use that value set.
The advantage of a shared value set is that a single change propagates to all usages. The drawback is that the change
shared across usages may not be appropriate in every case.
Value Set Values
To configure user-defined attributes to be captured on the value set values in the Manage Value Sets task, configure the
Value Set Values descriptive flexfield. The object's code is FND_VS_VALUES_B.This flexfield expects the context code
to correspond to the value set code. For each value set, you can define a context whose code is the value set code, and
whose context-sensitive segments are shown for the values of that value set. By default, the context segment is hidden
since it maps to the value set code and is not expected to be changed.
You can also define global segments that are shown for all value sets. However, this would be quite unusual since it
would mean that you want to capture that attribute for all values for all value sets.
651

Oracle Fusion Cloud HCM
Using Common Features for HCM
Chapter 25
HCM Flexfields Setup
Deployment
When you deploy a flexfield, the value sets assigned to the segments of the flexfield provide users with the valid values
for the attributes represented by the segments.
Related Topics
•
Overview of Flexfield Deployment
•
How Flexfields Work with Oracle Application Cloud Architecture
•
Validation Type Options for Value Sets
Default Segment Values
To populate a flexfield segment with a default value when a row is created, specify a default type of constant, parameter,
or Groovy, and a default value or expression.
Note: Default values for global, context, and context-sensitive segments are shown only when a descriptive flexfield
row is created. Also, when a context segment value is changed on a UI that renders new context-sensitive segments,
these segments display default values for both new and existing rows.
To synchronize a segment's value with another field's value whenever it changes, specify the derivation value to be the
flexfield parameter from which to derive the attribute's value. Whenever the parameter value changes, the attribute's
value is changed to match. If you derive an attribute from a parameter, consider making the attribute read-only, as
values entered by users are lost whenever the parameter value changes. When setting a default value or deriving
a default value from a parameter, only those attributes designated by development as parameters are available for
selection. Different combinations of making the segments read only or editable in combination with the default or
derivation value or both, have different effects.
If your segment's default type is Groovy, you can set the Groovy expression you need using the expression builder. To
open the expression builder, select Groovy Expression as your Default Type and click the Groovy Expression Builder
icon. But you should know that Groovy defaulting doesn't support derivation when a dependent parameter changes.
The expression is evaluated only at segment creation.
Note: New usages of Groovy default values and validators in flexfields are deprecated because they won't be
automatically upgraded in future releases. However, flexfields already using Groovy will continue to work. If you
want to add Groovy expression to new flexfields, you must set the Flexfield Groovy Usage Support Restricted
(ORA_FND_FLEX_GROOVY_RESTRICTED) profile option to N.
The following table maps these different combinations. Initial action corresponds to the row for the attribute value being
created in the entity table. If the default value is read only, it can't subsequently be changed through the user interface.
If the default value isn't read only, users can modify it. However, if the segment value is a derived value, a user-modified
segment value is overwritten when the derivation value changes.
652

Oracle Fusion Cloud HCM
Using Common Features for HCM
Chapter 25
HCM Flexfields Setup
Default Type Default value specified? Derivation value
specified?
Initial action Action after parameter
changes
None
No
Yes
No initial segment value
The changed parameter
derivation value updates
segment value
Constant
Yes
No
Default segment value
N/A
Constant
Yes
Yes
Default segment value
The changed parameter
derivation value updates
segment value
Parameter
Yes
No
The default segment value
is the parameter's default
value
N/A
Parameter
Yes
Yes, and same as default
value
The default segment value
is the parameter's default
and derivation value
The changed parameter
derivation value updates
segment value
Parameter
Yes
Yes, and different from
default value
The default segment value
is the parameter's default
value
The changed parameter
default value doesn't
update segment value. Only
the changed derivation
value updates the segment
value.
Groovy Expression
Yes
N/A
The default value of the
segment is determined
by evaluating the groovy
expression.
Groovy expressions
are evaluated only at
segment creation. They're
not evaluated when a
dependent parameter is
modified.
SQL
Yes
No
The default segment value
is the value returned by
executing SQL statement
N/A
SQL
Yes
Yes
The default segment value
is the value returned by
executing SQL statement
The changed parameter
derivation value updates
segment value
Note: For Descriptive Flexfield, only the PARAMETER bind variable is supported as the default type in a SQL statement
in the specified format: #{PARAMETER.<PARAMETER_NAME>} Other bind variables, such as SEGMENT, CONTEXT, and VALUESET
aren't supported in a SQL statement. Also, the default type in a SQL statement is evaluated only when you create a
segment. They aren't evaluated when a dependent parameter is modified.
653

Oracle Fusion Cloud HCM
Using Common Features for HCM
Chapter 25
HCM Flexfields Setup
Related Topics
•
How can I set a default value for a flexfield segment?
•
Groovy Scripting Reference
Flexfield Usages
The flexfield usage specifies the table with which the flexfield and its segments are associated. A flexfield can have
multiple usages. However, the first table registered for a flexfield indicates the primary usage. Segments are based on
the primary usage.
Other usages of the same table for the same flexfield use the same segment setup, though the column names may have
a differentiating prefix.
On the Manage Descriptive Flexfields and Manage Extensible Flexfields pages, click the Show Entity Usages icon for
a specific flexfield to view its entity usage. On the Manage Value Sets page, you can view the flexfield usages for a
selected value set.
Extensible Flexfields
For extensible flexfield contexts, you can configure a different usage. The use of an extensible flexfield context
determines the scenarios or user interfaces in which the segments of a context appear to users. For example, the
Supplier page displays an extensible flexfield's supplier usage and the Buyer page for the same flexfield displays the
buyer usage. Then, a context that's associated only with the supplier usage appears only on the Supplier page and not
on the Buyer page.
Value Sets
The use of value sets specifies the flexfields having segments where the identified value set is assigned.
FAQs for Flexfield Management
How can I access predefined flexfields?
Search for predefined flexfields using the manage flexfields tasks.
1. In the Setup and Maintenance work area, go to any of the following tasks:
◦
Manage Descriptive Flexfields
◦
Manage Extensible Flexfields
◦
Manage Key Flexfields
2. On the page for the type of flexfield you're looking for, enter any of the search parameters and click Search.
Tip: If you don't know the flexfield name or the code, use the Module field to filter search results.
3. Click a flexfield to view its details.
654

Oracle Fusion Cloud HCM
Using Common Features for HCM
Chapter 25
HCM Flexfields Setup
For configuration that's not available through the manage flexfields tasks and the UI, ask your help desk to log a service
request.
Related Topics
•
How do I update existing setup data?
Why can't I edit my flexfield or value set configuration?
Your flexfield or value set configuration may be protected. Application developers mark some configurations as
protected, indicating that you can't edit them.
Some examples of configurations that may be protected are:
• Descriptive flexfields
• Extensible flexfield contexts
• Extensible flexfield pages
• Value sets
Why did my page not display any flexfield?
For a flexfield to be available on the page, it must be registered by developers and also deployed. The segments appear
on the page only after you have successfully deployed the flexfield.
A flexfield's deployment status indicates whether the flexfield segments are available to users. The flexfield segments
that users see correspond to the flexfield definition last deployed successfully.
Note: Oracle Fusion Cloud Sales Automation and Oracle Fusion Cloud Fusion Service don't support flexfields.
To add attributes to these applications, you may use Application Composer. For more information, see the product-
specific documentation.
Related Topics
•
How Flexfield Deployment Status is Calculated
Why did my flexfield changes not appear in the UI?
The ADF business components or artifacts of a flexfield, which are generated into an Oracle Metadata Services (MDS)
Repository when the flexfield is deployed, are cached within a user session.
You must sign out and sign back in to view flexfield definition changes reflected in the application user interface page.
655

Oracle Fusion Cloud HCM
Using Common Features for HCM
Chapter 25
HCM Flexfields Setup
Related Topics
•
How Flexfield Deployment Status is Calculated
How can I enable flexfield segments for Oracle Social Network
Cloud Service?
When you manage Oracle Social Network Objects during setup and maintenance, search for the business object that
includes descriptive flexfields. Select the attributes that are defined as flexfield segments and enable them.
Flexfield Deployment
Overview of Flexfield Deployment
Deployment generates or refreshes the Application Development Framework (ADF) business component objects that
render flexfields on the UI. Deployment adds user-defined attributes to the Web Services Description Language (WSDL)
schemas exposed by Oracle Fusion Cloud ADF services and used by SOA composites.
Flexfields are deployed for the first time when the application is provisioned. After you configure a flexfield, you must
deploy it to make the changes available to users.
If a descriptive flexfield is enabled for business intelligence, the deployment process redeploys the flexfield's business
intelligence artifacts.
You can deploy a flexfield to a sandbox for testing or to the mainline metadata for use in a test or production
environment. You can deploy extensible flexfields as a background process.
After deployment, the user-defined attributes are available for incorporating into the SOA infrastructure, such as
business process and business rule integration. For example, you can now write business rules that depend on the
user-defined attributes. You must sign out and sign back in to Oracle Fusion Cloud Applications to see the changes you
deployed in the production environment.
The following aspects are important in understanding flexfield deployment:
• Deployment Status
• Initial Deployment Status
• Metadata Validations
• Metadata Synchronization
• Deployment as a Background Process
• Export of Artifacts from Flexfield MDS
Deployment Status
Every flexfield has a deployment status. Check the deployment status of your flexfield after patching. The following
table lists the different deployment statuses a flexfield can have.
656

Oracle Fusion Cloud HCM
Using Common Features for HCM
Chapter 25
HCM Flexfields Setup
Deployment Status Meaning
Edited
The flexfield metadata definition hasn't been deployed yet. Updates of the metadata definition aren't
applied in the production environment yet.
Patched
The flexfield metadata definition has been modified through a patch or a data migration action, but
the flexfield hasn't yet been deployed. So, the updated definition isn't reflected in the production
environment.
Deployed to Sandbox
The current metadata for the flexfield is deployed in ADF artifacts and available as a flexfield-enabled
sandbox.
Deployed
The current metadata for the flexfield is deployed in ADF artifacts and available to users. No changes
have been made to the flexfield after being deployed to the mainline metadata.
Error
The deployment attempt in the mainline metadata failed.
Note: Whenever a value set definition changes, the deployment status of a flexfield that uses that value set changes
to edited. If the change results from a patch, the deployment status of the flexfield changes to patched.
Initial Deployment Status of Flexfields
The Oracle Fusion Cloud Applications implementation loads flexfield metadata into the database. This initial load sets
the flexfield status to Edited. During installation, the application provisioning process deploys the flexfields of the
provisioned applications, setting their status to Deployed if no errors occur.
In a provisioned application, deployed flexfields are ready to use. In some cases, flexfield availability at production
environment requires setup, such as defining key flexfields.
Metadata Validation
Use the Validate Metadata command to view possible metadata errors before attempting to deploy the flexfield.
Metadata validation is the initial phase of all flexfield deployment commands. By successfully validating metadata
before running the deployment commands, you can avoid failures in the metadata validation phase of a deployment
attempt. The deployment process ends if an error occurs during the metadata validation phase. Metadata validation
results don't affect the deployment status of a flexfield.
Metadata Synchronization
When an extensible or descriptive flexfield is deployed, the deployment process regenerates the XML schema definition
(XSD). As a result, the user-defined attributes are available to web services and the SOA infrastructure.
After deploying a flexfield configuration, you must synchronize the updated XML schema definition (XSD) files in the
MDS repositories for each SOA application.
Note: To synchronize the updated XSD files in the MDS repositories in Oracle Cloud implementations, log a service
request using My Oracle Support at https://support.com/
657

Oracle Fusion Cloud HCM
Using Common Features for HCM
Chapter 25
HCM Flexfields Setup
Deployment as a Background Process
You can deploy extensible flexfields offline as a background process and continue working in the session without having
to wait for the deployment to complete. You can queue up several extensible flexfields and deploy as a background
process. The flexfields are deployed, one at a time, in the order that you deploy them to the queue. You must deploy
extensible flexfields with more than 30 categories as a background process.
You can remove an extensible flexfield from the deployment queue with the Cancel Background Deployment command.
When an extensible flexfield is deployed in a background process, its offline status indicates that the flexfield is in a
background deployment process. A flexfield's offline status is cleared and its deployment status updated when the
background deployment process has completed.
Export of Artifacts from Flexfield MDS
You can export business components from MDS for descriptive, extensible, or key flexfields, mainly for use in
troubleshooting issues with flexfields. Use Download Flexfield Archive on the Manage Flexfields page to export MDS
artifacts of the selected flexfield, and import them to an archive on your local computer. You can use these archived
business components of flexfields for troubleshooting purposes.
Alternatively, export the deployed artifacts using exportMetadata WLST.
Related Topics
•
How Flexfield Deployment Status is Calculated
•
How Flexfields Work with Oracle Application Cloud Architecture
•
Considerations for Deploying a Descriptive Flexfield to a Sandbox
•
Why did my flexfield changes not appear in the UI?
How Flexfield Deployment Status is Calculated
Flexfield deployment status indicates how the flexfield metadata definition in the Oracle Fusion Cloud Applications
database relates to the Application Development Framework (ADF) business components residing in an Oracle
Metadata Services (MDS) Repository.
The following aspects are important in understanding how flexfield deployment status is calculated:
• Settings that affect flexfield deployment status
• How deployment status is calculated
Settings That Affect Flexfield Deployment Status
If you have made a change to a flexfield and expect a changed deployment status, ensure that you have saved your
changes. No settings affect flexfield deployment status.
How Deployment Status Is Calculated
If the flexfield definition has been edited through the Define Flexfields activity task flows, the status is Edited. The latest
flexfield metadata definition diverges from the latest deployed flexfield definition. Any change, including if a value set
used in a flexfield changes, changes the deployment status to Edited. If a flexfield has never been deployed, its status is
Edited.
658

Oracle Fusion Cloud HCM
Using Common Features for HCM
Chapter 25
HCM Flexfields Setup
Note: When an application is provisioned, the provisioning framework attempts to deploy all flexfields in that
application.
If you deploy the flexfield to a sandbox successfully, the status is Deployed to Sandbox. The latest flexfield metadata
definition in the application matches with the metadata definition that generated ADF business components in a
sandbox MDS Repository. Whether the sandbox is active or not doesn't affect the deployment status. If the flexfield was
deployed to a sandbox and hasn't been edited or redeployed to the mainline metadata since then, the status remains
Deployed to Sandbox independent of whether the sandbox is active, or who's viewing the status.
If you deploy the flexfield successfully to the mainline metadata, the status is Deployed. The latest flexfield metadata
definition in the application matches the metadata definition that generated ADF business components in a mainline
MDS Repository. Change notifications are sent when a flexfield is deployed successfully to the mainline metadata.
If either type of deployment fails and that the current flexfield definition isn't deployed, the status is Error. The
deployment error message gives details about the error. The latest flexfield metadata definition in the application likely
diverges from the latest successfully deployed flexfield definition.
If the flexfield definition has been modified by a patch, the status is Patched. The latest flexfield metadata definition in
the application diverges from the latest deployed flexfield definition. If the flexfield definition was Deployed before the
patch and then a patch was applied, the status changes to Patched. If the flexfield definition was Edited before the patch
and then a patch was applied, the status remains at Edited to reflect that there are still changes (outside of the patch)
that aren't yet in effect.
When a deployment attempt fails, you can access the Deployment Error Message for details.
Related Topics
•
How Flexfields Work with Oracle Application Cloud Architecture
•
Considerations for Managing Extensible Flexfields
How Deploying a Flexfield-Enabled Sandbox Works with Mainline
Metadata
When you deploy a flexfield to a sandbox, the flexfield definition corresponds to the flexfield metadata definition in
the Oracle Fusion Cloud Applications database. When the flexfield is ready for use, it must be deployed to the mainline
metadata.
A flexfield-enabled sandbox uses the following components.
• Flexfield metadata in the Fusion Applications database
• Flexfield business components in a sandbox Oracle Metadata Services (MDS) repository
• User interface modifications for the flexfield in the mainline MDS repository
659

Oracle Fusion Cloud HCM
Using Common Features for HCM
Chapter 25
HCM Flexfields Setup
Sandbox Metadata Services Repository Data
Deploying the flexfield to a sandbox generates the Application Development Framework (ADF) business components of
a flexfield in a sandbox MDS Repository for testing in isolation.
CAUTION: Don't modify flexfield segment display properties using Page Composer in a flexfield sandbox as these
changes are lost when you deploy your flexfield to the mainline metadata.
Mainline Metadata Services Repository Data
The Oracle Fusion Cloud Applications database stores the single source of truth about a flexfield. When the flexfield is
deployed, the ADF business component objects that implement the flexfield in the run time user interface are generated
in the mainline MDS Repository from this source.
660

Oracle Fusion Cloud HCM
Using Common Features for HCM
Chapter 25
HCM Flexfields Setup
Related Topics
•
How Flexfield Deployment Status is Calculated
Considerations for Deploying a Descriptive Flexfield to a Sandbox
You can deploy and test the behavior of a descriptive flexfield in the flexfield-enabled sandbox. Use the Manage
Descriptive Flexfields task to change the flexfield definition, if required.
When you deploy a descriptive flexfield to a sandbox, the process reads the metadata about the segments from
the database. It generates ADF Business Components artifacts for flexfields based on the definition, and stores the
generated artifacts in the sandbox.
You can't deploy your changes in value sets, key flexfields, and extensible flexfields to your sandbox. You must deploy
them directly to the mainline environment. However, if you're making changes to any descriptive flexfield, you must
deploy your flexfield to the sandbox and test your changes before publishing your sandbox. After you deploy a
descriptive flexfield to a sandbox, you must sign out and sign back in to the application to see your changes.
Note: You can deploy a descriptive flexfield to a sandbox using the Manage Descriptive Flexfields task only.
Manage Value Sets
Overview of Value Sets
A value set is a group of valid values that you assign to a flexfield segment to control the values that are stored for
business object attributes.
A user enters a value for an attribute of a business object while using the application. The flexfield validates the value
against the set of valid values that you configured as a value set and assigned to the segment.
For example, you can define a required format, such as a five-digit number, or a list of valid values, such as green, red,
and blue.
Flexfield segments are usually validated, and typically each segment in a given flexfield uses a different value set. You
can assign a single value set to more than one segment, and you can share value sets among different flexfields.
Note: Ensure that changes to a shared value set are compatible with all flexfields segments using the value set.
The following aspects are important in understanding value sets:
• Managing value sets
• Validation
• Security
661

Oracle Fusion Cloud HCM
Using Common Features for HCM
Chapter 25
HCM Flexfields Setup
• Precision and scale
• Usage and deployment
• Protected value set data
Managing Value Sets
To open the Manage Value Sets page, use the Manage Value Sets task. You can also use the Manage Descriptive
Flexfields and Manage Extensible Flexfields tasks for configuring a segment, including its value set. To open the
Manage Values page, select the value set from the Manage Value Sets page, and click Manage Values. Alternatively,
click Manage Values from the Edit Value Set page.
Validation
The following types of validation are available for value sets:
• Format only, where users enter data instead of selecting values from a list
• Independent, a list of values consisting of valid values you specify
• Dependent, a list of values where a valid value derives from the independent value of another segment
• Subset, where the list of values is a subset of the values in an existing independent value set
• Table, where the values derive from a column in an application table and the list of values is limited by a WHERE
clause
A segment that uses a format only value set doesn't present a list of valid values to users. If required, you may add table
validated value sets to the list of available value sets available for configuration.
For a dependent value set, you must assign an existing independent value set to it. You can’t assign a value set whose
validation type is Dependent.
Note: For the Accounting Key Flexfield value sets, you must use independent validation only. If you use other
validations, you can't use the full chart of accounts functionality, such as data security, reporting, and account
hierarchy integration.
Security
Value set security only works in conjunction with usage within flexfield segments. You can specify that data security be
applied to the values in flexfield segments that use a value set. Based on the roles provisioned to users, data security
policies determine which values of the flexfield segment users can view or modify.
The application of value set security has the following conditions:
• At the value set level: The value set is the resource secured by data security policies. If a value set is secured,
every usage of it in any flexfield is secured. Disabling security for individual usages of the same value set isn't
possible.
• Applies to independent, dependent, or table-validated value sets.
• Applies mainly when data is being created or updated, and to key flexfield combinations tables for query
purposes. Value set security doesn't determine which descriptive flexfield data is shown upon querying.
• Security conditions defined on value sets always use table aliases. When filters are used, table aliases are always
used by default. When predicates are defined for data security conditions, make sure that the predicates also
use table aliases.
662

Oracle Fusion Cloud HCM
Using Common Features for HCM
Chapter 25
HCM Flexfields Setup
For key flexfields, the attributes in the view object corresponding to the account combination ID, structure instance
number (SIN), and data set number (DSN) can't be transient. They must exist in the database table. For key flexfields,
the SIN segment is the discriminator attribute, and the account combination segment is the common attribute.
Precision and Scale
If the data type of a value set is Number, you can specify the precision (maximum number of digits user can enter) or
scale (maximum number of digits following the decimal point).
Usage and Deployment
The usage of a value set is the flexfields where that value set is used. The deployment status of flexfields in which the
value set is used indicates the deployment status of the value set instance.
For most value sets, when you enter values into a flexfield segment, you can enter only values that already exist in the
value set assigned to that segment.
Global and context-sensitive segment require a value set. You can assign a value set to a descriptive flexfield context
segment. If you specify only context values, not value sets for contexts, the set of valid values is equal to the set of
context values.
663

Oracle Fusion Cloud HCM
Using Common Features for HCM
Chapter 25
HCM Flexfields Setup
Protected Value Set Data
Application developers may mark some value sets as protected, indicating that you can't edit them.
You can edit only value sets that are not marked as protected. You can't edit or delete protected value sets. If the value
set type supports values (such as independent, dependent or subset value sets), then you can't add, edit, or delete
values.
Note: References to protected value sets aren't restricted. Value sets, protected or not, may be assigned to any
flexfield segment. Likewise, other value sets may reference protected value sets; for example, an unprotected
dependent value set may reference a protected independent value set.
Related Topics
•
How Flexfields and Value Sets Work Together
•
Why can't I edit my flexfield or value set configuration?
•
What's the difference between a lookup type and a value set?
•
Default Segment Values
•
Chart of Accounts Components
Validation Type Options for Value Sets
Validation and usage of value sets determine where and how users access valid values for attributes represented by
flexfield segments.
Tip: As a flexfield guideline, define value sets before configuring the flexfield, because you can assign value sets to
each segment as you configure a flexfield. With descriptive and extensible flexfield segments, you can create value
sets when adding or editing a segment on the UI where the flexfield appears.
The following aspects are important in defining value sets:
• Value sets for context segments
• Format-only validation
• Interdependent value sets
• Table validation
• Range
• Security
• Testing and maintenance
Value Sets for Context Segments
When assigning a value set to a context segment, you can only use table-validated or independent value sets.
You can use only table and independent value sets to validate context values. The data type must be character and
the maximum length of the values being stored must not be larger than the context's column length. If you use a table
664

Oracle Fusion Cloud HCM
Using Common Features for HCM
Chapter 25
HCM Flexfields Setup
value set, the value set can't reference flexfield segments in the value set's WHERE clause, other than the flexfield
segment to which the value set is assigned.
Format Only Validation
You can use the format only validation type to enter any value as long as it meets your specified formatting rules. The
value must not exceed the maximum length specified for that value set, and it must meet any format requirements for
that value set. For example, if the value set permits only numbers, you can enter the value 456 for a value set with a
maximum length of three or more, but not the value ABC.
You can also define a range of valid values for your value set by using the Minimum Value and Maximum Value fields.
After you've defined a range of values, you can’t define a new valid value that falls outside this range. For example, you
might create a value set with a number type format where the user can enter only the values between 0 and 100.
Note: For value sets with the value data type of Character, you can enforce minimum and maximum values only if the
value set code ends with _VALIDATE_CHAR_MINMAX.
Interdependent Value Sets
Use an independent value set to validate data against a list that isn't stored in an application table, and not dependent
on a subset of another independent value set. You can't specify a dependent value set for a given segment without
having first defined an independent value set that you apply to another segment in the same flexfield. Use a dependent
value set to limit the list of values for a given segment based on the value that the user has defined for a related
independent segment. The available values in a dependent list and the meaning of a given value depend on which value
was selected for the independently validated segment.
For example, you could define an independent value set of the states in the USA with values such as CA, NY, and so on.
Then you define a dependent value set of cities in the USA with values such as San Francisco and Los Angeles that are
valid for the independent value CA. Similarly, New York City and Albany are valid for the independent value NY. In the UI,
only the valid cities can be selected for a given state.
Because you define a subset value set from an existing independent value set, you must define the independent value
set first. Users don't have to select a value for another segment first to have access to the subset value set.
Independent, dependent, and subset value sets require a user-defined list of valid values. Use the Manage Values page
to create and manage a value set's valid values and the order in which they appear.
Tip: You can configure the Manage Value Sets page to capture additional attributes for each valid value by adding
context-sensitive segments in a new context for FND_VS_VALUES_B descriptive field.
Table Validation
Typically, you use a table-validated set when the values you want to use are already maintained in an application table,
such as a table of supplier names. Specify the table column that contains the valid value. You can optionally specify the
description and ID columns, a WHERE clause to limit the values to use for your set, and an ORDER BY clause.
If you specify an ID column, then the flexfield saves the ID value, instead of the value from the value column, in the
associated flexfield segment. If the underlying table supports translations, you can enable the display of translated text
by basing the value set's value column on a translated attribute of the underlying table. You should also define an ID
column that's based on an attribute that isn't language-dependent so that the value's invariant ID (an ID that doesn't
change) is saved in the transaction table. The run time displays the corresponding translated text from the value column
for the run time session's locale.
665

Oracle Fusion Cloud HCM
Using Common Features for HCM
Chapter 25
HCM Flexfields Setup
Table validation lets you enable a segment to depend on multiple prior segments in the same context structure. You
can't reference other flexfield segments in the table-validated value set's WHERE clause. Which means, the WHERE
clause can't reference SEGMENT.segment_code or VALUESET.value_set_code.
Table-validated value sets have unique values across the table, irrespective of bind variables. The WHERE clause
fragment of the value set is considered if it doesn't have bind variables. If it has bind variables, the assumption is that
the values are unique in the value set. If you use table validated value sets for key flexfields, then you can't use all
integration options supported for key flexfields, such as:
• Data security
• Oracle Transactional Business Intelligence (OTBI)
• Extended Spread Sheet Database (ESSbase)
• Tree or hierarchy integration
To use these integration options for key flexfields, you must use independent value sets only.
Range
In the case of format, independent, or dependent value sets, you can specify a range to limit which values are valid. You
can specify a range of values that are valid within a value set. You can also specify a range validated pair of segments
where one segment represents the low end of the range and another segment represents the high end of the range.
For example, you might specify a range for a format-only value set with format type Number where the user can enter
only values between 0 and 100.
Security
In the case of independent and dependent values, you can specify that data security be applied to the values in
segments that use a value set. Based on the roles provisioned to users, data security policies determine which values of
the flexfield segment users can view or modify.
To enable security on a value set, specify a database resource, typically the code value for the value set. Using the
Manage Database Security Policies task, specify conditions, such as filters or SQL predicates, and policies that associate
roles with conditions. You can use a filter for simple conditions. For more complex conditions, use a SQL predicate.
Value set data security policies and conditions differ from data security conditions and policies for business objects in
the following ways:
• You can grant only read access to users. You can't specify any other action.
• When defining a condition that's based on a SQL predicate, use VALUE, VALUE_NUMBER, VALUE_DATE,
VALUE_TIMESTAMP, or VALUE_ID to reference the value from a dependent, independent, or subset value set.
For table value sets, use a table alias to define the table, such as &TABLE_ALIAS category=70.
When you enable security on table-validated value sets, the security rule that's defined is absolute and not contingent
upon the bind variables (if any) that may be used by the WHERE clause of the value set. For example, suppose a table-
validated value set has a bind variable to further filter the value list to x, y and z from a list of x, y, z, xx, yy, zz. The data
security rule or filter written against the value set must not assume anything about the bind variables. Instead the whole
list of values must be available and you write the rule, for example, to permit x, or to permit y and z. By default in data
security, all values are denied and show only rows to which access has been provided.
666

Oracle Fusion Cloud HCM
Using Common Features for HCM
Chapter 25
HCM Flexfields Setup
Testing and Maintenance
You don't have to define or maintain values for a table-validated value set, as the values are managed as part of the
referenced table or independent value set, respectively.
You can't manage value sets in a sandbox.
When you change an existing value set, the deployment status for all affected flexfields changes to Edited. You must
redeploy all flexfields that use that value set to make the flexfields reflect the changes. In the UI pages for managing
value sets, the value set's usages show which flexfields are affected by the value set changes.
If your application has more than one language installed, or there is any possibility that you might install one or
more additional languages for your application in the future, select Translatable. This doesn't require you to provide
translated values now, but you can't change this option if you decide to provide them later.
Related Topics
•
Considerations for Bind Variables in Table-Validated Value Sets
•
What happens if a value set is security enabled?
•
Add Attributes to the Manage Value Sets Page
Considerations for Planning Value Sets
The value sets you create and configure depend on the valid values of the business object attributes that use the value
sets. When creating value sets, you first provide a name and description, and then define the valid values.
The following aspects are important in planning value sets:
• List of values
• Plain text
• Value ranges
• Value format specification
• Security
List of Values
You can use one of the following types of lists to specify the valid values for a segment:
• Table column
• User-defined list. Also include a sub list.
• Dependent user-defined list
If the valid values exist in a table column, use a table value set to specify the list of values. To limit the valid values to a
subset of the values in the table, use a SQL WHERE clause. Table value sets also provide some advanced features, such
as enabling validation depending on other segments in the same structure.
Use an independent value set to specify a user-defined set of valid values. For example, you can use an independent
value set of Mon, Tue, Wed, and so forth to validate the day of the week. You can also specify a subset of an existing
independent value set as the valid values for a segment. For example, if you have an independent value set for the days
of the week, then a weekend subset can comprise entries for Saturday and Sunday.
667

Oracle Fusion Cloud HCM
Using Common Features for HCM
Chapter 25
HCM Flexfields Setup
Use a dependent value set when the available values in the list and the meaning of a given value depend on which
independent value was selected for a previously selected segment value. For example, the valid holidays depend on
which country you're in. A dependent value set is a collection of value subsets, with one subset for each value in a
corresponding independent value set.
For lists of values type value sets, you can additionally limit the valid values that an end user can select or enter
by specifying format, minimum value, and maximum value. For list of values type value sets, you can optionally
implement value set data security. If the applications are running in different locales, you might need to provide
different translations for the values and descriptions.
Plain Text
Use a format-only value set when you want to allow users to enter any value, as long as that value conforms to
formatting rules. For example, if you specify a maximum length of 3 and numeric-only, then end users can enter 456,
but not 4567 or 45A. You can also specify the minimum and maximum values, whether to align the text to either side,
and whether to zero-fill. With a format-only value set, no other types of validation are applied.
Value Ranges
You can use either a format-only, independent, or dependent value set to specify a range of values. For example, you
might create a format-only value set with Number as the format type where the end user can enter only the values
between 0 and 100. Or, you might create a format-only value set with Date as the format type where the end user can
enter only dates for a specific year, such as a range of 01-JAN-93 to 31-DEC-93. Because the minimum and maximum
values enforce these limits, you need not define a value set that contains each of these individual numbers or dates.
Value Format
Flexfield segments commonly require some kind of format specification, regardless of validation type. Before creating a
value set, consider how you will specify the required format.
The following table shows options for validation type and value data type.
Option Description
Value data type
Character, Number, Date, Date Time.
Value subtype
Text, Translated text, Numeric digits only, Time (20:08), Time (20:08:08).
An additional data type specification for the Character data type for the Dependent, Independent, and
Format validation types.
Maximum length
Maximum number of characters or digits for Character data type.
Precision
Maximum number of digits the user can enter.
Scale
Maximum number of digits that can follow the decimal point.
Uppercase only
Lowercase characters automatically changed to uppercase.
Zero fill
Automatic text alignment and zero-filling of entered numbers (affects values that include only the
digits 0-9).
668

Oracle Fusion Cloud HCM
Using Common Features for HCM
Chapter 25
HCM Flexfields Setup
Option Description
Note: You can't change the text value data type to a translated text value subtype after creating a value set. If there
is any chance you may need to translate displayed values into other languages, choose Translated text. Selecting the
Translated text subtype doesn't require you to provide translated values.
Value Sets for Context Segments
You can use only table and independent value sets to validate context values. The data type must be character and
the maximum length of the values being stored must not be larger than the context's column length. If you use a
table value set, the value set can't reference flexfield segments in the value set's WHERE clause other than the flexfield
segment to which the value set is assigned.
Security
When enabling security on a value set, the data security resource name is an existing value set or one that you want to
create. The name typically matches the code value for the value set. You can't edit the data security resource name after
you save your changes.
Related Topics
•
Overview of Value Sets
•
How Flexfields and Value Sets Work Together
•
Validation Type Options for Value Sets
•
Default Segment Values
•
What's the difference between a lookup type and a value set?
Considerations for Bind Variables in Table-Validated Value Sets
After you assign a value set to a flexfield, you can use bind variables in the WHERE clause.
These bind variables refer to flexfield elements:
• :{SEGMENT.<segment_code>}
• :{CONTEXT.<context_code>;SEGMENT.<segment_code>}
• :{VALUESET.<value_set_code>}
• :{FLEXFIELD.<internal_code>}
• :{PARAMETER.<parameter_code>}
Segment Code
:{SEGMENT.<segment_code>}
This bind variable refers to the ID or value of a segment where <segment_code> identifies the segment. Where referring
to the ID, the value set is ID-validated. Where referring to the value, the value set isn't ID-validated. The data type of the
bind value is the same as the data type of the segment's column.
669

Oracle Fusion Cloud HCM
Using Common Features for HCM
Chapter 25
HCM Flexfields Setup
For both descriptive and extensible flexfields, the segment must be in the same context as the source segment. The
source segment contains the WHERE clause. For descriptive flexfields, if the segment is global, then the source segment
must be global.
The segment must have a sequence number that's less than the sequence number of the target segment with this bind
variable. A matching segment must exist in the current flexfield context.
This bind variable is useful when the set of valid values depends on the value in another segment. For example, the
values to select from a CITIES table might depend upon the selected country. If SEGMENT1 contains the country value,
then the WHERE clause for the CITIES table might be <country_code> = :{SEGMENT.SEGMENT1}.
Context Code
:{CONTEXT.<context_code>;SEGMENT.<segment_code>}
This bind variable, which is valid only for extensible flexfields, refers to the ID (if the value set is ID-validated) or value
(if not ID-validated) of a segment that's in a different context than the target segment (the segment with the WHERE
clause).
• The <context_code> identifies the context and must be in the same category or in an ancestor category. It can't
be a multiple-row context.
• The <segment_code> identifies the segment. The data type of the bind value is the same as the data type of the
segment's column.
Note: The target segment should appear in the UI after the source segment to ensure the source segment has a
value. If the target segment's context is a single-row context, the source and target segments must be on separate
pages and the target page must follow the source page.
The framework of extensible flexfields doesn't perform any additional validation related to mismatched values for
segments defined with cross context bind parameters. Administrators must populate the correct pair of segment values.
This bind variable is useful when the set of valid values depends on the value of a segment in another context. For
example, the values to select from a CERTIFICATION table for a segment in the Compliance and Certification context
might depend on the value of the country segment in the Manufacturing context.
Value Set Code
:{VALUESET.<value_set_code>}
This bind variable refers to the ID (if the value set is ID-validated) or value (if not ID-validated) of the segment that's
assigned to the value set that's identified by the value_set_code. The data type of the bind value is the same as the data
type of the segment's column.
The segment must have a sequence number that's less than the sequence number of the segment with this bind
variable. If more than one segment is assigned to the value set, the closest prior matching segment will be used to
resolve the bind expression. A matching segment must exist in the current flexfield context.
This bind variable is useful when the set of valid values depends on the value in another segment and that segment
code can vary, such as when the value set is used for more than one context or flexfield. For example, the values
to select from a CITIES table might depend upon the selected country. If the value set for the segment that
contains the country value is COUNTRIES, then the WHERE clause for the CITIES table might be <country_code> = :
{VALUESET.COUNTRIES}.
670

Oracle Fusion Cloud HCM
Using Common Features for HCM
Chapter 25
HCM Flexfields Setup
Flexfield Internal Code
:{FLEXFIELD.<internal_code>}
This bind variable refers to an internal code of the flexfield in which the value set is used, or to a validation date. The
internal_code must be one of the following:
• APPLICATION_ID - the application ID of the flexfield in which this value set is used. The data type of
APPLICATION_ID and its resulting bind value is NUMBER.
• DESCRIPTIVE_FLEXFIELD_CODE - the identifying code of the flexfield in which this value set is used. The data
type of DESCRIPTIVE_FLEXFIELD_CODE and its resulting bind value is VARCHAR2. Note that you use this string
for both descriptive and extensible flexfields.
• CONTEXT_CODE - the context code of the flexfield context in which this value set is used. The data type of
CONTEXT_CODE and its resulting bind value is VARCHAR2.
• SEGMENT_CODE - the identifying code of the flexfield segment in which this value set is used. The data type of
SEGMENT_CODE and its resulting bind value is VARCHAR2.
• VALIDATION_DATE - the current database date. The data type of VALIDATION_DATE and its resulting bind
value is DATE.
Flexfield Parameters
:{PARAMETER.<parameter_code>}
This bind variable refers to the value of a flexfield parameter where parameter_code identifies the parameter. The data
type of the resulting bind value is the same as the parameter's data type.
Note: You can't assign a table value set to a context segment if the WHERE clause uses VALUESET.value_set_code or
SEGMENT.segment_code bind variables.
Related Topics
•
Create and Edit Table-Validated Value Sets Based on Lookups
Create and Edit Table-Validated Value Sets Based on Lookups
While creating and editing value sets, use a predefined list of values that are stored in an application table.
You can specify which table you want to use, along with a WHERE clause to limit the values you want to use for your
set. For example, let's use the FND_LOOKUPS view as the basis for a table-validated value set. The lookup meaning
corresponds to the Value Column Name field and the lookup description corresponds to the Description Column
Name field.
Create a Value Set Based on a Lookup
1. In the Setup and Maintenance work area, go to the Manage Value Sets task.
2. On the Manage Value Sets page, click the Create icon.
671

Oracle Fusion Cloud HCM
Using Common Features for HCM
Chapter 25
HCM Flexfields Setup
3. On the Create Value Set page, enter these values:
Field Value
Value Set Code
SAMPLE_VALUE_SET_CODE
Description
Sample lookup-based table validated value set
Module
Oracle Middleware Extensions for Applications
Validation Type
Table
Value Data Type
Character
4. In the Definition section, enter these values:
Field Value
FROM Clause
FND_LOOKUPS
Value Column Name
Meaning
Description Column Name
Description
Start Date Column Name
start_date_active
End Date Column Name
end_date_active
Enabled Flag Column Name
'Y'
ID Column Name
lookup_code
WHERE Clause
lookup_type = 'SAMPLE_LOOKUP_TYPE'
ORDER BY Clause
display_sequence, meaning
5. Click Save and Close.
672

Oracle Fusion Cloud HCM
Using Common Features for HCM
Chapter 25
HCM Flexfields Setup
Edit a Value Set Based on a Lookup
1. In the Setup and Maintenance work area, go to the Manage Value Sets task.
2. On the Manage Value Sets page, use the Search text field to search for a value set.
3. Select a value set and click the Edit icon.
4. On the Edit Value Set page, modify the existing values.
5. Click Save and Close.
Related Topics
•
How do I update existing setup data?
Add Attributes to the Manage Value Sets Page
You can add attributes to independent, dependent, and subset value sets. The attributes appear on the Manage
Value Sets page where you can store additional information about each valid value. To display attributes, you must
programmatically modify the application.
To add attributes and subsequently view them on the Manage Value Sets page, perform the following steps:
1. Using the Manage Descriptive Flexfields task, find the FND_VS_VALUES_B flexfield and open it for editing.
2. Click Manage Contexts.
3. Create a new context and use the value set code for the context code.
4. Add new attributes as context-sensitive segments and save the changes.
5. Deploy FND_VS_VALUES_B to run time.
6. Sign out and sign back in.
7. Open the Manage Value Sets page to view the new attributes.
Import Value Set Values
You can import a file containing values that you want to edit or add to a given independent or dependent value set.
For example, uploading hundreds of values might be more efficient than creating them individually using the Manage
Value Sets task. However, for just a few values, it might be quicker to perform the relevant tasks. Here are a few things
you need to keep in mind while creating these files:
• Use a vertical bar or pipe ( | ) as a delimiter between fields for both the header and the value rows.
• As per the Oracle Fusion Cloud WebCenter Content specification, set the file encoding to UTF-8 without the
Byte Order Mark (BOM).
• Make sure that the first line in the file is a header line, and the files look exactly the same as shown in the
sample file.
Here's a sample file for value set value. You can see the header values at the beginning of the file, followed by the line
entries of the two value set codes that are to be imported.
VALUESETCODE|VALUE|ENABLEDFLAG
FLEX_KFF1_IND_CHR_L10_ZEROFILL|5000|Y
FLEX_KFF1_IND_CHR_L10_ZEROFILL1|5001|N
673

Oracle Fusion Cloud HCM
Using Common Features for HCM
Chapter 25
HCM Flexfields Setup
To import value set values, do these tasks:
1. Create a flat file containing the values in the value set that you want to add or update.
When creating the file, you must specify an existing value set code to which you want to add values or edit
existing values. If the value set does not exist, add the value set using the appropriate Manage Value Sets task
in the Setup and Maintenance work area.
2. Upload the flat file to the content repository using the File Import and Export page.
3. Import the file using the appropriate Manage Value Sets task in the Setup and Maintenance work area. To
import the file, do these tasks:
a. In the Manage Value Sets page, click Actions > Import Related Values.
b. In the Account field, select the user account containing the flat file.
c. In the Related Value Set File Name field, enter the name of the related value set file you uploaded using
the File Import and Export page.
d. In the Related Values File Name field, enter the name of the related values file you uploaded using the
File Import and Export page.
e. Click Upload.
Note: Alternatively, you can import the file using either of the following methods:
◦
Run the Upload Value Set Values scheduled process.
◦
Use the Applications Core Metadata Import web service. For more information on the
Applications Core Metadata Import web service, see the SOAP Web Services guide for your cloud
services.
Related Topics
•
Requirements for Flat Files to Upload Value Set Values
•
Upload Value Set Values Process
•
Overview of Files for Import and Export
Import Value Set Values Using Web Services
As an alternative to using the import option on the Manage Value Sets page, you can use the
FndManageImportExportFilesService web service to import value set values into an application. The web service uses
the valueSetValuesDataLoader method.
Prerequisite
Ensure that the web service FndManageImportExportFilesService is added to the Manage Application Flexfield Value Set
entitlement. Use the Security Console to perform this configuration on Oracle Entitlements Server. While configuring
the web service, provide the following details:
• Resource type: WebserviceResourceType
• Display name: ImportExport
674

Oracle Fusion Cloud HCM
Using Common Features for HCM
Chapter 25
HCM Flexfields Setup
• Name: http://xmlns.oracle.com/oracle/apps/fnd/applcore/webservices/
FndManageImportExportFilesService#*
• Entitlement (In Default Policy Domain): Manage Application Flexfield Value Set
• Security policy: oracle/wss11_saml_or_username_token_with_message_protection_service_policy
Importing Value Set Values
To import value set values:
1. Perform the following substeps to generate keystore for the security policy "oracle/
wss11_saml_or_username_token_with_message_protection_service_policy":
a. Generate keystore using the command keytool -genkeypair -keyalg RSA -alias mycompkey -keypass
<password> -keystore mycompclient-keystore.jks -storepass <password> -validity 3600.
b. Access the WSDL using the URL http://<host>:<port>/fndAppCoreServices/
FndManageImportExportFilesService?wsdl through a web browser, and get the public key <wsdl:service>/
<wsdl:port>/<wsa:EndpointReference>/<wsid:Identity>/<dsig:keyInfo>/<dsig:X509Data>/
<dsig:X509Certificate>. Then, enclose it with ---- BEGIN CERTIFICATE ---- and ---- END CERTIFICATE
---- and save it to a file by name cdrmpk.cer.
c. Store the key information in the truststore using the command keytool -importcert -alias cdrmkey -
file cdrmpk.cer -keystore mycompclient-keystore.jks -storepass <password>.
2. Access the WSDL page using the browser of your choice.
3. Export and save the associated security certificates Verisign Class 3 Public Primary Certification Authority -
G5 and Verisign Secure Server CA - G3.
4. Use the following command to import the saved certificates into the trust store of the client computer.
keytool -importcert -keystore <truststore> -storepass <truststorepassword> -file <file location where
the mentioned certificate is stored> -alias <alias for certificate>
5. Run the following command to generate the JAX-WS proxy for the FndManageImportExportFilesService web
service.
C:\Program Files\Java\jdk1.7.0_04\bin>wsimport
-s "d:\wsimport\FndManageImportExport"
-d "d:\wsimport\FndManageImportExport" http://<host>:<port>/fndAppCoreServices/
FndManageImportExportFilesService?wsdl
parsing WSDL...
Generating code...
Compiling code...
6. Save the generated code as a JAR file and name it FndManageImportExportProxy.jar.
7. Use the following code to create another JAR file to initiate the web service:
package com.oracle.xmlns.oracle.apps.fnd.applcore.webservices;
import com.sun.xml.ws.developer.WSBindingProvider;
import java.io.File;
import java.io.IOException;
import java.util.List;
import java.util.Map;
import javax.xml.ws.BindingProvider;
675

Oracle Fusion Cloud HCM
Using Common Features for HCM
Chapter 25
HCM Flexfields Setup
import javax.xml.ws.WebServiceRef;
import javax.xml.ws.handler.Handler;
import oracle.webservices.ClientConstants;
import weblogic.wsee.jws.jaxws.owsm.SecurityPoliciesFeature;
// !THE CHANGES MADE TO THIS FILE WILL BE DESTROYED IF REGENERATED!
// This source file is generated by Oracle tools
// Contents may be subject to change
// For reporting problems, use the following
// Version = Oracle WebServices (11.1.1.0.0, build 130224.1947.04102)
public class FndManageImportExportFilesServiceSoapHttpPortClient
{
@WebServiceRef
private static FndManageImportExportFilesService_Service fndManageImportExportFilesService_Service;
public static void main(String [] args)
{
System.setProperty("javax.net.ssl.trustStore","<location of truststore which is used in II) to import
the certificates>");
System.setProperty("javax.net.ssl.trustStorePassword", "<truststore password>");
fndManageImportExportFilesService_Service = new FndManageImportExportFilesService_Service();
SecurityPoliciesFeature securityFeatures =
new SecurityPoliciesFeature(new String[] { "oracle/
wss11_username_token_with_message_protection_client_policy",
});
FndManageImportExportFilesService
fndManageImportExportFilesService =
fndManageImportExportFilesService_Service.getFndManageImportExportFilesServiceSoapHttpPort
(securityFeatures);
// Add your code to call the desired methods.
WSBindingProvider wsbp = (WSBindingProvider) fndManageImportExportFilesService;
Map<String, Object> requestContext = wsbp.getRequestContext();
requestContext.put(ClientConstants.WSSEC_KEYSTORE_TYPE,"jks");
// Provide location of 'mycompclient-keystore.jks' which was created during Step I)
requestContext.put(ClientConstants.WSSEC_KEYSTORE_LOCATION,"/home/user1/mycompclient-keystore.jks");
requestContext.put(ClientConstants.WSSEC_KEYSTORE_PASSWORD,"<password>");
requestContext.put(ClientConstants.WSSEC_RECIPIENT_KEY_ALIAS,"cdrmkey");
//Provide user who is having permission to initiate the service
requestContext.put(WSBindingProvider.USERNAME_PROPERTY,"<username>");
requestContext.put(WSBindingProvider.PASSWORD_PROPERTY, "<password>");
String id = invokeUploadFiletoUCMMethod(fndManageImportExportFilesService);
if (id != null) {
invokevalueSetValuesDataLoader(fndManageImportExportFilesService, new Long(id));
}
}
static String invokeUploadFiletoUCMMethod(FndManageImportExportFilesService
fndManageImportExportFilesService) {
String response = null;
DocumentDetails document = new DocumentDetails();
ObjectFactory objfactory = new ObjectFactory();
document.setFileName(objfactory.createDocumentDetailsFileName("import_data.txt"));
676

Oracle Fusion Cloud HCM
Using Common Features for HCM
Chapter 25
HCM Flexfields Setup
// Provide UCM repository - if repository is fin/tax/import then suffix each value with $ as mentioned
here
document.setDocumentAccount(objfactory.createDocumentDetailsDocumentAccount("fin$/tax$/import$"));
document.setDocumentTitle(objfactory.createDocumentDetailsDocumentTitle("VS"));
document.setContentType(objfactory.createDocumentDetailsContentType("plain/text"));
try {
// Provide location of 'VS.txt' which contains ValueSet values data in prescribed format
byte[] content =
org.apache.commons.io.FileUtils.readFileToByteArray(new File("/home/user1/VS.txt"));
//System.out.println("File content:" + new String(content, "UTF-8"));
document.setContent(objfactory.createDocumentDetailsContent(content));
} catch (IOException e) {
System.out.println(e.getMessage());
}
catch(Exception e) {
System.out.println("Exception: "+e.getMessage());
}
try {
response = fndManageImportExportFilesService.uploadFiletoUCM(document);
System.out.println("Response: " + response);
} catch (ServiceException e) {
System.out.println(e.getMessage());
}
return response;
}
static void invokevalueSetValuesDataLoader(FndManageImportExportFilesService
fndManageImportExportFilesService,
Long id) {
String response;
try {
response = fndManageImportExportFilesService.valueSetValuesDataLoader(id);
System.out.println("Response: " + response);
} catch (ServiceException e) {
System.out.println(e.getMessage());
}
}
}
8. Save the generated output as a JAVA file and name it as
FndManageImportExportFilesServiceSoapHttpPortClient.java.
9. Use the JAVA file to build a JAR file, and name it as FndManageImportExportClient.jar.
10. Use the following command to run the web service:
java -cp ./FndManageImportExportProxy.jar:./ws.api_1.1.0.0.jar:./FndManageImportExportClient.jar
FndManageImportExportFilesServiceSoapHttpPortClient
Related Topics
•
Import Value Set Values
677

Oracle Fusion Cloud HCM
Using Common Features for HCM
Chapter 25
HCM Flexfields Setup
Requirements for Flat Files to Upload Value Set Values
You can import large volumes of value set value data from the content repository.
To upload value set values to the content repository, create a flat file containing values in the value set you want to add
or update. You upload these flat files using the File Import and Export page.
General Requirements
The first line of the flat file must contain the column names for the value set value data, including all mandatory
columns, and separated by the '|' (pipe) character. Each subsequent line should contain a row of data specified in the
same order as the column names, also separated by the '|' character.
The requirements for creating flat files vary with the type of value sets:
• Independent value sets
• Dependent value sets
Independent Value Set
A flat file for uploading values for independent value sets must contain the mandatory columns. The following table lists
the three mandatory columns and their data types.
Column Name Data Type
ValueSetCode
VARCHAR2(60)
Value
VARCHAR2(150)
Enabled Flag
VARCHAR2(1), Y or N
Note: You can also specify optional columns.
Examples:
• To upload values to a COLORS independent value set with the minimum columns, you can use the following flat
file:
ValueSetCode | Value | EnabledFlag
COLORS | Red | Y
COLORS | Orange | Y
COLORS | Yellow | Y
• To upload values to a STATES independent value set with more (optional) columns, you can use the following
flat file:
ValueSetCode | Value | Description | EnabledFlag
STATES | AK | Alaska | Y
STATES | CA | California | Y
678

Oracle Fusion Cloud HCM
Using Common Features for HCM
Chapter 25
HCM Flexfields Setup
STATES | WA | Washington | Y
Dependent Value Sets
A flat file for uploading values for dependent value sets must contain the mandatory columns. The following table lists
the four mandatory columns and their data types.
Column Name Data Type
Value Set Code
VARCHAR2(60)
Independent Value
VARCHAR2(150)
Value
VARCHAR2(150)
Enabled Flag
VARCHAR2(1), Y or N
Note: You can also specify optional columns.
Example:
To upload values to a CITIES dependent value set (dependent on the STATES independent value set), you can use the
following flat file:
ValueSetCode | IndependentValue | Value | EnabledFlag
CITIES | AK | Juneau | Y
CITIES | AK | Anchorage | Y
CITIES | CA | San Francisco | Y
CITIES | CA | Sacramento | Y
CITIES | CA | Los Angeles | Y
CITIES | CA | Oakland | Y
Additional Optional Columns
In addition to the mandatory columns, you can add optional columns. The following table lists the optional columns for
both dependent and independent value sets.
Column Name Type
Translated Value
VARCHAR2(150), for use in value sets that are translatable
Description
VARCHAR2(240)
Start Date Active
DATE, formatted as YYYY-MM-DD
End Date Active
DATE, formatted as YYYY-MM-DD
Sort Order NUMBER(18)
679

Oracle Fusion Cloud HCM
Using Common Features for HCM
Chapter 25
HCM Flexfields Setup
Column Name Type
Summary Flag
VARCHAR2(30)
Flex Value Attribute1 ... Flex
Value Attribute20
VARCHAR2(30)
User-defined Value
Attribute1 ... User-defined
Value Attribute10
VARCHAR2(30)
Optional Columns to Support Descriptive Flexfields
You can also capture these additional columns on the value set values in the Manage Value Sets page. To capture these
additional columns, you must configure the FND_VS_VALUES descriptive flexfield. This descriptive flexfield expects the
context code to correspond to the value set code.
Column Name Description
globalSegment1ApiName
This column corresponds to the API Name for a global segment defined in the FND_VS_VALUES
descriptive flexfield.
contextSensitiveSegment1ApiName
This column corresponds to the API Name for a context sensitive segment defined in the FND_VS_
VALUES descriptive flexfield.
Here's a sample file that contains the value set codes:
ValueSetCode|IndependentValue|IndependentValueNumber|IndependentValueDate|IndependentValueTimestamp|Value|
ValueNumber|ValueDate|ValueTimestamp|TranslatedValue|Description|EnabledFlag|StartDateActive|EndDateActive|
SortOrder|SummaryFlag| globalSegment1ApiName | contextSensitiveSegment1ApiName
VS1|||||DFF|||||Testing for WS updated|Y|2000-01-11|2000-01-2|1||seg1v1|ndseg1vs3
VS1|||||KFF|||||Testing for WS updated without segments|Y|2000-1-11|2000-01-22|1|seg1v2|nd1seg1vs4
Related Topics
•
Import Value Set Values
•
Overview of Files for Import and Export
Manage Values
Independent, dependent, and subset value sets require a user-defined list of valid values. Use the Manage Values page
to create and manage values for a value set. You can also manage the order in which the value appears.
Create Values for a Value Set
1. In the Setup and Maintenance work area, go to the Manage Value Sets task.
680

Oracle Fusion Cloud HCM
Using Common Features for HCM
Chapter 25
HCM Flexfields Setup
2. Use the Search text field to search for a value set.
3. Select a value set and click Manage Values.
4. On the Manage Values page, click the Create icon and enter new values for the value set.
5. Click Save and Close.
Delete Values from a Value Set
1. In the Setup and Maintenance work area, go to the Manage Value Sets task.
2. Use the Search text field to search for a value set.
3. Select a value set and click Manage Values.
4. On the Manage Values page, click the Delete icon to delete a value from the value set.
5. Click Save and Close.
Upload Value Set Values Process
This process uploads a flat file containing value set values for flexfields. You can use the scheduled process to upload a
file containing values you want to edit or add to an existing independent or dependent value set.
This process is useful for adding or updating large volumes of value set value data in an automated or recurring fashion.
For example, you can upload a hundred values on a recurring basis when scheduled as a recurring process. This method
could be more efficient than using the Import action in the Manage Value Sets tasks in the Setup and Maintenance work
area. However, for a task of uploading a hundred values, it may be quicker to use the Import action in the relevant tasks.
Run this process from the Scheduled Processes Overview page. You can run it on a recurring basis whenever the flat file
in the content repository account is updated.
You must create the flat file containing the values data, and upload the flat file to the content repository using the File
Import and Export page.
Note: Here are some alternate ways of doing this task:
• Using the File Import and Export page. For more information, see Export and Import of CSV File Packages.
• Using the SOAP web services or REST APIs. For more information, see the Value Sets REST Endpoints section
in the REST API for Common Features in Oracle Fusion Cloud Applications guide.
Parameters
Flat File Name
Enter the name of the flat file you uploaded using the File Import and Export page.
Account
Select the user account containing the flat file in the content repository to upload.
681

Oracle Fusion Cloud HCM
Using Common Features for HCM
Chapter 25
HCM Flexfields Setup
Related Topics
•
Import Value Set Values
•
Export and Import of CSV File Packages
•
REST API for Common Features in Oracle Fusion Cloud Applications
•
What are scheduled processes?
Upload Comma-Separated Value Files for Import Process
This process uploads a flat file containing comma-separated values for various artifacts, such as flexfields, messages,
lookups, and so on. You can use this process to add setup data for these artifacts or update existing ones.
Before running this process, you must create the flat file in the given format and upload it to the content repository
using the File Import and Export work area. To run this process, use the Scheduled Processes work area and specify the
required parameters.
Note: Here are some alternate ways of doing this task:
• Using the File Import and Export page. For more information, see Export and Import of CSV File Packages.
• Using the SOAP web services or REST APIs. For more information, see the Value Sets REST Endpoints section
in the REST API for Common Features in Oracle Fusion Cloud Applications guide.
Parameters
Flat File Name
Enter the name of the file you uploaded using the File Import and Export page.
Account
Enter the user account containing the file in the content repository to upload.
File Type
Select the file type for the file you uploaded using the File Import and Export page.
Here are the supported file types and the corresponding file formats and examples for various application artifacts.
Artifact File Type File Formats and Examples
ValueSet
VALUE_SET
Value Set Values
VALUESET_VALUES
File Format for Importing Value Set and Value
Set Values
RELATEDVALUESET
Related Value Set
RELATEDVALUESETVALUES
File Format for Importing Related Value Sets
682

Oracle Fusion Cloud HCM
Using Common Features for HCM
Chapter 25
HCM Flexfields Setup
Artifact File Type File Formats and Examples
MESSAGES
Messages
MESSAGE_TOKENS
File Format for Importing Messages
STANDARD_TYPE
COMMON_TYPE
SETID_TYPE
COMMON_CODE
STANDARD_CODE
Lookups
SETID_CODE
File Format for Importing Lookups
PROFILE_OPTIONS
PROFILE_CATEGORIES
PROFILE_CATEGORY_OPTIONS
Profiles
USER_PROFILE_VALUES
File Format for Importing Profile Values
DFF_CONTEXT
DFF_LABELED_SEGMENT
Descriptive Flexfields
DFF_SEGMENT
File Format for Importing Descriptive Flexfields
EFF_CONTEXT
Extensible Flexfields
FileEFF_CONTEXT_SEGMENT
File Format for Importing Extensible Flexfields
DS_OBJECTS
DS_CONDITIONS
DS_ACTIONS
Data Security Objects Data
DS_GRANTS
File Format for Importing Data Security Instance
Sets and Grants
683

Oracle Fusion Cloud HCM
Using Common Features for HCM
Chapter 25
HCM Flexfields Setup
Artifact File Type File Formats and Examples
DOCUMENT_SEQUENCE_CATEGORY
DOCUMENT_SEQUENCE
Document Sequence Data Loaders
DOCUMENT_SEQUENCE_ASSIGNMENT
File Format for Importing Document Sequences
Hierarchies Data Loaders
HIERARCHYNODE
Related Topics
•
Export and Import of CSV File Packages
•
REST API for Common Features in Oracle Fusion Cloud Applications
•
What are scheduled processes?
•
Submit Scheduled Processes and Process Sets
Translation of Flexfield and Value Set Configurations
When you first configure a flexfield or segment, the translatable text you enter, such as prompts and descriptions, is
stored as the text for all installed locales. You may then provide a translation for a particular locale.
If you don't provide a translation for a given locale, then the value that was first entered is used for that locale.
To translate the text for a particular locale, sign in with that locale, or use the Settings and Actions menu. Click your
user image or name in the global header to open this menu, and select Set Preferences to translate the text for a
particular locale. Then, update the translatable text in the flexfield using the Manage Descriptive Flexfields task, Manage
Key Flexfields task, or Manage Extensible Flexfields task. Your modifications change the translated values only for the
current session's locale.
After you complete the translations, deploy the flexfield.
You can define translations for a dependent value set or an independent value set, if the value set is of type Character
with a subtype Translated text. You define the translations by setting the current session to the locale for which you
want to define the translation. Then use the Manage Value Sets task to enter the translated values and descriptions for
that locale.
For table-validated value sets, if the underlying table supports translations, use a translation view as the basis for a
table-validated value set. You can set the ID Column Name field to the non-translated primary key and the Value
Column Name field to the translated key.
Related Topics
•
Considerations for Planning Value Sets
•
Create and Edit Table-Validated Value Sets Based on Lookups
684

Oracle Fusion Cloud HCM
Using Common Features for HCM
Chapter 25
HCM Flexfields Setup
FAQs for Manage Value Sets
What happens if a value set is security enabled?
Value set security is a feature that enables you to secure access to value set values based on the role of the user in the
application.
As an example, suppose you have a value set of US state names. When this value set is used to validate a flexfield
segment, and users can select a value for the segment, you can use value set security to restrict them to selecting only a
certain state or subset of states based on their assigned roles in the application.
For example, Western-region employees may choose only California, Nevada, Oregon, and so on as valid values. They
can't select non-Western-region states. Eastern-region employees may choose only New York, New Jersey, Virginia, and
so on as valid values, but can't select non-Eastern-region states. Value set security is implemented using Oracle Fusion
Cloud Applications data security.
How can I set a default value for a flexfield segment?
When you define or edit a flexfield segment, you pick a value from the assigned value set and set it as default.
You can set the default value for a descriptive flexfield segment to be a parameter. The mapped entity object attribute
provides the initial default value for the segment.
You can set the default value to be a constant, if appropriate to the data type of the value set assigned to the segment.
In addition to an initial default value, you can set a derivation value for updating the attribute's value every time the
parameter value changes. The parameter you select identifies the entity object source attribute. Any changes in the
value of the source attribute during run time are reflected in the value of the segment.
If the display type of the segment is a check box, you can set whether the default value of the segment is checked or
unchecked.
Related Topics
•
Default Segment Values
685

Oracle Fusion Cloud HCM
Using Common Features for HCM
Chapter 25
HCM Flexfields Setup
686

Oracle Fusion Cloud HCM
Using Common Features for HCM
Chapter 26
HCM Flexfields Maintenance
26 HCM Flexfields Maintenance
Manage Descriptive Flexfields
Overview of Descriptive Flexfields
Use descriptive flexfields to add attributes to business object entities, and define validation for them.
All the business object entities that you can use in the application are enabled for descriptive flexfields. However,
configuring descriptive flexfields is an optional task.
Context
A descriptive flexfield can have only one context segment to provide context sensitivity. The same underlying database
column can be used by different segments in different contexts.
For example, you can define a Dimensions context that uses the following attributes:
• ATTRIBUTE1 column for height
• ATTRIBUTE2 column for width
• ATTRIBUTE3 column for depth
You can also define a Measurements context that uses the same columns for other attributes:
• ATTRIBUTE1 column for weight
• ATTRIBUTE2 column for volume
• ATTRIBUTE3 column for density
Segments and Contexts
The following table lists the different types of descriptive flexfield segments.
Segment Type Run Time Appearance
Global segment
Always available
Context segment
Determines which context-sensitive segments are displayed
Context-sensitive segment
Displayed depending on the value of the context segment
687

Oracle Fusion Cloud HCM
Using Common Features for HCM
Chapter 26
HCM Flexfields Maintenance
Application development determines the number of segments available for configuring. During implementation,
configure the flexfield by determining the following:
• Attributes to add using the available segments
• Context values
• The combination of attributes in each context
Value Sets
For each global and context-sensitive segment, you configure the values permitted for the segment. Based on it, the
values that end users enter are validated, including interdependent validation among the segments.
Protected Descriptive Flexfield Data
Application developers may mark some data configurations in a descriptive flexfield as protected, indicating that you
can't edit them.
Related Topics
•
Considerations for Managing Descriptive Flexfields
•
Overview of Value Sets
•
How can I access predefined flexfields?
•
Considerations for Managing Flexfields
688

Oracle Fusion Cloud HCM
Using Common Features for HCM
Chapter 26
HCM Flexfields Maintenance
Considerations for Planning Descriptive Flexfields
Once you have identified a flexfield to configure, plan the configuration. Make a list of UI pages and other artifacts that
are affected by the configuration. Verify that you have the appropriate roles to view and configure the flexfields.
You can locate flexfields on a page using the Settings and Actions menu. Click your user image or name in the global
header to open this menu, and select Highlight Flexfields to locate flexfields on a page. Once you have configured
the flexfields, plan to deploy them for test and production users. Review the tools and tasks available for managing
flexfields to add and edit flexfield segments.
Planning a descriptive flexfield can involve the following tasks:
1. Identify existing parameters.
2. Identify existing context values and whether the context value is derived.
3. Identify user-defined attributes and plan the descriptive flexfield segments, segment properties, and structure.
4. Plan validation rules.
5. Plan initial values.
6. Plan attribute mapping to Oracle Transactional Business Intelligence objects.
Identify Existing Descriptive Flexfield Parameters
Some descriptive flexfields provide parameters that can be used to specify the initial value of a descriptive flexfield
segment. The parameter is external reference data, such as a column value or a session variable. For example, if a
flexfield has a user email parameter, you can configure the initial value for a customer email attribute to be derived from
that parameter.
Review the list of available parameters in the Derivation Value field in the Create Segment page for a descriptive
flexfield. If you decide to use one of the parameters to set an initial value, select that parameter from the Derivation
Value drop-down list when you add the descriptive flexfield segment.
Evaluate Whether the Context Value Is Derived
The context value for a descriptive flexfield might have been preconfigured to be derived from an external reference.
For example, if the context is Marriage Status, then the value might be derived from an attribute in the employee
business object. When the context value is derived, you might need to take the derived values and their source into
consideration in your plan.
To determine whether the context value is derived, access the Edit Descriptive Flexfield task to view the list of
configured context values for the flexfield. The Derivation Value field in the Context Segment region displays a list of
available parameters. If context values have been preconfigured, see Oracle Fusion Cloud Applications Help for product-
specific information about the use of those values.
Plan the Segments, Segment Properties, and Structure
Identify the user-defined attributes you need for a business object to determine the segments of the descriptive
flexfield. Determine the segment properties such as the prompt, display type, or initial value.
The structure of the descriptive flexfield is determined by its global, context, and context-sensitive segments. Plan a
global segment that captures an attribute for every instance of the business object. Plan a context for segments that
depend on a condition of situation applying to a particular instance of the business object. Plan context-sensitive
segments to capture attributes that are relevant in the context.
689

Oracle Fusion Cloud HCM
Using Common Features for HCM
Chapter 26
HCM Flexfields Maintenance
There's only one context segment available for descriptive flexfields. If you have more than one group of user-defined
attributes where you could use the context segment, you will have to pick one group over the others, based on your
company's needs and priorities, and add the other user-defined attributes as global segments.
Plan Validation Rules
Define each segment's validation rules and check if value sets exist for those rules or you must create new ones. If you
must create a value set, you can create it either before configuring the flexfield or while creating or editing a segment.
When determining a segment's validation rules, consider the following questions:
• What is the data type - character, date, date and time, or number?
• Does the segment require any validation beyond data type and maximum length?
• Should a character type value be restricted to digits, or are alphabetic characters allowed?
• Should alphabetic characters automatically be changed to uppercase?
• Should numeric values be zero-filled?
• How many digits can follow the radix separator of a numeric value? In base ten numeric systems, the radix
separator is decimal point.
• Does the value need to fall within a range?
• Should the value be selected from a list of valid values? If so, consider the following questions:
◦
Can you use an existing application table from which to obtain the list of valid values, or do you need to
create a list?
◦
If you're using an existing table, do you need to limit the list of values using a WHERE clause?
◦
Does the list of valid values depend on the value in another flexfield segment?
◦
Is the list of valid values a subset of another flexfield segment's list of values?
Plan Initial Values
For every segment, list the constant value or SQL statement, if any, to use for the initial value of the user-defined
attribute.
Plan How Segments Map to Oracle Transactional Business Intelligence Objects
You can extend descriptive flexfields into Oracle Transactional Business Intelligence (OTBI) for ad hoc reporting
purposes. Determine the descriptive flexfield segments to be made available for reporting, and select the BI Enabled
check box accordingly on the Manage Descriptive Flexfields page. You must run a process to extend the BI enabled
segments into OTBI.
Depending on the reporting needs, you may map similar context-sensitive attributes from different contexts to the
same attribute in OTBI. For example, there may be a segment tracking the Product Color attribute in different contexts
of a context sensitive descriptive flexfield. You can use segment labels to map these context-sensitive attributes
together by defining a segment label and updating the BI Label list accordingly.
690

Oracle Fusion Cloud HCM
Using Common Features for HCM
Chapter 26
HCM Flexfields Maintenance
Related Topics
•
Flexfield Segment Properties
•
Overview of Value Sets
•
Considerations for Enabling Descriptive Flexfield Segments for Business Intelligence
•
Default Segment Values
•
Overview of Transactional Business Intelligence Configuration of Descriptive Flexfields
Considerations for Managing Descriptive Flexfields
Configuring descriptive flexfields involves managing the available flexfields registered with your Oracle Fusion Cloud
Applications database and configuring their flexfield-level properties, defining and managing descriptive flexfield
contexts, and configuring global and context-sensitive segments.
Every descriptive flexfield is registered to include a context segment, which you may choose to use or not.
In general, configuring descriptive flexfields involves:
1. Creating segment labels for business intelligence enabled flexfields.
2. Configuring global segments by providing identity information, the initial default value, and the display
properties.
3. Configuring the context segment by specifying the prompt, whether the context segment should be displayed,
and whether a value is required.
4. Configuring contexts by specifying a context code, description, and name for each context value, and adding
its context-sensitive segments, each of which is configured to include identifying information, the column
assignment, the initial default value, and the display properties.
The following aspects are important in understanding descriptive flexfield management:
• Segments
• Adding segments to highlighted descriptive flexfields
• Usages
• Parameters
• Delimiters
• Initial Values
• Business Intelligence
Segments
You can assign sequence order numbers to global segments and to context-sensitive segments in each context.
Segment display is always in a fixed order. You can't enter a number for a segment if that number is already in use for a
different segment.
Value sets are optional for context segments and follow specific guidelines:
• The value set that you specify for a context segment consists of a set of context codes.
• Each context code corresponds to a context that's appropriate for the descriptive flexfield.
• The value set must be independent or table-validated.
691

Oracle Fusion Cloud HCM
Using Common Features for HCM
Chapter 26
HCM Flexfields Maintenance
• If table-validated, the WHERE clause must not use the VALUESET.value_set_code or SEGMENT.segment_code
bind variables.
• The value set must be of data type Character with the maximum length of values being stored no larger than
the context's column length.
• If you don't specify a value set for a context segment, the valid values for that context segment are derived
from the context codes. The definition of each context segment specifies the set of context-sensitive segments
that can be presented when that context code is selected by the end user.
• For reasons of data integrity, you can't delete an existing context. Instead, you can disable the associated
context value in its own value set by setting its end date to a date in the past.
• You can configure the individual global segments and context-sensitive segments in a descriptive flexfield.
These segment types are differentiated by their usage, but they're configured on application pages that use
most of the same properties.
Adding Segments to Highlighted Descriptive Flexfields
When you highlight flexfields on a run time page and use an Add Segment icon button to create a segment, the
segment code, name, description, table column, and sequence number are set automatically. If you use an Add
Segment icon button to configure descriptive flexfield segments, you can't use an existing value set. Value sets are
created automatically when you add the segments. You can enter the valid values, their descriptions, and the default
value or specify the formatting constraints for the value set, such as minimum and maximum values.
Depending on display type, the value set you create using the Add Segment icon button is either an independent value
set or a format-only value set. The following table shows which type of value set is created depending on the segment
display component you select.
Display Component Value Set Created Using Add Segment
Check Box
Independent
Drop-down List
Independent
List of Values
Independent
Radio Button Group
Independent
Text Field With Search
Independent
Text box
Format Only
Text area
Format Only
Date/Time
Format Only
Tip: After you add a context value, refresh the page to see the new value.
692

Oracle Fusion Cloud HCM
Using Common Features for HCM
Chapter 26
HCM Flexfields Maintenance
Usages
Descriptive flexfield usages allow for the same definition to be applied to multiple entities or application tables, such as
a USER table and a USER_HISTORY table. Descriptive flexfield tables define the placeholder entity where the flexfield
segment values are stored once you have configured the descriptive flexfield. When you configure a flexfield, the
configuration applies to all its usages.
Parameters
Some descriptive flexfields provide parameters, which are attributes of the same or related entity objects. Parameters
are public arguments to a descriptive flexfield. Parameters provide outside values in descriptive flexfield validation.
You use parameters to set the initial value or derivation value of an attribute from external reference data, such as a
column value or a session variable, rather than from user input. Parameters can be referenced by the logic that derives
the default segment value, and by table-validated value set WHERE clauses.
Delimiters
A segment delimiter or separator visually separates segment values when the flexfield is displayed as a string of
concatenated segments.
Initial Values
The SQL statement defining an initial value must be a valid statement that returns only one row and a value of the
correct type.
You can use two types of SQL statements:
• SQL statement with no binding. For example, select MIN(SALARY) from EMPLOYEES.
• SQL statement with bind variables. You can use the PARAMETER bind variable in the WHERE clause of the SQL
statement.
◦
:{PARAMETER.<parameter_code>}: Identifies a parameter.
Business Intelligence
Selecting a global, context, or context-sensitive segment's BI Enabled check box specifies that the segment is available
for use in Oracle Business Intelligence.
When the flexfield is imported into Oracle Business Intelligence, the label you selected from the BI Label drop-down list
equalizes the segment with segments in other contexts, and maps the segment to the logical object represented by the
label.
Related Topics
•
Validation Type Options for Value Sets
•
Default Segment Values
•
Considerations for Enabling Descriptive Flexfield Segments for Business Intelligence
•
Flexfield Segment Properties
•
Why can't I edit my flexfield or value set configuration?
693

Oracle Fusion Cloud HCM
Using Common Features for HCM
Chapter 26
HCM Flexfields Maintenance
Edit Descriptive Flexfields
You can edit your descriptive flexfield by changing its values.
Here are the steps:
1. In the Setup and Maintenance work area, go to the Manage Descriptive Flexfields task in the Application
Extensions functional area.
2. On the Manage Descriptive Flexfields page, use the text fields in the Search section to search for a descriptive
flexfield.
3. Select a descriptive flexfield and click the Edit icon.
4. Edit the descriptive flexfield values and click Save and Close.
Related Topics
•
How do I update existing setup data?
Validate Descriptive Flexfields
Before deploying your descriptive flexfields, you can validate their values to identify and fix errors in advance.
Here are the steps:
1. In the Setup and Maintenance work area, go to the Manage Descriptive Flexfields task in the Application
Extensions functional area.
2. On the Manage Descriptive Flexfields page, use the text fields in the Search section to search for a descriptive
flexfield.
3. Select the descriptive flexfield and click Actions Validate Flexfield.
4. In the confirmation dialog box, click OK.
Related Topics
•
How do I update existing setup data?
Deploy Descriptive Flexfields
After editing the descriptive flexfield, you can deploy your changes. After you deploy the flexfield, you can view your
changes in the UI.
To deploy the descriptive flexfield, do these steps:
1. In the Setup and Maintenance work area, go to the Manage Descriptive Flexfields task in the Application
Extensions functional area.
2. On the Manage Descriptive Flexfields page, use the text fields in the Search section to search for a descriptive
flexfield.
3. Select the descriptive flexfield and click Actions Deploy Flexfield.
4. In the confirmation dialog box, click OK.
694

Oracle Fusion Cloud HCM
Using Common Features for HCM
Chapter 26
HCM Flexfields Maintenance
Related Topics
•
How do I update existing setup data?
Manage Global Segments
Global segments are those segments in a descriptive flexfield that are available throughout the enterprise. These
segments always appear regardless of the context. You can create, edit, and delete global segments for a descriptive
flexfield.
Note: Once you delete a segment, you can never recover it. So, you should delete only unwanted segments.
Create Global Segments
1. In the Setup and Maintenance work area, go to the Manage Descriptive Flexfields task in the Application
Extensions functional area.
2. On the Manage Descriptive Flexfields page, use the text fields in the Search section to search for a descriptive
flexfield.
3. Select the descriptive flexfield and click the Edit icon.
4. On the Edit Descriptive Flexfield page, click the Create icon in the Global Segments section.
5. On the Create Segment page, enter the values for the segment.
6. Click Save and Close.
Edit Global Segments
1. In the Setup and Maintenance work area, go to the Manage Descriptive Flexfields task in the Application
Extensions functional area.
2. On the Manage Descriptive Flexfields page, use the text fields in the Search section to search for a descriptive
flexfield.
3. Select the descriptive flexfield and click the Edit icon.
4. On the Edit Descriptive Flexfield page, select a segment and click the Edit icon in the Global Segments section.
5. On the Edit Segment page, edit the segment values.
6. Click Save and Close.
Delete Global Segments
1. In the Setup and Maintenance work area, go to the Manage Descriptive Flexfields task in the Application
Extensions functional area.
2. On the Manage Descriptive Flexfields page, use the Search text field to search for a descriptive flexfield.
3. Select the descriptive flexfield and click the Edit icon.
4. On the Edit Descriptive Flexfield page, select a segment and click the Delete icon in the Global segments
section.
5. In the confirmation dialog box, click Yes.
Related Topics
•
How do I update existing setup data?
695

Oracle Fusion Cloud HCM
Using Common Features for HCM
Chapter 26
HCM Flexfields Maintenance
Manage Contexts
A descriptive flexfield may have a context segment to provide context sensitivity. You can create, edit, and delete
context segments for a descriptive flexfield.
Create Context
1. In the Setup and Maintenance work area, go to the Manage Descriptive Flexfields task in the Application
Extensions functional area.
2. On the Manage Descriptive Flexfields page, use the text fields in the Search section to search for a descriptive
flexfield.
3. Select the descriptive flexfield and click the Edit icon.
4. On the Edit Descriptive Flexfield page, click Manage Contexts.
5. On the Manage Contexts page, click the Create icon.
6. On the Create Context page, enter the values for the context.
7. Click Save and Close.
Edit Context
1. In the Setup and Maintenance work area, go to the Manage Descriptive Flexfields task in the Application
Extensions functional area.
2. On the Manage Descriptive Flexfields page, use the text fields in the Search section to search for a descriptive
flexfield.
3. Select the descriptive flexfield and click the Edit icon.
4. On the Edit Descriptive Flexfield page, click Manage Contexts.
5. On the Manage Contexts page, use the Search text field to search for a context.
6. Select the context and click the Edit icon.
7. On the Edit Context page, edit the values for the context.
8. Click Save and Close.
Delete Context
You can delete unwanted contexts, but once you delete a context, you can never recover it. So, before you delete, be
sure that you don't need it anymore.
1. In the Setup and Maintenance work area, go to the Manage Descriptive Flexfields task in the Application
Extensions functional area.
2. On the Manage Descriptive Flexfields page, use the text fields in the Search section to search for a descriptive
flexfield.
3. Select the descriptive flexfield and click the Edit icon.
4. On the Edit Descriptive Flexfield page, click Manage Contexts.
5. On the Manage Contexts page, use the Search text field to search for a context.
6. Select the context and click the Delete icon.
7. In the confirmation dialog box, click Yes.
Related Topics
•
How do I update existing setup data?
696

Oracle Fusion Cloud HCM
Using Common Features for HCM
Chapter 26
HCM Flexfields Maintenance
Manage Context-Sensitive Segments
A context-sensitive segment is available based on the context value. Once you define the context value, you can create
a context-sensitive segment for the defined context value. You can also edit and delete a context-sensitive segment.
Create Context-Sensitive Segment
1. In the Setup and Maintenance work area, go to the Manage Descriptive Flexfields task in the Application
Extensions functional area.
2. On the Manage Descriptive Flexfields page, use the text fields in the Search section to search for a descriptive
flexfield.
3. Select the descriptive flexfield and click the Edit icon.
4. In the Context Sensitive Segments section, select the context from the Context list.
5. Click the Create icon.
6. On the Create Segment page, enter the values for the segment.
7. Click Save and Close.
Edit Context-Sensitive Segment
1. In the Setup and Maintenance work area, go to the Manage Descriptive Flexfields task in the Application
Extensions functional area.
2. On the Manage Descriptive Flexfields page, use the text fields in the Search section to search for a descriptive
flexfield.
3. Select a descriptive flexfield and click the Edit icon.
4. On the Edit Descriptive Flexfield page, select a segment and click the Edit icon under the Context-Sensitive
Segments section.
5. On the Edit Segment page, edit the segment values.
6. Click Save and Close.
Related Topics
•
How do I update existing setup data?
Configure Descriptive Flexfield Segments for a Lookup Type
Depending on the configuration level of a lookup type, you can configure the lookup codes or their meanings.
To capture more information for the lookup type, you can also configure the descriptive flexfield segments for the
lookup type. For example, let's configure the descriptive flexfield segments for the US_STATE lookup type. Here are the
tasks we need to do:
• Create the US_STATE context code
• Create the context-sensitive segments
• Deploy the changes
• Add a context segment value for the lookup type
697

Oracle Fusion Cloud HCM
Using Common Features for HCM
Chapter 26
HCM Flexfields Maintenance
Create the US_STATE Context Code
1. In the Setup and Maintenance work area, go to the Manage Descriptive Flexfields task in the Application
Extensions functional area.
2. On the Manage Descriptive Flexfield page, use the Search text field to search for FND_LOOKUP_VALUES_B
descriptive flexfield.
3. Select the descriptive flexfield and click the Edit icon.
4. On the Edit Descriptive Flexfield page, go to the Context Segment section and specify these values:
Field Value
Default Type
Parameter
Default Value
LookupType
Derivation Value
LookupType
Display Type
List of Values
5. Click Manage Contexts.
6. On the Manage Contexts page, go to the Search Results section and click the Create icon.
7. On the Create Context page, enter the context code as US_STATE.
8. Click Save and Close.
Create the Context Sensitive Segments
1. On the Manage Contexts page, go to the Search Results section and select the US_STATE context code.
2. Click the Edit icon.
3. On the Edit Context page, go to the Context Sensitive Segments section and click the Create icon.
4. On the Create Segment page, specify these values:
Field Value
Code
Capital
Data type
Character
Value Set
GL_100_CHARACTERS
Default Type
Parameter
Default Value
LookupType
698
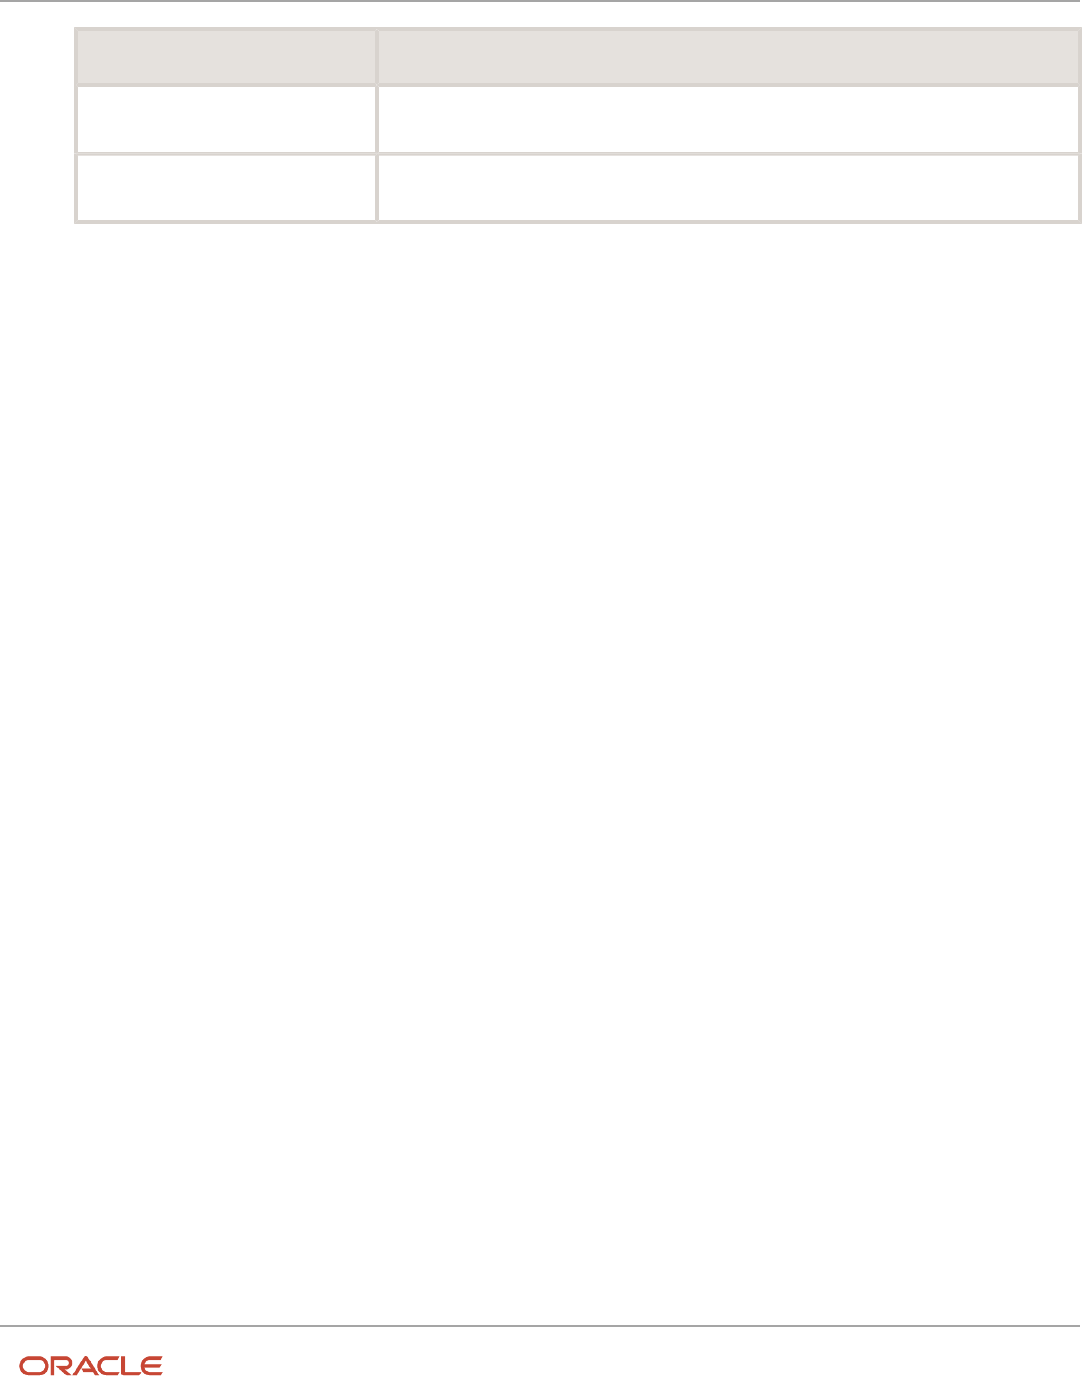
Oracle Fusion Cloud HCM
Using Common Features for HCM
Chapter 26
HCM Flexfields Maintenance
Field Value
Derivation Value
LookupType
Display Type
List of Values
5. Click Save and Close.
6. On the Manage Contexts page, click Save and Close.
7. On the Edit Descriptive Flexfield page, click Save and Close.
Deploy the Changes
1. On the Manage Descriptive Flexfield page, click Deploy Flexfield to deploy the changes made in the
FND_LOOKUP_VALUES_B descriptive flexfield.
2. In the confirmation window, click OK.
3. Sign out and sign back in to see the changes.
Add a Context Segment Value for the Existing Lookup Type
After you add a new lookup code for the US_STATE lookup type, the context segment appears for the new lookup code.
You can add value to the context segment.
1. In the Setup and Maintenance work area, go to the Manage Common Lookups task in the Application
Extensions functional area.
2. On the Manage Common Lookups page, use the Search text field to search for the US_STATE lookup type.
3. Select the US_STATE lookup type.
4. Go to the Lookup Codes section and click the New icon.
5. In the Lookup Code field, enter AZ.
6. In the Meaning field, enter the meaning of the lookup code as Arizona.
7. Click Save.
8. Click the Expand icon to the left of the newly added lookup code.
9. In the Capital field, enter Phoenix.
10. Click Save and Close.
Considerations for Enabling Descriptive Flexfield Segments for
Business Intelligence
A descriptive flexfield that's registered in the database as enabled for Oracle Transactional Business Intelligence (OTBI)
includes a BI-enabled setting for each of its segments. When a global, context, or context-sensitive segment is BI-
enabled, it's available for use in Oracle BI.
The following aspects are important in understanding BI-enabled flexfield segments:
• Flattening business components to use BI-enabled segments in Oracle BI
• Equalizing segments to prevent duplication and complexity in the flattened component
• Mapping attributes of flattened business components to logical objects in Oracle BI
• Managing the labels that map segments to logical objects in Oracle BI
699

Oracle Fusion Cloud HCM
Using Common Features for HCM
Chapter 26
HCM Flexfields Maintenance
After you deploy a business intelligence-enabled flexfield, use the Import Oracle Data Extensions for Oracle
Transactional Business Intelligence process to import the flexfield changes into the Oracle Transactional Business
Intelligence repository. Users can make use of the newly-generated attributes in business intelligence applications. For
example, a user can generate a report that includes attributes added by the descriptive flexfield. For information about
logical objects and import, see the Creating and Administering Analytics and Reports guide for your products.
Flattening
When you deploy a BI-enabled descriptive flexfield, the deployment process generates an additional set of flattened
Application Development Framework (ADF) business components. The ADF business component is generated in
addition to the usual ADF business components and the ADF faces artifacts. The flattened business components
include attributes for BI-enabled segments only. Flattening means each user-defined column in each context shows up
as an attribute in the Oracle Business Intelligence folder.
Flattened components include one attribute for the BI-enabled context-segment, and one attribute for each business
intelligence-enabled global segment. For BI-enabled context-sensitive segments, what's included as part of the
flattened components depend on whether you assign a label to the segment or not:
• If you assigned a label to the segment, the flattened components include an additional single attribute
representing segments with that label.
• If you didn't assign a label, the flattened components include a discrete attribute for each BI-enabled context-
sensitive segment in each context.
Mapping to Logical Objects in Business Intelligence
You can simplify reporting by representing similar segments as a single logical object in Business Intelligence.
If you assign a label to any set of context-sensitive segments that serve the same purpose in different contexts, you
can consolidate or equalize the segments into a single attribute. This prevents duplication and the extra workload and
complexity that result from the flattening process. For example, a United States context might have a Passport segment
and a Canada context might have Visa segment. If you assign the NationalID segment label to both the Passport and
Visa segments, they're equalized into the same NationalID attribute in the flattened business component.
Non-labeled context-sensitive segments aren't equalized across context values, so the flattened components include a
separate attribute for each context-sensitive segment for each context value. It may not be possible to equalize similarly
labeled segments if they have incompatible data types or value set types.
Assign a label to a global segment, context segment, or context-sensitive segment to map the corresponding attribute
in the flattened components to a logical object in Oracle Business Intelligence. Using labels to map segments to BI
logical objects minimizes the steps for importing the flexfield into Oracle Business Intelligence.
Note: Assigning a label to a context-sensitive segment serves to equalize the attribute across contexts, as well as
map the equalized attribute to business intelligence.
Managing Labels
You may assign a predefined label (if available) to segments or create new labels for assignment, as needed. Specify
a code, name, and description to identify each label. In the BI Object Name field, enter the name of the logical object
in Oracle Business Intelligence to which the segment label should map during import. Specifying the BI logical object
minimizes the steps for importing the flexfield into Oracle Business Intelligence and helps to equalize context-sensitive
segments across contexts.
700

Oracle Fusion Cloud HCM
Using Common Features for HCM
Chapter 26
HCM Flexfields Maintenance
If no labels are assigned to a BI-enabled segment, or the BI Object Name on the assigned label doesn't exist in business
intelligence, you must manually map the segment to the desired logical object when importing into Oracle Business
Intelligence.
In addition, context-sensitive segments without labels can't be equalized across context values. The flattened
components include a separate attribute for each non-labeled context-sensitive segment in each context.
Importing to Oracle Business Intelligence Repository
After you deploy a business intelligence-enabled flexfield, import the flexfield changes into the Oracle Business
Intelligence repository to make use of the newly flattened business components in business intelligence and then
propagate the flexfield object changes. When you import the metadata into the Oracle Business Intelligence repository,
you must do so as the FUSION_APPS_BI_APPID user.
To import flexfield changes into the Oracle Transactional Business Intelligence repository in Oracle Cloud
implementations, run the Import Oracle Data Extensions for Oracle Transactional Business Intelligence process. For
information about logical objects and import, see the Creating and Administering Analytics and Reports guide for your
products.
Note: When you import a flexfield into the Oracle Transactional Business Intelligence repository, you see both <name>_
and <name>_c attributes for each segment, along with some other optional attributes. The <name> attribute contains the
value. The <name>_c attribute contains the code of the value set that the value comes from, and is used for linking to
the value dimension. You must import both attributes.
Related Topics
•
Considerations for Enabling Key Flexfield Segments for Business Intelligence
•
Overview of Transactional Business Intelligence Configuration of Descriptive Flexfields
•
Overview of Flexfield Change Import
File Format for Importing Descriptive Flexfields
You can import descriptive flexfields to your application by creating separate text files containing contexts and
segments. You can then upload these files to the Oracle WebCenter Content document repository.
Here are a few things that you need to keep in mind while creating these files:
• Use a vertical bar or pipe ( | ) as a delimiter between fields for both the header and the value rows.
• According to the Oracle WebCenter Content specification, set the file encoding to UTF-8 without the Byte Order
Mark (BOM).
• Make sure the first line in the file is a header line, and the files look exactly the same as shown in the sample
file.
The following sections contain specific details about each file format.
Context
To create a file containing the contexts, include the headers specified in this table:
701

Oracle Fusion Cloud HCM
Using Common Features for HCM
Chapter 26
HCM Flexfields Maintenance
Header Data Type Data Size Description Required or Optional
ApplicationId
Long
-
This value determines the
application your flexfield
and context belong to.
Required
DFFCode
String
40
This value is the code of the
descriptive flexfield where
you're adding your context.
The value should match
the code of a descriptive
flexfield that's already in
the application.
Required
ContextCode
String
80
This value is the code for
your context.
Required
Name
String
80
This value determines
the display name of your
context.
Required
EnabledFlag
String
1
This value lets you enable
or disable your context:
• Y: Enable context
• N: Disable context
Required
Description
String
240
This value describes your
context.
Optional
ContextIdentifier
String
30
This value determines the
API name for your context.
While naming APIs, follow
the naming conventions.
Optional
Here's a sample file for contexts. You can see the header values at the beginning of the file, followed by the line entries
of the two value set codes to be imported. For importing several contexts, add more entries in the same format.
ApplicationId|DFFCode|ContextCode|Name|EnabledFlag|Description
0|TEST_DEPLOY_DFF1|LOADER_Con1|Loader con Name|Y|Description
Segment Label
To create a file containing context segments, include the headers specified in this table:
Header Data Type Data Size Description Required or Optional
ApplicationId
Long
-
This value determines the
application your flexfield,
context, and segment
belong to.
Required
702

Oracle Fusion Cloud HCM
Using Common Features for HCM
Chapter 26
HCM Flexfields Maintenance
Header Data Type Data Size Description Required or Optional
DFFCode
String
40
This value is the code of
the descriptive flexfield
where you're adding
your segment. The value
should match the code of a
descriptive flexfield that's
already in the application.
Required
SegmentLabelCode
String
30
This value is the code for
your segment.
Required
Name
String
80
This value is the name of
your segment.
Required
Description
String
240
This value describes your
segment.
Optional
BIObjectName
String
128
This value provides the
name for the BI-enabled
segment.
Optional
Here's a sample file for the segment label. You can see the header values at the beginning of the file, followed by the line
entries of the two value set codes to be imported. For importing several segment labels, add more entries in the same
format.
ApplicationId|DFFCode|SegmentLabelCode|Name|Description|BIObjectName
0|FLEX_DFF1|Label Code 1|Label name 1|Description 1| BIObJ1
Segment
To create a file containing context segments, include the headers specified in this table:
Header Data Type Data Size Description Required or Optional
ApplicationId
Long
-
This value determines the
application your flexfield,
context, and segment
belong to.
Required
DFFCode
String
40
This value is the code of
the descriptive flexfield
where you're adding
your segment. The value
should match the code of a
descriptive flexfield that's
already in the application.
Required
ContextCode
String
80
This value is the code for
the context where you're
adding your segment.
The value should match
a context code that's in
Required
703

Oracle Fusion Cloud HCM
Using Common Features for HCM
Chapter 26
HCM Flexfields Maintenance
Header Data Type Data Size Description Required or Optional
the application. For Global
Segments, use the value
for the field as Global Data
Elements.
SegmentCode
String
30
This value is the code for
your segment.
Required
Name
String
60
This value is the name of
your segment.
Required
ColumnName
String
30
This value determines the
table column that your
segment uses to save data.
The value must match
a column that's in the
application.
Required
ValueSetCode
String
60
This value is the code for
the value set you want to
use in your segment. The
value must match a value
set code in the application.
Required
DisplayType
String
30
This value determines
the display type of the
segment. Here are the valid
values for this attribute:
• INPUT_SEARCH
• TEXT_BOX
• TEXT_AREA
• HIDDEN,LOV
• POP_UP_LIST
• DROP_DOWN_LIST
• RADIO_BUTTON_
GROUP
• CHECKBOX
• DATE_TIME
Required
Prompt
String
80
This value determines
the display name of the
segment.
Required
ShortPrompt
String
80
This value determines the
shortened display name of
the segment.
Required
EnabledFlag
String
1
This value lets you enable
or disable your segment:
Required
704

Oracle Fusion Cloud HCM
Using Common Features for HCM
Chapter 26
HCM Flexfields Maintenance
Header Data Type Data Size Description Required or Optional
• Y: Enable segment
• N: Disable Segment
RequiredFlag
String
1
This value indicates
whether you must specify
the segment:
• Y: You must specify
the segment.
• N: You may not
specify the segment.
Required
ReadOnlyFlag
String
1
This value lets you set your
segment to be read-only:
• Y: The segment is set
to read-only.
• N: The segment isn't
set to read-only.
Required
Description
String
240
This value describes your
segment.
Optional
UOMclass
String
20
This value specifies the unit
for the data that you add to
your segment.
Optional
TerminologyHelpText
String
80
This value describes the
segment.
Optional
InFieldHelpText
String
160
This value provides
instructions on how to use
the segment.
Optional
SequenceNumber
Integer
-
This value specifies
the order in which your
segments display in your
context.
Optional
DefaultType
String
30
This value specifies the
type of default value for
your segment. Here are the
types of default values:
• CONSTANT
• SQL
• GROOVY_EXPRESSION
Optional
DefaultValue
String
4000
This value provides the
default values for your
segment.
Optional
705

Oracle Fusion Cloud HCM
Using Common Features for HCM
Chapter 26
HCM Flexfields Maintenance
Header Data Type Data Size Description Required or Optional
DisplayWidth
Integer
-
This value specifies the
maximum number of
characters that can display
in a line.
Optional
DisplayHeight
Integer
-
This value specifies the
maximum number of lines
that can display in the
segment.
Optional
RangeType
String
30
This value specifies the
range of values for the low-
end and high-end fields.
You can set the respective
field value as LOW or HIGH.
Optional
BIEnabledFlag
String
1
This value indicates
whether your segment is BI
enabled:
• Y: Your segment is BI
enabled.
• N: Your segment isn't
BI enabled.
Optional
SegmentIdentifier
String
30
This value determines the
API name for your segment.
While naming APIs, follow
the naming conventions.
Optional
Here's a sample file for a segment. You can see the header values at the beginning of the file, followed by the line entries
of the two value set codes to be imported. For importing several segment labels, add more entries in the same format.
ApplicationId|DFFCode|ContextCode|SegmentCode|Name|ColumnName|ValueSetCode|DisplayType|Prompt|ShortPrompt|
EnabledFlag|RequiredFlag|ReadOnlyFlag|Description|UomClass|BIEnabledFlag|BIEqualizationTag
0|FLEX_DFF1|Global Data Elements|SWAMY_TEST_GSEG1|Global seg 1|ATTRIBUTE10_VARCHAR2|EFF_BASIC_FMT_CHR|
TEXT_BOX|Prompt|Short Prompt|Y|N|N|TEST desc aug LABEL TAG 1NOV LOAD && ||Y|LabelC1
Related Topics
•
Overview of Descriptive Flexfields
•
Naming Conventions for Flexfield APIs
•
Overview of Files for Import and Export
706

Oracle Fusion Cloud HCM
Using Common Features for HCM
Chapter 26
HCM Flexfields Maintenance
Enable Auditing for Descriptive Flexfields
You can enable auditing for your descriptive flexfield to keep a track of all the changes made on various objects and
attributes in the application.
1. In the Setup and Maintenance work area, go to the Manage Audit Policies task.
2. Go to the Oracle Fusion Applications section and click Configure Business Object Attributes.
3. Click Product and select the product area for which you want to enable audit. The business objects associated
with that product appear in the Objects section.
4. Click the check boxes next to the listed business objects to select them. If the selected object has attributes,
they appear in the Audited Attributes area.
5. Click the Add icon to add attributes from the Select and Add Audit Attributes page.
6. On the Select and Add Audit Attributes page, click the Flexfields (Additional Attributes) check box to add the
flexfields attribute.
7. Click OK.
8. Click Save and Close. You return to the Manage Audit Policies page.
9. In the Oracle Fusion Applications section, select Auditing from the Audit Level drop-down. This setting
enables auditing for descriptive flexfields.
10. Click Save and Close.
Manage Extensible Flexfields
Overview of Extensible Flexfields
Extensible flexfields are like descriptive flexfields, with some additional features.
• You can add as many context-sensitive segments to the flexfield as you need. You aren't restricted by the
number of columns predefined and registered for the flexfield.
• You can configure a one-to-many relationship between the entity and its extended attribute rows.
◦
A row of data can have multiple contexts associated with it.
◦
A row of data can have multiple occurrences of the same context.
• You can configure attributes in groups to form a context so that the attributes in the context always appear
together in the user interface.
• You can use existing hierarchical categories so that entities inherit the contexts that are configured for their
parents. Contexts are reusable throughout categories.
• Application development has registered some extensible flexfields to support view and edit privileges. For such
flexfields, you can specify view and edit privileges at the context level to control who sees the attributes and
who can change the attributes' values.
When you configure a context for multiple rows per entity, the segments are displayed as a table.
Unlike descriptive flexfields, the extension columns corresponding to extensible flexfields segments are part of
extension tables, separate from the base application table. Unlike descriptive flexfield contexts, the set of attributes in
707

Oracle Fusion Cloud HCM
Using Common Features for HCM
Chapter 26
HCM Flexfields Maintenance
an extensible flexfield context remains constant and doesn't differ by context value. An extensible flexfield describes an
application entity, with the run time ability to expand the database that implementation consultants can use to define
the data structure that appears in the application. Extensible flexfields support one-to-many relationships between
the entity and the extended attribute rows. To get a list of predefined extensible flexfields, use the Manage Extensible
Flexfields task in the Setup and Maintenance work area.
The following aspects are important in understanding extensible flexfields:
• Usages
• Categories
• Pages
• Security
• Protected Extensible Flexfield Data
Usages
Similar to the descriptive flexfields, you can define multiple usages for an extensible flexfield, which enables several
application tables to share the same flexfield.
For example, a flexfield for shipping options can be used by both a Supplier table and a Buyer table. In addition, you can
associate a context with one, some, or all of the flexfield's usages. Thus, with the shipping information example, you can
associate a warehouse context with the Supplier usage, a delivery location context with the Buyer usage, and a ship-via
context with all usages.
Usages include security information for applying no security to user access or enforcing view and edit privileges. Some
product-specific extensible flexfields have specialized usage fields beyond those for security.
Categories
You can configure multiple extensible flexfield contexts and group the contexts into categories. All extensible flexfields
have at least one category. For some extensible flexfields, you can configure a hierarchy of categories. A child category
in the hierarchy can inherit contexts from its parent category.
You can define categories for extensible flexfields, and you can associate any combination of contexts with a given
category.
For example, the Electronics and Computers category hierarchy might include a Home Entertainment category, which
in turn might include an Audio category and a TV category, and so on. The Home Entertainment product might have
contexts that specify voltage, dimensions, inputs and outputs. Contexts are reusable within a given extensible flexfield.
For example, the dimensions context could be assigned to any category that needs to include dimensional information.
Pages
Extensible flexfields let you combine contexts into groups known as pages, which serve to connect the contexts so they
will always be presented together in the application user interface.
Each application page corresponds to one extensible flexfield category, with a separate region of the page for each
associated context.
Security
When you configure a flexfield, you set the privileges for a context at the usage level by selecting actions for the view
and edit privileges of a context usage.
708

Oracle Fusion Cloud HCM
Using Common Features for HCM
Chapter 26
HCM Flexfields Maintenance
When an end user performs a search, the user interface displays only the attribute values of the contexts for which the
user has view privileges. The user can perform a search using all attributes for all contexts, regardless of view privileges.
If end users access a context through a web service, an exception is thrown if they perform an action for which they
don't have privileges.
All extensible flexfields have a base data security resource. Some data security resources for extensible flexfields
are preconfigured with actions that you can use to specify access privileges. If no action is preconfigured, a security
administrator can create actions and policies to support access control on the extensible flexfield attributes.
Some extensible flexfields have a translatable option; these flexfields also have a translation data security resource.
Protected Extensible Flexfield Data
Application developers may mark some data configurations in an extensible flexfield as protected, indicating that you
can't edit them.
If an extensible flexfield is partially protected, then you can't edit the protected portions of the flexfield's configuration.
For example:
• If an extensible flexfield context is protected, you can't edit its:
◦
Context details
◦
Context segments
◦
Context usages
• If an extensible flexfield page is protected, you can't:
◦
Edit the page details or delete the page
◦
Edit the contexts associated with the page
Note:
• There's no restriction on page references to protected contexts. The pages you create may contain any context,
whether protected or not.
• There's a restriction on category references to protected contexts. If a context is protected, you can't add it to
or delete it from any category.
Related Topics
•
Overview of Flexfield Deployment
•
Considerations for Managing Extensible Flexfields
•
How can I access predefined flexfields?
•
Considerations for Managing Flexfields
•
How do I update existing setup data?
709

Oracle Fusion Cloud HCM
Using Common Features for HCM
Chapter 26
HCM Flexfields Maintenance
Considerations for Planning Extensible Flexfields
Once you have identified a flexfield, plan the configuration. Make a list of the UI pages and other artifacts that are
affected by the configuration. Verify that you have the appropriate roles to view and configure the flexfields.
You can locate flexfields on a page using the Settings and Actions menu. Click your user image or name in the
global header to open this menu, and select Highlight Flexfields to locate flexfields on a page. After you configure
the flexfields, plan to deploy them for test and production users. Review the tools and tasks available for managing
flexfields to add and edit flexfield segments.
Planning an extensible flexfield involves:
1. Identifying the following:
◦
A hierarchical structure of categories
◦
Existing context values
◦
User-defined attributes, the relevant extensible flexfield segments, segment properties, and the structure
2. Planning the following:
◦
Validation rules
◦
Initial values
◦
Security
◦
Attribute mapping to Oracle Business Intelligence objects.
Category Hierarchy Structure
Existing category hierarchy structures provide the framework for planning what segments to add to an extensible
flexfield as user-defined attributes of an entity. Some applications provide user interfaces to create and manage an
extensible flexfield's category hierarchy.
Contexts and Existing Context Values
If related attributes can be grouped together, plan adding the attributes as a context of segments, and plan the order
in which the attributes should appear. Some extensible flexfields have preconfigured context values. Region headers
displayed in the user interface page or pages that contain the flexfield segments identify existing contexts. Using the
Manage Extensible Flexfields task, find and open the flexfield for editing to view the list of configured context values.
See product-specific information for guidance in using preconfigured context values.
Plan the Segments and Segment Properties
List all the user-defined attributes that you want to add as extensible flexfield segments. For each segment, define
properties, including the indexed property.
Plan Validation Rules
Define each segment's validation rules and check if value sets exist for those rules or you must create. If you must
create a value set, you can create it either before you configure the flexfield or at the same time that you create or edit a
segment.
710

Oracle Fusion Cloud HCM
Using Common Features for HCM
Chapter 26
HCM Flexfields Maintenance
When determining a segment's validation rules, consider the following questions:
• What is the data type: character, date, date and time, or number?
• Does the segment require any validation beyond data type and maximum length?
• Should a character type value be restricted to digits, or are alphabetic characters permitted?
• Should alphabetic characters automatically be changed to uppercase?
• Should numeric values be zero-filled?
• How many digits can follow the radix separator of a numeric value? In base ten numeric systems, the radix
separator is a decimal point.
• Should the value be within a range?
• Should the value be selected from a list of valid values? If yes, consider the following questions:
◦
Can you use an existing application table from which to obtain the list of valid values, or do you have to
create a list?
◦
If you're using an existing table, do you have to limit the list of values using a WHERE clause?
◦
Does the list of valid values depend on the value in another flexfield segment?
◦
Is the list of valid values a subset of another flexfield segment's list of values?
Plan Initial Values
For every segment, list the constant value or SQL statement, if any, to use for the initial value of the user-defined
attribute.
Plan Security
Determine what privileges to set for view and edit access to context attributes, such as providing all users with view
access but only managers with edit access.
If your security restrictions apply to several contexts, you can create generic actions. At a minimum, create the generic
actions for the base data security resource. If the flexfield has a translatable option and you plan to use translatable
contexts, then also create the generic actions for the translation data security resource. For example, the Item flexfield
supports the translatable option and has a data security resource ITEM_EFF_VL in addition to the base data security
resource ITEM_EFF_B. Then, create actions for both data security resources, such as EDIT_NONTRANS_ATTRS for
ITEM_EFF_B and EDIT_TRANS_ATTRS for ITEM_EFF_VL.
If your security restrictions are more fine-grained, such as having to secure each context with a different privilege, then
you can create more fine-grained actions.
Plan Which Segments Map to Oracle Business Intelligence Objects
If an extensible flexfield has been enabled for Oracle Business Intelligence, you can make the attributes available for use
in Oracle Business Intelligence Applications.
Related Topics
•
Considerations for Managing Extensible Flexfields
•
Flexfield Segment Properties
711

Oracle Fusion Cloud HCM
Using Common Features for HCM
Chapter 26
HCM Flexfields Maintenance
Considerations for Managing Extensible Flexfields
Configuring extensible flexfields involves managing the available flexfields registered with your application database.
The following sequence describes how to configure extensible flexfields:
1. Configuring contexts by creating each context segment and the context-sensitive segments for each context
segment, and providing the following for each segments:
a. Identifying information
b. Column assignment
c. Initial default value
d. Display properties
2. Configuring context usages and usage security by selecting actions to which users should have access:
◦
View
◦
Edit
◦
None, if no special privileges should be enforced.
3. Configuring categories and category details.
4. Associating contexts with a category.
5. Creating logical pages for a category.
The following aspects are important in understanding extensible flexfield management:
• Contexts and pages
• Categories
• Initial values
• Adding segments to highlighted extensible flexfields
• Indexed segments
• Security
• Deployment
Contexts and Pages
Each context is displayed to end users as a region containing its context-sensitive segments. You can specify instruction
help text to display instructions that explain how to use the region and its attributes to end users. Instruction help text
is displayed at the beginning of the context region. A context can be defined as single row or multi-row. Single row
contexts are the same as descriptive flexfields contexts. A single row context has only one set of context-sensitive
segments. A multi-row context enables you to associate multiple sets of values with the same object instance.
For example, for a BOOK table, you could create a multi-row context named chapters that contains a segment for
chapter and a segment for number of pages. Multiple chapters can then be associated with each book in the BOOK
table.
For contexts that store multiple rows, you can uniquely identify each row by having the values in each row form a
unique key.
If flexfield has a category hierarchy, then you can leverage the hierarchy to reuse contexts for similar entities, such as
similar items in a product catalog.
712

Oracle Fusion Cloud HCM
Using Common Features for HCM
Chapter 26
HCM Flexfields Maintenance
Set the context to translatable so that free-form text entered by end users is stored in the language of the user's locale,
and different translations of that text can be stored in other languages. Segments in the translated contexts should use
format-only value sets for storing free-form, user-entered text.
Set the context security to give an end user view or edit access to a context. The context's task flow and region appear
in the user interface only for users with view access. With edit access, an end user can edit the context's attribute values.
With no action specified for a usage, no special privileges are enforced through the context's configuration.
Define logical pages to group contexts together in the user interface. For a given category, you may create one or more
logical pages. You may add one or more of the category's associated contexts to each of the category's logical pages.
You can specify:
• The sequence of the contexts within each page.
• The sequence in which the logical pages appear.
• Instruction help text to display instructions that explain how to use the page to end users. Instruction help text
is displayed at the beginning of the logical page, preceding all of its context regions.
Categories
A category is a grouping of related data items that can be considered to belong together. You can associate any
combination of contexts with a given category. Extensible flexfields with more than 30 categories must be deployed as a
background process.
A category hierarchy logically organizes a set of categories. For example, the Electronics and Computers category
hierarchy might include a Computer category and a Home Entertainment category, which in turn might include an
Audio category and a TV category, and so on.
A category can be a child or sibling of an existing category. The hierarchy can be as simple or as complex as desired,
with any combination of zero or more sibling categories and zero or more child categories. If no category is defined, the
data items are grouped in a single predefined default category.
Each category has associated contexts that store relevant information about a data item in that category. For example, a
Home Entertainment product has contexts that specify Voltage, Dimensions, Inputs and Outputs. Contexts are reusable
within a given extensible flexfield. Then, the Dimensions context could be assigned to any category that needs to
include dimensional information.
If a hierarchy includes child categories, each child category inherits the contexts from its parent category; for example,
the Home Entertainment category inherits Voltage and Dimensions from the Electronics and Computers category.
Each extensible flexfield is associated with a particular category hierarchy. Consider category hierarchies to be defining
framework for extensible flexfields and their contexts. A category hierarchy specifies which contexts are valid for each
category.
An extensible flexfield can include multiple contexts which you define to support a given category. These contexts can
be suitable for various purposes, but within a particular category, some contexts might be considered to be related to,
or dependent on, each other. You can combine these contexts into groups known as logical pages, and determine the
sequence in which the pages appear. This serves to connect the contexts so they will always be presented together and
in a particular order in the application user interface.
For example, the Home Entertainment category might have an Electrical Specifications page that contains the Voltage,
Inputs and Outputs contexts, and a Physical Specifications page that contains the Dimensions and Form Factor
contexts.
713

Oracle Fusion Cloud HCM
Using Common Features for HCM
Chapter 26
HCM Flexfields Maintenance
Initial Values
The SQL statement defining an initial value must be a valid statement that returns only one row and a value of the
correct type.
You can use two types of SQL statements:
• SQL statement with no binding. For example, select MIN(SALARY) from EMPLOYEES.
• SQL statement with bind variables. You can use these bind variables in the WHERE clause of the SQL statement.
◦
:{SEGMENT.<segment_code>}: Identifies a segment in the same context.
◦
:{PARAMETER.<parameter_code>}: Identifies a parameter.
◦
:{CONTEXT.<context_code>;SEGMENT.<segment_code>}: Identifies a segment in a different context. The
context must be in the same category or in an ancestor category, and it can't be a multiple-row context.
◦
:{VALUESET.<value_set_code>}: Identifies the closest prior segment in the same context that's assigned to
the specified value set.
◦
:{FLEXFIELD.<internal_code>}: Identifies a flexfield.
Adding Segments to Highlighted Extensible Flexfields
When you highlight flexfields on a run time page and use an Add Segment icon button to create a segment, the
segment code, name, description, table column, and sequence number are set automatically. If you use an Add
Segment icon button to configure extensible flexfield segments, you can't use an existing value set. Value sets are
created automatically when you add segments. You can enter the valid values, their descriptions, and the default value
or specify the formatting constraints for the value set, such as minimum and maximum values.
Depending on display type, the value set you create with the Add Segment icon button is either an independent value
set or a format-only value set. The following table shows which type of value set is created depending on the segment
display component you select.
Display Component Value Set Created Using Add Segment
Check Box
Independent
Drop-down List
Independent
List of Values
Independent
Radio Button Group
Independent
Text Field With Search
Independent
Text box
Format Only
Text area
Format Only
Rich Text Editor Format Only
714

Oracle Fusion Cloud HCM
Using Common Features for HCM
Chapter 26
HCM Flexfields Maintenance
Display Component Value Set Created Using Add Segment
Date/Time
Format Only
Tip: After you add a context value, refresh the page to see the new value.
Indexed Segments
You can designate an extensible flexfield segment as indexed so that it's one of the selectively required attributes a
user can use in an attribute search. If you indicate in the Manage Extensible Flexfield UI page that a segment should
be indexed, the column representing the segment must be added to the database index. Commonly, a database
administrator (DBA) adds columns to the database index.
When an extensible flexfield with indexed segments is deployed, search task flows are generated along with the other
flexfield artifacts and specify the indexed attributes as selectively required. In the deployed extensible flexfield's search
task flow, an end user must specify at least one of the indexed attributes in the search criteria. This prevents non-
selective searches, which could cause performance issues.
For example, if you index the memory and processor attributes and ensure that the corresponding columns in the
database are indexed, a user can search an item catalog for computers by entering processor or memory or both as a
search criteria. No search is performed if an end user enters an attribute that isn't indexed as a search criterion.
Security
An extensible flexfield's base data security resource typically has a name with an _B suffix. The translation data security
resource is a view of a translation table that typically has a name with an _VL suffix.
If a flexfield supports the translatable option and has a translation data security resource, make sure that you create the
action for the appropriate data security resource.
• If you create a context-specific action for a nontranslatable context, add it to the base data security resource.
• If you create a context-specific action for a translatable context, add it to the translation data security resource.
Deployment
You can only deploy extensible flexfields using the Manage Extensible Flexfields task. You can deploy extensible
flexfields offline as a background process and continue working in the session without having to wait for the
deployment to complete. You can queue up several extensible flexfields and deploy as a background process. The
flexfields are deployed, one at a time, in the order that you deploy them to the queue. You must deploy extensible
flexfields with more than 30 categories as a background process.
You can remove an extensible flexfield from the deployment queue with the Cancel Background Deployment command.
When an extensible flexfield is deployed in a background process, its offline status indicates that the flexfield is in a
background deployment process. A flexfield's offline status is cleared and it's deployment status updated when the
background deployment process has completed.
Note: The Offline Status column refreshes when you perform a new search in the Manage Extensible Flexfields task.
715

Oracle Fusion Cloud HCM
Using Common Features for HCM
Chapter 26
HCM Flexfields Maintenance
Related Topics
•
Why did my flexfield changes not appear in the UI?
•
Flexfield Usages
•
Why can't I edit my flexfield or value set configuration?
Considerations for Enabling Extensible Flexfield Segments for
Business Intelligence
An extensible flexfield that's registered in the database as enabled for Oracle Transactional Business Intelligence (OTBI)
includes a BI Enabled setting for each of its segment instances. When a segment instance is BI-enabled, it's available for
use in OTBI.
The following aspects are important in understanding BI-enabled extensible flexfield segments.
• Flattening business components to use BI-enabled segments in Oracle BI
• Mapping attributes of flattened business components to logical objects in OTBI
After you deploy a business intelligence-enabled flexfield, use the Import Oracle Data Extensions for OTBI process to
import the flexfield changes into the Oracle Transactional Business Intelligence repository. Users can make use of the
newly-generated attributes in business intelligence applications. For information about logical objects and import, see
the Creating and Administering Analytics and Reports guide for your products.
Flattening
When you deploy a business intelligence-enabled extensible flexfield, the deployment process generates an additional
set of flattened business components for use in business intelligence. The flattened business components include
attributes for business intelligence-enabled segment instances only.
If you assigned a label to a segment, the flattened components include a single attribute representing all segment
instances with that label. If you didn't assign a label, the flattened components include a discrete attribute for each BI-
enabled segment instance in each structure.
Importing to Oracle Transactional Business Intelligence Repository
After you deploy a business intelligence-enabled flexfield, import the flexfield changes into the Oracle Transactional
Business Intelligence repository to make use of the newly flattened business components in business intelligence and
then propagate the flexfield object changes. When you import the metadata into the Oracle Transactional Business
Intelligence repository, you must do so as the FUSION_APPS_BI_APPID user. To import flexfield changes into the
Oracle Business Intelligence repository in Oracle Cloud implementations, run the Import Oracle Data Extensions for
Transactional Business Intelligence process. For information about logical objects and import, see the Creating and
Administering Analytics and Reports guide for your products.
Tip: When you import a flexfield into the Oracle Transactional Business Intelligence repository, you see both <name>_
and <name>_c attributes for each segment, along with some other optional attributes. The <name>_ attribute contains
the value. The <name>_c attribute contains the code of the value set that the value comes from, and is used for linking
to the value dimension. You must import both attributes.
716

Oracle Fusion Cloud HCM
Using Common Features for HCM
Chapter 26
HCM Flexfields Maintenance
Related Topics
•
Considerations for Enabling Descriptive Flexfield Segments for Business Intelligence
•
Overview of Extensible Flexfields
•
Set Extensible Flexfields as BI-Enabled
•
Overview of Flexfield Change Import
Considerations for Managing Extensible Flexfield Categories
Categories are a way of extending the number of context-sensitive segments for a flexfield beyond the columns
reserved for flexfield segments.
For example, an Items extensible flexfield has a category for each item and each category can have one or more
contexts. The laptop item belongs to the Computers category. Since extensible flexfields are mapped to separate
extension tables, not just to columns as with descriptive flexfields, the thirty reserved columns on the extensible
flexfield table let you define up to thirty context-sensitive segments for each context.
If you add a Dimensions context to the Computers category, thirty segments are available. But if you need to add more
than thirty attributes, create another context and associate it to the same category. You could now add an Electronics
Attributes context to the same Computers category in which you create another thirty segments. You can continue
creating more contexts and adding them to the Computers category. In this way your laptop computer item can be
extended with as many attributes as you need, because it's mapped to a category and you can keep adding contexts to
that category.
A descriptive flexfield on an items table with thirty columns reserved for segments can only have a single context. Once
you configure the columns for that one context, you can't create any more segments.
Predefined and Preconfigured Categories
How you structure the flexfield configuration depends on how categories are defined for the flexfield. If the extensible
flexfield is preconfigured with one category, associate all your contexts and pages with that category. If a product-
specific extensible flexfield is preconfigured with several categories, associate your contexts and pages with those
categories. If the extensible flexfields provide user interfaces for configuring multiple categories, associate a context
with more than one category using inheritance.
Some products provide an activity or task for creating and maintaining categories for an extensible flexfield. See
product-specific information to determine if you can create categories for the flexfield.
You can view a flexfield's category hierarchies by using either the Highlight Flexfields feature or the Manage Extensible
Flexfields task to find and open the flexfield for editing.
Disabling Categories
While configuring an extensible flexfield, you can disable a category. The Enabled column in the Category table of the
Edit Extensible Flexfield page, indicates which categories are enabled.
Note: When you deploy an extensible flexfield that has a disabled category, that category and its descendant
categories aren't deployed. Contexts and their segments are deployed only if they belong to at least one enabled
category.
717
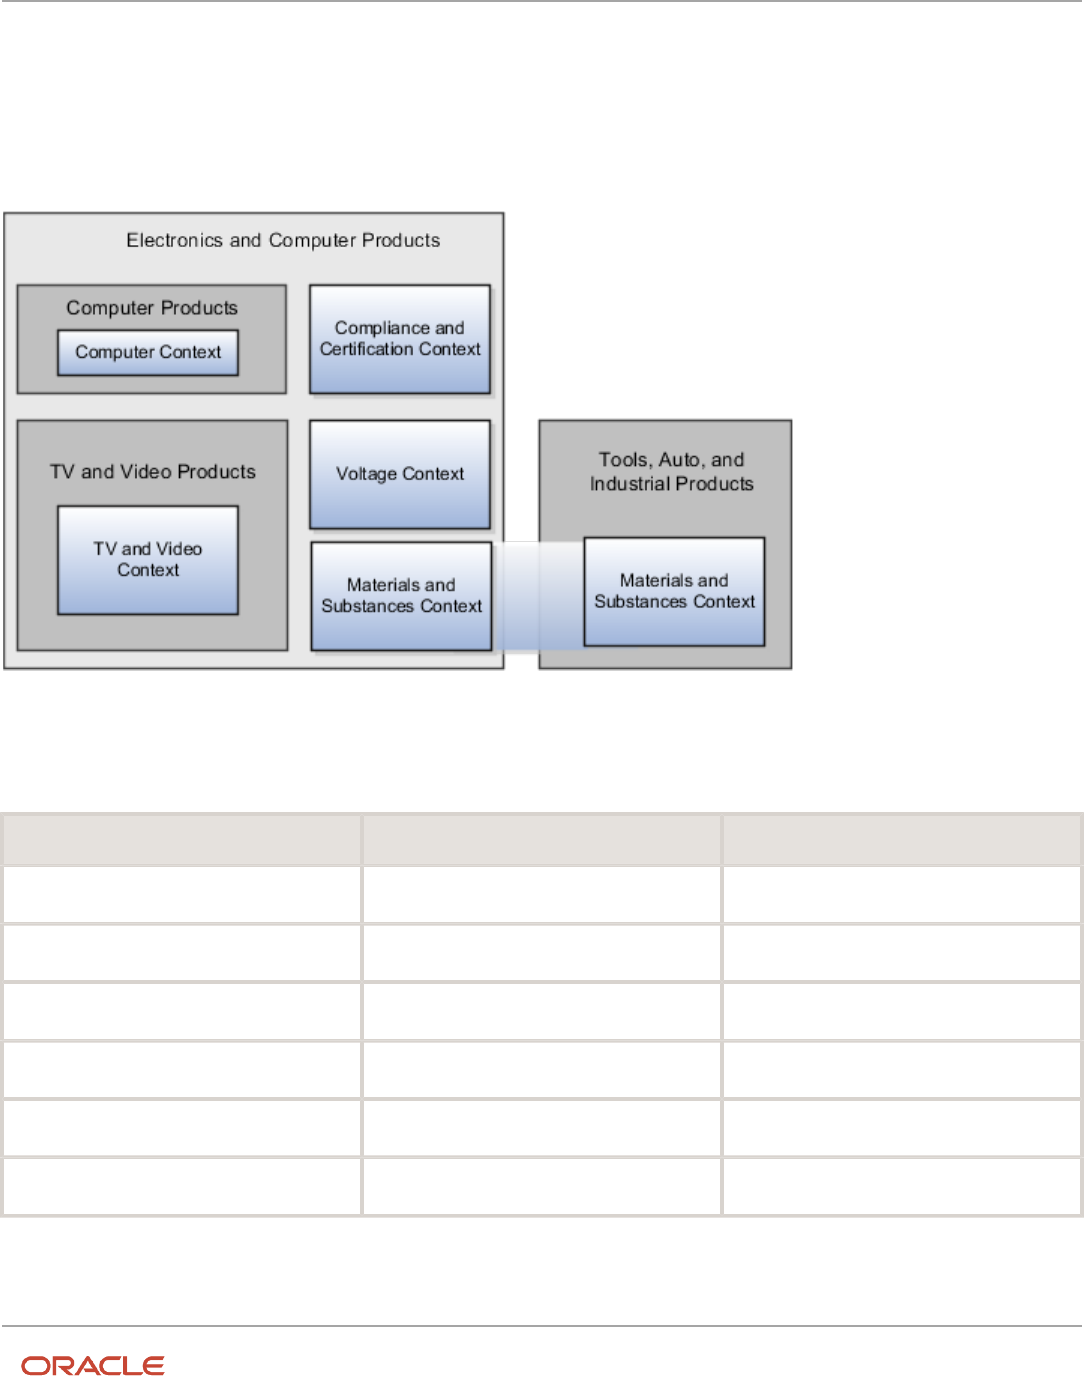
Oracle Fusion Cloud HCM
Using Common Features for HCM
Chapter 26
HCM Flexfields Maintenance
Contexts
Group similar attributes into contexts. The group is displayed together in a region. The region's header is the context
value.
If a category hierarchy exists for the flexfield, then you can leverage the hierarchy to reuse contexts for similar entities,
such as similar items in a product catalog.
The following table shows an example of category hierarchy for an extensible flexfield. To store voltage information for
all electronic and computer items, associate a Voltage context with the Electronics and Computers category. Both the
TV and Video subcategory and the Computers subcategory then inherit the Voltage context from the parent Electronics
and Computers category.
Display Name Code Description
Electronics and Computers
PROD_ELECTRONICS
Electronics and Computers
TV and Video
PROD_TV_VIDEO
Television and Video
Computers
PROD_COMPUTERS
Computers
Office Products and Supplies
PROD_OFFICE_PRODUCTS_SUPPLIES
Office Products and Supplies
Tools, Auto, and Industrial
PROD_TOOLS_AUTO_INDUSTRIAL
Tools, Automotive, and Industrial
Sports and Outdoors
PROD_SPORTS_OUTDOORS
Sports and Outdoors
718

Oracle Fusion Cloud HCM
Using Common Features for HCM
Chapter 26
HCM Flexfields Maintenance
Example of Configuring an Item Extended Attributes Flexfield
The Item Extended Attributes flexfield provides segments for extending the Item business object. In the Manage
Extensible Flexfields task, configure your product business object to include a technical specifications logical page on
the UI for the Electronics and Computers category.
In this example, your configuration of this flexfield groups attributes into the following contexts:
• Materials and Substances
• Compliance and Certification
• Voltage
Scenario
The following list shows an example plan for computer attributes for the Item Extended Attributes flexfield. In this
example, the Electronics Information page is inherited from the parent Electronics and Computers category.
• Page: Electronics Information
◦
Context: Compliance and Certification, single row
- ISO 14001 (International Organization for Standardization for an Environmental Management
System)
- ENERGY STAR (energy efficiency guidelines)
- ROHS (Restriction of the use of certain hazardous substances in electrical and electronic
equipment)
◦
Context: Voltage, single row
- Minimum voltage
- Maximum voltage
- Current type
◦
Context: Materials and Substances, multiple rows
- Material
- Contain recyclate
- Percent unit mass
• Page: Computer Information
◦
Context: Processor Specifications, single row
- Manufacturer
- CPU type
- Processor interface
- Processor class
- Processor speed
- Cores
The following table summarizes key decisions for this scenario.
719

Oracle Fusion Cloud HCM
Using Common Features for HCM
Chapter 26
HCM Flexfields Maintenance
Decisions to Consider In This Example
Which extensible flexfield is available for
configuring a hierarchy of categories?
Item Extended Attributes flexfield
Collecting Technical Specifications
Your product inventory pages for electronics and computers require a technical specifications page. Your product
inventory pages for furniture require a furniture specifications page and an assembly instructions page. Items in both
the electronics and computer category, and in the furniture category, share attributes for specifying materials and
substances.
Use logical pages to determine how the contexts appear on the user interface. Use a context to store all the materials
and substances required to make a single product. You can configure a context to store multiple rows per entity. The
multiple rows are displayed in a table, like the Materials and Substances context.
The Technical Specifications logical page contains the attributes for the four contexts.
• Recovery and Recycling
• Compliance and Certification
• Operating Conditions
• Materials and Substances
The following figure is an example, where the Furniture category is configured to include
a Furniture Specifications logical page and an Assembly Instructions logical page. The two
720

Oracle Fusion Cloud HCM
Using Common Features for HCM
Chapter 26
HCM Flexfields Maintenance
categories (Electronics and Computers and Furniture) share the Materials and Substances context.
Configure Security for the Item Flexfield Configuration
The following table shows an example of data security policies for the Item flexfield.
Data Security Resource Policy Role Action Condition
ITEM_EFF_B
A
VOLTAGE_SPEC
edit_nontrans_voltage_ctx
All values
ITEM_EFF_VL
B
COMPLIANCE_SPEC
edit_trans_compliance_ctx
All values
ITEM_EFF_VL
C
COMPUTER_SPEC
edit_trans_attrs
ComputerCategoryFilter
ITEM_EFF_VL
D
TELEVISION_SPEC
edit_trans_attrs
TVCategoryFilter
The following table shows the privileges for the three flexfield contexts.
Context Edit Privilege View Privilege
Voltage
edit_nontrans_voltage_ctx
NONE
Compliance and Certification
edit_trans_compliance_ctx
NONE
Materials and Substances
edit_trans_attrs
NONE
721

Oracle Fusion Cloud HCM
Using Common Features for HCM
Chapter 26
HCM Flexfields Maintenance
In this example, anyone can view the contexts' attributes, but the edit privileges are restricted as follows:
• Voltage: Only voltage specialists can edit this value.
• Compliance and Certification: Only compliance specialists can edit this value.
• Materials and Substances: Only computer specialists can edit these attributes for items in the computer
category. Only television specialists can edit these attributes for items in the TV category.
To sum up, in this entire example, the Materials and Substances context is secured by a generic action with a condition
applied to restrict access by category. Voltage and Compliance and Certification are secured by actions specific to each
context.
Import Extensible Flexfields
Use the Import option on the Manage Extensible Flexfield page to bulk import the flexfield data that includes value set,
context, and context segment details.
Prerequisite
The files containing the flexfield details are available in the document repository of Oracle WebCenter Content.
Importing Flexfields
To import flexfields:
1. Sign in to the application as an implementation consultant or an administrator.
2. In the Setup and Maintenance work area, open the Manage Extensible Flexfield task or a similar task for
importing flexfields.
3. In Search Results, from the Actions menu, select Import.
4. On the Upload Flexfield Data dialog box, select the WebCenter Content account to which the files were
uploaded.
5. Enter the names of the separate files containing the value set, context, and context segment information. The
names here must match with the names of the files uploaded to the selected account.
6. Click Upload. The flexfield details are imported.
Note: If the import fails, click the link to the log file on the confirmation dialog box and examine the cause of
failure.
Related Topics
•
Import Flexfields, Lookups, or Profile Values Using Web Services
•
Import Value Set Values Using Web Services
•
File Format for Importing Extensible Flexfields
722

Oracle Fusion Cloud HCM
Using Common Features for HCM
Chapter 26
HCM Flexfields Maintenance
FAQs for Manage Extensible Flexfields
Why did the extensible flexfield context not appear at run time?
If a deployed extensible flexfield context doesn't appear in the user interface, verify that the context is associated with
one of the category's pages defined for the extensible flexfield.
Related Topics
•
Why did my flexfield changes not appear in the UI?
Manage Key Flexfields
Overview of Key Flexfields
Key flexfields provide a means to capture a key such as a part number, a job code, or an account code. A key flexfield
consists of one or more segments, where each segment can have a meaning.
For example, a part number 10-PEN-BLA-450 might correspond to a black pen from supplier #450 sold by division #10
(office supplies). Behind the scenes, the application uses a unique number, 13452, for this part, but the user always sees
the 10-PEN-BLA-450 part number.
The following aspects are important to understanding key flexfields:
• Architecture
• Segments and segment labels
• How to Identify Segments
• How the Override, Visible, and Rendered Properties Work
• Structures and segment instances
• Combinations
• Dynamic combination creation
• Security
Key flexfields aren't optional. You must configure key flexfields to ensure that your applications operate correctly. You
configure and maintain key flexfield definitions with the Manage Key Flexfields task. To get a list of predefined key
flexfields, use the Manage Key Flexfields task in the Setup and Maintenance work area. For information about specific
key flexfields, see the help for the product where the associated business component is implemented.
723

Oracle Fusion Cloud HCM
Using Common Features for HCM
Chapter 26
HCM Flexfields Maintenance
Architecture
Flexfield metadata is stored in the flexfield metadata tables. When you configure a key flexfield, you define metadata
about the key flexfield covering aspects such as:
• Segments are in a structure
• Structures in the flexfield
• Value sets in each segment
Based on the flexfield metadata, actual part numbers are captured as a combination of segment values and stored in
a combinations table. A combinations table contains all the segment columns for a flexfield, a unique ID column, and a
structure instance number column. The structure instance number column differentiates multiple arrangements of the
segment columns. For example, a part number containing multiple segments can be represented by a key flexfield. A
part number key flexfield has a corresponding combinations table. In that table, the flexfield stores a list of the complete
codes, with each segment of the code in a column, with the corresponding unique ID and structure instance number for
the code. When users define a new part number or maintain existing part numbers in the parts catalog, they directly
maintain rows in the combinations table.
The foreign key table contains a different business entity than the combinations table. For example, the business entity
in the foreign key table is order lines or invoice lines that contain foreign key references to parts for ordering. Any
number of foreign key tables can reference a particular entity represented by a key flexfield.
Segments and Segment Labels
A key flexfield contains segments. Each segment contains these details:
• A prompt
• A short prompt
• Display width
• The sequential position of the segment within the key flexfield structure
• The range type
• Column name of the attribute being stored by the segment
• A default value set
• A label for the segment
How to Identify Segments
You can identify and control a segment within a key flexfield using a segment label. Segment labels act as tags for the
segments, and these labels are defined by application developers. For example, say in the accounting flexfield, you
want to identify which segment contains balancing information and which one contains natural account information.
A segment label identifies the segment that contains natural account information. When you define your accounting
flexfield, you must specify the segment labels for each segment. Some segment labels must be unique, and can't be
applied to more than one segment in each structure. Other labels are required and must be applied to at least one
segment in each structure.
You can also use a segment label to search for segments, such as the Cost Center label for all segments across key
flexfields that store a value for the cost center. To identify and control a segment in key flexfield, you can set several
segment properties in the flexfield XML with a literal value or an EL expression. These properties are attributes of the
<flexfieldLabeledSegmentHint> element of the flexfield. These property settings apply to all segments that have the
specified segment label assigned to them.
724

Oracle Fusion Cloud HCM
Using Common Features for HCM
Chapter 26
HCM Flexfields Maintenance
Property Description
SegmentLabel
Indicates the segment label for the segment being configured.
Rendered
Indicates whether the segment is available on the page. You can set the value to True, False, or EL
expression
Required
Indicates whether users must enter some data for the component before they save. You can set the
value to True, False, or EL expression.
Read-only
Indicates whether the users can modify the segment. You can set the value to True, False, or EL
expression.
Visible
Indicates whether the segment is visible on the page. You can set the value to True, False, or EL
expression.
Label
Indicates the display text for the segment.
ShortDesc
Indicates the text that appears when users hover over the component.
Columns
Indicates the width of the text control in terms of the number of characters shown. The number of
columns is calculated based on the default font size of the browser. You can set this property with a
literal value or EL expression.
Override
Indicates whether a certain child component inside a parent component is visible. You can set the
value to True, False, or EL expression. When you use this property along with the visible property, it
overrides the visible property of the parent component.
How the Override, Visible, and Rendered Properties Work
Let's look at a few scenarios:
• Here's a snippet of code without the override property:
<fnd:keyFlexfieldPartial value="#{bindings.Kff1PaInstanceIterator}" id="kfp1" visible="false">
<fnd:flexfieldLabeledSegmentHint
segmentLabel="SEGMENT_LABEL_R1" visible="true"/>
</fnd:keyFlexfieldPartial>
In this case, the visible property of the child component is set to true and the visible property of the parent
component is set to false. So, segments with SEGMENT_LABEL_R1 aren't visible because the visible property of
the child component is used in conjunction with the visible property of the parent component.
• Here's a snippet of code with the override property:
<fnd:keyFlexfieldPartial value="#{bindings.Kff1PaInstanceIterator}" id="kfp1" visible="false">
<fnd:flexfieldLabeledSegmentHint
segmentLabel="SEGMENT_LABEL_R1" visible="true" override="true"/>
725

Oracle Fusion Cloud HCM
Using Common Features for HCM
Chapter 26
HCM Flexfields Maintenance
</fnd:keyFlexfieldPartial>
Here also, the visible property of the child component is set to true and the visible property of the parent
component is set to false. But you're also setting the override property of the child component to true. So,
segments with SEGMENT_LABEL_R1 are visible because the visible property of the child component overrides the
visible property of the parent component.
Remember, you must not use the rendered property along with the override property, because when you set the
rendered property to false at the flexfield level, the Oracle ADF module ignores the rendered property at the segment
level. For example, consider this snippet of code:
<fnd:keyFlexfieldPartial value="#{bindings.Kff1PaInstanceIterator}" id="kfp1" rendered="false">
<fnd:flexfieldLabeledSegmentHint
segmentLabel="SEGMENT_LABEL_R1" rendered="true" override="true"/>
</fnd:keyFlexfieldPartial>
Though you set the rendered property to true at the segment level, this property is ignored. That's because the rendered
property is set to false at the flexfield level. So, make sure that you use the visible property instead of the rendered
property along with the override property.
Structures and Segment Instances
A key flexfield structure definition includes the number of segments and their order.
In some applications, different users like to see different segment structures for the same flexfield. A key flexfield can
have multiple structures if registered to support more than one structure.
The flexfield can display different fields for different users based on a data condition in your application data, such
as the value of another field entered by the user or the user's role. For example, the correctly formatted local postal
address for customer service inquiries differs based on locale. A postal address key flexfield could display different
segments and prompts for different users based on a location condition in your application data, such as the user's role
or a value entered by the user.
Each structure can have one or more segments. Thus a segment is a child of a structure. To store a particular segment,
such as Cost Center, in two different structures, you must define the segment separately in each structure. Each
structure may have one or more structure instances. Each instance of a structure shares the same number and order of
segments, but differs in the values or value sets used in validating the segments.
You can define multiple configurations of a key flexfield structure. These structure instances have the same segment
structure, in the same sequence order. They differ primarily in how each segment is validated. You define a structure
instance for each key flexfield and each key flexfield structure instance.
The segments in a key flexfield structure instance are segment instances. A segment instance is a segment with a
specific value set assigned to it. If a key flexfield is registered with a tree structure, you can specify a tree code for a
segment instance.
Combinations
A combination is a complete code, or combination of segment values that makes up the code, that uniquely identifies
an object.
For example, each part number is a single combination, such as PAD-YEL-11x14 or 01-COM-876-7BG-LTN. In these
combinations, the hyphen is the segment separator. If you have ten parts, define ten combinations. A valid combination
is an existing or new combination that can be used because it's currently active and doesn't violate cross-validation
or security rules. A combination has different segments depending on the flexfield structure being used for that
combination. Any combination is associated with only one particular flexfield structure.
726

Oracle Fusion Cloud HCM
Using Common Features for HCM
Chapter 26
HCM Flexfields Maintenance
Many applications refer to a key flexfield combination by using the name of the entity or the key flexfield itself. For
example, Assets uses the asset key flexfield and refers to one of its combinations as an asset key or asset key flexfield.
In another example, Oracle General Ledger refers to combinations of the accounting flexfield as account or GL account.
Each key flexfield has one corresponding table, known as the combinations table, where the flexfield stores a list of the
complete codes, with one column for each segment of the code, together with the corresponding unique ID number
(an account combination ID) for that code. Then, other tables in the application have a column that stores just the
unique ID for the code. For example, you may have a part number code, such as PAD-YEL-11x14. The Parts combinations
table stores that code along with its ID, 57494. If your application lets you take orders for parts, you might then have
an Orders table that stores orders for parts. That Orders table would contain a single column that contains the part ID,
57494, instead of several columns for the complete code PAD-YEL-11x14. Typically, one combinations page maintains
the key flexfield, where the key flexfield is the representation of an entity in your application. Maintain individual
combinations, such as part numbers in the combinations page.
Dynamic Combination Creation
Dynamic combination creation is the insertion of a new valid combination into a combinations table from a page other
than the combinations page. The following table lists the levels at which dynamic combination creation may be enabled.
Level Of Dynamic Combination Creation Controlled By
Flexfield
Application development
Each usage or reference to the key flexfield
Application development
Structure instance
Administrators and implementation consultants
Other
Administrators and implementation consultants
If your key flexfield or certain usages or references of the key flexfield don't permit dynamic combination creation,
you may control whether dynamic combination creation is enabled for each structure instance. If enabled, a user can
enter a new combination of segment values using the flexfield window from a foreign key page. For example, when
entering a transaction, a GL user can enter a new expense account combination for an account that doesn't yet exist.
Your application creates the new account by inserting the new combination into the combinations table behind the
scenes. Assuming that the new combination satisfies any existing cross-validation rules, the flexfield inserts the new
combination into the combinations table, even though the combinations table isn't the underlying table for the foreign
key page.
Related Topics
•
Overview of Flexfield Deployment
•
Key Flexfield Structures
•
How can I access predefined flexfields?
•
Considerations for Managing Flexfields
•
How do I update existing setup data?
727

Oracle Fusion Cloud HCM
Using Common Features for HCM
Chapter 26
HCM Flexfields Maintenance
Considerations for Planning Key Flexfields
Your first step in planning your key flexfields is to determine which key flexfields your application requires.
Your plan should include these tasks:
• Determine the purpose of the key flexfield.
• Identify the number and length of its available segment columns.
• Identify if your key flexfield permits more than one structure.
• Identify if more than one structure must be defined.
• Identify the number, order and length of your segments for each structure.
Before You Begin
Once you have identified a flexfield, plan its configuration in advance. Compile a list of the UI pages and other artifacts
in your deployment that are affected by the configuration. Verify that you're provisioned with the roles required to view
and configure the flexfield. Use the Highlight Flexfields command in the Administration menu to view the run time page
where the flexfield appears. Plan how you deploy the flexfield for test and production users and review the tools and
tasks available for managing flexfields.
If you plan to use value sets, create them before configuring the key flexfield. You can't create value sets for key
flexfields at the time that you add and configure key flexfield segments.
Access to Flexfield-Related Tasks
To configure flexfields and value sets, you must have access to the tasks for managing flexfields. Contact your security
administrator for details. For information about product-specific flexfield tasks, such as Manage Fixed Assets Key
Flexfields, refer to the product-specific documentation.
Restrictions
If you plan to use value sets, create them before configuring the flexfield. Plan your key flexfield configuration to scale
to your enterprise needs. For example, if you expect to disable old cost centers and enable new ones frequently, plan
a larger maximum size for your cost center value set so that you can have more available values. A 3-character value
set with one thousand available values provides more room for changes than a 2-character value set with 100 available
values.
Note the code name of the flexfield you intend to configure so that you find it easily in the tasks for managing key
flexfields. In some cases you can configure how the flexfield appears on the page. See product-specific documentation
to determine any restrictions on using product-specific key flexfields.
Note: Table-validated value sets with ID columns and translated independent or dependent value sets aren’t
supported in key flexfields.
Reporting
To report on your data by certain criteria or sub-entities, such as account number or project or region, consider making
that sub-entity a distinct segment, rather than combining it with another sub-entity. You can categorize and report on
smaller discrete units of information.
728

Oracle Fusion Cloud HCM
Using Common Features for HCM
Chapter 26
HCM Flexfields Maintenance
Related Topics
•
Considerations for Planning Value Sets
Considerations for Managing Key Flexfields
Consider the plans for a key flexfield, security, and resulting run time pages when configuring key flexfields.
Planning
Plan structures carefully and enable them for future needs. Don't change the number, order, and maximum length of
segments once you have acquired flexfield data.
Structure Delimiters
A delimiter separates the segments when they appear to users. The delimiter value of a structure specifies the character
used to visually separate segment values when the key flexfield is displayed as a string of concatenated segments in the
UI.
Identify the delimiter value of your key flexfield carefully so that it doesn't conflict with the flexfield data. For example,
if your data frequently contains periods, such as in monetary or numeric values, don't use a period as your segment
separator. Any character you expect to appear frequently in your segment values or descriptions isn't a good choice for
the delimiter. If you change the configuration of a key flexfield, such as the delimiter, the change affects the previously
stored key flexfields with that structure.
Security
Oracle data security enforces value set security.
Within key flexfields, value set security applies to the selection of the individual segment values in the segment list of
values. When selecting a key flexfield segment value from the combinations table, data security permits display of only
the combinations whose segment values you have access to. Applications development controls whether or not value
set security rules propagate to the foreign key table. By default they do.
Run Time Pages
Application development determines the user interface (UI) pages used to render flexfields. The types of key flexfield UI
pages are as follows:
• Combinations pages where the underlying entity objects use the combinations table itself
• Foreign key pages where the underlying entity objects contain a foreign key reference to the combinations table
• Partial usage pages where some or all of the key flexfield's segment columns are in a product table
The same key flexfield can be used in different ways on different pages.
A page with a foreign key reference has a base table or view that contains a foreign key reference to a combinations
table with the actual flexfield segment columns. This lets you manipulate rows containing account combination IDs
(account combination).
729

Oracle Fusion Cloud HCM
Using Common Features for HCM
Chapter 26
HCM Flexfields Maintenance
A page with partial usage of a key flexfield presents segments that are defined on a product's transactional table in
addition to being defined on a combinations table. In the case of a partial usage page, only a part of the configuration is
likely to be visible. This enables the key flexfield to act more like a descriptive flexfield.
An account combination maintenance page or combinations page presents the combinations table. This enables
directly creating and maintaining account combinations. The combinations table contains all key flexfield segment
columns and a unique ID column.
A typical application has only one combinations page. An application might not have a combinations page if it doesn't
support maintenance by administrators.
A page containing a search region enables users to select which attributes of the key flexfield view object to use as
criteria to search for flexfield metadata.
For example, you can configure seven segments for the Account key flexfield. In a foreign key reference page, users
see the typical key flexfield picker with all seven segments where they can search for combinations. In a partial usage
page using the same key flexfield, users potentially could see only a single segment such as the Cost Center labeled
segment, or they might see multiple segments but displayed as individual segments rather than options for selecting
combinations.
Related Topics
•
Key Flexfield Structures
•
Example of a Key Flexfields
•
Key Flexfield Structure Instances and Segment Instances
•
Considerations for Enabling Key Flexfield Segments for Business Intelligence
•
Flexfield Usages
Key Flexfield Structures
A key flexfield structure arranges the segments of a key so that you can reuse a single key flexfield in multiple
combinations of the same segments or a subset of those segments.
Multiple instances of a single structure can accommodate differences in the value sets assigned to the structure's
segments.
The structure determines the following aspects of a key flexfield:
• The segments to include
• The order of the segments
• Segment labels on the included segments
• Properties for each segment applied to the instances of the segments in an instance of the structure
Managing Key Flexfield Structures
All the segments defined for a key flexfield are available to be included in a key flexfield structure.
730

Oracle Fusion Cloud HCM
Using Common Features for HCM
Chapter 26
HCM Flexfields Maintenance
You can define as many segments as there are defined segment columns in your key flexfield combinations table.
Ensure that you add segments in the order that your key requires. Once deployed, the order can't be changed.
Enable segments to indicate that they are in use. A flexfield doesn't display disabled segments in run time. To protect
the integrity of your data, disable a segment if you have already used it to enter data.
Related Topics
•
Key Flexfield Structure Instances and Segment Instances
Key Flexfield Structure Instances and Segment Instances
A key flexfield structure can have one or more alternate structure instances. The instances of a key flexfield structure
share the following aspects of the structure.
• The same set of segments
• The same arrangement of segments
• The same properties at the segment and structure levels
The differences among structure instances include whether dynamic combination creation is permitted. Likewise, at the
structure instance level, differences among segment instances are based on the following:
• Value set
• Default type and default value
• Tree code
• Whether the segment is any of the following:
◦
Required
◦
Displayed
◦
Enabled for business intelligence
◦
Optional or required as a query criterion
For example, you can use one group of value sets for the US and another for France.
731

Oracle Fusion Cloud HCM
Using Common Features for HCM
Chapter 26
HCM Flexfields Maintenance
The structures differ in the number of segments and the segment separators used. The structure instances share all
the properties defined for that structure. However, the structure instances may vary if the properties are defined at the
structure instance or segment instance level. For example, the value set assigned to the segment instances.
Query Required Segment Instances
You can designate a key flexfield segment instance as a query for making it a selectively required attribute. A user
can use it as a key flexfield combination search. On the Manage Key Flexfields UI page, if you indicate that a segment
instance requires indexing, add the column representing the segment to the database index. Commonly, a database
administrator (DBA) adds columns to the database index.
Following deployment, the combination picker of the key flexfield displays the query required attributes as selectively
required. A user must specify at least one of the query required attributes in the search criteria. This prevents
unnecessary searches that could cause performance issues.
732

Oracle Fusion Cloud HCM
Using Common Features for HCM
Chapter 26
HCM Flexfields Maintenance
For example, you mark the cost center and account attributes as query required and ensure that the corresponding
columns in the database are indexed. A user can search for combinations by entering cost center or account or both as
search criteria. No search is performed if a user doesn't enter at least one query required attribute as search criteria.
Tip: Index the Structure Instance Number column on your combinations table to improve run time performance.
Dynamic Combinations
If a key flexfield supports dynamic combination creation, you can select to enable this feature by selecting Dynamic
Combination Creation Allowed. As a result, users enter values at run time that produce new account combinations
for the flexfield. If Dynamic Combination Creation Allowed isn't enabled, new valid combinations can only be entered
using the combinations table for the flexfield.
Trees
You may define a tree code for the value set assigned to the segment instance. When you assign the tree code to the
segment instance, tree hierarchy search operations are available on the segment values.
For a segment instance to be based on a tree, the following must be true.
• Application development registered the key flexfield with a tree structure. The tree structure may be fixed
across all segments in the flexfield, or may vary across segments.
• A tree code for that tree structure exists.
• The tree code includes tree versions containing the values of the value set assigned to the segment instance.
• You assign the required tree code directly to the segment instance.
If these conditions are satisfied, you can assign the same or different tree codes to the different segment instances that
use the same value set.
Related Topics
•
Flexfield Segment Properties
Cross-Validation Rules
You can define cross-validation rules across segments to control the creation of key flexfield code combinations. These
rules enforce whether a value of a particular segment can be combined with specific values of other segments to form a
new combination.
The following table compares segment validation to cross-segment validation:
Type of validation Type of control
Segment validation
Controls the values you can enter for a particular segment
Cross-segment validation
Controls the combinations of values that administrators and end users can create for key flexfields
733

Oracle Fusion Cloud HCM
Using Common Features for HCM
Chapter 26
HCM Flexfields Maintenance
Note: You can use cross-validation rules for any key flexfield that has cross-validation enabled. See the
documentation for your key flexfield to determine if it supports cross validation.
Cross-validation rules prevent the creation of combinations with values that can't coexist in the same combination.
For example, your company requires that all revenue accounts must have a specific department. Therefore, account
combinations that have revenue account values, such as all values between 4000 and 5999, must have a corresponding
department value other than 000, which indicates no department is specified. You can define cross-validation rules that
disallow creation of combinations with incompatible segments, such as 4100-000 or 5000-000.
Alternatively, suppose your accounting key flexfield has an Organization segment with two possible values, 01 and 02.
You also have a Natural Account segment with many possible values, but company policy requires that Organization 01
uses the natural account values 001 to 499 and Organization 02 uses the natural account values 500 to 999. You can
create cross-validation rules to ensure that users can't create a general ledger account with combinations of values such
as 02-342 or 01-750.
The following aspects are important to understanding cross-validation rules:
• Rule Definitions
• Enforcement
• Timing
Rule Definitions
The following table contains definitions used in cross-validation rules:
Rule Definition Purpose
Name
Uniquely identifies cross-validation rules in a deployment.
Description
Helps administrators identify the purpose of the rule.
Error message
Explains why the attempted combination violates the rule.
Start Date, End Date
Indicates the period of time when the rule is in effect.
Enabled
Determines whether the rule is enforced.
Condition filter
Determines the conditions in which an enabled cross-validation rule should be evaluated.
Validation filter
Determines the validation that the rule enforces when that condition is met.
When the event specified in the condition filter is applicable, the validation filter condition must be satisfied before
the combination can be created. If the event specified in the condition filter isn't applicable, then the combination is
considered to pass the rule and the rule won't be evaluated even if it's enabled.
Note: If you don't specify any statement in the condition filter, then the condition is always true and the rule is always
evaluated.
734

Oracle Fusion Cloud HCM
Using Common Features for HCM
Chapter 26
HCM Flexfields Maintenance
Enforcement
Cross-validation prevents creation of invalid combinations by administrators using maintenance pages and end users
using dynamic insertion in foreign key pages.
Enabled rules are enforced when there is an attempt to create a new combination of segment values. Disabled rules are
ignored. Deleting the rule has the same effect, but you can re-enable a disabled rule.
Timing
When users attempt to create a new combination, the key flexfield evaluates any cross-validation rules that are enabled
and in effect.
Note: Cross-validation rules have no effect on combinations that already exist. The flexfield treats any existing invalid
combinations that pre-date the rule as valid.
If you want to prevent users from using previously existing combinations that are no longer valid according to your
cross-validation rules, manually disable those combinations using the combinations page for that key flexfield.
When defining a cross-validation rule, specify a start and end date to limit the time when the rule is in effect. The rule is
valid for the time including the From and To dates.
Related Topics
•
Considerations for Cross-Validation Rules
Considerations for Cross-Validation Rules
To validate the key flexfield combinations of segment values across segments, optimize your cross-validation rules to
improve the experience of administrators and users.
Consider the following when defining cross-validation rules:
• Filters
• Rule Complexity
• Maintenance
Filters
A cross-validation rule includes a condition filter and a validation filter. The rule is evaluated using the following logical
order: If the condition filter is satisfied, then apply the validation filter.
The condition filter describes the event when the rule is evaluated. If the event specified in the condition filter isn't
applicable, then the rule isn't evaluated, even if enabled. When the event specified in the condition filter is applicable,
the validation filter condition must be satisfied before the combination can be created.
For example, your organization has determined that a certain company value called Operations can't use a specific cost
center called Marketing. You can define a cross-validation rule to validate your combinations.
1. The rule evaluates the company condition filter.
2. When company is equal to Operations, the rule evaluates the cost center validation filter.
735

Oracle Fusion Cloud HCM
Using Common Features for HCM
Chapter 26
HCM Flexfields Maintenance
3. When cost center is equal to Marketing, the rule prevents a combination from being created.
4. The error message you defined for the rule displays to inform the user that the attempted combination violates
the rule.
Such a rule doesn't affect the creation of combinations with Marketing cost center and company values other than
Operations.
Rule Complexity
For optimal performance and ease of understanding, define several simple validation rules instead of using one
complex rule. Simple validation rules let you provide a more specific error message and are easier to maintain over time.
Avoid rules that control validation across more than two segments, where possible. While you can define cross-
validation rules that span two or more segments, it becomes difficult to interpret cross-validation error messages and
rectify invalid key flexfield combinations.
Maintenance
To maintain consistent validation, review existing key flexfields when you update your cross-validation rules. Regardless
of your current validation rules, you can use an existing key flexfield combination if it's enabled. Therefore, to ensure
accurate validation, you must review your existing combinations and disable any combinations that don't match the
criteria of your new rules.
Tip: To keep this type of key flexfield maintenance to a minimum, decide upon your cross-validation rules when
you first set up your key flexfield structure. Define cross-validation rules before creating combinations and before
combinations are used in transactions.
To prevent users from using existing combinations that are no longer valid according to your cross-validation rules,
disable them using the combinations page.
Related Topics
•
Cross-Validation Rules
Edit a Cross-Validation Rule
Cross-validation rules prevent specific combinations of segment values in account combinations. You can use the
Manage Cross-Validation Rules task to edit existing rules or to create one-off rules.
Scenario
Your organization has a cross-validation rule named Companies 131 and 151, which restricts account combinations for
those companies to department 40 and product 211. Account combinations for both companies should now include
department 30. To edit the cross-validation rule, perform these steps.
736

Oracle Fusion Cloud HCM
Using Common Features for HCM
Chapter 26
HCM Flexfields Maintenance
1. In the Setup and Maintenance work area, go to the following:
◦
Offering: Financials
◦
Functional Area: Financial Reporting Structures
◦
Task: Manage Cross-Validation Rules
2. On the Rules tab, select the chart of accounts for your organization and select the Companies 131 and 151
cross-validation rule.
The following figure shows the section of the Edit Cross-Validation Rules page with the condition and validation
filter details for companies 131 and 151. A condition is defined for company values equal to 131 or 151, and the
validation specifies the department value equals 40 and the product value equals 211.
3. Click the Validation Filter icon.
4. Click Add Fields and select the Department segment.
5. Accept the default operator, which is Equals, and select department 30.
The following figure shows the Validation Filter window with three validations: department equals 40,
department equals 30, and product equals 211.
6. Click OK.
737

Oracle Fusion Cloud HCM
Using Common Features for HCM
Chapter 26
HCM Flexfields Maintenance
7. Click Save.
The following figure shows the details for the updated validation on the Edit Cross-Validation Rules page. The
validation specifies departments equal to 30 or 40, and the product equal to 211.
8. To update the error message, search for and select the Manage Messages for General Ledger task. Query the
error message name for the cross-validation rule and edit the message to include department 30.
Related Topics
•
How do I update existing setup data?
Considerations for Enabling Key Flexfield Segments for Business
Intelligence
A key flexfield registered in the database as enabled for Oracle Transactional Business Intelligence (OTBI) includes a BI
Enabled setting for each of its segment instances. When a segment instance is BI-enabled, it's available for use in Oracle
Transactional Business Intelligence.
The following aspects are important in understanding BI-enabled key flexfield segments.
• Flattening business components to use BI-enabled segments in Oracle BI
• Equalizing segments to prevent duplication and complexity in the flattened component
• Mapping attributes of flattened business components to logical objects in Oracle BI
• Managing the labels that map segments to logical objects in Oracle BI
After you deploy a business intelligence-enabled flexfield, use the Import Oracle Data Extensions for Transactional
Business Intelligence process to import the flexfield changes into the Oracle Business Intelligence repository. Users can
make use of the newly-generated attributes in business intelligence applications. For information about logical objects
and import, see the Creating and Administering Analytics and Reports guide for your products.
Flattening
When you deploy a business intelligence-enabled key flexfield, the deployment process generates an additional set of
flattened business components for use in business intelligence. The flattened business components include attributes
for business intelligence-enabled segment instances only.
738

Oracle Fusion Cloud HCM
Using Common Features for HCM
Chapter 26
HCM Flexfields Maintenance
If you assigned a label to a segment, the flattened components include a single attribute representing all segment
instances with that label. If you didn't assign a label, the flattened components include a discrete attribute for each BI-
enabled segment instance in each structure.
Mapping to Logical Objects in Business Intelligence
You can simplify reporting by representing similar segments as a single logical object in Business Intelligence. If you
assign a label to segments that serve the same purpose in different structures, you can consolidate the segments into a
single attribute. This prevents duplication and the extra workload and complexity that result from the flattening process.
For example, an organization may have more than one definition of its key accounting flexfield to support different
requirements for accounting reporting. A US Accounting Flexfield structure may have a segment called Subaccount to
track project expenditures. The same type of information may be tracked in a UK accounting flexfield structure with a
segment called Project. Equalize these two segments to create a single list of values for reporting.
Non-labeled segments aren't equalized across context values, so the flattened components include a separate
attribute for each segment for each structure. It may not be possible to equalize similarly labeled segments if they have
incompatible data types or value set types.
Assign a label to a segment to map the corresponding attribute in the flattened components to a logical object in Oracle
Business Intelligence. Using labels to map segments to BI logical objects minimizes the steps for importing the flexfield
into Oracle Business Intelligence. Assigning a label to a segment serves to equalize the attribute across structures, as
well as map the equalized attribute to business intelligence.
Managing Labels
You may assign a predefined label (if available) to segments or create labels for assignment, as needed. Specify a code,
name, and description to identify each label. In the BI Object Name field, enter the name of the logical object in Oracle
Business Intelligence to which the segment label should map during import. Specifying the BI logical object minimizes
the steps for importing the flexfield into Oracle Business Intelligence and helps to equalize context-sensitive segments
across structures.
If no labels are assigned to a BI-enabled segment, or the BI Object Name on the assigned label doesn't exist in business
intelligence, you must manually map the segment to the required logical object when importing into Oracle Business
Intelligence. In addition, segments without labels can't be equalized across structures. The flattened components
include a separate attribute for each non-labeled segment in each structure.
Importing to Oracle Business Intelligence Repository
After you deploy a business intelligence-enabled flexfield, import the flexfield changes into the Oracle Business
Intelligence repository to make use of the newly flattened business components in business intelligence. Then
propagate the flexfield object changes. When you import the metadata into the Oracle Business Intelligence repository,
you must do so as the FUSION_APPS_BI_APPID user.
To import flexfield changes into the Oracle Transactional Business Intelligence repository in Oracle Cloud
implementations, run the Import Oracle Data Extensions for Transactional Business Intelligence process. For
information about logical objects and import, see the Creating and Administering Analytics and Reports guide for your
products.
Note: When you import a flexfield into the Oracle Business Intelligence repository, you see both <name>_ and <name>_c
attributes for each segment, along with some other optional attributes. The <name>_ attribute contains the value. The
<name>_c attribute contains the code of the value set that the value comes from, and is used for linking to the value
dimension. You must import both attributes.
739

Oracle Fusion Cloud HCM
Using Common Features for HCM
Chapter 26
HCM Flexfields Maintenance
Related Topics
•
Considerations for Enabling Descriptive Flexfield Segments for Business Intelligence
•
Overview of Key Flexfields
•
Enable Key Flexfields for Business Intelligence Reporting
•
Overview of Flexfield Change Import
Example of a Key Flexfields
A key flexfield can capture expense account information.
Scenario
When entering details for each expense, the user specifies an account to which the expense is charged.
Entering Expense Accounts
A user interface for entering expenses helps the user select an expense account that identifies the cost center and other
details needed for processing the expense.
The expense account field is a foreign key reference to a account combination (EXPENSE_LINES.EXPENSE_ACCOUNT =
ACCOUNT.COMBINATION).
Account combinations Table for Entering Accounts and Employees
The account combinations table supports entering account information, such as for expense accounts.
740

Oracle Fusion Cloud HCM
Using Common Features for HCM
Chapter 26
HCM Flexfields Maintenance
The combinations page, which is the maintenance page for the key flexfield, is for managing rows in the combinations
table. In this example, managing the combinations means adding or editing account numbers that adhere to the key
flexfield metadata rules.
741

Oracle Fusion Cloud HCM
Using Common Features for HCM
Chapter 26
HCM Flexfields Maintenance
If dynamic combination creation isn't enabled, then when entering an expense line, the user can only select an account
that already exists in the ACCOUNTS (combinations) table. If they require an account that doesn't exist, they must
consult with the appropriate application administrator who can add the account to the combinations table.
If dynamic combination creation is enabled, then when entering an expense line, the user can either select a preexisting
account, or type in a new account that's created dynamically on the fly in the ACCOUNTS (combinations) table. Once the
new combination is created, the same user can refer to it on the expense line.
When managing employee information, the user specifies the cost center that the employee belongs to. The cost center
field corresponds to a single, labeled segment of the Account Key Flexfield and has metadata defined such as the
allowable value set for that segment.
742


Oracle Fusion Cloud HCM
Using Common Features for HCM
Chapter 26
HCM Flexfields Maintenance
744

Oracle Fusion Cloud HCM
Using Common Features for HCM
Chapter 27
HCM Cloud Mobile App
27 HCM Cloud Mobile App
Oracle Fusion Applications Mobile App
Use the Oracle Fusion Applications mobile app to access HCM cloud features on your mobile device.
You use the same URL you use on your desktop to connect to Fusion Applications on your mobile. You only see
information that's relevant to your role when you sign in.
If you open the app on your phone, you can access only the mobile responsive features. If you open it on a tablet, you
can access both classic and mobile responsive features.
Note: To access the mobile responsive home page, your administrator needs to set the layout to News Feed. If this
isn't set, the home page won't adjust to the size of your device. For more information on how to enable the News
Feed home page and mobile responsive features, see the document (Document ID 2399671.1) on My Oracle Support
https://support.oracle.com
The mobile app uses the preferred language you select in the desktop application. On the desktop application, you
select the language for the current session on the login screen. The only exception to this is the language used by the
mobile app which could be different because it's decided by the device language.
Related Topics
•
Configure the Oracle Fusion Applications Mobile App
Configure the Oracle Fusion Applications Mobile App
Use these steps to install and configure the app on Android and iOS mobile devices.
The steps are the same on both mobile devices, except where indicated:
1. Download Oracle Fusion Application from the app store or play store. On Android devices, you need to
download and manually install the mobile app.
2. Accept the end user license agreement (EULA) to proceed to the sign in page. From there on, you'll have the
same user experience on the desktop and mobile.
3. Paste the entire Fusion Applications URL on the Getting Started page. For example:
◦
HCM URL:
https://<POD>.fa.<data center ID>.oraclecloud.com/fscmUI/faces/FuseWelcome
In the URL, replace the pod and data center details in the URL with your actual host name and domain.
You can change this later. You can also go to Settings and change the primary account host name.
Note: If you can't access the application using the mobile app, try accessing it using the mobile browser. If
you still can't sign into the mobile app, contact your HR department.
745

Oracle Fusion Cloud HCM
Using Common Features for HCM
Chapter 27
HCM Cloud Mobile App
4. To add more accounts, tap Settings on the Getting Started page and do these things:
◦
Swipe the Multiple Accounts option to On.
◦
Add the environment URLs for the other accounts.
Note: If the global search in the mobile app doesn't display results, verify your global search configuration settings. In
Setup and Maintenance, use the Manage Global Search Configurations task to edit the existing configuration and set
the Show Top Suggestions option to On in the Behavior section.
Related Topics
•
Oracle Fusion Applications Mobile App
FAQs for HCM Cloud Mobile
Can I use any third-party mobile device management software
with Oracle Fusion Applications mobile app?
Your organization can use enhanced security measures like securing the app using a third-party Mobile Device
Management (MDM) tool.
However, there's no support for this and organizations are responsible for the related outcome if they use any third-
party tool or mechanism.
What's the difference between accessing Oracle Fusion
Applications on the mobile app and through the mobile browser?
The main difference is that you can use the mobile app for offline learning.
A tablet provides the same functionality and experience as in the desktop. Both mobile responsive and classic pages
and menu items are available.
746

Oracle Fusion Cloud HCM
Using Common Features for HCM
Chapter 28
Alerts Composer
28 Alerts Composer
Overview
Overview
Alerts Composer is a tool that enables you to send informational notifications to Oracle HCM Cloud users by email and
worklist.
You can configure the notification templates and add recipients. On the home page, click Navigator > Alerts
Composer to open the tool. Notifications are triggered based on predefined conditions for two types of alerts.
• Event Alerts: Event Alerts are based on the context provided by the calling client. They're triggered when a
specific event occurs in the application. You can't modify the triggering criteria for notifications.
For example, Time Exceptions from Compliance Rules is a predefined Event alert which is triggered when
compliance exceptions are available. Notifications are sent to managers informing them of the exceptions.
• Resource Alerts: Resource Alerts are based on Oracle HCM Cloud REST API resources. The resources must be
deployed in the environment. You can modify the triggering criteria for notifications by defining filters on the
resource attributes if you have the required privileges to access the REST resources.
For example, Visa Expiration is a sample Resource alert which is triggered when a worker visa is approaching
expiration. A filter is defined on the workers resource for the visa attribute. Notifications are sent to the worker
and the manager informing them of visa expiration.
Key Features
Using the Alerts Composer tool, you can:
• Configure the notification templates and email formats and define language-specific templates.
• Define multiple templates for the same triggering criteria.
• Use Groovy expressions and define variables to substitute runtime values.
• Schedule jobs for processing the Resource alert notifications.
• Verify the alerts history and notifications activity.
• Leverage DKIM and DMARC support for custom From Address.
Related Topics
•
Alerts Composer Tutorial
•
DKIM Support for Fusion Cloud on OCI
Functional Privileges and Access Levels
To use the Alerts Composer tool and run the alerts, you require these functional privileges.
747

Oracle Fusion Cloud HCM
Using Common Features for HCM
Chapter 28
Alerts Composer
Functional Security Privilege Description Assigned to Job Role
Access Alerts Composer
HRC_ACCESS_ALERTS_COMPOSER_PRIV
Allows access to Alerts Composer.
Human Capital Management Integration
Specialist
Process a Predefined Alert
HRC_PROCESS_PREDEFINED_ALERT_PRIV
Allows processing of predefined alerts.
Human Capital Management Integration
Specialist
Additionally, you require functional privileges to access REST API resources to create or modify user-defined and
predefined resource alerts. For example, you require the functional privilege Use REST Services - Workers to access the
workers resource and its child resources to manage the alert templates that are based on this resource.
Access Levels
Access levels are predefined for alerts to control the actions that can be performed on the alerts. For example, you can
add new templates and modify predefined templates for an alert if its Access Level is set to Extensible or User but not if
its Access Level is set to System.
You can view the access level for an alert when editing the alert; however, you can't modify it. Alerts that are predefined
with access levels System or Extensible are always enabled. You can't disable them. Alerts that are user-defined are
enabled by default. You can disable them.
The following table shows the access levels for alerts.
Access Level System Extensible User
View alerts
Yes
Yes
Yes
Disable alerts
No
No
Yes
Add new templates
No
Yes
Yes
Modify templates
No
Yes
Yes
Delete templates
No
No
Yes
Disable templates
No
Yes
Yes
Add recipients
Yes
Yes
Yes
Related Topics
•
Define Alert Notifications
•
Process Alert Notifications
748

Oracle Fusion Cloud HCM
Using Common Features for HCM
Chapter 28
Alerts Composer
Functions and Groovy Expressions
This topic describes various functions and Groovy expressions that you can use when configuring alerts using the Alerts
Composer.
The return attributes for the person can be one of these:
• PersonId
• WorkEmail
• DisplayName
• FirstName
• LastName
• UserName
Functions
This table describes the functions that are supported for alerts. A maximum of 25 results are retrieved. If the results
exceed 25, warning messages will be displayed in the log.
Function Description Usage Example
• Name: hrRepList
• Display name: Human
resources representative
Returns HR Representative person
attributes for the PersonId.
Recipient Section
Email is :
${AlertUtils.toString(AlertUtils.hrRepList(workers.PersonId).WorkEmail)}
User name :
${AlertUtils.toString(AlertUtils.hrRepList(workers.PersonId).UserName)}
Body or Subject Section
First Name is:
${AlertUtils.hrRepList(workers.PersonId).FirstName)}
First Name is:
${AlertUtils.toString(AlertUtils.hrRepList(workers.PersonId).FirstName)}
Loop Example
First Name is:
${AlertUtils.loop('workers',
'${AlertUtils.toString(AlertUtils.hrRepList(workers.PersonId).FirstName)}')}
Recipient Section
Email is:
User Name is:
Christopher.Brown,
William.Jones
Body or Subject Section
First Name is:
[Christopher,William]
First Name is:
Christopher,William
Loop Example
First Name is:
Christopher,William
• Name: payRepList
• Display name: Payroll
representative
Returns Payroll Representative
person attributes for the
PersonId.
Recipient Section
Email is :
${AlertUtils.toString(AlertUtils.payRepList(workers.PersonId).WorkEmail)}
User name :
${AlertUtils.toString(AlertUtils.payRepList(workers.PersonId).UserName)}
Body or Subject Section
Recipient Section
Email is:
User Name is:
Christopher.Brown,
William.Jones
749

Oracle Fusion Cloud HCM
Using Common Features for HCM
Chapter 28
Alerts Composer
Function Description Usage Example
First Name is:
${AlertUtils.toString(AlertUtils.payRepList(workers.PersonId).FirstName)}
Loop Example
First Name is:
${AlertUtils.loop('workers',
'${AlertUtils.toString(AlertUtils.payRepList(workers.PersonId).FirstName)}')}
Body or Subject Section
First Name is:
Christopher,William
Loop Example
First Name is:
Christopher,William
• Name: benRepList
• Display name: Benefits
representative
Returns Benefits Representative
person attributes for the
PersonId.
Recipient Section
Email is :
${AlertUtils.toString(AlertUtils.benRepList(workers.PersonId).WorkEmail)}
User name :
${AlertUtils.toString(AlertUtils.benRepList(workers.PersonId).UserName)}
Body or Subject Section
First Name is:
${AlertUtils.toString(AlertUtils.benRepList(workers.PersonId).FirstName)}
Loop Example
First Name is:
${AlertUtils.loop('workers',
'${AlertUtils.toString(AlertUtils.benRepList(workers.PersonId).FirstName)}')}
Recipient Section
Email is:
User Name is:
Christopher.Brown,
William.Jones
Body or Subject Section
First Name is:
Christopher,William
Loop Example
First Name is:
Christopher,William
• Name: unionRepList
• Display name: Union
representative
Returns Union Representative
person attributes for the
PersonId.
Recipient Section
Email is :
${AlertUtils.toString(AlertUtils.unionRepList(workers.PersonId).WorkEmail)}
User name :
${AlertUtils.toString(AlertUtils.unionRepList(workers.PersonId).UserName)}
Body or Subject Section
First Name is:
${AlertUtils.toString(AlertUtils.unionRepList(workers.PersonId).FirstName)}
Loop Example
First Name is:
${AlertUtils.loop('workers',
'${AlertUtils.toString(AlertUtils.unionRepList(workers.PersonId).FirstName)}')}
Recipient Section
Email is:
User Name is:
Christopher.Brown,
William.Jones
Body or Subject Section
First Name is:
Christopher,William
Loop Example
First Name is:
Christopher,William
• Name: empManagerList
• Display name: Employee
manager
Returns employee's manager
person attributes for the
PersonId.
Recipient Section
Email is :
${AlertUtils.toString(AlertUtils.empManagersList(workers.PersonId).WorkEmail)}
User name :
${AlertUtils.toString(AlertUtils.empManagersList(workers.PersonId).UserName)}
Body or Subject Section
Recipient Section
Email is:
User Name is: Diane.Brown
Body or Subject Section
First Name is: Diane
750

Oracle Fusion Cloud HCM
Using Common Features for HCM
Chapter 28
Alerts Composer
Function Description Usage Example
First Name is:
${AlertUtils.toString(AlertUtils.empManagersList(workers.PersonId).FirstName)}
• Name: roleMemberList
• Display name: Role members
by role
Returns all the active users who are
assigned to a particular role for the
role code provided.
Recipient Section
Returns the users with person
details who have been assigned the
provided Role_Name or Role_Code
Email is:
${AlertUtils.toString(AlertUtils.roleMemberList("CUSTOM_
X_JOB_ROLE_
CODE").WorkEmail)}
User name is:
${AlertUtils.toString(AlertUtils.roleMemberList("CUSTOM_
X_JOB_ROLE_
CODE").UserName)}
Body or Subject Section
First Name is:
${AlertUtils.toString(AlertUtils.roleMemberList("CUSTOM_
X_JOB_ROLE_
CODE").FirstName)}
Recipient Section
Email is:
User Name is:
Christopher.Brown,
William.Jones
Body or Subject Section
First Name is:
Christopher,William
• Name: toString
• Display Name: None
Converts an array of objects into
comma separated strings.
${workRelationships.assignments.AssignmentName}
${AlertUtils.toString(workRelationships.assignments.AssignmentName)}
[Assignment A, Assignment
B]
Assignment A, Assignment B
• Name: person
• Display name: Person details
Returns person attributes for the
PersonId.
Person Name is
${AlertUtils.person(workers.PersonId).DisplayName}
Person Name is Edward
• Name: getSysdate
• Display name: System date
Returns the system date.
${AlertUtils.getSysdate()}
2016-04-25
• Name: getSystimestamp
• Display name: System time
stamp
Returns the system date and time.
${AlertUtils.getSystimestamp()}
2016-04-25 23:44:52.0
• Name: formatNumber
• Display name: Format
number
Formats the number to the
specified Java number format.
Supported formats are available
at https://docs.oracle.com/
javase/7/docs/api/java/text/
NumberFormat.html.
Probation Period is
${AlertUtils.formatNumber(workers.workRelationships.assignments[0].ProbationPeriod,
'9,999,999')} days
Probation Period is 240
days
• Name: formatDate
• Display name: Format date
Formats the date to the
specified Java date format.
Supported formats are available
at https://docs.oracle.com/
javase/7/docs/api/java/text/
SimpleDateFormat.html
Date is :
${AlertUtils.formatDate(workers.workRelationships.assignments.ProbationEndDate,
'dd-MMM-yyyy')}
Date is : [30-Mar-2022]
751

Oracle Fusion Cloud HCM
Using Common Features for HCM
Chapter 28
Alerts Composer
Function Description Usage Example
Note:
Date provided must be in the
[yyyy-MM-dd] format, which
is the default date format
for Application Developer
Framework (ADF) REST
response.
Name: getLookupMeaning
Returns the Lookup meaning
based on the user's preference
language.
Lookup meaning
${AlertUtils.getLookupMeaning(<LookupType>,
<LookupCode>)}
${AlertUtils.getLookupMeaning('YES_
NO','Y')}
Yes
Name: getLookupMeaning
Returns the Lookup meaning
based on the user's preference
language for the legislation stripe
${AlertUtils.getLookupMeaning(<LookupType>,
<LookupCode>,
<LegislationCode>)}
${AlertUtils.getLookupMeaning('GENDER',
'M','US')}
Male
• Name: loop
• Display name: Loop
Loops through a collection. This
function can be used to construct
tables in the message content as
follows:
${AlertUtils.loop('ResourceName1,
ResourceName2' ,
'Content1','Content2')}
The resource names are separated
by commas and the contents that
follow are used to append data in
the given order. For each Resource
Name1 record, the respective
content for Resource Name2 is
appended. This happens in a
nested manner.
Rules
• The list of resource names
must be in hierarchical order.
Every child resource must
be preceded with the parent
resource (unless it is a root-
level child resource).
For example, consider
a hierarchy with root
as workers, child as
workRelationships,
and grandchild as
assignments. To create
a loop on assignments,
you must also include the
Sample 1
Hello ${FirstName},
Visas of these employees
expire in the next 30
days:
<table>
${AlertFct.loop('visas',
'<tr><td>
${IssuingCountry}</td><td>
${VisaPermitNumber}</td></
tr>')}
</table>
Thank you.
Sample 2
Hello ${FirstName},
Visas of these employees
expire in the next 30
days:
<table>
${AlertUtils.loop('workers,
visasPermits','<tr><td>
${workers.DisplayName}</
td>','<td>
${IssuingCountry} </
td><td>${ExpirationDate}</
td></tr>')}
Sample 1
Hello John,
Visas of these employees expire in
the next 30 days:
US NBC-88457
US 234234
Thank you.
Sample 2
Hello John,
Visas of these employees expire in
the next 30 days:
Name Issuing Country
Expiration Date
Employee1 US 2016-03-14
Employee1 IN 2016-03-20
Employee2 US 2016-02-18
Employee3 US 2015-05-01
Employee4 US 2015-12-14
Employee5 US 2015-05-17
Employee5 UK 2015-09-17
Thank you.
752

Oracle Fusion Cloud HCM
Using Common Features for HCM
Chapter 28
Alerts Composer
Function Description Usage Example
workRelationships
resource in the API.
${AlertUtils.loop('workRelationships,
assignments','<tr><td>
${AssignmentNumber}</
td>','<td>${Name}</
td></tr>')}
• An attribute at each level
can be referenced directly.
A parent attribute can
be accessed in the child
content using the expression
${parentResourceName.AttributeName}.
For example,
${workers.PersonId}
</table>
Thank you.
Groovy Expressions
Alerts Composer supports Groovy expressions to substitute variables and add conditions based on the values provided
at runtime. The following table shows some examples.
Groovy Expression Example
Hi
${AlertUtils.toString(workers.names.LastName)}
Your visa issued in
${AlertUtils.toString(visasPermits.IssuingCountry)}
expires on
${AlertUtils.toString(visasPermits.ExpirationDate)}.
Hi John
Your visa issued in GB, US expires on 2022-03-10, 2022-01-11.
Hi
${AlertUtils.toString(workers.names.LastName)}
<%
asgStr ="";
for(visaPermit in visasPermits)
{
asgStr = asgStr +
visaPermit.IssuingCountry+" ";
}
print("Multiple visas are issued
for employee: "+asgStr);
%>
Regards,
Administrator
Hi John
Multiple visas are issued for employee: GB
Regards,
Administrator
753

Oracle Fusion Cloud HCM
Using Common Features for HCM
Chapter 28
Alerts Composer
Groovy Expression Example
Define Alert Notifications
Define Alert Notifications
Using the Alerts Composer tool, you can set up notifications for Event alerts and Resource alerts.
The access level of an alert determines the extent of configuration that can be done for the alert. See the security
considerations before you set up alert notifications.
Security Considerations
To define alerts notifications:
• You must be granted the function privilege Access Alerts Composer
(HRC_ACCESS_ALERTS_COMPOSER_PRIV).
• You must be granted the required function privilege to create Resource alerts, which are based on REST
resources. For example, to create a Resource alert based on the workers REST resource, you must have the
function privilege to access the workers resource.
• You must not include sensitive information in the body template. For example, when sending visa expiring
notifications to a line manager, don't include the visa permit number of the worker in the template.
• You must not include any recipient who should not get access to the information provided in the message
template.
Related Topics
•
Functional Privileges and Access Levels
•
Configure Resource Alerts
•
Configure Event Alerts
Define Templates
A template is the format for an alert notification. It includes the message text and Groovy expressions defined for the
variables in the message.
Use the Templates tab on the Edit Alert page for defining templates. For alerts with access levels Extensible and User,
you can define multiple templates and modify and disable the templates. For alerts with access level User, you can
delete templates.
Alerts Composer supports multiple language templates. You can set the default language when creating the template.
When you save the template, language-specific templates are created in the application based on the installed
languages.
754

Oracle Fusion Cloud HCM
Using Common Features for HCM
Chapter 28
Alerts Composer
You can define Groovy expressions in the templates and add conditions to substitute variables with runtime data.
You can set alert notifications to be delivered to recipients by email and worklist. If you provide an expression for email,
the notification is delivered by email. If you provide an expression for user name, the notification is delivered by both
email and worklist.
Related Topics
•
Define Templates
•
Modify Templates
Define Filters
If you have the required privileges to access REST resources, you can define filters on specific resources and set the
triggering criteria for notifications.
Use the Filters tab for defining filters on Resource alerts. You can define multiple filters on a resource by adding filter
expressions for specific attributes. For example, you can define filters on the workers resource and its child resources for
location, organization, legal entity, and so on.
Use the predefined alerts utility date functions where applicable. To retrieve the current date, use the Alerts utility
function AlertFilterUtils.getCurrentDate. To retrieve date for n number of days added to the current date, use the
AlertFilterUtils.addDays(AlertFilterUtils.getCurrentDate(),n) utility function.
For example ${resource.assignedDate} = ${AlertFilterUtils.getCurrentDate()} or ${resource.assignedDate} =
${AlertFilterUtils.addDays(AlertFilterUtils.getCurrentDate(),10)}
To filter records that were already processed in previous alert runs, use the Alerts utility function
AlertFilterUtils.getAlertLastRunDate() as the filter criteria.
It's recommended that you define filters to process data in smaller logical sets for better performance. For example,
you can define additional filters to logically group data. You can also define filters on attributes such as Legal Entity,
Location, or Department to process notifications for specific organizations in separate runs, instead of processing for all
organizations in a single run.
Related Topics
•
Functions and Groovy Expressions
•
Define Filters
Define Recipients and Test Email Notifications
You can set alert notifications to be delivered to recipients by email and worklist. Use the expression builder function to
specify recipients as representatives with predefined areas of responsibility.
Test Email Alert Notifications in Nonproduction Environments
You can test the email alert notifications in nonproduction environments when using the email communication
method in the Alerts Composer tool. You need to configure the BPM worklist application preferences to provide a test
755

Oracle Fusion Cloud HCM
Using Common Features for HCM
Chapter 28
Alerts Composer
email address. If you leave the email setting as null, no email notifications are sent to anyone in the nonproduction
environments.
To determine which email address the test alert email notifications are sent to in nonproduction environments,
set the value of the new profile option, BPM Worklist Test Email Address Enabled (Profile Code:
ORA_HRC_USE_BPMCONFIG_TEST_EMAIL), accordingly.
The default value for this profile option is N. It indicates that for the email communication method, email notifications
aren't sent to the test email address specified in the BPM worklist application preferences. They're sent to the recipients
specified in the individual Alert templates.
If the profile option value is set to Y, it indicates that for the email communication method, no email notifications are
sent to the recipients specified in the individual Alert templates in nonproduction environments. They’re sent to the test
email address specified in the BPM worklist application preferences.
For the worklist communication method, in both the production and nonproduction environments, notifications are
sent to the email address specified in the BPM worklist email address preference. If the address isn't specified, email
notifications are sent to the recipients provided in the individual Alert templates.
Set the Profile Option Value
To change the profile option value:
1. Go to the Setup and Maintenance work area and search for the Manage Administrator Profile Values task.
2. Search for the ORA_HRC_USE_BPMCONFIG_TEST_EMAIL profile option and change the value to Y.
3. Save your changes.
Provide a Test Email Address
To provide a test email address in the BPM Worklist:
1. Go to Application Preferences in the BPM Worklist.
2. Enter a test email address in the Test Notification Email Address field.
3. Save your changes.
Related Topics
•
Functions and Groovy Expressions
•
Set Delivery Options
Set Run Options
Use the Run Options tab for specifying the runtime settings of an alert such as the start date and frequency. You can
also enable the activity log for an alert to view the activity on the Alerts History page.
To process large volume of data, it's recommended that you schedule the alert more frequently, for example daily or
weekly. For better performance, process smaller sets of data incrementally, instead of processing in a single run.
Additionally, enable the feature to stop duplicate messages and provide a desired time interval to prevent duplicate alert
notifications from being sent for recurring scheduled alert jobs. For example, if notifications are scheduled for daily
run and you've enabled the stop duplication messages feature for the Workers Visa Expiration alert say for 15 days, the
recipients will not receive duplicate notifications daily for 15 days.
756

Oracle Fusion Cloud HCM
Using Common Features for HCM
Chapter 28
Alerts Composer
Related Topics
•
Resolve Alert Run Errors
•
Set Run Options for Resource Alerts
•
Set Run Options for Event Alerts
Process Alert Notifications
Process Alert Notifications
You can process alert notifications on demand or schedule them for a specific date and frequency. See the security
considerations before you process alert notifications.
Security Considerations
To process alert notifications:
• You must be an application administrator with the Integration Specialist role.
• You must be granted the function privilege Process a Predefined Alert
(HRC_PROCESS_PREDEFINED_ALERT_PRIV).
• Ensure that only those recipients who should get access to the specified information are included in the
message template. Alerts Composer doesn't apply data restrictions on the message content while sending
notifications to recipients.
Related Topics
•
Functional Privileges and Access Levels
Set Delivery Options
Alerts are delivered to recipients based on the communication method specified when defining the alerts.
• If the communication method is selected as email, you've to specify an expression for a valid email address.
Notifications will be delivered by email.
• If the communication method is selected as worklist, you've to specify an expression for a valid user name.
Notifications will be delivered by both email and worklist.
You can also test the email alert notifications in nonproduction environments when using the email communication
method in the Alerts Composer tool. You need to configure the BPM worklist application preferences to provide a
test notification email address. If you leave the email setting as null, no email notifications are sent to anyone in the
nonproduction environments. For more information, see Define Recipients and Test Email Notifications.
During runtime, worklist notifications are sent based on the recipient's user language preference. If the corresponding
language template isn't found, then Alerts Composer uses the template in the default language.
757

Oracle Fusion Cloud HCM
Using Common Features for HCM
Chapter 28
Alerts Composer
Related Topics
•
DKIM and DMARC Support
•
Define Recipients and Test Email Notifications
DKIM and DMARC Support
To ensure that spam filters don't block the email notifications sent by Oracle HCM Cloud on behalf of your company, the
following internet standards are used to verify that incoming email notifications are originating from a trusted source.
• Sender Policy Framework (SPF): Specifies the servers that can send email for a domain.
• DomainKeys Identified Mail (DKIM): Verifies that message content is authentic and not changed.
• Domain-based Message Authentication, Reporting, and Conformance (DMARC): Specifies how your
domain handles suspicious incoming emails.
If you have a requirement to change the default email From Address originating from Oracle HCM Cloud, for example,
[email protected]aclecloud.com, to your company-specific From Address, you've to follow the steps
for the required SR process specified in the document DKIM Support for Fusion Cloud on OCI (Doc ID 2702234.1) on My
Oracle Support.
This uptake requires the pods to be in Oracle Cloud Infrastructure (OCI) to leverage the new Cloud Notification Structure
(CNS) that supports DKIM and DMARC functionalities required for your company-specific From Address.
The current support is only for single custom From Address across different applications that send outbound email
notifications.
View Alerts History
You can view the history of alerts that are enabled for activity logging on the Alerts History page. You can view statistics
such as alert status, start date, duration, messages, and processing errors. Click the alert name to view detailed
information about an alert.
Alerts on the Alerts History page are classified into three categories.
• Processed: Displays the alerts that are processed.
• Running: Displays the alerts that are currently being processed.
• Scheduled: Displays the alerts that are scheduled to run on a future date.
758

Oracle Fusion Cloud HCM
Using Common Features for HCM
Chapter 28
Alerts Composer
Configure Resource Alerts
Configure Resource Alerts
To configure resource alerts, you must have:
• The required functional privileges and access levels to create and modify user-defined and predefined alerts.
• The required functional privileges to access REST API resources.
Create a Resource Alert
Creating a Resource alert is a three-step process:
1. Defining Filters
2. Defining Templates
3. Setting Run Options
Follow these steps to create a Resource alert:
1. Click Navigator > Alerts Composer.
2. On the Alerts page, select Add > Resource Alert.
3. On the Add Resource Alert page, enter the name and description for the alert.
The character limit for name is 80 and description is 2000.
4. In the Resource field, select the REST resource for which you want to create the alert. For example, to create an
alert for the workers resource, select workers.
Related Topics
•
Functional Privileges and Access Levels
Define Filters
Filters enable you to specify the triggering criteria for alert notifications.
To define filters for a Resource alert:
1. On the Filters tab, click Add Filter.
2. On the Add Filter page, in the Resource field, select the specific parent or child resource such as workers/
emails.
3. Click Add Expression to define filter expressions on specific attributes of the resource.
4. In the Edit Expression dialog box, select the parameters to build the filter expression.
a. Enter a name for the expression.
b. Use the Prefix With option to specify any prefix operators on the expression.
c. In the Attribute field, select the resource name and the attribute that you want to specify the filter
condition on.
d. In the Operator field, select the logical operator.
759

Oracle Fusion Cloud HCM
Using Common Features for HCM
Chapter 28
Alerts Composer
e. In the Value field, specify the value for the condition.
f. Click Insert into Expression.
g. Click Apply. The expression appears on the Add Filter page.
h. Repeat steps 3 and 4 to add more filter expressions.
5. Click Apply to return to the Add Resource Alert page.
6. Repeat steps 1 to 4 to define more filters on the Resource alert.
Define Templates
Templates enable you to define the format for alert notifications.
To define templates for a Resource alert:
1. On the Add Resource Alert page, click the Templates tab and then click Add Template.
2. Enter a name for the template and select the default language. The character limit for template name is 80.
By default, the template is enabled.
3. Click Edit and select Manage Recipients and Message.
4. On the Edit Template page, click Add Recipient.
5. In the Communication Method column, select email or worklist from the list of values.
6. In the Expression field:
◦
Add the expression for the email address or user name of the recipient.
◦
Add comma-delimited expressions for email addresses or user names of multiple recipients.
or
i. Click the Expression icon to build the expression.
ii. In the Edit Expression dialog box, follow one of these steps:
◦
In the Literal field, enter the expression directly, for example, john.smith@oracle.com.
◦
Select the parameters to build the expression, for example, ${workers.emails.EmailAddress}.
See Functions and Groovy Expressionsfor more examples.
iii. Click Apply. The expression appears on the Edit Template page.
7. In the Message section, set up the notification format.
a. Select the HTML or Text format for the message text.
b. Enter the message subject. You can also insert expressions in the subject using the Expression icon.
c. In the Group By field, specify an expression for the attribute that the message should be grouped by.
d. Use the rich text editor to format the message text. You can select options such as font, size, style, and so
on.
e. Enter the message text. You can also include expressions in the text.
Use the Insert Expression option to build expressions and insert them into the message text.
8. Click Apply to save the changes and return to the Add Resource Alert page.
760

Oracle Fusion Cloud HCM
Using Common Features for HCM
Chapter 28
Alerts Composer
Set Run Options
Run Options enable you to specify the runtime settings for an alert.
To set the run options for a Resource alert:
1. On the Add Resource Alert page, click the Run Options tab.
2. In the Automatically Run field, select one of these options:
◦
On demand to run the alert notification immediately.
◦
Schedule to run the notification at a specified time. Specify the notification frequency and the start date
and time.
3. Set the Log Activity History field to Yes to enable activity logging for the alert on the Alerts History page.
4. Specify the settings for the Stop Duplicate Messages option.
5. Set the Simulate Run option to Yes to do a test run of the alert.
When this option is set to Yes, notifications aren't triggered in the environment, but you can see the simulated
content. This option is useful in a non production environment to test the notifications without sending them.
You can review the notification content on the Alerts History page.
6. Click Schedule to return to the Alerts page.
7. Select the resource alert and click Action Run to run the alert.
Resource Alerts Tutorial
A tutorial is available to help you get started with setting up resource alerts and understand how they correspond to
REST API resources. Click this link to see the tutorial.
Resource Alerts Tutorial
Related Topics
Import and Export Resource Alerts Tutorial
You can import and export the setup data for resource alerts from one application environment to another environment.
Use the Functional Setup Manager to import and export Resource alert packages across environments.
A tutorial is available to help you get started with importing and exporting resource alerts using FSM. This tutorial also
shows you how to copy a resource alert from the alerts composer tool.
Click this link to see the tutorial.
Import and Export Resource Alerts Tutorial
761

Oracle Fusion Cloud HCM
Using Common Features for HCM
Chapter 28
Alerts Composer
Related Topics
Configure Event Alerts
Configure Event Alerts
Event alerts are based on predefined triggering criteria. You can't modify these criteria or create new alerts. However,
based on the access level privileges defined for the alert, you can edit the notification templates and add new templates
for a predefined alert.
All tokens are predefined for Event alerts. You can't modify them or add custom tokens. The predefined templates
expose the tokens that are supported for a particular predefined Event alert. Only those tokens can be used in the
custom template for the predefined alert. You've to manually type these tokens in the template, which is a one-time
setup. You can refer to the predefined template to get the predefined tokens for Event alerts.
Related Topics
•
Functional Privileges and Access Levels
Modify Templates
Templates enable you to define the format for alert notifications.
To modify an existing template for an Event alert:
1. On the Templates tab, click Edit and select Manage Recipients and Message for the template.
2. On the Edit Template page, click Add Recipient to add a new recipient.
3. In the Communication Method column, select email or worklist from the list of values.
4. In the Expression field:
◦
Edit or add the expression for the email address or user name of the recipient.
◦
Edit or add the expressions for comma-delimited email addresses or user names of multiple recipients.
5. In the Message section, set up the notification format.
a. Select the HTML or Text format for the message text.
b. Edit the message subject.
c. Use the rich text editor to format the message text. You can select options such as font, size, style, and so
on.
d. Edit the message text.
6. Click Apply to save the changes and return to the Edit Event Alert page.
762

Oracle Fusion Cloud HCM
Using Common Features for HCM
Chapter 28
Alerts Composer
Set Run Options
Run Options enable you to specify the runtime settings for an alert.
To set the run options for an Event alert:
1. On the Edit Event Alert page, click the Run Options tab.
2. Specify the settings for Stop Duplicate Messages option.
3. Set the Log Activity History field to Yes to enable activity logging for the alert on the Alerts History page.
4. Set the Simulate Run option to Yes to do a test run of the alert.
When this option is set to Yes, notifications aren't triggered in the environment, but you can see the simulated
content. This option is useful in a non production environment to test the notifications without sending them.
You can review the notification content on the Alerts History page.
5. Click Save and Close to return to the Alerts page.
Resolve Alert Run Errors
This topic explains how to identify and resolve errors that may occur when running alerts.
Follow these steps:
1. Enable the Log Activity History option on the Run Options tab when setting up an alert.
2. Use the Alerts History page to review the success, warning, and error messages for the alert.
3. Review the alert log to identify any processing errors of templates and filters.
4. Verify the application logs for Event alerts, if required, and take necessary action.
5. Verify the diagnostic logs on the Scheduled Processes page for Resource alerts, if required, and take necessary
action.
Related Topics
•
Set Resource Alert Run Options
•
Set Event Alert Run Options
Purge Alerts
Successful alert process logs are purged automatically every 14 days, while runs with errors and alert message history
that are older than 90 days are purged on the fourth Sunday of every month. This is a predefined schedule and can't be
updated. However, you can create a new schedule or submit additional purge processes as per your requirements.
You can manually create a new schedule by using the Purge Alert Processing and Log Entries process in the Schedule
Processes work area. On the home page, click Tools > Scheduled Processes > Schedule New Process to create the
schedule.
763

Oracle Fusion Cloud HCM
Using Common Features for HCM
Chapter 28
Alerts Composer
764

Oracle Fusion Cloud HCM
Using Common Features for HCM
Chapter 29
HCM Events
29 HCM Events
Overview
Various business processes in Oracle HCM Cloud require the ability to monitor one or more events, check if these events
meet certain conditions, and then take the required action.
The Event Conditions page lets you define conditions for specific events and their associated attributes to trigger
processes or actions when an event occurs in Oracle HCM Cloud. On the home page, click My Client Groups > HCM
Experience Design Studio > Event Conditions to open the Event Conditions page.
Key Features
Event conditions have these key features:
• You can specify conditions based on event attributes, so the application responds to only those events that
match these conditions.
• Various products in Oracle HCM Cloud can consume event conditions. Refer to the product documentation or
features, if any, consuming event conditions.
• Each consuming product can associate an event condition to product-specific processes.
Security Settings
The Event Conditions page is secured with the function privilege, HRC_EVT_COND_CONFIG_PRIV, which allows
configuration of event conditions. This privilege is granted by default to the Human Capital Management Application
Administrator job role. No data security is required for this page.
Define HCM Event Conditions
You can define event conditions for an entity based on the attributes that you want to monitor the changes for. The
application responds to or acts on only those events that match these conditions.
To define an event condition:
1. On the home page, click My Client Groups > HCM Experience Design Studio > Event Conditions.
2. On the Event Conditions page, Click Add.
3. In the Details section, provide the details of the event condition.
a. Specify the name of the event condition, short code, and description.
b. Select the entity on which you’re defining the event condition.
c. Select the product or the consumer that uses the defined condition in their setup pages.
d. Enable or disable the event condition, as required.
4. In the Attributes section, select the attributes for which you want an event to be triggered when changes occur
on the attributes.
765

Oracle Fusion Cloud HCM
Using Common Features for HCM
Chapter 29
HCM Events
Select one or more attributes from the Available Attributes list and move them to the Selected Attributes list.
5. In the Condition Details section, view the details of the condition created for the entity object using the
condition builder.
You can change the name of the event condition, code, description, and consumers, but you can't edit the
condition.
6. In the Defined Condition section, review the existing conditions for the entity, and edit any newly-defined
condition, if required.
7. Click Save and Close.
You can now associate the event condition to processes that are specific to your products in Oracle HCM Cloud. For
more details, refer to the product documentation.
766

Oracle Fusion Cloud HCM
Using Common Features for HCM
Chapter 30
HR Help Desk Classic Configuration
30 HR Help Desk Classic Configuration
HR Help Desk Classic Documentation
The classic HR Help Desk application is used to create and submit HR Help Desk service requests (HRHD SRs). Oracle
introduced Redwood Help Desk in release R13.22.07 (21C).
If you are implementing or using the classic version of HR Help Desk, the documentation is located in the appendixes of
the new Redwood Help Desk guides.
Related Topics
•
Implementing Redwood Help Desk
•
Using Redwood Help Desk
767

Oracle Fusion Cloud HCM
Using Common Features for HCM
Chapter 30
HR Help Desk Classic Configuration
768

Oracle Fusion Cloud HCM
Using Common Features for HCM
Chapter 31
Eligibility Profiles
31 Eligibility Profiles
How Eligibility Works With Other Objects
You add eligibility criteria to an eligibility profile, and then associate the profile with an object that restricts eligibility.
The following figure shows the relationships between eligibility components.
Eligibility Criteria
You can add different types of eligibility criteria to an eligibility profile. For many common criteria, such as gender or
employment status, you can select from a list of predefined criteria values. However, you must create user-defined
criteria and derived factors before you can add them to an eligibility profile.
Eligibility Profile
When you add an eligibility criterion to a profile, you define how to use it to determine eligibility. For example, when you
add gender as a criterion, you must specify a gender value (male or female) and whether to include or exclude persons
who match that value.
769

Oracle Fusion Cloud HCM
Using Common Features for HCM
Chapter 31
Eligibility Profiles
Associating the Profile with Objects
This table describes associating eligibility profiles with different kinds of objects and whether you can attach more than
one profile.
Object that Uses an Eligibility Profile Purpose Whether You Can Attach More Than One
Profile?
Variable rate or variable coverage profile
Establish the criteria required to qualify for that
rate or coverage
No
Checklist task
Control whether that task appears in an
allocated checklist
No
Total compensation statement
Apply additional eligibility criteria after
statement generation population parameters
No
Benefits object
Establish the eligibility criteria for specific
programs, plans, and options
Yes
Compensation object
Establish the eligibility for specific plans and
options
Yes
Performance documents
Establish the eligibility for performance
documents
Yes
Check-in templates
Establish the eligibility to use check-in
templates for creating check-in documents
Yes
Goal plans or goal mass assignments
Establish eligibility for the goal
Yes
Absence plan
Determine the workers who are eligible to
record an absence that belongs to that plan
Yes
Related Topics
•
User-Defined Criteria
•
Derived Factors
•
Eligibility Profiles
Derived Factors
Derived factors define how to calculate certain eligibility criteria that change over time, such as a person's age or
length of service. You add derived factors to eligibility profiles and then associate the profiles with objects that restrict
eligibility.
770

Oracle Fusion Cloud HCM
Using Common Features for HCM
Chapter 31
Eligibility Profiles
Derived Factor Types
Using the Manage Derived Factors task, you can create six different types of derived factors:
• Age
• Length of service
• A combination of age and length of service
• Compensation
• Hours worked
• Full-time equivalent
Determination Rules and Other Settings
For each factor that you create, you specify one or more rules about how eligibility is determined. The following table
provides example settings for two factors.
Factor Example Settings
Age derived
Select a determination rule to specify the day on which to evaluate the person's calculated age for
eligibility.
Example: If the determination rule is set to the first of the year, then the person's age as of the first of
the year is used to determine eligibility.
Full-time equivalent
Specify the minimum and maximum full-time equivalent percentage and whether to use the primary
assignment or the sum of all assignments when evaluating eligibility.
Example: If 90 to 100 percent is the percentage range for the sum of all assignments, then a person
who works 50 percent full-time on two different assignments is considered eligible.
For derived factors pertaining to time and monetary amounts, you can also set the following rules:
• Unit of measure
• Rounding rule
• Minimum and maximum time or amount
Related Topics
•
Examples of Derived Factors
•
Eligibility Profiles
Examples of Derived Factors
The scenarios described here illustrate how to define different types of derived factors.
771

Oracle Fusion Cloud HCM
Using Common Features for HCM
Chapter 31
Eligibility Profiles
Age
Benefits administrators frequently use age factors to determine:
• Dependent eligibility
• Life insurance rates
Age factors typically define a range of ages, referred to as age bands, and rules for evaluating the person's age. The
following table illustrates a set of age bands that could be used to determine eligibility for life insurance rates that vary
based on age.
Derived Factor Name Greater Than or Equal To Age Value Less Than Age Value
Age Under 25
1
25
Age 25 to 34
25
35
Age 35 to 44
35
45
Age 45 to 54
45
55
Age 55 to 64
55
65
Age 64 or Older
65
75
The determination rule and other settings for each age band can use the same values, as shown in the following table:
Field Value
Determination Rule
First of calendar year
Age to Use
Person's
Units
Year
Rounding
None
Length of Service
You use the length of service derived factor to determine eligibility based on an employee's length of service. For
example, you can create a derived factor to determine if an employee has completed 10 years of service. You can specify
the start date of the length of service period using any rule in the Period Start Date Rule list:
• Adjusted service date
772

Oracle Fusion Cloud HCM
Using Common Features for HCM
Chapter 31
Eligibility Profiles
• Date of hire
• Original hire date
• Seniority date
If you select Seniority Date, you use the Seniority Date list to select the specific configuration rule, such as the grade
seniority date, to determine the date. If you have other special requirements to calculate the length of service, you can
use a formula. You indicate the end of the length of service period by using a determination rule, such as end of month,
first of month, as of event date, or end of pay period. The following table shows an example of a set of length-of-service
bands.
A derived factor for length of service defines a range of values and rules for calculating an employee's length of service.
The following table shows an example of a set of length-of-service bands. You can use the length-of-service bands to
determine eligibility for compensation objects such as bonuses or severance pay.
Derived Factor Name Greater Than or Equal To Length of Service
Value
Less Than Length of Service Value
Service Less Than 1
0
1
Service 1 to 4
1
5
Service 5 to 9
5
10
Service 10 to 14
10
15
Service 15 to 19
15
20
Service 20 to 24
20
25
Service 25 to 29
25
30
Service 30 Plus
30
999
The determination rule and other settings for each length-of-service band are the same:
Field Value
Period Start Date Rule
Date of hire
This sets the beginning of the period being measured.
Determination Rule
End of year
This sets the end of the period being measured.
Age to Use
Person's
773
Oracle Fusion Cloud HCM
Using Common Features for HCM
Chapter 31
Eligibility Profiles
Field Value
Units
Year
Rounding
None
Compensation
A derived factor for compensation defines a range of values and rules for calculating an employee's compensation
amount. The following table shows an example of a set of compensation bands. You can use the compensation bands
to determine eligibility for compensation objects such as bonuses or stock options.
Derived Factor Name Greater Than or Equal To Compensation
Value
Less Than Compensation Value
Less than 20000
0
20,000
Salary 20 to 34000
20,000
35,000
Salary 35 to 49000
35,000
50,000
Salary 50 to 75000
50,000
75,000
Salary 75 to 99000
75,000
100,000
Salary 100 to 200000
100,000
200,000
Salary 200000 Plus
200,000
999,999,999
The determination rule and other settings for each compensation band are the same:
Field Value
Determination Rule
First of year
Unit of Measure
US Dollar
Source
Stated compensation
Rounding
Rounds to nearest hundred
774
Oracle Fusion Cloud HCM
Using Common Features for HCM
Chapter 31
Eligibility Profiles
Related Topics
•
Eligibility Profiles
•
Derived Factors
Options for Using Age to Determine Eligibility
The Age to Use value that you select for an age derived factor determines whose birth date is used to calculate the
derived age. The most common value is Person's.
Use the Manage Derived Factors task to configure age derived factors.
Person's Age
You usually use Person's as the Age to Use setting. With this setting, each person's own birth date is used to calculate
age for eligibility evaluation, as shown in the following table.
Scenario Result
You select Person's as the Age to Use
value, and associate the age derived factor
with a dependent eligibility profile.
Each dependent's eligibility is evaluated based on the age calculated from his or her own birth date.
Other Age to Use
To evaluate participant or dependent eligibility or rates based on another person's age, such as a spouse or child, select
a value other than Person's.
The following table provides examples.
Scenario Result
You select Person's oldest child as the
Age to Use value, and associate this
derived factor with a dependent eligibility
profile.
Eligibility for all dependents is based on the age of the participant's oldest child. For example, all
dependents become ineligible when the oldest child reaches the maximum age of eligibility.
You select Inherited Age as the Age to
Use value, and associate this derived
factor with a dependent eligibility profile.
Eligibility for all dependents is based on the date of birth as defined in the person extra information
flexfield.
Related Topics
•
Derived Factors
•
Examples of Derived Factors
775

Oracle Fusion Cloud HCM
Using Common Features for HCM
Chapter 31
Eligibility Profiles
User-Defined Criteria
You can define your own eligibility criteria that meet any special requirements of your organization. Associate your
criteria with eligibility profiles.
This topic provides an example and discusses creating and using a user-defined criteria.
Example
Your organization wants to use work-at-home assignment as the eligibility criteria for a monthly telecommunications
allowance. The table and column already exist, but the data is not available from existing eligibility criteria tabs on the
Create Eligibility Profile page. Therefore, you must first create the work-at-home criteria so that you can then use it with
an eligibility profile.
Creating the Criteria
Use the Manage User-Defined Criteria task in the Plan Configuration work area. The data for the eligibility criterion
that you create must be stored in a table that is accessible to the application. The procedure varies depending on the
table.
Data Table Procedure
Person Attributes or Assignments table
1. Select the table and table column from lists. You must understand the basic structure of these
tables.
2. Select the lookup type to use to validate input values, including user-defined lookup types that
you created for either table.
For details, see the Setting Up Lookup-Based User-Defined Criteria: Worked Example topic.
3. If the field stores a numeric value or a date, specify a range of valid values.
Other tables
1. Use the Manage Fast Formulas task in the Setup and Maintenance work area.
2. Select your formula on the Create User-Defined Criteria page.
Using the Criteria
You can define one or two sets of criteria on the Create User-Defined Criteria page. The participant must meet the
criteria defined in either set to be considered eligible or ineligible.
After you create your user-defined criteria, you can add it to an eligibility profile on the User-Defined Criteria tab in the
Other category.
Related Topics
•
Examples of User-Defined Criteria
•
Eligibility Profiles
•
Configure Your Own Criteria Based on Lookups and Flexfields
776

Oracle Fusion Cloud HCM
Using Common Features for HCM
Chapter 31
Eligibility Profiles
Examples of User-Defined Criteria
The following scenarios illustrate how you can create different types of user-defined criteria for use in eligibility profiles
associated with benefits and compensation objects.
In each example, you must:
1. Create the user-defined criteria using the Manage User-Defined Criteria task in the Plan Configuration work
area.
2. Add the user-defined criteria to an eligibility profile using the Manage Eligibility Profile task.
3. Set the criteria values to use in the eligibility profile.
4. Associate the eligibility profile with the relevant benefits or compensation object.
Base Eligibility on a User-Defined Attribute
Your commercial diving company wants to offer different benefit rates to employees who dive to depths greater than
330 feet.
1. On either the create or edit page for user-defined criteria, set the following values.
Field Value
Table
Person Attributes
Column
BEN_DIVE_DEPTH
Lookup
BEN_DIVE_DEPTH
Enable range validation one
Selected
2. On either the create or edit page for the eligibility profile, add the user-defined criteria to an eligibility profile.
3. On the Other tab, User-Defined Criteria subtab, set the following values.
You might have to refresh the Meaning list before you see the choice that you want. To do so, click another
subtab, such as Formula, and then click the User-Defined Criteria tab again.
Field Value
Set 1 Meaning
330
Set 1 To Meaning
9999
Exclude
Clear
777

Oracle Fusion Cloud HCM
Using Common Features for HCM
Chapter 31
Eligibility Profiles
4. Associate the eligibility profile with a benefit variable rate profile.
Base Eligibility on a Formula
Your company wants to offer a spot incentive bonus to hourly employees who worked 100 percent of their scheduled
shift hours in a three-month period. In the Setup and Maintenance work area, you used the Manage Fast Formula task
to create the formula that calculates Scheduled Hours minus Worked Hours for each week in the previous three months.
If the result of successive calculations is less than or equal to zero, then the formula returns a result of Yes.
1. On the create or edit page for user-defined criteria, enter the following values.
Field Value
Access One Formula
Worked_Sched_Hours_Percent
Enable range validation one
Clear
2. On either the create or edit page for the eligibility profile, add the user-defined criteria to an eligibility profile.
3. On the Other tab, User-Defined Criteria subtab, set the following values.
You might have to refresh the Meaning list before you see the choice that you want. To do so, click another
subtab, such as Formula, and then click the User-Defined Criteria tab again.
Field Value
Set 1 Meaning
Yes
Exclude
Clear
4. Associate the eligibility profile with the bonus compensation object.
Tip: For very complex scenarios, your organization or implementation team can write a company-defined program to
evaluate eligibility.
Use Eligibility to Exclude
Your organization wants to exclude workers with a work-at-home assignment from a transportation allowance.
1. On the create or edit page for user-defined criteria, set the following values.
Field Value
Table
Assignment
Column Work_at_home
778

Oracle Fusion Cloud HCM
Using Common Features for HCM
Chapter 31
Eligibility Profiles
Field Value
Lookup
YES_NO
Enable range validation one
Clear
2. On either the create or edit page for the eligibility profile, add the user-defined criteria to an eligibility profile.
3. On the Other tab, User-Defined Criteria subtab, set the following values.
You might have to refresh the Meaning list before you see the choice that you want. To do so, click another
subtab, such as Formula, and then click the User-Defined Criteria tab again.
Field Value
Set 1 Meaning
Yes
Exclude
Selected
4. Associate the eligibility profile with the transportation allowance compensation object.
Related Topics
•
User-Defined Criteria
•
Configure Your Own Criteria Based on Lookups and Flexfields
Example of Using Range of Scheduled Hours
This example illustrates how to define eligibility criteria based on the number of hours a worker is scheduled to work
within a specified period.
Weekly and Monthly Ranges
You want to limit eligibility for a benefits offering to workers who were scheduled to work either of the following ranges.
Both ranges are as of the end of the previous quarter:
• Between 30 and 40 hours each week
• Between 130 and 160 hours each month
To do this, add two different ranges on the Range of Scheduled Hours subtab under the Employment tab of the create
or edit eligibility profile pages. Set the values for the weekly range as shown in the following table:
779

Oracle Fusion Cloud HCM
Using Common Features for HCM
Chapter 31
Eligibility Profiles
Field Value
Sequence
1
Minimum Hours
30
Maximum Hours
40
Scheduled Enrollment Periods
Weekly
Determination Rule
End of previous quarter
Set the values for the monthly range as shown in this table:
Field Value
Sequence
2
Minimum Hours
130
Maximum Hours
160
Scheduled Enrollment Periods
Monthly
Determination Rule
End of previous quarter
Related Topics
•
Eligibility Profiles
•
Create a Participant Eligibility Profile
Eligibility Profiles
Create eligibility profiles to define criteria that determine whether a person qualifies for objects that you associate the
profile with. You can associate eligibility profiles with objects in a variety of business processes.
The following are key aspects of working with eligibility profiles:
• Planning and prerequisites
• Specifying the profile type, usage, and assignment usage
• Defining eligibility criteria
• Excluding from eligibility
780

Oracle Fusion Cloud HCM
Using Common Features for HCM
Chapter 31
Eligibility Profiles
• Assigning sequence numbers
• Adding multiple criteria
• Viewing the criteria hierarchy
Planning and Prerequisites
Before you create an eligibility profile, consider the following:
• If an eligibility profile uses any of the following to establish eligibility, you must create them before you create
the eligibility profile:
◦
Derived factors
◦
User-defined formulas
◦
User-defined criteria
• Consider whether to combine criteria into one profile or create separate profiles depending on:
◦
Whether the object for which you're creating eligibility accepts only one eligibility profile or more than
one
◦
Performance considerations
• Use names that identify the criteria being defined rather than the object with which the profile is associated,
because eligibility profiles are reusable.
Example: Use Age20-25+NonSmoker rather than Supplemental Life-Minimum Rate.
Specifying Profile Type, Usage, and Assignment Usage
This table describes the basic profile attributes that you specify when you create an eligibility profile:
Setting Description
Profile Type
Use only dependent profiles for Benefits plans or plan types when determining eligibility of
participants' spouses, family members, or other individuals who qualify as dependents.
All other profiles are participant profiles.
Usage
Determines the type of objects the participant profile can be associated with, such as benefits offerings
and rates, compensation plans, checklist tasks, goal plans or mass goal assignments, or performance
documents.
Selecting Global makes the profile available to multiple business process usages.
Assignment to Use
Determines the assignment that the eligibility process evaluates for the person
• Select Specific assignment when the usage is Compensation or Performance.
• Select a value that includes benefit relationship when the usage is Benefits. You select this
value to restrict eligibility evaluation to active assignments that are associated with the benefits
relationship of the person on a given date. If you select other values, then you might need to
include eligibility criteria to exclude inactive assignments.
781

Oracle Fusion Cloud HCM
Using Common Features for HCM
Chapter 31
Eligibility Profiles
Setting Description
• Select one of the following values for all other usages, such as total compensation statements:
◦
Any assignment - enterprise
◦
Employee assignment only - enterprise
◦
Primary employee assignment only - enterprise
Defining Eligibility Criteria
Here's the list of eligibility criteria that you can use to configure benefit offerings:
Category Description
Personal
• Gender
• Person Type
• Disabled
• Uses Tobacco
• Service Areas
• Home Location
• Postal Code Ranges
• Leave of Absence
• Termination Reason
• Qualification
• Competency
• Marital Status
• Religion
Employment
• Assignment Status
• Hourly or Salaried
• Assignment Category
• Grade
• Job
• Position
• Payroll
• Salary Basis
• Department
• Legal Entities
• Performance Rating
• Quartile in Range
• Work Location
• Range of Scheduled Hours
782

Oracle Fusion Cloud HCM
Using Common Features for HCM
Chapter 31
Eligibility Profiles
Category Description
• People Manager
• Job Function
• Job Family
• Hire Date
• Probation Period
• Business Unit
Derived factors
• Age
• Length of Service
• Compensation
• Hours Worked
• Full-Time Equivalent
• Combined Age and Length of Service
• Benefit Groups
• Health Coverage Selected
• Participation in Another Plan
• Formula
• User-Defined Criteria
Other
• Benefit Groups
• Health Coverage Selected
• Participation in Another Plan
• Formula
• User-Defined Criteria
Related coverage
• Covered by Another Plan
• Covered by Another Plan in Program
• Covered by Another Plan Type in Program
• Covered by Another Program
• Dependent Eligible for Another Plan Type in Program
• Eligible for Another Plan
• Eligible for Another Plan Type in Program
• Enrolled in Another Option in Plan
• Enrolled in Another Plan
• Enrolled in Another Plan in Program
• Enrolled in Another Plan Type in Program
• Enrolled in Another Program
• Other Coverage
Labor Relations
• Bargaining Unit
• Labor Union Member
783

Oracle Fusion Cloud HCM
Using Common Features for HCM
Chapter 31
Eligibility Profiles
Category Description
• Union
• Collective Agreement
Some criteria, such as gender, provide a fixed set of choices. The choices for other criteria, such as person type, are
based on values defined in tables. You can define multiple criteria for a given criteria type.
Excluding from Eligibility
For each eligibility criterion that you add to a profile, you can indicate whether persons who meet the criterion are
considered eligible or are excluded from eligibility. For example, an age factor can include persons between 20 and 25
years old or exclude persons over 65.
If you:
• Exclude certain age bands, then all age bands not explicitly excluded are automatically included.
• Include certain age bands, then all age bands not explicitly included are automatically excluded.
Assigning Sequence Numbers
You must assign a sequence number to each criterion. The sequence determines the order in which the criterion is
evaluated relative to other criteria of the same type.
Adding Multiple Criteria
If you define multiple values for the same criteria type, such as two postal code ranges, a person must satisfy at least
one of the criteria to be considered eligible. For example, a person who resides in either postal range is eligible.
If you include multiple criteria of different types, such as gender and age, a person must meet at least one criterion
defined for each criteria type.
Viewing the Criteria Hierarchy
Select the View Hierarchy tab to see a list of all criteria that you have saved for this profile. The list is arranged by criteria
type.
Related Topics
•
Examples of Eligibility Profiles
•
Derived Factors
•
User-Defined Criteria
•
Single or Multiple Eligibility Profiles
•
Create a Participant Eligibility Profile
784

Oracle Fusion Cloud HCM
Using Common Features for HCM
Chapter 31
Eligibility Profiles
Single or Multiple Eligibility Profiles
You can define multiple criteria in an eligibility profile or create separate profiles for individual criterion.
To determine the best approach, consider the following:
• Does the object for which you are defining eligibility allow multiple eligibility profiles?
• What is the best approach in terms of efficiency and performance?
• Are your criteria both inclusive and exclusive?
Allowable Number of Eligibility Profiles
If an object permits only one eligibility profile, you must include all criteria in a single profile.
The following table shows which objects permit only one profile and which permit more.
Only One Profile One or More Profiles
• Checklist tasks
• Variable rate profiles
• Variable coverage profiles
• Total compensation statements
• Absence types
• Benefits offerings
• Individual and workforce compensation plans
• Performance documents
• Check-in templates
• Goal plans or mass goal assignments
• Absence plans
Efficiency and Performance in the Benefits Hierarchy
For optimum performance and efficiency, attach profiles at the highest possible level in the benefits object hierarchy
and avoid duplicating criteria at lower levels. For example, to be eligible for a plan type, a person must satisfy eligibility
profiles defined at the program and plan type in program levels.
The following objects inherit the eligibility criteria associated with the program:
• Plan types in program
• Plans in program
• Plans
• Options in plans that are in programs
However, it's sometimes more efficient to create more than one profile and attach the profiles at various levels in the
hierarchy. The following table illustrates applying successively restrictive exclusion criteria at different levels in the
hierarchy:
785

Oracle Fusion Cloud HCM
Using Common Features for HCM
Chapter 31
Eligibility Profiles
Level Eligibility Profile Criteria
Program
Exclude employees who do not have an active assignment.
Plan type in program
Exclude employees who do not have a full-time assignment.
Plan
Exclude employees whose primary address is not within a defined service area.
Using Both Inclusive and Exclusive Criteria
Eligibility criteria can be used to include or exclude persons from eligibility. Sequencing of criteria is more complicated
when you mix included and excluded criteria in the same profile. For ease of implementation, keep excluded criteria in a
separate eligibility profile.
Related Topics
•
How Eligibility Works With Other Objects
•
What happens if I include multiple criteria in an eligibility profile?
•
Best Practices for Setting Up Eligibility in a Benefits Hierarchy
Examples of Eligibility Profiles
The following examples show how to use eligibility profiles to determine which workers are eligible for a plan,
compensation object, and checklist task.
In each case, you:
1. Create the eligibility profile using the Manage Eligibility Profiles task, which is available in several work areas,
including the Setup and Maintenance work area and the Plan Configuration work area.
2. Associate the eligibility profile with the relevant object, such as a benefit plan.
Savings Plan Eligibility
A savings plan, such as a 401k plan, is restricted to full-time employees under 65 years of age. Create an eligibility
profile to associate with your plan.
The following table provides the values for the eligibility profile definition.
Field Value
Profile Usage
Benefits
Profile Type
Participant
786

Oracle Fusion Cloud HCM
Using Common Features for HCM
Chapter 31
Eligibility Profiles
Criteria Type Name Values Select Exclude Check Box
Employment
Assignment Category
Full-Time
No
Derived Factor
Age
Select an age derived factor for the
age band of 65 and older
Yes
Bonus Eligibility
You offer a bonus to all employees who received the highest possible performance rating in all rating categories. Create
an eligibility profile to associate with your Bonus compensation object.
The following table provides the values for the eligibility profile definition.
Field Value
Profile Usage
Compensation, or Global
Profile Type
Participant
Assignment to Use
Specific Assignment
The following table provides the values for the eligibility criteria for each rating category.
Criteria Type Name Values Select Exclude Check Box
Employment
Performance Rating
Select the performance template
and rating name, and then select
the highest rating value
No
Checklist Task Eligibility
A new hire checklist contains tasks that don't apply to employees who work in India. Create an eligibility profile to
associate with each checklist task that doesn't apply to workers in India.
The following table provides the values for the eligibility profile definition.
Field Value
Profile Usage
Checklist
Profile Type
Participant
The following table provides the values for the eligibility criteria.
787

Oracle Fusion Cloud HCM
Using Common Features for HCM
Chapter 31
Eligibility Profiles
Criteria Type Name Values Select Exclude Check Box
Employment
Work Location
India
Yes
Related Topics
•
Eligibility Profiles
•
Derived Factors
•
How can I restrict benefits enrollment opportunities based on provider location?
•
How to Configure Grandfathered Benefits
Create a Participant Eligibility Profile
This example demonstrates how to create a participant eligibility profile used to determine eligibility for variable life
insurance rates. Use the Plan Configuration work area to complete these tasks.
The following table summarizes key decisions for this scenario.
Decisions to Consider In this Example
What is the profile type?
Participant
What type of object is associated with this
profile?
Variable rate for benefits offering
What types of eligibility criteria are defined
in this profile?
Age derived factor (must have been previously defined)
Uses Tobacco criteria
Should persons meeting these criteria be
included or excluded from eligibility?
Included
788

Oracle Fusion Cloud HCM
Using Common Features for HCM
Chapter 31
Eligibility Profiles
The following figure shows the tasks to complete in this example:
In this example, you create one eligibility profile that defines the requirements for a single variable rate.
• Typically, you create a set of eligibility profiles, one for each variable rate.
• Create a separate profile for each additional rate by repeating the steps in this example, varying the age and
tobacco use criteria.
Prerequisites
1. Create an age derived factor for ages less than 30.
Creating the Eligibility Profile
Use default values for fields unless the steps specify other values.
1. In the Tasks panel drawer, click Manage Eligibility Profiles to open the Manage Eligibility Profiles page.
2. On the Create menu, select Create Participant Profile.
3. In the Eligibility Profile Definition section, complete the fields as shown in this table.
Field Value
Name
Age Under 30+ Non-Smoking
Profile Usage
Benefits
Status
Active
Assignment to Use
Any assignment - benefit relationship
789

Oracle Fusion Cloud HCM
Using Common Features for HCM
Chapter 31
Eligibility Profiles
Adding the Derived Factor for Age
Use default values for fields unless the steps specify other values.
1. In the Eligibility Criteria section, select the Derived Factors tab.
2. On the Age tab, click Create.
3. Complete the fields as shown in this table.
Field Value
Sequence
1
Age
Select the derived factor that you previously defined for ages under 30
Exclude
Make sure that it's not selected
Adding the Criteria for Tobacco Use
Use default values for fields unless the steps specify other values.
1. Select the Personal tab.
2. On the Uses Tobacco tab, click Create.
3. Complete the fields as shown in this table.
Field Value
Sequence
1
Tobacco Use
None
Exclude
Make sure that it's not selected
4. Click Save and Close.
Associating the Eligibility Profile with a Variable Rate Profile
Use default values for fields unless the steps specify other values.
1. In the Tasks panel drawer, click Manage Benefits Rates to open the Manage Benefits Rates page.
2. Select the Variable Rates tab.
3. Click Create.
4. In the Eligibility Profile field, select the eligibility profile you just created.
5. Complete other fields as appropriate for the rate.
6. Click Save and Close.
790


Oracle Fusion Cloud HCM
Using Common Features for HCM
Chapter 31
Eligibility Profiles
792

Oracle Fusion Cloud HCM
Using Common Features for HCM
Chapter 32
Predictive Models for HCM
32 Predictive Models for HCM
Guidelines for Managing Predictive Models
Oracle Fusion Workforce Predictions provides predefined models for the prediction of worker performance and
voluntary termination. Each predictive model is based on multiple attributes.
You can:
• Run predictive models to provide up-to-date predictions.
• Remove individual predictive models from the predictions process.
• Remove individual attributes from the predictive models or what-if analyses.
• Create predictive attributes to include in the predefined predictive models or what-if analyses.
Running Predictive Models
When you run a predictive model, the process Collect Data and Perform Data Mining for Predictive Analytics is invoked
immediately to:
• Rebuild the selected predictive models.
• Make predictions based on scores derived during the build process.
If the volume of relevant transactions (such as transfers, hires, terminations, and promotions) is high in your enterprise,
then you can schedule the process to run weekly. At a minimum, you're recommended to run the process monthly to
take account of latest data trends. When scheduled, the process rebuilds and runs all predictive models.
If you add attributes to or remove attributes from a predictive model, and you want to include those changes in
predictions immediately, then you need to run the predictive model immediately. Don't wait for the next scheduled run
of Collect Data and Perform Data Mining for Predictive Analytics.
Removing Predictive Models
To remove a predictive model from the predictions process, you deselect the Include in Predictions option for the
model. In this case, the model is excluded when you run Collect Data and Perform Data Mining for Predictive Analytics,
whether you run it immediately or as a scheduled process. Consequently, related analytics in transactional flows, such
as Promote Worker, are empty.
Creating and Editing Predictive Attributes
You can create predictive attributes to include in the predefined predictive models. To derive the value of the new
attribute, you create a fast formula database item (DBI) group and select it in the Formula Function field. You can also
control which predefined and locally created predictive attributes appear in what-if analyses.
In Oracle Cloud environments, you can't create formula functions. Therefore, you may not be able to create predictive
attributes.
You can edit or delete any predictive attribute that you create. You can't edit or delete predefined predictive attributes.
For any attribute, you can edit how the attribute appears in what-if analyses. For example, you can change the
minimum and maximum values on a slider scale.
793

Oracle Fusion Cloud HCM
Using Common Features for HCM
Chapter 32
Predictive Models for HCM
794

Oracle Fusion Cloud HCM
Using Common Features for HCM
Chapter 33
Process Configuration
33 Process Configuration
Payroll Process Configuration Groups
Payroll process configuration groups provide sets of processing parameters, primarily related to logging and
performance.
Select a process configuration group when you run a process, such as a new-hire flow or termination flow, or an extract
process or report.
If you don't select a process configuration group, the application uses the parameters in the default group. You must
specify the default group in the Process Configuration Group ACTION_PARAMETER_GROUPS profile option.
Here's the list of tasks you can use to set up profile options and default process configuration groups.
Action Task and Page
Edit predefined process configuration
groups
Default Group tab of the Payroll Process Configuration page.
Create additional process configuration
groups
Group Overrides tab on the Process Configuration Group page.
Select a process configuration group as
the default at the site or user level
Manage Administrator Profile Values task in the Setup and Maintenance area.
To open the Payroll Process Configuration page, use the Payroll Process Configuration task under Show More >
Payroll in My Client Groups on the Home page.
Create a group with the logging parameters turned on to troubleshoot processes. You can also specify different
performance parameter values, such as chunk size and buffer size, for running different processes.
Payroll Process Configuration Parameters
Payroll processing parameters are system-level parameters that control aspects of payroll-related processes, such as
flows and reports.
Values for each parameter are predefined with the application, but you can override these values as part of your initial
implementation and for performance tuning. Use the Payroll Process Configuration task under Show More > Payroll in
My Client Groups on the Home page.
795

Oracle Fusion Cloud HCM
Using Common Features for HCM
Chapter 33
Process Configuration
Processing Parameters
The effects of setting values for specific parameters may be system-wide. When you submit a process that uses flows,
such as a batch upload, new hire, or report process, the process reads values from the PAY_ACTION_PARAMETERS
table.
Note: You should understand the concept of array processing and how this affects performance before setting some
parameters.
The application doesn’t allow a blank value for any parameter. Unless the parameter is required, you must delete the
parameter row.
This table describes processing parameters and lists values and predefined default values. These parameters apply to
HR applications including payroll and payroll interface.
Parameter Description Values
Assignment ID to End Logging
Assignment ID upon which logging ends.
Default: All assignments
Assignment ID to Start Logging
Assignment ID upon which logging starts.
Default: All assignments
Balance Buffer Size
Buffer size for array inserts and updates of
latest balances, based on one row per balance.
Tip:
If your trace files show differences between
execute and retrieve timings, look at the
buffer sizes you're using. Try setting each of
these to 100.
Maximum: 1000
Minimum: 1
Default: 500
Batch Error Mode
Determines error notifications for the HCM data
loads.
ALL = all rows
ANY = any rows
NONE = no errors
Default: ANY
Chunk Size
Number of payroll relationship actions
that process together. See also the Parallel
Processing Parameters topic.
Maximum: 16000
Minimum: 1
Default: 20
Disable Locking Code in Check Process Post-
Populate Method
Disables the locking code added to the post-
populate method to improve check process
performance.
This parameter isn't available by default. To add
the parameter, search for the lookup type PAY_
ACTION_PARAMETER_TYPE on the Common
Yes, No
Default: No
Only change this value if advised by Oracle
Support.
796

Oracle Fusion Cloud HCM
Using Common Features for HCM
Chapter 33
Process Configuration
Parameter Description Values
Lookups page and add the lookup code ORA_
DISABLE_POST_POP_FIX.
Element Entry Buffer Size
Buffer size that payroll runs use in the initial
array selects of element entries, element entry
values, run results, and run result values per
assignment.
Maximum: 1000
Minimum: 1
Default: 500
Formula Execution Logging
Sets the logging level to investigate formula
code problems. See also the Logging
Processing Parameters topic.
Unless the parameter is required, delete the
parameter row.
Historic Payment
Removes the validation to look for banks
active as of the process date. This validation is
enforced by the payments process.
This parameter isn't available by default. You
can add it in test environments only. To add
the parameter, search for the lookup type
PAY_ACTION_PARAMETER_TYPE on the
Common Lookups page and add the lookup
code HISTORIC_PAYMENT.
Yes, No
Default: No
Logging Area
Area to log code. See also the Logging
Processing Parameters topic.
The values correspond to C-code entries in the
form PY_ENTRY, that includes the functional
area that has logging enabled.
Logging Category
Helps investigate problems with large volumes
of detailed data. See also the Logging
Processing Parameters topic.
You can set any number of categories by
specifying multiple values. For example, enter
GMPE, for general logging information, routing
information, performance information, and
element entry information.
Refer to the Logging Processing Parameters
topic in the Related Links section for applicable
values.
Unless the parameter is required, delete the
parameter row.
Manual Task Processing
Determines processing of manual tasks when
SOA server is unavailable.
Y, N
Default: Y
Maximum Errors Allowed
Number of payroll relationship actions that you
can roll back, when rolling back a process.
Minimum: 0
Default: CHUNK_SIZE or 20
Maximum File Size for View Report Output
Maximum size in bytes of the report file to
show in the output window.
This parameter isn't available by default. To add
the parameter, search for the lookup type PAY_
ACTION_PARAMETER_TYPE on the Common
Must be a positive number.
Default: 10000000
797

Oracle Fusion Cloud HCM
Using Common Features for HCM
Chapter 33
Process Configuration
Parameter Description Values
Lookups page and add the lookup code BI_
OUTPUT_SIZE.
Maximum Iterations Allowed per Run Action
Maximum number of iterations allowed per run
action within net-to-gross calculations within
the payroll run.
Minimum: 0
Default: 15
Maximum Number of Payroll Relationship
Actions to Roll Back
Number of payroll relationship actions that you
can roll back, when rolling back a process.
Minimum: 1
Default: 50
Multithreaded XML Generation for Extracts
Generates XML for extracts using multiple
threads.
Y, N
Default: N
New Hire Flow Pattern
Name of the customer-defined flow that’s
triggered as part of the new hire process.
Unless the parameter is required, delete the
parameter row.
Notifications Expiration Offset
Number of days before a payroll flow
notification is automatically deleted.
Minimum: 5
Default: 5
Payroll Batch Loader Encryption Type
The type of encryption applied to source files
loaded using the HCM data loader.
PGPSIGNED, PGPUNSIGNED,
PGPX509SIGNED, PGPX509UNSIGNED
Unless the parameter is required, delete the
parameter row.
Payroll Criteria for Element Eligibility
Enables eligibility by payroll for assignment-
level elements.
Yes, No
Default: No
Process Timeout
Number of minutes before the Run Balance
Generation process times out.
Minimum: 0
Default: No timeouts limit enforced.
Unless the parameter is specified, delete the
parameter row.
Remove Report Assignment Actions
Removes report processing actions after
generating reports.
Yes, No
Default: Yes
Run Result Buffer Size
Buffer size for array inserts and updates, based
on 1 row for each payroll run result.
Maximum: 1000
Minimum: 1
Default: 500
Shuffle Chunk Processing
Random processing of order chunks for
assignment actions.
Yes, No
Default: No
798

Oracle Fusion Cloud HCM
Using Common Features for HCM
Chapter 33
Process Configuration
Parameter Description Values
Suppress Empty XML Tags in Extract Reports
Reduces the size of extract output for reports
by excluding tags with blank values in XML
output files.
Y, N
Default: Y
Termination Flow Pattern
Name of the customer-defined flow that’s
triggered as part of the termination process.
Unless the parameter is required, delete the
parameter row.
(No predefined Termination flow pattern).
Threads
Total number of subprocesses that you can run
from the Oracle Enterprise Scheduler Service.
See also the Parallel Processing Parameters
topic.
Minimum: 1
Default: 1
Trace
Enables the database trace facility for
application processes written in C only.
Yes, No
Default: No
Trace Level
Sets the trace level of the trace event. To
generate the finest level of detail, enter the
highest value.
1, 4, 8, 12
Default: None
User Messaging
Enables detailed logging of user-readable
information to the PAY_MESSAGE_LINES table.
Yes, No
Default: No
XML_DATA_SOURCE
For document records delivery options
performance purposes, determines if XML is
derived from the database.
Y, N
Default: Y
Payroll-Specific Processing Parameters
This table lists the processing parameters that are applicable only for Oracle Global Payroll.
Parameter Description Values
Accounting Date for Transfer to General Ledger
The date to transfer and post journal entries for
costing results to Oracle Fusion General Ledger.
E = Date Earned
P = Process Date
DP = Date Paid from payroll time periods for
calculate payroll and QuickPay only.
EVE = For the Partial Period Accrual Reversal
process, date earned is used. However, if the
date earned isn't defined for the time periods
on the Payroll Definition page, the payroll
period end date is used.
799

Oracle Fusion Cloud HCM
Using Common Features for HCM
Chapter 33
Process Configuration
Parameter Description Values
For the payroll run that includes the actual
costs, the process date of the payroll run is
used.
Default: P
Cost Buffer Size
Buffer size for array insert and select
statements when calculating the costing of the
payroll run results.
Maximum: 1000
Minimum: 1
Default: 500
Date to Retrieve Assignment Status
Date earned or date paid, used to determine the
effective date for checking assignment status in
payroll calculations.
E = Date earned
P = Date paid
Default: P
Earliest Retroactive Processing Date
Sets earliest date that retroactive processes
are calculated. Updates made before this date
aren’t recalculated.
Note: If you define a static retroactive start
date and a rolling retroactive start date, the
retropay process uses the latest of the two
dates. For example, if the static retroactive
start date is 01-JAN-2020 and the rolling
retroactive start date is 15-MAR-2019, the
retropay process uses a start date of 01-
JAN-2020.
Controls the start date of the retroactive period
for the Calculate Payroll for Retroactive
Changes flow (retropay) as well as for an
individual employee
Date value in YYYY/MM/DD format
Extract Data Group for Payroll Register
Limits the records to include in the output file
based on the specified data group name.
Default: No data group
Limit Payroll Register Output by Data Group
Enables processing a subset of records to
include in the output file when an extract data
group parameter value is also specified.
Y, N
Default: N
Number of months in rolling period for
retroactive changes
Sets the number of months in the retroactive
pay rolling period.
If you don't want to limit the duration of the
retroactive pay period, change the default of 12
month rolling period to 999 months.
Default: 12
800

Oracle Fusion Cloud HCM
Using Common Features for HCM
Chapter 33
Process Configuration
Parameter Description Values
Note: You can limit the number of payroll
periods included in the retroactive pay
process by setting the earliest start date for
the process for the process for all retroactive
notifications using both the Earliest
Retroactive Processing Date parameter
and this parameter. For example, you may
want to set a static start date based on your
payroll go-live date and use a rolling period
to ensure retroactive pay doesn't calculate
for more than a 24 month period. Retroactive
pay uses the latest of the two dates when
both parameters are set.
If you don't want to limit the duration of the
retroactive pay period, change the default 12
month rolling period to 999 months.
Reversal and Balance Adjustment Accounting
Date
Accounting date based on one of these dates:
• The process date of reversal or balance
adjustment
• The process end date of the Transfer to
Subledger Accounting task. You can use
this task to transfer journal entries for
costing results to Oracle Fusion General
Ledger.
T = Transfer using end date of the Transfer to
Subledger Accounting task as the accounting
date
P = Use process date of the reversal or balance
adjustment as the accounting date
Default: P
Wage Basis Rules Buffer Size
Used in array selects from the PAY_
TAXABILITY_RULES table within the Payroll
Calculation process.
Minimum: 100
Default: 500
Related Topics
•
Payroll Process Configuration Groups
•
Logging Processing Parameters
•
Parallel Processing Parameters
Parallel Processing Parameters
Payroll processes are designed to take advantage of multiprocessor computers. You can improve performance of your
batch processes, such as Calculate Payroll or Calculate Gross Earnings, by splitting the processing into a number of
threads, or subprocesses, which run in parallel.
To improve performance you can also set the number of payroll relationship actions that process together and the size
of each commit unit for the batch process.
Here’s a list of parameters that you can use for parallel processing.
801

Oracle Fusion Cloud HCM
Using Common Features for HCM
Chapter 33
Process Configuration
Parallel Processing Parameters
Threads
When you submit a batch process, the Threads parameter determines the total number of subprocesses that run
concurrently. The number of subprocesses equals the Threads value minus 1.
Set this parameter to the value that provides optimal performance on your computer:
• The default value of 1 is set for a single-processor computer.
• Benchmark tests on multiprocessor computers show that the optimal value is approximately 2 processes per
processor.
For example, if the server has six processors, set the initial value to 12 and test the impact on performance of
variations on this value.
Chunk Size
The Chunk Size parameter:
• Indicates the size of each commit unit for the batch process.
• Determines the number of assignment actions that are inserted during the initial phase of processing.
• Sets the number of assignment actions that are processed at one time during the main processing phase.
This parameter doesn't apply to all processes, such as Generate Check Payments and Retroactive Pay.
To set the value of the Chunk Size parameter, consider the following points:
• Parameter values range from 1 to 16,000.
• The default value is 20, which was set as a result of benchmark tests.
• Each thread processes one chunk at a time.
• Large chunk size values aren't desirable.
Related Topics
•
Payroll Process Configuration Groups
•
Payroll Process Configuration Parameters
•
Logging Processing Parameters
Logging Processing Parameters
Use logging parameters to investigate problems that aren't easily identified in other ways. In a normal operation, disable
logging because it can impact the performance of the process you're logging.
Note: Prepare log files before contacting Oracle Support for assistance. Define the logging area, category, and range
of assignments before resubmitting the problem.
802
Oracle Fusion Cloud HCM
Using Common Features for HCM
Chapter 33
Process Configuration
Logging Parameters
Typically, you use this feature during your initial implementation and testing before you go live. In a normal
operation you should disable detailed logging.
The three processing parameters for logging are:
• Logging Area
• Logging Category
• Formula Execution Logging
Logging Area
The Logging Area parameter works with the Logging Category parameter to limit the code area for logging. Even if you
set the logging category, you must also set the logging area if you want to limit logging to a particular code area.
The values correspond to C-code entries in the form PY_ENTRY, which includes the functional area that will have
logging enabled.
Logging Category
Logging categories define the type of information included in the log. You can set any number of categories by
specifying multiple values to focus on specific areas that you think may be causing a problem. The application doesn’t
allow a blank value and you must delete the parameter row if logging isn’t required.
This table explains each logging category. It provides the log output information to investigate the problems
encountered.
Parameter Value Logging Category Description
B
Balance Information
Provides output information that shows the
creation and maintenance of balances used
during payroll processing.
C
C cache structures information
Provides output information that shows details
of the payroll cache structures and changes to
the entries within the structure. While working
on a service request, Oracle may ask you to use
this parameter to gather additional information.
E
Element entry information
Provides output information that shows the
state of the element entries in the process
memory after retrieving entries from the
database. The information is provided
whenever data for an entry is changed during
processing.
F
Formula information
Provides output information that shows
details of formula execution, including formula
contexts, inputs, and outputs.
G
General logging information
Provides general information, rather than
a specific information type. This parameter
doesn't provide sorted output. In general, it's
803

Oracle Fusion Cloud HCM
Using Common Features for HCM
Chapter 33
Process Configuration
Parameter Value Logging Category Description
recommended that you choose parameters that
provide specific types of information.
I
Balance output information
Provides output information that shows details
of values written to the database from the
balance buffers.
L
Balance fetching information
Provides output information that shows the
balances retrieved from the database and
whether or not the process will use those
balances. (If balances such as Year To Date
totals have expired because the year has
changed, the process resets them and uses the
new balance.)
M
Entry or exit routing information
Provides output information to show when any
function is entered and exited.
This information is indented to show the
call level, and can be used to trace the path
taken through the code at the function call
level. Often, this information is useful when
attempting to track down a problem such as a
core dump.
P
Performance information
Provides output information to show the
number of times certain operations take place
at the assignment and run levels and why the
operation took place. This parameter is often
used to balance the buffer array write operation.
Q
C cache query information
Provides output information that shows the
queries being performed on the payroll cache
structures. While working on a service request,
Oracle may ask you to use this parameter to
gather additional information.
R
Run results information
Provides output details of run results and run
result values from the Run Results buffer or
the Values buffer before writing them to the
database. This enables verification that the
buffer contents were correct.
S
C cache ending status information
Provides output information that shows the
state of the payroll cache before the process
exits, whether that process ends with success
or an error. While working on a service request,
Oracle may ask you to use this parameter to
gather additional information.
T and Z
PL/SQL detail and PL/SQL output
To obtain detailed information about the PL/
SQL calls made by the Payroll application, use
the combination of the T parameter and the Z
parameter.
804

Oracle Fusion Cloud HCM
Using Common Features for HCM
Chapter 33
Process Configuration
Parameter Value Logging Category Description
This combination is typically useful for
obtaining information about payroll processes
that use a large amount of PL/SQL code, such
as prepayments and archive.
Using this parameter, the process buffers
output while it's running and places it the end
of the log file after processing is complete.
Each payroll process instance has its own log
file, located under the log subdirectory for the
particular process ID.
V (USA only)
Vertex tax calculation information
Provides output information that shows the
values passed in and out of a third-party Vertex
tax engine. This parameter also provides a
separate file in the Out directory that shows
the internal settings of the Vertex engine. This
logging option is available to customers in the
USA only.
Formula Execution Logging
Formula execution logging is the code area where logging is performed. This processing parameter mechanism is only
available for formula logging in the payroll run. Specify parameter values as a character or combination of characters
to determine the area for logging. For example, the string di (the combination of d and i) corresponds to the logging of
database item cache access and formula input and output values. The default value is no logging.
CAUTION: Use the dump logging options in rare circumstances only. The T trace option, which generates very large
amounts of data, would significantly slow down processing.
The following table lists formula execution logging parameter values and its details.
Parameter Value Meaning
c
Change contexts
d
Database item cache access
D
Database item cache dump
f
Formula cache access
F
Formula cache dump
I
Formula input/output values
m
Miscellaneous
805

Oracle Fusion Cloud HCM
Using Common Features for HCM
Chapter 33
Process Configuration
Parameter Value Meaning
n
Nested calls
s
SQL execution (database item and PL/SQL formula function calls)
T
Trace (very large level that provides the inputs and outputs of every call made when executing a
formula)
w
Working storage area access
W
Working storage area dump
1
Level 1 (combination of c. f, i, and m)
2
Level 2 (combination of 1, c, d, n, and w)
3
Level 3 (combination of 2, D, s, and W)
4
Level 4 (combination of 3 and F)
5
Level 5 (combination of 4 and T)
Related Topics
•
Payroll Process Configuration Groups
•
Payroll Process Configuration Parameters
•
Parallel Processing Parameters
806

Oracle Fusion Cloud HCM
Using Common Features for HCM
Chapter 34
Country Extensions and Address Rules
34 Country Extensions and Address Rules
Change Address Style and Address Validation Settings
Use the Features by Country or Territory task to control address style and level of address validation for the countries or
territories you configure. The values you can set depend on the combination of the country or territory and the selected
country extension.
For example, for Canada, you can change the address style from its default value only when you set the country
extension to Human Resources or None. You can't change the address style from its default value when you set the
country extension to Payroll or Payroll Interface.
Address Styles
The address style you select determines which address attributes are available and maintained in the application. The
combination of address style and address validation determines the level of validation.
Depending on the country or territory and the country extension you select, you have one or both of the following
address style options. Each address style provides its own validation.
Address Style What the Address Style Does
Postal Address
This address style provides the fundamental set of address attributes for a country or territory. In some
cases, this style adds supplemental attributes. For instance this address style might include general
address attributes that aren't relevant, such as State or Postal Code.
Supplemental Taxation and Reporting
Address
Enforces validation to attribute changes.
For example, this style may add specific validation of postal codes, such as requiring a specific number
of characters in a specific sequence.
Use the Features by Country or Territory task to see what's delivered for your country. Each country has a default
address style and the choice of the country extension determines whether you can change the default address style.
Address Validation Based on Country Extension
Address validation is the validation of county, city, province, and postal code combinations.
Employees must have a valid address in order for them to receive their tax card and to ensure the accuracy of their tax
calculations.
Address validation is automatically enabled for some license and product extension combinations. For example, for
Canada, the default is Supplemental Taxation and Reporting Address. However, the address style and address validation
depends on the country extension, as shown in this table.
807

Oracle Fusion Cloud HCM
Using Common Features for HCM
Chapter 34
Country Extensions and Address Rules
Extension Style Enforced Validation Enforced
Human Resources
No
No
Payroll Interface
Yes
No
Payroll
Yes
Yes
For Canada, if you have chosen to install Human Resources, the value for the Address Style can be modified to
either format. If you have chosen to install either Payroll Interface or Payroll, the value for the Address Style can't be
modified. It must be set to Supplemental Taxation and Reporting Address. Validations are implemented to enforce that
requirement.
Change Address Styles
For most of the predefined countries and territories, the application enforces the address style, preventing you from
making changes. However, when the address style isn't enforced, such as a customer-configured legislation, changing
address styles can affect validation rules. This might lead to address data integrity and validation issues.
For example, for Canada, if you initially implement Human Resources using the Postal Address style and then later
change the country extension to Payroll, you must also change the address style to Supplemental Taxation and
Reporting Address. As a result, you must update your existing address data to resolve validation errors.
Note: The Supplemental Taxation and Reporting Address style, once selected, impacts both the Person and HCM
Locations address styles. Ensure to test any changes you make to address style or validation for a country or territory
before you implement them in a production environment. If you provide data to a third party, such as a payroll or
benefit provider, statutory recipients, or financial institutions, you must test the changes. Changes to validation or
address styles may result in missing data or unrecognized data.
Tip: Use the Manage Legal Addresses task to review and configure how addresses appear in the application.
Disable Address Validation
Disabling address validation disables any country-specific programmatic validation rules created for a specific country
or territory. You can disable address validation on the Features by Country or Territory page.
A country or territory might have rules defined using the Manage Geographies task for validating address structure,
format, or values. Disabling address validation doesn't have any impact on the validations you have set up on the
Manage Geographies page.
For some countries, the application prevents you from disabling the programmatic validation. For other countries and
territories, when you disable address validation, any existing validation rules for the selected address style, remains in
place.
Note: For Canada, when Payroll is the selected country extension, you can't disable the address validation.
For example, suppose you have chosen Human Resources with address validation enabled. During data conversion, you
want to temporarily bypass address validation rules to load a batch of worker data. You can achieve this by deselecting
the Address Validation check box before loading your data. After loading the batch, if the address validation remains
808

Oracle Fusion Cloud HCM
Using Common Features for HCM
Chapter 34
Country Extensions and Address Rules
disabled, any new address data you enter later, could be potentially invalid. Errors may occur in subsequent processes
and reports. As a result, you must re-enable address validation and update your existing address data to resolve
validation errors.
Enable Address Validation
To manually enable or disable address validation:
1. Search for and start the Features by Country or Territory task.
2. Select the Address Validation box.
3. Click Save and then Done.
CAUTION: If you don't have address validation enabled, then you must take care when switching product extensions,
as any address you previously defined may be missing required values, such as county and tax district. There's also
the possibility of invalid address combinations, such as mismatched city and postal code combinations.
Select Country Extensions
This example demonstrates how to configure payroll-related features for countries and territories in an enterprise.
The Vision enterprise has employees in several countries with different payroll arrangements:
• In the United States and United Kingdom, the enterprise pays employees using Oracle Fusion Global Payroll.
• In France, the enterprise extracts and sends payroll-related data to third-party payroll provider using Payroll
Interface extract definitions.
• In China, the enterprise stores only HR data in Oracle Fusion Applications and doesn't require any data for
payroll purposes.
The following table summarizes the key decisions to consider while deciding on the product usage for a country.
Decisions to Consider In This Example
Do your plans include processing payrolls
within Oracle Fusion for any country?
Yes, using Global Payroll in the US and UK
Do your plans include extracting or
transferring payroll-related data to a third-
party provider for any country?
Yes, using Payroll Interface extracts in France
Do your plans include processing only HR
details?
Yes, using Global HR in China
How to Set the Extension
1. Select the Features by Country or Territory task from My Client Groups > Show More > Payroll.
2. In the Selected Extension list, select the country extension for the countries as shown in this table.
809

Oracle Fusion Cloud HCM
Using Common Features for HCM
Chapter 34
Country Extensions and Address Rules
The following table lists the country names and the product usage that you can select for this scenario.
Country Extension
United States
Payroll
United Kingdom
Payroll
France
Payroll Interface
China
Human Resources or None
3. Click Save, and then click Done.
Related Topics
•
Change Address Style and Address Validation Settings
810

Oracle Fusion Cloud HCM
Using Common Features for HCM
Chapter 35
Elements, Balances, and Formulas Task List
35 Elements, Balances, and Formulas Task List
Define Elements, Balances, and Formulas
The Define Elements, Balances, and Formulas task list contains the tasks required for creating payroll elements for
compensation, absences, time and labor, and HR management.
You can also use this task list if you're recording earnings, deductions, and other payroll data for reporting,
compensation and benefits calculations, or transferring data to a third-party payroll provider.
Note: If you're using Oracle Global Payroll, use the Define Payroll task list instead. The Define Payroll task list includes
other tasks required to set up payroll processing.
Required Tasks
Your business requirements and product usage decide which required tasks you need to complete. The required tasks
include:
• Elements
• Payroll Definitions, which is usually required to support elements
• Consolidation Groups, which is required for creating payroll definitions
If you use predefined Payroll Interface extracts to transfer data to a third-party payroll provider, you might need to
create element subclassifications, balances, organization payment methods, and object groups. See the Global Payroll
Interface documentation for more information.
Before You Begin
Before you start the Define Elements, Balances, and Formulas task list, complete the tasks these offerings contain.
Task Use To Why It's Important
Manage Legal Entities Create payroll statutory units. Ensures that hiring employees automatically
creates payroll relationship records.
Manage Legal Entity HCM Information Associate a legislative data group with each
payroll statutory unit.
Ensures that hiring employees automatically
creates payroll relationship records.
Manage Features by Country or Territory Select Payroll Interface as the extension for any
countries or territories where you extract HR
data to send to a third-party payroll provider.
Ensures that you use the appropriate element
templates to create earnings.
811

Oracle Fusion Cloud HCM
Using Common Features for HCM
Chapter 35
Elements, Balances, and Formulas Task List
Configure Legislations for Human Resources
Use this task to create and edit legislative data for a country or territory that doesn't have a predefined country
extension. It guides you through configuring some payroll objects and values required for creating elements, including:
• Tax year start date
• Period of service on rehire rules
• Default currency
• Element classifications
• Component groups
• Payment types
Note: Complete this task before the other tasks in this task list.
Elements
Use elements to communicate payment and distribution information to payroll applications from the source
applications listed in the following table.
Source Application Element Purpose
Compensation
• Earnings and deduction elements, such as bonuses, overtime earnings, and voluntary
deductions.
• Information elements to load user-defined data to use during a workforce compensation cycle.
Benefits
• Deduction elements to record activity rate calculation results, such as:
◦
Employee contributions and employer distributions for medical options
◦
Flex credits for flex benefits
• Earnings elements to disburse unused credits as cash.
Time and Labor Time card details such as salary, overtime hours, and shift unit payments.
Absence Management Absence details such as number of hours, days absent, or accrual absence balance details.
Payroll Definitions
The payroll definition supplies the payroll period frequency and dates, which some applications use for payroll
calculations. A payroll is assigned to the assignment record of an employee, it indicates the payroll frequency for the
assignment such as weekly. This table shows which applications require payroll definitions.
Application Payroll Definition Required? Usage Conditions
Global Payroll Interface Yes, optional Required if you run the Calculate Gross
Earnings process
Compensation Yes, optional Required if you capture salary with a frequency
of payroll period
812

Oracle Fusion Cloud HCM
Using Common Features for HCM
Chapter 35
Elements, Balances, and Formulas Task List
Application Payroll Definition Required? Usage Conditions
Benefits Optional Required to use the payroll period frequency to
calculate communicated rates or values passed
to payroll.
Time and Labor Optional N/A
Absence Management Optional N/A
Consolidation Groups
You must have at least one consolidation group for each legislative data group where you create elements. Payroll
definitions require a consolidation group.
Other Payroll-Related Setup Tasks
Your implementation might require other tasks from My Client Groups.
Task Requirements
Organization Payment Methods To record personal payment methods for your employees, you need to create organization payment
methods and associate them with your payroll definitions. Organization payment methods define the
combination of payment type and currency to use for payments to employees or external parties.
Element Classifications Primary element classifications are predefined. If you run the Calculate Gross Earnings process
(provided with Global Payroll Interface), you might create subclassifications to feed user-defined
balances.
Fast Formulas The Elements task provides predefined payroll formulas for payroll interface users. You can also write
formulas for several uses, including:
• Validating user entries into element input values
• Configuring compensation, benefit, and accrual plan rules
• Calculating periodic values for gross earnings and defining element skip rules for the Calculate
Gross Earnings process (provided with Global Payroll Interface)
Balance Definitions If you're using Global Payroll Interface, creating earnings elements creates balances automatically. You
can edit these generated balance definitions.
If you're using the Calculate Gross Earnings process, you might want to create other balances for
extracts or reporting.
Object Groups You can create object groups to specify subsets of elements or payroll relationships to include in a
report or process, such as the Calculate Gross Earnings process.
Related Topics
•
Overview of Using Formulas
•
Payroll Definitions
•
How Payroll Elements Hold Information for Multiple Features
•
Payroll Balance Definitions
813

Oracle Fusion Cloud HCM
Using Common Features for HCM
Chapter 35
Elements, Balances, and Formulas Task List
Overview of Implementing Payroll Relationship
A payroll relationship is the highest level of the payroll employment model. It groups a person's assignment records for
payroll statutory calculation and reporting purposes.
The assignments grouped within a payroll relationship always belongs to the same PSU and person type such as
employee.
A payroll relationship enables you to enter information for a person in Oracle HCM Cloud that impacts their pay such as
salary, compensation, time cards, and absences.
For employees with multiple assignments, payroll relationships support tax and social insurance calculations that you
perform on earnings from all assignments grouped within the relationship. The results of payroll processes such as
Calculate Payroll are accordingly held against the payroll relationship of a person.
Payroll relationship rules and mappings control the creation of payroll relationships and define how they're processed
by Cloud Payroll for a localization. These rules and mappings are automatically available for country extensions
which are predefined by Oracle. If you're configuring a legislation that isn't predefined by Oracle, use the Configure
Legislation for Human Resources task to define the payroll relationship and mapping rules.
Related Topics
•
Configure Legislations
•
Overview of Administering Payroll Relationships
Overview of Payroll Employment Model
In the payroll employment model, each person has a payroll relationship to a payroll statutory unit (PSU), and one or
more payroll assignments and other employment structures.
Comparing the HR and Payroll Employment Models
This diagram shows the human resource (HR) employment model and the payroll employment model contrast where
two legal employers, Manufacturing and Installation belong to one PSU, Sun Power. As you can see, David Ellis has two
assignments where the HR model creates two work relationships and the payroll employment model creates one payroll
relationship.
814


Oracle Fusion Cloud HCM
Using Common Features for HCM
Chapter 35
Elements, Balances, and Formulas Task List
Payroll Legislative Data
Use the Configure Legislations for Human Resources task in the Setup and Maintenance area to create and edit payroll
rules for countries or territories not initially provided by Oracle.
Objects you can configure include:
• Legislative rules
• Element classifications
• Valid payment types
• Component groups
• Balance dimensions
• Legislative data groups
Legislative Rules
Legislative rules govern how to manage employee records when you rehire employees into your organization. For
example, for some countries, a rehire continues to be associated with the earlier payroll relationship, thereby having
access to prior data, such as year-to-date balances. For some other countries, a rehire creates a new payroll relationship
record with no access to prior data. The statutory rules for your country or territory determines the selections you make,
such as the starting month of the tax year.
The legislative rules you can configure include mappings between system person types and payroll relationship types.
This mapping controls which person types you can include in payroll calculation processing, such as the Calculate Gross
Earnings process.
Note: You can't undo payroll relationship type mapping. If you select an element entries only option for a person type
and then at a later date decide to use the Calculate Gross Earnings process, the process won't generate results for that
person type. Consider using a standard option to provide more flexibility.
Element Classifications
Element classifications are collections of related elements. You select the primary classifications you want to include
for your elements. You can provide new display names for element classifications to match the terminology that's most
appropriate for your country or territory.
Valid Payment Types
Payment types are the means by which you issue payments to workers. The predefined payment types are Check, Cash,
EFT (electronic funds transfer), and International Transfer. You can provide new display names for payment types to
match terminology that's most appropriate for your country or territory.
816

Oracle Fusion Cloud HCM
Using Common Features for HCM
Chapter 35
Elements, Balances, and Formulas Task List
Component Groups
Component groups are logical sets of payroll components, which are the rates and rules that determine calculated
values for some earnings and deduction elements. You can provide new display names for the component groups you
want to support to match terminology that's most appropriate for your country or territory.
The Configure Legislations for Human Resources task creates a calculation card definition and payroll components for
each component group you enable. When you create elements in certain classifications and categories, the element
template associates the element with a payroll component and creates calculation components that you can add to
workers' calculation cards. The calculation card creates the components for the component groups you selected. The
element template then associates these components with the statutory elements you create. Ensure that you associate
these components with your employees through element eligibility for calculation to be processed.
Depending on the legislative rules, if you enable the Federal or Social Insurance component groups and set your
country extension on the Features by Country or Territory page to Payroll or Payroll Interface for your country or
territory, hiring workers automatically creates a statutory deduction calculation card for them. Ensure that you create
eligibility records for your statutory deduction elements before hiring any workers.
Balance Dimensions
Balance dimensions identify the specific value of a balance at a particular point in time, based on a combination of
criteria, including time, employee relationship level, jurisdiction, and tax reporting unit. You can provide new display
names for the balance dimensions you want to support to match terminology that's appropriate for your country or
territory.
The Configure Legislations for Human Resources task creates some predefined balances that the application uses
within the statement of earnings, such as Gross Earnings and Net Pay. Additionally, the Net Payment balance is required
to set up organization payment methods.
Legislative Data Groups
Use the Manage Legislative Data Groups task in the Setup and Maintenance area to define at least one legislative data
group for each country or territory where your enterprise operates.
Related Topics
•
Legislative Data Groups
Configure Legislations
Create the legislative content for a country or territory in the Setup and Maintenance area as part of implementing
Oracle Human Resources. The Installed Legislations page shows which country extensions are predefined or already
implemented or both.
This procedure outlines the steps required to configure a legislation that isn't predefined by Oracle.
When you first configure a legislation, the flow guides you through a series of setup steps for the objects necessary to
set up elements, balances, and other payroll-related data for implementations. The objects you can configure include:
• Legislative Rules
• Element Classifications
817

Oracle Fusion Cloud HCM
Using Common Features for HCM
Chapter 35
Elements, Balances, and Formulas Task List
• Payment Types
• Component Groups
• Balance Dimensions
Set Legislative Rules
Legislative rules govern default values and how to manage employee records in your organization. Base your selections
on the statutory rules for your country or territory.
1. In the Setup and Maintenance area, go to the Configure Legislations for Human Resources task.
Note: Use the Configure Payroll Legislations task if you're implementing Global Payroll.
2. Select the country or territory from the list on the Installed Legislations page.
3. Select Legislative Rules from the left-pane and click Edit.
4. Select the month and day of the typical tax year. For example, 01 for January and 01 for the first day of the
month.
5. Select the currency to use by default for this country or territory.
6. Select a payroll relationship rule. This value determines how employment records are created when employees
are hired or rehired.
7. Review the mapping of the predefined system person types to payroll relationship types. Select appropriate
values for your country or territory.
8. Click Save.
Note: You can't undo payroll relationship type mapping. If you select an 'element entries only' option for a
person type and decide at a later date to use a payroll calculation process, such as Calculate Gross Earnings,
the process won't generate results for that person type. If you're certain that you won't perform any type of
payroll calculation, you can select an element entries only option. Selecting a standard option provides more
flexibility.
Select Objects and Modify Display Names
The flow guides you through selecting primary classifications you want to include for your elements, payment types,
balance dimensions, and component groups. For each of these objects, you can provide new display names to match
the terminology that's most appropriate for your country or territory.
1. Select Element Classifications from the left pane and click Edit. Select the primary classifications you want to
include for your elements.
2. For each primary classification you select, optionally edit the value in the Display Name column, and then click
Next.
3. Select the payment types to include, such as Check/Cheque and EFT (electronic funds transfer).
The payment types you select here are available when you create organization payment methods for your
country or territory.
4. For each payment type you select, optionally edit the value in the Display Name column, and then click Next.
5. Select the component groups to include.
6. For each component group you select, optionally edit the value in the Display Name column, and then click
Next.
7. Add any balance definitions as needed that aren't already selected. The page displays all balance dimensions
available for your country or territory.
8. For each selected balance definition, optionally edit the value in the Display Name column.
9. Click Submit.
818

Oracle Fusion Cloud HCM
Using Common Features for HCM
Chapter 35
Elements, Balances, and Formulas Task List
How Legislations are Edited
If you have configured legislative content for a country or territory not already predefined by Oracle, you can edit it
using the Configure Legislations for Human Resource task.
Your ability to edit the legislative rules and objects depends on the other objects in the legislation.
Legislative Rules and Objects You Can't Edit or Delete
The following tables summarize the restrictions when you're editing legislative content for a country or territory.
Legislative Rule Restriction
Tax Year Start Date
Can't change after running a payroll process
Currency
Can't change after initial configuration because it would impact generated balances
Payroll Relationship Type Mapping
Can change, but affects only future person records, not existing person records
Object Restriction
Element Classification
Can't delete if you have created an element of that primary classification
Payment Type
Can't delete if you have created payment methods for that payment type
Component Group
Can't delete if you have created calculation cards for that component group
Balance Dimension
Can't delete if you have created balances with that dimension
Overview of Object Groups
Object groups are sets of elements or persons. Use object groups to define subsets of objects for processing or
reporting.
Use the Object Group task to define these object group types.
• Element
• Payroll Relationship
• Work Relationship
819

Oracle Fusion Cloud HCM
Using Common Features for HCM
Chapter 35
Elements, Balances, and Formulas Task List
• Process Information Group
Note: If you're loading an object group with a large number of inclusions or exclusions, you're recommended to use
the individual Object Group Amend file to achieve that. This supports the data to be multithreaded and minimizes the
processing time.
Element Groups
Use Element groups to limit the elements processed for payroll, reporting, cost distribution, and for global transfer
purposes.
This table explains the usages for an element group.
Element Group What It Does
Run group
Specifies the elements to be processed in a payroll run.
Distribution group
Defines the elements on which the cost results are distributed
Configuration group
Restricts the elements that can be updated on the Element Entries page.
All element groups are static. You can select element classification to include in or exclude from the group. You can also
select specific elements to include in or exclude from the group.
Payroll Relationship Groups
Use Payroll relationship groups to limit the persons processed for payroll, data entry, and reporting.
Defining a payroll relationship group is a two-step process.
1. Specify a payroll definition. Every group is limited to the payroll relationships assigned to a single payroll that
you select.
2. Optionally, define the group to be either static or dynamic.
a. To define a static group, select the payroll relationships and assignments to include in or exclude from
the group.
b. To define a dynamic group, use a fast formula of type Payroll Relationship Group. The formula contains
the criteria to establish the payroll relationships and assignments included in the group. Then, you can
individually select additional payroll relationships and assignments to include in or exclude from the
group.
Work Relationship Groups
You can use Work relationship groups to limit the persons processed for Human resources and reporting. For example,
you can use work relationship groups in your user-defined extracts. You can define the group to be either static or
dynamic.
• In a static group, select the work relationships and assignments to include in or exclude from the group.
820

Oracle Fusion Cloud HCM
Using Common Features for HCM
Chapter 35
Elements, Balances, and Formulas Task List
• In a dynamic group,
◦
Use a fast formula of type Work Relationship Group. This formula contains the criteria to establish the
work relationships and assignments included in the group.
◦
Individually select additional work relationships and assignments to include in or exclude from the group.
Process Information Groups
You use a bank reprocessing group to load the bank corrections file returned by your bank. Each payroll period, you
transfer payroll payments directly into the bank accounts designated by the employee. If any of the bank account
records are invalid, your bank returns a file containing these details.
For example, an employee can have an incorrect account number which results in the payment being rejected by the
bank. Alternatively, the payment could have been transferred to an invalid branch number due to the closure of a bank
or merger of a bank branch with another.
Related Topics
•
Overview of Loading Object Groups
•
Example of Loading Object Groups
•
Set Up Distributed Costing for an Element
•
Object Group HCM Data Loader Files for Bank Reprocessing
FAQs for Elements, Balances, and Formulas Task List
When do I change the payroll relationship rules for an
international legislation?
Configure payroll relationship mapping rules for all person types when you implement an international legislation.
The Configure Legislation for Human Resources task would create mapping rules for person types such as employee.
You can use this task to create any person type mapping rules that aren't predefined by Oracle.
If employment records already exist, the best approach is to not change the payroll relationship rules. This approach
ensures that new and existing employment records have the same rules. However, if you want to update the payroll
relationship rules after employment records exist, your updates will affect only the newly created employment records
for the person type.
Related Topics
•
Configure Legislations
821

Oracle Fusion Cloud HCM
Using Common Features for HCM
Chapter 35
Elements, Balances, and Formulas Task List
How do I diagnose payroll employment model setup issues?
After creating enterprise structures, run the Payroll Employment Model Setup Validation test. This test checks whether
legal employers are associated with a legislative data group.
Select Run Diagnostic Tests from the Setting and Actionsmenu in the global area. You must have access to the
Diagnostic Dashboard to run this test.
How can I validate data after legislative setup?
You can run data validation reports from the Payroll Checklist work area to identify any missing attributes based on
statutory rules of the legislative data group.
Use the Run Payroll Data Validation Report process to list noncompliant or missing statutory information for a person by
payroll statutory unit (PSU). For example, your report might list all people in the PSU with a missing tax reporting unit.
Use the Run Worker Data Validation Report process to list noncompliant or missing statutory information for a worker
by legal employer. For example, your report might list all workers in the legal employer with a missing date of birth, job,
or department.
Related Topics
•
Add Rules to Data Validation Reports
822

Oracle Fusion Cloud HCM
Using Common Features for HCM
Chapter 36
Organization Payment Methods
36 Organization Payment Methods
How Bank, Branch, and Account Components Work
Together
Banks, branches, and accounts fit together on the premise of the Bank Account model.
The model enables you to define and keep track of all bank accounts in one place and explicitly grant account access to:
• multiple business units
• functions
• users
This eliminates the redundant duplicate bank account setup in different business units when these business units share
the same bank account.
Banks
Creating a bank is the first step in the bank account creation. You can:
• Search for existing banks to view and update
• Create a new bank from an existing party
Consider the following:
• The option to create from an existing party is implicitly implemented by the matching option.
• The option is available only after the existing party has been found with the same bank.
• If you select the matching option, the page repopulates the information from the matched party.
Branches
Once you have created your bank, the next step is creating a branch or branches associated to the bank. The matching
option is also available when creating branches. To create a new branch without using the matching option, manually
enter the required information. You can also define other branch- related attributes in the same page.
If you don't use the matching option when an existing party is found, a branch with the same party name is created.
Accounts
The four areas associated with defining an account are:
• General information
• Control of the account
• Security and access to the account
• Business unit assignment
823

Oracle Fusion Cloud HCM
Using Common Features for HCM
Chapter 36
Organization Payment Methods
Once the bank and branch are created, proceed to the bank account setup by doing the following:
• Select the bank branch you want to associate to your bank account.
• Assign the owner of the bank account.
Note: To create a bank account for Payables or Receivables, add the Business Unit Access first for the
business units to use the bank account.
Consider the following:
• The Oracle Fusion Account Payables or Receivables accounts are identified by the business unit.
• The Oracle Fusion Payroll accounts are identified by the legal entity.
• The program, Inactivates Banks and Bank Branches enables you to inactivate all banks and bank branches that
have no active internal and external bank accounts.
• Optionally, secure the access to bank account information based on the user's legal entity data access, by
enabling the opt-in Legal Entity-Based Data Access for Bank Account Setup.
• Legal entity-based data access for bank account setup:
◦
Improves security and increases control of bank account setup by limiting user access to bank account
information.
◦
Helps decentralized organizations that require users only to manage the bank account information for
the organizations they are authorized for.
Related Topics
•
Considerations When You Create Accounts
•
Reconciliation Matching Rules
•
Assign Data Access to Users
Bank Info for Personal Payment Methods
You can create bank, branch, and bank account info as part of implementation, or you can let employees add their own
bank info. Once created, you can use bank accounts in other Oracle applications, such as Cloud expenses.
Enter Bank Info for PPMs
This table summarizes approaches to create bank info for employees.
Approach Purpose
Manage Banks and Manage Bank
Branches pages
Create, edit, and view your bank account information.
Note:
In order to manage banks and branches, you must have the Manage Bank and Manage Bank Branch
privileges.
824

Oracle Fusion Cloud HCM
Using Common Features for HCM
Chapter 36
Organization Payment Methods
Approach Purpose
Payment Methods page
Create, edit and view employee bank account details to receive payroll payments.
HCM Data Loader
Use an integrated Excel workbook to load personal payment methods and employee bank account
details.
You can use CE_USE_EXISTING_BANK_BRANCH profile option to control to whether or not your employee can create
their own bank and branch data. On the Manage Cash Management Profile Options page, set the Use Existing Banks
and Branches profile option to either Yes or No.
• If you set the option to Yes, you need to load bank and branch data. Administrators and employees select bank
and branch details from a list of values in the bank region on the Payment Method page.
• If you set the option to No (default setting), you don't need to load any bank details. Administrators and
employees enter their bank and branch details as free text.
Access to PPMs and Bank Info
The table shows the privileges you need to access PPMs and bank info:
User Privileges Access Description
Employee Self-service
Manage Personal Payment Method
Allows users to manage their own personal
payment methods
Employee Self-service
View Personal Payment Method
Allows users to view their own personal
payment methods
Employee Self-service, Implementors,
Administrators, or Managers
Payee Bank Account Management Duty
Allows users to create bank accounts
Implementors, Administrators, or Managers
Manage Worker Personal Payment Method
Allows access to manage employee personal
payment methods
Implementors, Administrators, or Managers
View Worker Personal Payment Method
Allows access to view employee personal
payment methods.
Related Topics
•
How Bank, Branch, and Account Components Work Together
•
Configure Payment Method Preferences
•
Examples of Loading Banks
•
Examples of Loading Bank Branches
•
Example of Loading Personal Payment Methods
825

Oracle Fusion Cloud HCM
Using Common Features for HCM
Chapter 36
Organization Payment Methods
Organization Payment Methods Overview
Organization payment methods (OPM) control how you pay payroll payments to your employees and third parties.
OPMs interact with payroll definitions, payment sources, payment rules, prenotifications, and link the personal payment
methods (PPMs) with your organization payment sources.
After setting up the banks, bank branches, and bank accounts that you use, you can define payment methods for your
organization. OPMs include key information, such as payment type, currency, and company bank information.
You must create one organization payment method for each combination of legislative data group, payment type,
and currency that you use to disburse wages and other compensation. You can also create rules to determine the
distribution of payments from a specific bank account for a specific group of payees. Use the Organization Payment
Methods page to view, create and edit.
Note: Create one organization payment method per payment type and currency, such as a direct deposit being paid
in USD. Define payment sources and payment method rules to determine which payment source will pay which group
of payees. If you decide to create more than one OPM per payment type and currency, you must configure payment
method preferences to define OPMs available for employees to use.
Payment Types
When you create an organization payment method, select a payment type.
These are the most common payment types and the name of the corresponding payment processes:
Payment Types Payment Process
Direct Deposit
Make EFT Payment
Check/cheque
Choose one of these 2 check/cheque payment processes:
• Use the Generate Check Payments process to run the check process for your employees and third
parties in one process.
• Use the Generate Check Payments for Employees and Third Parties process to run the check
process for your employees and third parties in separate processes.
International Transfer
Make EFT Payments
Cash
There's not a cash payment process. You can make cash payments outside of the application and
record as an external payment.
Note: The exact list of payment types and their names can vary by country. Your enterprise may support a different
range of types that are appropriate for your localization. For example, in the US, the payment type for EFT is Direct
Deposit; in the UK it's BACS, and in Australia it's BECS.
826

Oracle Fusion Cloud HCM
Using Common Features for HCM
Chapter 36
Organization Payment Methods
Currency
Currency is typically defined as the same currency as your company's source bank account. Define currency in the OPM
for payment transfers, such as EFT files.
The prepayment process supports currency conversions but it's important to make sure your localization and bank
support multi-currency payments, to include the format of the payment file that supports international payments. For
example, your output currency for your elements is defined as USD. All payroll calculations use your element currency,
to include net payment amounts. When you define an international transfer OPM with GBP currency and associate it to
an employee's personal payment method, the prepayments process converts the payment amount from USD to GBP for
the employee. And, the payment process payment file contains the converted amounts in GBP to send the payment in
the employee's currency.
Payment Information
Use the payment information region to capture details for your payments. For example, you can specify a maximum
limit for each payment made using the organization payment method. You also have an option to define a maximum
limit for the total payment transaction.
The exact content of this region can vary based on the selected payment type and your localization.
Note: You can enter payment information at the organization payment method level, the payment source level,
or both. Entries at the payment source level take priority over entries at the organization payment method level. If
you define details at the payment source level, to use those details when you process payments, you must enter the
payment source when you submit the payment process.
Prenotifications
Prenotifications or prenotes are typically 0 amount electronic entries you send to a bank to verify the routing number
and account number of the receiving bank. Use the Organization Payment Methods task, to configure following
prenotification rules for direct deposit payment types.
Field Name What it does
Prenotification Required
Designates the prenotification is required for employees.
Prenotification Amount
Designates the prenotification transaction amount. is required for employees. Default value is 0 USD.
Days
Number of days required for a prenotification wait period. Until the waiting period is complete, the
employee is paid by check. For example, if you set the prenote wait period to 10 days, depending on
the timing for weekly payroll runs, the employee may receive 2 checks before the direct deposit begins.
If you prenote bank accounts in your legacy system, you may choose to skip the prenote process when you implement
payroll. To do this use the Payroll Bank Account Prenote Status Update data loader.
Payment Sources
Payment sources identify your company bank accounts debited for payroll payments. You must associate at least one
payment source to an organization payment method.
827

Oracle Fusion Cloud HCM
Using Common Features for HCM
Chapter 36
Organization Payment Methods
This validation occurs to ensure the bank account on the payment source are available for payroll payments:
• Must be associated to a Payroll Statutory Unit (PSU). You must either assign a PSU legal entity to the bank
account or assign a legal employer with a parent PSU to the bank account.
• Must be enabled for payroll payments. You must select Payroll in the Account Use option for the bank account.
• Must have active bank account. You must assign a bank account that's active at the time of the payroll
payment.
This diagram highlights the bank account set-up required for Cloud Payroll. Use the payroll
extension option on the Features by Country or Territory page to register Cloud Payroll.
Note: In order for a bank account to appear in the payment source page it must be associated to a Payroll Statutory
Unit (PSU), enabled for payroll payments and active.
Note: If you use a third-party payroll product, you can create an organization payment method without a payment
source record.
Note: If you cost your payments, enter cost account information on the Costing of Payment Sources page.
You can use the same bank account in different payment sources in more than one organization payment method, as in
this example.
Organization Payment Method Payment Source Bank Account
Check/cheque
Bank of America Account A
Bank A - Account 7890045
EFT
Bank of America Account B
Bank A - Account 7890045
Payment Method Rules
Payment method rules define the appropriate payment source to be used for payment to a specific group of payees. If
you define multiple payment sources for an organization payment method, you must set up payment method rules.
You can define standard payment method rules based on the tax reporting unit (TRU) of an employee. You can also use
the payment criteria feature to set up payment method rules to derive payment sources within a single TRU, such as
rules based on department, job or location.
This example shows payment method rules based on the TRU of the payee. The organization payment method has
three different payment sources.
828

Oracle Fusion Cloud HCM
Using Common Features for HCM
Chapter 36
Organization Payment Methods
Payment Source Tax Reporting Unit Default Payment Source
Payroll EFT Source A
Bank A - Account 7890045
None
Yes
Payroll EFT Source B
Bank B - Account 1238900
TRU1
No
Payroll EFT Source C
Bank C - Account 8765999
TRU2
No
The first payment source that you add is the default payment source, but you can select another payment source as the
default, or not have a default payment source.
To understand the effect of a default payment source, consider these examples that describe what happens when a TRU
changes, and causes an invalid payment rule.
Approach Example
With a default payment source, the
payment process pays employees with the
default payment source.
This approach might suit a company with multiple independent franchises, each with its own TRU. If a
franchise holder sells the franchise, payments don't fail.
Without a default payment source,
the payments process issues error
notifications to ensure that you use the
appropriate payment source to fund the
payment.
This approach might suit a company with strict policies about payment rule compliance.
International Transfer Payment
The international transfer payment type supports payment methods for electronic funds transfer (EFT) payments to a
country different from the originating payment source.
In order for you to use this functionality, you must be able to support payments to international bank accounts. For
example, the US supports a file format called IAT NACHA, which supports making payments from the US to bank
accounts which reside outside of the US. Attach the file format to the 'International EFT' report category.
Related Topics
•
Payment Sources in Organization Payment Methods Setup Examples
•
Configure Payment Method Preferences
•
How do I import organization data?
•
Payment Method Rules Setup Examples
•
Example of Skipping Prenotes
829

Oracle Fusion Cloud HCM
Using Common Features for HCM
Chapter 36
Organization Payment Methods
Prenotifications
The purpose of prenotifications is to validate routing numbers and account numbers of the receiving banks. Once you
have set up prenotifications for your organization payment method, the prenotification status is on in the professional
payment method page.
Depending on the prenote status, you may edit the prenotification status field to update the prenote status.
This table describes the prenote status and actions that you can take:
Prenote Status Description Statuses available?
Not Submitted
This status will show when the bank account is
first created and added to a payment method.
Marked as complete
Submitted
This status will show when the payment
method is processed prepayments, for the
number of prenote days as defined in the
Organization Payment Method page.
Marked as complete
Rejected
Complete
This status will show when the prenote period
has completed.
N/A
Rejected
This status can be set by the professional user if
the bank rejects the bank account information.
N/A
Marked as Complete
This status can be set by the professional user
if they want to bypass the prenote process for a
specific employee.
N/A
For example, your prenote process requires a 5 day wait period. You have a new hire, on a monthly payroll, with the first
period end date being the 30th Jan. They enter their bank account details on 15th Jan. When the payroll department
runs the prepayment process with an effective date of 30th Jan, the prenote statuses will appear as follows:
Not Submitted Submitted Complete
15th Jan -29th Jan
30th Jan - 3rd Feb
4th Feb -
The employee will receive a check payment for the first payroll period and the bank account will be used for payment
effective 4th Feb and after.
Note: A professional user can also update the prenote date field, when the status is submitted, if for example, they
need longer to verify the account.
830
Oracle Fusion Cloud HCM
Using Common Features for HCM
Chapter 36
Organization Payment Methods
Important prenotification banner messages show at the top of the page to let you know that the bank account isn't
currently used for payment because it's still in Submitted status or is in Rejected status. This table explains these banner
messages:
Prenotification Banner Message Banner Shows on Page
This bank account will be used once the
prenote process is complete.
During Submitted status, from the time the bank is first entered and attached to a payment method
until the prenote process is complete.
This bank account was rejected during the
prenote process and will not be used.
During Rejected status, This will be shown when the bank has been marked as rejected.
Skip Prenotification
There are situations where you may choose to skip the prenote process, such as if you recently migrated data into HCM
Cloud and the bank prenote was completed in your legacy system. The prenote process automatically triggers when
new bank accounts are loaded. Because prepayments process pays the employees by check until prenote process is
complete, you must skip the prenote process to avoid this. Manually skip the prenote process or use HCM Data Loader.
Related Topics
•
Organization Payment Methods Overview
•
Example of Skipping Prenotes
•
Payment Sources in Organization Payment Methods Setup Examples
Payment Sources in Organization Payment Methods
Setup Examples
You set up payment sources when you create organization payment methods (OPM) for payroll processing. Use the
Organization Payment Methods task.
Derive Payment Source Based on TRU
You pay your workers by electronic funds transfer (EFT) payments. To comply with tax reporting unit (TRU) regulations
for out-of-TRU payments, payment rules are created based on TRU to pay from two different banks. This table helps
you understand your key decisions for this scenario:
Decisions to Consider In This Example
How many OPMs do you need?
One.
How many payment sources do you need?
Three.
831

Oracle Fusion Cloud HCM
Using Common Features for HCM
Chapter 36
Organization Payment Methods
Decisions to Consider In This Example
One default payment source for the TRU1, one source for payments in TRU2, and one source for
payments in TRU3.
How many bank accounts do you need?
Three.
One for each payment source.
What payment method rules do you need?
Rules for bank accounts used as payment sources based on each TRU.
Prerequisites
Verify you have completed these before you continue:
1. Primary ledger is set up in Oracle Cloud General Ledger.
2. Banks, branches, and account info to use as the payment sources are set up in Oracle Cloud Cash Management.
3. Legal entity associated with the legislative data group is assigned to a general ledger.
4. TRUs are set up.
Create the OPM with Basic Details
Add new OPM in the Organization Payment Methods page with this info:
1. Click the Organization Payment Methods task.
2. In the Search Results section, click Create.
3. Select your legislative data group. This example is InFusion LDG.
4. Select the date this payment method is to be available for use.
Tip: Select a date that's on or before the effective date this payment method will be used by the payroll
definition or other objects.
5. Click Continue.
6. In the Basic Details section, complete the fields with this info:
Field Value
Name
Payroll Direct Deposit
Payment Type
Direct Deposit
Note:
The available payment types for OPMs can vary by legislation.
Currency
Payment currency
7. Click Save.
832

Oracle Fusion Cloud HCM
Using Common Features for HCM
Chapter 36
Organization Payment Methods
Add EFT File Info
When you select the EFT payment type, you have the option enter EFT info at these levels:
Note: EFT file info entered at the payment source level takes priority over info entered at the organization payment
method level.
1. Payment source level
2. Organization payment method level
3. Both levels
Create Payment Sources
Perform these steps three times to create each payment source.
1. In the Payment Sources section under Payment Source Information, click Create.
2. On the Create Payment Source page, complete the fields in order, as shown in this table:
Field Source 1 Source 2 Source 3
Name
Payroll EFT Source 1
Payroll EFT Source 2
Payroll EFT Source 3
Bank Account Name
Bank A
Bank B
Bank C
Bank Reference
123456789
234567890
345678901
Company Reference
456789012
567890123
678901234
Tip: Keep your payment source names unique and specific as possible for each scenario. This naming
convention helps you manage complicated combinations of OPMs and payment rules.
3. Click Continue.
Create Payment Rules
Perform these steps three times to create each payment source.
1. In the Payment Method Rules section, for Payroll EFT Source US, ensure that the default setting is Yes.
2. In the same section, click Create and select the values shown in this table to create two payment rules that map
a payment source to a TRU.
Field Source 2 Source 3
Default
No
No
Tax Reporting Unit TRU2 TRU3
833

Oracle Fusion Cloud HCM
Using Common Features for HCM
Chapter 36
Organization Payment Methods
Field Source 2 Source 3
Payment Source
Payroll EFT Source 2
Payroll EFT Source 3
3. Click Submit.
Create Same Payment Source for Pay Workers and Third Parties
Your organization pays all workers and third-party payees from the same source bank account. In this scenario, no
special payment method rules are required. Perform these steps for this scenario:
1. Ensure the payment source is set as the default.
2. Leave the Third-Party Payment, Tax Reporting Unit, and Payment Criteria fields blank.
3. Click Continue.
Create Separate Payment Source for Pay Workers and Third Parties in a
Specified TRU
Your enterprise is based in one tax reporting unit (TRU1), but you have some workers in another tax reporting unit
(TRU2). To comply with TRU1 regulations for out-of-TRU payments, you specify a payment source for the TRU2. In this
scenario, your payment source for TRU1 is already set as the default payment source, so no change is needed for TRU1.
Perform these steps for the TRU2 employees:
1. Add a payment method rule.
2. Select the TRU2.
3. Select the TRU2 payment source.
4. Click Continue.
Create Separate Payment Sources for Pay Workers and Third Parties in the
Same TRU
You currently pay everyone in your TRU using Payment Source A. Your company recently employed a private consultant,
Jon Moore, from a third-party auditing company. A new company requirement states that payments must come from a
new payment source, Payment Source B. For this scenario:
1. Create John as a third-party person payee.
2. Leave the Third-Party Payment, Tax Reporting Unit, and Payment Criteria fields blank.
3. Click Continue.
834

Oracle Fusion Cloud HCM
Using Common Features for HCM
Chapter 36
Organization Payment Methods
Create Separate Payment Source for Pay Workers in a Specified
Department
Note: This scenario has these prerequisites:
• An information element exists named Default Payer with an input value named Payment Criteria.
• A formula exists that retrieves department names and the assignment IDs of the employees associated with
them.
• The processing rules in the Default Payer element refer to the formula. The result rules target field is set to
Payment Criteria. The returned field is set to the value specified in the formula.
You use different payment sources to pay employees in the Sales and Development departments. Perform these steps
for this scenario:
1. Create a payment method rule for each department.
2. Enter the department name in the Payment Criteria field.
3. Select the TRU and payment source.
4. Click Continue.
Related Topics
•
How Bank, Branch, and Account Components Work Together
•
Organization Payment Methods Overview
•
Derive Payment Sources Example
•
Payment Method Rules Setup Examples
835

Oracle Fusion Cloud HCM
Using Common Features for HCM
Chapter 36
Organization Payment Methods
836

Oracle Fusion Cloud HCM
Using Common Features for HCM
Chapter 37
Payroll Definitions
37 Payroll Definitions
Payroll Definitions
Payroll definitions contain calendar and offset information used to determine when you calculate and cost payments.
Payroll period types, such as weekly or monthly, determine the interval at which you pay employees.
Use the Payroll Definitions task to specify payment frequency, processing schedule, and other parameters for a
particular payroll.
Create at least one payroll definition for each payroll period type you use to pay employees. For example, to pay
employees semimonthly, create a payroll definition using the semimonthly payroll period type, ensuring that tax
calculations and other calculations produce correct results for those employees.
Create Payroll Definitions
When you create a payroll definition, the application generates the complete payroll schedule based on the payroll
period type, the offsets or calendar adjustments, and the number of years that you specify. Each payroll in the schedule
is assigned a unique name. Assign employees to payroll definition on the Manage Payroll Relationships page. You can
configure the payroll calendar by increments of ten or fewer years. Create a payroll definition to replace one that expired
or end-dated.
Each payroll must belong to a consolidation group, which the application requires for processing purposes and a
legislative data group so make sure these exist before creating your payroll definition.
Modify Payroll Definitions
When you modify a payroll definition, the application adjusts the payroll schedule based on the values you have
modified. Modify an existing payroll definition to increase the number of years and generate more payroll time periods
that configure the payroll calendar.
Note: Payroll names in the payroll schedule are unique. You can edit the generated payroll names, but you must
ensure they're unique within the payroll definition.
Related Topics
•
Overview of Payroll Definitions
•
Create Payroll Definitions
Overview of Payroll Definitions
When you create or modify payroll definitions, the application generates a calendar of payroll periods based on your
selections. The choices you make for these values determine the resulting schedule of payroll periods:
837

Oracle Fusion Cloud HCM
Using Common Features for HCM
Chapter 37
Payroll Definitions
Effective Start Date
The effective start date is the first date that the payroll definition is available for employee data. The start date must
be on or before the earliest date of any historical data that you want to load. For example, for a payroll starting on 01-
JAN-2013 with five years of historical payroll data to load, you set the start date of the payroll definition to 01-JAN-2008.
The effective start date doesn't affect the generated calendar of payroll periods. The start date for the first payroll
period is based on the first period end date.
First Period End Date
The first period end date is the end date of the first payroll period that the application generates for a payroll definition.
The first period end date is typically based on the date of implementation, tax year, benefits enrollments, or a particular
payment cycle. For example, if your weekly payroll work week is Saturday through Friday, and your first payment date is
on 06-JAN-2012, you could use 30-DEC-2011 as your first period end date.
Ledger
You can select a primary ledger that will be used for payroll costing. The ledger determines the accounting information,
such as, the chart of accounts and the accounting calendar.
Suspense and Default Accounts
You can associate accounts to the payroll definition that will be used by the payroll costing process for suspense and
default accounting purposes.
Number of Years
The number of years you enter represents how many years of time periods to generate starting from the beginning of
the first payroll period, which is determined by the first period end date. This table shows an example for a semimonthly
payroll definition.
Effective Start Date First Period End Date Number of Years Generated Time Periods
01-JAN-2014
15-JUN-2014
5
01-JUN-2014 to 31-MAY-2018
Once you save a payroll definition, you can later only increase but not reduce its number of years because a calendar of
time periods for the payroll was already generated.
Note: The application generates the calendar of payroll periods in increments of ten or fewer years. For example,
if you want a 12-year calendar of payroll periods, you first enter 10 years and submit your changes. Then you set the
payroll definition number of years to 12.
Offsets
Depending on the payroll period type, you can elect for your payroll cycle events to occur on specific dates, or to have
the application calculate dates based on offsets from period start or end dates.
This table describes the predefined payroll cycle events that you can offset.
838

Oracle Fusion Cloud HCM
Using Common Features for HCM
Chapter 37
Payroll Definitions
Date Meaning
Cutoff Date
Final date that payroll information is entered for the payroll period.
This date is for information purposes only. Your departments, such as HR, may need this payroll
deadline to submit information that affects the payroll run
Payslip Availability Date
Date on which payees can view payslips.
Payroll Run Date
Date used by payroll calculation processes to retrieve effective values such as employee details. The
process date, if provided when submitting a payroll process, overrides this value.
This date is predefined for your country or territory and is typically based on either date earned or date
paid that payroll calculation uses as the process date.
Date Earned
Date on which the application processes element entries for the payroll run.
The date earned must be within the effective dates of the payroll period.
Date Paid
Date the employee is marked as paid. For check/cheque payments, this is the date that the check/
cheque is valid for cash or deposit. For electronic funds transfer (EFT) payments, it's the transfer date.
Planned Submission Date
Date to inform the payroll administrator or payroll manager on the planned date to submit the payroll
run for each payroll period.
Dynamic Offsets
When you create a payroll definition, you can use dynamic offsets for payroll cycle events. All of the predefined payroll
time periods you can use support dynamically generated dates for offsets. Use dynamic offsets to offset each payroll
cycle event by a specified number of days before or after the start or end date.
Fixed-Date Offsets
The predefined Monthly (Calendar) payroll time period supports both dynamic offsets and fixed-date offsets. Use fixed
date to adjust the exact date of each of the payroll cycle events for the first payroll period. Any adjustments that you
make are reflected in the payroll calendar for subsequent payroll time periods. For example, if you set the cutoff date as
the 25th of the month, then all payroll periods in the calendar will have those offsets.
Specific Date Adjustments
Once you generate the payroll time periods, you can further adjust any specific calendar dates, as needed. For example,
if you know of a particular bank holiday that falls on a payment date, you might want to adjust the dates manually on
the payroll calendar's time period. Make these adjustments when you create a payroll definition or any time after then,
as long as the time period is in the future. Adjust the dates of an existing time definition on the Time Periods tab on the
Manage Payroll Definitions page.
839

Oracle Fusion Cloud HCM
Using Common Features for HCM
Chapter 37
Payroll Definitions
Related Topics
•
Periodicity Conversion
•
Create Payroll Definitions
•
Statutory and Earning Periods
Create Payroll Definitions
This shows you how to create two payroll definitions for different payment frequencies that are associated with one
consolidation group and one legislative data group.
Watch video
The InFusion Company requires payroll definitions for two sets of employees. A set of permanent salaried employees
paid on a semimonthly basis and a set of temporary employees paid on a monthly basis using time card data. Costing is
managed monthly and uses results from all payroll runs by using the consolidation group name as an input parameter
in the costing run. You can see in this example how to create two payroll definitions with different payment periods
with the same consolidation group. Both definitions are effective starting on 1/1/11 and generate payroll time periods
covering five years.
Prerequisites
1. Ensure that the legislative data group for your payrolls exists, such as InFusion LDG.
2. Ensure that organization payment methods exist for your payrolls, such as InFusion Employee Check/cheque
and InFusion Employee EFT.
3. Create a consolidation group named InFusion Employee Group assigned to the InFusion LDG.
Create Payroll Definitions
Create two payroll definitions:
• One to pay permanent employees on a semimonthly basis. This payroll definition includes dynamically
generated offset dates.
• One to pay temporary employees using time card data on a monthly calendar basis.
Perform the following steps twice, first using the semimonthly values and then using the monthly values.
1. Payroll Definitions task.
2. In the Search Results section of the Payroll Definitions page, click the Create icon.
3. Select the InFusion LDG legislative data group from the list.
4. Enter 1/1/11 as the effective start date you want the payroll to be available for use, and then click Continue.
In this example, the company hires all employees after the effective start date of this payroll definition, so
there's no issue with loading historical employee data.
840

Oracle Fusion Cloud HCM
Using Common Features for HCM
Chapter 37
Payroll Definitions
5. In the Basic Details section, complete the fields as shown in this table, and then click Next.
Field Semimonthly Value Monthly Value
Name
InFusion Employee Semimonthly
InFusion Employee Monthly
Reporting Name
InFusion Semimonthly
InFusion Monthly
Consolidation Group
InFusion Employee Group
InFusion Employee Group
Period Type
Semimonthly
Monthly (Calendar)
First Period End Date
6/15/12
6/30/12
Default Payment Method
InFusion Employee Check/cheque
InFusion Employee Check/cheque
Valid Payment Method
InFusion Employee EFT
InFusion Employee EFT
6. On the Payroll Offsets page, in the Number of Years field, enter 5.
Note: The application generates the calendar of payroll periods in increments of 10 or fewer years. For
example, if you want a 12-year calendar of payroll periods, you first enter 10 years and submit your changes.
Then you edit the payroll definition, setting the number of years to 12.
7. For the semimonthly payroll, use dynamic variables to define offsets as shown in this table, and then click Next.
Field Falls Value Day Type Value Base Date Value
Cutoff Date
5
Before
Period End Date
Planned Submission Date
4
Before
Period End Date
Payroll Run Date
0
Before
Period End Date
Payslip Availability Date
0
Before
Period End Date
Date Earned
0
Before
Period End Date
Date Paid
0
Before
Period End Date
841

Oracle Fusion Cloud HCM
Using Common Features for HCM
Chapter 37
Payroll Definitions
8. For the monthly payroll, use fixed dates to define offsets as shown in this table, and then click Next.
Field Value
Fixed Date
Yes
Cutoff Date
6/25/12
Date Earned
6/28/12
Payroll Run Date
6/28/12
Date Paid
6/28/12
Payslip Availability Date
6/28/12
Planned Submission Date
6/26/12
9. On the Payroll Calendar page, adjust payroll days to account for a bank holiday, as shown in this table.
Column Semimonthly Value Monthly Value
Payroll Run Date
Old Value: 11/28/13
New Value: 11/27/13
Old Value: 5/27/13
New Value: 5/28/13
10. Click Next.
11. Review the details of the payroll definition, and then click Submit.
Related Topics
•
Payroll Definitions
•
Overview of Payroll Definitions
•
How Payment Methods and Payroll Definitions Work Together
•
Payroll Setup for Costing Accounts
•
Overview of Ledger and Subledgers
842

Oracle Fusion Cloud HCM
Using Common Features for HCM
Chapter 37
Payroll Definitions
FAQs for Manage Payroll Definitions
When would I close a payroll period?
Closing a payroll period can prevent changes to recurring entries. Payroll periods aren't like General Ledger periods.
Closing payroll periods isn't necessary.
Why can't I select a payment method when creating a payroll
definition?
If you can't select a payment method when creating a payroll definition, either the start date of the payroll definition
is before the start date of the organization payment method or the organization payment method has no associated
payment source.
843

Oracle Fusion Cloud HCM
Using Common Features for HCM
Chapter 37
Payroll Definitions
844

Oracle Fusion Cloud HCM
Using Common Features for HCM
Chapter 38
Payroll Elements
38 Payroll Elements
How Payroll Elements Hold Information for Multiple
Features
Use Payroll Elements to determine the payment of base pay, benefits, absences, and other earnings and deductions.
Associate payroll elements with salary bases, absence plans, and the benefits object hierarchy to determine how you will
use those elements.
This table provides some examples of how you can use payroll elements.
Payroll Element Usage Examples of Payroll Elements
Base Pay Management
Annual Salary Basis
Monthly Salary Basis
Hourly Salary Basis
Absence Management
Absence Payment
Leave Liability
Discretionary Disbursement
Final Disbursement
Benefits
Health Care Deduction
Savings Plan Deduction
Employee Stock Purchase Deduction
Time and Labor
Regular Hourly Earnings
Overtime Earnings
Shift Earnings
Payroll
Regular Standard Earnings
Bonus Earnings
Tax Deduction
Involuntary Deduction
845

Oracle Fusion Cloud HCM
Using Common Features for HCM
Chapter 38
Payroll Elements
Base Pay Management
To manage base pay, you attach an earnings element to each salary basis (hourly, monthly or annual) for each worker.
When a manager or compensation specialist enters a base pay amount for a worker, the application writes the amount
to an element entry. The application does this by using the element input value associated with the worker's salary
basis. Payroll processing uses the element entry to generate payment amounts.
Absence Management
You can manage worker absences and corresponding entitlements. You can create absence types based on predefined
absence patterns, and associate them with absence plans. You can associate an absence element with an absence plan
to transfer this information for payroll processing:
• Payments for absent time, for example, during maternity or long term sickness.
• Accrual disbursement at the end of absence plan year
• Accrual disbursement when plan enrollment ends
• Absence liability amounts
You can process the payments in Oracle Fusion Global Payroll or use HCM extracts to transfer the information to a third-
party payroll application for processing.
Benefits
Attach payroll elements at various levels in the benefits object hierarchy to create deductions and earnings that you can
process in a payroll run to calculate net pay.
Time and Labor
Create payroll elements for use in time cards, and calculate payroll or gross earnings based on the time card entries
transferred to payroll. For example, for Oracle Fusion Time and Labor, you run processes that create dependent payroll
attributes and time card fields for element input values. You can automate the routine import of time card entries to
payroll using predefined flows.
Payroll
For Oracle Fusion Global Payroll, you define earnings and deduction elements, such as bonus and overtime earnings
and involuntary deductions. These elements incorporate all components required for payroll processing, including
formulas, balances, and formula result rules.
Payroll Elements
Some elements are predefined. You can also create other elements to match your requirements. Each element belongs
to a primary classification, according to its purpose, which determines the template you use to create it.
Use the template to create the elements and depending on your country extension, you create the associated items
required forpayroll processing.
846

Oracle Fusion Cloud HCM
Using Common Features for HCM
Chapter 38
Payroll Elements
Use the elements to represent these components:
• Earnings, such as salary, wages, and bonuses
• Compensation, such as employee stock purchase and insurance plans
• Absences from work
• Tangible items distributed to persons, such as tools, uniforms, mobile phones, or computers
• Statutory deductions, such as taxes, voluntary deductions, contributions to charities or savings plans, and
involuntary deductions, such as court orders and pretax deductions
• Employer taxes and other employer liabilities
Note: You can associate a time card with a results element that has the costing definition. On the Element Summary
page, you can use the base element attribute to directly link a time element to the result element.
Use Predefined Elements
The predefined elements are specific to your country or territory. They typically include deductions for tax and wage
attachments. You can't make any changes to these predefined elements. However, you must create eligibility records for
them.
Create Element
You can create as many earnings and deduction elements as you require using the Elements task. Let's assume that,
effective 6th March, you create an element entry for a worker. In this case, the element entry has a start and end date of
6th March.
You select the element classification and category that determine the template of questions. You answer the questions
to specify the details of the element you want to create. The items that the template generates can include multiple
elements, input values, formulas, balances, and other items.
Note: The template you use to create elements also depends on the configuration selected for your country or
territory on the Features by Country or Territory page. For example, if the country extension is set to Payroll, you
use a template that generates all the items required for payroll processing. If the country extension is set to Human
Resources or None, you use a basic template that generates the elements only. However, if you select an element
classification, such as Standard Earnings, Supplemental Earnings, Direct Payments and Taxable Benefits, the basis
template creates input values for Amount, Periodicity, and Full-Time Equivalent.
You can configure any of the generated items to match your specific business requirements. For example, you can
add input values, edit the formulas, or add a status processing rule to use a different formula for certain assignment
statuses. You must also create element eligibility records for the elements.
This table explains the purpose of the items that you use when creating element.
Items Purpose
Input Values
Defines the entry values available on each entry of this element, such as hours worked or amount.
Element Eligibility Records
Defines the eligibility criteria a worker's employment record must meet to be eligible for the element.
For example you can use grade, payroll, salary basis, or organization as eligibility criteria.
847

Oracle Fusion Cloud HCM
Using Common Features for HCM
Chapter 38
Payroll Elements
Items Purpose
Status Processing Rules
Identifies the formula the payroll run uses to process the element, and how to handle the formula
results.
Related Formulas and Related Elements
Identifies additional elements and formulas created by the template for payroll processing.
Related Balances
Identifies the balances created by the element template for this element.
Related Topics
•
How You Maintain Payroll Elements
•
Payroll Element Eligibility
•
Payroll Element Input Values
•
Create Earnings Elements for Payroll
•
Formula Result Rules for Elements
Payroll Element Input Values
An element's input values define the entry values available on each entry of an element. Each input value has a unit of
measure, such as money or date.
Input values can include validations and conditions to control the data entry of theelement entry assigned to a person.
For example, an earnings element may have an input value for hours worked, whichis required and has a unit of
measure of number.
When you create an element, some input values are created automatically depending on your country extension and
the element classification. You can create additional input values for any element, as needed.
Note: You can't add an input value to the element if any payroll process were run after the element was created. This
behavior holds good irrespective of whether the payroll run included this element or not. To add input values, rollback
all processes that were ran after the element creation date.
Input Value Options
For each input value created, you can modify these attributes:
Field Value What You Do
Display Sequence
Enter a number to control the display order of the entry value on element entries.
Special Purpose
Select how the input value is to be used. For example, you can indicate that it holds a percentage value,
a rate, or third-party payee details. This value assists with processing the input value based on what
type of information it holds.
848

Oracle Fusion Cloud HCM
Using Common Features for HCM
Chapter 38
Payroll Elements
Field Value What You Do
Unit of Measure
Select the value that describes the type of value the entry value can hold, such as number or character.
Displayed
Select to display the input value on the element entry.
Allow User Entry
Select to enter values on element entries.
Required
Select to make the input value a required entry value on the element entry. If you select Required, you
must also select Displayed and Allow User Entry.
Create a Database Item
Select if you want to make the values available for formulas or HCM extract.
Rate Formula
Select a rate calculation formula, for example to return a value from a user-defined table. This option
only applies to the Primary input value for elements associated with rate definitions that have the
Element method and a contributor type of Amount. If you select a formula, you must not select Allow
User Entry.
Default
Enter a value that appears as the default value for this entry value in element entries, if needed.
Apply default at runtime
Select to apply the default value when you run the payroll process, rather than when you create the
element entry. This selection ensures you use the latest value on the date of the payroll run. You can
manually override the default value on the element entry.
Minimum
Enter a minimum value, if needed.
Maximum
Enter a maximum value, if needed.
Validation Formula
Enter a formula that validates the entry value entered on element entries, if needed.
Validation Source
Use with the other input value options to select the valid validation method, such as lookups or
formulas.
Lookup Type
Specify a lookup type to provide a list of values for an entry value. This option is available for input
values of type Character only.
Warning or Error
Use when you're validating the input value or entering a minimum or maximum value. It specifies
whether a warning or an error displays if the entry fails the validation condition or doesn't meet the
minimum or maximum value indicated.
Reference
Use to associate a balance context with the run result.
For example, you can associate a context, such as jurisdiction, with an element. Create an input value
for jurisdiction and select the jurisdiction context in the Reference field. Then the run result value of
the input value works as a context value when updating the balance.
If you select a reference, then the lookup type and validation source values should be automatically set
to the reference context. You must provide the Reference field first for the validation source value to
be automatically populated.
849

Oracle Fusion Cloud HCM
Using Common Features for HCM
Chapter 38
Payroll Elements
Field Value What You Do
Value Set
Specify a value set to provide a dynamic list of values for an entry value. This option is available for
input values of type Character only.
CAUTION: Once an element is processed, you can't update certain input value attributes, such as unit of measure.
This restriction ensures that you can't change attributes that would invalidate prior results.
This table provides examples of the allowable formats, depending on the unit of measure (UOM) specified for the entry
value.
Unit of Measure Sample Entry Value Display in Application
Character
C
Complete
Integer
12345
12,345
Number
12345.6789
0.123456789
12,345.6789
0.123456789
Day
123
0.123
123
0.123
Money
12345
-12345.67
12345.00
<12345.67>
Hours in decimal format, 1 place
12345
12345.0
Hours in decimal format, 2 places
12345
12345.00
Hours in decimal format, 3 places
12345
12345.000
Hours expressed as a numeric value
12345
12345
Hours and minutes expressed as numeric
values
12345
12345:00
Hours, minutes, and seconds expressed as
numeric values
12345
12345:00:00
Date
2016-06-21
21-Jun-2016
Time 13:05 1:05 PM
850

Oracle Fusion Cloud HCM
Using Common Features for HCM
Chapter 38
Payroll Elements
Unit of Measure Sample Entry Value Display in Application
Note: Display values can be derived from the meaning attribute of the view object. For example if you enter C as a
value for the Character UOM, it displays as Complete. Conversion to display formats is based on the profile option
value and locale.
Related Topics
•
Payroll Elements
•
Create and Edit Profile Options
•
How Element Setup Affects Entries and Their Values
•
Use a Value Set for an Element Input Value
Employment Level Options for Payroll Elements
Your enterprise uses an employment model. When you create elements, you select the employment level at which to
attach the element. If you select a level below payroll relationship, each assignment record can have separate element
entries.
Payroll Relationship Level
This level is the highest level for accumulating balances. Every payroll run processes payroll relationship elements.
Here are the typical elements to define at payroll relationship level:
• Tax deductions
• Pension
• Child support
• Medical care
• Union dues
• Benefits activity rate calculations, such as employee contributions and flex credits
Assignment Level
Use this lowest level for elements that require different entries for different assignments, or when the element applies
only to specific assignments.
Here are the typical elements to define at assignment level:
• Assignment salary
• Regular hours
• Overtime
• Sales bonus
851

Oracle Fusion Cloud HCM
Using Common Features for HCM
Chapter 38
Payroll Elements
• Profit-sharing bonus
How You Maintain Payroll Elements
After you create and use an element, you're limited on the updates you can make to it. This ensures the integrity of the
element for retroactive processing and the balances of the input values.
You can't remove existing input values or add new ones if you have created entries for the element. To add an input
value to an element before you create any element entries, set your effective date to the element's start date.
You can make these changes to an element that has been previously processed:
• Change a required input value to be optional.
• Alter the sequence in which input values appear on the Element Entries page.
• Change the input value validation rules for minimum, maximum, lookup, or formula.
• Change your specification of which input values create database items.
• Change the reporting name. However, the database items created for the element continue to use the original
name.
• Delete elements that are in In Progress status.
For existing elements you can now make updates to these attributes in the correction mode if the element meets the
specified criteria rules for the attribute.
• Allow multiple entries in same period
• Latest Entry Date
• Output Currency
• Process once per period
Let's assume you correct the Allow multiple entries in same period attribute, all date effective records would get
updated with the change.
Example:
An element has these two date-effective records:
• 01-Jan-2010 to 31-Dec-2017
• 01-Jan-2018 to 31-Dec-4712
And for that element, the value of Allow multiple entries in same period option is N. Effective 15-Jun-2018, you
change the value of this option from N to Y. Then, as the figure shows, the application updates both the records with
the value Y.
852

Oracle Fusion Cloud HCM
Using Common Features for HCM
Chapter 38
Payroll Elements
Allow Multiple Entries
Edit the Allow multiple entries in same period option from N to Y even if element entries and run results exist for that
element.
However, you can't edit this option in these scenarios:
• If the element is target of Stop Entry rules.
• If the value of the Standard Link option is Y.
• If the element is a target of indirect formula result rules.
As this figure shows, you can't change the value from Y to N. This is because such an action invalidates the existing
entries and possibly could impact retroactive processing.
Termination Rule
You can update the termination rule of an element even if element entries or run results exists for that element. Such
updates don't affect the existing element entries, but impact only new element entries.
In the Latest Entry Date field, you can change a lower element definition date to a higher element definition date.
However, you can't change a higher element definition date to a lower element definition date.
853

Oracle Fusion Cloud HCM
Using Common Features for HCM
Chapter 38
Payroll Elements
This change isn't applicable to time definitions that you define.
Output Currency
The output currency for an element is defaulted based on the currency defined for the legislative data group. You can
update the Output Currency field to a required currency under these circumstances.
• If it's a newly created element
• There isn't element eligibility for that element
• No balances exist for this element
Note: If you calculate statutory deductions such as tax, you should not change the element output currency. All
predefined tax calculations are performed using the currency of the legislative data group. All reports including
payslips are also generated using the currency of the legislative data group.
Your company may have a requirement to change the element output currency for payroll calculations that don't include
legislative taxes. For example, a British national who works in the USA might be paid on an expat payroll which isn't
subject to US taxes.
Process Once Per Period
Use the Process once per period option to check if the element entry has been processed or not.
As this figure shows, modify this field both from Y to N and N to Y even if element entries or run results exists.
If the value of the option is Y and the element entry is already processed in the period, then the application doesn't
process it again.
If the value of the option is N, then the application processes the element entry even if it's already processed in the run.
As this figure shows, depending upon the value of the option, the application processes the element entry.
854

Oracle Fusion Cloud HCM
Using Common Features for HCM
Chapter 38
Payroll Elements
Search for Elements Using the Element Code
You can now search and view elements using the element code.
• Use the Add Fields option in the Advanced Search region to search the element using element code.
• Select View > Columns > Element Code to view the element code attribute with other element details.
• The element code attribute is displayed under the Element Name attribute in the Element Summary page.
Delete In Progress Status Elements
On the Element Search page, you can delete those elements that are in the In Progress status. However, you can delete
only those elements for which the corresponding ESS element creation process has failed .
Related Topics
•
Payroll Element Input Values
Element Eligibility
Payroll Element Eligibility
Use element eligibility to determine which people are eligible for an element. To determine eligibility, you select the
criteria that people must receive entries of the element.
In these examples, you restrict who can receive an element entry:
• Your enterprise provides company cars only to people in the sales or customer support departments. You
create two eligibility records, and use the Department field to specify the eligibility criteria. Select Sales
Department for one record and Customer Support for the second record.
• Your enterprise offers a production bonus to people who work full-time in production and are on the weekly
payroll. You create one eligibility record and select Full-time regular in the Employment Category field,
Production in the Department field, and Weekly in the Payroll field.
855

Oracle Fusion Cloud HCM
Using Common Features for HCM
Chapter 38
Payroll Elements
Eligibility Criteria
You can define element eligibility using these criteria.
Level Available Criteria
Payroll Relationship
Payroll Statutory Unit
Relationship Type
Items
Assignment
Legal Employer
Department in which the person works
Job, for example, associate professor or secretary
Grade
Employment Category
People Group
Legal Employer
Department, same as in Items
Job, same as in Items
Grade
Employment Category
People Group: To set up logical entity specific people group, on the Create Element Eligibility page,
select the required values in these options:
• Legal Employer
• People Group
If you don't select a legal entity as a criteria, then the application looks for the people group associated
at the enterprise level.
By default, the enterprise level people group is available.
Note:
You set up all the people groups that are appropriate for your enterprise. For example, you could
decide to group people by company within a multi-company enterprise, and by union membership.
Location of person's office
Position, which is a class of job performed in a particular organization, for example, associate professor
of chemistry, or finance department secretary.
Payroll
All payrolls eligible
856

Oracle Fusion Cloud HCM
Using Common Features for HCM
Chapter 38
Payroll Elements
Level Available Criteria
Note:
You're advised to define eligibility rules based on the payroll criteria for all assignment elements
such as salary. Select the 'All Payroll Eligible' option if your company doesn't have eligibility rules
based on an employee's payroll. The 'All Payroll Eligible' option ensures all employees who are
assigned to a payroll will be eligible for the element.
Bargaining Unit
Collective Agreement
Union Member
Tip: You must define element eligibility for every element, including predefined elements. You are advised to define
eligibility rules based on the payroll criteria for all assignment level elements. It is also common practice for payroll
customers to define costing rules on the element eligibility record. Additional eligibility rules can be defined for
compensation and benefit elements using eligibility profiles.
Multiple Rules of Eligibility
You can define more than one eligibility record for each element, but there must be no overlap between them.
For example, you can create one record for the combination of grade A and the job of accountant. However, you can't
create one record for grade A and a second for the job of accountant. These rules would imply that an accountant on
grade A is eligible for the same element twice.
If you have more than one element eligibility record, you can enter different default values and costing information for
each eligibility group.
Related Topics
•
Maintain Element Eligibility
Add Eligibility Rules for Predefined Elements
If the country extension on the Manage Features by Country or Territory page is set to Payroll or Payroll Interface, you
must add element eligibility records for predefined statutory deduction elements before you hire any workers.
Here's how you can search for the predefined elements:
1. Go to the Elements task.
2. Click Go to Task.
3. Search for these predefined elements:
Country or Territory Predefined Element
US, Canada, Mexico
US Taxation, CA Taxation, MX Taxation
Australia, India, Singapore Statutory Deductions
857

Oracle Fusion Cloud HCM
Using Common Features for HCM
Chapter 38
Payroll Elements
Country or Territory Predefined Element
Kuwait, Saudi Arabia, United Arab
Emirates, Bahrain, Qatar and Oman
Social Insurance
Gratuity
GOSI
China
Aggregation Information
UK
Tax and NI
Pensions Automatic Enrollment
Netherlands
Tax and Social Insurance Calculations
France
French Payroll Processing
Note: There are no predefined elements that require eligibility rules for Germany, Ireland, Switzerland, or Hong Kong.
Here's how you can add eligibility rules:
1. Click the element name to open the Element Summary page.
2. Enter a date in the Effective As-of Date field.
Use the start date of the element, which is 1/1/1901.
3. Enter a name for the eligibility rule and click Submit. Since you haven't selected any eligibility criteria, all
employees are eligible for the element.
4. Click Done.
Maintain Element Eligibility
After saving an element eligibility record, you can only make certain changes. You can't update the eligibility criteria.
This table summarizes the actions you can take.
Action What's The Result
Change the input value default values and
validation
These changes affect all new entries, and updates to existing entries. Changes to runtime defaults
affect existing entries too.
Delete the element eligibility record
The application automatically ends all existing recurring entries when you end the element's eligibility.
858

Oracle Fusion Cloud HCM
Using Common Features for HCM
Chapter 38
Payroll Elements
Action What's The Result
Note:
You can't delete the element eligibility record if any nonrecurring entries exist at the date you want
to end the record. You must delete existing entries before you end the element's eligibility.
Related Topics
•
Payroll Element Eligibility
Using Element Templates
Define Payroll Elements for an Absence Accrual Plan
This example shows how to define an absence element for a vacation accrual absence plan. Based on your setup
decisions, this procedure configures these additional elements.
• Accrual element to process absence liability amounts
• Entitlement element to process payments for absence during vacation
• Discretionary Disbursement element to process disbursement of partial time accruals
• Final Disbursement element to process accrual disbursement when the absence plan enrollment ends
The name of the element is prefixed to each additional element.
This table summarizes key decisions for this scenario.
Decisions to Consider In This Example
What type of an absence are you
transferring to payroll?
Accrual balances
Who's eligible to receive this element?
All workers
What units do you want to use for
reporting calculations?
Days
Do you want the element to calculate
absence liability?
Yes
Which rate should the calculate absence
liability use?
Liability Rate
Does your absence plan enable balance
payments when enrollment ends?
Yes
859

Oracle Fusion Cloud HCM
Using Common Features for HCM
Chapter 38
Payroll Elements
Decisions to Consider In This Example
Which rate should the final disbursement
payment use?
Final Disbursement Rate
Does your absence plan enable payment
of partial accrual balances?
Yes
Which rate should the partial
disbursement payment use?
Partial Disbursement Rate
How do you want to calculate deductions
for paid absences for employees not
requiring a time card?
• Reduce regular earnings by the
amount of the absence payment
so that the worker doesn't get paid
twice?
• Select a rate to determine the
absence deduction amount?
Reduce regular earnings by absence payment
Before You Begin
Ensure that you configured a rate definition to determine the monetary value of a unit of absence. And depending on
your enterprise separate rates to calculate liability, discretionary disbursement, and final disbursement payments. You
configure a rate definition using the Rate Definitions task.
Define an Absence Element
1. On the Elements page, click Create.
2. In the Create Element window, complete the fields as shown in this table.
Field Value
Legislative Data Group
Select your legislative data group.
Primary Classification
Absences
Secondary Classification
Select an appropriate value for your legislation, such as Vacation.
3. Click Continue.
4. On the Create Element: Basic Information page, enter Vacation Payment in the Name and Reporting Name
fields.
860

Oracle Fusion Cloud HCM
Using Common Features for HCM
Chapter 38
Payroll Elements
5. In the Absence Plan Details section, complete the fields as shown in this table. Use default values for fields
unless the steps specify other values.
Field Value
What calculation units are used for
reporting?
Days
Work Units Conversion Rule
Standard Rate Daily
What type of absence information do
you want transferred to payroll?
Accrual Balances and Absences
6. Click Next.
7. On the Create Elements: Additional Details page, in the Accrual Liability and Balance Payments section,
complete the fields as shown in this table. Use default values for fields unless the steps specify other values.
Field Value
Calculate absence liability?
Yes
Which rate should the liability
balance calculation use?
Liability rate.
Does this plan enable balance
payments when enrollment ends?
Yes
Which rate should the final balance
payment calculation use?
Final disbursement rate.
How do you want Payout Amount to
be taxed?
Supplemental
Absence Payout Process Mode
Process and pay with other earnings
Does this plan enable partial
payments of absences?
Yes
Which rate should the discretionary
disbursement use?
Discretionary disbursement rate.
861

Oracle Fusion Cloud HCM
Using Common Features for HCM
Chapter 38
Payroll Elements
Field Value
How do you want Cash out amount to
be taxed?
Regular
8. On the Create Elements: Additional Details page, in the Absence Payments section, complete the fields as
shown in this table. Use default values for fields unless the steps specify other values. For the purposes of this
worked example, all fields are being entered, however, only required fields must be entered and others may be
blank.
Field Value
How do you want to reduce earnings
for employees not requiring a time
card?
Reduce regular earnings by absence payment.
Which rate should the absence
payment calculation use?
Absence payment.
9. Click Next.
10. On the Create Element: Review page, review the information that you entered so far.
11. Click Submit to open the Element Summary page.
The template generates all the related elements, balances, and formulas.
Defining Element Eligibility
1. In the Element Overview section of the Element Summary page, click the Element Eligibility node.
2. Click Create Element Eligibility from the Actions menu.
3. In the Element Eligibility section, enter Vacation Payment Open in the Element Eligibility Name text box.
Leave the rest of the fields on the page blank.
4. Click Submit.
5. Click Done.
6. On the Elements page, search for the other elements prefixed with your absence element name.
7. Select each element in turn and repeat the steps on the Element Summary page to define eligibility for each
element.
Define Payroll Elements to Process Absences
You define elements to calculate and process absence payments in Oracle cloud. When you define an absence element,
your responses to the element template questions determine which elements, balances, formulas, and calculation
components the template generates.
Defining an absence element involves these steps:
• Define an absence element
862

Oracle Fusion Cloud HCM
Using Common Features for HCM
Chapter 38
Payroll Elements
• Complete absence detail questions
• Complete accrual liability and balance payment questions
• Complete absence payment questions
• Submit the element
• Define element eligibility records and cost distributions
Define an Absence Element
Use the Elements task to define an absence element, selecting a primary classification of Absence, and a secondary
classification. Typically, the predefined values include vacation, maternity, and sickness.
Complete Absence Detail Questions
The questions you complete in the Absence Details section determine which subsequent questions the template
displays. You enter this information in the Absence Details section:
1. Specify the calculation units to use when reporting the absence, for example that's shown on the payslip, and
statement of earnings. Typically, you select Days or Hours for your reports that correspond to the units for your
absence plan. When creating an absence element, select the work calculation rule to calculate the absence rate.
2. Select the absence information to transfer to payroll based on the type of absence management plan.
Absence Management Plan Type Absence Information to Transfer
Accrual
Accrual Balances
Accrual, Leave Donation,
Compensatory
Accrual Balances and Absences
Qualification
Qualification Absences
No Entitlement
No Entitlement Absences
Complete Accrual Liability and Balance Payment Questions
If you transfer accrual balances, complete these questions.
Question Steps
Calculate absence liability?
1. Select Yes, if you calculate liability.
2. Select a liability rate.
Usually the rate is the same as the absence payment rate. You might select a different rate when
estimating liability for billing purposes.
Does this plan enable balance payments
when enrollment ends?
1. Select Yes to configure a final disbursement element and to maintain balances for the
disbursement hours and payments.
2. Optionally, select a rate to use for the calculation.
863

Oracle Fusion Cloud HCM
Using Common Features for HCM
Chapter 38
Payroll Elements
Question Steps
Does this plan enable partial payment of
balance?
1. Select Yes to configure a discretionary disbursement element and to maintain balances for
disbursement hours and payments.
2. Optionally, select a rate to use for the calculation.
Complete Absence Payment Questions
Complete these questions:
1. Select a method to reduce regular earnings if employees don't complete a time card.:
◦
Reduce regular earnings by absence payment (entitlement payment balance)
◦
Select rate to determine absence deduction amount (entitlement deduction balance)
You might select one of these options:
- The Reduce regular earnings option to reduce regular earnings by the absence payment. This
means that the employee is paid the same net amount as if they weren't absent.
- The Select rate to determine deduction amount option when the employee isn't due to be paid
for the absence at the same rate as their regular earnings. In this case, the absence deduction rate
that you select will be a rate that deducts 100% of the regular earnings. However, the absence
payment rate would be a different rate, for example 50%.
2. Optionally, select a rate to calculate the absence payment.
If you have standard earnings and absence elements in the same payroll run that reduce regular earnings, the
payroll calculation reduces earnings in this sequence:
a. Using absence element entries
b. Using any standard earnings elements that reduce regular earnings
The salary balance isn't reduced beyond zero.
3. You can now ensure that absence entitlement payments are made to employees after terminations. Use the
Does this plan enable entitlement payments after termination? question on the absence element template
to set the entitlement element to Final Close.
Example: Amelia is due to be paid maternity payments after her termination. Select Yes in this question to set
the latest entry date of the entitlement elements to final close. With this, the absence entitlement payments are
made to Amelia after her termination. When Amelia is terminated, change her employment assignment status
to Process When Earning. Also, set the TERM_INCLUDE_PR_LEVEL action parameter to Y, so that payroll
relationship level entries are considered for processing.
Submit the Element
When you submit the element, the template automatically configures a base pay element, balances, formulas, and
calculation components.
The template also configures additional elements, depending on the options selected in the template to transfer
absence information, as shown in this table.
864

Oracle Fusion Cloud HCM
Using Common Features for HCM
Chapter 38
Payroll Elements
Type of Absence Information to Transfer Optional Balance Payments Selected Additional Elements Configured
Accrual Balances
• Discretionary Disbursements
• Final Disbursements
• Accrual
• Discretionary Disbursement
• Final Disbursement
Accrual Balances and Absences
• Discretionary Disbursements
• Final Disbursements
• Accrual
• Entitlement
• Discretionary Disbursement
• Final Disbursement
Qualification Absences
none
Entitlement
No Entitlement Absences
none
Entitlement
Define Element Eligibility Records and Cost Distributions
Define element eligibility records for all elements generated by the template, for example for your accrual, entitlement,
discretionary and final disbursement elements.
If your enterprise calculates cost distributions, specify costing for all the element eligibility records. For example, for an
accrual element, you do these steps
1. Define element eligibility records for the accrual, accrual results, accrual retroactive, and accrual retroactive
results elements.
2. Specify costing for the accrual results and retroactive results elements.
The costing process costs the change in the liability balance since the last payroll period, debits the expense account
and credits the liability account.
Related Topics
•
Define Elements, Balances, and Formulas
•
How Payroll Elements Hold Information for Multiple Features
•
Rates Used to Calculate Absences in Payroll
•
Element Costing Options
•
Import Absence Entries to Payroll
Define Payroll Elements for an Absence Accrual Plan
This example shows how to define an absence element for a vacation accrual absence plan. Based on your setup
decisions, this procedure configures these additional elements.
• Accrual element to process absence liability amounts
• Entitlement element to process payments for absence during vacation
• Discretionary Disbursement element to process disbursement of partial time accruals
865

Oracle Fusion Cloud HCM
Using Common Features for HCM
Chapter 38
Payroll Elements
• Final Disbursement element to process accrual disbursement when the absence plan enrollment ends
The name of the element is prefixed to each additional element.
This table summarizes key decisions for this scenario.
Decisions to Consider In This Example
What type of an absence are you
transferring to payroll?
Accrual balances
Who's eligible to receive this element?
All workers
What units do you want to use for
reporting calculations?
Days
Do you want the element to calculate
absence liability?
Yes
Which rate should the calculate absence
liability use?
Liability Rate
Does your absence plan enable balance
payments when enrollment ends?
Yes
Which rate should the final disbursement
payment use?
Final Disbursement Rate
Does your absence plan enable payment
of partial accrual balances?
Yes
Which rate should the partial
disbursement payment use?
Partial Disbursement Rate
How do you want to calculate deductions
for paid absences for employees not
requiring a time card?
• Reduce regular earnings by the
amount of the absence payment
so that the worker doesn't get paid
twice?
• Select a rate to determine the
absence deduction amount?
Reduce regular earnings by absence payment
Before You Begin
Ensure that you configured a rate definition to determine the monetary value of a unit of absence. And depending on
your enterprise separate rates to calculate liability, discretionary disbursement, and final disbursement payments. You
configure a rate definition using the Rate Definitions task.
866
Oracle Fusion Cloud HCM
Using Common Features for HCM
Chapter 38
Payroll Elements
Define an Absence Element
1. On the Elements page, click Create.
2. In the Create Element window, complete the fields as shown in this table.
Field Value
Legislative Data Group
Select your legislative data group.
Primary Classification
Absences
Secondary Classification
Select an appropriate value for your legislation, such as Vacation.
3. Click Continue.
4. On the Create Element: Basic Information page, enter Vacation Payment in the Name and Reporting Name
fields.
5. In the Absence Plan Details section, complete the fields as shown in this table. Use default values for fields
unless the steps specify other values.
Field Value
What calculation units are used for
reporting?
Days
Work Units Conversion Rule
Standard Rate Daily
What type of absence information do
you want transferred to payroll?
Accrual Balances and Absences
6. Click Next.
7. On the Create Elements: Additional Details page, in the Accrual Liability and Balance Payments section,
complete the fields as shown in this table. Use default values for fields unless the steps specify other values.
Field Value
Calculate absence liability?
Yes
Which rate should the liability
balance calculation use?
Liability rate.
Does this plan enable balance
payments when enrollment ends?
Yes
867

Oracle Fusion Cloud HCM
Using Common Features for HCM
Chapter 38
Payroll Elements
Field Value
Which rate should the final balance
payment calculation use?
Final disbursement rate.
How do you want Payout Amount to
be taxed?
Supplemental
Absence Payout Process Mode
Process and pay with other earnings
Does this plan enable partial
payments of absences?
Yes
Which rate should the discretionary
disbursement use?
Discretionary disbursement rate.
How do you want Cash out amount to
be taxed?
Regular
8. On the Create Elements: Additional Details page, in the Absence Payments section, complete the fields as
shown in this table. Use default values for fields unless the steps specify other values. For the purposes of this
worked example, all fields are being entered, however, only required fields must be entered and others may be
blank.
Field Value
How do you want to reduce earnings
for employees not requiring a time
card?
Reduce regular earnings by absence payment.
Which rate should the absence
payment calculation use?
Absence payment.
9. Click Next.
10. On the Create Element: Review page, review the information that you entered so far.
11. Click Submit to open the Element Summary page.
The template generates all the related elements, balances, and formulas.
Defining Element Eligibility
1. In the Element Overview section of the Element Summary page, click the Element Eligibility node.
2. Click Create Element Eligibility from the Actions menu.
868

Oracle Fusion Cloud HCM
Using Common Features for HCM
Chapter 38
Payroll Elements
3. In the Element Eligibility section, enter Vacation Payment Open in the Element Eligibility Name text box.
Leave the rest of the fields on the page blank.
4. Click Submit.
5. Click Done.
6. On the Elements page, search for the other elements prefixed with your absence element name.
7. Select each element in turn and repeat the steps on the Element Summary page to define eligibility for each
element.
Payroll Elements for Time Card Attributes
To process pay according to time card entries, such as regular and overtime, you can create elements with the Time
Card category.
Time card elements support hours-based and units-based quantities. You use the hours-based quantifies to assign
people a flat payment amount through associated rates. For example, you pay people a meal allowance according to
the number of meals they take daily. The related payroll elements, balances, formulas, and calculation components are
automatically generated when you create a time card element.
Time cards with retroactive changes include the Expedite to payroll option that lets managers transfer the changes for
expedited processing and payment.
Create Time Card Elements for Time Entries
Time card elements support hours-based and units-based quantities. You use the hours-based quantifies to assign
people a flat payment amount through associated rates. For example, you pay people a meal allowance according to the
number of meals they take daily.
When you create a time card element, you also create the related payroll elements, balances, formulas, and calculation
components.
Tip: If people report regular and straight time portions of overtime separately, create two elements, such as Overtime
and Overtime Premium. If they report the portions together, you might use straight time instead of regular time, and
create a separate element for the overtime premium.
1. Create the payroll element.
a. In the Setup and Maintenance work area, click the Elements task.
- Offering: Workforce Deployment
- Functional Area: Elements and Formulas
b. On the Elements page, click the Create icon.
c. On the Create Element dialog box, complete these steps:
i. Select the legislative data group, such as FR LDG, Hong Kong LDG, or US LDG.
ii. Select the primary classification, such as Regular Earnings or Earnings.
iii. When available, select the secondary classification.
iv. Select the Time Card category.
v. Click Continue.
869

Oracle Fusion Cloud HCM
Using Common Features for HCM
Chapter 38
Payroll Elements
2. On the Create Element: Basic Information page, complete these steps:
a. Enter a descriptive name, such as Regular, Straight Time, Overtime, or Shift Pay.
b. Enter the name that you want to display on reports containing this payroll element.
c. Select the effective date January 1, 1951. The early date ensures that the element attributes are
immediately available to use with shifts, time cards, web clock, and time collection devices.
d. Click Next to accept the remaining default values.
3. On the Create Element: Additional Details page, complete these steps:
a. Select Days, Hours, or Other Units as the calculation units for reporting.
b. Select the Work Units conversion rule. For the calculation used by each conversion rule, see Conversion Rule
Options for Configuring Additional Details of Payroll Elements.
c. Click Next to accept the remaining default values.
4. On the Create Element: Review page, complete these steps:
a. Review the element configuration to ensure that everything is correct.
b. Click Submit to create the element and automatically generate all the related elements, balances, formulas,
and calculation components.
By default, the Time Card category elements already have the appropriate value definition configurations required to
support location overrides. You don't have to make any edits.
5. On the Element Summary page, configure element eligibility by completing these steps:
a. In the Elements Overview section, select Element Eligibility.
b. On the Actions menu, select Create Element Eligibility.
c. In the Information section, enter an element eligibility name with a suffix that identifies the criteria. For
example, for the regular element with open eligibility--no selected criteria--the name would be Regular
Open.
d. Select the eligibility criteria. To leave eligibility open on the element and control it with HCM groups and
time processing profiles, skip this step.
e. Click Done.
6. Configure element eligibility for each of the related elements, which share the same name as this element and have
suffixes. Suffixes include Earnings Calculator, Earnings Distributor, Earnings Results, Retro, and Retro Results.
a. On the Manage Elements page, search for the element that you just created.
b. Click the related element name.
c. On the element summary page, complete these steps:
i. In the Elements Overview section, select Element Eligibility.
ii. On the Actions menu, select Create Element Eligibility.
iii. In the Information section, configure the same eligibility criteria as the original element.
iv. Click Submit.
v. Click Done.
Related Topics
•
Process Time Entries in Payroll
•
Time Card Required Option
•
Create the Units-Based Meals Taken Element for Time Entries
•
Time Card Updates to Payroll
870

Oracle Fusion Cloud HCM
Using Common Features for HCM
Chapter 38
Payroll Elements
Generate Time Attributes and Time Card Fields for Your Elements
After you create or edit earnings elements for time entries, such as Regular, Overtime, and Shift Pay, you generate time
attributes for the data dictionary. Optionally, you can also generate time card fields for them.
Complete the processes in this table using the Time and Labor functional area in the Setup and Maintenance work area,
Workforce Deployment offering.
Step Process Description Comments
1 Generate Data Dictionary Time
Attributes, required
Creates dependent payroll
attributes for all element input
values, such as hours and rate
You must run the Generate Data
Dictionary Time Attributes process
after making any changes to time
elements. Such changes include
adding or deleting elements,
editing input values, or editing
element eligibility records.
CAUTION: Failure to run the
process might negatively affect
the setup of fields, validation of
payroll time types, or transfers
of time data to payroll.
2 Generate Time Card Fields,
optional
Creates time card fields using time
attributes from the data dictionary
for the specified legislative data
group
Instead of running this process,
use the Time Entry Layout
Components task to create time
card fields and web clock buttons.
If you’re using a third-party time provider, create an HCM extract for the time entry elements. The extract includes the
element mapping ID that you specify in the XML file when you transfer the time entries to payroll.
Related Topics
•
Time Attributes
•
How Time Entry Profile Components Work Together
Set Up Overrides
You can override the default value or formula for a specific group of employees identified by an element eligibility
record. Override the default value for specific employees on their element entries.
Set Up Area Overrides
Some countries or territories create time card elements with area input values for use as overrides. The overrides enable
employers to tax employees based on where they work. For example, employees specify the area information where
871

Oracle Fusion Cloud HCM
Using Common Features for HCM
Chapter 38
Payroll Elements
they worked on temporary assignment while away from their normal work location. These area entries are then included
in the time card records transferred to payroll by the Load Time Card Batches process.
Set Up Costing Overrides
You can specify additional attributes in Time and Labor to enter costing segment values on time cards. The segments
must match the segments that you can enter on element entries. Use the Element Entries task to search a person's
record. View the available segments on the Costing tab of the Person Details page. Costing is defined on the element
eligibility record of the results element. When you transfer time entries, the transfer process displays the costing on the
calculation element.
As an example, the structure of your cost allocation key flexfield might specify that the department segment is entered
at the element entry level. You could specify this additional attribute on the time card. Your employees can then specify
the department to charge for overtime hours worked while on loan to a different department. After you transfer the
time entries, the payroll calculation uses the department specified for the overtime hours to derive the costing results.
To view the results of the costing overrides transferred to payroll, perform these steps:
1. On the Home page, click the Process Results Summary quick action under the My Client Groups tab.
2. You can find a list of payrolls which have been processed on the View Person Process Results page. Select the
correct payroll before you search for a person, then select a person on this page.
3. Click the down arrow in the Process Results tab.
4. Go into that person's statement of earnings.
5. Select Costing Results.
Related Topics
•
Process Time Entries in Payroll
•
Time Card Required Option
Enable Automatic, Multiple, or Additional Element Entries Options
You can select one of these options for an element to define how you can update its element entries:
• Automatic entry
• Allow multiple entries in same period
Automatic Entry
When you create an element, you can select Yes for the question: Should every person eligible for the element
automatically receive it? This setting selects the Automatic entry option by default for all eligibility records you create
for that element. However, you can override the selection for any specific eligibility record before you save it.
When you select this option, saving the eligibility record initiates a payroll flow to create element entries for all eligible
workers. To monitor this flow, you do these tasks:
• View the progress of the process in the Automatic Entry Status field. If the status shows that an error
occurred, you can save the eligibility record again to resubmit the flow.
• Monitor the progress of the Generate Automatic Element Entries flow on the Processes and Reports tab.
872

Oracle Fusion Cloud HCM
Using Common Features for HCM
Chapter 38
Payroll Elements
Any updates to the employment records of eligible workers, including hires and terminations, automatically update,
create, or end the element entries, as appropriate.
Tip: If you select the Automatic entry option, you can't also select Allow multiple entries in same period.
Allow Multiple Entries in Same Period
This option enables you to give a person more than one entry of the element in the same pay period. Let's consider the
scenario when you enter overtime hours on a weekly basis for a person that's paid monthly. In this case, you might need
to enter five entries on an overtime element in each period.
If you're creating a net-to-gross element, you must select Allow multiple entries in same period.
Note: An element with the Automatic entry option selected can't allow multiple entries in the same period.
Related Topics
•
Default Values for Element Entries
•
Element Entry Methods
•
Status of Flow Tasks
Options to Determine an Element's Latest Entry Date
An element's latest entry date determines how element entries process after a person is terminated or transferred to
another payroll.
The options include: final close, last standard earning date, and last standard process date. These are the predefined
options. You can create others that fit your business needs.
Final Close
Use this option to let the element stay open for entries beyond a person's last day worked. For example, you may want
the element to stay open to pay a severance package.
Last Standard Earning Date
Use this option to stop all element entries on the date the person leaves. You can use this option for recurring entries,
such as salary.
Tip: If you select the last standard earning date option, also select proration for the element. This ensures that the
element is processed up to this date, even if it isn't active at the end of a payroll period.
Last Standard Process Date
The application sets the value for the last standard process date to the last day of the pay period in which the person is
terminated. However, you can set it to a later period when you terminate the person. The application stops all element
entries on the last standard process date or on the date the assignment ends, if it's earlier.
873

Oracle Fusion Cloud HCM
Using Common Features for HCM
Chapter 38
Payroll Elements
Related Topics
•
Payroll Elements
•
How Element Setup Affects Entries and Their Values
Default Values for Element Entries
Specify default values for element entries using the Elements task. Your element setup controls when the default value
affects element entries.
You can apply the default value in any of these scenarios
• When you create an element entry
• At run time
• When you use a formula to define default values on one or more entry values
You can do these actions:
• Set a default value for an input value, or select a defaulting formula for the element.
• Override the default value or formula for a specific group of employees that an element eligibility record
identifies.
• Override the default value for specific employees on their element entries.
Define Default Values at Element Entry Creation
When you create or edit input values, you can specify a default value. If you don't select the Apply default at runtime
option, subsequent updates to the default value have no effect on existing element entries. Users can override or
change the default value at any time.
Define Default Values at Runtime
To use this method, enter the default value and select the Apply default at runtime option for the input value. If
the element entry value is left blank, the payroll process uses the current default value from the element or element
eligibility record. If you enter a value, the manual entry overrides the default value and updates to the default value don't
affect that entry. If you want to restore the default value, clear the entry.
Use a Formula to Provide Default Values
You can create a formula of type element input validation to provide default values for one or more entry values. Select
this formula in the Defaulting Formula field for an element or element eligibility record.
Here's the order of precedence:
1. A formula at the element eligibility level overrides a formula at the element level.
2. If you enter a default value for the input value and select a defaulting formula, the formula overrides the default
value.
874
Oracle Fusion Cloud HCM
Using Common Features for HCM
Chapter 38
Payroll Elements
Related Topics
•
Options to Determine an Element's Latest Entry Date
•
How Element Setup Affects Entries and Their Values
•
Element Input Validation Formula Type
Element Input Validation Formula Type
You can use an element input validation formula to validate one or more element entry values. You can also use this
formula type to provide a default value for an element entry value.
Additionally, you can calculate entry values based onthe user's entries in other entry values.
You select the formula on the Element Summary page in these fields:
Page Section Field Purpose When Does the Formula Run?
Element Details or Element
Eligibility
Validation Formula
Validates one or more entry values
for the element based on entries in
other entry values.
When you save the element entry.
Element Details or Element
Eligibility
Calculation Formula
Provides values for one or more
entry values using a calculation
formula that takes input from these
entry values or other entry values.
When you save the element entry.
Element Details or Element
Eligibility
Defaulting Formula
Provides default values for one or
more entry values.
When you create the element
entry.
Input Value
Validation Formula
Validates one entry value
independent of others.
When you enter a value.
Note: A formula at the element eligibility level always overrides an equivalent formula at the element level.
Here are the contexts that are available to all formulas of this type:
• LEGISLATIVE_DATA_GROUP_ID
• DATE_EARNED
• EFFECTIVE_DATE
These contexts are available to formulas only at element or element eligibility level; they aren’t available to validation
formulas at the input value level:
• PERSON_ID
• PAYROLL_RELATIONSHIP_ID
• PAYROLL_TERM_ID
• PAYROLL_ASSIGNMENT_ID
875

Oracle Fusion Cloud HCM
Using Common Features for HCM
Chapter 38
Payroll Elements
• HR_RELATIONSHIP_ID
• HR_TERM_ID
• HR_ASSIGNMENT_ID
Here are the input variables that are available to formulas of this type.
Formula Usage Input Variables Comments
Validation formula at input value level
entry_value
Passes the value to be validated. You must
declare the input variable as the appropriate
type for the element input value.
Validation formula at element or element
eligibility level
Any element input value name that
corresponds to an entry value.
Replace spaces in the input value name with
underscores in the input variable name.
It doesn't matter whether you use uppercase or
lowercase for the name.
Defaulting formula
None
Use database items or other logic instead.
Calculation formula
Any element input value name of an entry
value.
Replace spaces with underscores.
You need not provide all of the available entry
values.
Here are the return values that are available to formulas of this type.
Formula Usage Return Values Comments
Validation formula at any level.
formula_status
Must be either 'S' (success) or 'E' (error).
Required.
Validation formula at any level.
formula_message
The text of the message is passed to the user if
the validation fails. Optional.
Defaulting formula
Any element input value name of an entry
value.
A return value overrides any default value that’s
provided on the input value in the element or
element eligibility record.
Calculation formula
Any element input value name of an entry
value.
You don't need to return all of the available
entry values. You can return the entry values
that were passed as input variables or other
entry values.
Here are a few sample formula that you can use:
• Validation formula at input value level
• Validation formula at element or element eligibility level
• Calculation formula at element or element eligibility level
876

Oracle Fusion Cloud HCM
Using Common Features for HCM
Chapter 38
Payroll Elements
• Defaulting formula at element or element eligibility level
Validation formula at input value level:
inputs are entry_value(date)
if(entry_value = '01-APR-2008' (date)) then
(
formula_message = 'Valid date'
formula_status = 'S'
)
else(formula_message = 'Invalid date'
formula_status = 'E'
)
return formula_message, formula_status
Validation formula at element or element eligibility level:
inputs are hours_worked, rate, earning_date(date), comment(text)
if(hours_worked > 80) then
(
formula_message = 'You are within the working limit.
'formula_status = 'S'
)
else
(
formula_message = 'You have worked too many hours.
'formula_status = 'E'
)
return formula_message, formula_status
Calculation formula at element or element eligibility level:
inputs are hours_worked, rate, comment(text)
if(hours_worked > 80) then
(
rate = rate * 1.2
comment = 'Your rate has been increased'
)
return rate, comment
Defaulting formula at element or element eligibility level:
if(CATEGORY = 'S') then
(
rate = 20
)
else
(
rate = 30
)
rate_code = 'B'
return rate, rate_code
Use a Value Set for an Element Input Value
You can use value sets to provide a dynamic list of values for an element input value. Use a value set for lists containing
values that already exist in tables.
For example, person name or number, legislative data group, or payroll statutoryunit. The benefit of this approach is
that you don't have to create and maintain a lookup type. Using value sets helpsmaintain consistency and accuracy in
your data.
877

Oracle Fusion Cloud HCM
Using Common Features for HCM
Chapter 38
Payroll Elements
Note: The only type of value set supported for element input values is the table-based value set. Oracle Fusion Global
Payroll doesn't support other value set types, such as Independent or Format Only.
Use the Manage Value Sets task in the Setup and Maintenance work area.
Create value sets using the Manage Value Sets task. You select the Table validation type to define a value set that filters
values from an existing table using a SQL statement.
This table provides the required values that you enter when you create a value set for use on the Manage Elements
page.
Field Value
Module
Global Payroll
Validation Type
Table
Value Data Type
Character
Note: To enable the Value Set field on the Manage Elements page you must select Character as the Unit of Measure
for the input value.
To improve the performance of your value set queries, use these contexts to filter the value set records:
• PayrollRelationshipId
• PersonId
• PayrollTermId
• PayrollAssignmentId
• LegDataGroupId
• LegCode
• SysEffectiveDate
WHERE Clause example: pay_pay_relationships_dn.payroll_relationship_id = :{PARAMETER.PayrollRelationshipId}
Note: If you use these contexts in your value set SQL, make sure the WHERE clause parameter name matches the
context name.
In this example, an element contains input values for legislative data group and element name. The list of values for
element name is dependent on the selected legislative data group. As part of setup, you can select a default legislative
data group for the element, or for a specific element eligibility record.
In summary, here are the steps:
• Create a value set to return a list of all legislative data groups
• Create a value set that returns all elements in the legislative data group
• Add the value set codes to the Manage Elements page
878

Oracle Fusion Cloud HCM
Using Common Features for HCM
Chapter 38
Payroll Elements
Create a Value Set to Return a List of all Legislative Data Groups
1. From the Setup and Maintenance work area, search for and select the Manage Value Sets task.
2. Click Create.
3. Complete the fields, as shown in this table.
Field Value
Value Set Code
LDG_VS
Description
Retrieve Legislative Data Groups
Module
Global Payroll
Validation Type
Table
Value Data Type
Character
FROM Clause
PER_LEGISLATIVE_DATA_GROUPS_vl
Value Column Name
NAME
ID Column Name
LEGISLATIVE_DATA_GROUP_ID
WHERE Clause
business_group_id=202
Tip:
To avoid failure of the value set, use IDs instead of names in case the display name changes
in the future.
ORDER BY Clause
NAME
4. Click Save.
Create a Value Set that Returns all Elements in the Legislative Data Group
1. On the Manage Value Sets page, click Create.
879

Oracle Fusion Cloud HCM
Using Common Features for HCM
Chapter 38
Payroll Elements
2. Complete the fields, as shown in this table.
Field Value
Value Set Code
ELE_VS
Description
Elements
Module
Global Payroll
Validation Type
Table
Value Data Type
Character
FROM Clause
pay_element_types_f
Value Column Name
base_element_name
ID Column Name
element_type_id
WHERE Clause
LEGISLATIVE_DATA_GROUP_id=:{PARAMETER.LDG_IP}
Note:
LDG_IP is the input value name.
ORDER BY Clause
base_element_name
3. Click Save.
Add the Value Set Codes to the Elements Page
1. On the Home page, click the Elements quick action under the My Clients Groups tab.
2. Create a new element to meet your requirements and then click Submit.
3. When the Element Summary page displays, click the Input Values folder.
4. Click Actions and then select Create Input Values.
5. Enter the name LDG_IP and the display sequence for the input value.
6. Select Character as the Unit of Measure.
7. Enter LDG_VS in the Value Set field.
8. Go to the Default field and select a legislative data group.
9. Click Save.
10. Click Submit.
880

Oracle Fusion Cloud HCM
Using Common Features for HCM
Chapter 38
Payroll Elements
11. Repeat these steps to create an element input value using the ELE_VS value set.
You can override the default values on the Element Eligibility - Input Values page for a specific eligibility record.
FAQs for Manage Payroll Elements
What's the difference between a recurring and nonrecurring
element?
A recurring element has an entry that applies in every pay period until the entry ends.
A nonrecurring element has an entry that applies in one pay period only. It's only processed once per pay period. The
assigned payroll determines the dates of the person's pay period.
Note: A base pay element associated with a salary basis must be recurring.
What happens if I select the Closed for Entry option for an
element?
The Closed for Entry option prevents the creation of all new element entries for the element. However, it doesn't affect
any existing element entries.
CAUTION: When hiring, terminating, or updating assignments, this option prevents all element entry creation for the
element, including automatic entries.
Related Topics
•
Element Entry Methods
What happens if I manually enter a value in an element entry value
that has a runtime default value?
Any subsequent changes to the default value on the element or element eligibility record won't affect the element entry.
To clear your entry, you can restore the default value.
Related Topics
•
Default Values for Element Entries
881

Oracle Fusion Cloud HCM
Using Common Features for HCM
Chapter 38
Payroll Elements
882

Oracle Fusion Cloud HCM
Using Common Features for HCM
Chapter 39
Fast Formulas
39 Fast Formulas
Overview of Using Formulas
Oracle Fast Formula is a simple way to write formulas using English words and basic mathematical functions. You can
use information from your database in formulas without learning the database structure or a programming language.
Each formula usage summarized in this topic corresponds to one or more formula types, requiring specific formula
inputs and outputs.
The formulas delivered in Oracle HCM Cloud contain English language names, but you can write formulas in other
languages. You can provide formula names and descriptions in any language. Formula text isn't translated, but can
handle non-English user-defined elements, input values, or balances. For example, if you define an element name in
Chinese, the base element name is stored in Chinese. If you create a formula, it can have variable names or string values
in other languages and character sets like Chinese.
Calculate Payrolls
You can write payroll calculations and skip rules for elements to represent earnings and deductions.
You can do these tasks using fast formulas:
• Control the repetition of a payroll flow.
• Control when elements are processed in a payroll run.
• Define a set of people for payroll processing, data entry, or reporting.
• Validate one or more element entry values. Provide a default value for an element entry value, or calculate entry
values based on the user's entries in other entry values.
• Validate entries in user-defined tables.
• Proration formulas control how payroll runs prorate element entries when they encounter an event such as a
mid-period change in an element entry value.
• Associate more than one payroll formula with each element to perform different processing for employee
assignments with different statuses.
• Transformation formulas convert inbound data into a format that HCM Data Loader understands.
• Configure payment method preferences. For example, you can limit the number and types of payment
methods.
Benefits Administration
You can use formulas to structure your benefit plans. Formulas provide a flexible alternative to the delivered business
rules. Use formulas to configure:
• Date calculations, such as enrollment start and end dates, rate or coverage start and end dates, waiting periods
and enrollment periods, or action item due dates
• Calculations of rate and coverage amount, minimum and maximum, or upper and lower limits
• Certification requirements
883

Oracle Fusion Cloud HCM
Using Common Features for HCM
Chapter 39
Fast Formulas
• Partial month and proration calculations
• Eligibility and participation evaluation
For example, you can write a formula to calculate benefits eligibility for those cases where the provided eligibility
criterion doesn't accommodate your particular requirements.
Note: For more information, see Benefits Fast Formula Reference Guide (1456985.1) on My Oracle Support at https://
support.oracle.com.
Define Configuration for Compensation
Here's what you can modify using formulas and add flexibility to existing compensation plan configuration:
• Start and end dates for compensation allocations under individual compensation plans
• Person selection, hierarchy determination, column default values, and currency selection for workforce
compensation plans
• The source of items displayed in total compensation statements
Define Formulas to Create Rule Templates for Time and Labor
Use formulas with time repository rule templates to create rules. The formulas contain delivered combinations of
rule parameters and output results. You can use one formula with multiple rule templates by varying the template
configuration.
When creating a rule template, you select a formula name, and then configure the parameter type and display name of
the parameters and variables. You don't have to redo the entire formula statement to determine what details to change
to achieve a particular outcome.
Here's what you can use formulas to apply in Time and Labor:
• Logic for processing or calculating time
• Parameters that enable rules to pass values to the formula for use in calculations
• Output variables that the formula uses to return calculation results to the rules
For example, the Period Maximum Hours Template uses the WFM_PERIOD_MAXIMUM_TIME_ENTRY_RULE formula to
compare reported time category hours to defined maximum hours.
Note: For more information, see Time and Labor Fast Formula Reference Guide (1990057.1) on My Oracle Support at
https://support.oracle.com.
Example of Writing a Fast Formula Using Formula Text
In this example, you use the text editor to create a fast formula.
Here are the key decisions when deciding on which formula to create:
884

Oracle Fusion Cloud HCM
Using Common Features for HCM
Chapter 39
Fast Formulas
Key Decisions In This Example
Is the formula for a specific legislative data
group?
No, this is a global formula that can be used by any legislative data group.
Are there any contexts used in this
formula?
No
Are there any database item defaults?
Yes, PER_ASG_JOB_NAME
Are there any input value defaults?
No
What are the return values?
MIN_HOURS, MAX_HOURS, FREQUENCY
Creating a Fast Formula Using the Text Editor to Determine a Manager's
Scheduled Hours
1. Search for and select Fast Formulas in My Client Groups.
2. Click Create.
3. Complete these fields:
Fields for the Fast Formula Values for the Fast Formula
Formula Name
Manager Range of Scheduled Hours
Formula Type
Range of Scheduled Hours
Description
Manager's Range of Hours
Effective Start Date
1-Jan-2010
4. Click Continue.
5. Enter these formula details in the Formula Text section:
/* DATABASE ITEM DEFAULTS BEGIN */
DEFAULT FOR per_asg_job_name IS ' '
/* DATABASE ITEM DEFAULTS END */
JOB_1 = PER_ASG_JOB_NAME
IF JOB_1 = 'Manager' then
(MIN_HOURS = 25
MAX_HOURS = 40
FREQUENCY = 'H')
else
(MIN_HOURS = 20
MAX_HOURS = 35
FREQUENCY = 'H')
885

Oracle Fusion Cloud HCM
Using Common Features for HCM
Chapter 39
Fast Formulas
return MIN_HOURS, MAX_HOURS, FREQUENCY
6. Click Compile.
7. Click Save.
Example of Writing a Fast Formula Using Expression
Editor
In this example, you create a fast formula that groups executive workers for reporting and processing. All executive
workers are in department EXECT_10000.
After you create the formula, you need to add it to the object groupparameters, so that only the workers that belong to
the EXECT_10000 department are used in processing.
Here are the key decisions when deciding on which formula to create.
Key Decisions In This Example
Is the formula for a specific legislative data
group?
Yes, InVision
What is the formula type for this formula?
Payroll Relationship Group
Creating a Fast Formula Using the Expression Editor
1. On the Home page, click the Fast Formulas quick action under the My Client Groups tab.
2. Click Create.
3. Complete these fields:
Fields for Fast Formula Values for Fast Formula
Formula Name
Executive Payroll Relationship Group
Type
Payroll Relationship Group
Description
Executive Workers
Legislative Data Group
Vision LDG
Effective As-of Date
1-Jan-2010
Type of Editor Expression Builder
886

Oracle Fusion Cloud HCM
Using Common Features for HCM
Chapter 39
Fast Formulas
Fields for Fast Formula Values for Fast Formula
Note:
For more complex conditions to create a group, you can select Text. However, after you save
the formula, you can't change the type of editor.
4. Click Continue.
5. In the Formula Details section, click Add After to add a row and complete these fields:
Conjunction Database Item Name Data Type Operand Literal Value
None applicable
DEPARTMENT
Character
=
'EXECT_10000'
And
SELECT_EMP
Character
=
'YES'
6. Click Compile.
7. Click Save.
Formula Compilation Errors
Compilation errors are displayed in the Fast Formulas page after you compile the formula. The compiler stops the
compilation process when it encounters an error. Error messages display the line number and the type of error.
Common Compilation Errors
Here's some of the common formula compilation errors.
Formula Compilation Error Description
Syntax Error
The formula text violates the grammatical rules for the formula language. For example, if you use IF1
instead of IF in an IF statement.
Incorrect Statement Order
ALIAS, DEFAULT, or INPUT statements come after other statements.
Misuse of ASSIGNMENT Statement
Occurs when any of these conditions exist:
• An ASSIGNMENT assigns a value to a database item.
• A context is assigned a value externally to a CHANGE_CONTEXTS statement.
• The formula assigns a value to a non-context variable within a CHANGE_CONTEXTS statement.
You can use CHANGE_CONTEXTS statements in a formula.
887

Oracle Fusion Cloud HCM
Using Common Features for HCM
Chapter 39
Fast Formulas
Formula Compilation Error Description
Misuse of ALIAS Statement
You can use an ALIAS statement only for a database item.
Missing DEFAULT Statement
A database item that specifies a default value must have a DEFAULT statement.
Misuse of DEFAULT Statement
You specify a DEFAULT statement for a variable other than as an input or a database item.
Uninitialized Variable
The compiler detects that a variable is uninitialized when used. The compiler can't do this in all cases.
This error often occurs when the formula includes a database item that requires contexts that the
formula type doesn't support. The formula treats the database item as a local variable. For example,
balance database items require the PAYROLL_REL_ACTION_ID, PAYROLL_ASSIGNMENT_ID and CALC_
BREAKDOWN_ID contexts. Typically, you use these statements in formulas of type Oracle Payroll.
Missing Function Call
The compiler doesn't recognize a function call. The combination of return type, function name, and
parameter types doesn't match any available function.
Incorrect Operator Usage
An instance of a formula operator use doesn't match the permitted uses of that operator.
For example, the + operator has two permitted uses. The operands are both of data type NUMBER, or
both of data type TEXT.
Inconsistent Data Type Usage
The formula uses a formula variable of more than one data type. Or the formula uses a database item
or context with the wrong data type.
For example, Variable A is assigned a NUMBER value at the start of the formula, but is assigned a TEXT
value later in the formula.
EXIT Statement Not Within WHILE Loop
A condition that eventually becomes false or an EXIT call for exiting the loop doesn't exist.
Misuse of Context
The formula uses a variable as a context, or a context as a variable.
For example, a formula assigns a value to AREA1 as an ordinary variable, but later uses AREA1 as a
context in a GET_CONTEXT call.
Formula Execution Errors
Fast formula execution errors occur when a problem arises while a formula is running. Typically, data-related issues
cause these errors either in the formula or in the application database.
Formula Execution Errors
Here's some of the formula execution errors.
888

Oracle Fusion Cloud HCM
Using Common Features for HCM
Chapter 39
Fast Formulas
Formula Execution Error Description
Uninitialized Variable
When the formula compiler can't fully determine if a variable or context is initialized, it generates a
code to test if the variable is initialized.
When the formula runs, the code displays an error if the variable or context isn't initialized.
Divide by Zero
Raised when a numeric value is divided by zero.
No Data Found
Raised when a non-array type database item unexpectedly fails to return any data. If the database item
can't return data, then it should provide a default value.
You can specify a default value using a DEFAULT statement. An error in formula function code can also
cause this error message.
Too Many Rows
Raised when a non-array type database item unexpectedly returns more than a single row of data. The
cause is an incorrect assumption made about how the data is being accessed.
An error in the formula function code can also cause this error message.
NULL Data Found
Raised when a database item unexpectedly returns a NULL data value. If the database item can return a
NULL value, then it provides a default value.
Note:
Some database items can't return a NULL value. If the database items can return a NULL value, then
you can provide a default value for that database item.
Value Exceeded Allowable Range
Raised for a number of reasons, such as exceeding the maximum allowable length of a string.
Invalid Number
Raised when a formula attempts to convert a nonnumeric string to a number.
User Defined Function Error
Raised from within a formula function. The error message text is provided as part of the formula error
message.
External Function Call Error
A formula function returns an error, but doesn't provide any additional information to the formula
code. The function may have sent error information to the logging destination for the executing code.
Function Returned NULL Value
A formula function returns a NULL value.
Too Many Iterations
A single WHILE loop, or a combination of WHILE loops has exceeded the maximum number of
permitted iterations. This error is raised to terminate loops that can never end, which indicates a
programming error within the formula.
Array Data Value Not Set
The formula tries to access an array index that has no data value. This error occurs in the formula code.
Invalid Type Parameter for WSA_EXISTS
You specify an invalid data type in the WSA_EXISTS call.
Incorrect Data Type For Stored Item
When retrieving an item using WSA_GET, the actual data type doesn't match that of the stored item.
This error occurs within the calling formula.
889

Oracle Fusion Cloud HCM
Using Common Features for HCM
Chapter 39
Fast Formulas
Formula Execution Error Description
Called Formula Not Found
The called formula isn't found when attempting to call a formula from a formula. This error may occur
due to an issue in the calling formula, or because of installation issues.
Recursive Formula Call
An attempt was made to call a formula from itself. The call could be made directly or indirectly from
another called formula. Calling a formula in a recursive manner isn't permitted.
Input Data Has Different Types in Called
and Calling Formulas
When calling a formula from a formula, the input data type within the called formula doesn't match the
data type specified in the calling formula.
Output Has Different Types In Called and
Calling Formulas
When calling a formula from a formula, the output data type within the called formula doesn't match
the data type specified in the calling formula.
Too Many Formula Calls
When a formula calls another formula in its text, resulting in a hierarchy. The maximum depth of the
hierarchy is 10.
FAQs for Fast Formulas
When do I run the Compile Formula process?
When you create or update multiple fast formulas simultaneously, run the Compile Formula process on the Submit a
Process or Report page.
What's the difference between a formula compilation error and an
execution error?
Compilation errors occur on the Fast Formulas page when you compile the formula. An error message explains the
nature of the error.
Common compilation errors are syntax errors resulting from typing mistakes. You can view error messages on the
dashboard or go to the messages tab directly after the process is run.
Execution errors occur when a problem arises while a formula is running. Typically, data-related issues either in the
formula or in the application database cause these errors.
890

Oracle Fusion Cloud HCM
Using Common Features for HCM
Chapter 40
Rate Definitions
40 Rate Definitions
Overview of Rate Definitions
Use rate definitions to create rates such as salary rates, absence rates, time card rates, and other types of payroll rates.
Further, you can use a rate definition for different types of rate calculations. For example, use a salary rate definition to
display an employee's salary on the salary page. You can also use it to display the employee's salary rate on the time
card and to pay the employee's salary in Cloud Payroll.
Here are some rate types that you can create:
• Compensation rates, such as a base salary or car allowance rate.
• Rates based on a set of criteria and conditions. For example, a union rate that's based on the job and location of
an employee.
• Rates with multiple rate contributors, such as an overall salary rate, which is the sum of multiple salary
components.
• Rates derived on the grade of an employee, such as a base salary rate and payroll balance rates, such as
pension reporting rate.
• Rates calculated based on other rates. For example, a shift allowance rate that's calculated based on a
percentage of the employee's salary rate.
You can define minimum and maximum validation rules for your rate definition. For example, define a minimum rate
rule to ensure that an employee isn't paid less than the minimum hourly rate for their job.
When you create a rate definition, you can define a frequency for the rate returned by the calculation, such as 50,000
annually, or 7.25 hourly. Alternatively, you can define a rate that's calculated for a unit of work, such as a shift rate, or a
mileage rate. You can control if the application calculates the rate values live or retrieves it based on the results of the
Generate HCM Rates process. For example, it's a common practice for salary rates to be calculated live when you enter
the salary page for an employee.
As a cloud payroll user, you can calculate most rate calculations live in the payroll run. However, you'll need to perform
some complex rate calculations using the Generate HCM Rates process. In this scenario, Cloud Payroll retrieves the
stored rate value directly from the rates reporting table for an employee. You can use the rates generated by the
Generate HCM rates process for generating reports, such as pension reports.
Use the Rate Definitions task to define and manage rate definitions.
Categories
To create a new rate, select a category from this table.
Category What it Does
Derived Rate
Retrieves values from one or more payroll balances or other rate definitions, including rates that
retrieve element entry values. Use this option to create a rate that retrieves a value from one or more
rate contributors.
891
Oracle Fusion Cloud HCM
Using Common Features for HCM
Chapter 40
Rate Definitions
Category What it Does
Element
Retrieves rate information from an element input value. When using salary rates, use this type of rate
definition to create and update entries, such as create or update a salary element entry.
Select a storage type of Amount or Factor and then select the name of a corresponding element.
You can select one of these storage types:
• Amount: Retrieves a value from or posts to the element input value with a special purpose of
Primary Input Value. For example, 'Amount' is the primary input value for elements created with
the flat amount calculation rule, such as salary. If you associate a flat amount salary element with
a rate, the application retrieves or posts to the salary amount for an employee.
• Factor: Retrieves a value from or posts to the element input value with a special purpose of
Factor. The 'Factor' is the primary input value for elements created with the Factor calculation
rule.
Use this rate definition to apply the factor held on an element entry to a payroll balance. You can also
use it to apply it to another rate definition including base rates or an overall salary rate.
For example, the application calculates your company's car allowance rate based on a factor of salary.
The application captures the factor value, such as 0.05 at the employee level on their car allowance
element entry. When creating the car allowance rate definition, select your car allowance element to
enable the rate to retrieve the factor value for an employee.
In the rate contributor region, select your salary rate definition. This selection ensures that the
application calculates the car allowance rate based on a factor value of the employee's salary rate.
Note:
The element rate doesn't support the input value information that's held on Hours x Rate elements.
It's a common practice for the payment rate for this type of element to be based on a recurring flat
amount element, such as salary.
Note:
Salary rates supports Factor, but the payroll run doesn't. Use the Generate HCM Rates process to
calculate this type of rate. Also, you can use the process to retrieve the stored value in the payroll run
using the predefined CALL_CALC_VALUE formula.
Value by Criteria
Retrieves values from a single value by criteria definition. A value by criteria definition specifies one or
more evaluation conditions that determine a particular value or rate. You can specify the conditions as
a tree structure to define the evaluation sequence.
For example, you can define a value-by-criteria to capture car allowance and housing allowance values
based on an employee's job. Define a rate definition to retrieve car allowance rates and another rate
definition to retrieve housing allowance rates. Both rate definitions refer to the same value-by-criteria
and use the criteria of job to retrieve the appropriate rate values for an employee.
Grade Rate
Retrieves values based on an employee's grade details.
Formula
Retrieves values from a rate definition formula. The Generate HCM Rates process supports the
calculation of most formula-based rates. However, rates that include complex payroll formula contexts
or use balances calculated within the payroll run, are calculated by the payroll run.
Note: Formula rates are supported only in Global Payroll.
892

Oracle Fusion Cloud HCM
Using Common Features for HCM
Chapter 40
Rate Definitions
Related Topics
•
Options to Configure Rate Definitions
•
Rate Contributors for Derived Rates
•
Configure Elements Used by Rate Definitions
•
Overview of Values Defined by Criteria
•
Calculate Values Defined by Criteria
Options to Configure Rate Definitions
To configure rate definitions to get your desired rates, you should know how to use the various rate definition options.
For rates based on a single element entry value, you can also apply override and defaulting rules.
Note: Use the HCM Generate Rates process to calculate factor based element rates.
This table describes the fields that you can configure for the Derived Rate, Element, and Value by Criteria category
types.
Field Category Description
Storage Type
Element
If you select the Element category to define a
rate, you must select a storage type of Amount
or Percentage. For example, you can configure
a rate definition using the Salary element. If
the salary is held as a monetary value, select
Amount. If the salary is a factor of another
value, such as a balance, select Percentage.
Note:
This field is hidden for all rate definition
categories other than Element.
Element Name
Element
Derived Rate
For the Element category, the field is enabled
only when you select the storage type.
If you select the Element category to define a
rate, you must select an element name. This is
required if you're configuring a primary rate.
This is a rate that retrieves a value from a single
element, such as salary.
For the Derived Rate category, the field is
enabled when you access the page.
Employment Level
Derived Rate
Value by Criteria
Select either Payroll Relationship, Term,
or Assignment. This field is mandatory for
all derived rates and value by criteria rate
893

Oracle Fusion Cloud HCM
Using Common Features for HCM
Chapter 40
Rate Definitions
Field Category Description
definitions. It controls which employment ID the
rates process uses when calling a rate.
If the employee has multiple assignments,
the rates process uses the assignment ID to
identify the correct assignment record for the
employee.
Sometimes the contributor value is held at a
different level to the employment level defined
on the rate. In such cases, the rate process uses
the employment ID to locate the correct record.
Status
Element
Derived Rate
Value by Criteria
Set the status of a rate to active or inactive. You
can't assign an inactive rate to an employee.
Employees that are allocated a rate while it was
active aren't impacted by a change in status to
inactive.
Base Rate
Element
Select this option if the rate represents a base
rate that another rate uses in its calculation. For
example, you might have day shift employees
and night shift employees, with different base
pay rates.
If each set of employees receives an allowance
that's a percentage of the base rate, define one
allowance rate. And that rate is calculated based
on the two rates that have the Base Rate option
selected.
Overall Salary
Element
Derived Rate
If you're defining rates for use on the Salary
page, use the derived rate category and define
an Overall Salary. To do this, you must associate
a salary element to the rate. Define an Overall
Salary Information element for this purpose.
Reporting Required
Element
Derived Rate
Value by Criteria
Select this option to indicate if the calculated
rate value should be stored on the rate table for
reporting purposes.
If you're defining rates for use on the Salary
page, you must select this option.
Rate definitions with this option selected are
included when the Generate HCM Rates batch
process is run. Use this feature to report on
primary rates and not derived rates. HCM
extracts use this report to send data to third
parties.
Value by Criteria Name
Value by Criteria
If you select the Value by Criteria category
to define a rate, you must select a Value by
Criteria name. A value by criteria definition
specifies one or more evaluation conditions
that determine a particular value or rate.
894

Oracle Fusion Cloud HCM
Using Common Features for HCM
Chapter 40
Rate Definitions
Returned Rate Details
You can specify the periodicity of the returned rate, factor rules, currency, decimal display, rounding rules, and minimum
and maximum rules. If the process returns a rate that's outside the minimum and maximum range, you can do one of
these actions.
• Set up an action that enforces the rule, displays a warning
• Forces the user to fix the error
Select the Return FTE Rate check box to instruct the rate definition process to return a part-time value by applying an
employee's FTE to the rate value.
Periodicities
You must specify a periodicity, such as hourly or weekly, for the returned rate and each rate contributor. However, when
you use the rate in a formula, you can override the default periodicity.
The rate calculation converts each contributor to the periodicity specified on the rate contributor. It then adds or
subtracts the rate contributors, even if the periodicities are different. In most cases, they will be the same. Once the rate
contributors are summed up, the rate calculation then converts them into the return periodicity and currency.
For example, for a rate with a periodicity of weekly using the Standard Rate Annualized conversion formula, the rate
calculation does these actions.
1. Calculates an annual figure from the value and periodicity of each contributing earning and deduction.
2. Converts the annual figure into a weekly value.
By default, rates are converted using these predefined rate conversion formulas.
• Standard Rate Annualized
• Standard Rate Daily
• Standard Working Hours Rate Annualized
• Assignment Working Hours Rate Annualized
• Periodic Work Schedule Rate Annualized
If the values in the predefined conversion rules don't meet your requirements, you can define your own.
Factor Rules
You can apply a factor or multiplier to a calculated rate, or to an individual rate contributor. To apply a factor rule, do
these steps.
• Select Value as the factor rule.
• In the Factor field, enter the number by which you want to multiply the rate.
• Add the contributor.
You can apply a factor rule to the rate definition, rate contributors, or both. For example, you can define rate
contributors to calculate hourly values based on salary and bonus. You can then apply a factor of 1.0 or 100 percent
to the salary balance contributor and a factor of 0.5 or 50 percent to the bonus balance contributor. The factor rule is
applied to the rate before the periodicity conversion is applied.
895

Oracle Fusion Cloud HCM
Using Common Features for HCM
Chapter 40
Rate Definitions
Minimum and Maximum Values
You can define minimum and maximum values for the returned rate, and for individual rate contributors.
Use the Limit Violation Action field to display an error, warning, or enforce the application to use minimum or
maximum value that you enter. For example, you can enter 500 as the minimum value and then select Enforce Rules. If
the returned value comes back as 400, the application uses 500 as the value.
This table explains the options for the minimum and maximum rate values.
Value Comments
Null
No minimum or maximum value
A specified value
Example: 2000
Based on another rate
Uses the calculated value of the rate definition that you select.
Be careful that you don't create a loop. For example, Rate A has minimum value that's based on Rate B,
which has a minimum value based on Rate A. This situation would result in a runtime error.
Value by Criteria
Minimum or maximum value based on a value by criteria definition.
Override and Defaulting Rules
You can set override and default rules only if you select Element as the category when you define rate definitions. Set
up override rules for the element associated with your rate definition. If you select the Override Allowed check box, you
can enter rate values on the Salary page.
If an element input validation formula has been defined for the rate contributor input value, you can view it in the
Override and Defaulting Rules section.
Note: You can't define override and defaulting rules if you select the Values by Criteria category to define a rate. But
you can select a formula to validate any rate that's returned and also use formulas to create default values.
For example, you can use the HCM Rates Default Value formula type to define the number of workdays in a year for your
organization.
workday = 250
periodicity = YEAR
return workday, periodicity, currency
In addition, you can use a value by criteria definition as the default type. Here, the process uses the value for the first
record created and carries that value forward in subsequent records, unless it's manually overridden. The rate engine
reevaluates the rate that the value by criteria method creates for each subsequent record. So, this rate could change. For
example you could use a value by criteria definition to enable a default value of 10 percent for bonuses that are targeted
to all eligible employees.
896

Oracle Fusion Cloud HCM
Using Common Features for HCM
Chapter 40
Rate Definitions
Contributor Rules
You can specify the periodicity for the contributor total. To process contributor totals as full-time equivalency amounts,
select Yes in the Process Contributor Total as FTE Amount field. The final rate value is converted from this status to
the Return Rate FTE status.
Information
In this section, enter text that explains the purpose of the rate, how the rate is calculated, or provides further details for
the rate. This section isn't available for rate definitions using the Value by Criteria categories.
Related Topics
•
Rate Contributors for Derived Rates
•
Configure Elements Used by Rate Definitions
•
Configure Periodicity Conversion Rules
•
Element Input Validation Formula Type
Rate Contributors for Derived Rates
You can add four different types of rate contributors to your rate definitions. These rate contributes include, Balance,
Base Rate, Overall Salary, and Rate Definitions.
You can add rate contributors when you define a rate using the Derived Rate category. You can also manually add rate
contributors for the Element category when the storage type is Factor.
For example, if you define a bonus rate which is 0.1 (10 percent) of average earnings, then you do these steps.
• Enter 0.1 as the factor on the element.
• Define a rate contributor based on your average earnings balance.
Rate Contributor Types
This table lists the types of rate contributors, descriptions, and the additional fields that display for each type.
Type What it Contains Additional Fields
Balance
Value calculated by these payroll processes.
• An employee's average salary rate over
their last three months of salary payments
• Taxable earnings for the last tax year
• Commissions paid in the last quarter
Balance Name
Balance Dimension
Divisional Balance
Base Rate
Value from the employee's Base Rate
Employment Level
Overall Salary
Value from the employee's Overall Salary rate
Employment Level
897

Oracle Fusion Cloud HCM
Using Common Features for HCM
Chapter 40
Rate Definitions
Type What it Contains Additional Fields
Note:
Each overall salary element must be
associated with only one overall salary rate.
In addition, if the rate definition is an overall
salary rate, you can't select Overall Salary as
the Contributor Type.
Rate Definition
Other rate definitions that contribute to the rate
definition you're creating.
For example you can add regular salary, car
allowance, and bonus pay rate contributors
together to create an overall salary definition.
Rate Name
Reference Dates
You can select a reference date, which is the date the application uses to retrieve rate contributor information for the
rate calculation. The reference date specifies the context for the balance dimension.
For example, to retrieve a rate as of the actual start of an absence, select Absence Start Date. To retrieve a rate as of a
specific time period, select a specific time period.
The Reference Date field lists only these types of time definitions:
• Time Span - a period of time, such as three months
• Retrieval Date - a type of time definition that's based on a database item
Selecting a value for the Reference Date field is optional.
Note: If you don't select a reference date, the application uses the effective as-of date that's used by the rate engine
to calculate the rate.
Single or Multiple Rate Contributors
If the rate definition is based on multiple values, you may need to create multiple rate contributors, as explained in this
table.
Rate Number of Rate Contributors
A single earning or deduction, such as
salary
One
A combination of earnings, such as the
sum of salary and car allowance payments
Multiple, if salary and car allowance are stored as separate rate definitions
Note: All balances and element entries that contribute to a rate must use the same currency.
898

Oracle Fusion Cloud HCM
Using Common Features for HCM
Chapter 40
Rate Definitions
Example: Using multiple rate contributors, an hourly holiday pay rate could be based on adding together these values,
which are all paid at the end of the previous year.
• Salary
• Incentive bonus
• Seniority bonus
• Other changeable components of remuneration
Related Topics
•
Configure Elements Used by Rate Definitions
•
Create Rate Definitions for Leave
•
Create a Rate Definition for Basic Salary
•
Create Rate Definitions for Overall Salary
Configure Elements Used by Rate Definitions
If you create rate definitions that reference element input values, you must configure them for the different calculation
rules, such as Flat Amount and Factor.
This ensures that the values calculated by the rate are consistent with the values processed through payroll.
Elements use the predefined CALL_CALC_VALUES formula to calculate rate values in Calculate Payroll and Generate
HCM Rates. Each element also requires the necessary payroll calculation information is defined such as values
definitions, calculation steps and calculation factors.
When you create elements with a category such as Time Card or Absence, you can associate a default rate definition
and the application generates all the rules and definitions required to calculate the rate.
When you create elements with a category of Standard, you need to update the element formula to use
CALL_CALC_VALUE and create the payroll calculation information required to associate the rate definition to the
element and calculate the rate.
Do these element configuration steps if you're using this element for a rate definition with the category element.
1. Create an element of type Recurring or Assignment level.
2. Don't select the Multiple Entries Allowed check box.
3. Select a special purpose for each element input value.
a. Primary Input Value for an Amount value.
b. Factor for a Factor value.
c. Periodicity for a Periodicity value.
Note: When creating elements for use in rate definitions, don't select Periodically. The Rate Definition
process is unable to convert rates with a periodicity of periodically to different frequencies such as annual,
weekly, and daily.
4. If the flat amount is a full-time equivalent value, you must select Yes in the Default field for the Full-Time
Equivalent input value.
5. Create element eligibility.
899

Oracle Fusion Cloud HCM
Using Common Features for HCM
Chapter 40
Rate Definitions
Configure Elements to Create Rate Definitions for Flat Amount
Calculations
1. On the Home page, click the Elements quick action under the My Client Groups tab.
2. Click Create.
3. Enter these values.
Field Value
Legislative Data Group
Select your legislative data group
Primary Classification
Standard Earnings
Category
Standard
4. Click Continue.
5. Enter a name, reporting name, and description.
6. Enter the effective date.
7. Answer the questions in the Duration and Standard Rules sections.
Note: Multiple entries aren't allowed.
8. For the question, At which employment level should this element be attached?, select Assignment Level.
9. For the question, Does this element recur each payroll period, or does it require explicit entry? select Recurring.
10. Click Next.
11. In the Calculation Rules section, select Flat Amount and then click Next.
12. Click Submit.
13. On the Element Summary page under the Input Values folder, select Full-Time Equivalent.
14. Check that these values exist.
Field Value or Check Box Status
Name
Full-Time Equivalent
Special Purpose
Full-Time Equivalent
Unit of Measure
Character
Displayed
Selected
Allow User Entry
Selected
Required Deselected
900

Oracle Fusion Cloud HCM
Using Common Features for HCM
Chapter 40
Rate Definitions
Field Value or Check Box Status
Create a Database Item
Selected
Default
No
Lookup Type
PAY_TMPLT_YES_NO
Configure Elements to Create Rate Definitions for Factor Calculations
1. Repeat steps 1 through 9 in the first procedure.
2. In the Calculation Rules section, select Factor and then click Next.
3. Click Submit.
4. On the Element Summary page under the Input Values folder, select Pay Value.
5. Check that these values exist.
Field Value or Check Box Status
Name
Pay Value
Special Purpose
Primary output value
Unit of Measure
Money
Displayed
Selected
Allow User Entry
Selected
Required
Deselected
Create a Database Item
Selected
6. On the Element Summary page under the Input Values folder, select Factor.
7. Check that the following fields and values exist.
Field Value or Check Box Status
Name Factor
901

Oracle Fusion Cloud HCM
Using Common Features for HCM
Chapter 40
Rate Definitions
Field Value or Check Box Status
Special Purpose
Factor
Unit of Measure
Number
Displayed
Selected
Allow User Entry
Selected
Required
Deselected
Create a Database Item
Selected
Test Your Element Configuration
You're almost done. Now, to test your element configuration, follow these steps.
Note: These procedures are for payroll users only.
Step Page Do This Action
1
My Client Groups
Find a payroll and an employee that you can
use for testing purposes.
2
Elements
For the Flat Amount element, use the Pay Value
balance feed to enter an Eligible Compensation
balance for the Percentage element.
3
Element Entries
Add the Flat Amount and Percentage elements
to the employee as element entries and enter
input values.
4
Submit a Process or Report
Enter a suitable period for the payroll you
selected in step 1.
5
Submit a Process or Report
Run the payroll.
6
View Payroll Process Results
Check if the payroll results are correct.
902

Oracle Fusion Cloud HCM
Using Common Features for HCM
Chapter 40
Rate Definitions
Related Topics
•
Overview of Rate Definitions
•
Options to Configure Rate Definitions
•
Rate Contributors for Derived Rates
•
Calculate Standard Earnings Rate Using Values Defined by Criteria
•
Payroll Calculation Information
•
Overview of Payroll Calculation Information Formulas
Create Rate Definitions for Leave
In this example, let's calculate an employee's absence rate as of a particular date.
The rate includes a combination of average salary and car allowance. The employee has an annual year-to-date salary
of 26,000. The employee also receives an annual car allowance payment of 2,000. The absence rate is 26,000 + 2,000 =
28,000. To provide a daily absence rate, you convert this rate into a daily rate.
This table summarizes the key information you use in the example.
What You Need To Consider For This Example
What elements do I need to create before I
define the rate?
• Salary (assignment level) - This element contains the salary value to be retrieved by the rate
definition. You must create it using the Flat Amount calculation rule.
• Car Allowance (assignment level) - This element contains the car allowance value to be retrieved
by the rate definition. You must create it using the Flat Amount calculation rule.
• Absence - Use the Absence template to create the element. Enter Sickness as the classification
and Absence as the category.
Which balances hold the contributing
values?
• Salary is fed by the Salary element.
• Car Allowance is fed by the Car Allowance element.
Should I process contributor totals as full-
time equivalent amounts?
Yes
Create the Rate Definition
1. On the Home page, click the Rate Definitions quick action under the My Client Groups tab.
2. In the Search Results section, click Create.
3. Enter these values.
Field What You Select
Category
Derived Rate
903

Oracle Fusion Cloud HCM
Using Common Features for HCM
Chapter 40
Rate Definitions
Field What You Select
Effective Start Date
A date that's after the creation date of the objects that you're referencing
Legislative Data Group
Your legislative data group
4. Click OK.
5. In the Basic Details section, enter these values.
Field Value
Name
Absence Rate - Salary and Car Allowance
Short Name
ABS RATE - SAL/CAR ALLOW
6. In the Returned Rate Details section, Periodicity field, select Daily.
7. Click the Contributor Rules tab and in the Process Contributor Total as FTE Amount select, Yes.
The balances referenced need to be populated using payroll runs for the periods covered by the balance
dimension or the rate definition won't generate a meaningful value.
Create Rate Contributors
1. In the Rate Contributors section, click Create.
2. In the Contributor Type field, select Balance and click OK.
3. On the Create Rate Contributors page, enter these values.
Field What You Enter
Add or Subtract
Add
Balance Name
Regular Salary
Balance Dimension
Assignment State Period to Date
Periodicity
Daily
4. Click Save and Continue.
5. In the Rate Contributor section, click Create.
6. In the Contributor Type field, select Balance and click OK.
904

Oracle Fusion Cloud HCM
Using Common Features for HCM
Chapter 40
Rate Definitions
7. On the Create Rate Contributor page, enter these values.
Field What You Enter
Add or Subtract
Add
Balance Name
Car Allowance
Balance Dimension
Assignment State Period to Date
Periodicity
Daily
8. Click Save and Continue.
9. Click Submit.
10. Assign an Absence element entry to the employee's assignment. You will then need to pass the absence entry
to payroll using the absence interface.
Related Topics
•
Options to Configure Rate Definitions
•
Rate Contributors for Derived Rates
•
Generate HCM Rates
•
Integrate Absence Management with Global Payroll
Create a Rate Definition for Basic Salary
In this example, you create a primary rate for a basic salary. After you run the rate engine, the Element Entries - Person
Details page displays the values for eligible employees.
Before you begin, create the salary element at the assignment level. This element contains the salary information to be
retrieved by the rate definition. You can create it using the flat amount or factor calculation rule.
1. On the Home page, click the Rate Definitions quick action under the My Clients Groups tab.
2. Click Create.
3. Enter these values.
Field Value
Category
Element
Effective Start Date
Enter the current date.
905

Oracle Fusion Cloud HCM
Using Common Features for HCM
Chapter 40
Rate Definitions
Field Value
Legislative Data Group
Enter your legislative data group.
Storage Type
Amount
Element Name
Regular Salary
4. Click OK.
5. In the Returned Rate Details section, complete the fields, as shown in this table.
Field Value
Periodicity
Annually
Periodicity Conversion Formula
Standard Rate Annualized
Currency
LDG Currency
6. Click Submit.
Related Topics
•
Overview of Rate Definitions
•
Options to Configure Rate Definitions
•
Configure Elements Used by Rate Definitions
•
Generate HCM Rates
Create Rate Definitions for Overall Salary
In this example, you create a rate definition for overall salary that includes multiple rate contributors.
You do these actions.
• Create the overall salary rate definition
• Add the regular salary rate contributor
• Add the car allowance rate contributor
This table summarizes the key decisions for your scenario.
906

Oracle Fusion Cloud HCM
Using Common Features for HCM
Chapter 40
Rate Definitions
Decisions to Consider In This Example
What components of pay should be
included in an employee's overall salary?
• Regular Salary
• Car Allowance
Should I include all pay for car allowance in
the overall salary?
No. Only include 50 percent of the amount paid for car allowance.
Note: The overall salary rate definition is a derived rate. To populate the Overall Salary check box, select a salary
element in the Element name field. You then add the regular salary rate and car allowance rate contributors to the
rate definition. The rate contributors that you add should be elements that you select from the Rate Name field on the
Create Rate Contributor page.
Create the Overall Salary Rate Definition
1. On the Home page, click the Rate Definitions quick action under the My Clients Groups tab.
2. Click Create.
3. Enter these values.
Field Value
Category
Derived Rate
Effective Start Date
Enter the current date.
Legislative Data Group
Select your legislative data group.
4. Click OK.
5. Enter these values.
Field Value
Name
Overall Salary
Short Name
OVERALL_SAL
Element Name
Salary
907

Oracle Fusion Cloud HCM
Using Common Features for HCM
Chapter 40
Rate Definitions
6. In the Returned Rate Details section, enter these values.
Field Value
Periodicity
Weekly
Periodicity Conversion Formula
Standard Rate Annualized
Currency
LDG Currency
Add the Regular Salary Rate Contributor
1. In the Calculation section, click Create.
2. In the Create Rate Contributor dialog box, Contributor Type field, select Base Rate.
3. Enter these values.
Field Value
Add or Subtract
Add
Employment Level
Payroll Assignment
Periodicity
Weekly
4. Click Save and Continue.
Add the Car Allowance Rate Contributor
1. In the Calculation section, click Create.
2. In the Create Rate Contributor dialog box, Contributor Type field, select Rate Definition and click OK.
3. Enter these values.
Field Value
Add or Subtract
Add
Rate Name
Car Allowance
Periodicity
Weekly
Factor Rule Value
908

Oracle Fusion Cloud HCM
Using Common Features for HCM
Chapter 40
Rate Definitions
Field Value
Factor Value
0.5
4. Click Save and Continue.
5. Click Submit.
Related Topics
•
Overview of Rate Definitions
•
Options to Configure Rate Definitions
•
Rate Contributors for Derived Rates
•
Generate HCM Rates
Generate HCM Rates
Submit the Generate HCM Rates process to calculate and store most types of rate definitions.
You can use the stored rate values for reporting payroll calculations. Run this batch process frequently to ensure the
stored rate values are accurate. After you run this process, you can report on the rates using extracts. The user entity
includes the database items that you can use in reports.
Use this flow to calculate and store most types of rate definitions in these scenarios.
• Rates that are associated with an element. For example, a salary rate definition is associated with a salary
element. The process calculates a salary rate value for all workers with a salary element entry.
• Rates values for factor based element rates. Use the Generate HCM Rates process to calculate and store rate
values for factor based element rates. You can retrieve this value in the payroll run.
• Rates that are associated with a value definition. Certain types of elements, such as time elements, use payroll
calculation information rules and definitions. For example, a value definition is generated for an overtime
element and this is associated with an overtime rate definition. The process calculates an overtime rate value
for all workers with an overtime element entry.
• Rates that are based on a value-by-criteria defined for an assignment level criteria, such as a worker's grade or
location.
• Rates that are based on a formula. However, such rates are calculated in a payroll run.
• Rates that are derived. For example, a rate that's derived based on the sum of car and housing allowance rates.
In this case, the Generate HCM Rates process calculates the car allowance rate, the housing allowance rate, and
the derived rate.
The stored rate values can be used for reporting or retrieving for payroll calculation purposes.
The application provides database items to support the rate batch process. These array database items return all rates
associated with a payroll relationship record as of a specific date.
909

Oracle Fusion Cloud HCM
Using Common Features for HCM
Chapter 40
Rate Definitions
Note: The REPORTING_RATE_VALUES and REPORTING_RATE_PERIODICITIES database items return values
based on the return rate details defined on the rate definition. The other periodicity database items, such as
REPORTING_RATE_QUARTERLY, return a rate that's converted to the specified periodicity.
The Generate HCM Rates process supports the database items listed in this table.
Database Items Description
REPORTING_RATE_NAMES
Name of the rate
REPORTING_RATE_VALUES
Value of the rate
REPORTING_RATE_PERIODICITIES
Periodicity of the rate
REPORTING_RATE_FTE_FLAGS
Full-time status of the rate
REPORTING_RATE_TERM_NUMBERS
Term number associated to the rate values
REPORTING_RATE_ASG_NUMBERS
Assignment number associated to the rate values
REPORTING_RATE_WEEKLY
Weekly rate value
REPORTING_RATE_MONTHLY
Monthly rate value
REPORTING_RATE_QUARTERLY
Quarterly rate value.
REPORTING_RATE_YEARLY
Annual rate value
REPORTING_RATE_PT_WEEKLY
Part-time weekly rate value
REPORTING_RATE_PT_MONTHLY
Part-time monthly rate value
REPORTING_RATE_PT_QUARTERLY
Part-time quarterly rate value
REPORTING_RATE_PT_YEARLY
Part-time annual rate value
REPORTING_RATE_FT_WEEKLY
Full-time weekly rate value
REPORTING_RATE_FT_MONTHLY
Full-time monthly rate value
REPORTING_RATE_FT_QUARTERLY
Full-time quarterly rate value
REPORTING_RATE_FT_YEARLY
Full-time annual rate value
910

Oracle Fusion Cloud HCM
Using Common Features for HCM
Chapter 40
Rate Definitions
Database Items Description
PER_ASG_ESTABLISHMENT_ID
Establishment
PER_ASG_UNION_ID
Worker Union ID
PER_ASG_UNION_NAME
Worker Union Name
PER_ASG_JOB_MANAGER_LEVEL
Job Manager Level
PER_ASG_JOB_MANAGER_LEVEL_NAME
Job Manager Level Name
CMP_ASSIGNMENT_SALARY_BASIS_
NAME
Salary Basis
PER_ASG_COLLECTIVE_AGREEMENT_ID
Collective Agreement
PER_ASG_BARGAINING_UNIT_CODE_
NAME
Bargaining Unit Name
PER_ASG_BARGAINING_UNIT_CODE
Bargaining Unit Code
PER_ASG_ACTION_CODE
Action Code
PER_ASG_ACTION_REASON_CODE
Action Reason
Run the process if these conditions apply.
• Changes to the data referenced by the rate, which may include element entries, grade rates, and values defined
by criteria. This process only reports the rate values. It doesn't update, delete, create, or have any impact on the
underlying objects.
• Updates to rate definitions, such as when a new rate contributor is added or removed, or the rate is made
inactive.
• Changes to employee records that impact their salary rates, such as changes to job or grade.
Note: You should run the process before any operation that depends on the values that are stored in the table. For
example, if you have a rate based on seniority, values could change simply by the passage of time.
Let's look at the steps to run the process.
1. On the Home page, click the Submit a Flow quick action under the My Clients group.
2. Select your legislative data group.
3. Select the Generate HCM Rates flow pattern.
911

Oracle Fusion Cloud HCM
Using Common Features for HCM
Chapter 40
Rate Definitions
4. Enter these values for the Process Mode field:
Note: Review how your company uses the information generated by the Generate HCM Rates process and
ensure that you're selecting the appropriate process mode parameter. The mode controls the frequency of
rate calculations performed for each employee. The higher the frequency and number of rate calculations,
the more accurate the rates, but this will be reflected in the overall performance of the Generate HCM Rates
process. For more information, see "Control the Start and End Date of the Rate Calculation Period".
Mode Description Accuracy
Fast
Uses the start and end date specified to
calculate the rate value. If the rate value
is the same for both dates, it determines
that the rate value is the same over the
entire period. If the start and end values are
different, this method then determines a
value in the middle, and compares it with
the start and finish values to see where
the change occurred. This process repeats
until the date of the change is found. This is
known as a binary chop algorithm.
This is the quickest but least accurate
method to calculate rate values. It misses
any changes if a rate value goes up and
then back down to the same value that's
calculated at the start and end dates.
Select this option when you need detailed
rate details for reporting purposes, but you
don't require 100% accuracy. As the name
suggests, this option will deliver the best
performance for the Generate HCM Rates
process.
Full
Performs separate rate calculations for
every day within the rate calculation period.
Slowest but most accurate method.
This mode ensures that rates are 100%
accurate, but the volume of calculations per
employee is very high. It's recommended
you only select this option if you are using
the rates stored by the Generate HCM Rates
process for payroll calculation purposes.
Periodic
This method works the same as Fast, except
that you can specify the number of days the
process calculates rates between the start
and end dates.
The accuracy of this method is half-way
between the Fast and Full modes.
Select this option when you need more
precise rate details for reporting purposes.
The number of days you enter will control
the accuracy and performance of the
Generate HCM Rates process.
For example, when you select a 7-day
period, the process will calculate the rate for
an employee at the start and end of each 7-
day period. If these rates are the same, the
process will assume that the employee rate
did not change. and will move on to the next
7-day period. If the rates are different, the
process will calculate daily rates within the
912
Oracle Fusion Cloud HCM
Using Common Features for HCM
Chapter 40
Rate Definitions
Mode Description Accuracy
7-day period to identify the date on which
the rate changed.
When you select a 14-day period, the
process will work in the same manner,
but the rates will be calculated at the start
and end of each 14-day period. In this
example, the 7-day option is more accurate,
but the Generate HCM Rates process will
take longer because it's performing more
calculations than the 14-day option.
So, the lower the number you enter in the
Number of Days parameter, the more
accurate is the rate calculation of the
Generate HCM Rates process.
5. Click Next.
6. Select a flow submission.
Note: If you select Using a schedule, you must also select a frequency, such as once, weekly or daily.
Note: Use the Payroll Relationship Group parameter to reduce the number of employees included in the
Generate HCM rates process. The Payroll Relationship Group parameter supports these relationship groups:
a. Static and dynamic payroll relationship groups.
b. Groups that include assignment or payroll relationship records.
7. Click Next and then Submit.
Control the Start and End Date of the Rate Calculation Period
It's essential that you understand the HCM rates configuration for your organization in detail, so that you know what
type of updates can result in a rate change, and who makes those changes. You can then define the start and end date
of rate calculations to meet the business requirements of your company. The shorter the time span, the fewer rate
calculations will be performed, and this is reflected in the performance of the Generate HCM Rates process.
Use the Generate HCM Rates Start Date parameter to set an earliest start date for rate calculations. For example, set
this parameter to 2020-01-01 (YYYY-MM-DD), and the Generate HCM Rates process will only recalculate rates from this
date.
Note: This parameter applies only when you're using the Full or Periodic modes.
The rates process automatically calculates the rate changes that occur up to 2 years in the future. If this rate information
is not required, use the "Set the default end date limit for the rate" batch process to stop the calculation of future dated
rates. This parameter captures the number of years in advance the rates are calculated. Set to 0 to ensure that the rates
are only calculated up to the process end date you entered while submitting the Generate HCM Rates process.
913

Oracle Fusion Cloud HCM
Using Common Features for HCM
Chapter 40
Rate Definitions
Related Topics
•
Overview of Rate Definitions
•
Options to Configure Rate Definitions
•
Rate Contributors for Derived Rates
•
Create Rate Definitions for Overall Salary
Rates Defined by Formula
You can define rates based on Fast Formula.
Let's consider an example where an employee can work in a job at a higher grade than their normal job. The rate paid to
that employee is based on different criteria and includes rules, such as the minimum rate must be at least 1.00. You can
use a formula to step up the grade to the next level and to return the rate assigned to that higher grade.
On the Rate Definition page, Calculation Formula field, select the HCM Rates Calculate Value formula type. The
formula type supports contexts, such as assignment, payroll relationship, and job. You can select and create the correct
formula for rate definitions from all standard database items.
Write a Formula
You can write your own formula when the formula type is HCM Rates Calculate Value.
The formula has certain inputs and return value, but the rate always returns these values:
• Monetary Amount
• Currency
• Periodicity
Note: Formula rates are supported only in Global Payroll.
Examples
In this formula, the return values set to 65.23, but you can add the required logic to calculate the rate return values.
Default for value_name is EMPTY_TEXT_NUMBER
default for value_value is EMPTY_TEXT_NUMBER
default for value_datatype is EMPTY_TEXT_NUMBER
inputs are
value_name (text_number),
value_value (text_number),
value_datatype (text_number),
AMOUNT = 65.23
CURRENCY = 'USD'
PERIODICITY = 'YEAR'
return AMOUNT, CURRENCY, PERIODICITY
914

Oracle Fusion Cloud HCM
Using Common Features for HCM
Chapter 40
Rate Definitions
Let's consider another example where the formula returns a rate based on a job. You can use this formula to calculate a
rate value when an employee works in a job at a higher grade than at their normal job.
default for value_name is EMPTY_TEXT_NUMBER
default for value_value is EMPTY_TEXT_NUMBER
default for value_datatype is EMPTY_TEXT_NUMBER
default for PER_ASG_ELIG_JOBS_CURRENCY is 'UNKNOW'
default for PER_ASG_ELIG_JOBS_END_DATE is '0001/01/01 00:00:00' (date)
default for PER_ASG_ELIG_JOBS_FREQUECY is 'YEARLY'
default for PER_ASG_ELIG_JOBS_FROM_DATE is '0001/01/01 00:00:00' (date)
default for PER_ASG_ELIG_JOBS_JOB_CODE is 'UNKNOW'
default for PER_ASG_ELIG_JOBS_JOB_ID is 0
default for PER_ASG_ELIG_JOBS_JOB_NAME is 'UNKNOWN'
default for PER_ASG_ELIG_JOBS_MANUAL_RATE is 0
default for PER_ASG_JOB_ID is 0
inputs are
value_name (text_number),
value_value (text_number),
value_datatype (text_number)
AMOUNT = 0
PERIODICITY = 'YEARLY'
CURRENCY = 'USD'
l_log = PAY_INTERNAL_LOG_WRITE('[RATE_FML] - count is : ' || to_char(value_name.count))
l_log = PAY_INTERNAL_LOG_WRITE('[RATE_FML] - count2 is : ' || to_char(value_value.count))
l_log = PAY_INTERNAL_LOG_WRITE('[RATE_FML] - count3 is : ' || to_char(value_datatype.count))
l_job_id = PER_ASG_JOB_ID
l_log = PAY_INTERNAL_LOG_WRITE('[RATE_FML] - l_job_id is : ' || to_char(l_job_id))
i = 0
while (i < value_name.count) loop
(
l_log = PAY_INTERNAL_LOG_WRITE('[RATE_FML] - name is : ' || value_name[i])
l_log = PAY_INTERNAL_LOG_WRITE('[RATE_FML] - value is : ' || value_value[i])
l_log = PAY_INTERNAL_LOG_WRITE('[RATE_FML] - datatype is : ' || value_datatype[i])
if(value_name[i] = 'PER_ASG_JOB_ID') then
(
l_job_id = to_num(value_value[i])
l_log = PAY_INTERNAL_LOG_WRITE('[RATE_FML] - l_job_id has been set with : ' || to_char(l_job_id))
)
i = i + 1
)
CHANGE_CONTEXTS(JOB_ID = l_job_id)
(
l_t_dummy = PER_ASG_ELIG_JOBS_CURRENCY
l_log = PAY_INTERNAL_LOG_WRITE('[RATE_FML] - l_t_dummy is : ' || l_t_dummy)
if(l_t_dummy != 'UNKNOW') then
(
CURRENCY = l_t_dummy
)
l_dt_dummy = PER_ASG_ELIG_JOBS_END_DATE
l_log = PAY_INTERNAL_LOG_WRITE('[RATE_FML] - l_dt_dummy is : ' || to_char(l_dt_dummy))
l_t_dummy = PER_ASG_ELIG_JOBS_FREQUECY
l_log = PAY_INTERNAL_LOG_WRITE('[RATE_FML] - l_t_dummy is : ' || l_t_dummy)
if(l_t_dummy != 'UNKNOW') then
(
915

Oracle Fusion Cloud HCM
Using Common Features for HCM
Chapter 40
Rate Definitions
PERIODICITY = l_t_dummy
)
l_dt_dummy = PER_ASG_ELIG_JOBS_FROM_DATE
l_log = PAY_INTERNAL_LOG_WRITE('[RATE_FML] - l_dt_dummy is : ' || to_char(l_dt_dummy))
l_t_dummy = PER_ASG_ELIG_JOBS_JOB_CODE
l_log = PAY_INTERNAL_LOG_WRITE('[RATE_FML] - l_t_dummy is : ' || l_t_dummy)
l_n_dummy = PER_ASG_ELIG_JOBS_JOB_ID
l_log = PAY_INTERNAL_LOG_WRITE('[RATE_FML] - l_n_dummy is : '||to_char(l_n_dummy))
l_t_dummy = PER_ASG_ELIG_JOBS_JOB_NAME
l_log = PAY_INTERNAL_LOG_WRITE('[RATE_FML] - l_t_dummy is : ' || l_t_dummy)
l_n_dummy = PER_ASG_ELIG_JOBS_MANUAL_RATE
l_log = PAY_INTERNAL_LOG_WRITE('[RATE_FML] - l_n_dummy is : '||to_char(l_n_dummy))
if(l_n_dummy > 0) then
(
AMOUNT = l_n_dummy
)
)
return AMOUNT, PERIODICITY, CURRENCY
Related Topics
•
Overview of Rate Definitions
Rates Used to Calculate Absences in Payroll
You can specify a rate for use in calculating an absence in an absence plan or an absence element.
When processing absence entries in a payroll run, the formula associated with the absence element uses the Rate
Converter global formula to convert rates. The formula checks for a rate in this sequence.
1. Absence plan
2. Absence element
3. Compensation salary element
Absence Plan
In Oracle Fusion Absence Management, you can select a rate rule on the Entries and Balances tab of the Create
Absence Plan page. The rate rule calculates the units passed to payroll when you record an absence. You can select rate
rules for the absence payment, final disbursement, discretionary disbursement, and liability balance calculation.
For third-party absence providers, the application transfers the rate information and override rates in the HCM Data
Loader file attached to the Load Absence Batch process.
Absence Element
If you don't specify rates in the absence plan, you can specify a rate when you create the absence elements. The type
of absence information determines the rates you can select. For example, for plans where you transfer accrual balances
and absences, you can select different rates for these calculations.
• Absence payments
916

Oracle Fusion Cloud HCM
Using Common Features for HCM
Chapter 40
Rate Definitions
• Discretionary disbursement
• Final disbursement
• Liability balance rate
As best practice, specify a rate in either the plan or the element. If you specify in both, ensure the rate for the element is
same as the rate you selected in the corresponding plan.
Compensation Salary Element
If the formula doesn't find a rate specified in the plan or the element, it uses the compensation salary element.
When you associate a payroll element to a salary basis, you specify an input value that holds the base pay on a worker's
element entry. The monetary amount or rate recorded in the element entry is the salary value in the worker's salary
information held on the assignment. If you specify a rate, the formula uses this rate if it doesn't find one defined in the
absence plan or absence element.
Related Topics
•
Define Payroll Elements to Process Absences
FAQs for Rate Definitions
How does periodicity conversion work when there are multiple
contributors with different periodicities?
Sometimes, you may need to add a base salary, which is an annual figure, to a 13th month salary. This 13th month salary
is a monthly figure that's calculated from the annual base salary.
The base salary in this example is held as anannual amount on an element entry as 24,000. The 13th month salary
is 2,000 (24000 / 12). If you add each of thesecontributors together, the sum of the contributors is 26,000 (24,000 +
2,000).
At this point you have added an annual figure to a monthly figure, but you haven't indicated what the periodicity of the
total is. On the Create Rate Definitions page, if you select Annual in the Contributor Total Periodicity field, the sum of the
contributors is 26,000. If you select Monthly, the application converts the contributors to 312,000 (26,000 * 12), which is
now the annual figure.
Note: When the formula is called to calculate the rate, there is an option to override the return periodicity of the rate.
Related Topics
•
Options to Configure Rate Definitions
•
Rate Contributors for Derived Rates
917

Oracle Fusion Cloud HCM
Using Common Features for HCM
Chapter 40
Rate Definitions
918

Oracle Fusion Cloud HCM
Using Common Features for HCM
Chapter 41
Values Defined by Criteria
41 Values Defined by Criteria
Calculate Values Defined by Criteria
Use the Values Defined by Criteria task to calculate or retrieve values based on one or more conditions. You can use
values defined by criteria in rate definitions. You can also use value by criteria definitions in any formula used for
validation.
If you use a third-party payroll product and want to extract the salary rate details, use the Generate HCM Rates process
to calculate rate values. The Generate HCM Rates process is primarily used to calculate derived rate values, such as
those which sum multiple salary components. However, it's also used to process primary rates, as you may define rate
definitions which calculate values that are different from those stored on an element entry.
Note: The values that the Generate HCM Rates process creates are stored on a rates table. You can extract this
information using the HCM Extract tool to send to your third-party payroll providers.
Use these examples to understand how you can calculate values defined by criteria for these elements of payroll.
Annual Salaries
You can calculate annual salaries for employees based on their jobs. For example:
• If the employee is a Consultant, pay 45,000.
• If the employee is a Senior Consultant, pay 55,000.
• If the employee is a Principal Consultant, pay 65,000.
Note: If the criteria that you have set up doesn't cover all the conditions, define a default criteria condition.
Bonus Payments
You can choose to calculate bonus payments for employees that are weighted by their location. A more complicated
scenario would be to pay bonuses based on an employee's department and years of service.
• To weight a bonus payment by location, you could set up these criteria:
◦
For employees working in London, pay a 15 percent bonus.
◦
For employees working in Manchester, pay a 13 percent bonus.
◦
For employees working in Southampton, pay a 9 percent bonus.
◦
For all other employees, pay a 5 percent bonus.
• To pay a bonus based on department and years of service, you could set up these criteria:
◦
If an employee working in sales has less than or equal to 5 years of service, pay a 2,000 bonus.
◦
If an employee working in sales has less than or equal to 10 years of service, pay a 5,000 bonus.
919

Oracle Fusion Cloud HCM
Using Common Features for HCM
Chapter 41
Values Defined by Criteria
◦
If an employee working in sales has greater than 10 years of service, pay a 9,000 bonus.
◦
For all other employees working in sales, pay a 7 percent bonus.
Pension Contributions
Your pension plan may have rules that limit contributions based on an employee's job. For example, in this scenario you
could set up these criteria:
• If an employee is a Consultant, limit maximum contributions to 2,500.
• If an employee is a Senior Consultant, limit maximum contributions to 7,500.
• If an employee is a Principal Consultant, limit maximum contributions to 12,500.
• If an employee is a Manager or higher, limit maximum contributions to 14 percent of pay.
Hourly Rates
In the United States, labor law mandates to pay a higher rate when a locality's minimum wage is greater than the state
or federal minimum wage. To fulfill this requirement, use the Values Defined by Criteria task to set up pay rates that a
worker's state, county, and profession determines.
In this example, you could set up criteria for these scenarios:
• Pay carpenters working in City 1 in County 1 greater than or equal to the rate of 15 per hour.
• Pay carpenters working in City 1 in County 2 greater than or equal to the rate of 17 per hour.
• Pay carpenters working in City 1 in County 3 greater than or equal to the rate of 19 per hour.
• For all other workers, pay rate of 12 USD per hour, the prevailing state wage for laborers.
Related Topics
•
Overview of Values Defined by Criteria
•
Generate HCM Rates
•
Overview of Rate Definitions
Overview of Values Defined by Criteria
Each value defined by criteria requires you to specify one or more evaluation conditions that determine a particular
value or rate.
In cases where you specify many conditions, each condition is defined as a separate level and placed in priority order to
produce a tree structure.
You control the criteria that you enter and the resulting tree structure. In each branch of the tree, you can have multiple
evaluation conditions. If the conditions that you've set don't meet your requirements, the payroll process uses the value
established for the default criteria that you set up. Each criterion and value, as well as the parent criteria definition, is
stored as a calculation value definition. You can define a rate definition to retrieve a rate based on values defined by
criteria.
920

Oracle Fusion Cloud HCM
Using Common Features for HCM
Chapter 41
Values Defined by Criteria
You can also search for criteria and value records, on a value defined by criteria, to quickly select a record you want to
view or update. For more information, see Search for Values Defined by Criteria.
Criteria and Evaluation Conditions
Within the tree structure, you create the criteria rules. For example, you can define criteria rules based on the location of
an employee. You can select or enter the specific location for each criterion, such as London, from a value set or on the
criteria page.
You can also define a default criterion if an employee doesn't meet any other condition. Defining a default also includes
a situation in which the application hasn't captured criteria information on the employee record, such as location. If
you know the criteria definitions you set up cover all the conditions for all employees, then you don't need a default
criterion.
Each criterion is stored as a calculation value definition. You must enter a name for the calculation value definition that's
unique within a legislative data group. With a unique name, you can identify the record while you create the values
defined by criteria hierarchy through HCM Data Loader.
You must also select a value definition group for each criterion. The group enables you to manage the value definitions
within your legislative data group; it doesn't impact the behavior of the criterion. Use the Retrieval Date to determine
whether the criterion uses the date earned or effective date to retrieve information. The default value is the effective
date.
Once you have created a criterion, you can enter these condition details:
• Sequence: Define the priority of each criterion using the sequence. The application uses the sequence order to
produce a tree structure, which affects processing and the value that's returned. For example, the first criteria
definition has a condition of age greater than 0 years, and the next criteria definition in the sequence has the
condition of age greater than 55 years. In this scenario, all employees would meet the first condition and there
would be no results for the second condition. To fix this situation, you would reverse the order of the criteria
definitions where the condition greater than 55 years is first in the sequence.
• Database Item Name: Select a database item to identify the type of criteria. For example, if your criterion is the
location of an employee you could select PER_ASG_LOCATION_NAME.
Note: If you're defining values by criteria for Salary Rates, select one of the database items that are
supported by HR flows such as new hire and promotion.
• Display Name: You have the option to enter a name for the criteria. This name doesn't need to be unique
and is displayed in the value by criteria hierarchy record. If you don't enter a display name, the database item
description or name gets displayed.
• Operand: You use operands when you're creating criteria. You can specify whether the value defined by the
database item should be equal to, greater than, less than, greater than or equal to, or less than or equal to the
literal value. To capture multiple values for the same criteria, use the In operand. For example, if you want to
give employees that work in City 1 and City 2 the same bonus, you can create a single evaluation condition for
both cities using the In operand.
• Value Sets: Specify a value set to provide a dynamic list of values from which you can select an entry. This
option is available for input values that provide text only.
• Literal Value: If you specify a value set, you can select an entry from a list of values you have chosen. If you
leave the Value Set field blank, you can enter any information that's appropriate for the value definition that
you're creating.
921

Oracle Fusion Cloud HCM
Using Common Features for HCM
Chapter 41
Values Defined by Criteria
Values
Create one or more value records for each criterion. Here you enter the calculation types and rates. For example, you
can enter the bonus values for each location.
Each value record gets stored as a calculation value definition. You must enter a name for the calculation value
definition that's unique within a legislative data group. With a unique name, you can identify the record while you create
the values defined by criteria hierarchy through HCM Data Loader.
You must enter a value identifier when you define multiple value records for a criterion. This identifier enables you
to define which value record should be calculated. For example, your company calculates car allowance and housing
allowance rates for an employee based on their job. The job criteria details and the allowance values are captured in a
Values Defined by Criteria. You can indicate which of the values captured on the Values Defined by Criteria should be
calculated when processing an element in the payroll run.
If you don't enter a value identifier, the name of the calculation value definition gets displayed for the value on the
hierarchy. You must select a value definition group for each value record. The group enables you to manage the value
definitions within your legislative data group; it doesn't impact the behavior of the value. Use the Retrieval Date to
determine whether the date earned or effective date retrieves the information of the value. The default is the effective
date.
If you select a Default Calculation Type while creating the values defined by criteria, it gets displayed on each value
record. Alternatively, you can enter a calculation type. You have the option to select a different calculation type for each
value within the values defined by criteria depending on your business requirements.
The supported calculation types include:
• Flat Amount Times Multiplier
• Flat Calculation
• Flat Rate
• Grade Rate
• Incremental Rate
• Number
• Rate Definition
• Standard Formula 1
• Standard Formula 2
Database Items for Values Defined by Criteria
Each condition refers to a database item to identify where the value is used. It also determines the data type of the
value, such as text, number, or date. Define conditions using predefined database items or the dynamically created
database items when the application creates data, such as balances and elements.
You can refer to any static or dynamic database items that support these contexts:
• HR_ASSIGNMENT_ID
• HR_TERM_ID
• PAYROLL_ASSIGNMENT_ID
• PAYROLL_TERM_ID
922

Oracle Fusion Cloud HCM
Using Common Features for HCM
Chapter 41
Values Defined by Criteria
• PAYROLL_RELATIONSHIP_ID
• PERSON_ID
• CALC_BREAKDOWN_ID
• PAYROLL_ID
• EFFECTIVE_DATE
• DATE_EARNED
• LEGISLATIVE_DATA_GROUP_ID
Database Items for Salary Rates
Perform rate calculations before information such as job and grade is submitted for the employee. While using salary
rates, you can only define values by criteria that use the database items supported by HR flows such as new hire and
promotion. If you refer to other types of database items, the process either returns zero or uses the default criteria.
Here's the list of database items to define values by criteria while using salary rates:
Database Item Name Display Name
PER_ASG_ASSIGNMENT_NUMBER
Assignment Number
PER_ASG_ASSIGNMENT_ID
Assignment ID
PER_ASG_EFFECTIVE_START_DATE
Assignment Start Date
PER_PERSON_ENTERPRISE_HIRE_DATE
Hire Date
PER_ASG_JOB_ID
PER_ASG_JOB_NAME
Job
PER_ASG_JOB_CODE
Job Code
PER_JOB_FAMILY_ID
PER_JOB_FAMILY_NAME
Job Family
PER_ASG_BUSINESS_UNIT_ID
PER_ASG_BUSINESS_UNIT_NAME
Business Unit
PER_ASG_LOCATION_ID
PER_ASG_LOCATION_NAME
Location
PER_ASG_DEPARTMENT_ID
PER_ASG_ORG_DEPARTMENT_NAME
Department
923

Oracle Fusion Cloud HCM
Using Common Features for HCM
Chapter 41
Values Defined by Criteria
Database Item Name Display Name
PER_ASG_LEGAL_ENTITY_ID
Legal Entity
PER_ASG_ORG_LEGAL_EMPLOYER_
NAME
Legal Employer
PER_ASG_NORMAL_HOURS
Normal Hours
PER_ASG_EMPLOYEE_CATEGORY
PER_ASG_EMPLOYMENT_CATEGORY
Assignment Category
PER_ASG_ORG_LEGAL_EMPLOYER_
NAME
Legal Employer
PER_ASG_DF
Assignment Flexfield
PER_GRADES_DF
Grade Flexfield
PER_LOCATIONS_DF
Location Flexfield
PER_ASG_GRADE_CODE
Grade Code
PER_ASG_GRADE_ID
PER_ASG_GRADE_NAME
Grade
PER_ASG_GRADE_LADDER_PGM_ID
Grade Ladder
PER_ASG_GRADE_STEP_ID
PER_GRADE_STEP_NAME
Grade Step
PER_ASG_ESTABLISHMENT_ID
Establishment
PER_ASG_UNION_ID
Worker Union ID
PER_ASG_UNION_NAME
Worker Union Name
PER_ASG_JOB_MANAGER_LEVEL
Job Manager Level
PER_ASG_JOB_MANAGER_LEVEL_NAME
Job Manager Level Name
CMP_ASSIGNMENT_SALARY_BASIS_
NAME
Salary Basis
924

Oracle Fusion Cloud HCM
Using Common Features for HCM
Chapter 41
Values Defined by Criteria
Database Item Name Display Name
PER_ASG_COLLECTIVE_AGREEMENT_ID
Collective Agreement
PER_ASG_BARGAINING_UNIT_CODE_
NAME
Bargaining Unit Name
PER_ASG_BARGAINING_UNIT_CODE
Bargaining Unit Code
PER_ASG_ACTION_CODE
Action Code
PER_ASG_ACTION_REASON_CODE
Action Reason
Related Topics
•
Options to Configure Rate Definitions
•
Generate HCM Rates
•
Calculation Types in Calculation Value Definitions
•
Pay Bonuses at Different Rates
•
Limit Pension Contributions
Pay Bonuses at Different Rates
This example demonstrates how to create criteria to pay employee bonuses at different rates based on age and location.
This table summarizes the key decisions for this scenario:
Decisions to Consider In this Example
What ages and rates should be used?
• Age 25 or less, pay 10 percent
• Age greater than 25, pay 14 percent to City 1 employees
• Age greater than 25, pay 16 percent to City 2 employees
What locations should be used to
determine bonus rates?
• City 1
• City 2
Are there any special conditions that
should be added?
Yes. In City 2 the general manager wants to pay a flat amount of 15,000 for all employees over the age
of 25 who make over 100,000 per year.
In this example, we would perform these actions:
• Create the bonus rate criteria definition
925

Oracle Fusion Cloud HCM
Using Common Features for HCM
Chapter 41
Values Defined by Criteria
• Create age criteria
• Create location criteria for age group 2
• Create a calculation value definition for age group 1
• Create calculation value definitions for locations
• Modify evaluation conditions
Before You Start
In this example, HRX_US_REP_LOCATION is used as the value set for the entry of different locations. If you don't have
an equivalent value set, you may need to create one.
Create the Bonus Rate Criteria Definition
1. On the Home page, click the Values Defined by Criteria quick action under the My Client Groups tab.
2. Click Create.
3. Complete these fields as shown in this table.
Field Value
Name
Bonus Rate
Effective Start Date
1/1/15
Legislative Data Group
Select your legislative data group.
4. Select Create new value definition group.
5. Enter Bonus in the New Value Definition Group field.
6. Enter Flat Rate in the Default Calculation Type field.
7. Click OK.
Create Age Criteria
1. Select the row with the Bonus Rate criteria definition.
2. Click New.
3. Select Criteria and click OK.
4. For each criteria definition you create, complete these fields.
Field Age 25 or less Age greater than 25
Calculation Value Definition Name
Bonus Rate Age Group 1
Bonus Rate Age Group 2
Value Definition Group
Bonus
Bonus
Retrieval Date
Date Earned
Date Earned
926

Oracle Fusion Cloud HCM
Using Common Features for HCM
Chapter 41
Values Defined by Criteria
Field Age 25 or less Age greater than 25
Sequence
1
2
Database Item Name
PER_PER_PERSON_AGE
PER_PER_PERSON_AGE
Operand
<=
>
Literal Value
25
25
5. Click OK each time you create a criteria definition.
6. To create a default group for the age criteria, repeat steps 1 through 3.
7. Complete these fields:
Field Value
Calculation Value Definition Name
Bonus Rate Age Group Default
Value Definition Group
Bonus
Retrieval Date
Date Earned
8. Select the Default Criteria check box and click OK.
Create the Location Criteria for Age Group 2
1. Select the row with the Person Age > 25 criteria definition.
2. Click New.
3. Select Criteria and click OK.
4. For each criteria definition you create, complete these fields.
Field City 1 City 2
Calculation Value Definition Name
Bonus Range Age Group 2 Location 1
Bonus Range Age Group 2 Location 2
Value Definition Group
Bonus
Bonus
Retrieval Date
Date Earned
Date Earned
Sequence
1
2
927

Oracle Fusion Cloud HCM
Using Common Features for HCM
Chapter 41
Values Defined by Criteria
Field City 1 City 2
Database Item Name
PER_ASG_LOCATION_ID
PER_ASG_LOCATION_ID
Display Name
Location
Location
Operand
=
=
Value Set
HRX_US_REP_LOCATION
HRX_US_REP_LOCATION
Literal Value
City 1
City 2
5. Click OK each time you create a criteria definition.
6. To create a default group for the location criteria, repeat steps 1 through 3.
7. Complete these fields:
Field Value
Calculation Value Definition Name
Bonus Rate Age Group 2 Location Default Rate
Value Definition Group
Bonus
Retrieval Date
Date Earned
8. Select the Default Criteria check box and click OK.
Related Topics
•
Overview of Values Defined by Criteria
•
Generate HCM Rates
Limit Pension Contributions
This example demonstrates how to create criteria to limit pension contributions based on the employee's job. This table
summarizes the key decisions for this scenario.
Decisions to Consider In this Example
What jobs and contribution limits should
be used?
• If the employee is an Associate Consultant, limit pension contribution to 5,000
928

Oracle Fusion Cloud HCM
Using Common Features for HCM
Chapter 41
Values Defined by Criteria
Decisions to Consider In this Example
• If the employee is a Consultant, limit pension contribution to 10,000
• For all other jobs, limit pension contribution to 17 percent of annual salary
This example:
1. Creates the pension limits criteria definition
2. Creates job criteria
3. Creates the value definition for job 1
4. Creates the value definition for job 2
5. Creates the value definition for the default criteria definition
Create the Pension Limits Criteria Definition
1. On the Home page, click the Values Defined by Criteria quick action under the My Client Groups tab.
2. Click Create.
3. Complete these fields:
Field Value
Name
Pension Limits
Effective Start Date
1/1/15
Legislative Data Group
Select your legislative data group.
4. Select the Use existing value definition group radio button.
5. Select Limit Rules in the Value Definition Group field.
6. Select Flat Amount in the Default Calculation Type field.
7. Click OK.
Create Job Criteria
1. Select the row with the Pension Limits criteria definition.
2. Click New.
3. Select Criteria and then click OK.
4. For each criteria definition you create, complete these fields:
Field Job 1 Job 2
Calculation Value Definition Name
Job 1
Job 2
Value Definition Group
Limit Rules
Limit Rules
Retrieval Date Date Earned Date Earned
929

Oracle Fusion Cloud HCM
Using Common Features for HCM
Chapter 41
Values Defined by Criteria
Field Job 1 Job 2
Sequence
1
2
Database Item Name
PER_ASG_JOB_CODE
PER_ASG_JOB_CODE
Operand
=
=
Literal Value
Associate Consultant
Consultant
5. Click OK each time you create a criteria definition.
6. To create a default group for the job criteria, repeat steps 1 through 3.
7. Complete these fields:
Field Value
Calculation Value Definition Name
Other Jobs
Value Definition Group
Limit Rules
Retrieval Date
Date Earned
8. Select the Default Criteria check box and click OK.
Create the Value Definition for Job 1
1. Select the row with the criteria definition as Job 1 = Associate Consultant.
2. Click New.
3. Select Value and click OK.
4. Complete these fields:
Field Value
Calculation Value Definition Name
Contribution Limits 1
Value Definition Group
Limit Rules
Retrieval Date
Date Earned
Calculation Type Flat Amount
930

Oracle Fusion Cloud HCM
Using Common Features for HCM
Chapter 41
Values Defined by Criteria
Field Value
Periodicity
Annually
Unit of Measure
Money
Currency
LDG Currency
Flat Amount
5,000
5. Click OK .
Create the Value Definition for Job 2
1. Select the row with the criteria definition as Job 2 = Consultant.
2. Click New.
3. Select Value and click OK.
4. Complete these fields:
Field Value
Calculation Value Definition Name
Contribution Limits 2
Value Definition Group
Limit Rules
Retrieval Date
Date Earned
Calculation Type
Flat Amount
Periodicity
Annually
Unit of Measure
Money
Currency
LDG Currency
Flat Amount
10,000
5. Click OK.
931

Oracle Fusion Cloud HCM
Using Common Features for HCM
Chapter 41
Values Defined by Criteria
Create the Value Definitions for the Default Criteria Definition
1. Select the row with the Default Criteria definition.
2. Click New.
3. Select Value and click OK.
4. Complete these fields:
Field Value
Calculation Value Definition Name
Other Jobs
Value Definition Group
Limit Rules
Retrieval Date
Date Earned
Calculation Type
Flat Rate
Rate
.17
5. Click OK.
Related Topics
•
Overview of Values Defined by Criteria
•
Generate HCM Rates
FAQ for Values Defined by Criteria
Does the order in which I add criteria definitions matter?
Yes, each criteria definition that you add is defined as a separate level and placed in priority order. The order produces a
tree structure, which affects processing and the value that's returned.
You can change the sequence of the criteria definitions at any time to suit your business needs and fix processing
problems.
932
Oracle Fusion Cloud HCM
Using Common Features for HCM
Chapter 42
Base Pay
42 Base Pay
Overview of Base Pay Configuration
Base pay is a person's salary amount. Managers and HR specialists view and adjust this amount or any component
amounts or percentages over the time someone works in their organization. Each salary record they manage has an
associated salary basis.
Here's how the salary basis configuration works with salary records and payroll processing.
• Calculations use the frequency and annualization factor of the salary basis to decide the annualized salary that
appears on the salary record. Calculations also use these salary basis settings and the full-time equivalent value
from the employment record to decide the annualized full-time salary.
• The salary record uses any salary components configured on the salary basis to itemize salary adjustments for
reports, such as merit and location.
• The payroll element associated with the salary basis holds the salary amount entered on the salary record. The
basis passes that amount to payroll for processing.
• The grade rate and differential profile associated with the salary basis decide the salary metrics and validation
messages people see on the salary record. Associating them with the salary basis is optional, so they aren't part
of every salary basis configuration.
You configure grades, grade rates, progression grade ladders, rate definitions, and payroll elements using the Base Pay
task list in the Compensation work area. You can also manage lookups, actions, and action reasons.
Related Topics
•
How You Enable Salary Itemization Using Incremental Components
•
How You Store the Salary Amount and Pass It to Payroll for Processing
•
How Salary Metrics Are Calculated
933

Oracle Fusion Cloud HCM
Using Common Features for HCM
Chapter 42
Base Pay
Salary Basis Options for Determining Salary Amount
When you configure a salary basis, you need to specify whether it determines the salary amount by user, by incremental
components, or by simple components.
Related Topics
•
Salary Amount Is Determined by User
•
Salary Amount Is Determined by Incremental Components
•
FTE Adjustments When Salary Amount Is Determined by Simple Components
Rounding Rules, Salary Amounts, and Decimal Places to
Display
You can specify separate rounding rules for the salary amount, annualized values, and salary ranges on a salary basis.
You can also specify the decimal places to show for all numeric salary values that you see on the salary record.
Use the Salary Basis task in the Compensation Management work area.
Rounding Rules and Usages
Here's how amounts and ranges use each rounding rule.
Rounding Rule Usage
Salary amount Used by calculations that include the salary amount, for example:
• To increase a salary using a percentage, such as 3.5%
• To convert the salary to a different frequency, such as from monthly to annually
• To prorate the salary based on a specific full-time equivalent, such as from 1 FTE to 0.5 FTE
It’s also used when calculating simple component amounts from percentages or adjustment
percentages. The rounding rule doesn’t apply to the overall salary amount because it’s a sum of the
component amounts.
Annualized values Specifies how the annual salary and annualized full-time salary amounts appear.
Salary range Specifies how salary ranges appear and when calculating revised salary ranges, for example:
• To convert the salary range from one frequency to another
• To apply salary differentials
934

Oracle Fusion Cloud HCM
Using Common Features for HCM
Chapter 42
Base Pay
The rounding rules always affect amounts and values from when you set them and onward. They don't affect previously
calculated amounts and values. Here's how you can ensure consistency across historical and current salary amounts:
1. Create another salary basis with new rules instead of editing an existing salary basis.
2. Update the salary records with this new salary basis from a specific date.
You can use loading tools, such as HCM Data Loader and HCM Spreadsheet Data Loader to make this transition
seamless. Be sure to set the old salary basis to Inactive. This way it's no longer available for people to add it as part of
their salary proposals.
Rounding Rule Place and Decimal Place to Display
We recommend that you match the decimal place of your salary amount rounding rule with the decimal place to display.
Here's what happens when the decimal and rounding rule places don't match.
Mismatch Issue Example Scenario Example Results
If the decimal place to display is longer than
your rounding rule place, salary amounts have
extra zeroes at the end.
Salary amount: 15.7923234
Decimal place to display: 4
Rounding rule: Nearest .01
Calculations round the amount to 15.79 and
salary pages display the amount as 15.7900.
If the decimal place to display is shorter than
your rounding rule place, salary amounts get
truncated.
Salary amount: 15.7923234
Decimal place to display: 2
Rounding rule: Nearest .0001
Calculations round the amount to 15.7923 and
salary pages display the amount as 15.79.
Payroll element entries ignore the decimal place to display from the salary basis because the elements always use the
decimal place of the currency definition. For example, US currency is defined to 2 decimal places. Even if you set your
salary amount display to 4 places, the element entries round the amount to 2 places.
Related Topics
•
Overview of Base Pay Configuration
•
Can HCM Data Loader round salary amounts when it loads salary information?
Salary Range Violation Behavior for Proposed Salaries
Specify how to handle salary range violation for various compensation actions, such as Change Salary and Salary
History. This handling also applies to Offer and HR actions that include the Salary section, such as Offer, Hire, Promote,
and Transfer.
You configure violation behavior using the Salary Range Violation Behavior field of the salary basis. You can let people
propose salaries that violate the salary range with or without a warning. Or, you can prevent people from proposing any
salaries that violate the salary range. For example, you warn people when their proposed salaries are below or over the
specified salary range. Or, you don't let anyone propose salaries that are below or over the specified salary range.
935

Oracle Fusion Cloud HCM
Using Common Features for HCM
Chapter 42
Base Pay
The default value for the Salary Range Violation Behavior field of all existing salary bases is Warn. We don't recommend
that you change it to Error for existing salary bases because you can get errors with historic data. For example, you've
an existing salary basis with a salary range of 100 to 200 USD. The salary basis is associated with a 2010 salary record
where the salary amount was 95 USD. It's also associated with a 2015 salary record where the salary amount was 105
USD. When you change the violation behavior to Error and try to load salary for 2020, you can get the violation error for
2010. The error occurs even though that's not the record you're correcting. To set the violation behavior to Error, then
we recommend that you create another salary basis to use with new salaries. This way, you can avoid issues with historic
data.
When you set the violation behavior to Warn, you don't see the warning message when you load salaries using
these tools: REST API, HCM Data Loader, and HCM Spreadsheet Data Loader. These tools show you only errors. The
Download Salaries task and grate step progression processes ignore this violation behavior.
Related Topics
•
Overview of Base Pay Configuration
•
How You Validate Salary Changes with the Grade Range
•
Overview of Salary Range Differentials
•
How Salary Metrics Change According to the Grade Rate and Salary Range Differentials
How You Store the Salary Amount and Pass It to Payroll
for Processing
The salary basis holds the overall salary amount from the salary record. It passes the amount to the element entry for
payroll processing each pay period.
Legislative Data Group (LDG)
You configure each salary basis for a specified LDG. If your organization has multiple LDGs, you need to create a
uniquely named salary basis for each unique set of characteristics applicable to each LDG. The LDG limits the payroll
elements that you can associate with the salary basis.
Payroll Element
You attach a single payroll element to each salary basis to hold the overall salary amount. The elements that you can
select from meet these criteria:
• They're valid for the selected LDG.
• They recur.
• They're either Earning or Information elements.
• They include eligibility definitions.
The required element eligibility definition can include eligibility criteria. We recommend that you leave the
eligibility open on the payroll element.
936

Oracle Fusion Cloud HCM
Using Common Features for HCM
Chapter 42
Base Pay
Make sure that individual compensation doesn't also use the element you select. Using the same element across
compensation objects can lead to payroll conflicts. It can also lead to unexpected deletions of salary or individual
compensation.
Restrictions
You can link recurring elements to multiple salary bases only if they meet these conditions:
• Headquarters-based grades have a base pay of X.
• Grades for all other locations have a base pay of X - 2%.
Input Value
An element can have multiple input values. The element input value that you select in the salary basis, such as Amount,
is the value that stores the salary amount.
The monetary amount stored in the element entry is the salary amount in the salary information for the person's
assignment. That salary amount is in the frequency of the person's salary basis, such as annually or hourly.
If you don't use Oracle Fusion Global Payroll, you can store the salary amount using information payroll elements.
• If the element includes the Periodicity input value, the element entry stores the annual salary amount.
• If the element doesn't include the Periodicity input value, the element entry stores the salary amount in the
same frequency as the salary basis.
Here's how the payroll formula processes the input values of element entries received in the frequency of the salary
basis:
Salary Basis Frequency Amount Passed to Payroll Payroll Processing
Annually Annual amount Converts the annual amount to the appropriate
payroll period amount.
Hourly Hourly rate Multiplies the hourly rate by the number of
hours reported for the payroll period.
The resulting base pay earnings appear on the payslip for the payroll element associated with the salary basis.
Currency
The element currency automatically decides the salary basis currency used to pay the person.
Reference
The Configuring Payroll Elements for Use in Oracle Fusion Compensation document (ID 1589502.1) explains how
compensation uses payroll elements. It also explains how to configure the elements for specific uses.
Related Topics
•
Overview of Base Pay Configuration
•
Create a Payroll Element to Use with Salary Bases
937

Oracle Fusion Cloud HCM
Using Common Features for HCM
Chapter 42
Base Pay
How You Enable Salary Itemization Using Incremental
Components
You can enable itemization that lets HR specialists and managers reflect the different reasons for salary changes, such
as merit or location. Use the Salary Basis task in the Compensation work area.
Incremental Component Configuration
Here are the key settings for the salary basis that let you include salary components for itemization.
Field Value
Salary Basis Type Salary adjustment amount is determined by incremental components.
Components to Display When Adjusting
Salary
Either of these:
• Select specific incremental components to display during allocation.
• Enable incremental component selection during allocation.
You add incremental salary components or can change the available components by editing the
CMP_SALARY_COMPONENTS lookup type. Use the Manage Common Lookups task in the Compensation work area.
Incremental Component Processing
When values change for incremental salary components, the payroll element associated with the salary basis holds the
new salary amount calculated from the component adjustments. Payroll doesn't receive individual component values
for processing.
Example
The person's current salary is 50,000 USD. Their manager enters incremental component adjustment percentages and
salary calculations decide the monetary amounts, as shown here. The calculations then sum the monetary amounts and
the original salary amount to decide the new salary amount of 60,000 USD. Here's the equation:
(5,000 + 3,000 + 2,000 + 50,000)
Salary Component Adjustment Percentage Calculated USD
Merit 10 5,000
Promotion 6 3,000
Adjustment 4 2,000
938

Oracle Fusion Cloud HCM
Using Common Features for HCM
Chapter 42
Base Pay
Related Topics
•
Incremental Salary Component Lookups
Basic Process to Default Salary Amounts from Grade
Ladder Rates
Here's how you can populate someone's salary amount from grade ladder rates during HR actions that change their
grade ladder, grade, or step. Examples of these HR actions are Hire, Transfer, and Promote.
1. Set up your rates using the Progression Grade Ladders task, not the Manage Grade Ladders task.
◦
Set Include Salary Updates to Yes.
◦
Set Salary Calculation Method to Use grade step rate.
2. Make sure that people have a salary basis where the salary amount is determined by user or simple component.
If you select any other salary basis type, the grade ladder won't default the salary amount. If it uses simple
components, the salary basis needs to include a Progression grade ladder rate component. You configure salary
bases using the Salary Basis task.e
3. Include the Salary section in your HR action. You might need to configuration responsive pages using
Transaction Design Studio in HCM Experience Design Studio.
4. Include the Grade Ladder, Grade, and Step attributes in your HR action. You need to configure responsive
pages, using Transaction Design Studio in HCM Experience Design Studio.
Exception: If your grades don't have steps, then you don't need to include the Step attribute in your HR actions.
To default the salary amount from the grade ladder when you hire someone, you need to select the salary basis. Also
select the grade ladder, grade, and step.
Related Topics
•
Salary Basis Options for Determining Salary Amount
How You Validate Salary Changes with the Grade Range
You can verify that salary changes fall within the appropriate range for each person using grade range validation.
This validation generates a warning message when someone enters a new or adjusted salary that's outside the person's
assignment grade range. The person can ignore the message or revise the salary to fall within the valid range.
The assignment grade in the grade rate attached to the salary basis defines the minimum and maximum grade range
values. You can adjust the base ranges by linking a differential profile to the salary basis. Differentials apply according to
one of these criteria:
• Location
• Business unit
• Location and business unit
• Compensation zone
939

Oracle Fusion Cloud HCM
Using Common Features for HCM
Chapter 42
Base Pay
• Compensation zone and business unit
You can also associate grade rate differentials that override the grade rate, and thus the grades and grade ranges,
associated with the salary basis. The grade rate from the differential profile needs to have corresponding grades for all
the grades of the grade rate linked to the salary basis.
Related Topics
•
Grade Rates
•
Overview of Salary Range Differentials
How Salary Metrics Are Calculated
Salary amount has a date while full-time equivalent (FTE), grade, grade rate, and differential profile have effective dates.
Thus, a salary record can apply logic for multiple combinations of FTE, grade, grade rate, and differential to different
time periods.
So, how are salary metrics, such as compa-ratio, range minimum, and range maximum, calculated? The metric
calculations use a reference date. Here's how we decide that date:
• If the salary record has an end date that's earlier than the current date, then use the salary end date.
• If the start date of the salary record is in future, then use the salary start date.
• If the salary record started in the past and doesn't have an end date, then use the current system date.
Related Topics
•
How Salary Metrics Change According to the Grade Rate and Salary Range Differentials
How Many Salary Bases to Create
You need to create a separate salary basis, for each unique combination of the following characteristics associated with
a worker's base pay.
A good practice if you require many salary bases in your organization is to use descriptive names. Examples are CA
Hourly Wages, UK Annual Salary with Components, and Adjunct Pay 3 Credit Courses.
Legislative Data Group (LDG)
How many LDGs are in your enterprise? You can create salary bases within a particular LDG. You can't share salary bases
across LDGs. Each salary basis name and each salary basis code must be unique within a legislative data group (LDG).
Frequency and Annualization Factor
How many different frequencies for quoting base pay are in use? People with multiple assignments on different payroll
frequencies need to have a different salary basis associated with each assignment.
Do any of the frequencies have multiple annualization factors for base pay? Your number of salary bases increases by
one for each extra annualization factor in each separate LDG.
940

Oracle Fusion Cloud HCM
Using Common Features for HCM
Chapter 42
Base Pay
Payroll Element and Currency
Do you want to use the same payroll element for different salary bases? You can do this if the element has these
configurations:
• It's a recurring earnings element.
• It allows multiple entries in the same period.
How many currencies do you pay people in, within a single LDG? You need one payroll element for each currency within
an LDG. You also need a separate salary basis for each payroll element.
Components
Do you want to itemize salary? You need one extra salary basis for each unique collection of components.
Grade Rates and Differential Profiles
How many grade rates are you using? The number of salary bases increases by one for each grade rate in use. You can
reduce the number of grade rates by using a differential profile. Profiles with the compensation zone or compensation
zone and business unit criteria can have grade rates configured instead of multipliers. The number of salary bases
increases by one for each differential profile in use.
Rounding Rules and Decimal Precision
How many different rounding rules do you use for salary amount? The number of salary bases increases by one for
each rounding rule in use.
How many different decimal places do you display? The number of salary bases increases by one for each decimal
precision in use.
Related Topics
•
Grade Rates
•
Incremental Salary Component Lookups
•
Create a Payroll Element to Use with Salary Bases
•
How Salary Basis Options Work with Salary Amounts and Calculations
Periodicity Conversion
Rate conversion formulas convert amounts to different periodicities for payroll calculations. The following calculations
use rate conversion formulas:
• Proration
• Hours multiplied by rates calculation of an element run result
• Rates based on rate definitions
941

Oracle Fusion Cloud HCM
Using Common Features for HCM
Chapter 42
Base Pay
Predefined Periods
This table lists the predefined periods that you can use to set periodicity.
If these values don't meet your requirements, you can copy a predefined rate conversion formula and edit its periodicity
values.
Periodicity Valid for Payroll Periods Number of Periods per Year
Annually
Yes
1
Bimonthly
Yes
6
Biweekly
Yes
26
Calendar Monthly
Yes
12
Daily
No
365
Hourly
No
2920 (365 days multiplied by 8 hours)
Lunar Month
Yes
13
Periodically
No
Payroll frequency determines the number of
periods to use in the rate conversion.
Quarterly
Yes
4
Semiannually
Yes
2
Semimonthly
Yes
24
Workday
No
260
Weekly
Yes
52
Work Hour
No
2080 (260 days multiplied by 8 hours)
Defining Periodicity
This table lists the different ways in which you can define periodicity:
942

Oracle Fusion Cloud HCM
Using Common Features for HCM
Chapter 42
Base Pay
Object Task Description
Elements
Elements
The Periodicity input value specifies the
frequency of the element value.
For example, salary element entries that hold
annual salary values have an annual periodicity.
Payrolls
Payroll Definitions
Period Type specifies the number of payroll
periods.
For example, the Monthly Lunar period type
includes 13 payroll periods.
Rates
Rate Definitions
Rate definition can specify the following
periodicities:
• Return periodicity of the rate
• Periodicity of each rate contributor
• Periodicity of the calculated sum of the
rate contributors
Rate Conversion Formulas
Rate conversion formulas change the periodicity of an amount.
For example, the Standard Rate Annualized conversion formula can convert an annual salary amount to a weekly
amount.
This table lists the predefined rate conversion formulas to change the periodicity of an amount.
Rate Conversion Rule Description Example
Standard Rate Annualized
Calculates the annual rate using the input
periodicity and converts the amount to an
output periodicity and rate.
This rule uses default values, such as 2080
hours or 260 working days, to calculate the
annual rate. You select the day or hourly basis
during element definition.
To convert a weekly amount to a semimonthly
periodicity, the formula:
1. Multiplies the weekly amount by 52.
2. Divides the result by 24.
Standard Rate Daily
Calculates the daily rate using the input
periodicity and converts the amount to an
output periodicity and rate.
This rule uses a default value, such as 260
working days a year, to calculate the daily rate.
To convert an annual amount to daily
periodicity, the formula:
1. Divides the annual amount by 365.
2. Multiplies the result by the number of days in
the payroll period.
Standard Working Hours Rate Annualized
Uses the employee's standard working hours to
convert the monetary value and working hours
to an annual value before calculating the rate.
The employee works 40 hours a week with a
monthly salary of 1000:
((1000*12)/(40.00*52) = 5.77 an hour
943

Oracle Fusion Cloud HCM
Using Common Features for HCM
Chapter 42
Base Pay
Rate Conversion Rule Description Example
Assignment Working Hours Rate Annualized
Uses the employee's working hours to convert
the monetary value and working hours to an
annual value before calculating the rate.
The employee works 40 hours a week, with 37.5
standard working hours a week, and a monthly
salary of 1000:
((1000*12)/(37.50*52) = 6.15 an hour
Periodic Work Schedule Rate Annualized
Uses the employee's work schedule for the
payroll period for daily and hourly conversions.
For an employee:
• With a monthly salary of 1000
• Assigned a monthly payroll
The formula checks the work schedule details
for the month.
For a daily conversion:
1000 a month/20 days in the month = 50
Note:
For compensation calculations where the
employee isn't assigned a payroll, the rate is
calculated using the weekly rate calculation.
The amount is converted to an annual figure
and divided by the number of days or hours
in that week based on the work schedule.
The impact of rate conversion rule is summarized here.:
Periodicity: The conversion rule for periodicity applies to Flat Amount, Hours * Rate, and Days * Rate calculation rules.
You can override the periodicity used as the default for the element definition at the element entry level.
Work Units: The Work Units conversion rule applies only to flat amount calculation rules for standard and supplemental
earnings elements. The selection of which work units to use in reports and payslips determines the conversion
calculation. The application creates the element input values using the default values of the rate conversion formulas.
For example, this table illustrates how the payroll process determines the standard work units for any given pay period:
Work Units Selected Example
Hours
2080/24 = 86.67
Days
260/24 = 10.83
None
No input values are created
Proration: The element template includes a new question for proration units. Proration rate conversion rules replace
the previous proration methods in the element template. You have greater flexibility, for example, to base proration on
calendar days when using work units for conversion.
944
Oracle Fusion Cloud HCM
Using Common Features for HCM
Chapter 42
Base Pay
Note: If the conversion rules don't meet your requirements, you can copy and edit the rules using the Fast Formulas
task under My Clients Group on your Home page.
Related Topics
•
Overview of Using Formulas
•
Options to Configure Rate Definitions
•
Configure Periodicity Conversion Rules
•
Create Conversion Formulas for Proration
Examples of Annual Salary and Annualized Full-Time
Salary Calculations
These examples show you how the annual salary and annualized full-time salary that you see on the salary get
calculated.
The legal employer standard working hours, person working hours, and FTE come from the person's employment
record. You can view it using the Employment Info task for your teams or your client groups. The salary annualization
factor and frequency come from the salary basis associated with the person's salary record.
Assumptions
Here are the expressions used to calculate FTE and the annualization factor for hourly rates:
• FTE = Person Working Hours per Week / Legal Employer Standard Working Hours per Week
• Annualization Factor for Hourly Rates = Legal Employer Standard Working Hours per Week * Weeks per Year
For these examples, the variable Legal Employer Standard Working Hours per Week is 40.
Person Working Hours = Standard Working Hours (40h)
Here are the hourly rate inputs when the person working hours are the same as the standard working hours, which are
40 hours.
Calculation Input Value
Person working hours 40
FTE 1
Annualization factor 2080
Salary amount 15 USD
Here are the corresponding salary calculations and results.
945

Oracle Fusion Cloud HCM
Using Common Features for HCM
Chapter 42
Base Pay
Salary Calculation Result
Annual 15 x 2080 31,200 USD
Annualized Full-Time 15 x (2080/1) 31,200 USD
Person Working Hours = Standard Working Hours (35h)
Here are the hourly rate inputs when the person working hours are the same as the standard working hours, which are
35 hours.
Calculation Input Value
Person working hours 35
FTE 1
Annualization factor 1820
Salary amount 10 USD
Here are the corresponding salary calculations and results.
Salary Calculation Result
Annual 10 x 1820 18,200 USD
Annualized Full-Time 10 x (1820/1) 18,200 USD
Person Working Hours < Standard Working Hours
Here are the rate inputs when the person working hours are less than the standard working hours. Typically, this applies
to part-time people.
Calculation Input Hourly Rate Value Monthly Rate Value Annual Rate Value
Person working hours 20 20 20
FTE 0.5 0.5 0.5
Annualization factor 2080 12 1
Salary amount 15 USD 5,000 USD 50,000 USD
Here are the corresponding salary calculations and results.
Salary Annual Salary Calculation Result Annualized Full-Time
Salary Calculation
Result
Hourly 15 x 2080 x 0.5 15,600 USD 15 x (2080/1) 31,200 USD
946

Oracle Fusion Cloud HCM
Using Common Features for HCM
Chapter 42
Base Pay
Salary Annual Salary Calculation Result Annualized Full-Time
Salary Calculation
Result
Monthly 5,000 x 12 60,000 USD 5,000 x (12/0.5)
120,000 USD
Annual 50,000 x 1 50,000 USD 50,000 x (1/0.5)
100,000 USD
Person Working Hours > Standard Working Hours
Here are the annual rate inputs when the person working hours are greater than the standard working hours. This can
apply to people who have an on-call component to their job.
Calculation Input Value
Person working hours 48
FTE 1.25
Annualization factor 1
Salary amount 20,000 USD
Here are the corresponding salary calculations and results.
Salary Calculation Result
Annual 20,000 x 1 20,000 USD
Annualized Full-Time 20,000 x (1/1.25) 16,000 USD
Reference
For more details about how FTE affects salary and example best practices for salary management, see How Salary and
FTE Work Together (document ID 2168552.1).
Related Topics
•
How Many Salary Bases to Create
•
How You Change a Salary to Account for a Changed FTE
947

Oracle Fusion Cloud HCM
Using Common Features for HCM
Chapter 42
Base Pay
FAQs
How You Can Audit Salary Data
You need to enable audit for salary data using the Manage Audit Policies task.
Where does the annualization factor for a salary basis that uses
payroll period frequency come from?
The period type on the payroll linked to a person's assignment decides the number of payroll periods in a year. These
payroll periods are the annualization factor.
Can I use the same payroll element for multiple salary bases?
Yes, if it's a recurring element that you classify as an earnings element and configure to enable multiple entries in the
same period.
Related Topics
Can I change or delete a salary basis that's in use?
No. After you associate the salary basis with anyone, you can't delete or change any characteristic.
Can I add effective-dated changes to the salary basis?
No because the salary basis isn't an effective-dated object.
Can managers change the salary basis of a salary record?
Yes. You can hide or show the edit capability for managers using personalization on the pages where managers enter
salary allocations.
948

Oracle Fusion Cloud HCM
Using Common Features for HCM
Chapter 42
Base Pay
Can I update an element mapped to a salary basis that's in use?
Yes, but only the next salary change recognizes the updated element or input value. At that time, salary processing end
dates the element entry associated with the prior salary.
When you update the element mapping, no changes apply to the person's data.
Using Base Pay
Overview of Base Pay Management
Base pay is a person's fixed salary amount. You view and adjust this amount or any component amounts or percentages
over the time the person works in your organization.
Typically, you adjust salary as part of HR actions, such as when you hire, transfer, or promote someone.
• As a line manager, you can also review and adjust base pay using the Compensation page of the My Team work
area. Or you can use the Change Salary quick action.
• As a compensation manager or HR specialist, you can change salary and review proposed salary changes using
the My Client Groups > Compensation work area. Or you can use the Compensation quick actions, such as
Change Salary.
Salary monetary values appear by default in the currency of the element associated with the salary basis. Individual
compensation award and contribution values appear by default in the currency of the element associated with the
plan option. Normally, these currencies are the individual's local currency. You can also view the salary, award, and
contribution currencies values in your preferred currency.
How the Salary Basis Affects Salary
Each salary record that you can manage has an associated salary basis. Here's how the configured salary basis affects
what you see on the salary record.
949
Oracle Fusion Cloud HCM
Using Common Features for HCM
Chapter 42
Base Pay
The annualized salary that you see got calculated using the currency, frequency, and annualization factor from the
salary basis. Any salary components you use to itemize salary adjustments for reports, such as merit and location, also
come from the salary basis. And, the salary amount you enter is held by the payroll element associated with the salary
basis. The salary basis passes that amount to payroll for processing.
Typically, you don't change salary basis associated with the salary record, but here are some examples of when you
might change it:
• The person's job changes from that of an individual contributor to a manager. You change their salary basis
from hourly to annual.
• A union contract amendment mandates itemizing the person's pay rate. You change their hourly salary basis
that doesn't use components changes to an hourly salary basis that does.
Related Topics
•
How's the salary or individual compensation amount calculated when I select a different currency?
950

Oracle Fusion Cloud HCM
Using Common Features for HCM
Chapter 42
Base Pay
Annual Salary and Annualized Full-Time Salary Calculations
The annual salary and annualized full-time salary amounts on the salary get calculated using the salary amount and
annualization factor.
The annualized salary calculation also uses the person's full-time equivalent (FTE). The annualization factor comes from
the associated salary basis. The FTE comes from the person's employment record.
Amount Description Calculation
Salary The actual salary the person receives. This
amount has the same periodicity as the salary
basis, such as Annual or Hourly.
The numeric form of the periodicity, such as 12
or 2080, is called annualization factor.
None
Annual Salary The salary amount that's converted to the
annual periodicity for the person's FTE (full-
time equivalent).
(Salary Amount * Annualization Factor)
Annualized Full-Time Salary The salary amount that's converted to the
annual periodicity and calculated as if the
person's FTE was 1.0.
(Salary Amount * Annualization Factor) / FTE
Sample Calculated Salary Amounts
The FTE gives you the same annual and annualized amounts for full-time employees and different amounts for part-
time employees. Here's sample salary information for a full-time employee whose FTE is 1.0 and a part-time person
whose FTE is 0.6.
Periodicity Annual Monthly Weekly Work Hourly Hourly
Annualization factor 1
12 52
2080
2920
Full-time salary
amount
156,000 13,000 3,000 75 50
Full-time annual salary 156,000 156,000 156,000 156,000 146,000
Full-time annualized
full-time Salary
156,000 156,000 156,000 156,000 146,000
Part-time salary
amount
93,600 7,800 1,800 75 50
Part-time annual
salary
93,600 7,800 1,800 75 50
Part-time annualized
full-time salary
156,000 156,000 156,000 156,000 146,000
951

Oracle Fusion Cloud HCM
Using Common Features for HCM
Chapter 42
Base Pay
The salary amounts don't change for the Work Hourly and Hourly salaries of the full-time and part-time people. That's
because FTE doesn't affect salaries with hourly periodicities the way it affects salaries with any of the other periodicities.
The hourly rate is always the hourly rate for any FTE.
Related Topics
•
How You Change a Salary to Account for a Changed FTE
•
Examples of How FTE and Salary Amount Changes Work
•
Examples of Annual Salary and Annualized Full-Time Salary Calculations
•
Periodicity Conversion
Examples of Annual Salary and Annualized Full-Time Salary
Calculations
These examples show you how the annual salary and annualized full-time salary that you see on the salary get
calculated.
The legal employer standard working hours, person working hours, and FTE come from the person's employment
record. You can view it using the Employment Info task for your teams or your client groups. The salary annualization
factor and frequency come from the salary basis associated with the person's salary record.
Assumptions
Here are the expressions used to calculate FTE and the annualization factor for hourly rates:
• FTE = Person Working Hours per Week / Legal Employer Standard Working Hours per Week
• Annualization Factor for Hourly Rates = Legal Employer Standard Working Hours per Week * Weeks per Year
For these examples, the variable Legal Employer Standard Working Hours per Week is 40.
Person Working Hours = Standard Working Hours (40h)
Here are the hourly rate inputs when the person working hours are the same as the standard working hours, which are
40 hours.
Calculation Input Value
Person working hours 40
FTE 1
Annualization factor 2080
Salary amount 15 USD
Here are the corresponding salary calculations and results.
952

Oracle Fusion Cloud HCM
Using Common Features for HCM
Chapter 42
Base Pay
Salary Calculation Result
Annual 15 x 2080 31,200 USD
Annualized Full-Time 15 x (2080/1) 31,200 USD
Person Working Hours = Standard Working Hours (35h)
Here are the hourly rate inputs when the person working hours are the same as the standard working hours, which are
35 hours.
Calculation Input Value
Person working hours 35
FTE 1
Annualization factor 1820
Salary amount 10 USD
Here are the corresponding salary calculations and results.
Salary Calculation Result
Annual 10 x 1820 18,200 USD
Annualized Full-Time 10 x (1820/1) 18,200 USD
Person Working Hours < Standard Working Hours
Here are the rate inputs when the person working hours are less than the standard working hours. Typically, this applies
to part-time people.
Calculation Input Hourly Rate Value Monthly Rate Value Annual Rate Value
Person working hours 20 20 20
FTE 0.5 0.5 0.5
Annualization factor 2080 12 1
Salary amount 15 USD 5,000 USD 50,000 USD
Here are the corresponding salary calculations and results.
Salary Annual Salary Calculation Result Annualized Full-Time
Salary Calculation
Result
Hourly 15 x 2080 x 0.5 15,600 USD 15 x (2080/1)
31,200 USD
953

Oracle Fusion Cloud HCM
Using Common Features for HCM
Chapter 42
Base Pay
Salary Annual Salary Calculation Result Annualized Full-Time
Salary Calculation
Result
Monthly 5,000 x 12 60,000 USD 5,000 x (12/0.5)
120,000 USD
Annual 50,000 x 1 50,000 USD 50,000 x (1/0.5)
100,000 USD
Person Working Hours > Standard Working Hours
Here are the annual rate inputs when the person working hours are greater than the standard working hours. This can
apply to people who have an on-call component to their job.
Calculation Input Value
Person working hours 48
FTE 1.25
Annualization factor 1
Salary amount 20,000 USD
Here are the corresponding salary calculations and results.
Salary Calculation Result
Annual 20,000 x 1 20,000 USD
Annualized Full-Time 20,000 x (1/1.25) 16,000 USD
Reference
For more details about how FTE affects salary and example best practices for salary management, see How Salary and
FTE Work Together (document ID 2168552.1).
Related Topics
•
How Many Salary Bases to Create
•
How You Change a Salary to Account for a Changed FTE
How You Change a Salary to Account for a Changed FTE
Typically, when you change the full-time equivalent (FTE) value you also need to change the salary amount.
For the adjustments to happen automatically, use an integrated task, such as Change Working Hours. You can create or
change an FTE and then make salary changes in the Change Salary section. This way, the annualized full-time salary
amount and salary metrics are automatically adjusted using the new FTE. When you don’t create salary, the calculations
could be incorrect. So we always recommend creating a salary together with FTE change.
954

Oracle Fusion Cloud HCM
Using Common Features for HCM
Chapter 42
Base Pay
When you created an FTE change without salary change, use the Change Salary task to create a salary change. Be sure
to use the same date as the FTE change you just made.
These are the calculated values that adjust automatically:
• Salary range minimum, midpoint, and maximum
• Annual salary, annualized full-time salary
• Compa-ratio, quartile, quintile, and salary range position
Tip: To make sure that salary calculations work, the calculations treat FTEs of 0 as if the FTE is 1.
Related Topics
•
Examples of How FTE and Salary Amount Changes Work
Examples of How FTE and Salary Amount Changes Work
These examples show how a full-time equivalent (FTE) change affects an annual salary. The effect depends on the
salary basis frequency and whether you use components to itemize the salary adjustment.
In both examples, you make these changes:
1. Change the person's FTE from 1.0 to 0.5 starting on July 1, 2019 using the Manage Employment task.
2. Add a salary change that also starts on July 1, 2019 using the Salary task.
Or make an assignment and a salary change together starting on July 1, 2019 using the Change Working Hours task.
Changes to a Monthly Salary Basis
Because you're using the same start date, the salary calculations automatically adjust all the salary amounts and related
metrics using the new 0.75 FTE.
Salary Info Previous Value New Value
FTE 1 0.75
Salary Amount 10,000 7,500
Adjustment Amount NA 0
Adjustment Percentage NA 0
Annual Salary 120,000 90,000
Annualized Full-Time Salary 120,000 120,000
Salary Range 10,000-20,000 7,500-15,000
Compa-Ratio 66.67 66.67
Range Position 0 0
Quartile 1 1
955

Oracle Fusion Cloud HCM
Using Common Features for HCM
Chapter 42
Base Pay
Salary Info Previous Value New Value
Quintile 1 1
Changes to an Hourly Salary Basis
The calculations use the 2080 annualization factor and the new 0.75 FTE. The calculations don't automatically adjust
the salary amount because FTE doesn't affect hourly periodicities the way it affects all other periodicities.
Salary Info Previous Value New Value
FTE 1 0.75
Salary Amount 50 50
Adjustment Amount NA 0
Adjustment Percentage NA 0
Annual Salary 104,000 78,000
Annualized Full-Time Salary 104,000 104,000
Salary Range 10,000-20,000 7,500-15,000
Compa-Ratio 66.67 66.67
Range Position 0 0
Quartile 1 1
Quintile 1 1
Changes to an Annual Frequency Incremental Salary Basis
When you change the FTE for an incremental salary basis with an annual frequency, such as from 1 to 0.75, the salary
info adjusts. And the incremental component values get set to 0.
Salary Info Previous Value New Value
FTE 1 0.75
Salary Amount 100,000 75,000
Annual Salary 100,000 75,000
Annualized Full-Time Salary 100,000 100,000
Salary Range 50,000-1500,000 37,500-112,500
Compa-Ratio 100 100
Range Position 50 50
Quartile 3 3
956

Oracle Fusion Cloud HCM
Using Common Features for HCM
Chapter 42
Base Pay
Salary Info Previous Value New Value
Quintile 3 3
Incremental Components Table
Incremental Component Previous Value New Values
Adjustment 10,000 0
Cost of Living 5,000 0
Equity 5,000 0
Location 10,000 0
Market 10,000 0
Merit 60,000 0
Related Topics
•
How You Change a Salary to Account for a Changed FTE
Overview of Salary History
As a compensation manager, you can view and manage assignment salaries with amounts that people entered directly
or using components.
More specifically, you can view and compare salaries, and see the summary and details of individual salaries. You can
also create, edit, or delete multiple salaries and submit all your changes together for approval. And you can view who
created and updated salary details, and when.
To open the Salary History page, you can use the My Client Groups > Salary History task or quick action. On the My
Client Groups > Compensation Info page, you can use the Actions menu, Salary History option.
When you open the Salary History page, it recalculates the analytical values of all the salary records so you see accurate
analytics in each row. Thus when you submit changes from this page that you opened, the Updated By field identifies
you in all the salary records. To change a single salary record, use the Compensation Info or Change Salary task. That
way you don't recalculate data for all salary records.
Edit Salaries in the Integrated Workbook
You can edit salary data using an integrated Microsoft Excel workbook. You can edit salaries, but you can't change
the associated salary bases. If you configured differentials, the workbook calculates salary ranges by considering the
corresponding differential profiles.
957

Oracle Fusion Cloud HCM
Using Common Features for HCM
Chapter 42
Base Pay
Download Salaries
1. In the tasks panel tab, click Download Salaries.
2. Select the relevant download parameters. Be sure to include the latest salary start date and local currency if you
plan to upload your changes.
The currency shown comes from the input value of the payroll element associated with the salary basis.
3. To view the data that matches your download parameters, click Preview Download.
4. To generate the workbook and populate it with the data that matches your download parameters, click Prepare
in Workbook.
Edit Salary Data
You can change values in cells with a white background. The workbook adds a symbol in the Changed field to mark the
rows where you changed values in one of the white cells. If you enter a new base salary, you also need to enter a new
salary start date. Make sure that the new base salary and current base salary are different. Otherwise, you get errors
when you upload your changes.
The workbook contains five columns to hold data for up to five active salary components of a salary basis. When you've
less than five active salary components, only the column cells for those components have values. If you've more than
five active salary components, the workbook includes columns and values for only the first five components.
Upload Salary Changes
When you finish, click Upload. The upload process loads only those rows marked as Changed. It ignores any changes in
cells without a white background.
CAUTION: Don't select the Upload and then immediately download option when prompted during an upload. The
data that you uploaded then immediately download back into the workbook, hiding any errors that occurred during
the upload.
Validate Changes
Open the Manage Salaries page, then search for and select a person whose salary you updated.
Resolve Errors
The upload process automatically updates the Status field in each workbook row. If there are errors that require review,
the process takes these actions:
1. Rolls back the change in the application.
2. Sets the workbook row status to Update failed.
3. Continues to the next workbook row.
To view and resolve an error:
1. In the Status field, double-click Update failed.
2. Fix any data issues in the workbook.
3. Upload the latest changes.
958

Oracle Fusion Cloud HCM
Using Common Features for HCM
Chapter 42
Base Pay
Related Topics
•
Guidelines for Using Desktop Integrated Excel Workbooks
•
Set Up Desktop Integration for Excel
•
Troubleshoot Desktop Integration for Excel
•
What's the difference between Export to Excel and desktop integration for Excel?
FAQs for Base Pay
How You Can Change Multiple Salaries at One Time
You can use the integrated workbook in the Compensation work area to view and edit salaries for multiple people.
1. Use the Export Salaries task to set your export parameters.
2. In the Edit Preview section, click Prepare in Workbook to generate the workbook.
3. Make your edits in the workbook.
4. Upload your changes.
Can I copy salary as part of a global transfer?
Yes, if the transfer is within the same LDG, and the salary basis associated with the salary is of type user determined.
How You Can See Salary Changes That Need Your Approval
Use the Compensation Info quick action in My Teams or My Client Groups, depending on your role.
If you submitted the change, you can withdraw it. If you're the approver, you can approve or reject the change. If you're
an observer, then you get an informational notice.
Can HCM Data Loader round salary amounts when it loads salary information?
No. The data loader loads the amounts that are in the file.
Here are the three conditions when salary amounts get rounded:
• You increase the amount using a percentage, such as 3.5%.
• Salary calculations convert the amount to a different frequency, such as from monthly to annual or annual to
monthly.
• You prorate the amount according to a specific full-time equivalent (FTE), such as from 1 FTE to 0.5 FTE.
959

Oracle Fusion Cloud HCM
Using Common Features for HCM
Chapter 42
Base Pay
960

Oracle Fusion Cloud HCM
Using Common Features for HCM
Chapter 43
Individual Compensation Plans
43 Individual Compensation Plans
Overview of Individual Compensation
You can let managers and specialists award compensation outside of the regular compensation cycle. For example,
a line manager can give someone a spot bonus or grant stock shares. And a compensation manager can give people
education reimbursements.
You can also let people make and change their own contributions to charitable or savings plans. These off-cycle
allocations and contributions require appropriate payroll elements and individual compensation plans.
• The payroll element communicates the payment or distribution details to payroll for processing. For example, a
company car plan has options with different compensation amounts for various mileage ranges. A spots bonus
plan has options with different fixed monetary amounts.
• The plan includes at least one option that links the payroll element to the plan. It also decides when payments
start and end, the people eligible for the plan, and when people can access the plan. For example, a car
allowance plan has multiple options for monthly payments starting January 1 and ending December 31
according to mileage ranges. People in field sales and service jobs are eligible for the plan, and managers can
award compensation when they hire, transfer, and promote people.
You can also let people view nonmonetary awards by adding the relevant plans to compensation history. To let them
view their payment and contribution history, add the payroll elements linked to the plans that have recurring payments
or contributions.
Plan Access Restrictions
You control the situations when a manager can create, update, or discontinue individual compensation awards using
plan restrictions. These same restrictions let you control similar actions for people contributing to savings and donation
plans.
You configure these restrictions when you create the individual compensation plan using the Individual Compensation
Plans task in the Compensation work area.
Whether to Restrict Access
The first decision you make on the Plan Access tab is whether to restrict access to the plan.
• If you select No, the plan becomes available to everyone on all pages where people hire individuals, or manage
individual compensation or personal contributions. It's very rare that you'd select this option. For example,
if you don't restrict access to a bonus plan, then people could manage the bonus plan for themselves. That's
because the plan would appear in the Manage Personal Contributions action.
• If you select Yes, you need to add at least one action where the plan should be available. Make sure that you
select all related actions. For example, you set up the plan so that it's visible in the Pending Worker action.
You also want to make it visible in the Hire action. Otherwise, when someone converts to an employee, their
manager can't see the allocation. And, when the manager submits their changes, the employee's allocation gets
961

Oracle Fusion Cloud HCM
Using Common Features for HCM
Chapter 43
Individual Compensation Plans
removed. You can optionally configure the corresponding access details about when people can start, update,
or stop allocations or contributions.
All Action
The default action All is similar to setting Restrict Plan Access to No, except that you can configure access details. This
action opens plan access to all actions available in the list, including the Manage Contributions action. Basically, anyone
who meets the eligibility criteria for the plan can see the plan. If you added this action to a bonus plan, for example,
anyone eligible for the plan could award themselves a bonus.
To add other access actions, you need to change the All action to something else, such as Hire. Then, the Add icon is
available and you can add any other access actions that are appropriate for the plan.
HR Actions
To make the plan available to people as part of an HR action, add one or more HR actions. For example, add the Transfer
action to a moving allowance plan to make the plan available when people transfer someone using that action.
To make the plan available to recruiters creating or editing job offers, you need to add the same action that they select
in the offer. For example, the recruiter selects the Add Pending Worker or Add Assignment action while creating the
offer. The individual compensation plan access needs to include the same action for the plan to appear in the Other
Compensation section of the job offer.
Manage Individual Compensation Action
To make the plan available to people when they want to award off-cycle compensation to someone, add the Manage
Individual Compensation action. You can add only this action or also add HR actions. For example:
• You want managers to use the Bonus plan to reward performance. So, you restrict plan access to the Manage
Individual Compensation actions.
• You want managers to use the Bonus plan to award hiring bonuses or to reward performance. So, you restrict
plan access to the Hire and Manage Individual Compensation actions.
Administer Individual Compensation Action
To make the plan available to only HR specialists, compensation specialists, and compensation managers, add
the Administer Individual Compensation action. These people can see plans with this plan access action using the
Administer Individual Compensation task.
Manage Contributions Action
To make the plan available for people to contribute to, such as for retirement savings or charities, add the Manage
Contributions action. Don't add any other actions for contribution plans.
Individual Compensation Plan and Option Visibility
Your plan configuration decides whether people can see the plan or option when they use the Administer Individual
Compensation, Individual Compensation, and Manage Personal Contribution tasks.
962

Oracle Fusion Cloud HCM
Using Common Features for HCM
Chapter 43
Individual Compensation Plans
The person getting the compensation allocation or making the personal contribution needs to meet these conditions:
• Be eligible for the element you associated with the option.
• Meet the criteria of the eligibility profile you associated with the plan, option, or both.
Also, the plan status needs to be Active and plan access should have the appropriate actions added. For example, to be
visible for the Manage Personal Contributions task, plan access needs to have the Manage Contribution action.
Related Topics
•
Plan Access Restrictions
Spot Bonus and Stock Grant Plan Configuration
Here's how you create a plan to make a onetime spot bonus payment or stock grant. Use the Elements and Individual
Compensation Plans tasks on the My Client Groups > Compensation page.
1. Create a payroll element that makes a onetime payment. Configure the element to process once per payroll
period and let managers enter the payment amount or grant quantity.
2. Create the plan.
a. Add an option with the payroll element. For stock grants, be sure to set the nonmonetary units to Shares
and select the grant type.
b. Select a payment or grant start date. If it's present, leave the end date blank to indicate this is a onetime
payment.
c. Optionally, add an eligibility profile to limit the people that the plan applies to. For example, use derived
factors to identify full-time people with a minimum service of 1 year as eligible for the spot bonus.
Identify full-time people with a minimum service of 5 years as eligible for the stock grant.
d. Restrict access to specific HR actions, such as Hire and Promote. Also add the Manage Individual
Compensation action so that managers can award bonuses or grant stock to their people using the
Individual Compensation action.
Stock grant records get the stock or trading symbol and grant type from the plan option. They get the grant date and
number of shares granted from the element entries.
Car Allowance Plan Configuration
Here's how you create an ongoing car allowance plan with two payment options. The options vary according to the
distance of regional territories from headquarters. Use the Elements and Individual Compensation Plans tasks on the
My Client Groups > Compensation page.
1. Create two payroll elements to make recurring payments once a month. For territories within a 100-mile radius
of headquarters, set the input value default to 300. For territories beyond a 100-mile radius, set the input value
default to 500.
963

Oracle Fusion Cloud HCM
Using Common Features for HCM
Chapter 43
Individual Compensation Plans
2. Create the plan.
a. Configure an option for each payroll element.
b. Let managers enter payment start and end dates according to agreements with their people. For
example, a manager starts payment on the first of the month or the first payroll period after a promotion.
They end payment after 1 year.
c. Attach an eligibility profile that limits plan eligibility to people with the Regional Sales Manager job.
d. Restrict access to specific HR actions, such as Hire and Transfer. Also add the Manage Individual
Compensation action so that managers can award or update the car allowance for their people using that
action.
e. Optionally, add instructions that tell managers how the payment policy varies according to the distance
from headquarters. And, include a link to the policy.
Charity or Savings Contribution Plan Configuration
Here's how you create a plan that lets people manage their personal contributions. Use the Elements and Individual
Compensation Plans tasks on the My Client Groups > Compensation page.
1. Create a payroll element to accept recurring contributions per payroll period. Configure the input value to be
either a flat amount or percentage.
2. Create the plan.
a. Add an option for contributions of either amount or percentage.
b. Select a start date, typically January 1 of the next calendar year or after open enrollment.
c. Restrict access to the Manage Contributions action to let people manage their instances of the plan.
You can define periods when people can enroll for the first time, update existing contributions, or stop
contributions. For example, let people always create allocations. Restrict when they can make updates or
discontinuations to a specified period, such as an open enrollment period of November 15 through 30.
d. Optionally, add instructions that clarify specific plan policies.
How You Let People Submit Personal Contributions
When Earlier Contributions Are Pending Approval
To let people submit personal contributions when earlier contributions are pending approval, you need to enable the
CMP_DISABLE_PENDING_APPROVALS_CHECK_IN_MANAGE_CONTRIBUTION profile option at the Site level.
You also need to configure the access details of the relevant individual compensation plans. For the Manage Personal
Contribution task, never allow update allocations and never allow the discontinuation of allocations. This access
detail configuration ensures that individuals can't change or delete existing contributions, preventing conflicts for
contributions that are pending approval.
With this option enabled, approvers can't edit submitted contributions as part of their approval. Also, they can't see the
submitted values if they edit the submitted contribution. Line managers, compensation managers and administrators,
and HR specialists can still make updates or deletions using the Manage Individual Compensation or Administer
Individual Compensation tasks. This visibility assumes you configured the plan access to include the corresponding
actions for these tasks.
964

Oracle Fusion Cloud HCM
Using Common Features for HCM
Chapter 43
Individual Compensation Plans
Related Topics
•
Plan Access Restrictions
How You Let Managers Track Off-Cycle and On-Cycle
Compensation Against a Budget
Here's how you can enable managers to track off-cycle and on-cycle awards when they review their budget pool.
1. Create the workforce compensation plan using the Workforce Compensation Plans task in the Compensation
work area.
a. Configure the plan details.
b. Configure the budget pool.
c. Create at least one worksheet compensation component and associate the budget pool with it.
d. Run the Start Compensation Cycle process.
2. After you start the compensation cycle, associate the budget pool with an individual compensation plan option.
Use the Individual Compensation Plans task in the Compensation work area. Select the budget pool when you
add or edit the relevant plan option.
FAQs
The Difference Between Plan Access Restriction and Access
Security
Access security identifies which roles grant access to actions, such as Individual Compensation, Manage Personal
Contribution, and Administer Individual Compensation.
Plan access restriction identifies which actions, such as Personal Contribution or Individual Compensation, show the
plan. It also lets you control if people can add, edit, or delete contributions or allocations.
Using Individual Compensation
Overview of Individual Compensation Management
You can award variable compensation to individuals outside the regular compensation cycle. Examples of variable
compensation include a spot bonus, an education reimbursement, or a car allowance. You can also start and change
recurring payments, and see past award amounts.
965
Oracle Fusion Cloud HCM
Using Common Features for HCM
Chapter 43
Individual Compensation Plans
You manage individual compensation in Compensation sections of HR actions, such as when you hire, transfer, and
promote someone.
• As a line manager, you can also use the Individual Compensation quick action for your team.
• As a compensation manager or HR specialist, you can also use the Individual Compensation and Administer
Compensation quick actions for your client groups.
To view monetary amounts in your currency instead of the plan currency, you can use the Currency drop-down list.
Related Topics
•
How's the salary or individual compensation amount calculated when I select a different currency?
Examples of Salary Growth Rate Calculations
These examples show you how compensation history calculates the salary growth rates.
Type Description Calculation
Average annual growth rate The statistical average of the total percentage
increase from January to December of each full
year
SUM(Annual Growth Rate per Year in Period) /
Number of Years in Period
Cumulative Growth Rate The total percentage of salary change over the
period
(Ending Salary for Period - Starting Salary for
Period) / Starting Salary for Period
Salary Change Information
These example starting and ending salaries span 5 years and show the corresponding annual growth rates. The 3-year
calculations use the information for 2017 through 2019.
Year Starting Salary Ending Salary Annual Growth Rate
2015 38,000 41,000 7.89
2016 41,000 43,000 4.88
2017 43,000 49,000 13.95
2018 49,000 54,000 10.20
2019 54,000 54,000 0.00
Example Calculations
Here's how the calculations look using the sample information.
Type Period Example Calculation Example Growth Rate
Average annual growth rate 3-year (13.95 + 10.20 + 0.00) / 3 8.05
966

Oracle Fusion Cloud HCM
Using Common Features for HCM
Chapter 43
Individual Compensation Plans
Type Period Example Calculation Example Growth Rate
5-year (7.89 + 4.88 + 13.95 + 10.20 +
0.00) / 5
7.38
Cumulative Growth Rate 3-year ((54,000 - 43,000)/43,000) * 100 25.58
5-year ((54,000 - 38,000) / 38,000) * 100 42.10
FAQs for Individual Compensation
Can I copy individual compensation allocations as part of a global transfer?
The responsive global transfer flow that includes the individual compensation section automatically copies the
allocations from the source legal employer according to certain conditions.
Here are the conditions:
• The LDG of the element linked to the individual compensation plan option is the same for both legal employers.
• The individual compensation plan has Restrict Plan Access set to No. Or, plan access includes the Global
Transfer action.
The automatic copy happens only if the local and global transfer action includes the individual compensation section,
and you visit the section.
You can't copy individual compensation when you use the Mass Legal Employer Change process.
How's the salary or individual compensation amount calculated when I select a
different currency?
Currency conversions use the currency conversion rates maintained for the Corporate rate type. Currency conversions
for total compensation statements and Oracle Transactional Business Intelligence reports also use the Corporate rate
type.
You maintain conversion rates using the Manage Daily Rates task in the Setup and Maintenance work area.
967

Oracle Fusion Cloud HCM
Using Common Features for HCM
Chapter 43
Individual Compensation Plans
968

Oracle Fusion Cloud HCM
Using Common Features for HCM
Chapter 44
Personal Contributions
44 Personal Contributions
Overview of Personal Compensation Information and
Contribution Management
You can view your compensation information using the My Compensation task. You can manage your enrollments and
contributions for company-sponsored savings and charitable plans using the Personal Contributions task.
• View information about your salary, personal contributions, and any company stock grants for each of your
assignments using the Business Title field. The recurring and onetime payments section has only the payroll
elements that are on the Compensation History page, but not configured as individual compensation plans.
• Open total and workforce compensation statements that merge your compensation information for easy
viewing and printing. The type of information that statements contain varies depending on how your company
configures compensation. Not everyone can view these statements.
You can also view personal compensation and manage contributions using Compensation quick actions.
View My Compensation Information
You can view your compensation information, personal contributions, and total compensation statements.
1. Here's how you can view your compensation information and personal contributions:
a. Click Me > Personal Information or Me > Quick Actions > My Compensation.
b. On the My Details page, click Compensation.
You can use the Compensation page to see your salary information, such as your annual salary, salary
range, and last salary change date and percentage. You can see your prior salaries, other compensation,
and recurring and one-time payments. You can also see your personal contributions to company-
sponsored savings and charitable plans.
2. Here's how you can view your total compensation statements. The statement information depends on how your
organization configures compensation. Not everyone can view compensation statements.
a. Click the Total Compensation Statement quick action.
You can see details of your compensation, such as cash compensation and benefits, in the Summary
section. You can also see it in the Total Compensation Statement section on the My Compensation page.
b. To print your statement, click View Printable Statement.
969

Oracle Fusion Cloud HCM
Using Common Features for HCM
Chapter 44
Personal Contributions
970

Oracle Fusion Cloud HCM
Using Common Features for HCM
Chapter 45
Compensation History
45 Compensation History
Compensation History Categories
Compensation history has a summary table with four categories--Salary, Stock, Other Compensation, and Recurring
Payments--and links to compensation details. Summary info covers 5 years of history while details cover all years.
Salary
The Salary category has these three rows of information:
Row Comments
Overall Salary For the current year, it's the most recent pay rate. The rate appears in the frequency of the person's
salary basis, such as hourly, monthly, or annually.
For previous years, it's the pay rate on 31 December of that year.
Annualized rate Calculated using the person's overall salary and the annualization factor of the salary basis frequency
as of 31 December of that year.
Percentage change The difference in the person's overall salary from the previous year, if history exists.
In the summary table, click the base pay link to view detailed information about salary history, percentage change,
compa-ratio, and growth rate. The detail view includes links to individual base pay change records.
Stock
The Stock category shows a total for each grant type awarded in the unit granted, such as shares or options. In the
summary table, click the grant name to view more information, such as grant date, vested shares, and the estimated
value of unvested shares.
Other Compensation
The Other Compensation category shows nonrecurring monetary compensation, such as commissions, bonuses,
overtime, and reimbursable expenses. In the summary table, click the compensation name to view effective date,
amount, currency, and grand total information about all awards.
You can see elements information with only input values that are numbers, integers, and money because history was
designed for monetary and quantity compensation. For example, you can see salary, bonus, and allowance amounts
and quantities of vested, unvested, exercised, and unexercised stock shares. Also, the overall view shows various totals,
which history can't calculate for nonmonetary and nonnumeric values.
971

Oracle Fusion Cloud HCM
Using Common Features for HCM
Chapter 45
Compensation History
Recurring Payments
The Recurring Payments category includes the latest amount of recurring compensation, such as car allowances and
education assistance. In the summary table, click the payment name to view effective date, amount, currency, and grand
total information for an individual award or compensation amounts.
Related Topics
•
How You Set Up the Other Compensation and Recurring Payments Summary Data for Compensation History
How You Set Up the Other Compensation and Recurring
Payments Summary Data for Compensation History
You set up the summary table data that shows in the Other Compensation and Recurring Payments compensation
history categories. Use the Compensation History task on the My Client Groups > Compensation page.
The Other Compensation category groups one-time payments, such as bonuses. The Recurring Payments category
groups nonbase pay distributions, such as allowances or tuition reimbursements. To include compensation in these
history categories, on the Compensation History page, select the appropriate payroll elements and corresponding input
values. The payroll element definition automatically supplies the remaining data and identifies the history category
based on the recurrence of the payroll element.
Compensation history automatically gets the applicable Salary and Stock summary data, you don't need to do any
setup.
Related Topics
•
Compensation History Categories
Manage Stock Grants in the Integrated Workbook
You can add and edit stock grant data and upload it into the application using an integrated Microsoft Excel workbook.
Download the Workbook
You manage stock grants in the Compensation work area.
1. In the Tasks panel tab, click Manage Stock Grants.
2. On the Search Results toolbar for the Manage Stock Grants page, click Prepare Import Spreadsheet.
Add Stock Grant Data
Copy the stock grant data provided by your supplier. Make sure that each row contains a unique grant date, grant ID,
and grant number. The workbook adds a symbol in the Changed field to mark the rows that you added.
972

Oracle Fusion Cloud HCM
Using Common Features for HCM
Chapter 45
Compensation History
CAUTION: Don't delete or reorder template columns. The upload process might fail.
Upload Stock Grant Data
When you're done, click Upload. The application uploads only those rows that are marked as Changed and ignores any
changes in cells that don't have a white background.
CAUTION: Don't select the Upload and then immediately download option when prompted during an upload. The
data that you uploaded immediately downloads back into the workbook, hiding any errors that occurred during the
upload.
Validating Changes
Open the Manage Stock Grants page and search for and view the imported stock grant data.
Resolve Errors
The upload process automatically updates the Status field in each workbook row. If there are errors that require review,
the process:
1. Rolls back the change in the application.
2. Sets the workbook row status to Upload Failed
3. Continues to the next workbook row
To view and resolve an error:
1. Double-click Update Failed in the Status field.
2. Fix any data issues in the workbook.
3. Upload the latest changes.
Related Topics
•
How can I import stock data sent to me by my supplier?
•
Set Up Desktop Integration for Excel
•
Guidelines for Using Desktop Integrated Excel Workbooks
•
Troubleshoot Desktop Integration for Excel
Set Up Desktop Integration for Excel
You can create or edit records and upload them to the application using integrated Excel workbooks. To use these
workbooks, you must install an Excel add-in.
973

Oracle Fusion Cloud HCM
Using Common Features for HCM
Chapter 45
Compensation History
Note: Every release of Oracle Fusion Cloud Applications is likely to have a new version of the Oracle ADF Desktop
Integration add-in. When prompted, install the latest version of the add-in.
• For information on the new version, see the relevant What’s New document.
• For information on the upgrade policy for the Oracle ADF Desktop Integration add-in, see Add-In Upgrade
Policy for ADF Desktop Integration: DOC ID 2242879.1.
Install the Desktop Integration Add-In
To install the Oracle ADF Desktop Integration Add-In for Excel, you must have the appropriate Excel and
Windows version. Refer to the Excel and Windows version listed in the Supported Platforms for ADF
Desktop Integration: DOC ID 2242428.1 Also, make sure that you have the Download Desktop Integrator
(ATK_DOWNLOAD_DESKTOP_INTEGRATOR_PRIV) privilege to access the add-in installer.
1. Sign into your computer with your account.
2. Close Excel.
3. Click Navigator > Tools > Download Desktop Integration to download the installer file.
4. Run the adfdi-excel-addin-installer-current-user.msi installer just like you would run any program that you
install on your computer.
5. Run Excel once to complete the installation.
Note: If you have administrator privileges, you can also install the add-in for all users. For more information, see How
to install the ADF Desktop Integration Add-in for Excel: DOC ID 2681794.1
Related Topics
•
Troubleshoot Desktop Integration for Excel
•
Guidelines for Using Desktop Integrated Excel Workbooks
•
Business User's Guide for ADF Desktop Integration
Guidelines for Using Desktop Integrated Excel
Workbooks
Where available, you can download a desktop-integrated Microsoft Excel workbook and use it to create or edit records.
Your edits in the workbook don't affect the application until you upload the records back into the application.
What You Must Not Do
To ensure that you successfully upload your changes to the application, avoid doing these tasks:
• Rename text from the integrated workbook, such as the worksheet names.
• Add columns.
• Delete any part of the template, such as columns.
• Hide required columns and status columns or headers.
974

Oracle Fusion Cloud HCM
Using Common Features for HCM
Chapter 45
Compensation History
CAUTION: Don't close Excel using the Windows Task Manager and clicking the End task button because that might
disable the add-in.
Conventions
Some column headers in the integrated workbook might include [..]. This means that you can double-click within any
cell in the column to open a dialog box, where you can select a value to insert into that cell.
Statuses
You can use Status Viewer to see the status of the entire integrated worksheet and the status of any row in a
worksheet. To use the status viewer, click Status Viewer on the Excel ribbon. You can see the status of the entire
integrated worksheet by default. To see the status of a row, click any table row in a worksheet. You can use the
information that appears on the Status Viewer to review and correct errors at the same time.
Searches
Some integrated workbooks include searches. To search within the workbook, you must first sign into the application.
When you click the Search button, the application prompts you to sign in if you haven't already done so.
Refreshes After Upload
If your changes aren't reflected after you upload the records back into the application, you can try out these options:
• Refresh the table
• Use a filter or search on the table to see your changes
Related Topics
•
Set Up Desktop Integration for Excel
•
Troubleshoot Desktop Integration for Excel
•
How You Use Tables
Troubleshoot Desktop Integration for Excel
If you run into any issues with the integration, use the Client Health Check tool first to find out what integration issues
you might have and how to resolve them.
For more information, see How to use the ADF Desktop Integration Client Health Check Tool (Doc ID 2010222.1) on My
Oracle Support.
If the health check tool doesn't resolve your issue, you can uninstall and reinstall the Oracle ADF Desktop Integration
add-in. For more information, see Information Center: Troubleshooting Oracle ADF Desktop Integration (2012600.2) on
My Oracle Support.
975

Oracle Fusion Cloud HCM
Using Common Features for HCM
Chapter 45
Compensation History
Uninstall the Desktop Add-In
Use the Microsoft Windows Settings to remove the ADF Desktop Integration add-in. After removing the add-in, you can
use the integrated Excel workbooks on this system only after you reinstall the ADF Desktop Integration add-in.
1. Open Windows Settings and go to Apps & features.
2. Select Oracle ADF Desktop Integration Add-In for Excel from the list of programs.
3. Click Uninstall from the toolbar at the top of the program list.
4. When prompted, click Uninstall to remove the Oracle ADF Desktop Integration add-in.
Note: If you have installed the Oracle ADF Desktop Integration add-in on multiple user profiles using the current-user
installer, you must remove it from each user profile.
Related Topics
•
Set Up Desktop Integration for Excel
FAQs
How can I import stock data sent to me by my supplier?
On the Manage Stock Grants page, use the Prepare Import Spreadsheet button to generate the stock table spreadsheet.
Enter your supplier's data, ensuring that each row contains a unique Grant Date, Grant ID, and Grant Number. Upload
the information into the stock table.
976

Oracle Fusion Cloud HCM
Using Common Features for HCM
Chapter 46
Other Setup and Maintenance Tasks
46 Other Setup and Maintenance Tasks
Set Up the Mapping Service for Contextual Addresses
A contextual address is marked with an orange triangle, the More icon. When users hover over the triangle, an icon
appears, which they can click to display the address on a map.
Set Up Mapping Service
You can specify the mapping service to be used to display the map.
1. In the Setup and Maintenance work area, go to the Manage Application Toolkit Administrator Profile Values
task in the Application Extensions functional area.
2. Search for the Mapping Service for Contextual Addresses (ATK_CONTEXT_ADDRESS_MAP_OPTION) profile
option.
3. In the Profile Values section, enter a full URL of a mapping service in the Profile Value field.
CAUTION: By default, the Profile Value field is blank. Until you enter a valid value for this profile option,
users continue to get an error when they try to open a map for any contextual address.
Here are a few examples of mapping service URLs:
◦
http://maps.google.com/maps?output=embed&q=
◦
http://maps.live.com/default.aspx?where1=
◦
http://bing.com/maps/?v=2&encType=1&where1=
Tip: You can include parameters in the URL. For example, to avoid a locator box in Google Maps, you can add
&iwloc=& to the URL. So, the mapping service URL you would enter in the Profile Value field is: http://
maps.google.com/maps?iwloc=&&output=embed&q=
Related Topics
•
Set Profile Option Values
•
Why can't I see the map for contextual addresses?
Home Page Setup
Configure Infolet Display
Use the Home Configuration page in the Structure work area (Navigator > Configuration > Structure) to configure
the display settings of infolet pages in the Analytics section of the home page.
977

Oracle Fusion Cloud HCM
Using Common Features for HCM
Chapter 46
Other Setup and Maintenance Tasks
If you're using a panel or banner layout, the home page displays the page control containing icons that you use to go to
infolet pages.
Define Settings
You can rename infolet pages, change their visibility settings, and reorder them. But before you start, activate a sandbox
that has the Structure tool in it.
On the Home Configuration page, you can do these tasks:
• Click the infolet page name to rename it.
• Click the Visible field for an infolet page to change its visibility setting. You can show or hide specific infolet
pages on the home page. To do so, select any of these options:
◦
Yes: The infolet page appears on the home page.
◦
No: The infolet page doesn't appear on the home page.
◦
EL expression: The evaluation of the EL expression decides the visibility of the infolet page on the home
page for specific user roles.
• Use the Move Up and Move Down icons to adjust the relative positions of the infolet pages on the home page.
If you're using a panel or banner layout, you can use profile options to define settings for the filmstrip, which appears
between the global header and the page title:
• To enable users to use the filmstrip, set the Springboard Strip Enabled profile option (FND_USE_FILMSTRIP)
to Yes.
• If the FND_USE_FILMSTRIP profile option is set to Yes, then you can display the filmstrip as expanded by
default. To do so, set the Springboard Strip Expanded profile option (FND_EXPAND_FILMSTRIP) to Yes. A
user can still collapse or expand the strip on any page, and when done, this profile option is set by default for
subsequent sessions of that user.
Related Topics
•
Set Profile Option Values
•
Define Home Page Appearance
•
Examples of EL Expressions
•
Overview of Sandboxes
•
Create and Activate Sandboxes
Define Home Page Appearance
Use the Themes tab in the Appearance work area to first select your home page layout and then define its display
settings. And then use the Home Page Display tab to define the display settings of your home page.
Based on the home page layout you're using, the options available on the Home Page Display page may vary.
Let's see how to define the home page appearance.
1. Activate a sandbox that has the Appearance tool in it.
2. Click Navigator > Configuration > Appearance.
3. Click the Home Page Display tab.
978

Oracle Fusion Cloud HCM
Using Common Features for HCM
Chapter 46
Other Setup and Maintenance Tasks
4. In the Name column of the table, click any section name to rename it.
5. Click the Visible field for a section to change its visibility setting. You can show or hide the section on the home
page.
◦
Yes: The section appears on the home page.
◦
No: The section doesn't appear on the home page.
◦
EL expression: The evaluation of the EL expression decides whether the section appears on the home
page for specific user roles.
6. In the Order column, use the Move Up and Move Down icons to adjust the relative positions of the sections on
the home page.
7. Click Apply.
If you're using a panel or banner layout, do these tasks:
1. Activate a sandbox that has the Appearance tool in it.
2. Click Navigator > Configuration > Appearance.
3. Click the Home Page Display tab.
4. Select one of these options to display on the home page:
◦
Social: Displays social networking content, such as the number of followers.
◦
Announcements: Displays employee announcements.
◦
Cover image: Displays the image for the main panel or banner, which you specify on the Themes page.
◦
None
5. Specify whether to display the photo in the main panel or banner of the home page from the social network
profile or from HCM.
6. Click Apply.
Related Topics
•
Configure Infolet Display
•
Manage Themes
•
Overview of Configuring Themes and Home Page Settings
•
Configure Classic Themes
•
Overview of Sandboxes
Create and Enable Announcements
Use the Announcements page to create, edit, or delete company announcements. After you create announcements, you
can enable them to display on the home page, and also specify which user roles can see specific announcements on the
home page.
You can also use the Announcements REST resource to create, edit, view, or delete announcements. Your
application users can also create or edit announcements on their own, but they must have the Manage Help Content
(ATK_CUSTOMIZE_HELP_TOPICS_PRIV) privilege.
Create Announcements
1. Click Navigator > Tools > Announcements.
2. Click Create.
979

Oracle Fusion Cloud HCM
Using Common Features for HCM
Chapter 46
Other Setup and Maintenance Tasks
3. Specify the details, such as subject, start date, and end date.
4. Select a category. If you select User-Defined, a text box appears, where you can provide additional details.
5. Select any of these options to upload an image. Make sure your image size is 776x437 px or larger to avoid
image distortion.
◦
Predefined: Select an image from the list.
◦
File: Browse and select a file from your local computer.
◦
URL: Enter a full URL for the image.
Note: You can't delete announcement images or resize them.
6. From the Visible list, select any of these options:
◦
Yes: The announcement appears on the home page.
◦
No: The announcement doesn't appear on the home page.
◦
EL Expression: The evaluation of the EL expression decides whether the announcement will appear on
the home page for a specific user role.
7. If you have selected EL Expression from the Visibility list, click the Edit icon next to the Visibility list. Then
enter a value or expression, and click Validate to make sure that the validation result is True. For example, you
can enter the EL expression in the #{securityContext.userInRole['<role-name>']} format.
8. Add the content in the text box. You can format your text using the formatting options.
9. Click Save and Close.
Your changes on the Announcements page apply immediately to all users, even if you saved your changes while a
sandbox is active and not yet published.
Edit or Delete Announcements
1. Click Navigator > Tools > Announcements.
2. Select the announcement that you want to edit or delete.
3. Edit the announcement details or click Delete.
Enable News and Announcements Section on the Home Page
You can use the Appearance work area to determine whether to display the News and Announcements section on the
home page. The News and Announcements section on the home page displays the entire announcement along with
the subject and image. But if you're using a panel or banner layout, you will see only the announcement content, not the
subject or image in the panel or banner.
1. Click Navigator > Configuration > Appearance.
2. Click the Home Page Display tab.
3. Select Yes for News and Announcements, and click Apply.
Note: If you're using a panel or banner layout, select Announcements from the home panel options, and
then click Apply.
Related Topics
•
Overview of Configuring Themes and Home Page Settings
•
Why can't I see announcements on my home page?
•
Announcements REST Endpoints
980

Oracle Fusion Cloud HCM
Using Common Features for HCM
Chapter 46
Other Setup and Maintenance Tasks
Configure Email Security
To ensure that spam filters don't block the email notifications sent by Oracle Fusion Cloud Applications on behalf of
your company, the following internet standards are used to verify that incoming email notifications are originating from
a trusted source.
• Sender Policy Framework (SPF): Specifies the servers that can send email for a domain.
• DomainKeys Identified Mail (DKIM): Verifies that message content is authentic and not changed.
• Domain-based Message Authentication, Reporting, and Conformance (DMARC): Specifies how your
domain handles suspicious incoming emails.
If you have a requirement to change the default email From Address originating from Fusion Applications, for example,
[email protected], to your company-specific From Address, you must set up SPF and DKIM.
DKIM uptake requires the pods to be in Oracle Fusion Cloud Infrastructure (OCI) to leverage the Oracle Fusion Cloud
Notification Structure (CNS) that supports DKIM and DMARC functionalities required for your company-specific From
Address.
Set Up DomainKeys Identified Mail (DKIM)
Use DomainKeys Identified Mail (DKIM) to verify the authenticity of email messages sent from Oracle Fusion Cloud
Applications.
DKIM is a cryptographic signature-based method to authenticate email senders. With DKIM, email senders generate
public and private key pairs. The public key is published to DNS records, and the matching private keys are stored in a
sender's outbound email servers.
When emails are sent, the private keys generate message-specific signatures that are added to the embedded email
headers. ISPs that authenticate using DKIM look up the public key in the public DNS record. ISPs can then verify that
the signature in the email header was generated by the matching private key. This method ensures that an authorized
sender actually sent the message, and that the message headers and content were not altered during transit.
Enabling DKIM is a manual process. You must perform this task for each individual Fusion Applications environment for
which you want to use DKIM. For example, if you have five Fusion Applications environments, then you must perform
this task five times.
1. Create a service request.
See Contact My Oracle Support.
Use the CSI number you received in the Welcome email when logging service requests. This number identifies
your organization, product information and service level agreement with Oracle Support.
2. Include the following information in the service request.
◦
Name of your Fusion Applications environment
◦
From email address
◦
Key size (1024 or 2048)
Also mention Doc ID 2702234.1 (DKIM Support for Fusion Applications on OCI) in the service request.
981

Oracle Fusion Cloud HCM
Using Common Features for HCM
Chapter 46
Other Setup and Maintenance Tasks
3. Optional: Specify a DNS selector in the service request.
The default generated DNS selector uses this format: <env-name>-<region-code>-<date>
For example: mycompany-iad-20210127
A DNS selector can contain only letters, digits, periods ("."), and dashes ("-").
4. Submit the service request.
Oracle Support responds to your service request with a DKIM-enabled DNS record.
5. Add the CNAME DNS record to your domain configuration and then update the service request.
It takes up to 24 hours for Oracle to detect your latest DNS configuration and to begin signing emails using
DKIM.
6. When prompted by the support engineer, verify that the signed email messages are delivered successfully, and
then update the support request.
Oracle Support changes the From email address in your Fusion Applications environment to the new DKIM-
enabled address.
FAQs for Home Page Setup
How can I rename an icon for an infolet page in the page control on the home page?
You can rename an icon for an infolet page using the Home Configuration page of the Structure work area. To open this
page, select Configuration > Structure from the Navigator menu, and then click the Home Configuration tab.
Related Topics
•
Configure Infolet Display
Set Privacy Statement URL
A privacy statement is legal content that tells you how a company collects and manages user data. You can add a link to
your company's statement in the About This Application dialog box.
1. In the Setup and Maintenance work area, go to the Manage Applications Core Administrator Profile Values
task in the Application Extensions functional area.
2. Search for the Privacy Statement URL (PRIVACY_PAGE) profile option.
3. In the Profile Values section, update the Profile Value field with the full URL of the web page that has the
privacy content. By default, this profile value is N.
CAUTION: Don't enter any other value, such as Y, because that causes a broken link.
4. Click Save and Close.
And that's it! Your users can now view the Privacy Statement link by clicking their user image or name in the global
header and selecting About This Application.
982

Oracle Fusion Cloud HCM
Using Common Features for HCM
Chapter 46
Other Setup and Maintenance Tasks
Set Up Sender Policy Framework (SPF)
If you send an email from Oracle Applications Cloud and want the email to use your domain, you must set up Sender
Policy Framework (SPF).
Setting up the framework ensures that your domain is protected and your messages are delivered correctly. By updating
the SPF record, you authorize the Oracle email servers to send emails on behalf of your domain. When the recipient
receives your email, the SPF record of your domain is validated to determine if it's a valid email. Only after validation,
your message is delivered.
To set up SPF, do these tasks:
• Have your IT Administrator update your SPF record with this statement:
include:spf_c.oraclecloud.com
• Validate your SPF record by using an SPF record checker tool. For example, you can use the SPF Surveyor tool
to authenticate your domain.
To use the SPF Surveyor tool, do these tasks:
a. Go to https://dmarcian.com/spf-survey/.
b. Enter the domain you are using for the email, such as oracle.com.
c. Click Survey domain.
A message is displayed indicating the validation results.
Guidelines for Setting Up General Troubleshooting
To share application-related issues with the help desk, users can record the on-screen activity while they reproduce the
issues. The help desk can then view those recordings for troubleshooting the issues.
Some advanced users might also need detailed information present on the About This Page dialog box. Therefore, to
set up your application for troubleshooting, make sure that your users have the required access to record and view
issues. It's also important to determine how many users can record at the same time.
Access
Check with your security administrator that the appropriate users are assigned roles that inherit the following privileges:
• Record and View Issue (FND_RECORD_AND_VIEW_ISSUE_PRIV): To create a basic recording
• Set Issue Recording Advanced Options (FND_SET_ISSUE_RECORDING_ADVANCED_OPTIONS_PRIV): To set
advanced options before starting the recording
• View Version Information (FND_VIEW_VERSION_INFORMATION_PRIV): To see the versions that technical
components of the application are on
983

Oracle Fusion Cloud HCM
Using Common Features for HCM
Chapter 46
Other Setup and Maintenance Tasks
Number of Users
Recordings are stored on servers, and by default, up to five users can record at the same time on each
server. For performance reasons, you can set the Maximum Number of Users Allowed to Record Issues
(ORA_FND_RECORD_ISSUE_MAX_USERS) profile option to a number lower than five.
Related Topics
•
Set Profile Option Values
•
Record Issues to Troubleshoot
•
How can I view the version information of an application?
Set Up the Worklist Region on My Dashboard
The Worklist: Notifications and Approvals region displays the workflow tasks assigned to the user. You can
add this region to My Dashboard for all users, and set the Welcome Dashboard Worklist Timeout Interval
(ATK_HOME_PAGE_WORKLIST_TIMEOUT) profile option.
Adding the Region
To add the Worklist: Notifications and Approvals region to My Dashboard:
1. Click Navigator > Others > My Dashboard.
2. If the Page Composer isn't active, click the Activate a sandbox link in the warning dialog box to activate a
sandbox with that tool.
3. Click your initials in the global header, and select Edit Pages in the Administration menu group.
4. Click the Add Content button where you want to place the region.
5. Open the Application Content folder in the Add Content dialog box.
6. Click Add for the Worklist: Notifications and Approvals item.
7. Click Close.
8. Save your work, and then click the Close button.
Defining the Timeout Interval
When users open My Dashboard and it contains the Worklist: Notifications and Approvals region, data for the region is
retrieved. The Welcome Dashboard Worklist Timeout Interval profile option determines how long to continue retrieving
before timing out and displaying no data. In the Setup and Maintenance work area, use the following:
• Functional Area: Application Extensions
• Task: Manage Application Toolkit Administrator Profile Values
Note: If you don't see this task, then make sure that the Application Toolkit Component Maintenance feature is
enabled at the offering level in the Offerings work area.
On the Manage Application Toolkit Administrator Profile Values page, set the Welcome Dashboard Worklist Timeout
Interval profile option.
• If you don't set a value for this profile option, which is blank by default, then the region doesn't time out.
984

Oracle Fusion Cloud HCM
Using Common Features for HCM
Chapter 46
Other Setup and Maintenance Tasks
• Retrieving data for the Worklist region affects the performance of My Dashboard as a whole. So, select a value
for this profile option if your users have the Worklist region on My Dashboard and notice performance issues.
After the timeout, users can refresh the region to try retrieving the data again.
Related Topics
•
Set Profile Option Values
•
Create and Activate Sandboxes
•
Configure Offerings
•
How do I update existing setup data?
Deep Links
You can use deep links to open pages without using menus or navigating through pages. Deep links come in handy if
you want users to go directly from various locations to Oracle Applications Cloud.
You can add deep links to a business intelligence report, an email notification, or a company website hosted on Oracle
Cloud. For example, you can enable direct navigation to the My Team page. If users click your deep link URL from the
company website, but aren't yet signed in to Oracle Applications Cloud, they're automatically redirected to the Sign In
page. To see a complete list of the available deep links, use the Deep Links work area (Navigator > Tools > Deep Links).
For access to this work area, you need to have the View Administration Link (FND_VIEW_ADMIN_LINK_PRIV) privilege.
How It Works
You can copy a URL from the Deep Links page and use it to create a link, for example on your company website. You can
use deep links as is, to take users to a high level page, for example an overview or search page. Or, you can edit the URL
so that it opens a page where the user can take action, for example to create something. For more information, refer to
your product-specific documents.
URL Pattern of Deep Links
Here's a typical URL pattern of a deep link.
https://<pod-name>/fndSetup/faces/deeplink?
objType=<objID>&objKey=<name1=value1;name2=value2>&action=<action>&returnApp=<returnappURL>&returnAppParams=<returnAppParameter>
To direct users to a product-specific action page, you need to add specific parameters to the deep link URL. This table
describes the parameters and gives you some examples of parameter values.
Parameter Description Example of Parameter Values
pod-name
The host name.
pod.oraclecloud.com
objType
The object type, such as work areas.
SUPPLIER
objKey
The object identifier.
SupplierNumber
985

Oracle Fusion Cloud HCM
Using Common Features for HCM
Chapter 46
Other Setup and Maintenance Tasks
Parameter Description Example of Parameter Values
action
The action that users can do on the page
that the URL opens up, for example to edit
something.
Here are a few things to know:
• If you don't add any value for the action
parameter, this value is considered as
NONE by default. So users will be taken to a
high-level page, such as an overview page
or a search page.
• If the value you added for the action
parameter doesn't match with any action
on the UI, or the user doesn't have the
privileges to access that action, they will
be taken to a high-level page.
NONE
VIEW
CREATE
EDIT
returnAppURL
The application URL where users will be
automatically redirected to when they try
to return to the previous page, or after they
complete their task.
If you're using a third party URL, make sure
the application name is registered using the
Manage Integration of Additional Applications
page in the Setup and Maintenance work area.
MyOracle
returnAppParams
Parameters for the return application URL.
type=photo
Where to Find Information About Product-Specific Deep Links
Here's some information about specific deep links depending on the products you're using. This isn't a comprehensive
list of all available deep links.
• Oracle Fusion Cloud Supply Chain & Manufacturing
See: Deep Links for SCM
• Oracle Fusion Cloud Procurement
See: Deep Links for Procurement
• Oracle Fusion Cloud Succession Planning
See: Overview of Succession Plan Deep Links
• Oracle Fusion Cloud Financial Reporting Compliance
See: Deep-Link URLs
Related Topics
•
Manage Integration of Additional Applications
986

Oracle Fusion Cloud HCM
Using Common Features for HCM
Chapter 47
Moving Common Reference Objects
47 Moving Common Reference Objects
Overview of Moving Common Reference Objects
The common reference objects are used by several setup tasks in the Setup and Maintenance work area. The common
reference objects become a part of the configuration package that's created for an implementation project.
While moving the application content, for example, moving from test to the production phase of an implementation,
attend to the nuances of these common reference objects.
Parameters
The common reference objects are represented as business objects. A single object can be referenced in multiple setup
tasks with different parameters. In the configuration package created for the implementation project, parameters
passed to a setup task are also passed to the business objects being moved. As a result, the scope of the setup tasks is
maintained intact during the movement.
Dependencies
Common reference objects may have internal references or dependencies among other common reference objects.
Therefore, you must note all the dependencies before moving the objects so that there are no broken references among
them.
Related Topics
•
Guidelines for Moving Related Common Reference Objects
•
Business Objects for Moving Common Reference Objects
•
Overview of Setup Data Export and Import
•
Setup Data Export and Import Using an Offering or a Functional Area
Business Objects for Moving Common Reference Objects
Common reference objects in Oracle Fusion Functional Setup Manager are used to move application setup content from
one environment to another. For example, from a test environment to a production environment.
Choice of Parameters
The following table lists the business objects, the movement details, and the effect of the setup task parameter on the
scope of the movement.
987

Oracle Fusion Cloud HCM
Using Common Features for HCM
Chapter 47
Moving Common Reference Objects
Note:
• You can move only the translations in the current user language.
• You can move the Oracle Social Network business objects and the changes to the Navigator using the
configuration sets on the Configuration Set Migration page.
Business Object Name Moved Functional Item Effect on the Scope of Movement
Application Message
Messages and associated tokens
No parameters: All messages are moved.
Parameter moduleType/moduleKey: Only
messages belonging to the specified module
and its descendant modules in the taxonomy
hierarchy are moved.
Parameter messageName/applicationId:
Only the specified message is moved.
Application Taxonomy
Application taxonomy modules and
components
No parameters: All taxonomy modules and
components are moved.
Application Attachment Entity
Attachment entities
No parameters: All attachment entities are
moved.
Parameter moduleType/moduleKey: Only
attachment entities belonging to the specified
module and its descendant modules in the
taxonomy hierarchy are moved.
Application Attachment Category
Attachment categories and category-to-entity
mappings
No parameters: All attachment categories and
category-to-entity mappings are moved.
Parameter moduleType/moduleKey: Only
attachment categories belonging to the
specified module and its descendant modules
in the taxonomy hierarchy along with the
respective category-to-entity mappings are
moved.
Application Document Sequence Category
Document sequence categories
No parameters: All categories are moved.
Parameter moduleType/moduleKey: Only
categories belonging to the specified module
and its descendant modules in the taxonomy
hierarchy are moved.
Parameter code/applicationId: Only the
specified document sequence category code is
moved.
Application Document Sequence
Document sequences and their assignments
No parameters: All sequences are moved.
Parameter moduleType/moduleKey: Only
document sequences belonging to the
specified module and its descendant modules
in the taxonomy hierarchy are moved
988

Oracle Fusion Cloud HCM
Using Common Features for HCM
Chapter 47
Moving Common Reference Objects
Business Object Name Moved Functional Item Effect on the Scope of Movement
Parameter name: Only the specified document
sequence is moved.
Application Descriptive Flexfield
Descriptive flexfield registration data and setup
data
No parameters: All descriptive flexfields are
moved.
Parameter moduleType/moduleKey: Only
descriptive flexfields belonging to the specified
module and its descendant modules in the
taxonomy hierarchy are moved.
Parameter descriptiveFlexfieldCode/
applicationId: Only the specified descriptive
flexfield is moved. Importing the metadata of
a flexfield can change its deployment status.
Therefore, you must redeploy if there are
any affected flexfields. The import process
automatically submits affected flexfields for
redeployment. Also, only flexfields with a
deployment status of Deployed or Deployed to
Sandbox are eligible to be moved.
Note: Sometimes, the flexfield setup
data exported to an XML file may contain
noneditable auto-generated content that
might not exist when exported to a CSV
file. You may ignore and exclude such data
during the export-import process.
Application Extensible Flexfield
Extensible flexfield registration data and setup
data, including categories
No parameters: All extensible flexfields are
moved
Parameter moduleType/moduleKey: Only
extensible flexfields belonging to the specified
module and its descendant modules in the
taxonomy hierarchy are moved.
Parameter extensibleFlexfieldCode/
applicationId: Only the specified extensible
flexfield is moved. Importing the metadata of
a flexfield can change its deployment status
and therefore, the affected flexfields must be
redeployed. The import process automatically
submits affected flexfields for redeployment.
Also, only flexfields with a deployment status of
Deployed or Deployed to Sandbox are eligible to
be moved.
Note: Sometimes, the flexfield setup
data exported to an XML file may contain
noneditable auto-generated content that
might not exist when exported to a CSV
file. You may ignore and exclude such data
during the export-import process.
Application Key Flexfield Key flexfield registration data and setup data No parameters: All key flexfields are moved.
989

Oracle Fusion Cloud HCM
Using Common Features for HCM
Chapter 47
Moving Common Reference Objects
Business Object Name Moved Functional Item Effect on the Scope of Movement
Parameter moduleType/moduleKey: Only key
flexfields belonging to the specified module
and its descendant modules in the taxonomy
hierarchy are moved.
Parameter keyFlexfieldCode/
applicationId: Only the specified key
flexfield is moved.
Importing the metadata of a flexfield can
change its deployment status and therefore,
the affected flexfields must be redeployed. The
import process automatically submits affected
flexfields for redeployment. Only flexfields with
a deployment status of Deployed or Deployed
to Sandbox are eligible to be moved.
Note: Sometimes, the flexfield setup
data exported to an XML file may contain
noneditable auto-generated content that
might not exist when exported to a CSV
file. You may ignore and exclude such data
during the export-import process.
Application Flexfield Value Set
Value set setup data
No parameters: All value sets are moved.
Parameter moduleType/moduleKey: Only
value sets belonging to the specified module
and its descendant modules in the taxonomy
hierarchy are moved.
Parameter valueSetCode: Only the specified
value set is moved.
Importing the metadata of a value set can
change the deployment status of flexfields
that use the value set. Therefore, you must
redeploy if there are any affected flexfields. The
import process automatically submits affected
flexfields for redeployment.
Application Reference Currency
Currency data
No parameters: All currencies are moved.
Application Reference ISO Language
ISO language data
No parameters: All ISO languages are moved.
Application Reference Industry
Industry data including industries in territories
data
No parameters: All industries are moved.
Application Reference Language
Language data
No parameters: All languages are moved.
Application Reference Natural Language
Natural language data
No parameters: All natural languages are
moved.
Application Reference Territory Territory data No parameters: All territories are moved.
990

Oracle Fusion Cloud HCM
Using Common Features for HCM
Chapter 47
Moving Common Reference Objects
Business Object Name Moved Functional Item Effect on the Scope of Movement
Application Reference Time zone
Time zone data
No parameters: All time zones are moved.
Application Standard Lookup
Standard lookup types and their lookup codes
No parameters: All standard lookups are
moved.
Parameter moduleType/moduleKey: Only
standard lookups belonging to the specified
module and its descendant modules in the
taxonomy hierarchy are moved.
Parameter lookupType: Only the specified
common lookup is moved.
Application Common Lookup
Common lookup types and their lookup codes
No parameters: All common lookups are
moved.
Parameter moduleType/moduleKey: Only
common lookups belonging to the specified
module and its descendant modules in the
taxonomy hierarchy are moved.
Parameter lookupType: Only the specified
common lookup is moved.
Application Set-Enabled Lookup
Set-enabled lookup types and their lookup
codes
No parameters: All set-enabled lookups are
moved.
Parameter moduleType/moduleKey: Only
set-enabled lookups belonging to the specified
module and its descendant modules in the
taxonomy hierarchy are moved.
Parameter lookupType: Only the specified set-
enabled lookup is moved.
Application Profile Category
Profile categories
No parameters: All profile categories are
moved.
Parameter moduleType/moduleKey: Only
categories belonging to the specified module
and its descendant modules in the taxonomy
hierarchy are moved.
name/applicationId: Only the specified
category is moved.
Application Profile Option
Profile options and their values
No parameters: All profile options and their
values are moved.
Parameter moduleType/moduleKey: Only
profile options and their values belonging to
the specified module are moved.
Parameter profileOptionName: Only the
specified profile option and its values are
moved.
991

Oracle Fusion Cloud HCM
Using Common Features for HCM
Chapter 47
Moving Common Reference Objects
Business Object Name Moved Functional Item Effect on the Scope of Movement
Application Profile Value
Profile options and their values
No parameters: All profiles and their values are
moved.
Parameter moduleType/moduleKey: Only
profiles and their values belonging to the
specified module are moved.
Parameter categoryName/
categoryApplicationId: Only profiles and
their values belonging to the specified category
are moved.
Parameter profileOptionName: Only the
specified profile and its values are moved.
Application Reference Data Set
Reference data sets
No parameters: All sets are moved.
Application Reference Data Set Assignment
Reference data set assignments
Parameter determinantType: Only
assignments for the specified determinant type
are moved.
Parameter determinantType/
referenceGroupName: Only assignments for
the specified determinant type and reference
group are moved.
Application Tree Structure
Tree structures and any labels assigned to the
tree structure
No parameters: All tree structures (and their
labels) are moved.
Parameter moduleType/moduleKey: Only tree
structures (and their labels) belonging to the
specified module are moved.
Parameter treeStructureCode: Only the
specified tree structure (with its labels) is
moved.
Application Tree
Tree codes and versions
No parameters: All trees are moved.
Parameter moduleType/moduleKey: Only
trees belonging to the specified module are
moved.
Parameter treeStructureCode: Only trees
belonging to the specified tree structure are
moved.
Parameter TreeStructureCode/TreeCode:
Only trees belonging to the specified tree
structure and tree code are moved.
Application Tree Label
Tree structures and any labels assigned to the
tree structure
No parameters: All tree structures (and their
labels) are moved.
Parameter moduleType/moduleKey: Only tree
structures (and their labels) belonging to the
992

Oracle Fusion Cloud HCM
Using Common Features for HCM
Chapter 47
Moving Common Reference Objects
Business Object Name Moved Functional Item Effect on the Scope of Movement
specified module and its descendant modules
in the taxonomy hierarchy are moved.
Parameter treeStructureCode: Only the
specified tree structure (with its labels) is
moved.
Application Data Security Policy
Database resources, actions, conditions, and
data security policies
No parameters: All database resources/actions/
conditions/policies are moved.
Parameter moduleType/moduleKey: Only
database resources/actions/conditions/policies
belonging to the specified module and its
descendant modules in the taxonomy hierarchy
are moved.
Parameter objName: Only the specified
database resource along with its actions/
conditions/policies is moved.
If the policies being moved contain reference
to newly created roles, move the roles before
moving the policies. If the source and target
systems use different LDAPs, manually perform
the GUID reconciliation after moving the data
security policies.
Related Topics
•
Guidelines for Moving Related Common Reference Objects
Guidelines for Moving Related Common Reference
Objects
Certain common reference objects may use other common reference objects creating dependencies among the objects.
During the movement of common reference objects, ensure that these dependencies or references aren't broken or lost.
Dependencies
The dependencies among the common reference objects may be caused by any of the following conditions.
• Flexfield segments use value sets
• Value sets may make use of standard, common, or set-enabled lookups
• Key flexfields may have an associated tree structure and key flexfield segments may have an associated tree
code
• Tree codes and versions may be defined over values of a value set
• Data security policies may be defined for value sets that have been enabled for data security
993

Oracle Fusion Cloud HCM
Using Common Features for HCM
Chapter 47
Moving Common Reference Objects
You may decide to move one, some, or all of the business objects by including the ones you want to move in your
configuration package. For example, you may decide to move only value sets, or move both value sets and their lookups
as part of the same package. Whatever be the combination, Oracle recommends that during the movement of objects,
you follow an order that maintains the dependencies among the objects.
While moving the business objects, adhere to the following order:
1. Move created taxonomy modules before moving any objects that reference them, such as flexfields, lookups,
profiles, messages, and so on.
2. Move created currencies before moving any objects that reference them, such as territories.
3. Move created territories before moving any objects that reference them, such as languages and natural
languages.
4. Move created ISO languages before moving any objects that reference them, such as languages, natural
languages, and industries.
5. Move created tree structures before moving any objects that reference them, such as trees or tree labels.
6. Move created profile options before moving any objects that reference them, such as profile categories or
profile values.
7. Move created attachment entities before moving any objects that reference them, such as attachment
categories that reference them.
Note: In scenarios where there may be dependencies on other objects, you must move the dependencies before
moving the referencing object. For example, if data security policies have dependencies on newly created security
roles, you must move the security roles before moving the security policies.
Related Topics
•
Business Objects for Moving Common Reference Objects
Guidelines for Moving Common Reference Objects Using
the Seed Data Framework
To move the common reference objects, you can use the Seed Data Framework. You can also use the command line
interface of the Seed Data Framework to move the object setup data.
Movement Dependencies
The seed data interface moves only the setup metadata. For example, if you use Seed Data Framework to import
flexfield metadata, the flexfield setup metadata is imported into your database. However, you must initiate the flexfield
deployment process separately after seed data import to regenerate the runtime flexfield artifacts in the target
environment. Similarly, if you use Seed Data Framework to import data security metadata, you must first move any new
referenced roles and then manually run the GUID reconciliation where required.
To ensure that the reference data isn't lost during the movement, certain guidelines are prescribed. It's recommended
that you perform the movement of object data exactly in the following order:
Note: Only the translation in the current user language is moved.
994

Oracle Fusion Cloud HCM
Using Common Features for HCM
Chapter 47
Moving Common Reference Objects
1. Move created taxonomy modules before moving any objects that reference them, such as flexfields, lookups,
profiles, attachments, reference data sets, document sequences, messages, and data security.
2. Move created currencies before moving any objects that reference them, such as territories.
3. Move created territories before moving any objects that reference them, such as languages and natural
languages.
4. Move created ISO languages before moving any objects that reference them, such as languages, natural
languages, and industries.
5. Move created tree structures before moving any objects that reference them, such as trees or tree labels.
6. Move created profile options before moving any objects that reference them, such as profile categories or
profile values.
7. Move created attachment entities before moving any objects that reference them, such as attachment
categories that reference them.
8. Move created reference data sets before moving any objects that reference them, such as reference data set
assignments and set-enabled lookups.
9. Move created document sequence categories before moving any objects that reference them, such as
document sequences.
10. Move created tree labels before moving any objects that reference them, such as trees.
11. Move created data security objects and policies before moving any objects that reference them, such as value
sets.
12. Move created value sets before moving any objects that reference them, such as flexfields.
13. Move created trees before moving any objects that reference them, such as key flexfields.
995

Oracle Fusion Cloud HCM
Using Common Features for HCM
Chapter 47
Moving Common Reference Objects
996
