
July 2014
CTMS Site Monitoring
User Reference Guide

Trademarks
DCRI is a registered trademark of Duke University.
Siebel is a registered trademark of Siebel Systems, Incorporated.
Microsoft, Excel, Outlook, Windows, and Word are registered trademarks of
the Microsoft Corporation in the United States and other countries.
Adobe and Acrobat are registered trademarks of Adobe Systems Incorporated
in the United States and other countries.
All other product names and services used throughout this document are
trademarks or registered trademarks of their respective companies. The
product names and services are used throughout this document in editorial
fashion only and for the benefi t of such companies. No such use, or the use
of any trade name, is intended to convey endorsement or other affi liation
with the document.
Copyright Notice
Copyright © 2014 by Information Technology Training & Documentation at
Duke Clinical Research Institute. All rights reserved.
Printed in the United States of America. This publication, or any part thereof,
may not be reproduced or transmitted in any form or by any means, electronic
or mechanical, including photocopying, recording, storage in an information
retrieval system, or otherwise, without the prior written permission of Duke
Clinical Research Institute.
Version
Revision Level 9 • Published July 2014

CONTENTS
Reference Guide Conventions ........................................... vii
What You Need to Know Before Using This Reference Guide ................ vii
Visual Aids Used in This Reference Guide ............................................... vii
Site Monitoring Overview ..................................................... 9
Protocol-Specifi c Options ..........................................................................10
Site Visits: How Often?..............................................................................10
Site Visit Process Flow ..............................................................................11
Before the Site Visit .............................................................................11
During/After the Site Visit ...................................................................12
Marking Subjects to be Monitored ..................................... 13
Marking Subjects .......................................................................................13
Documenting a Site Visit .................................................... 15
Creating a Site Visit Record .......................................................................16
Completing Fields After Trip Report Approval .........................................23
Adding Data to Fields After Trip Report Approval .............................23
Viewing the Trip Report Status History .....................................................25
Trip Reporting ...................................................................... 27
Starting a New Trip Report ........................................................................28
Changing the Report Template ............................................................30
Creating a Confi rmation Letter ..................................................................31
Completing the Trip Report .......................................................................35
Form Fields ..........................................................................................35
Checklist Activities ..............................................................................39
Follow-Up Activities ...........................................................................42
ICF Tracking ........................................................................................45
CRF Tracking ......................................................................................47
Rev 9 - July 2014
CTMS Site Monitoring ║ v

vi ║ CTMS Site Monitoring
Rev 9 - July 2014
Protocol Deviations .............................................................................49
Attachments .........................................................................................51
Creating a Follow-Up Letter ......................................................................54
Working with the Offl ine Trip Report ........................................................57
Key Points for Exporting .....................................................................57
Exporting a CTMS Trip Report to Excel .............................................57
Entering Data into the Exported Trip Report .......................................58
Key Points for Importing .....................................................................59
Importing a Trip Report from Excel Back to the CTMS .....................59
Trip Report Approval Process ....................................................................61
Submitting a Trip Report for Approval................................................61
Approving a Trip Report......................................................................63
Returning a Trip Report to the CRA for Editing .................................65
Viewing and Creating a PDF Trip Report ..................................................66
Viewing the PDF Trip Report ..............................................................66
Creating a PDF version of the Trip Report ..........................................67
Viewing Site Visit Metrics ................................................... 69
Logging Conversations ...................................................... 71
Logging a Conversation .............................................................................71
Viewing All Conversation Logs .................................................................74
Appendix A: Trip Report ..................................................... 75
Appendix B: Attachments ................................................... 77

Rev 9 - July 2014
CTMS Site Monitoring ║ vii
What You Need to Know Before Using This
Reference Guide
To gain maximum benefi t from the material presented in this reference guide and
the associated training course, you should have a working knowledge of personal
computers (PCs), Microsoft Windows, and the DCRI network. If you need training
in any of these areas, send an email message to IT Training (at dcriittrain@
dm.duke.edu) requesting assistance.
Visual Aids Used in This Reference Guide
This reference guide uses the following visual aids to indicate notes, tips, and
warnings.
NOTE: The note icon indicates a clarifi cation or
supplemental information. Content that is too extensive
for a note appears inside a shaded box instead. Read a
note or a shaded box if you want to learn more about a
particular step or procedure.
TIP: The tip icon indicates a helpful hint or keyboard
shortcut. Read a tip if you want to learn a quicker or
easier way to perform a particular step or procedure.
WARNING: The warning icon indicates that performing a
particular step or procedure under the stated conditions
causes a signifi cant problem or concern. Always read
warnings.
REFERENCE GUIDE CONVENTIONS

viii ║ CTMS Site Monitoring
Rev 9 - July 2014

Rev 9 - July 2014
NOTES
CTMS Site Monitoring ║ 9
S
ite visit scheduling, tracking, and reporting can be performed in DCRI’s
Clinical Trial Management System (CTMS). Monitors can record their
activities during the course of a clinical trial and track the following items:
♦ Planned and actual site visits that comply with a clinical trial’s monitoring
plan.
♦ Subject forms that are reviewed during a site visit or in-house at the
DCRI.
♦ Issues and protocol deviations identifi ed during a site visit or at any other
time during the course of the clinical trial, including the resolution of
those issues.
CTMS integration enables you to create custom Confi rmation and Follow-Up
letters as well as Trip Reports that pull together the information you track.
SITE MONITORING OVERVIEW

10 ║ CTMS Site Monitoring
Rev 9 - July 2014Site Monitoring Overview
NOTES
Protocol-Specifi c Options
Before a new protocol is entered into the CTMS, a Protocol Setup meeting
occurs to identify protocol-specifi c requirements and settings, including
options that might infl uence how you enter site visit data. Please refer to your
protocol’s Data Entry Guideline (DEG) document to determine how data
should be entered into the CTMS for your protocol.
Other protocol-specifi c options include:
♦ Blinding/unblinding fi eld requirement.
♦ Whether or not to use the CTMS Trip Report tool.
♦ Custom checklist activities.
♦ Custom Confi rmation and Follow-Up letters.
Site Visits: How Often?
Optionally, protocol-wide monitoring intervals can be confi gured during
protocol setup by submitting a CTMS Request (CTMSR) form by email to
the DCRI Service Desk ([email protected]).
Your requested interval appears on all sites in the protocol, but you can
override this setting on a per-site basis by changing the following fi elds in the
site record:
Field Guidelines
Monitoring Interval
Override
Enter a number that is the interval of the unit
of measure you specify in the Monitoring
Interval Unit Override fi eld. For example,
enter 2 (for two days, two weeks, two months,
or two years).
Monitoring Interval Unit
Override
From the drop-down list, select the unit
of measure (Days, Weeks, Months, Years)
to go with the interval you entered in the
Monitoring Interval Override fi eld.
Monitoring Interval
Override Reason
From the drop-down list, select the reason for
the override.

CTMS Site Monitoring ║ 11
NOTES
Rev 9 - July 2014 Site Monitoring Overview
Site Visit Process Flow
The following fl ow charts represent the steps to properly record a site visit
and create a Trip Report. You will fi nd detailed instructions in the remaining
sections of this guide.
Before the Site Visit
Mark subjects
to be
monitored
Begin
Site Visit
Record
Send
Confi rmation
Letter
Begin
Trip Report
Record
(optional)
Export Trip
Report to Excel

12 ║ CTMS Site Monitoring
Rev 9 - July 2014Site Monitoring Overview
During/After the Site Visit
Update
Site Visit
Record
(if applicable)
Import Trip Report
from Excel
Send
Follow-Up
Letter
Complete
Trip Report
Record
Submit Trip
Report for
Approval
Complete
Site Visit
Record
NOTES

Rev 9 - July 2014
NOTES
CTMS Site Monitoring ║ 13
D
epending on the Monitoring Plan for your protocol, a percentage of
subjects enrolled at a site will need to be monitored (source verifi cation
of subject forms). In the CTMS, all enrolled subjects are listed in subject-
related views. You can indicate which subjects you intend to monitor by
following the process below.
WARNING: If your trial uses an Interactive Voice
Response System (IVRS) to automatically pull
enrollment information into the CTMS, do NOT use the
New button in the Subjects view to add a new subject
record. There can be a 48-hour delay from the time
subject information is received from the IVRS to when it
appears in the CTMS.
Marking Subjects
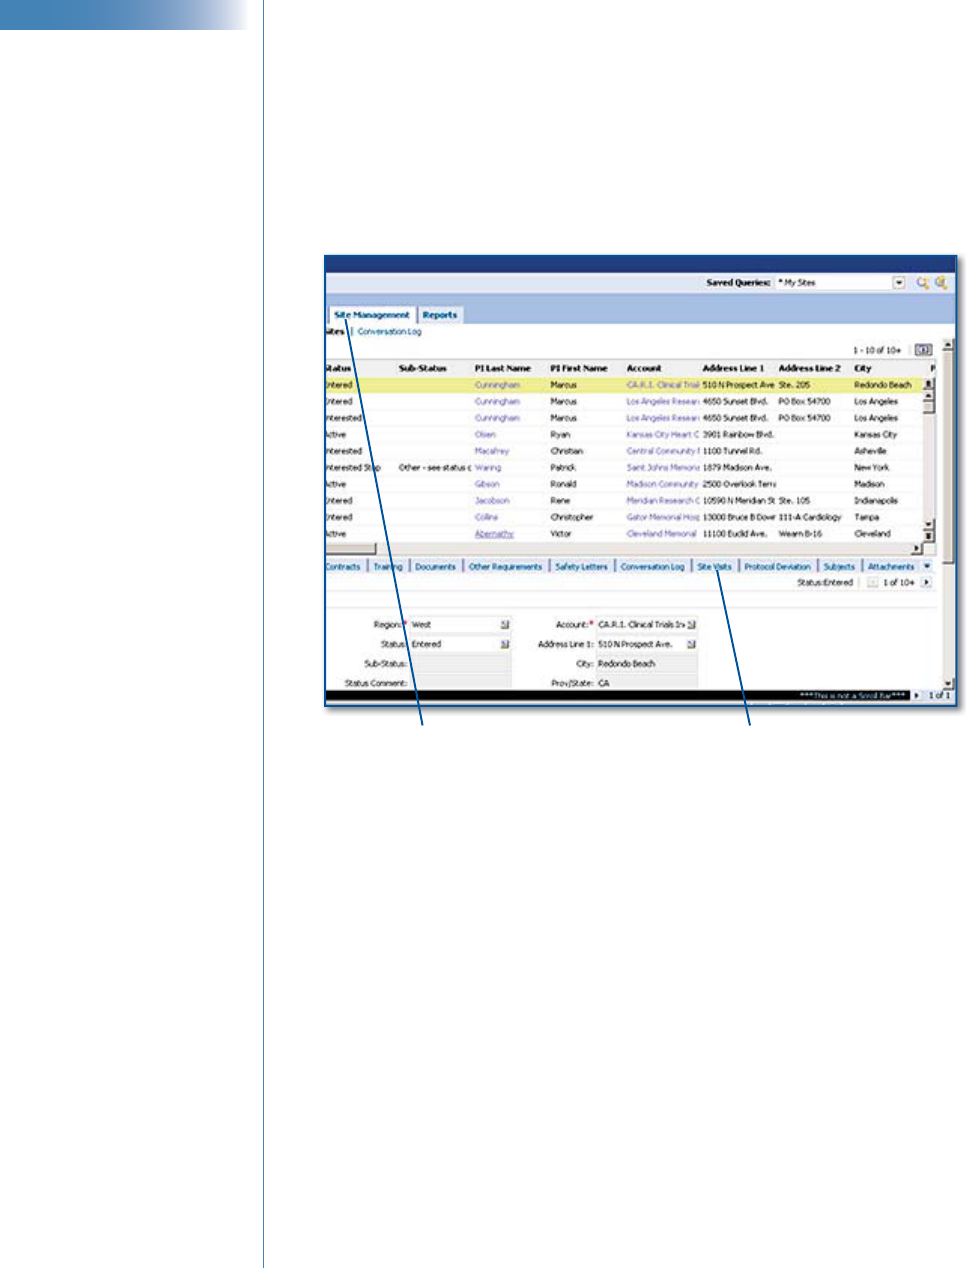
1 Go to the Site Management screen.
2 Locate the site by running a query on the Site # fi eld. (See “Query
Basics” in IT Training’s CTMS Fundamentals user reference guide.)
3 Select the site by clicking to the left of the site record.
4 Select Subjects. If this tab does not show, click the drop-down list to the
right of all view tabs at the bottom of the window.
Site Management tab
Drop-down list to
view more tabs
Subjects tab
MARKING SUBJECTS TO BE MONITORED

14 ║ CTMS Site Monitoring
Rev 9 - July 2014
NOTES
Marking Subjects to be Monitored
5 If necessary, query for the subject under the Subjects view tab.
WARNING: Do not attempt to add subjects manually
until you determine whether subjects are automatically
or manually added to the CTMS for your protocol.
6 To mark a subject record for monitoring, click in the subject’s To Be
Monitored fi eld.
7 Check the box to fl ag the subject for monitoring.
8 Save the record by pressing Ctrl+S.

Rev 9 - July 2014
NOTES
CTMS Site Monitoring ║ 15
S
ite visit scheduling, tracking, and reporting can be performed in the
CTMS. Monitors can record their activities during the course of a
clinical trial, and track the following items:
♦ Planned and actual site visits that comply with the protocol’s monitoring
plan.
♦ Subject forms that are reviewed during a site visit or in-house at the
DCRI.
♦ Issues and protocol deviations identifi ed during a site visit or at any other
time during the course of the clinical trial, including the resolution of
those issues.
There are two steps involved with documenting a site visit:
Step 1: Create a site visit record (discussed in this section).
Step 2: Create a Trip Report (see “Trip Reporting” on page 27).
CTMS integration enables you to create custom Confi rmation and Follow-
Up letters (see “Creating a Follow-Up Letter” on page 54), as well as Trip
Reports, which automatically incorporate the data that you have entered.
Site visits can consist of site selections, site initiations, periodic monitoring,
site close-outs, and unscheduled visits. This section covers how to record site
visit data, including fi elds that you can populate before, during, and after a
site visit.
DOCUMENTING A SITE VISIT
16 ║ CTMS Site Monitoring
Rev 9 - July 2014
NOTES
Documenting a Site Visit
Creating a Site Visit Record
1 Click the Site Management screen tab.
2 Locate the site by running a query on the Site # fi eld. (See “Query
Basics” in IT Training’s CTMS Fundamentals user reference guide.)
3 Select the site by clicking to the left of the site record.
4 Click the Site Visits view tab at the bottom of the window.
Site Visits view tab
Site Management screen tab
The Site Visits applet opens. An applet is an area that performs a separate
function in the Siebel application.
5 On the Site Visits view applet, do one of the following:
♦ Click the New button to start a new row.
OR
♦ Click the Query button to locate and edit an existing visit record.
6 Use the following table as a guideline for completing the row.

CTMS Site Monitoring ║ 17
NOTES
Rev 9 - July 2014 Documenting a Site Visit
* Indicates a required fi eld
Field Guidelines
Visit Name
Enter a descriptive name for the visit that will
appear on the Trip Report.
Note: Refer to your protocol’s Data Entry
Guideline (DEG) or clinical monitoring plan to
determine the naming convention for your site
visits. For example, the Visit Name could be the
site name concatenated with the visit type:
30-Day or Visit1.
Visit Type*
Select the appropriate value from the drop-down
list to identify the type of visit that is being
scheduled.
Note: After moving off of this fi eld (or pressing
Ctrl+S to save the entry), the entry becomes
a hyperlink connected to the Trip Report for
the visit (only for protocols using DCRI’s trip
reporting service).
Unblinded?*
If applicable, use the drop-down list to specify
whether this visit was performed by a blinded
or unblinded clinical research associate (CRA).
Blinded CRAs can only view records marked
blinded. Unblinded CRAs can view all records.
Note: For most protocols, this fi eld is read-only.
Planned Visit Start
Enter the estimated date that the visit will be
performed.
Planned Visit
Completion
Enter the estimated date that the visit will be
completed.

18 ║ CTMS Site Monitoring
Rev 9 - July 2014
NOTES
Documenting a Site Visit
Field Guidelines
Actual Visit Start
Enter the date that the visit actually occurred.
Actual Visit
Completion
Enter the date that the visit actually ended.
Visit Status
Automatically displays the current status of the
visit, based on whether a date appears in the
Planned Visit Completion (Planned), Actual
Visit Completion (Done), or Visit Cancelled
(Cancelled) fi eld. The default value is Planned.
The process for using this fi eld is trial-specifi c.
Some trial teams edit an existing record; others
delete the old record and add a new one.
For visits with Site Selection in the Visit Type
fi eld, the following statuses appear in the Visit
Status drop-down list:
♦ Not Required - Waiver should be used
when DCRI does not have documentation
that the site has had an on-site monitoring
visit in the last 24 months, but the sponsor
waives the requirement for the site selection
visit. Selecting this status changes the Trip
Report Status fi eld’s value from Not Started
to Not Required.
♦ Not Required - Exemption should be
used when DCRI has documentation that
the site has had an on-site monitoring visit
in the last 24 months, so it is exempt from
the requirement for an on-site site selection
visit. Selecting this status changes the Trip
Report Status fi eld’s value from Not Started
to Not Required.
(continued on next page)

CTMS Site Monitoring ║ 19
NOTES
Rev 9 - July 2014 Documenting a Site Visit
Field Guidelines
(continued)
Note: When a Not Required status is
selected, all other fi elds in the site visit
record are locked from editing.
Trip Report Status
Automatically populated from the Trip Report’s
Report Status fi eld.
Visit Mechanism
Select the type of visit from the drop-down list.
The default value is On-site.
Co-Monitoring Visit
If the visit will be performed by more than one
CRA, select Yes from the drop-down list. The
default value is No.
Training Visit
If the visit will be used to train one or more
CRAs, select Yes from the drop-down list. The
default value is No.
To record trainer/trainee names and roles:
1 Select Yes from the Training Visit drop-
down list.
2 Save the record by pressing Ctrl+S.
3 Scroll down to the Training area of the
window.
4 Click New.
5 In the Last Name fi eld, click the selection
icon to select the other CRA’s name.
6 In the Role fi eld, select the CRA’s training
role.
7 Save the record by pressing Ctrl+S.
Note: Training role information is not recorded
on the printed PDF copy of the Trip Report.

20 ║ CTMS Site Monitoring
Rev 9 - July 2014
NOTES
Documenting a Site Visit
Field Guidelines
Assigned To
To assign the visit to another CTMS user (the
default value is your user name):
1 Click the selection icon in the fi eld.
2 Query for and select the name of the person
from the Available list.
3 Click Add to add the name to the Selected
list.
4 Check the Primary checkbox to indicate the
person who is responsible for completing the
site visit record.
5 (optional) Remove the original name from
the Selected list by selecting it and clicking
Remove.
6 Click OK.
Loop Visit Name
Enter a name to identify that the visit is part of a
combined trip to other sites. For example, enter
East Coast Loop.
Loop Sequence
Enter a number that represents the sequence of
the visit in a particular loop. For example, enter
2 to represent the second visit completed in the
loop.
Planned Patients
Monitored
Enter the number of subjects that are estimated to
be monitored on the site visit.
Actual Patients
Monitored
Enter the number of subjects that were actually
monitored on the site visit.
Travel Time
Enter the number of hours that you travelled.
Numbers are rounded to the nearest tenth. For
example, entering 5.25 rounds to 5.3 hours.
Time On Site
Enter the number of hours that you were on site.
Numbers are rounded to the nearest tenth. For
example, entering 5.25 rounds to 5.3 hours..

CTMS Site Monitoring ║ 21
NOTES
Rev 9 - July 2014 Documenting a Site Visit
Field Guidelines
Planning/Reporting
Time
Enter the number of hours that you spent
planning for and documenting the site visit.
Numbers are rounded to the nearest tenth. For
example, entering 5.25 rounds to 5.3 hours.
Confi rmation Letter
Sent Date
Enter the date that the Confi rmation Letter for
the visit was sent to the site.
Follow-Up Letter Sent
Date
Enter the date that the Follow-Up Letter for the
visit was sent to the site.
Comments
Enter any comments related to the visit, up to a
maximum of 255 characters.
Trip Report
Completed
Enter the date that the Trip Report was
completed.
Note: The process for using this fi eld can be
trial-specifi c. Typically, this date represents when
all documentation is complete for the visit and
Trip Report.
Visit Cancelled
If applicable, enter the date the visit was
cancelled.
Note: Selecting Cancelled from the Visit Status
fi eld automatically populates this fi eld with the
current date.
Submit To Last Name
Automatically populated from the Trip Report’s
Submitted To fi eld.
Submit To First Name
Automatically populated from the Trip Report’s
Submitted To fi eld.
Submitted By Last
Name
Automatically populated from the Trip Report’s
Submitted By fi eld.
Submitted By First
Name
Automatically populated from the Trip Report’s
Submitted By fi eld.

22 ║ CTMS Site Monitoring
Rev 9 - July 2014
NOTES
Documenting a Site Visit
Field Guidelines
Submitted Date
Automatically populated when the Trip Report’s
Report Status fi eld shows Submitted.
Approved Date
Automatically populated when the Trip Report’s
Report Status fi eld shows Approved.
Expense Report
Submitted
Enter the date that the expense report for the visit
was submitted to the project lead.
Exp Rpt Submit By
FN
Automatically populated when a name is selected
in the Exp Rpt Submit By LN fi eld.
Exp Rpt Submit By
LN
Click the selection icon to select your name (or
the name of the person submitting the expense
report).
Exp Rpt Appr By FN
Automatically populated when a name is selected
in the Exp Rpt Appr By LN fi eld.
Exp Rpt Appr By LN
Click the selection icon to select the name of the
person who approved the expense report.
Expense Report
Approved
Enter the date that the expense report for the visit
was approved.
Trip Report Sent to
Sponsor Date
Automatically populated when the Trip Report’s
Report Status fi eld shows Sent to Sponsor.
7 Save the record by pressing Ctrl+S.

CTMS Site Monitoring ║ 23
NOTES
Rev 9 - July 2014 Documenting a Site Visit
Completing Fields After Trip Report Approval
When the Trip Report is approved (see “Trip Report Approval Process” on
page 61), all fi elds in the Trip Report and Site Visit Record are locked from
editing. The following fi elds are made available on the More Info applet
below the site visit record, so that you can complete them even after the Trip
Report is approved, since these events generally occur after approval:
♦ Expense Report Submitted
♦ Exp Rpt Submit By FN
♦ Exp Rpt Submit By LN
♦ Exp Rpt Appr By FN
♦ Exp Rpt Appr By LN
♦ Expense Report Approved
♦ Trip Report Sent to Sponsor
♦ Follow-Up Letter Sent
♦ Trip Report Completed
Adding Data to Fields After Trip Report Approval
1 On the Site Visits view tab, select the site visit by clicking to the left of
the record.
2 Scroll down to the More Info applet at the bottom of the window.
Site Visits view tab
More Info applet
3 Use the following table as a guideline for completing the fi elds.

24 ║ CTMS Site Monitoring
Rev 9 - July 2014
NOTES
Documenting a Site Visit
* Indicates a required fi eld
Field Guidelines
Expense Report
Submitted
Enter the date that the expense report for the visit
was submitted to the Lead CRA or Project Lead.
Exp Rpt Submit By
FN
Automatically populated when a name is selected
in the Exp Rpt Submit By LN fi eld.
Exp Rpt Submit By
LN
Click the selection icon to select your name (or
the name of the person submitting the expense
report).
Expense Report
Approved
Enter the date that the expense report for the visit
was approved.
Exp Rpt Appr By FN
Automatically populated when a name is selected
in the Exp Rpt Appr By LN fi eld.
Exp Rpt Appr By LN
Click the selection icon to select the name of the
person who approved the expense report.
Trip Report Sent to
Sponsor
If applicable, enter the date that the Trip Report
was sent to the sponsor.
Follow-Up Letter Sent
Enter the date that the Follow-Up Letter for the
visit was sent to the site.
Trip Report
Completed
Enter the date that the Trip Report was
completed.
Note: The process for using this fi eld can be
trial-specifi c. Typically, this date represents when
all documentation is complete for the visit and
Trip Report.
4 Save the data by pressing Ctrl+S.

CTMS Site Monitoring ║ 25
NOTES
Rev 9 - July 2014 Documenting a Site Visit
Viewing the Trip Report Status History
The Trip Report Status History applet that appears at the bottom of both
the Site Visits screen tab (at the top of the window) and the Site Visits view
tab (available on the Site Management screen tab) shows status changes that
were made to the Trip Report.
The applet’s read-only fi elds are explained in the table below.
Field Description
Employee Login
Who made the update.
Operation
The action that was taken.
Field
The fi eld that was updated.
Old Value
The value that was in the fi eld prior to the
update.
New Value
The new value that is now in the fi eld.
Date
The date that the update occurred.

26 ║ CTMS Site Monitoring
Rev 9 - July 2014Documenting a Site Visit

Rev 9 - July 2014
NOTES
CTMS Site Monitoring ║ 27
A
Trip Report is populated before, during, and after a site visit, containing
data that is collected by CRAs. The CTMS supports electronic signature
technology, enabling submission and approval of Trip Reports to be done
electronically.
Trip Reports can contain the following information:
♦ Type of visit
♦ Submitted by and approval information
♦ Site visit attendees
♦ Site visit checklist items
♦ Site visit follow-up items
♦ Informed Consent Form (ICF) monitoring information
♦ Case Report Form (CRF) monitoring information
♦ Protocol deviations
♦ Site visit attachments
♦ Site visit observations and comments
TIP: Although you cannot save “versions” of your
electronic Trip Report, you can save a PDF copy at any
time to capture the most current updates. See “Viewing
and Creating a PDF Trip Report” on page 66.
TRIP REPORTING

28 ║ CTMS Site Monitoring
Rev 9 - July 2014
NOTES
Trip Reporting
Starting a New Trip Report
When a site visit has been scheduled, the Trip Report can be started to
help you prepare for the visit. Specifi cally, the Report Template should be
selected, which automatically changes the Report Status to In Progress and
populates the Checklist Activities tab.
1 Click the Site Management screen tab.
2 Locate the site by running a query on the Site # fi eld. (See “Query
Basics” in IT Training’s CTMS Fundamentals user reference guide.)
3 Select the site by clicking to the left of the site record.
Site Visits view tab
Site Management screen tab
4 Click the Site Visits view tab at the bottom of the window.
5 If necessary, query for the visit in the Site Visits view tab.
If the query does not return any records, you must enter the site visit prior
to completing this procedure. See “Documenting a Site Visit” on page 15.
6 Click the blue hyperlink in the Visit Type fi eld.
Visit Type hyperlink

CTMS Site Monitoring ║ 29
NOTES
Rev 9 - July 2014 Trip Reporting
The Trip Report detail window appears.
Template Unlock fi eld
Report Template fi eld
7 Click the Report Template drop-down arrow to select a template.
The following occurs:
♦ The Report Template fi eld becomes read-only.
♦ The Report Status fi eld is populated with the value In Progress.
♦ The Template Unlock fi eld is unchecked.
♦ The Checklist Activities tab is populated with checklist items to be
addressed during the site visit.
WARNING: If applicable, protocol-specifi c templates
will be listed fi rst in the Report Template drop-down
list. Use protocol-specifi c templates unless otherwise
instructed. Refer to your protocol’s DEG or clinical
monitoring plan to determine which template to use.
8 Press Ctrl+S to save the record.

30 ║ CTMS Site Monitoring
Rev 9 - July 2014
NOTES
Trip Reporting
Changing the Report Template
By default, when a Report Template is selected, the selection immediately
becomes read-only to prevent accidental changes of the template after data
has been added to the Checklist Activities tab. The Template Unlock
checkbox enables you to unlock the Report Template fi eld and change the
template when needed. Both the Report Template and Template Unlock
fi elds are read-only for Trip Reports with a Report Status of Submitted,
Approved, or Sent to Sponsor.
WARNING: When you change a Report Template, all
previously entered data on the Checklist Activities
tab will be deleted and replaced with the checklist
associated with the new template. Data on all other
tabs in the Trip Report window will not be affected if
you change the Report Template.
1 Select Template Unlock, and then step off the fi eld to save the selection.
The following message appears:
2 Do one of the following:
♦ Click OK if you want to replace the checklist and any previously
entered data with the new template’s checklist. You can now click
the Report Template drop-down arrow to select a new template.
Or
♦ Click Cancel. No changes will be made.

CTMS Site Monitoring ║ 31
NOTES
Rev 9 - July 2014 Trip Reporting
Creating a Confi rmation Letter
You can create Confi rmation Letters in the Trip Report window, using a
built-in template tool. This tool pulls data from your site visit record and Trip
Report to populate the letter with information specifi c to your visit. Letters
are saved in Microsoft Word format, enabling you to save them to another fi le
location, print and mail or fax them, or attach them to an email message.
NOTE: Standard, site-visit-type-specifi c letter templates
are automatically created when following the letter
generation procedures below. Protocol-specifi c, site-visit-
type-specifi c letter templates can be accommodated.
Requests should be submitted on a CTMS Request
(CTMSR) form by email to the DCRI Service Desk
TIP: Instead of manually signing the letters, CTMS
offers an optional electronic signature feature that is 21
CFR Part 11 compliant. For this capability to work, you
must request electronic signature confi guration for your
protocol’s letters in a CTMSR sent to the DCRI Service
Desk.
1 Click the Site Management screen tab.
2 Locate the site by running a query on the Site # fi eld. (See “Query
Basics” in IT Training’s CTMS Fundamentals user reference guide.)
3 Select the site by clicking to the left of the site record.
Site Visits view tab
Site Management screen tab

32 ║ CTMS Site Monitoring
Rev 9 - July 2014
NOTES
Trip Reporting
4 Click the Site Visits view tab at the bottom of the window.
5 If necessary, query for the visit on the Site Visits view tab.
If the query does not return any records, you must enter the site visit prior
to completing this procedure. See “Documenting a Site Visit” on page 15.
6 Click the blue hyperlink in the Visit Type fi eld.
Visit Type hyperlink
The Trip Report detail window appears.
Attach Confi rmation Letter button
7 Click Attach Confi rmation Letter.
After a brief pause, the confi rmation
window to the right appears, telling
you that the Confi rmation Letter has
been added to your Attachments tab.
8 Click OK.
9 Click the Attachments tab.
The new Confi rmation Letter appears at the top of the list.

CTMS Site Monitoring ║ 33
NOTES
Rev 9 - July 2014 Trip Reporting
10 Click the Confi rmation Letter hyperlink.
A message appears,
,
enabling you to open the
fi le or save it to another
location.
11 Click Open.
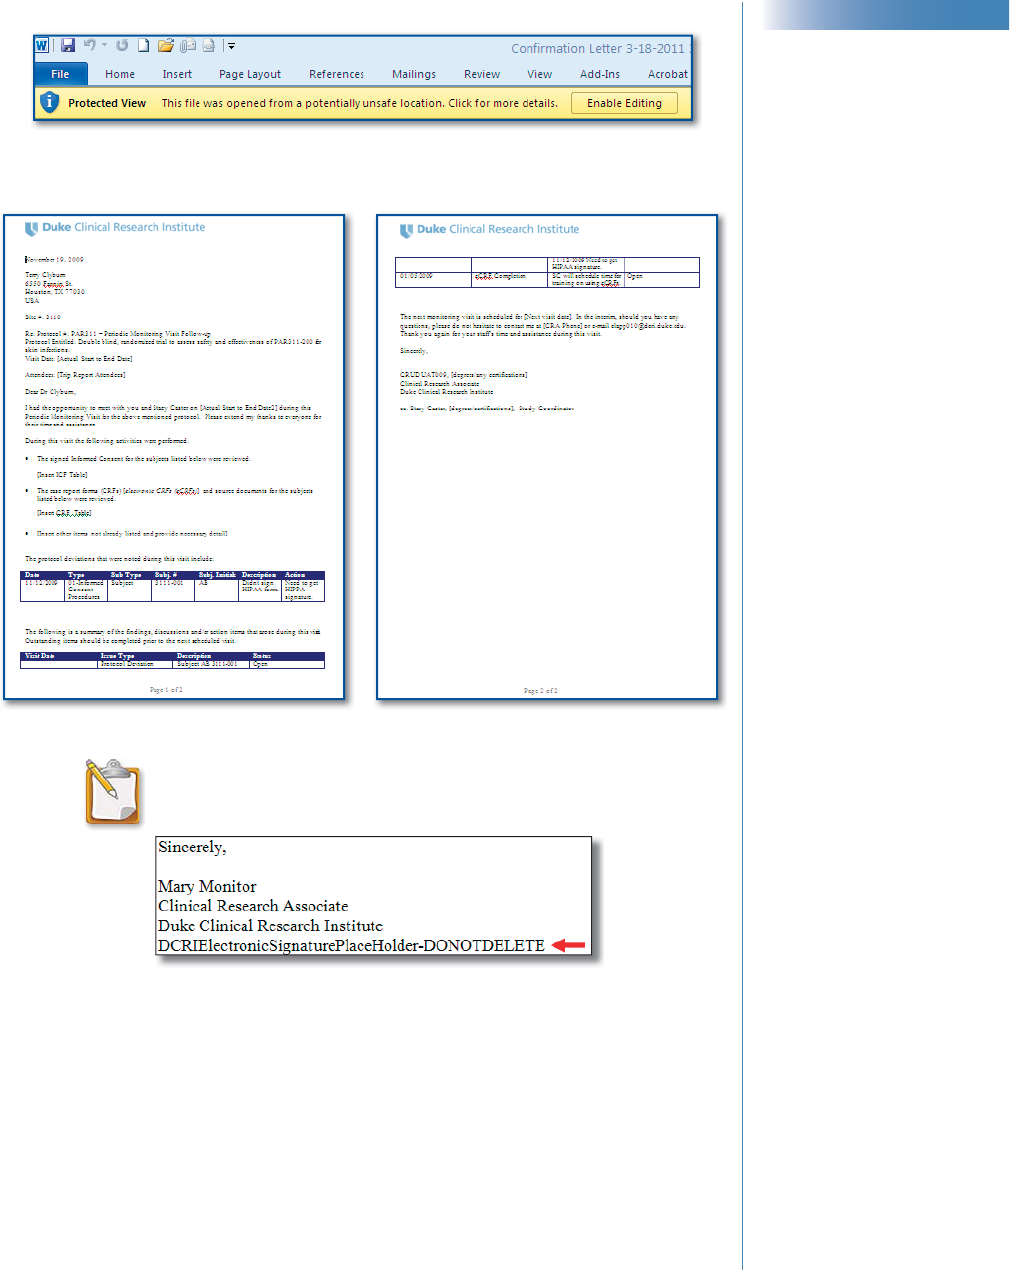
The letter opens in Microsoft Word in Protected View mode.
12 To edit the fi le, click Enable Editing at the top of the Word window.
13 Review and edit the letter as needed.

34 ║ CTMS Site Monitoring
Rev 9 - July 2014
NOTES
Trip Reporting
NOTE: If the letter’s signature block includes the line
pointed out below, then electronic signatures are
enabled for this letter.
Important! Do not edit or delete this text.
14 To print the letter, select File>Print.
15 To save the letter, select File>Save as, and then navigate to the location
where you want to save the fi le (selecting fi le type *doc or *docx).
WARNING: You can no longer save a Word document
directly to the CTMS if you had opened that fi le from
within the CTMS. The work-around is to fi rst save the
document to another location and then import it back
into the CTMS, following steps 15 and 16
.
16 To add the fi le back into the Trip Report, click New File on the
Attachments tab, locate the fi le, and then click Open.
17 If electronic signatures have been enabled for the letter, then do the
following:
a On the Attachments tab, save the record by pressing Ctrl + S.
WARNING: If you forget to press Ctrl + S, changes you
saved in Word are lost.
b On the Attachments tab, highlight the letter by clicking to the left of
the record.
c Click .
An Electronic Signature window appears.
d Enter your DCRI network password, and then click OK. A
confi rmation window appears.
e Click OK.
On the Attachments tab, a new PDF version of the letter appears
with the text Authored and Electronically Signed by [your name][DD
MMM YYYY][HH:MM][AM/PM] in the signature area of the letter.
NOTE: To see the new PDF attachment, you may need
to refresh your screen.

CTMS Site Monitoring ║ 35
NOTES
Rev 9 - July 2014 Trip Reporting
TIP: The default name for the PDF is rather long. You
can change this title by aiming to the right of the default
name and clicking a blank area of the Title fi eld, and
then entering a new name for the PDF fi le.
f Check your Data Entry Guidelines (DEG) for instructions on whether
or not to delete the original Word version of the letter.
TIP: To send the letter via email, go to the Attachments
tab, click to the left of the letter to highlight it, and then
select File>Send Email.
Completing the Trip Report
Once a Trip Report has been started, you can return to it as often as needed
to complete additional fi elds, add new data, and attach documents—until the
Trip Report is approved. To open an existing Trip Report, follow steps 1–6 of
“Starting a New Trip Report” on page 28.
This section covers the various pieces of the Trip Report window:
♦ Form fi elds (see next)
♦ Checklist activities (page 39)
♦ Follow-up activities (page 42)
♦ ICF tracking (page 45)
♦ CRF tracking (page 47)
♦ Protocol deviations (page 49)
♦ Attachments (page 51)
Form Fields
The fi elds in the upper portion of the Trip Report window pertain to the site
visit and determine the type of Trip Report you are completing. The header
at the top of the window displays the site number, principal investigator, and
visit type for the report.
Upper left portion of Trip Report, showing some of the form fi elds

36 ║ CTMS Site Monitoring
Rev 9 - July 2014
NOTES
Trip Reporting
Use the following table as a guideline to complete the form fi elds.
Field Guidelines
Submitted By
When submitting a Trip Report for approval, click
the selection icon in this fi eld to open the Pick
Internal Personnel window. Select your name
from the list, and then click the Pick button. See
“Trip Report Approval Process” on page 61.
Submitted To
When submitting a Trip Report for approval,
select the name to which the report is being
submitted. See “Trip Report Approval Process” on
page 61.
Report Template
Select a Trip Report template from the drop-down
list. This step populates the Checklist Activities
tab. See “Starting a New Trip Report” on page
28. If you would like to change the template, see
“Changing the Report Template” on page 30.
Report Status
Populated with the appropriate status when the
following actions occur:
♦ Not Required. (For SSV visits) Appears when
the site visit’s Visit Status is Not Required.
♦ Not Started. Default status indicating that
a template has not yet been selected in the
Report Template fi eld.
♦ In Progress. Appears when the CRA selects a
template in the Report Template fi eld.
♦ Submitted. Appears when the CRA submits
the Trip Report for approval.
♦ Sent to Sponsor. Selected by the team member
designated to send the Trip Report to the
sponsor (typically the Lead CRA).
♦ Recall. Can be selected by the CRA after the
Trip Report has been submitted for approval,
allowing the CRA to edit the Trip Report.
♦ Not Approved. Selected by the Trip Report
approver (typically the Lead CRA) to indicate
that the Trip Report requires further editing by
the CRA.
♦ Approved. Appears when the Trip Report
approver (typically the Lead CRA) clicks the
Approve & Attach button.
See “Trip Report Approval Process” on page 61.

CTMS Site Monitoring ║ 37
NOTES
Rev 9 - July 2014 Trip Reporting
Field Guidelines
Template Unlock
Check the box to unlock the Report Template
drop-down list. See “Changing the Report
Template” on page 30.
Visit Start
Automatically populated from the site visit
record’s Actual Start Date fi eld.
Visit Completed
Automatically populated from the site visit
record’s Actual Completion Date fi eld.
Next Visit
Enter the next date that you plan to visit the site.
If this fi eld is populated, it will show on the Trip
Report. If this fi eld is not populated, the words
Next Visit will not appear on the printed Trip
Report.
Visit Name
Automatically populated from the site visit
record’s Visit Name fi eld.
Mechanism
(read-only) Automatically populated from the site
visit record’s Visit Mechanism fi eld.
Attendees
To select the attendees who participated in the
visit:
1 Click the selection icon in this fi eld.
2 Query a name in the left side of the window.
Note: By default, the list shows only site
(“affi liated”) personnel. To view a list of all
CTMS contacts, click All Contacts.
3 Click Add to add the name to the right side of
the window.
4 Click the Attending Role drop-down arrow to
select the attendee’s role.
5 If needed, repeat steps 2–4 to add other
attendees.
6 Click OK.
Note: Contacts with a date in the End Date fi eld
can still be selected as an attendee for the visit.

38 ║ CTMS Site Monitoring
Rev 9 - July 2014
NOTES
Trip Reporting
Field Guidelines
Other Locations
To record other affi liated sites you attended while
visiting the main site:
Selection
icon
1 Click the selection icon in the fi eld.
A DCRI Site Account Affi liation window
appears. Accounts listed on the site’s Acct
Affi liations tab appear in the Available
(left) box.
2 Select an account that you visited while on
this site visit, and then click Add.
The site appears in Selected (right box).
3 Click OK.
Note: If this fi eld is populated, the accounts
appear on the PDF copy of the Trip Report.
E-sig Submitted By
E-sig Submitted Date
E-sig Approved By
E-sig Approved Date
Automatically populated during the Trip Report
approval process.
Note: E-sig (electronic signature) information
appears in the current user’s time zone in the
Trip Report window. The PDF version of the Trip
Report will always display e-sig information in
Eastern Standard / Daylight Time (EST / EDT)
time zone.
See “Trip Report Approval Process” on page 61.
Additional
Observations/
Comments
Use this fi eld to capture additional comments
about the trip. All users can enter comments in this
fi eld (maximum 16,000 characters). Comments
entered in this fi eld appear on the fi nal printed
Trip Report.
Internal Comments
Use this fi eld to capture comments to and
from the Trip Report approver. All users can
enter comments in this fi eld (maximum 4,000
characters). Comments entered in this fi eld will
not show on the fi nal printed Trip Report. When
the Trip Report is approved, the contents of this
fi eld are deleted.

CTMS Site Monitoring ║ 39
NOTES
Rev 9 - July 2014 Trip Reporting
Checklist Activities
The Checklist Activities tab displays a list of questions and issues to be
addressed during the site visit. The list of checklist activities is determined by
the template that is selected in the Report Template fi eld in the top portion of
the Trip Report window.
Answer each item by selecting an option from the appropriate column. (For
example, you enter numbers in the Quantity column.) Depending on your
protocol, you can also refer to the Instructions and Annotations fi elds to
help you understand the proper way to answer specifi c questions.
Upper portion of Checklist Activities tab
TIP: Select a row and then scroll down to enter data in
the form displayed at the bottom of the window. Data
you enter in form fi elds is more visible and can be spell-
checked. Use the navigation buttons to go to the next/
previous checklist item.
Spell-check buttons Navigation buttons
Lower portion of Checklist Activities tab
WARNING: You must turn off your pop-up blocker
for the spell-check feature to work. See “ Enabling
CTMS Pop-Up Windows” in Appendix A of IT
Training’s CTMS Fundamentals user reference
guide.

40 ║ CTMS Site Monitoring
Rev 9 - July 2014
NOTES
Trip Reporting
1 On the Checklist Activities tab, do one of the following:
♦ To complete an existing checklist activity, select the activity by
clicking to the left of the record.
Or
♦ To add a new checklist activity, click the New button.
2 Use the following table as a guideline to complete the record.
* indicates fi eld is pre-populated for template activities
Field Guidelines
Item # *
During protocol setup, this fi eld can be pre-
populated with a numbering sequence for
each activity. Pre-populated (“template”) item
numbers cannot be modifi ed. If new activities are
added to the list, you cannot duplicate an item
number.
Activity Type *
Select a category for the checklist item from the
drop-down list.
Description *
Enter the question or issue that needs to be
addressed at the site, up to a maximum of 256
characters.
Instructions *
(read-only) Based on the protocol, this fi eld
shows instructions for how to answer the
question. For example, Use the Response fi eld to
answer this question.
Annotations *
(read-only) Based on the protocol, this fi eld
shows additional instructions for how to answer
the question. For example, this fi eld provides
additional steps to take if the answer in the
Response fi eld is Yes.
Quantity
For checklist items that require a number answer,
enter the quantity in this fi eld.
Note: Only one answer can be entered in the
Quantity, Response, or Date fi eld. When a
value is entered in one fi eld, the other two are
locked from editing. Clearing the fi eld opens all
three fi elds for editing.

CTMS Site Monitoring ║ 41
NOTES
Rev 9 - July 2014 Trip Reporting
Field Guidelines
Response
For checklist items that require a response, such
as Yes or No, select the option from the drop-
down list. See the Note in the Quantity fi eld
guidelines.
Date
For checklist items that require a date answer,
enter the date in this fi eld. See the Note in the
Quantity fi eld guidelines.
Comments
Use this fi eld to capture additional comments
about the checklist activity. All users can
enter comments in this fi eld (maximum 4,000
characters). Comments entered in this fi eld
appear on the fi nal printed Trip Report.
Note: Use Ctrl+X to cut comments from
another source and Ctrl+V to paste them into the
Comments fi eld.
Internal Comments
Use this fi eld to capture manager comments
about the checklist activity, as well as CRA
responses to manager comments. All users can
enter comments in this fi eld (maximum 4,000
characters). Comments entered in this fi eld will
not show on the fi nal printed Trip Report. When
the Trip Report is approved, the contents of this
fi eld are deleted.
Created By
(read-only) Displays the current user ID.
Outstanding Issues
Check the box to indicate that there is an
outstanding issue with the checklist item.
Note: Checking the box does not automatically
add a new entry in the Current Follow-Up
Items tab.
3 Save the record by pressing Ctrl+S.
TIP: To create a new checklist activity, click New.

42 ║ CTMS Site Monitoring
Rev 9 - July 2014
NOTES
Trip Reporting
Follow-Up Activities
There are two follow-up activity tabs.
♦ Current Follow-up. Shows all follow-up activities for this visit only. You
can add new records and edit records in this view.
♦ All Follow-up. Shows all follow-up activities for this visit, plus the
following:
– Follow-up activities from previous site visits that still have a Status
of Open.
– Previous site visit follow-up activities that were closed (Status is
Done) after the previous site visit’s Actual Completion Date.
All activities listed on the All Follow-up tab appear on the printed Trip
Report. In this view you cannot add new records; however, you can edit
existing records.
TIP: Select a row and then scroll down to enter data in
the form displayed at the bottom of the window. Data
you enter in form fi elds is more visible and can be spell-
checked. Use the navigation buttons to go to the next/
previous follow-up item.
Top portion of Current Follow-up tab
► Complete Follow-up Activities with the Current Follow-up Tab
1
Click the Current Follow-up tab.
2 If no additional follow-up activities need to be added to the existing list,
skip to step 4 of this procedure.
3 If there are additional follow-up activities that need to be added, click the
New button on the Current Follow-up tab.
4 Use the following table as a guideline to complete the new row or to fi ll
in data for an existing follow-up activity.

CTMS Site Monitoring ║ 43
NOTES
Rev 9 - July 2014 Trip Reporting
* indicates a required fi eld
Field Guidelines
Activity Type*
Select an option from the drop-down list to
identify the follow-up activity.
Description
Describe the follow-up activity that needs
to be addressed at the site (maximum 4,000
characters).
Due
Enter the date that the follow-up activity should
be completed. The default value is blank.
Status
Select the appropriate option from the drop-down
list. The default value is Open.
Completed Date
Enter the date that the follow-up activity ended.
Resolution/Action
Comments
Enter comments regarding the resolution of the
follow-up activity (maximum 4,000 characters).
Assigned To:
Follow-up activities only appear in your list if
your user ID is listed in the Assigned To fi eld
(the default). The name listed in the SM Last
Name fi eld on the site record is the default
“primary” contact. To assign the follow-up
activity to another person, follow these steps:
1 Click the selection icon in the fi eld.
2 Select the person’s name from the Available
list.
3 Click Add to add the person’s name to the
Selected list.
4 Check the Primary checkbox to indicate
the person that will be responsible for
completing the activity.
5 Click OK.
Note: The new person’s name does not appear
until you exit and return to the window.

44 ║ CTMS Site Monitoring
NOTES
Rev 9 - July 2014
Field Guidelines
Created By
(read-only) Displays the current user ID.
Show on Follow-Up
Letter
Checked by default. Uncheck the box to remove
the follow-up item from the Follow-Up Letter.
See “Creating a Follow-Up Letter” on page 54.
Internal Comments
Use this fi eld to capture comments to and
from the Trip Report approver. All users can
enter comments in this fi eld (maximum 4,000
characters). Comments entered in this fi eld will
not show on the fi nal printed Trip Report. When
the Trip Report is approved, the contents of this
fi eld are deleted.
► Complete Follow-up Activities from the Site Visits Screen Tab
Alternately, you can close follow-up items by using the Site Visits screen
tab (click the Site Visit Follow Up link). The fi elds that can be edited at this
level include Resolution Comments, Status, and Completed Date. Use this
method to close follow-up items after a Trip Report has been approved, or
when a future site visit and Trip Report have not yet been entered for the site.
1 From the Site Visits screen tab (at the top of the window), click Site Visit
Follow Up.
2 Query for the appropriate site visit.
3 Edit the follow-up record at the list level (do not drill into the site fi rst).
4 Save the record by pressing Ctrl+S.
NOTE: To view and/or edit records that are assigned to
someone else, select All My Sites from the blue drop-
down list at the top left of the window.
Trip Reporting

CTMS Site Monitoring ║ 45
NOTES
Rev 9 - July 2014 Trip Reporting
ICF Tracking
If your protocol is tracking subject Informed Consent Forms (ICFs) during
site visits, click the ICF’s tab to record the information. Before the Trip
Report is approved, you can use the Delete button to remove ICF records
entered in error.
NOTE: Because some protocols are set up to
automatically import enrollment data into the CTMS,
there can be as much as a 48-hour delay before
enrollment data appears in the CTMS.
TIP: Select a row and then scroll down to enter data in
the form displayed at the bottom of the window. Data
you enter in form fi elds is more visible and can be spell-
checked. Use the navigation buttons to go to the next/
previous subject.
1 Click the ICF’s tab, then click the New button.
A new row appears.
New button
2 Use the following table as a guideline to complete the new row.
* indicates a required fi eld
Field Guidelines
Subject ID
(read-only) After the record is saved, shows the
protocol-specifi c number automatically assigned
to the subject. Typically, this is the site number
concatenated with a sequence number.
Subject Initials*
1 Click the selection icon in this fi eld.
2 Select the subject by clicking to the left of
the record.
3 Click OK.
(continued on next page)

46 ║ CTMS Site Monitoring
Rev 9 - July 2014
NOTES
Trip Reporting
Field Guidelines
(continued)
Notes:
♦ If you do not see a subject record, contact
your clinical administrator. There can be
up to a 48-hour delay from the time subject
information is received from the IVRS to
when it appears in the CTMS.
♦ Subject initials do not appear on the printed
Trip Report.
Enrollment Date
(read-only) Shows the date that the subject was
enrolled.
Consent Date
Enter the date that the consent occurred.
Version Date
Enter the version date of the ICF. Refer to your
protocol’s DEG or clinical monitoring plan to
determine what date to put in this fi eld.
Type
Select the ICF type from the drop-down list.
Source Document
Verifi ed
Check the box to indicate that the source
documents for the ICF have been verifi ed.
Source Document
Verifi ed Date
Enter the date that the ICF for the subject was
verifi ed.
Comments
Enter comments pertaining to the ICF record
(maximum 4,000 characters).
Internal Comments
Use this fi eld to capture comments to and
from the Trip Report approver. All users can
enter comments in this fi eld (maximum 4,000
characters). Comments entered in this fi eld do
not show on the fi nal printed Trip Report. When
the Trip Report is approved, the contents of this
fi eld are deleted.
3 Press Ctrl+S to save the record.
4 Repeat steps 1-3 as needed to record additional ICF data.
TIP: To quickly duplicate a record, highlight the record
and then press Ctrl + B on your keyboard.

CTMS Site Monitoring ║ 47
NOTES
Rev 9 - July 2014 Trip Reporting
CRF Tracking
If your protocol is tracking subject Case Report Forms (CRF) during site
visits, click the CRF’s tab.
NOTE: Because some protocols are set up to
automatically import enrollment data into the CTMS,
there can be as much as a 48-hour delay before
enrollment data appears in the CTMS.
TIP: Select a row and then scroll down to enter data in
the form displayed at the bottom of the window. Data
you enter in form fi elds is more visible and can be spell-
checked. Use the navigation buttons to go to the next/
previous subject.
1 Click the CRF’s tab, and then click the New button.
A new row appears.
2 Use the following table as a guideline to complete the new row.
* indicates a required fi eld
Field Guidelines
Subject ID
(read-only) After the record is saved, shows the
protocol-specifi c number automatically assigned
to the subject. Typically, this is the site number
concatenated with a sequence number.
Subject Initials*
1 Click the selection icon in this fi eld.
2 Select the subject by clicking to the left of
the record.
3 Click OK.
Notes:
♦ If you do not see a subject record, contact
your clinical administrator. There can be
up to a 48-hour delay from the time subject
information is received from the IVRS to
when it appears in the CTMS.
♦ Subject initials do not appear on the printed
Trip Report.

48 ║ CTMS Site Monitoring
Rev 9 - July 2014
NOTES
Trip Reporting
Field Guidelines
Visit Type
Select an option from the drop-down list to
describe the CRF visit.
Visit
Enter the visit name (maximum 150 characters),
based on your protocol’s work instructions for
naming conventions. For example, enter 30-day.
Source Verifi ed
Check the box to indicate that the source
documents for the CRF have been verifi ed.
Source Document
Verifi ed Date
Enter the date that the source documents were
verifi ed.
Retrieved
If applicable, check the box to indicate that the
CRF pages were retrieved from the site by the
Monitor.
Retrieved Date
If applicable, enter the date that the CRF pages
were retrieved.
Page #
If applicable, enter the page numbers of the
pages that were retrieved. Alternatively, for
Electronic Data Capture (EDC) trials, enter
screen reference information (maximum 60
characters). For example, enter 1-50.
Comments
Enter comments related to the CRF record
(maximum 4,000 characters).
Internal Comments
Use this fi eld to capture comments to and
from the Trip Report approver. All users can
enter comments in this fi eld (maximum 4,000
characters). Comments entered in this fi eld will
not show on the fi nal printed Trip Report. When
the Trip Report is approved, the contents of this
fi eld are deleted.
3 Press Ctrl+S to save the record.
4 Repeat steps 1-3 as needed to record additional CRF data.
TIP: To quickly duplicate a record, highlight the record
and then press Ctrl + B on your keyboard.

CTMS Site Monitoring ║ 49
NOTES
Rev 9 - July 2014 Trip Reporting
Protocol Deviations
Use the Protocol Deviation tab to record both subject-related and site-related
deviations that have occurred at the site.
► To record a protocol deviation
TIP: Select a row and then scroll down to enter data in
the form displayed at the bottom of the window. Data
you enter in form fi elds is more visible and can be spell-
checked. Use the navigation buttons to go to the next/
previous record.
1 Click the Protocol Deviation tab, then click the New button.
A new row appears.
2 Use the following table as a guideline to complete the new row.
Field Guidelines
Type
Select the type of protocol deviation from the
drop-down list.
Sub-Type
Select either Site or Subject from the drop-down
list to further specify the deviation.
Subject Initials
If the Sub-Type is Subject, click the selection
icon in this fi eld to select the subject to whom
the deviation relates. If the Sub-Type is Site, this
fi eld is read-only.
Subject ID
(read-only) After the record is saved, shows the
protocol-specifi c number automatically assigned
to the subject. Typically, this is the site number
concatenated with a sequence number.
PD Date
Enter the date that the deviation occurred.

50 ║ CTMS Site Monitoring
Rev 9 - July 2014
NOTES
Trip Reporting
Field Guidelines
PD Description
Enter a description of the deviation.
Action Description
If applicable, describe the action that was taken
to address the deviation.
Follow-Up Required
Check the box to indicate that there is a follow-
up item for this deviation.
Note: Checking the box creates a new entry
on the Current Follow-up tab. The follow-up
activity’s Description fi eld is populated with the
following:
♦ If the Subtype is Subject, includes the
word “Subject,” Subject Initials, Subject
ID, PD Date, and Action Description.
♦ If the Subtype is Site, includes the
word “Site,” the PD Date, and Action
Description.
► To view all protocol deviations for your protocol
1
Click the Protocol Deviation hyperlink at the top of the Site Visits
screen tab.
Protocol Deviation Link
2 Do one of the following:
♦ Click the blue hyperlink in the Type fi eld to go to the Protocol
Deviation tab on the Trip Report for that deviation.
Or
♦ Click the blue hyperlink in the Follow-Up fi eld to go to the Current
Follow-Up tab in the Trip Report for that deviation.

CTMS Site Monitoring ║ 51
NOTES
Rev 9 - July 2014 Trip Reporting
Attachments
Before the Trip Report is approved, you can attach documents, including the
a PDF copy of the Trip Report itself, to the electronic Trip Report. The names
of the attachments appear on the printed report (if the Show on Trip Report
checkbox is selected).
The Investigator Study File Inventory (Reg Doc Checklist) is pre-attached
to the Attachments tab. View a sample in “Appendix B: Attachments” on
page 77.
► To complete the Investigator Study File Inventory document
1
Click the Investigator Study File Inventory blue hyperlink.
Note: If the window shown at right
appears, click Open to open the
fi le or Save to save it to another
location.
The fi le opens in Microsoft Word in Protected View mode.
2 To edit the fi le, click Enable Editing at the top of the Word window.
3 Complete the appropriate entries, and then click File>Save As to save the
fi le to an external location. This method can be used to keep a “running
log” of Investigator Study File related information.
► To attach a document
1
Click the Attachments tab, and then click New File.
New File link

52 ║ CTMS Site Monitoring
Rev 9 - July 2014
NOTES
Trip Reporting
2 Select the fi le that you want to attach.
3 Click Open.
4 In the Comments fi eld, enter additional comments about the attachment,
(maximum 4,000 characters).
5 In the Show on Trip Report fi eld, select the checkbox to show the
attachment name in the list of attachments on the printed Trip Report.
► To delete a document
1
Select the attachment row that you want to delete.
2 Click Delete.
Delete link
► To email all attachments
1 On the Attachments tab, click Email All Attachments.
Email All Attachments link
The CTMS Send Email window appears. All attachments on the
Attachments tab list are automatically attached to the message.

CTMS Site Monitoring ║ 53
NOTES
Rev 9 - July 2014 Trip Reporting
2 Click the Attachments icon to view a list of the attachments that will be
included on the email.
Attachments icon
3 If necessary, delete or add fi les using the Delete and New File buttons at
the top of the window.
4 Attachments that are deleted from the email Attachments list will still
appear on the Trip Report Attachments tab.
5 Click OK to return to the Send Email window.
6 Address the email message by doing one of the following:
♦ Enter the email address in the To fi eld.
Or
♦ Click the To button and select a contact from the CTMS global
database.
7 Enter a subject in the Subject fi eld.
8 Enter a message in area under the Body fi eld.
9 Click Send.
NOTE: Because the From fi eld is automatically
populated with your user name, messages sent using
this method appear to be from you. However, note that
there will be no record of the sent message in your
Microsoft Outlook Sent folder.

54 ║ CTMS Site Monitoring
Rev 9 - July 2014
NOTES
Trip Reporting
Creating a Follow-Up Letter
Follow-Up Letters can be created in the Trip Report window, using a built-in
template tool. This tool pulls data from your site visit record and Trip Report
to populate the letter with information specifi c to your visit. Letters are saved
in Microsoft Word format, enabling you to save them to another fi le location,
print and mail or fax them, or attach them to an email message.
NOTE: Standard, site-visit-type-specifi c letter
templates are automatically created when following
the letter generation procedures below. Protocol-
specifi c, site-visit-type-specifi c letter templates can be
accommodated. Requests should be submitted on a
CTMS Request (CTMSR) form by email to the DCRI
Service Desk ([email protected]).
TIP: Instead of manually signing the letters, CTMS
offers an optional electronic signature feature that is 21
CFR Part 11 compliant. For this capability to work, you
must request electronic signature confi guration for your
protocol’s letters in a CTMSR sent to the DCRI Service
Desk.
1 In the Trip Report window, click Attach Follow
Up Letter.
After a pause, a confi rmation window appears,
telling you that the Follow-Up Letter has been
added to your Attachments tab.
2 Click OK.
3 Click the Attachments tab.
The new Follow-Up Letter appears in the list.
4 Click the Follow Up Letter
hyperlink.
Note: If the window shown right
appears, click Open to open the
fi le or Save to save it to another
location.
CTMS Site Monitoring ║ 55
NOTES
Rev 9 - July 2014 Trip Reporting
The letter opens in Microsoft Word in Protected View mode.
5 To edit the fi le, click Enable Editing at the top of the Word window.
6 Review and edit the letter as needed.
Sample Follow-Up Letter
NOTE: If the letter’s signature block includes the line
pointed out below, then electronic signatures are
enabled for this letter.
Important! Do not edit or delete this text.
7 To print the letter, select File>Print.
8 To save the letter, select File>Save as, and then navigate to the location
where you want to save the fi le (selecting fi le type *doc or *docx)
.

56 ║ CTMS Site Monitoring
Rev 9 - July 2014
NOTES
Trip Reporting
WARNING: You can no longer save a Word document
directly to the CTMS if you had opened that fi le from within
the CTMS. The work-around is to fi rst save the document
to another location and then import it back into the CTMS,
following steps 8 and 9.
9 To add the fi le back into the Trip Report, click New File on the Attachments
tab, locate the fi le, and then click Open
10 If electronic signatures have been enabled for the letter, then do the
following:
a In CTMS, on the Attachments tab, save the record by pressing
Ctrl + S.
WARNING: If you forget to press Ctrl + S, changes you
saved in Word are lost.
b On the Attachments tab, highlight the letter by clicking to the left of
the record.
c Click .
An Electronic Signature window appears.
d Enter your DCRI network password, and then click OK. A
confi rmation window appears.
e Click OK.
On the Attachments tab, a new PDF version of the letter appears
with the text Authored and Electronically Signed by [your name][DD
MMM YYYY][HH:MM][AM/PM] in the signature area of the letter.
NOTE: To see the new PDF attachment, you may need
to refresh your screen.
TIP: The default name for the PDF is rather long. You
can change this title by aiming to the right of the default
name and clicking a blank area of the Title fi eld, and
then entering a new name for the PDF fi le.
f Check your Data Entry Guidelines (DEG) for instructions on whether
or not to delete the original Word version of the letter.
TIP: To send the letter via email, go to the Attachments
tab, click to the left of the letter to highlight it, and then
select File>Send Email.

CTMS Site Monitoring ║ 57
NOTES
Rev 9 - July 2014 Trip Reporting
Working with the Offl ine Trip Report
The CTMS Trip Report can be exported to Microsoft Excel, where you can
enter site visit data while working offl ine. The data can then be imported back
into the CTMS Trip Report.
Key Points for Exporting
♦ The export function can only be performed once per Trip Report. In
special situations, you can request that the DCRI Service Desk reset the
function (email [email protected]).
♦ Before exporting data:
– Select a template from the Report Template fi eld.
– Verify that the Report Status is In Progress.
– For manual enrollment, complete all subject records.
♦ All CTMS Trip Reports are saved to C:\CTMS\Trip_Reports. If the
folder does not already exist, the CTMS creates it for you.
♦ Exporting makes all CTMS Trip Report fi elds read-only until the data is
imported again.
Exporting a CTMS Trip Report to Excel
WARNING: The fi elds might not appear to be read-only
immediately after exporting. However, refreshing the screen
by clicking the Execute Query button applies the
read-only formatting. Any edits made after exporting will be
overwritten during the import process.
1 Select a template from the Report Template fi eld.
2 Verify that the Report Status fi eld displays In Progress.
3 Required for manual enrollment only: Ensure that all subject records have
been completed.
4 Click Export.
Export button

58 ║ CTMS Site Monitoring
Rev 9 - July 2014
NOTES
Trip Reporting
After a brief pause, the following export confi rmation message appears,
including the name and location of the new Excel fi le.
Note the name and location of the fi le for future reference. The fi le
name uses the format of Protocol_Site #_Visit Name_Planned Visit
Completion Date.
5 Click OK.
The new Excel Trip Report fi le appears in the location indicated in the
export confi rmation message.
Entering Data into the Exported Trip Report
1 Navigate to the location indicated in the export confi rmation message.
2 Open the appropriate Excel fi le.
Note: The Excel tabs correspond to tabs in the CTMS
Trip Report. The Subjects tab populates pick-lists for the
ICFs, CRFs, and Protocol Deviation tabs.
3 Click the appropriate tab and enter data into applicable fi elds. Refer to the
Excel fi le’s Information tab for guidelines about populating the fi elds.
4 Save and close the Excel fi le.

CTMS Site Monitoring ║ 59
NOTES
Rev 9 - July 2014 Trip Reporting
WARNING: Save the fi le back to the C:\CTMS\Trip_Reports
folder. Do not change the name of the fi le or convert it to
Microsoft Excel 2010 (*.xlsx) format. You cannot import data
back into the CTMS unless the Excel fi le is in this folder with
the original name and fi le extension.
Key Points for Importing
♦ The import function can only be performed once per Trip Report.
♦ Save the Excel fi le in the same location (C:\CTMS\Trip_Reports). Do
not change the name of the fi le.
♦ Before importing, save and close the Excel fi le.
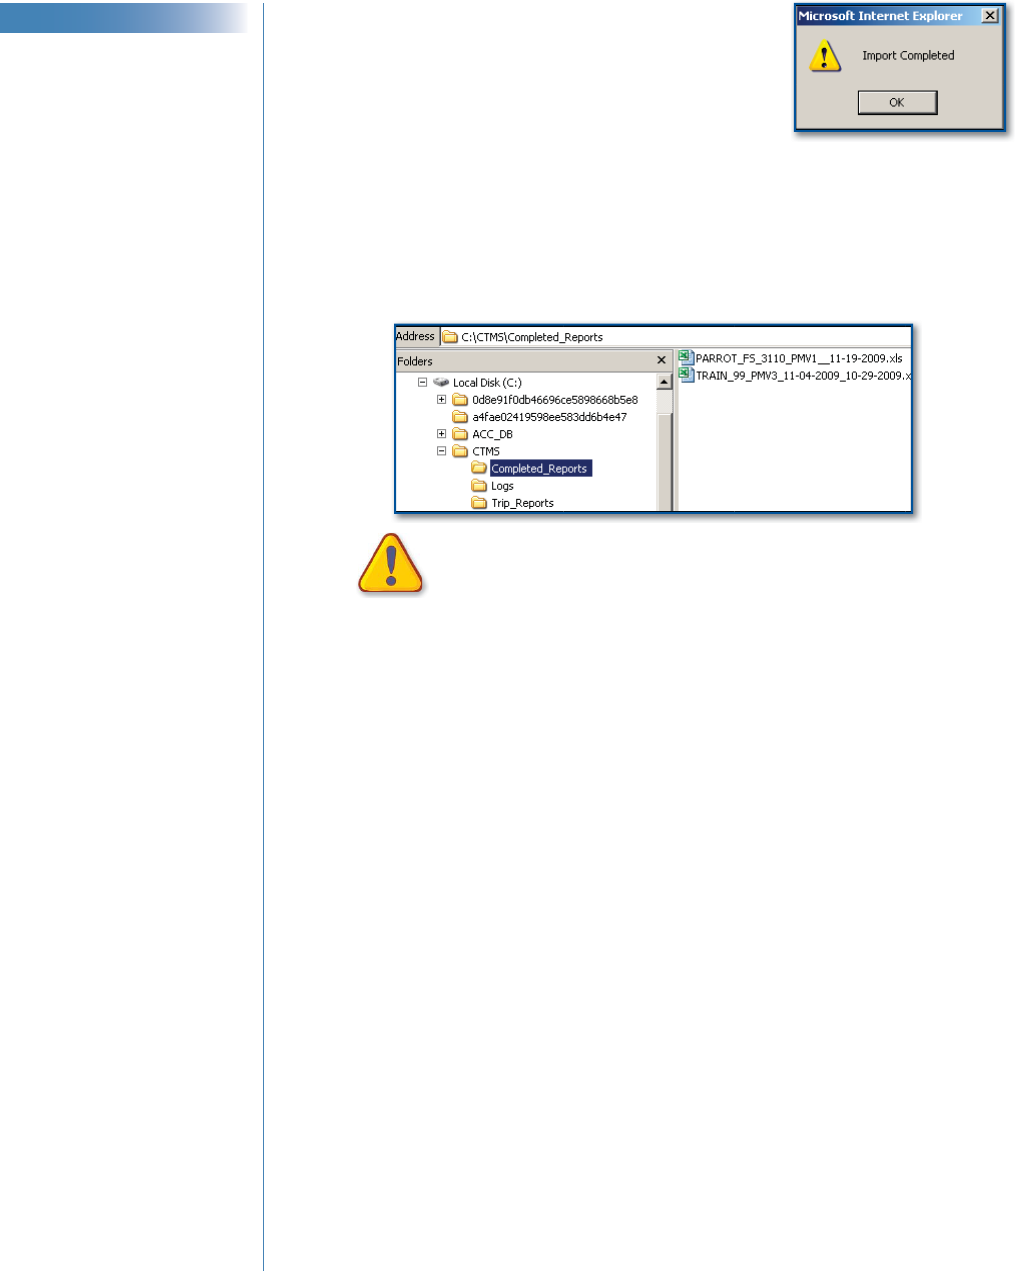
♦ After the data is imported into the CTMS, the Excel fi le is automatically
moved to C:\CTMS\Completed_Reports.
Importing a Trip Report from Excel Back to the CTMS
1 Save and close the Excel fi le.
2 In the CTMS Trip Report window, click Import.
Import button
3 Do one of the following:
♦ If an ICF error message appears during the import process:
a Click OK.
A new message appears indicating the location of a log fi le with
error details.
b Write down the location of the log fi le, and then click OK.
The error message closes.
c Email DCRI Service Desk ([email protected]) for
assistance.
60 ║ CTMS Site Monitoring
Rev 9 - July 2014
NOTES
Trip Reporting
♦
If the Import Completed confi rmation
message appears, click OK.
After a successful import:
♦ Each tab of the CTMS Trip Report
populates with data from the corresponding tab name in the Excel
fi le.
♦ All CTMS Trip Report fi elds are editable.
♦ The Excel fi le moves to C:\CTMS\Completed_Reports. Files in
this folder are automatically deleted after 60 days.
WARNING: Always take time to verify that your data was
imported properly. The CTMS does not always give an
error message when importing data that was entered
incorrectly.

CTMS Site Monitoring ║ 61
NOTES
Rev 9 - July 2014 Trip Reporting
Trip Report Approval Process
After completing a Trip Report, the CRA submits it for approval. The Trip
Report approver must then approve the Trip Report before it can be submitted
to the sponsor. The CTMS uses electronic signature technology for the Trip
Report approval process.
Submitting a Trip Report for Approval
1 On the Trip Report window, click the selection icon in the Submitted
To fi eld.
Selection icon in the Submitted To fi eld
2 Query for and select the Trip Report approver’s name.
3 Click Pick.
4 Verify that In Progress appears in the Report Status fi eld.
5 Click Submit.
Submit button

62 ║ CTMS Site Monitoring
Rev 9 - July 2014
NOTES
Trip Reporting
The Sign Submittal window appears so that you can electronically sign
your submission.
6 Enter your DCRI network Password.
7 Click OK.
The status automatically changes to Submitted in the Report Status fi eld.
Report Status changes to Submitted
8 An automatic email alert notifi cation is sent to the Trip Report approver,
stating that there is a Trip Report waiting for approval.
Example of email message to Trip Report approver

CTMS Site Monitoring ║ 63
NOTES
Rev 9 - July 2014 Trip Reporting
Approving a Trip Report
Only users set up with approval permission in the CTMS can approve a Trip
Report.
NOTE: If the Trip Report is Approved or Not Approved
by someone other than the person it was originally
submitted to, the Submitted To fi eld changes to the
new approver’s name and email notifi cations properly
refl ect the new approver’s name.
1 Click the Site Management screen tab.
2 Locate the site by running a query on the Site # fi eld. (See “Query
Basics” in IT Training’s CTMS Fundamentals user reference guide.)
3 Select the site containing the Trip Report that you want to approve by
clicking to the left of the site record.
4 Click the Site Visits view tab at the bottom of the window.
5 If necessary, query for the correct visit on the Site Visits tab.
6 Click the blue hyperlink date in the Visit Type fi eld.
Visit Type hyperlink
The Trip Report detail window appears.
7 Do one of the following:
♦ If no changes are required, proceed to step 8.
♦ If changes are required, complete the next procedure, “Returning a
Trip Report to the CRA for Editing” on page 65.
8 Click Approve & Attach.
The Sign Approval window appears so that you can electronically sign
your approval.

64 ║ CTMS Site Monitoring
Rev 9 - July 2014
NOTES
Trip Reporting
9 (optional, per protocol) Click the Review Level drop-down arrow to select a
number (1, 2, or 3) to indicate the protocol-defi ned review level.
NOTE: Trip Report Review Levels are defi ned per
protocol (in the Data Entry Guideline document), to
indicate, for example, the level of effort required by the
Lead CRA (trip report approver) to review a CRA’s trip
report submission for approval. The fi eld defaults to
blank and only displays on the trip report PDF (under
the e-signature area) if you select a level number.
10 Enter your DCRI network Password.
11 Click OK.
The following automatically occurs:
♦ The Trip Report Status fi eld changes to Approved.
♦ An email alert notifi cation is sent to the CRA (the name that is in the
Submitted By fi eld), stating that the Trip Report has been approved.
♦ The approved PDF version of the Trip Report is attached to the
Attachments tab.
Approved PDF appears in Attachments tab
Report Status changes to Approved

CTMS Site Monitoring ║ 65
NOTES
Rev 9 - July 2014 Trip Reporting
NOTE: To edit an approved Trip Report, the status
must fi rst be changed back to Submitted. The CTMS
Administrator must confi gure your login to have
approval responsibility in the CTMS before you can
change the status of an approved report.
Returning a Trip Report to the CRA for Editing
1 Follow steps 1–6 of the “Approving a Trip Report” on page 63.
2 Enter general comments in the Internal Comments fi elds on the Trip
Report form applet in the upper portion of the window, and in the
Internal Comments fi elds located on each of the Trip Report tabs, as
needed.
♦ Click the Comment button to view a larger window.
♦ Click the Spell-Check button to check the spelling of your comments.
Internal Comments fi eld
Spell-check button Comment button
Lower portion of Checklist Activities tab
NOTE: All users can edit the Internal Comments fi elds
to accommodate dialog between Trip Report approvers
and CRAs. Text from these fi elds will not show on the
printed Trip Report and will be permanently removed
from the audit trail when the Trip Report is approved.
3 In the Trip Report form applet in the upper portion of the window, click
the Trip Report Status drop-down arrow to select Not Approved.

66 ║ CTMS Site Monitoring
Rev 9 - July 2014
NOTES
Trip Reporting
4 Press Ctrl+S to save the record.
5 An automatic email alert notifi cation is
sent to the CRA (whose name is in the
Submitted By fi eld), stating that the
Trip Report has not been approved.
Viewing and Creating a
PDF Trip Report
At any time, you can view the PDF version of the Trip Report by following
the procedure below. You can also create a PDF version of the Trip Report to
attach to the Trip Report’s Attachments tab or save outside of the CTMS.
Viewing the PDF Trip Report
1 On the Trip Report window, click View Trip Report.
View Trip Report button
The PDF fi le opens in an Adobe Acrobat viewer window.
Print button
Save button

CTMS Site Monitoring ║ 67
NOTES
Rev 9 - July 2014 Trip Reporting
2 Click the Print button to send the fi le to a printer.
3 Click the Save button to save the fi le to a folder outside of the CTMS.
Creating a PDF version of the Trip Report
1 In the Trip Report window, click Attach Trip Report.
Attach Trip Report button
The following message appears.
2 Click OK.
After a brief pause, the following message appears.
3 Click OK.
4 Click the Attachments tab.
The new Trip Report entry appears in the list.

68 ║ CTMS Site Monitoring
Rev 9 - July 2014
NOTES
Trip Reporting
5 Click the Trip Report hyperlink.
The following window appears, enabling you to open the fi le or save it to
another location.
6 Click Open.
The Trip Report opens in an Adobe Acrobat Reader window.
NOTE: Until the Trip Report is approved, you can delete
attachments that are no longer needed.

Rev 9 - July 2014
NOTES
CTMS Site Monitoring ║ 69
T
he Site Visits screen tab can be used to look up site visit and Trip Report
data without having to fi rst drill into a specifi c site record.
Click the blue hyperlinks at the top of the Site Visits screen tab to change the
list of records in your current view.
Hyperlink Description
Clinical Site Visits List
Default view showing a list of site visits for
all protocols to which you are assigned. Click
the blue Visit Type hyperlink to open a site
visit’s Trip Report.
Site Visit Follow Up
Lists follow-up activities for all protocols
to which you are assigned. Click the blue
Activity Type hyperlink to drill into the Trip
Report’s Current Follow-up tab for a site
visit.
CRF Monitored
Lists CRF records for all protocols to which
you are assigned. Click the blue Trip Report
Type hyperlink to drill into the Trip Report’s
CRF’s tab for a site visit.
ICF Monitored
Lists ICF records for all protocols to which
you are assigned. Click the blue Trip Report
Type hyperlink to drill into the Trip Report’s
ICF’s tab for a site visit.
Protocol Deviation
Lists protocol deviation records for all
protocols to which you are assigned. Click
the blue Type hyperlink to drill into the Trip
Report’s Protocol Deviation tab for a site
visit.
VIEWING SITE VISIT METRICS

70 ║ CTMS Site Monitoring
Rev 9 - July 2014Viewing Site Visit Metrics

Rev 9 - July 2014
NOTES
CTMS Site Monitoring ║ 71
U
se the Conversation Log to capture required communication with the
site, as well as other correspondence. This record can contain activity
types such as:
♦ Call—Inbound/Outbound
♦ Email—Inbound/Outbound
♦ Fax—Inbound/Outbound
♦ Letter—Inbound/Outbound
NOTE: Only the person who created a Conversation
Log entry (whose name appears in the Owner First /
Last Name fi elds) can edit that record. For other users,
all fi elds of the record are locked from editing.
Logging a Conversation
1 Click the Site Management screen tab.
2 Locate the site by running a query on the Site # fi eld. (See “Query
Basics” in IT Training’s CTMS Fundamentals user reference guide.)
3 Select the site by clicking to the left of the site record.
4 Click the Conversation Log view tab at the bottom of the window.
5 In the Conversation Log tab, click the New button.
New button
A new row appears.
LOGGING CONVERSATIONS

72 ║ CTMS Site Monitoring
Rev 9 - July 2014
NOTES
Logging Conversations
6 Use the following table as a guideline to complete the new row.
TIP: Select a row and scroll down to enter data in
the form displayed at the bottom of the window. Data
entered in form fi elds is more visible and can be spell-
checked. Use the navigation buttons to go to the next/
previous conversation.
Field Guidelines
Activity #
(read-only) This is a CTMS system-generated
unique identifi er.
Type
Click the drop-down arrow to select the activity
description (for example, Call - Inbound).The
default value is Other.
Activity Date
Enter the date that the activity occurred.
Activity Time
Enter the time that the activity occurred.
Description
Enter a detailed description of the activity. For
example, for a Call - Inbound activity type, enter
the conversation details in this fi eld, up to a
maximum of 4,000 characters.
You can copy email text to this fi eld by
highlighting the email text, pressing Ctrl + C
to copy it, clicking in the Conversation Log’s
Description fi eld, and then pressing Ctrl + V to
paste the text into the fi eld.
Warning! Be careful not to copy email headers
and blank rows into the Description fi eld, as
they can take up a large amount of storage space.

CTMS Site Monitoring ║ 73
NOTES
Rev 9 - July 2014 Logging Conversations
Field Guidelines
Keywords
Used primarily for Call activity types, this fi eld
assists in organizing and querying for data.
1 Click the selection icon to display the
Activity Keywords applet.
2 Click New.
3 Select a keyword from the DCRI Keywords
drop-down list.
4 Repeat steps 2–3 to add additional keywords.
5 Click OK.
Contact First Name or
Contact Last Name
1 Click the selection icon in either fi eld to
view a list of contacts currently affi liated
with the site.
Note: To view all contacts in the CTMS,
click All Contacts. To return to the list of
site contacts, click Affi liated Contacts.
2 In the left pane, select the contact associated
with the activity.
3 Click Add to move the contact name to the
right pane.
4 Select the appropriate option from the
Attending Role drop-down list.
5 Click OK.
6 Repeat these steps to add additional contacts
to the record.
Owner
(read-only) Shows the name of the person who
created the conversation log entry.
7 Save the record by pressing Ctrl+S.

74 ║ CTMS Site Monitoring
Rev 9 - July 2014
NOTES
Logging Conversations
Viewing All Conversation Logs
You can view a list of all conversation logs by clicking the Conversation
Log hyperlink at the top of the Site Management view tab.
Conversation Log hyperlink
All logs appear, regardless of site or protocol. To fi nd specifi c conversation
logs:
1 Click Query.
2 In the Keywords fi eld, enter one or more words to narrow your search.
TIP: You can enter an asterisk (*) as a wildcard.
3 Click Go.
All logs appear that contain the keyword(s) you entered.

Rev 9 - July 2014
NOTES
CTMS Site Monitoring ║ 75
The following is an example of a Trip Report created in the CTMS. For
detailed information, see “Trip Reporting” on page 27.
Page 1 of 2
Page 2 of 2
APPENDIX A: TRIP REPORT

76 ║ CTMS Site Monitoring
Rev 9 - July 2014Appendix A: Trip Report

Rev 9 - July 2014
NOTES
CTMS Site Monitoring ║ 77
The Investigator Study File Inventory (Reg Doc Checklist) automatically
attaches to your Trip Report. See “Attachments” on page 51.
Page 1 of 3
Page 2 of 3
APPENDIX B: ATTACHMENTS

78 ║ CTMS Site Monitoring
Rev 9 - July 2014
NOTES
Appendix B: Attachments
Page 3 of 3
