PharmaSUG 2024 - Paper DV-328
Next Level Reporting: ODS and Open Source
Chevell Parker, SAS Institute
ABSTRACT
This document describes techniques used to get started with the Output Delivery System such as an
introduction to the Output Delivery System basics. Also discussed include automating and making the
most out of your ODS destinations. This document will also highlight the dynamic capabilities when using
ODS. The document will further drill down on the popular ODS Excel destination and discuss highlights
and limitations of this destination. Finally, this document will discuss open-source integration in SAS and
Viya platforms and how this can be used to take your reporting to the next level. Concepts will focus on
techniques geared to the data analyst and SAS programmer.
INTRODUCTION
The Output Delivery System is a great way to automate your reporting by generating output in some of
the industry’s most used file formats. Along with the ability to generate files in the various formats,
ODS can generate output data sets from most procedures. Both the SAS and Viya platforms provide the
ability to use open-source clients to enhance your reporting. This paper was created with the beginner
ODS user in mind; however, it applies to all levels of SAS programmers and analysts.
THE ODS DESTINATIONS AND ECOSYSTEM
The Output Delivery System is fully integrated in the SAS system. Programming clients such as SAS
Studio, Enterprise Guide, and the Display Manager System (DMS) all use ODS as the default for output
generation. Also, most procedures have underlying table templates that control the default formatting of
the output. In this section, we will explore the ODS destinations along with ODS procedures and some of
the other ODS statements. As pervasive as ODS is within the SAS System it is also very flexible and
customizable. We will do a deep dive on a few of the ODS destinations, ODS procedures, and other
statements in the ODS ecosystem.
DISCOVERING ODS DESTINATIONS
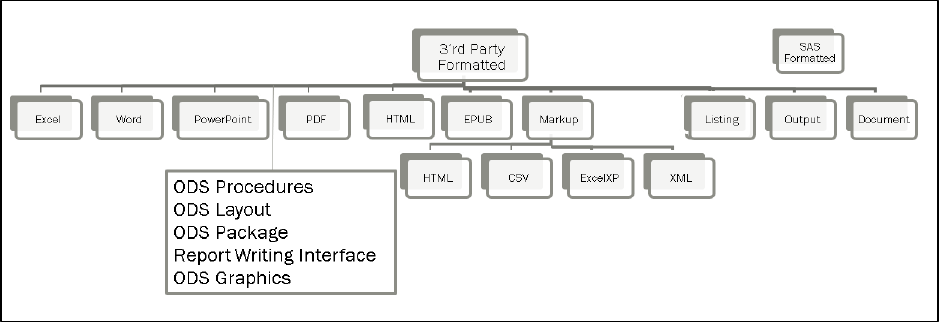
The Output Delivery System can generate output in many of the industry’s most widely used file
formats. This includes HTML, Excel, Word, PDF, PowerPoint, XML, and various other formats. The ODS
destinations are very diverse for instance some formats such as HTML are great for sharing, while
others such as PDF are better when printed output is required. Display 1, list a subset of the ODS
destinations and various other members of the ODS ecosystem.
Display 1. ODS Destinations and Procedures

ODS PROCEDURES AND ECOSYSTEM MEMBERS
There are several procedures added within the ODS ecosystem, however none is more important than
the TEMPLATE procedure. The TEMPLATE procedure is responsible for creating and modifying styles,
tables, tagsets, and statistical graphics templates. In addition, the TEMPLATE procedure is also
responsible for managing item stores. The complete list of procedures in the ODS ecosystem includes:
• PROC ODSTEXT/ODSLIST
• PROC DOCUMENT
• PROC ODSTABLE
• PROC TEMPLATE
The ODSTEXT and ODSLIST procedures create lists and paragraphs and were created with the
PowerPoint destination in mind, however, they have become a best practice for adding text with the
formatted destinations. Other procedures include the DOCUMENT procedure which manages ODS
documents by copying, moving, renaming, deleting, and replaying objects of an ODS document.
The ODSTABLE procedure is a very powerful reporting procedure that takes most of its features from
table templates while making the syntax more user-friendly. Additional ecosystem members are
detailed in the following sections.
The ODS Layout Statement
ODS Layout provides the ability to place objects on a page. Using ODS Layout within the ODS
destinations is a great way to add dashboards or generate complex output. There are two types of
layouts which are gridded and absolute. A gridded layout enables you to arrange output dynamically in a
two-dimensional grid structure and handles the spacing. An absolute layout provides explicit positioning
using X and Y coordinates. The following ODS Layout statement provides instructions to generate a
gridded layout on the page using two rows and two columns. Each object whether a procedure, graph, or
DATA step is added within the ODS REGION statement to be included within the layout. Absolute layouts
are available with the PDF and Printer destinations only.
ods layout gridded columns=2 rows=2;
ods region
<procedure>
ods region
<procedure>
…
ods layout end;
The Report Writing Interface
The Report Writing Interface (RWI) provides the ability to generate complex reports such as a patient
profile. Reports that are often difficult to generate using one of the reporting procedures are less
complicated using RWI. The Report Writing Interface uses object-oriented syntax to build reports. The
first step when building a report with RWI is to create an object which is done using the DECLARE
statement. Once an object is generated, you can use the documented methods to add the desired
functionality to the report. Some of the popular groups of methods include the table, layout, and a general
group of methods. The following RWI step uses the DECLARE statement and creates the object OBJ().
The method FORMAT_TEXT is then used to add text.

3
data _null_;
declare odsout obj();
obj.format_text(data:"Some text");
run;
REPORTING USING ODS DESTINATION AND PROCEDURES
This section samples selected ODS destinations that demonstrate next-level reporting capabilities.
Some of the strengths include being accessible, secure, stylistic, and customizable. We will look at the
strengths of some of the destinations such as HTML, Excel, PDF, and PowerPoint combined with other
items within the ODS ecosystem.
NEXT LEVEL HTML
The HTML format is great for providing information that can be shared regardless of the device or
operating system. One of the greatest features of the HTML format is its’ accessibility support.
ODS HTML5 provides accessible output that includes captions for tables, and scope tags for headers
which are used by assistive technologies. The HTML5 destination also has support for accessible
headers using the ODSTEXT procedure. A major benefit of the HTML5 destination is that graphics are
embedded within the web page as a default. The HTML5 destination is very flexible and customizable
and provide many methods of enhancing output. Some items include adding sticky headers, including a
Viewport meta tag, creating dashboards using ODS Layout. This section will discuss a few of these
enhancements to the file.
Adding Sticky Headers
A technique for freezing table headers can be done using a JavaScript library or Cascading Style Sheets
using the stylesheet property Sticky-header. This style property locks the column headers while scrolling
long tables. A simple method of providing this style property to the HTML file is using the HEADTEXT=
ODS HTML5 option. When the statement has been added, the value is added to the header section of the
HTML file.
headtext="<style> thead {position: sticky;top:0 }</style>";
Using Viewport to Control Display
Controlling the display of HTML on mobile devices can be done using the Viewport meta tag. This tag can
be added using the METATEXT= option on the ODS HTML/HTML5 statements. The NAME= parameter
specifies the value Viewport and the CONTENT= specifies the dimension of the device. Specifying the
viewport allows the display to fit nicely depending on the device such as an iPhone. The METATEXT=
ODS HTML5 can also add other content such as the content security policy which is more generally
added to headers.
metatext='name="viewport" content="width=device-width, initial-scale=1"';
Accessibility Features
Accessibility is the strength of the HTML5 format. Accessible headers can be added to HTML files using
the PROC ODSTEXT procedure. The H1-H6 statements within the ODSTEXT procedure are used to add
headers which are expected by assistive technologies. There is also the SAS Graphics Accelerator which
can be used with HTML5 that enables you to explore the graph and data within the graph in various
interactive ways. Using the ACCESSIBLEGRAPH system option enables the graph to be read,
interpreted and amplified by the SAS Graphics Accelerator. The following ODSTEXT procedure
demonstrates generating accessible headers with the ODS HTML5 destination and creating alternate text
with the PROC SGPLOT procedure.
proc odstext;
h1 "This header uses the H1 tag";
h2 "This header uses the H2 tag";

4
h3 "This header uses the h3 tag";
run;
HTML
<h1 class="heading1">This header uses the H1 tag</h1>
<h2 class="heading2">This header uses the H2 tag</h2>
<h3 class="heading3">This header uses the h3 tag</h3>
proc sgplot data=sashelp.cars
des="Make of Cars";
vbar make;
run;
HTML
<img alt="Make of Cars" src="SGPlot1.png" style=" height: 480px; width:
640px;" border="0" class="c">
Example Study of Blood Pressure Versus Weight Using ODS HTML5
The following example highlights some of the previously discussed features in this section and presents
the results of a study of subjects with high blood pressure and weight. The HTML report generates sticky
headers, adds a viewport meta tag, generates accessible headers using the ODSTEXT procedure, and
uses the CALL DEFINE statement to add styles to the row and hyperlinks to highlight when the blood
pressure is high, and the weight status is overweight.
In this example:
1. The HEADTEXT= ODS HTML5 option is used to add the sticky header style.
2. The METATEXT= option adds the Viewport for the mobile browser.
3. PROC ODSTEXT is used to add accessible headers with the H1 statement.
4. The CALL DEFINE statement is adds a row color and hyperlinks to a web page based on the
value of the variable BP_STATUS and WEIGHT_STATUS.
Example 1
ods html5 path="c:\temp" file="temp.html"
headtext="<style> thead {position: sticky;top:0 }</style>"
metatext='name="viewport" content="width=device-width, initial-scale=1"';
proc odstext;
h1 "Study of Blood Pressure Status" / style=systemtitle[just=c];
run;
proc report data=sashelp.heart(obs=100);
column Sex diastolic Systolic height weight BP_Status weight_status;
compute weight_status;
if bp_status="High" and Weight_status="Overweight" then
do;
call define(_row_,"style","style={background=#f0f5f5}");
call define(_col_,"url","https://www.cdc.gov/
healthyweight/tools/index.html");
end;
endcomp;
run;
ods html5 close;

5
Output 1. HTML output on desktop and mobile client
NEXT LEVEL PDF
The Portable Document Format (PDF) is one of the most widely accepted document formats. The PDF
format also has seamless compatibility across devices and operating systems. Accessibility is the
strength of the PDF format which is inherited by the ODS PDF destination. In addition to being
accessible, the PDF format is also secure and requires special software to edit the file. The PDF format is
also great when printed output is required. This section will discuss why the ODS PDF destination is a
next-level reporting tool.
Accessibility and ODS PDF
There are many accessibility features added when the ACCESSIBILE option is placed on the ODS PDF
statement. When the ACCESSIBLE option is added, features such as tagged PDFs are generated which
are used by assistive technologies. The PROC ODSTEXT procedure can also be used to generate
accessible headers for this destination using the H1-H6 statements to add text.
ODS PDF file="my report.pdf" ACCESSIBLE;
Password Protecting PDF Files
Security can be implemented for PDF files using the system options PDFPASSWORD= and
PDFSECURITY=. When these options are specified as below, the PDF file is encrypted and requires a
password before opening files generated using the ODS PDF destination. The options statement shown
in display 2, prompts users when opening the PDF file for the password.
options pdfsecurity=high fpw=(open=xxx);
ODS PDF file="report.pdf";

6
Display 2. Prompt for the Password for PDF Files
Generating Dynamic Page Control
The ODS PDF destination provides dynamic page control using the STARTPAGE= ODS PDF option.
This option is responsible for controlling which page tables and graphics are placed. Valid values for this
option are YES, NO, NOW, NEVER and BYGROUP. When the value NO is specified, the output is added
to the same page when it is possible to fit. The value YES is the default and places each table or graph
on a separate page. The option is added to the ODS PDF statement as displayed on the following ODS
PDF statement.
ODS PDF file="report.pdf" startpage=no;
ODS Layout- Absolute
The PDF/Printer destinations are the only destinations that provide the ability to generate absolute
layouts. This allows you to position table, graph, or text exactly on a page based on the X and Y
coordinates specified. This provides the PDF destination more flexibility to generate complex reports. The
X and Y coordinates are specified ODS REGION statement. The following layout within the PDF
destination specifies the height and width of the layout along with ODS REGION statements which
specifies the coordinates for the placement of the object.
ods layout absolute width=8.5in height=11in;
ods region x=1.5in y=2in;
proc …;
ods region x=2.5.y=4in;
proc …;
ods layout end;
Example Clinical Trial Report of Blood Pressure and Cholesterol Using ODS PDF
The following example generates a sample summary of a clinical study that reviews cholesterol and blood
pressure. The Report Writing Interface builds the summary of the report first followed by a table with
detailed data, a graph and further text describing the results.
In this example:
1. The ODS PDF statement is added using the ACCESSIBLE option.
2. The ODS Report Writing Interface is used to add a summary prior to the detail.
3. ODS Layout is used with an absolute layout to place a detailed table, graphics, and summary on the
page.
4. The ODS REGION statement is added for the PROC REPORT and the PROC SGPLOT procedures.
Example 2
options nodate nonumber;
ods pdf file="c:\temp\trial.pdf" ACCESSIBLE startpage=no;
options nocenter;

7
data _null_;
declare odsout obj();
obj.format_text(data:"JNJ-56021927 (apalutamide)");
obj.format_text(data:"Clinical Study Report ARN-509-003",
style_attr:"just=r width=8.5in");
obj.line();
obj.format_text(data:"Aragon Pharmaceuticals, Inc*",
style_attr:"just=c fontsize=14pt width=8.5in");
obj.format_text(data:" ",row_span:3);
obj.format_text(data:"Clinical Study Report",
style_attr:"just=c fontsize=10pt width=8.5in");
obj.line();
obj.format_text(data:"A Multicenter, Randomized, Double-Blind,
Placebo-Controlled, Phase III Study",
style_attr:"just=c fontsize=12pt width=8.5in");
obj.format_text(data:" ");
obj.format_text(data:"Selective Cholesterol Targeting with ARN
509",style_attr:"just=c fontsize=10pt width=8.5in");
obj.line();
obj.format_text(data:" ");
obj.format_text(data:"Protocol ARN-509-003; Phase 3",
style_attr:"just=c fontsize=10pt width=8.5in");
run;
ods layout absolute width=8.5in height=11in;
ods region x=0in y=.3in;
proc report data=sashelp.heart(where=(sex="Male"));
column sex chol_status BP_Status systolic cholesterol;
define sex / group;
define bp_status / group;
define chol_status / group;
define systolic / mean;
define cholesterol / mean;
run;
ods region x=3.5in y=.5.5in;
ods graphics / height=1.5in width=3in;
proc sgplot data=sashelp.heart;
vbar bp_status / group=sex response=systolic stat=mean;
run;
proc odstext;
p "The researchers used a 3-sample randomization analysis of
participants who were registered." /style={fontsize=9pt};
p "There were three groups in the analysis:" / style={fontsize=9pt
fontweight=bold};
list / style={liststyletype="disc" fontsize=9pt};
item "130 people had high cholesterol (LDL-C)";
item "150 people had elevated systolic blood pressure (SBP)";
item "170 people had coronary heart disease";
end;
run;
ods layout end;
ods pdf close;

8
Output 2. Clinical Trials Summary Created using ODS PDF
NEXT LEVEL EXCEL
The ODS Excel destination generates output in the Microsoft Office Open Office Document format (.xlsx).
The Excel output is unique compared to other file formats as this tool allows for further analysis after
handing off the worksheet. Excel files can be created using SAS in a variety of ways such as PROC
EXPORT and the ODS Excel destination. The ODS Excel destination provides features such as the ability
to add options, formulas, formats, images, placement of output, and various other features. Styles can be
added with the ODS Excel destination using either PROC TEMPLATE or Cascading Style Sheets. In this
section, we will discuss these topics further.
ODS Excel Options
There are over 50 options available for use with the ODS Excel destination that allow modifications to
most parts of the workbook or worksheet. These options control most of the frequently modified features
of an Excel worksheet or workbook such as the page setup options, freezing rows and columns, adding
filters, and various other modifications. The options are added using the Options, option on the ODS
Excel statement. The following statement displays the basic syntax for supplying options.
ods excel options(options-1,options-2..)
Adding Excel Formats and Formulas
The ability to add formulas provides a dynamic component that allows the ability to further analyze the
data with over 500 Excel formulas to choose from. The ODS Excel destination adds formulas using the
TAGATTR= style attribute which passes the formula directly to Excel without any validation. The following
syntax adds a formula using the TAGATTR= style attribute on the define statement of PROC REPORT.
Define column / style(column)={tagattr="formula:=SUM(RC[-4]:RC[-3]")
Excel formats can be added using either SAS formatting which gets mapped to the equivalent Excel
format or using Excel forming applying the TAGATTR= style attribute as demonstrated in the following

9
statement. The DEFINE statement from the REPORT procedure is used to apply the ACCOUNTING
Excel format to the field column.
Define column / style(column)={tagattr="format:Accounting")
Adding Graphics and Images to the Worksheet
Images can be added to the worksheet using the GSLIDE procedure or by adding the IMAGE method
using the Report Writing Interface. Neither of these methods allows for specific image placement or
sizing. The ODS Excel destination does support the BACKGROUNDIMAGE= attribute for the worksheet.
The following statement adds an image using RWI and the IMAGE method. Graphics can be added to the
ODS Excel destination using either ODS Graphics or SAS/Graph.
data _null_;
dcl odsout obj();
obj.image( file: "Heart.png" description="Heart Health")
run;
Example Study of Heart Health and Weight Using ODS Excel
The following example uses ODS Excel options to add features to the Excel worksheet. Also, the Report
Writing Interface is used to add a summary table to the beginning of the worksheet by adding formulas.
The BMI is calculated using a formula to determine when the CDC determination has been documented.
In this example:
1. Options are added to embed the title, freeze the column headers, add filters to the first 3
columns, add a tab name and color, and finally prevent ODS Excel from adding content to a new
sheet.
2. The Report Writing Interface is used with the IMAGE method to add an image to the worksheet
along with the TABLE method which adds a summary table with formulas.
3. A new computed column BMI is added using the TAGATTR= attribute with the FORMULA
parameter.
4. Styles were added to the background of various rows using the CALL DEFINE statement within
the compute block of PROC REPORT.
Example 3
title "Study of Heart Health and Weight ";
ods excel file="c:\temp\heart.xlsx" options(embedded_titles="yes"
autofilter="1" sheet_name="Heart Health"
sheet_interval="none" tab_color="red") style=analysis;
data _null_;
declare odsout obj();
obj.image(file:"c:\temp\heart.jpg");
obj.table_start();
obj.head_start();
obj.row_start();
obj.format_cell(data:"Subjects");
obj.format_cell(data:"AVG Weight");
obj.row_end();
obj.head_end();
obj.row_start();
obj.format_cell(data:"=count(c:c)");
obj.format_cell(data:"=average(c:c)");
obj.row_end();
obj.table_end(); run;

10
title "Study of Heart Health and Weight ";
proc report data=sashelp.heart(obs=100);
where weight_status="Overweight";
column sex height weight weight_status chol_status BMI;
define BMI / computed style(column)={tagattr="formula:=RC[-3]/RC[-4]/RC[-
4]*703"};
compute chol_status;
if weight_status="Overweight" and chol_status="High" then
call define(_row_,"style","style=[background=pink]");
else if weight_status="Overweight" and chol_status="Borderline" then
call define(_row_,"s tyle","style=[background=yellow]");
endcomp;
run;
ods excel close;
Output 3. Sample Study of Heart Health using ODS Excel
PRESENTATION OF HEART HEALTH USING ODS POWERPOINT
The PowerPoint format (.pptx) is a good way to present and disseminate information in the most widely
accepted format for presentations. One of the reasons is that PowerPoint allows for visuals that are very
engaging and will last long after discussions within a meeting. ODS provides the ability to generate slides
directly from a DATA step or procedure. The styles that work with the ODS PowerPoint destination are
the PowerPointLight and the PowerPointDark both of which are shipped with SAS. The PowerPoint
destination takes advantage of many of the features of PowerPoint such as the ability to add options to do
such things as add background images or colors to each slide, add transitions and effects, and
gradients. The PowerPoint destination can also be used with ODS Layout to place graphics and tables on
a slide using gridded layouts.
In this example:
1. The transition= option is set and adds a transition between slides, while the effect option is set to
an effect.
Formula
Formula

11
2. The backgroundimage= option is added with a gradient color which has two separate colors.
3. The REG procedure models cholesterol with the height and weight along with the diastolic and
systolic variables with the selection=forward.
Example 4
ods powerpoint file="temp.pptx"
options(transition="push" effect_option="from_left"
backgroundimage="linear-gradient(90deg ,#c0c0c0, #FFFFFF)");
title "Study of Heart Health";
proc reg data=sashelp.heart;
model cholesterol=height Weight diastolic systolic
/ selection=forward;
run;
quit;
ods powerpoint close;
Output 4. Presentation of Heart Health using ODS PowerPoint
GENERATING DYNAMIC CONTENT USING ODS AND VIYA
You can generate dynamic front ends for your programs by creating a Viya job. A SAS Viya job consists
of a program and its definition. The job definition includes information such as the job name, the author,
and the creation date and time. You can also create a user interface for the job which can be an HTML
form or task prompt which gives the user the ability to do such things as create a selection list that can
pass the values as macro variables to the program.
Display 3. Creating a Viya Job
12
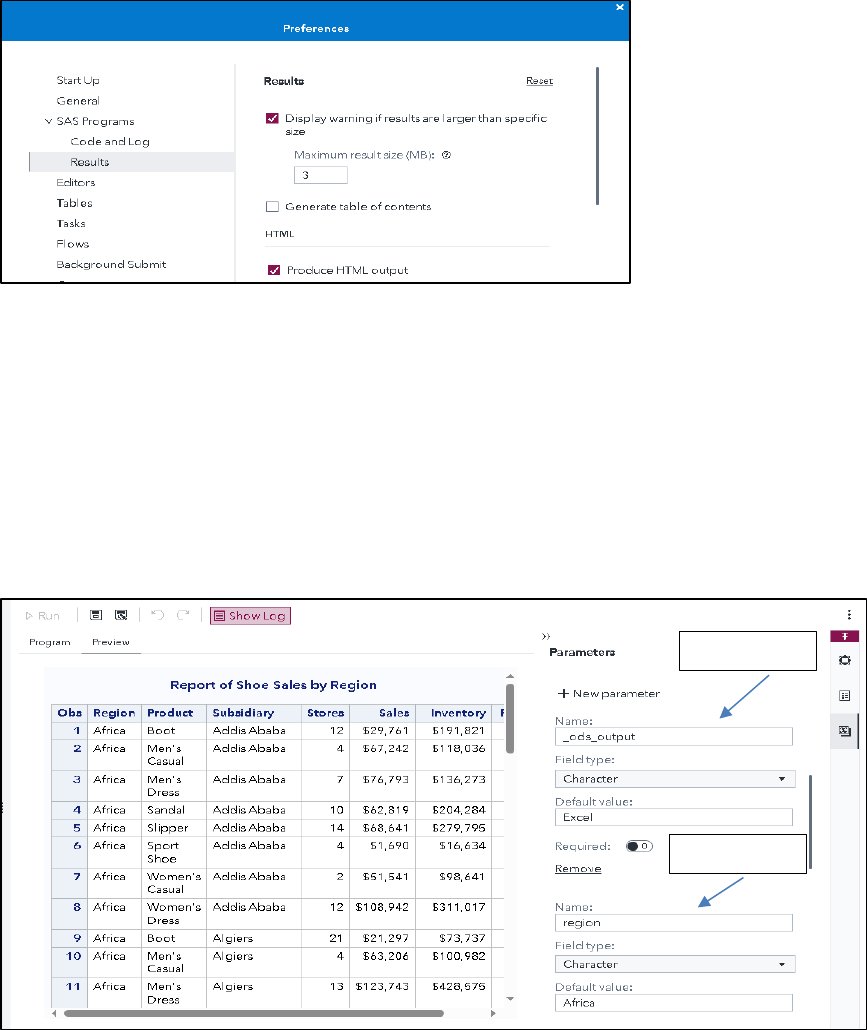
SELECTING ODS FORMATS USING SAS STUDIO
SAS Studio is a web-based client and is one of the clients that is used as a front end to SAS Viya.
The default output format for SAS Studio is HTML5 and is displayed on the results tab by default.
In addition to the HTML5 output generated, other ODS output formats may be selected such as PDF,
Word, Excel, RTF, and PowerPoint. To select other formats other than HTML5, simply navigate to the
preferences window and select Results. This will display the output formats available that you can select.
Options→ Preferences-> Results
Display 4. SAS Studio Preferences Window
Adding Job Parameters Using SAS Studio
In addition to going to the preferences window and selecting the desired file formats, the ODS
destinations can also be selected by passing the desired ODS destination as a parameter. Various built-in
parameters can be chosen such as the _ODS_OUTPUT parameter which provides the ability to add the
ODS destination. User-defined parameters can also be added which are passed to the program as a
macro variable. To add parameters, open the parameters pane as displayed in Display 5, and enter
the name of the parameter followed by the value. Display 5 also displays adding the _ODS_OUTPUT
parameter with the Excel destination along with the user defined parameter Region which was used to
subset the data which was added as a macro variable on the WHERE statement.
Display 5. Adding Job Parameters using Viya Jobs
Parameter 1.
Parameter 2.

13
Adding a Link to Include Other ODS Formats
The previous examples of selecting output formats can be further enhanced to allow the user to view the
destination of choice by selecting a link on the page. In the following example, the ODS Document
destination was used to create a document from the PROC PRINT output. The DOCUMENT procedure
replays the content of the ODS Document along with the Filename statement using the FILESRVC
access method and the ODS PDF destination to SAS Content in the Viya platform. The user can then
select whether to view the page as an HTML file or PDF.
Example 5.
1. An ODS Document is created with the output of the PRINT procedure.
2. The FILENAME statement with the FILESRVC access method is used to store the PDF file in
SAS Content.
3. A hyperlink is added for this PDF file which is stored as a content object.
4. The link to the PDF file is added via the TEXT= option of the ODS HTML5 statement.
ods document name=test;
proc print data=sashelp.shoes;
run;
ods document close;
filename f_pdf filesrvc parenturi="&SYS_JES_JOB_URI" name='shoes.pdf'
contenttype='application/pdf';
ods pdf file=f_pdf style=HTMLBlue;
proc document name=test;
replay;
quit;
ods pdf close;
%let PDF_LINK=%bquote(<a href=""&_FILESRVC_F_PDF_URI/content""
target=""_Self""> PDF</a>);
filename f_htm filesrvc parenturi="&SYS_JES_JOB_URI" name='_webout.htm';
ods html5 file=f_htm text="<span>^{style systemtitle &PDF_LINK}</span>";
proc document name=test;
replay;
run;
quit;
ods html5 close;
Output 5. Adding a link to the PDF output on the page

14
USING OPEN SOURCE TO ENHANCE REPORTING
The Output Delivery System may fulfill most of your reporting needs with its destinations and ecosystem
members, however, there are times when you simply need an additional feature that may not be
available. This is when extending the software using open-source technologies allows you to bridge that
gap. This section will discuss open-source technologies such as the Python language and how they can
be used and easily integrated into the SAS and Viya platforms to enhance your reporting needs. There
are many methods of integrating open-source technologies such as PROC LUA, PROC GROOVY, PROC
IML, and the DATA Step Java Object just to name a few. This paper will concentrate on Python language.
PYTHON FOR SAS PROGRAMMERS
Python is a high-level programming language used for a wide variety of applications such as automation,
web development, and data analysis. The Python language has various libraries that can read and write
files in many of the industry's most common formats. The XLSX format is a widely popular file format for
data scientists and can be created and enhanced using several Python libraries such as Pandas,
Openpyxl, XlsxWriter in addition to some others. Additional libraries such as PyPDF2 provide the
capability of reading and modifying PDF files. In this section, we will demonstrate how Python can be
used to create and enhance formats such as XLSX and PDF within SAS and Viya.
Installing Python and Packages
The Python application must first be installed to take advantage of the features discussed in this section.
To install Python, you will need to decide on the distribution to use such as Anaconda or Python.org.
Once Python is installed, you will then want to install the desired packages. In this section, we will
explore the Pandas, Openpyxl, and XlsxWriter libraries which have the capability of working with XLSX
files. We will also explore the PyPDF2 which provides the ability to create and modify PDF files.
To install Python packages, use either the PIP or Conda commands from the command prompt with
the name of the packages to install. If you are using Viya 4 and installing and configuring packages to be
used with SAS Studio, the SAS Configurator for Open Source which can be used to install and configure
Python with Viya 4 as well as Python and R packages.
➢ Pip install OpenPyXL XlsxWriter PyPDF2
Pandas Python Package
The Pandas library is used for data manipulation and analysis. It provides data structures for storing and
manipulating large tables. It can read, filter, and rearrange data and output it into a variety of formats.
The Pandas package complements the integration features in SAS some which were modeled after the
Pandas library. Table 1. displays a subset of the various file formats which can be read and written using
the Pandas library. Because SAS data sets and Pandas DataFrames can be moved between the
applications, you can see how this will allow us to extend the software.
.
Format
Read
Write
SAS
Read_SAS
csv/excel/xml
EXCEL
Read_excel
To_Excel
JSON
Read_Json
To_json
XML
Read_xml
To_xml
Parquet
Read_parquet
To_Parquet
SQL
Read_SQL
To_SQL
HTML
Read_html
To_html
Table 1. Subset of Pandas I/O Methods

15
The following example imports the Panda's library using the READ_CSV method and creates a Python
dataFrame from the cars.csv file. The TO_EXCEL method exports the Pandas DataFrame to an XLSX
file adding the FREEZE_PANES=, the SHEET_NAME=, and the INDEX= options.
Example 6.
import pandas as pd
df = pd.read_csv('https://support.sas.com/documentation/'
'onlinedoc/viya/exampledatasets/cars.csv')
wb = df.to_excel('c:/temp/cars.xlsx',
sheet_name='Demo',
freeze_panes=(1,5),
index=False)
Output 6. Output from Pandas Export
Openpyxl Python Package
The openpyxl Python library provides the ability to read and write Excel 2010 and later files. After the
package has been installed, you can use documented methods to read, write, and update the various
types of Excel files. Openpyxl provides more flexibility when creating and modifying XLSX output than the
Pandas library, however both the Pandas package and openpyxl integrate well together. The Openpyxl
can be used separately or together with the Pandas package when creating or modifying Excel files.
There are various methods for specifying the worksheet names such as specifying the active worksheet,
the worksheet position which starts at 0, and the name of the worksheet which is demonstrated with
example 7. Commented out are some of the other methods of loading the worksheet.
1. Imports the load_work library to import existing XLSX files
2. Creates the workbook object wb with the worksheet information
3. Creates the worksheet object ws from the output XLSX file created in Example 6.
4. Add the Title method to the worksheet object ws to modify the tab name
5. Use the Save method with the workbook object wb to save the updated worksheet
Example 7.
from openpyxl import load_workbook
wb = load_workbook('c:/temp/cars.xlsx')
ws=wb["Demo"]
#ws=wb.active
#ws=wb.worksheets[0]
ws.title='Sample Output'
wb.save('c:/temp/openpyxl.xlsx')

16
Output 7. Output from Openpyxl package
SAS INTEGRATION TO PYTHON
There are several methods of integrating SAS with the Python open-source language. The PYTHON
procedure is available with Viya 4 and allows Python to be called within a SAS program. The FCMP
procedure using Python objects allows Python functions to be called within a SAS program within SAS
9.4M6 and later releases. There is also the SASPy library which is an open-source project created at
SAS and provides the functionality of generating an analysis in SAS using Python-like syntax. There are
other methods of integrating Python with SAS and Viya a subset of the methods is listed in Table 2.
SAS Integration
Language
Version
PROC PYTHON
Python
Viya 4
PROC FCMP
Python
SAS 9.4M6+
SASPy
Python
SAS 9.4+
Python Editor
(SAS Studio)
Python
Viya 4
Python CAS API
Python
Viya 3.5 +
Table 2. Python Integration with SAS and Viya
THE PROC PYTHON PROCEDURE
The PYTHON procedure provides the ability to submit Python statements from an external Python script
or enter Python statements directly within the SUBMIT and ENDSUBMIT statements. Some of the other
highlights of the PROC PYTHON procedure include the ability to move data between SAS data sets and
Pandas DataFrames, transfer SAS macro variables and Python variables, and call PROC FCMP
functions within Python statements. The procedure has several callback functions that allow interaction
between SAS and the compute server. The following example demonstrates the PROC Python syntax
when the Python syntax is added between the SUBMIT and ENDSUBMIT statements, There is a required
setup which can be found here.
proc python;
submit;
<python-syntax>
endsubmit;
run;

17
THE PROC FCMP PROCEDURE
The PROC FCMP procedure and Python objects can be used to execute Python functions directly within
SAS 9.4M6 and later releases. The Python function is added within the SUBMIT and ENDSUBMIT
statements if run interactively and can consist of Python syntax as well as SAS callback functions which
allows information to be passed back and forth between Python and SAS. The example below is a basic
structure of the syntax needed to use the PROC FCMP procedure to use the openpyxl package to modify
or create XLSX files.
1. The Declare statement adds an instance of the Python object with the name Py. The module
name is not defined within the parenthesis and defaults to the PROC FCMP symbol name.
2. The submit block is used to specify the Python source statements.
3. The define statement is added to add a Python function
4. A comment is added “output:Mykey” specifying the value to return to SAS
5. The PUBLISH method makes the Python function available.
6. The CALL method invokes the function and sets the output to the return value created by the
function.
proc fcmp;
declare object py(python);
submit into py;
def MyFunc():
"Output: MyKey"
<python statements>
endsubmit;
rc = py.publish();
rc = py.call("MyFunc");
run;
EXAMPLES USING OPEN SOURCE INTEGRATION
This section demonstrates creating or modifying XLSX, or PDF files using the Python open-source client
using one or more of the Python libraries and one of the SAS integration methods such as PROC Python
or PROC FCMP procedures. The examples modify or update files with features that are not currently
available with the software and extended using open source. These features are:
• Password protecting an existing XLSX file created with ODS Excel
• Adding filters and sorts to the columns of the worksheet
• Adding images to a specific location on the worksheet and sizing
• Add data validation to an existing worksheet created using ODS Excel
• Adding data bars to specific columns of a worksheet
• Combining individual PDF files into a single PDF file
The examples in this section will use the same data source that is Heart.xlsx which is created using
PROC EXPORT and the SASHELP.HEART table. Most of the examples in this section will modify .XLSX
files using one of the open-source integration methods such as PROC FCMP using Python Objects,
PROC PYTHON, or the SASPy library. The ODS Excel destination was excluded from the examples
because of an existing defect listed here.
proc export data=sashelp.heart(keep=Sex Height Weight Diastolic Systolic
Cholesterol obs=100)
outfile="c:\temp\heart.xlsx"
dbms=xlsx replace;
run;

18
Password Protect Worksheets Created with ODS Excel
The ODS Excel destination has the capability of protecting worksheets using the PROTECT_
WORKSHEETS= ODS EXCEL option. This option can be toggled, however. to make the worksheet a
little more secure you can add a password to the worksheet. Although more secure, this does not really
provide any encryption. To add password protection to the worksheet, add the SET_PASSWORD method
to the worksheet object which will request the password before any modification can be made on the
worksheet. When sensitive patient data is in the worksheet, this is a way to make it more secure.
1. Use the PROC FCMP procedure to add a Python function AddPaass
2. Import load_workbook module and create workbook object wb
3. Create worksheet object ws with the active worksheet
4. The PROC FCMP is used to add the SET_PASSWORD method to the worksheet object.
5. The SAVE method is added to workbook object wb and creates a new workbook.
Example 8.
proc fcmp;
declare object py(python);
submit into py;
def AddPass():
"Output: MyKey"
from openpyxl import load_workbook
wb = load_workbook('c:/temp/passwords.xlsx')
ws=wb.active
ws.protection.set_password('test')
wb.save('c:/temp/password_update.xlsx')
endsubmit;
rc = py.publish();
rc = py.call("AddPass");
run;
Output 8. Password protecting output
Adding Images to a Worksheet
Using the ODS Excel destination doesn’t support images in the same way as the other destinations. For
example, none of the style attributes that support images such as PREIMAGE=, POSTIMAGE= or the
BACKGROUND= are supported with the Excel destination. Images can be added using the PROC
GSLIDE procedure or the Report Writing Interface using the IMAGE method as demonstrated in Example

19
3. These methods don’t allow for specific image placement or sized. Using the openpyxl library, the
images can be placed at specific locations and added to the worksheet using the ADD_IMAGE= method.
There are times when a brand is required on the worksheet or simply a graphics image positioned.
Example 9
1. The graphics image created using PROC SGPLOT is generated using PROC SGPLOT along
with the ODS Listing statement with the GPATH= option.
2. The PROC FCMP procedure is used to add the Python script within the SUBMIT and
ENDSUBMIT statements.
3. The import package is added which makes the image library available.
4. The Python variable IMG is created to store the path and name of the image.
5. The ADD_IMAGE= method adds the image to the worksheet using the worksheet object ws.
6. The SAVE method is added to the workbook object wb which create a new worksheet.
ods listing gpath="c:\temp";
proc sgplot data=sashelp.heart;
scatter x=diastolic y=systolic;
run;
proc fcmp;
declare object py(python);
submit into py;
def AddImg():
"Output: MyKey"
from openpyxl import load_workbook
from openpyxl.drawing.image import Image
wb = load_workbook('c:/temp/heart.xlsx')
ws=wb.active
img = Image('c:/temp/SGplot1.png')
img.width = 500
img.height =500
ws.add_image(img,"G1")
wb.save('c:/temp/images_update.xlsx')
endsubmit;
rc = py.publish();
rc = py.call("AddImg");
run;
Output 9. Adding Images to a Worksheet

20
Adding Preselected Filters and Sorts
The ODS Excel destination provides the ability to add column filters to headers in sequence using the
AUTOFILTER= ODS Excel option. This is a great way to gain insight into the data. An additional request
may be to add preselected filters to a column or add filters out of sequence. This all can be done simply
using the Openpyxl library. A sort can also be added to the column which is demonstrated with example
10. The worksheet has an AUTO_FILTER= attribute which exposes the REF= which is the range of the
data. The ADD_FILTER_ COLUMN method is used to add the filter to the column. The sort order can
also be specified using the ADD_SORT_CONDITION method with the range of data. Other custom or
advanced filtering may be applied. This example adds parameters to the Python function..
Example 10
1. The REF= method adds the AUTO_FILTER attribute to the worksheet object and specifies the
range.
2. The ADD_FILTER_COLUMN= method is added specifying the column and the preselect filter.
3. The ADD_SORT_CONDITION is used to sort a range of values
proc fcmp;
declare object py(python);
submit into py;
def PyFilter(input,output):
"Output: MyKey"
from openpyxl import load_workbook
wb = load_workbook(input)
sheet=wb.active
sheet.auto_filter.ref = 'A1:B100'
sheet.auto_filter.add_filter_column(0, ['Female'])
sheet.auto_filter.add_sort_condition('B1:B100')
wb.save(output)
endsubmit;
rc = py.publish();
rc = py.call("PyFilter","c:/temp/heart.xlsx","c:/temp/filter_update.xlsx");
run;
Output 10. Adding preselected filters and Sorts:
Adding Data Bars to a Column
Conditional formatting can be added very easily using the PROC REPORT and the CALL DEFINE
statement. his allows the highlighting of rows, columns, and individual table values. The openpyxl library
in addition to highlighting values in each range can also add data bars which displays a graphical
Preselected filter
Sort

21
representation of the value within the range. Parameters were added to the function specifying the input
and output files.
Example 11
1. Add a data rule for the data bars that has a starting and ending value for the range along with a
color for the bars.
2. The data rule for the range D2:D365 is added to the worksheet using the
CONDITIONAL_FORMATTING_ADD worksheet method.
proc fcmp;
declare object py(python);
submit into py;
def DataBars(input,output):
"Output: MyKey"
from openpyxl import load_workbook
from openpyxl.formatting.rule import DataBarRule
wb = load_workbook(input)
ws = wb.active
data_bar_rule = DataBarRule(start_type="num",
start_value=150,
end_type="num",
end_value="300",
color="0000FF")
ws.conditional_formatting.add("F2:F100",data_bar_rule)
wb.save(output)
endsubmit;
rc = py.publish();
rc = py.call("DataBars","c:/temp/heart.xlsx","c:/temp/databars_update.xlsx");
run;
Output 11. Conditional formatting using Databars
Adding Data Validation to the Worksheet
Neither ODS Excel nor PROC EXPORT can add data validation. Data validation allows you to validate
values within a range of cells based on a rule. This could require that all values within the cell be valid
integers or require a list of values to be specific values. This can also require that a value be within a
range of values. The following example adds a rule using the Python variable DV that defines the valid
values within a defined range of cholesterol numbers.

22
Example 12
1. The data validation rule is added with the Python variable DV.
2. An error is added using the ERROR method.
3. The data validation is added to the worksheet using the ADD_DATA_VALIDATION method.
proc fcmp;
declare object py(python);
submit into py;
def PyValidate(input,output):
"Output: MyKey"
from openpyxl import load_workbook
from openpyxl.worksheet.datavalidation import DataValidation
wb = load_workbook(input)
ws = wb.active
dv = DataValidation(type="whole",
operator="greaterThan",
formula1=200)
dv.error ='This entry is not valid'
ws.add_data_validation(dv)
dv.add('F3:F100')
wb.save(output)
endsubmit;
rc = py.publish();
rc =
py.call("PyValidate","c:/temp/heart.xlsx","c:/temp/validate_update.xlsx");
run;
Output 12. Data validation added to the column Product
Combining PDF Files Created with SAS
The ODS PDF destination can generate PDF files, however, it does not have the ability to combine PDF
files. Using the PyPDF2 package, one or more PDF files can be combined into a single file. In the
example 13, two PDF files are generated using ODS PDF with separate styles. The two files are
combined to generate a single PDF file. Each file retained its own styles.
Example 13
ods pdf file="c:\temp\file1.pdf" style=htmlblue;
proc print data=sashelp.class; run;
ods pdf close;
ods pdf file="c:\temp\file2.pdf" style=egdefault;
proc print data=sashelp.class; run;
ods pdf close;

23
proc fcmp;
declare object py(python);
submit into py;
def PyPDF():
"Output: MyKey"
from openpyxl import load_workbook
from PyPDF2 import PdfFileMerger, PdfFileReader
merger = PdfFileMerger()
merger.append(PdfFileReader(open("c:/temp/file1.pdf", 'rb')))
merger.append(PdfFileReader(open("c:/temp/file2.pdf", 'rb')))
merger.write("c:/temp/merged.pdf")
endsubmit;
rc = py.publish();
rc = py.call("PyPDF");
run;
Output 13. The Merged PDF File
CONCLUSION
The Output Delivery System is a very powerful tool to generate output in most of the popular formats and
with its broad range of ecosystem members is a great tool for reporting. When requested ODS can also
generate dynamic output that can be further extended using open-source technology as demonstrated
using the Python language. e basics of ODS, the ODS Destinations, styles and ODS and finally using
ODS with other applications. ODS will make a difference in your report writing.
REFERENCES
Downloads, Examples from Paper DV-328 (github.com)
OpenPyXL. 2023. “openpyxl - A Python library to read/write Excel 2010 xlsx/xlsm files.” Available at
openpyxl.readthedocs.io/en/stable/
Lund, Pete. “Have it Your Way: Creating Reports with the Data Step Report Writing Interface” SAS
Global 2007 Conference, Washington, DC
Parker, Chevell. 2018. "Insights from a SAS Technical Support Guy: A Deep Dive into the SAS® ODS
Excel Destination." Proceedings of the SAS Global Forum 2018 Conference. Cary, NC: SAS Institute Inc.
24
CONTACT INFORMATION
Your comments and questions are valued and encouraged. Contact the author at:
Chevell Parker
SAS Institute Inc.
SAS Campus Drive
Cary, NC 27513
Email: chevell.parker@sas.com
Web: support.sas.com/en/support-home.html
SAS and all other SAS Institute Inc. product or service names are registered trademarks or trademarks of
SAS Institute Inc. in the USA and other countries. ® indicates USA registration.
Other brand and product names are trademarks of their respective companies.
